

Page 1
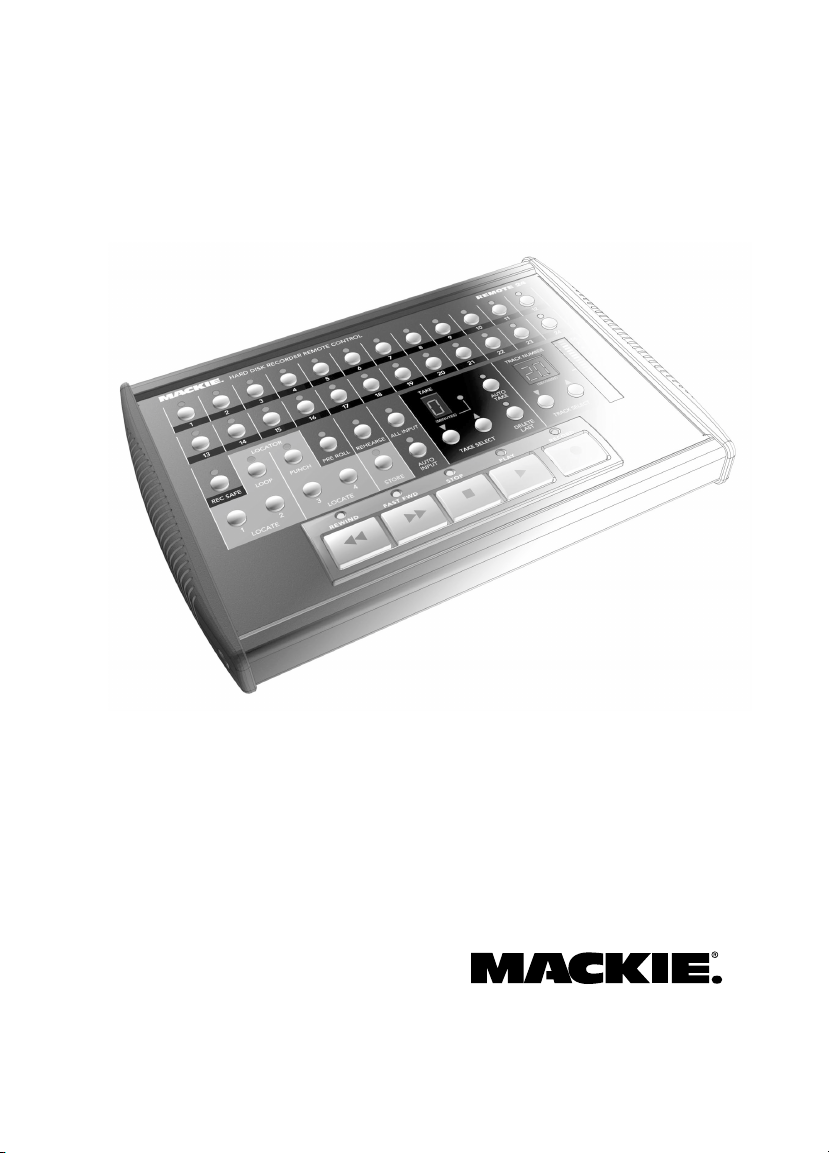
REMOTE 24
USER’S GUIDE
REMOTE CONTROL FOR THE
HDR24/96 HARD DISK RECORDER
Page 2
SAFETY INSTRUCTIONS
1. Read Instructions — Read and understand all safety and operating instructions before
using the Remote 24.
2. Retain Instructions — Keep these safety and operating instructions for future
reference.
3. Heed Warnings — Follow all warnings marked on the Remote 24.
4. Water and Moisture — Do not use the Remote 24 near water – for example, near a
bathtub, fish tank, automatic lawn sprinkler system, salivating St. Bernard dog, etc. – or
when condensation has formed on the unit.
5. Heat — Locate the Remote 24 away from heat sources such as radiators, hair dryers,
charcoal grills, smelting furnaces, and thermonuclear explosions.
6. Power Sources — The Remote 24 should be connected only to a Mackie HDR24/96 and
no other devices, as prescribed in this manual.
7. Data Cable Protection — Install the Remote 24 in a location where no one can step on
or trip over the data cable. Protect the data cable from damage or abrasion.
8. Object and Liquid Entry — Do not drop objects or spill liquids into the Remote 24. Do
not clean with liquid or aerosol cleaners.
9. Damage Requiring Service — Unplug the Remote 24 from the HDR24/96 and refer
servicing to qualified service personnel when:
A. The chassis, buttons, or connectors have been damaged; or
B. The unit has been exposed to rain or water; or
C. The unit does not appear to operate normally or exhibits a marked change in
performance.
10. Servicing — Do not attempt to service the Remote 24. All servicing should be
referred to the Mackie Service Department.
Thank you for adding the Remote 24 to your arsenal of Mackie
equipment. You probably already know what a remote control does, but
just in case, this guide will explain all those buttons ... some of which
are new or a little different from the HDR24/96 front panel.
Assuming you’re already familiar
Serial Number:
with the HDR24/96, we’ll try not to
repeat ourselves. See your
HDR24/96 Quick Start Guide,
Reference Manual, or visit our
Purchased at:
website at http://www.mackie.com
for more information.
Date of purchase:
Before you lose your receipt (tsk,
tsk), please write your serial
number here for future reference:
Part No. 820-205-00 Rev. B 6/02
®
Page 3

Contents
User’s Guide
Installation 4
Mount on Mic Stand
(Optional) --------------------4
Mount on Homemade Stand
(Optional) --------------------4
Plug It In ----------------------5
Footswitch--------------------5
Transport Features 6
Play----------------------------- 6
Stop ----------------------------6
Fast Wind ---------------------6
Record -------------------------6
Record Features 7
Record Ready ----------------7
Record Safe------------------- 7
Monitoring Modes 7
Take Management
Features 9
Take Select -------------------9
Track Select ------------------9
Auto Take ---------------------9
Meter --------------------------9
Delete Last -------------------10
Current Time Display 10
Current Time -----------------10
Other Stuff 10
Specifications ----------------10
Troubleshooting &
Warranty Service------------11
Colophon ---------------------12
All Input-----------------------7
Auto Input --------------------7
Locator Features 8
Locate -------------------------8
Store ---------------------------8
Loop ---------------------------8
Punch -------------------------- 8
Pre Roll ------------------------8
Rehearse ----------------------9
User Guide
3
Page 4
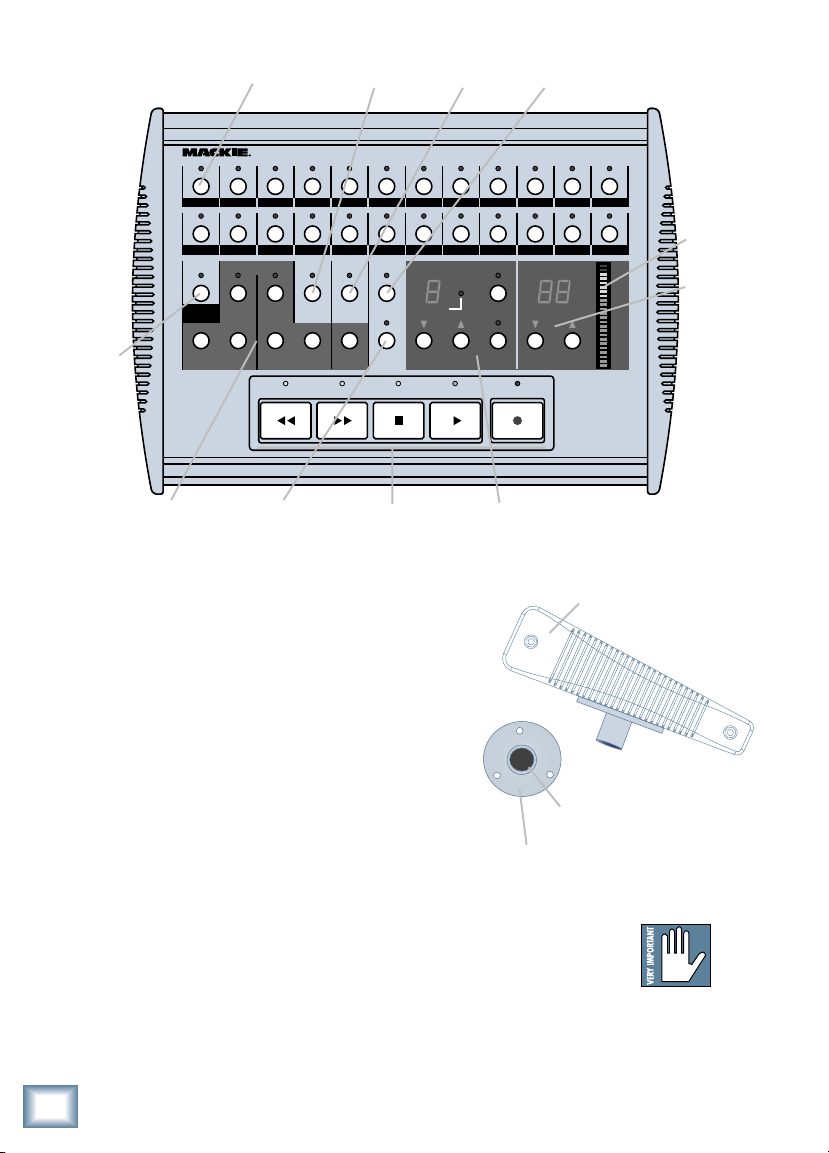
Record Ready
Pre Roll
Rehearse
All Input
Remote 24
Rec Safe
Locate, Loop
and Punch
Installation
Mount on Mic Stand (Optional)
Mic stand adapters can make the
Remote 24 seem like it's floating in
midair! We recommend the Atlas
model AD-11, available at your
favorite music store. (If it's not, you
need a new favorite music store.)
HARD DISK RECORDER REMOTE CONTROL
123456789101112
13 14 15 16 17 18 19 20 21 22 23 24
LOCATOR
LOOP
REC
SAFE
123
PUNCH REHEARSE ALL INPUT
LOCATE LOCATE
REWIND
Auto Input
PRE ROLL
4
STORE
FAST FWD PLAY
Transport
TAKE TRACK NUMBER
(MINUTES)
AUTO
TAKE SELECT
INPUT
STOP
AUTO
TAKE
DELETE
LAST
RECORD
Take Managment
REMOTE 24
OL
--
2
-
-
4
--
7
--
10
--
(SECONDS)
TRACK SELECT
15
—-
20
--
25
--
30
--
35
--
40
--
50
--
Remote 24 with optional
Atlas AD-11
Standard mic stand
thread pitch
Assignable
Meter
Track
Select
Mount on Homemade Stand
(Optional)
The 3-hole pattern is equally spaced on a
1.25" diameter circle. The holes accept three 6-32 x
3/8 machine screws.
If you’re especially proud or ashamed of your
handiwork, please mail us a photo.
4
Remote 24
(Top view) Optional
Atlas AD-11 Surface
Mount Adaptor
Note:Note:
Note: 3/8"
Note:Note:
maximum
screw length!
Page 5
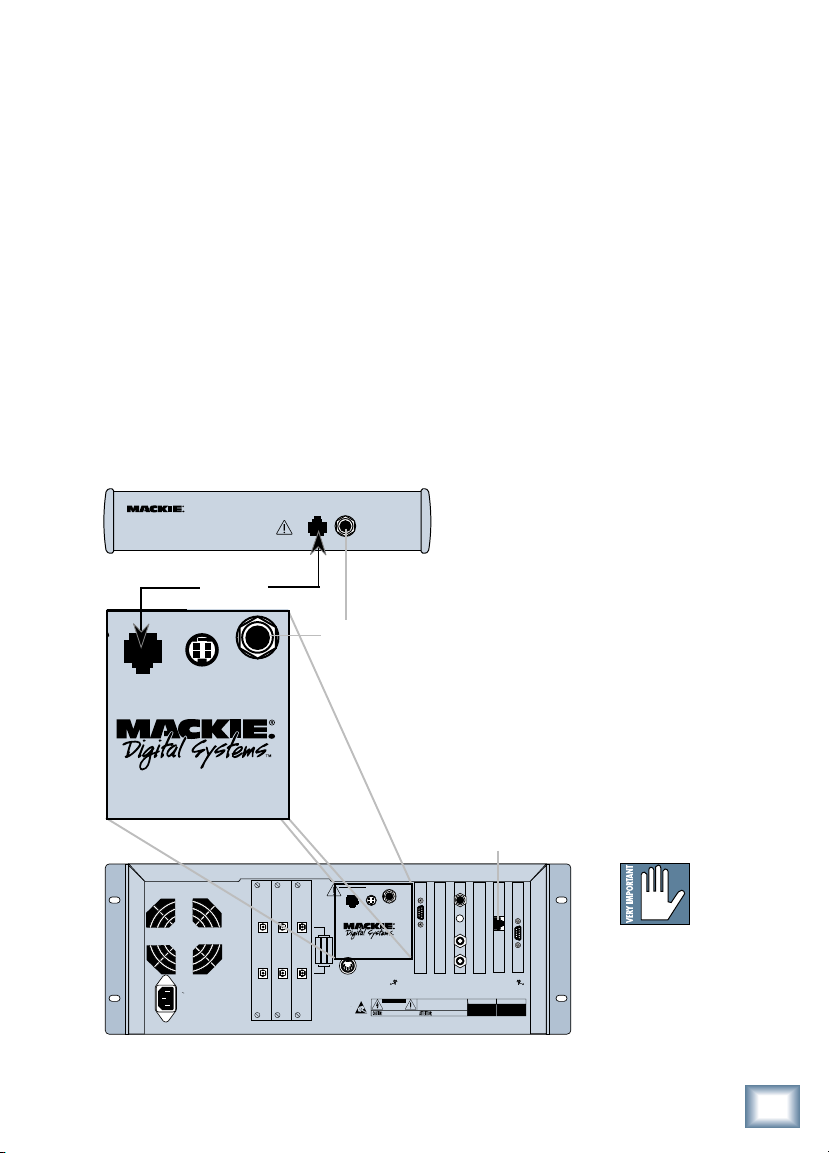
Plug It In
NOT
WARNING
NOT
You can do this with the HDR24/96 powered on or powered off, it
doesn’t matter.
1. Plug the supplied 25' cable into the “To HDR” jack on
the back of the Remote 24.
2. Plug the other end into the “Remote” jack on the back of
the HDR24/96.
Footswitch
A must-have for performer-engineers: use a footswitch to punch in
and out on-the-fly, stop and start the transport, jump to the next
cue, create new cues, or select the next take. The footswitch jack
function is assigned in the
Remote24 Back Panel
REMOTE 24
WARNING
DO NOT PLUG INTO
ETHERNET
Remote
MOUSE
Cable
FOOT
SWITCH
DO NOT
PLUG INTO
ETHERNET
REMOTE
TO HDR
FOOT SW
REMOTE JACK
Footswitch
HDR24/96 General Setup
window. This TS 1/4" jack and a jack on the back of
the HDR24/96 - accepts a
momentary, normally open
footswitch, available at any
reputable footswitch
emporium. For double the
fun, you can use
footswitches in the Remote
24 and HDR24/96 at the
same time.
User’s Guide
HDR 24/96
24TRACK 24 BIT DIGITAL AUDIO
HARD DISK RECORDER/EDITOR
OUTPUT
INPUT
OPT • 8
120VAC
50/60 Hz 475W
HDR 24/96 Back Panel
Ethernet Jack
WARNING
DO NOT
PLUG INTO
ETHERNET
FOOT
SWITCH
REMOTE
24
-
16
-
TAPE 9
TAPE 17
TAPE 1– 8
KEYBOARD
WARNING: SHUT OFF POWER
TO UNIT BEFORE INSTALLING
OR REMOVING CARDS!
MOUSE
HDR 24/96
24TRACK 24 BIT DIGITAL AUDIO
HARD DISK RECORDER/EDITOR
REGISTERED TRADEMARKS OF MACKIE DESIGNS INC.: "MACKIE.", MACKIE DIGITAL SYSTEMS AND THE "RUNNING MAN" FIGURE.
CAUTION
RISK OF ELECTRIC SHOCK
DO NOT OPEN
REPLACE WITH THE SAME TYPE FUSE AND RATING.
DISCONNECT SUPPLY CORD BEFORE CHANGING FUSE
VIDEO SYNCACC 1 ACC 2 ETHERNET MIDI
CONCEIVED, DESIGNED, AND MANUFACTURED BY MACKIE DESIGNS INC • WOODINVILLE • WA 98072 • USA
MADE IN USA • FABRIQUE AU USA • PATENTS PENDING COPYRIGHT ©1998 THE FOLLOWING ARE TRADEMARKS OR
WARNING:
TO REDUCE THE RISK OF FIRE OR ELECTRIC SHOCK, DO NOT
EXPOSE THIS EQUIPMENT TO RAIN OR MOISTURE. DO NOT REMOVE COVER.
NO USER SERVICEABLE PARTS INSIDE. REFER SERVICING TO QUALIFIED PERSONNEL.
AVIS:
RISQUE DE CHOC ELECTRIQUE — NE PAS OUVRIR
UTILISE UN FUSIBLE DE RECHANGE DE MÊME TYPE.
DEBRANCHER AVANT DE REMPLACER LE FUSIBLE
SERIAL NUMBER
MANUFACTURING DATE
Note:Note:
Note: Do not
Note:Note:
confuse the
Remote jack
with the
OUTPUT
OUTPUT
INPUT
INPUT
OPT • 8
OPT • 8
Ethernet jack!
User’s Guide
5
Page 6

Transport Features
Remote 24
REWIND
FAST FWD PLAY
STOP
RECORD
Play
Play puts the HDR24/96 into play. Play also punches out of record
and cancels master record standby.
Stop
Stop brings the “tape” to an immediate halt. Stop also punches
out of record and cancels master record standby.
Fast Wind
Rewind and Fast Forward put the HDR24/96
into fast wind mode from any state. They
behave just like those on a large multitrack
recorder: when pressed from stop, the “tape”
rolls slowly at first, then accelerates to 20X
speed in a few seconds. Pressing either button
a second or third time puts the Transport into
even faster wind speeds.
REWIND
FAST FWD
6
Record
Press Play and Record simultaneously to
commence recording. Press any transport
button except Record to end recording. The
Record LED glows when recording and blinks
when Record is engaged with no tracks armed
(master record standby mode).
Remote 24
PLAY
RECORD
Page 7

Record Features
Record Ready
Recording can only take place on tracks which are
“armed” for recording. Press the Record Ready buttons to
arm tracks. When Record is engaged, you can punch
individual tracks in and out on the fly with the Record
Ready buttons. Their LEDs blink in standby and glow in
record.
Record Safe
Record Safe disarms all tracks and disables the Record
Ready and master Record buttons. Use Record Safe to
prevent users from inadvertently recording over existing
audio.
Monitoring Modes
The monitor mode buttons determine what the user hears at the
HDR24/96 tape outputs.
All Input
1
13
REC
SAFE
User’s Guide
All Input is used for rehearsal and level setting. When All
Input is on, both armed and unarmed tracks monitor their
tape inputs, and the Auto Input setting has no effect.
Auto Input
Auto Input is used for recording, and affects only tracks
that are armed. Unarmed tracks always monitor the
playback of previously recorded audio.
When Auto Input is off, armed tracks always monitor their
tape inputs.
When Auto Input is on, armed tracks monitor their tape inputs in
stop, fast forward, rewind, and record; in play they monitor the
playback of previously recorded audio. This mode is used for
overdubbing.
User’s Guide
ALL INPUT
AUTO
INPUT
7
Page 8

Locator Features
Locate
Remote 24
123
LOCATE LOCATE
4
STORE
Locate points provide fast access to frequently used locations in
your project. Press one of the four Locate buttons to jump to a
Locate point.
Store
To set a Locate point, press Store, then press a Locate
button when the transport reaches the desired time.
Loop
Locate 1 and Locate 2 double as start and end
points for looped playback. To enable loop play,
press Loop. Playback cycles between the two Loop
points. The order of the Loop points does not
matter.
12
LOCATE
Punch
Locate 3 and Locate 4 double as in and out points
for automated punching. To enable automated
punching, press Punch. When you engage record,
the HDR24/96 automatically punches in at the first
Punch point, and punches out at the second. The
order of the Punch points does not matter.
PUNCH
LOCATE
STORE
LOOP
43
8
Pre Roll
Pre Roll causes a Locate to jump to a time that is earlier
than the Locate time by the amount of the Pre Roll Time.
Pre Roll is handy for autopunching, where you need to start
playback a few seconds before the Punch in point. Pre Roll
Time is set in the HDR24/96 MIDI Setup window.
Remote 24
PRE ROLL
Page 9

Rehearse
—
Rehearse allows you to practice punching without
actually recording anything to disk, saving you the hassle
of deleting unwanted takes while monitoring and finetuning Autopunch points.
Take Management Features
User’s Guide
REHEARSE
Take Select
TAKE TRACK NUMBER
Each track has eight
“virtual” takes that you can
record to and play from.
(MINUTES)
AUTO
TAKE
(SECONDS)
Take Select sets the active
take for the selected track.
Track Select
TAKE SELECT
DELETE
LAST
TRACK SELECT
Use the Track Select
buttons to select which track’s virtual take and meter information
is shown in the Take and Meter displays; the selected track is
shown in the Track Number display.
Auto Take
Auto Take automatically advances the Take Number of all armed
tracks at the start of each record pass. When a track’s Take
number reaches 8, it remains there until you change it.
Tip: Use Loop and Punch with Auto Take to automatically
record up to eight takes per track.
OL
--
-
-
--
--
--
-
--
--
--
--
--
--
Meter
2
4
The Meter displays the selected track’s input or
7
playback level. On the Remote 24 and HDR24/96
10
15
meters, 0 dB represents “full scale”, with no
20
headroom to spare. Before recording, set the input
25
30
level from your console as hot as possible.
35
40
50
Audio levels must NEVER reach 0 dBFS….. ever!
User’s Guide
9
Page 10

Delete Last
Press the Delete Last button twice to erase the most
recent recording pass from disk. A recording pass
consists of all punches made within one play cycle. If you
press Delete Last once then decide not to delete, wait five
seconds and the operation will cancel.
Current Time Display
Remote 24
DELETE
LAST
Current Time
The Take and Track Number
displays show Current Time
whenever Play is held or the
transport is in fast forward or
rewind. Current Time also
appears momentarily when Stop, Play or a Locate is pressed. An
LED adjacent to the Take display blinks when current time is
shown. Minutes in are shown in the Take display and Seconds in
the Track Number display. Only the Minutes 'units' are visible; for
example, if Current Time is '01:33:48:23', the display
shows'3:48'.
TAKE TRACK NUMBER
(MINUTES)
AUTO
TAKE
Other Stuff
TO HDR
Specifications
W = 9.31" / 23.65 cm
L = 6.44" / 16.36 cm
H = 1.73" / 4.39 cm (high end);
0.93" / 2.36 cm (low end)
Shipping weight: 4.0 lbs / 1.8 kg
Supplied cable: CAT-5 Ethernet,
25' / 7.6m
Max cable length = 30' / 9.1m
REMOTE 24
WARNING
DO NOT PLUG INTO
ETHERNET
HARD DISK RECORDER REMOTE CONTROL
123456789101112
13 14 15 16 17 18 19 20 21 22 23 24
LOCATOR
REC
LOOP
PUNCH REHEARSE ALL INPUT
LOCATE LOCATE
REWIND
PRE ROLL
4
AUTO
STORE
INPUT
FAST FWD PLAY
STOP
SAFE
123
FOOT SW
REMOTE JACK
TAKE TRACK NUMBER
AUTO
(MINUTES)
TAKE SELECT
(SECONDS)
TAKE
DELETE
TRACK SELECT
LAST
RECORD
REMOTE 24
—-
(SECONDS)
OL
--
2
-
-
4
--
7
--
10
--
15
20
--
25
--
30
--
35
--
40
--
50
--
1.73”
9.31”
10
6.44”
Remote 24
Page 11

Troubleshooting & Warranty Service
If you think your Remote 24 has a problem, try the following:
Make sure the cable is plugged into the “Remote” jack on the
rear panel of the HDR24/96 - the “Remote” jack is easy to
confuse with the Ethernet jack.
Remove and reinstall the cable, reboot the HDR24/96, and/or
replace the Remote 24 cable (available at computer supply
stores).
Be sure you are not using a CAT-5 crossover cable (usually
known by its yellow color and always labled “Crossover”).
Put the Remote 24 into self-test mode and test the function of
the swiches and LEDs.
• Place a blank floppy disk into the HDR24/96 and power
up the unit while holding down Record Ready buttons 1
and 2 on the Remote 24.
• When the unit is first powered on, all LEDs will be lit,
and the Remote 24 firmware version number is shown in
the Take and Track Number displays.
User’s Guide
• Pressing a button associated with an LED turns the
LED off.
• Pressing a Locate button lights the LED above it in the
Locator section.
• Pressing the Take Select buttons increments/
decrements the Take and Track Number displays; and
pressing the Track Select buttons increments/
decrements the Meter display.
After all this, if it still doesn’t work properly please contact Mackie
Designs technical support at (800) 258-6883 (8:00 AM to 5:00 PM
Pacific Time) - see the included Warranty Card for details.
User’s Guide
11
Page 12

Remote 24
Colophon
This whopping opus was created by the HDR24/96 development
team. Graphics and layout performed by Tony “waldog” Baird. No
animals were injured in the production of this document, although
Bob did feed Phydeaux some pretty old potato chips last week...
“Mackie,” the “Running Man” figure, “HDR24/96” and “Remote
24” are trademarks or registered trademarks of Mackie Designs
Inc. All other brand names mentioned are trademarks or
registered trademarks of their respective holders, and are hereby
acknowledged.
© 2000-2002 Mackie Designs Inc.
All Rights Reserved.
Printed in the U.S.A.
®
12
Remote 24
Page 13

Notes
User’s Guide
User’s Guide
13
Page 14

Remote 24
Notes
14
Remote 24
Page 15

REMOTE 24
WARNING
DO NOT PLUG INTO
ETHERNET
TO HDR
REMOTE JACK
User’s Guide
FOOT SW
HARD DISK RECORDER REMOTE CONTROL
123456789101112
13 14 15 16 17 18 19 20 21 22 23 24
LOCATOR
LOOP
REC
SAFE
123
LOCATE LOCATE
PUNCH REHEARSE ALL INPUT
REWIND
PRE ROLL
4
FAST FWD PLAY
STORE
AUTO
INPUT
TAKE TRACK NUMBER
(MINUTES)
TAKE SELECT
STOP
DELETE
AUTO
TAKE
LAST
RECORD
(SECONDS)
TRACK SELECT
REMOTE 24
OL
--
2
-
-
4
--
7
--
10
--
15
—-
20
--
25
--
30
--
35
--
40
--
50
--
User’s Guide
15
Page 16

16220 Wood-Red Rd. NE • Woodinville, WA 98072 • USA
US & Canada: 800/898-3211
Europe, Asia, Central & South America: 425/487-4333
Middle East & Africa: 31-20-654-4000
Fax: 425/487-4337 • www.mackie.com
E-mail: sales@mackie.com
 Loading...