

Page 1

Page 2

Congratulations on purchasing your Trio Personal Media Player! To get the
most out of your purchase, please take the time to carefully read through this
manual.
Foreword
If any problems occur during while using your Trio, please feel free to contact Mach
Speed technical support at 580-272-0035, or sending an email to
mssupport@machspeed.com
Thank you for your support and cooperation!
Mach Speed Technologies bears no responsibility for any damage or loss of personal
data due to misuse of software and/or hardware, damage to the player caused by
human factors, replacement of battery, or other unforeseen circumstances. To
prevent loss of your data, please backup your data regularly.
Information in the manual is subject to change without notice
copyright protection. Copying or otherwise reproducing this material without prior
written consent is prohibited.
Due to Firmware changes, some of the pictures and functions described in this
manual may not be the same as are included with your player.
.
and is subject to
1
Page 3

Note:
● The playback times listed refer to the maximum playback times possible, using the
best power savings. The actual playback time may differ as adjustments to screen
brightness; power savings modes, volume, etc are made.
● As there are many brands of Micro SD cards in market, using different quality and
speed standards. Therefore, we are unable to guarantee that our product will be
compatible with all types or brands of Micro SD cards, but will be compatible with
those Micro SD cards with mainstream specifications in the market, and we will
constantly strive to provide the largest selection of cards possible.
● As parameters such as formats, bitrate, codecs, framerates, and resolutions differ,
the player will not be compatible with all listed files. If you are experiencing issues
playing your files on this player, we recommend using a supported conversion tool to
reconvert your file to the specifications of the device.
Caution
Modifications not approved by the party responsible for compliance could void the
user’s authority to operate the equipment.
NOTE- This equipment has been tested and found to comply with the limits for Class
B Digital device, pursuant to part 15 of the FCC rules. These limits are designed to
provide reasonable protection against harmful interference in a residential installation.
This equipment generate, uses and can radiate radio frequency energy and, if not
2
Page 4

installed and used in accordance with the instructions, may cause harmful
interference to radio or telephone reception, which can be determined by turning the
equipment off and on, the user in encouraged to try to correct the interference by one
or more of the following measures:
Reorient or relocate the receiving antenna.
Increase the separation between the equipment and the receiver
Connect the equipment to an outlet on a circuit different from that to which the
receiver is connected.
Consult the dealer or an experienced radio/TV technician for help.
Caution
• Do not use the player in exceptionally cold or hot, dusty, damp or dry
environments.
• Do not drop, strike, or throw your player. Physical damage to your
player will void ALL warranties.
• Please charge your battery when
o Battery power icon shows an empty icon;
o The system automatically shuts down and the power is
soon off when you switch on the unit once again;
o There is no response if you operate on any key
• Please always follow the correct disconnect procedures for your
operating system. Do not disconnect power abruptly when the player is
being formatted or in the process of uploading or downloading files.
3
Page 5

Otherwise it may lead to file corruption, firmware failure, and even
hardware damage.
• Please ensure that the player is powered off before inserting or
removing the Micro SD Card
• We are not liable for any loss of data stored on this device.
• Please do not dismantle this player. Any disassembly not done by an
authorized technician will void ALL warranties
• This product and manual are change without subject to notice.
Features:
• 3.0 inch Full Color TFT LCD Screen, 400x240 native resolution
• Touch Screen Controls
• 1.3MP Digital Video Camera
• Plays Music: Supports MP3, WMA (non encrypted) WAV, FLAC, OGG,
and MP2 audio formats
• Plays Video: Supports AVI, RM, RMVB, WMV (non encrypted), 3GP,
and FLV video formats
• Supports JPG, GIF, and BMP format image files
• Supports ID3 and LRC files
• High Speed USB 2.0 Interface
• Built in rechargeable battery
• Multiple language support
4
Page 6
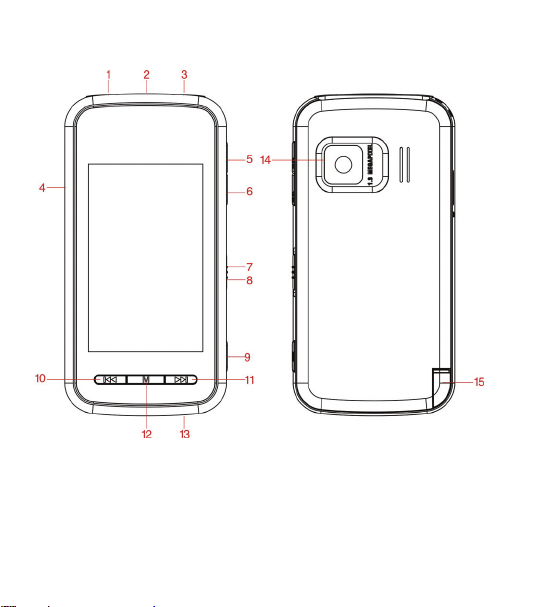
Get to Know Your Player
1. Earphone Jack
2. USB port
3. Earphone Jack
4. Micro SD card
5. VOL-
6. VOL+
7. power
8. Hold
9. Camera Button
10. Previous
5
11. Nex t
12. menu
13. MIC
14. Camera
15. Stylus
Page 7

Basic Operations
Powering on
To power the player on, slide the power switch to the UP position and hold it there for
5 seconds or until the welcome screen is displayed.
Powering off
To power the player on, slide the power switch to the UP position and hold it there for
5 seconds or until the goodbye screen is displayed.
Locking and Unlocking the touchscreen
To lock the touchscreen, slide the power switch into the DOWN position. To unlock
the touchscreen, return the power switch to the neutral or middle position.
Charging the Player
To charge the player, simply connect it to a powered USB port, or external AC
adapter. If you choose to use a third party adapter, please ensure that it is 5V and
between 350 and 500mA output.
When you connect the player to your computer, you will see a screen displaying the
USB symbol as well as “Charging”. When connected to a charger, you will see the
“Charging” screen.
Inserting and removing the Micro SD card
Inserting: Ensure that the player is powered off, and disconnected from the
6
Page 8

computer. Hold the Micro SD card face up (side with words aligned in the opposite
direction of the display screen), and slide the card into the socket on the player,
slightly past flush. When you hear the card click into place, you can access the card.
Removing: Ensure that the player is powered off, and push the SD card just past
flush. When you hear the click, release pressure, and the card will slide out.
Caution: Please ensure that the power is off when you connect or disconnect your
SD card, or damage may occur to the player or your card.
7
Page 9

Loading files
Using Windows Media Player
(Note: you must use Windows Media Player 10 or later to use this feature.)
(Note: this player does not support DRM encrypted audio or video files, such as
those downloaded from the Windows Media Player “Overdrive” download service.)
1. Open Windows Media Player and connect the player to a working USB port.
Windows Media player will prompt you with a setup screen asking you to name the
MP3 player.
8
Page 10

2. Once you have named your MP3 player, select Finish, and your Windows Media
Player will open to the Sync tab.
3. Drag your music to the sync list (on the right of the screen) from the list on the left.
Once you have selected the music you wish to add to the player, press Sync.
9
Page 11

4. Windows Media player will load the songs on to your player.
5. Once all the songs you have added are synced to the unit, and Windows Media
Player says that is safe to disconnect your MP3 player, disconnect the device.
10
Page 12

COPY AND PASTE
Note- This alternate method is used to load videos, pictures, and ebook files as well
as audio files
1. Connect the MP3 player to a working USB port.
2. When the unit is connected to your computer, it will create a gray and green icon
in the system tray (lower right hand corner of your desktop). The icon will be called
safely remove hardware.
3. Go to the “My Computer” section of your computer. In there you will find a section
called “devices with removable storage”
11
Page 13

4. Locate the drive created by the unit, generally just called Removable Disk, with a
letter in Parenthesis. Drive letters vary depending on your system configuration.
5. Open the drive by either double left clicking on the drive itself, or by right clicking
to open the option menu then left click on the desired drive.
6. Locate the music stored on your computer. Generally this is stored in the “My
Music” folder of your computer.
NOTE: if you are unable to locate the music on your computer, click on start,
search, files and folders, then search for “*.MP3, *.WMA”.
12
Page 14

7. Once you have located the song files, you can right click on the song itself, and
select “copy”. Open the removable disk drive, right click on in the empty space, and
select Paste. This will transfer the song on to your player.
13
Page 15

8. Repeat step 7 for as many songs as you want to copy on to the unit.
NOTE: MAC Computers
When connected to your MAC computer, the device will act as a removable drive.
Simply drag your files to the device.
14
Page 16

Main Menu
Once you power the player on, the Main Menu will be displayed with icons for the
different modes of the player: Music, Video, Camera, eBook, Photo, Recorder,
Explorer, Settings, and Other Functions. Tap the icon corresponding with the mode
you wish to enter.
15
Page 17

Music Mode
• Note- this player supports audio files in MP3, WMA (non encrypted)
WAV, FLAC, OGG, and MP2 formats. If your audio files are not in one of
these formats, the files will not play.
When you tap the Music icon on the Main Menu, you will enter the Music Selection
screen as Displayed below.
This screen will allow you to select the music you wish to play, either using ID3 tag
16
Page 18

selection (artist, album, genre, etc) or manually by selecting the “Dir List” option.
Once you have entered the music playback mode, your audio file will begin playing
automatically. Tap the PLAY icon to pause the file, and tap it again to resume
playback. Tapping the Next or Previous Icons will skip to the next or previous tracks.
Tap and hold the Next or Previous Icons to fast forward or rewind the current track.
Volume Adjustment
To Adjust the volume on the player, simply press the V+ or V- buttons to increase or
decrease the volume. Alternatively, you can tap the speaker icon on the screen, and
slide the volume adjustment bar to the desired level.
Music Submenu
On the Music Playback screen, tap the Music Submenu Icon to enter the Music
Submenu
• Repeat Mode- Allows you to select your Repeat mode. select from One,
Repeat, All, Repeat All, and Intro modes.
• Play Mode allows you to select whether to play the files in order, or to shuffle
the files. Please note however, that this player will only shuffle files within a
single directory or folder.
• MSEQ allows you to select one of three special equalizer settings: 3D, BASS,
or LEQ
• EQ Select allows you to activate one of 6 standard equalizer settings, a
special MSEQ setting, or a user defines equalizer setting
• Display allows you to select whether you want to display the ID3 information
of your songs, Lyrics, or a frequency chart while your audio files are playing.
17
Page 19

Please note that to display lyrics, the lyric files (.lrc) must be saved in he same
directory or folder as the audio file for them, and ID3 tags must be added to
the audio files before loading them to the player in order for them to display.
Video Mode
• Note- this player supports video files in AVI, RM, RMVB, WMV (non
encrypted), 3GP, and FLV formats. If your video files are not in one of
these formats, the files will not play.
When you tap the video icon on the Main Menu, you will enter the Video Selection
screen as Displayed below.
18
Page 20

Tap the video file you wish to play, and the file will start automatically. When you tap
the screen, the video controls will display.
Once you have entered the video playback mode, your file will begin playing
automatically. Tap the PLAY icon to pause the file, and tap it again to resume
playback. Tapping the Next or Previous Icons will skip to the next or previous tracks.
Tap and hold the Next or Previous Icons to fast forward or rewind the current track.
19
Page 21

Volume Adjustment
To Adjust the volume on the player, simply press the V+ or V- buttons to increase or
decrease the volume. Alternatively, you can tap the speaker icon on the screen, and
slide the volume adjustment bar to the desired level.
Camera Mode
Camera mode both allows you to take still pictures, and record video. To enter
Camera Mode, tap the Camera icon on the main menu. You will automatically enter
camera mode, ready to take photos. Re recommend taking photos and recording
videos with the player tilted on its side, so that the “top” of the player is on the right,
and the “bottom” of the player is on the left hand side. When arranged in this manner
the camera button will be arranged at the new top of the device on the right hand
side, just as on a standard camera. Press and hold the Menu button on the player to
return to the main menu, or briefly press the Menu button to bring up the camera
options where you can adjust the resolution of images, add a filter, adjust brightness
and zoom.
Still Images
To take a still image, simply briefly press the camera button on the player. The
camera will snap a picture and save it. Saved images are stored in the CAMERA
folder on the player.
Recording Video
To record video, enter camera mode, then tap the
20
icon and the player will enter
Page 22

video recording mode. Briefly press the camera button to begin recording, and press
it again to stop and save the recording.
EBook Mode
Ebook mode allows you to view your text files loaded on the player. To enter eBook
mode, tap the eBook icon on the main menu, and you will enter the ebook selection
screen. Select the file you wish to view. When in the eBook mode, tap the up or
down arrows to advance by page, or use the V+ or V- buttons to adjust the page line
by line.
Ebook Submenu
When viewing an eBook file, tap the eBook submenu icon to enter the eBook
submenu
• Page Jump- allows you to skip to a specific page in the current eBook file
• Save Mark- allows you to save the current spot in your eBook file to return to
at a later time
• Load Mark- Load one of your bookmarks and return to the point the mark was
saved at
• Del Mark- allows you to delete one of your current bookmarks
• Set Font- allows you to adjust your font size
• Set Color- allows you to set the text to one of three colors
• Browser Mode- allows you to set up an auto browser mode which will
automatically turn the pages for you.
21
Page 23

• Flip Time- set the length of time a page is displayed before changing when the
auto browser is set
Photo Mode
• Note- this player supports image files in JPG, GIF, and BMP formats. If your
image files are not in one of these formats, the files will not display.
To enter Photo Mode tap the Photo Icon on the main menu. Select the file you wish
to wish to display.
22
Page 24

You can tap the rotate left and right buttons ( , ) to rate the image, zoom in
and out, or simply tap the next or previous buttons to skip to the next or previous
images. Tapping the slideshow icon will allow you to set up a slideshow to
automatically display your images.
Voice Recorder
To enter the voice recording mode, tap the Recorder icon on the main menu. This
mode will allow you to record voice notes.
Tap the play/pause icon to begin or pause the current recording, and press the save
icon to save the file. Tapping the Voice Recording Submenu icon will allow you to
23
Page 25

adjust the recording quality and volume.
Explorer
Explorer mode allows you to select a file to play, of any type. The file will
automatically open in the appropriate mode (videos in video mode, audio files in
Music mode, etc)
Settings
The settings mode allows you to adjust a large number of your system settings. To
enter this mode, tap the settings icon on the main menu.
Display Settings
• Backlight Time- Adjust the length of time that the backlight stays lit
when not viewing a movie and no buttons are pressed.
• Brightness- Adjust the screen brightness
• Light Mode- Allows you to select whether the screen powers completely
off or dims when the backlight time is reached
• Display Status- Select whether to display the status bar on the top of the
screen.
System Settings
• Restore Defaults- returns the player to the factory settings
24
Page 26

Desk Top
Use this item to select one of 5 desktop backgrounds to use.
Language
Select from one of 19 supported languages
System Information
Displays some system information including the firmware version, Hardware
ID number, flash memory, and SD memory.
Automatic Shutdown
Allows you to set a timer to power the device off
Calibrate screen
If your touch screen is not responding well, use this mode to recalibrate the
screen. NOTE- if the touch screen is miscalibrated, the player’s touch screen
controls will not function
Set the Time
Allows you to set the time and date.
25
Page 27

Other Functions
Calculator
This functions as a standard calculator. Tap the numbers and symbols to
perform calculations
Calendar
Displays a standard Calendar.
If at any point, you have questions about your player or experience an issue with your
player, please feel free to contact our technicians at mssupport@machspeed.com
by phone at 580 272 0035.
26
or
Page 28

 Loading...