

User Manual
MachineryGuide GPS Guidance System
Read the whole manual before using the product
and keep it for later reference UK ENG

1

Table of Contents
Parts of the guidance system 4
GPS/GLONASS antenna 5
Bluetooth GNSS Receiver 6
Antenna Cable 7
DC-USB Cable 8
Tablet Mount 8
Software Installation 9
Installation steps 9
Software Updates 10
First Steps 11
Options menu 12
Units, Gauges to display and Overlap option menu 12
Session handling, Localization source and Display menu 13
Size and alignment menu 15
Guidance mode menu 16
Language settings 17
Font size settings 17
Starting a new job session (with Bluetooth-receiver) 18
Error messages and notifications when using the Bluetooth-antenna 20
Alarm notification in Main menu 21
2

Starting a new job session (with built-in GPS-module) 22
Loading previously saved sessions and continue former job 24
Managing former paths 26
Layout of the Navigation screen 27
Function buttons 28
Starting navigation (with A-B straight guidance mode) 30
Starting navigation (AB with surrounding guidance mode) 32
Starting navigation (AB curve guidance mode) 35
Starting navigation (AB round curve guidance mode) 36
3
Parts of the guidance system
Part name
Options
1
GPS/GLONASS antenna
SM1 or DM1 antenna
2
Bluetooth GNSS receiver
SM1 or DM1 receiver
3
Antenna cable
Only for DM1
4
DC-USB cable
Car charger, 3-points charger
and 2-wire charger
5
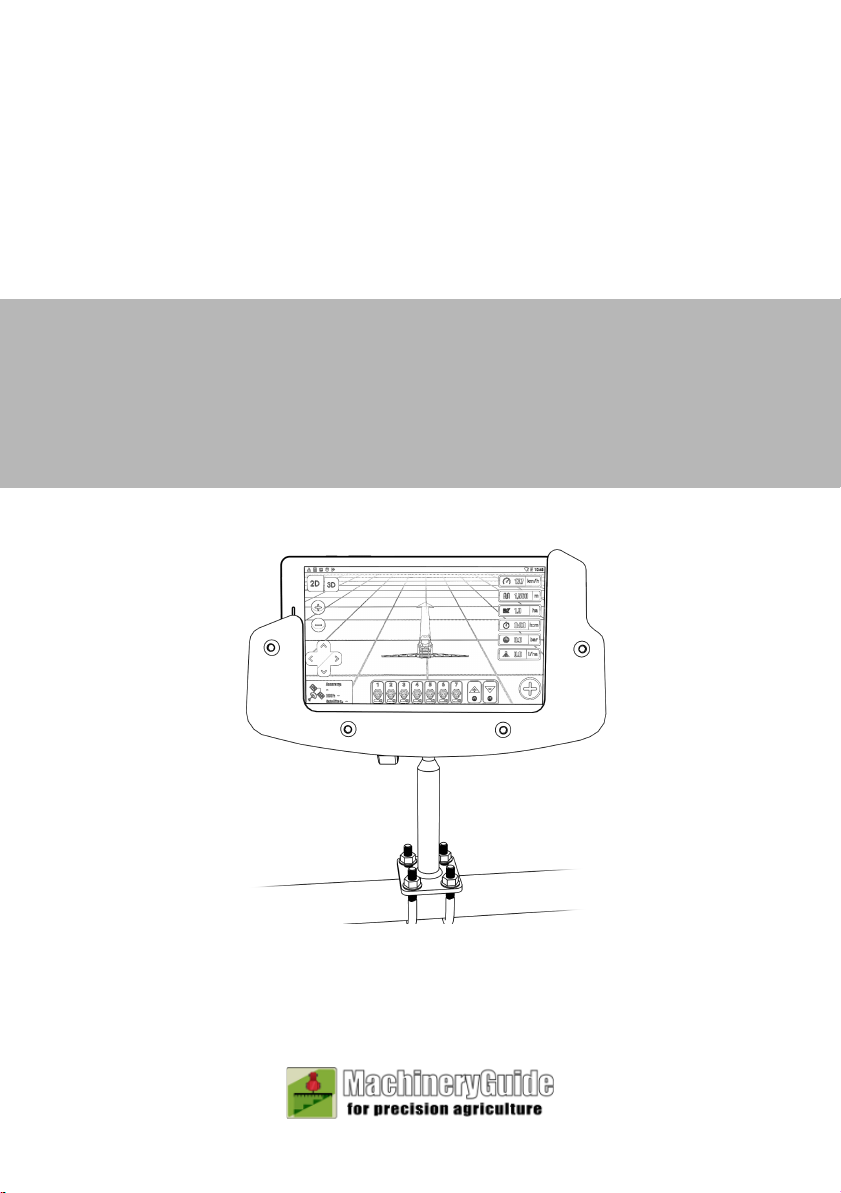
Tablet mount
-
6
Android device
-
7
MachineryGuide Android application
-
4

GPS/GLONASS antenna
The antenna has to be mounted to the highest part of the agricultural machinery, and
must not be obscured in order to achieve the best accuracy. There are two antenna
options available for the MachineryGuide application:
SM1 antenna
Specifications:
● Frequency: 1575MHz ~
1615MHz
● VSWR: 1.3 @ 1580MHz
● Bandwidth: 43MHz
● Polarization: RHCP
● Antenna gain: 27dB
● Size: 37.5mm x 34.5mm x
12.5mm
● Connection: SMA
● RF cable: RG174, 2.5m
● Magnetic bottom
DM1 antenna
The DM1 antenna has high gain (40 dB)
and multipath error rejection.
Specifications:
● Frequency: 1574 MHz +/- 10
MHz
● Bandwidth: 31 MHz (1dB)
● Polarization: RHCP
● Antenna gain: 40 dB
● Size: 66.5 mm x 66.5 mm x
49.8 mm
● Connector: TNC
● Manufacturer: Tallysman
5
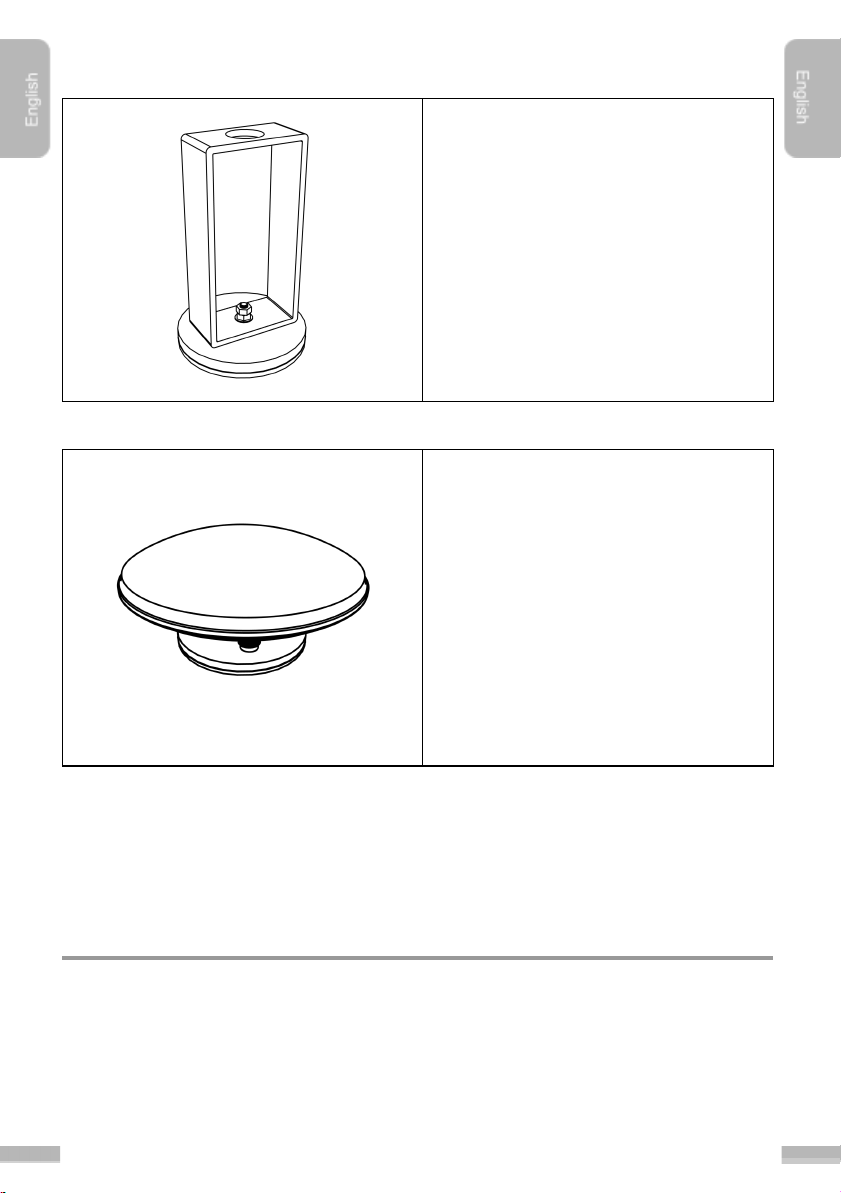
DM1 Antenna Console
The DM1 antenna can be installed with a
magnetic console. The antenna goes to
the top of the holder.
The consol with the antenna should be
installed to the top of the agricultural
machine. It is very important to place it
on the highest part of the vehicle, and to
ensure that it is not covered, because
this is indispensable to achieve the
correct pass-to-pass accuracy.
CM1 antenna
The DM1 antenna has high gain (40 dB)
and multipath error rejection.
Specifications:
● Frequency: 1574 MHz ~ 1606
MHz
● Bandwidth: 31 MHz (1dB)
● Polarization: RHCP
● Antenna gain: 40 dB
● Size:152 mm x 152 mm x 94
mm
● Connector: TNC
● Manufacturer: Harxon
Bluetooth GNSS Receiver
The receiver unit gets the 12 V supply via DC cable. The communication with the
tablet is done via Bluetooth interface. The external GPS antenna can be connected to
the receiver via an SMA-connector. The data connection is in the form of serial NMEA
messages.Two GNSS Receiver options available for the MachineryGuide application:
6
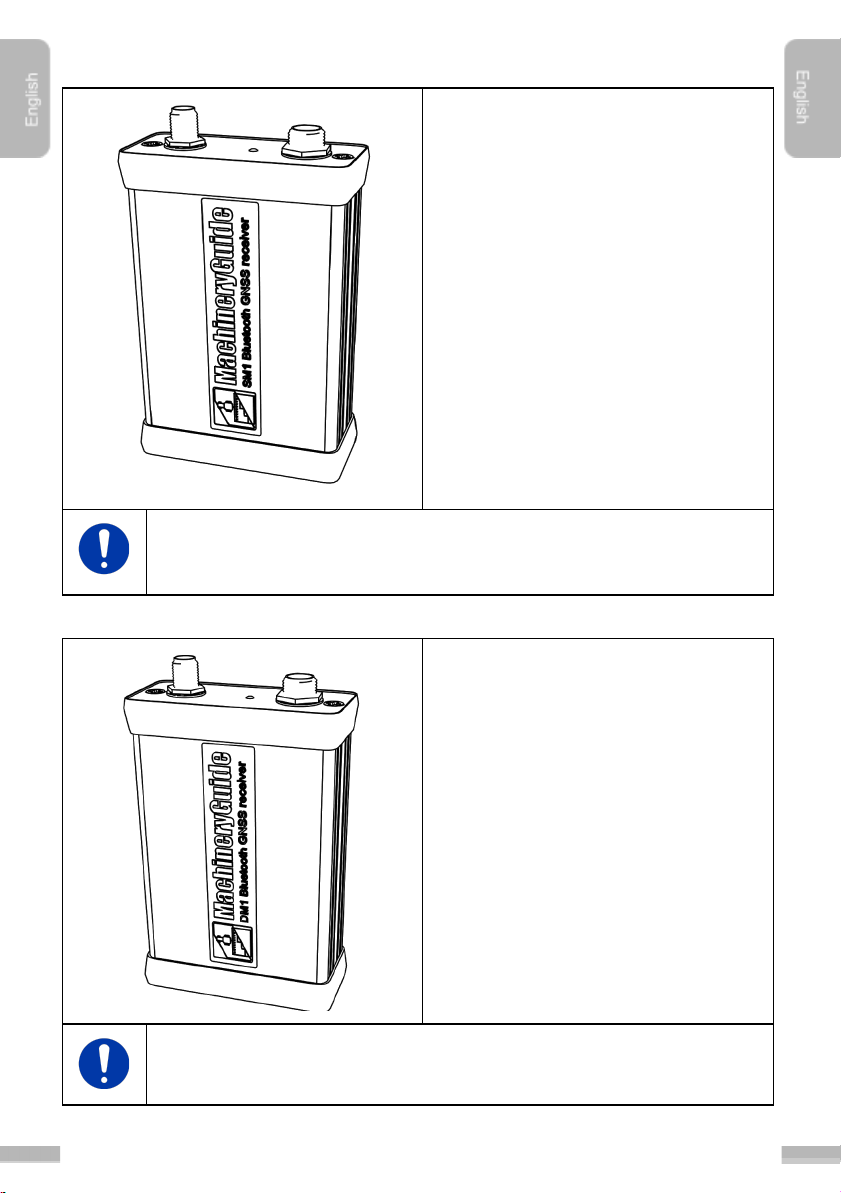
SM1 Bluetooth GNSS Receiver
Specifications:
● GPS-, GLONASS-, SBAS-,
QZSS-signals
● 10 Hz update rate
● Absolute accuracy: 2.5 m CEP
● Absolute accuracy with SBAS
correction: 2.0 m
● Absolute accuracy with SBAS +
PPP correction: < 1 m
● Pass-to-pass accuracy with
SBAS+PPP correction:10-20 cm
● Speed accuracy: 0.1m/s
● Hot start TTFF open sky: 29 mp
● Col start TTFF open sky:30 mp
● Sensitivity: -161 dBm
● Bluetooth device name:
MachineryGuide BT-REC-V2.3
DM1
When the Receiver is turned on, after two-three minutes of initialization time
(depends on the satellite coverage) the Receiver starts to provide submeter
level pass-to-pass accurate position data.
DM1 Bluetooth GNSS Receiver
Specifications:
● Uses GPS, GLONASS, SBAS,
QZSS signals
● 10 Hz update rate
● Absolute position accuracy 2.5
m CEP
● Relative (pass-to-pass)
accuracy: 30-40 cm
● Velocity accuracy 0.1m/sec
● Warm start TTFF under open
sky 29 sec average
● Cold start TTFF under open sky
30 sec average
● Tracking sensitivity -165 dBm
● Bluetooth device name:
MG BT-REC-V2.3
When the Receiver is turned on, after ten minutes of initialization time
(depends on the satellite coverage) the Receiver starts to provide decimeter
level pass-to-pass accurate position data.
7

CM1 Bluetooth GNSS Receiver
Specifications:
● Uses GPS, GLONASS, SBAS,
QZSS signals
● 10 Hz update rate
● Absolute position accuracy 1
cm CEP
● Relative (pass-to-pass)
accuracy: 2 cm
● Velocity accuracy 0.1m/sec
● Warm start TTFF under open
sky 29 sec average
● Cold start TTFF under open sky
30 sec average
● Tracking sensitivity -165 dBm
● Bluetooth version: 2.0
● Bluetooth device name:
● MG BT-REC-V2.3
When the Receiver is turned on, after ten minutes of initialization time
(depends on the satellite coverage) the Receiver starts to provide
centimeter level pass-to-pass accurate position data.
Antenna Cable
DM1 and CM1 antennas could be
connected to the Bluetooth GNSS
Receiver via an RF cable.
● Length: 2.5 m
8

DC-USB Cable
The DC-to-USB cable provides power to the Bluetooth GNSS Receiver. There are
three types of cables available for the Receiver:
A DC-to-USB cable with DC plug only on
one end for the Bluetooth GNSS
Receiver.
Specifications:
● Length: 2 m
● Plug type: 2.1 mm DC plug
A DC-to-USB cable with a DC plug for
the Bluetooth GNSS Receiver and a
standard car charger plug.
Specifications:
● Length: 2 m
● Plug type: 2.1 mm DC plug
A DC-to-USB cable with a DC plug for
the Bluetooth GNSS Receiver and a
3-point charger plug.
Specifications:
● Length: 2 m
● Plug type: 2.1 mm DC plug
Tablet Mount
Tube mount for tablet with display size
7”.
● Easy to install
● Stable mount
● Flexible at two spherical joint
9
Software Installation
Internet connection is required for downloading and activating the
application.
Installation steps
1. The software (APK file) can be downloaded from website
machineryguideapp.com, from the following link:
machineryguideapp.com/en/releases
a. It is recommended to reach the website directly from your
tablet/smartphone, since this way the APK file is installed right away
when tapping the download link.
b. When the installer file (APK file) is downloaded to your computer,
copy the file to your Android device. For this, connect your device to
the computer as a media device with a USB-cable.
Since MachineryGuide app is outside of official Android marketplace, to
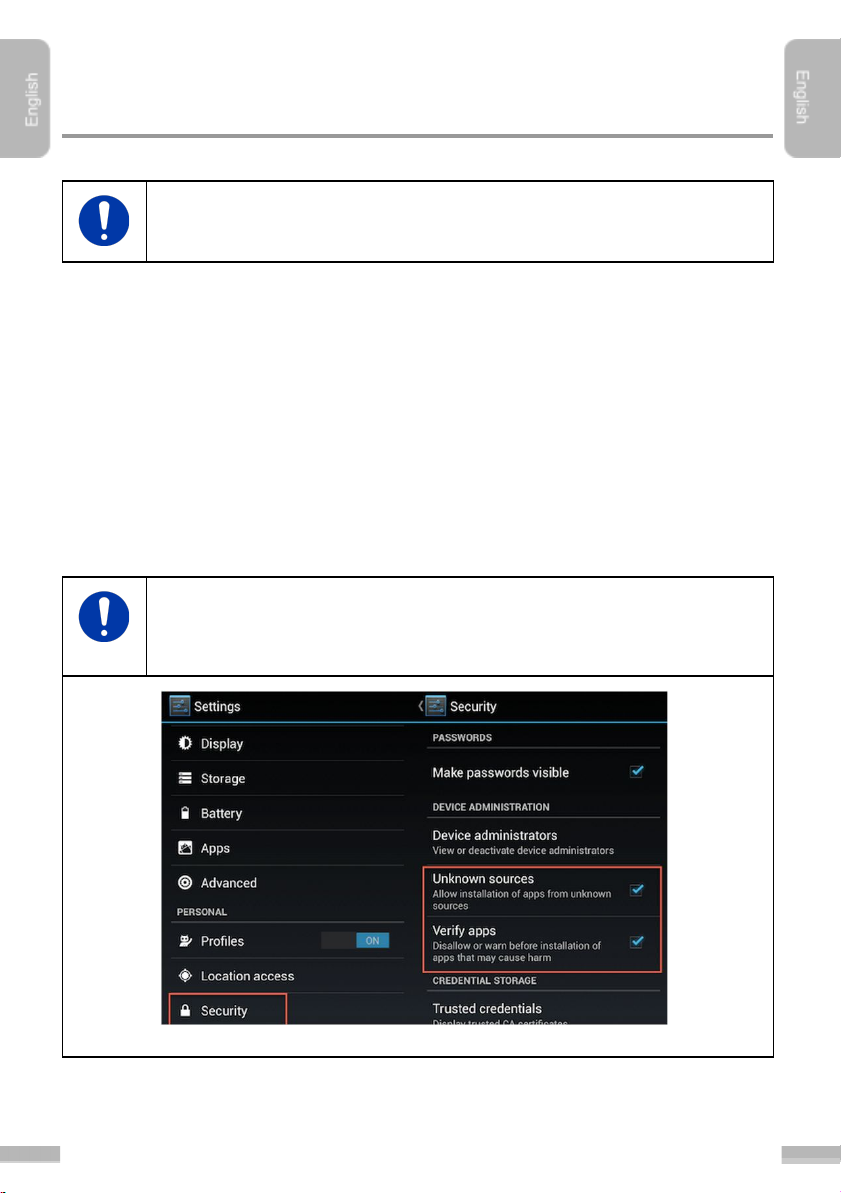
install the APK first go to Settings, scroll down to Security, and select
Unknown sources.
10

2. After installation, activate your software. Click on ”Licence” button, then write
in your 8 character long code given by your distributor. (In case you bought
only the software, you will receive it in an e-mail, otherwise the code is found
in the product box.)
3. After entering the code, the ”Licence” button on the main window will change
to ”Start” button and you will be able to use the software without any
restrictions.
Software Updates
Software updates are available on this link: machineryguideapp.com/en/releases.
Installing a software update is very similar to the installation of the original software,
the main difference is that Activation is not required this time.
In case of a new release, each user will be notified via e-mail. (The e-mail will be sent
to the e-mail address that was assigned to the registration).
11

First Steps
Instructions for using MachineryGuide guidance application.
Main Screen
Function
1
If the program has not been activated, instead of the ”Start” button the
”Licence” button appears. (you can read above about the activation)
2
The software can be configured in the “Options” menu
3
By tapping the ”Exit” button you can close the application.
If you have started a job session, the program will ask if you want to save
the data of the session before closing.
12

Options menu
The application can be customized through several settings. Each setting is saved
automatically, so you do not have to set the desired parameters every time you start
the application.
13
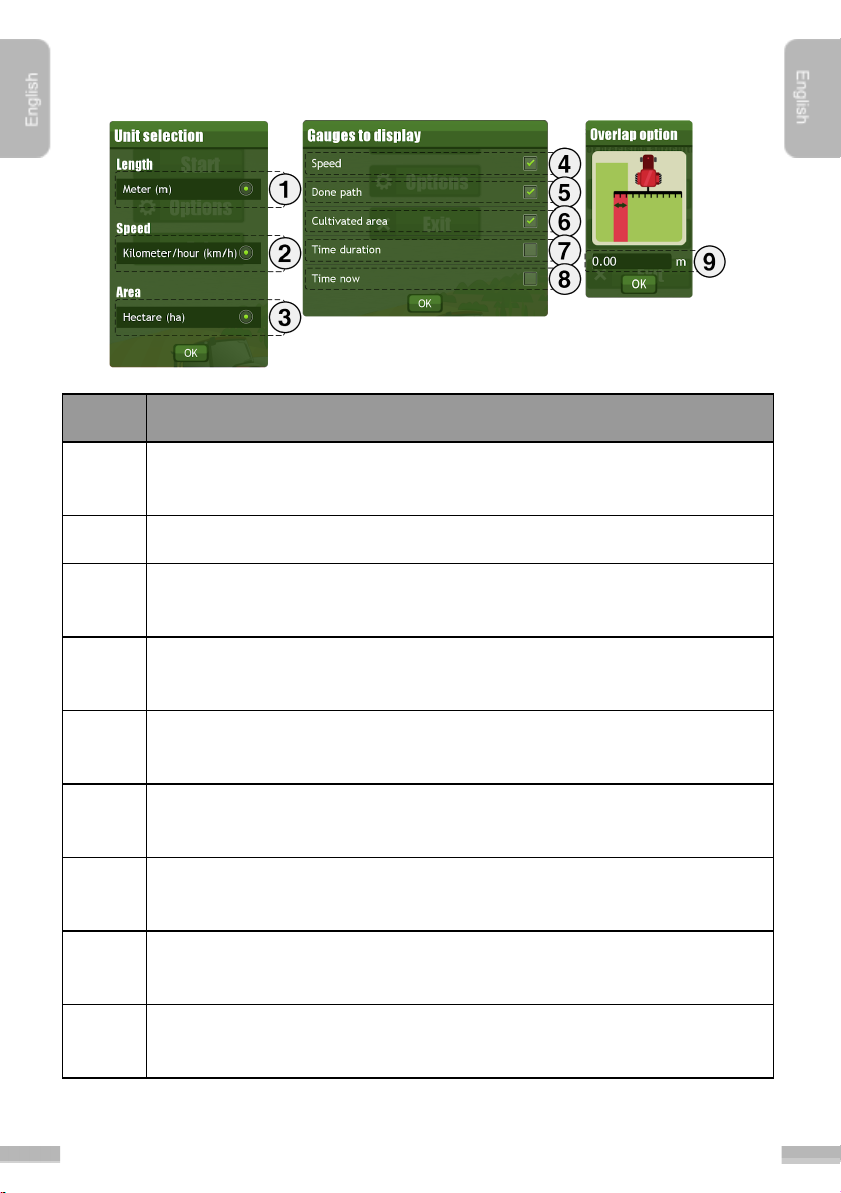
Units, Gauges to display and Overlap option menu
Function
1
Unit for length can be set here. Supported formats are Meter, Feet, Inch
and Yard
2
Unit for speed can be set here. Options are Kilometer/hour or Mile/hour.
3
Unit for area measurement can be set here. Options are Hectare, Acre and
Square miles
4
Set Speed gauge to be displayed on the Navigation screen. Displays the
actual speed of the agricultural machinery.
5
Set Done path gauge to be displayed on the Navigation screen. Displays
the covered distance since the start of the session.
6
Set Cultivated area gauge to be displayed on the Navigation screen.
Displays the area of the cultivated field since the start of the session.
7
Set Time duration gauge to be displayed on the Navigation screen. Displays
the elapsed time since the start of the session.
8
Set Time now gauge to be displayed on the Navigation screen. Displays the
actual time.
9
You can set the width of the allowed overlap. The distance between the
navigation lines are calculated based on the values given here.
14
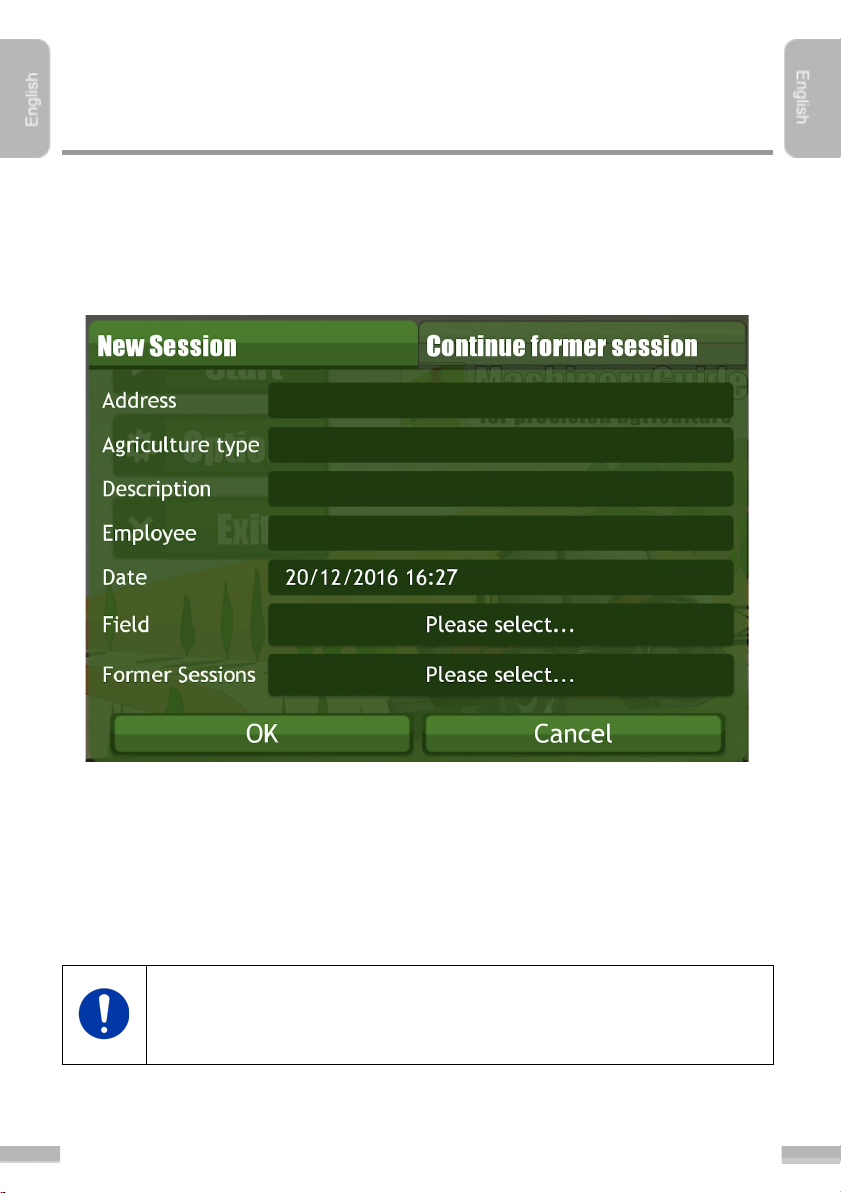
Session handling, GPS source and Display menu
Function
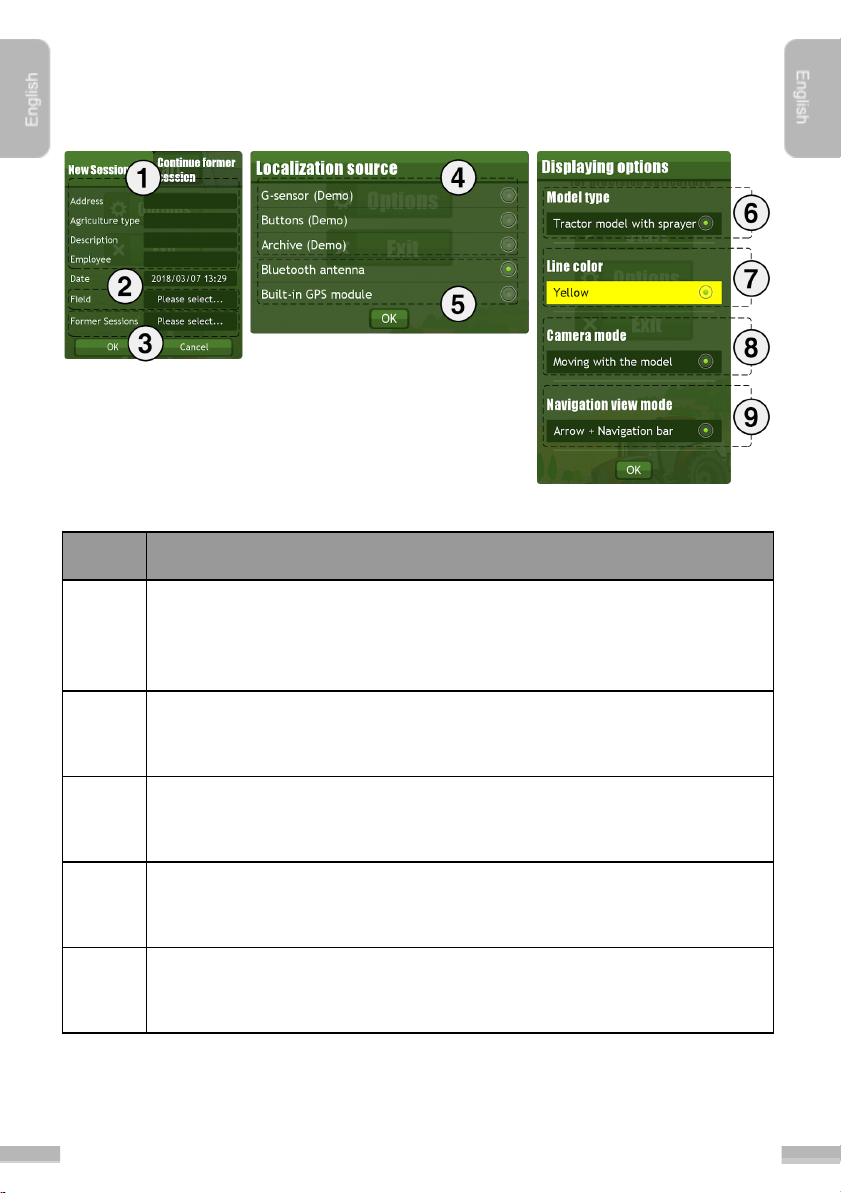
1
For each job session several parameters can be set, which can checked
anytime later on. Address of the field, type of actual agriculture, description
of the job and the name of the employee can be set here.
2
Previously saved Fields with their parameters can be loaded by tapping
here.
3
Previously saved Sessions can be loaded by tapping here. Tap to “Continue
former session” to simply load and continue a saved session.
4
G-sensor control, Button control and Archive session can be set for demo or
testing purposes.
5
External Bluetooth antenna or Built-in GPS module can be set as actual
GPS data source.
15

6
Visualization of the agricultural machinery displayed on the Navigation
screen can be set here. A tractor model with sprayer, a tractor sprayer, a
harvester and a simple arrow are the available options.
7
The color for the cultivated area.
8
Two camera modes are available: (1) Camera moves along with the tractor
(follows the moving tractor) and (2) Camera is fixed, looks only in one
direction.
9
Option for Navigation: (1) Navigation bar, (2) Navigation arrow and (3)
arrow with navigation bar.
16

Size and alignment menu
Function
Options
1
Setting the width of the work
- The workwidth of the agricultural
machine can be set with the
parameter given here. (The software
sets the width of the line (stripe),
which indicates the cultivated area.
The navigation distances are also
calculated based on this data.)
- Negative number cannot be given.
2
Setting the center-offset
- The outline of the cultivated area
can be moved to the left of the
agricultural machine with negative
values. It can move to the right of
the agricultural machine with
positive values.
- center-offset is not considered when
calculating the navigation path (not
supported when guidancing)
3
Setting the distance of the
antenna from the machinery
The software does not support
towed machines with joint.
17

Guidance mode menu
Function
1
A-B straight mode
2
A-B surrounding mode
3
A-B curve mode
4
A-B round curve mode
5
Tracking only mode
18

Language settings
You can set the language of the operating system. The chosen language will be the
language of the program as well.
Supported languages:
- Chinese, English, German, Hungarian, Polish, Portuguese, Russian, Spanish
Font size settings
You can choose the font size of the operating system. The chosen size will be the
font size of the application as well.
19

Starting a new job session (with
Bluetooth-receiver)
Steps of starting a job session:
1. Start the program
2. Set the parameters in the “Options” menu that are necessary to start
guidancing.
a. set workwidth
b. set center-offset
c. Set distance of the antenna
d. Set guidance mode
e. Set allowed overlap
3. Select the Bluetooth-antenna as GPS-source in the “Localization source”
menu.
4. Tap ”Start”.
5. To start the job session, the Bluetooth-device needs power supply.
6. After tapping ”Start” button the “Satellite Information” window appears on the
screen. If the Bluetooth device had been not selected yet, click on the
“Modify” button and select the “BT-REC-V2.3” receiver. If the mentioned
device is not listed on the screen, please click on the “SCAN FOR DEVICES”
button.
7. The following window appears after clicking “Start”:
20

On the Navigation screen the job session can be immediately started, as soon as
position data is available, independently from its accuracy.
On the Navigation screen a small icon and caption gives information about the
accuracy, so the User can choose the accuracy they want to work with.
Accuracy levels:
● Bad (Red sign)
● Weak (Orange sign)
● Good (Yellow sign)
● Excellent (Green sign)
8. The following window appears after clicking “Ok”:
Information about the new job session could be added here. It is not necessary to fill
any of the fields here, but it makes easier to find a session later.
9. A summary of the given data appears after clicking “Ok”.
21

Error messages and notifications when using the
Bluetooth-antenna
The Application send notifications in case of any error that occurs while using the
Bluetooth GPS-receiver.With these notifications the User can solve issues in
connection with the guidance system quickly. If the accuracy of the received position
data decreases below the minimum level, a notification shows up, so the User can
stop the job until the signal becomes accurate enough to continue with the desired
accuracy. The Application also gives notifications if the connection with the antenna is
lost or not stable.
Sources of error messages:
1. Bluetooth connection had been cut-off (possible cause: the power supply of
the Bluetooth-receiver is unavailable, that is, the USB-cable or the car
charger is unplugged)
2. There has been no new information about the position within a certain
amount of time.
Alarm notification in Main menu
22

Alarm notification on the Navigation screen
Check if the cables of the receiver are properly connected to the
Bluetooth-receiver, then tap ”Reconnect” button to start again the
connection between the device and the Application if Bluetooth-connection
is interrupted and the automatic reconnection has failed.
23

Starting a new job session (with built-in
GPS-module)
Steps of starting a job session:
1. Start the program
2. Set the parameters in the “Options” menu that are necessary to start
guidancing.
a. set workwidth
b. set center-offset
c. Set distance of the antenna
d. Set guidance mode
e. Set allowed overlap
3. Select the built-in GPS-module as the GPS-source in the “Localization
source” menu.
4. Tap ”Start”.
5. To start a job session, the Built-in GPS-module has to be turned on.
6. After tapping ”Start” the following window appears. Wait until the pop-up
window disappears.
While waiting for GPS-reception all functions of the program are blocked. The program
behind the dialogue window indicating waiting is darkened. You can interrupt the
progress anytime by tapping the tablet’s/phone’s ”Back” button.
7. At the following window data of the job session could be added for easier
access later on
24
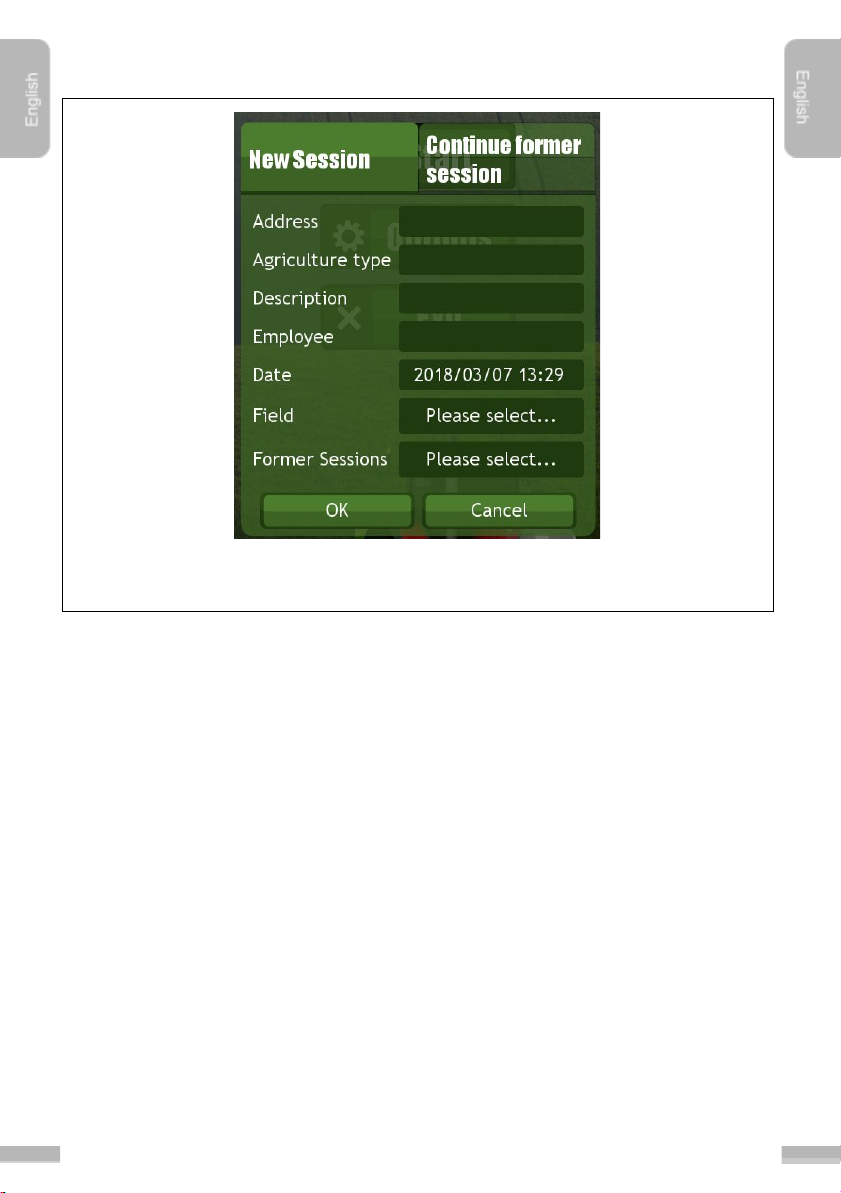
Information about the new job session could be added here. It is not necessary to fill
any of the fields here, but it makes easier to find a session later.
8. Press “Ok” to start the session
25
Loading previously saved sessions and continue
former job
1. Reload former session data
When starting a new job, data from previously saved jobs could be added. Former
field data (area, perimeter etc.) and former session data (path) could be added by
tapping the “Please select…” buttons.
If any former data had been selected, the guidance will be created as an individual job
session, thus it can be retrieved with its individual date and session name.
2. Continue former job
User can also load and continue previously started jobs. In this case the selected job
will be continued instead of an individual new job.
Warning! Due to the fact that the positional data given by free corrections
have low absolute accuracy, there might be a difference between the
loaded and the actual positions.
26

Steps to continue a job session:
1. Start the program.
2. In the main menu tap ”Start”.
3. As soon as the initialization of the GPS’s position reception is done, the
following window disappears:
4. Tap ”Continue former session” tab.
5. Select the session from the list that you want to continue. Newer items listed
first.
6. Click “Ok” to start loading the job.
27
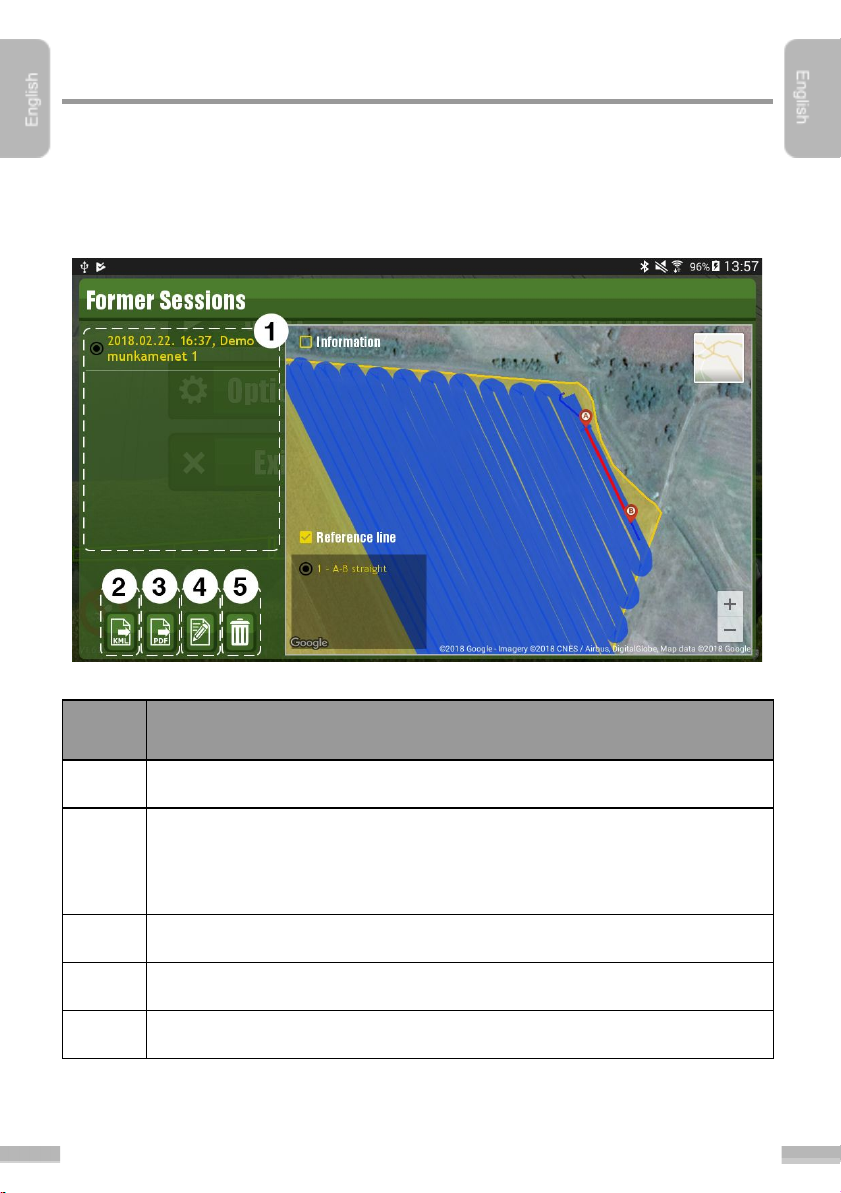
Managing former paths
Former paths can be managed in the “Session handling” sub-menu in the “Settings”
menu. All statistical data of the saved paths and former jobs can be viewed here, with
area of the field (if it has been assigned to the actual job) and reference lines. Route
of the previously done fieldwork also appears here.
Former sessions screen:
Function
1
List of former jobs
2
Export selected session to a KML file. The exported file can be found in the
“MachineryGuide” folder at the root of the file system and can be opened in
any free KML-viewer application (such as GPX Viewer, Google Earth)
In the opened KML file various information about the job can be displayed.
3
Export selected session to a PDF file.
4
Edit data of the selected job
5
Delete selected job
28
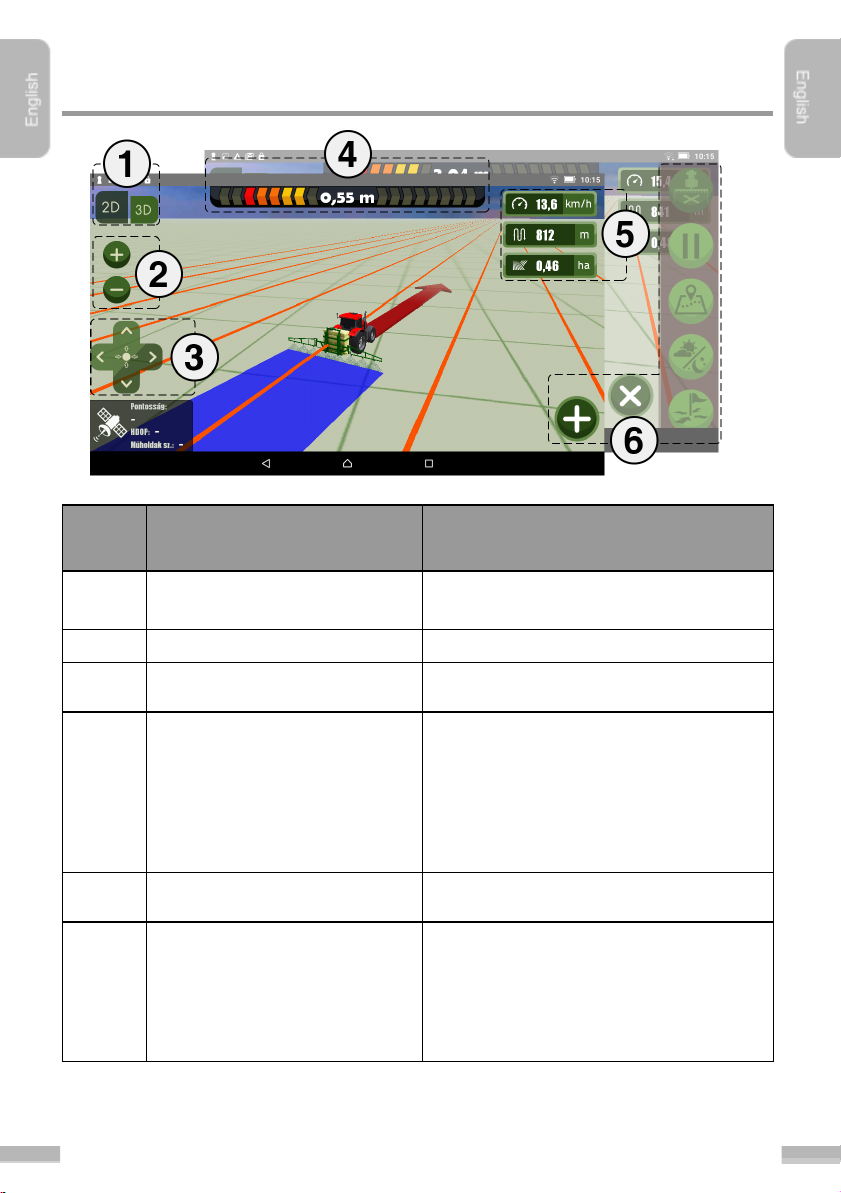
Layout of the Navigation screen
Name
Function
1
Change view
Swapping between bird’s-eye view and
3D-view.
2
Zoom
Zoom in or out of the machinery
3
Changing point of view
Bird’s eye view: moving the camera around
3D view: rotate the camera around
4
Navigation
Navigation arrow, navigation distance and
field border notification are the parts of the
navigation. The navigation arrow turns in
proportion to distance, visually indicating to
the user how to correct the direction of the
machinery.
5
Measuring gauges
Gauges to display information about the
actual job.
6
Function buttons
Function buttons are hidden by default.
They can be revealed by tapping the
button in the right bottom corner, or by
pulling them from the right side of the
screen.
29

Function buttons
Name
Function
Start button
Guidancing starts after tapping this
button. If not activated, the path of the
machinery is a thin line, the normal path
appears after activation
Pause button
Stops the gaudicing. A flag will be placed
at the position of the machinery, so later
on the User can continue the work from
the exact position.
“A” reference point
With this button the "A” reference point
can be set (placed on the field).
“B” reference point
With this button the "B” reference point
can be set (placed on the field). There
must be minimum 50 m distance
between “A” and “B” points. The section
between “A” and “B” point will be the
reference line of the actual session, the
navigation trajectory calculation is based
on this section.
Hide/show cultivated area
Hides or shows the whole cultivated
area.
Hide/show navigation arrow
Hides or shows the navigation arrow
(plus the navigation distance and the
field border alarm)
Satellite information
Information about the satellite connection
by tapping this button. This function is
only available with the Bluetooth GPS
antenna.
30
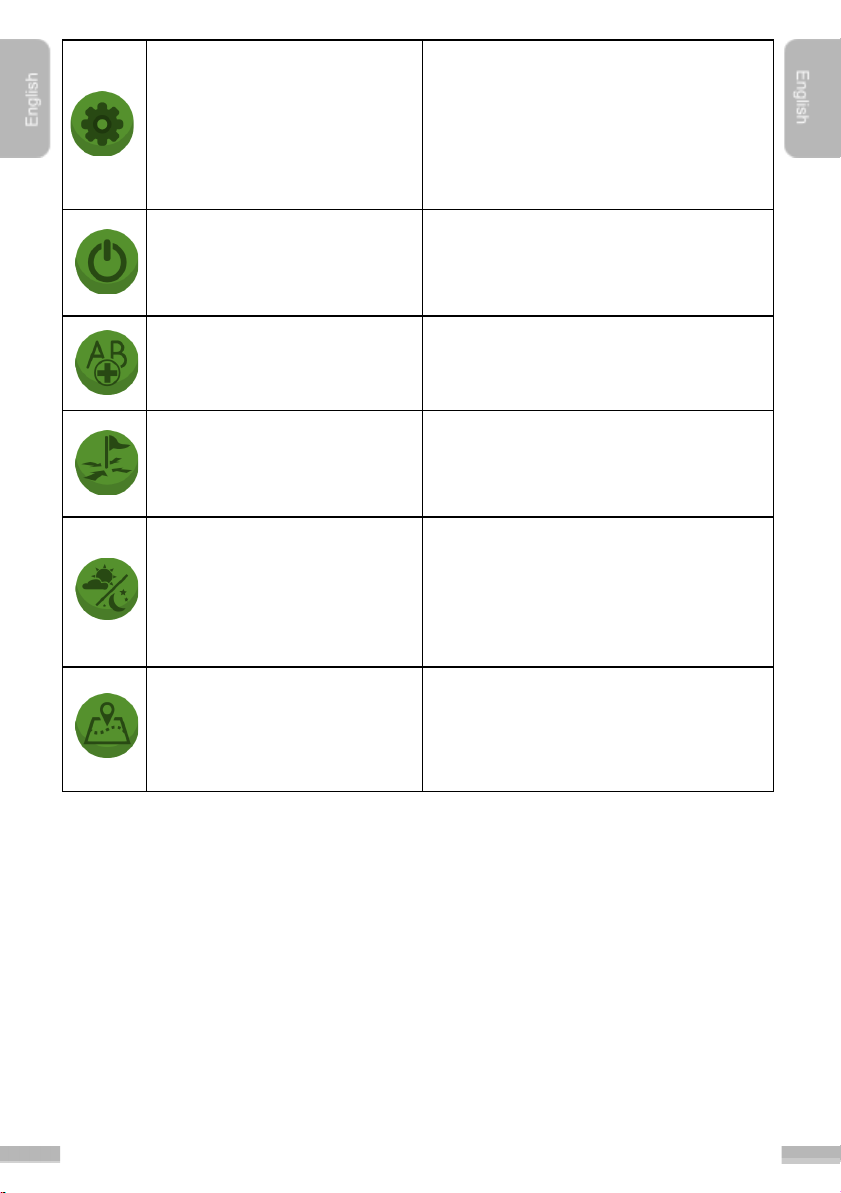
Options
The Options menu is available from
Navigation screen as well, but
preferences are limited here, because
when a session is started, for instance
the "allowed overlap", "center offset",
"guidance mode" are no longer
changeable.
Exit job
Exit the application. The software asks
whether the User want to save the
session or not before closing the
application.
New A-B line
It is possible to add several “A” and “B”
points for consecutive guidances.
Position correction
This option helps the User to correct the
actual position of the machinery relative
to the done path, or loaded coordinates
of previous jobs.
Night mode
Agricultural activities often continues
after dark. With the help of Night mode,
MachineryGuide can be used
comfortably under such circumstances
as well.
Snapshot view
A snapshot of the full session can be
viewed at any phase of the job on
Google Maps in 2D, 3D, normal and
satellite mode.
31

Starting navigation (with A-B straight guidance
mode)
Steps of starting navigation:
1. Go through the steps of ”Starting a new job session”.
2. Drive the agricultural machine to the right position, if the machinery is not yet
at the area to be cultivated
3. Tap “Start” to start the job.
In case of A-B guidancing, User has to select a reference section, to which the
navigation path (parallel lines) will be calculated. For setting the reference line, “A” and
“B” points have to be placed.
4. Set point “A” to set the first reference point
5. Drive forward. To place ”B” reference point the machinery need to be at least
20 metres away from point ”A”. Until then, ”B” button is inactive.
6. Set point “B” to set the second reference point
7. Guidancing now has started. It can be interrupted any time by tapping the
button, and be continued by tapping the button.
8. Go by the outlined navigation lines, follow the directions of the navigation
arrow.
32
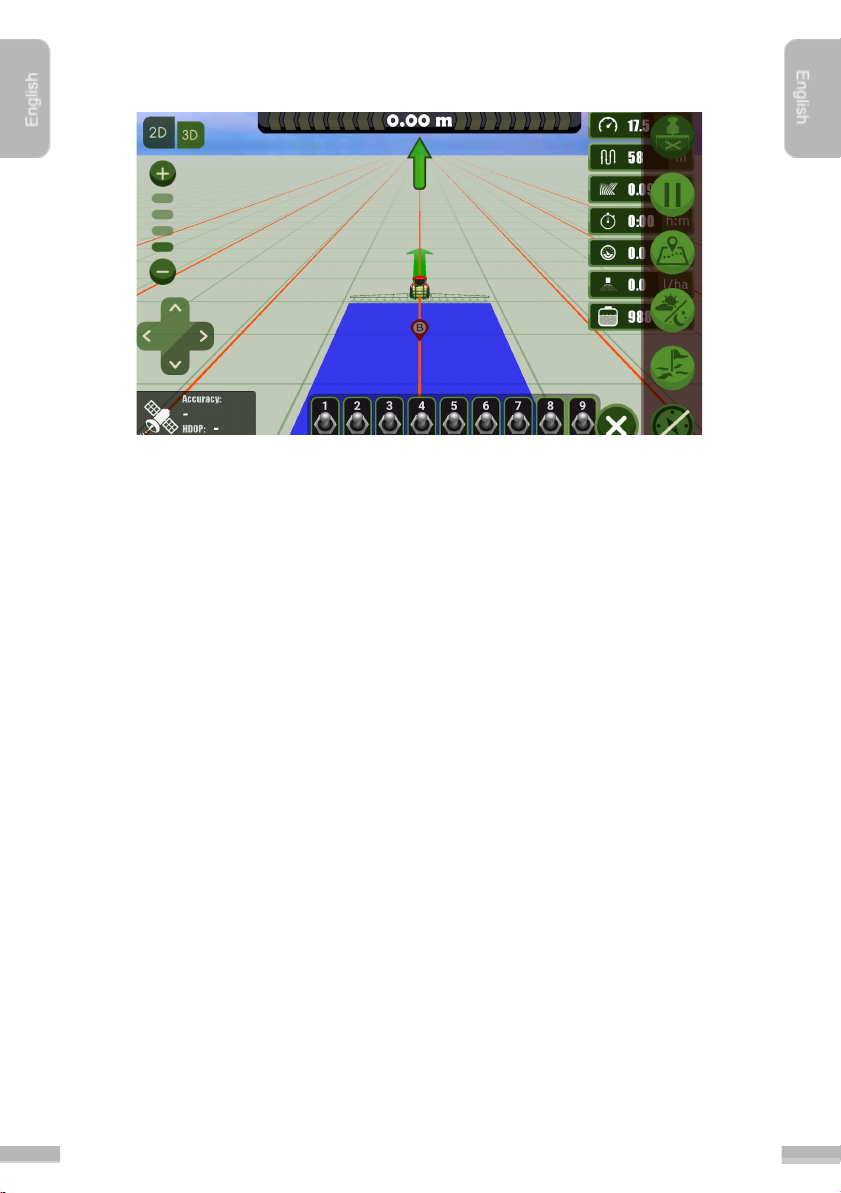
Navigation screen after placing the reference points
33

Starting navigation (AB with surrounding guidance
mode)
Steps of starting navigation:
1. Choose “A-B with surrounding” mode in Settings, under Guidance mode
sub-menu
2. Go through the steps of ”Starting a new job session”.
3. Drive the agricultural machine to the right position, if the machinery is not yet
at the area to be cultivated
4. Tap “Start” to start the job.
In case of AB with surrounding guidancing, first drive around the field area and point
out the ”A” and “B” reference points, the so-called reference section, to which the
navigation path (parallel lines) will be calculated. You should follow these lines during
guidancing.
5. A circle appears at the starting point of the job, indicating the place where the
machinery have to return after surrounding the field:
6. Start to go around the field, and set point “A” as the first reference
point
7. Drive forward. To place ”B” reference point the machinery need to be at least
50 metres away from point ”A”. Until then, ”B” button is inactive.
34

9. Set point “B” to set the second reference point
10. After returning to the starting point circle, the software automatically closes
the field and opens the window below to save the field:
10. Guidancing now has started. It can be interrupted any time by tapping the
button, and be continued by tapping the button.
11. Go by the outlined navigation lines, follow the directions of the navigation
arrow. If you reach the edge of the field the following notification will appear
on the screen:
35

Starting navigation (AB curve guidance mode)
Steps of starting navigation:
1. Choose “AB curve” mode in Settings, under Guidance mode sub-menu. The
following steps are the same as described at the chapter “AB straight
guidance mode”.
2. After placing the “A” and “B” reference points the navigation lines will be
calculated regarding to the shape of the A-B section, for example:
36

Starting navigation (AB round curve guidance
mode)
Steps of starting navigation
1. Choose “AB round curve” mode in Settings, under Guidance mode
sub-menu.
2. Go through the steps of ”Starting a new job session”.
3. Drive the agricultural machine to the right position, if the machinery is not yet
at the area to be cultivated
4. Tap “Start” to start the job.
5. Start to go around the field, and set point “A” as the first reference
point
6. Drive forward. After surrounding the field, return to the ”A” reference point
and place ”B” reference point by tapping the following button:
7. Guidancing now has started. It can be interrupted any time by tapping the
button, and be continued by tapping the button.
8. Go by the outlined navigation lines, follow the directions of the navigation
arrow:
37

For further information visit www.machineryguideapp.com
E-mail: info@machineryguideapp.com
38

39
 Loading...