

Macally ivoicepro User Manual
Voice and Audio Recorder for iPod
®
iVoicePro
USER GUIDE
BEDIENUNGSANLEITUNG
GUIDE DE L’UTILISATEUR
GUÍA DEL USUARIO
GEBRUIKERSGIDS
GUIDA D’USO
2
IT NL ES FR DE EN
About this guide
Before you start using the iVoicePro, be sure to read
this guide in its entirety.
Package contents
• iVoicePro
• USB cable
• 3.5 mm audio cable
• User guide
Registration
Please register this product at http://www.macallyeurope.com/register.php.
Technical support
Please call to +31 24 373 14 10 or email to techsup
port@macally-europe.com. Technical support hours
are from 9h00 to 17h00 (CET), from Monday to
Friday.
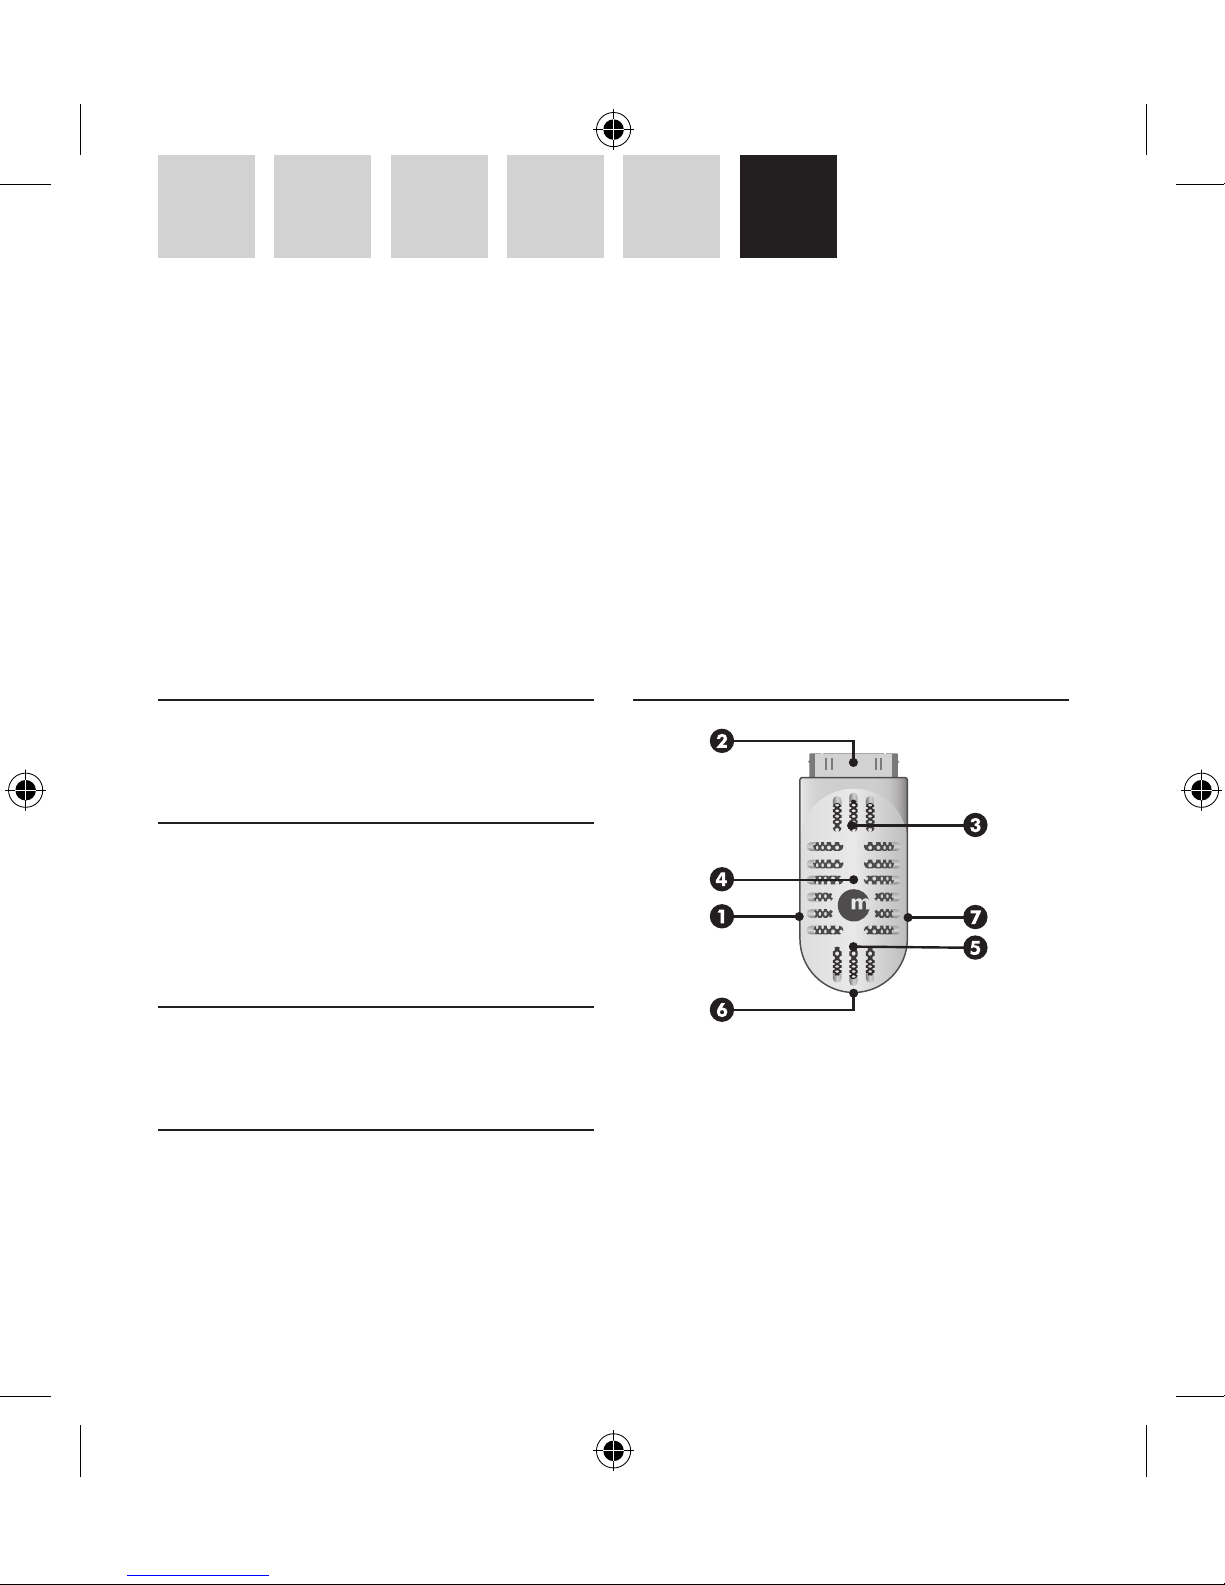
Hardware basics
1 USB port to charge iPod and extend recording
time
2 30 pin Dock connector to your iPod, fits through
most iPod cases
3 Built-in speaker
4 LED status indicator
5 Built-in microphone
6 Record mode switch
EN – USER GUIDE
Thank you for purchasing the Macally iVoicePro, voice and audio recorder for iPod®. The iVoicePro is an
elegantly, in thirties/forties style, designed microphone for your iPod nano 2nd/3rd gen. and iPod 5th/6th
gen. With the iVoicePro you can record your lecture notes, interviews or live music, but also record from
external audio devices through the built-in 3.5mm line-in jack. When you are done recording you can listen
to the result through the built-in speaker. The iVoiceIII connects easily to your iPod even when it is in a silicon
protection case!

3
EN DE FR ES NL IT
7 Stereo line-in for any audio device with a 3.5 mm
line-out jack
Recording
For iPod nano 2nd gen. and iPod 5th gen. (video):
when you connect the iVoicePro, the Voice Memos
menu will open automatically and you are ready
to record.
For iPod nano 3rd gen. and iPod classic: when you
connect the iVoicePro, go to the iPod main menu and
select the Voice Memos menu.
1. Recording with built-in microphone
For general voice recording during a lecture or a
conference, you can simply use the built-in microphone (mono). Connect the iVoicePro to your iPod
and set the record mode switch of the iVoicePro to
microphone position. Then, in Voice Memos menu
set the recording quality at “Low”* and you are
ready to record.
2. Recording through stereo input
You can record CD quality stereo audio on your
iPod through the 3.5mm input jack in the iVoicePro. Connect the iVoicePro to your iPod and set the
record mode switch of the iVoicePro to Audio Device
Recording or Microphone Recording (for an external
stereo microphone). The difference in the Record
Mode is that the Microphone Recording position
uses amplification and the Audio Device Recording
position does not need amplification for recording. When you connect an external audio device to
the 3.5mm input jack of the iVoicePro, the builtin microphone will be disabled. Then, in the Voice
Memos menu set the recording quality at “High”*
and you are ready to record.
Notes
• Low recording quality (mono) uses 22.05KHz
Sample Rate, 16bit Sample Size and 352kbps Bit
Rate. One minute recording takes about 2.6MB in
the iPod.
• High recording quality (stereo) uses 44.1KHz
Sample Rate, 16bit Sample Size and 1411kbps
Bit Rate. One minute recording takes about
10.3MB in the iPod.
• To use less drive space in the iPod it is recommended to select Low quality for voice recording,
and High quality for stereo audio input recording.
• Recording files, in WAV format, are stored within
the Voice Memo menu in the iPod. When your
iPod is connected to a computer, the recording
files are imported into the Playlist Voice Memos
in iTunes and are removed from the iPod. To
reduce the file size for long recordings stored in
iTunes, it is recommended to convert them to
AAC or MP3 format.
Listening
You can play back the recording and listen through
the iVoicePro speaker, by selecting the file and press
“Enter” in the Voice Memos menu. You can also listen
to songs through the iVoicePro speaker.

4
IT NL ES FR DE EN
Charging
The iVoicePro works on the iPod’s power. Therefore,
to avoid that your iPod runs out of power while you
are recording, you can charge your iPod through the
iVoicePro. Simply connect the mini-B end of the
included cable to the iVoicePro and the other end to
the USB port of your computer, an USB power adaptor (f.i. Macally USBPower or PowerPal) or external
battery (f.i. Jbox or Jboxmini).
However, when you connect your iPod through the
iVoicePro to your computer, your iPod will mount
in iTunes and prevent you from accessing the Voice
Memos menu on your iPod. Therefore, to access the
Voice Memos menu while connected to the computer, simply eject your iPod from iTunes.
Warranty
Macally Peripherals warrants that this product will be free from defects
in title, materials and manufacturing workmanship for two (2) years
from the date of the purchase. If the product is found to be defective
then, as your sole remedy and as the manufacturer’s only obligation,
Macally will repair or replace the product. This warranty is exclusive
and is limited to the Macally iVoicePro. This warranty shall not apply to
products that have been subjected to abuse, misuse, abnormal electrical
or environmental conditions, or any condition other than what can be
considered normal use.
The liability of Macally Peripherals arising from this warranty and sale
shall be limited to a refund of the purchase price. In no event shall
Macally Peripherals be liable for costs of procurement of substitute
products or services, or for any lost profits, or for any consequential,
incidental, direct or indirect damages, however caused and on any
theory of liability, arising from this warranty and sale. These limitations shall apply notwithstanding any failure of essential purpose of
any limited remedy.
Environmental Information for Customers in the European
Union
European Directive 2002/96/EC requires that the equipment bearing this symbol on the product and/or its packaging must not be disposed of with unsorted municipal
waste. The symbol indicates that this product should
be disposed of separately from regular household waste
streams. It is your responsibility to dispose of this and
other electric and electronic equipment via designated collection facilities appointed by the government or local authorities. Correct disposal
and recycling will help prevent potential negative consequences to the
environment and human health. For more detailed information about
the disposal of your old equipment, please contact your local authorities,
waste disposal service, or the shop where you purchased the product.

5
EN DE FR ES NL IT
Über diese Anleitung
Bevor Sie den Macally iVoicePro benutzen, lesen Sie
bitte die gesamte Anleitung hier durch.
Lieferumfang
• iVoicePro
• USB-Kabel
• 3,5 mm Audiokabel
• Bedienungsanleitung
Registrierung
Wir bitten Sie Ihr Produkt unter http://www.macally-europe.com/register.php zu registrieren.
Technische Assistenz
Für technische Assistenz, verwenden Sie bitte die
Rufnummer +31 24 373 14 10 oder senden Sie ein
e-mail an techsupport@macally-europe.com. Die
technische Assistenz kann Montags bis Freitags von
9:00 bis 17:00 Uhr MEZ erreicht werden.
Hardwaregrundlagen
1 USB Anschluss zum aufladen des iPod und die
Aufnahmezeit zu verlängern
2 30 poliger Dock Connector zu Ihrem iPod, passt in
die meisten iPod Schutzhüllen
3 Eingebauter Lautsprecher
4 LED Statusanzeige
5 Eingebautes Mikrophon
6 Schalter für den Aufnahmemodus
DE – BEDIENUNGSANLEITUNG
Vielen Dank für den Kauf des Macally iVoicePro, voice and audio recorder for iPod®. iVoicePro ist ein elegantes
Mikrophon für Ihr iPod nano 2./3. Gen und iPod 5./6. Gen. im Stil der 30er/40er Jahre Mit iVoicePro können
Sie gesprochene Notizen, Interviews oder Musik, aber auch, über den eingebauten 3,5 mm Audioeingang,
von externen Audiogeräten aufnehmen. Ist die Aufnahme beendet, können Sie diese über den eingebauten
Lautsprecher anhören. Das iVoicePro kann leicht an Ihr iPod angeschlossen werden, selbst wenn es sich in
seiner Schutztasche befindet!

6
IT NL ES FR DE EN
7 Stereoeingang für irenddein Audiogerät mit 3,5
mm Klinkensteckerausgang
Aufnehmen
Für iPod nano 2G und iPod 5G (Video): sobald Sie
iVoicePro anschliessen, erscheint automatisch
das Sprachmemos Menü und Sie können mit der
Aufnahme beginnen.
Für iPod nano 3G und iPod classic: nachdem Sie
iVoicePro angeschlossen haben, wählen Sie
am iPod das Hauptmenü und dann die Option
Sprachmemos.
1. Aufnahme mit dem eingebauten Mikrophon
Für normale Sprachaufnahmen während einer
Vorlesung oder Konferenz können Sie einfach das
eingebaute Mikrophon benutzen (Mono). Schliessen
Sie iVoicePro an Ihr iPod an und stellen Sie den
Schalter für den Aufnahmemodus am iVoicePro in
die Position Mikrophon. Danach setzen Sie im Menü
Sprachmemos die Aufnahmequalität auf “Gering”*
und die Aufnahme kann beginnen.
2. Aufnahme über den Stereoeingang
Sie können mit Ihrem iPod Tonaufnahmen
in CD-Qualität und Stereo über den 3,5 mm
Klinkensteckeranschluss speichern. Schliessen
Sie iVoicePro an Ihr iPod an und stellen Sie den
Schalter für den Aufnahmemodus am iVoicePro in
die Position zur Aufnahme über Tongeräte oder auf
Mikrophon (für externe Stereomikrophone). Der
Unterschied zwischen den Aufnahmemodi liegt
darin, das der Mikrophoneingang einen Verstärker
benutzt , während die Option Tongeräteaufnahme
keine Verstärkung benötigt. Wenn Sie ein
Wiedergabegerät an den Klinkensteckeranschluss
des iVoicePro anschliessen, wird das eingebaute
Mikrophon abgeschaltet. Danach setzen Sie im Menü
Sprachmemos die Aufnahmequalität auf “Hoch” und
die Aufnahme kann beginnen.
Hinweise
• Bei geringer Aufnahmequalität (Mono) wird das
Signal mit 22.05 KHz /16 bit und 352 kbps verarbeitet. Eine Minute Tonaufnahme belegt im iPod
etwa 2.6 MB.
• Bei hoher Aufnahmequalität (Stereo) wird das
Signal mit 44,1KHz /16 bit und 1411 kbps verarbeitet. Eine Minute Tonaufnahme belegt im iPod
etwa 10,3 MB.
• Um weniger Platz im iPod zu belegen empfiehlt sich eine geringe Tonqualität bei Menü
Sprachmemos zu verwenden und eine hohe
Tonqualität bei Aufnahmen von Stereogeräten.
• Die aufgenommenem Dateien sind im Format
WAV unter der Option Sprachaufnahmen
des iPod gespeichert. Wird Ihr iPod an einen
Computer angeschlossen, werden die gespeicherten Dateien in die Wiedergabeliste für
Sprachaufnahmen in iTunes importiert und aus
dem iPod gelöscht. Um die Dateigrösse bei lang
andauernden Aufnahmen zu verringern, empfiehlt es sich die Dateien in das Format AAC oder
MP3 umzuwandeln.
 Loading...