

Page 1
Network Attached Storage
And USB2.0 Enclosure
for 3.5” Serial ATA Hard Drive
G-S350UN
User’s Manual
1
Page 2

TABLE OF CONTENTS
g
g
g
ging
g
r
Introduction
Features
About this Guide
Packa
Safety Precautions
e Contents
Hardware Basics
Hardware Installation
Initial NAS Setup
Confi
Confi
uring a Fixed IP address to the NAS in PC 10
uring a Fixed IP address to the NAS in Mac 13
Administration of the NAS
Finding the NAS with DHCP IP address 17
Mana
Network Storage
Using the NAS Storage in PC 39
Usin
the NAS Storage in Mac 40
Network Functions
Printer Serve
BTorrent 60
the NAS 20
45
45
USB Connection for Mac and PC
Glossary
FAQ
3
4
4
4
5
6
7
10
17
39
62
63
65
2
Page 3
Introduction
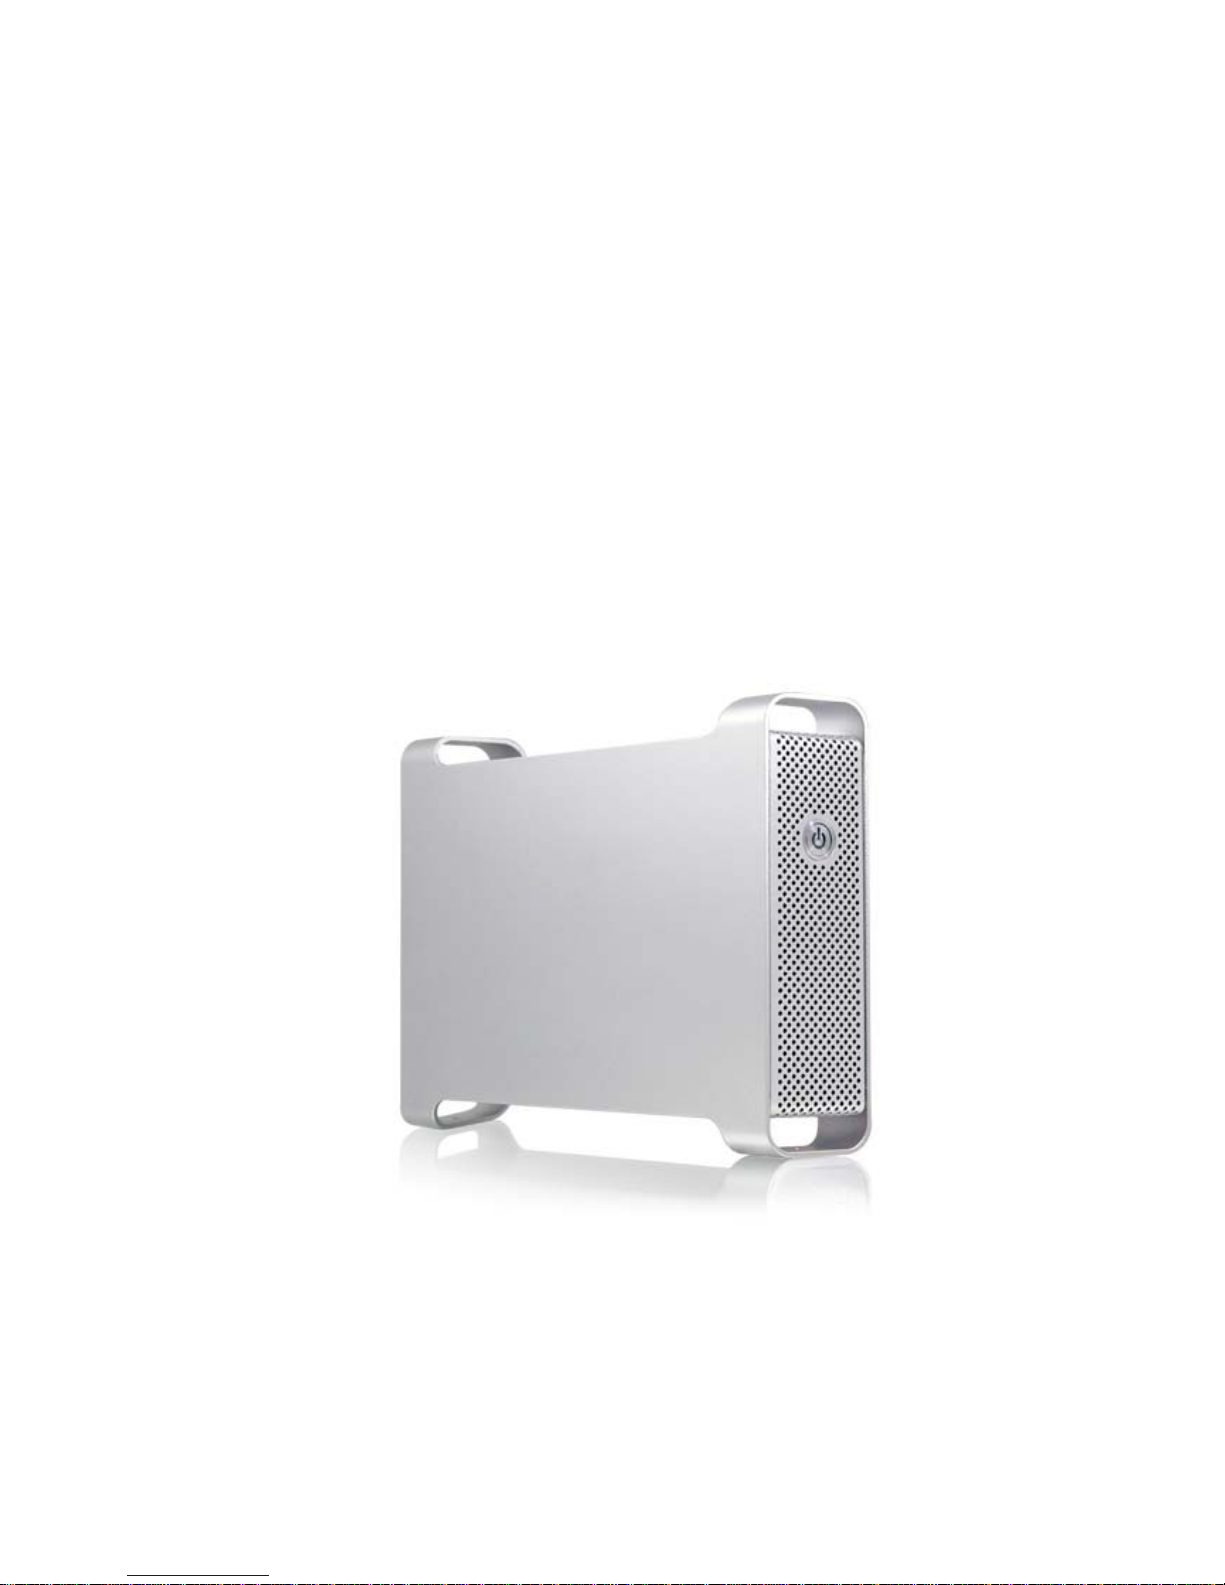
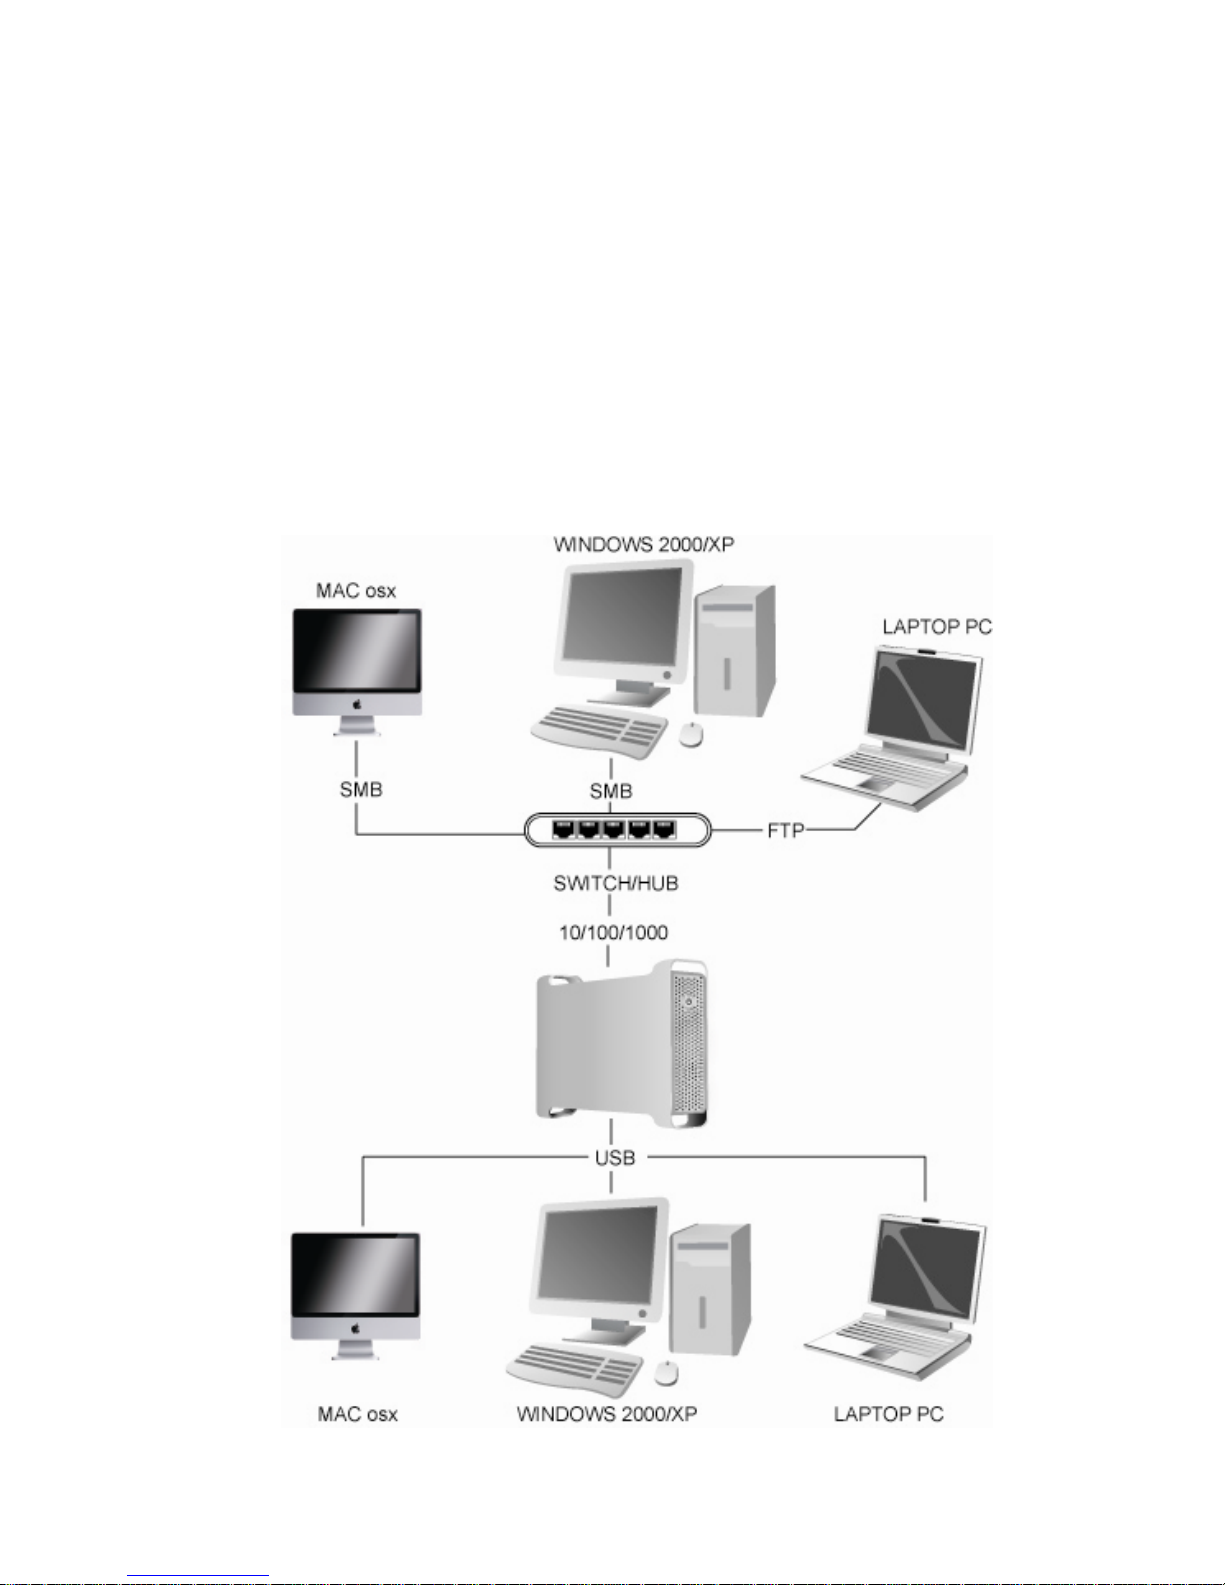
Thank you for choosing G-S350UN, an USB2.0/Network Attached Storage (NAS) Enclosure for 3.5”
SATA HDD. G-S350UN can be used as a portable regular USB2.0 HDD with a computer or it can be
used as a NAS by connecting it to your home or office network to share the storage services among
computers. It is compatible to 1000/100/10 mbps network and has a user friendly web-based Network
Administrator (GUI) to let you configure, manage and maintain the enclosure.
As a NAS, G-S350UN is compatible with the current OS and computers to feature support of SMB/CIFS,
FTP, UPnP and Bonjour protocols. In addition, G-S350UN includes functions such as File Server, DHCP
Server, Printer Server, iTunes music server and BTorrent download. The G-S350UN is an ideal storage
solution for your data, video, music and photos.
With so many functionalities built into the G-S350UN, please read the entire User’s Manual
thoroughly before setting up and using the product.
3
Page 4
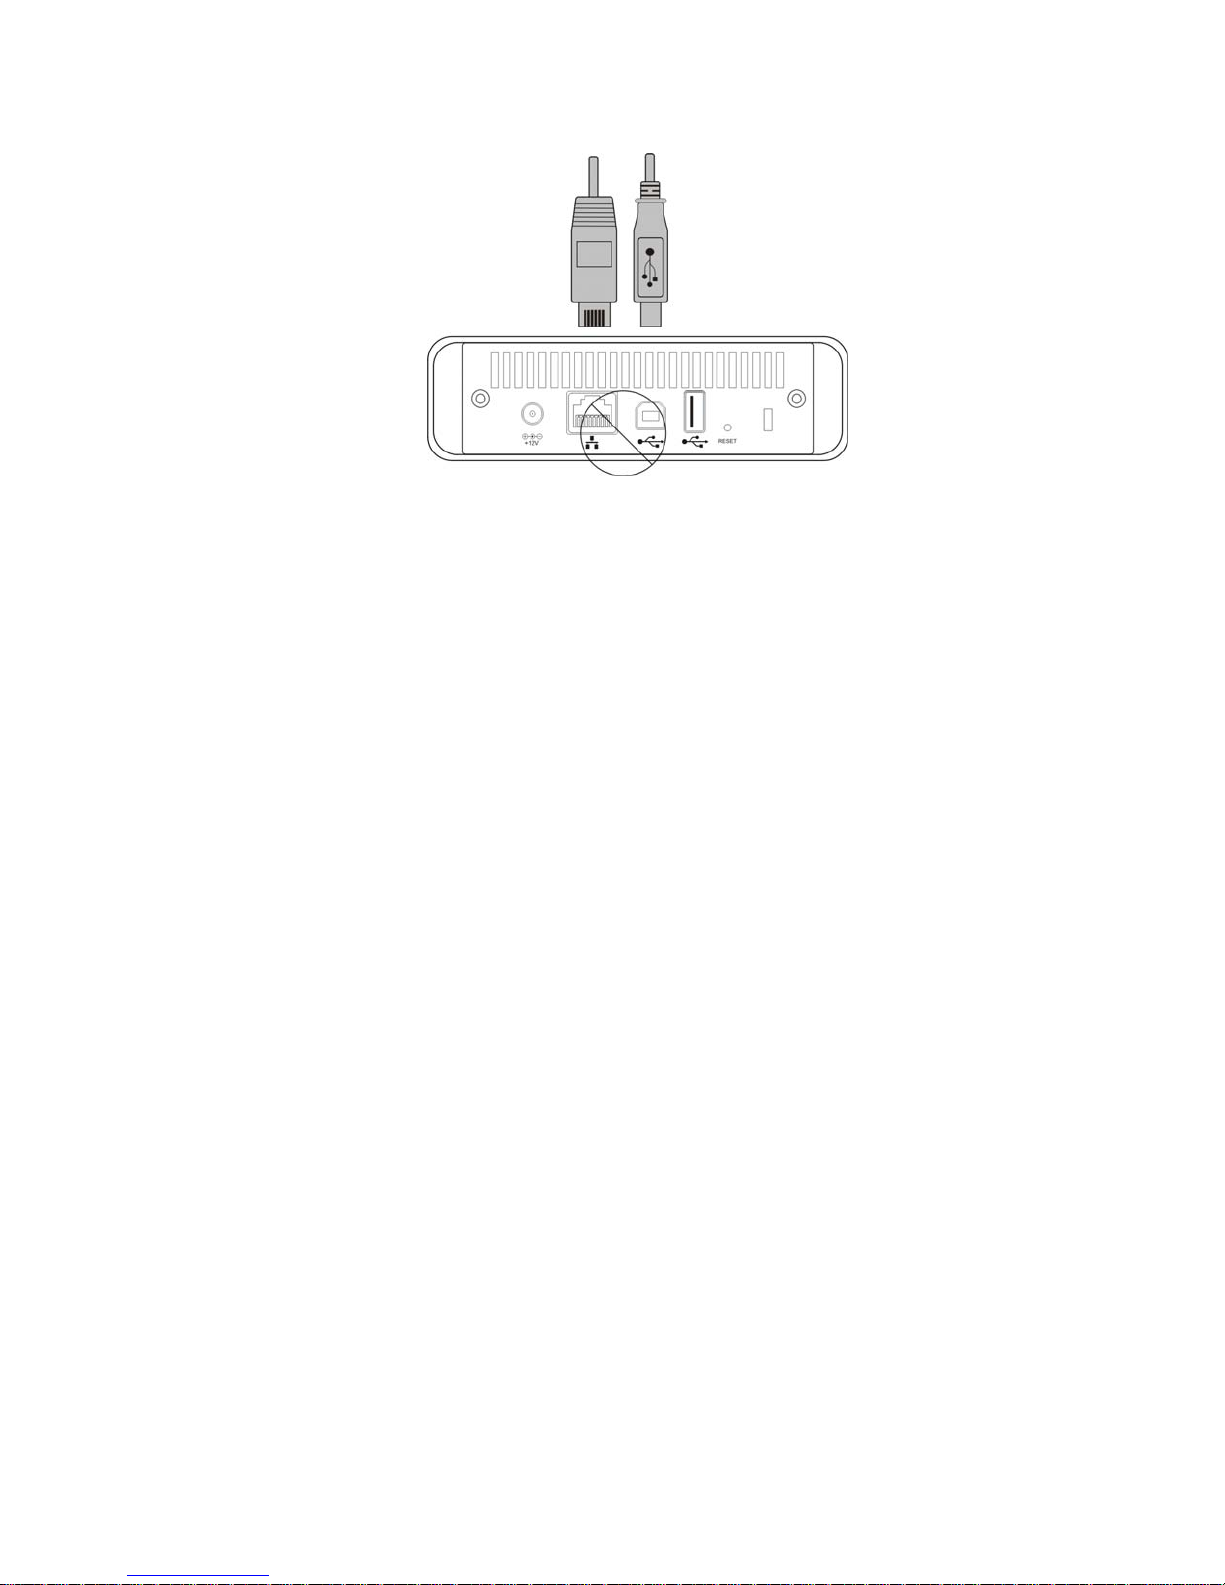
WARNING: PLEASE DO NOT CONNECT USB CABLE AND ETHERNET CABLE AT THE SAME TIME. ONLY ONE
TYPE OF CONNECTION CAN BE MADE BEFORE POWERING ON G-S350UN.
Features:
● Works as a regular external USB 2.0 3.5” SATA HDD Enclosure
● Works as a central shared storage device for multiple PCs, Macs, and Linux workstations
●10/100/1000 autosensing Ethernet port
● Windows 2000 system or later and Mac OS 10.2.8 system or later
● Easy web-based Administration GUI
● FTP server and printer server functions
● Centralized Music Server for iTunes and BTorrent download for media play.
About This Guide
Before you begin using the G-S350UN, be sure to read this manual in its entirety.
This guide contains:
z Introduction
z Hardware Basics
z Hardware Installation
z Initial NAS setup
z Administration of the NAS
z Network Storage
z Functions
z USB connection for Mac and PC
z FAQ
Package Contents
The G-S350UN package includes the followings:
z USB2.0 /Network Attached Storage Enclosure
z Quick Installation Guide
z Software CD containing this User’s Manual, SetupUtil, and Yummy FTP
z USB2.0 cable
z Ethernet cable
z AC/DC adapter
4
Page 5

Safety Precautions
On Installation
1. To reduce the risk of fire or electric shock, do not expose this product to rain, water or
moisture.
2. Do not place any containers with liquid (drinking glass, flower vase, etc.) or containers
with small metal parts (paper clips, etc.) on top of the unit.
3. According to standard industry practice, surge protection is recommended for all
telecommunications devices. Surge suppressors and/or line conditioning should be used
on the input power supply.
On Operation
z Do not move the chassis during operation. Doing so may cause a malfunction.
z Protect the unit from shocks and vibrations.
z Do not use the G-S350UN in areas exposed to oily smoke or steam, such as a
kitchen or close to a humidifier.
z Do not use the G-S350UN in locations exposed to rain or splashes of liquid, such as
outdoors, in a bathroom, or close to a window.
z Do not use the G-S350UN on an unstable or slanted surface without proper support.
z Do not expose the unit to direct sunlight or hot air where the temperature may
exceed 45℃ or very cold locations where the temperature is below 0℃.
z Keep the power cord away from hot appliances.
z Do not touch the power cord with wet hands.
On Transportation
Save the packing materials as you may need to repack to transport the unit at a later
date.
On Power Sources
When you are not using the unit for a long time, disconnect the power cord from the unit.
To properly unplug the AC power adapter, grasp the adapter itself and remove from the
wall outlet. Do not pull the cord.
Warning
To avoid the risk of fire and electric shock, immediately disconnect the power cord from
the wall outlet and contact your dealer or an authorized service station if any of the
following conditions occur.
z Smoke or unusual burned smell is coming from the G-S350UN.
z Water has entered the unit, or the unit has become wet.
z A foreign object has entered the unit.
z The unit has been dropped or the front panel or frame has been damaged.
z The power cable is damaged causing wire breakage or exposed leads.
5
Page 6
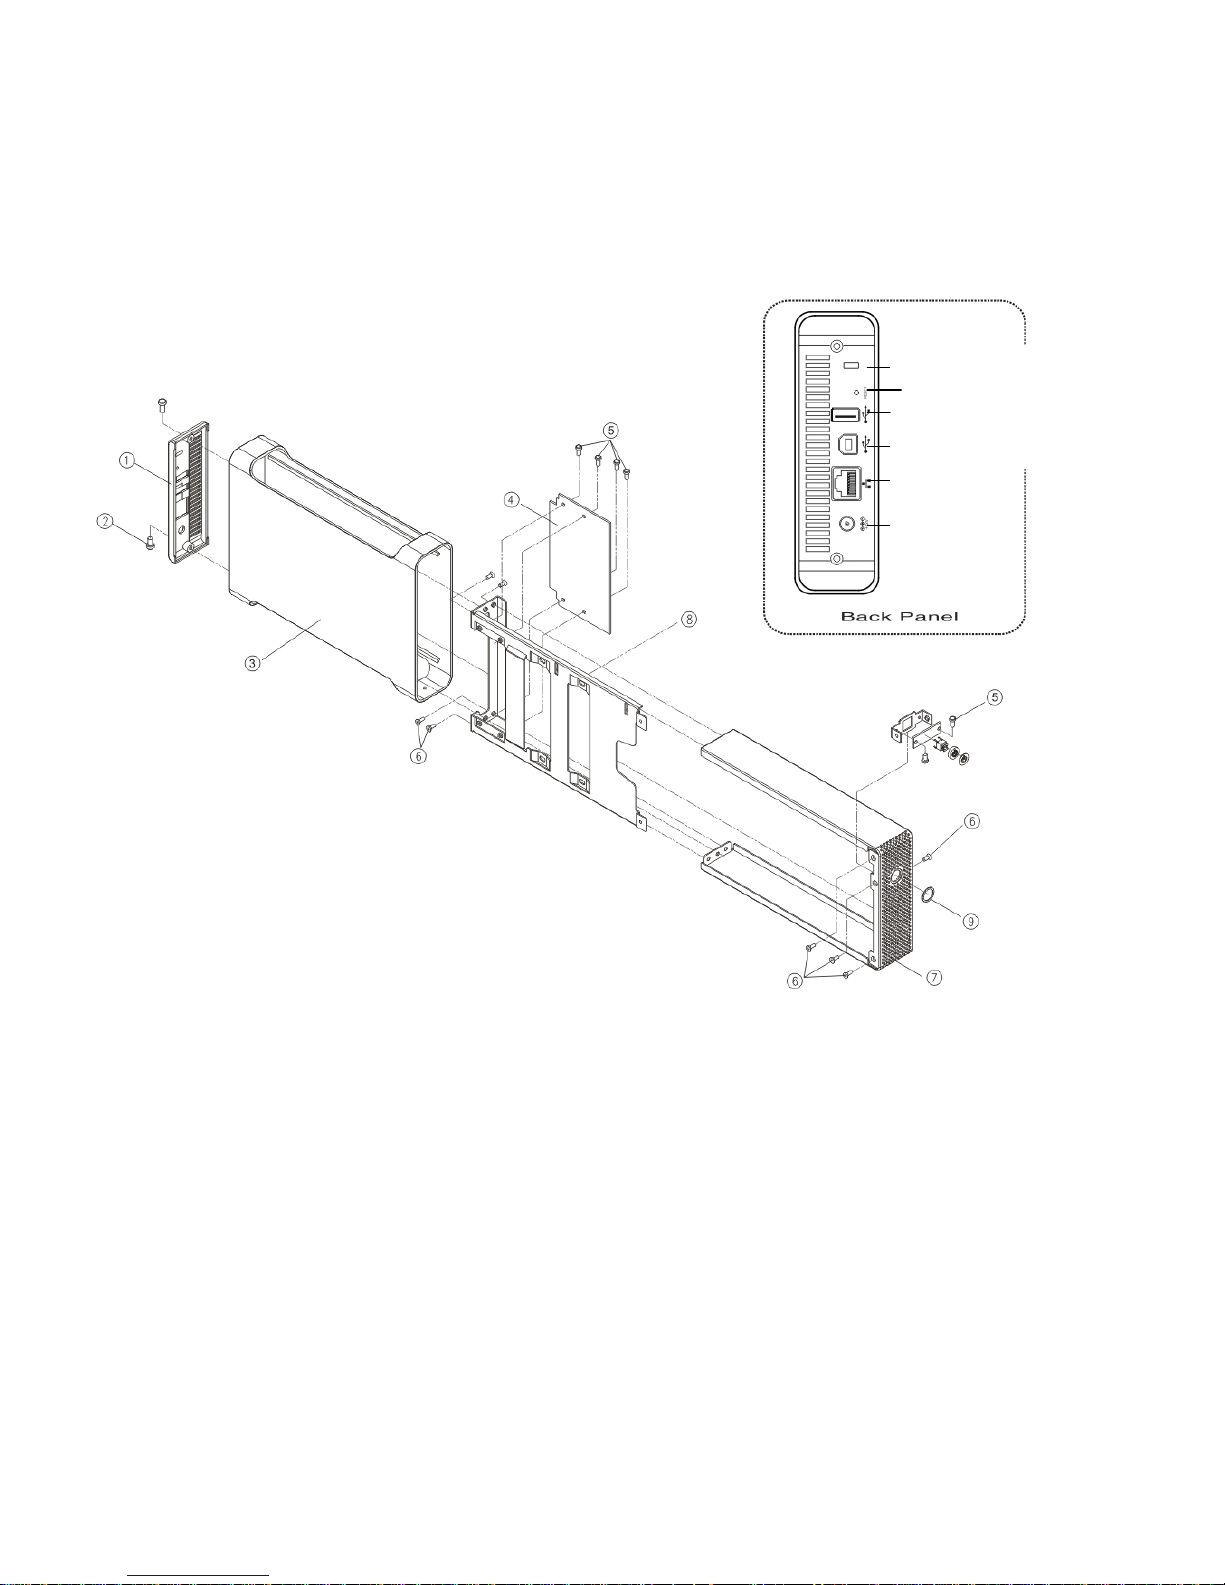
Hardware Basics
Precaution:
Please make sure to remove any static from your body by touching metal parts of your computer
chassis and that your hands are dry.
1 --- Back Panel 2 --- 2 x 6mm Screws 3 --- Enclosure Sleeve
Security Slot
Reset
USB Printer or US B drive
USB connection to a computer
LAN cable
connector
Power
Connector
4 --- Base Tray bridge 5 --- 6 x 5mm Screws 6 --- 8 x 4mm Screws
7 --- Front Panel 8 --- Base Tray 9 --- Power on/off button
6
Page 7

Hardware Installation
Note: The diagrams below use the G-S350U Enclosure as an example.
1. On a flat desk surface, unscrew to loosen the Enclosure back panel. Remove the back panel.
2. Use your fingers to push the Base Tray out.
7
Page 8
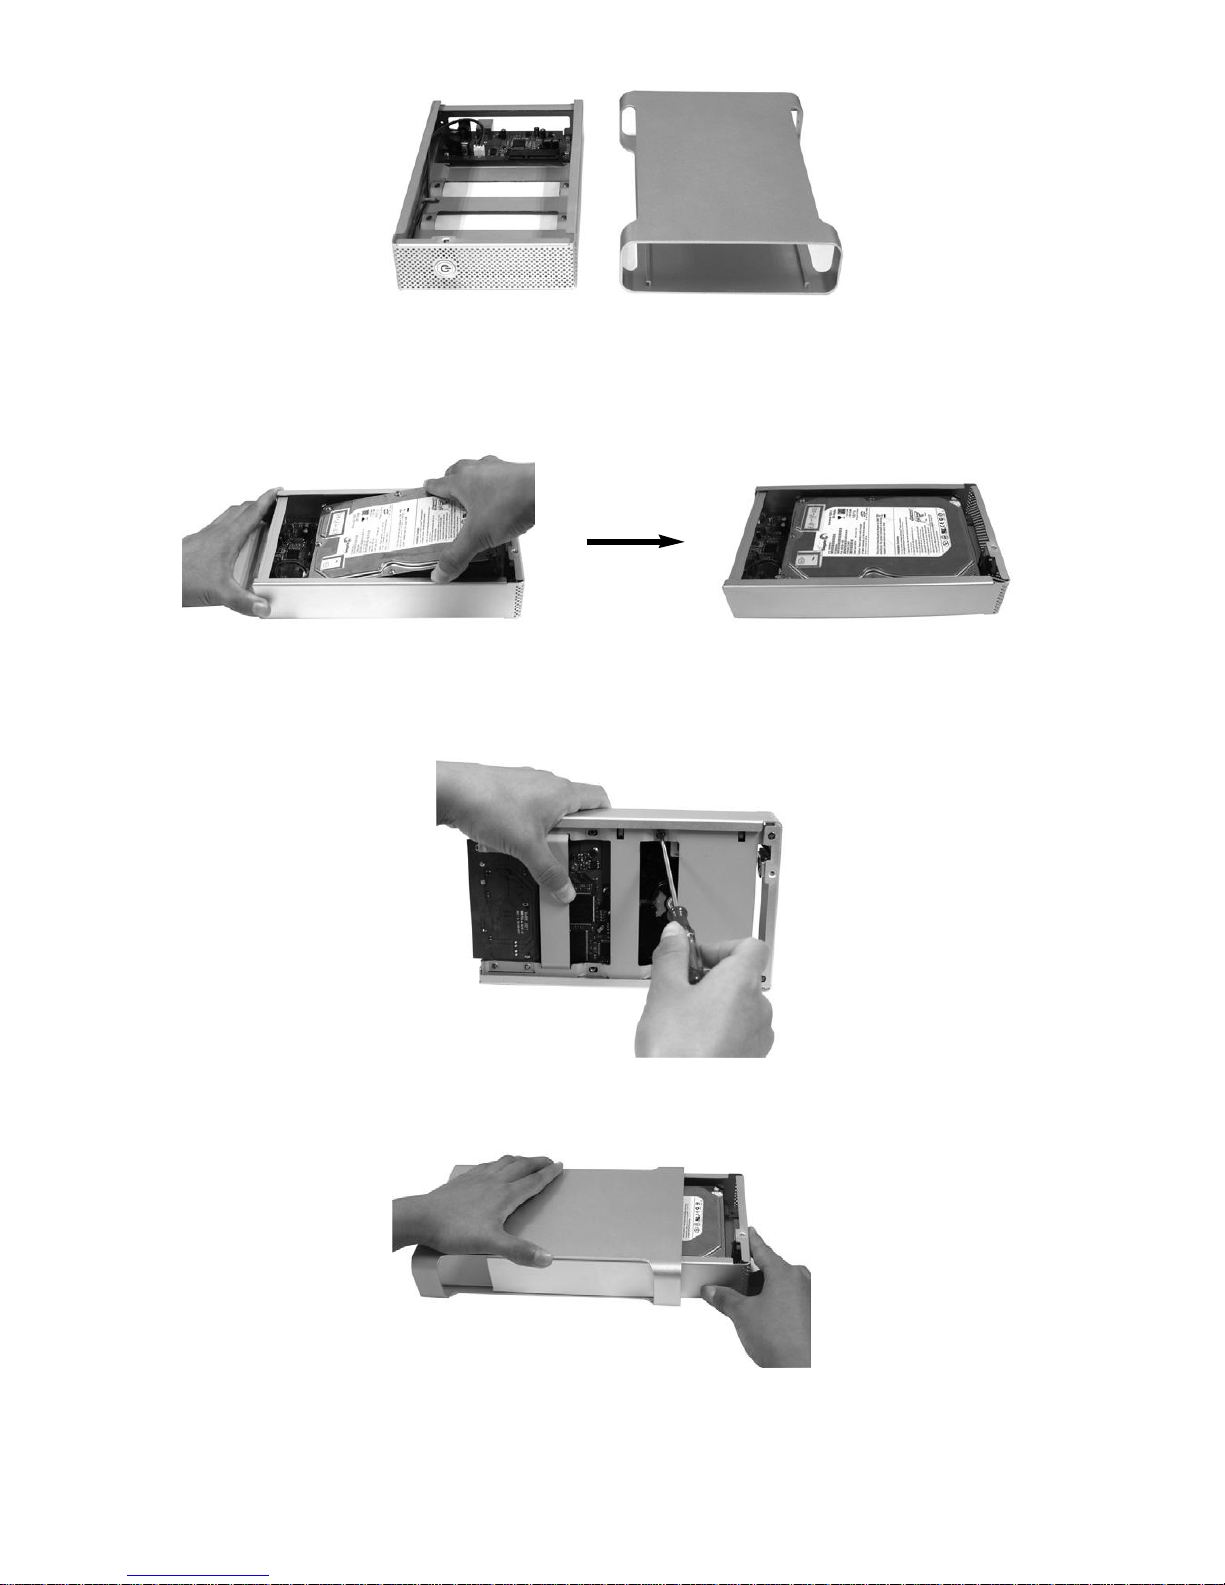
3. Separate the enclosure sleeve from the Base Tray then put it aside.
4. Align the black Power/SATA connector on the hard drive to the black female SATA connector on
the Base Tray bridge board and then push the drive completely into the connector. Carefully seat the
whole drive on the Base plate.
5. Secure the HDD to the Base Tray with 2 hard drive screws.
6. Push the Base Tray with the HDD completely into the Enclosure Sleeve.
8
Page 9
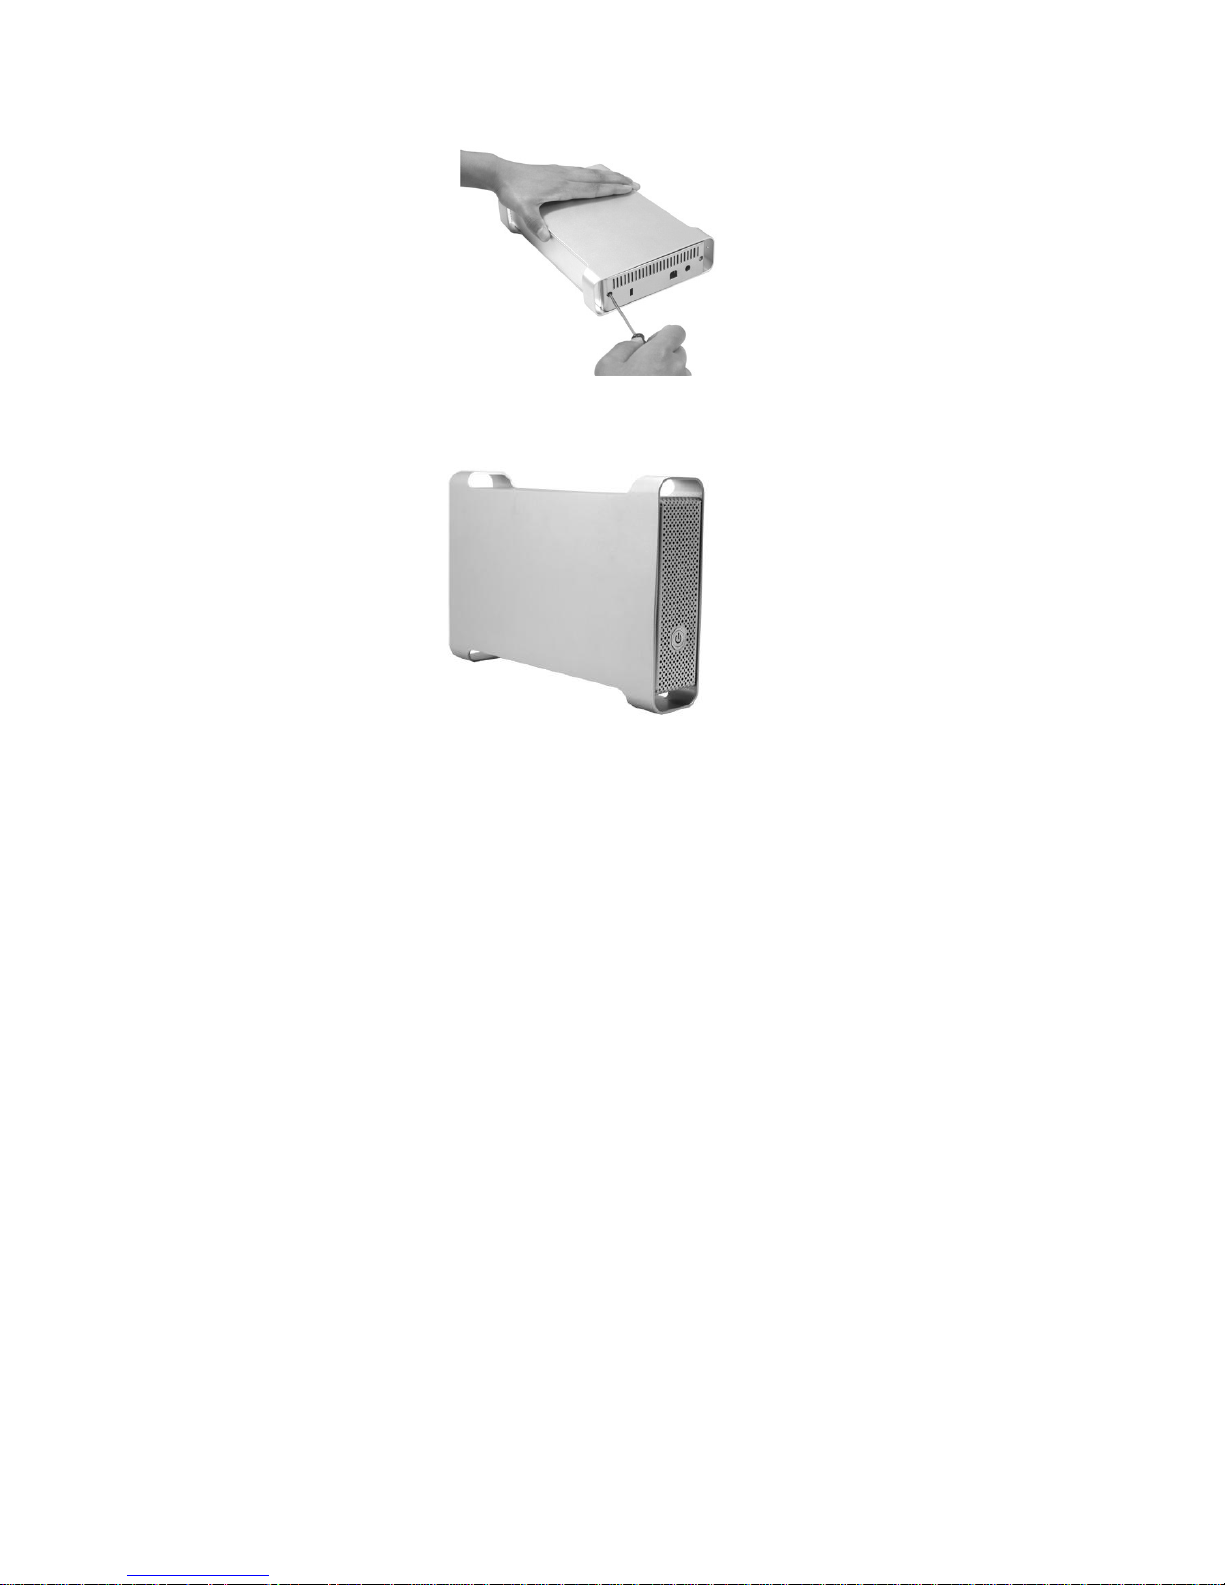
7. Secure the Base Tray and Enclosure Sleeve with two 6mm screws.
8. Since G-S350UN enclosure can be used as either an USB2.0 HDD or a NAS drive, you must choose
one of the connection types first.
*NAS Connection ~ If the G-S350UN is going to be used as a network storage drive, then use the
included LAN (Ethernet) cable to connect G-S350UN to a network switch, router or Ethernet Hub in your
home or office network. Lastly, plug the AC/DC adapter into the enclosure and then press the power
button in the front to turn it on.
*USB Connection ~ If the G-S350UN is going to be used as a USB2.0 drive with a single computer,
then use the included USB cable to link G-S350UN to a computer, then power on the enclosure.
Important note: If G-S350UN will be used and switched between NAS and USB connection, it is
recommended to use the most compatible hard drive format, FAT32 in the enclosure, and you should
format it to FAT32 using Disk Utility from the NAS administrator described in the following sections.
9
Page 10
Initial NAS Setup
In the network connection, G-S350UN is preset to obtain a dynamic IP address from your local DHCP
server. If there is a DHCP server to assign IP address to a network device, G-S350UN will obtain a
dynamic IP address automatically. If this is the case you can go to the next section “Administration of the
NAS” directly. However we highly recommend you to configure a fixed IP address to the G-S350UN.
Otherwise, if DHCP server is not available in your network, or for certain reason it couldn’t grab an IP
address automatically, G-S350UN uses its default IP address 192.168.1.202 with subnet 255.255.255.0.
If this default IP does not fit into your LAN environment, most likely it won’t fit, there are ways to help you
to configure the NAS through a PC and Mac computer. Please follow the steps below to manually
configure a fixed IP address to G-S350UN.
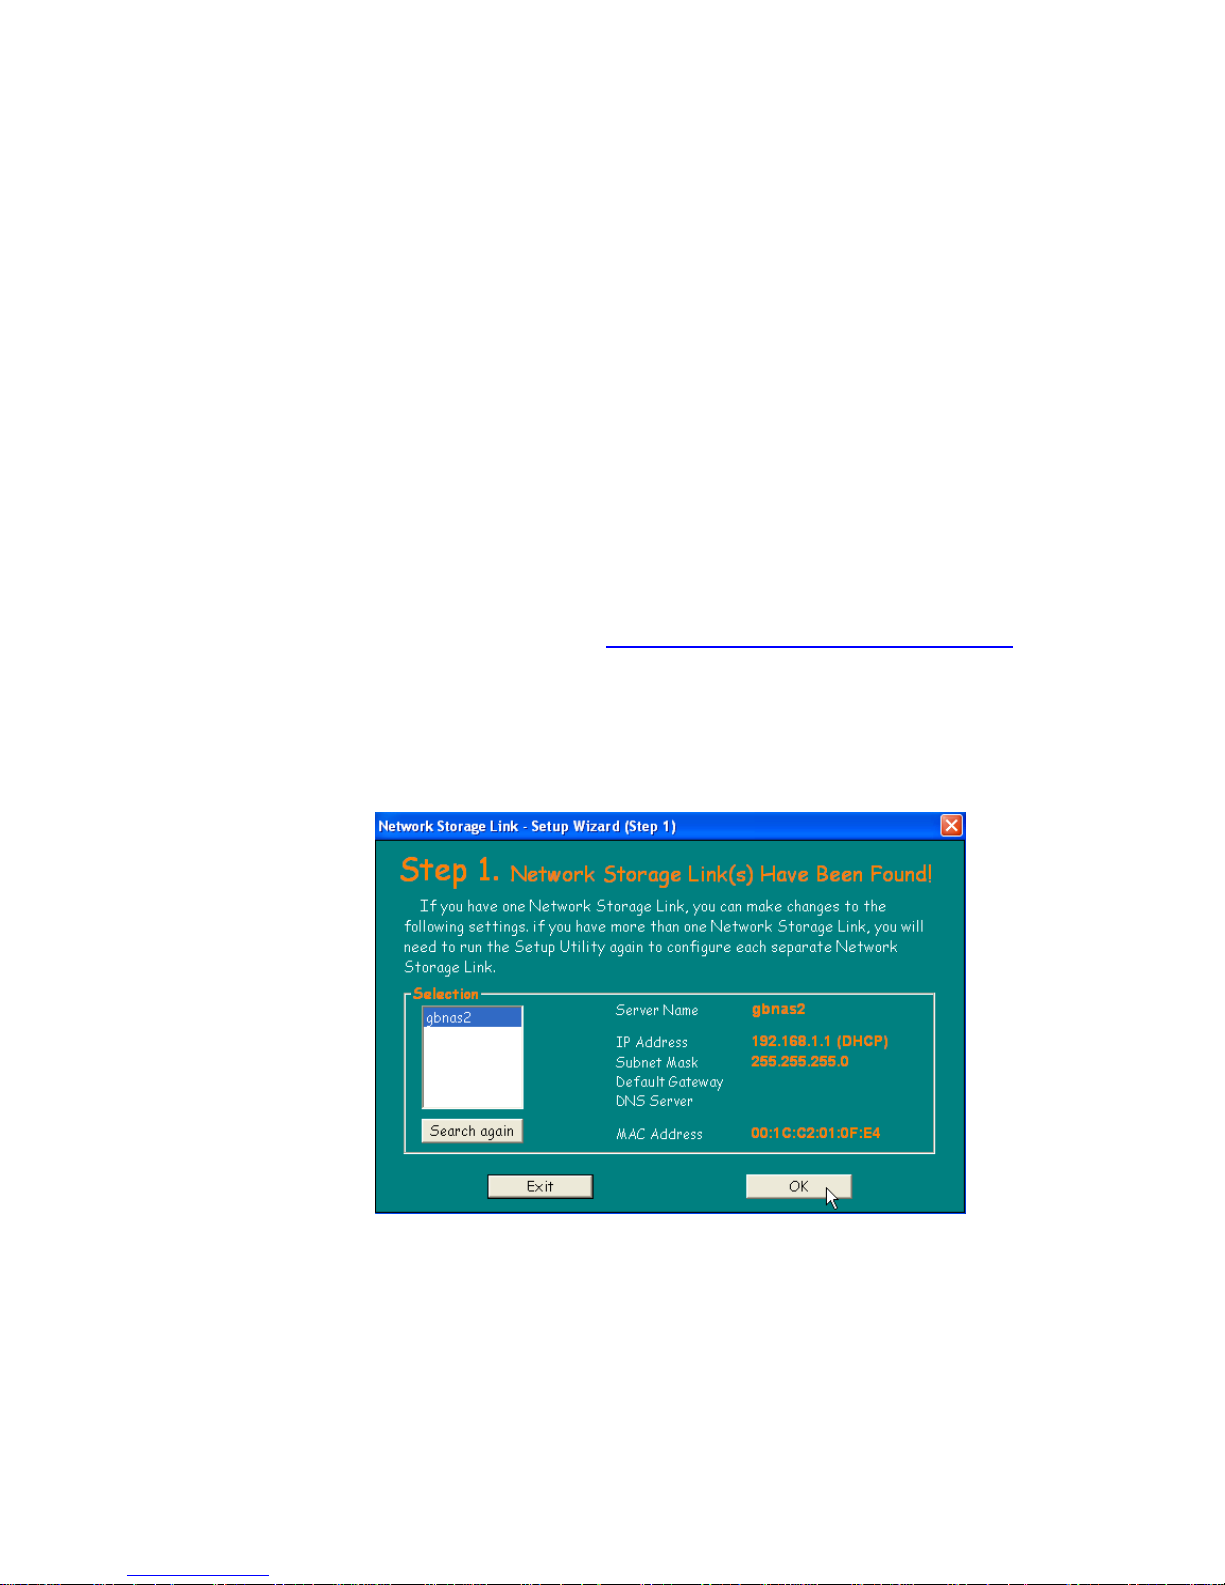
Configuring a Fixed IP Address to the NAS in PC
1. Please load the NAS software CD and copy SetupUtil.exe file to the Windows desktop. If the
software CD is not available, you can visit http://www.macally.com/EN/Techsupport/
NAS Setup Utility file (SetupUtil.exe), save the file to the desktop then expand the zip file.
2. Confirm that G-S350UN is connected to the network and power is turned on. From a networked
Windows PC, or Boot Camp/Parallel Desktop running Windows in Intel-Based Mac, run the
SetupUtil.exe.
to download
3. Above Setup Wizard window appears and should displays G-S350UN(listed as name “gbnas”). If
you don’t see “gbnas” listed, please click on “Search again” button until “gbnas” appears.
10
Page 11
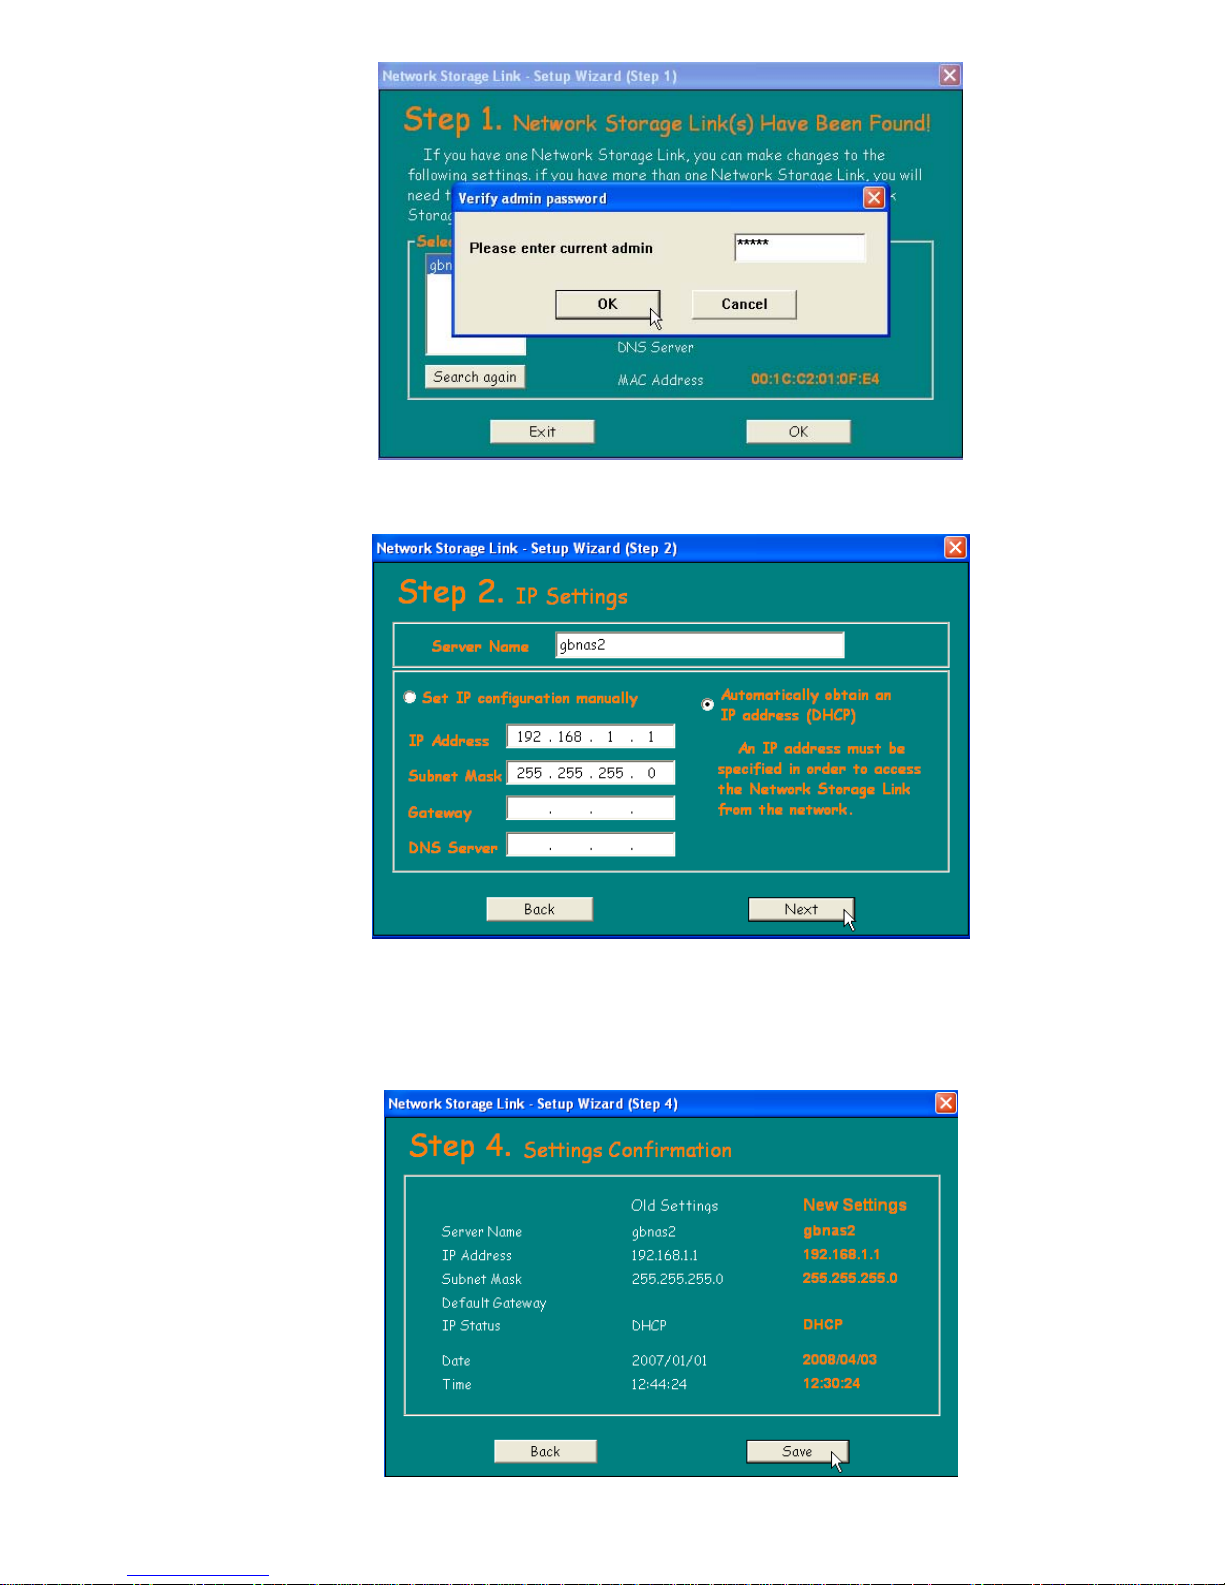
4. Then highlight “gbnas” and click the “OK” button. Enter “admin”(without the quotation) as
password and then click the “OK” button.
5. In IP Settings window, please select the option “Set IP configuration manually” and fill in an
unique IP address for the NAS enclosure and Subnet Mask suitable to your network, this is the
fixed IP address for the NAS you will use to access the NAS from now on. You can also enter
Gateway IP address (your router IP) and DNS IP or leave them blank if you don’t know and then
click the “Next” button.
11
Page 12

6. Set the date and time and then click the “Next” button to proceed. Click on “Save” button to finish
the setup.
7. Click “OK” button to close the window.
8. Please proceed to the section “Administration of the NAS”.
12
Page 13
13
Configuring a Fixed IP Address to the NAS in Mac
If DHCP server is not available in your network, G-S350UN uses its default IP address 192.168.1.202.
If this default IP does not fit into your LAN environment, then you have to configure G-S350UN with
an IP address suitable to your LAN. If you don’t have a PC computer in your LAN network to use
SetupUtil.exe to configure G-S350UN as described in previous section, you can change your Mac
computer’s IP address temporarily to 192.168.1.2 and subnet 255.255.255.0 in order to connect to
the NAS to configure it.
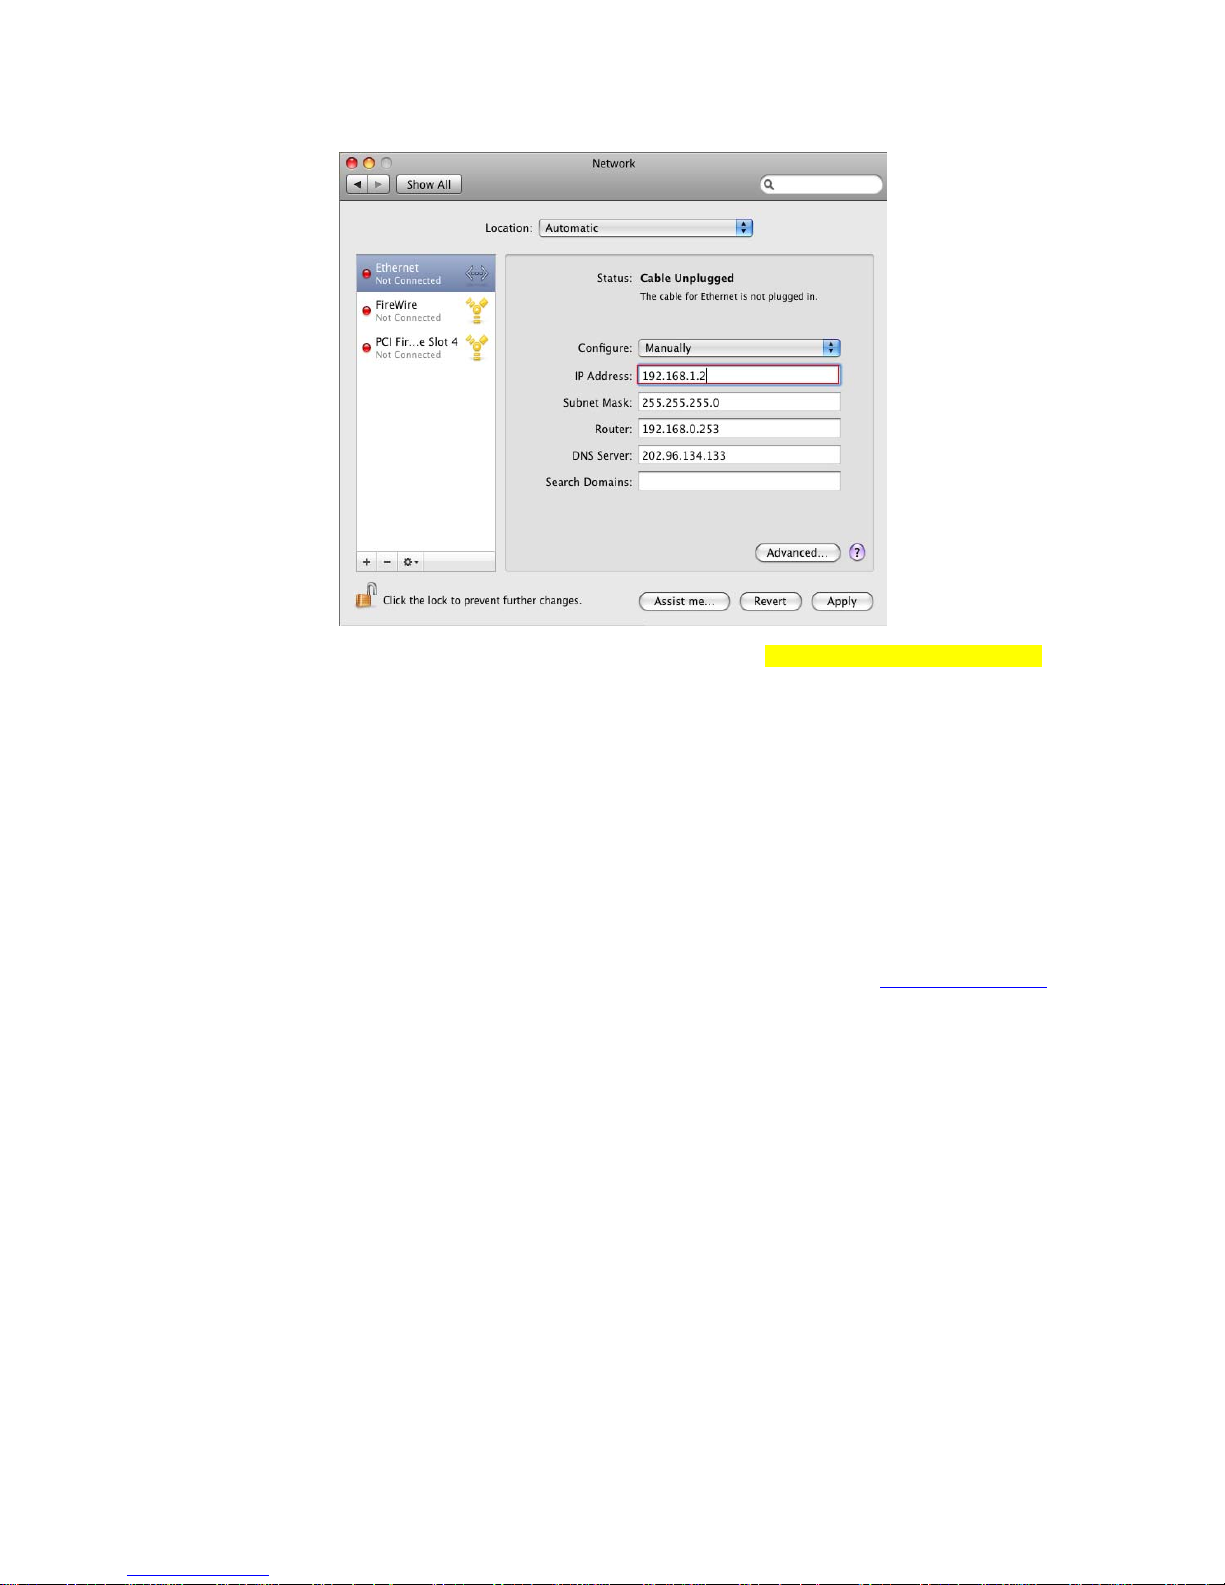
First connect G-S350UN into your Mac’s Ethernet port directly using the Ethernet cable included in GS350UN package. Turn on both G-S350UN and your Mac. Open System Preferences in your MacOS
X and then click the “Network” icon. From the screen similar to above, WRITE DOWN YOUR
CURRENT CONFIGURE SETTING(EITHER “USING DHCP” OR “MANUALLY”), IP ADDRESS,
SUBNET MASK, ROUTER AND DNS INFO FIRST, YOU WOULD NEED THEM TO RESTORE BACK
TO THE CURRENT SETTINGS LATER ON. Then select “Manually” in Configure field and change the
current Mac computer’s IP address into IP address 192.168.1.2, and enter 255.255.255.0 in Subnet
Mask. Click “Apply” to complete.
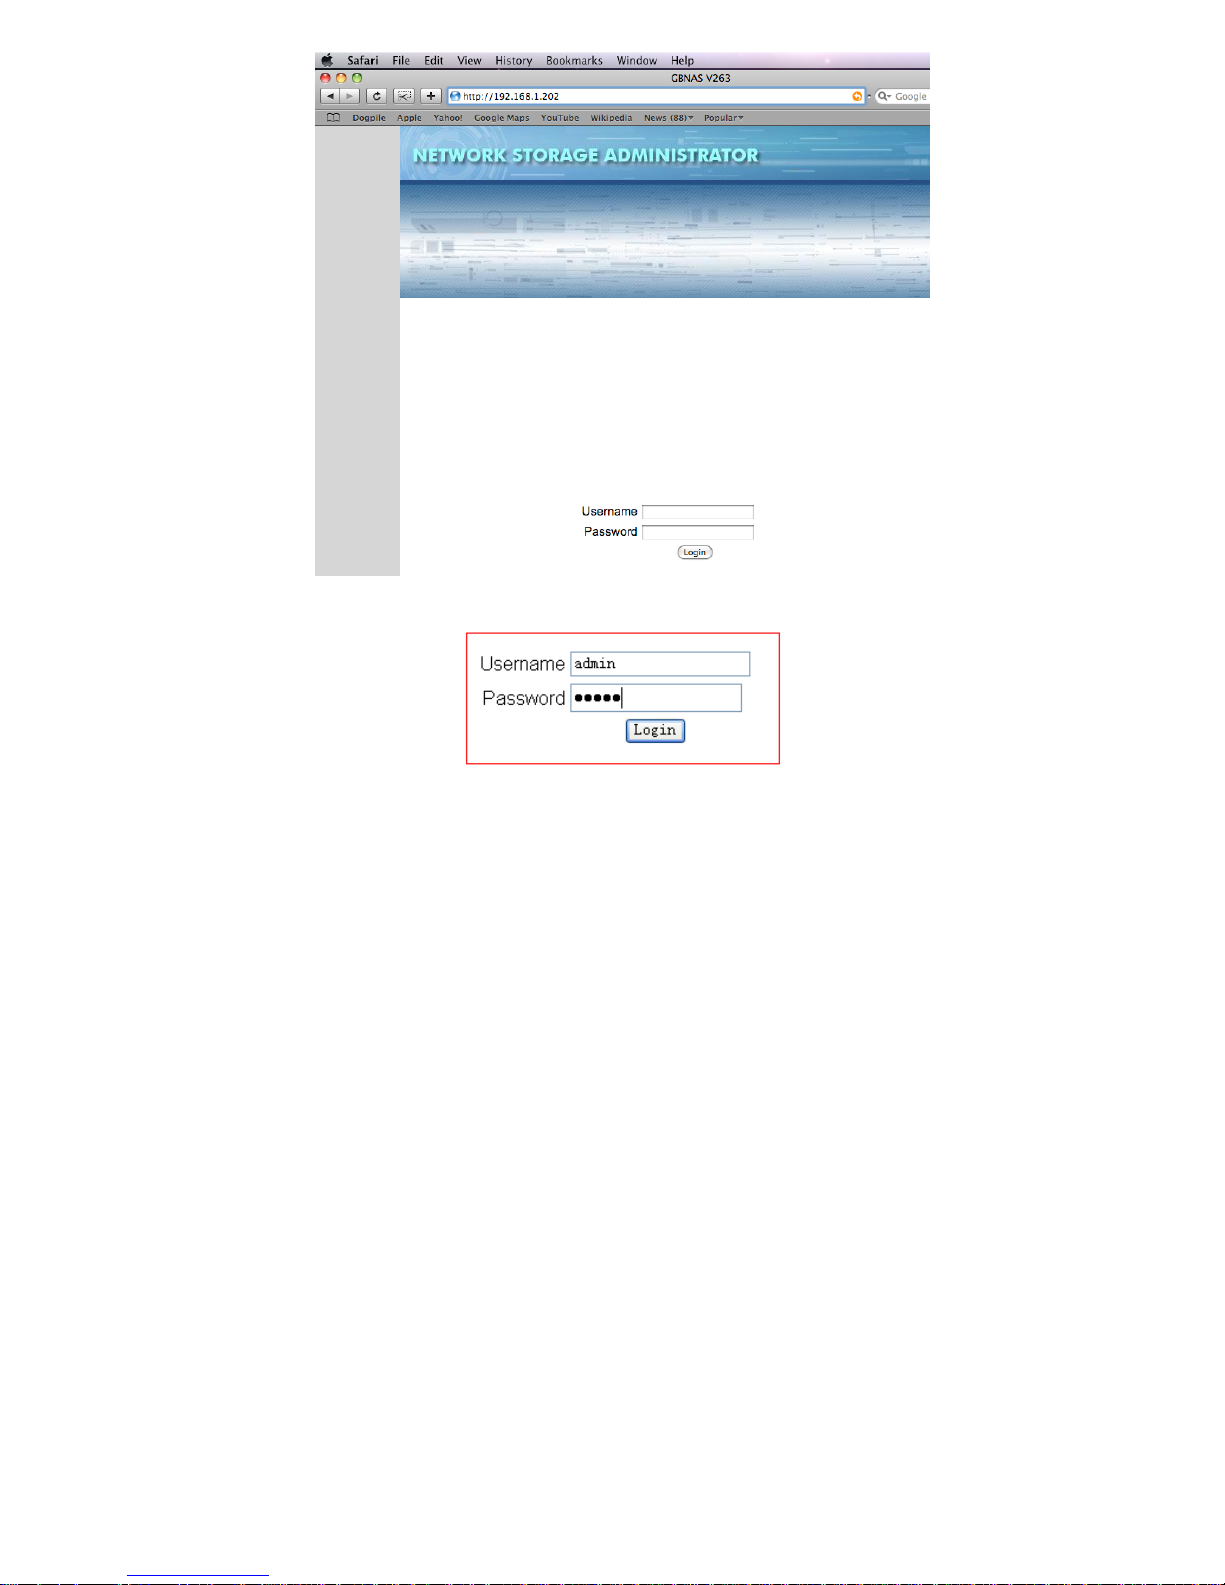
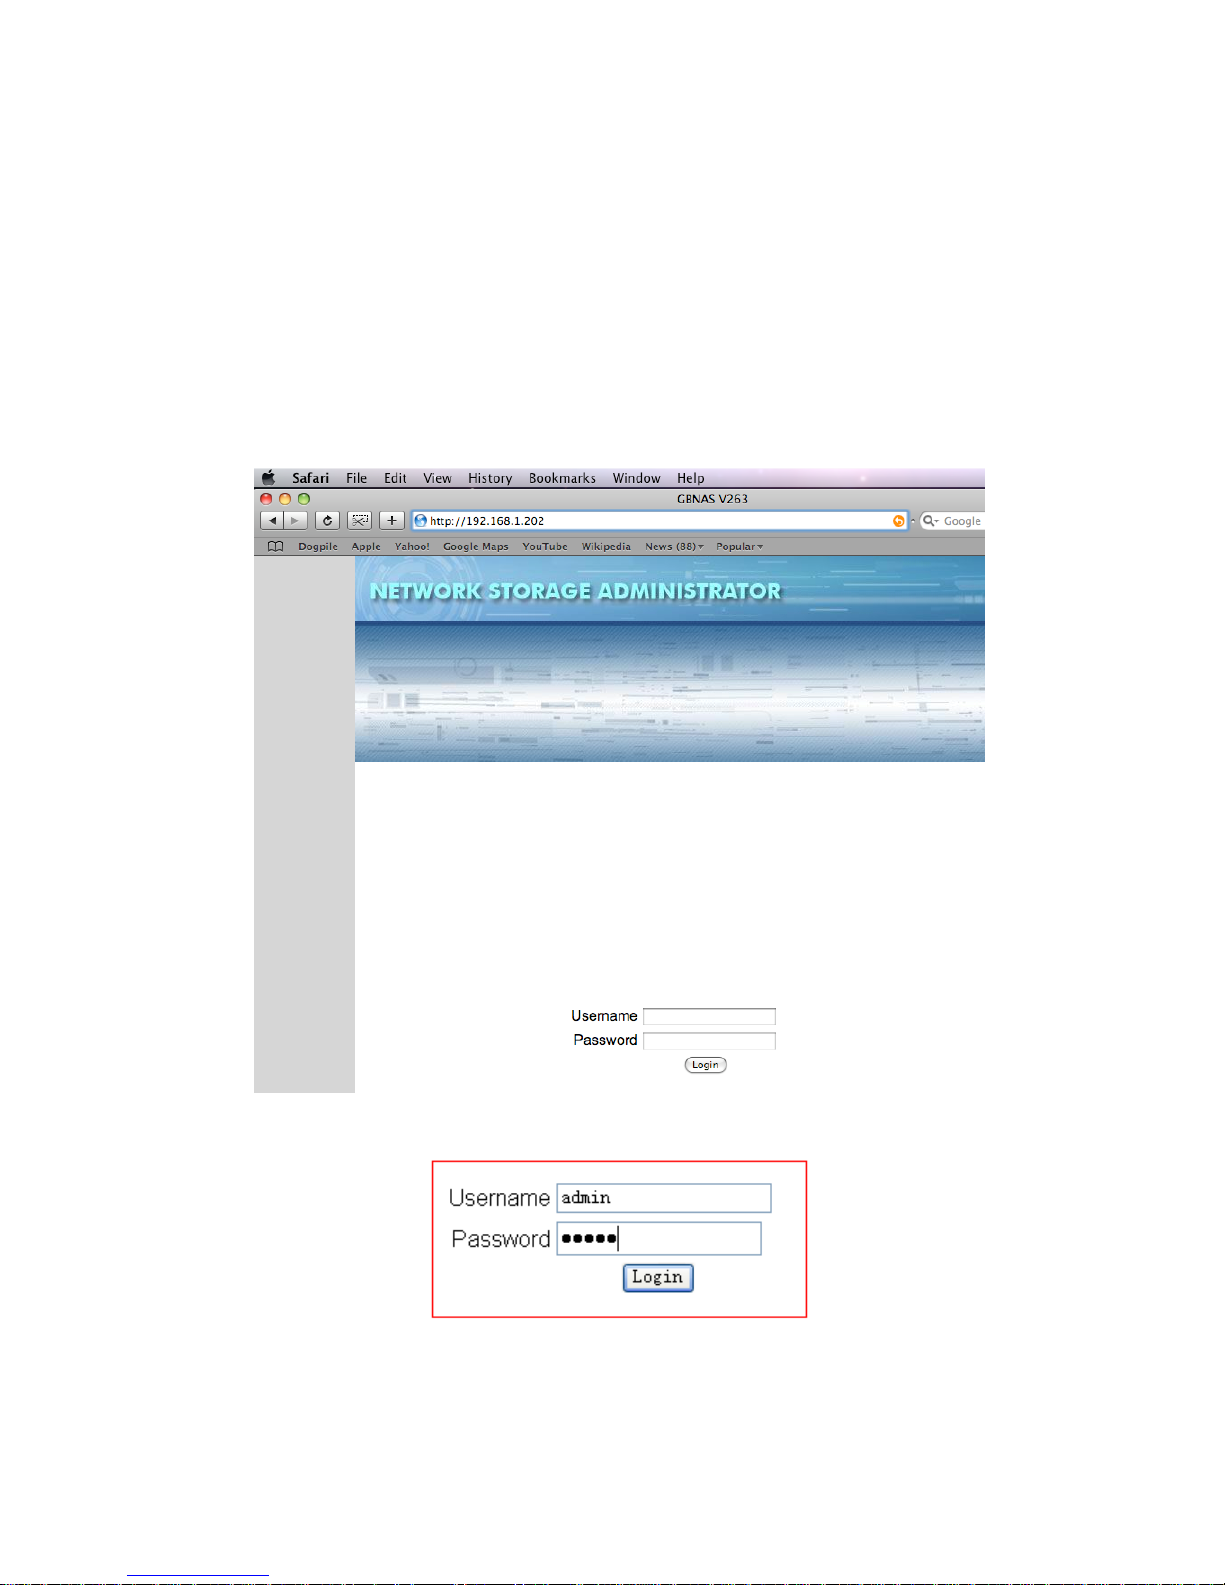
Then launch the web browser Safari or Internet Explorer from MacOS X, type in http://192.168.1.202
in address field and press Enter key, NETWORK STORAGE ADMINISTRATOR Login screen will
appear as shown below.
Page 14
14
Please enter “admin” as Username and Password.
Page 15

15
Once you enter the NAS administrator the first time, please format the hard drive when the NAS
administrator alerts you a new hard drive is found and asks you to format it. You go to Control Panel,
Maintenance menu, find Disk Utility to format the new drive. The subsection ”Managing the NAS”
shows the procedure graphically. When finished, wait for the NAS to reboot and then login again. Go
to Control Panel, Network Service, then open Bonjour, check both boxes to enable Bonjour and
iTunes support.
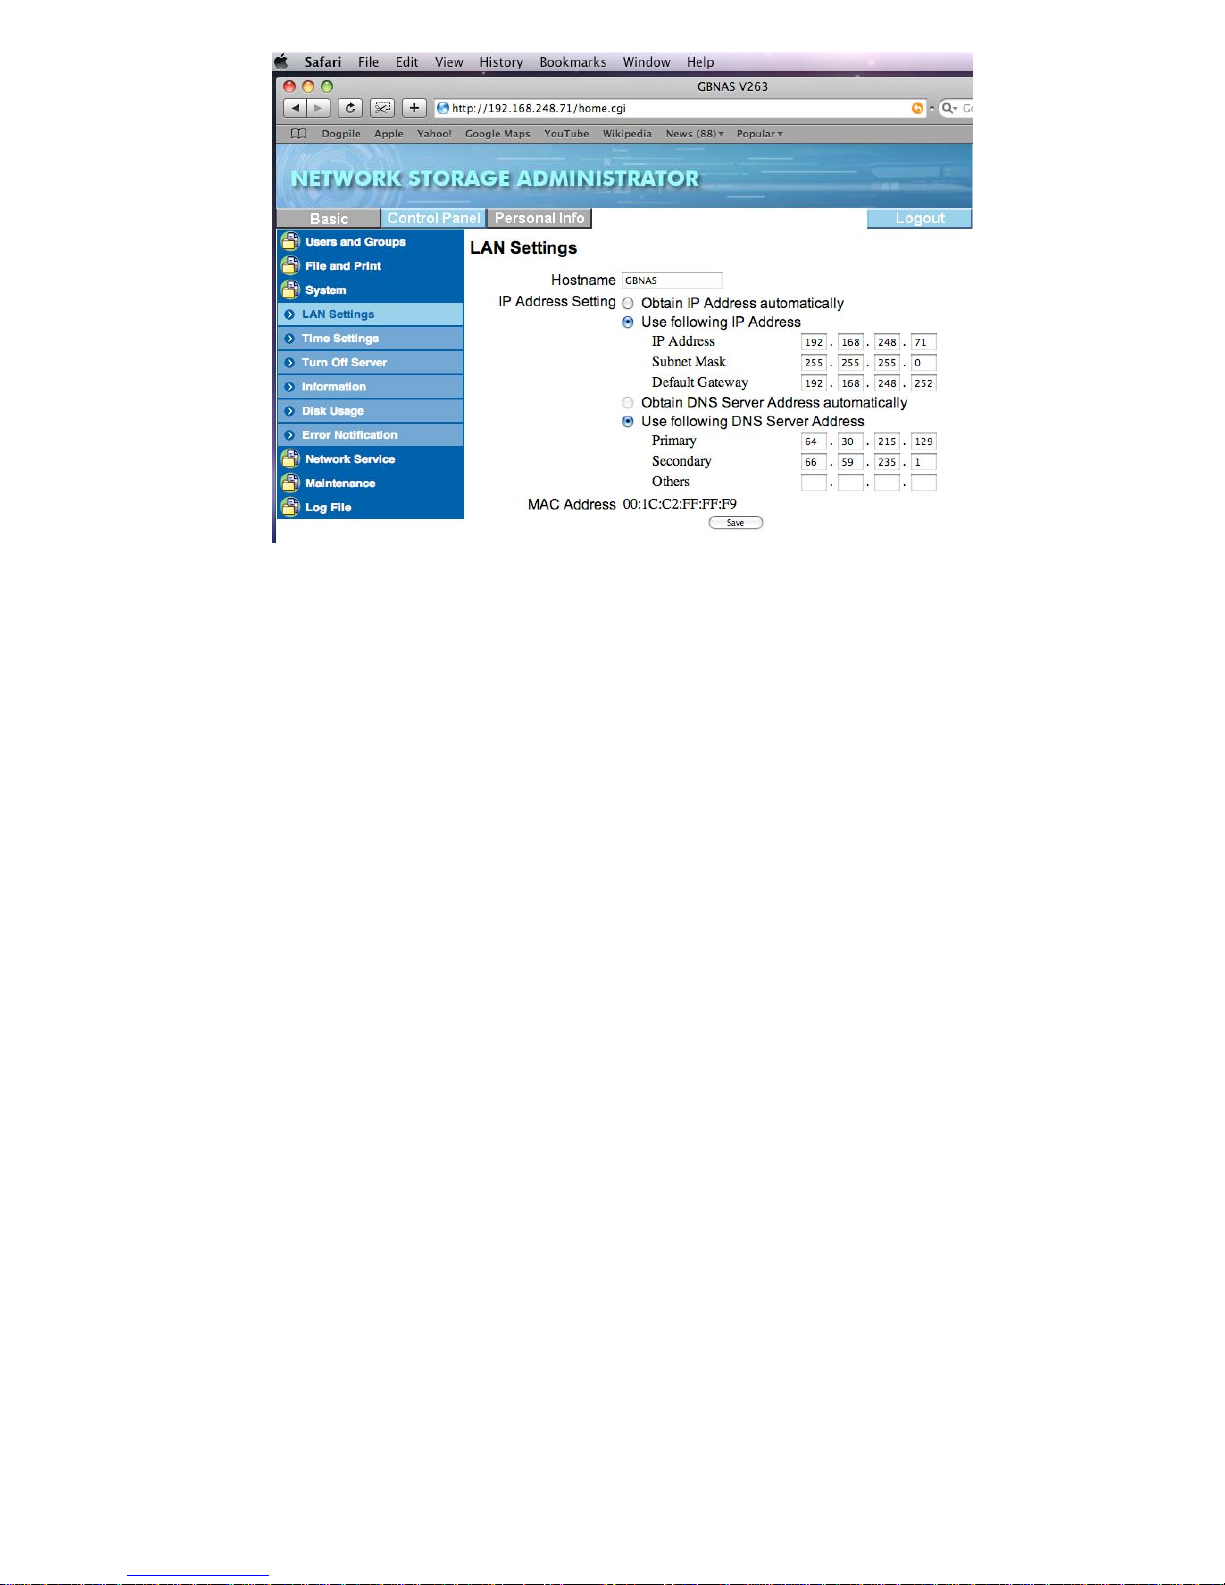
Then go to Control Panel button, -> System -> LAN Settings, as shown below. Check option “Use
following IP Address” and “Use following DNS Server Address”, enter all info such as a fixed IP
Address, Subnet Mask, Default Gateway, Primary DNS and Secondary DNS from your network. The
addresses below are for example, do not copy them, please use addresses to match your local
network, ask your network administrator if you need help. It is important to assign the NAS a fixed and
unique IP address and write the address down, the fixed IP address is the way that your computer will
find and access the NAS. Click on “Save” button to finish.
Page 16
16
Next, please restore your Mac back to the Network settings you wrote down before from the Network
page of System Preferences. Disconnect the NAS from your Mac’s Ethernet port, connect the NAS
and your Mac into your LAN, respectively. Please be sure your Mac is able to use the network and
internet before trying to access the NAS enclosure with the newly configured fixed IP address. Please
proceed to the next section “Administration of the NAS”
Page 17
Administration of the NAS
Please note: this manual contains many screen shots to demonstrate graphically how to set up,
administrate and use the NAS. The screen shots may contain different product names such as “gbnas”,
“gbnas2” and “gforcenas” and different IP addresses at various locations because we have several
NAS product models sharing the same procedures for set up and administration, they are all used to
take the screen shots to create this user’s manual. Please follow the general instructions and
substitute in throughout the manual with your specific NAS model, product name and network IP
address while managing and using your specific NAS model in your network environment.
If you manually configure an IP address for the NAS enclosure, you have a fixed, known IP address,
you can access the NAS from the web browser to start formatting the hard drive or managing the NAS.
In this case, please skip to the section “Managing the NAS” directly.
In another case, G-S350UN obtains a dynamic IP address from your local DHCP server if available.
However, you generally do not know the dynamic IP address it obtains. You have to find this specific
dynamic IP address in order to administrate and use the NAS enclosure. Next we will show you ways
to connect to the NAS and find its dynamic IP address. Again we strongly recommend you to set a
fixed IP address to the NAS as soon as possible because a dynamic IP address for the NAS can
change often, which makes it very difficult to track its new IP to use the NAS.
Finding the NAS with DHCP IP Address
In Windows PC
If a software CD comes with the NAS enclosure, please load the CD into CD-ROM drive, locate the
SetupUtil.exe file. Otherwise, please visit http://www.macally.com/EN/Techsupport/
Setup Utility file SetupUtil.exe. Save the file to the desktop then expand the zip file.
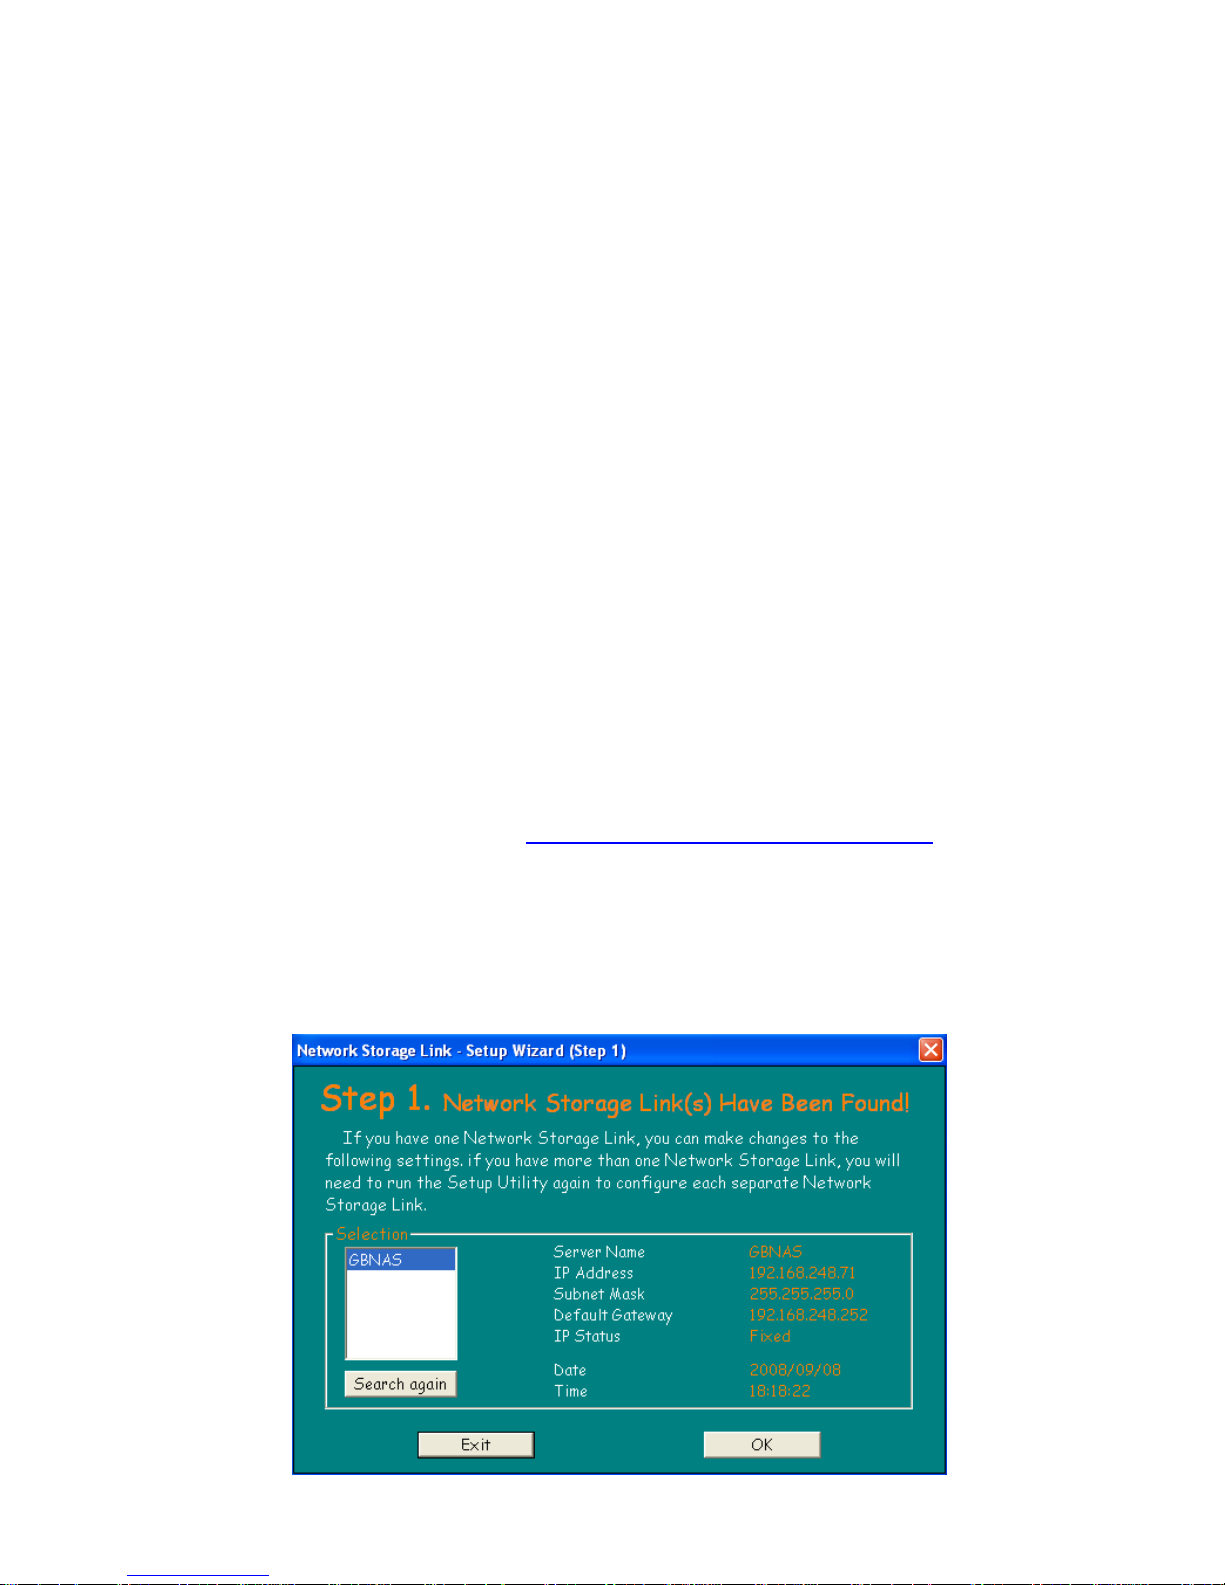
Launch SetupUtil.exe. In the Setup Wizard, please select GBNAS, the IP address the NAS obtains
automatically will appear on the right hand side as below example. IP Status will show DHCP instead.
Please write the IP address down, then click on “Exit” button. With the known dynamic IP address,
please go to the subsection “Managing the NAS”.
to download NAS
17
Page 18
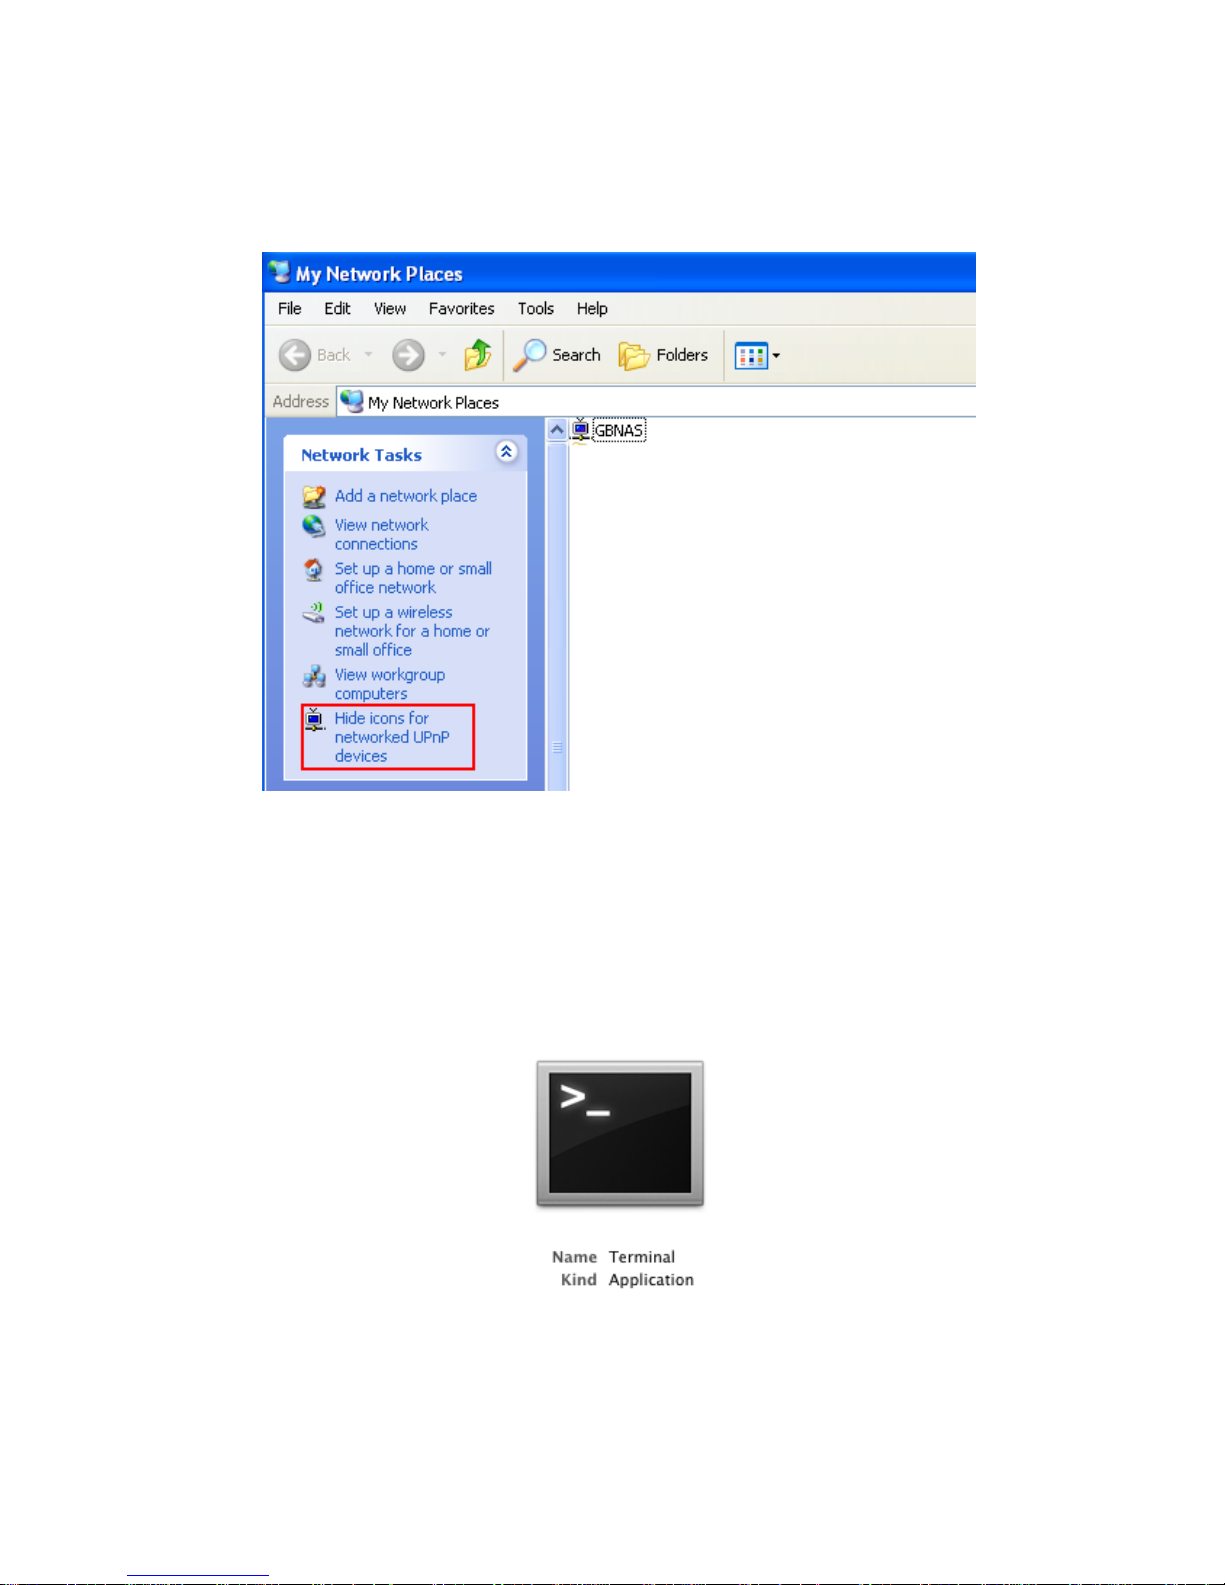
Another way to access the NAS is by Windows UPnP function. Please open “My Network Places”,
under “Network Tasks” click on “Show icons for networked UPnP devices” until it displays “Hide icons
for networked UPnP devices”. You will find GBNAS icon on the right hand side. Double click GBNAS
icon to launch the NAS login screen for administration. Proceed to the subsection “Managing the NAS”.
In MacOS X
Under MacOS X 10.3 to 10.5, please follow the procedures below to find out the dynamic IP address
for the NAS:
1, Power on the NAS and make sure that it has been connected to network.
2, In MacOS X, go to Applications and open Utilities folder, launch “Terminal Utility”.
3, In the command line, type “nmblookup GBNAS” without the quotations(“GBNAS” is the default name
of the G-S350UN NAS enclosure).
18
Page 19
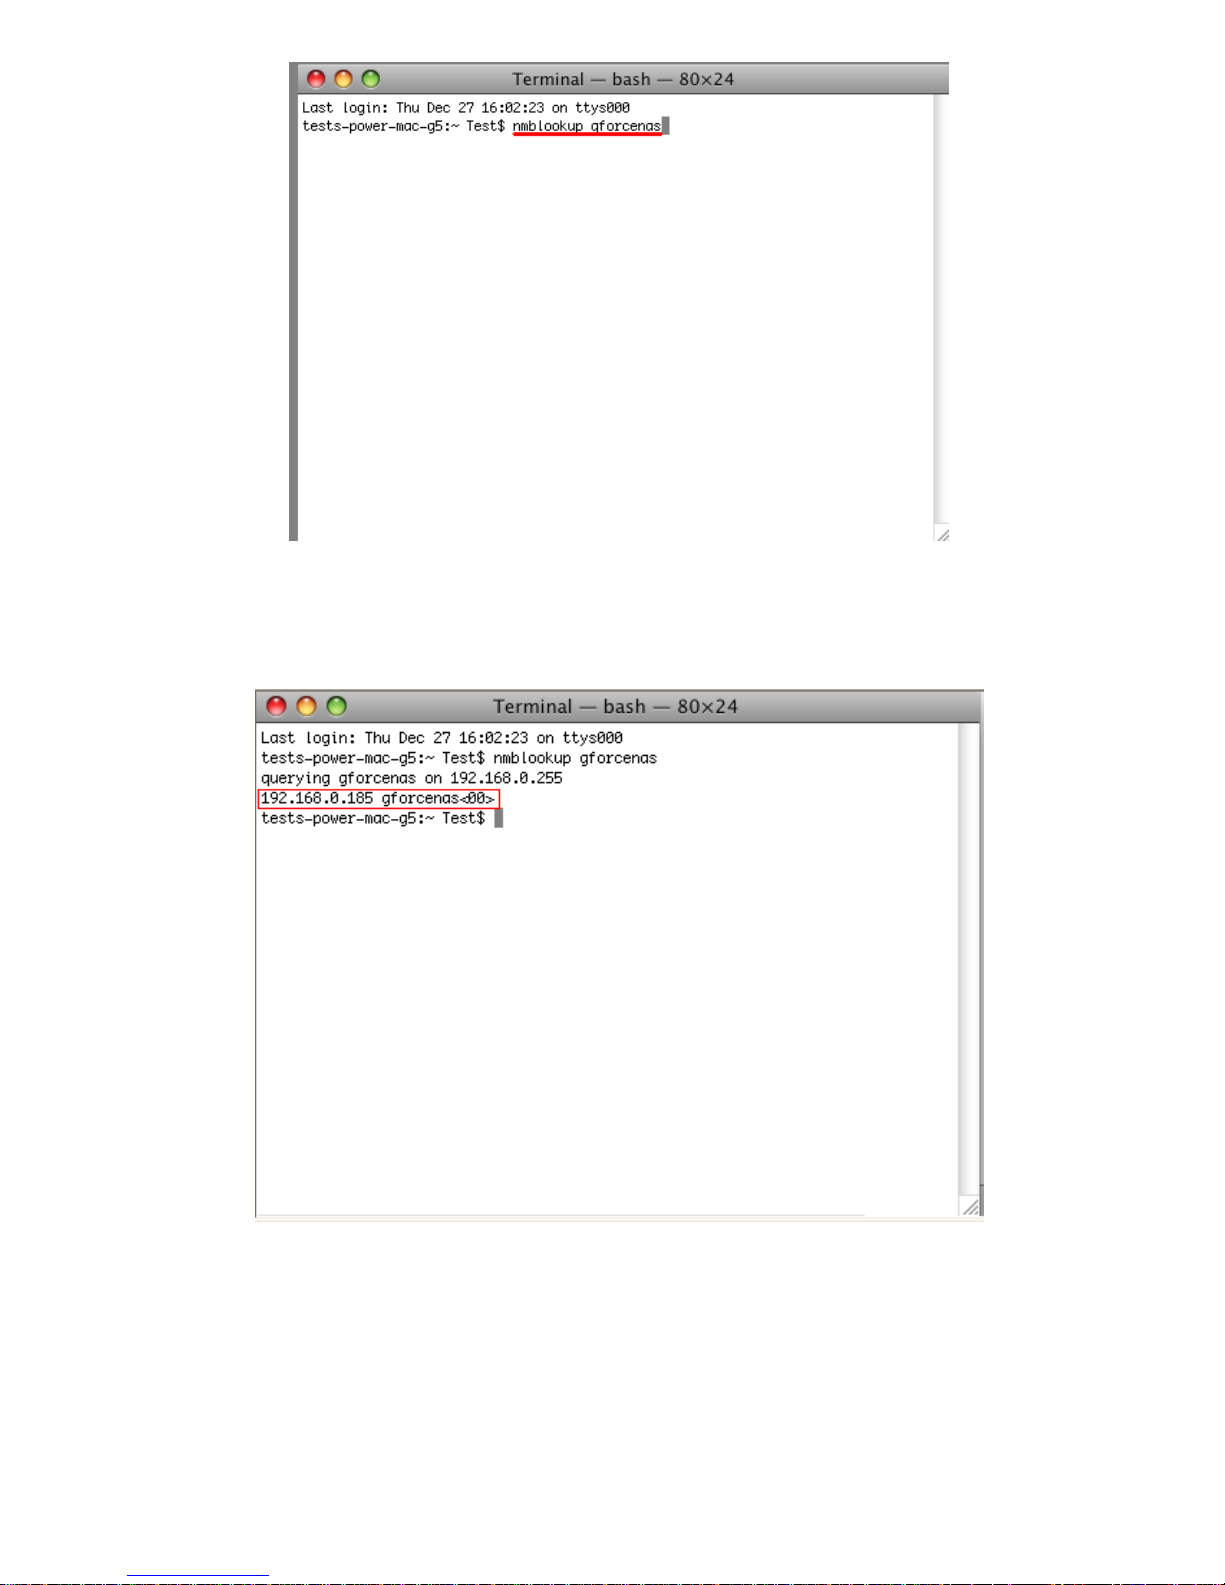
4, Press “Enter” key, it will report the IP address of GBNAS as shown below. Please write it down and
close the Terminal window.
5, Enter the known IP address in the web browser, login to the NAS administration home page. Input
default Username and Password: admin/admin.
6, Proceed to next section “Managing the NAS”.
19
Page 20
Managing the NAS
Above sections show you ways either to manually assign a fixed IP address to the NAS or reveal the
specific dynamic IP address the NAS grabs from your local DHCP server. Please open your web
browser, Safari in MacOS and Internet Explorer/Firefox/Opera etc. in Windows, type in the known IP
address in the URL address field, press Enter key. It opens the Network Storage Administrator login
screen.
Please note, the login screen can also be accessed through Windows My Network Places and UPnP.
After the NAS hard drive is formatted and the Bonjour is enabled, Bonjour /Rendezvous application in
MacOS X Safari will also allow you to locate the NAS and launch the NAS administrator login screen.
At login screen please enter “admin” as Username and Password to login.
.
The first time you login to the NAS administration home page or when the NAS detects newly installed
hard drive in the enclosure, you will see a message “Found New Drive, Please Format.”
20
Page 21

Please click on “Control Panel” button, select “Maintenance” in the menu, then “Disk Utility”.
There are four Format types to choose from: ext2, ext3, fat32 and NTFS. Definition of each Format
Types can be found in the Glossary section of this manual. If the G-S350UN is going to be strictly
used as NAS in the network, then format the drive in either ext2, ext3 or NTFS format at your
preference. If it will be used in both network and USB connection, then you must format it to
F AT32 for both PC or Mac USB connection, or NTFS for exclusive PC USB connection.
After selecting the Format Type, click on “Format” button and follow the on-screen instruction to finish
formatting. The G-S350UN will reboot itself once formatting is completed.
21
Page 22

After logging in, you will see four menu buttons “Basic”, “Control Panel”, “Personal Info” and “Logout” in
main administration page. Below are the list and detailed description of the main menu and submenu
system.
Basic
Quick Setup
z Wizard
z Add User
z Add Group
z Add Share
Control Panel
Users and Groups
z User Management
z Group Management
File and Print
z File Server
z Share Management
z Printer Server
System
z LAN Settings
z Time Settings
z Turn Off Server
z Information
z Disk Usage
z Error Notification
Network Service
z DHCP Server
z Bonjour
z Btorrent
Maintenance
z Disk Utility
z Firmware Upgrade
z Save Configuration
z Restore Configuration
z Factory Reset
22
Page 23

Log File
z Samba Log
z FTP Log
z DHCP Server Log
z System Log
z Administration Log
Personal Info
Personal Information
z Account
Logout
Basic-
Quick Setup
Wizard
Complete Wizard setting includes the following 6 steps:
1, Language setting options for WEB page display are English, simplified Chinese, and traditional
Chinese.
2, Password sets for administrator. The default password is “admin”, it is highly recommended to
change to a new password to prevent unauthorized access to your NAS. Be sure to memorize or write
down the new password. In case you forgot the new password, while the NAS is running, please press
and hold down the reset button for 5 seconds in the back panel of G-S350UN, then shut down and
power to restore the password to default “admin”.
3, Host name setting. The default host name is “GBNAS” which will appear in UPnP and “My network
places”, Bonjour etc.
4, Internet Protocol Setting sets the NAS by default to obtain an IP Address and DNS Server
automatically. You can also set the IP Address and the DNS Server manually when DNS server is not
available in your network.
5, Time setting allows the setup of Date, Time and Time Zone.
6, Display current setting and the new setting, click “complete” to finish Wizard setting.
Add User
23
Page 24

The NAS automatically creates three default folders in the drive, “admin”, “public” and “guest-share”.
Both “admin” and “public” require password to access these folders. To create additional folder(s) for
users in your network, please follow the next three steps:
1, Enter new User Name and Password, choose to create a Private Folder and enable Quota.
2, Set up Management option.
3, Add “Share Read/Write Permission” to the current folder for the new user.
Add Group
You can group different users for permission management by creating groups. Please follow these 3
steps:
1, Enter Group name.
2, Add or remove the users in the new group.
3, Set “Read/ Write Permission” for this new group.
Add Share
Complete “Add Share” setting by following 3 steps:
1, Input a share folder name.
24
Page 25

2, Set Windows and FTP Access permission including “Read Only” and “Writable” for all users and
groups.
3, Set “NFS Access permission” to a specific IP and subnet or to a range of IPs, or. For example,
192.168.0.2—192.168.0.100, all the computers that are in IP address range can access the share
folder through NFS).
Control Panel
Users and Group
User Management
● All users will be listed in “Existing Users” box.
● New user(s) can be added in this interface. Click “Clear Form” before you input new user name and
password. Fill in “optional description” to help administrator identify the folder. The new user folder
can be set to “private folder” and its quota through this interface. Click “Save” after setting is completed
for the new user.
● To add user(s) to a group, select the user(s) and click “Groups”
● To delete user(s), select user(s) and click “Delete User”
Important note: For the security of your NAS, we recommend you to assign a new password to
the master user account “admin”, and write new password in a safe place.
Group Management
●All groups will be listed in “Existing Groups”.
25
Page 26

● To add new group(s), click “Clear Form” then input a new group name. Click “Save” when done.
● To add or remove member(s), select the group then click “Members”
● To delete group, select the group then click “Delete Group”
File and Print
File Server
●Character set: English is the default language in this NAS system. Other language can be chosen
from this box if there are other languages expressions in your folder.
●Windows Setting: Set workgroup name for the NAS to belong to.
●FTP Server Setting: Turn on or off FTP server function and specify Port Number (default is 21).
●NFS Server Setting: Set NFS status.
●Guest Access Setting: Set status for guest and its quota of disk.
Share Management
26
Page 27

●All share folder will be listed in “Existing Shares.”
●To add new share folder(s), click “Clear Form,” input the new share name then click “Save” when
done.
●Click “Windows, FTP Access” to set windows and FTP access permission including “Read Only” and
“Writable” for the chosen share folder.
●Click “NFS Access” to set NFS Access permission for the range of IP and Subnet to the chosen share
folder.
● Click “Save” to store the new settings of “Window, FTP Access” and “NFS Access”.
● To delete the share folder, select share folder then click “Delete Share”.
Printer Server
Check “Enable” box to enable Print Server function. When a USB printer is connected to the NAS’s
USB port and powered on, it will appear in the Printer Name Description and becomes ready to use.
System
There are six submenus in “System Setting.” The submenus are “LAN Settings”, “Time Settings”, “Turn
Off Server”, “Information”, “Disk Usage” and “Error Notification”. They are described in detail below.
LAN Setting
●Hostname: a unique name, such as default gbnas and gbnas2, must be assigned to distinguish the
NAS within local area network. It is especially true if you install two or more identical model of the NAS
in your LAN. The hostname will appear in “My network places” in your computer.
●IP address setting:
— Obtain IP Address automatically.
27
Page 28

The NAS obtains the IP address automatically via DHCP protocol when a DHCP server is
available in the local network. If the NAS fails to get an IP address automatically from DHCP server, it
retains its default IP address 192.168.1.202.
— Use following static IP address
We strongly recommend you to do this option. To assign static(fixed) IP address to the NAS,
please obtain a unique IP address, Subnet mask, and Default gateway information from your network
administrator. Then fill the information into the corresponding fields of the GUI.
— Obtain DNS server address automatically
The system gets DNS server addresses from DHCP server if available. Select this option when
“Obtain IP Address automatically” is selected.
— Use static DNS server addresses
Enter the specific DNS server address for your network when “Using following IP address” option
is selected.
Note: Remember to click “Save” after you have finished entering all the settings.
Time Setting
— Set current Date, Time and Time zone.
— Specify NTP server if you want to get Date and Time from time server automatically.
Note: Click “Save” once completed to save the new settings.
Turn Off Server
— To restart the NAS, click the “Restart” button.
— To power off the NAS, click the “Turn off” button.
Information
28
Page 29

“System information” displays the NAS information below:
Product Name GBNAS
Firmware Version 2.6.3
Product Vendor
IP Address (Current IP address)
Disk Usage
Display the NAS drive usage summary and user’s quota information.
Error Notification
● Monitoring Services Setting
29
Page 30

— Disk Usage
When enabled, the NAS will notify administrator if “disk usage” reaches 90%.
— Windows File Sharing Server
When enabled, the NAS will notify administrator if “samba task” has problem.
— FTP Server
When enabled, the NAS will notify administrator if “FTP Server task” has problem.
— DHCP Server
When enabled, the NAS will notify administrator if “DHCP Server task” has problem.
● Check Interval
The NAS’s notification message interval can be set to hourly or daily.
● Email Notification Setting:
— Enable
Enable Error notification sent by email.
— Error Handling Mail Server
Specify your email host server info.
— Error Handling Email Address
Specify administrator email address.
● Pop-Up Notification Setting:
— Enable
Enable notification method by Windows pop-up messages.
— Error Handling Pop-Up Machines
Specify administrator PC’s IP address.
Note: Click “Save” button to save all new settings.
30
Page 31

Network Service
DHCP Server
● If you wish to use the NAS as a DHCP Server in your LAN, please be sure there is no other DHCP
server in service to cause conflict, then take the following steps to configure it:
— First under LAN Settings, select “Using the following IP address” and assign a fixed IP address,
and enter subnet, gateway and DNS addresses if you haven’t done so.
— In above DHCP Server Setting page, check “Enable Sever”, fill in all the needed fields under
DHCP Client Setting. Click the “Save” button when completed.
Bonjour and iTunes Settings
● Bonjour
After the NAS hard drive being formatted, you are allowed to enable the NAS to support Apple Bonjour
protocol and iTunes.
— Check “Enable” box to enable Bonjour protocol.
— Check “iTunes Enable” box to enable iTunes server. Click on the “Save” button, a “music”
folder will be created automatically in the public share volume. It is the designated central
location to hold all MP3 music files for your iTunes.
To access the NAS as iTunes music server, please save all MP3 music files into /public/music folder
through network volume(Samba protocol) or FTP client software. Once MP3 files are loaded in the
correct folder, iTunes can detect the NAS and display GBNAS_Music_Box under SHARED. Select the
“GBNAS_Music_Box”, then you can select the MP3 music files on the panel right hand side to play.
31
Page 32

The following steps show you how to use Bonjour(MacOS 10.5) or Rendezvous(both MacOS 10.3 and
10.4) to access the NAS for administration.
1, Ensure both the NAS and MacOS system are connected to the same network and powered on.
2, Open Safari, click “Show All Bookmarks” as following:
3, Click on the “Book” symbol (circled in red below), locate and select “Bonjour” or “Rendezvous” in the
left pane. Then double click “GBNAS” to launch the NAS administration screen.
4, Please note http://gbnas.local./login.cgi is displayed in the URL link. Please enter “admin” as the
Username and Password and then click “Login” button.
32
Page 33

5, Please proceed to administrate the NAS.
BTorrent
● BTorrent
NAS supports BTorrent Peer-to-Peer download function. You can download the seed to the NAS by
opening up the torrent file in “Open torrent file” box through the GUI.
— Set Max bandwidth download rate limit.
— Set Max bandwidth upload(or outward) rate limit.
— Add button (used to add new seed to the NAS)
— Click Save button to complete
Maintenance
33
Page 34

There are six submenus in Maintenance. The submenus are “Disk Utility”, “Firmware Upgrade”, “Save
Configuration”, “Restore Configuration” and “Factory Reset”.
Disk Utility
● Disk Utility
Disk utility shows device name, type of format, total disk size, used disk size, volume mounted, and
disk mount status of all disks.
Please format all newly
installed hard drive in the NAS enclosure the first time before using or
changing any settings because most of the settings and changes in Administration are saved in the
formatted hard drive due to limited RAM space in the NAS controller, and reloaded to the NAS
operation system at boot up.
To avoid executing an accidental command, the NAS will ask for confirmation before applying critical
function such as “Format” or “Scandisk”.
— Format Button
This is used to format NAS’s disk or attached external storage device such as a flash drive or
a regular external USB drive. NAS supports four types of file systems: “EXT2”, “EXT3”,
“NTFS” and “FAT32”.
— Scan Button
34
Page 35

This is used to check the disk integrity.
— Detail Button
If the hard disk supports S.M.A.R.T, “Detail Button” will report the health status of the disk.
Firmware Upgrade
This function displays the “Current Firmware Version.” Once the new firmware is available and you are
ready to upgrade it into the NAS, please click on the “Browse” button to locate the new firmware file in
your computer. Select the new firmware file and then click “Start Upgrade” to start the process. During
firmware upgrade process, all NAS’s network services will be temporary disable. It will take 10~20
minutes for the upgrade process to complete. The NAS will count down and reboots itself when
firmware upgrading is completed.
Note: Please don’t power off or stop upgrade during upgrade process, otherwise the NAS system will
be corrupted.
Save Configuration
This feature outputs the current system configuration to a file that can be saved to a local computer
hard drive. Later it can be used to restore to the same settings when needed.
Restore Configuration
35
Page 36

When the system configuration is destroyed, lost, or incorrectly changed, using “Restore
Configuration” function you can restore system configuration with the file you previously saved through
“Save Configuration”. To restore a saved system configuration settings, click “Browse” to search for the
configuration file and then click the “Restore” button. Follow the on-screen instruction to finish the
process.
Factory Reset
Like the hardware Reset button located in the back panel of the NAS enclosure, this software option
resets the system configuration to factory default configuration.
All users, networking, and other configuration information will be lost when “Factory Reset” button is
pressed. It’s strongly recommended that you save the current system configuration to a file before you
do Factory Reset.
Log File
There are five submenus in “Log File” menu. They are “Samba Log”, “FTP Log”, “DHCP Server Log”,
“System Log”, and “Administration Log” to log all the NAS activities for monitoring use.
Samba Log
36
Page 37

FTP Log
DHCP Server Log
System Log
Administration Log
37
Page 38

Personal Info
Personal Information
Account
Account Information is listed under “Personal Information” menu. General information such as
password, language can be changed for ‘admin’ account. This section also displays the share list,
system disk quota and the percentage of disk used.
To secure your NAS from unauthorized access, it is important to change the default admin
account password “admin” to your private one, and write it down in a safe place.
Logout
38
Page 39

Network Storage
The NAS can be accessed via FTP or SMB mode. Enable FTP or SMB function for the users or groups
that have permission to use this service (please refer to System Login for setting).
Using the NAS Storage in PC
FTP Access
The NAS enclosure has FTP server function enabled by default. Therefore you can use a FTP client
software to transfer file between your PC and the NAS. The NAS folder accessible depends upon the
NAS user account you choose to login in the FTP client.
Windows Access
Open “My Computer”, in the address line input \\192.168.1.202 (assuming 192.168.1.202 is the IP
address for the NAS). All accessible folders are listed. Select the folder you want to access, enter the
correct user name and password to get full access.
In “Windows Management Access” window, folders can be copied and pasted just like in your local
computer desktop.
A “Printer” icon will display if a printer is connected to the NAS and Printer Server is enabled.
A “usb1” folder will display for access as well when an external USB storage device is connected to the
NAS.
39
Page 40

Mapping Network Drive
Mapping the NAS folder(s) as a network drive is a common way to use the NAS storage on your
computer.
To map a NAS folder as a network drive, in above NAS folder window, please right click on the NAS
folder, and choose “Map Network Drive…” option in the pop-down menu, assign a drive letter, then
click “Finish” button to complete. From now on, when you start the windows OS, the network NAS drive
will be mounted automatically in “My Computer”, you will use the NAS drive just like a local hard drive.
Using the NAS Storage in Mac
Network Connection Access
To access the NAS, select “Network” item in “Go” menu then click on the NAS in network workgroup.
40
Page 41

Finally, click “Connect As” button to connect.
SMB Access and Mounting NAS Volume
In certain MacOS X except MacOS 10.5.x, you can access the NAS through “Connect to Server”
option. Please follow the directions below.
1, In the MacOS X “Go” menu, click “Connect to Server”.
2, Enter smb://192.168.0.185 (assuming 192.168.0.185 is the IP address for the NAS) in “Server
Address” line, then click on “Connect” button.
3, Once connected, the screen below shows. Select the folder you want to access and then click
“Authenticate”.
4, Enter user name and password as required. The folder will display in your computer desktop. Check
the option “Remember this password in my keychain” and click “Connect” button. The specific NAS
folder will mount on the desktop for you to use.
41
Page 42

5, If you would like to have the same NAS folder mounted automatically every time your Mac boots up,
please follow the steps below. After step 4 above, you will see the NAS volume ADMIN, for
example, appearing in the Finder.
6, Next, open “System Preferences”, then “Accounts”, select the user account, click on “Login Items”
tab. Click on “+” button.
7, From the pop-up Finder, select “ADMIN” volume icon, then click on “Add” button.
42
Page 43

8, “ADMIN” volume will be listed under “These items will open automatically when you log in.” Close
the “System Preference”. From now on “ADMIN” NAS volume will show in the Finder whenever
your MacOS X(below 10.5) starts up.
FTP Access and Yummy FTP Software
The NAS enclosure has FTP server function enabled by default, which allows you to use a FTP client
software to transfer file between your Mac and the NAS. The NAS folder accessible depends upon the
NAS user account you choose to login in the FTP client.
We include a Yummy FTP software to support MacOS 10.3 to 10.5 users. You might find it easy to use,
as an alternative way to access the NAS from the desktop, to transfer files, to drag and drop folders
and files between the NAS and your OS X Finder and desktop. It is a very useful piece of software.
43
Page 44

If the software CD is included with the NAS package, please copy YummyFTP.dmg from the CD to the
Mac desktop, double click the YummyFTP.dmg from the desktop to expand and copy the program to
the application folder as instructed. When you launch Yummy FTP the first time, please go to its
main menu, select “Enter Serial Number”, enter the serial number to activate the software. You
can find the Serial Number label (starting “YUMYFTP…”) on the Software CD or its envelope.
You may download Yummy FTP software from the following link (case sensitive).
http://www.yummysoftware.com/macally/YummyFTP.dmg
For the support of Yummy FTP software only, please visit:
http://www.yummysoftware.com/support
For any other question, please email to: techsupport@macally.com
Please create a FTP connection when using Yummy FTP the first time, enter your NAS IP address,
username and password such as “admin” account as shown below, click “connect” button. FTP
accessible folder is user account specific.
44
Page 45

Network Functions
Printer Server
The NAS supports printer server function. It can share a USB printer within network and also has auto
detection capability when a USB printer is connected.
Network Printer Installation in Windows PC
1, To enable printer auto-detection, please verify that the USB printer and the NAS are both powered
on, then connect the USB printer to the NAS using a USB cable.
2, Open the Printer Server in the NAS administrator, make sure to check “Enable” option and click
“Save” button. You will see the printer name “usblp0” and the printer model under the description. You
can logout the NAS administrator.
3, Open “Printers and Faxes” menu in PC.
4, Click “Add Printer Wizard” icon.
5, Check “A network printer …” option then “Next” button.
6, Check “Browse for a printer” option then click on “Next” button.
45
Page 46

7, Under Workgroup, select the GBNAS as the printer server.
8, Choose “lp” as the shared printer below GBNAS, click “Next” to install printer driver. In the Add
Printer Wizard, select the manufacturer and printer model to match your printer. If your model is not in
the list, you should click on “Have Disk” button, load the printer driver from the printer software CD or
downloaded driver.
46
Page 47

9, Once printer driver is installed, please perform a “Print Test” or print a file to the network printer to
verify that printer software is installed properly.
Please note: Network shared printer is typically slower than local printer. It’s normal for a network
printer to idle up to 1 min after a print job is sent then start printing.
Network Printer Installation in Mac
1, To enable printer auto-detection, please verify that the USB printer and the NAS are both powered
on, then connect the USB printer to the NAS using a USB cable.
2, Open the Printer Server in the NAS administrator, make sure to check “Enable” option and click
“Save” button. You will see the printer name “usblp0” and the printer model under the description. You
can logout the NAS administrator.
3, Open System Preferences in MacOS X, launch “Print & Fax” to set up the USB printer sharing. The
subsequent steps are provided below for MacOS 10.3, 10.4 and 10.5, respectively.
Please note: Network shared printer is typically slower than local printer. It’s normal for a network
printer to idle up to 1 min after a print job is sent then start printing.
For MacOS 10.3
47
Page 48

Step1 – click on “Set Up Printers” button
Step 2 – click on “Add” button
48
Page 49

Step 3 – Select “Windows Printing”, “WORKGROUP”, and choose “GBNAS”
Step 4 – Enter password for admin and check “Remember this password in my keychain”, click “OK”
49
Page 50

Step 5 – Highlight “lp” then click on “Add” button
After installation, the network printer will appear in the printer list, it is ready to use.
For MacOS 10.4
Step 1- Click on “+” button
50
Page 51

Step2 – Select “IP Printer” then click on “More Printers” button
Step 3 – Select Windows Printing
51
Page 52

Step 4 – Choose “GBNAS” under the Workgroup
Step 5 – Enter password, check “Remember this password in my keychain”, then click “OK”
52
Page 53

Step 6 – Select “lp” and choose the printer model then click on “Add” button
Step 7 – “lp” printer is added to the printer list successfully
53
Page 54

Step 8 – Example printing, choose “lp” as printer
For MacOS 10.5
Step 9 – Print job is executed
54
Page 55

Step 1- Click on “+” button
Step2 – Select Windows then click on “workgroup”
55
Page 56

Step 3 – Find “gbnas” in the list and click on it
Step 4 – Enter password for admin, click on “Connect” button
56
Page 57

Step 5 – Select “lp” then go to “Please select a driver or printer model” menu
Step 6 – Click on “Select a driver to use”
57
Page 58

Step 7 – Select your printer model from the list then click on “Add” button
Step 8 – The “lp” printer is added successfully
58
Page 59

Step 9 – Example printing, select “lp” as the printer
Step 10 – The print job is executed successfully
59
Page 60

BTorrent
When BitTorrent server is enabled, the NAS can share file(s) directly through the Internet unattended
from the host computer. This feature reduces the wear and tear of your computer by having the NAS
independently run the BitTorrent function. To download or upload BitTorrent file(s) from Internet, follow
the steps below.
1, Login the NAS administrator, click “Control Panel” then “Network Service” and then “BTorrent”.
3, Click the “Browse” button to find previously saved BitTorrent meta-seed file.
4, Finally, click the “Add” button.
5, Once the “Start” button is pressed, the NAS will automatically download the file from Internet to the
NAS. The file “download status” can be viewed by clicking the “Refresh” button.
60
Page 61

6, BitTorrent meta-seed file can be stopped or deleted in the list when download is completed or if you
no longer wish to share the files. Deleting the meta-seed files from the list does not permanently delete
the downloaded file from the NAS. All the downloaded files are saved in the folder “btdownload” in the
“public” folder in the NAS.
61
Page 62

USB Connection for Mac and PC
The G-S350UN enclosure can be connected directly to a Mac or PC computer through the included
USB cable. The only requirement is you must format the NAS hard drive to FAT32 in the beginning by
using the NAS Disk Utility. Please refer to the section “Administrating the NAS” for instructions.
Connect an USB cable between G-S350UN and the computer first, power on the G-S350UN enclosure.
It works like a regular external USB2.0 hard drive enclosure in a computer.
Please note, do not connect both USB and network cables into the G-S350UN simultaneously. Please
connect one cable only at a time.
62
Page 63

Glossary
TM
TM
TM
, please see www.bittorrent.com.
TM
file contains metadata information about server of download user, file calibrate
BitTorrent
BitTorrent is a protocol designed for transferring files. It’s a peer-to-peer multiple download in nature,
as users connect to each other directly to send and receive portions of the file. Users should
upload(transmit outbound) at the same time they are downloading(receiving inbound). To learn more
about BitTorrent
Torrent
TorrentTM is a file for BT system, which the BitTorrent will define download source through TorrentTM
files. Torrent
information and so on. BT system will deal with these files to find the download source and do the
relative operations.
EXT2
EXT2 is the standard file system on Linux.
EXT3
EXT3 is a journaled file system extended from EXT2 system.
FAT32
FAT32 is a file system with 32 bit file allocation and good compatibility. FAT32 reduce slack space, and
increase disk management and disk using efficiency. FAT32 is suit for all universal OS.
NTFS
NTFS is a format with secure and robust feature for management of network, disk allocation and file
encrypt in Window NT operating system. Data will be saved in NTFS cluster. The cluster size does not
depend on the disk volume and allocation size. It’s reduce the slack space in disk as well as reduce
disk chips, and increase security in more a depth for user through file encrypt management.
GUI
GUI is the abbreviation of Graphical User Interface. It refers to the web-based Network Storage
Administrator and its web page interface in this manual.
LAN
LAN (Local Area Network) is a group of computers and associated devices that share a common
communications line or wireless link. Typically, connected devices share the resources of a single
processor or server within a small geographic area (for example, within an office building). Usually, the
server has applications and data storage that are shared in common by multiple computer users. A
local area network may serve as few as two or three (for example, in a home network) or as many as
thousands of users (for example, in an organ or a company).
FTP
63
Page 64

FTP (File Transfer protocol) is the protocol for exchanging files over the Internet. FTP, a standard
protocol, is the simplest way to exchange files between computers on the Internet. FTP transferring
Web pages from server to a user’s browser and transferring electronic mail across the Internet and
uses the Internet’s TCP/IP protocols to enable data transfer. FTP is most commonly used to transfer
Web page files from their creator to the computer that serves the pages to everyone on the Internet.
It’s also commonly used to download programs and other files to your computer from other servers.
SMB
SMB (Server Message Block) or Samba is a message format/protocol used by processors to share
files, directories and devices. It supports printer and other device sharing among computers in LAN.
64
Page 65

FAQ
Q: What is the meaning of the Ethernet port LED color in the back panel of the NAS enclosure?
A: Green light means a successful 100Mb/s fast Ethernet connection to the network, red light indicates
a successful Gigabit Ethernet connection. Flashing orange light is the network data activity.
Q: How long does the NAS take to boot up and get ready for use?
A: It usually takes around 3 minutes to boot up and connect to the network. After powering up or reboot
the NAS, please allow enough time before trying to access it, refresh the connection or the
Administrator page in necessary.
Q: What should I do when Ethernet port LEDs on the NAS do not light up?
A: Power off then power on the NAS if both LEDs do not light up simultaneously after a long period of
time. Allow 3 minutes at least for the NAS to fully start up. During the start up process, it is normal for
the LEDs to go off and on.
Q: I can’t I power on, restart or shutdown the NAS. What can I do to fix the problems?
A: When the NAS is powered off, please press the front power button for 2 seconds to turn it on, the
front LED will turn on to blue. If you can’t restart or shut down the NAS, please verify that there are no
background operations running such as a file download, disk formatting, etc… Stop the ongoing
operation then try restarting or shut down.
Q: Why does the Mac computer ask me to format my NAS drive using USB connection after I’ve
formatted the disk through NAS Administrator? Why doesn’t my NAS drive mount in the Windows
system under USB connection?
A: These problems generally occur at the direct USB connection of the NAS enclosure to a computer.
The reason is the NAS was formatted by the Disk Utility in NAS Administrator using a format such as
NTFS, Ext2 or Ext3, incompatible to Mac or PC under direct USB connection. The solution is, first to
back up existing data from the NAS through network connection, then to use Disk Utility to reformat the
NAS drive into FAT32 system and restore the data back to the NAS drive. This way you won’t have
trouble switching the NAS drive between network connection and USB connection.
Q: Why can’t certain settings and function configuration be done or saved?
A: Please verify that the hard disk is installed correctly in the NAS enclosure and the drive is formatted
completely first by the Disk Utility inside NAS Administrator.
Q: What can I do if I forget my password?
A: While the NAS is on, press the “Reset” button in the back of the NAS for 5 seconds, then power off
and power on the NAS, the process will restore the NAS to factory default setting including password
“admin”.
Note: Restoring “factory default” will override all prior system setting changed by the user. However,
the previous setting changes saved in the hard drive will be reloaded to the NAS controller board after
the NAS restart.
Q: How come I cannot write file via FTP in MacOS X browser?
65
Page 66

A: MacOS X browser only supports “Read” function via FTP. Please use the included Yummy FTP
software to perform read /write operation.
Q: I mount the NAS volume in my MacOS 10.5 desktop, why does it pop up an error message and fail
to copy when I try to drag or copy file or folder from desktop into the NAS volume?
A: MacOS 10.5 does not have full Samba SMB protocol support at this moment, it can read from the
NAS volume but couldn’t write data into the NAS by dragging and dropping. Currently the solution is to
use a FTP client software such as Yummy FTP to connect to the NAS to copy files both way.
Q: Why can’t my web browser open my NAS Administrator?
A: Please use compatible web browser such as Internet Explorer or Safari to try again.
Q: Can I connect more than one printer to the NAS?
A: The NAS has only one print server daemon, which means that only one printer can be connected
and used at one time. If two printers are connected, only the printer connected to USB port 0 (bottom
port) will be recognized and supported.
Q: How come there’re error message during uploading music files to the NAS?
A: If this problem occurs, please try uploading music files in small group, preferably 50 files at a time,
this way will ensure that the NAS has enough time to build its database successfully.
Q: Why do I get a “corrupted file” message when accessing the files from the NAS?
A: Due to your network traffic, the files saved to the NAS directly from the desktop application might be
corrupted. Depending on your network traffic and the size of the files, it’s recommended that
sometimes you save the files from the application to your local hard drive first and then transfer them
to the NAS.
Q: Why is my video playing from the NAS choppy, paused and scrambled sometimes?
A: This can happen when the network is too busy or more than 5 users are using the NAS heavily.
Q: Where do I go to get the latest firmware to keep my G-S350UN updated?
A: Please visit our website or email to our tech support when you need to.
Q: Why is my internet connection slow and sluggish after the NAS is installed?
A: Other user in your network might be streaming music, accessing files and downloading/uploading
files thru BitTorrence function. All these activities take up network bandwidth thus slow down your
internet speed. Please set the BitTorrent bandwidth limit for upload and download in the NAS
Administrator.
Q: What are not supported under MacOS X 10.2.x?
A: MacOS X 10.2 does not support nmblookup command, Safari, Rendezvous and NAS printer
sharing.
66
 Loading...