

Page 1
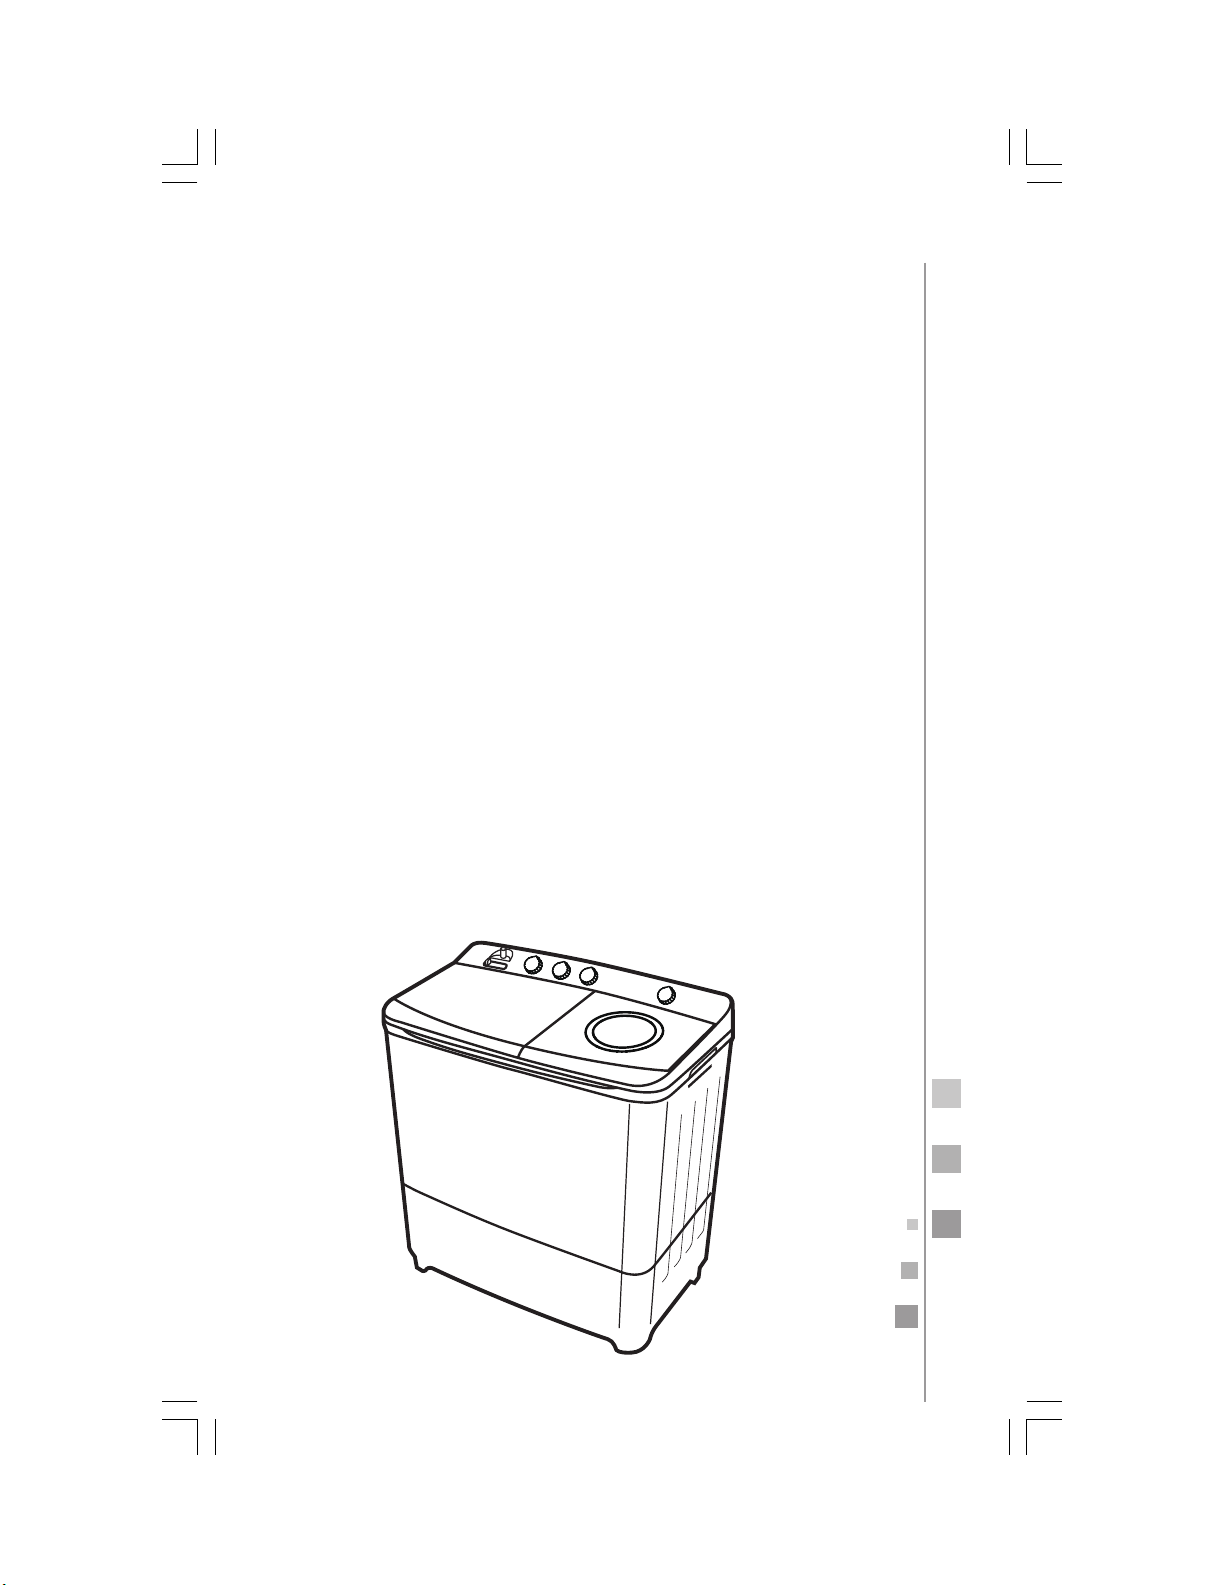
owner's manual
twin tub washer
1
models
LMD6124PBEB0
LMD6124PBCS0
LMD8124PBEB0
LMD8124PBCS0
PM01
read this manual before installing your new washer
Page 2
2
Page 3
contents
Important Safety Instructions ............................................................... 4
Packing list .............................................................................................. 7
Machine components ............................................................................ 8
Control panel ......................................................................................... 9
Installation instructions ......................................................................... 9
Installing the lint filter ........................................................................... 9
Install the drain hose ........................................................................... 10
Install the washer legs ......................................................................... 11
Install the water inlet hose .................................................................. 11
Washing tips ......................................................................................... 12
Proper use of laundry products ........................................................... 13
Washing sequence ............................................................................... 14
Spin ....................................................................................................... 15
Rinse ..................................................................................................... 16
Cleaning the unit ................................................................................. 19
Troubleshooting ................................................................................... 20
Specifications ........................................................................................ 21
3
welcome
Everything you need to know for the proper operation of your
product can be found here and in our web sites. We invite you to
get to know your product, read this manual and get the most out of
it.
Page 4
4
important safety instructions
• Your own safety is important for us. Please read this information
before using your new product.
• Do not use extension cords.
• Do not plug other electric appliances to the same power outlet.
• Hold the connector by the power plug, not by the cord.
• This product is equipped with a "Y" type polarized plug having a
built-in grounding wire.
• Do not remove the grounding terminal or use outlet adapters.
• If the power cord is damaged, it must be replaced by the manufacturer, its authorized service agent or by qualified personnel in order to avoid a hazard.
• If voltage variations are usual in your area, have a voltage regulator installed.
• This appliance is not intended for use by persons (including children) having reduced physical, sensory or mental capabilities, or
lack of experience and knowledge, unless they have been given supervision or instruction concerning the use of the appliance by a
person responsible for their safety.
• Children should be supervised to make sure they do not play with
the appliance.
• IMPORTANT: Failure to follow these warnings, will make you entirely responsible for personal injuries or material damages that
may occur from using this equipment.
The following conditions are not considered as a normal use of the
appliance:
• If it has not been operated in accordance with the provided operation instructions.
• Damages caused by accidents, electrical overloads, voltage fluctuations, using an energy other than the specified, or catastrophes.
• If it has been used with commercial or industrial purposes, or for
other than the indicated in the operation instructions.
• If the product has been repaired by unauthorized persons and/or
service workshops.
Page 5
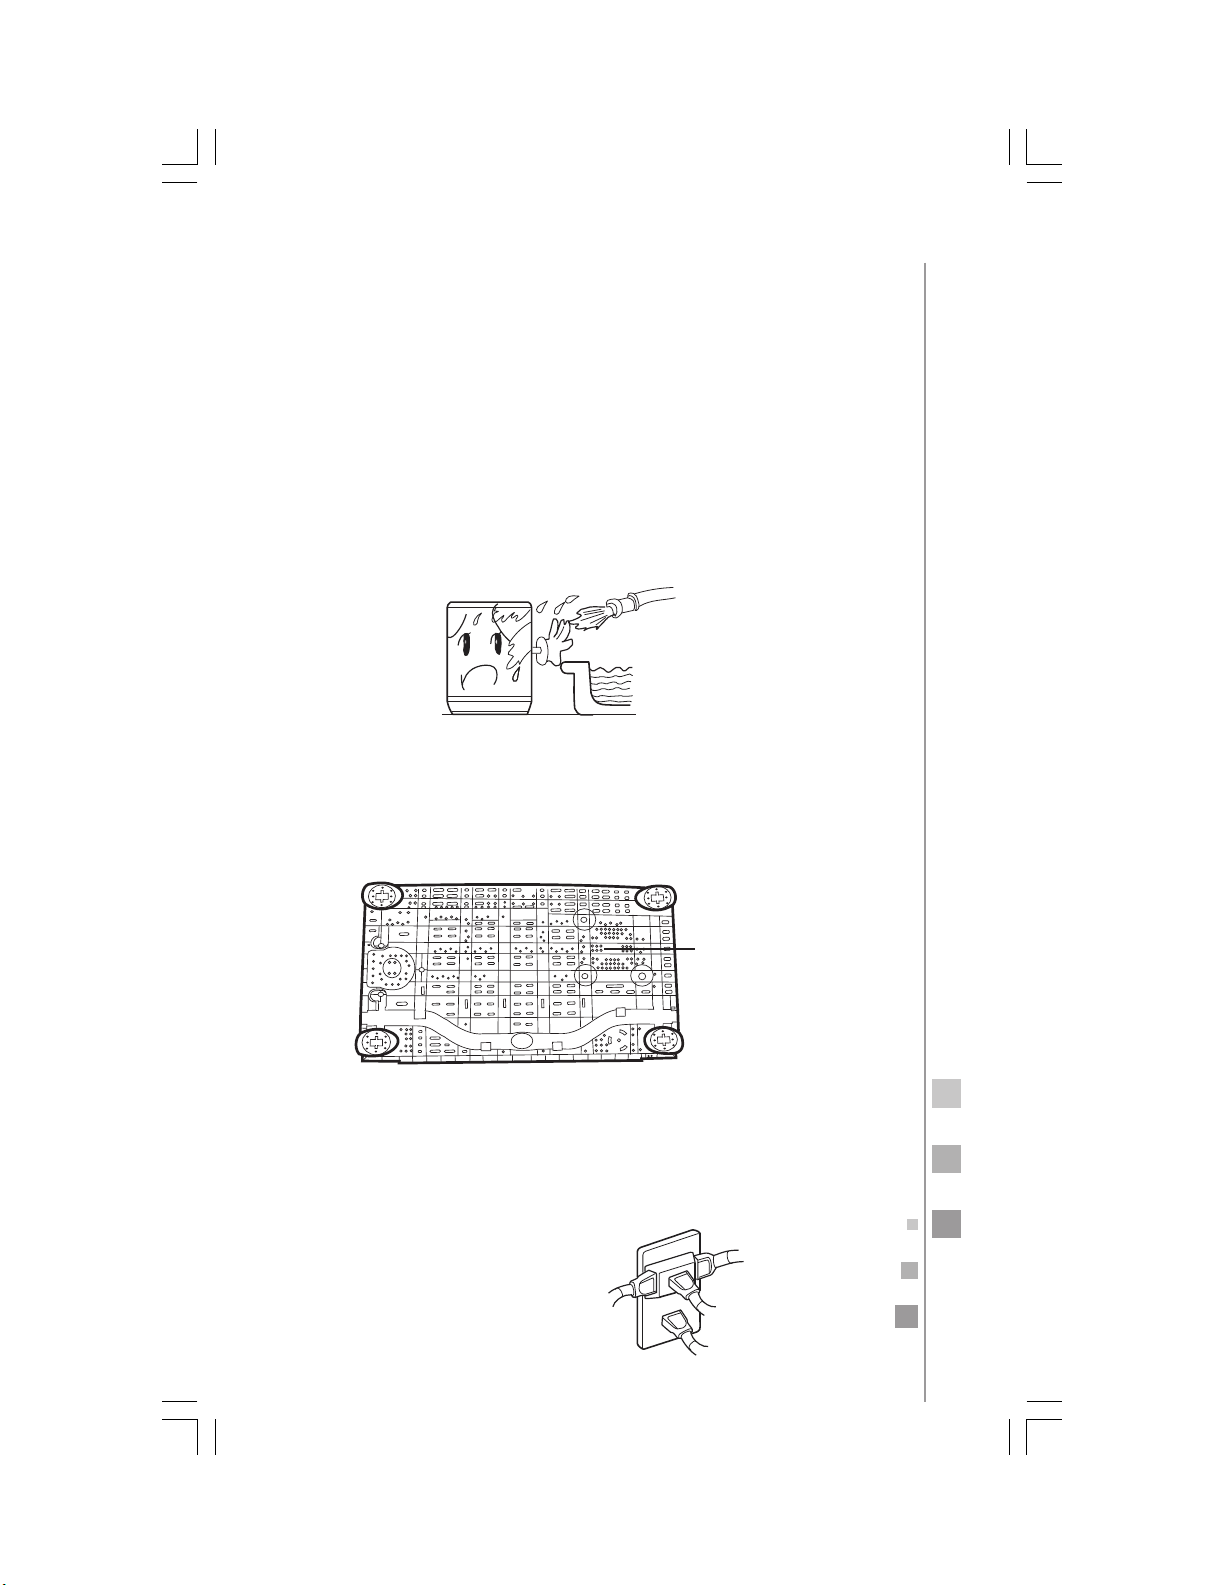
• Insert the power cord into a rated voltage outlet. Be sure to use a
single-phase three pin outlet.
• The terminal of the outlet must be grounded.
• Insert the power plug in a location where it can be easily inserted
and extracted by hand.
• Be sure to remove the plug from the power supply if power failure
occurs, when moving or cleaning the machine, or when the machine is idle.
• If the power cord is damaged, it must be replaced by the manufacturer, its authorized service agent or qualified personnel in order
to avoid a hazard.
• Do not wash the machine with water. Do not place wet clothes on
the control panel.
5
If the washing machine is installed on a carpet, make sure to keep
the ventilation hole clear of obstruction.
Ventilation hole
at the bottom of
the washing
machine.
• Do not share the outlet with other electric appliances. If the power
plug is damaged, or feels loose when plugged into the outlet, stop
using the plug immediately. Rated current of fuse: 10 A.
Page 6
6
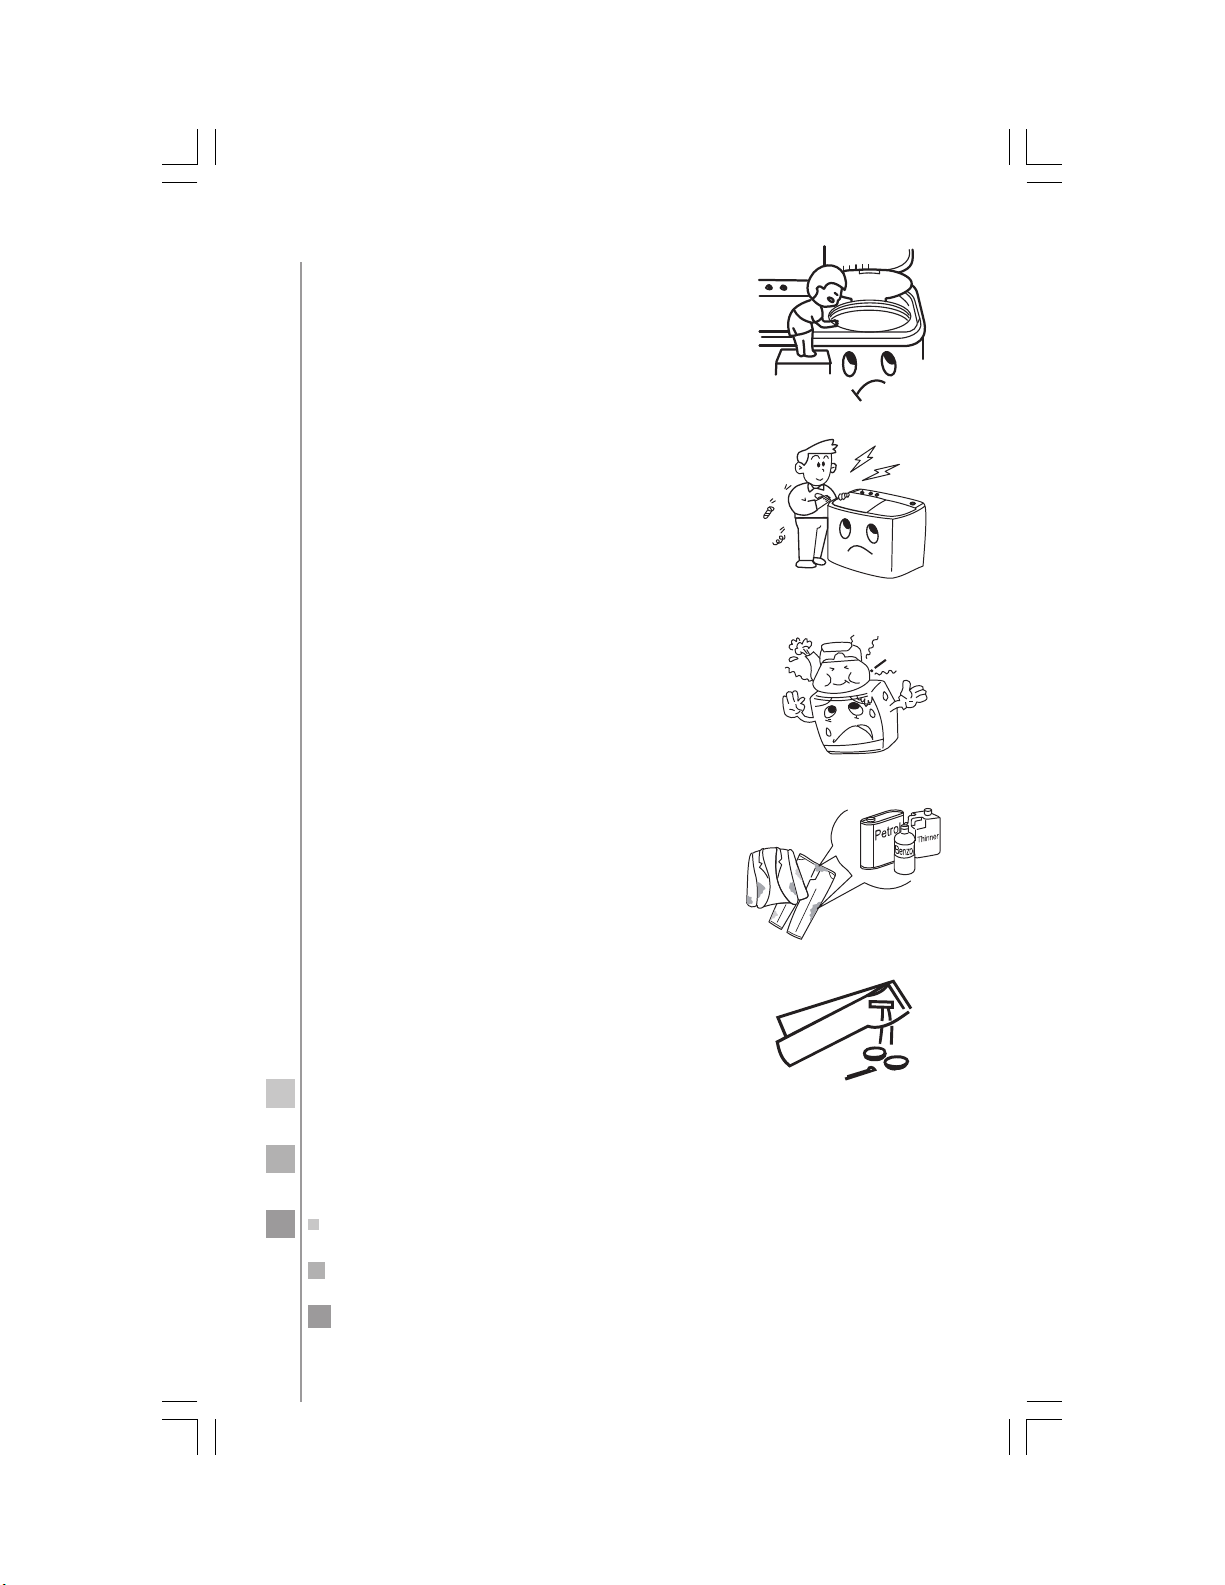
• Do not reach into the working machine.
It is dangerous even if the rotation is
slow. Take special care of the children.
• Do not attempt to disassemble, repair or
alter the machine by yourself.
• Do not put hot or heavy objects on the
washing machine.
• Do not wash laundry with volatile or
flammable materials (such as thinner,
petrol etc.).
• To protect your clothes and the washing
machine, remove all coins, buttons, sand,
hairpins and all foreign materials before
washing.
• Make sure that the water faucet is turned on and you have the
proper water pipe connection.
• Do not exceed the maximum water level of the washing tub.
Page 7
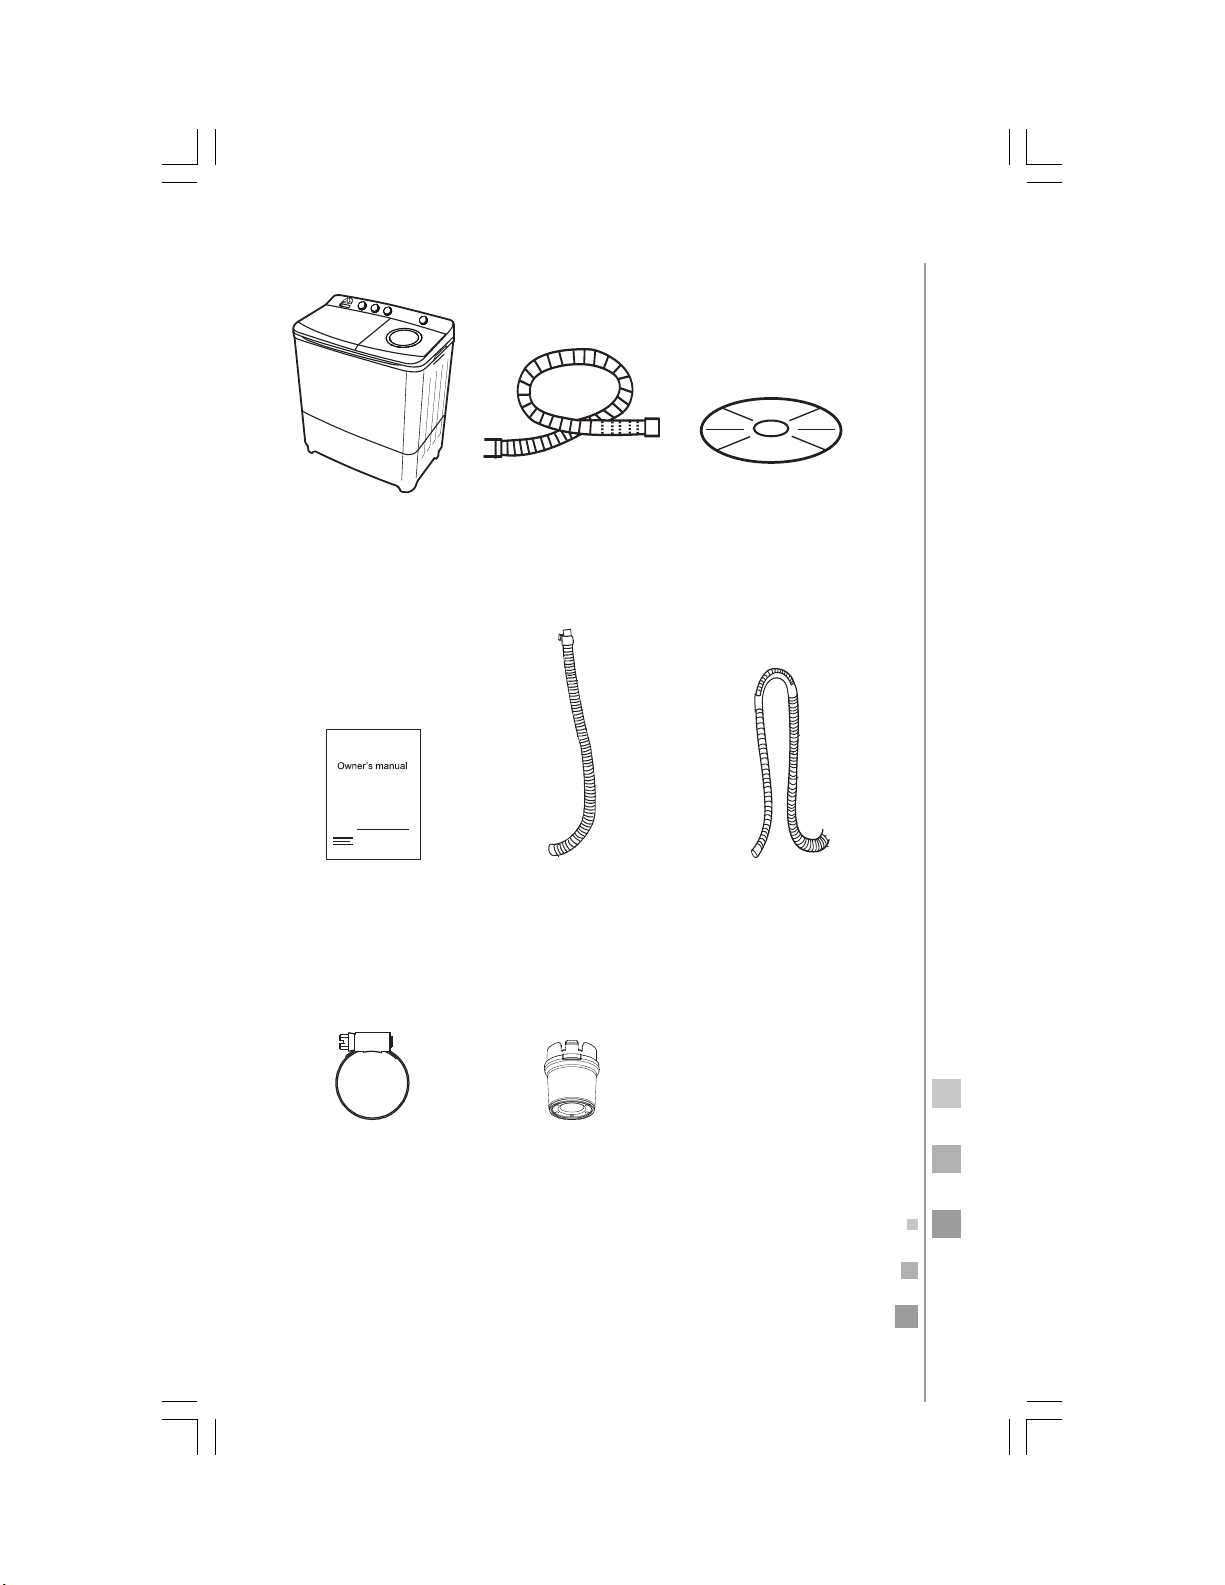
packing list
Twin-tub washing
machine
7
Water inlet hose Spin cap
Owner's manual Draining hose (on
models LMD6124PBEB0,
LMD6124PBCS0,
LMD8124PBCS0)
Hose clamp (on mod-
els LMD8124PBEB0)
Bottom leg
Draining hose (on
models LMD8124PBEB0)
Page 8
8
123
4
5
6
7
8
9
10
11
12
13
14
15
16
17
18
19
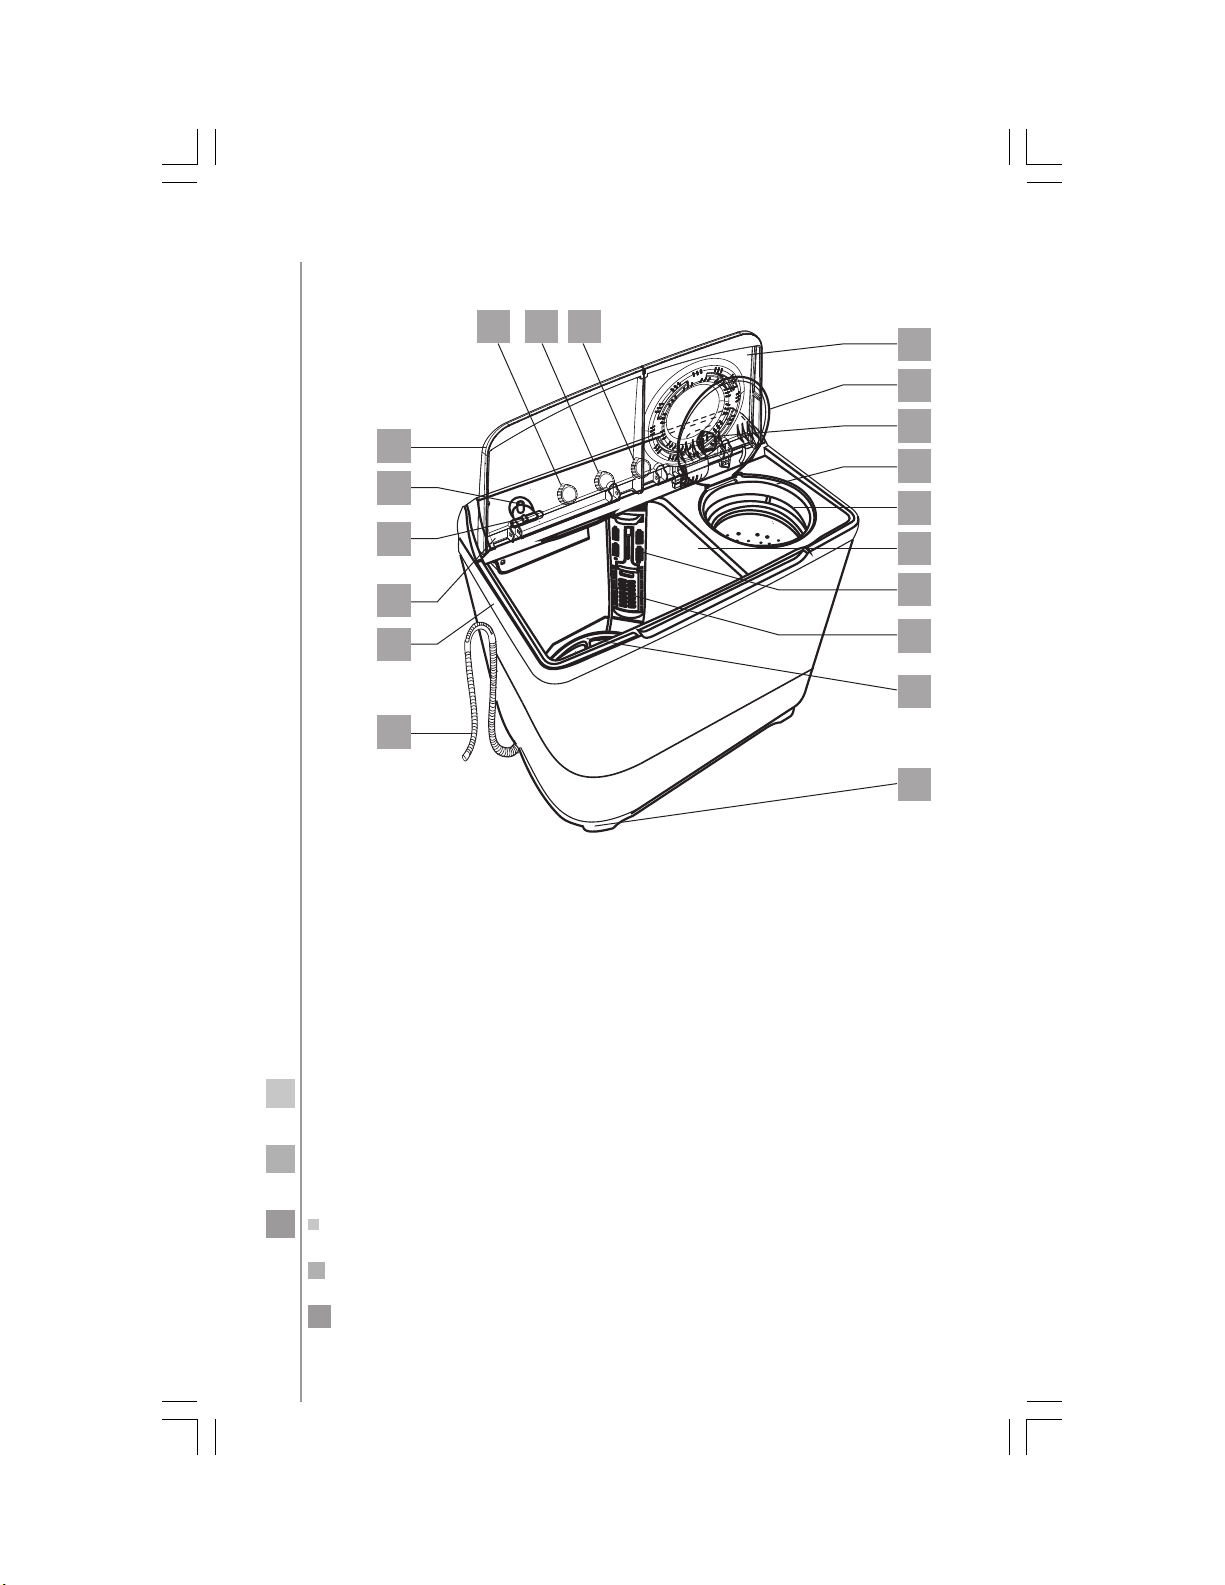
machine components
1. Drain selector knob
2. Wash type selector knob
3. Wash timer
4. Wash tub cover
5. Water inlet port
6. Water inlet switch
7. Control panel
8. Main frame
9. Drain hose
10. Spin tub exterior cover
11. Spin tub interior cover
12. Spin timer knob
13. Spin tub frame
14. Spin tub
15. Wash tub
16. Overflow filter
17. Lint filter
18. Pulsator
19. Base
Note: All illustrations in this manual are placed for reference only.
Your product and accessories may show differences from the ones illustrated.
Page 9
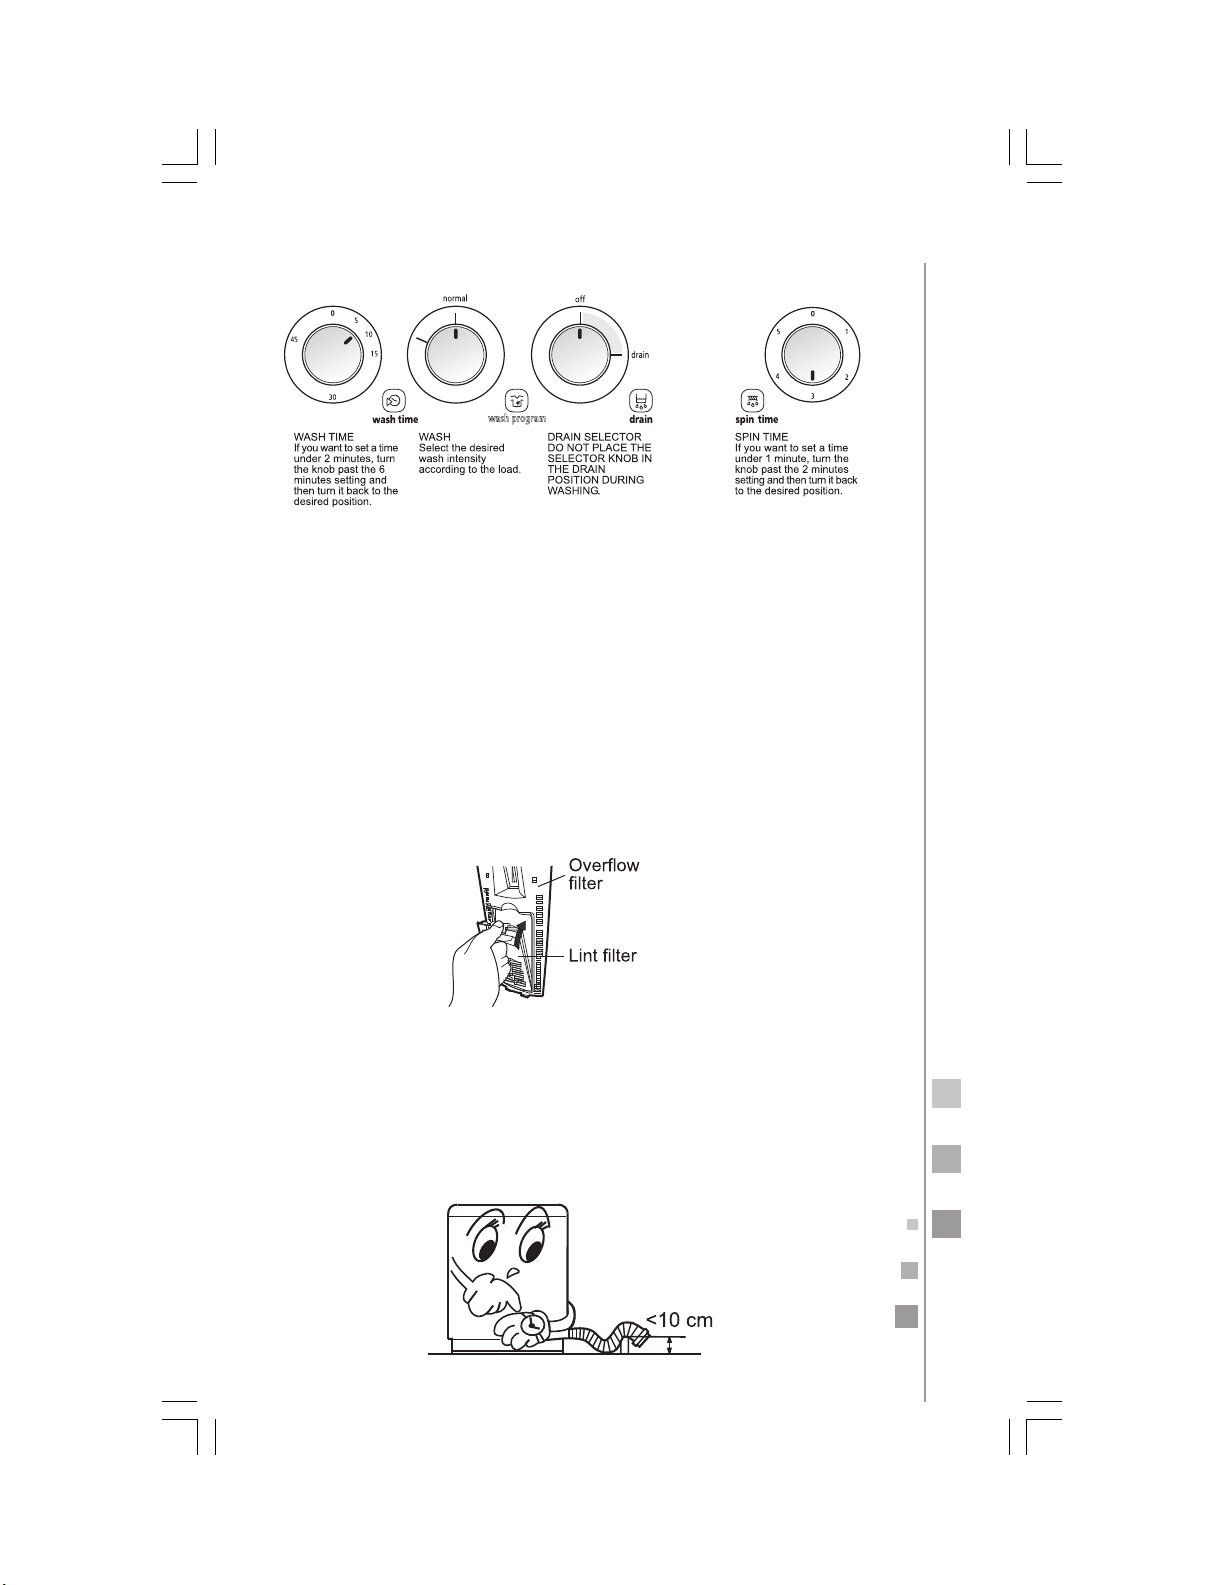
controlpanel
soft
wash program
PROGRAM
installation instructions
For your security and to ensure correct operation of the machine,
please install and adjust the machine according to these instructions.
installingthe lintfilter
Place the bottom side of the lint filter into the overflow filter, then
push the top side into the overflow filter.
After installation, double check to make sure that the lint filter is installed in the correct location; otherwise it may fall o ff during operatio n .
9
set up the drain hose on models (LMD6124PBEB0 ,
LMD6124PBCS0, LMD8124PBCS0)
The drain hose when laid down on the floor, should not be higher
than 10 cm, otherwise the drainage will not flow at the proper rate
causing an incomplete process.
Page 10
10
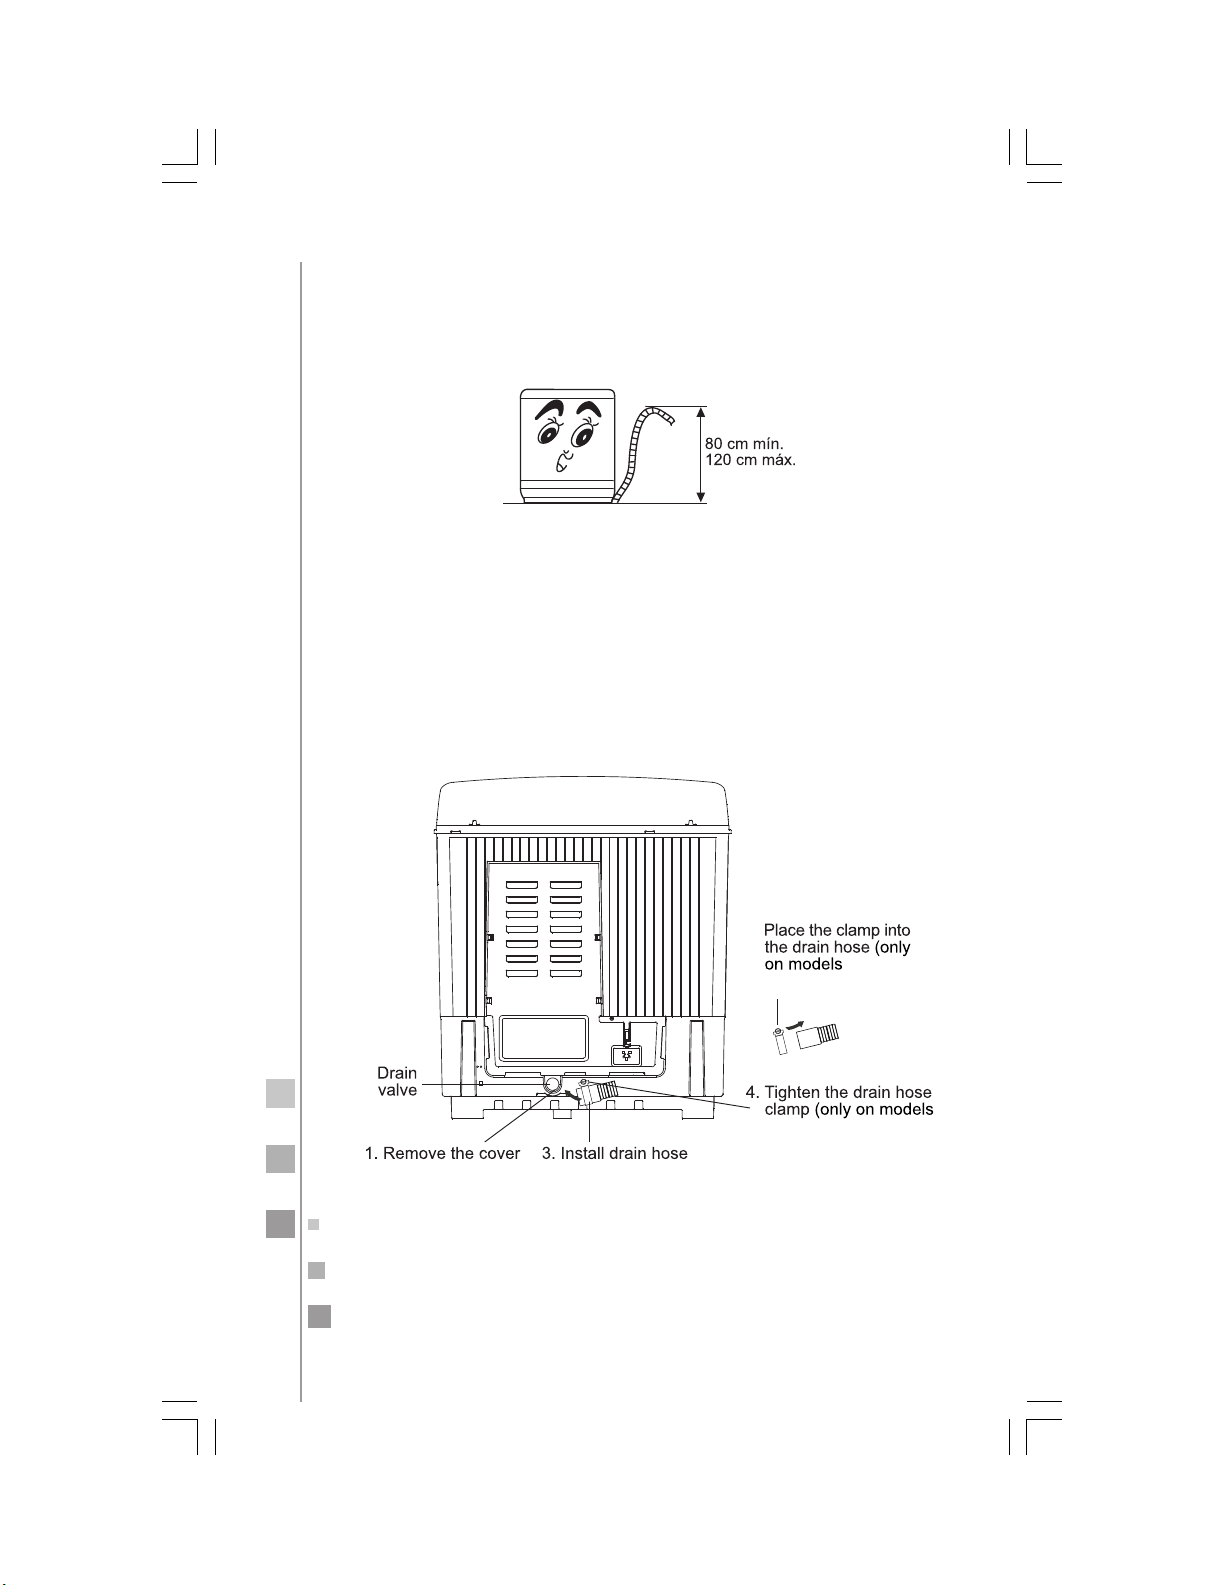
set up the drain hose on models (LMD8124PBEB0)
Before using the washer, hang the drain hose on a suitable location.
The height of the drain hose should be between 0.8 - 1.2 m
install the drain hose
The drain hose is packed inside the wash tub at the factory. Before
using the machine, screw the drain hose on the drain valve. Make
sure the drain hose is firmly fixed.
LM2.D8124PBEB0)
LMD8124PBEB0)
Page 11
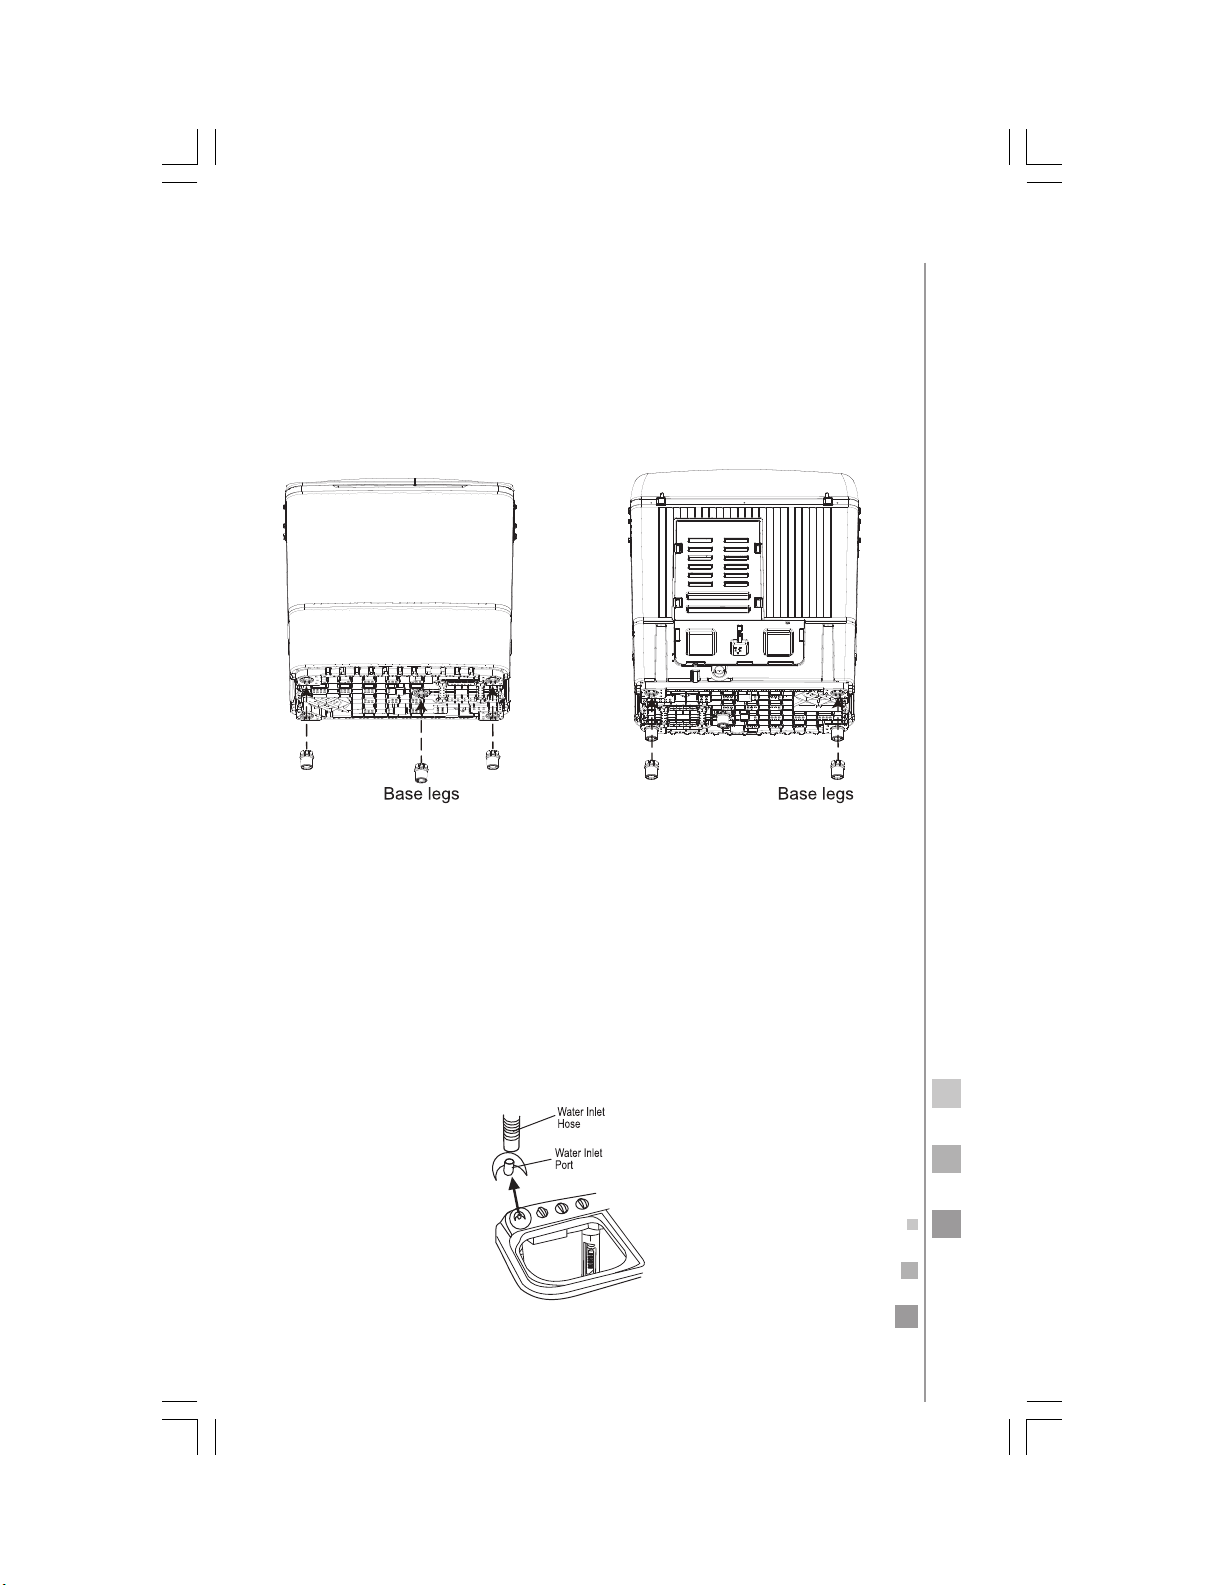
install the washer legs
1. Carefully tilt the washing machine to the back and install the bottom legs at the front of the base. Make sure that the legs are installed in place. (Figure 1).
2. Carefully tilt the washing machine to the front and install the bottom legs at the back of the base. Make sure that legs are installed
in place. (Figure 2).
11
Figure 1 Figure 2
install the water inlet hose
On models so equipped, insert the water inlet hose into the waterinlet port on the control panel.
Make sure the end of the inlet hose that has a couple is firmly
seated in the water inlet port. Otherwise there could be water leaks
that can damage the washer.
Page 12
12
washing tips
• The maximum capacity during washing and spinning cycles refers
to the maximum weight of standard dry clothes that can be
washed or spined at the same time. The load size during any washing cycle should be lower than the rated capacity.
• Thickness, size, and the type of items to be washed will affect the
actual washing capacity. Load a reasonable amount of items so
they can freely move inside the washing tub.
• To avoid splashing, do not select the MAXIMUM water level for
small loads.
• Do not use high sudsing detergent.
before washing a load
• Check to see if the items to be washed have special washing requirements.
• Place hard to absorb water items into the tub submerging them
with your hands.
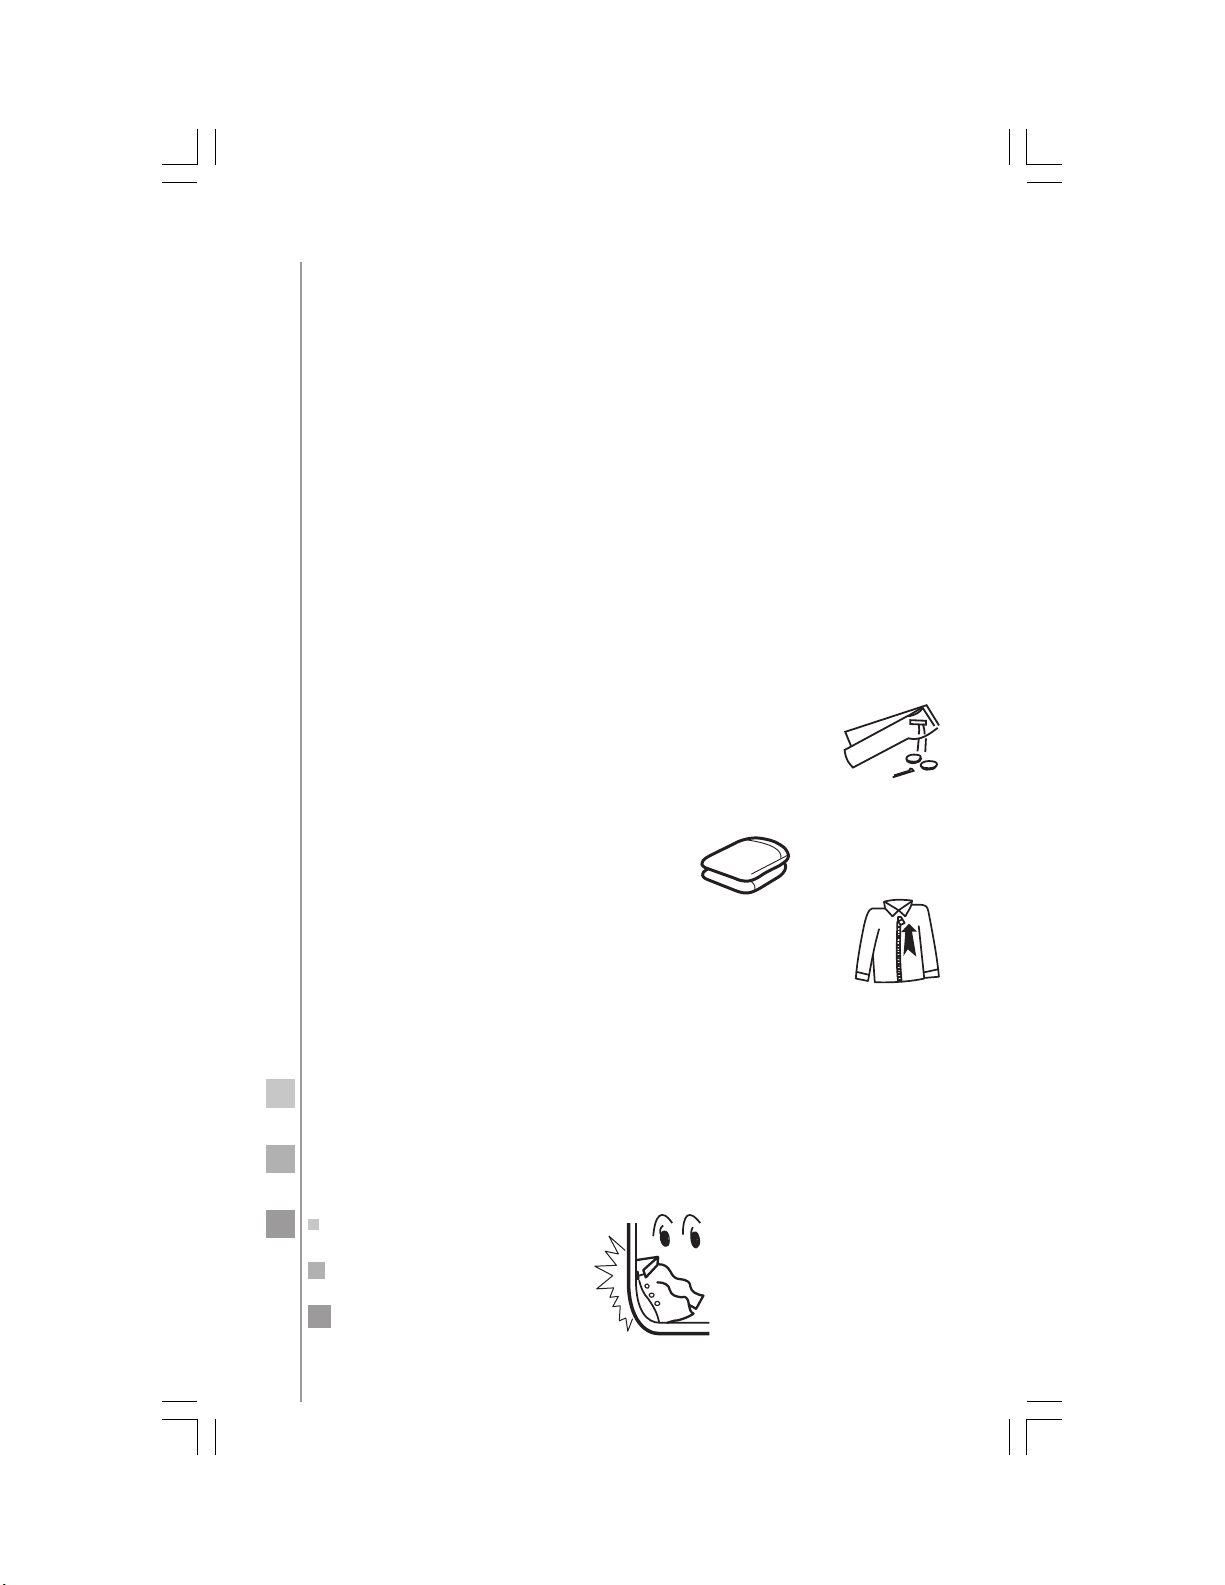
• Empty out pockets. Take out any coins, sand, hairpins, etc.
• Check to see if the items are appropriate for use
with the washing.
• Do not overload the washer. Stretch and loosen items before adding them into the washing tub.
• Tie any long strips; fasten buttons and zippers.
• For items prone to form lint balls and/or fur items,
turn them inside out before adding them into the
washer.
• Do not wash items polluted by chemical substances.
• For heavily soiled items, remove dirt such as mud or dust and apply
detergent before loading them into the machine. This will help to
remove the stains more easily.
• Sort non-colorfast items from other items.
• When the pulsator is running, you may hear noise caused by buttons on the clothes. To minimize this noise, surround items with
buttons with other clothes.
Page 13
proper use of laundry products
Powder detergent
Method 1: Dissolving it in the wash tub:
1. Add a small amount of water into the machine.
2. Add the powder detergent. Run washing machine for 30 seconds
to dissolve it completely.
3. Place load into the washing machine and select a suitable water
level.
Method 2: Instantly dissolving the detergent powder:
1. Prepare warm water at 30 °C in a container.
2. Add the detergent powder while stirring until it completely dissolves.
• Powder detergent is more prone to damage laundry than liquid
detergent. Please exercise caution and do not exceed the maximum quantity.
• The amount of powder detergent needed for a load will vary.
Please follow the instructions on the detergent package.
Bleach
• Add water to suitable level. Dilute the bleach in a separate con-
tainer. Pour it slowly into the washing machine.
• Avoid using whitening agents on items with colors and/or patterns
as they are prone to lose color.
• Bleach should not come in direct contact with the load.
• Refer to the product`s manufacturer instructions for information
on proper usage and quantity.
• Always dissolve powder whitening agents before use.
13
Page 14
14
washing sequence
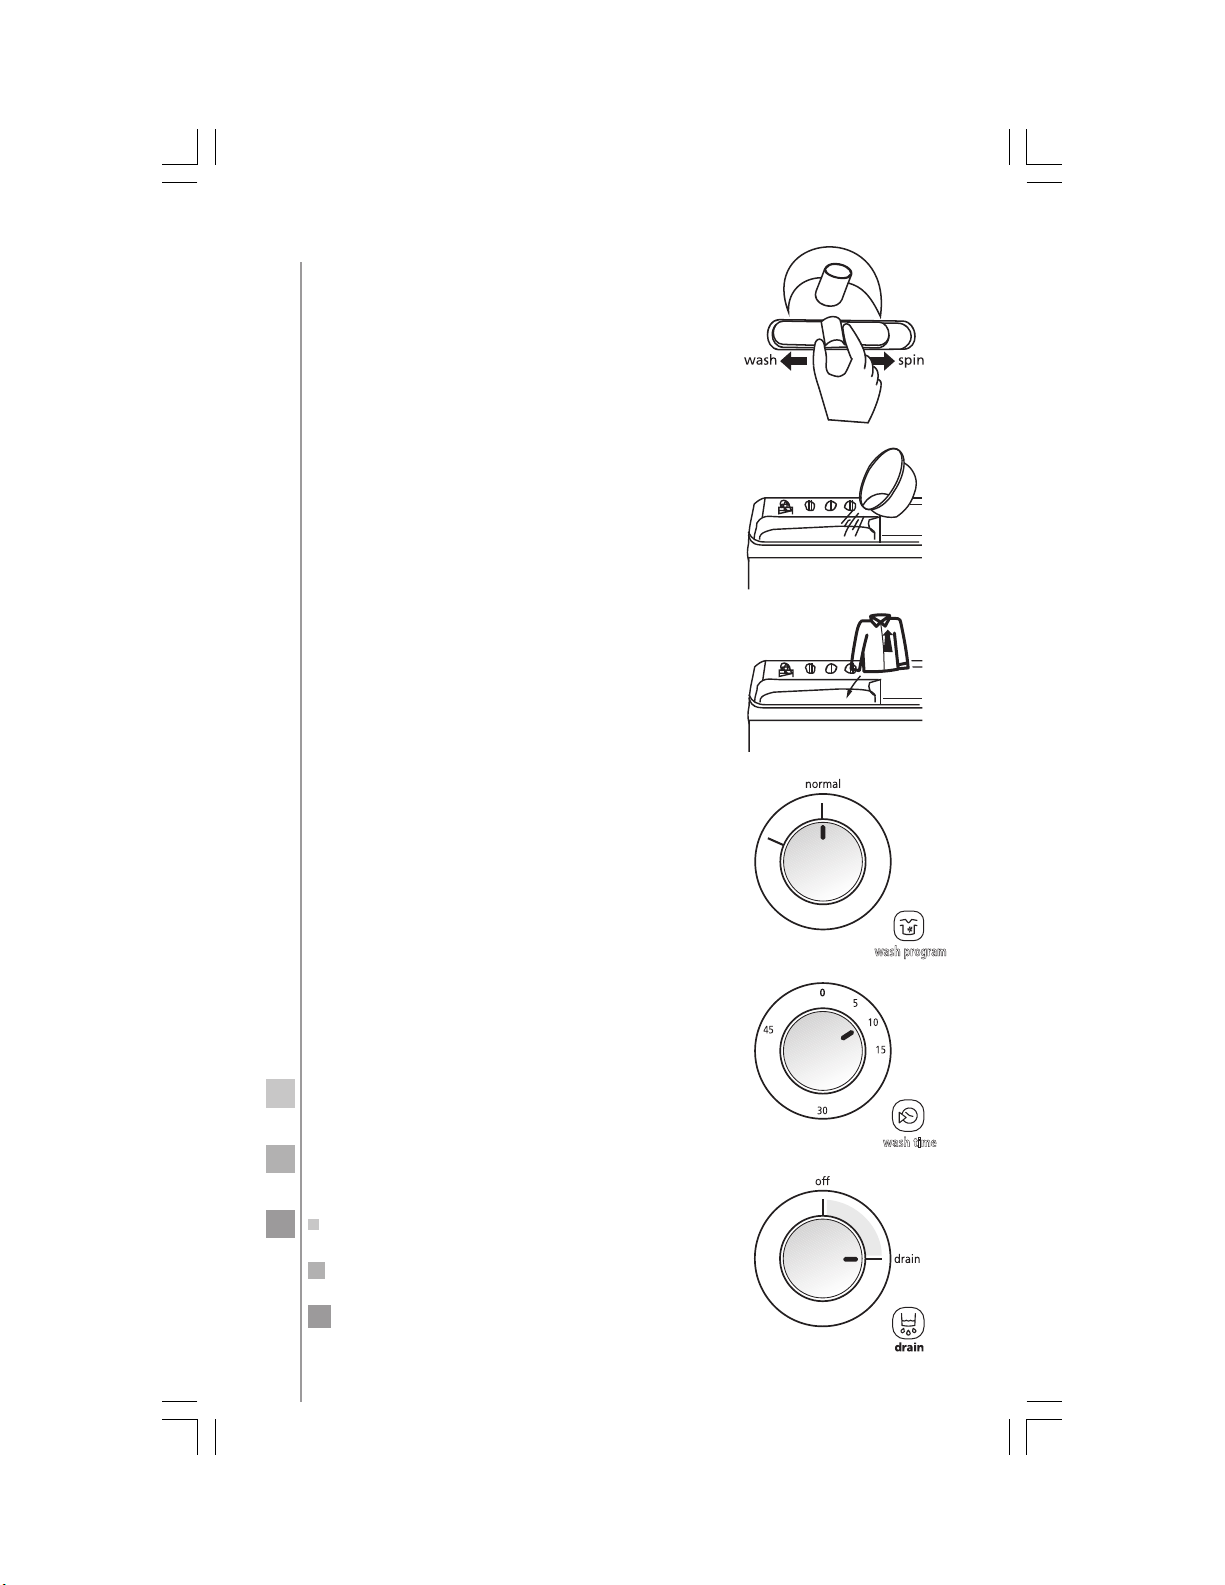
1. Water Inlet Selector. Set the selector to
the WASH setting.
2. Add water. Let the water enter the
washer tub. Add the diluted detergent
and make sure the water level reaches
the desired level.
3. Add the wash load into the tub. Add
more water as necessary.
4. Select the washing intensity. Select
SOFT or NORMAL washing intensity
according to the type of load.
5. Select the washing time according to
the load.
6. After the wash cycle is completed, set
the Water Inlet Selector to the DRAIN
position.
soft
wash program
wash time
Page 15
spin
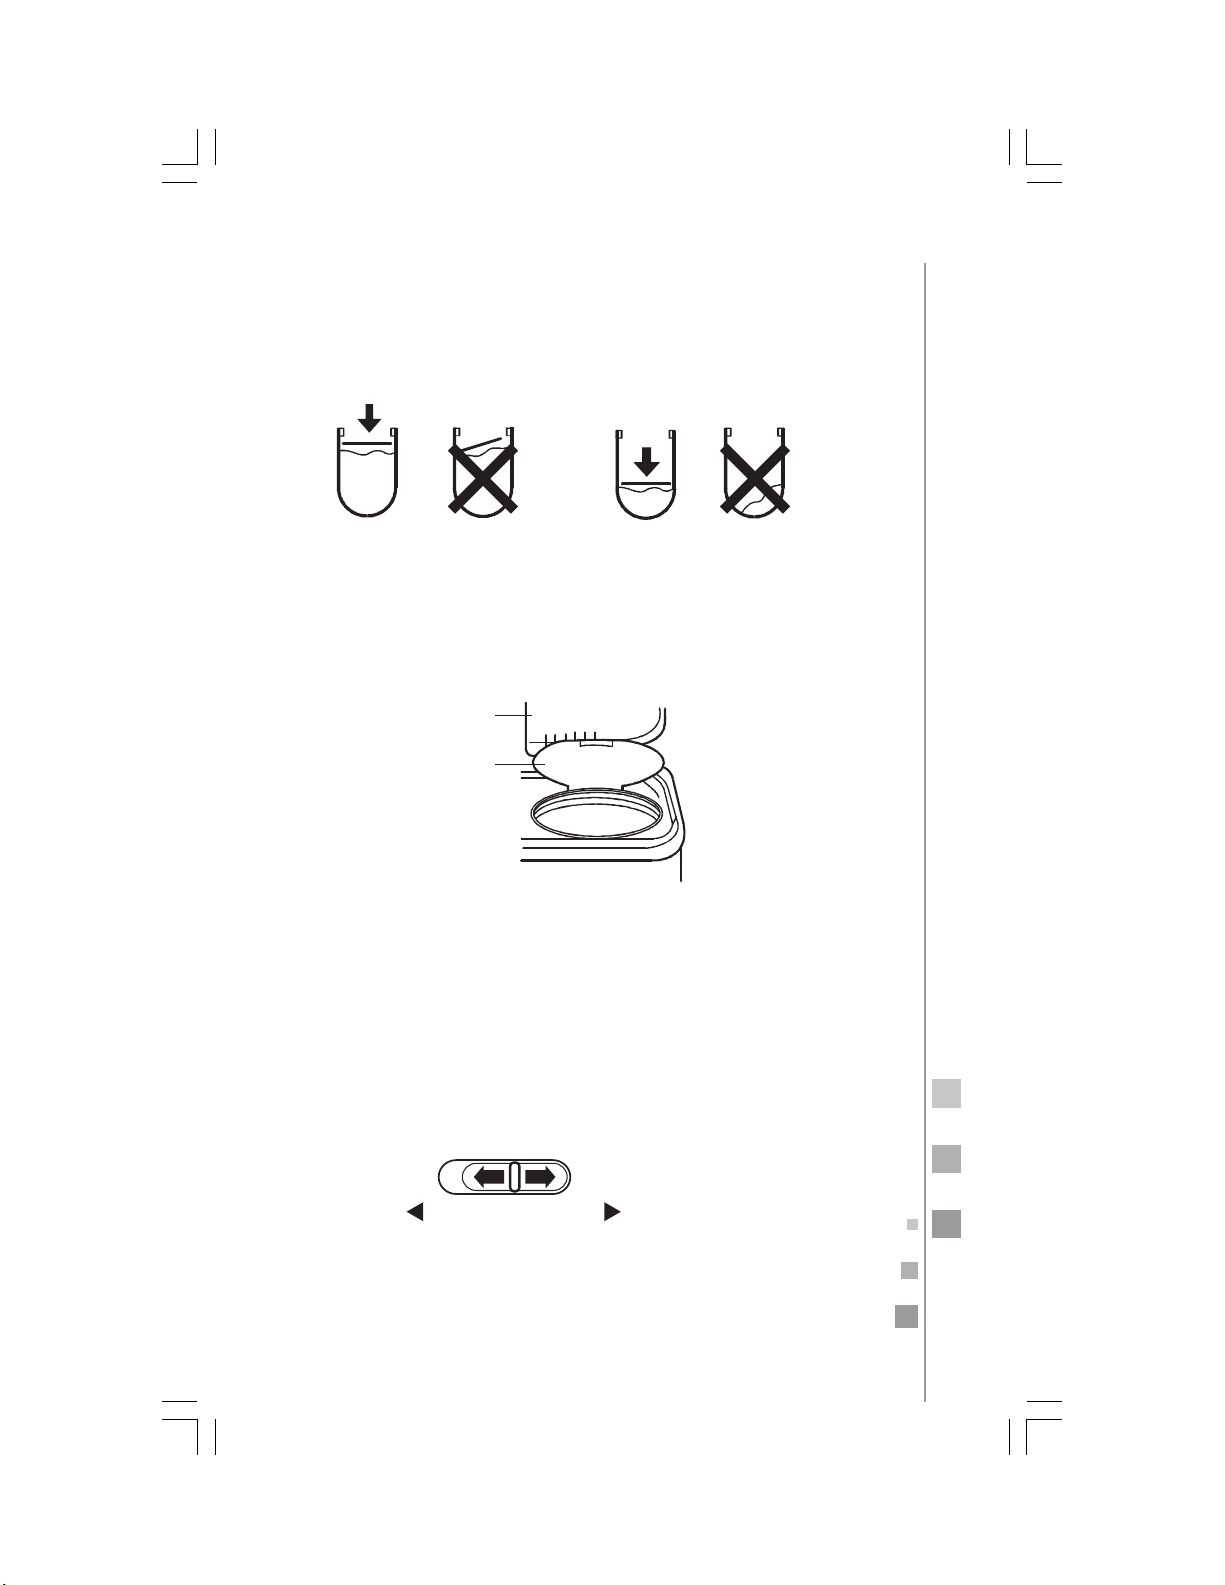
1. Distribute the load into the spin tub evenly and smoothly.
Properly place the spin cap, even when the load size is small.
Press down
spin cap
Press down
15
Correct
position
2. Spin the load.
3. Close both the interior and exterior lids of the spin tub.
4. Spin the load for 1-2 minutes.
Unbalanced
load
Exterior lid of
the spinning
tub
Interior lid of
the spinning
tub
Correct Without
spin cap
run a foam-removing spin
1. Open the exterior lid of the spin tub.
2. Set the water inlet selector control at the SPIN position. Let the
tub fill with water for about 1 minute. If the water flow rate is
too high, the water may flow out from the wash tub side. Adjust
the water tap to limit the water filling.
wash spin
3. Close the exterior lid of the spin tub. Spin for 1-2 minutes.
Page 16
16
rinse
1. Place the load into the washing tub. Select the appropriate wash
type according to the load.
2. Adjust the water level and let the water into the tub.
3. Use the WASH TIME selector knob to set a time of to 5-7 minutes
to perform the rinse.
rinsing with stored water
You can repeat the rinse-spin procedure 2-3 times using stored water.
1. Place the load into the washing machine. Select the appropriate
wash type according to the load.
2. Fill up water to the preset level.
3. To rinse, adjust the wash timer to 2-3 minutes.
When the load is small, use the LIGHT setting. If you use the NORMAL setting, the water may splash.
spinning
1. Evenly distribute the load into the spin tub.
2. Use the spinning cap to press the load inside the tub. Close the exterior and interior lids of the spin tub.
3. Select an appropriate spinning time according to the condition of
the load.
During the spinning cycle, you may hear abnormal sounds, they are
generally caused by an unbalanced load. Stop the machine and
evenly distribute the load inside the spinning tub.
During the spinning cycle, the machine will pause if the exterior lid
of the spinning tub is opened. Close it to resume the spinning cycle.
important
To run spinning and draining or rinsing with water
filling one after the other, first run the spinning
cycle for around 1 minute, then draining or rinsing
with water filling. Otherwise the spinning will stop
automatically because of the excess water in the
spinning tub.
Page 17
once the wash is completed
WARNING: UNPLUG THE WASHER FROM THE
POWER SUPPLY BEFORE PERFORMING ANY
CLEANING OR SERVICE JOB.
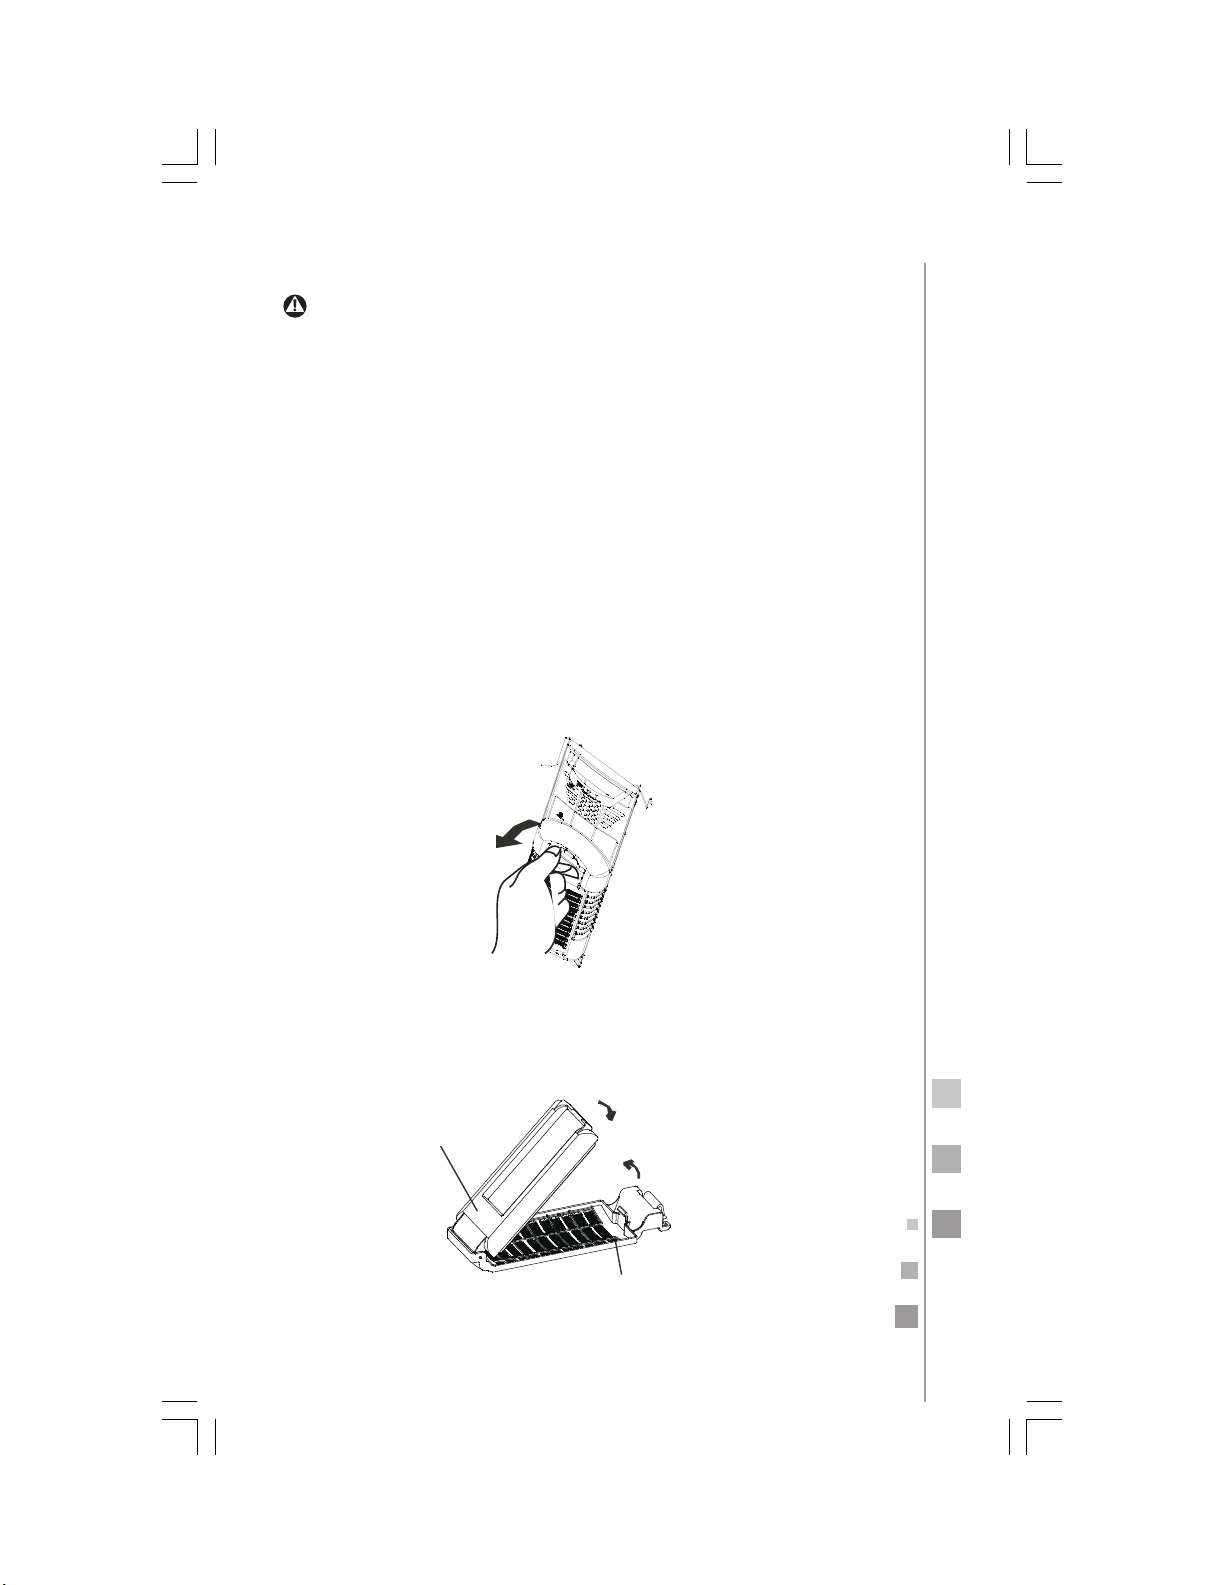
After each use, be sure to clean the lint as well as any foreign materials from the lint filter and the overflow filter. Removing lint is important for the good operation of the machine.
cleaning the lint filter
THE LINT FILTER MUST ALWAYS BE USED DURING WASHING AND
SHOULD BE CLEANED AFTER EACH USE.
1. To remove the lint filter, first press the elastic piece at the top end
of the filter to release the tab from the filter cover, then pull outward.
17
2. Pull out the bottom end of the lint filter to separate it from the
lint filter front cover. Remove lint completely by rinsing with clear
water.
Assemble
Lint filter
back cover
Disassemble
Lint filter front cover
3. Assemble and reinstall the lint filter.
Page 18
18
cleaning the overflow filter
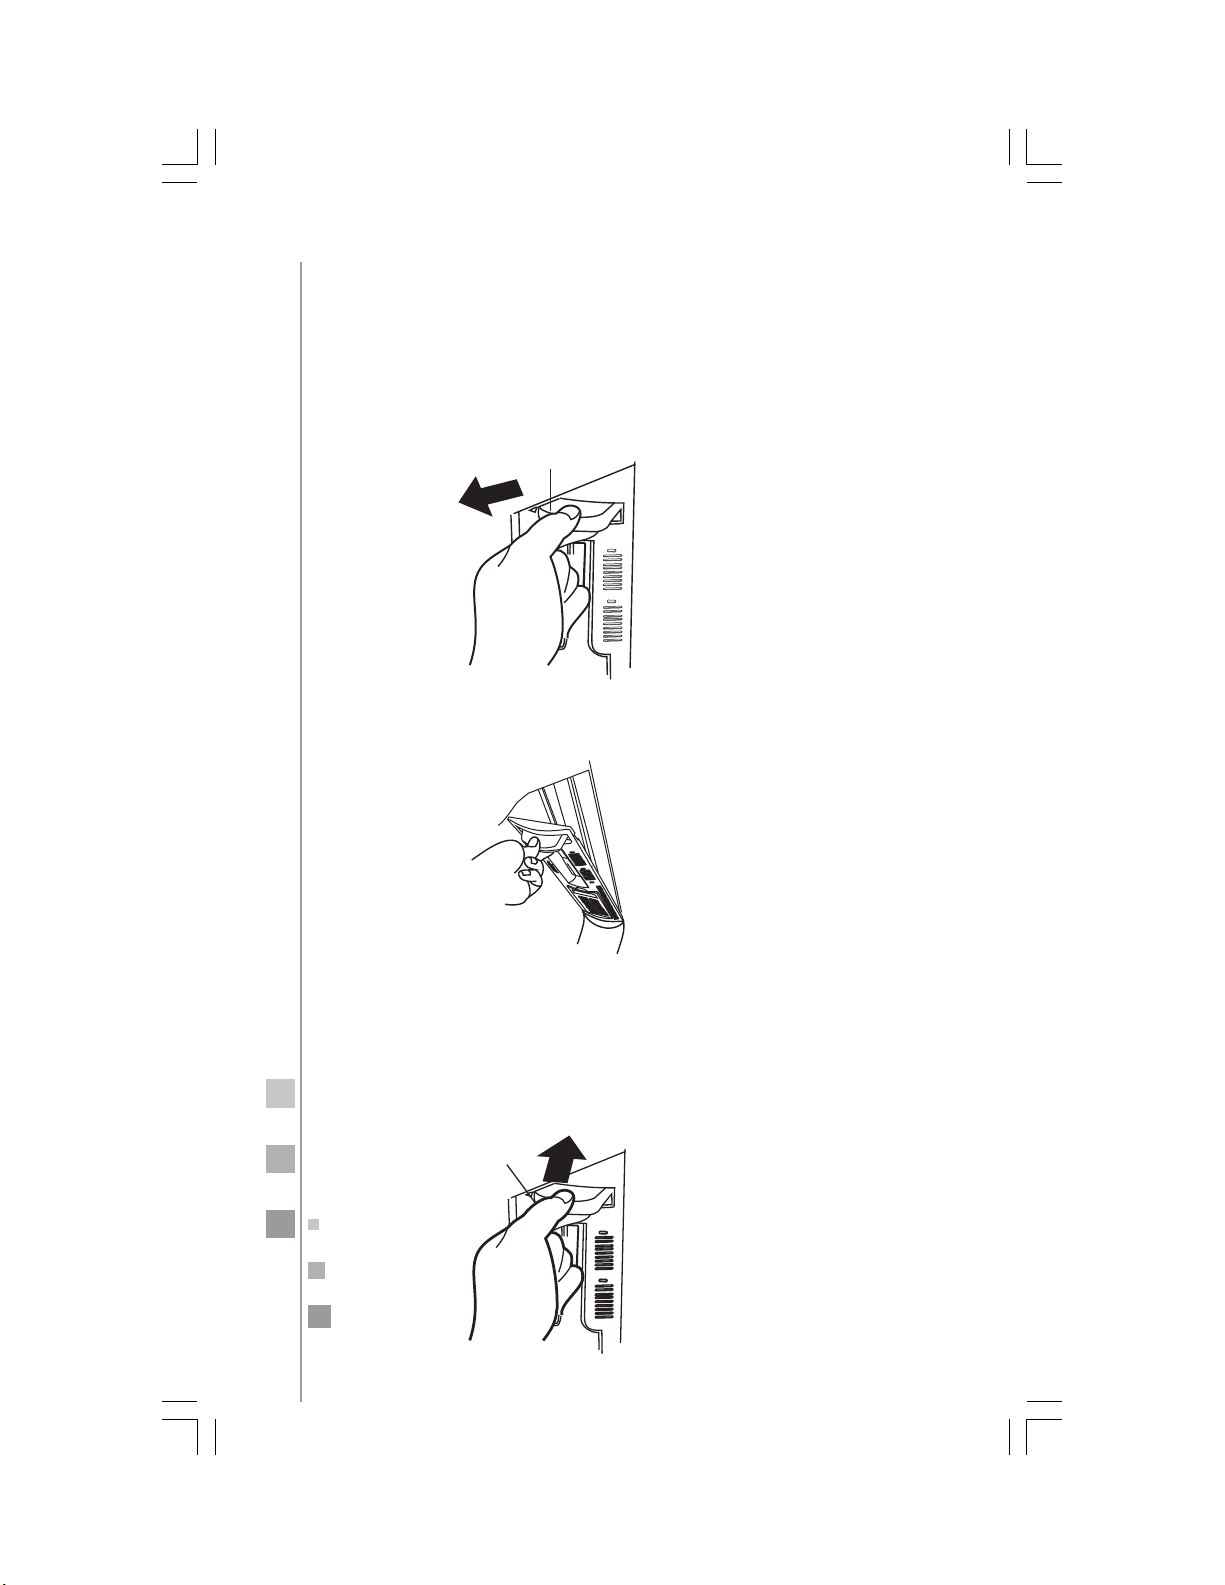
Too much lint in the overflow filter will affect the normal operation
of the machine. Clean it once every two months.
1. Remove the overflow filter. Nip the elastic fixing claw and pull in
the direction of the arrow to remove the overflow filter (as shown
in the illustration).
Elastic Fixing Claw
2. Clean the overflow filter. Clean the lint around the filter and flush
with tap water.
3. Reinstall the overflow filter.
a. Install the corrugated hose.
b. Attach the mounting plate at the bottom of the filter onto the
valve cover.
c. Hang the hook on the left upper side.
d. Push in the top end.
Hook
Page 19
cleaning the unit
• Wipe the entire unit using a soft moist cloth.
• Use a neutral detergent, if the machine is very dirty.
• Do not use water directly when cleaning.
• After washing, disconnect the water inlet hose.
• Do not let water stand into the machine for long periods of time.
Drain the water immediately after each use.
• Disconnect the power plug and hang up the power cord.
• Hang up the drain hose. Wipe off water drops from the surface of
the washer and inside the machine using a clean soft cloth.
• Leave the washer lid open, as well as the exterior and interior lids
of the spin tub for a short period of time (about one hour), then
close them.
prevent freezing
1. Be sure to drain the water completely after each use.
2. After complete the drain, set the DRAIN SELECTOR knob to the
OFF position. If the selector is set to the DRAIN position, it will be
difficult for the frozen water to melt.
19
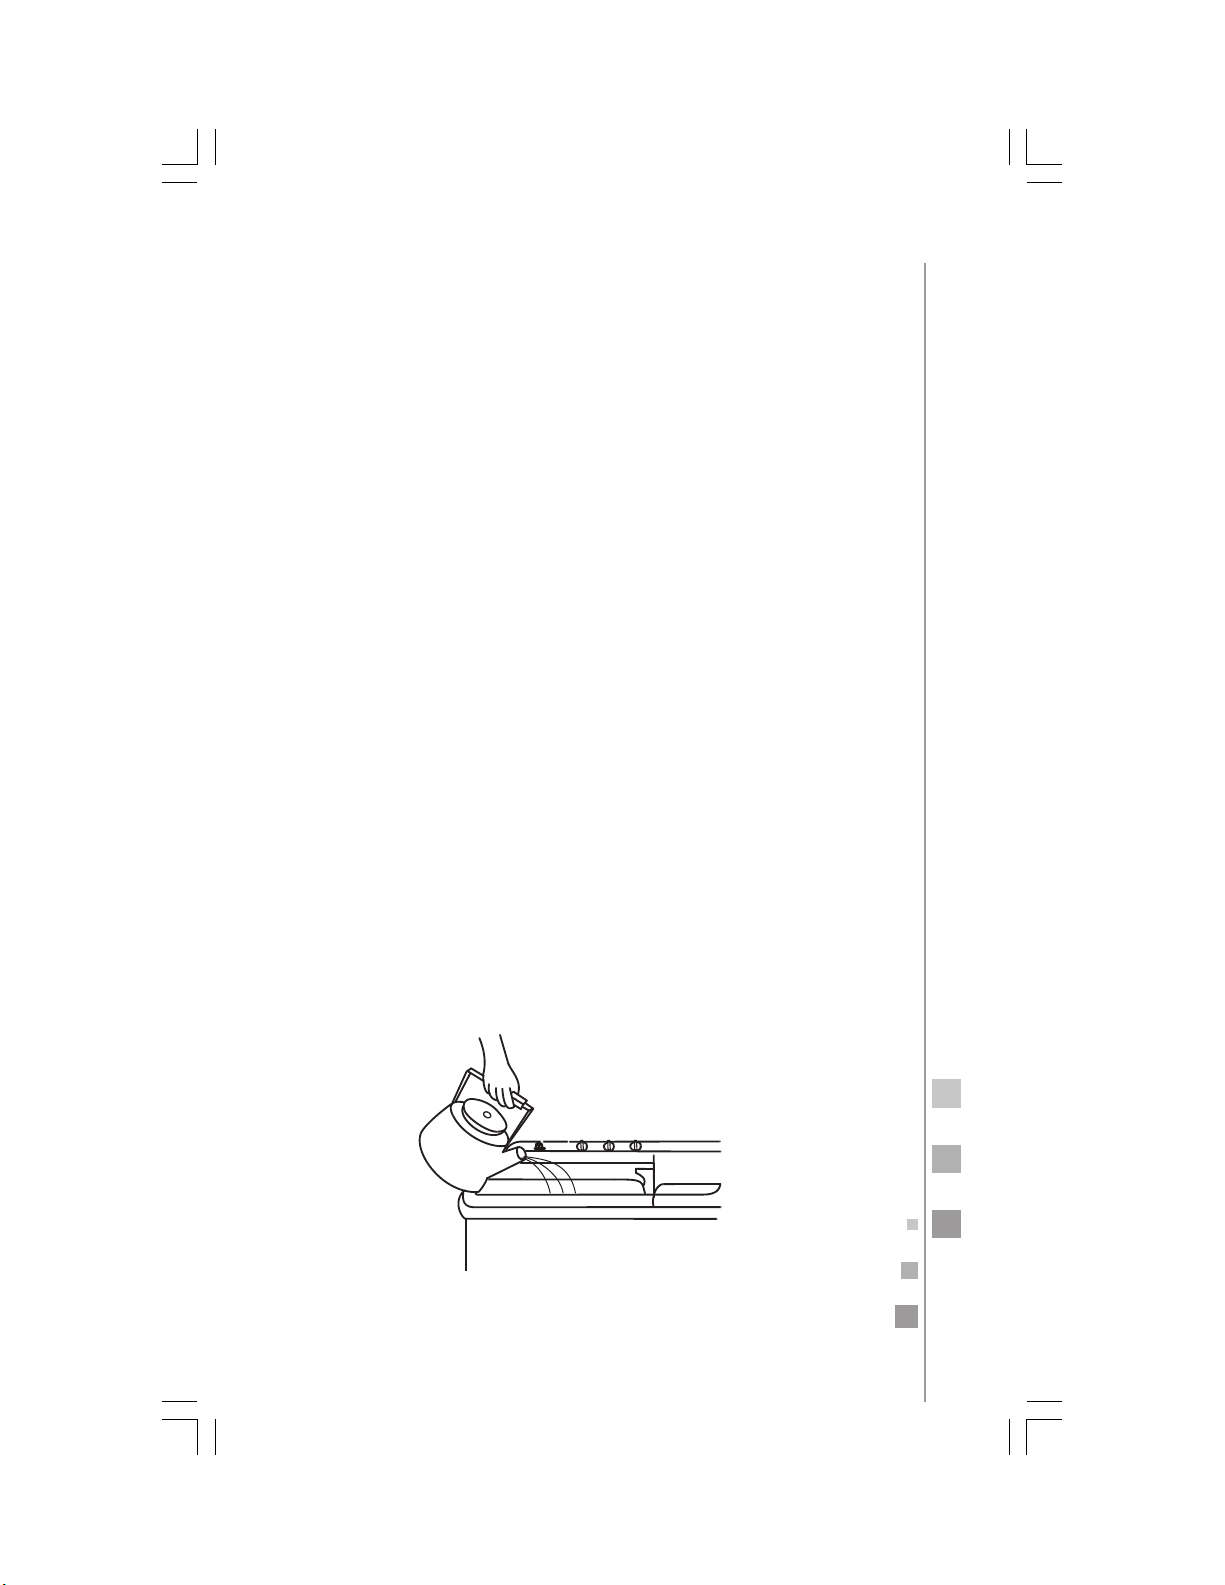
if water freezes inside the tub
1. Pour hot water (BELOW 50 °C) into the wash tub to soak it com-
pletely.
2. Using your hands, gently turn the pulsator.
3. Confirm that the drainage function is operating normally before
next use.
2 - 3 liters of water
below 50 °C
Page 20
20
troubleshooting
If a breakdown occurs, unplug the power cord before inspecting the
machine.
The following situations do not always indicate a breakdown. Please
double confirm before sending the machine to be repaired.
If an actual breakdown occurs, visit the special maintenance department or after-sales service department of our company. Do not attempt to repair the machine by yourself.
Problem Possible cause
The machine does
not start
• Is there a power failure?
• Is the power plug loose?
• Is the pulsator twisted by foreign materials?
The draining function does not work
Abnormal sound
during washing
Abnormal sound
and violent vibration during the
spin cycle.
Water flowing out
of the drain hose
during the first use
of the machine.
The spin part does
not work
• Is the drain hose frozen?
• Is the drain hose blocked by foreign material?
• Is there laundry adhering to the outer side of
the spin tub?
• Check the position of the drain hose, make
sure that the drain hose is fitted into a tub or
drain standpipe 0.8 - 1.2 m above the floor.
• Are there hair pins, coins or metal items inside the tub?
• Is the machine slanting?
• Is the gland pressed evenly?
• Is there laundry adhering to the outer side of
the spin cycle compartment?
• Is the spin cycle compartment overloaded?
• This is the water left over after the factory
performance inspection.
• Is the spin tub outer cover open?
Page 21
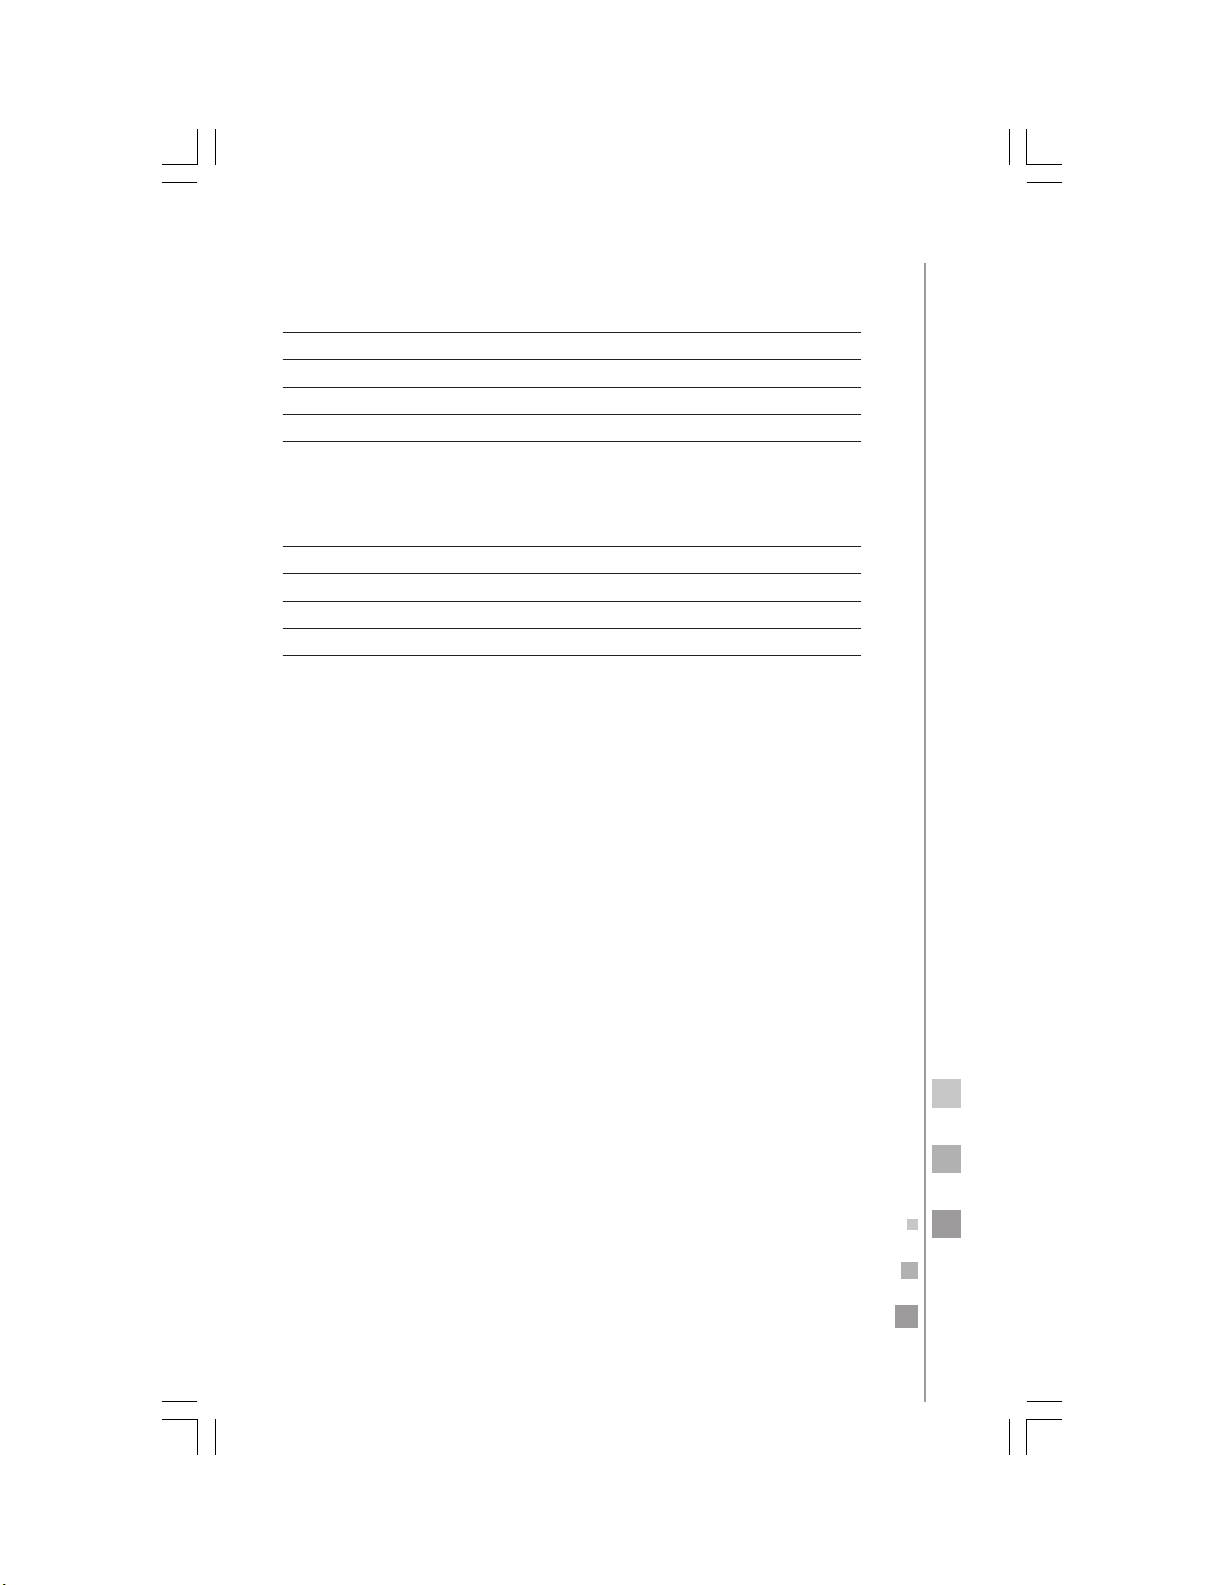
specifications
21
Model
Rated washing power
Rated spinning power
Rated voltage/frequency
Capacity
Model
Rated washing power
Rated spinning power
Rated voltage/frequency
Capacity
LMD6124PBEB0
420 W
280 W
110 V/60 Hz
16 kg
LMD8124PBBEB0
430 W
300 W
110 V/60 Hz
18 kg
LMD6124PBCS0
420 W
280 W
220 V/50 Hz
16 kg
LMD8124PBCS0
430 W
300 W
220 V/50 Hz
18 kg
Page 22
22
notes
Page 23
23
Page 24
24
 Loading...