

Page 1

1
PM01
LMD3123PBEB0
LMD3123PBCS0
read this owner's manual before installing your new twin tub washing machine
owner's manual
twin tub washing machine
models
Page 2
2
Page 3
contents
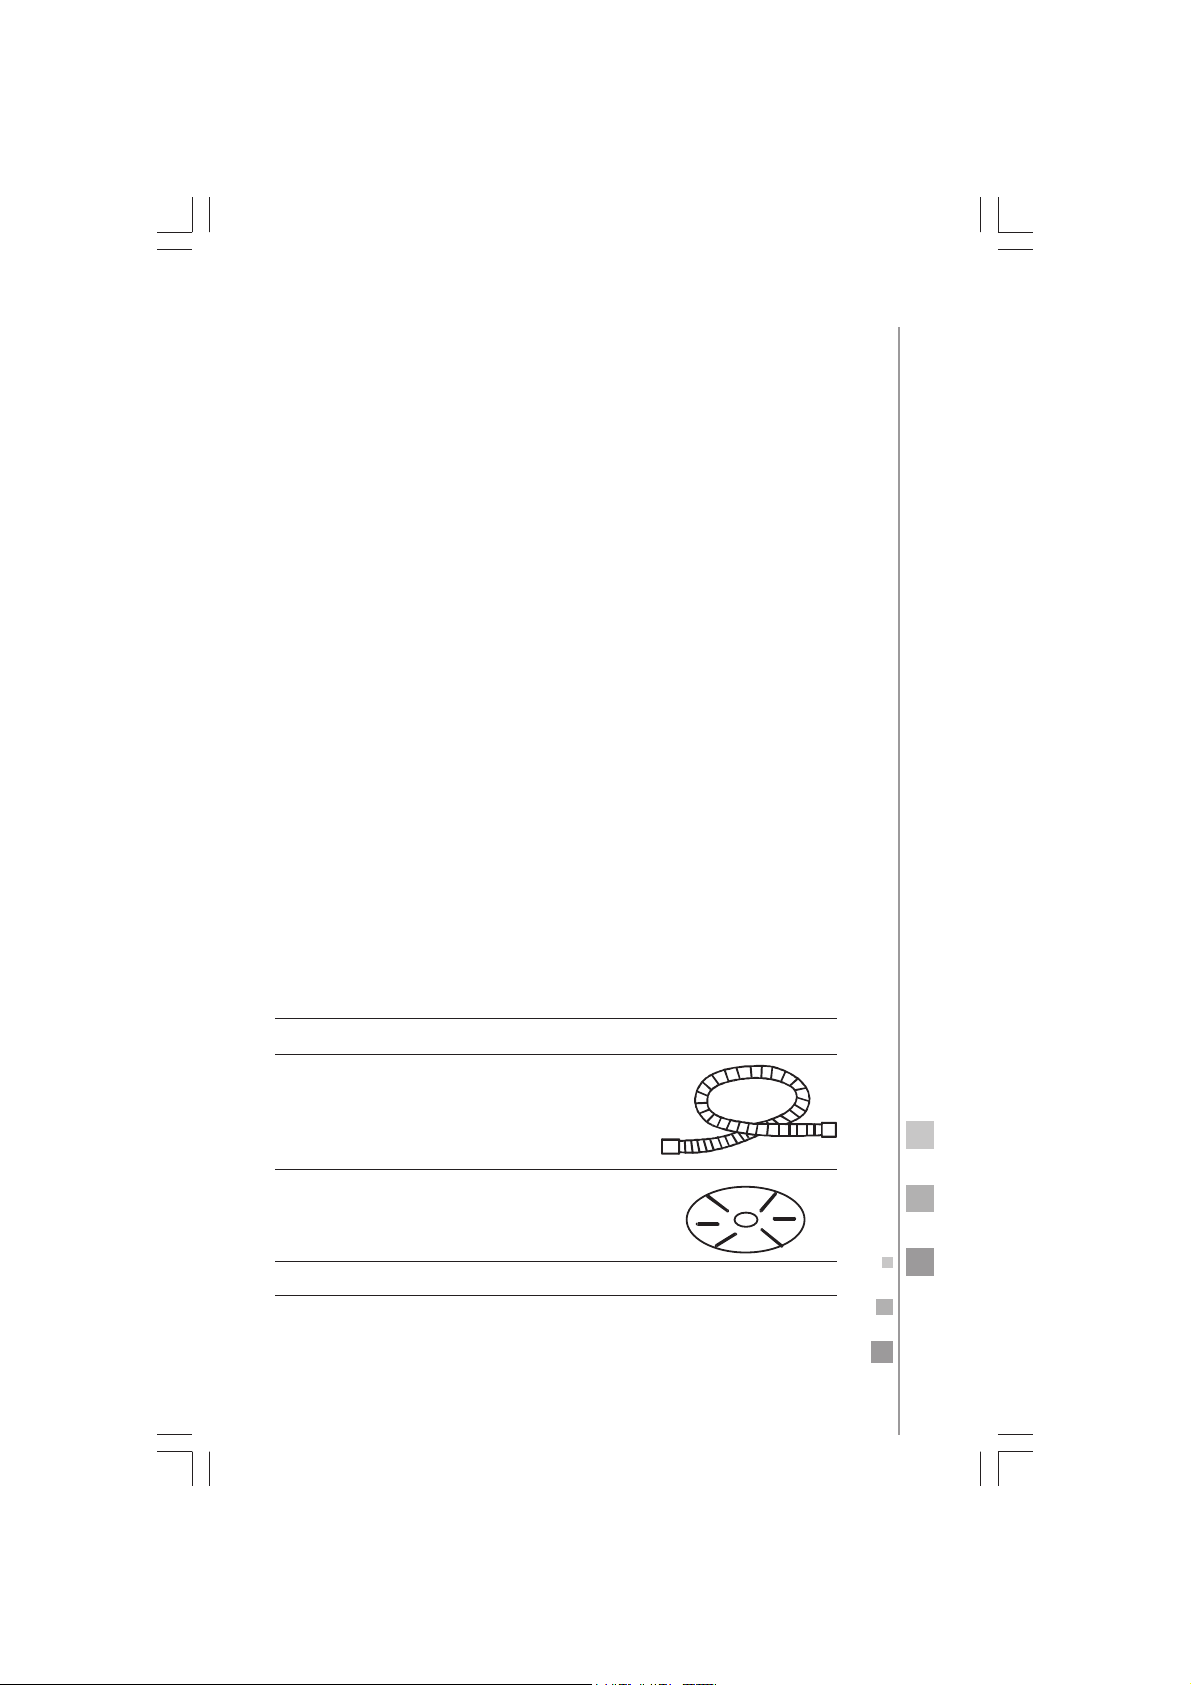
List of packaged parts
Important Safety Instructions
Parts of your new twin tub washer
Installation instructions
Preparation before washing
Washing tips
Proper use of laundry products
Control panel
Washing sequence
After washing a load
Cleaning the unit
Troubleshooting tips
Rated electrical specifications
......................................................................................... 14
........................................................................................ 15
............................................................................
....................
............................
................................................................. 13
............................................................. 15
............................................................................... 16
............................................................................. 19
......................................
..................................
.............................................................. 25
............................................. 4
............................................... 9
............................................ 22
........................................... 24
welcome
We invite you to get to know your product, read this manual and
getthe most out ofit.
3
3
8 ........................................................
list of packaged parts
P art
Owner' s manual
Water inlet hose
Spinning tub plate
Twin tub washer
Quantity
On e piece
On e piece
On e piece
On e piece
Page 4
4
• Your own safety is important for us. Please read this information
before using your new product.
• Do not use extension cords.
• Do not plug other electric appliances to the same power outlet.
• Hold the connector by the power plug, not by the cord.
• This product is equipped with a "Y" type polarized plug having a
built-in grounding wire.
• Do not remove the grounding terminal or use outlet adapters.
• If the power cord is damaged, it must be replaced by the manufacturer, its authorized service agent or by qualified personnel in order to avoid a hazard.
• If voltage variations are usual in your area, have a voltage regulator installed.
• This appliance is not intended for use by persons (including children) having reduced physical, sensory or mental capabilities, or
lack of experience and knowledge, unless they have been given supervision or instruction concerning the use of the appliance by a
person responsible for their safety.
• Children should be supervised to make sure they do not play with
the appliance.
• IMPORTANT: Failure to follow these warnings, will make you entirely responsible for personal injuries or material damages that
may occur from using this equipment.
important safety instructions
The following conditions are not considered as a normal use of the
appliance:
• If it has not been operated in accordance with the provided operation instructions.
• Damages caused by accidents, electrical overloads, voltage fluctuations, using an energy other than the specified, or catastrophes.
• If it has been used with commercial or industrial purposes, or for
other than the indicated in the operation instructions.
• If the product has been repaired by unauthorized persons and/or
service workshops.
Page 5
5
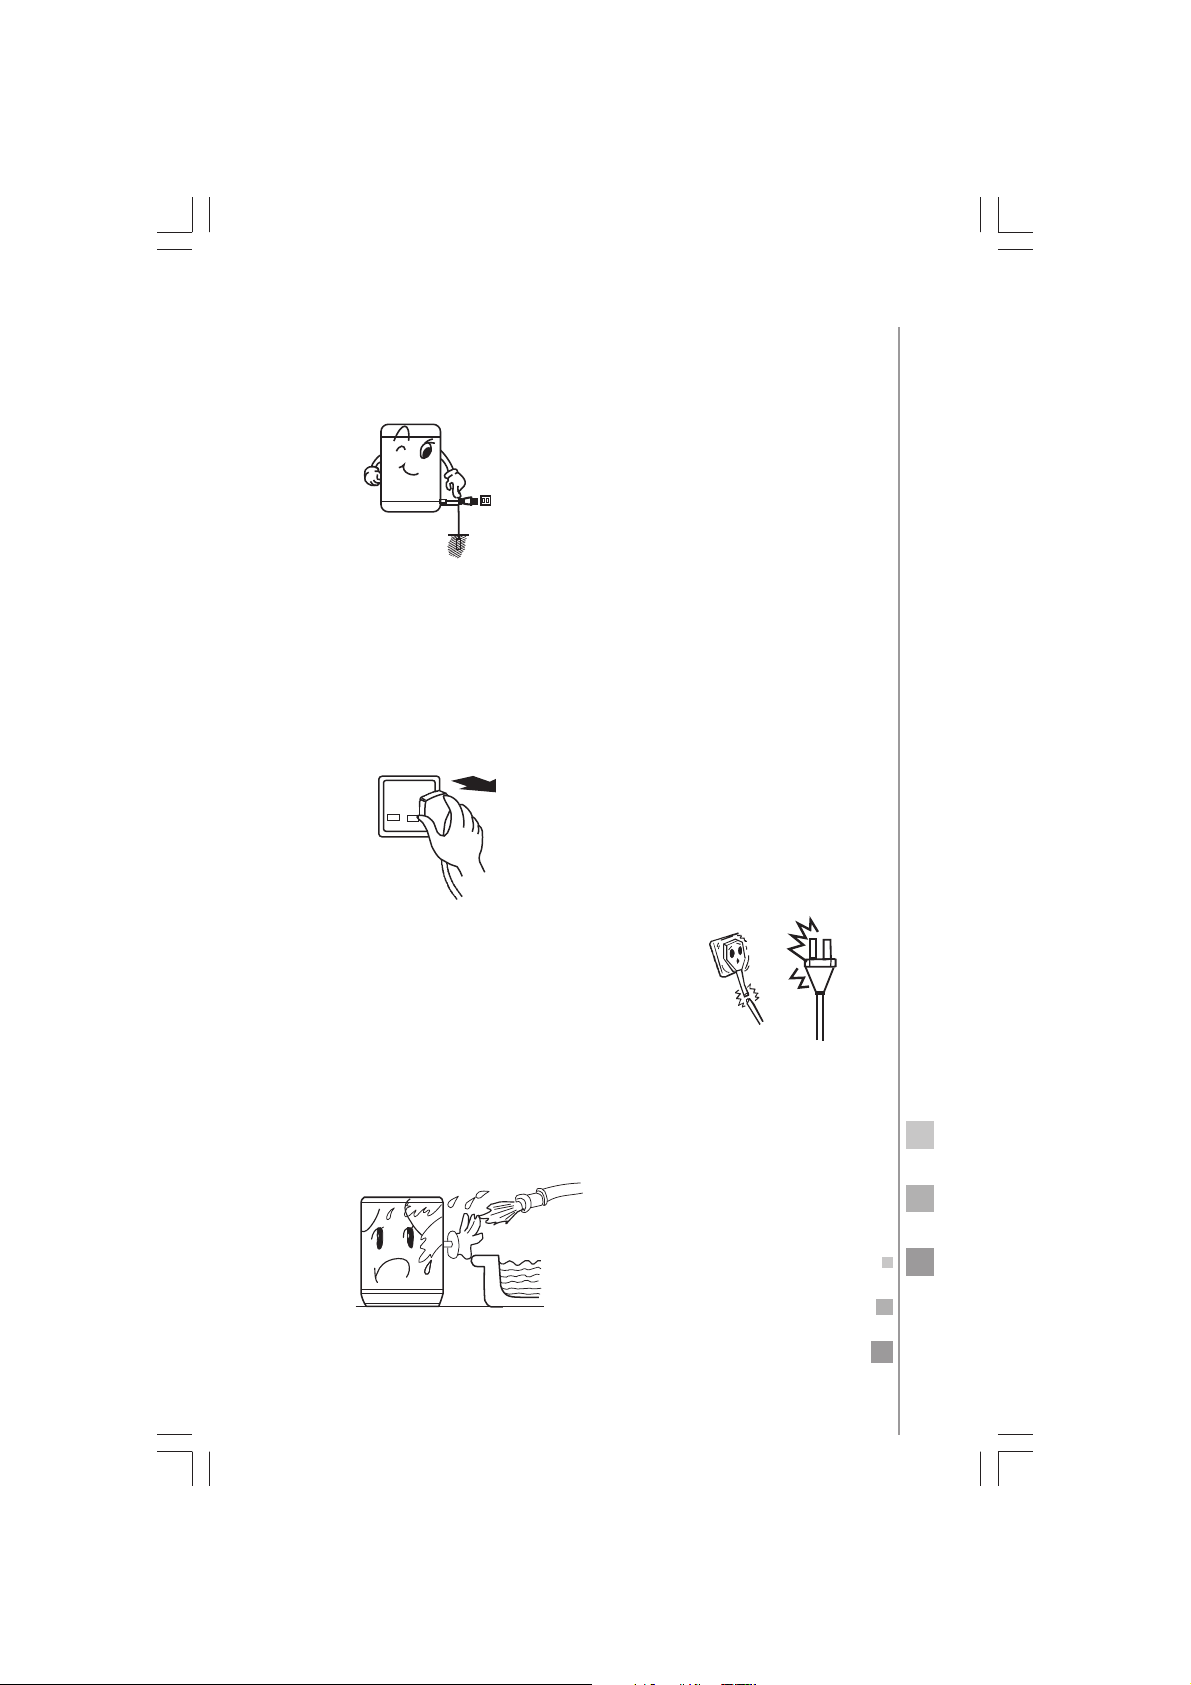
Please insert the power cord into special receptacle with rated voltage. Be sure to use single-phase three pins receptacle.
If possible, install an electric leakage protector.
Make sure the electrical outlet is located at an easy and accessible
place so the power plug can be easily connected and disconnected.
Be sure to pull the plug off when there's a power failure, or before
moving or cleaning the machine, and when it's idle.
If the power cord is damaged, it must be replaced
by the manufacturer, its authorized service agent
or by qualified personnel in order to avoid a hazard.
Never
wash the unit with water. Do not place wet clothes on
panel.
the control
Page 6
6
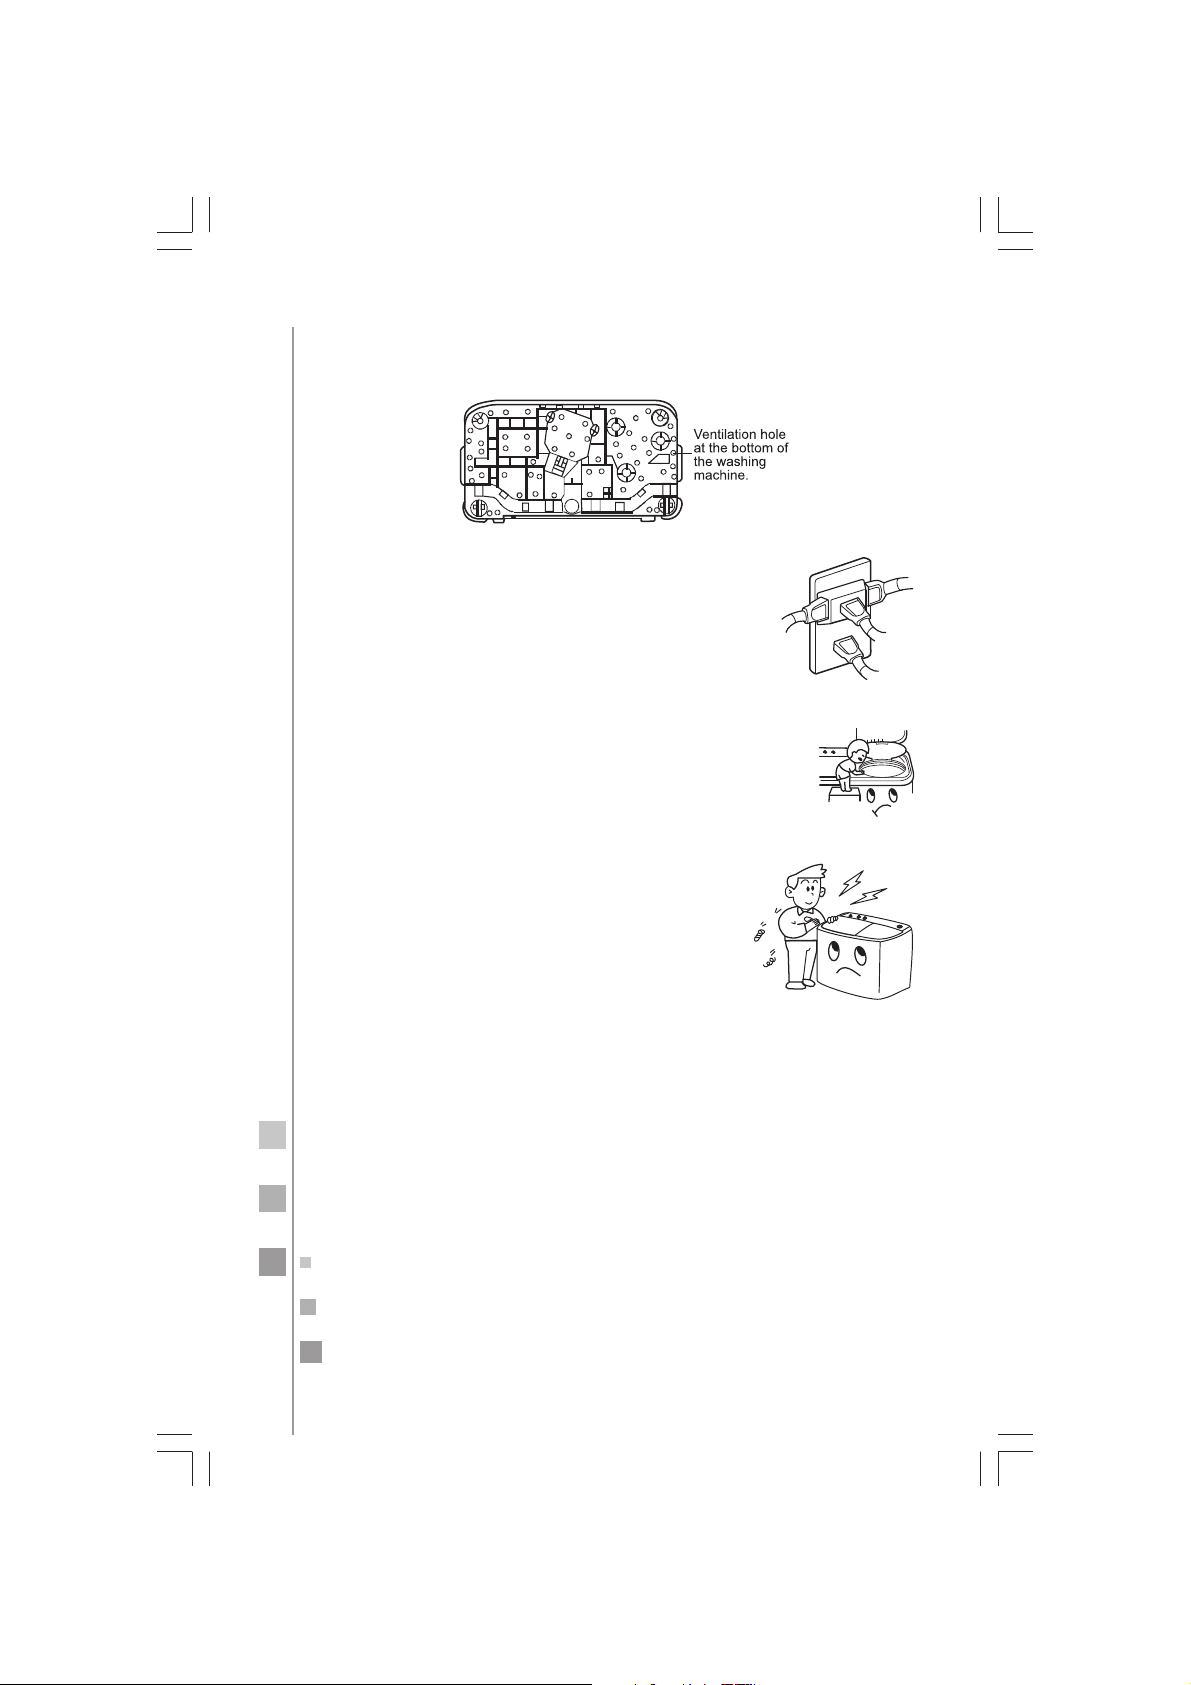
If the washing machine is installed on a carpet, do not block the
ventilation hole with the carpet.
Do not let the machine share the power outlet
with other electric appliances. If the power outlet
is damaged do not use it anymore until it is
checked by a qualified electrician.
Do not reach into the working machine. It is dangerous even if the rotation is slow. Take special care with
the children.
Do not try to disassemble, repair or alter the
machine by yourself.
Page 7
7
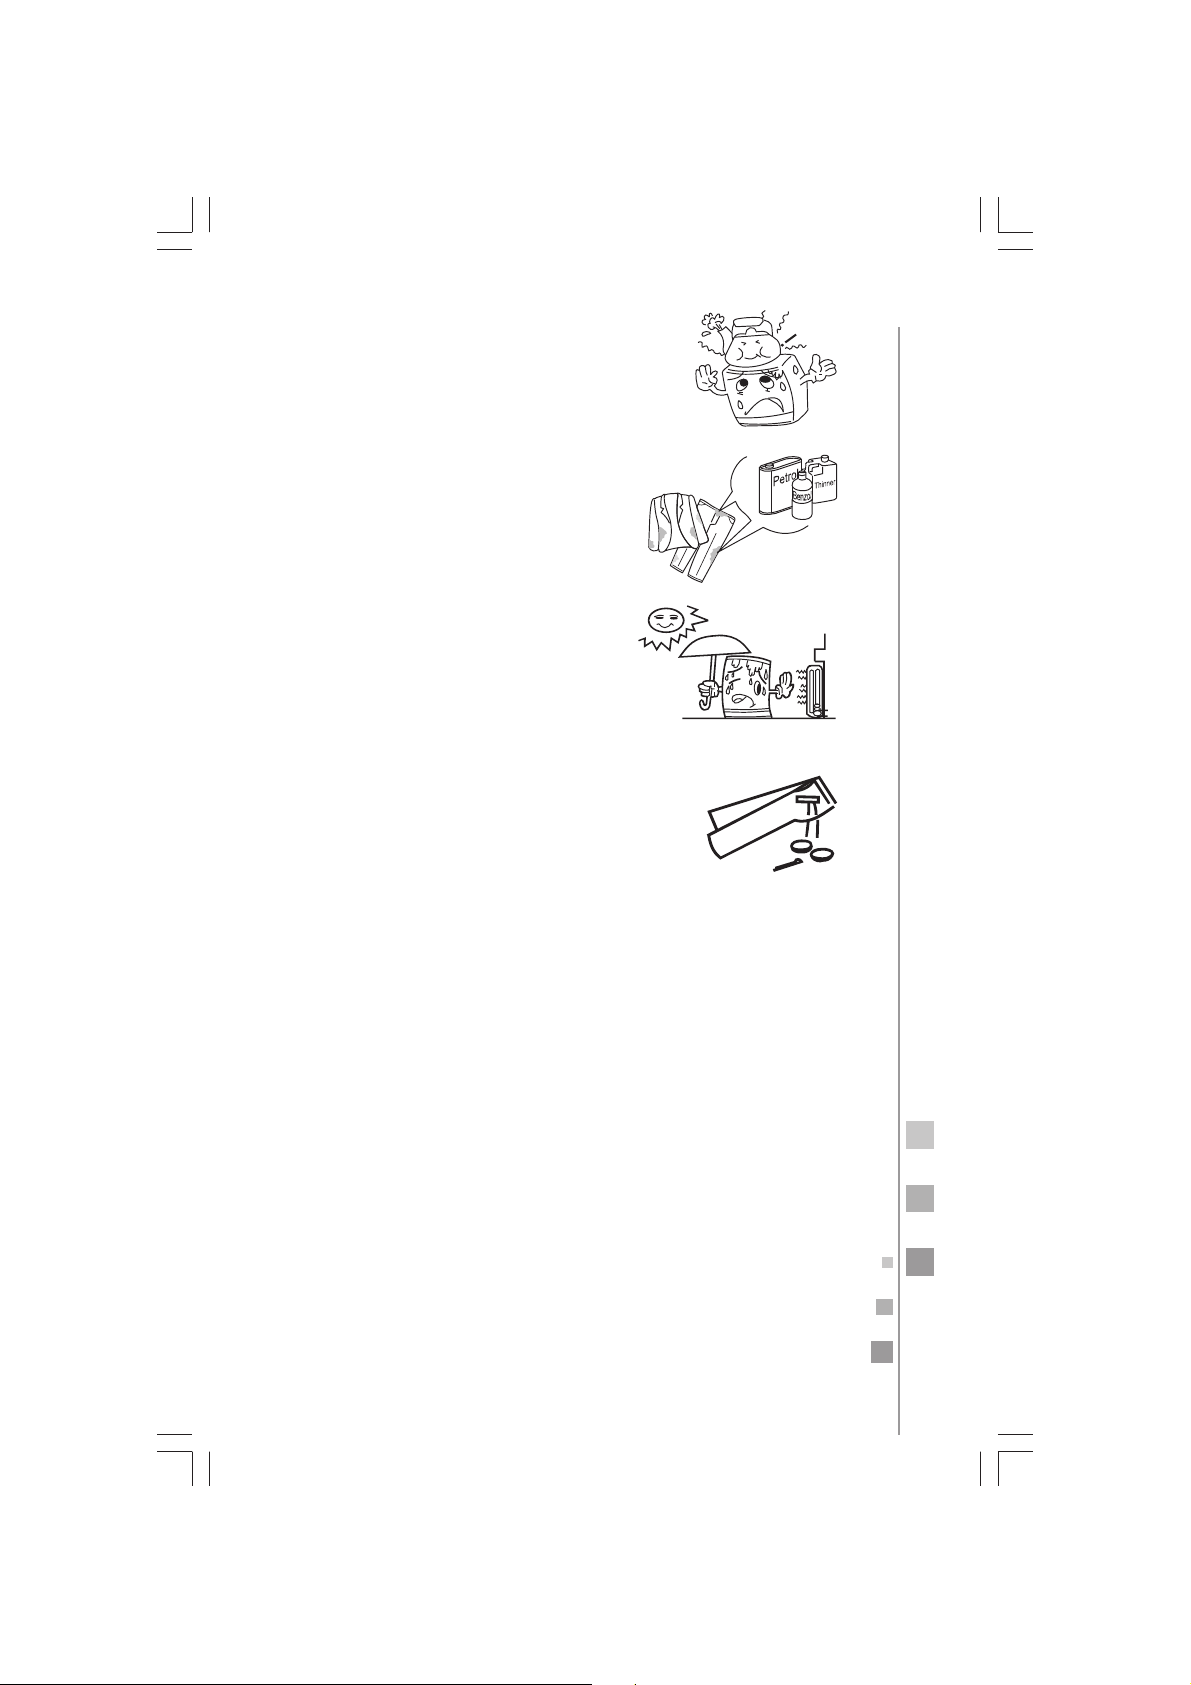
Do not put any hot or heavy items on the
washing machine such as a kettle with hot water.
Do not wash items that have been stained
with volatile substances such as thinner,
petrol, etc.
Keep the machine away from direct sunlight and heat sources like heaters.
To protect your clothes as well as the washing machine, please take out coins, sand, hairpins and
other foreign materials from clothes before washing.
The Maximum water level should not be exceeded when filling the
tub.
Make sure that the connection of the water inlet hose is proper.
Page 8
8
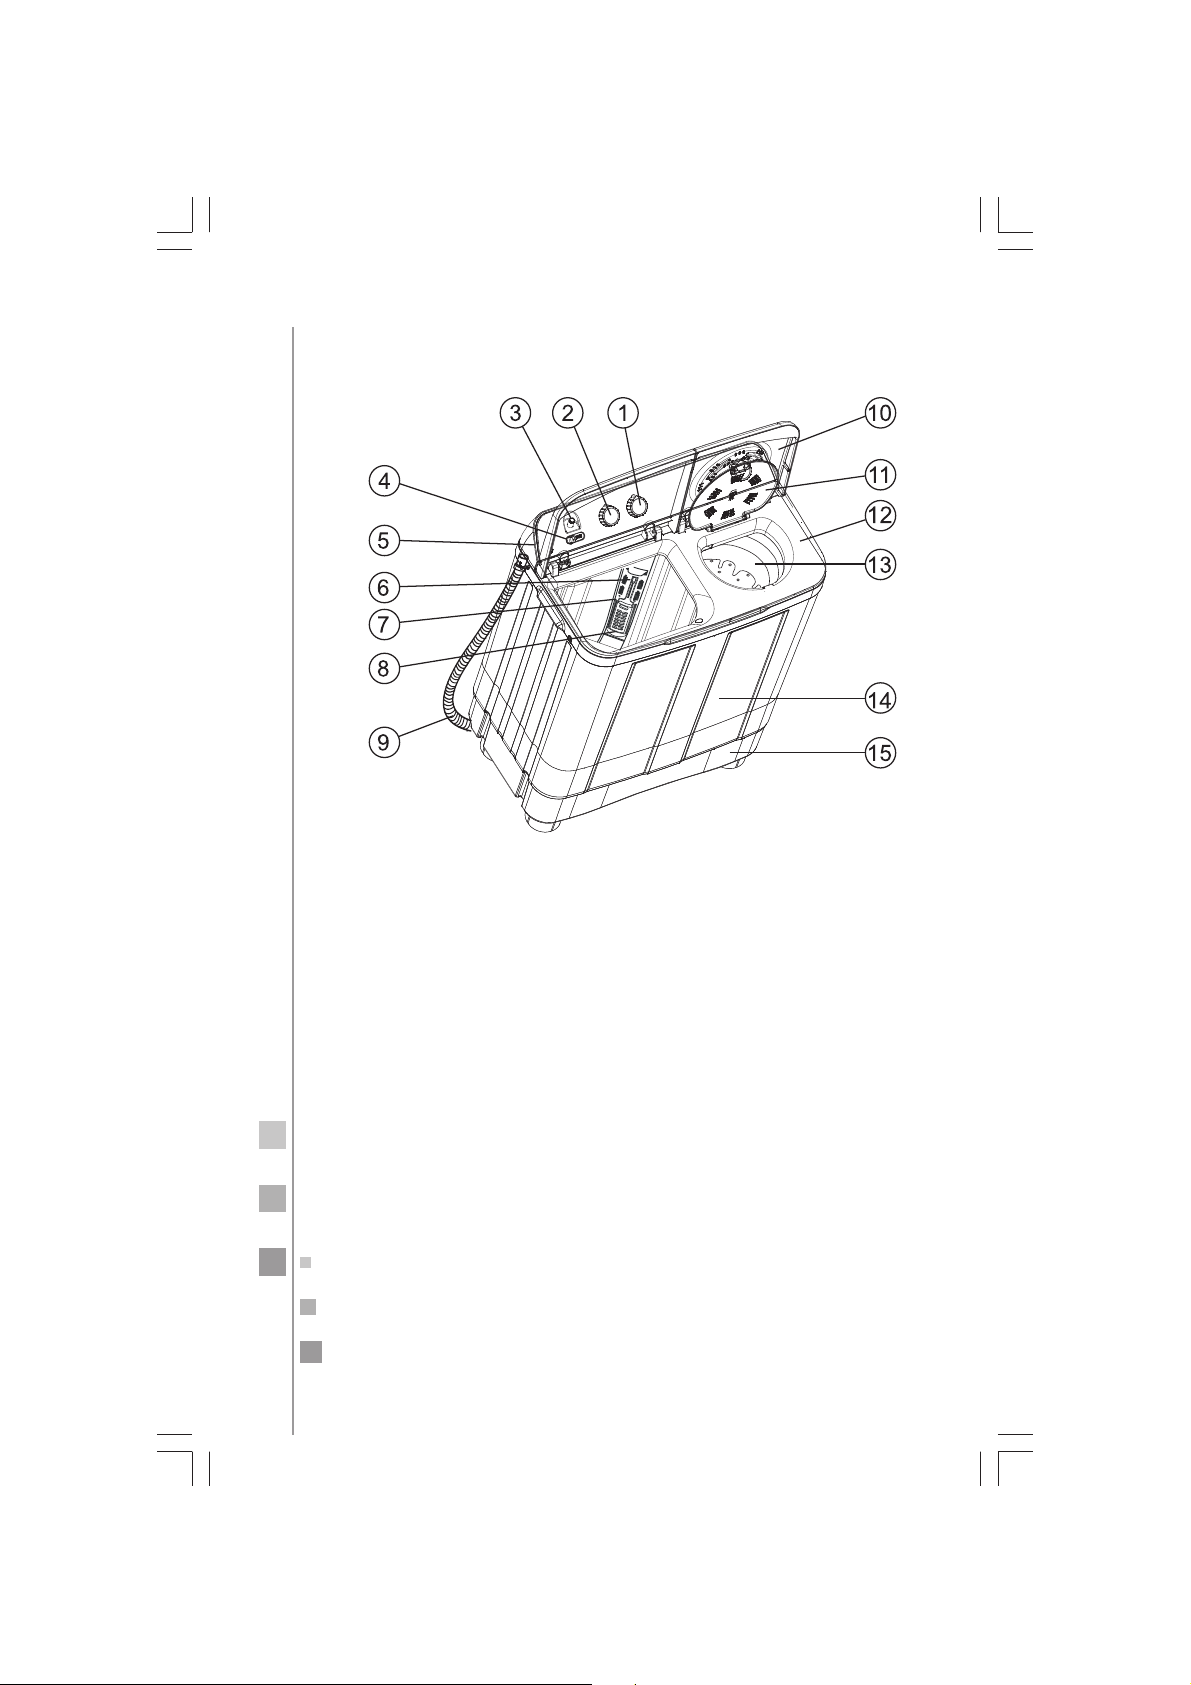
parts of your new washing machine
1. Wash Type Selector.
2. Wash Timer Selector.
3. Water Inlet Port.
4. Water Inlet Selector.
5. Control Panel.
6. Lint Filter (must be installed by
the end user).
7. Overflow Filter.
8. Washing Tub.
9. Drain Hose.
10. Outer Cover of the Spinning
Tub.
11. Inner Cover of the Spinning
Tub.
12. Main Frame.
13. Spinning Tub.
14. Cabinet.
15. Base Frame.
Important notes:
All illustrations contained in this manual have a reference purpose
only. Your washing machine as well as the accessories may look different from these illustrations
.
Page 9

9
install the lint filter
installation instructions
Install and adjust the washing machine according to the instructions
contained in this manual. It is very importan for your own safety
and the correct operation of the machine.
Put the underside of the lint filter into overflow filter, then push the
upside into overflow filter.Make sure that the lint filter is firmly placed
in the overflow filter,otherwise the lint filter may fall off when washing,
adversely affect-ing the operation of the machine.
Page 10
10
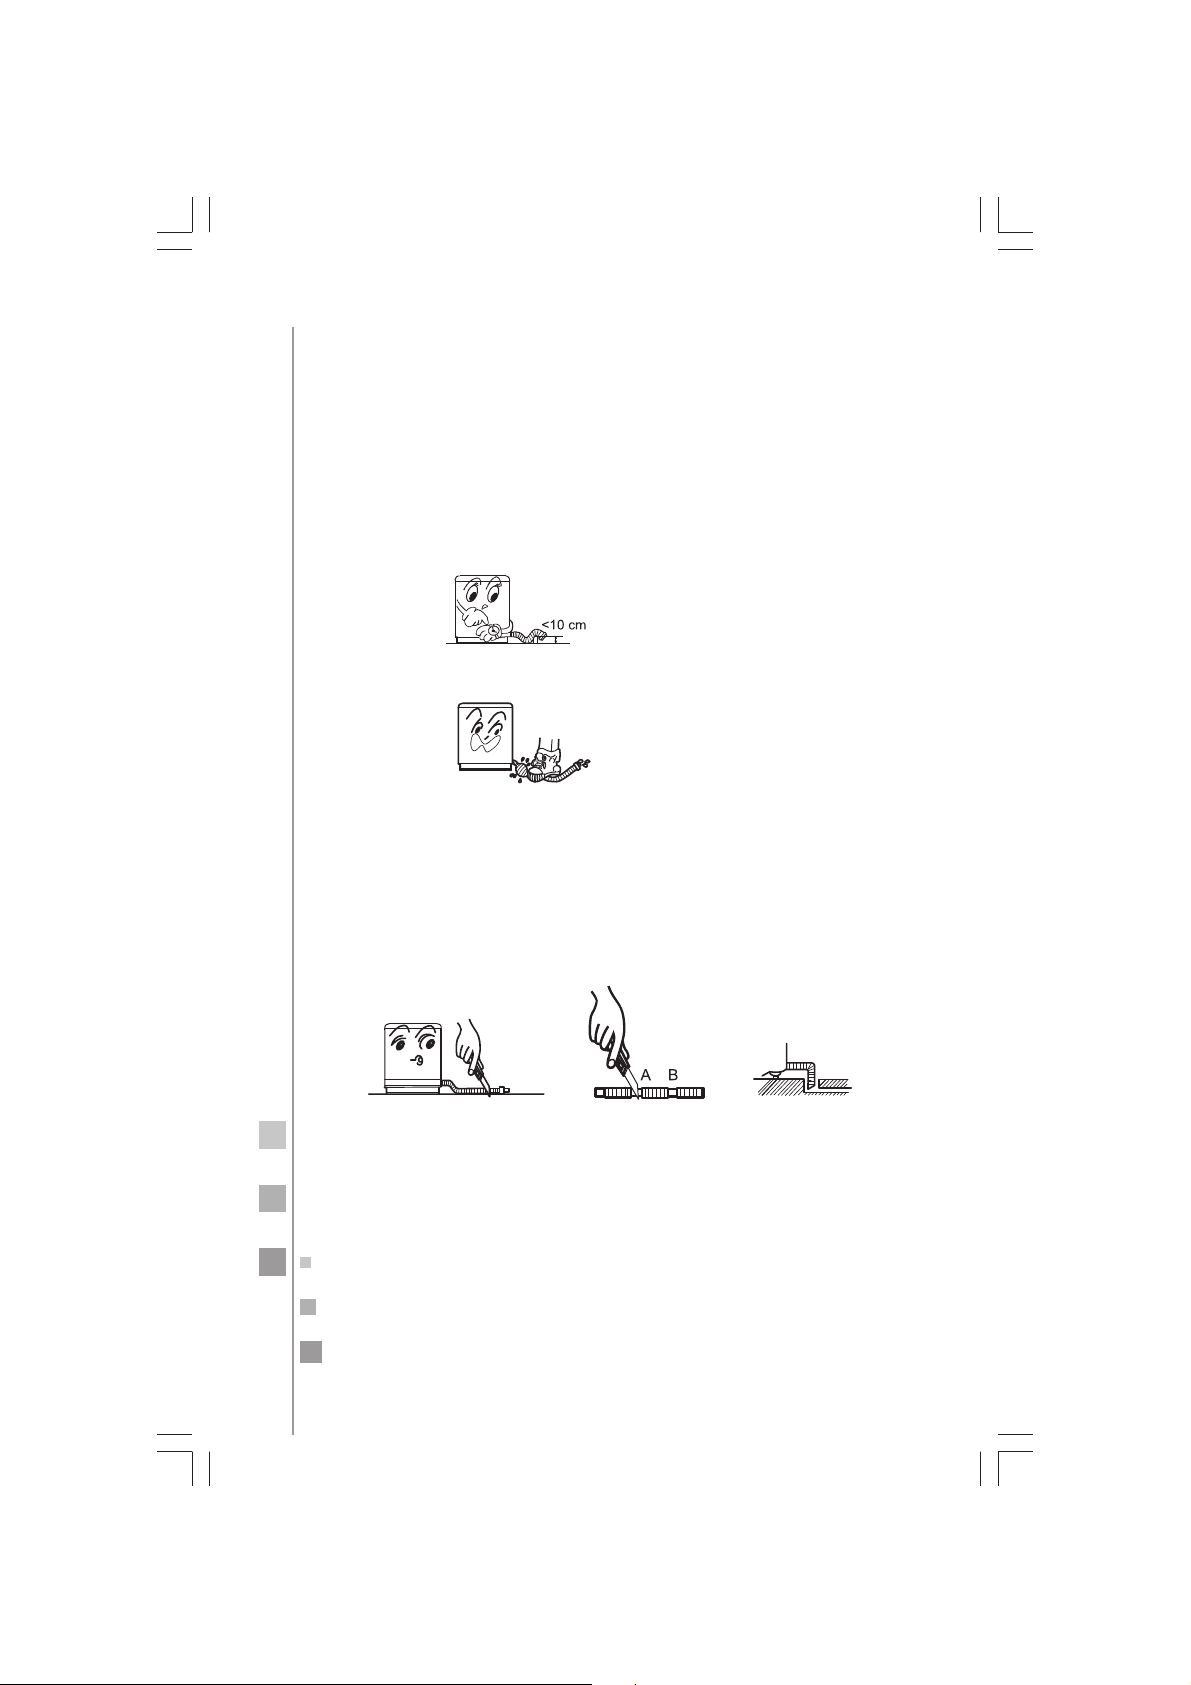
drain hose
The drainage of the machine should be smooth and fluid.
The height of the drain hose when placed down on the floor
should be less than 10 cm, or the drainage will not be smooth
enough causing an incomplete drainage.
Do not step on or crush the drain hose.
If the extra section of the drain hose is too long, you can cut it at either point indicated "A" or "B".
Once the washing or rinsing process is completed, and you need
to flush the water, it is necessary to place the drain hose on the
floor at a height not greater than 10 cm, and turn the control
panel knob to the function “Drained”.
Page 11
11
Turn 90° the
fixing hook
Take off the fixing
hook downwards
Drain hose
fixing hook
Slightly
pull out
Drain hose
Take off drain hose
Side Section View
Fixing hook
installation
hole
Drain Hose
Fixing Hook
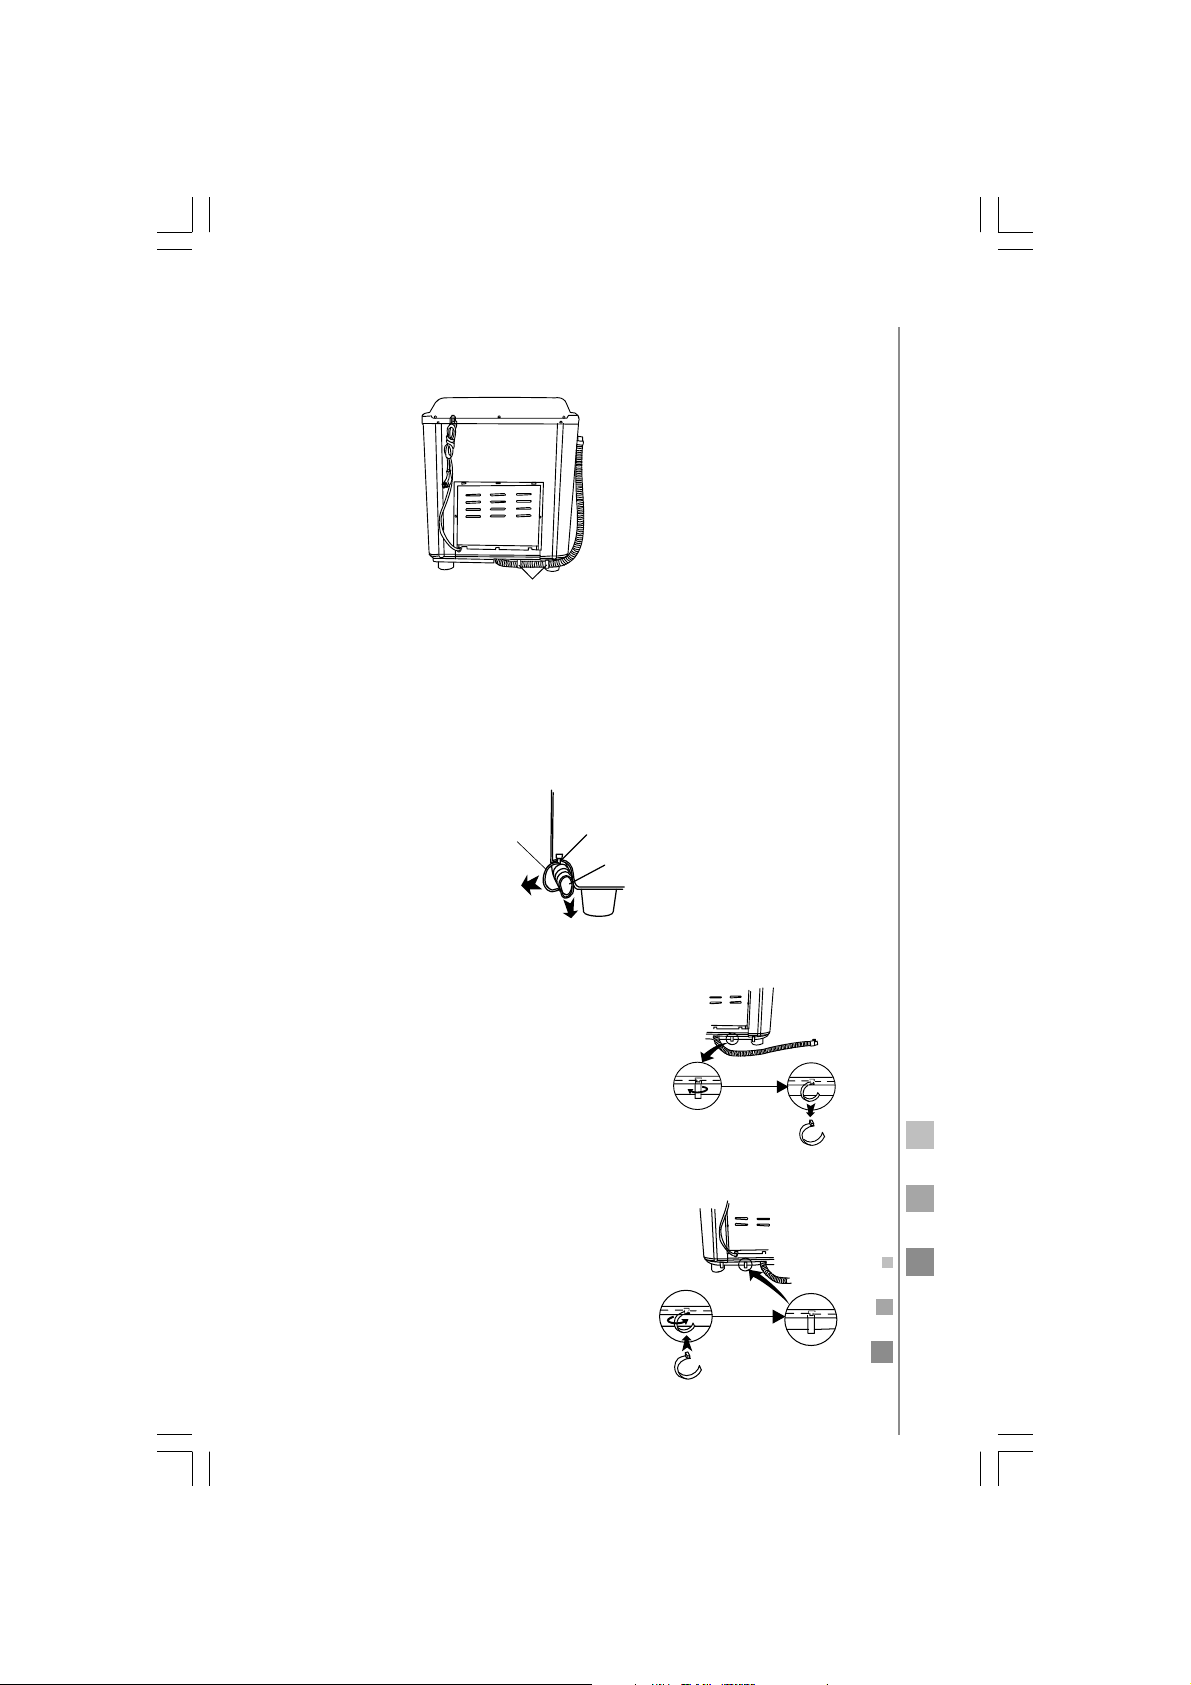
how to change the direction of the drain hose
Figure 1 shows the factory installation position of the drain hose.
Extend the drain hose from the spin tub side
1. Remove the drain hose from the hanging hole on the cabinet.
Pull the drain hose fixing hook outwards gently to take out the
drain hose from the two fixing hooks. (See Figure 2).
Turn 90° the
hook to fix it
Insert the fixing hook into the
Installation hole upwards
2. Turn 90° the drain hose fixing hook to remove it from the installation hole (see Figure 3).
3. Install the two drain hose fixing hooks taken
out, into the installation hole at the other
side of the base frame (to aim at the installation hole accurately you can lean the
washing machine forward slightly). Then
turn 90° (see Figure 4).
Figure 1
Figure 2
Figure 3
Figure 4
Page 12
12
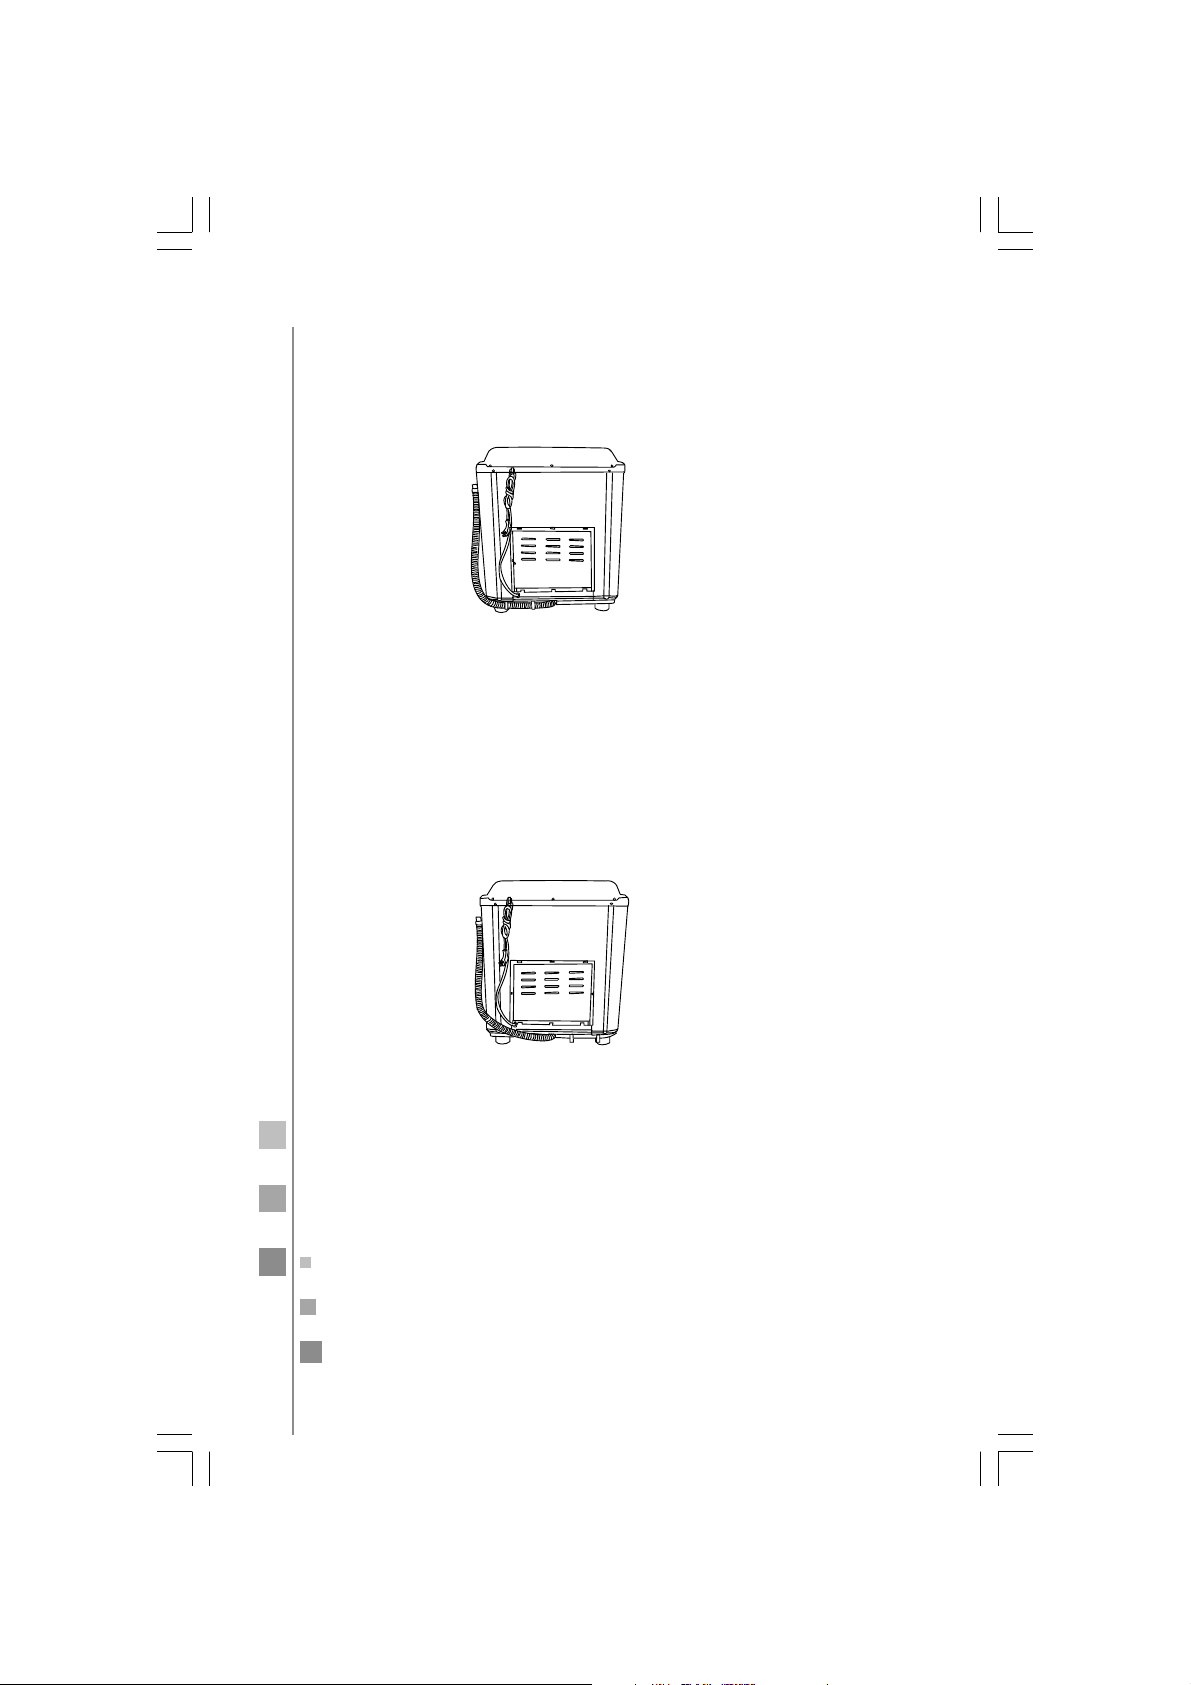
4. Pull the fixing hook outwards slightly. Inlay the drain hose into
the fixing hooks reliably along the groove at spin tub side, and
make it extend towards spin tub side.
5. Then hang the drain hose into the hanging hole at the spin tub
side. (See Figure 5).
Extend the drain hose from the back side
Take out the drain hose from the fixing hook. Extend it from the
back side.
When the drain hose is extended from the rear side, it can be
hanged on the point for drain hose at either side of the cabinet.
(See to Figure 6).
Figure 5
Figure 6
Page 13
install the water supply hose and select the water
level
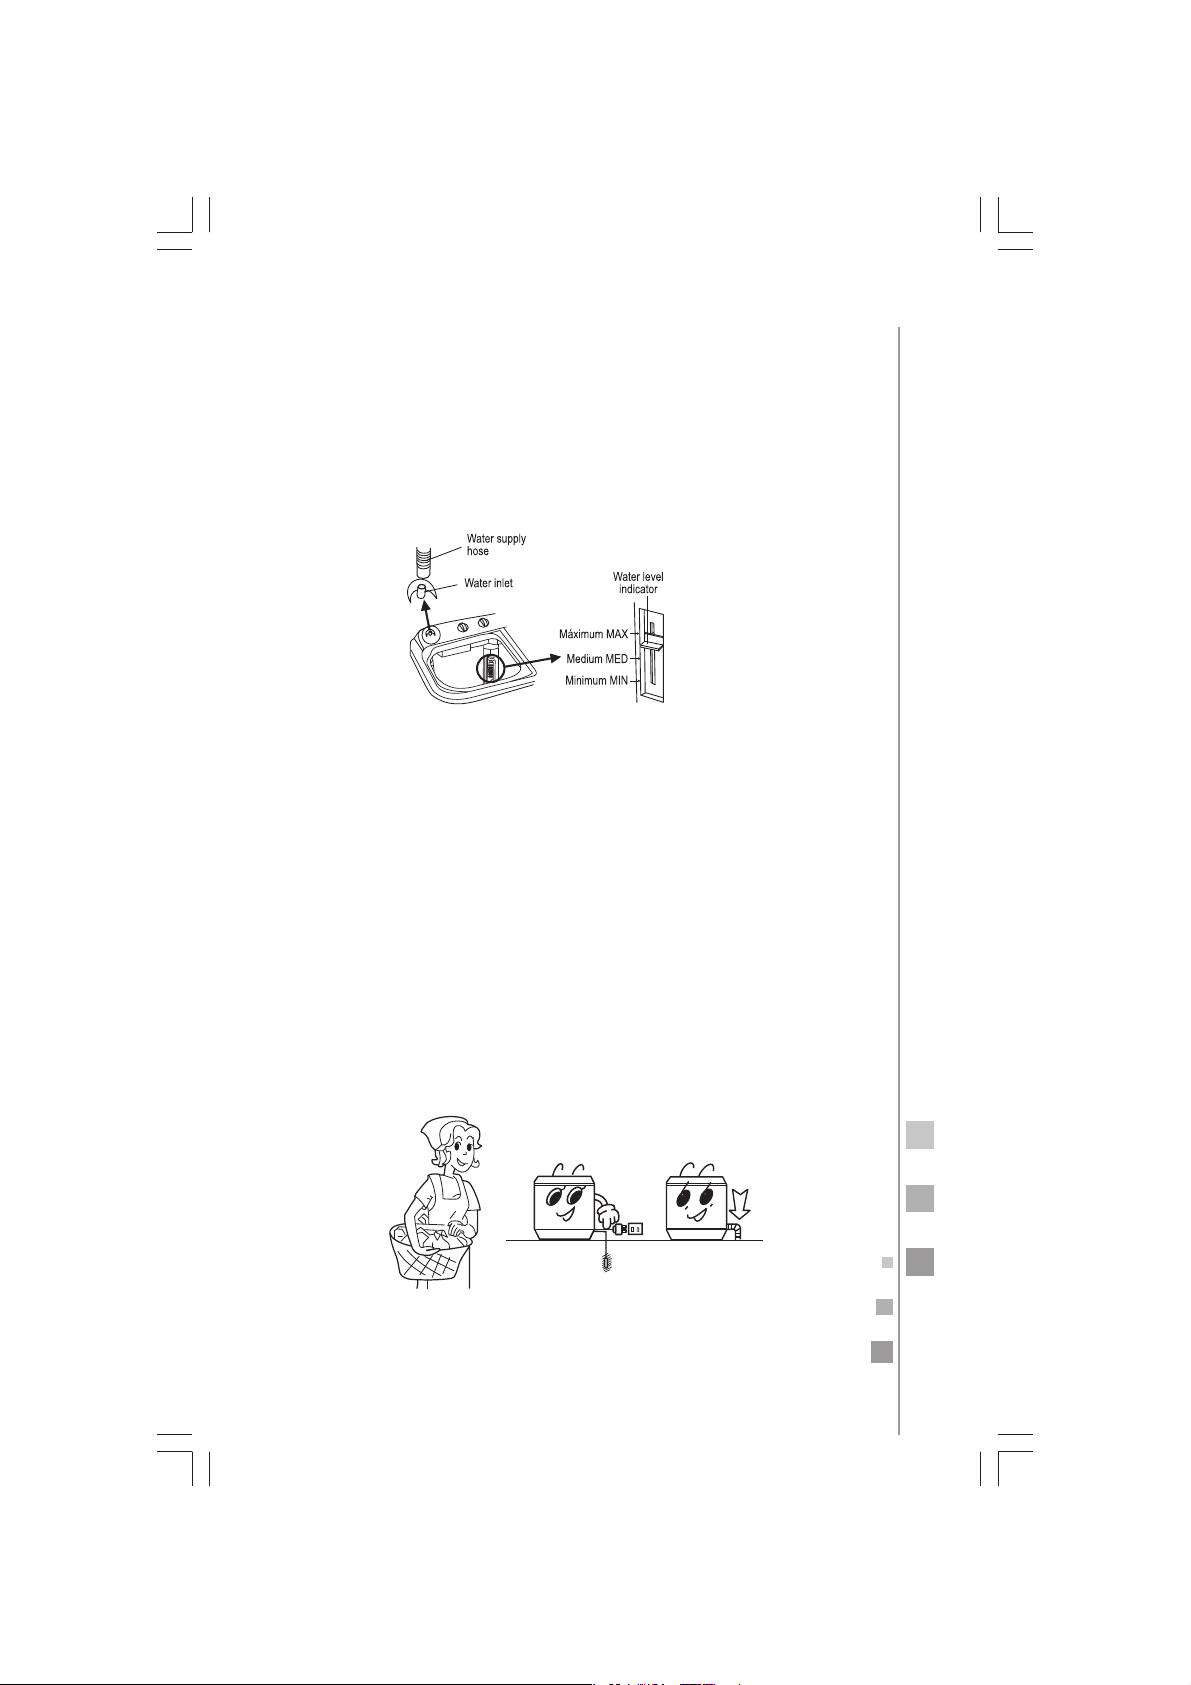
On the models that apply insert the water supply hose into the water
inlet port on the control panel.make sure that the end of the coupling
hose is firmly inserted into the inlet port. Failure to do so will result in
leaks that could damage your washer”.
To remove the water supply hose, just push the control handle as indicated in the figure and pull it out.
Select water level according to the size of the load to be washed.
Never exceed the maximum filling level shown on the lint filters.
Set the water level adjusting lever to the proper line.
Important: The appliance must be connected to the water mains
using a new water supply hose. Do not use previous or old hose.
13
preparation before washing
1. Connect the water supply hose.
2. Make sure that the washing machine is properly grounded, then
insert the power plug into the outlet. Do not connect the ground
terminal to a gas or water pipe.
3. Lower the drain hose to the floor.
Important: An uneven or slanted floor may result in unstable working and abnormal noise. Make sure the machine stands firmly on an
even floor.
Page 14
14
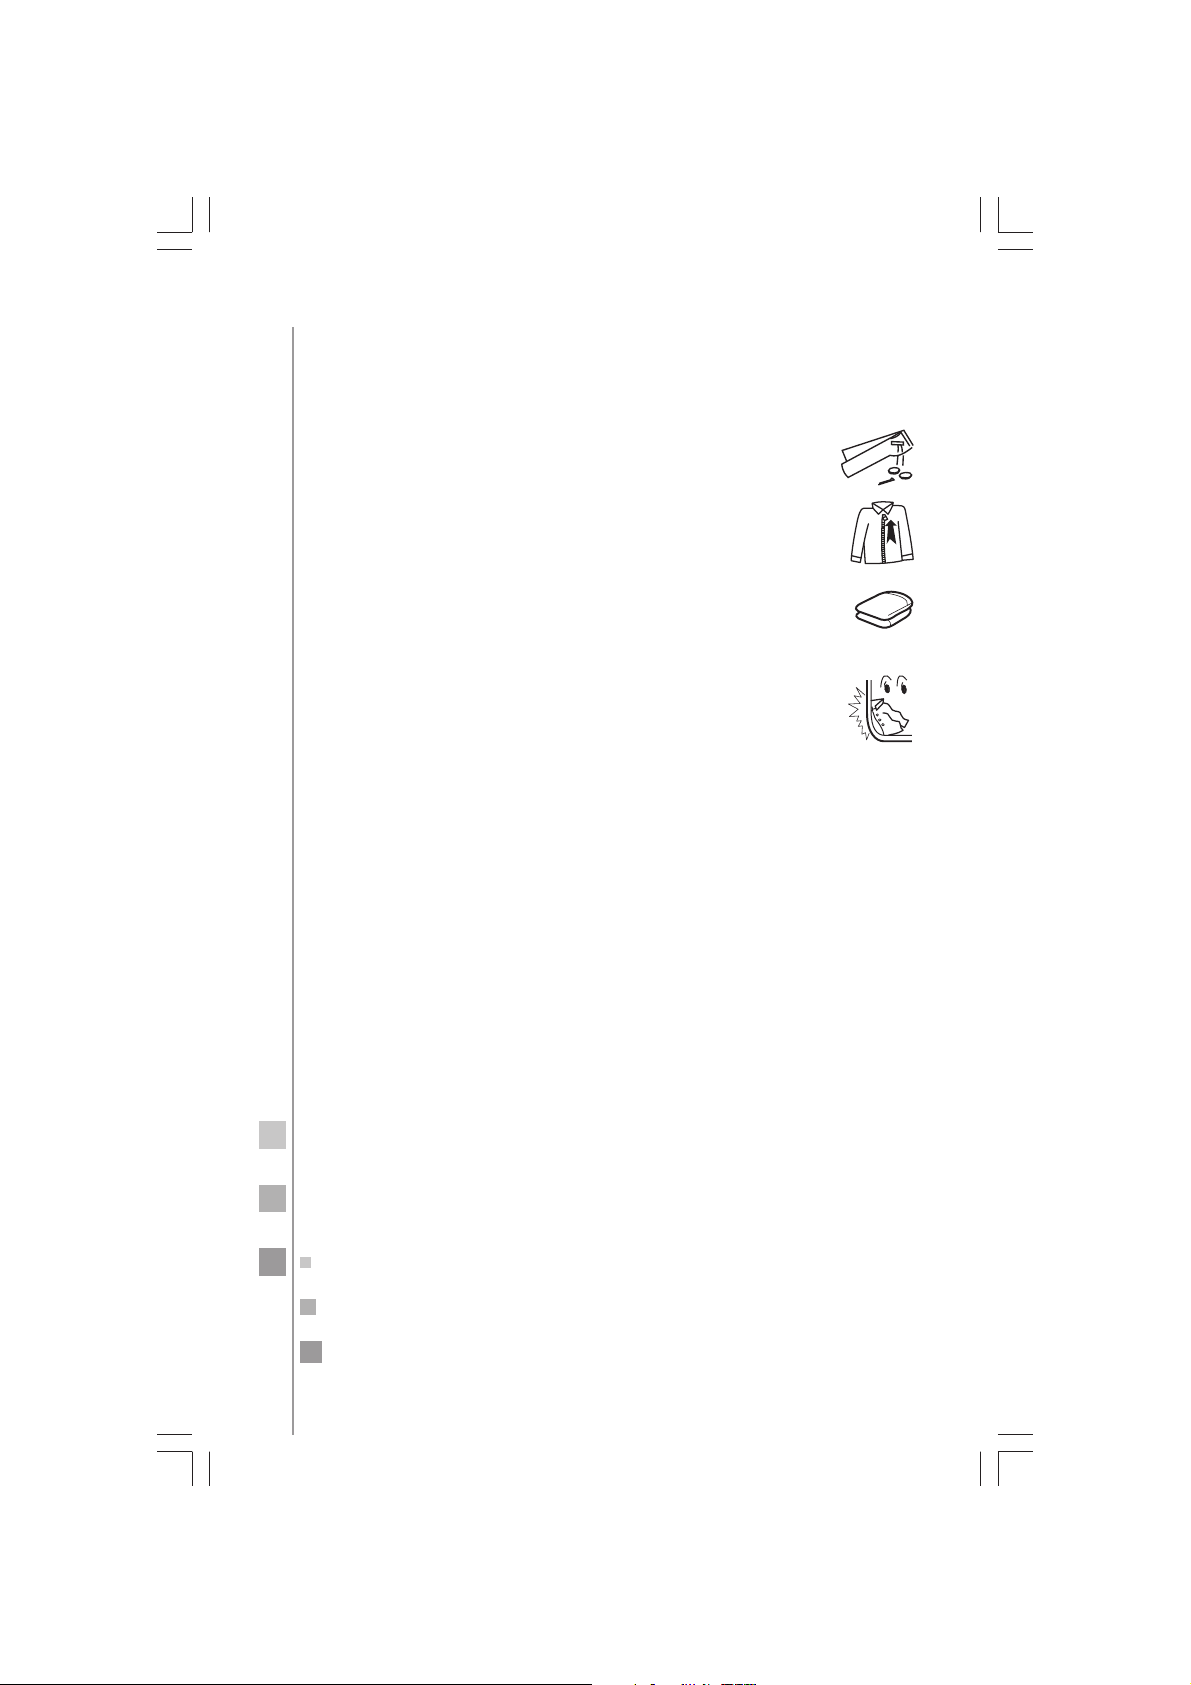
before washing a load pay attention to the
following
Check clothes care labels looking for special washing instructions.
Clear pockets. Take out coins, sand, hairpins etc.
Tie the long strips, fasten buttons and close zippers.
The size of the load to be washed should not be too
large. Stretch and loosen the items before putting them
in the tub.
Sort non-colorfast from colorfast items.
Dip with your hands items difficult to absorb water.
For items with heavy soil, please first remove the dirt like mud or
dust. For hard spots, apply detergent on them in advance. This will
make them easier to remove.
For items that may get lint ball and those with long fibers, turn
them over before loading.
Do not wash items spotted with chemicals using this appliance.
washing tips
The washing and spinning capacities of the machine refer to the
largest weight of standard items under dry condition that can be
washed or spined at once.
The size of the load in any washing cycle must be smaller than the
rated capacity.
The thickness, size and type of clothes will affect the actual wash-
ing capacity. Load a proper amount of items each time. Items
loaded should freely move
inside the tub.
Do not select the maximum water level for few items, so as to
avoid splashing of water. Do not use high suds detergents.
When the washing tub pulsator is running, the buttons
of clothes may cause noise. Load more items without
buttons to minimize the noise.
Page 15
proper use of laundry products
Using bleach
• Fill water to proper level. Dilute bleach in a suitable container.
Pour it slowly into the washing tub.
• Avoid using bleach on items with color or pattern as they are
prone to lose color.
• Bleach should not directly contact clothes.
• Refer to the bleach manufacturer instructions for the proper use
and amounts.
• For powder bleach, dissolve it before using.
Using powder detergent
• Powder detergent can be dissolved in the washing tub:
1. Let a small quantity of water into the tub.
2. Add the powder detergent. Run for 30 seconds to completely
dissolve it.
3. Load items into the tub. Select a suitable water level.
• You can also dissolve the powder detergent before adding it to
the washing tub:
1. Prepare warm water at 30 °C in a suitable container.
2. Add the powder detergent while stirring to fully dissolve it.
15
• Powder detergent tends to spot clothes more than liquid detergent. Be careful with the amount of detergent.
• The amount of detergent to be used varies with the type of detergent. Always refer to the manufacturer of the detergent instructions for
proper use and amounts.
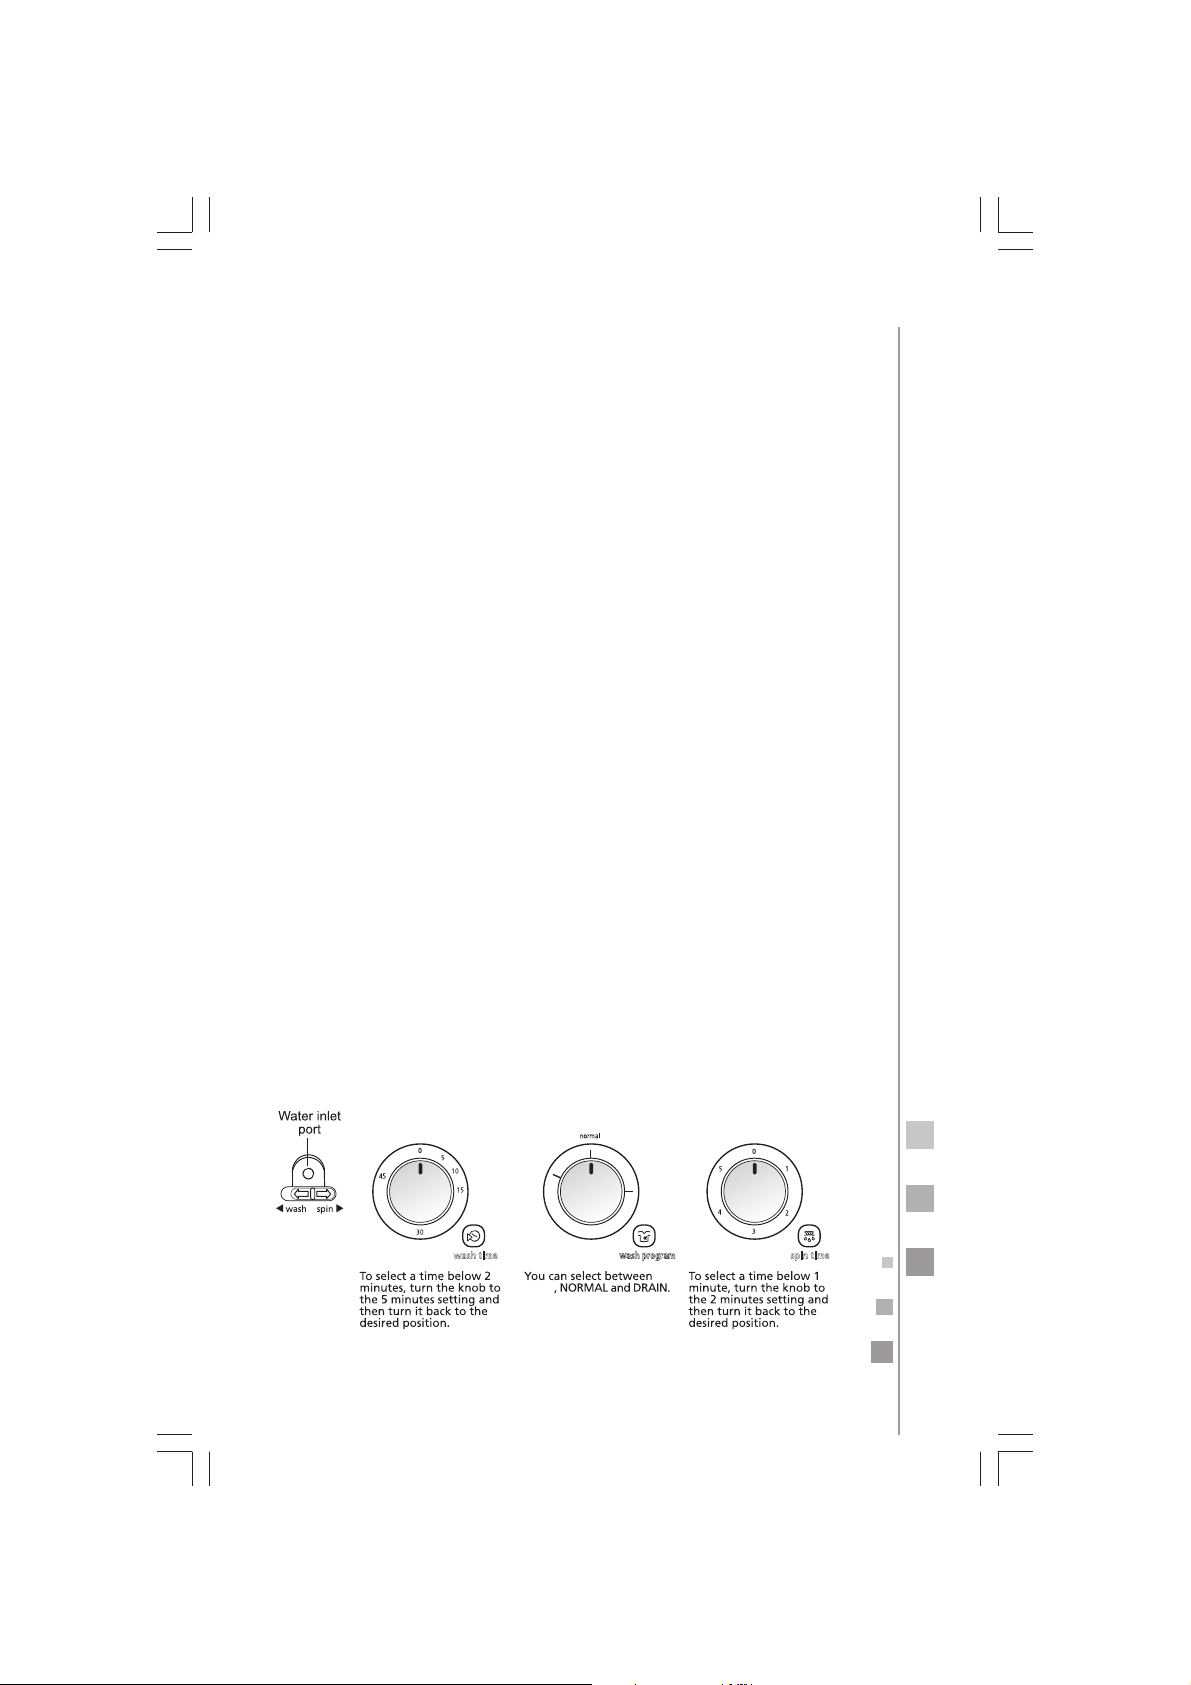
control panel
soft
drain
wash time spin time
SOFT
wash program
Page 16
16
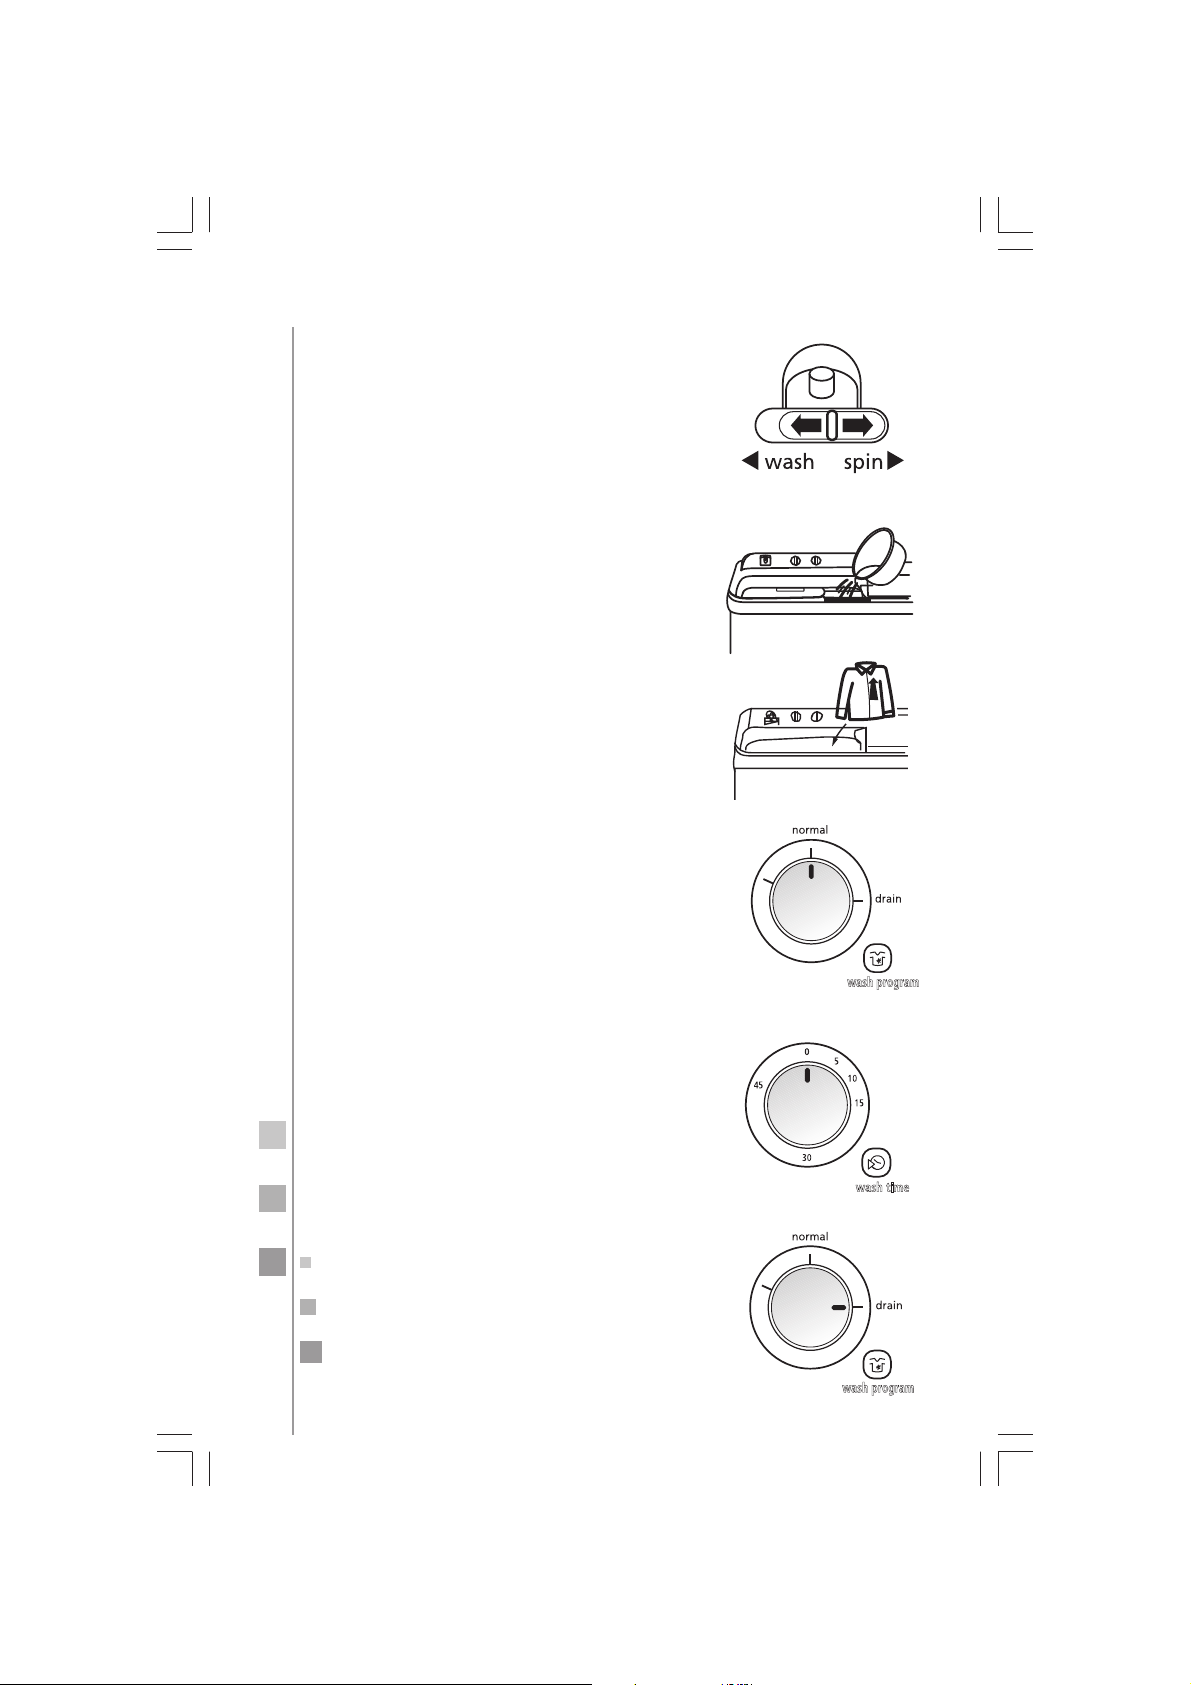
washing sequence
1. Fill selection. Set the water inlet selector
to WASH. Adjust water level rod to a
position as needed.
2. Let water into the tub and add dissolved
powder detergent until water reaches a
suitable level. It begins to wash and
dispense detergent evenly.
3. Add the wash load, and supply water if
necessary.
4. Select the proper WASH PROGRAM
according to the load.
5. Select the WASH TIME according to the
load.
6. After washing, set the WASH PROGRAM
SELECTOR to DRAIN.
soft
wash program
wash time
soft
wash program
Page 17
17
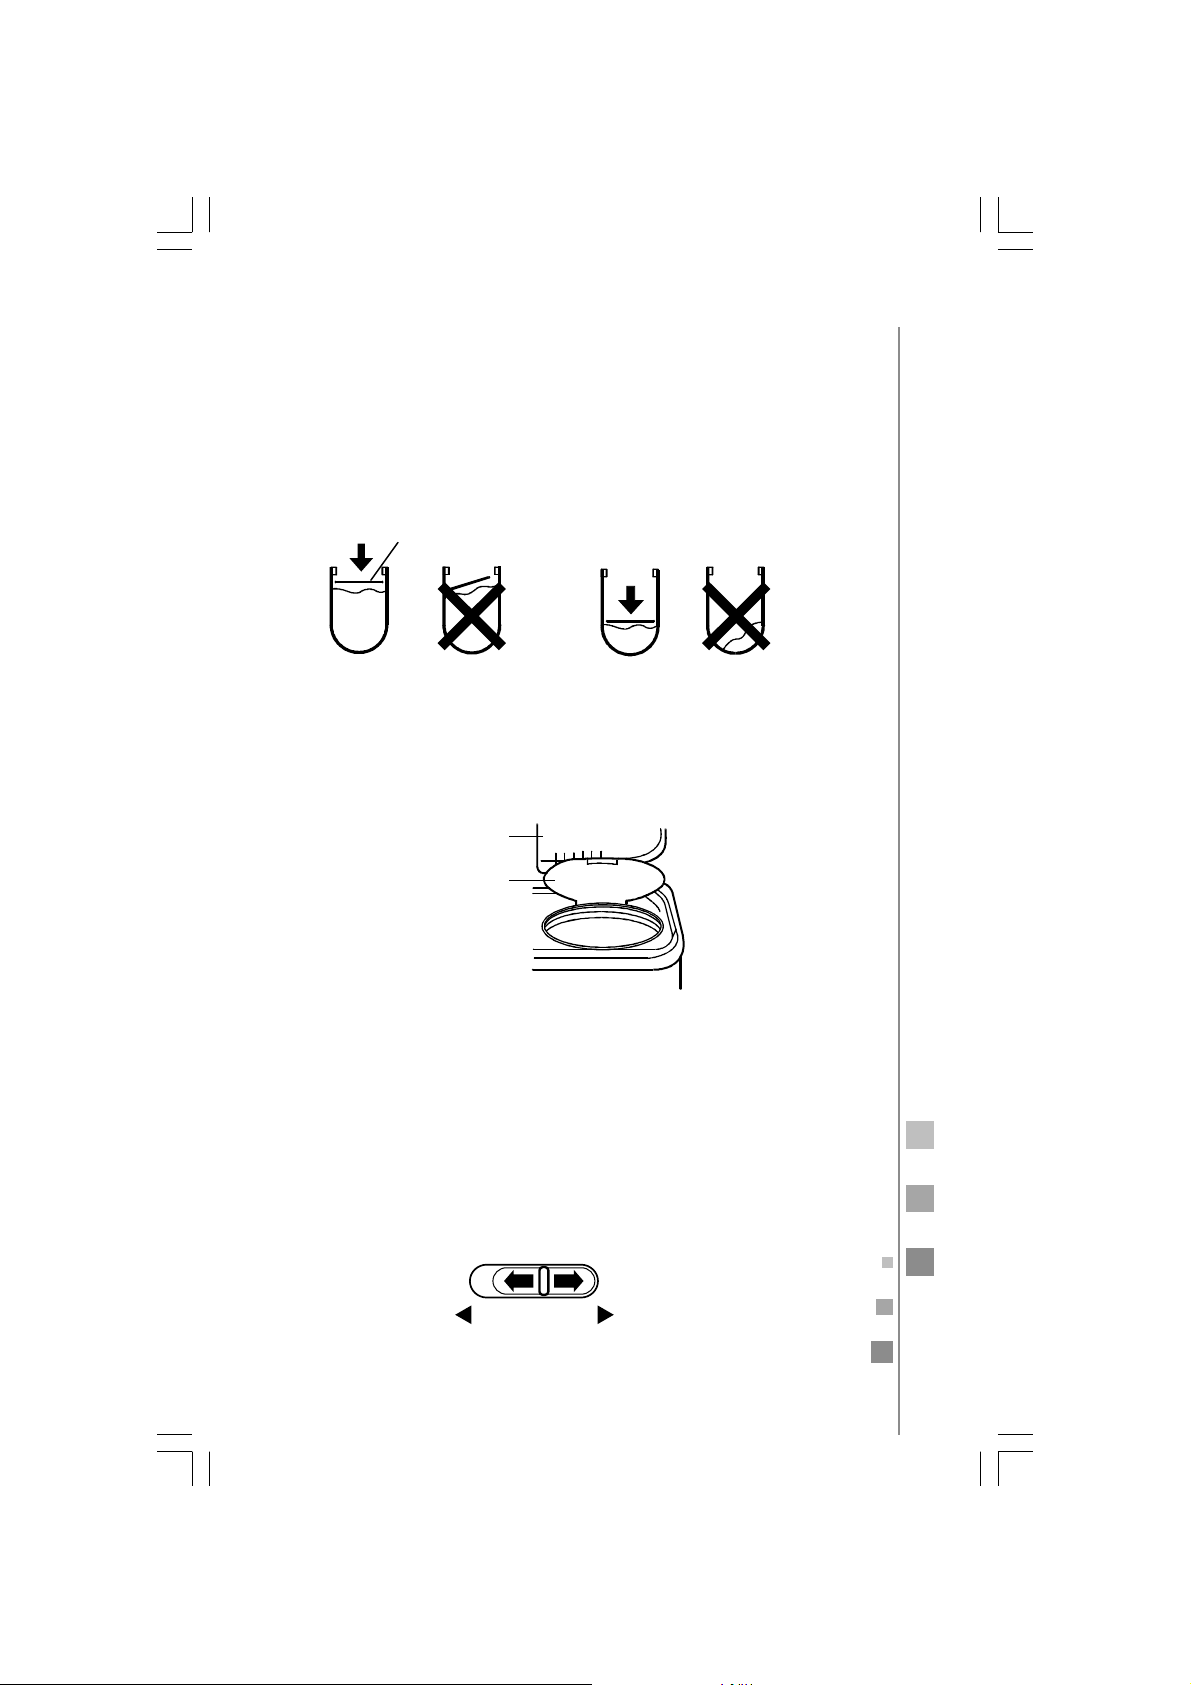
Outer cover
of spinning tub
Inner cover
of spinning tub
Press down
the spinning
tub plate
Correct
position
Load is
not level
Press down
Correct Without
spinning
tub plate
spin
1. Evenly load the items into de spin tub.
2. Spin the load.
Properly place the spinning tub plate on the load, even when the
load is small.
3. Close the inner and outer covers of the spinning tub.
4. Spin the load for 1-2 minutes.
foam-removing spinning
1. Place the water inlet selector at the SPIN position. Let the water
into the spinning tub for about 1 minute. If the water quantity is
too large, then it may flow out to the wash tub side. Please regulate the water supply tap to limit water filling.
2. Close the outer cover of the spin tub and set a spinning time of 1
or 2 minutes.
wash spin
Page 18
18
water saving rinse
Rinsing and spinning may be repeated 2 to 3 times using stored water.
1. Load the items into the washing tub. Select a suitable WASH TYPE
according to the type of the load.
2. Let the tub to be filled with water to the selected water level.
3. To rinse, adjust the wash timer to 2-3 minutes of operation.
When rinsing a small load, you can select the LIGHT wash type. If
you select the NORMAL wash type water may splash outside the tub.
spinning
1. Arrange the items into the spinning tub evenly and smoothly.
2. Press the spinning plate inside the tub properly. Close the inner
and outer covers of the spinning tub.
3. Select a suitable spin time according to the type of the load.
During spinning, you may hear abnormal noises; generally they are
caused by an uneven load arrangement inside the tub. Stop the machine and rearrange the load.
If you open the outer spinning tub cover the machine will pause.
Close the outer cover to resume the spinning.
rinsing
1. Load items to rinse into the washing tub. Select suitable WASH
TYPE according to the items to wash.
2. Set a proper water level using the adjusting lever according to the
size of the load. Let the water into the tub continuously.
3. Use the TIME knob to set a time between 5 and 7 minutes to perform the rinsing.
important
To spin and drain or to rinse with water-filling together, first spin for about 1 minute, then drain or
rinse with water-filling. Otherwise the spinning
will stop due to too much water stored in the spin
tub.
Page 19
when finishing
After using, remove lint and foreign materials from the lint and
overflow filters. Otherwise this will adversely affect the operation of
the machine.
WARNING: UNPLUG THE WASHING MACHINE
FROM THE POWER SUPPLY BEFORE PERFORMING ANY CLEANING JOB.
Page 20
20
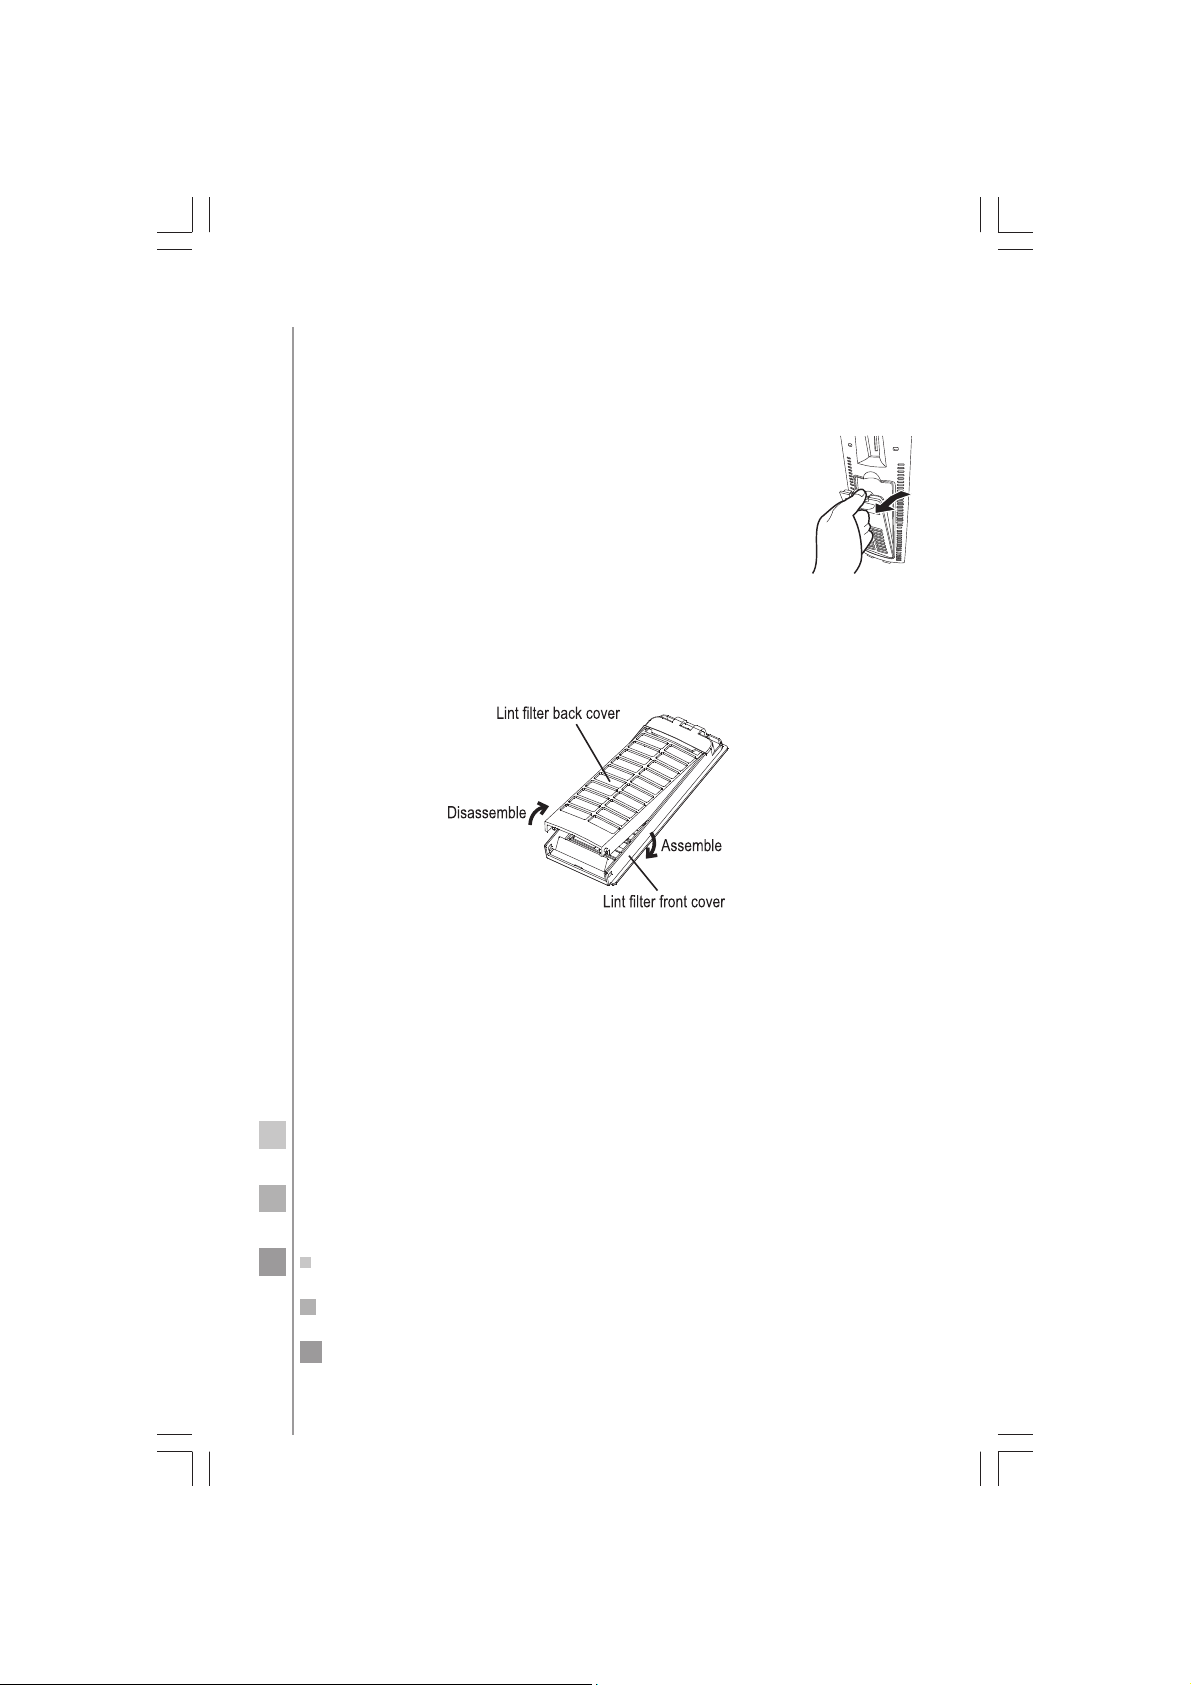
cleaning the lint filter
THE LINT FILTER MUST BE USED DURING WASHING AND MUST BE
CLEANED AFTER EACH USE.
1. Press the elastic piece at the top of lint filter to re-
lease the tab from the filter cover, and pull the lint
filter outward to remove it. (See Figure 1).
2. Remove the collected lint. Pull out the bottom of the lint filter
rear cover to disassemble it from the front cover. Remove lint
completely using clear water. (See Figure 2).
Figure 1
3. Reassemble and replace the lint filter.
Figure 2
Page 21
21
Too much lint on the overflow filter will affect the normal operation
of the machine. Clean it every two months.
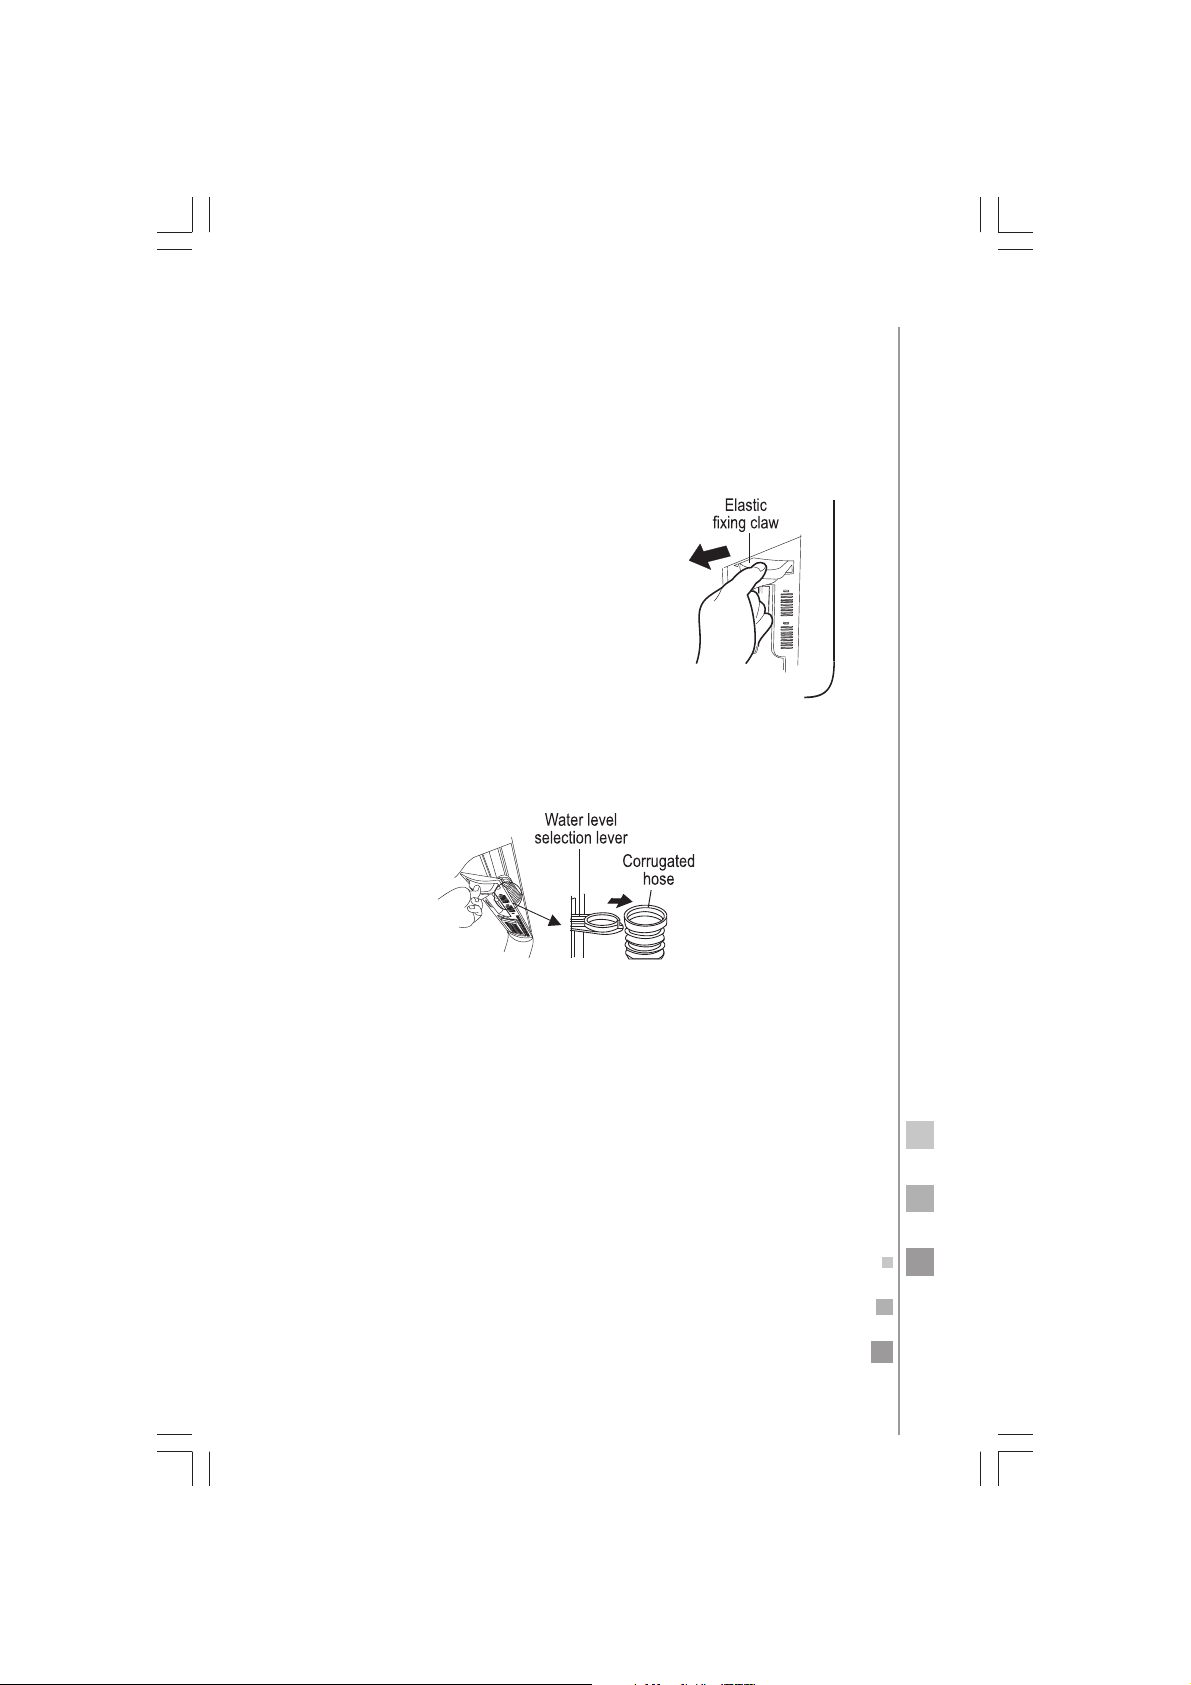
cleaning the overflow filter
1. Remove the overflow filter as indicated in
the figure. Nip the elastic fixing claw and
pull in the direction of the arrow to take it
off.
2. Remove the corrugated hose. Disengage the top of the corrugated hose inside the overflow filter (as shown in Figure 1).
Page 22
22
3. Clean the filter. Remove the lint around the filter and flush it with
tap water.
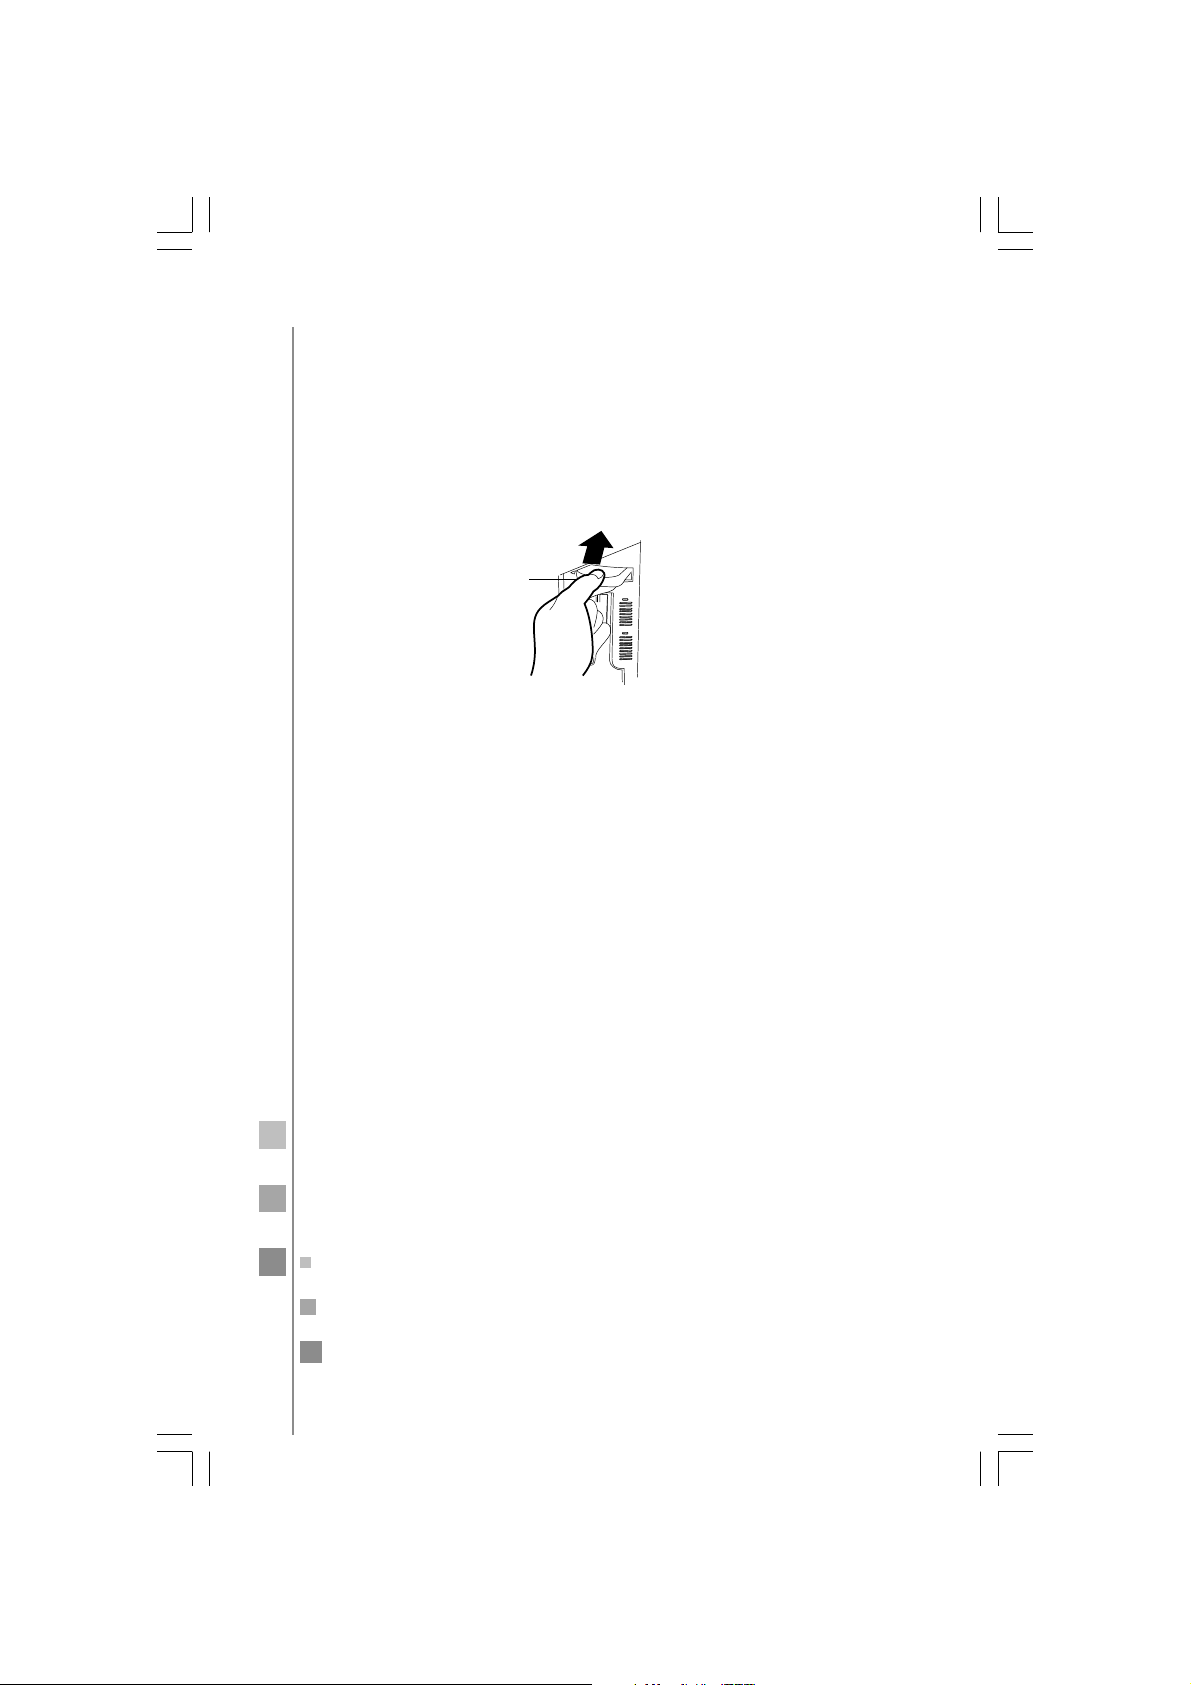
4. Replace the overflow filter.
a) Replace the corrugated hose.
b) Insert the mounting plate at the bottom of the filter into the
valve cover.
c) Hang up the hook at the upper side.
d) Push in the top of the filter as shown in the figure.
Hook
Page 23
23
when the remaining water is frozen
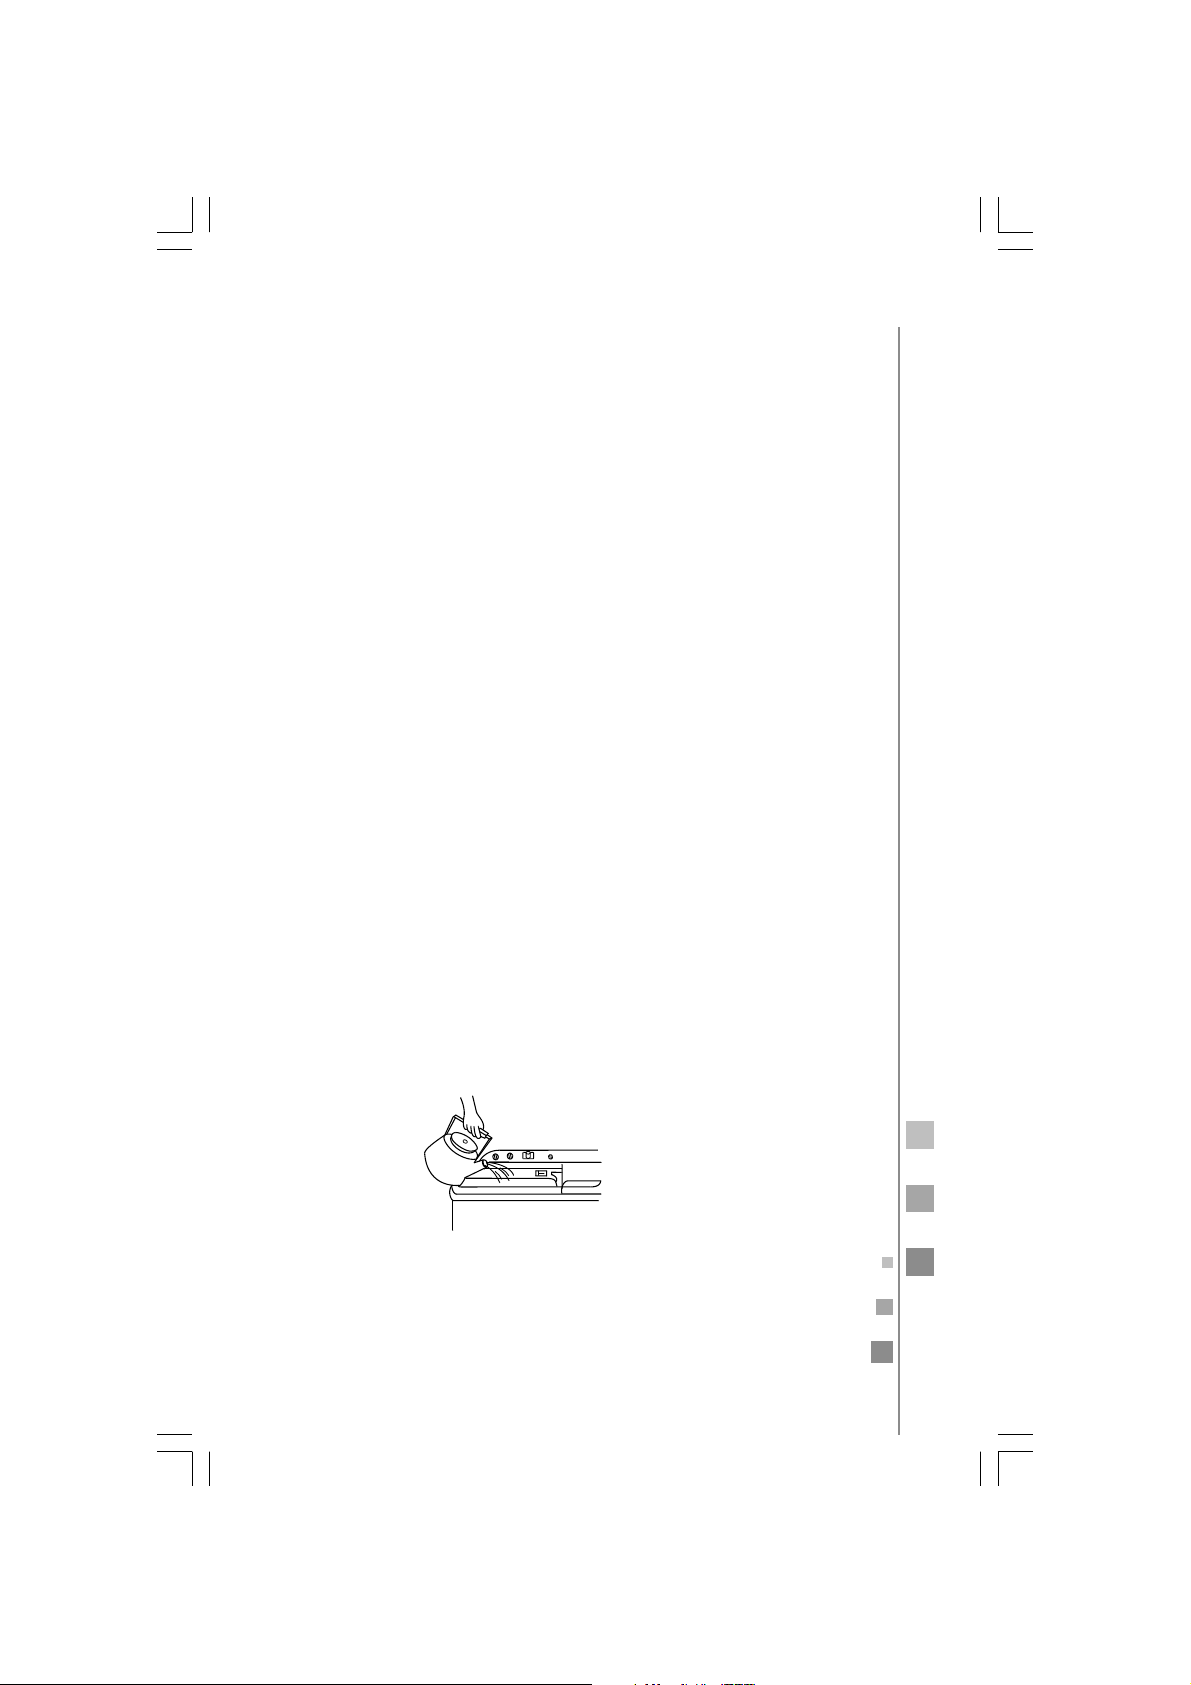
1. Pour warm water NOT EXCEEDING 50 °C into the washing tub to
soak it completely.
2. Use your hands to gently turn the pulsator. Be very careful.
3. Make sure the drainage works normally before operating the
washing machine.
prevent freezing of the washer
1. Make sure all water has been completely drained from the washing machine after using it.
2. After completely draining the water, set the WASH TYPE selector
in the DRAIN position. If left at the NORMAL position it will be
rather difficult for the frozen water to melt.
2 - 3 liters of water
NOT EXCEEDING
50 °C
cleaning the unit
• Completely wipe the unit using a damp soft cloth.
• If the washing machine is very dirty, wipe it with a neutral deter-
gent.
• Do not wash the machine by spraying water directly on it.
• After washing, disconnect the water supply hose.
• Do not store water in the tub for long periods. Discharge the wa-
ter immediately after each use.
• Pull off the power plug and hang up the power cord.
• Hang up the drain hose. Wipe off the water drops on the surface
of the machine and inside the tub using a clean soft cloth.
• Leave the cover of the washing tub and the inner and outer covers
of the spinning tub open for about an hour, then close them.
Page 24
24
troubleshooting tips
If the washing machine fails, pull off the power plug before checking. The following symptoms does not always represent a problem.
Please confirm failure again before contacting the authorized service center. If the problem persists, contact the authorized service
center. DO NOT try to repair the machine by yourself.
Problem Possible cause Solution
Washer won't
operate
• Power failure in your
area.
• Power plug not properly inserted in outlet.
• Pulsator jammed with
foreign material.
Machine won't
drain
• Drain hose is not on
the floor.
• Frozen drain hose.
• Drain hose is blocked
with foreign material.
• Clothes have fallen
over the outer edge of
the spinning tub.
Abnormal
noises during
wash
• Hairpins, coins or metallic objects inside the
tub.
• Wait until power has
been reestablished.
• Make sure plug is
firmly inserted in outlet.
• Remove foreign material.
• Bring down the drain
hose.
• Remove foreign materials from the drain
hose.
• Contact the authorized
service center.
• Remove all metallic
objects from inside the
tub.
Abnormal
sound and violent vibration
during spinning
• The washer is located
on uneven floor.
• The spinning tub plate
is not pressing the load
evenly.
• Clothes have fallen
over the outer edge of
the spinning tub.
• The load inside the
spinning tub exceeds
the maximum capacity.
• Level the machine.
• Make sure the spinning tub plate is evenly
pressing the load.
• Remove those items
and contact an authorized service center.
• Reduce the size of the
load.
During the first
use of the machine, some
water is flowing out from
the drain hose
• It is the water remaining from the inspection made at the factory.
• This is normal.
Page 25
25
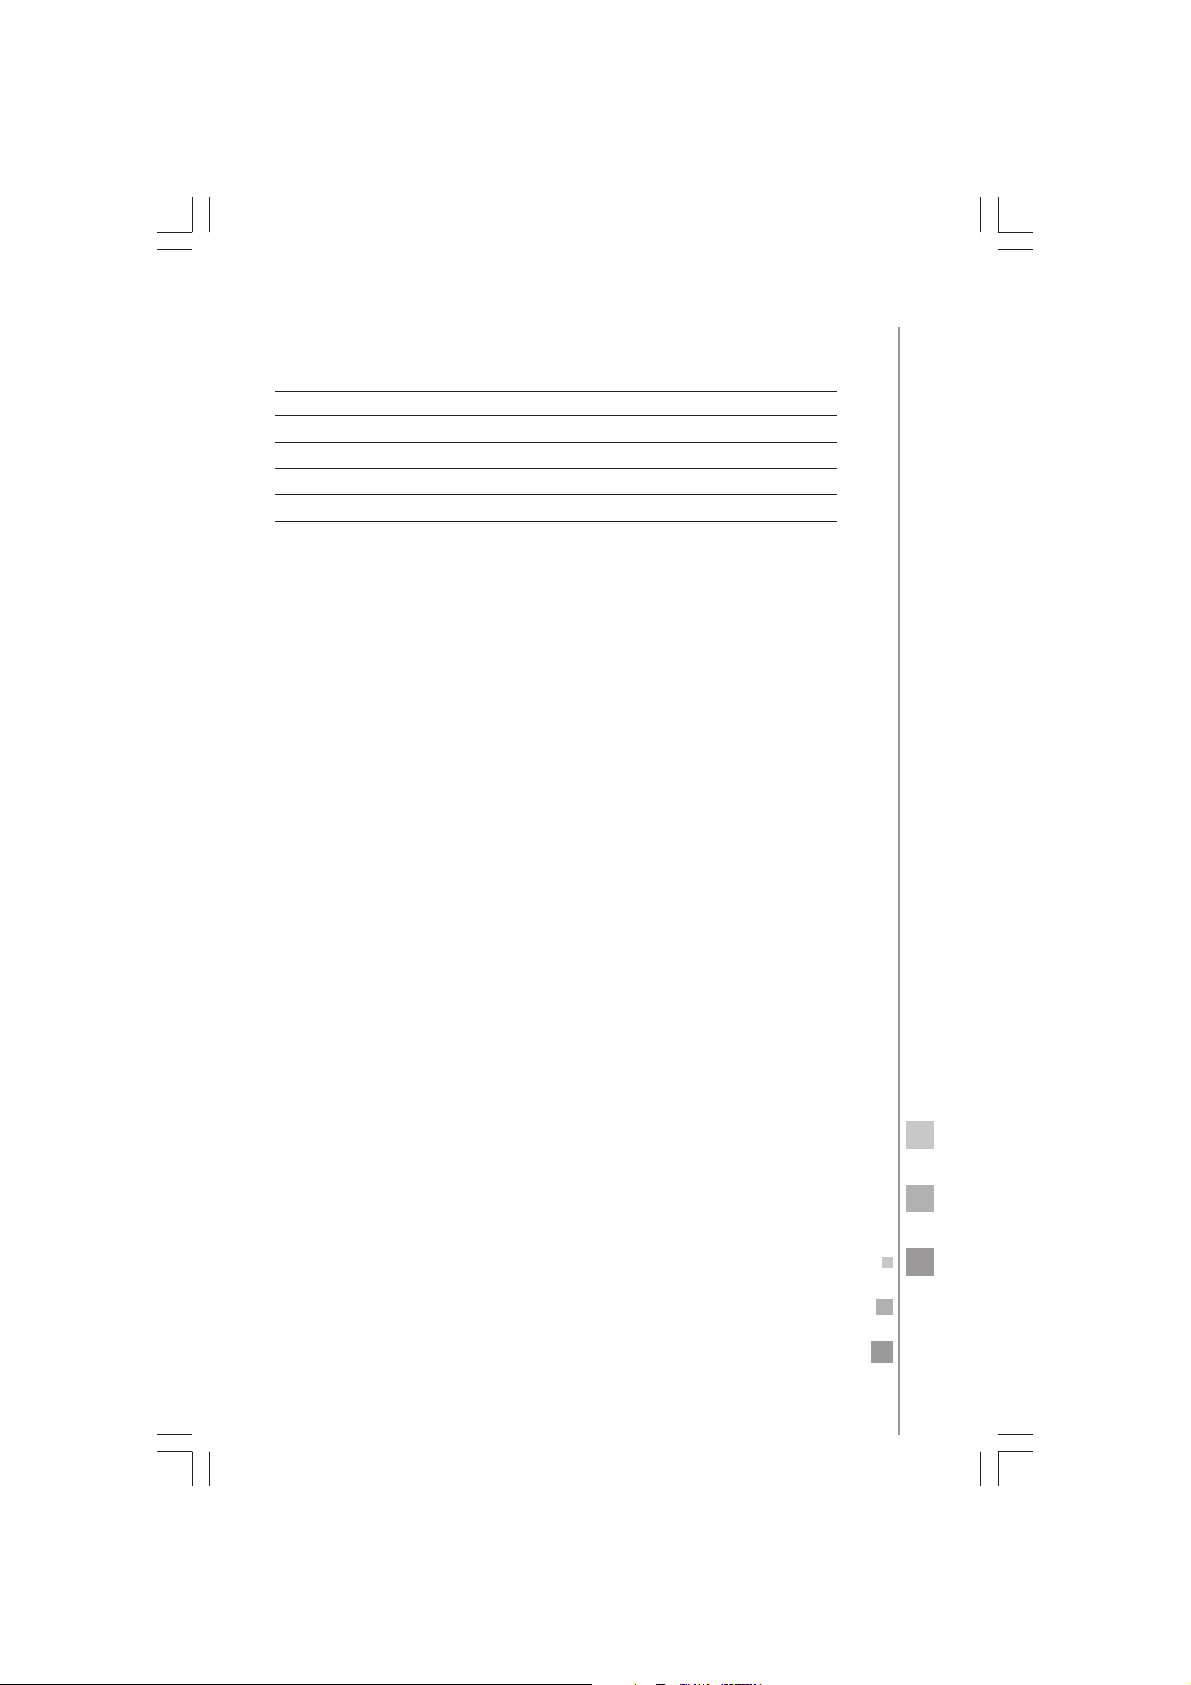
LMD3123PBCS0
220 V ~
50 Hz
400 W
150 W
13kg
LMD3123PBEB0
110 V ~
60 Hz
400 W
150 W
13 kg
rated electrical specifications
Model
Supply voltage
Frequency
Washing power consumption
Spinning power consumption
Capacity
Page 26
26
Producto:
Marca:
Modelo:
Fecha en la que el consumidor
recibe el producto
Datos de identificación del producto
Número de serie:
Distribuidor:
Firma o sello del
establecimiento
Este formulario debe ser llenado por el distribuidor.
Póliza de garantía. Aplica a México exclusivamente.
Mabe, garantiza este producto en todas sus piezas, componentes y mano
de obra por el tiempo de 1 año en su producto final —contado a partir de
la fecha de recepción de conformidad del consumidor final— contra
cualquier defecto de fabricación y funcionamiento durante el uso normal
y doméstico de este producto. Incluye los gastos de transportación del
producto que se deriven del cumplimiento de esta póliza dentro de su red
de servicio. Esta garantía ampara únicamente el modelo, marca y serie
referidos en los "datos de identificación del producto", ubicado en la parte
superior del presente documento.
Procedimiento para hacer efectiva la garantía
Para hacer efectiva la presente garantía, el consumidor deberá presentar
esta póliza debidamente sellada por el establecimiento que vendió el
producto, o la factura o recibo o comprobante con los datos de
identificación de producto que se describen en ésta póliza, en cualquiera
de nuestros Centros de Servicio Técnico referidos en la presente póliza o
llamando a los teléfonos del directorio incluido en este documento, en
donde también los consumidores podrán obtener las partes, consumibles
y accesorios correspondientes.
La garantía no podrá hacerse efectiva en los siguientes casos:
a) Cuando el producto se hubiese utilizado en condiciones distintas a las
normales.
b) Cuando el producto no hubiese sido operado de acuerdo con el
instructivo de uso que se le acompaña.
c) Cuando el producto hubiese sido alterado o reparado por personas y/o
talleres se servicio no autorizado por Mabe.
Conceptos cubiertos por la garantía
Defectos de fabricación que impidan total o parcialmente el correcto
funcionamiento del aparato que se presente dentro de los términos de
vigencia de esta garantía.
Esta garantía ampara todas las piezas y componentes del producto e incluye
la mano de obra, así como el reemplazo de cualquier pieza o componente
defectuoso sin costo adicional para el
consumidor. Se incluyen también los
gastos de transportación del producto que deriven del cumplimiento de la
presente, dentro de cualquiera de nuestros centros de servicio indicados
en el listado que se incluye en ésta póliza.
Teléfonos dentro de México
01 (461) 471.7000
01 (461) 471.7100
Página Web:
www.serviplus.com.mx
Page 27
27
Recuerde que su producto está respaldado por
SERVIPLUS, la empresa líder en Servicio para línea
blanca, donde siempre encontrará el trato amable
de profesionales dispuestos a resolver cualquier falla
en el funcionamiento de su producto.
Además de respaldar la garantía de su producto,
Serviplus le ofrece los siguientes servicios:
Instalación de línea blanca
Reparaciones con cargo para aparatos fuera de
garantía
Contratos de extensión de garantía
Venta de refacciones originales
Servicio exclusivo para Argentina, Chile,
Colombia, Ecuador y Perú
Colombia: 01.800.518.3227
www.serviciomabe.com.co
Bogotá: 508.7373 — Cali: 620.7363
Chile: 123.0020.3143
Santiago de Chile: 2618.8346
www.serviciomabe.cl
Argentina: 0.800.222.1745
Buenos Aires: 5984.1141
www.mabe.com.ar
Perú: 0800.78.188
Lima: 706.2952
www.mabe.com.pe
Importado y/o comercializado por:
Chile
Comercial Mabe Chile Ltda.
Av. Américo Vespucio Norte
No. 2416
Vitacura, Santiago, Chile
Teléfonos de servicio:
123.0020.3143 y 2618.8346
México
Mabe S.A. de C.V.
Av Paseo de Las Palmas 100
Col. Lomas de Chapultepec
I Sección
Delegación Miguel Hidalgo
Ciudad de México, C.P. 11000
R.F.C.: MAB911203RR7
Teléfonos de servicio:
01 (461) 471 7000 y
01 (461) 471 7100
Colombia
Mabe Colombia S.A.S.
Carrera 21 No. 74-100
Parque industrial Alta Suiza
Manizales - Caldas. Colombia
U.A.P. #141 de la DIAN
Teléfonos de servicio:
01.800.518.3227, 1-5087373 y
2-6207363
Ecuador
Mabe Ecuador
KM 14 ½ Vía a Daule
Guayaquil – Ecuador
RUC: 0991321020001
Teléfono de servicio:
1800.00.0690
Venezuela
Mabe Venezuela C.A.
Av. Sanatorio del Avila, Urb. Boleíta Norte, Edif. La Curacao
piso 1 al 3,
Caracas, zona postal 1060
RIF: J-00046480-4
Teléfono de servicio:
0800.136.2631 y 212.335.7605
Perú
Mabe Perú S.A.
Calle Los Antares No. 320 Torre
"A" Ofic. 701 Urb. La Alborada
Santiago de Surco – Lima
R.U.C. 20293670600
Teléfonos de servicio:
0800.78.188 y 706.2952
Teléfonos dentro de México
01 (461) 471.7000
01 (461) 471.7100
Página Web:
www.serviplus.com.mx
Venezuela
0800.136.2631
Caracas: 212.335.7605
www.mabe.com.ve
Costa Rica
(506) 4404.3001/3002
www.serviplus.co.cr
Ecuador: 1800.00.0690
www.mabe.com.ec
Guatemala
(502) 2476.0099
www.serviplus.com.gt
El Salvador
(503) 2294.0350
www.serviplus.com.sv
Honduras
(504) 2450.4917
www.serviplus.com.hn
Nicaragua
(505) 2248.0250
www.serviplus.com.ni
Panamá
(507) 397.6065
www.serviplus.com.pa
República
Dominicana
(1.809) 372.5392
www.serviplus.com.do
Antes de solicitar un servicio de garantía:
1. Asegúrese de haber seguido las indicaciones de
instalación, uso y cuidados que menciona el
instructivo.
2. Lo cali ce y te ng a a la man o s u garant ía
debidamente sellada por el establecimiento que
lo vendió, o la factura, o recibo, o comprobante.
3. Anote la marca, modelo y número de serie del
producto y tenga a la mano papel y lápiz.
4. Llame a los teléfonos de contacto Serviplus o
ingrese a nuestra página de internet para solicitar
el servicio de su producto.
Page 28
28
Información aplica a Argentina exclusivamente
Certificado de garantía
Durante el plazo de 12 meses a partir de la fecha de compra de este aparato, KRONEN INTERNACIONAL S.A.
fabricante y/o importador de este producto, garantiza y se compromete frente al comprador original a reparar o
reponer la pieza cuya defectuosidad obedezca a causas de fabricación. Se entiende por reponer a la sustitución de
la pieza por otra igual o similar a la original y que a juicio de KRONEN INTERNACIONAL S.A. asegure el correcto
funcionamiento de la unidad, no obligándose la Empresa al cambio de la unidad completa.
La garantía quedará anulada si los defectos, faltas mecánicas o deterioros fueran ocasionados por uso abusivo,
mal manejo y exceso o caída de tensión.
Caducará igualmente la validez de este certificado en los casos de culpa del adquiriente, intervención de personal
extraño al servicio técnico autorizado, cambio de propiedad, cambio de domicilio no informado, enmiendas o
raspaduras en los datos consignados en este certificado o la factura de compra.
Las reparaciones se realizarán en un plazo máximo de (30) días a partir del recibo fehaciente de solicitud de
reparación en nuestro Departamento de Servicio Técnico o Centro de Servicio Autorizado, quienes le otorgarán el
número de "orden de servicio" correspondiente.
Este
plazo podrá ampliarse por razones de fuerza mayor y casos fortuitos, debiendo previamente comunicarlo el
Servicio al usuario.
En el caso de que las reparaciones no puedan efectuarse en el domicilio del comprador original, KRONEN
INTERNACIONAL, S.A. se hará cargo de los costos del flete y seguro necesarios para el traslado del producto a
nuestros talleres o Centros de Servicio Autorizados en un radio máximo de 50 km. de los mismos.
Toda intervención de nuestro personal realizada a pedido del comprador, dentro del plazo de esta garantía, que
no fuera originada por falta o defecto cubierto por este certificado, deberá ser abonada por el interesado de
acuerdo a la tarifa vigente.
Se deja constancia que la garantía no cubre daños ocasionados al interior y exterior del gabinete producidos por
roturas, golpes, rayones, caídas, etc., como así tampoco los plásticos y accesorios, las lámparas, ni los daños
ocasionados por deficiencias o interrupciones que afecten el circuito eléctrico de conexión, o si los daños fueran
producidos por causa de fuerza mayor o caso fortuito, y los ocasionados por mudanzas o traslados.
En ningún caso KRONEN INTERNACIONAL S.A. asume responsabilidad por ningún daño y/o perjuicio, sea directo y/
o indirecto que pudiesen sufrir
el adquiriente, usuarios o terceros en relación al bien, no pudiendo interpretarse
esta garantía como generadora de obligaciones distintas a las expresamente indicadas en el presente certificado
de garantía.
RESPONSABILIDAD NORMAL DEL COMPRADOR ORIGINAL
1. Para que este certificado sea válido es imprescindible que el usuario acredite ante el servicio técnico autorizado
por KRONEN INTERNACIONAL S.A. la fecha de compra mediante la factura oficial de compra del aparato, KRONEN
INTERNACIONAL S.A. se reserva el derecho de cotejar la exactitud de estos datos contra los registros de control
de salida de la Empresa.
2. Que los talones de la garantía sean completados con todos los datos solicitados, y el sello del comercio vendedor.
Es de su interés exigirle al mismo que complete los datos que se solicitan en este certificado en el momento de
la compra y guardarlo prolijamente, es único medio para gozar de esta garantía.
3. Antes de instalar y usar el aparato, leer cuidadosamente el
manual de instrucciones, uso e instalación que se
adjunta y respetar sus indicaciones.
4. Conectar correctamente el toma de alimentación previsto con conexión de cable a tierra.
5. Verificar que la tensión de línea corresponda a 220 V y 50 Hz.
IMPORTANTE
1. El presente certificado anula cualquier otra garantía implícita o explícita por la cual y expresamente no autorizamos
a ninguna otra persona, sociedad o asociación a asumir por nuestra cuenta ninguna responsabilidad con respecto
a nuestros productos.
2. Hacemos constar que esta unidad ha sido diseñada para uso familiar, por tal motivo su uso comercial, industrial
o afectación a cualquier otro tipo de utilización no está amparada por esta garantía.
3. Cualquier gestión judicial a que pudiera dar lugar la presente, será resuelta ante la Justicia Ordinaria de la
Capital Federal.
REGISTRO DEL CERTIFICADO DE GARANTÍA
Propietario:
Lugar y fecha de compra:
Firma y sello de la casa vendedora:
Identificación de la unidad
Factura No.:
No.:
Código postal:
Teléfono:
Fecha de compra:
Identificación de la unidad:
Nombre del propietario:
Calle:
Localidad:
Provincia:
No. factura:
Casa vendedora:
Page 29
29
Información aplica a Chile exclusivamente
CERTIFICADO DE GARANTÍA
1. COMERCIAL MABE CHILE LTDA. garantiza al comprador que el artefacto vendido ha sido
revisado y comprobado su funcionamiento bajo condiciones normales de uso doméstico.
2. COMERCIAL MABE CHILE LTDA. se obliga durante el término de un año contado a partir
de la fecha de compra del producto a reparar sin costo alguno las fallas causadas por
defectos de los materiales, componentes o por defectos de fabricación.
Para hacer uso de esta garantía el cliente debe contar con la boleta, factura de compra o
la guía de despacho respectiva.
Para solicitar servicio por parte de COMERCIAL MABE CHILE LTDA., el cliente debe contactar nuestro call center al número 2618.8346 en la región metropolitana, al 123.0020.3143
para el resto del país o en el si sitio Web www.serviciomabe.cl
Así mismo, COMERCIAL MABE CHILE LTDA. se entiende autorizada para efectuar una revisión técnica del artefacto previa a la orden de reparación y/o sustitución del mismo. En
todo caso el comprador conviene expresamente en que
la sustitución del artefacto solo se
procederá en caso de que, a pesar de la intervención técnica autorizada, el defecto sea de
tal naturaleza que no sea factible su reparación, a juicio de COMERCIAL MABE CHILE
LTDA.
3. EXCLUSIONES DE GARANTÍA: Esta garantía no cubre los daños causados por mal trato,
accidente, por transporte, uso diferente al indicado en las instrucciones de manejo, por
causas de las condiciones ambientales en que se instale o daños por uso inapropiado del
artefacto como uso industrial o comercial en restaurantes, hoteles, moteles, lavanderías,
hogares de acogida, casas de reposo, fábricas. Tampoco cubre averías causadas por el
empleo de energía eléctrica diferente a la especificada, daños causados por fluctuaciones
de voltaje o ciclaje, o por causas fuera del control de COMERCIAL MABE CHILE LTDA.
como corto circuito, sobrecargas accidentales en la línea de alimentación o sobrecargas
por causa de descargas eléctricas, intervención técnica no autorizada, y en fin, cualquier
otra causa semejante a las anteriores.
En el caso de incurrir en destapes de bomba de lavadora, corrección de instalaciones que
afecten el funcionamiento correcto del producto hechas por personal ajeno a COMERCIAL
MABE CHILE LTDA., deben ser pagadas p
or el consumidor final al servicio técnico asigna-
do para atenderlo.
4. CANCELACION DE LA GARANTÍA: Este certificado quedará automáticamente cancelado
por las siguientes causas:
a) Intervención técnica del artefacto por personas no autorizadas por COMERCIAL MABE
CHILE LTDA., ya sea en la instalación o reparación de los productos que requieren ser
intervenidos o abiertos para su correcto funcionamiento como son los equipos de Aire
Acondicionado, Máquinas Lavadoras y Secadoras de uso comercial o Doméstico y cualquier producto comercializado por la compañía.
b) Por eliminación o modificación de los números de serie o la rotura de cualquier sello
que el artefacto lleva.
c) Por la alteración o falsedad de la información suministrada en este certificado.
d) Por el vencimiento del término de vigencia de la garantía.
5. COMERCIAL MABE CHILE LTDA. no asumirá, ni autoriza asumir a su nombre otras obligaciones en relación con la venta de artefactos o cualquiera de sus partes, diferentes a las
contempladas en esté certificado.
CERTIFICADO DE GARANTÍA
ADVERTENCIA
Las visitas de nuestros técnicos por causas injustificadas, dan lugar al pago por parte del
usuario del valor correspondiente al transporte y el tiempo del técnico.
Rogamos por lo tanto, antes de solicitar un servicio, comprobar todos los puntos acerca del
funcionamiento indicados en el manual de instrucciones.
1 AÑO
Page 30
30
Información aplica a Colombia exclusivamente
Póliza de garantía
Datos de identificación de producto (para ser llenado por el distribuidor)
Producto:
Marca:
Modelo:
Número de serie:
Fecha en la que el consumidor
recibe el producto:
Distribuidor:
Sello o firma:
mabe garantiza este producto en todas sus piezas, componentes y mano de obra; por el tiempo de 1 año en
su producto final, contados a partir de la fecha de recepción de conformidad del consumidor final; contra
cualquier defecto de fabricación y funcionamiento durante el uso normal y doméstico de este producto.
Incluye los gastos de transportación del producto que deriven del cumplimiento de esta póliza dentro de su
red de servicio. Esta garantía ampara únicamente el modelo, marca y serie referidos en el apartado "Datos
de identificación de producto", ubicado en la parte SUPERIOR del presente documento.
Conceptos cubiertos por la garantía
Defectos de fabricación que impidan total o parcialmente el correcto funcionamiento del aparato que se
presente dentro de los términos de vigencia de esta garantía. Esta garantía ampara todas las piezas y
componentes del producto e incluye la mano de obra, así como el reemplazo de cualquier pieza o componente
defectuoso sin costo adicional para el consumidor. Se incluye también los gastos de transportación del producto
que deriven del cumplimiento de la presente dentro de cualquiera de nuestros centros de servicio indicados
en el listado que se incluye en esta póliza.
La garantía no podrá hacerse efectiva en los
siguientes casos:
a) Cuando el producto se hubiese utilizado en condiciones distintas a las normales;
b) Cuando el producto no hubiese sido operado de acuerdo con el instructivo de uso que se le acompaña.
c) Cuando el producto hubiese sido alterado o reparado por personas y/o talleres de servicio no autorizados
por mabe.
Puntos aplicables para otras regiones
IMPORTANTE: Las siguientes condiciones no se consideran como uso normal del aparato por
lo que deben tenerse en cuenta para hacer válida esta garantía: la garantía no podrá hacerse
efectiva en los siguientes casos:
El uso del aparato con fines comerciales, de prestación de servicios, o cualquier otro propó-
sito que no sea estrictamente doméstico.
Daños causados por fluctuaciones de voltaje provocadas por corto circuito, sobrecargas ac-
cidentales en la línea de alimentación o sobrecargas por causas de descargas eléctricas;
Daños por uso de partes que no sean genuinas;
Daños en el producto causados por su transportación, cuando esta sea por cuenta del consu-
midor;
Daños al producto causados por accidente, fuego, inundaciones o actos de la Naturaleza;
Cualquier otra condición de instalación y operación diferente a la especificada en el instruc-
tivo de uso.
Daños ocasionados por mal manejo del cliente, por animales (roedores, insectos, otros), por
polvo o por causa de
las condiciones ambientales en que se instale el producto, tales como
humedad excesiva o salinidad.
Colombia,
Chile,
Argentina
ADVERTENCIAS
1. Esta garantía no es de cubrimiento internacional, solo tiene vigencia en el país donde fue
adquirido el producto, de acuerdo a los términos establecidos para cada país por parte del
fabricante y respetando las leyes de garantía del mismo. Para respaldar el origen del producto, es necesario que el usuario presente el documento de compra o factura, si así se
requiere.
2. Pasado un (1) mes a partir de la fecha prevista para la devolución o a la fecha en que el
consumidor debía aceptar o rechazar expresamente el servicio, y no acuda a retirar el bien,
el centro de Servicio Técnico lo requerirá para que lo retire dentro de los dos (2) meses
siguientes a la remisión de la comunicación. Si el consumidor no lo retira, se entenderá por
ley que abandona el bien, en dado caso el Centro de Servicio Técnico dispondrá del mismo
conforme con la reglamentación que expida el gobierno nacional para tal efecto. Los gastos que se deriven por el abandono del bien (almacenamiento, bodegaje y mantenimiento), deberán ser asumidos por el consumidor.
Colombia
Mabe garantiza la disponibilidad de repuestos por cinco (5) años.
CANCELACIÓN DE LA GARANTÍA
El amparo bajo la garantía quedará automáticamente cancelada por las siguientes causas:
Por la eliminación o modificación del número de serie o la ruptura de cualquier sello que
tenga el artefacto.
Por la alteración de la información suministrada en este certificado o sobre el producto.
Mabe no asumirá ni autorizará asumir a su nombre otras obligaciones en relación con la
venta del producto o cualquiera de sus partes, diferentes a las contempladas en este certificado.
Procedimiento para hacer efectiva la garantía:
Para hacer efectiva la garantía de su producto, el consumidor podrá solicitar servicio técnico a los números
de teléfono que están referidos en este documento, o a través de la página web www.serviciomabe.com.co
Page 31
27
Page 32
28
 Loading...