

Page 1

TP600 Control PANEL
__________________________________________________________________
NOTE: The look of your topside control panel design and buttons will vary according to
brand and features available on your spa. See table below for pictures and explanation of
TP600 Control Panel button functions.
Page 2

FILLING YOUR SPA
PREPARATION AND FILLING
Fill the spa 5-6” (13-15cm) below the lip of the spa. Open all valves and jets in the plumbing system before filling to allow as much air as possible to
escape from the plumbing and the control system during the filling process.
PRIMING MODE
This mode will last 4-5 minutes or you can manually exit the priming mode after the pump(s) have primed. Regardless of whether the priming mode
ends automatically or you manually exit the priming mode, the system will automatically return to normal heating and filtering at the end of the
priming mode. During the priming mode, the heater is disabled to allow the priming process to be completed without the possibility of energizing the
heater under low-flow/no-flow conditions. Nothing comes on automatically, but the pump(s) can be energized by pushing the “Jet” buttons. If the spa
has a Circ Pump, it can be activated by pressing the “Light” button during Priming Mode.
PRIMING THE PUMPS
After the display has gone through screens:
push “Jet” button once to start Pump 1 in low-speed and again to switch to high-speed. Push the Pump 2 button (if you have a 2nd pump) to turn it on.
The pumps will not be running in high-speed to facilitate priming. If the pumps have not primed after 2 minutes, and water is not flowing from the jets
in the spa, turn off the pumps and repeat.
NOTE: Turning the power off/on again will initiate a new pump priming session. Sometimes turning the pump off/on helps it to prime. If the pumps will
not prime after 5 times, turn power off and call for service.
IMPORTANT: A pump should not be allowed to run without priming for more than 2 minutes. Under NO circumstances should a pump be allowed to
run without priming beyond the end of the 4-5 minute priming mode. Doing so may cause damage to the pump and cause the system to energize the
heater and go into an overheat condition.
EXITING PRIMING MODE
Manually exit Priming Mode by pressing either Temperature button. If you do not manually exit the priming mode, it will be automatically terminated
after 4-5 minutes. Be sure that the pump(s) have been primed by this time.
Page 3

Once the system has exited Priming Mode, the top-side panel will momentarily display the set temperature
approximately 1 minute of water flowing through the heater to determine the water temperature and display it accurately.
but the display will not show the temperature yet because the system requires
SPA BEHAVIOR
Pumps
Press the “JETS 1” button once to turn pump 1 on or off, and to shift between low- and high-speeds if equipped. If left running, the pump will turn off
after a time-out period. The pump 1 low-speed will time out after 30 minutes. The high-speed will time out after 15 minutes.
On non-circ systems, the low-speed of pump 1 runs when the blower or any other pump is on. If the spa is in Ready Mode, Pump 1 low may also
activate for at least 1 minute every 30 minutes to detect the spa temperature and then to heat to the set temperature if needed. When the low-speed
turns on automatically, it cannot be deactivated from the panel, however the high speed may be started.
Circulation Pump Modes
The circ pump (if your spa is equipped with one) operates continuously (24 hours) with the exception of turning off for 30 minutes at a time when the
water temperature reaches 3°F (1.5°C) above the set temperature (most likely to happen in very hot climates).
Filtration and Ozone
On non-circ systems, Pump 1 low and the ozone generator will run during filtration. On circ systems, the ozone will run with
the circ pump.
The system is factory-programmed with one filter cycle that will run in the evening (assuming the time-of-day is properly
set) when energy rates are often lower. The filter time and duration are programmable. A second filter cycle can be enabled as needed.
At the start of each filter cycle, the blower (if there is one) or Pump 2 (if there is one) will run briefly to purge its plumbing to maintain good water
quality.
Freeze Protection
If the temperature sensors within the heater detect a low enough temperature, the pump(s) and the blower automatically
activate to provide freeze protection. The pump(s) and blower will run either continuously or periodically depending
on conditions.
In colder climates, an optional additional freeze sensor may be added to protect against freeze conditions that may not be sensed by the standard
sensors. Auxiliary freeze sensor protection acts similarly except with the temperature thresholds determined by the switch. See your dealer for details.
Clean-up Cycle (optional)
When a pump or blower is turned off by a button press or after it has timed out, a clean-up cycle runs for 30 minutes. Pump 1 on Low Speed and the
ozone generator will run for the set time.. The pump and the ozone generator will run for 30 minutes or more, depending on the system. On some
systems, you can change this setting.
TEMPERATURE & TEMP RA N G E
Adjusting the Set Temperature
Pressing Up or Down temperature buttons will cause the temperature to flash. Pressing a temperature button again will adjust the set temperature in
the direction indicated on the button. When the LCD stops flashing, the spa will heat to the new set temperature.
Press-and-Hold
If a Temperature button is pressed and held when the temperature is flashing, the temperature will continue to change
until the button is released.
Dual Temperature Ranges
This system incorporates two temperature range settings with independent set temperatures. The High Range designated in
the display by an “up” arrow, and the Low Range designated in the display by a “down” arrow.
These ranges can be used for various reasons, with a common use being a “ready to use” setting vs. a “vacation” setting.
The Ranges are chosen using the menu structure below. Each range maintains its own set temperature as programmed by
the user. This way, when a range is chosen, the spa will heat to the set temperature associated with that range.
For example:
High Range may be set between 80°F - 104°F (26˚-40˚C).
Low Range may be set between 50°F - 99°F (10˚-26˚C).
Freeze Protection is active in either range.
Page 4

MODE - REST AND READY
In order for the spa to heat, a pump needs to circulate water through the heater. The pump that performs this function is known as the “heater pump.”
The heater pump can be either a 2-Speed Pump 1 or a circulation pump.
If the heater pump is a 2-Speed Pump 1, READY Mode will circulate water every 1/2 hour, using Pump 1 Low, in order to
maintain a constant water temperature, heat as needed, and refresh the temperature display. This is known as “polling.”
REST Mode will only allow heating during programmed filter cycles. Since polling does not occur, the temperature display
may not show a current temperature until the heater pump has been running for a minute or two.
Circulation Mode
If the spa is configured for 24HR circulation, the heater pump generally runs continuously. Since the heater pump is always running, the spa will
maintain set temperature and heat as needed in Ready Mode, without polling.
In Rest Mode, the spa will only heat to set temperature during programmed filter times, even though the water is being filtered constantly when in
Circulation Mode.
Ready-in-Rest Mode
READY/REST appears in the display if the spa is in Rest Mode and Jet 1 is pressed. It is assumed the spa is being used and will heat to set temperature.
While Pump 1 High can be turned on and off, Pump 1 Low will run until set temperature is reached, or 1 hour has passed. After 1 hour, the System will
revert to Rest Mode. This mode can also be reset by entering the Mode Menu and changing it.
SHOW & SET TIME-OF-DAY
Setting the time-of-day can be important for determining filtration times and other background features. From the main menu, activate the
temperature flashing. While the temperature is flashing, press “Light” repeatedly until “TIME” is displayed on the screen. Proceed to set current time
using the up and down temperature buttons. When in the TIME menu, SET TIME will flash on the display if no time-of-day is set in the memory. 24-hour
time display can be set under the PREF menu.
Note: If power is interrupted to the system, Time-of-Day is not stored. The system will still operate and all other user settings will be stored. If filter
cycles are required to run at a particular time of day, resetting the clock will return the filter times to the actual programmed periods. When the system
starts up, it defaults to 12:00 Noon, so another way to get filter times back to normal is to start up the spa at noon on any given day. SET TIME will still
flash in the TIME Menu until the time is actually set, but since the spa started at noon, the filter cycles will run as programmed.
FLIP (INVE R T DISPLAY)
From the main screen, activate the temperature flashing. While the temperature is flashing, press “Light” repeatedly until “FLIP” is displayed on the
screen. While “FLIP” is displayed, press either the up or down temperature button to invert the screen. Follow the same procedures to flip it back.
Page 5
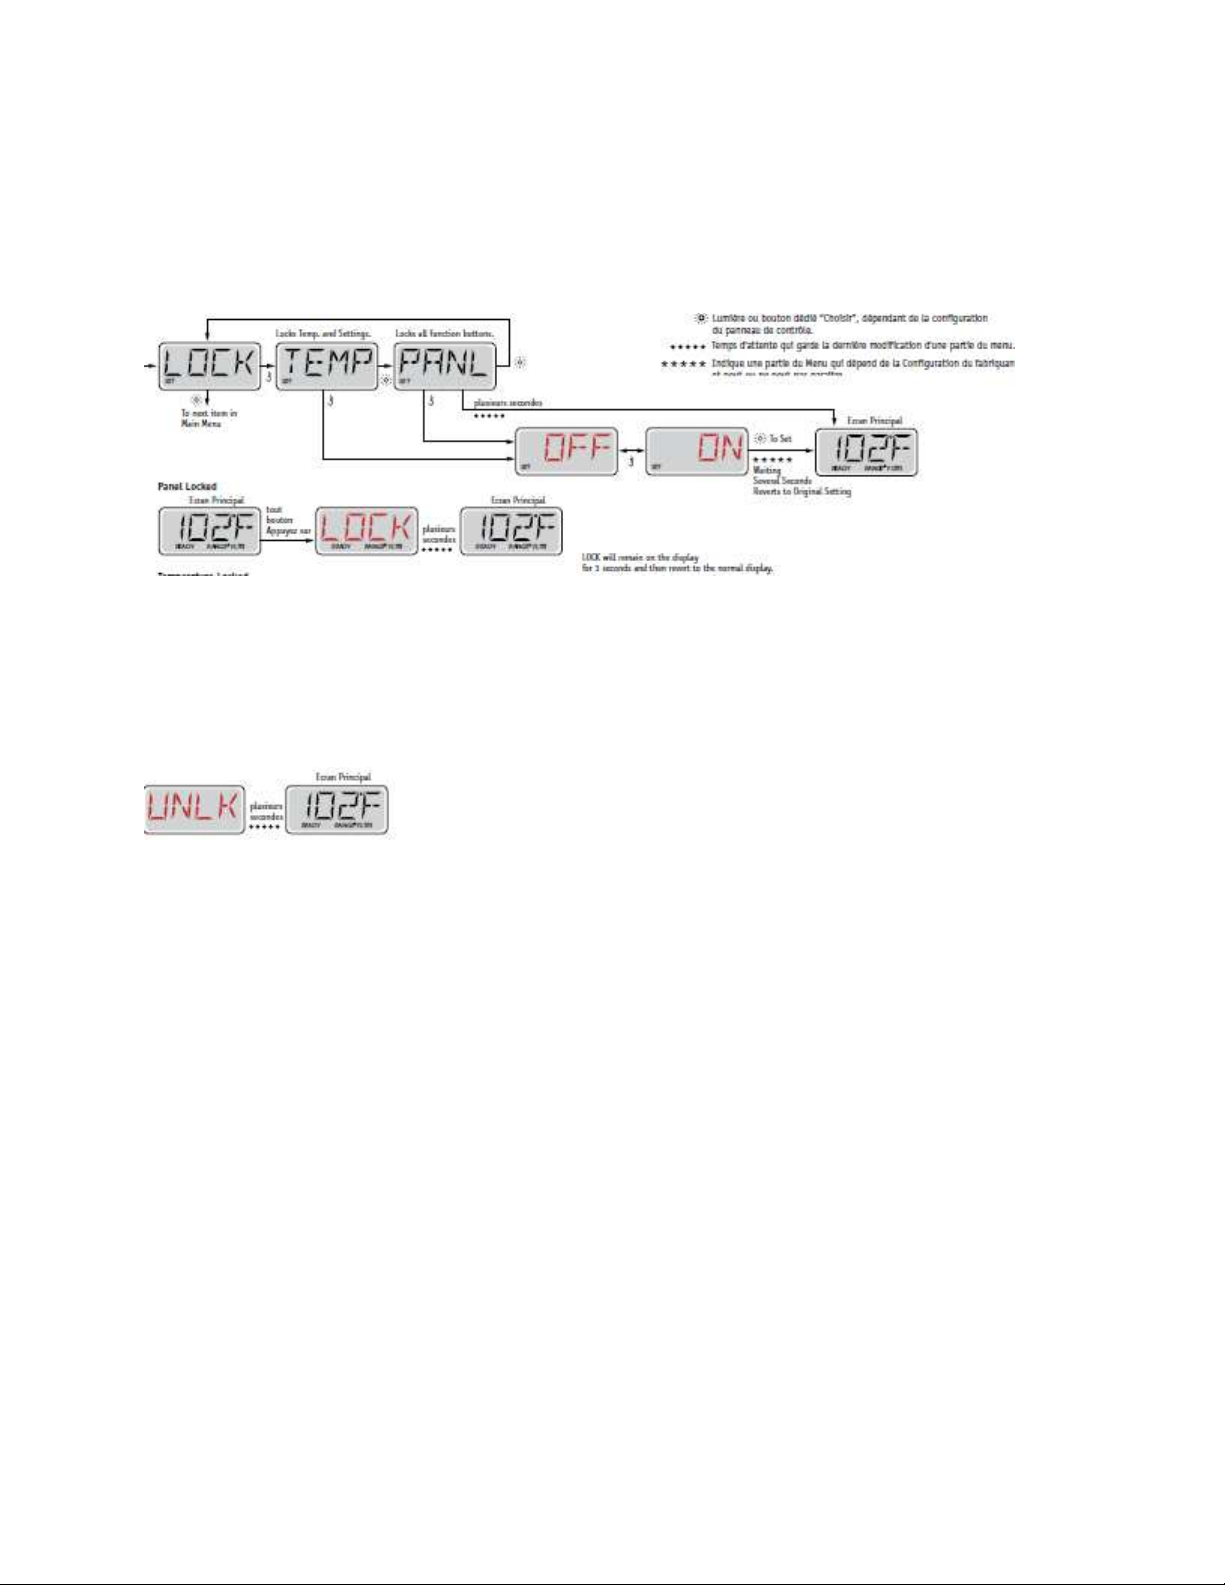
RESTRICTING O P ERATION
The control can be restricted to prevent unwanted use or temperature adjustments.
From the main screen, activate temperature flashing. While temperature is flashing, press “Light” repeatedly until “LOCK” appears on the screen.
Pressing the temperature up button allows you to toggle through “TEMP”, “OFF” and “ON”.
“TEMP” allows you to lock the temp./settings.
“ON” allows you to lock all settings/functions.
“OFF” does not lock the spa.
UNLOCKIN G
This Unlock sequence may be used from any screen that may be displayed on a restricted panel.While pressing and holding the Temperature Up
button, slowly press the Light button twice. “UNLK” will display on the screen and after a few seconds, will revert to main screen.
ADJUSTING FILT R A T I O N
Main Filtration
Filter cycles are set using a start time and a duration. Start time is indicated by an “A” or “P” in the bottom right corner of the display.
Duration has no “A” or “P” indication. Each setting can be adjusted in 15-minute increments. The panel calculates the end time and
displays it automatically.
To enter filter cycles, activate temperature flashing and press the “Light” button repeatedly until the display reads “FLTR” (with a 1 in
the bottom right corner). Pressing the Light button will bring you to the display “BEGN”. The numbers flashing indicate numbers that
can be changed. Scroll through with the up and down temperature buttons to choose what time your filter cycle will start and press
the Light button to make your choice. “RUN” “HRS” will be on the display next. Again, scroll through the numbers to choose the
duration of your filter cycle.
Filter Cycle 2 - Optional Filtration
Follow the same procedures under “FLTR” (with a 2 in the bottom right corner) to set up filter cycle 2.
It is possible to overlap Filter Cycle 1 and Filter Cycle 2, which will shorten overall filtration by the overlap amount.
Purge Cycles
In order to maintain sanitary conditions, secondary Pumps and/or a Blower will purge water from their respective plumbing by running briefly at the
beginning of each filter cycle.
If Filter Cycle 1 is set for 24 hours, enabling Filter Cycle 2 will initiate a purge when Filter Cycle 2 is programmed to begin.
Page 6

Page 7
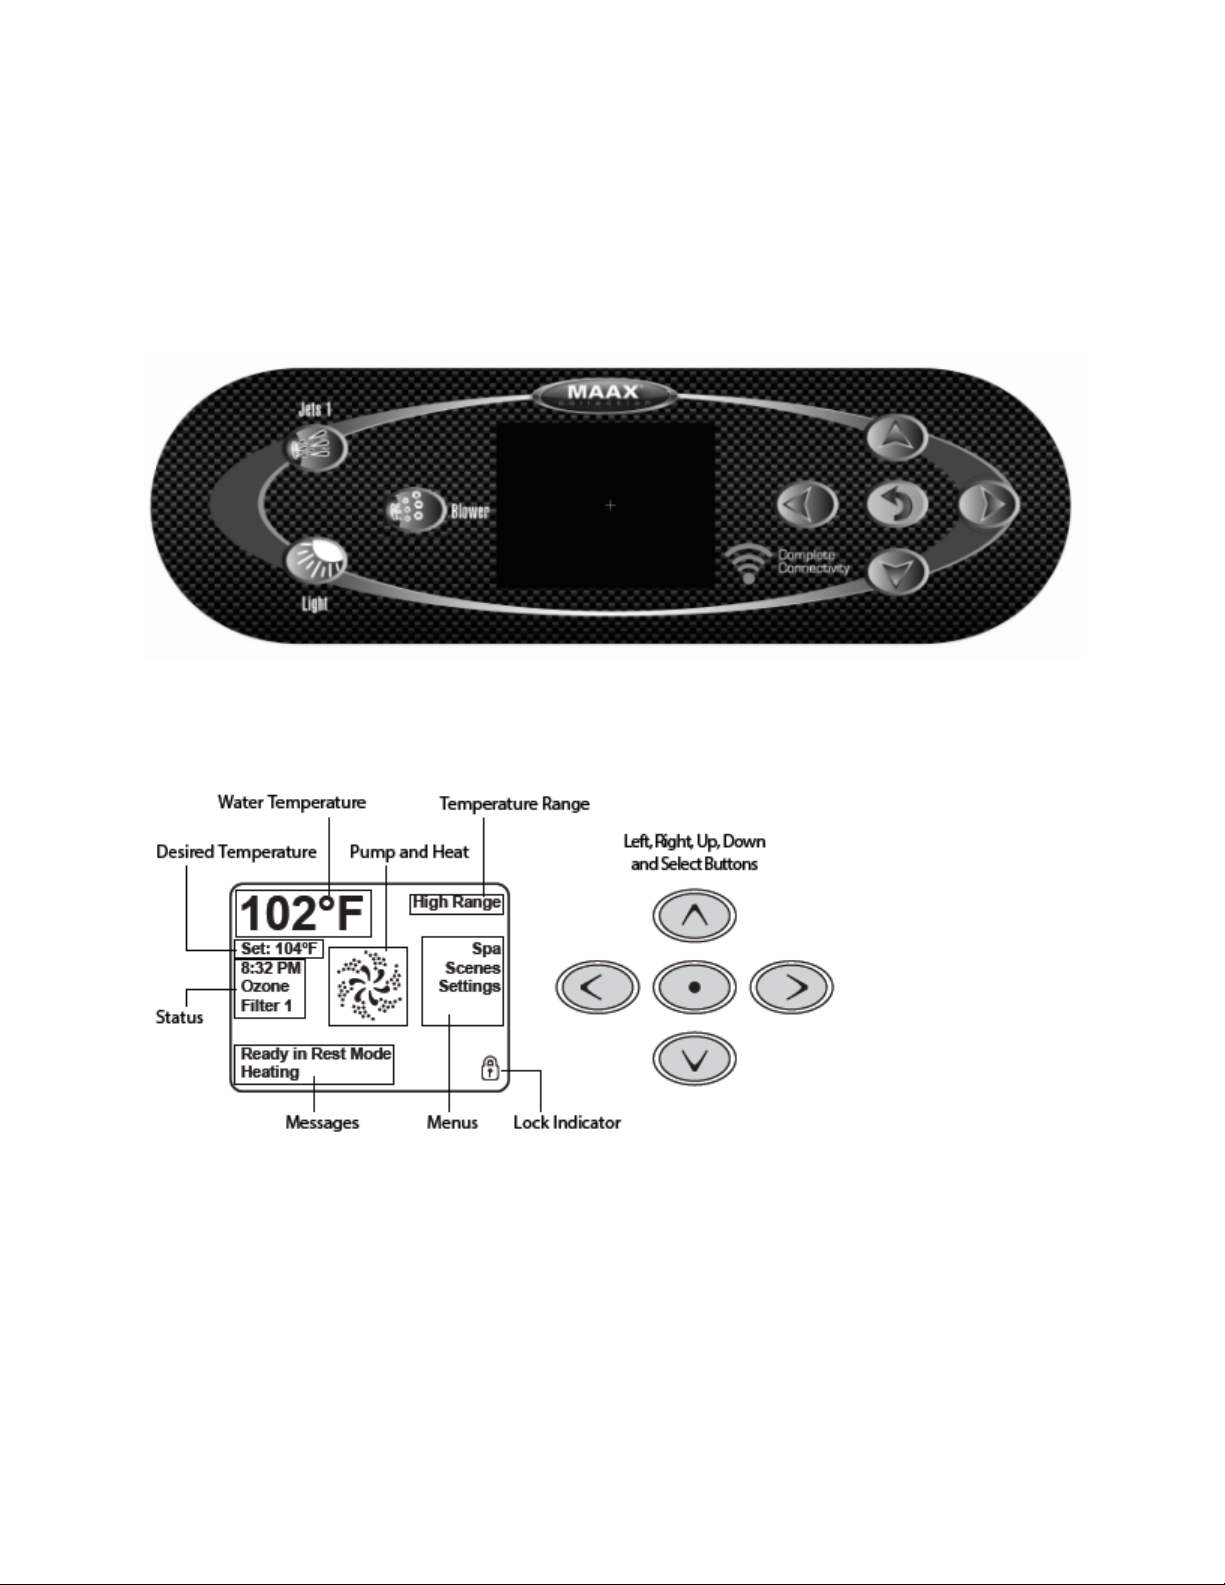
TP800 Control PANEL
__________________________________________________________________
NOTE: The look of your topside control panel design and buttons will vary according to brand and features available on your spa. See table
below for pictures and explanation of TP800 Control Panel button functions.
THE MAIN SCREEN
SPA STATUS
Important information about spa operation can be seen quickly from the Main Screen.
The most important features, including Set Temperature adjustment, can be accessed from this screen. The actual water temperature can be seen in
large text and the desired, or Set Temperature, can be selected and adjusted. Time-of-day, Ozone operation and Filter Operation status is available,
along with other messages and alerts. High Temperature Range vs. Low Temperature Range is indicated in the upper right corner. The Jets Icon in the
center will light up if any pump is running and changes color when the heater is on. A Lock icon is visible if the panel or settings are locked. The Menu
choices on the right can be selected and the screen will change to show more detailed controls or functions.
NAVIGATION
Page 8
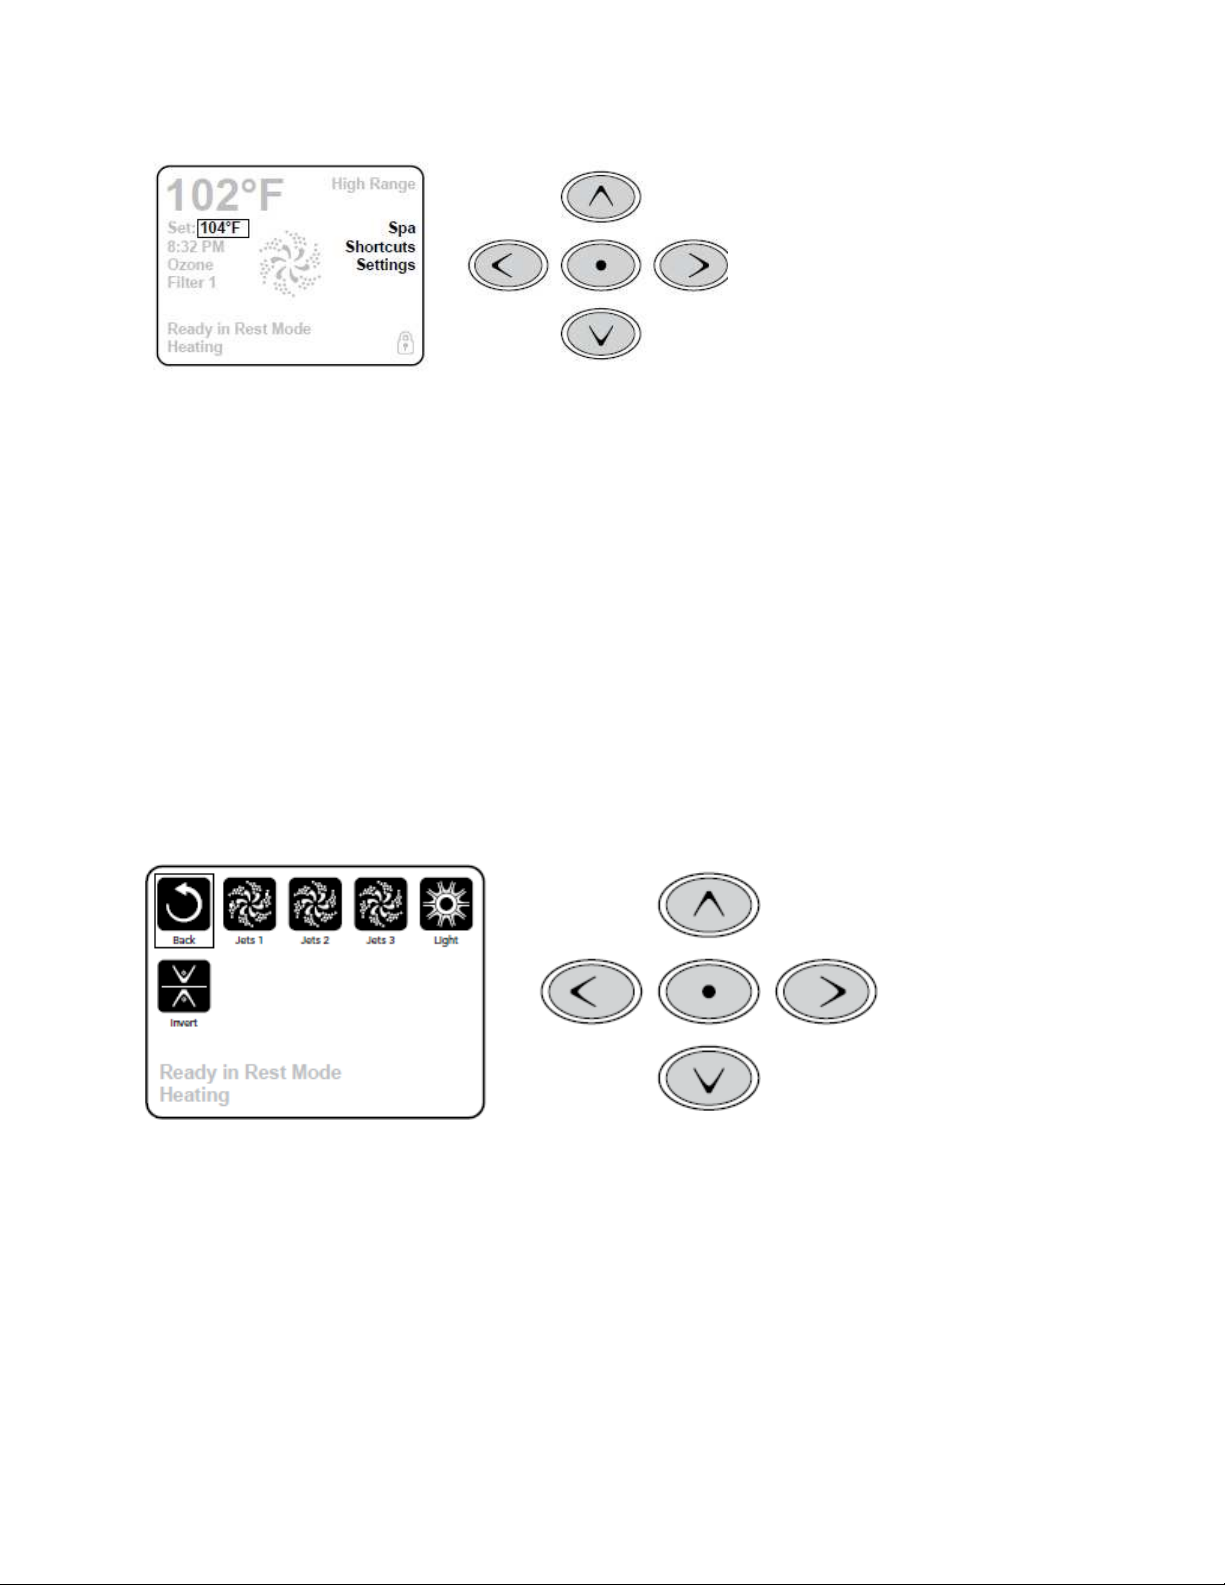
Navigating the entire menu structure is done with 5 buttons on the control panel. When a text item changes to white during navigation, that indicates
the item is selected for action.
Operating or changing a selected item is generally done with the center or “Select” button. The only item that can be changed on the left side of the
Main Screen is the Set Temperature. Press the Left Arrow button
to change the Set Temperature number to white. The Set Temperature can then be adjusted with the up and down buttons.
Pressing the Select button or the Right Arrow button will save the new set temperature.
On the right side of the screen, the menu selections can be selected with the Up and Down Buttons. Use the Select Button
to choose an item. Selecting one of these items will change to a different screen with additional controls.
MESSAGES
At the bottom of the screen, messages may appear at various times. Some of these messages must be dismissed by the user.
PRESS-AND-HOLD
If an Up or Down button is pressed and held when the Set Temperature is selected, the temperature will continue to change
until the button is released, or the Temperature Range limits are reached.
SPA & SHORTCUT SCREEN S
ALL EQUIPMENT ACCESS
The Spa Screen shows all available equipment to control, as well as other features, like Invert, in one easy-to-navigate screen. The display shows icons
that are related to the equipment installed on a particular spa model. The navigation buttons are used to select an individual device. The device that is
chosen is highlighted with a white outline and the text under the icon changes to white. Once a device is selected, it can be controlled using the center
Select Button. Some devices have low and high settings which have different icons for low and high speed indicators.
If the Spa has a Circ Pump, a Circ Pump Icon will appear to indicate its activity, but outside of Priming Mode, the Circ Pump cannot be controlled
directly.
NOTE: The icon for the pump that is associated with the heater (Circ or P1 Low) will have a red glow in the center when the
heater is running.
ONE-PRESS ACTIVATION
The Shortcut Screen requires no navigation. Each button is fixed on a specific fuction and can be used as a very simple user interface for the spa.
THE SETTINGS SCREEN
PRESSING A “BUTTON”
Page 9
When instructions are given to “press a button” any of the following can be done:
• Navigate to the desired item on any Screen. When the desired item is highlighted, press the Select Button.
• Press the button for that device while on the Shortcuts Screen, if the device is one of the 4 functions available.
PROGRAMMING, ETC.
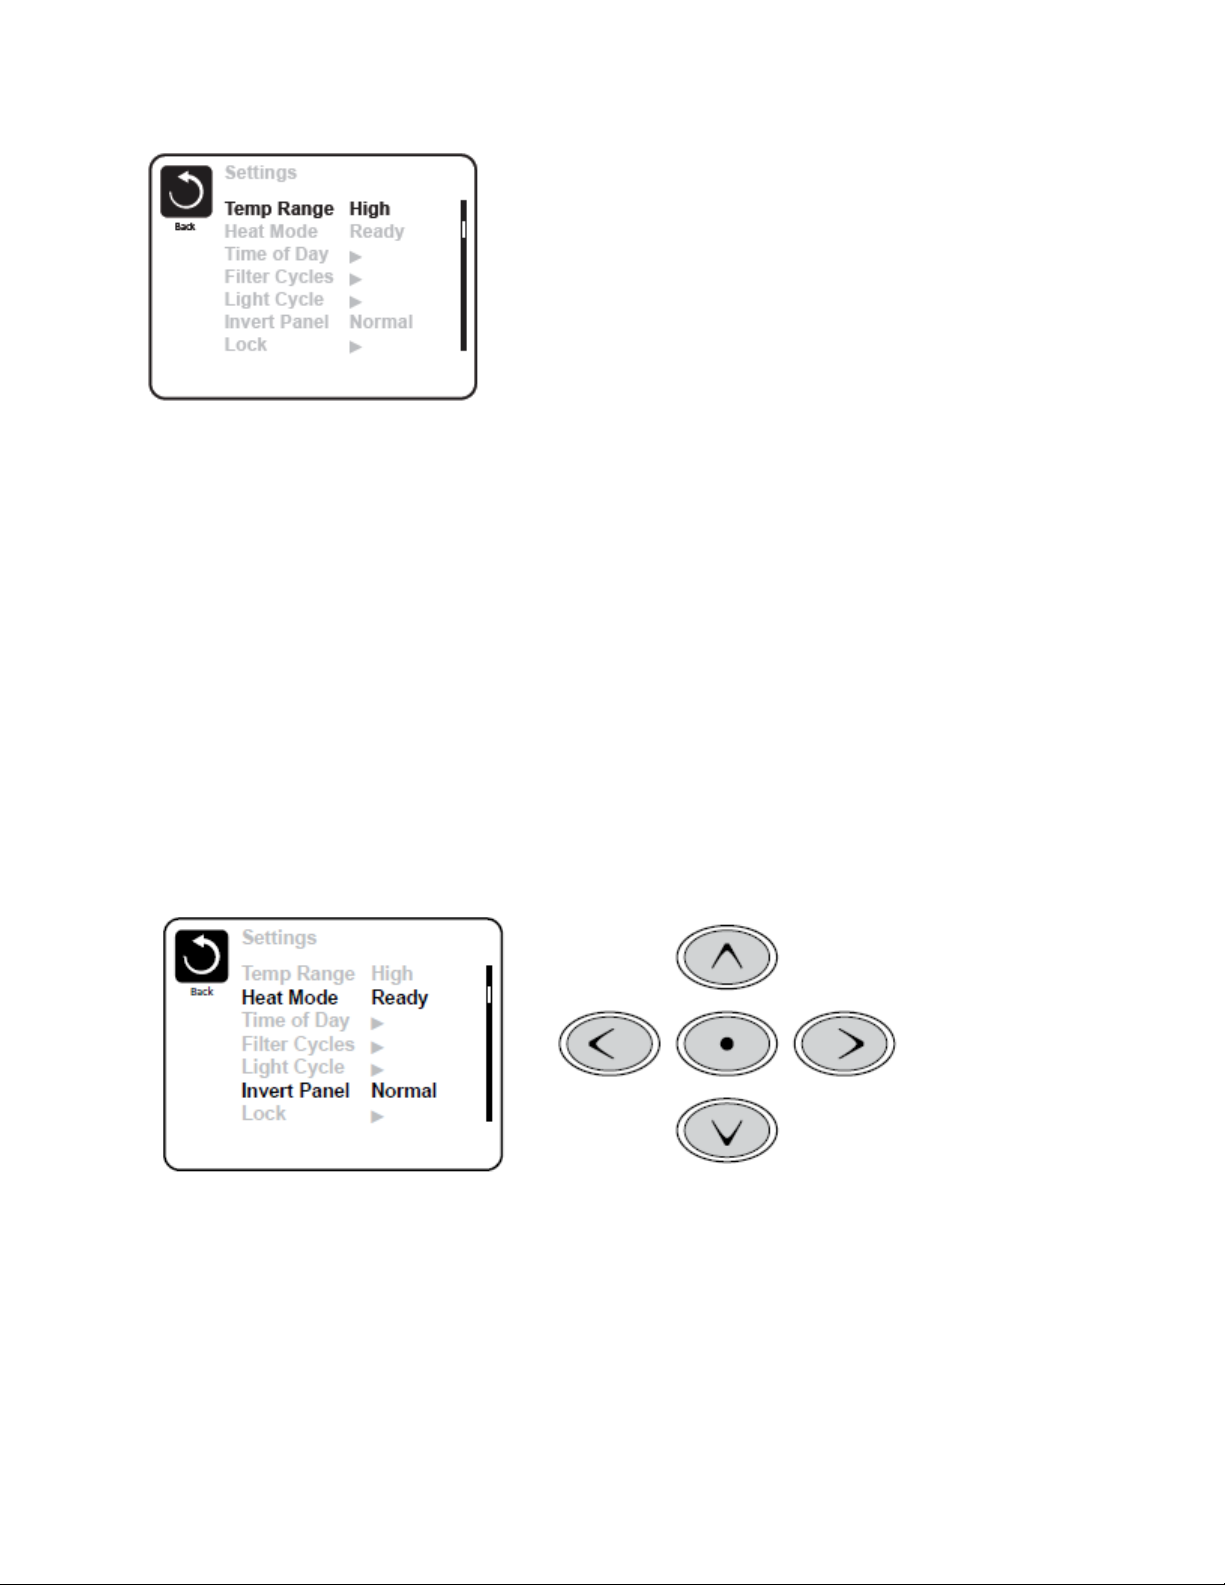
The Settings Screen is where all programming and other spa behaviors are controlled. This screen has several features that can be acted on directly.
These features include Temp Range, Heat Mode, and Invert Panel. When one of these items is highlighted, the Select Button is used to toggle between
two settings.
All other menu items (with an arrow pointing to the right) go to another level in the menu.
PRESS-AND-HOLD
If an Up or Down button is pressed and held when an item in a Menu List is highlighted, the list can be scrolled quickly from top to bottom. The scroll
bar on the right side of the screen indicates the relative position of the highlighted item in the list.
DUAL TEMPERATURE RANGES
This system incorporates two temperature range settings with independent set temperatures. The specific range can be selected on the Settings screen and
is visible on the Main Screen in the upper right corner of the display.
These ranges can be used for various reasons, with a common use being a “ready to use” setting vs. a “vacation” setting.
Each range maintains its own set temperature as programmed by the user. This way, when a range is chosen, the spa will heat to the set temperature
associated with that range.
High Range may be set between 80°F - 104°F (26˚-40˚C).
Low Range may be set between 50°F - 99°F (10˚-26˚C).
Freeze Protection is active in either range.
HEAT MODE - READY VS. REST
In order for the spa to heat, a pump needs to circulate water through the heater. The pump that performs this function is known as the “heater pump.” The
heater pump can be either a 2-speed pump (Pump 1) or a circulation pump. If the heater pump is a 2-Speed Pump 1, READY Mode will circulate water every
1/2 hour, using Pump 1 Low, in order to maintain a constant water temperature, heat as needed, and refresh the temperature display. This is known as
“polling.” REST Mode will only allow heating during programmed filter cycles. Since polling does not occur, the temperature display may not show a current
temperature until the heater pump has been running for a minute or two. While Pump 1 High can be turned on and off, Pump 1 Low will run until set
temperature is reached, or 1 hour has passed.
CIRCULATION MODE
If the spa is configured for 24HR circulation, the heater pump generally runs continuously. Since the heater pump is always running, the spa will
maintain set temperature and heat as needed in Ready Mode, without polling. In Rest Mode, the spa will only heat to set temperature during
programmed filter times, even though the water is being filtered constantly when in Circulation Mode.
Page 10

READY-IN-REST MODE
READY/REST appears in the display if the spa is in Rest Mode and the Jets 1 Button is pressed. It is assumed that the spa is being used and will heat to
set temperature. While Pump 1 High can be turned on and off, Pump 1 Low will run until set temperature is reached, or 1 hour has passed. After 1 hour,
the System will revert to Rest Mode. This mode can also be reset by entering the Settings Menu and changing the Heat Mode.
FILLING YOUR SPA
PREPARATION AND FILLING
Fill the spa 5-6” below the lip of the spa. Be sure to open all valves and jets in the plumbing system before filling to allow as much air as possible to
escape from the plumbing and the control system during the filling process.
After turning the power on at the main power panel, the top-side panel will display a splash, or startup screen.
PRIMING MODE
After the initial start-up sequence, the control will enter Priming Mode and display a Priming Mode screen. Only pump icons appear on the priming
mode screen. The system will automatically return to normal heating and filtering at the end of the priming mode, which lasts 4-5 minutes. During the
priming mode, the heater is disabled to allow the priming process to be completed without the possibility of energizing the heater under low-flow or
no-flow conditions. Nothing comes on automatically, but the pump(s) can be energized by selecting the “Jet” buttons. Manually exit Priming Mode by
pressing the “Exit” Button.
PRIMING THE PUMPS
As soon as the Priming Mode screen appears on the panel, select the “Jets 1” button once to start Pump 1 in low-speed and then again to
switch to high-speed. Also, select the other pumps to turn them on. The pumps should be running in high-speed to facilitate priming. If the pumps
have not primed after 2 minutes, and water is not flowing from the jets in the spa, do not allow the pumps to continue to run. Turn off the pumps and
repeat.
Note: Turning the power off and back on again will initiate a new pump priming session.
Sometimes momentarily turning the pump off and on will help it to prime. Do not do this more than 5 times. If the pump(s) will not prime, shut off the
power to the spa and call for service.
Important: A pump should not be allowed to run without priming for more than 2 minutes. Under NO circumstances should a pump be allowed to run
without priming beyond the end of the 4-5 minute priming mode. Doing so may cause damage to the pump and cause the system to energize the
heater and go into an overheat condition.
EXITING PRIMING MODE
You can manually exit Priming Mode by navigating to the “Back” button on the Priming Mode Screen. If you do not manually exit the priming mode, it
will terminate after 4-5 minutes. Once the system has exited Priming Mode, the top-side panel will display the Main Screen, but the display will not
show the temperature yet because the system requires approximately 1 minute of water flowing through the heater to determine the water
temperature.
SPA BEHAVIOR
PUMPS
On the Spa Screen, select a “Jets” button once to turn the pump on or off, and to shift between low- and high-speeds if equipped. If left running, the
pump will turn off after a time-out period. The pump 1 low-speed will time out after 30 minutes. The high-speed will time-out after 15 minutes. On
non-circ systems, the low-speed of pump 1 runs when the blower or any other pump is on. If the spa is in Ready Mode, Pump 1 low may also activate
for at least 1 minute every 30 minutes to detect the spa temperature (polling) and then to heat to the set temperature if needed. When the low-speed
turns on automatically, it cannot be deactivated from the panel, however the high speed may be started.
CIRCULATION PUMP MODES
The circ pump operates continuously (24 hours) with the exception of turning off for 30 minutes at a time when the water temperature reaches 3°F
(1.5°C) above the set temperature (most likely to happen in very hot climates).
FILTRATION AND OZONE
On non-circ systems, Pump 1 low and the ozone generator will run during filtration. On circ systems, the ozone will generally run with the circ pump,
but can be limited to filtration cycles. The system is factory-programmed with one filter cycle that will run in the evening (assuming the time-of-day is
properly
set) when energy rates are often lower. The filter time and duration are programmable.
A second filter cycle can be enabled as needed. At the start of each filter cycle, the water devices like blower and other pumps will run briefly to purge
the plumbing to maintain good water quality.
FREEZE PROTECTION
If the temperature sensors within the heater detect a low enough temperature, then the water devices automatically activate to provide freeze
protection. The water devices will run either continuously or periodically depending on conditions. In colder climates, an optional additional freeze
sensor may be added to protect against freeze conditions that may not be sensed by the standard sensors. Auxiliary freeze sensor protection acts
similarly except with the temperature thresholds determined by the switch. See your dealer for details.
CLEAN-UP CYCLE (OPTIONAL)
Page 11
When a pump or blower is turned off by a button press or after it has timed out, a clean-up cycle runs for 30 minutes. Pump 1 on Low Speed and the
ozone generator will run for the set time. The pump and the ozone generator will run for 30 minutes or more.
TIME-OF-DAY
Setting the time-of-day is important for determining filtration times and other background features. “Set Time” will appear on the display if no time-ofday is set in the memory. On the Settings Screen, select the Time-of-Day line. On the Time-of-Day screen, simply navigate right and left to select the
Hour, Minutes, AM/PM and 12/24 Hour segments. Use the Up and Down Buttons to make changes.
SAVING SETTINGS
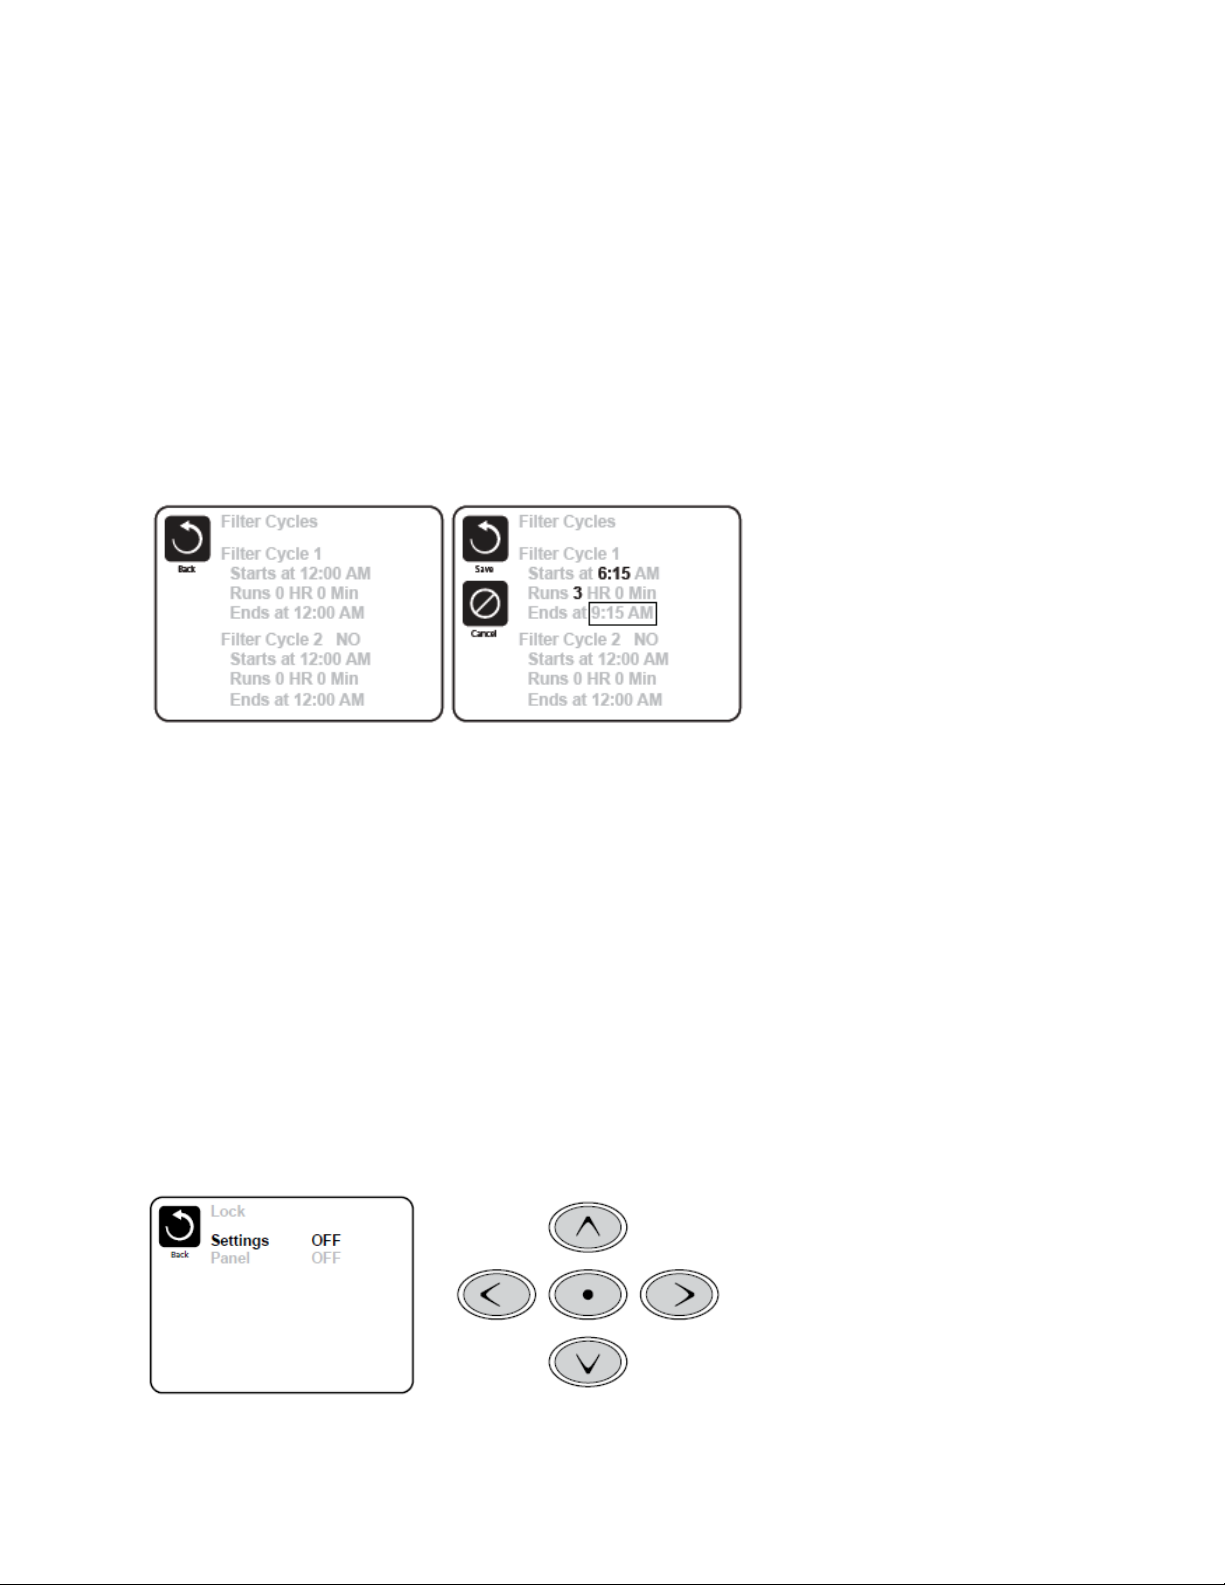
The Time-of-Day screen is a simple, editable screen that illustrates a feature of the control that applies to all other editable screens as well. When
changes are made, the icon to go “Back” changes to “Save” and a new icon for “Cancel” appears under the Save icon. Navigating to the left will
highlight the Save icon, and navigating down from there will allow the user to cancel the pending change. Pressing the “Select” button will save or
cancel the changes and go back to the previous screen.
NOTE: If power is interrupted to the system, you may have to reset your spa’s time.
ADJUSTING FILT R A T I O N
MAIN FILTRATION
Using the same navigation and adjustment as Setting the Time, Filter Cycles are set using a start time and a duration. Each setting can be adjusted in
15-minute increments. The panel calculates the end time and displays it automatically.
FILTER CYCLE 2 - OPTIONAL FILTRATION
Simply navigate to the Filter Cycle 2 line by pressing the Right Navigation Button, and when “NO” is highlighted, press Up or Down to toggle Filter
Cycle 2 on and off. When Filter Cycle 2 is ON, it can be adjusted in the same manner as Filter Cycle1 by navigating to the right. It is possible to overlap
Filter Cycle 1 and Filter Cycle 2.
CIRCULATION PUMP MODES
Some spas may be manufactured with Circ Pump settings that allow programming filtration cycle duration. Some circ Modes are pre-programmed to
operate 24 hours a day and are not programmable.
PURGE CYCLES
In order to maintain sanitary conditions, as well as protect against freezing, secondary water devices will purge water from their respective plumbing by
running briefly at the beginning of each filter cycle.
If the Filter Cycle 1 duration is set for 24 hours, enabling Filter Cycle 2 will initiate a purge when Filter Cycle 2 is programmed to begin.
RESTRICTING O P ERATION
The control can be restricted to prevent unwanted use or temperature adjustments.
Locking the Panel prevents the controller from being used, but all automatic functions are still active. Locking the Settings allows Jets and other
features to be used, but the Set Temperature and other programmed settings
cannot be adjusted. Settings Lock allows access to a reduced selection of menu items. These include Set Temperature, Invert, Lock, Utilities, Information
and Fault Log. They can be seen, but not changed or edited.
UNLOCKIN G
Page 12
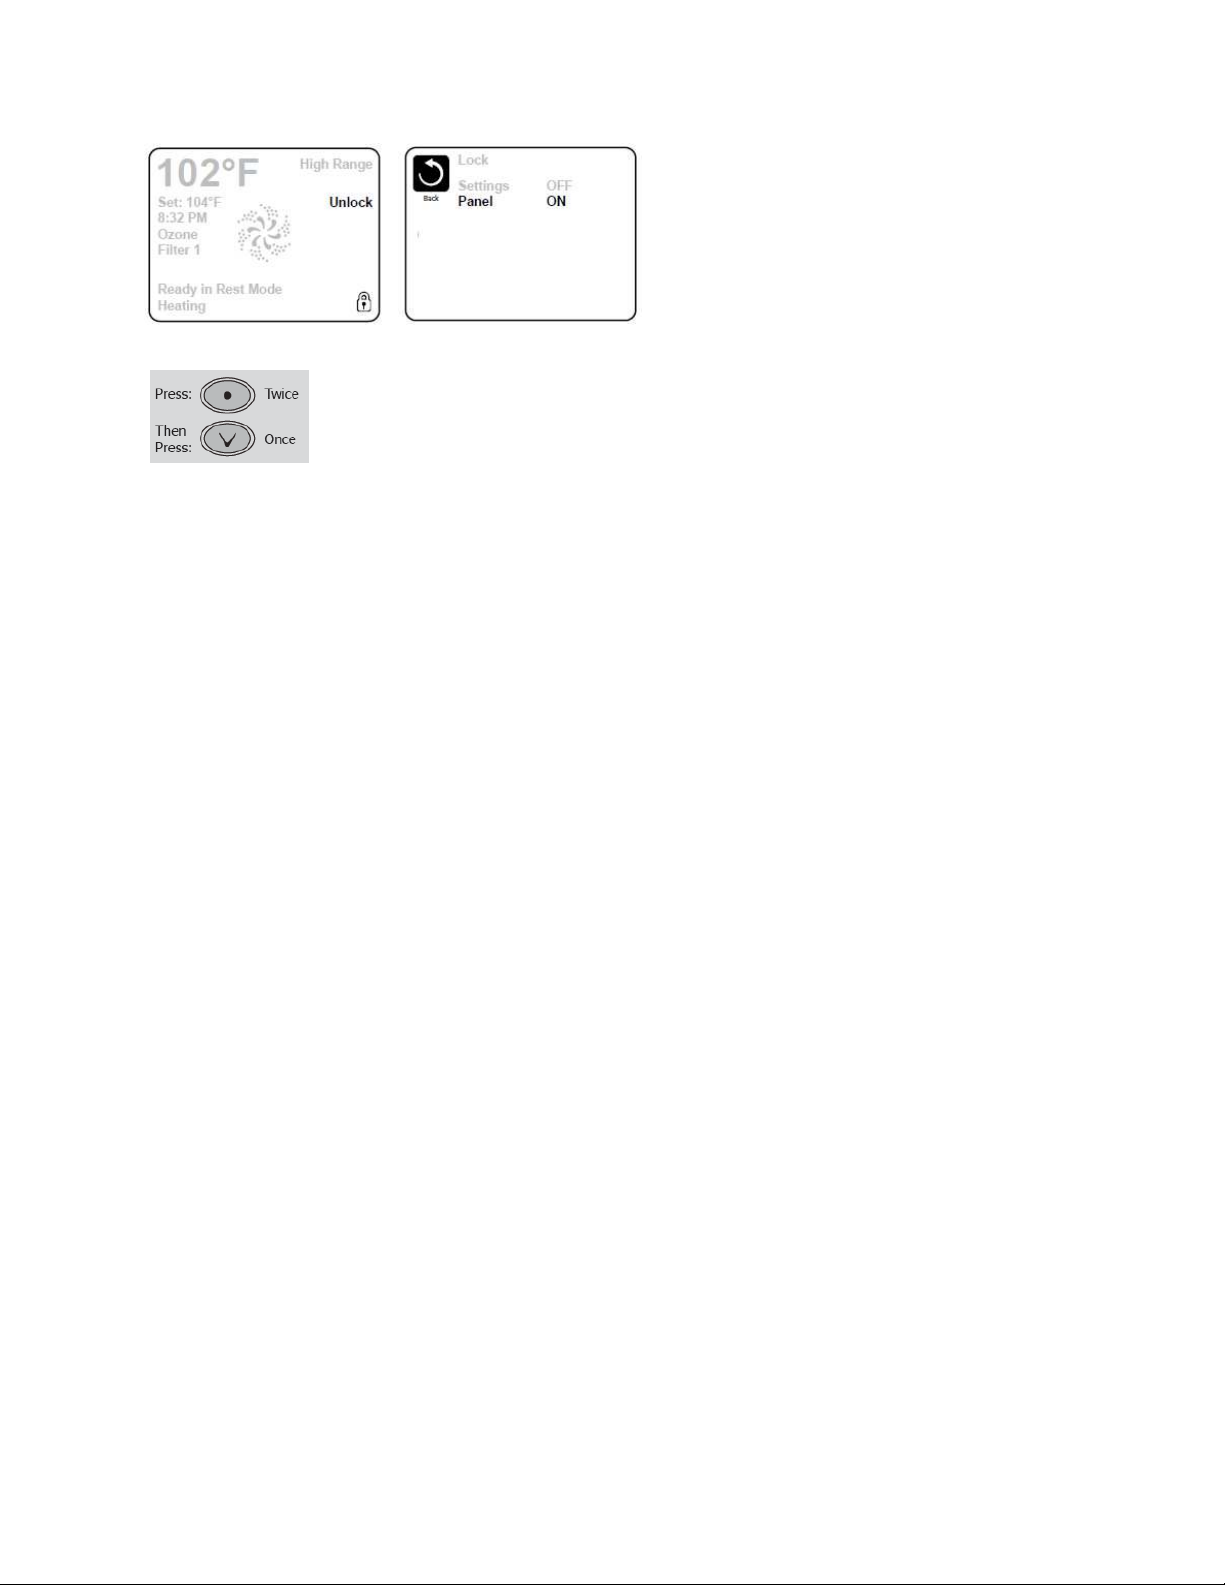
An Unlock Sequence using the navigation buttons can be used from the Lock Screen. The Unlock Sequence is the same for both Panel Lock and
Settings Lock. Press the following buttons: SELECT - SELECT - DOWN ARROW.
SCENES
Your TP800 control has an icon labeled “Scenes” that is not enabled. Future versions of your spa’s software may contain functionality related to the
Scenes settings, but please disregard this icon unless you receive notification from your dealer otherwise.
COLOR AND LANGUAGE
By pressing the Select button, you can change the color and the language.
GFCI TEST FEATURE
The Ground Fault Circuit Interrupter (GFCI) is an important safety device and is required
equipment on hot tub installations in North America. Used for verifying a proper
installation, the GFCI Trip Test must occur to allow proper spa function. Within 7 days after startup, the spa will trip the GFCI to test it. The GFCI must be
reset once it has tripped. After passing the GFCI Trip Test, the spa will
operate normally.
AUXILIARY P ANEL
Selected models are equipped with an auxiliary control panel which allows you to operate jets without leaving the comfort of your seat.
THERAPY SEQUENCER
Certain models are equipped with a Jet Sequencer System that opens and closes a series of ports to provide a therapeutic sequencing massage.
The control panel allows you to start or stop operation.
 Loading...