

M3 Mobile Sky Instruction Manual


Note
All oth
this d
z This manual is subject to copyright protection along with all relevant rights.
z No part of this document can be copied, reproduced, changed or translated in whole or in part by any means
without prior written consent of M3 Mobile Co., Ltd.
z The content of the manual is provided “as-is” and be subject to change at any time without notice.
z M3 Mobile Co., Ltd. makes no warranty of any kind with regard to this manual, including, but not limited to, the
implied warranties of merchantability and fitness for a particular purpose.
z Microsoft, ActiveSync, Windows, Windows logos, Windows Mobile 5.0 logos are trademarks, or registered
trademarks of Microsoft Corporation in the United States and/or other countries. Microsoft OEM products are
licensed by Microsoft Licensing Inc., a entire ly owned subsidiary of Microsoft Corporation.
2
z
er product names in
of the respective owners.
ocument or product are company names, trademarks or registered trademarks

Copyright and Agreement
p
yg ,
The brands of other products and service referred in this manual belong to corresponding providers
z This user manual is provided “as-is”. It may contain editing error or omitting due to the difficulty of expressing
technical feature.
z If an application program provided by other supplier using by M3 SKY, refer to the supplier for a program
manual.
z The application program providers have the responsibility of indicating their contact number for customer
service on M3 SKY terminal, item box, or program.
z M3 Mobile Corporation do not warranty any pr ograms produced and added by the third software companies
after M3 SKY products are distributed from factories.
z M3 Mobile Corporation has the right to ask warranty of any programs to the program providers to meet the
needs of mobile networking companies.
z The contents in the user’s manual are protected under the Software Copyright Act. Copy, reproduction,
distribution of the contents in the user’s manual without any written agreement notice of M3 Mobile Co. Ltd., is
considered as criminal actions.
z Windows, MS Office, Outlook, ActiveSync, Internet Explorer programs are the registered brand of Microsoft.
z M3 SKY is the registered brand of M3 Mobile Co. Ltd.
z
3
.

Caution when using M3 SKY (1)
Do not use the unit while driving
Use supplied adapter and accessories by M3 Mobile Co. Ltd
–
Avoid t
high t
idit
lity to the devi
z User Caution
– When the unit is lost or stolen, notify to network provider immediately.
– Do not rent the unit to third person without authorized permission.
.
– For technical help, contact designated service centers.
– Contact responding suppliers directly for questions on applications and work programs other than
hardware and basic installed applications.
– Any defect on a unit while using other batteries, chargers and accessories can not get warranty.
z Carrying and Storage Caution
.
o use the device under
– Avoid intentional dropping from high elevation. It may cause fatality to the device.
– Charge batteries fully before the first time use of the device.
4
emperature and hum
y. It may cause fata
ce.

Caution when using M3 SKY (2)
Any defect caused by reconstructing units, can not get warranty
–
Th
bil
z Do not reconstruct
– Do not reconstruct M3 SKY for any purpose.
– It may cause fire in the unit, and wound or electric shock to users.
z Illegal copy of mobile phone is prohibited
– The person who reproduces mobile phone and uses this mobile phone is considered as criminals.
.
e use of lost or stolen mo
– Keeping the lost or stolen mobile phone after turning power off, is considered as a criminal act.
5
e phone is considered as a criminal act.
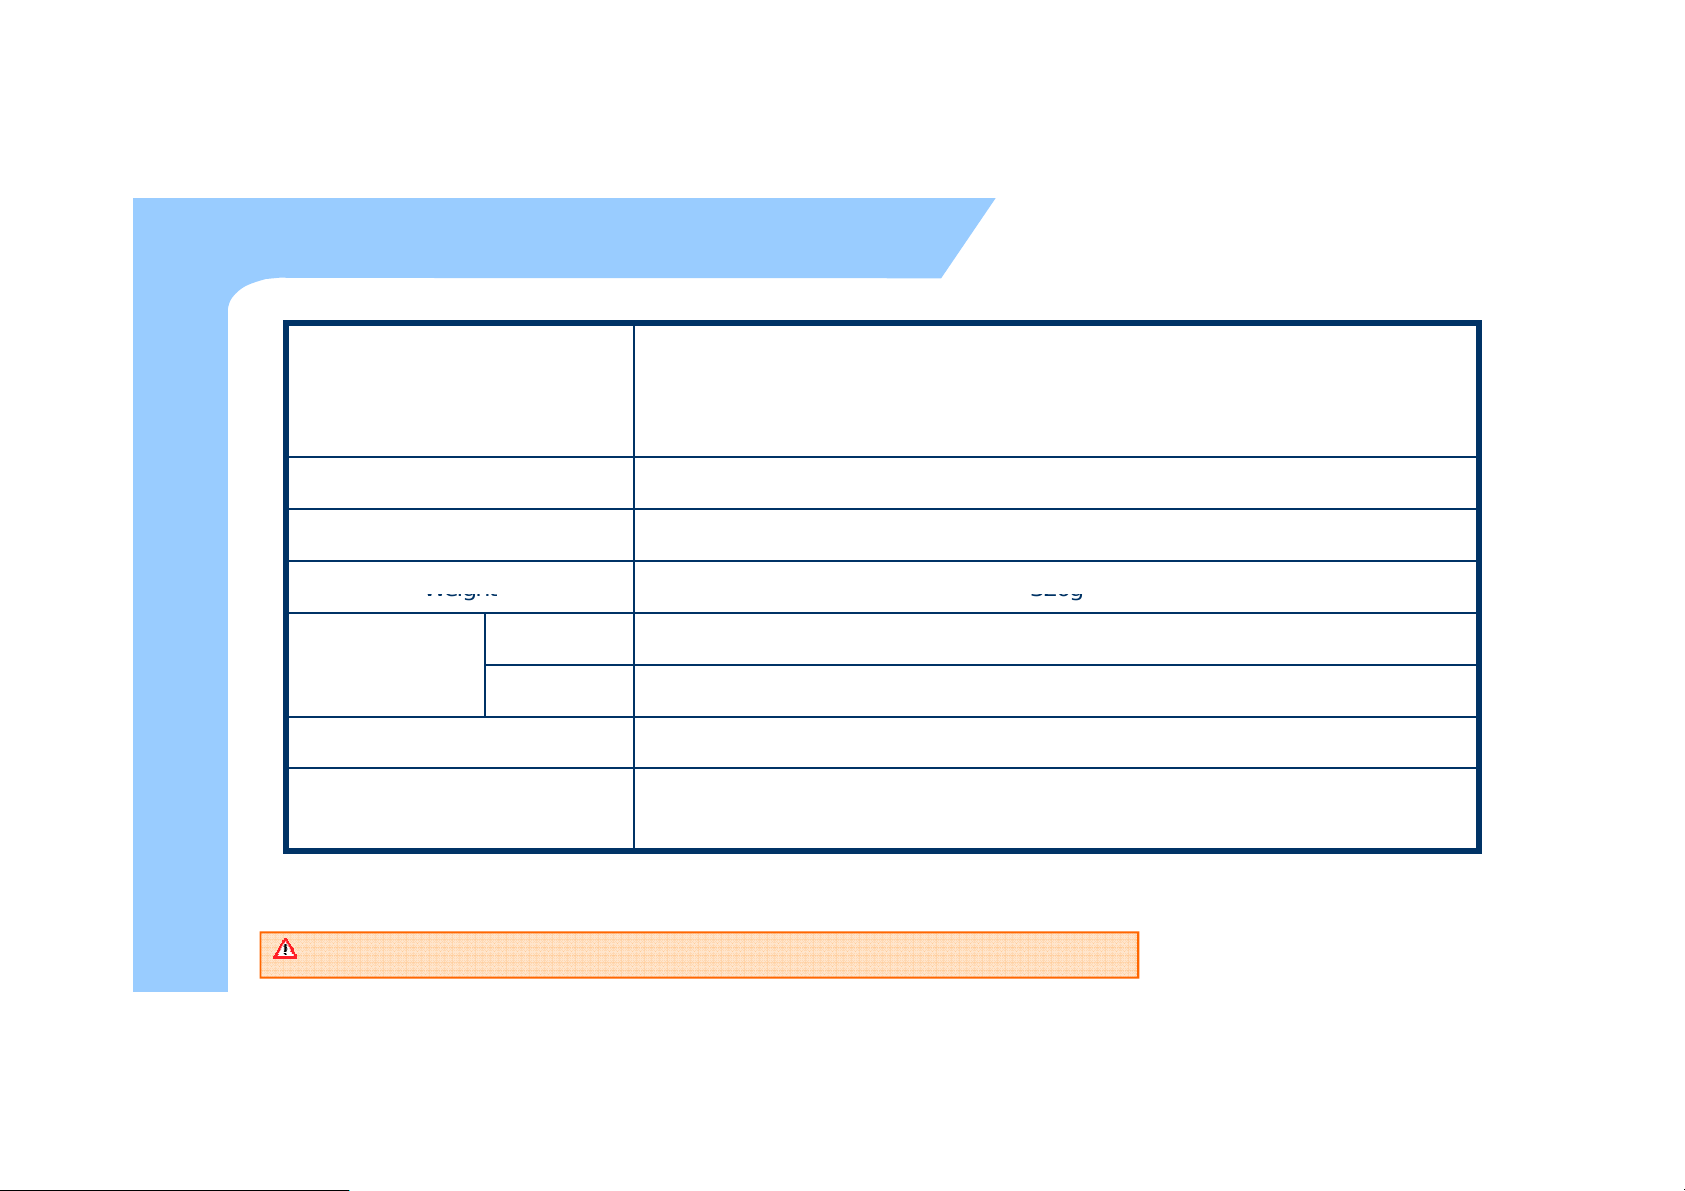
Size and Features
Weight
320g
Used frequency band
Band width 200 KHz (GSM) / 5MHz (3G)
External appearance 78.6 x 163.5 x 24.9mm (Width x length x height)
WCDMA : 2100 / GSM 850 (TX) 824 ~ 849 MHz / (RX) 869 ~ 894 MHz
WCDMA : 1900 / GSM 900 (TX) 880 ~ 915 MHz / (RX) 925 ~ 960 MHz
WCDMA : 850 / GSM 1800 (TX) 1710 ~ 1785 MHz / (RX) 1805 ~ 1880 MHz
GSM 1900 (TX) 1850 ~ 1910 MHz / (RX) 1930 ~ 1990 MHz
6
Operational
Temperature
Relative Humidity 5% ~ 80%
AC Power
Supported Frequency Bands can differ depending on the supplied antenna.
Main body
Adapter
Input : AC 100 ~ 250V, 50 ~ 60Hz
Output : DC +5.2V, 3.0A
-10 ℃ ~ +50 ℃
-10 ℃ ~ +50 ℃

Contents
Cauti
g
M34
T
1.M3Introduction
9
I
13
Synchronization
of
data
32
ENTS
CON
z Note 2
z Copyright and Agreement 3
z
z Size and Features 6
on when usin
Product Composition 10
Name and function of each part 12
nputButtons
Soft/Hard Reset 14
How to use stylus pen 15
LED/Battery attaching/detaching 16
Charging 17
How to connect to PC 18
2. Basic Usage 19
Calibration 20
Main screen 23
Input screen 24
3. ActiveSync 29
ActiveSync Introduction 30
Installing ActiveSync 31
7

Contents
T
Init
Screen
45
Scanner
66
Ph
k
48
ENTS
CON
4. How to use internet 33
Via HSDPA 34
Via Wireless LAN 36
Browsing the Web Site 39
5. How to use the Phone 44
Phone Control 46
Phone call and receive 47
oneboo
SMS send and receive 49
Phone function 51
Phone setting 52
6. Usage of Device 53
Camera 54
Bluetooth 58
IrDA 63
GPS 64
RFID 72
8

1. Introduction
Product C
iti
Soft/Hard Reset
Charging
9
ompos
Name and Function of each part
Input Buttons
How to use Stylus pen
LED Battery Attaching/Detaching
How to connect to PC
on

Product Composition (1)
At the first time of opening the product box, please check if it contains all the basic
d
M3 SKY main terminal
Ear Mic Phone
Portable Adapter
z
uction
Intro
components, listed as following.
+ 2 units of standard battery
+ 2 units of Stylus pen
Cradle + USB cable
CD + ActiveSync 4.x
The product components may differ depending on the supplied products.
10

z How to use the manual
qpp
,
d
uction
Intro
Product Composition (2)
– This manual provides detailed information to make using the device easier and faster.
– The content related to phone or communication in this manual is only applicable when the device is
equipped with HSDPA module for Voice and Data communication.
– The features described in this ma nual can not be used when it is not equipped in the device (WWAN,
WLAN, Bluetooth, IrDA, Scanner, Camera, GPS).
– The content of this manual is subject to change without prior notice due to product improvement or
modification of its functions, etc.
11
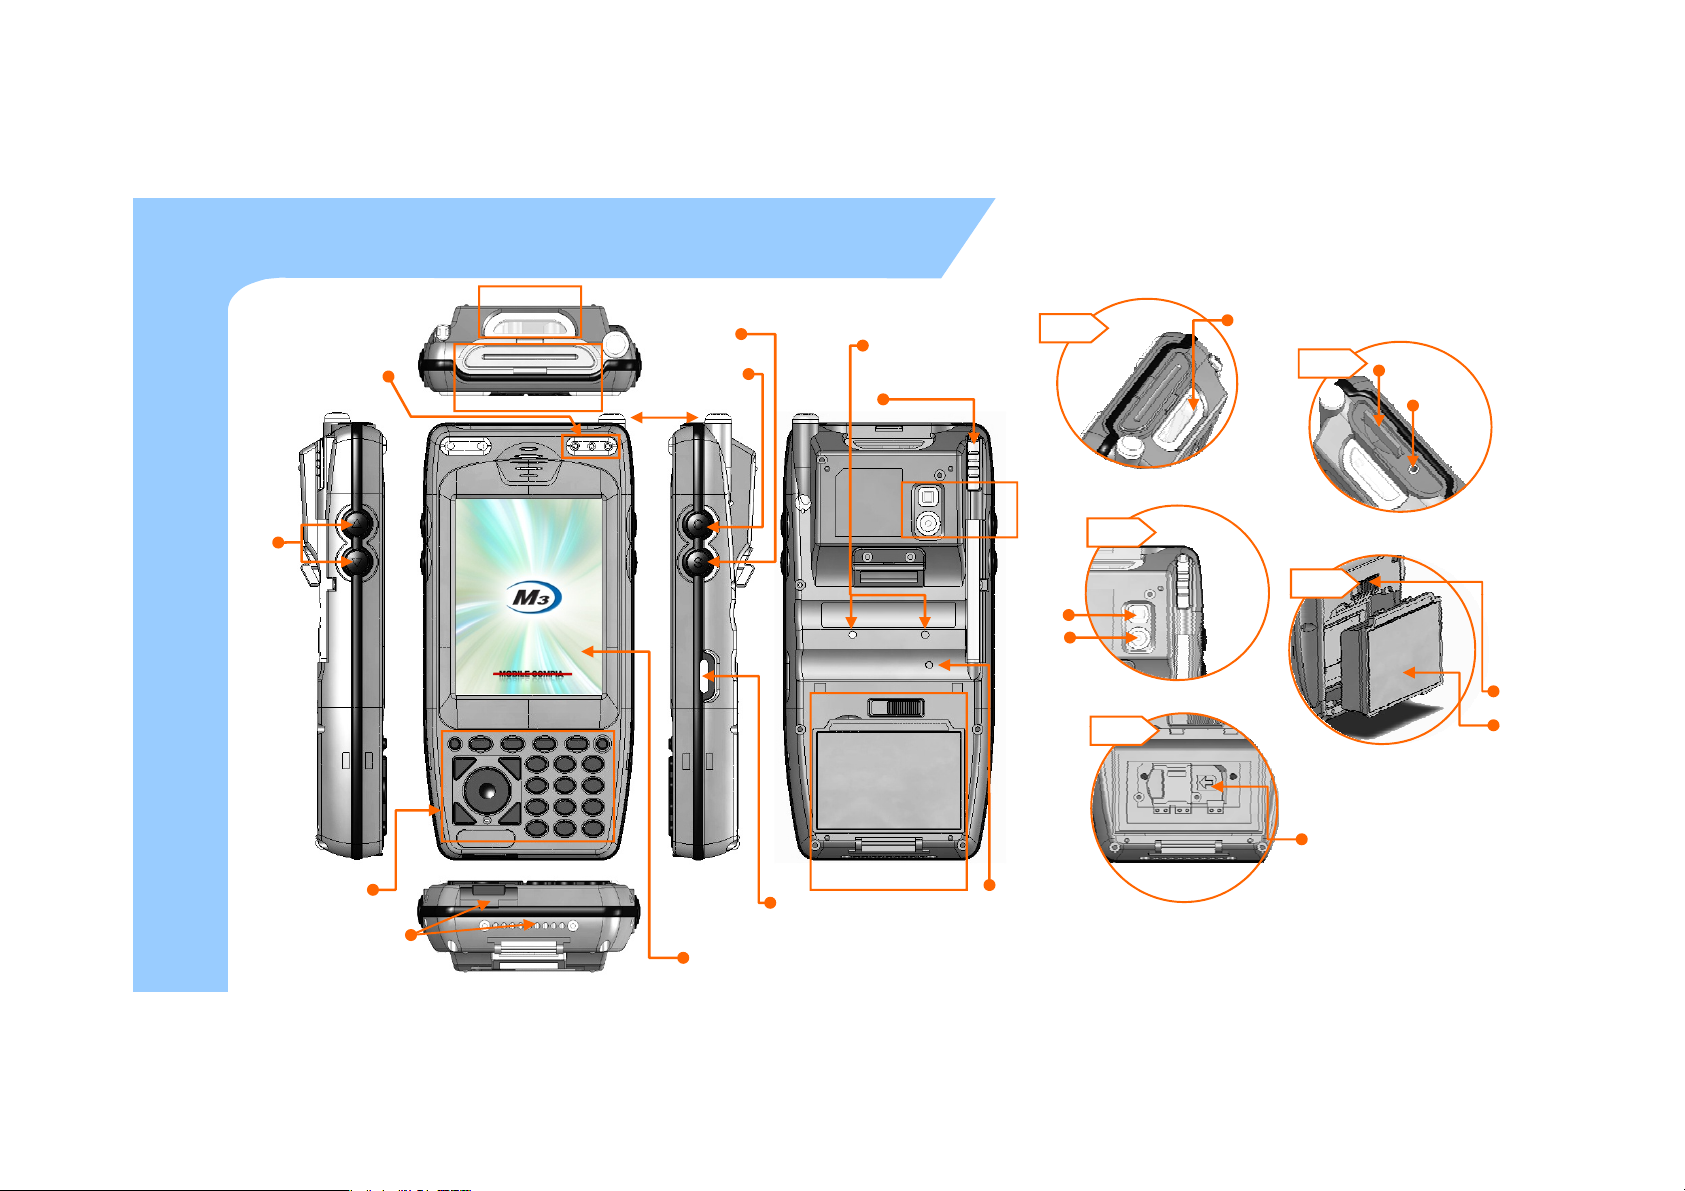
Name and function of each part
a
Window
d
e
Charge Ramp (Left)
HSDPA Status
Ramp (Center)
Scanner Ramp (Right)
Volume
Button
uction
Intro
a
Camera Button
Scanner Button
b
Antenna
Pistol Grip Connecter
Stylus Pen
Barcode Scanner
b
Mini SD Extension Slot
Ear Mic Plug
c
c
d
Flash
Camera
Battery Lock
Battery
SIM Card Slot
12
Key Pad
Charge & USB/serial port
Upper (portable)
Lower (Cradle) use
Infrared Communication
Port (IrDA)
LCD touch Screen
d, e
Reset Switch
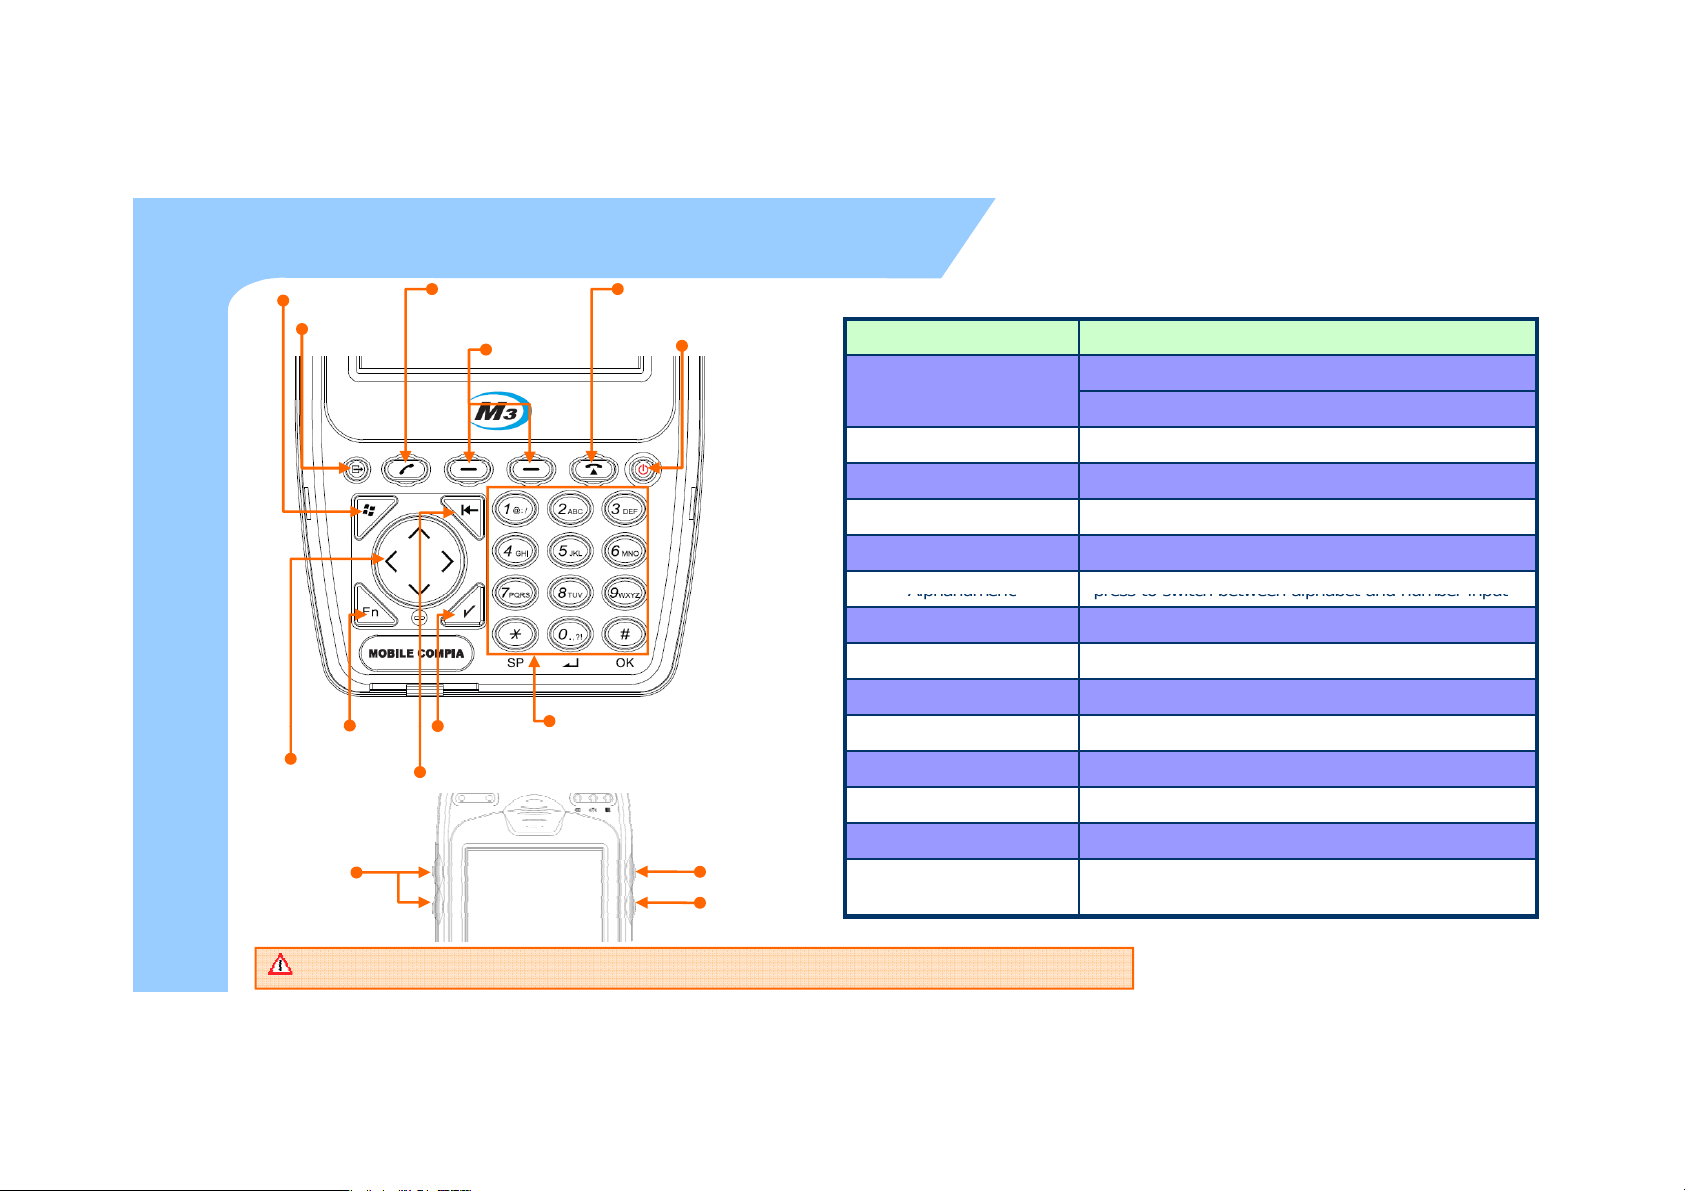
Input Button
Left, right
function
button
Alphanumeric
press to
switch between alphabet and number input
d
Di
Input keys
uction
Intro
Direction Button
Volume
Button
Start button
Alphanumeric
button
Function button
Phone/Call button
Return button
Backspace button
End button
Power button
Camera Button
Scanner Button
Component Description
Power button
Phone/Call function press to accept the call or to execute the phone
End function press to hang-up/reject the call.
Input keys Press to input alphabet characters or numbers
Left, right function button press to lunch an assigned application or function
Start button Press to display the Start menu.
Backspace button press to move back
Function button press to Function Key with (*, 0, #)
rectionbutton press to move left,right and up,down
Return button press to confirm the action
Scanner button Press to launch the barcode data scan application
Camera button Press to launch the Pictures & Videos
Volume button
Press to toggle the device on/off.
Long press to menu (Backlight, Display, etc) Function
Press the top key to increase volume, press the
bottom key to decrease volume.
13
Some key functions might not be supported, depending on the option.
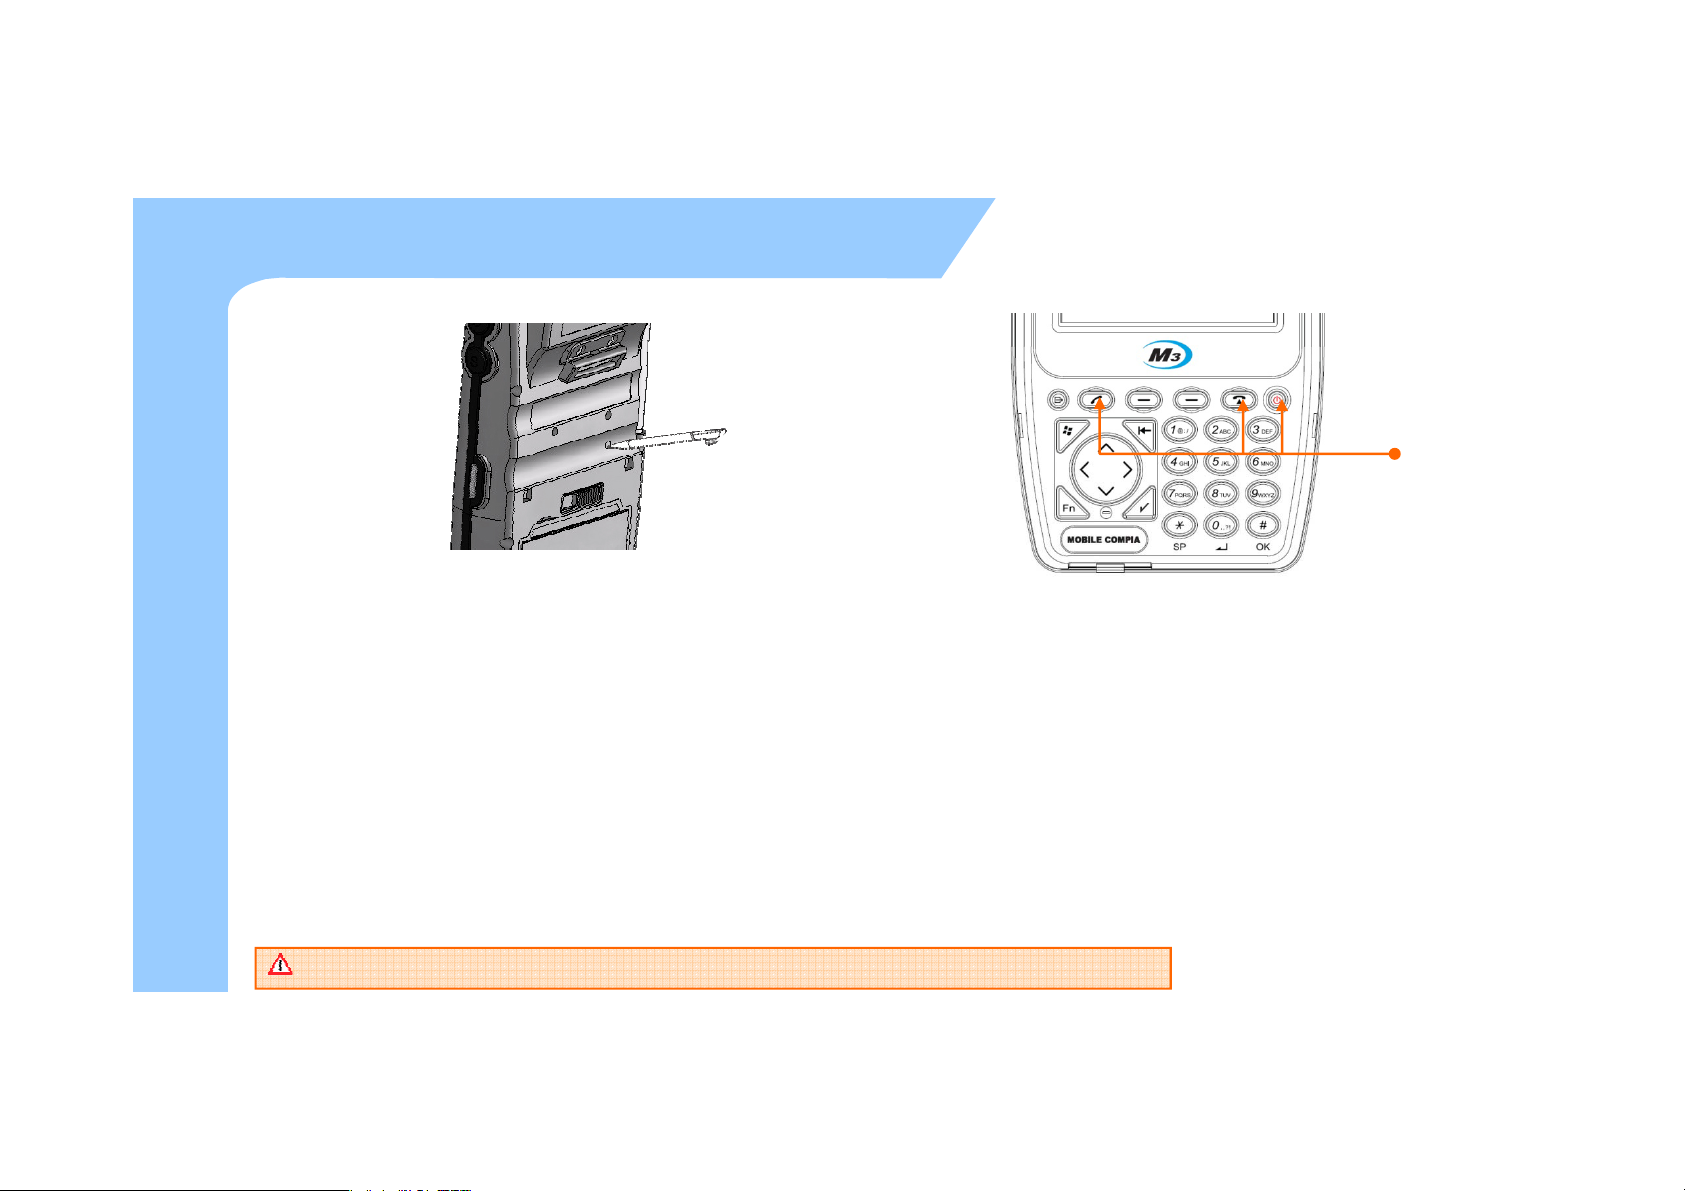
Soft/Hard Reset
Soft R
t
d
factory settings
Æ
Whil
①②③
Press ①+②
and ③ power button
uction
Intro
14
z
- A soft reset allows your device to get a fresh start,
similar to rebooting a computer.
- This restarts your device and adjusts memory
allocation.
- All records and entries are retained after a soft reset.
- Unsaved data in open programs may in some cases be
lost.
z To perform a hard reset :
ese
Æ Press the power button for more than 12 seconds to turn off the power (can be confirmed by LCD off)
e pressing call and end button, please press the power button shortly.
Æ When the [CLEAN BOOT WARNING] window will pop up with message “All data will be lost! Do you want to continue?”
“1. YES 0. NO, please press 1 to perform the Hard Reset.
Please mind that you need to set up the standard timezone date, and time. After power off.
z Hard Reset
- A hard reset removes power to your device.
- This erases all records and entries, deletes all additional
programs you have installed, and restores the device’s default
.
- Never perform a hard reset unless a soft reset does not correct
your problem.

How to use Stylus Pen
for long and you can select the
menu
T
d
z Long Press
Leave Stylus pen touching the screen
uction
Intro
z Tap
Tap the touch screen one
time using a Stylus pen to select
and execute items and files.
z Drag
It is used when you select the text.
Please drag the desired part with
stylus pen attached on the screen.
on the pop-up screen.
You can also select functions available
in the designated item using the popup menu.
he function of the pop-up menu can
be different according to the program.
15
LED / Battery attaching/detaching
Red
Ch
–
Detaching Batt
d
z LED Alarm
charging
uction
Intro
– Informs Charging, Scanner Status.
Type LED Status Details
LED for
WWAN
Status
LED
Scanner
LED
Green
Blue Blinking
Blue On
Blue OFF
Green When the barcode data is successfully read
arging
Charging complete
WWAN Standby
(within range of phone/internet)
WWAN in use
(phone/SMS/internet in use)
WWAN is off or out of range
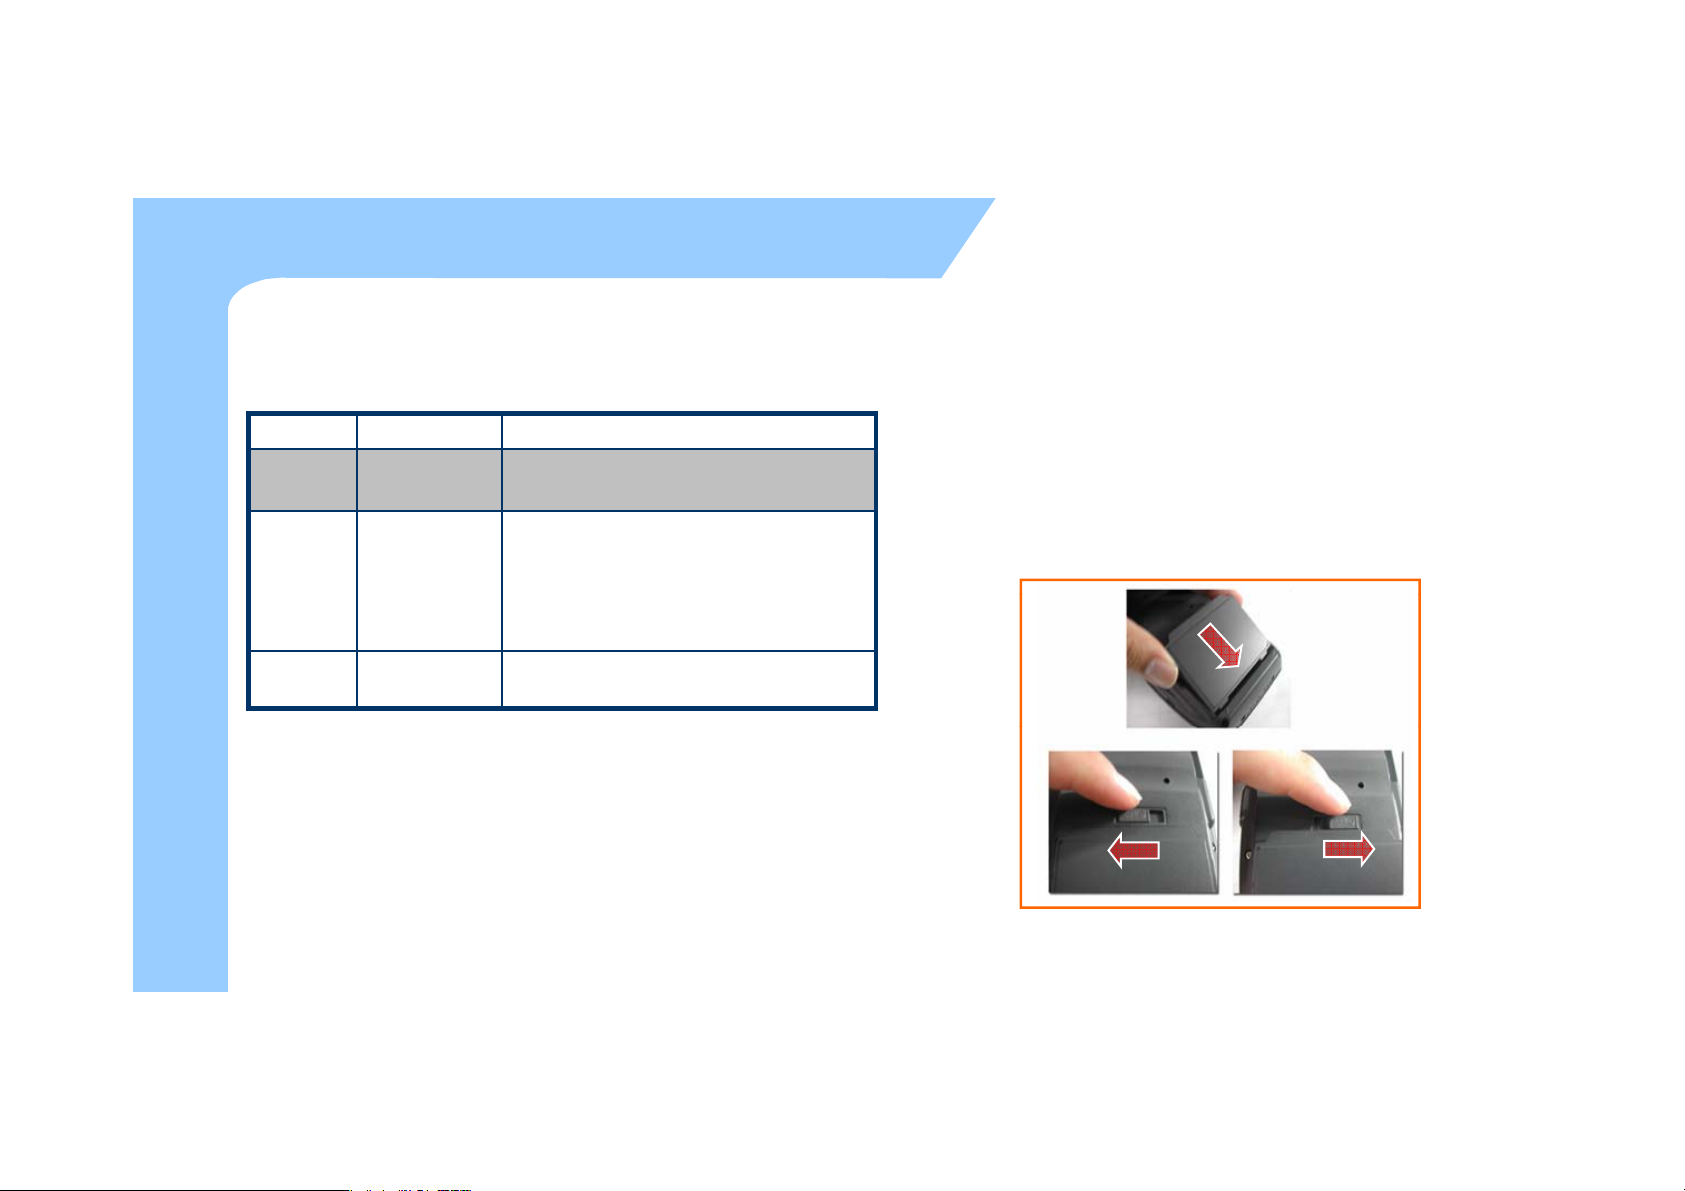
z Battery attaching/detaching
– Attaching Battery
As picture shown, put the battery pack to back of PDA,
and lock the battery pack with locking device.
ery
Press locking device to the right, then using upper
notch, detach the battery from main body.
16
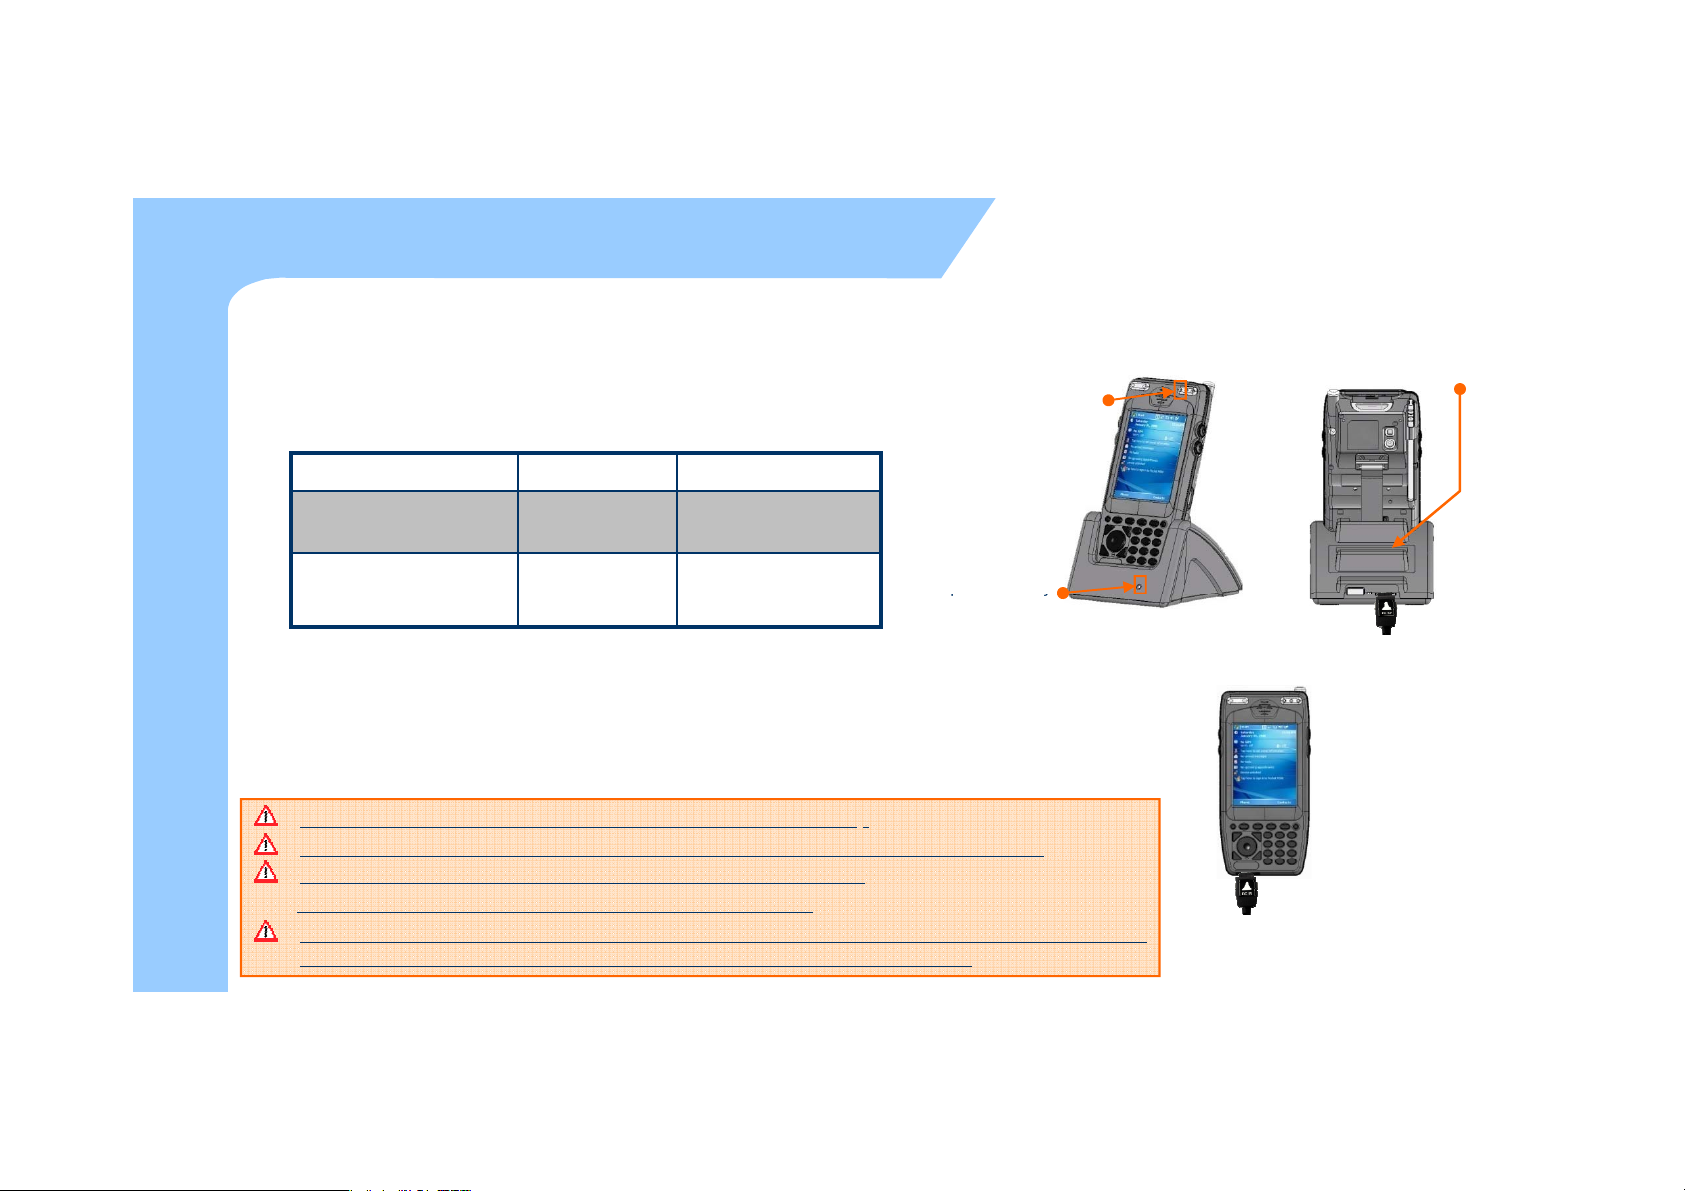
Charging
z
Connect plug
from charger to charge jack of main
z
Charging in Cradle
T
y
d
py
corner of main body. Also the status of Sub
battery
uction
Intro
17
-in
body, or charge jack of cradle, and then place main
body onto cradle.
z Charging LED
ype LED Status Details
Direct charging to main
body
Cradle Charging Red Charging
(Extra battery charging) Green Charging Complete
z When charging, the status of the battery attached to
Red
Green
Charging
Charging Complete
Separate Batter
Charging LED
z
Main body
Charging LED
Charging using portable adapter
main body can be confirmed by the LED left of upper
can be confirmed by the LED right of low corner of
Cradle.
Do not use any other charger except one (5.2 V / 3A) provided .
Make sure to handle it gentle; damage with excessive force may cause no warranty.
Risk of explosion if battery is replaced by an incorrect type.
Dispose of used batteries according to the instructions.
When attached battery is completely discharged, plug charger to main body, then reset the
device to check if screen is back on. To use, do at least 10 minute charging.
Separate Battery
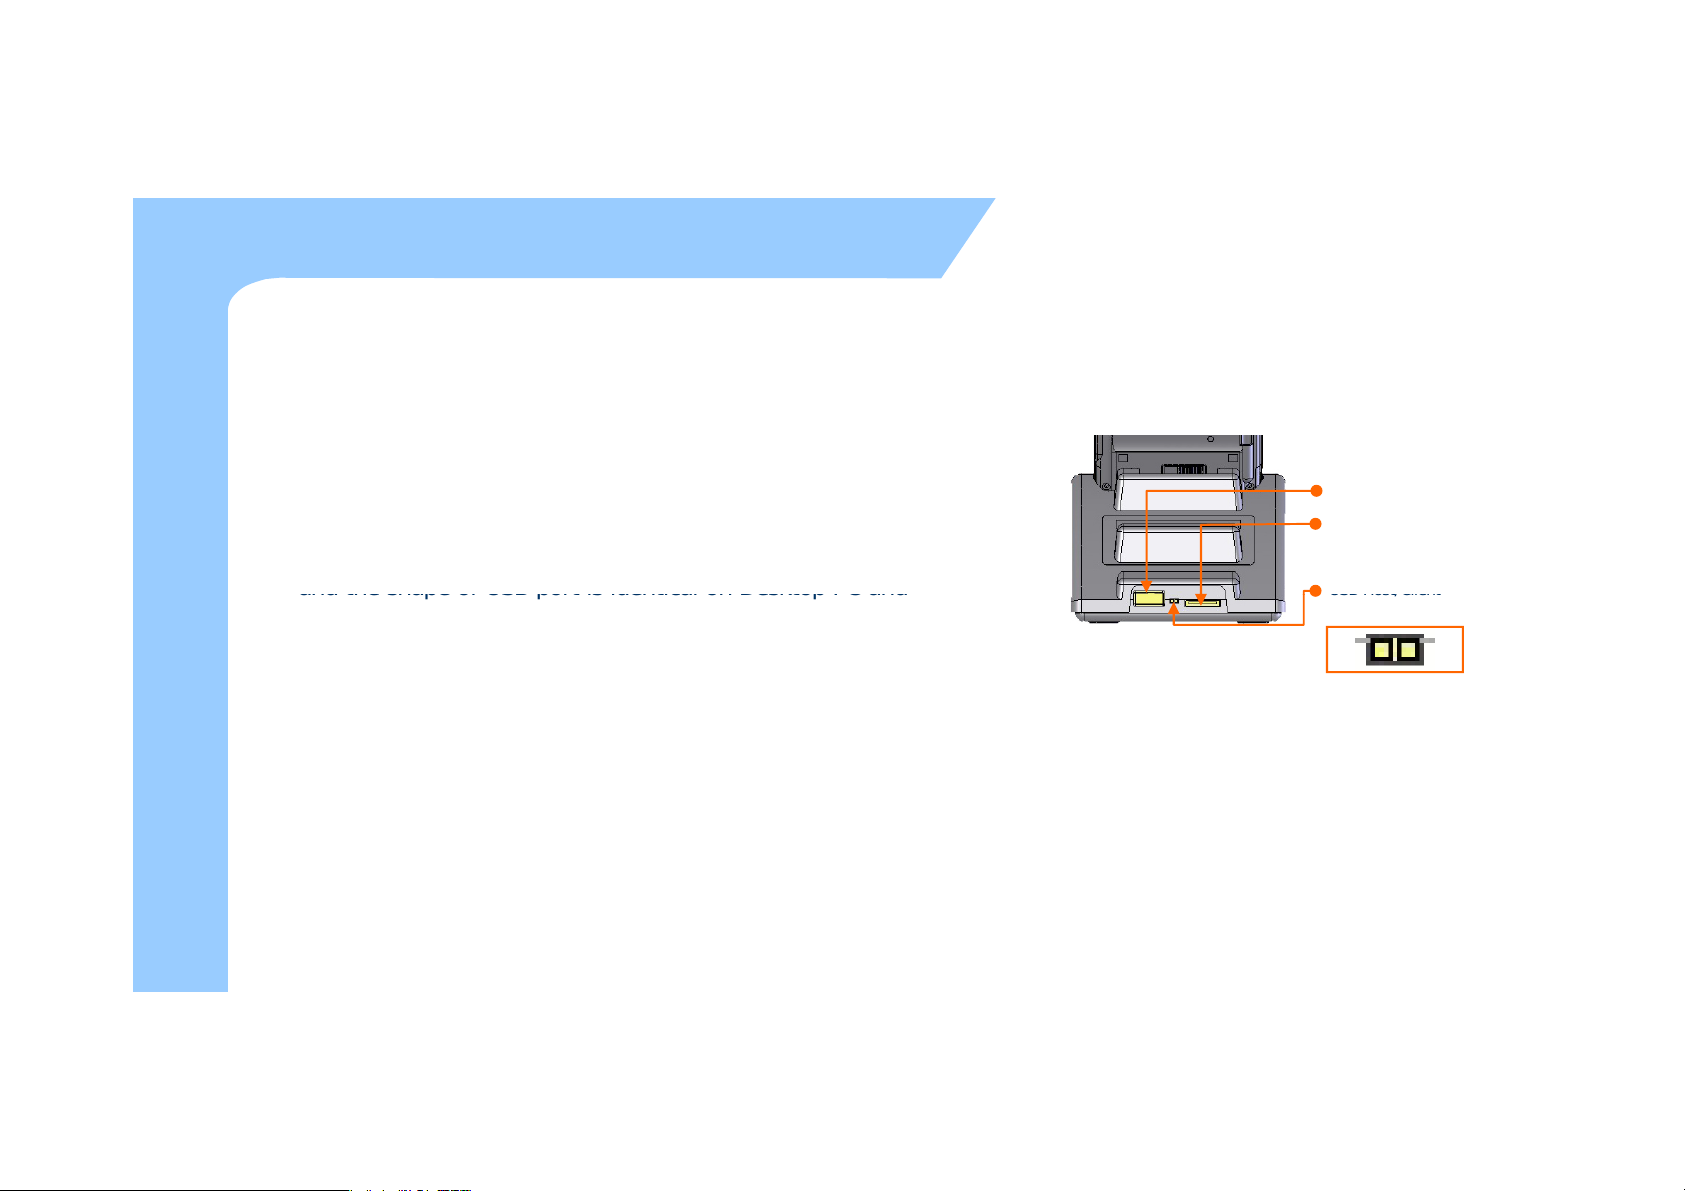
z A cradle of M3 SKY supports charging and USB connection.
and the shape of USB port is identical on Desktop PC and
USB Host/Client
d
z Connecting step of cradle of M3 SKY is as following.
z The location of USB port can be at the back, front or side of PC
uction
z USB host function is available by putting USB cable into USB port
Intro
How to connect to PC
– Connect charger to USB cradle. (24pin connector)
– Connect charger to power source. (to wall)
– Connect USB cable of USB cradle to USB port of desktop PC.
– Place M3 SKY onto docking cradle then execute Synchronization with
Desktop PC.
Notebook.
of Cradle.
USB Host/Client
AC Power
changeover switch
H
Connecting to Cradle
C
18

2. Basic Usage
Calib
19
ration
Main screen
Input Screen
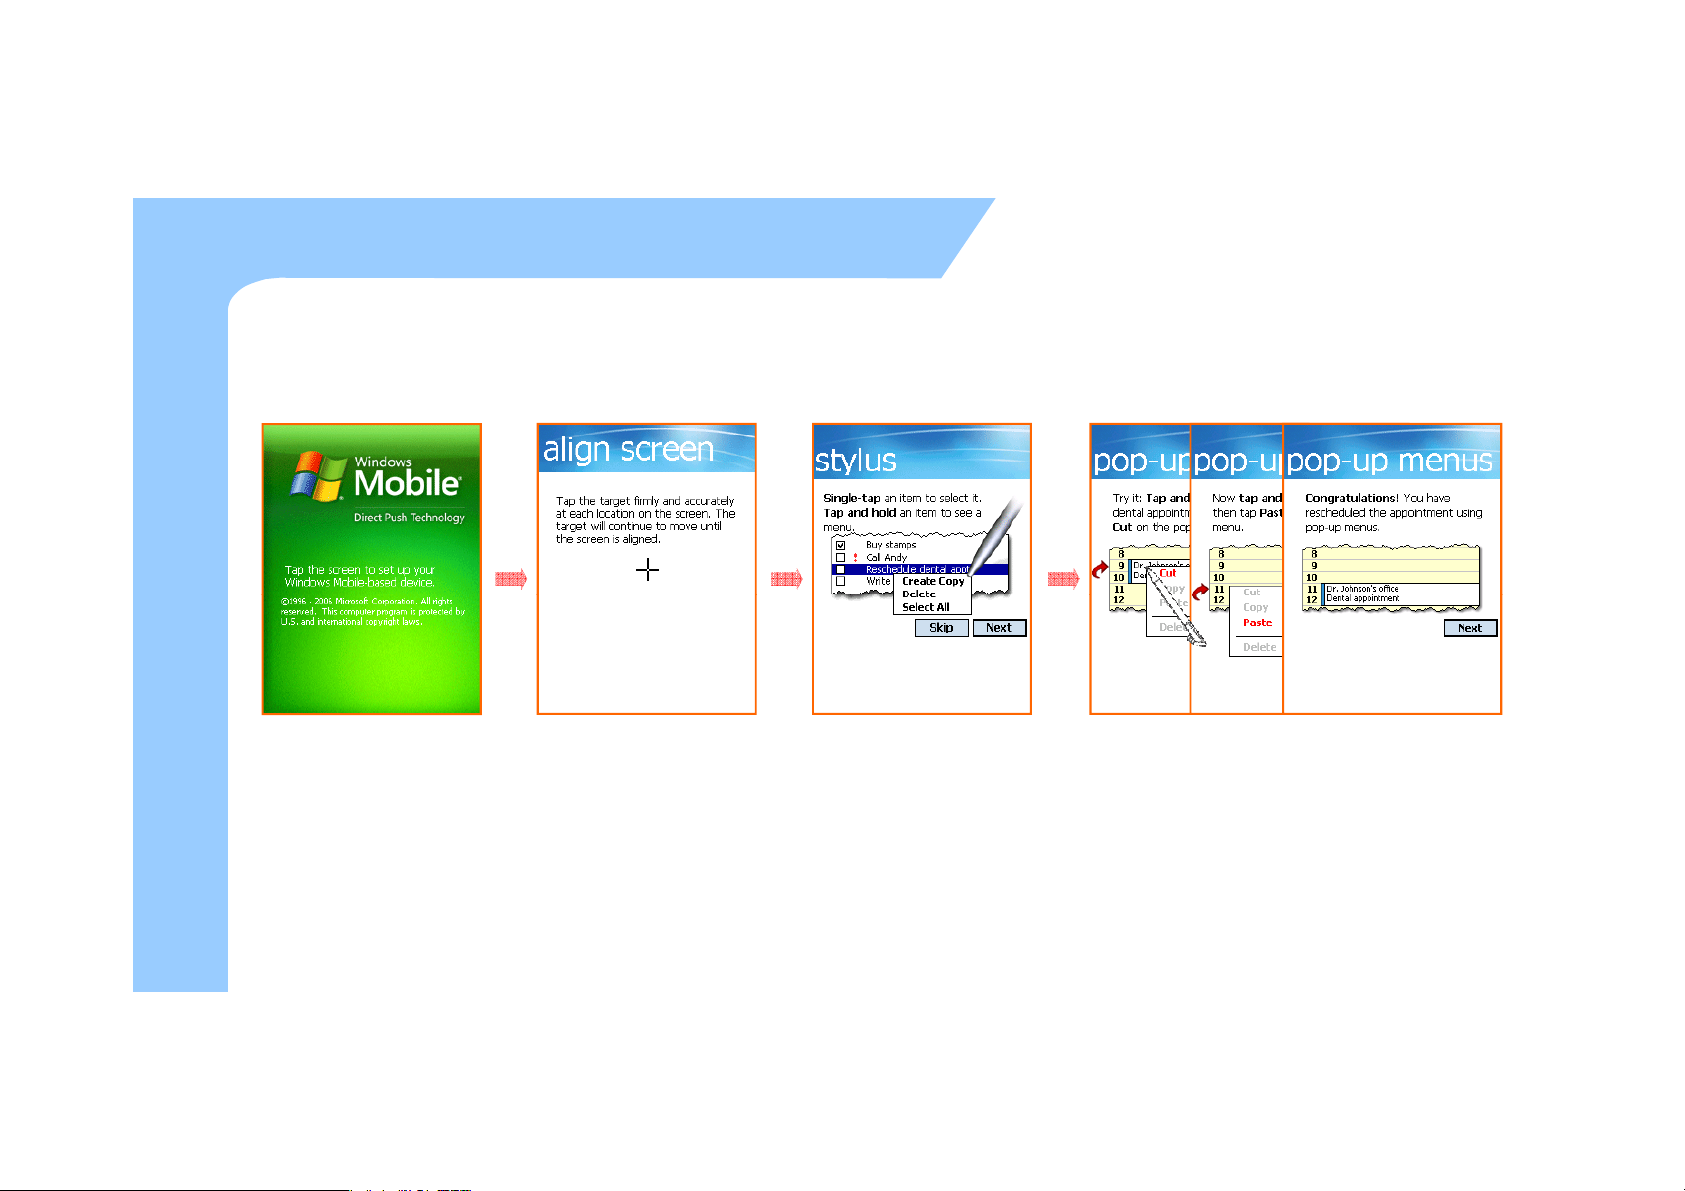
Calibration (1)
z Calibrate the touch screen as shown below, at first time use or when cold (hard) booted.
①②③
UsageBasic
20
Tap the screen one time with
a Stylus pen
Tap the (+) mark with the
Stylus pen as it moves around.
You can see the screen how
to use the Stylus. If you
don't need it, click the Skip.
① Press and hold the Stylus pen on the screen then
select the Cut on the pop-up menu.
② Press and hold the Stylus pen like the arrow on screen,
Tap the Paste on the pop-up menu.
③ When all processes are complete, click the Next.
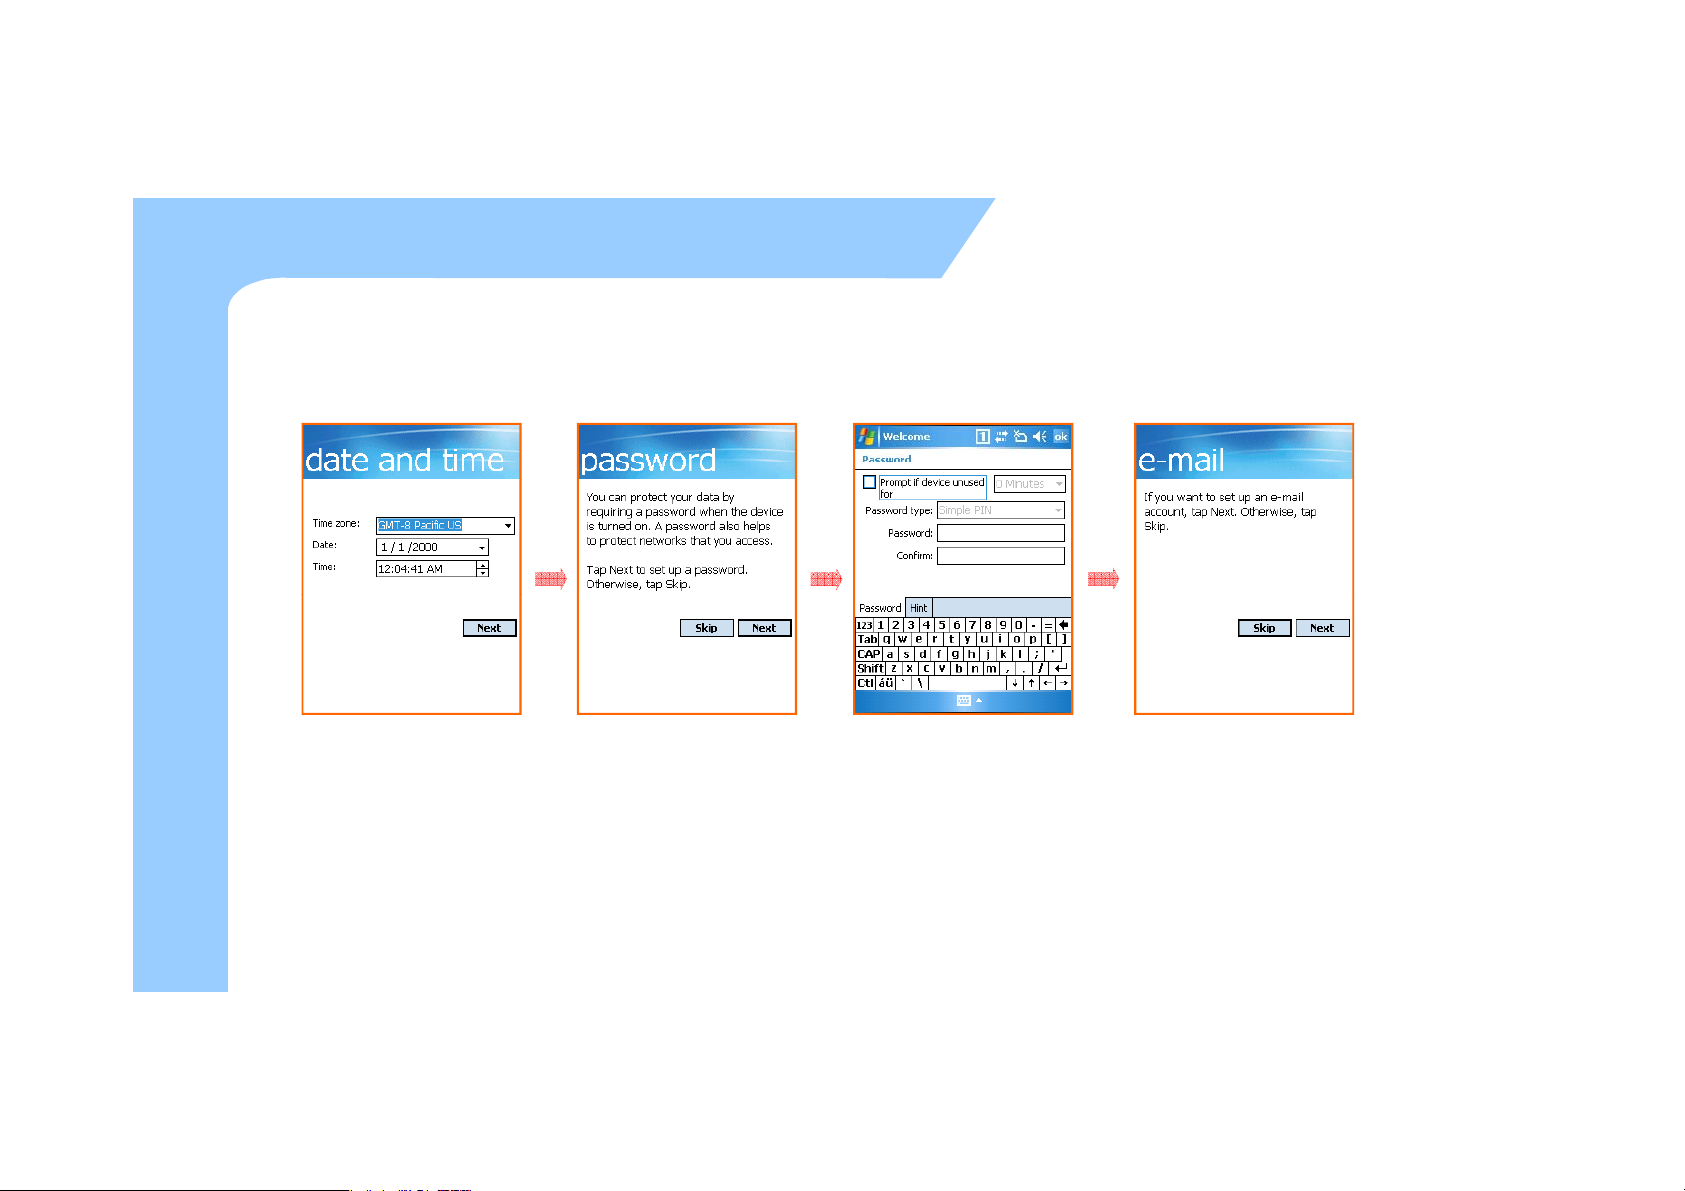
Calibration (2)
z Calibration continue....
UsageBasic
21
Set up the standard time zone
date, and time.
To set up a password, tap 'Next'
otherwise tap 'Skip'.
To set up a password set up a
password type and password.
To set up an e-mail account,
tap 'Next' otherwise tap 'Skip'.
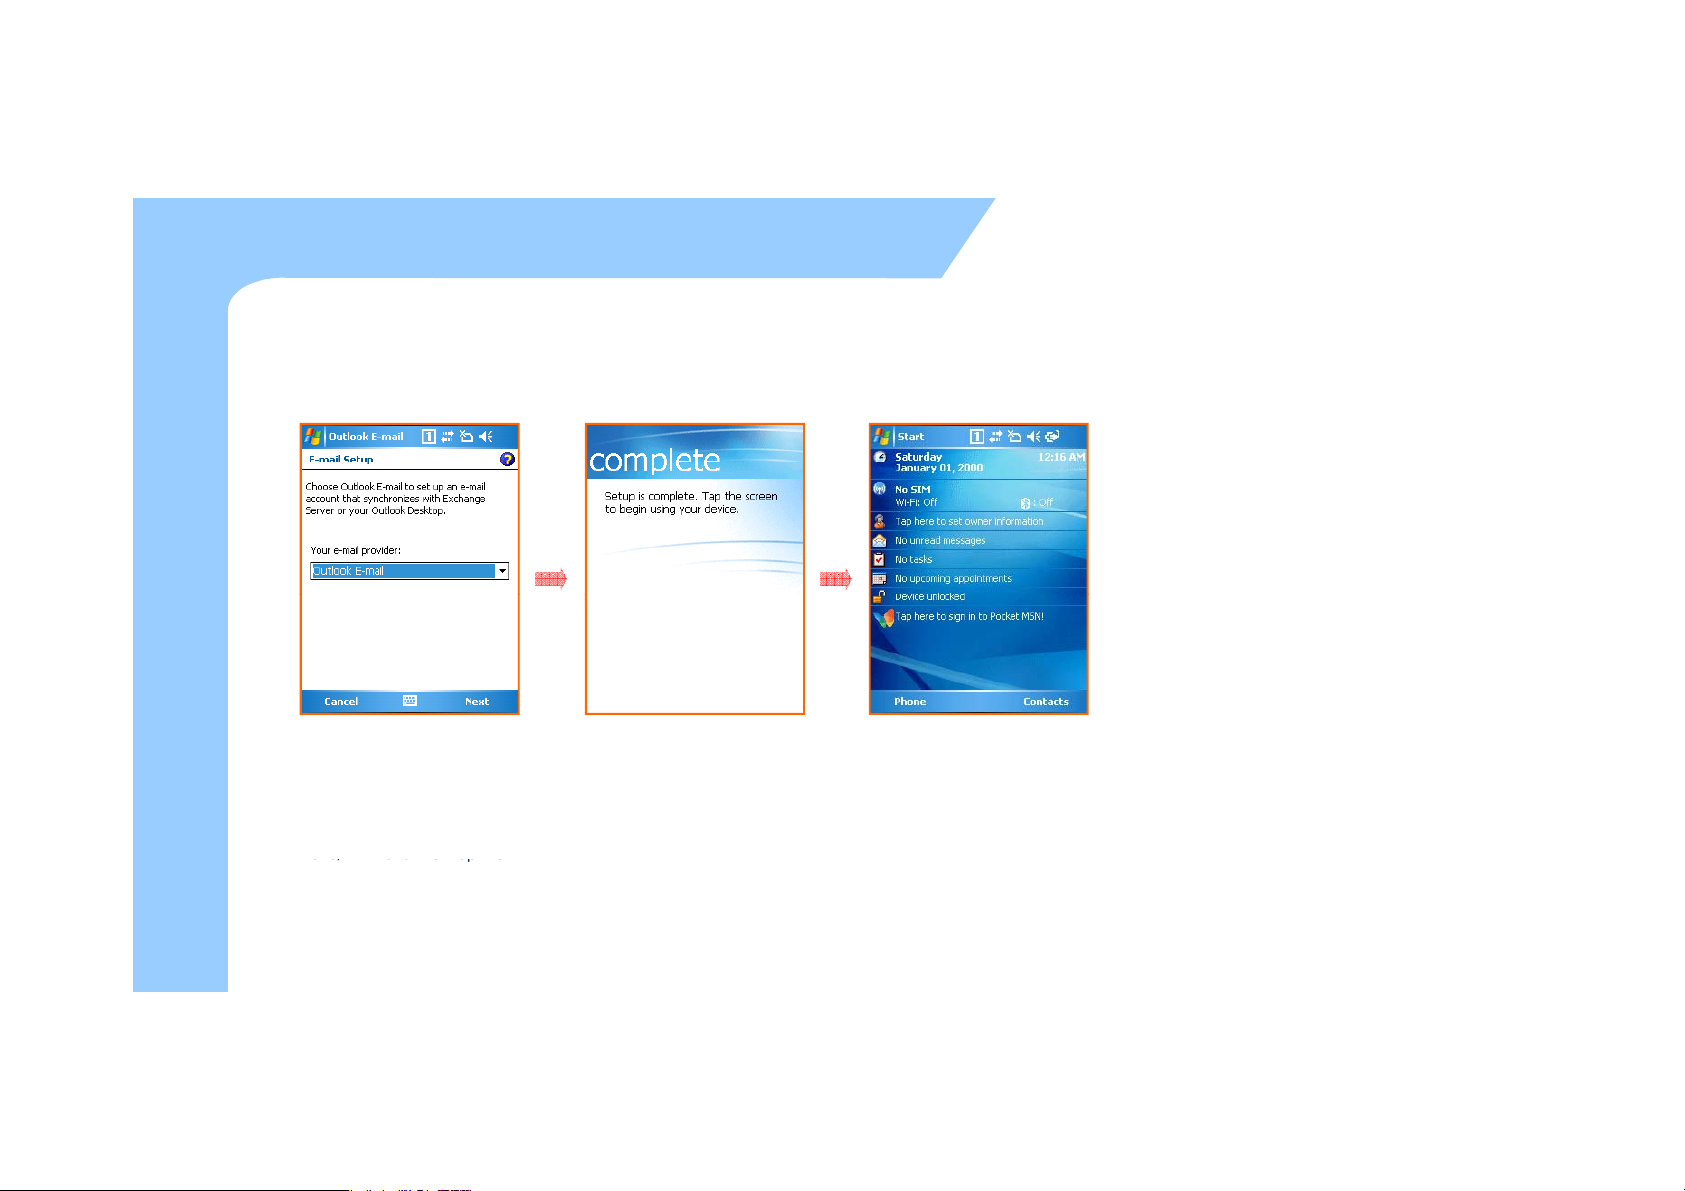
Calibration (3)
POP3/IMAP and then tap the
z Calibration continue....
UsageBasic
22
Choose outlook e-mail to set up
an e-mail account and then tap
the 'Next'.(POP3/IMAP/Outlook
/E-mail)
If you choose outlook E-mail or
'Next', you should set up it step
by step.
When all processes are complete,
tap the screen to start system.
You can see the screen above
after the Calibration.
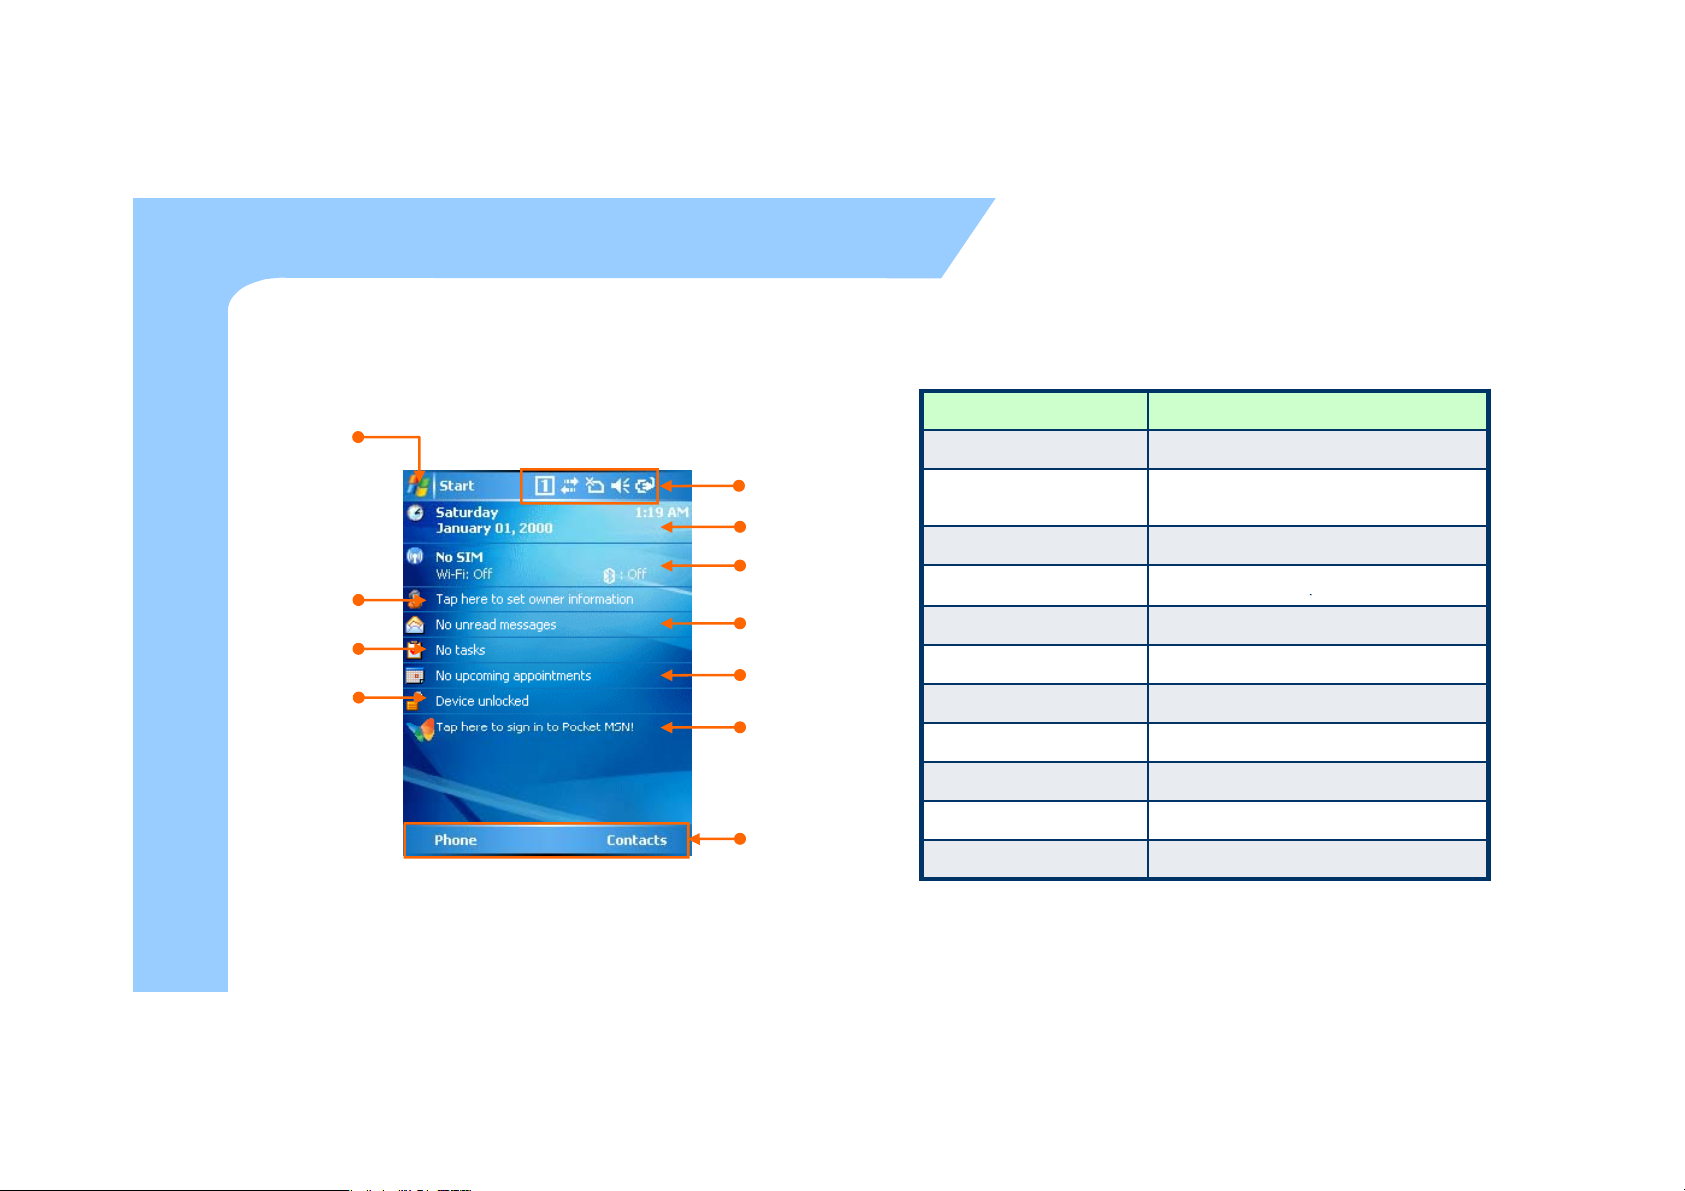
Main Screen
p
p
Pocket
MSN info
Left/Right Function info
View the Left / Right information
z Main screen
– Main Screen is set below
Start menu
Button function
Start menu Select the program you want to use.
Usage
Basic
23
User info
Task info
Lock info
Info bar
Day/Time info
Wireless info
Messages info
Today info
Left / Right function info
Info bar
Day/Time info View the current date and time.
Wireless info View the Wireless
User info View the personal information.
Messages info View the Messages received.
Task info View the task information.
Today info View the Today’s information.
Lock info View the screen / Lock information.
Pocket MSN info View the Pocket MSN information.
View the power, modem, sound, input
mode and connecting view.
ower and state.
.
 Loading...