

M3 Mobile Green User Manual

M3 Green
(MC
6300S / MC
6500S)
(
6300 /
600 /
6500 )
h
bil
-
-6400S / MC-
User Manual
Please read “the safety guide” before use and use it in a proper manner.
M3 Mobile Homepage
ttp://www.m3mo
All the information of user manual and programs in CD can be downloaded at
the M3mobile homepage.
e.co.kr

Note
All oth
this d
z This manual is subject to copyright protection along with all relevant rights.
z No part of this document can be copied, reproduced, changed or translated in whole or in part by any means
without prior written consent of M3 Mobile Co., Ltd.
z The content of the manual is provided “as-is” and be subject to change at any time without notice.
z M3 Mobile Co., Ltd. makes no warranty of any kind with regard to this manual, including, but not limited to, the
implied warranties of merchantability and fitness for a particular purpose.
z Microsoft, ActiveSync, Windows, Windows logos, Windows CE 5.0 logos are trademarks, or registered
trademarks of Microsoft Corporation in the United States and/or other countries. Microsoft OEM products are
licensed by Microsoft Licensing Inc., a entirely owned subsidiary of Microsoft Corporation.
2
z
er product names in
of the respective owners.
ocument or product are company names, trademarks or registered trademarks

Copyright and Agreement
z
The application program providers have the responsibility of indicating their contact number for customer
z
M3 Mobile Corporation has the right to ask warranty of any programs to the program providers to meet the
z This user manual is provided “as-is”. It may contain editing error or omitting due to the difficulty of expressing
technical feature.
z If an application program provided by other supplier using by M3, refer to the supplier for a program manual.
service on M3 terminal, item box, or program.
z M3 Mobile Corporation do not warranty any programs produced and added by the third software companies
after M3 products are distributed from our factories.
needs of mobile networking companies.
z The contents in the user’s manual are protected under the Software Copyright Act. Copy, reproduction,
distribution of the contents in the user’s manual without any written agreement notice of M3 Mobile Co. Ltd., is
considered as criminal actions.
z Windows, MS Office, Outlook, ActiveSync, Internet Explorer programs are the registered brand of Microsoft.
z M3 is the registered brand of M3 Mobile Co. Ltd.
z The brands of other products and service referred in this manual belong to corresponding providers.
3

Caution when using M3 (1)
Do not use the unit while driving
Use supplied adapter and accessories by M3 Mobile Co. Ltd
–
Avoid t
high t
idit
lity to the devi
z User Caution
– When the unit is lost or stolen, notify to network provider immediately.
– Do not rent the unit to third person without authorized permission.
– For technical help, contact designated service centers.
– Contact responding suppliers directly for questions on applications and work programs other than
hardware and basic installed applications.
– Any defect on a unit while using other batteries, chargers and accessories can not get warranty.
z Carrying and Storage Caution
.
.
o use the device under
– Avoid intentional dropping from high elevation. It may cause fatality to the device.
– Charge batteries fully before the first time use of the device.
4
emperature and hum
y. It may cause fata
ce.

Caution when using M3 (2)
Any defect caused by reconstructing units, can not get warranty
–
Th
bil
z Do not reconstruct
– Do not reconstruct M3 for any purpose.
– It may cause fire in the unit, and wound or electric shock to users.
z Illegal copy of mobile phone is prohibited
– The person who reproduces mobile phone and uses this mobile phone is considered as criminals.
.
e use of lost or stolen mo
– Keeping the lost or stolen mobile phone after turning power off, is considered as a criminal act.
5
e phone is considered as a criminal act.
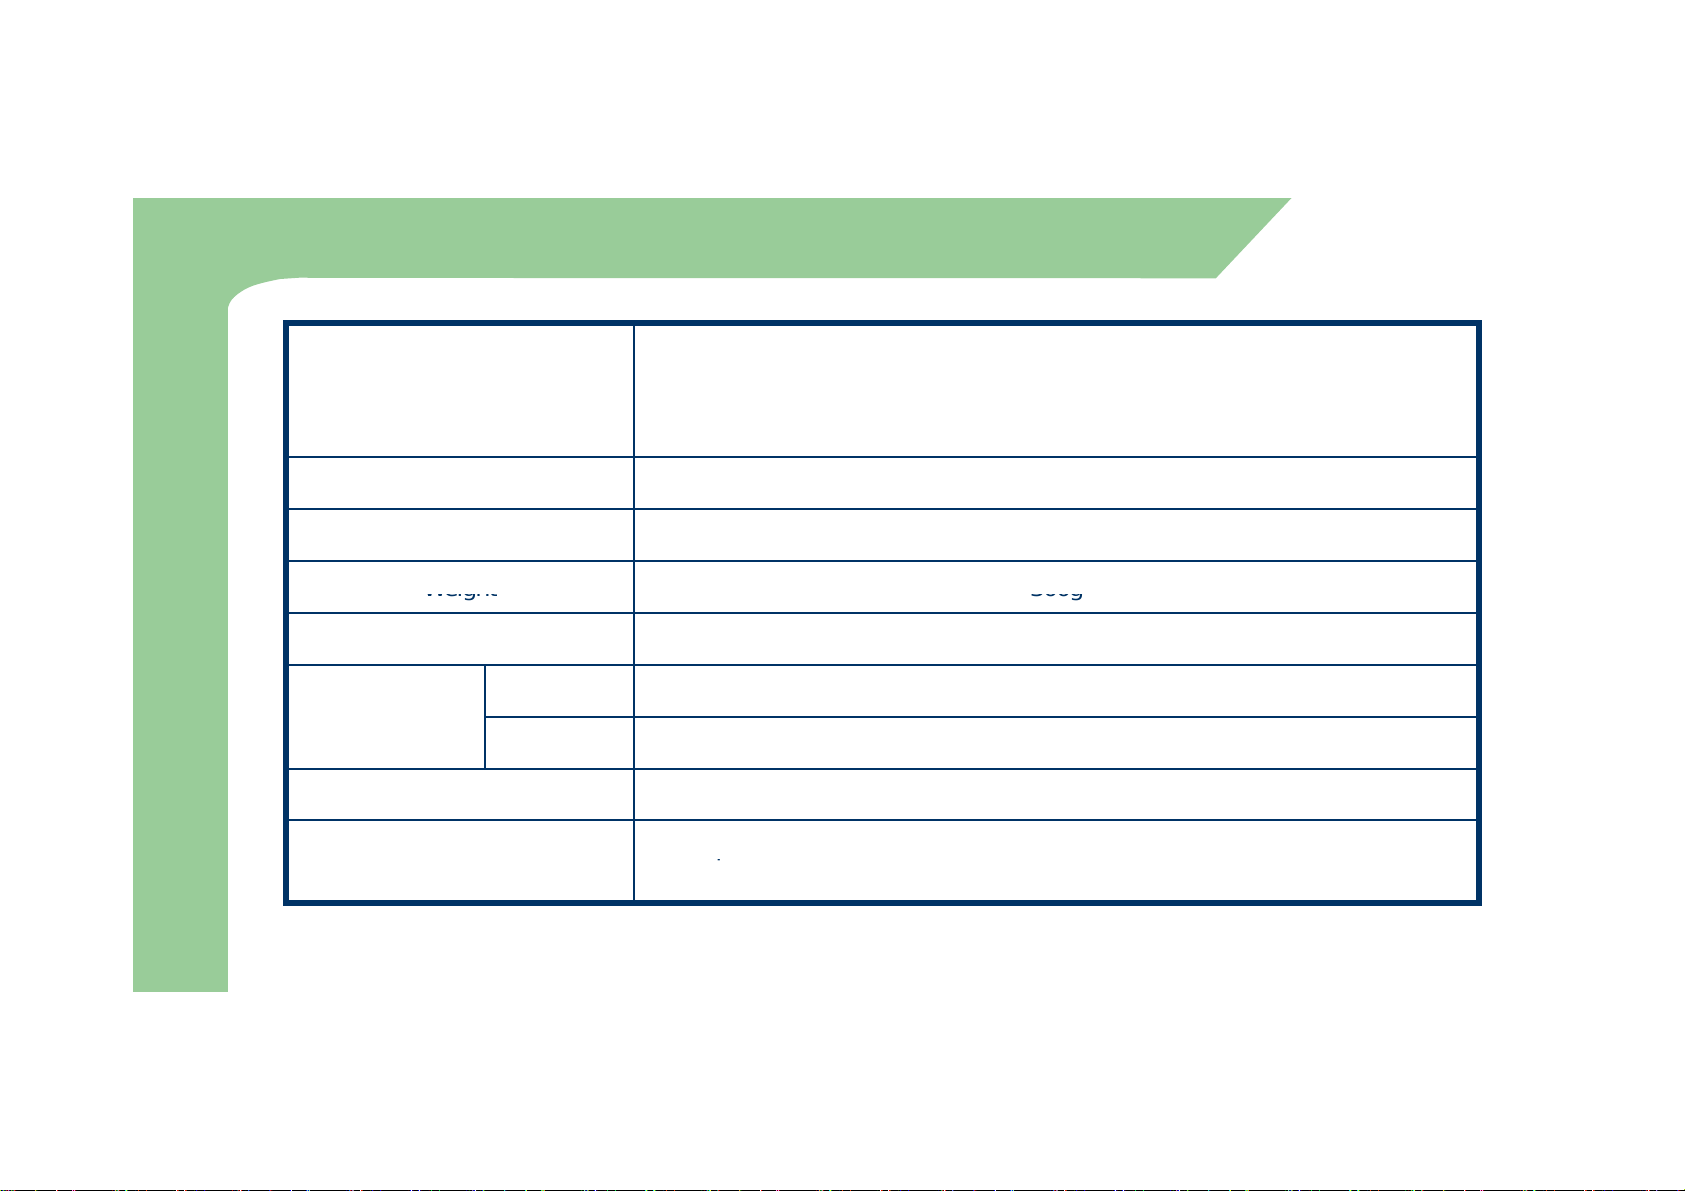
Size and Features
Weight
300g
T
AC Power
p,
GSM 850 (TX) 824 ~ 849 MHz / (RX) 869 ~ 894 MHz
Used frequency band
Band width 200 KHz
External appearance 7 8 .6 x 160 x 24.9mm (Width x length x height)
Transmission output power Maximum 0.3W
GSM 900 (TX) 88 0 ~ 915 MHz / (RX) 925 ~ 960 MHz
GSM 1800 (TX) 1710 ~ 1785 MHz / (RX) 1805 ~ 1880 MHz
GSM 1900 (TX) 1850 ~ 1910 MHz / (RX) 1930 ~ 1990 MHz
Operational
emperature
Relative Humidity 5 % ~ 80 %
6
Main body
Adapter
-10 ℃ ~ + 50 ℃
-10 ℃ ~ + 50 ℃
Input : AC 100 ~ 250V, 50 ~ 60Hz
Output : DC + 5.2V, 3.0A

Contents
z
Size
and
Features
6
y
Input
Button
15
Via
Wireless
LAN
36
Charging
19
Calibration
23
z Note 2
z Copyright and Agreement 3
z Caution when using M3 4
1. M3 Introduction 9
Product Composition 10
Name and function of each part 12
Soft/Hard Reset 16
How to use stylus pen 17
LED/Battery attaching/detaching 18
How to connect to PC 20
How to optimize battery longevity 21
2. Basic Usage 22
Main Window 24
Screen Rotation 26
Infrared Communication 27
BluetoothCommunication 28
Function Keymode 30
Transcriber/Keyboard 31
3. How to use internet 33
Via GPRS/EDGE 34
Via USB 37
Via Bluetooth 38
4. ActiveSync 39
ActiveSync Introduction 40
Installing ActiveSync 41
Synchronization of data 42
ActiveSync Troubleshooting 43
7

Contents
Status
icon/Display
window
47
g/
6.Usage
of
Scanner/Camera
51
5. How to use the Phone 44
Init Screen 45
Key Pad 46
Phone function 48
Voice Conversation via Bluetooth 49
SMS send and receive/Phone settings 50
How to use Scanner 52
How to use Camera 53
7. Usage of Pims 54
Today 55
InfoBox 56
SmartMemo 66
SWRecoder 69
8. UsageofApplication and Utility programs 71
Calculator/Image Viewer 72
MS-Backup 73
Menu Settings/Touch Protector 74
8
M
1. M3 Introduction
소
Product C
iti
Soft/Hard Reset
Charging
3
개
9
ompos
Name and Function of each part
Input Button
How to use Stylus pen
LED Battery Attaching/Detaching
How to connect to PC
How to optimize Battery Longevity
on
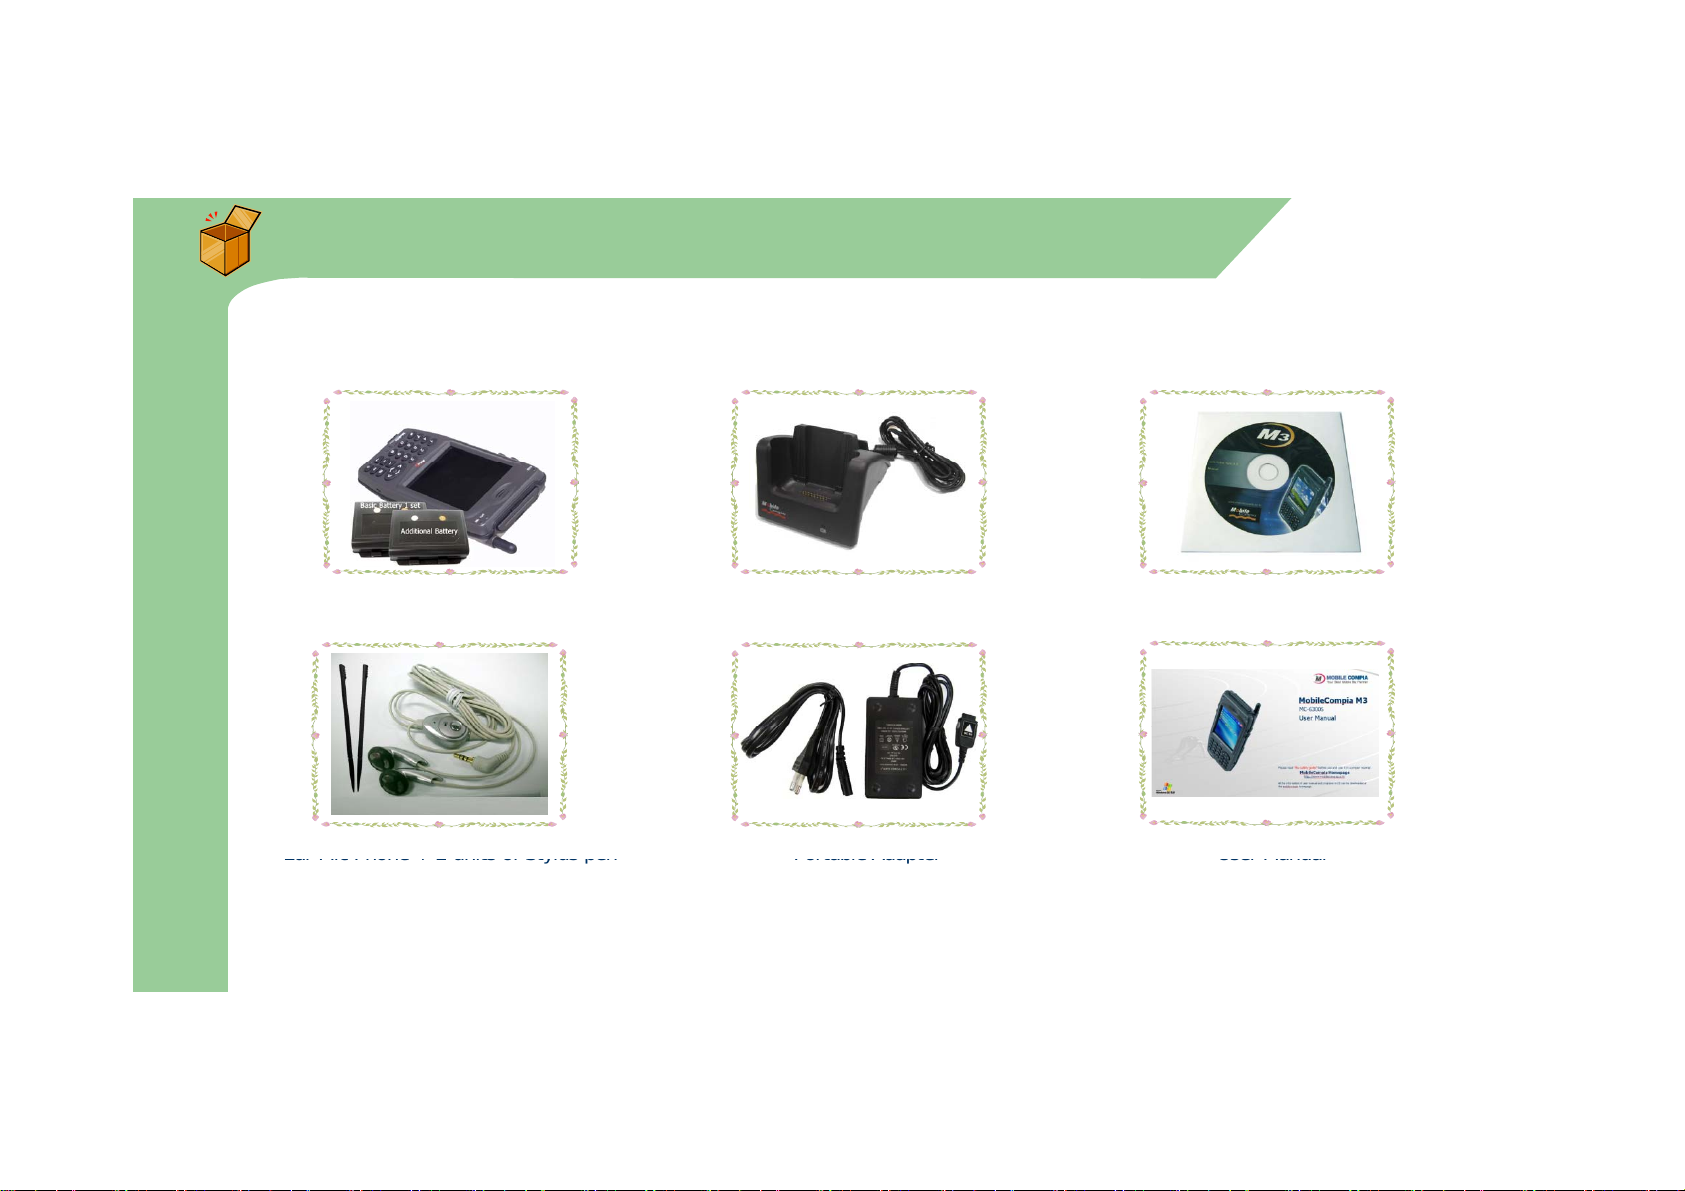
Product Composition (1)
At the first time of opening the product box, please check if it contains all the basic components
M3 Green main terminal
dl
Ear Mic Phone + 2 units of Stylus pen
Portable Adapter
User Manual
z
listed as following.
+ 2 units of standard battery
,
Cra
e + USB cable Manual CD + ActiveSync 3.x
10

Product Composition (2)
qpp / /
z How to use the manual
– This manual provides detailed information to make using the device easier and faster.
– The content related to phone or communication in this manual is only applicable when the device is
equipped with GSM/GPRS/EDGE module for Voice and Data communication.
– The features described in this manual can not be used when it is not equipped in the device (e.g. GSM,
WLAN, Bluetooth, IrDA, Scanner, Camera).
– This manual contains the basic usage which user should know in order to use the device. For more
detailed description, please refer to the manual in CD.
– The content of this manual is subject to change without prior notice due to product improvement or
modification of its functions, etc.
The location of camera and the availability of Flash is depending on the model of M3.
MC-6300S(Camera is located at Top-most, No Flash),
MC-6400S(Camera is located at the rear of device, With Flash)
MC-6500S(Camera is located at the rear of device, With Flash)
11
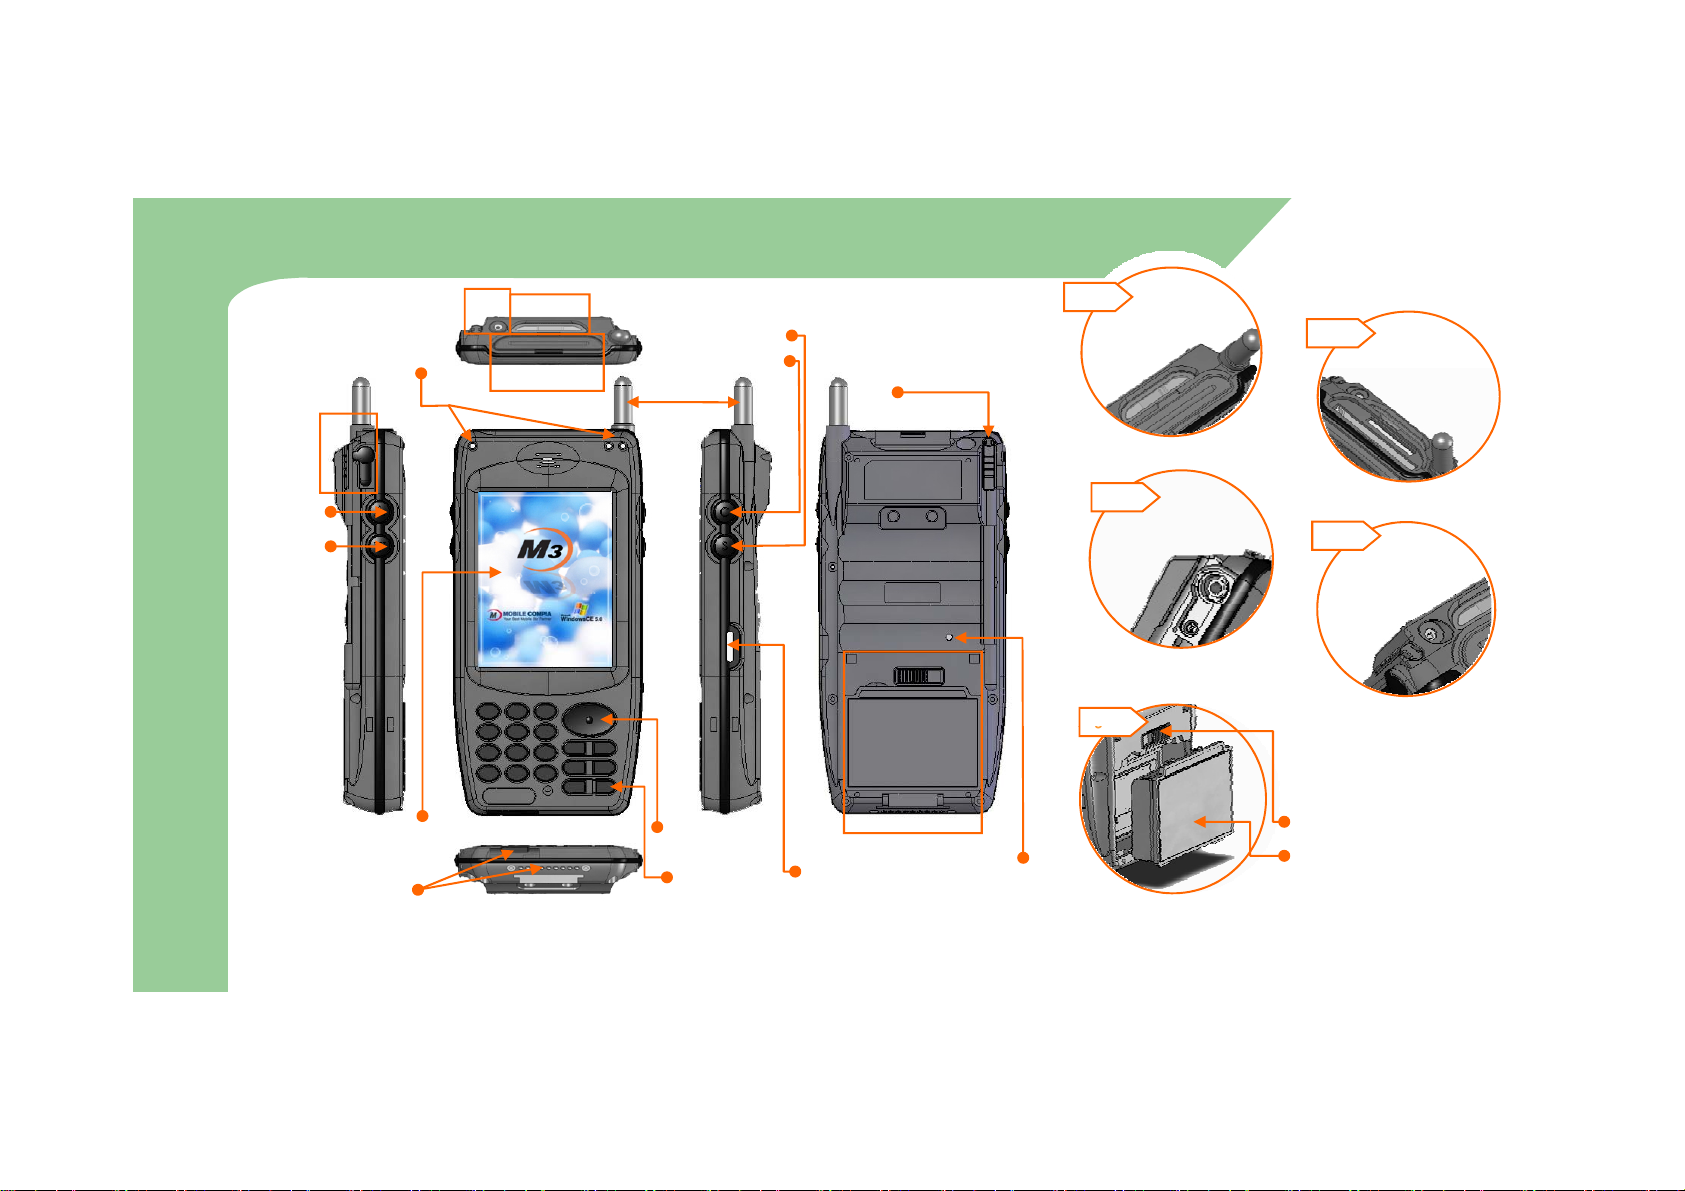
Name and function of each part (MC-6300S)
b
Barcode Scanner
S
e
Battery
Charge Ramp(Left)
Scanner Ramp(Right-Right)
c
ESC
Function Key
LCD touch Screen
Charge & USB/serial port
Upper (portable)
Lower (Cradle) use
a
d
canner Button
b
Camera Button
Antenna
Stylus Pen
a
Window
CF/SD extension
Slot
c
Navigation Button
LCD Power
Button
e
Infrared Communication
Port (IrDA)
Ear Mic Plug
Reset Switch
d
Camera Lens
Battery Lock
1212

Name and function of each part (MC-6400S)
b
S
Barcode Scanner
d
e
t
Battery
Charge Ramp(Left)
CDMA
Ramp (Right-Left)
Scanner Ramp(Right-Right)
c
ESC
Function Key
LCD touch Screen
Charge & USB/serial por
Upper (portable)
Lower (Cradle) use
a
d
canner Button
b
Camera Button
Antenna
Stylus Pen
a
Window
Mini SD
Extension Slot
c
Navigation Button
LCD Power
Button
e
Infrared Communication
Port (IrDA)
Ear Mic Plug
Flash
Reset Switch
d
Camera Mirror
Camera Lens
Battery Lock
13
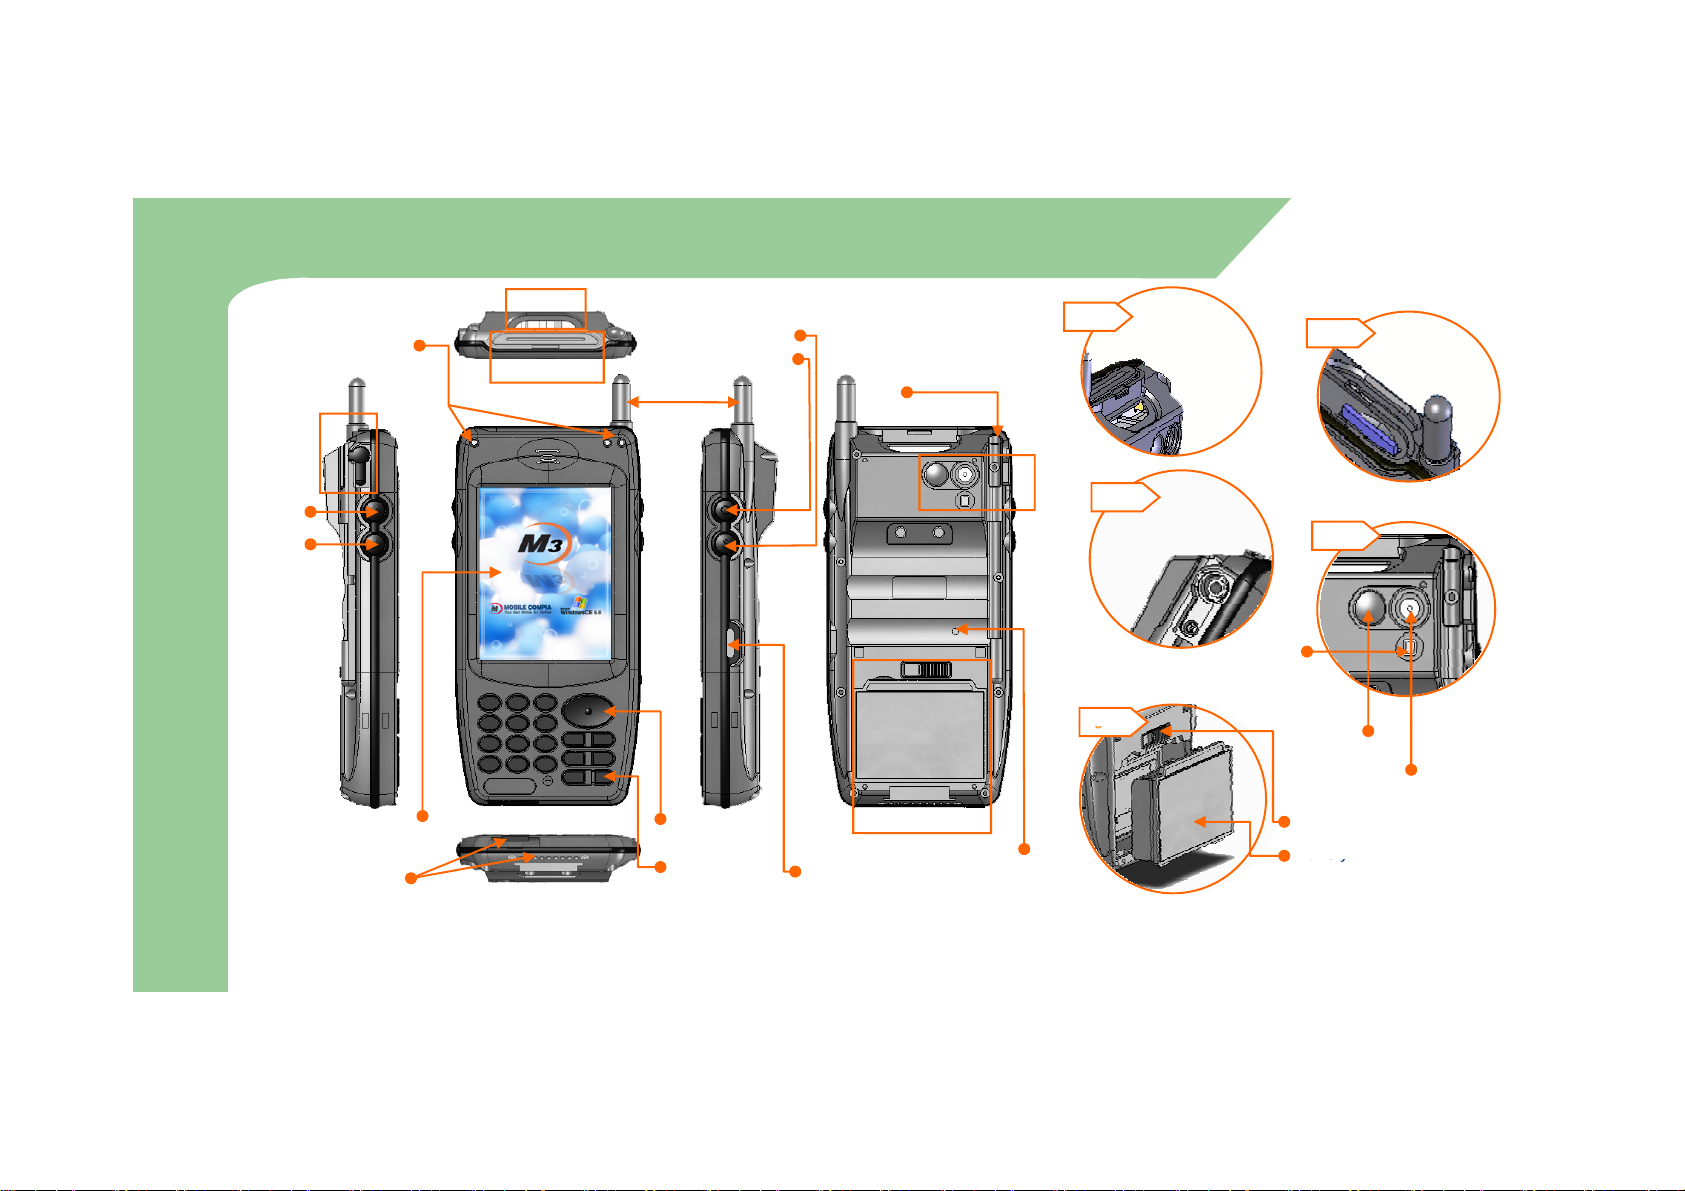
Name and function of each part (MC-6500S)
b
S
Barcode Scanner
d
e
t
Battery
Charge Ramp(Left)
GSM/GPRS/EDGE Status
Ramp (Right-Left)
Scanner Ramp(Right-Right)
c
ESC
Function Key
LCD touch Screen
Charge & USB/serial por
Upper (portable)
Lower (Cradle) use
a
d
canner Button
b
Camera Button
Antenna
Stylus Pen
a
Window
Mini SD
Extension Slot
c
Navigation Button
LCD Power
Button
e
Infrared Communication
Port (IrDA)
Ear Mic Plug
Flash
Reset Switch
d
Camera Mirror
Camera Lens
Battery Lock
14

Input Button
Click again
Hardware Reset
button
ESC button
Press
ESC (Escape) function
button
Keep pressing screen with stylus pen
Button Action Function
Power
Number
button
Function
button
Navigation
Scanner
button
Camera
button
Return
button
Press Power ON/OFF
Long press Backlight ON/OFF
Press Number Input
Press Changes to Function Mode
Press Moves to Up/Down and Left/right
Press Activates Scanner Beam
Press Activates Camera capture
Press Execute Selected application (Enter)
Button Action Function
Click Software Reset
Reset button
Phone button Press Run or display/hide the Phone program
LCD Click
after long
press
Long press Power Off (used for complete power off)
Click (Tap) Item select/click
Double Click Same as Double Click on PC
Drag & Drop
Tap & Hold
(long press of about 4 seconds and then
click one more time)
As like mouse, can drag item to a certain
position
.
Possible to select menu
(Copy, Delete, Paste)
15
Soft/Hard Reset
g
g,
–
Press the reset button for more than 4
data downloaded from PC will be lost. To avoid such cases, use external storage device
z Soft Reset
– Press reset groove briefly as like
the picture.
– For unexpected error occurred
while usin
button.
– In soft reset mode, application
will be shut down, and unsaved
data will be lost. However saved
data and file will be safe.
When doing soft reset, pressing reset button longer than one second may trigger hard
reset.
When doing hard reset, every created data, data file and programs personal managing
or internal flash disk having regular back up of important data
software, click reset
z Hard Reset
– Press reset groove for more than 4
seconds and the press it briefly one
more time.
– For fatal problem with a device, and
application problem beyond the soft
reset solution, hard reset is required.
– User shall caution that all data will be set
as default value except data in flash disk
folder.
seconds. The initial screen will be briefly
popped up and then immediately goes
off.
16
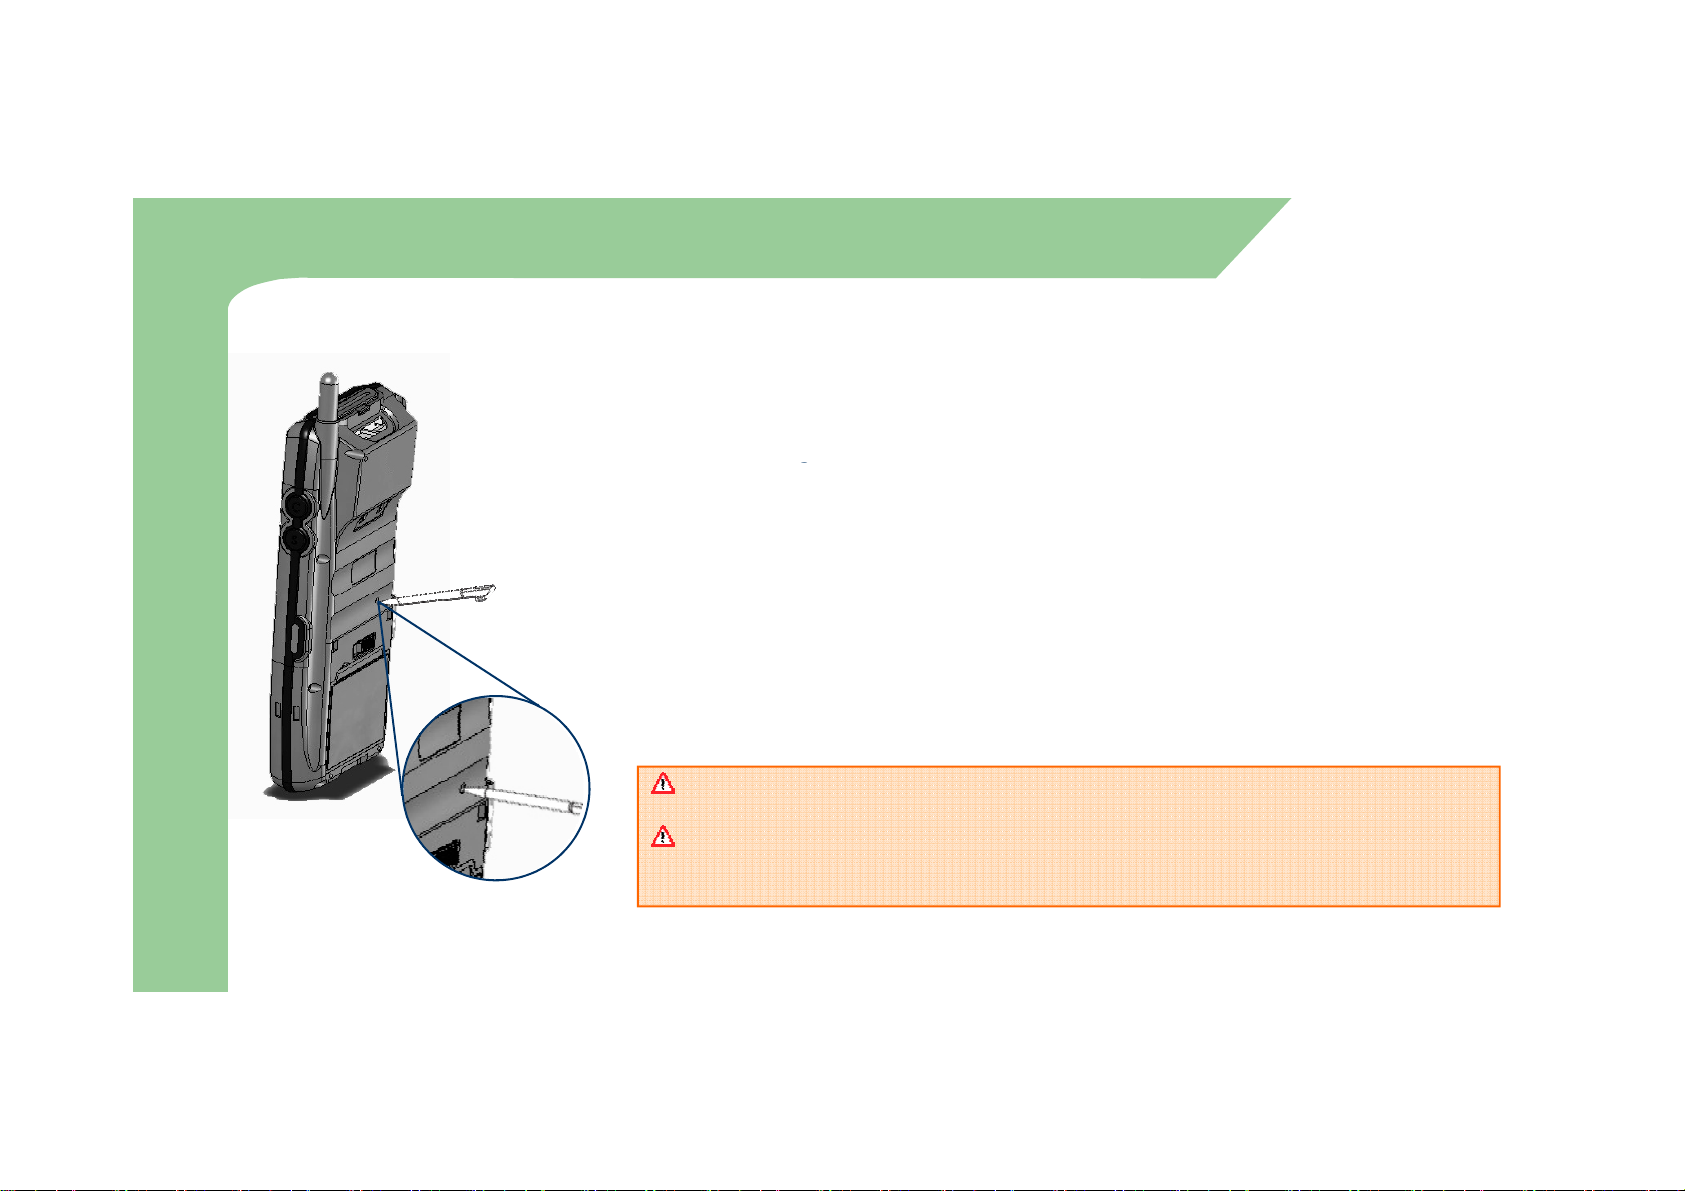
How to use Stylus Pen
itemtomove
to
other
position
file copy, delete, and paste or
z Tap
To select items or executing,
tap the touch screen one
time.
z Double Click
Similar function as mouse
double click function of
computer, click screen twice
x2
z Long Press
After tapping, leave Stylus
pen touching the screen. This
function is frequently used for
with when keyboard is using.
z To drag
Similar function as mouse
drag function of computer,
with pressing screen, drag
.
17
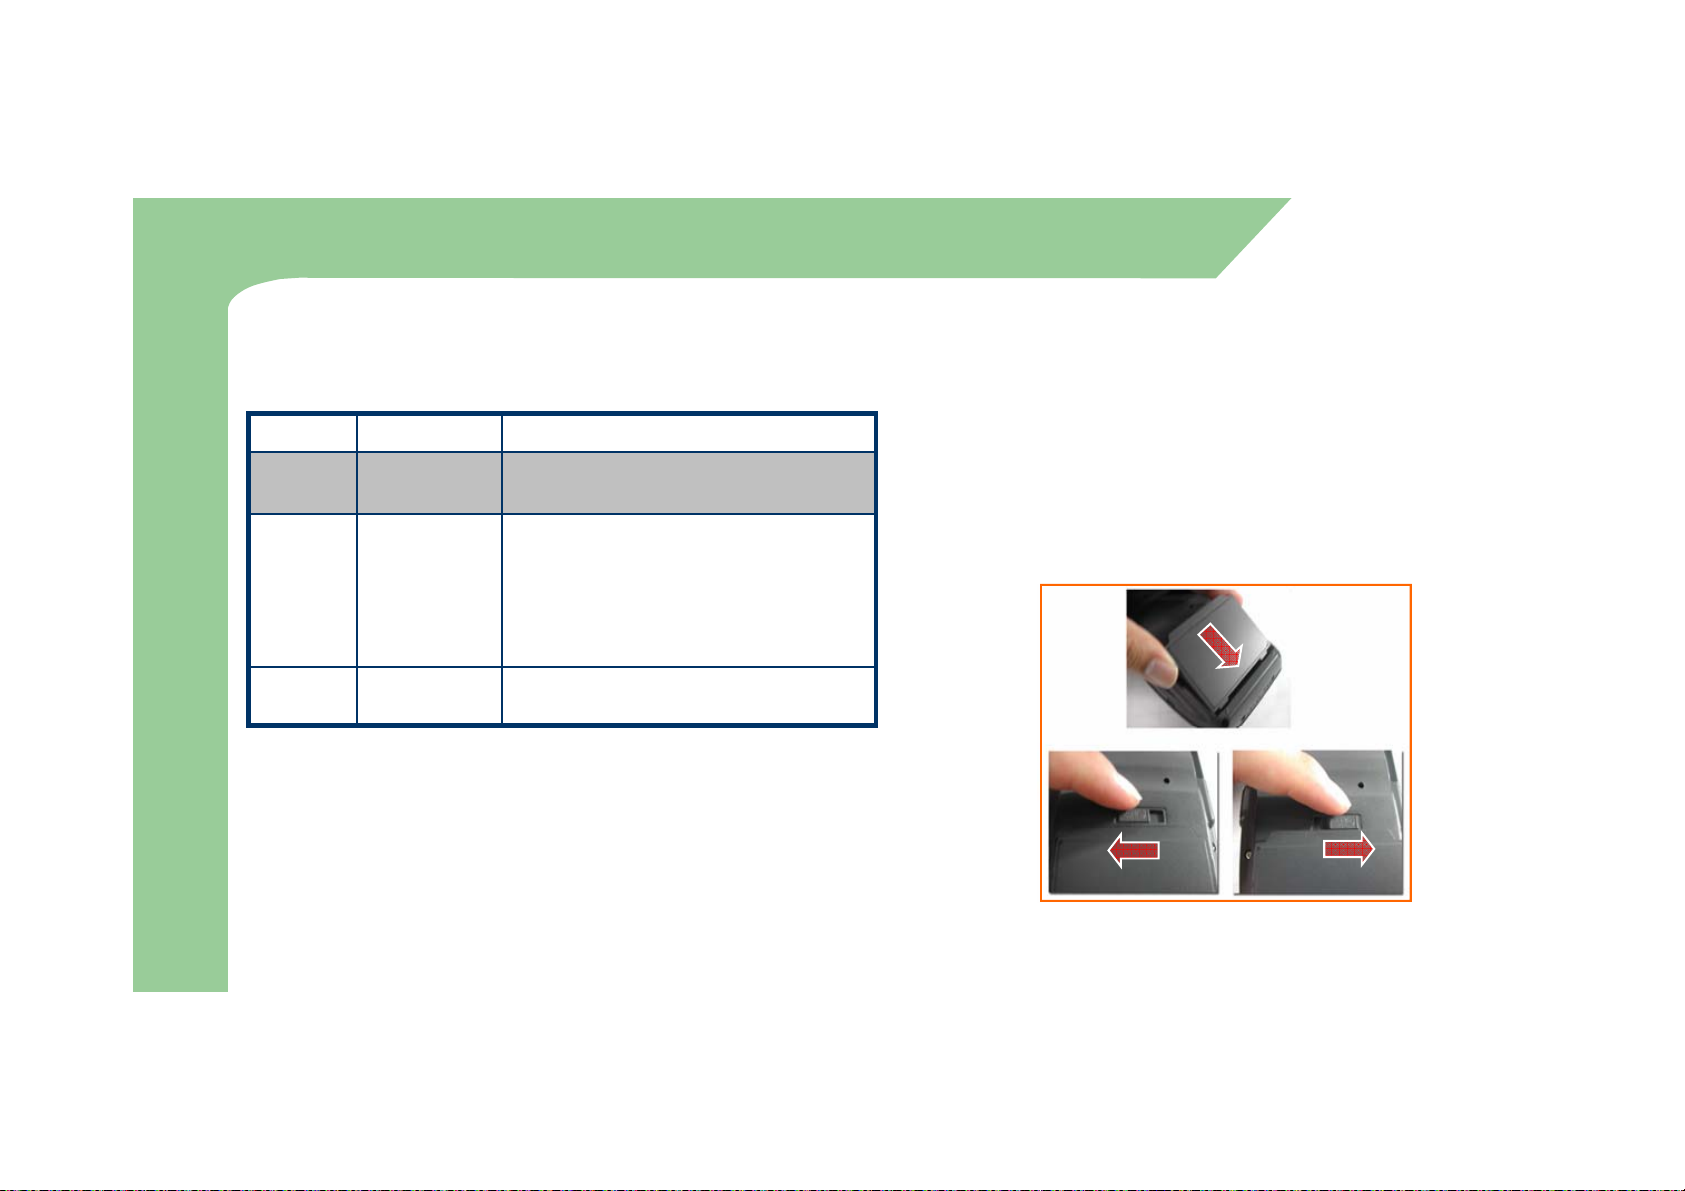
LED / Battery attaching/detaching
–
Detaching Batt
Blue On
GSM/GPRS in use
z LED Alarm
– Informs Charging, Scanner Status.
Type LED Status Details
LED for
charging
GSM
Red
Green
Blue Blinking
Charging
Charging complete
GSM/GPRS Standby
(within range of phone/internet)
/GRPS
Status
LED
Scanner
LED
Blue OFF
Green When the barcode data is successfully read
(phone/SMS/internet in use)
GSM/GPRS is off or out of range
z Battery attaching/detaching
– Attaching Battery
As picture shown, put the battery pack to back of PDA,
and lock the battery pack with locking device.
ery
Press locking device to the right, then using upper
notch, detach the battery from main body.
18
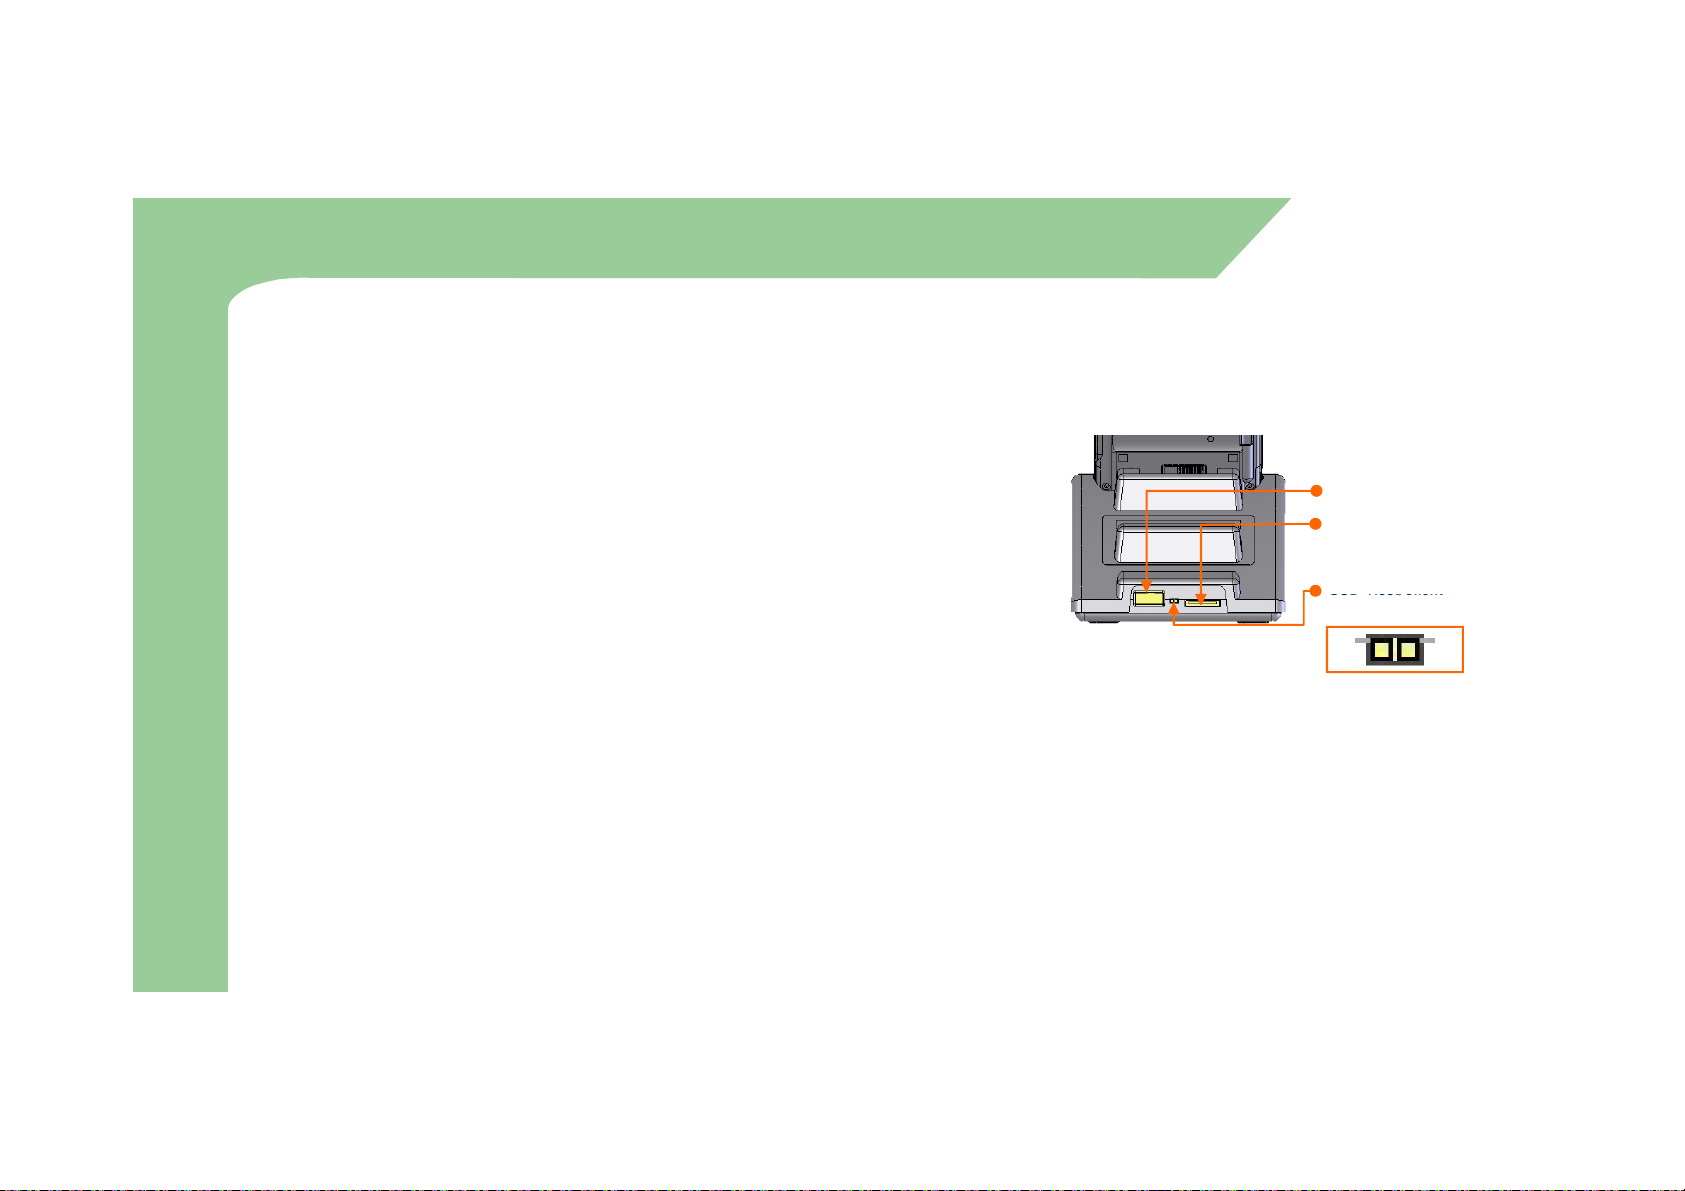
Charging
z
Connect plug
from charger to charge jack of main
z
Charging in Cradle
y
Type
LED Status
Details
py
(Extra battery charging)
Green
Charging Complete
Incongruent
change
of
battery
can
cause
the
explosion
-in
body, or charge jack of cradle, and then place main
body onto cradle.
z Charging LED
Direct charging to main
body
Cradle Charging
z When charging, the status of the battery attached to
Red
Green
Red
Charging
Charging Complete
Charging
Main body
Charging LED
Separate Battery
Charging LED
z Charging using portable adapter
main body can be confirmed by the LED left of upper
corner of main body. Also the status of Sub-battery
can be confirmed by the LED right of low corner of
Cradle.
Do not use any other charger except one (5.2 V / 3A) provided .
Make sure to handle it gentle; damage with excessive force may cause no warranty.
.
When attached battery is completely discharged, plug charger to main body, then reset
the device to check if screen is back on. To use, do at least 10 minute charging.
Separate Batter
19
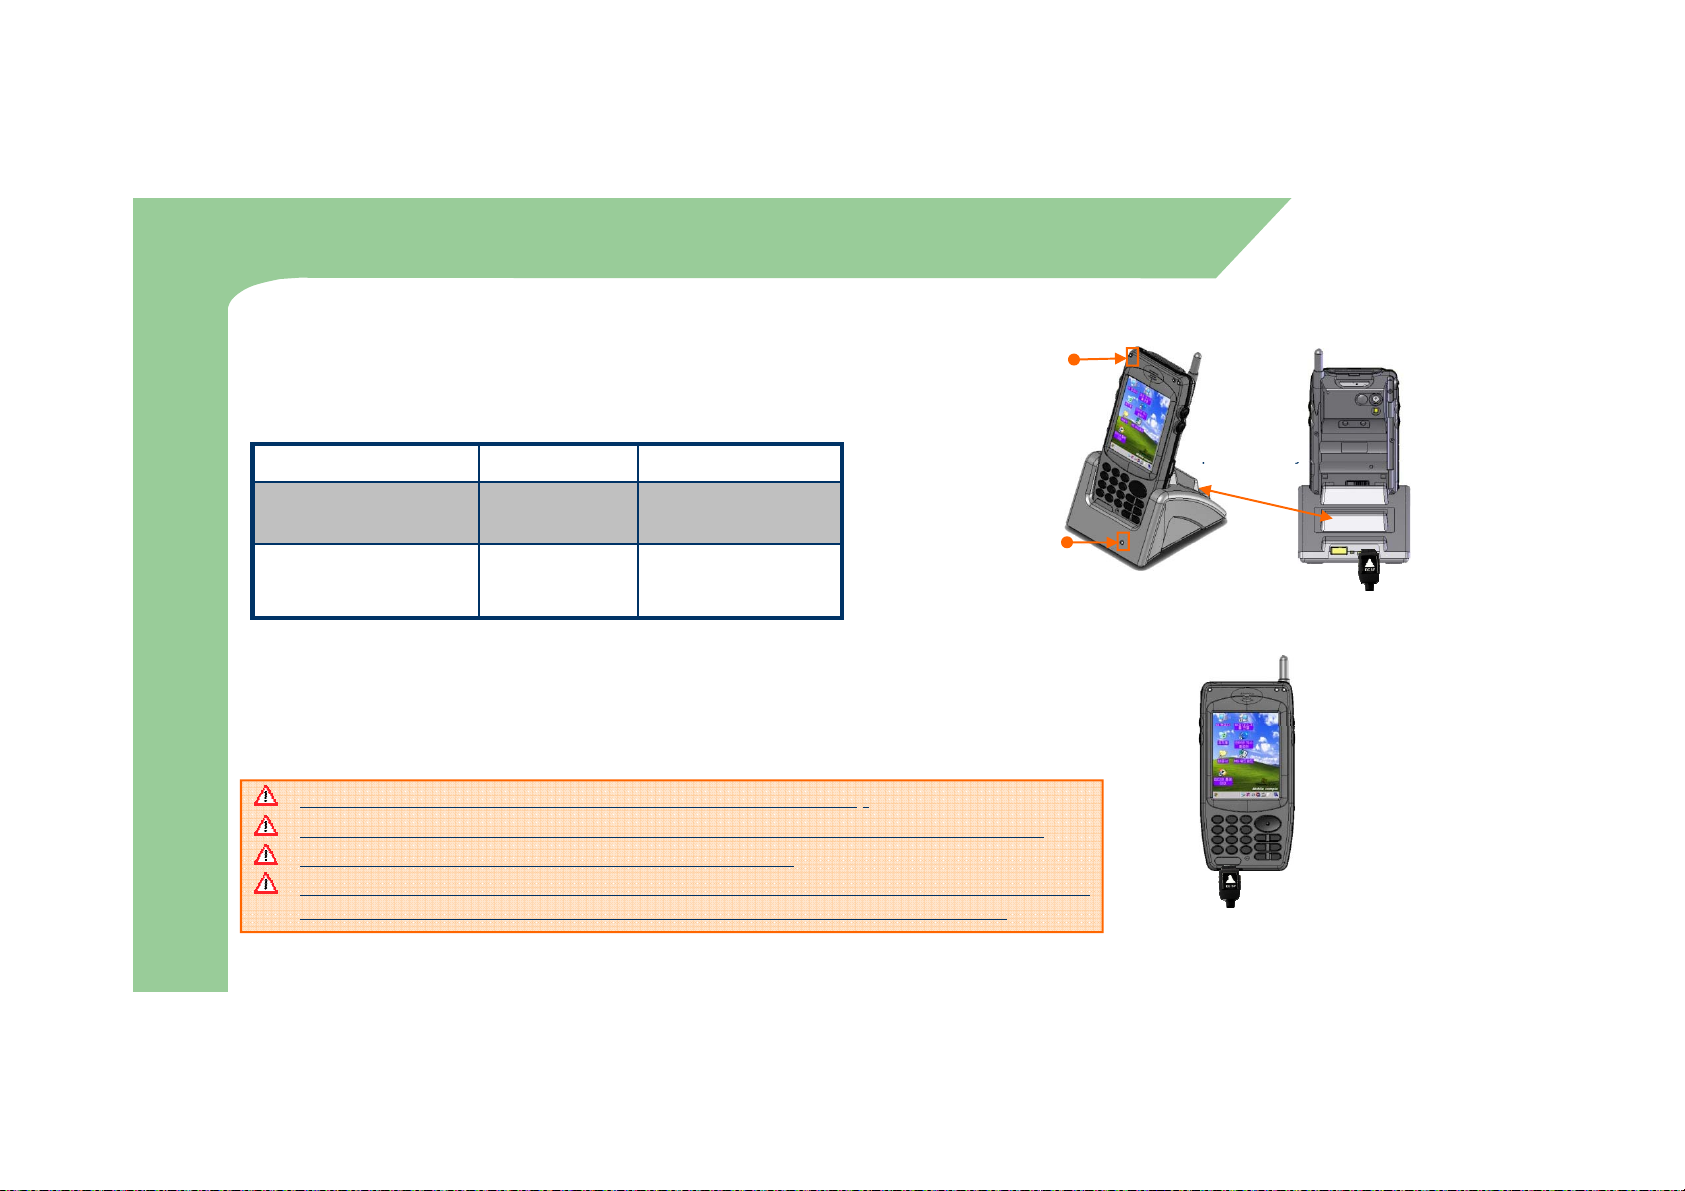
How to connect to PC
–
Connect charger to power source. (to wall)
USB Host/Client
z
The location of USB port can be at the back, front or side of PC
USB Host/Client
z A cradle of M3 supports charging and USB connection.
z Connecting step of cradle of M3 is as following.
– Connect charger to USB cradle. (24pin connector)
– Connect USB cable of USB cradle to USB port of desktop PC.
– Place M3 onto docking cradle then execute Synchronization with Desktop
PC.
USB Host/Client
AC Power
20
and the shape of USB port is identical on Desktop PC and
Notebook.
z USB host function is available by putting USB cable into USB port
of Cradle.
changeover switch
H
Connecting to Cradle
C
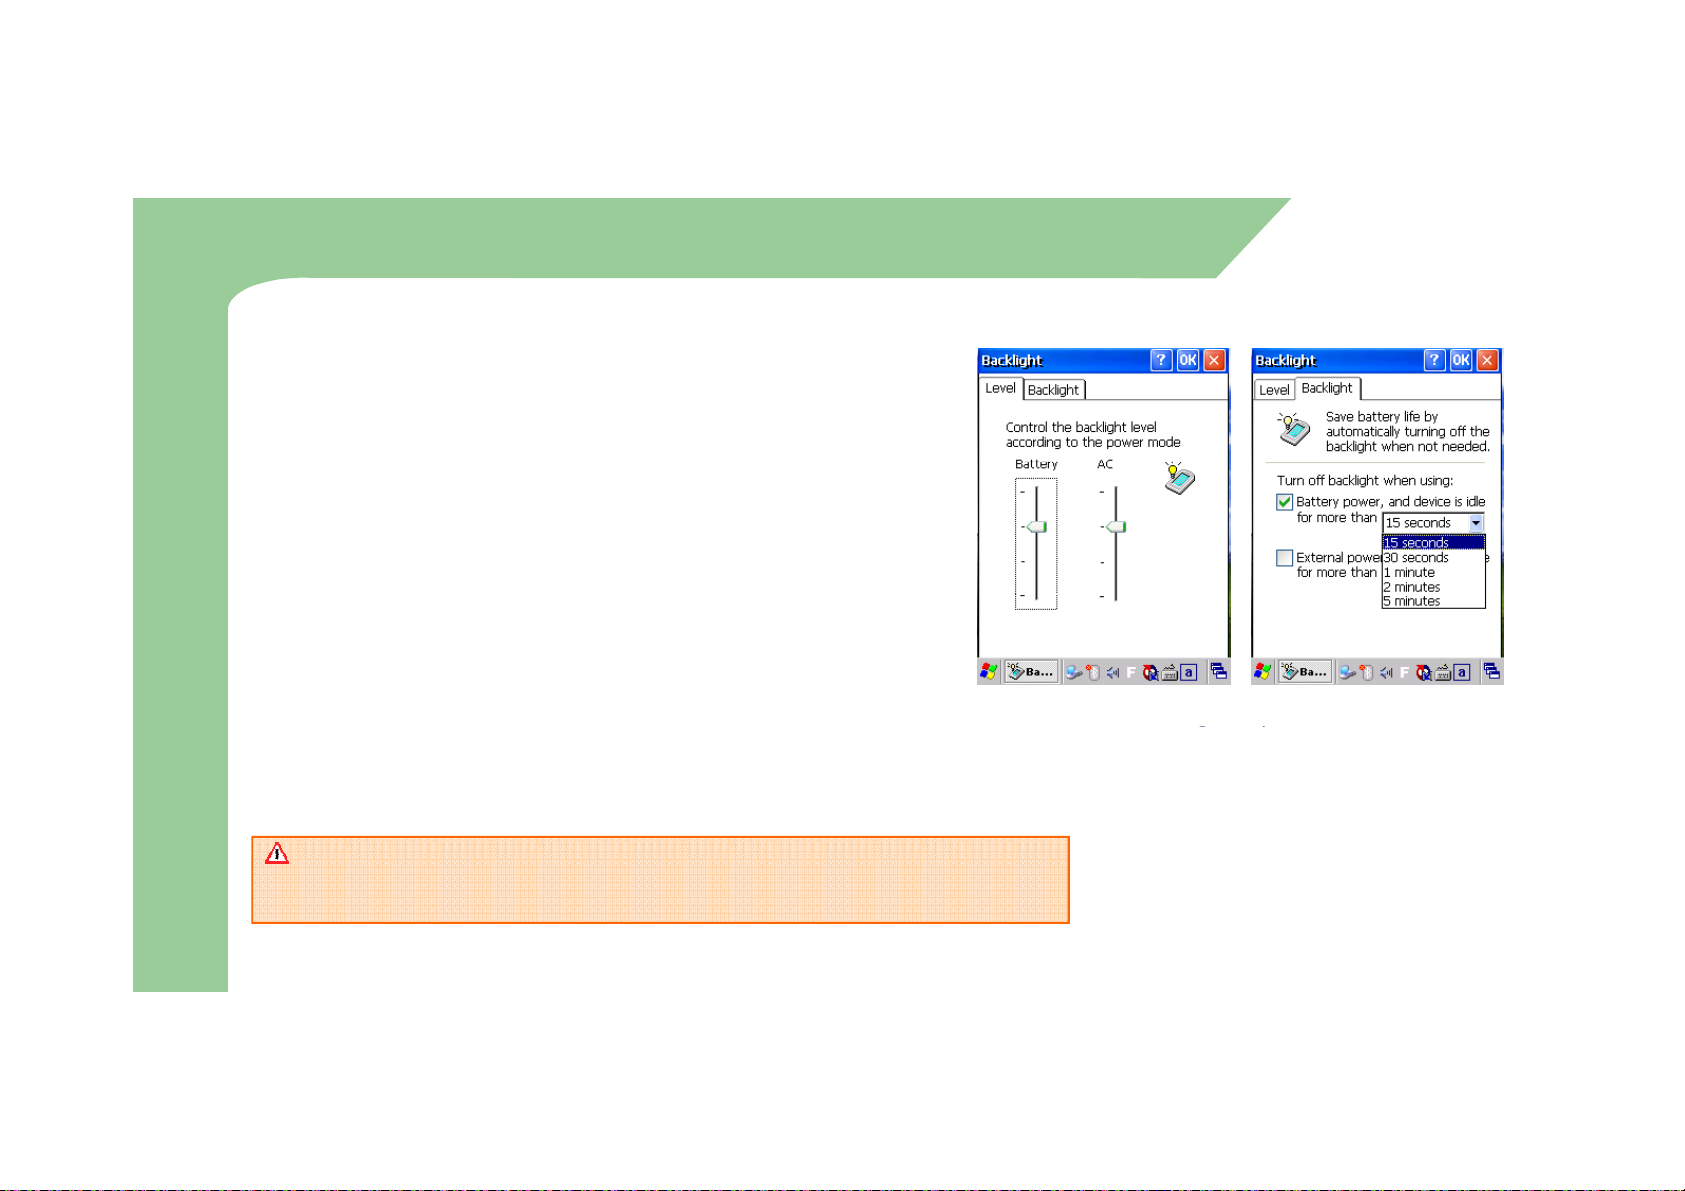
How to optimize battery longevity
the
Backlight
tap,check
Battery
power
and
device
is
idle
and
set
gp
If battery power is too low, Too Low Battery message will appear on the taskbar
z When you work outside of office or at home, you will
especially want your battery to last as long as possible. There
are several tips for longer battery life.
z When you are not using the device, turn it off by pressing
LCD power button.
– When you use the battery power, if you do not touch the keyboard
or use a stylus pen or mouse for more than 3 minutes, the device
will automatically be shut down. Shorten this time (Settings ->
Control Panel -> Power -> Schemes) to have longer battery life.
z LCD Backlight and Keypad Backlight set to the minimum
brightness.
– On Start > Settings > Control Panel > Backlight > Level, scroll
down the level of brightness at Battery mode to the minimum. On
the time to 15 second.
'
,
'
Backlight Properties
“
and start window. In that case, you have to recharge M3 using the charger.
Otherwise, it may cause problems in the system.
21
”
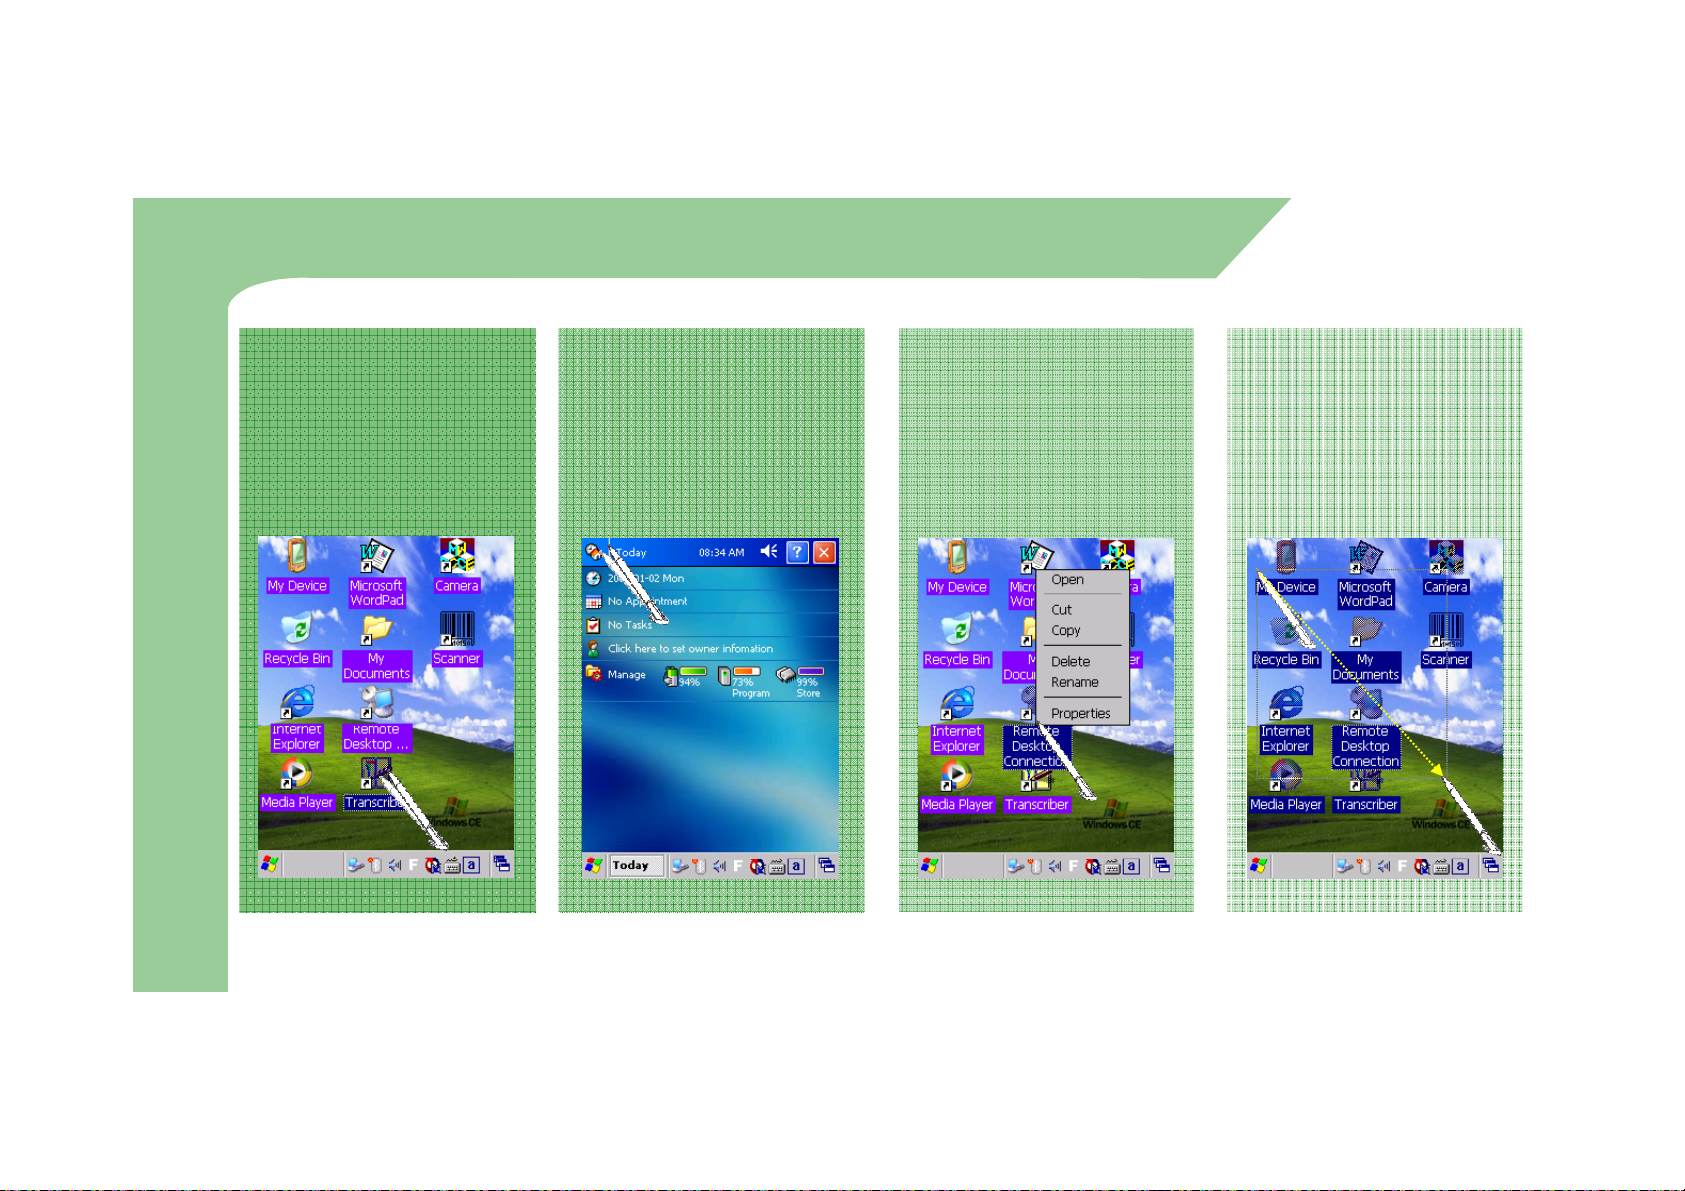
2. Basic Usage
Calib
22
ration
Main window
Screen Rotation
Infrared Communication
Bluetooth Communication
Function Key Mode
Transcriber/Keyboard
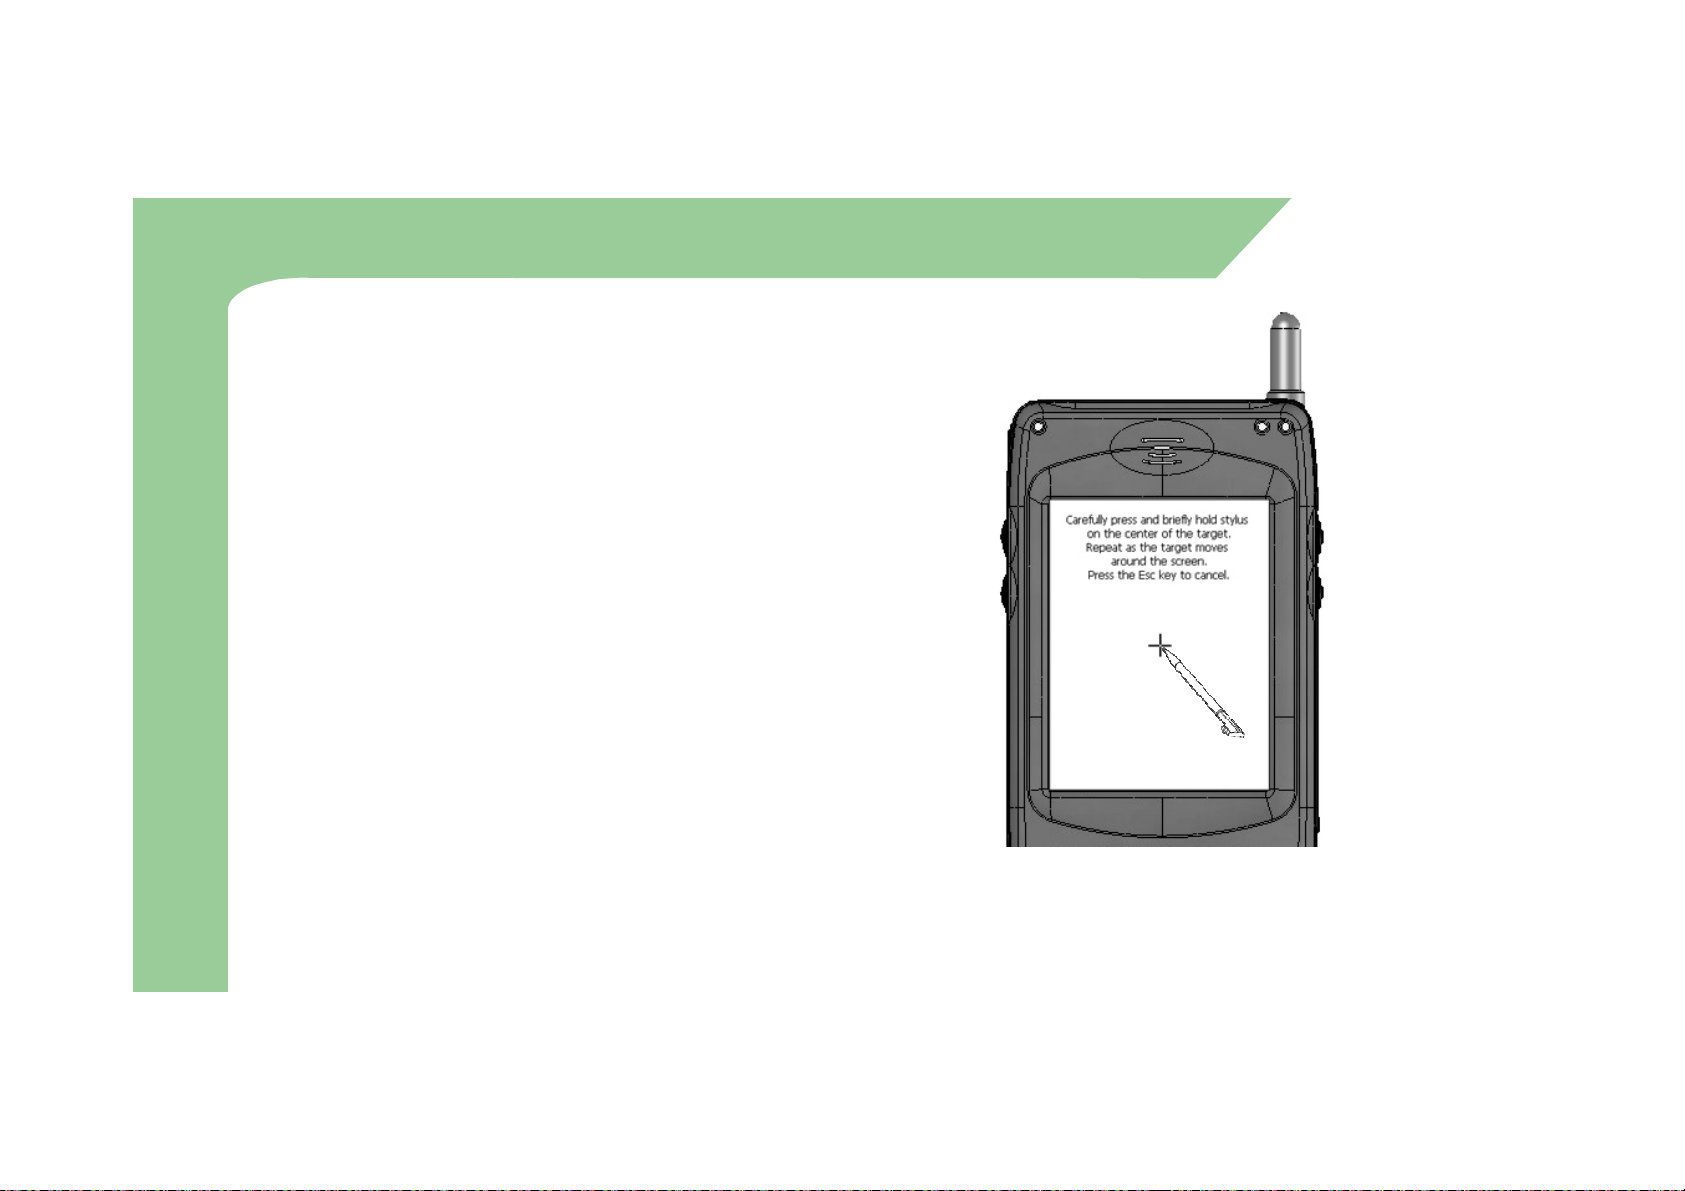
Calibration
z Choose ‘Recalibrate’ on Control Panel /
Stylus / Calibration tab (Fn + 4)
z Screen setup wizard will start. Screen
setup wizard calibrates the touch screen.
z Press and hold the (+) mark for more
than 1 second and release it. Keep
chasing and pressing this (+) mark as it
moves around. When all processes are
complete, M3 will automatically show the
main screen. Check if the LCD touch
input works correct after calibration.
23
 Loading...