

Page 1
M2TECH
VAUGHAN
384KHZ/32BIT DIGITAL-TO-ANALOG CONVERTER
USER MANUAL
------- PRELIMINARY -------
REV. PrA – 5/2012
Page 2

VAUGHAN
384kHz/32bit digital-TO-ANALOG CONVERTER
REVISION 1PrA – MAY 2012
M2Tech
www.m2tech.biz
Warning!
Changes or modifications not authorized by the manufacturer can invalidate the
compliance to CE regulations and cause the unit to be no more suitable to use. The
manufacturer refuses every responsibility regarding damages to people or things
due to the use of a unit which has been subject to unauthorized modifications or to
misuse or to malfunction of a unit which has been subject to unauthorized
modifications.
This unit is compliant with the following CE regulations when an USB cable less than 3m is used: CEI EN
55022:2009 Class B (Radiated Emissions), CEI EN 55024:1999, CEI EN 55024:A2/2003, CEI EN
55024:IS1/2008 (Radio Frequency Electromagnetic Fields, 50Hz Magnetic Field Immunity Test and
Electrostatic Discharges – ESD).
For a proper operation of this unit, all connections to other equipment in the system must be done
when all equipment are off. Failing to comply to this advice may lead to damage to the unit.
Recycling
The label above, printed on the product case, indicates that the product, when no more usable, can’t be
treated as generic garbage, but must be disposed of at a collection point for recycling of electrical and
electronic equipment, in compliance with the WEEE regulation (Waste of Electrical and Electronic
Equipment).
By making sure that this unit is correctly recycled, you will help preventing potential damages to environment
and human health, which could be caused by a wrong treatment of this product as generic garbage.
Materials recycling helps saving natural resources. For more in-depth information about recycling this
product, please contact M2Tech Srl.
WARNING: the information contained in this manual are considered to be reliable and accurate.
M2Tech reserves the right to change or modify the information any time, without prior advice. It’s up
to the customer to ensure that the manual being consulted is the latest version.
Copyright © 2012, M2Tech Srl
2
Page 3

VAUGHAN
384kHz/32bit digital-TO-ANALOG CONVERTER
REVISION 1PrA – MAY 2012
Dear customer,
thank you for purchasing VAUGHAN. What you have is a first-rate digital-to-analog converter
with many unique features conceived to obtain the best audio performance out of a music
file.
Even if getting music out of a PC or a Mac is nowadays quite simple, much harder is to
obtain the best sonic performance from it, due to intrinsic limits in USB 1.1 audio standard
and the implementation of digital audio interfaces in computers. Please visit M2Tech
website (www.m2tech.biz) to find extensive literature about this topic.
VAUGHAN overcomes all the limits of usual USB digital-to-analog converters by
implementing the latest generation hiFace technology, which uses proprietary drivers and
asynchronous data transfer, along with a sophisticated electronic design.
VAUGHAN features a comprehensive set of input connections which suit virtually all digital
sources around.
We feel that your expectations will be fulfilled by VAUGHAN: you’ll hear your CD’s, DVD’s
and music files in a way like never before, prepare for a whole new experience!
Nadia Marino, CEO
Please annotate here your VAUGHAN serial number for future reference:
S/N: ____________________________________
Date of purchase: _________________________
M2Tech
www.m2tech.biz
Copyright © 2012, M2Tech Srl
3
Page 4

VAUGHAN
384kHz/32bit digital-TO-ANALOG CONVERTER
REVISION 1PrA – MAY 2012
M2Tech
www.m2tech.biz
INDEX
1. Unpacking and placing the unit........................................................................................5
2. Front Panel ......................................................................................................................6
3. Back Panel.......................................................................................................................7
4. Remote Control................................................................................................................9
5. Connecting and powering the unit .................................................................................10
5.1. Standby and power off ............................................................................................10
6. Driver installation ...........................................................................................................12
6.1. Obtaining the driver .................................................................................................12
6.2. Installing the driver on a Windows-based PC..........................................................12
6.2.1. Automatic (guided) installation.........................................................................12
6.2.2. Manual installation ............................................................................................14
6.3. Installing the driver on a Mac ..................................................................................15
6.4. Unistalling the driver................................................................................................17
6.4.1. Uninstalling the driver on a Windows-based PC after installation with
setup32.exe or setup64.exe .......................................................................................17
6.4.2. Manually uninstalling the driver on a Windows-based PC ................................17
6.4.3. Uninstalling the driver on a Mac........................................................................18
7. Configuring the computer to use the VAUGHAN ..............................................................19
7.1. Configuring a PC with Windows XP ........................................................................19
7.1.1. Configuring for Direct Sound with Windows XP ................................................19
7.1.2. Configuring for Kernel Streaming with Windows XP .........................................20
7.1.3. Using VAUGHAN in both Kernel Streaming and Direct Sound mode. .................20
7.2. Configuring a PC with Windows Vista or Windows 7...............................................21
7.2.1. Configuring for Direct Sound with Windows Vista or Windows 7 ......................21
7.2.2. Configuring for Kernel Streaming with Windows Vista or Windows 7 ...............22
7.2.3. Configuring for WASAPI with Windows Vista or Windows 7 .............................22
7.3. Configuring a Mac ...................................................................................................22
8. Configuring the player for Kernel Streaming: some examples .......................................23
8.1. FooBar ....................................................................................................................23
8.2. Winamp and MediaMonkey.....................................................................................23
9. Configuring the player for WASAPI: an example ...........................................................25
9.1. FooBar ....................................................................................................................25
10. Cleaning the unit..........................................................................................................26
11. Tips on using the USB input ........................................................................................26
12. Tips on using the I2S input ...........................................................................................26
13. External clock input......................................................................................................26
14. Stereo and dual mono modes......................................................................................27
15. Power supply, battery and battery charger ..................................................................27
16. Configuration ...............................................................................................................29
16.1. Navigating the menu by the front panel controls ...................................................29
16.2. Navigating the menu by the remote control...........................................................29
16.3. Configuration options and values ..........................................................................29
17. Tecnhical Specifications ..............................................................................................32
Copyright © 2012, M2Tech Srl
4
Page 5

VAUGHAN
384kHz/32bit digital-TO-ANALOG CONVERTER
REVISION 1PrA – MAY 2012
M2Tech
www.m2tech.biz
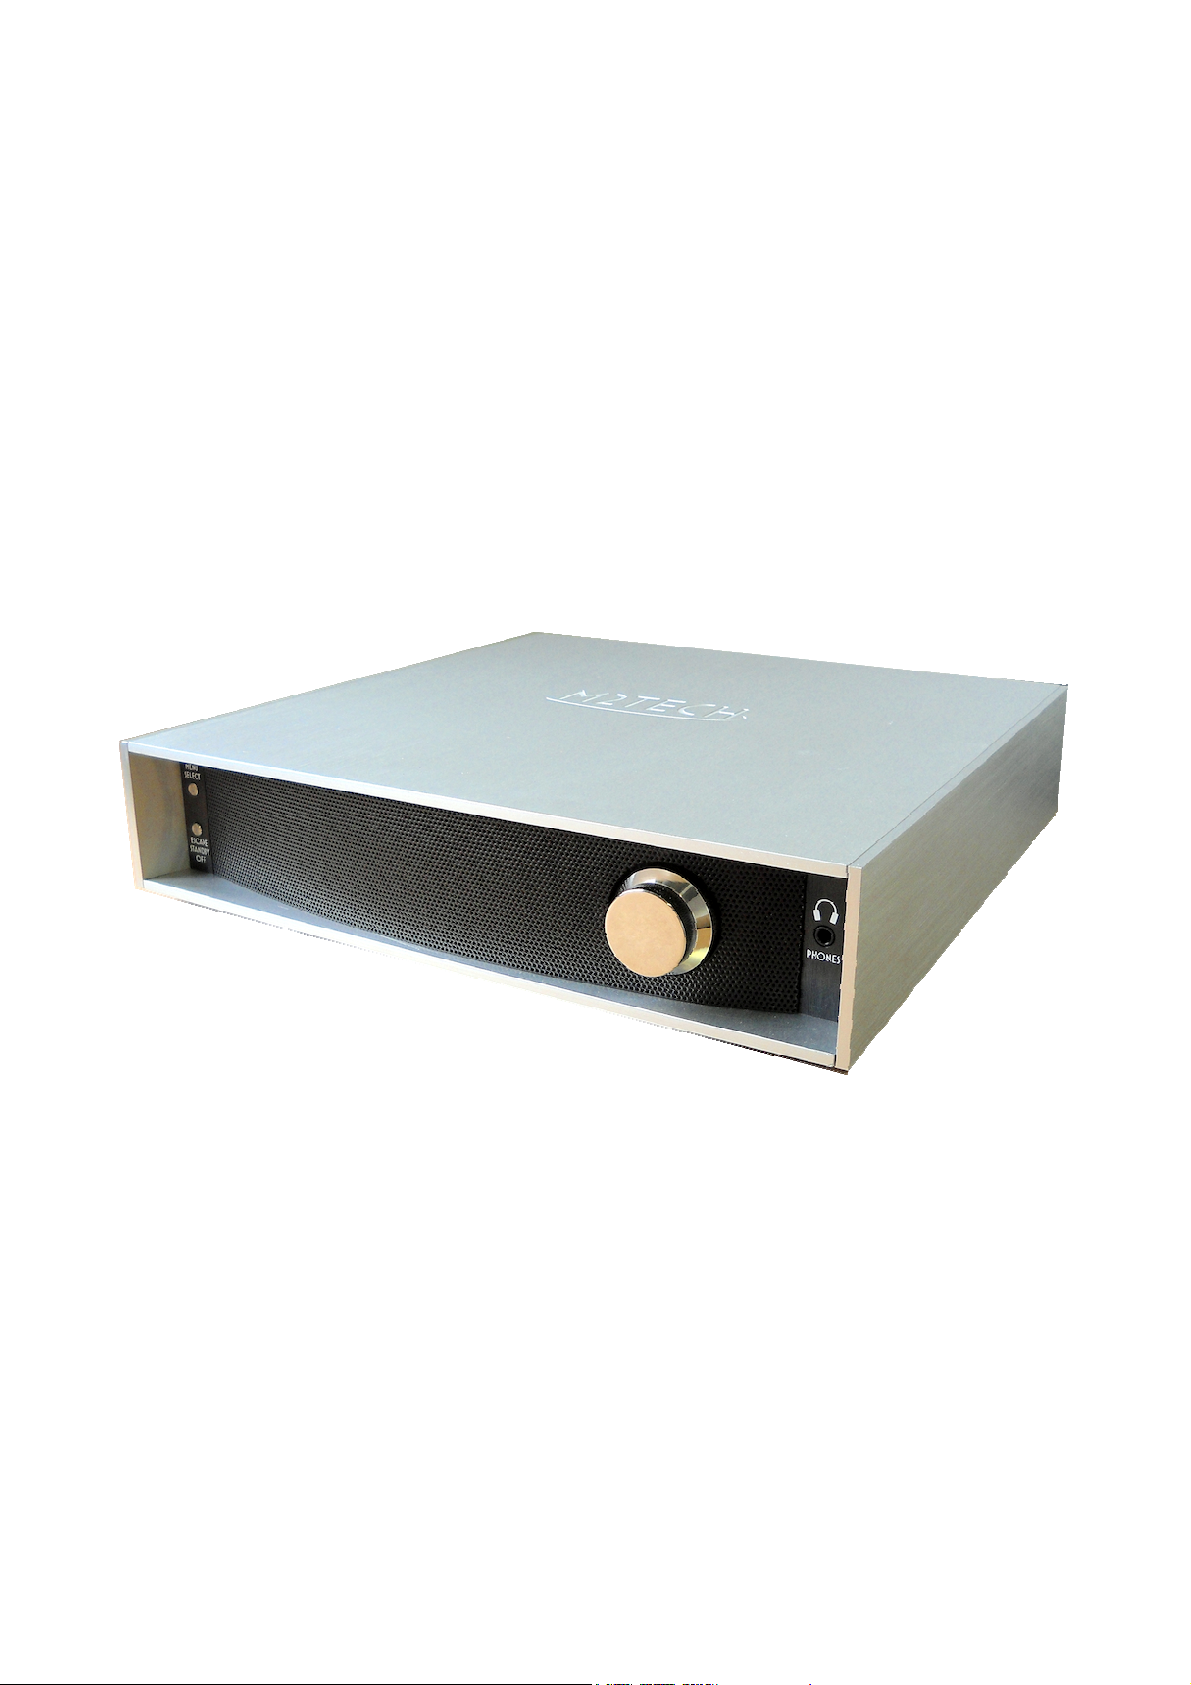
1. Unpacking and placing the unit
Place the carton box on a table and open it by removing or cutting the adhesive tape.
Extract the foam upper cover. You should find the following items:
• one VAUGHAN DAC;
• one mains cord;
• one A-B USB cable;
• one remote control;
• this manual;
• one pair of gloves.
Should one or more items be missing, please contact your dealer or local distributor.
Extract the VAUGHAN from the foam container and place it on a stable base, far from heat
sources. Avoid the direct sunlight on the unit. Allow for enough room around the unit for
venting. The VAUGHAN is a high efficiency design so little heat is produced during normal
operation; anyway, it’s better allow for adequate venting. Avoid smoke, humidity, moisture
and water from reaching the unit.
Do not place the unit on thick carpets or inside a box or piece of furniture, or in close
contact with curtains.
Copyright © 2012, M2Tech Srl
5
Page 6
VAUGHAN
384kHz/32bit digital-TO-ANALOG CONVERTER
REVISION 1PrA – MAY 2012
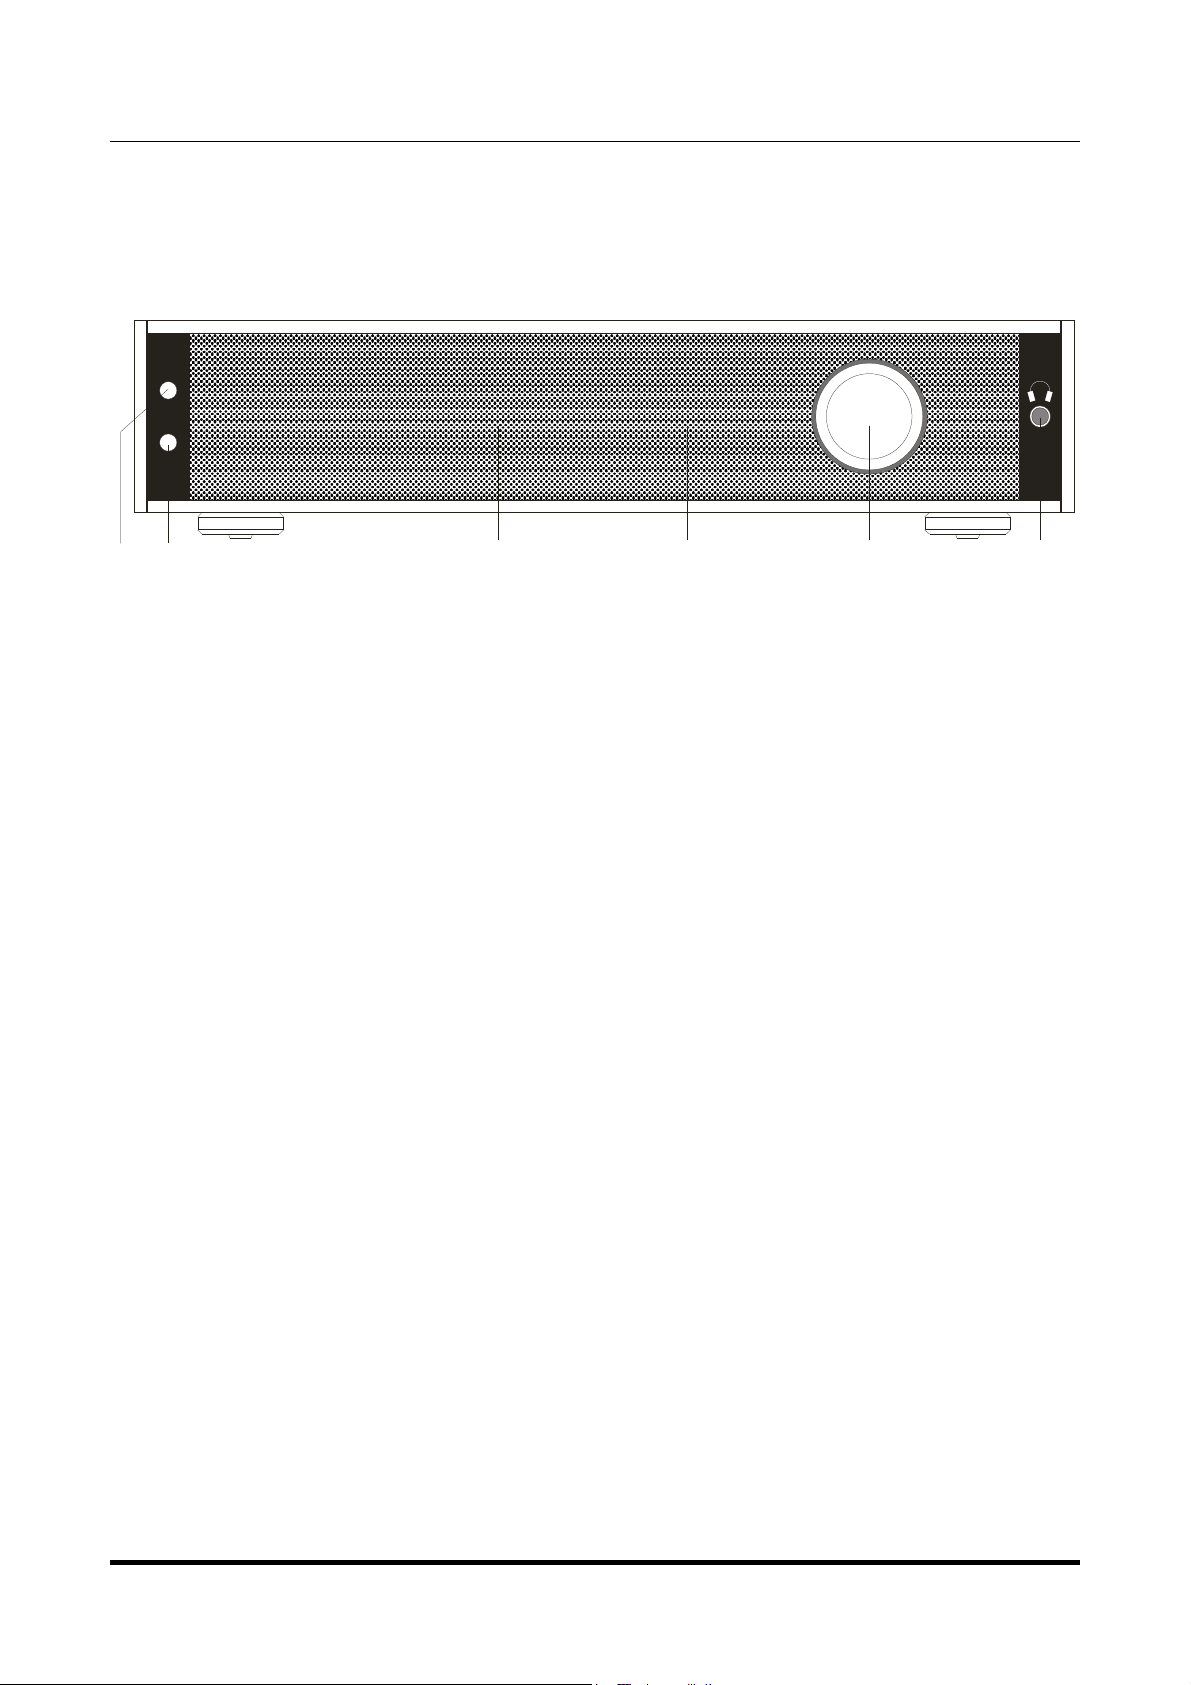
2. Front Panel
Menu
select
ESCAPE
STANDBY
OFF
M2Tech
www.m2tech.biz
PHONES
1 2 3 4 5 6
Figure 1
1) Menu/select button. It is used to access the menu and to select a menu option.
2) Escape/standby/off button. It is used to abort a choice in the menu, to put the unit in
standby and to switch the unit off.
3) Left display. Displays the selected input or the menu item.
4) Right display. Displays sampling frequency or the value for the menu item.
5) Encoder. It is used to set the volume or to scan through menu items values.
6) Headphones output. Connect a headphone jack to this output. 6.35mm (1/4”) stereo
socket.
Copyright © 2012, M2Tech Srl
6
Page 7
VAUGHAN
384kHz/32bit digital-TO-ANALOG CONVERTER
REVISION 1PrA – MAY 2012
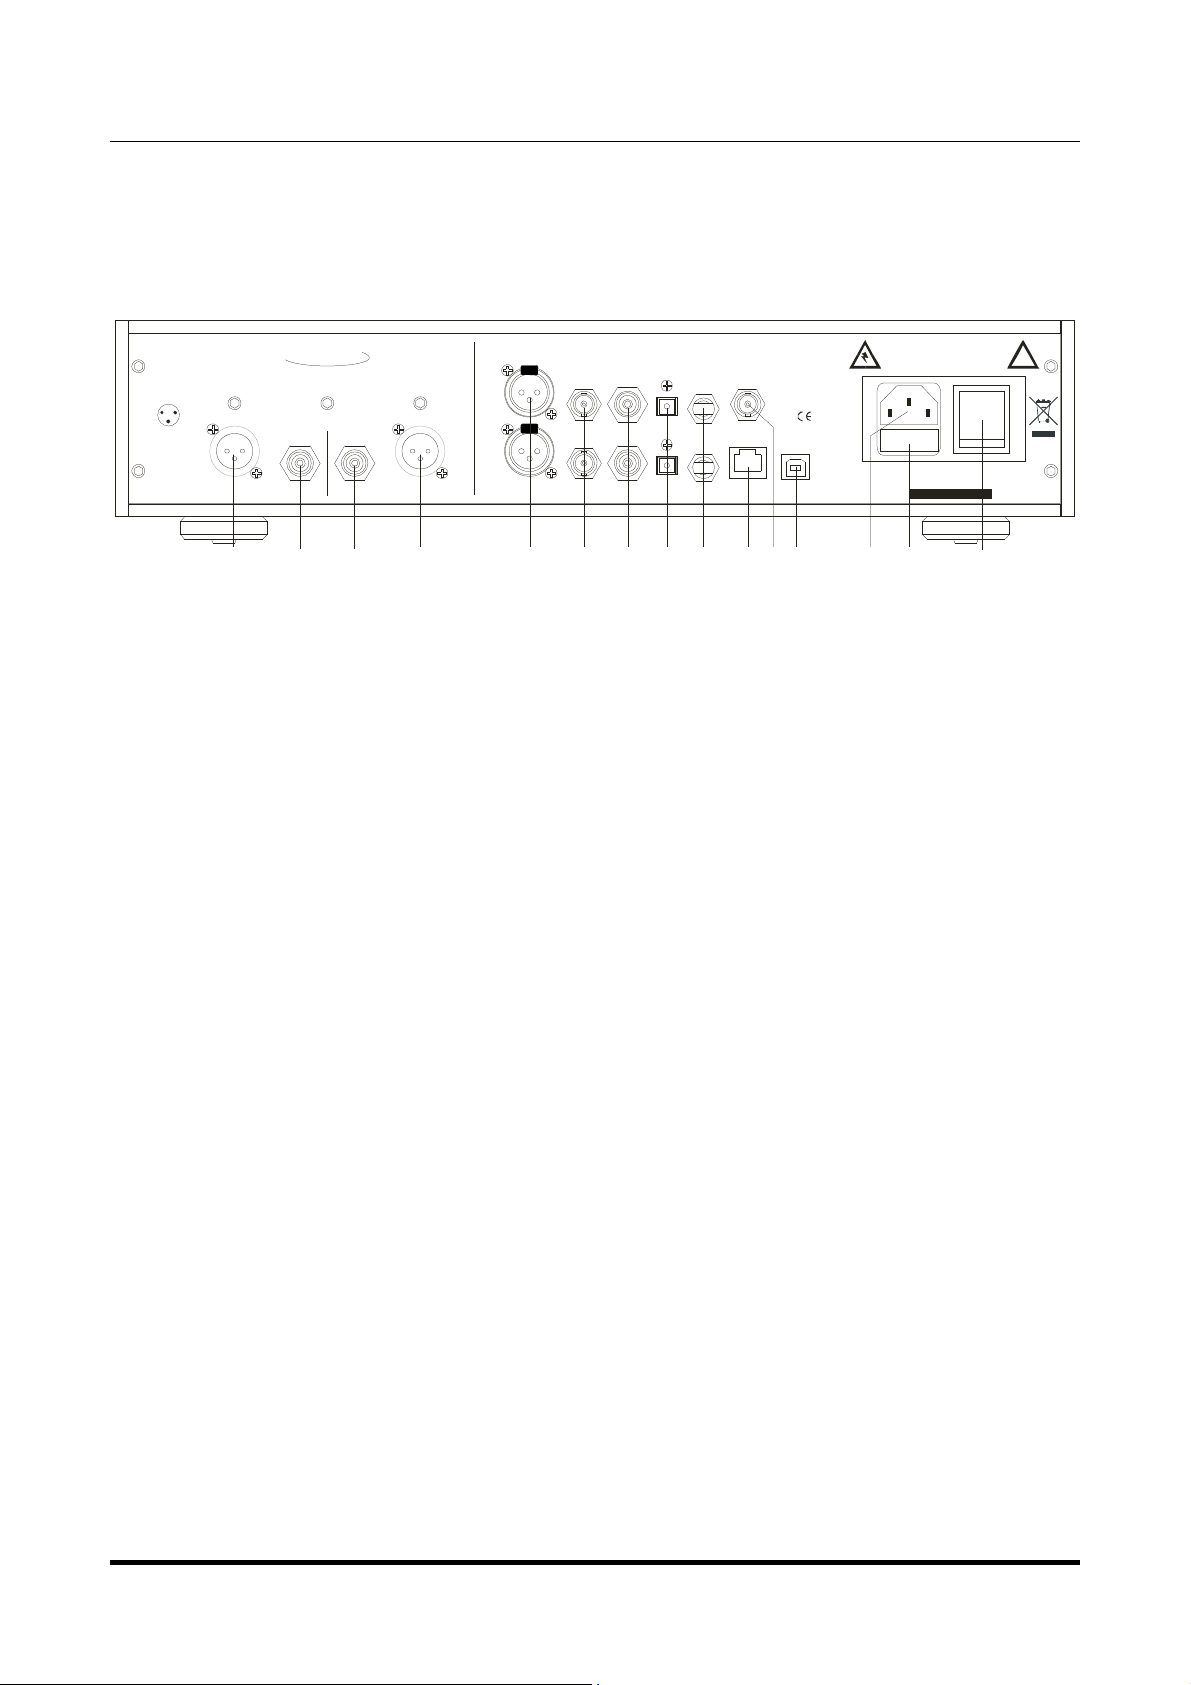
3. Back Panel
M2TECH
VAUGHAN
384 H /32bit D AC
K Z
HOT (+)
GND
COLD (-)
OUTPUTS
RIGHT LEFT
AES/EBU
PUSH
B/R
PUSH
A/L
S/PDIF
INPUTS
TOSLINK
M2Tech
www.m2tech.biz
WARNING!
ELECTRIC SHOCK H AZARD! DO NOT OPEN!
NO USER SERVICEABLE PARTS INSIDE
EXT.
ST
CLOCK
2
I S
MADE IN ITALY
USB 2.0
REFER ALL SERVICING TO QUALIFIED PERSONNEL
RATING: 100-240V AC - 50/60HZ
POWER CONSUMP TION: 75VA
FUSE: 2.5A Slow BLOW
S/N:
!
7 8 78 9 10 11 12 13 14 1516 17 18 19
Figure 2
7) Balanced analog outputs. Connect to a left-right pair of balanced inputs of the
amplifier or preamplifier. XLR male connectors.
8) Single-ended analog outputs. Connect to a left-right pair of single-ended inputs of the
amplifier or preamplifier. RCA female connector.
9) AES/EBU digital inputs. Accepts AES/EBU datastreams in either professional or
consumer format. Can be configured as two stereo inputs or one dual-mono input. XLR
female connector.
10) S/PDIF BNC digital inputs. Accept S/PDIF datastreams. Can be configured as two
stereo inputs or one dual-mono input. True 75 Ohms BNC female connectors
11) S/PDIF RCA digital inputs. Accept S/PDIF datastreams. Can be configured as two
stereo inputs or one dual-mono input. RCA female connectors
12) ToslinkTM optical digital input. Optical input for ToslinkTM cables. Can be configured
as two stereo inputs or one dual-mono input. ToslinkTM connector.
13) STTM optical digital input. Optical input for STTM cables. Can be configured as two
stereo inputs or one dual-mono input. STTM connector.
14) I2S input. Accepts I2S audio signals. RJ45 8-pole female connector with M2Tech
proprietary pinout (see Section 12 on Page 26).
15) External clock input. Accepts both master clocks and word clocks with automatic
detection (see Section 13 on Page 26). True 75 Ohm BNC female connector.
16) USB 2.0 input. Connect to a PC or MacIntosh with an USB 2.0 compliant A-B cable.
USB 2.0 B female connector.
Copyright © 2012, M2Tech Srl
7
Page 8

VAUGHAN
384kHz/32bit digital-TO-ANALOG CONVERTER
REVISION 1PrA – MAY 2012
17) IEC mains input. Connect the power cord provided with the unit or any other power
cord provided with IEC 3-prong female connector.
18) Fuse holder. Contains two 2A thermal 5x20mm fuses. One is in service while the
other is for spare.
19) Power Switch. It’s a temporary (monostable) rocker switch. It automatically reverts to
the off position after the user release it. Operate it for a few seconds to switch the unit on.
(see Section 5 on Page 10).
M2Tech
www.m2tech.biz
Copyright © 2012, M2Tech Srl
8
Page 9
VAUGHAN
384kHz/32bit digital-TO-ANALOG CONVERTER
REVISION 1PrA – MAY 2012
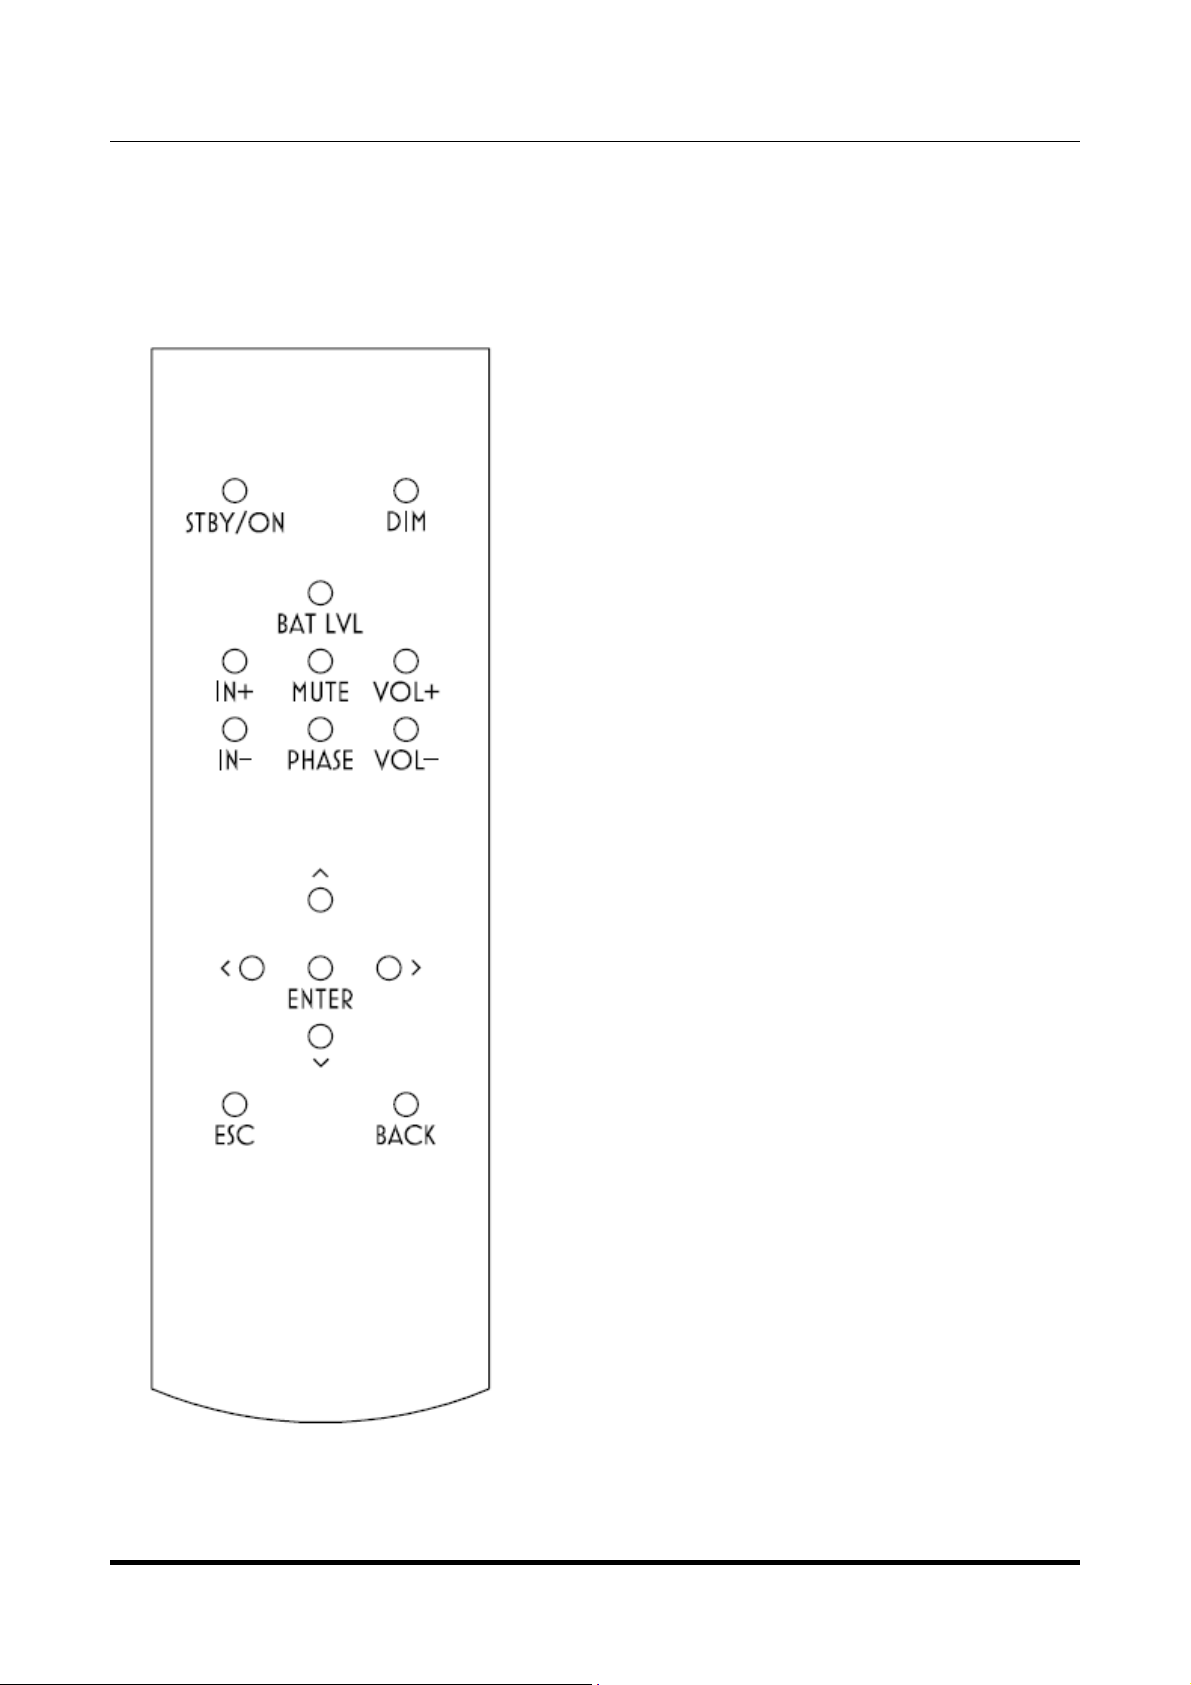
4. Remote Control
Figure 3
M2Tech
www.m2tech.biz
Stby/On. Activates the unit when it’s in
standby and puts it in standby when it’s on.
Dim. .Allows for choosing 6 different intensity
levels for the display, plus an “auto” mode in
which the display is always off, except for a
few seconds after a command is sent to the
unit.
Bat Lvl. Displays the battery status on the
display.
In+ and In-. Allow for sequentially choose the
input.
Mute. Toggles mute on and off. Mute is 20dB
attenuation over the set volume level.
Phase. Toggles output signal phase between
0° and 180°. Useful to restore absolute
phase of certain recordings made with
inverted phase
Vol+ and Vol-. Allow for setting the volume,
except when the volume control is disabled.
Arrows and Enter. Allow for navigating the
menu.
Esc. Exits the menu without changing the
displayed option.
Back. Recalls the active value of the
displayed option.
Note: the remote control is powered by two
AAA type batteries. To replace them,
unscrew the screw that holds the bottom
cover and open it by sliding it to the back.
Please pay attention: when the bottom cover
is extracted, the front grill may fall down.
Copyright © 2012, M2Tech Srl
9
Page 10

VAUGHAN
384kHz/32bit digital-TO-ANALOG CONVERTER
REVISION 1PrA – MAY 2012
M2Tech
www.m2tech.biz
5. Connecting and powering the unit
ADVICE: all connections to other equipment in the system must be done when all
equipment are off. Failing to comply to this advice may expose the VAUGHAN to the
risk of damages.
Please refer to section 3, “Back Panel Description”.
Connect the “B” plug of a 2.0 USB A-B cable to the USB connector (Figure 2, 16) of the
VAUGHAN.
Connect the “A” plug of the cable to a 2.0 USB port of your computer.
Connect two interconnects to the balanced or single-ended analog outputs of the VAUGHAN
(Figure 2, 7/8) and to the input of your amplifier/preamplifier.
Connect digital cables from your digital sources (CD player, DAT tape recorder,
DAB/DVB/sat tuner) to the VAUGHAN’s digital inputs (Figure 2, 9-14).
If needed, connect a clock generator to the external clock input (Figure 2, 15).
Connect the power cord to the supply connector (Figure 2, 17) of the VAUGHAN. Then,
connect the mains plug of the power cord to the wall outlet.
Now, operate the mains switch (Figure 2, 19) for a couple of seconds to activate the unit.
After releasing it, it will revert to the off position: this is a normal and desired
behaviour. In fact, after the initial operation by the user, necessary to activate the
unit, The VAUGHAN will take control of the mains supply.
If the selected input is “USB” and a driver hasn’t been installed on your computer, an
automatic driver installation wizard may appear.
Note: If you want to avoid the automatic driver installation, please connect the
VAUGHAN to the computer after manually installing the driver (see Section 6.2.2).
5.1. Standby and power off
Once the VAUGHAN is active, it’s possible to put it in standby pressing the
“Escape/Standby/off” button on the front panel for two seconds or the “Stby” button on the
remote control. The unit enters a low consumption mode and eventually starts a battery
charge. The unit can be reactivated by pressing the “Escape/Standby/off” button again.
While entering the standby, the unit stores its working configuration in its non-volatile
memory.
When a long idle period if planned, to avoid wasting battery charge cycles it’s wise to
completely switch the unit off. This is allowed by pressing the “Escape/Standby/off” for at
Copyright © 2012, M2Tech Srl
10
Page 11

VAUGHAN
384kHz/32bit digital-TO-ANALOG CONVERTER
REVISION 1PrA – MAY 2012
least four seconds. This way the battery is totally isolated. To switch the unit on again its is
necessary to operate the rear panel rocker switch (Figure 2, 19, Page 7).
For continuous or nearly continuous operation, it is recommended to set the power mode
in “Auto” (Section 16.3, page 31), to ensure the longest life possible to the battery.
M2Tech
www.m2tech.biz
Copyright © 2012, M2Tech Srl
11
Page 12

VAUGHAN
384kHz/32bit digital-TO-ANALOG CONVERTER
REVISION 1PrA – MAY 2012
M2Tech
www.m2tech.biz
6. Driver installation
6.1. Obtaining the driver
The drivers for the VAUGHAN are the same as the Young’s and are available on the M2Tech
website, in the download page (www.m2tech.biz/download.asp). Download the driver you
need for your computer and operating system. Windows drivers are contained in zip files,
Mac drivers are contained in dmg files encapsulated in zip files.
6.2. Installing the driver on a Windows-based PC
Create a temporary folder in the hard disk of your computer (you can even create it on the
desktop). Then, double-click on the zip file to open it. Select and drag all files in the
temporary folder: this automatically unzips all files.
6.2.1. Automatic (guided) installation
Activate the VAUGHAN, select the USB input and connect it to the PC. Following the
negotiation process, the driver installation wizard is automatically launched. Select the
option “Not now”, as in Figure 4.
Figure 4
Copyright © 2012, M2Tech Srl
12
Page 13

VAUGHAN
384kHz/32bit digital-TO-ANALOG CONVERTER
REVISION 1PrA – MAY 2012
Click on the button to proceed. A window appears as shown in figure 5:
M2Tech
www.m2tech.biz
Figure 5
Choose automatic installation (as recommended) and proceed to next step. Indicate the
folder where you have previously unzipped the driver and proceed to installation. The
window shown in figure 6 will appear:
Figure 6
Copyright © 2012, M2Tech Srl
13
Page 14
VAUGHAN
384kHz/32bit digital-TO-ANALOG CONVERTER
REVISION 1PrA – MAY 2012
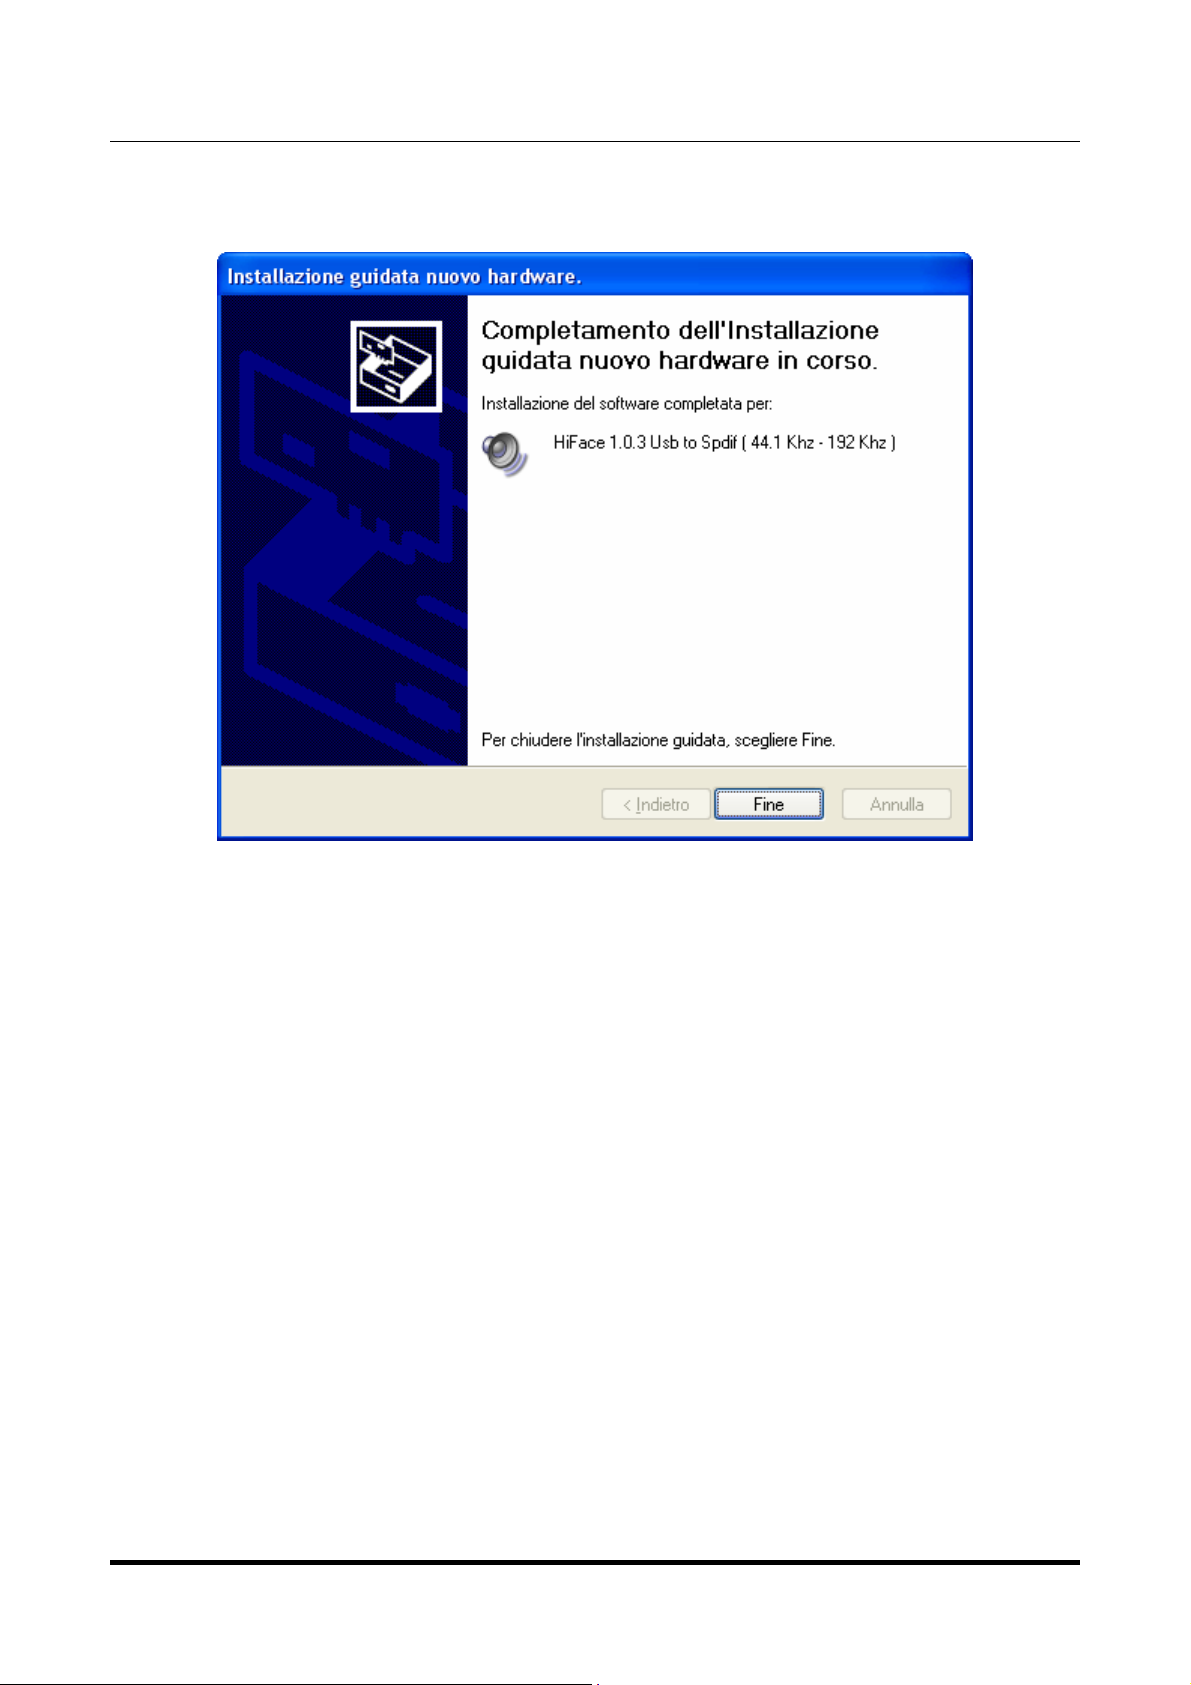
Click on Continue. The installation will proceed to the end. The window shown in figure 7
will appear. Click on Finish to complete the driver installation.
M2Tech
www.m2tech.biz
Figure 7
Note: the wizard appearance and the guided installation procedure may slightly vary
from XP to Vista to Windows 7.
6.2.2. Manual installation
Sometimes it’s necessary or advisable to install the driver manually. The installation
package offers two installation utilities, “setup32.exe” and “setup64.exe”. The former is for
32 bits operating systems, while the latter is for 64 bits operating systems. Without
connecting the VAUGHAN to the PC, double-click on either “setup64.exe” or “setup32.exe”,
depending on your operating system: the driver will be installed in your PC.
Copyright © 2012, M2Tech Srl
14
Page 15

VAUGHAN
384kHz/32bit digital-TO-ANALOG CONVERTER
REVISION 1PrA – MAY 2012
M2Tech
www.m2tech.biz
6.3. Installing the driver on a Mac
Double-click on the zip file to open it. It contains a single dmg file. Extract it from the zip
and double-click on it to open it. It only contains a pkg file. Double click on it to start driver
installation. The window shown in figure 8 will appear.
Figure 8
Click on the Continue button. The installation process will go on and the window in figure 9
will appear.
Figure 9
Copyright © 2012, M2Tech Srl
15
Page 16
VAUGHAN
384kHz/32bit digital-TO-ANALOG CONVERTER
REVISION 1PrA – MAY 2012
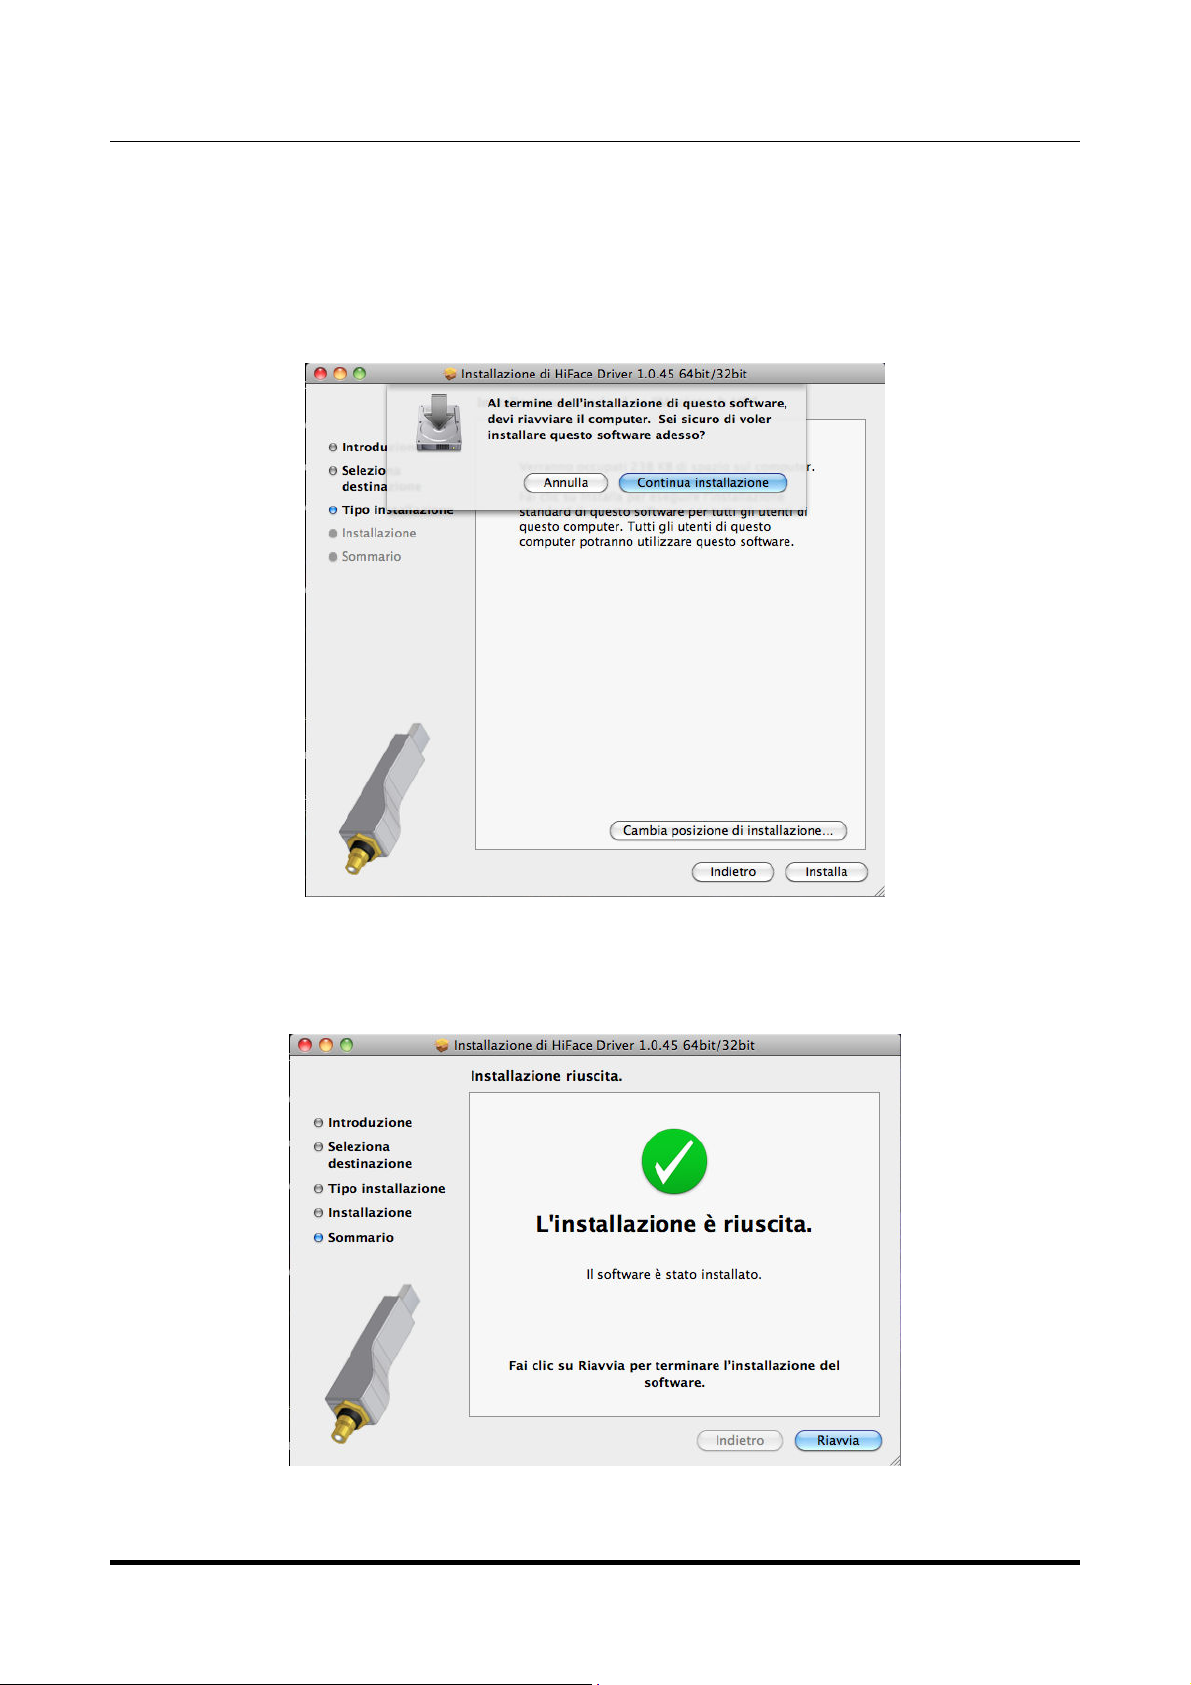
Select “Install for all users”, then click on Continue button. Another window will appear as
in figure 10 and you’ll be asked to type in the administrator password. After doing that, the
installation process will continue and you’ll be asked for a confirmation to continue the
process up to the computer restart. Click on Continue Installation button.
The installation will continue until the final window will appear, announcing the successful
installation of the driver.
M2Tech
www.m2tech.biz
Figure 10
Click on Restart button to complete the installation process as indicated in figure 11.
Figure 11
Copyright © 2012, M2Tech Srl
16
Page 17
VAUGHAN
384kHz/32bit digital-TO-ANALOG CONVERTER
REVISION 1PrA – MAY 2012
M2Tech
www.m2tech.biz
6.4. Unistalling the driver
Sometimes it is necessary to uninstall the driver to roll back to a previous version. Uninstall
is a quite simple procedure which depends on the operating system and the way the driver
was installed.
6.4.1. Uninstalling the driver on a Windows-based PC after installation with
setup32.exe or setup64.exe
Go to the control panel and launch the “Application Installation” utility.
Look for the VAUGHAN driver item in the list.
Double-click on it to launch uninstalling.
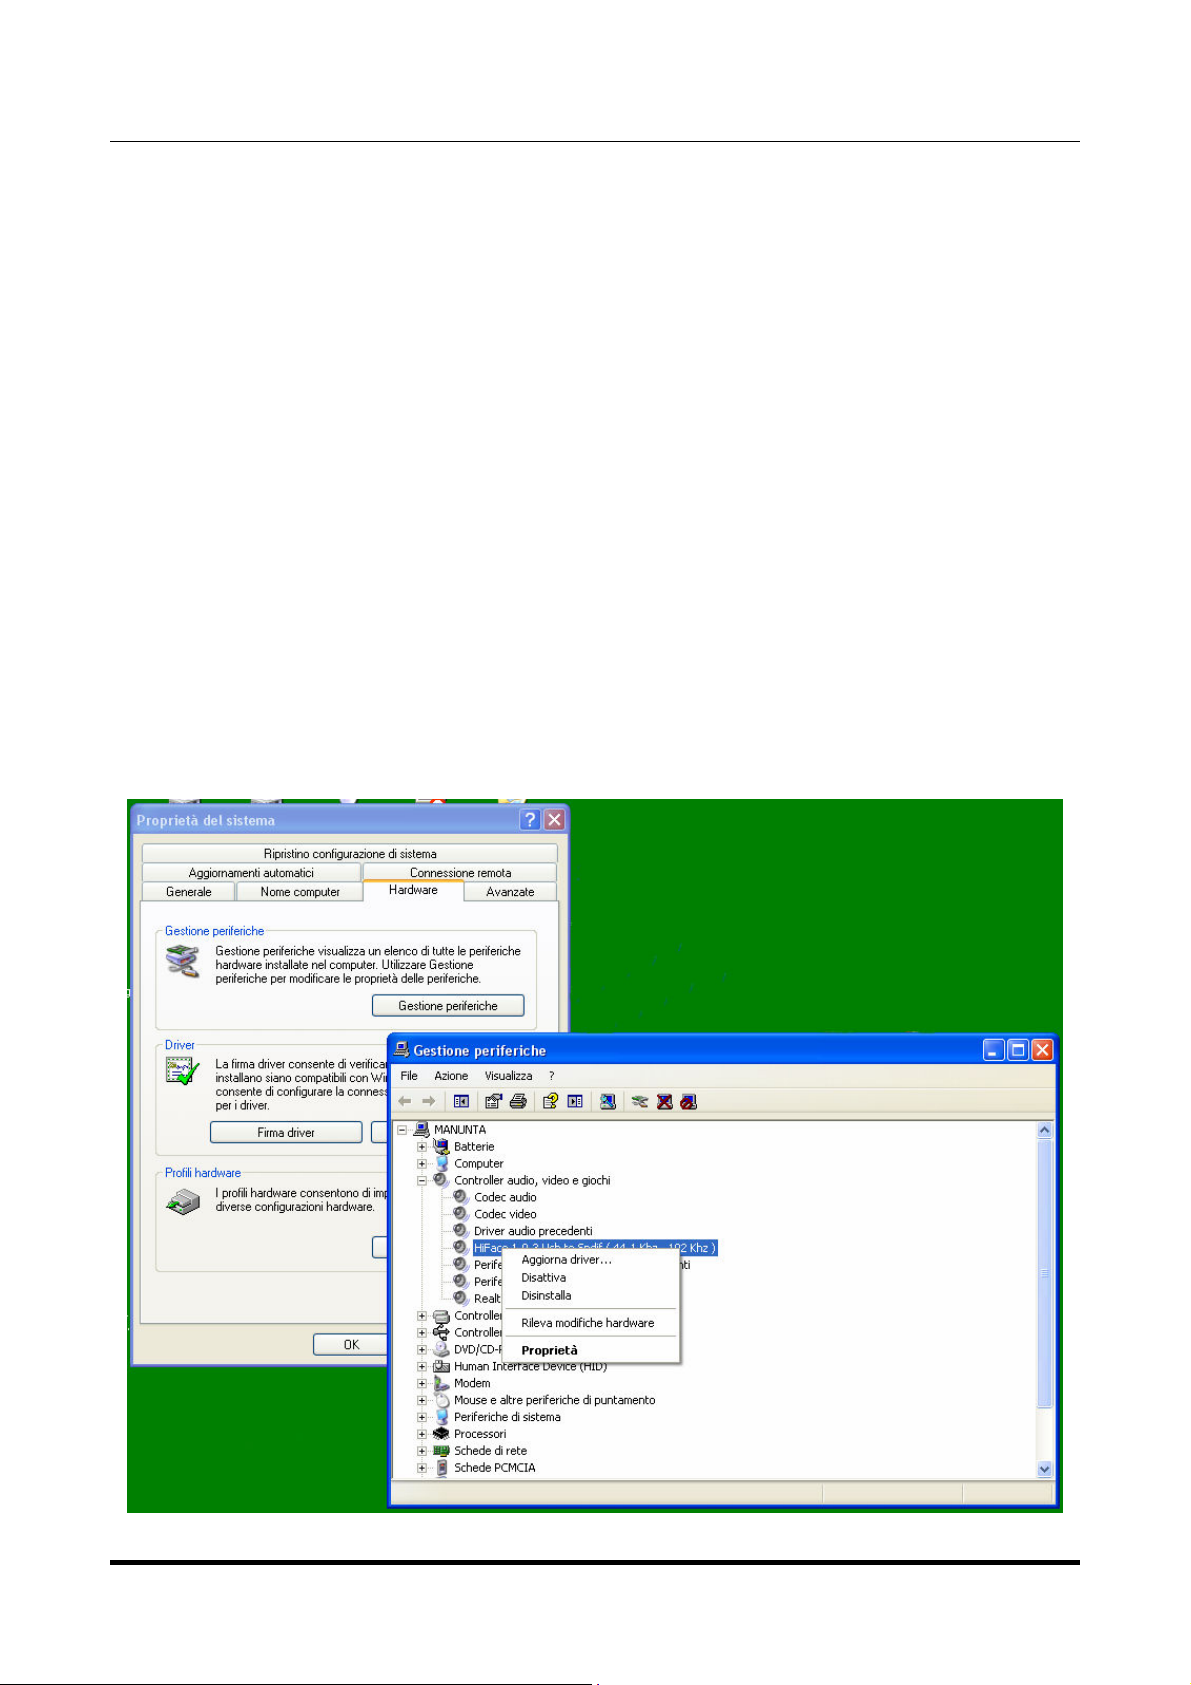
6.4.2. Manually uninstalling the driver on a Windows-based PC
Connect the VAUGHAN to the PC and select the USB input.
Go to the control panel and launch the “System” utility, then select Hardware tab. Open the
Peripehral Management window (see figure 12).
You’ll find Young listed under Audio, Video and Game controllers.
Figure 12
Copyright © 2012, M2Tech Srl
17
Page 18

VAUGHAN
384kHz/32bit digital-TO-ANALOG CONVERTER
REVISION 1PrA – MAY 2012
Right-click to access the available actions.
Select “Uninstall”.
6.4.3. Uninstalling the driver on a Mac
Open a console, then type the following commands:
sudo mv /System/Library/Extensions/Young.kext /tmp
sudo touch /System/Library/Extensions
sudo pkgutil --forget com.m2tech.driver
Then, restart the Mac.
M2Tech
www.m2tech.biz
Copyright © 2012, M2Tech Srl
18
Page 19
VAUGHAN
384kHz/32bit digital-TO-ANALOG CONVERTER
REVISION 1PrA – MAY 2012
M2Tech
www.m2tech.biz
7. Configuring the computer to use the VAUGHAN
VAUGHAN
VAUGHANVAUGHAN
7.1. Configuring a PC with Windows XP
A PC with Windows XP can use the VAUGHAN in two different ways: Direct Sound (DS) and
Kernel Streaming (KS). The former is suitable for players which can’t operate in Kernel
Streaming mode (such as Windows Media Player and iTunes) or for Internet streaming,
while the latter can be chosen (for better performance) with players which can operate in
Kernel Streaming mode (such as FooBar, Winamp, Monkey Media, JRiver).
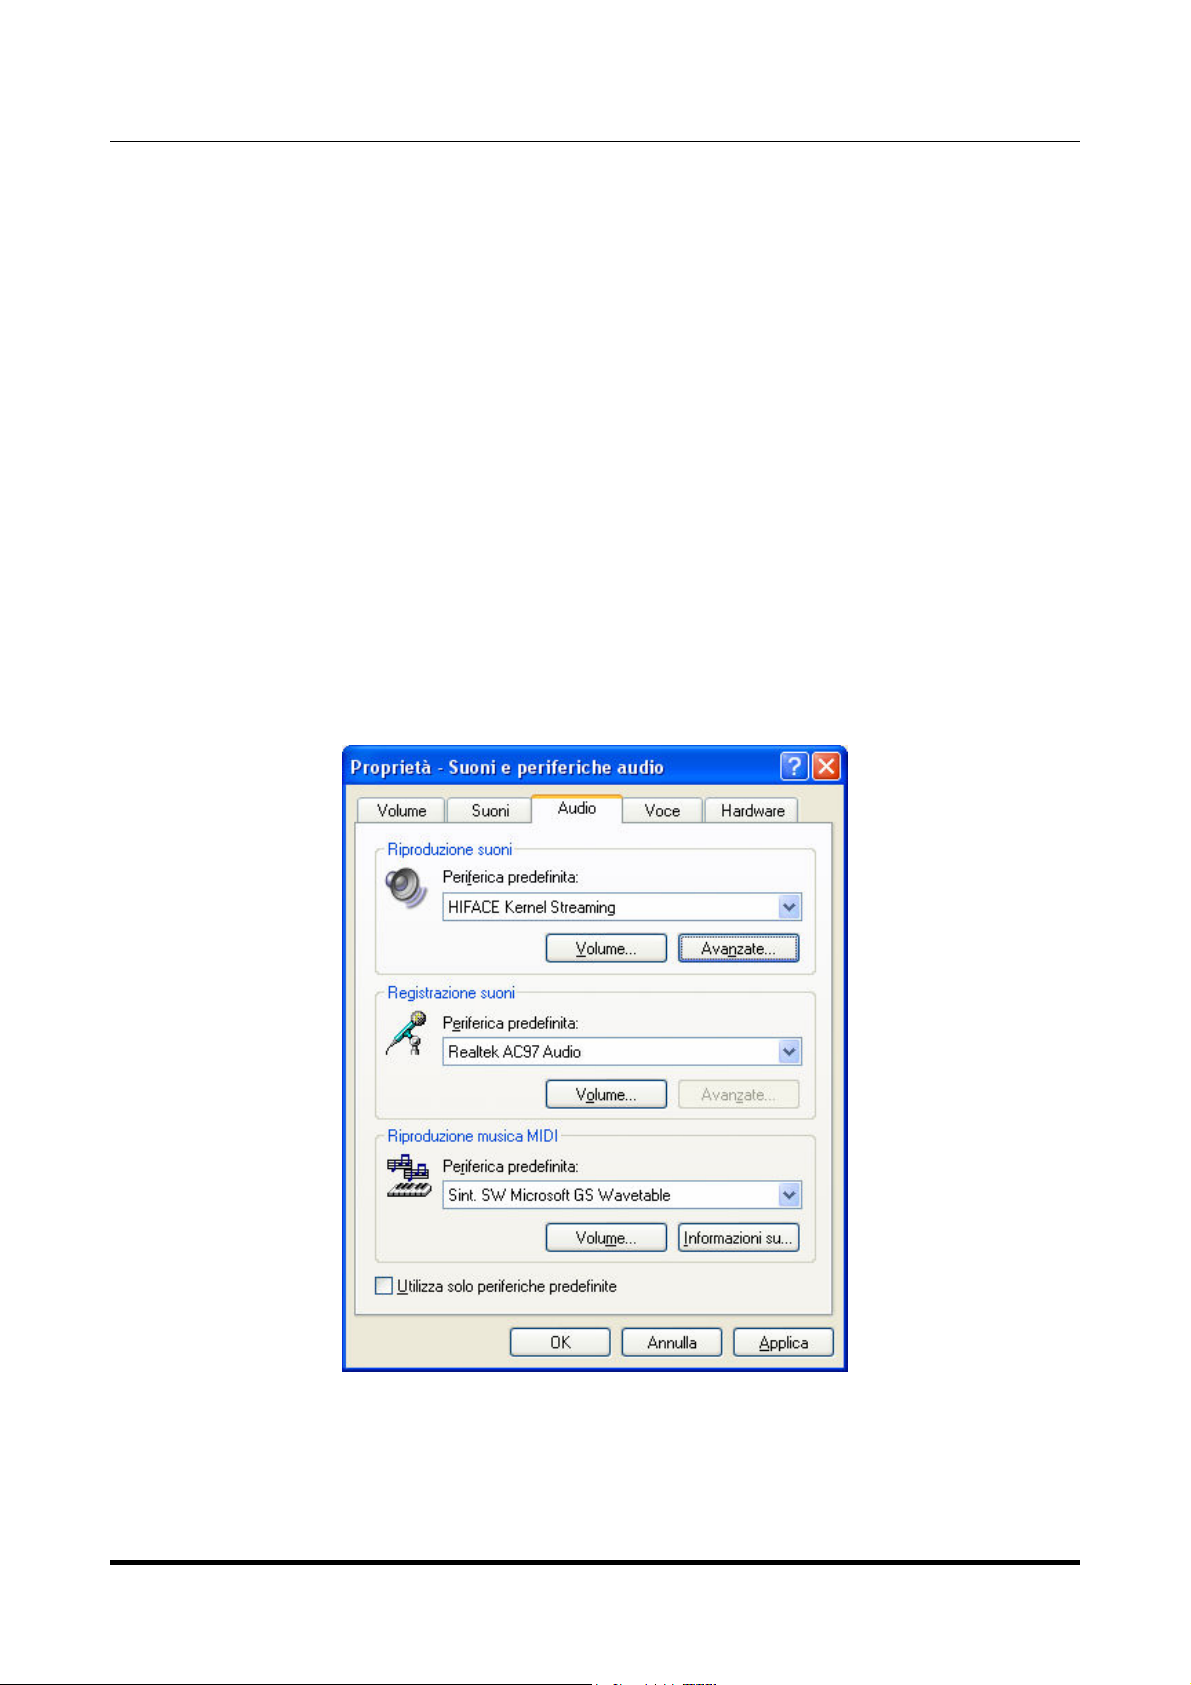
7.1.1. Configuring for Direct Sound with Windows XP
Connect the VAUGHAN to your PC and select the USB input. Then, go to the Control Panel
and launch the Sound and Audio Peripherals utility.
Select the Audio tab. In the Predefined Peripheral drop-down menu of the Playback area,
select “KS M2Tech 384/32 DAC” (see figure 13).
Figure 13
Then, select the “Voice” Tab. Again, select “Young Kernel Streaming” in the drop-down
menu of the Playback area. Click on OK button. Please be adviced that even if the
Copyright © 2012, M2Tech Srl
19
Page 20

VAUGHAN
384kHz/32bit digital-TO-ANALOG CONVERTER
REVISION 1PrA – MAY 2012
peripheral is listed as “kernel streaming”, it will operate in Direct Sound mode when listed
here.
From now on, unless the VAUGHAN is disconnected or settings are changed again,
VAUGHAN is the audio peripheral all audio programs will use when operating in direct sound
mode.
M2Tech
www.m2tech.biz
7.1.2. Configuring for Kernel Streaming with Windows XP
Kernel Streaming has no standard setting in Windows XP. KS must be selected in the
specific player you choose to use.
For example, when using FooBar, with VAUGHAN connected to the PC and USB input
selected, go to the File/Preferences/Playback /Output tab and select “KS: M2Tech 384/32
DAC” as output device. Other players will require different settings (see section 8).
7.1.3. Using VAUGHAN
When VAUGHAN is selected as predefined audio peripheral, it’s possible to use it in Kernel
Streaming mode, too, with a caveat. When using it in KS mode, it is necessary that no
other application accesses the VAUGHAN in DS mode. If this happens, Windows XP’s
Kernel Mixer takes control of VAUGHAN’s driver and from then on, no KS application can
access the VAUGHAN unless the PC is restarted or the VAUGHAN connection to the PC is
cycled or another input is selected on the VAUGHAN, then returning on the USB input.
20
VAUGHAN in both Kernel Streaming and Direct Sound mode.
VAUGHANVAUGHAN
Copyright © 2012, M2Tech Srl
Page 21
VAUGHAN
384kHz/32bit digital-TO-ANALOG CONVERTER
REVISION 1PrA – MAY 2012
M2Tech
www.m2tech.biz
7.2. Configuring a PC with Windows Vista or Windows 7
A PC with Windows Vista or Windows 7 can use the VAUGHAN in three different ways:
Direct Sound (DS), Kernel Streaming (KS) and WASAPI. DS is suitable for players which
can’t operate in Kernel Streaming mode nor with WASAPI or for Internet streaming; KS
can be chosen (for better performance) with players which can operate in Kernel
Streaming mode (such as FooBar, Winamp, Monkey Media, JRiver). WASAPI (Windows
Audio Standard API) is a standard interface for audio players which allows to get the same
performance of KS with applications which can’t operate in KS mode, at the cost of higher
CPU load.
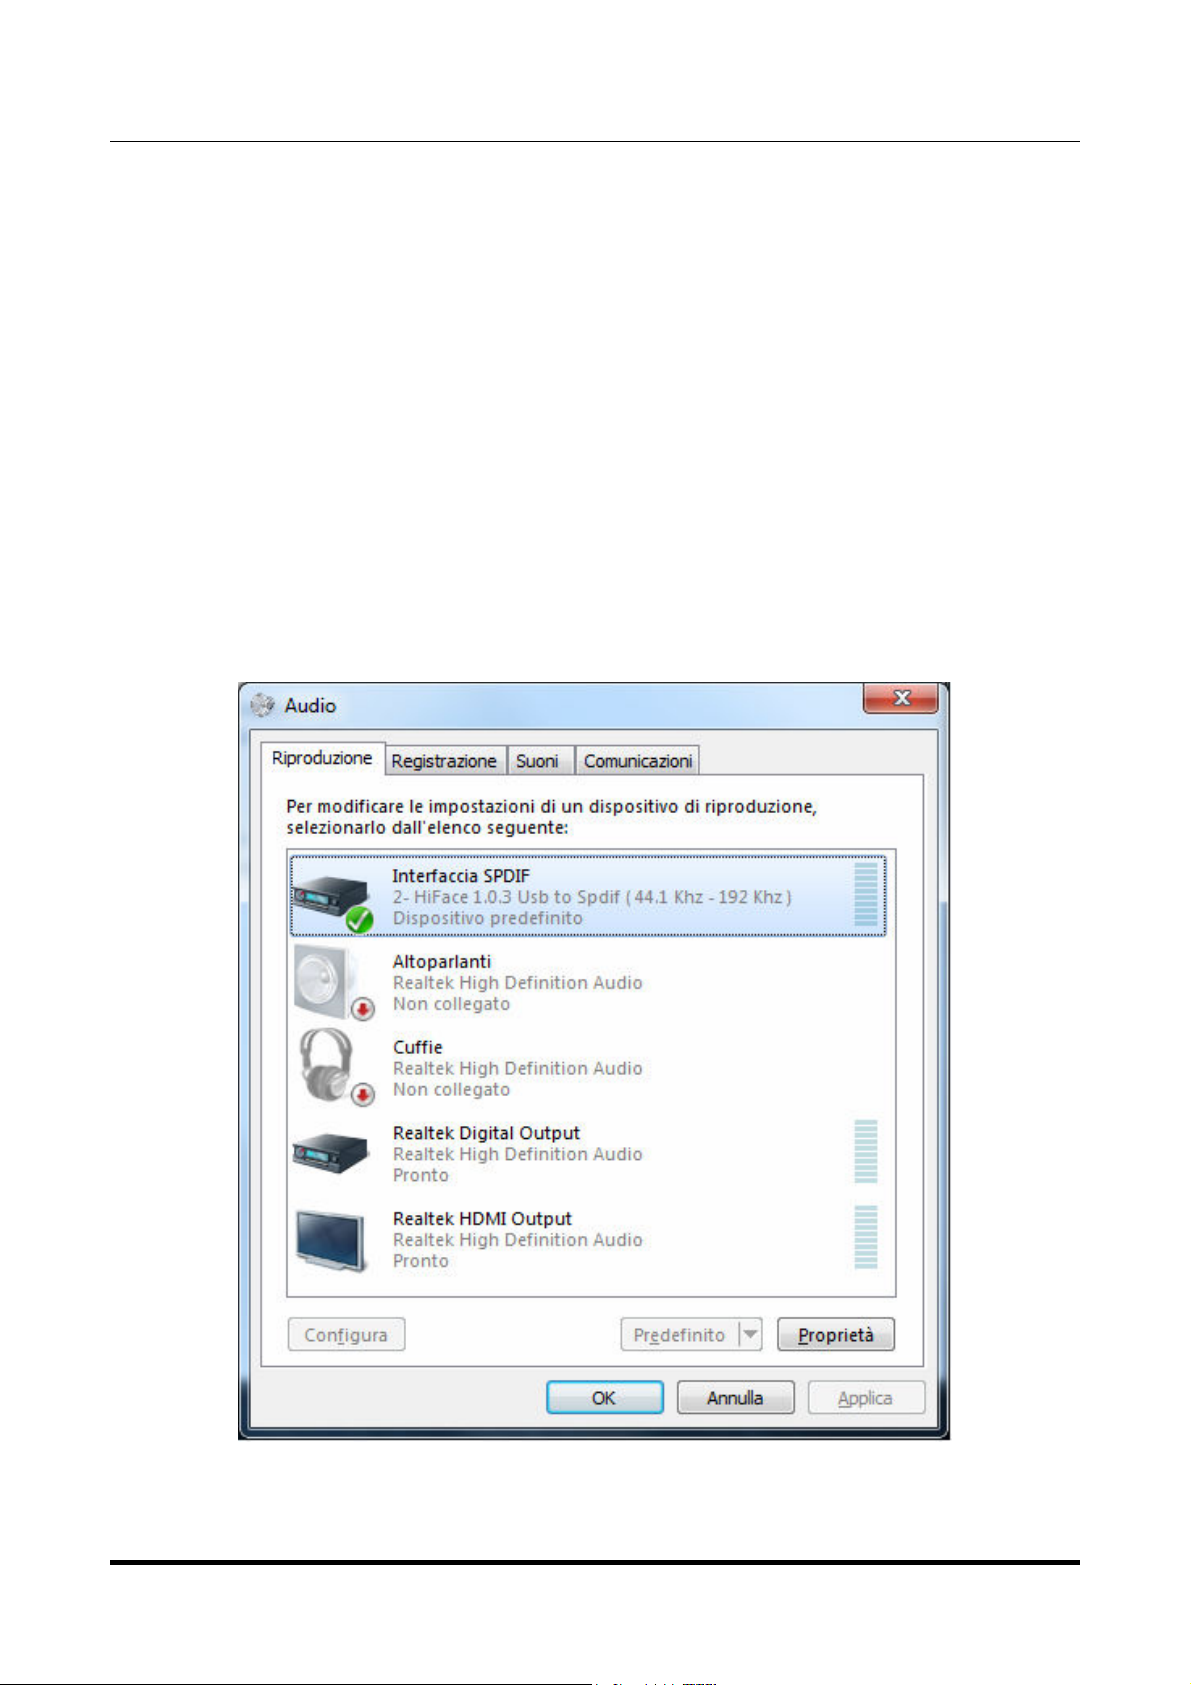
7.2.1. Configuring for Direct Sound with Windows Vista or Windows 7
Open control Panel and select Hardware and Sounds. Under Audio, click on Manage
Audio Devices. The following windows will appear, in which Young is listed. Set Young as
predefined device. Then, click on OK.
Figure 14
Copyright © 2012, M2Tech Srl
21
Page 22

VAUGHAN
384kHz/32bit digital-TO-ANALOG CONVERTER
REVISION 1PrA – MAY 2012
M2Tech
www.m2tech.biz
7.2.2. Configuring for Kernel Streaming with Windows Vista or Windows 7
As for Windows XP, Kernel Streaming has no standard setting in Windows Vista and
Windows 7. KS must be selected in the specific player you choose to use.
For example, when using FooBar, with the VAUGHAN connected to the PC and USB input
selected, go to the File/Preferences/Playback /Output tab and select “KS: M2Tech 384/32
DAC” as output device. Other players will require different settings (see section 8).
7.2.3. Configuring for WASAPI with Windows Vista or Windows 7
As happens with Kernel Streaming, WASAPI cannot be directly accessed. WASAPI must
be selected in the specific player you choose to use.
For example, when using FooBar, with the Young connected to the PC, go to the
File/Preferences/Playback /Output tab and select “WASAPI: M2Tech 384/32 DAC” as
output device. Other players will require different settings (see section 8).
7.3. Configuring a Mac
Go to System Preferences and select Sounds. The following windows will appear. Select
M2Tech 384/32 DAC for output as indicated in Figure 15.
Figure 15
Copyright © 2012, M2Tech Srl
22
Page 23
VAUGHAN
384kHz/32bit digital-TO-ANALOG CONVERTER
REVISION 1PrA – MAY 2012
M2Tech
www.m2tech.biz
8. Configuring the player for Kernel Streaming: some examples
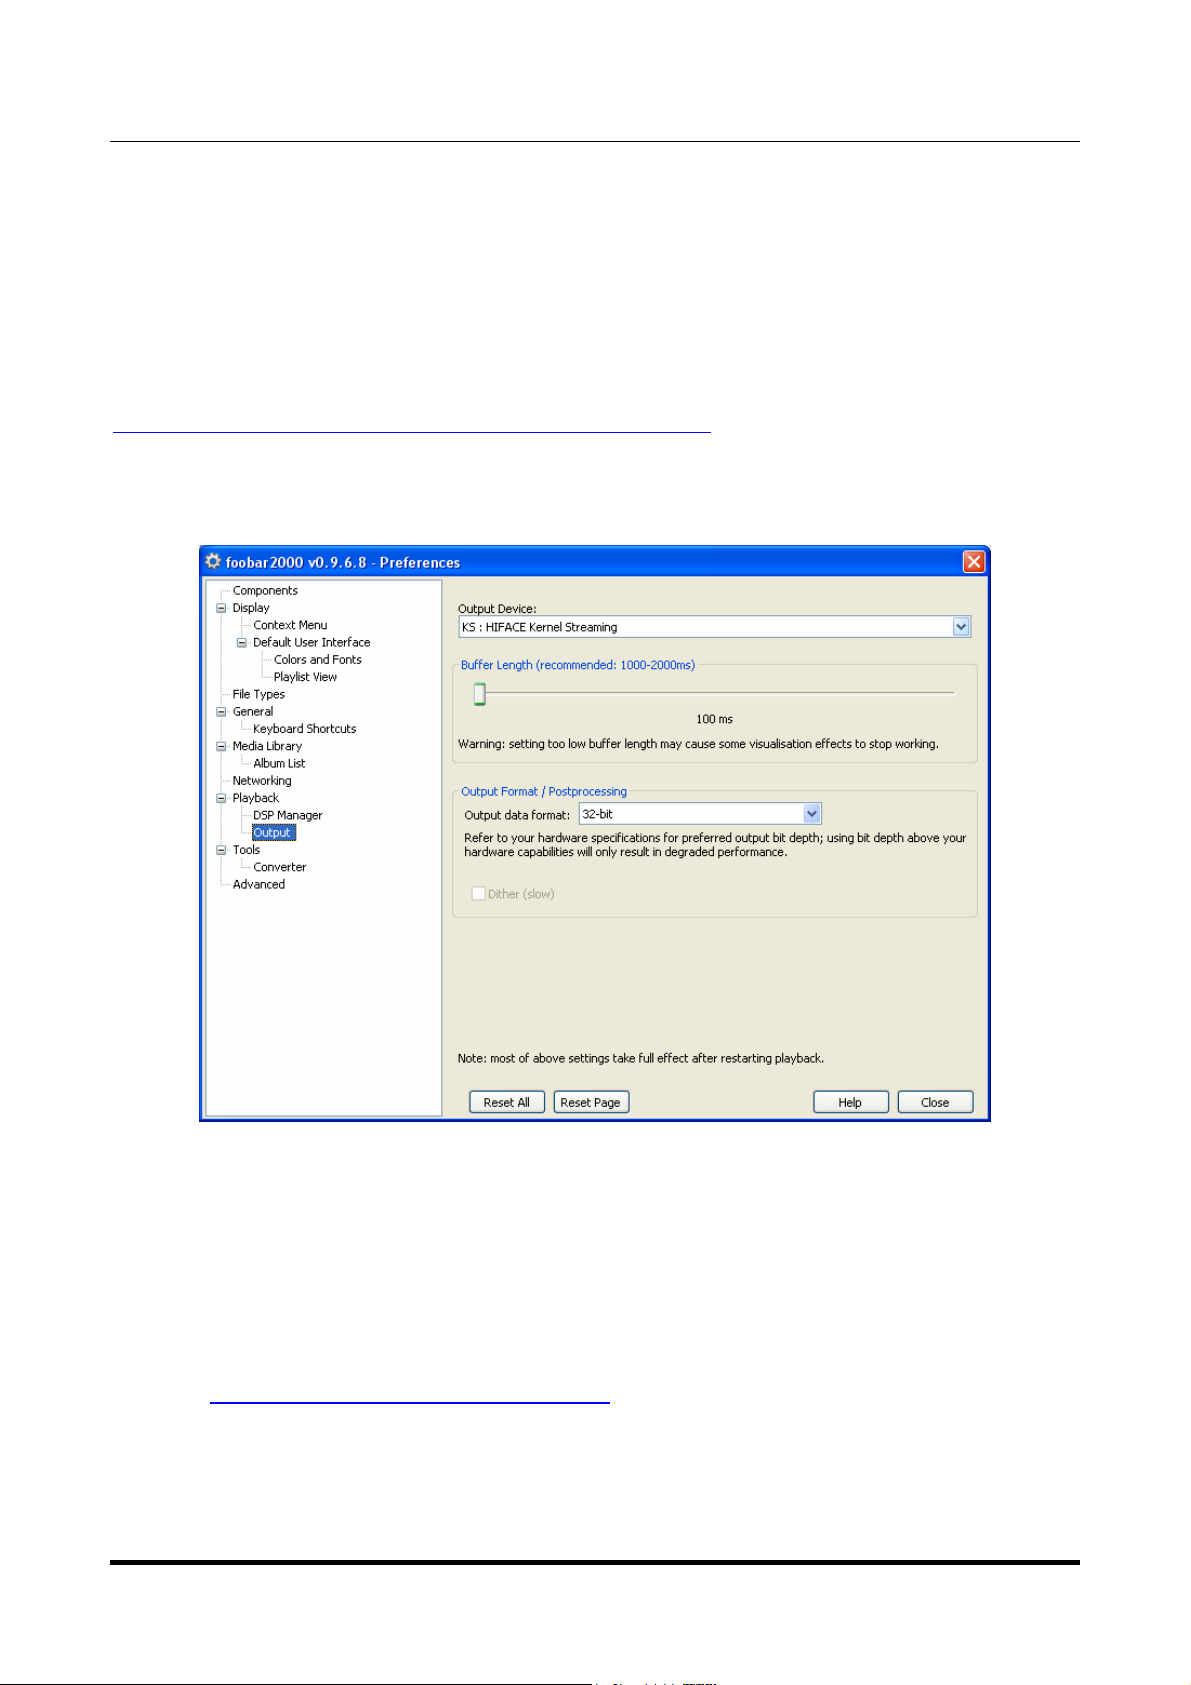
8.1. FooBar
To use FooBar in KS mode it is necessary to download the DLL for Kernel Streaming from
the FooBar2000 website and install it in the Components sub-folder inside FooBar2000
main folder in your hard disk. The DLL can be found at
http://www.foobar2000.org/components/view/foo_out_ks (click on Download). It is a zip
folder which contains the DLL. Extract it from the zip and copy to the Components folder.
Then, restart FooBar, go to the File/Preferences/Playback/Output window and set
parameters as in figure 16.
Figure 16
8.2. Winamp and MediaMonkey
These two players are actually the same player with different skins, so they can share the
same plug-ins. A freeware plug-in for Kernel Streaming by Steve Monks is available on the
Internet (http://www.stevemonks.com/ksplugin/) that can be used to enable Kernel
Streaming operation with these players.
Download the zip file, extract the dll file and copy it into the Plugins folder inside Winamp
main folder.
With the VAUGHAN connected and USB input selected, right-click on Winamp and select
Display/Select Plug-ins. The Preferences window of Winamp will open (see figure 17).
Copyright © 2012, M2Tech Srl
23
Page 24

VAUGHAN
384kHz/32bit digital-TO-ANALOG CONVERTER
REVISION 1PrA – MAY 2012
M2Tech
www.m2tech.biz
Figure 17
Go to Plug-in/Output and select “Kernel Streaming Output”. Then click on Configure
button. Choose YOUNG Kernel Streaming in the output device list (Figure 18).
Figure 18
Copyright © 2012, M2Tech Srl
24
Page 25

VAUGHAN
384kHz/32bit digital-TO-ANALOG CONVERTER
REVISION 1PrA – MAY 2012
M2Tech
www.m2tech.biz
9. Configuring the player for WASAPI: an example
9.1. FooBar
To use FooBar with WASAPI under Windows 7 it is necessary to download the DLL for
WASAPI from the FooBar2000 website and install it in the Components sub-folder inside
FooBar2000 main folder in your hard disk. The DLL can be found at
http://www.foobar2000.org/components/view/foo_out_wasapi (click on Download). It is a
zip folder which contains the DLL. Extract it from the zip and copy to the Components
folder.
Then, restart FooBar, go to the File/Preferences/Playback/Output window and set
parameters as in figure 19.
Figure 19
Copyright © 2012, M2Tech Srl
25
Page 26

VAUGHAN
384kHz/32bit digital-TO-ANALOG CONVERTER
REVISION 1PrA – MAY 2012
M2Tech
www.m2tech.biz
10. Cleaning the unit
The VAUGHAN should be cleaned with a soft, damp cloth. Do not use alcohol or other
cleaning liquids to avoid damaging the unit.
11. Tips on using the USB input
Depending on the PC or Mac being used, it is necessary to first connect and then power
up the VAUGHAN or first power up and then connect the VAUGHAN. Please try both ways to
see which one fits best to your computer.
Some care must also be used when switching from USB to other inputs and back. In fact,
the VAUGHAN’s USB interface is shut down whenever the selected input is other than USB,
to reduce the noise which can be coupled by the interface to other parts of the circuit when
it’s not used.
It’s strongly recommended to stop the player on the computer before switching to another
input or when putting the VAUGHAN in standby, to avoid unwanted behaviour from the
computer, like system crash or freezing.
12. Tips on using the I2S input
The VAUGHAN’s I2S input can be used with digital sources provided with I2S output, to
make an almost jitter-free connection which is better than a normal S/PDIF or AES/EBU
connection. This input is galvanically isolated to reduce noise coupling.
This I2S input accepts raw I2S data on an RJ-45 socket, compliant to LVCMOS or TTL
level (3.3V). Pinout is as follows (pins are listed from left to right):
2,4,6,8) Ground
1) SDATA
3) LRCK
5) SCLK
7) MCLK
Master clock high quality (low jitter) is mandatory in order to obtain the best performance
when using this input. In fact, due to the internal circuit structure, the LRCK is NOT used to
clock the DAC IC’s.
13. External clock input
The external clock input accepts both word clocks and master clocks (please refer to
technical specifications, Section 17 on Page 30, for details on the accepted frequencies).
A master clock is a high frequency clock (usually 22.5792MHz or 24.576MHz which the
unit uses directly to feed all audio digital circuits. A word clock is a sync clock with the
Copyright © 2012, M2Tech Srl
26
Page 27

VAUGHAN
384kHz/32bit digital-TO-ANALOG CONVERTER
REVISION 1PrA – MAY 2012
same frequency as the sample rate of the file or disc being played back. The Vaughan
uses the word clock to synthesize its master clock by a dedicated internal circuit. The
VAUGHAN automatically recognizes the clock frequency and type
.
Due to the unit’s internal structure, external word clocks may not allow for the best
performance, while master clocks do. Thus, using a master clock frequency, when
available, it’s preferred.
M2Tech
www.m2tech.biz
14. Stereo and dual mono modes
All S/PDIF and AES/EBU inputs (ToslinkTM and STTM included) can be used as either two
separate stereo inputs for sample rates up to 192kHz (96kHz on ToslinkTM) or a a single
dual mono input on two wires for sample rates up to 384kHz (192kHz on ToslinkTM). Dual
mono mode also accommodates some sources which only carry high resolution (192kHz)
on two wires. Each input pair can be independently configured to operate in either stereo
or dual mono. See details about how to configure the input mode in Section 16.3, Page 30.
15. Power supply, battery and battery charger
The VAUGHAN has a sophisticated power supply based on an universal AC power AC/DC
converter, a high quality, high capacity and high surge current LiPo battery and a
dedicated battery charger.
The units normally draws its power from the battery and the AC/DC converter is switched
off to avoid injecting noise in the audio circuits. A battery charge is sufficient for 4/5 hours
listening, depending on various factors like the ageing of the battery, the use of
headphones and the selected input.
When the battery is depleted, the system automatically isolates it from the audio circuits
and power them by the AC/DC converter (unless “manual” is selected for the power mode,
see Section 16.3, page 30), to ensure uninterrupted operation. The converter is also used
to provide the current to charge the battery via the dedicated battery charger.
When “manual” is selected for the power mode, the above strategy is inhibited and the
battery is used to the full capacity. After it is completely depleted, the system switches
itself off, thus isolating the battery to avoid damages due to excessive discharge. Before
reaching this point, the system advices the user with messages on the display. User may
decide to put the unit in standby, thus manually initiating a charge cycle.
In case of battery or battery charger failures, the user can force the usage of the AC/DC
converter to avoid stopping the unit while waiting for servicing or replacement, at the cost
of a slightly lower sound quality.
Copyright © 2012, M2Tech Srl
27
Page 28

VAUGHAN
384kHz/32bit digital-TO-ANALOG CONVERTER
REVISION 1PrA – MAY 2012
When planning to keep the unit off for a long time, please charge the battery up to 60%
before switching the unit off, to ensure the longest battery life. Also, please consider the
battery is subject to ageing, so its capacity can decrease during its life.
M2Tech
www.m2tech.biz
Copyright © 2012, M2Tech Srl
28
Page 29

VAUGHAN
384kHz/32bit digital-TO-ANALOG CONVERTER
REVISION 1PrA – MAY 2012
M2Tech
www.m2tech.biz
16. Configuration
The VAUGHAN is a versatile unit with many configurable options. Configuration is made by
a menu which can be accessed both by the VAUGHAN’s front panel or the remote control.
16.1. Navigating the menu by the front panel controls
To access the menu, press the “Menu/Select” button once.
To move from one configuration option to the next one or the previous one, rotate the
knob.
To select the desired option, press the “Menu/Select” button again.
To change the value associated with the option, rotate the knob.
To select the displayed value, press “Menu/Select” button. The menu will advance to the
following option.
To abort the configuration (that is, to exit the menu without changing the configuration),
press the “Escape/Standby/Off” button. Otherwise, just wait a few seconds without
selecting the displayed value: the system will automatically abort the configuration.
16.2. Navigating the menu by the remote control
To access the menu, press the “Enter” button once.
To move from one configuration option to the next one or the previous one, press the
“arrow up” or “arrow down” buttons.
To change the value associated with the displayed option, press the “arrow up” or “arrow
down” buttons.
To select the displayed value, press “Enter” button. The menu will advance to the following
option.
To return to the present value of the displayed option, press the “Esc” button”
To abort the configuration (that is, to exit the menu without changing the configuration),
press the “Exit” button. Otherwise, just wait a few seconds without selecting the displayed
value: the system will automatically abort the configuration.
16.3. Configuration options and values
Input. Allows for choosing the input for playback. Every input pair configured in stereo is
listed twice (e.g: RCAA and RCAB), while every input pair configured in dual mono is listed
only once (e.g: XRLM). Thus, the input value list can change depending on the input mode
configuration of each channel. In case of all stereo inputs, the following value are listed:
• XLRA
• XLRB
• BNC
• BNCB
A
Copyright © 2012, M2Tech Srl
29
Page 30

VAUGHAN
384kHz/32bit digital-TO-ANALOG CONVERTER
REVISION 1PrA – MAY 2012
• RCAA
• RCAB
• TOSA
• TOSB
• STA
• STB
• I2S
• USB
Balance. Allows for setting the left-right balance in 1dB steps. Due to the digital nature of
the unit, balance works in attenuation: setting the balance to right means attenuating left,
and vice-versa. The maximum value is +/-7dB.
Volume mode. Allows for choosing the way the volume is operated. Three values are
available:
• dB (0 = max, -90 = min)
• Steps (180 = max, OFF = min)
• Volume off
The first two options only choose the way volume is displayed. The third choice disables
the volume control (recommended when using the VAUGHAN as a source with a
preamplifier or an integrated amplifier). Please note that when choosing “Volume off”, the
output level is fixed to the last value set before disabling the volume. This is useful when
the 0dB volume is too high for your preamplifier.
Input mode. Allows for choosing the input mode for the selected input. Two values are
possible:
• 2 channels
• mono
Please note this option doesn’t apply to I2S and USB inputs.
External clock. Allows for toggling the external clock usage. Two values are possible:
• Off
• On
When “Off” is selected, any external clock applied to the external clock input is ignored.
When “On” is selected, the external clock is used to clock the unit when present on the
external clock input. Please be sure that the clock is present when starting playback.
Power mode. Allows for choosing the power management strategy. Three values are
possible:
• Auto
• AC
• Manual
M2Tech
www.m2tech.biz
Copyright © 2012, M2Tech Srl
30
Page 31

VAUGHAN
384kHz/32bit digital-TO-ANALOG CONVERTER
REVISION 1PrA – MAY 2012
“Auto” means that the system automatically recharges the battery when it’s nearly
depleted (85% capacity used), drawing power from the internal AC/DC for both the battery
charger and the audio circuits. When the battery is charged, the system reverts to it,
switching the internal AC/DC off. Moreover, a charge is initiated every time the unit is put
into standby. This mode ensures the longest life to the battery.
In AC mode, the unit is forced to use the AC/DC converter. This is useful in case of battery
failure or absence.
In Manual mode, the units uses the battery down to its complete depletion and then
switches off. This is useful when a listening session is in progress and the user doesn’t
want the unit to switch to the AC/DC which may lower the sound quality compared to the
battery supply. This way, the battery usage is a little longer and may allow for completing
the listening session.
When the battery discharge reaches 85%, the unit starts indicating it by displaying the
battery icon on the display. When depletion goes further on, the battery icon is replaced by
the “BAT LOW “ indication. In this case, the user may initiate a charge cycle by operating
the rear mains switch.
In both Auto and Manual modes, when the units is put into standby during a charge cycle
and then reactivated before the charge is terminated, the battery will be selected as power
source whenever its charge level is more than 15%.
Info. Displays sensible information about the unit: DAC’s configuration and battery charge
level.
M2Tech
www.m2tech.biz
Copyright © 2012, M2Tech Srl
31
Page 32

VAUGHAN
384kHz/32bit digital-TO-ANALOG CONVERTER
REVISION 1PrA – MAY 2012
M2Tech
www.m2tech.biz
17. Technical Specifications
Sampling frequencies: ...................... 44.1, 48, 88.2, 96, 176.4*, 192*, 352.8**, 384kHz**
Resolution:........................................ 16 to 32 bits***
USB: ................................................. 2.0 high speed
Clock precision: ................................ +/-1.5ppm 0 to 60°C, 0.1ppm typical @ 25°C
External clock frequencies ................ 44.1, 48, 88.2, 96, 176.4, 192, 352.8 and 384kHz,
22.5792 and 24.576MHz
External clock input level .................. 3.3V
S/PDIF input sensitivity: .................... 0.5Vpp +/-0.1V
S/PDIF input impedance: .................. 75 Ohms
AES/EBU input sensitivity: ................ 2Vpp +/- 0.5V
AES/EBU input impedance: .............. 110 Ohms
I2S input level.................................... LVCMOS/TTL (3.3V)
S/PDIF and AES/EBU inputs bit-rate up to 24.576Mbps (up to 384kHz sampling
frequency in dual mono mode)
ST inputs bit-rate .............................. up to 24.576Mbps (up to 384kHz sampling
frequency in dual mono mode)
Toslink™ input bit-rate: ..................... up to 15Mbps (up to 192kHz sampling frequency
in dual mono mode)
I2S input bit-rate ................................ up to 24.576Mbps (up to 384kHz sampling
frequency)
Analog output voltage: ...................... 2.65V
5.3V
THD+N:............................................. 0.0003% (1kHz @ 0dBFS, 0-22kHz)
S/N ratio:........................................... 128dB (A-weighted)
Volume control range........................ 0dB to -90dB, 0.5dB steps
Muting: .............................................. -20dB
Balance:............................................ 0dB to 6dB, 0.5dB steps
Minimal requirements:....................... 1.3GHz CPU clock, 1GB RAM, 2.0 USB port
Supply voltage: ................................. 90-265VAC, 50-60Hz
Power consumption: ......................... 75VA
Battery charge time........................... 4 hours +/- 0.5 hour
Battery duration ................................ 5 hours
Battery charge cycles........................ 1000 min. (up to 4000 in auto mode)
Size: ................................................. 450x90x450mm (w x h x d, cabinet)
450x100x465mm (w x h x d, with connectors and
feet)
550x150x550mm (w x h x d, box)
32
@ 0dBFS (single-ended)
rms
@ 0dBFS (balanced)
rms
Copyright © 2012, M2Tech Srl
Page 33

VAUGHAN
384kHz/32bit digital-TO-ANALOG CONVERTER
REVISION 1PrA – MAY 2012
Weight:.............................................. 9kg (DAC only)
10kg (box)
* Toslink™ inputs in dual mono mode only. Depending on the fiber used and the
transmitter’s power, 176.4kHz and 192kHz may be achieved with Toslink™ in stereo
mode, too, but this feature is not guaranteed.
** all S/PDIF and AES/EBU inputs in dual mono mode except Toslink™. Depending on the
fiber used and the transmitter’s power, 352.8kHz and 384kHz may be achieved with
Toslink™, too, but this feature is not guaranteed.
*** 32 bits are accepted on USB and I2S inputs only. When using WASAPI on USB,
resolution is limited to 24bits.
M2Tech
www.m2tech.biz
Copyright © 2012, M2Tech Srl
33
 Loading...