

Page 1
M2TECH
JOPLIN
384KHZ/32BIT ANALOG-TO-DIGITAL CONVERTER
USER MANUAL
--- PRELIMINARY ---
REV. PrB – 9/2012
Page 2

JOPLIN
384kHz/32bit ANALOG-TO-DIGITAL CONVERTER
REVISION PRB – SEPTEMBER 2012
M2Tech
www.m2tech.biz
Warning!
Changes or modifications not authorized by the manufacturer can invalidate the
compliance to CE regulations and cause the unit to be no more suitable to use. The
manufacturer refuses every responsibility regarding damages to people or things
due to the use of a unit which has been subject to unauthorized modifications or to
misuse or to malfunction of a unit which has been subject to unauthorized
modifications.
This unit is compliant with the following CE regulations when an USB cable less than 3m is used: CEI EN
55022:2009 Class B (Radiated Emissions), CEI EN 55024:1999, CEI EN 55024:A2/2003, CEI EN
55024:IS1/2008 (Radio Frequency Electromagnetic Fields, 50Hz Magnetic Field Immunity Test and
Electrostatic Discharges – ESD).
For a proper operation of this unit, all connections to other equipment in the system must be done
when all equipment are off. Failing to comply to this advice may lead to damage to the unit.
Recycling
The label above, printed on the product case, indicates that the product, when no more usable, can’t be
treated as generic garbage, but must be disposed of at a collection point for recycling of electrical and
electronic equipment, in compliance with the WEEE regulation (Waste of Electrical and Electronic
Equipment).
By making sure that this unit is correctly recycled, you will help preventing potential damages to environment
and human health, which could be caused by a wrong treatment of this product as generic garbage.
Materials recycling helps saving natural resources. For more in-depth information about recycling this
product, please contact M2Tech Srl.
WARNING: the information contained in this manual are considered to be reliable and accurate.
M2Tech reserves the right to change or modify the information any time, without prior advice. It’s up
to the customer to ensure that the manual being consulted is the latest version.
Copyright © 2012, M2Tech Srl
2
Page 3

JOPLIN
384kHz/32bit ANALOG-TO-DIGITAL CONVERTER
REVISION PRB – SEPTEMBER 2012
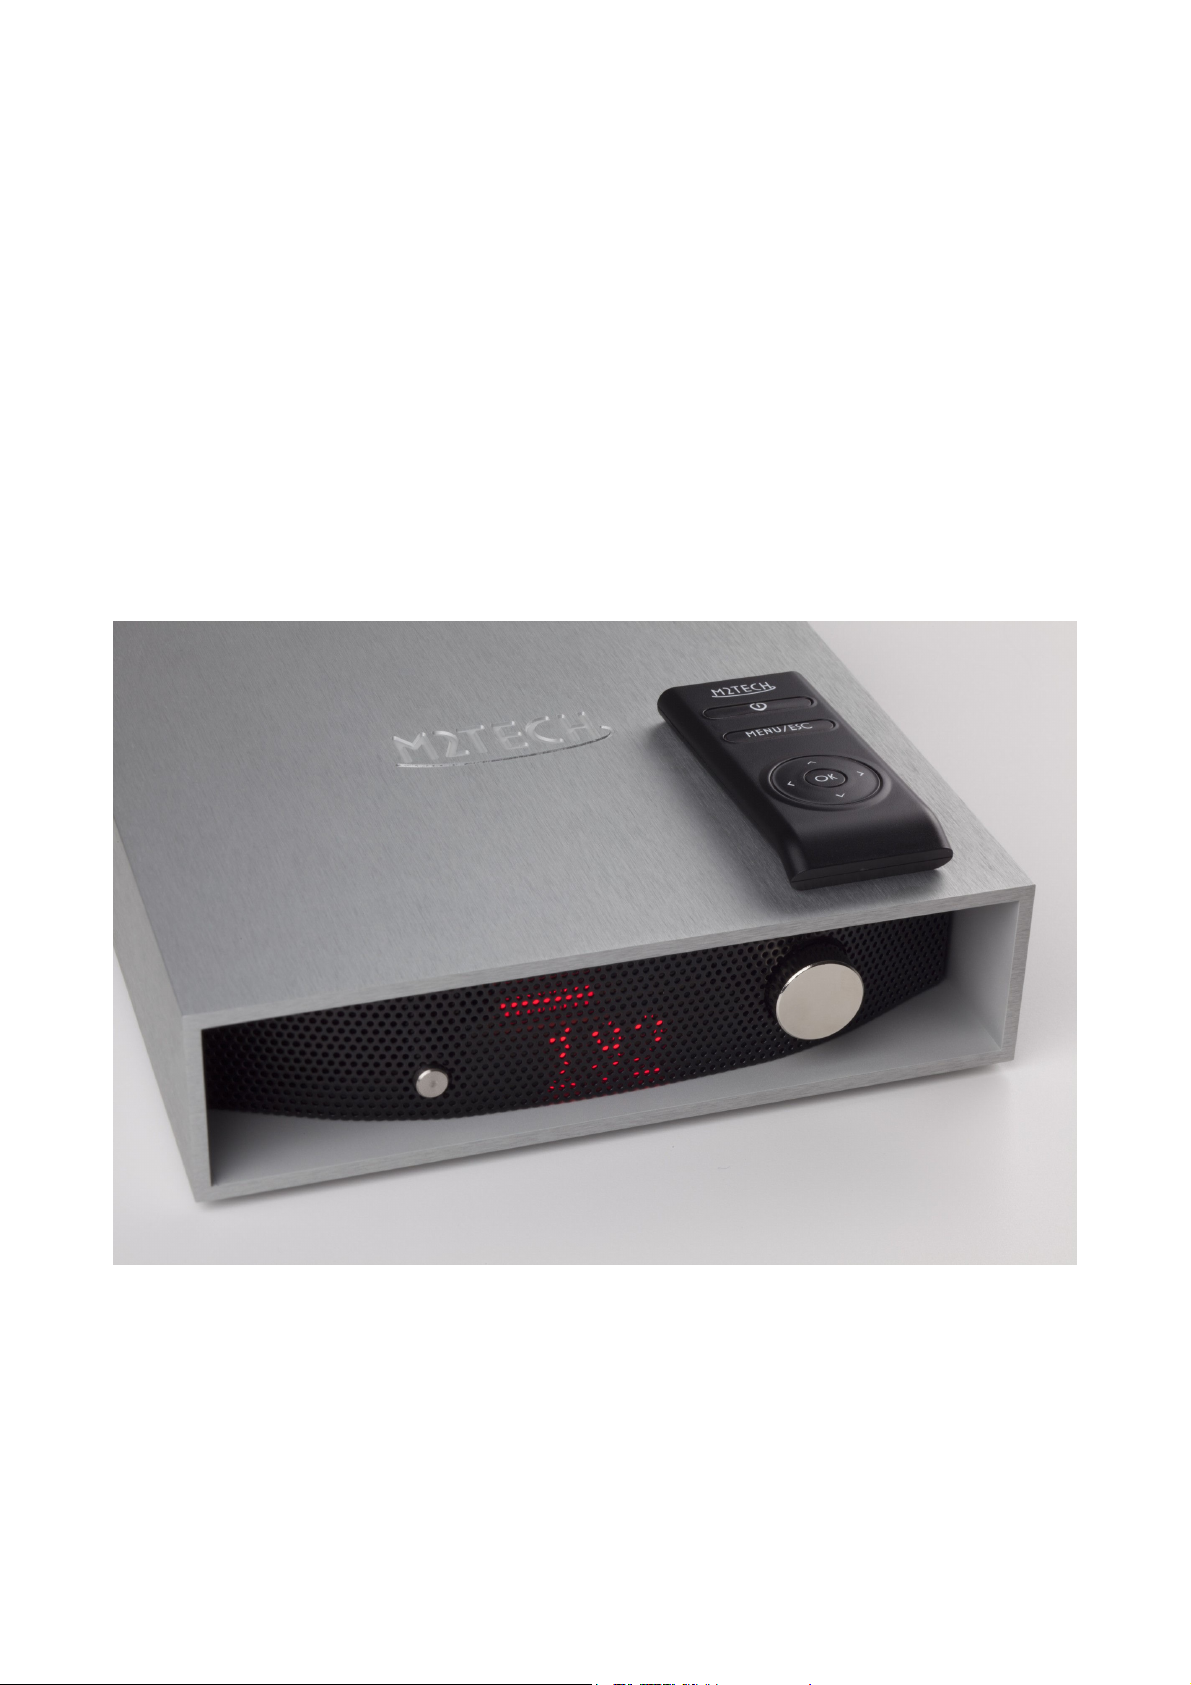
Dear customer,
thank you for purchasing JOPLIN. What you have is a first-rate analog-to-digital converter
with many unique features conceived to obtain the best audio performance out of an
analog source.
Even if sending music to a PC or a Mac is nowadays quite simple, much harder is to
obtain the best sonic performance while doing it, due to intrinsic limits in digital audio
interfaces in computers. Please visit M2Tech website (www.m2tech.biz) to find extensive
literature about this topic.
JOPLIN overcomes all the limits of your computer’s audio card by implementing the latest
generation hiFace TWO technology, which uses proprietary drivers and asynchronous
data transfer, along with a sophisticated electronic design.
JOPLIN features a comprehensive set of output connections which suit virtually all digital
equipment around.
JOPLIN is provided with a very complete set of equalization and filtering options to
accommodate all kind of analog signals.
We feel that your expectations will be fulfilled by JOPLIN: you’ll hear your analog sources
turned into music files or digital streams in a way like never before, prepare for a whole
new experience!
Nadia Marino, CEO
Please annotate here your JOPLIN serial number for future reference:
S/N: ____________________________________
Date of purchase: _________________________
M2Tech
www.m2tech.biz
Copyright © 2012, M2Tech Srl
3
Page 4

JOPLIN
384kHz/32bit ANALOG-TO-DIGITAL CONVERTER
REVISION PRB – SEPTEMBER 2012
M2Tech
www.m2tech.biz
INDEX
1. Unpacking and placing the unit........................................................................................6
2. Front Panel ......................................................................................................................7
3. Back Panel.......................................................................................................................8
4. Remote Control................................................................................................................9
5. Connecting and powering the unit .................................................................................10
6. Driver installation ...........................................................................................................11
6.1. Obtaining the driver .................................................................................................11
6.2. Installing the driver on a Windows-based PC..........................................................11
6.3. USB Control Panel ..................................................................................................16
6.4. Uninstalling the driver..............................................................................................17
6.5. True plug’n’play operation with Mac ........................................................................19
6.6. True plug’n’play operation with Linux ......................................................................19
7. Configuring the computer to use the Joplin...................................................................20
7.1. Configuring a PC with Windows XP ........................................................................20
7.1.1. Configuring for Direct Sound with Windows XP ................................................20
7.1.2. Configuring for ASIO with Windows XP ............................................................21
7.2. Configuring a PC with Windows Vista or Windows 7...............................................21
7.2.1. Configuring for Direct Sound with Windows Vista or Windows 7 ......................22
7.2.2. Configuring for Kernel Streaming with Windows Vista or Windows 7 ...............22
7.2.3. Configuring for ASIO with Windows Vista or Windows 7 ..................................23
7.2.4. Configuring for WASAPI with Windows Vista or Windows 7 .............................23
7.3. Configuring a Mac ...................................................................................................23
8. Configuring the JOPLIN ...................................................................................................24
8.1. Navigating the menu by the front panel controls .....................................................24
8.2. Navigating the menu by the IR remote ....................................................................24
8.3. Parameters meaning and choices ...........................................................................25
8.3.1. Input gain..........................................................................................................25
8.3.2. Input choice ......................................................................................................25
8.3.3. Sampling frequency ..........................................................................................26
8.3.4. Resolution.........................................................................................................26
8.3.5. Equalization curve ............................................................................................27
8.3.6. Display dimming ...............................................................................................27
8.3.7. High pass (anti-rumble) filter.............................................................................27
8.3.8. Low pass (anti-hiss) filter ..................................................................................27
8.3.9. MPX filter ..........................................................................................................28
9. Notes on equalization ....................................................................................................30
9.1. Why equalization is needed for records? ................................................................30
9.2. List of phono equalization curves available on the Joplin and notes on their usage......33
9.2.1. RIAA .................................................................................................................33
9.2.2. AES ..................................................................................................................33
9.2.3. Angel (ANG) .....................................................................................................34
9.2.4. Audiophile (AUDP)............................................................................................34
9.2.5. Capitol (CAP)....................................................................................................34
9.2.6. Columbia (COL)................................................................................................34
9.2.7. HMV..................................................................................................................34
9.2.8. Decca/London FFRR ........................................................................................34
9.2.9. MGM.................................................................................................................34
Copyright © 2012, M2Tech Srl
4
Page 5

JOPLIN
384kHz/32bit ANALOG-TO-DIGITAL CONVERTER
REVISION PRB – SEPTEMBER 2012
9.2.10. NAB ................................................................................................................35
9.2.11. Oiseau-Lyre (OYLR) .......................................................................................35
9.2.12. Pacific Jazz (PACJ) ........................................................................................35
9.2.13. Philips .............................................................................................................35
9.2.14. RCA (RCA1, RCA2 and RCAO) .....................................................................35
9.2.15. Brunswick .......................................................................................................35
9.2.16. Columbia 1925, Columbia 1938 and Columbia England (CO25, CO38 and COLE)35
9.2.17. Decca FFRR 78rpm (DEC) .............................................................................36
9.2.18. MGM 78rpm (MGM7)......................................................................................36
9.2.19. Victor 1938-47 and Victor 1947-52 (VIC3 and VIC4) ......................................36
9.3. Equalizing tapes: why and when .............................................................................36
9.3.1. CCIR/IEC for 9.5cm/s and 19cm/s (3¾ ips and 7½ ips) and CCIR/IEC for
38cm/s (15 ips) (IEC1 and IEC3) ................................................................................37
9.3.2. NAB for 9.5cm/s (3¾ ips) and NAB for 19cm/s (7½ ips)...................................37
9.4. Acquiring with equalization......................................................................................37
9.5. Interfacing a cartridge or a tape head......................................................................37
9.6. Recording programs................................................................................................38
10. Using a power supply different from the standard one.................................................39
11. Cleaning the unit..........................................................................................................39
12. Technical Specifications ..............................................................................................40
M2Tech
www.m2tech.biz
Copyright © 2012, M2Tech Srl
5
Page 6

JOPLIN
384kHz/32bit ANALOG-TO-DIGITAL CONVERTER
REVISION PRB – SEPTEMBER 2012
M2Tech
www.m2tech.biz
1. Unpacking and placing the unit
Place the carton box on a table and open it by removing or cutting the adhesive tape.
Extract the foam upper cover. You should find the following items:
• one Joplin ADC;
• one wall adapter;
• one A-B USB cable;
• a remote control.
Should one or more items be missing, please contact your dealer or local distributor.
Extract the Joplin from the foam container and place it on a stable base, far from heat
sources. Avoid the direct sunlight on the unit. Allow for enough room around the unit for
venting. The Joplin is a high efficiency design so little heat is produced during normal
operation; anyway, it’s better allow for adequate venting. Avoid smoke, humidity, moisture
and water from reaching the unit.
Do not place the unit on thick carpets or inside a box or piece of furniture, or in close
contact with curtains.
Copyright © 2012, M2Tech Srl
6
Page 7
JOPLIN
123
4
384kHz/32bit ANALOG-TO-DIGITAL CONVERTER
REVISION PRB – SEPTEMBER 2012
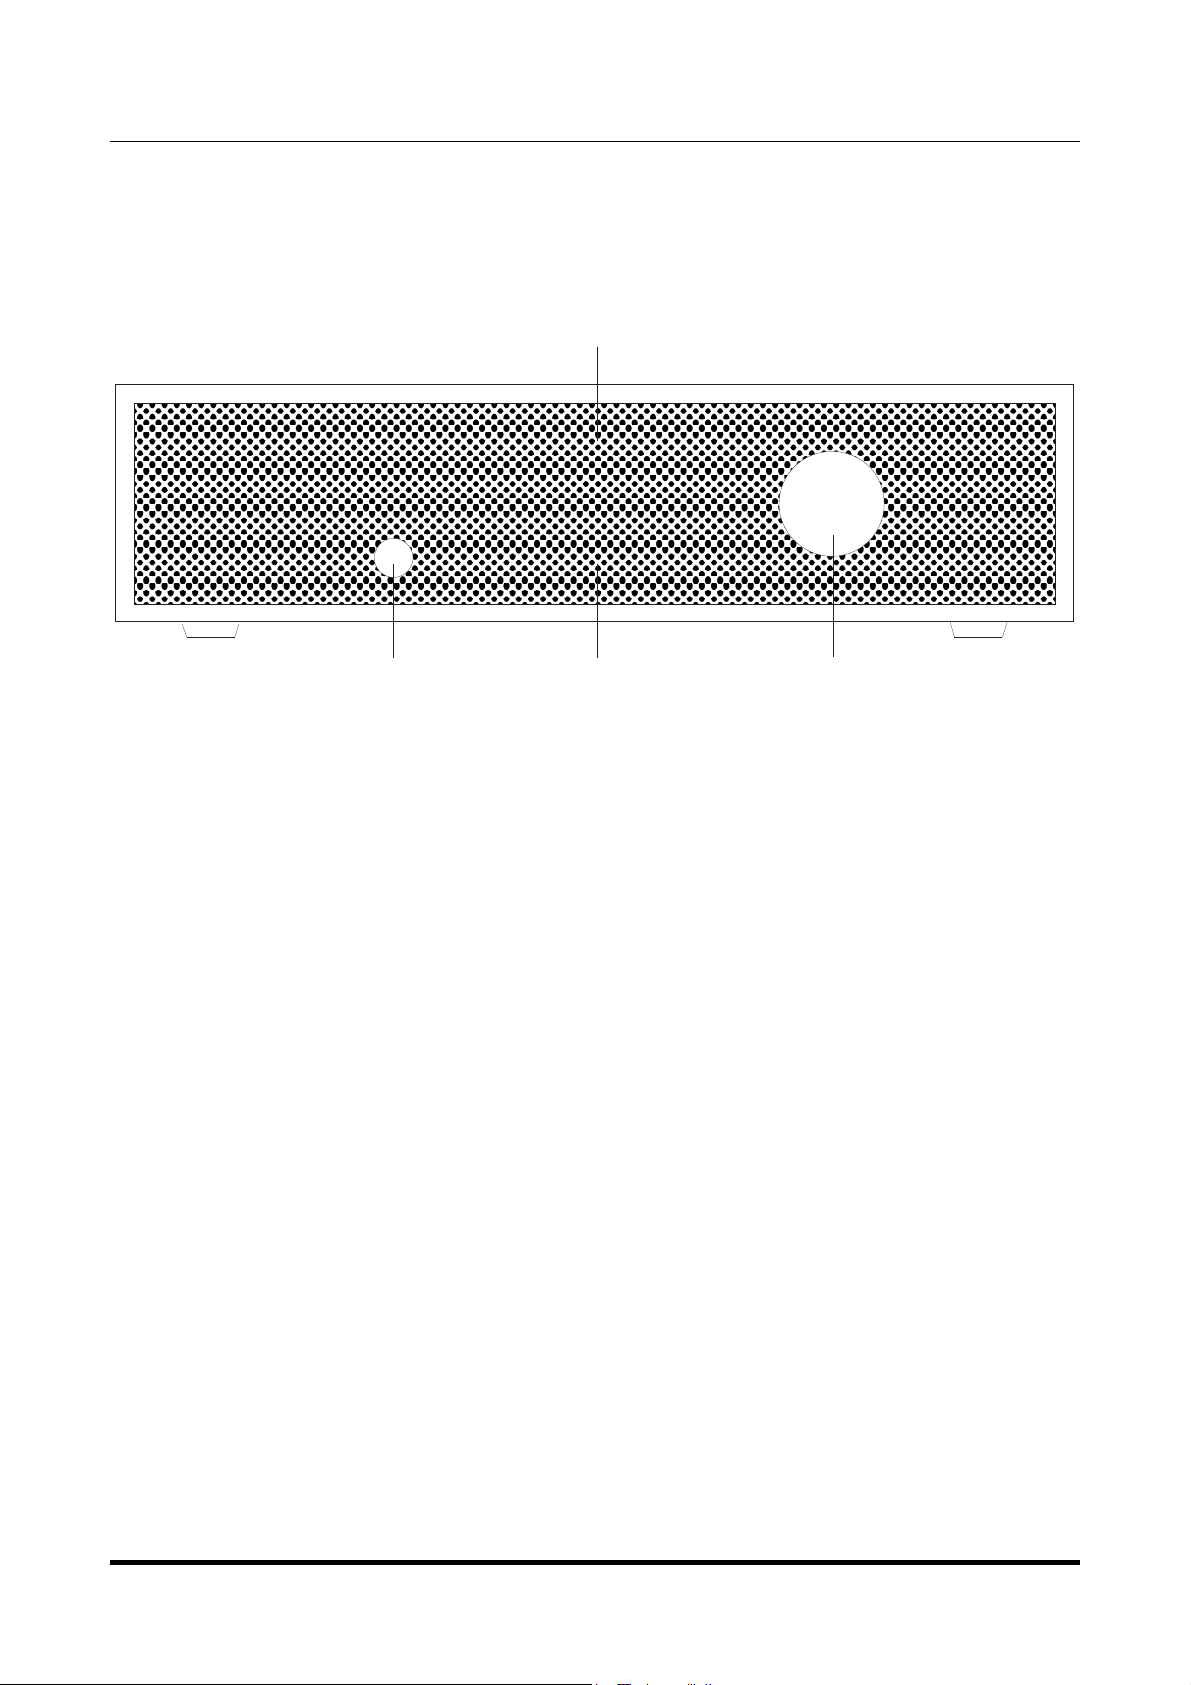
2. Front Panel
M2Tech
www.m2tech.biz
Figure 1
1) Standby/Exit button. This button has two function. When in standby, the unit is silent
and the display is off. Standby ends when this button is pressed. When the unit is
operative and the menu is not being accessed, press this button to put the unit in standby.
When accessing the menu, press this button to exit the menu without changing the
selected option.
2) Encoder knob and switch. Push the knob to access the menu. More pushes allow to
navigate the various menu items. When the desired item is accessed, rotate the knob to
choose the desired value for that item. Push the knob one last time to select the desired
value and exit the menu.
3) Display. Multifunction six digits led matrix display. During normal operation, it indicates
the sampling frequency. When accessing the menu, it indicates the menu item and current
value. When clipping is reached on the analog input, it indicates the status by displaying
“CLIP”. When in standby, a single led is on at the center of the display area. Its intensity is
set by menu.
4) VU-meter. It indicates the peak value for both channels. Left channel is top, right
channel is immediately below left channel. Its intensity is set by menu.
Copyright © 2012, M2Tech Srl
7
Page 8
JOPLIN
4
567891011
12
384kHz/32bit ANALOG-TO-DIGITAL CONVERTER
REVISION PRB – SEPTEMBER 2012
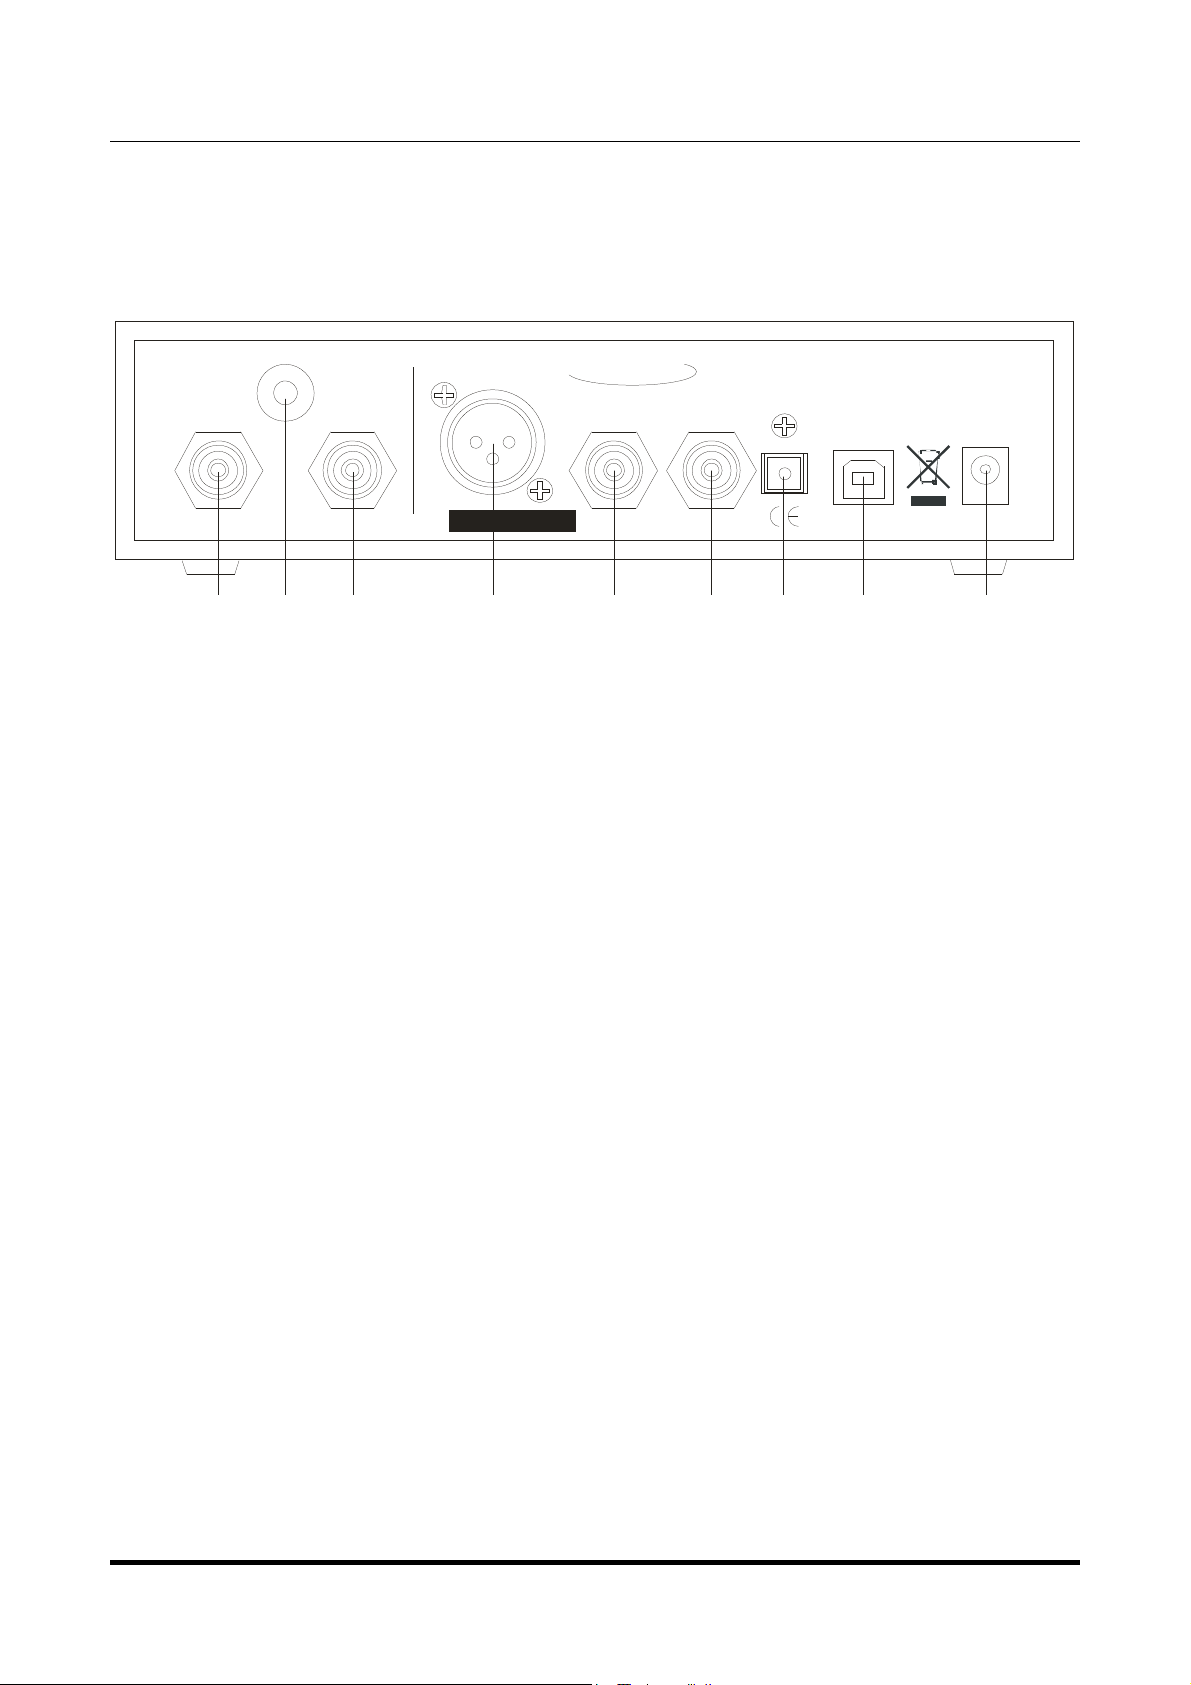
3. Back Panel
M2Tech
www.m2tech.biz
JOPLIN
USB 2.0
MADE IN ITALY
DC IN
15V
DC
GND
AES/EBU OUT
LEFT INRIGHT IN
S/N:
M2TECH
S/PDIF OU T S/PDIF IN
384 H 32BIT ANALOG-TO-DIGITAL CONVERTER
k Z
TOSLINK OUT
Figure 2
4) Right channel analog input. Connect to right channel of the analog source output.
RCA female connector.
5) Left channel analog input. Connect to left channel of the analog source output. RCA
female connector.
6) AES/EBU digital output. Generate AES/EBU data streams in consumer format. XLR
male connector.
7) S/PDIF digital output. Generate S/PDIF data streams. RCA female connector.
8) S/PDIF digital input. Accept S/PDIF data streams. RCA female connector.
9) ToslinkTM optical digital output. Optical output for ToslinkTM cables. ToslinkTM
connector.
10) USB 2.0 output. Connect to a PC with Windows or Linux or MacIntosh with an USB
2.0 compliant A-B cable. USB 2.0 B female connector.
11) Power supply input. Connect the wall adaptor provided with the unit or any other
power supply capable of 15V/500mA. 5.5mm/2.1mm supply jack (female, tip is positive).
12) Ground (chassis) post. When necessary, connect this post to the chassis wire from
the source, to reduce hum and noise pickup.
Copyright © 2012, M2Tech Srl
8
Page 9

JOPLIN
384kHz/32bit ANALOG-TO-DIGITAL CONVERTER
REVISION PRB – SEPTEMBER 2012
4. Remote Control
M2TECH
M2Tech
www.m2tech.biz
1
MENU/ESC
>
>
OK >
>
1) Standby. Push this button to put the unit in standby and to activate it.
4) Menu/Esc. Push this button to access the menu and to exit the menu without changing
the current item.
4) Menu navigation arrows. When accessing the menu, push arrow up and arrow down
to scroll through the various menu items. Push arrow left and arrow right to choose the
value for the selected item.
4) OK. When accessing the menu, push this button to update the current item with the
displayed value.
2
3
4
Copyright © 2012, M2Tech Srl
9
Page 10

JOPLIN
384kHz/32bit ANALOG-TO-DIGITAL CONVERTER
REVISION PRB – SEPTEMBER 2012
M2Tech
www.m2tech.biz
5. Connecting and powering the unit
ADVICE: all connections to other equipment in the system must be done when all
equipment are off. Failing to comply to this advice may expose the Joplin
of damages.
ADVICE: Windows users must install the driver prior to connecting the Joplin
PC (please refer to section 6).
Please refer to section 3, “Back Panel Description”.
Connect the “B” plug of a 2.0 USB A-B cable to the USB connector (Figure 2, 10) of the
Joplin.
Connect the “A” plug of the cable to a 2.0 USB port of your computer.
Connect two interconnects to the analog inputs of the Joplin (Figure 2, 4/5) and to the
outputs of your analog source (be it a turntable, a tuner, a tape recorder or even the tape
rec output of your amplifier).
Connect a digital cable with suitable termination (RCA, XLR or optical Toslink™) from the
Joplin to your amplifier’s digital inputs or to a DAC (Figure 2, 6/7/9).
If you need to route the output of a digital source to your computer or to the amplifier, you
may connect the source to the Joplin using an RCA digital interconnect (Figure 2, 8).
Connect the wall adaptor provided with the Joplin or any other 15V/500mA power supply
to the supply connector (Figure 2, 11) of the Joplin.
Joplin to the risk
JoplinJoplin
Joplin to the
JoplinJoplin
Copyright © 2012, M2Tech Srl
10
Page 11

JOPLIN
384kHz/32bit ANALOG-TO-DIGITAL CONVERTER
REVISION PRB – SEPTEMBER 2012
M2Tech
www.m2tech.biz
6. Driver installation
The Joplin is USB 2.0 Audio compliant. This means that no driver is needed with Apple
computers, nor with Linux-based PC’s. The latter will need ALSA to operate the Joplin.
Windows is presently not compatible with USB 2.0 Audio, so no native support is available.
In this case, M2Tech provides a driver which needs to be installed prior to access the
Joplin via USB.
6.1. Obtaining the driver
The Windows driver for the Joplin is available on the M2Tech website, in the page
dedicated to the Joplin (www.m2tech.biz/joplin.html). The driver is contained in selfextracting file.
6.2. Installing the driver on a Windows-based PC
The procedure is almost the same for Windows XP, Windows Vista and Windows 7.
Double-click on the 7-Zip folder to automatically extract the files in a directory of your
choice (Figure 4).
Figure 4
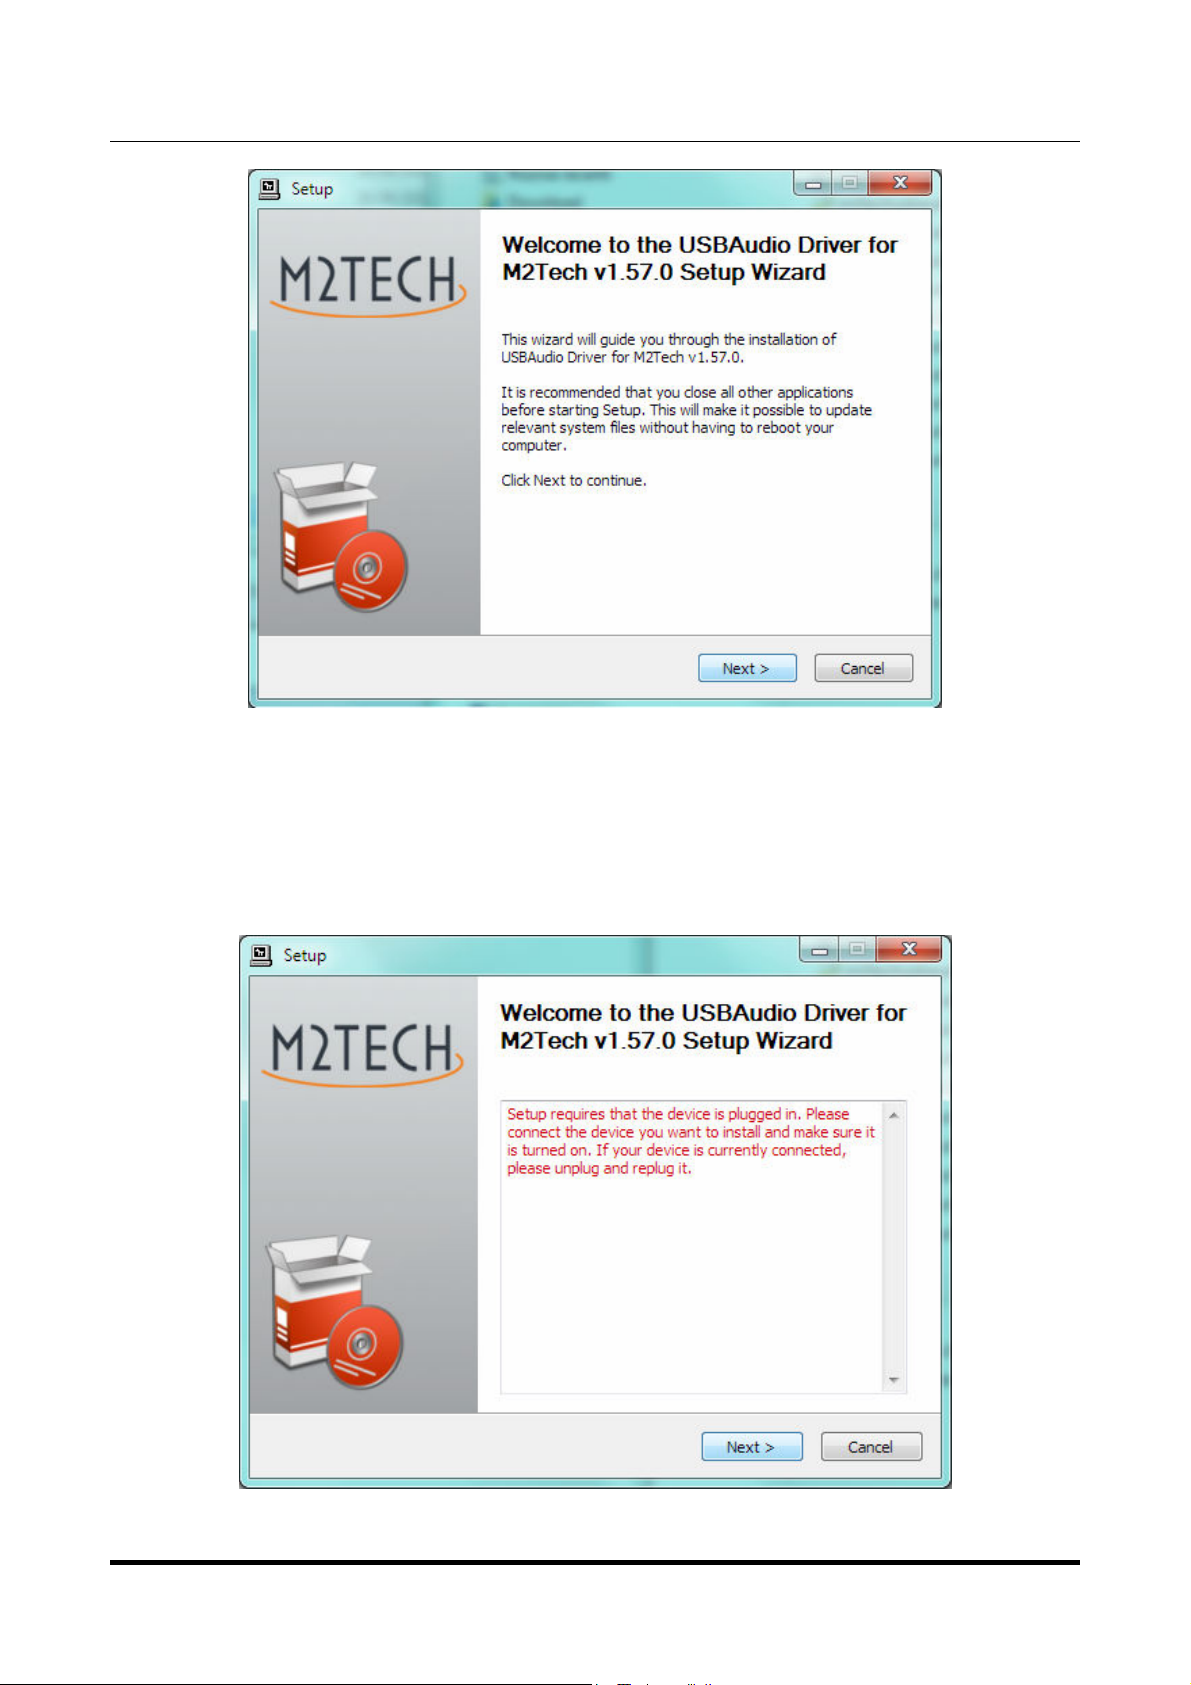
Amongst the files extracted is “setup.exe”. Double-click on its icon to launch it and follow
the indications provided by the setup program (Figure 5).
Copyright © 2012, M2Tech Srl
11
Page 12
JOPLIN
384kHz/32bit ANALOG-TO-DIGITAL CONVERTER
REVISION PRB – SEPTEMBER 2012
M2Tech
www.m2tech.biz
Figure 5
In Windows 7, the installation wizard will ask for authorization to start installation. Accept.
Then, the wizard will check for system features. At a certain point, it will ask you to connect
the Joplin in one of the USB ports (Figure 6).
Figure 6
Copyright © 2012, M2Tech Srl
12
Page 13

JOPLIN
384kHz/32bit ANALOG-TO-DIGITAL CONVERTER
REVISION PRB – SEPTEMBER 2012
Follow the indications and plug the device in one port, then click on “Next”. You’ll be asked
to choose the installation directory (Figure 7). After choosing it, click on “Install”.
M2Tech
www.m2tech.biz
Figure 7
The installation process continues showing the progress (Figure 8).
Figure 8
Copyright © 2012, M2Tech Srl
13
Page 14

JOPLIN
384kHz/32bit ANALOG-TO-DIGITAL CONVERTER
REVISION PRB – SEPTEMBER 2012
At the end of the installation process, the wizard notify the completion (Figure 9). Click on
“Finish” to complete the installation.
M2Tech
www.m2tech.biz
Figure 9
To ensure that installation has correctly completed, the Device Manager should be
checked. The Joplin will be listed under “Audio, Video and Games Controllers” (Figure 10
on next page).
Copyright © 2012, M2Tech Srl
14
Page 15

JOPLIN
384kHz/32bit ANALOG-TO-DIGITAL CONVERTER
REVISION PRB – SEPTEMBER 2012
M2Tech
www.m2tech.biz
Figure 10
Copyright © 2012, M2Tech Srl
15
Page 16

JOPLIN
384kHz/32bit ANALOG-TO-DIGITAL CONVERTER
REVISION PRB – SEPTEMBER 2012
M2Tech
www.m2tech.biz
6.3. USB Control Panel
A control panel is installed together with the driver, which can be used to optimize Joplin’s
USB port performance (Figure 11). More details on the Control Panel’s features in the
application note App002.
Figure 11
Copyright © 2012, M2Tech Srl
16
Page 17

JOPLIN
384kHz/32bit ANALOG-TO-DIGITAL CONVERTER
REVISION PRB – SEPTEMBER 2012
M2Tech
www.m2tech.biz
6.4. Uninstalling the driver
Sometimes it is necessary to uninstall the driver to roll back to a previous version. Uninstall
is a quite simple procedure.
Go to the control panel and launch the “Application Installation” utility (Figure 12).
Look for the Joplin driver item in the list. Double-click on it to launch uninstalling.
Figure 12
The installation wizard, which also handles uninstalling, will show up (Figure 13 on next
page). Click on “Uninstall” to start uninstalling.
Copyright © 2012, M2Tech Srl
17
Page 18

JOPLIN
384kHz/32bit ANALOG-TO-DIGITAL CONVERTER
REVISION PRB – SEPTEMBER 2012
M2Tech
www.m2tech.biz
Figure 13
At this point, the wizard will show up the installation progress (Figure 14), up to the end.
Figure 14
Copyright © 2012, M2Tech Srl
18
Page 19

JOPLIN
384kHz/32bit ANALOG-TO-DIGITAL CONVERTER
REVISION PRB – SEPTEMBER 2012
After the uninstalling of all files related to the driver is complete, the “Next” button will be
enabled. Click on it. The final message will appear (Figure 15). Click on “Finish” to
complete uninstalling.
M2Tech
www.m2tech.biz
Figure 15
6.5. True plug’n’play operation with Mac
Mac computers with OSX 10.6.4 and later have a native support for audio devices
compliant with USB 2.0 Audio class. This means that the driver is already included in the
operating system and the user needs not to install anything: just connect the Joplin to
your Mac and it will be immediately recognized by the OS and ready to use. Macs with
older OS need update to use the Joplin.
6.6. True plug’n’play operation with Linux
Linux has a native support for audio devices compliant with USB 2.0 Audio class based on
ALSA. This means that the driver is already included in the operating system and the user
needs not to install anything: just connect the Joplin to your PC with Linux and it will be
immediately recognized by the OS and ready to use. ALSA version needs to be 1.0.24 or
later.
Copyright © 2012, M2Tech Srl
19
Page 20

JOPLIN
384kHz/32bit ANALOG-TO-DIGITAL CONVERTER
REVISION PRB – SEPTEMBER 2012
M2Tech
www.m2tech.biz
7. Configuring the computer to use the Joplin
Joplin
JoplinJoplin
7.1. Configuring a PC with Windows XP
A PC with Windows XP can use the Joplin in two different ways: Direct Sound (DS) and
ASIO. The former is suitable for recorders which can’t operate in ASIO mode, while the
latter can be chosen (for better performance) with players which can operate in ASIO
mode. Please consider that bit-perfect operation is ensured in ASIO mode only.
7.1.1. Configuring for Direct Sound with Windows XP
Connect the Joplin to your PC. Then, go to the Control Panel and launch the Sound and
Audio Peripherals utility.
Select the Audio tab. In the Predefined Peripheral drop-down menu of the Record area,
select “M2Tech Audio 2.0 Input” (see figure 16).
Figure 16
Copyright © 2012, M2Tech Srl
20
Page 21

JOPLIN
384kHz/32bit ANALOG-TO-DIGITAL CONVERTER
REVISION PRB – SEPTEMBER 2012
Then, select the “Voice” Tab (Figure 17). Again, select “M2Tech Audio 2.0 Input” in the
drop-down menu of the Record area. Click on OK button.
M2Tech
www.m2tech.biz
Figure 17
From now on, unless the Joplin is disconnected or settings are changed again, Joplin is
the audio peripheral all audio programs will use when operating in direct sound mode for
recording.
7.1.2. Configuring for ASIO with Windows XP
ASIO has no standard setting in Windows XP. ASIO must be selected in the specific
recorder you choose to use.
7.2. Configuring a PC with Windows Vista or Windows 7
A PC with Windows Vista or Windows 7 can use the Joplin in four different ways: Direct
Sound (DS), Kernel Streaming (KS), ASIO and WASAPI. DS is suitable for recorders
which can’t operate in Kernel Streaming mode nor with WASAPI; KS can be chosen (for
better performance) with recorders which can operate in Kernel Streaming mode. WASAPI
(Windows Audio Standard API) is a standard interface for audio players which allows to
Copyright © 2012, M2Tech Srl
21
Page 22

JOPLIN
384kHz/32bit ANALOG-TO-DIGITAL CONVERTER
REVISION PRB – SEPTEMBER 2012
get the same performance of KS with applications which can’t operate in KS mode, at the
cost of higher CPU load. More or less the same can be said about ASIO
M2Tech
www.m2tech.biz
7.2.1. Configuring for Direct Sound with Windows Vista or Windows 7
Open control Panel and select Hardware and Sounds. Under Audio, click on Manage
Audio Devices. The following windows will appear. Click on the “Recording” tab and select
“M2Tech Joplin” as predefined device. Then, click on OK.
Figure 18
7.2.2. Configuring for Kernel Streaming with Windows Vista or Windows 7
As for Windows XP, Kernel Streaming has no standard setting in Windows Vista and
Windows 7. KS must be selected in the specific recorder you choose to use.
Copyright © 2012, M2Tech Srl
22
Page 23

JOPLIN
384kHz/32bit ANALOG-TO-DIGITAL CONVERTER
REVISION PRB – SEPTEMBER 2012
M2Tech
www.m2tech.biz
7.2.3. Configuring for ASIO with Windows Vista or Windows 7
As it happens with Kernel Streaming, ASIO cannot be directly accessed. ASIO must be
selected in the specific recorder you choose to use.
7.2.4. Configuring for WASAPI with Windows Vista or Windows 7
As it happens with Kernel Streaming, WASAPI cannot be directly accessed. WASAPI must
be selected in the specific recorder you choose to use.
7.3. Configuring a Mac
Go to System Preferences and select Sounds. The following windows will appear. Select
“M2Tech USB 2.0 Audio In” for input as indicated in Figure 19.
Figure 19
Copyright © 2012, M2Tech Srl
23
Page 24

JOPLIN
384kHz/32bit ANALOG-TO-DIGITAL CONVERTER
REVISION PRB – SEPTEMBER 2012
M2Tech
www.m2tech.biz
8. Configuring the Joplin
The Joplin is a very versatile unit, with plenty of features to tailor its behaviour to the
source being used and the music program being played back. To configure all the features
and parameters, a menu can be accessed from both the front panel controls and the
remote.
The menu has a simple one-level structure in which all the parameters are accessed
sequentially. The following parameters can be set:
• Input gain;
• Input choice;
• Sampling frequency;
• Resolution;
• Equalization curve;
• Display dimming;
• High-pass (anti-rumble) filter;
• Low-pass (anti-hiss) filter;
• MPX filter.
All parameters are stored in a non-volatile memory, so that they are recalled after every
power-on.
Joplin
JoplinJoplin
8.1. Navigating the menu by the front panel controls
The menu is accessed by pressing the encoder knob once (Figure 1, 2). The first
parameter (Input gain) is displayed along with its current value. Successive pushes on the
encoder knob without rotating it will allow to access other parameter, in the order listed
above.
When the desired parameter is displayed, its value can be changed by simply rotating the
encoder knob. To confirm the new value for the current parameter, press the encoder knob
one last time.
To exit the menu without changing the displayed parameter value after the knob has been
rotated, press the Standby/Exit button once (Figure 1, 1). Anyway, the system resets to the
idle state after some seconds from the last operation on the knob.
8.2. Navigating the menu by the IR remote
The menu is accessed by pressing the Menu/Exit button on the remote once (Figure 3, 2).
The first parameter (Input gain) is displayed along with its current value.
To display other parameters, use the arrow up and arrow down buttons (Figure 3, 3).
Copyright © 2012, M2Tech Srl
24
Page 25

JOPLIN
384kHz/32bit ANALOG-TO-DIGITAL CONVERTER
REVISION PRB – SEPTEMBER 2012
When the desired parameter is displayed, its value can be changed using the arrow left
and arrow right buttons (Figure 3, 3). To confirm the new value for the current parameter,
press the OK button (Figure 3, 4).
To exit the menu without changing the displayed parameter value, press the Menu/Exit
button once again (Figure 3, 2). Anyway, the system resets to the idle state after some
seconds from the last operation on the knob.
M2Tech
www.m2tech.biz
8.3. Parameters meaning and choices
8.3.1. Input gain
The Joplin is provided with an analog front-end which gain can be set to 0dB or to any
value between 10dB and 65dB in 1dB steps. 0dB means that an input voltage of 1.7Vrms
produces and output of 0dBFS (that is the full dynamic of the ADC).
Sources with lower output levels (such as turntable, but also many cassette tape recorders
and also reel-to-reel tape recorders and tuners) may require a higher sensitivity to fully
exploit the dynamic of the Joplin. For example, a tuner with a nominal output voltage of
500mVrms would require a gain of 3, that is 10dB, to achieve the full ADC dynamic. As
well, a phono cartridge with 5mV output level would need 40dB gain. 65dB gain means
that the full dynamic is achieved with an input voltage as low as 0.95mVrms. This means
that even MC cartridges with output voltages as low as 0.5mV can be directly connected to
the Joplin, at the cost of a slight loss of dynamic.
The optimal gain is a matter of the source output level but also of the chosen equalization
curve. Rely on the VU meter and the clip indication to set the gain to the best setting for
the used source. Too high a gain, the unit will saturate and clip and the noise floor will be
higher than desired. Too low a gain and a part of the ADC dynamic will be lost.
8.3.2. Input choice
The Joplin has two inputs: one analog (called “line”) and one coaxial digital (called
“coax”). The use of the former is straightforward, the latter has been included to allow
users to connect a digital source to a computer which is not provided with a digital input,
making a bridge between the S/PDIF and the USB. Please note that the input sampling
frequency on the coax input (set by the digital source) is generally not the same as the
output sampling frequency (set by either the USB driver or the user via the configuration
menu). An asynchronous sample rate converter performs the sampling rate conversion
between input and output. When such an operation is not desired, user needs to set the
output sampling frequency to the same value as the incoming stream sampling frequency.
Copyright © 2012, M2Tech Srl
25
Page 26

JOPLIN
384kHz/32bit ANALOG-TO-DIGITAL CONVERTER
REVISION PRB – SEPTEMBER 2012
M2Tech
www.m2tech.biz
8.3.3. Sampling frequency
The Joplin can operate at the following sampling frequencies: 44.1kHz, 48kHz, 88.2kHz,
96kHz, 176.4kHz, 192kHz, 352.8kHz and 384kHz. The higher the sampling frequency, the
larger the files produced when recording the data out of the ADC, but also the higher the
sound quality. Thus, the choice of the sampling frequency is a trade-off between disk
usage and quality.
On the other hand, when using the Joplin to drive a digital amplifier, a DAC or a streaming
player for real-time playback, the best choice is always the highest sampling frequency
possible.
NOTE: The sampling frequency set by the user via the menu is used when the Joplin
is not connected to any computer, otherwise the parameter is ignored and the
actual sampling frequency is the one set by the computer audio control panel or by
the recorder program. The value set via the menu is restored as soon as the
computer is disconnected from the Joplin
NOTE: the highest sampling frequencies available (352.8kHz and 384kHz) are not
settable by the user via the menu. This is because in standalone use the only usable
outputs are the S/PDIF, AES/EBU and Toslink™ ones, which cannot operate at
sampling frequencies higher than 192kHz.
Joplin or it is shutdown.
JoplinJoplin
Joplin
JoplinJoplin
8.3.4. Resolution
The Joplin can operate at the following resolutions: 16 bits, 20 bits, 24 bits, 32 bits. As for
the sampling frequency, the higher the resolution, the larger the files produced when
recording from the source but also the higher the sound quality.
The ADC works natively at 32 bits. Thus, when a lower resolution is chosen, it is
necessary to get rid of some bits from each sample acquired by the ADC. This operation
generates distortion in the sound.
For this reason, The three lower resolution settings are available in two flavours: with
dithering and without dithering. The dither is a small random noise which is added to the
sound before reducing the resolution. The dither turns the distortion due to the resolution
cut into white noise, which is far more pleasant to the ear.
When SNR is a main goal and a little distortion can be tolerated, dither should be avoided.
On the other hand, when the best sound is desired at the cost of a little added noise, dither
is mandatory.
It should also be considered that the S/PDIF, AES/EBU and Toslink™ outputs can only
transfer 24 bits per channel. Thus, the “24D” value should be chosen to obtain the best
audio performance out of the digital outputs.
Copyright © 2012, M2Tech Srl
26
Page 27

JOPLIN
384kHz/32bit ANALOG-TO-DIGITAL CONVERTER
REVISION PRB – SEPTEMBER 2012
M2Tech
www.m2tech.biz
8.3.5. Equalization curve
The Joplin has been conceived to be used with a wide variety of different sources: tuners,
recorders, turntables. Some of these sources require an equalization to enjoy their sound.
The Joplin is provided with a wealth of equalization curves to satisfy even the most
requiring vinyl collector or reel-to-reel tapes enthusiast. Of course, equalization can be
disabled when the source doesn’t require it. This is obtained by choosing the “FLAT” value
for this parameter.
16 different curves for microgroove LP’s, 7 curves for 78rpm, 4 curves for reel-to-reel
tapes are available. Please see Section 9 for more details on equalization.
8.3.6. Display dimming
The Joplin display intensity can be set on 5 different levels. In addition, an automatic dim
mode allows for keeping the display off every time it’s not necessary to read it. When the
automatic mode (value “A”) is chosen, the display activates at the highest intensity every
time a control is accessed, then it remains active for 5 seconds after the last control is
accessed, finally turning off.
8.3.7. High pass (anti-rumble) filter
When acquiring a noisy source, it is sometimes desirable to cut some low frequencies. For
example, warped records or the output of a mike preamp or a mixer when recording live in
a windy setup. Two high-pass cut-off frequencies are available: 16Hz (for microgroove
LP’s and also for modern era stereo LP recorded with RIAA curve when the extra 16Hz
high pass is known to be used for the LP making) and 50Hz (for most 78rpm records
which have generally poor music contents below 50Hz). See Figure 20 for more details on
high-pass filter effect on frequency response.
8.3.8. Low pass (anti-hiss) filter
When acquiring a noisy source, it is sometimes desirable to cut some high frequencies.
For example, many 78rpm records have poor music contents above 5kHz and a strong
surface noise. Using a low-pass filter allows for a more intelligible sound. Two low-pass
cut-off frequencies are available: 5kHz and 10kHz. See Figure 20 for more details on lowpass filter effect on frequency response.
Copyright © 2012, M2Tech Srl
27
Page 28

JOPLIN
384kHz/32bit ANALOG-TO-DIGITAL CONVERTER
REVISION PRB – SEPTEMBER 2012
M2Tech
www.m2tech.biz
Figure 20
8.3.9. MPX filter
Stereo is obtained in FM broadcast by carrying the difference (L-R) information modulated
on a 38kHz carrier, while the sum information (L+R, that is the mono sound) is placed in
the channel’s baseband. Tuner are aware of receiving a stereo broadcast because of a
pilot tone of 19kHz which is also used to recreate the 38kHz frequency necessary to
demodulate the difference information to be blended with the sum information to get the
two stereo channels (in fact, (L+R)+(L-R) = 2L, while (L+R)-(L-R) = 2R). The 19kHz tone is
beyond the bandwidth of the FM tuner (which is limited to 16kHz), but is well into the ADC
bandwidth even at 44.1kHz sampling frequency. A 19kHz tone can be heard by a young
ear, and may also generate intermodulation distortion, so it could be useful to eliminate it.
The MPX filter does this by cutting away a very narrow band around 19kHz (Figure 21). It
presence is quite inaudible, but the effect on the overall sound can be surprisingly good.
Copyright © 2012, M2Tech Srl
28
Page 29

JOPLIN
384kHz/32bit ANALOG-TO-DIGITAL CONVERTER
REVISION PRB – SEPTEMBER 2012
M2Tech
www.m2tech.biz
29
Figure 21
Copyright © 2012, M2Tech Srl
Page 30

JOPLIN
1
0
1
2
,
5
16
202
5
31,
5
40
50638
0
100
125
1
6
0
2
0
0
2
5
0
315
400
5
0
0
630
800
1000
1
2
50
1600
2000
2
5
00
3
1
25
4
0
00
5000
6300
8
0
00
10000
12500
1
6
00
0
2
0
00
0
384kHz/32bit ANALOG-TO-DIGITAL CONVERTER
REVISION PRB – SEPTEMBER 2012
M2Tech
www.m2tech.biz
9. Notes on equalization
9.1. Why equalization is needed for records?
When cutting a record, two problems must be faced: the dynamic of the media, which is
related to the groove width and depth, thus to the record diameter and thickness, and the
surface noise. As low frequency tones tend to cut large, deep grooves, dynamic limits are
likely to be hit due to the low frequency content of the music being cut into the vinyl. On
the other hand, high frequency tones have generally low amplitude, thus they are likely to
be covered by surface noise.
To solve the above problems, an equalization is applied to the signal before sending it to
the cutting lathe: low frequencies are attenuated to reduce their dynamic and high
frequencies are amplified to elevate them over the surface noise floor.
Of course, the reversed equalization is applied to the signal coming out of a cartridge while
reading a disc: low frequencies are amplified and high frequencies are attenuated
(together with the surface noise which becomes less apparent).
Presently, all records are cut using the RIAA curve (Figure 22), which has been proposed
as a standard back in 1954. Both low frequencies amplification and high frequencies
attenuation for playback are clearly visible.
30
RIAA playback curve
70
60
50
40
dB
30
20
10
0
Hz
Figure 22
Copyright © 2012, M2Tech Srl
Page 31

JOPLIN
384kHz/32bit ANALOG-TO-DIGITAL CONVERTER
REVISION PRB – SEPTEMBER 2012
The curve has three parameters:
1. the turnover frequency, that is the frequency below which the low frequencies start
to be attenuated during the recording and amplified during the playback (500Hz for
RIAA);
2. the roll-off, that is the value of the high frequency amplification at 10kHz during
recording and attenuation during playback (16dB for RIAA);
3. the shelving frequency, that is the frequency below which the low frequency
attenuation during recording and high frequency amplification during playback are
limited to a fixed value (50Hz for RIAA).
Before the introduction of the RIAA standard curve, each recording company used her own
“secret” curve (FFRR from Decca/London, HMV, Capitol, Columbia…), with big troubles
for music lovers, because no amplifier could be provided with all equalization circuits to
accommodate all the different curves. For this reason, all amplifiers were provided with
tone controls: not to compensate speakers response nor room acoustics, but to adapt the
one and only phono curve provided with the amp to the different curves of the various
LP’s. Not only LP’s are equalized: equalization was used for 78rpm, too, as well with great
variety of choices.
A good phono preamplifier, or an ADC suitable for direct phono acquiring as is the Joplin,
should allow the vinyl collector to choose the right curve for each LP pressed before 1954
(but it’s known that many recording companies adopted the RIAA curve years after the
official introduction date. It seems that some eastern Europe labels only adopted RIAA
around 1975!).
Most collectors use the RIAA curve to listen to all their records, often resulting in a sound
which is not the one really recorded on master tape. To show the reason of that, Figure 23
on next page shows some of the most famous playback curves superimposed on the
same graph.
Differences are not subtle!
Note the different low frequency amplification due to different turnover frequencies and the
different high frequency attenuation due to different roll-offs. Also, note that no shelving is
applied to HMV and Capitol curves. In fact, shelving is a relatively recent choice to avoid
phono preamps excessively amplifying the turntable rumble, thus saturating. Older curves
were thought for playback systems in which the low frequency limit was relatively high (5080Hz) and for recordings with poor low frequency content, setups in which the turntable
rumble was not a problem.
M2Tech
www.m2tech.biz
Copyright © 2012, M2Tech Srl
31
Page 32

JOPLIN
10
12,5
16202
5
3
1
,
5
40
506380
1
0
0
1
2
5
1
6
0
2
0
0
250
315
4
0
0
5
0
0
6
3
0
8
0
0
1
0
0
0
0
1
2
5
0
0
16000
20000
Equalization of the signal of a Decca FFRR record being amplified by a RIAA phono
10
1
2
,5
1620
2
5
31,5
405063
80
100
125
1
6
0
2
0
0
2
5
0
315
400
5
0
0
630
800
1000
1250
1
6
00
2
0
00
2500
3125
4
0
00
5000
6300
8
0
00
1
0
00
0
12500
1
6
0
00
2
0
00
0
384kHz/32bit ANALOG-TO-DIGITAL CONVERTER
REVISION PRB – SEPTEMBER 2012
Eq comparison
80
70
60
M2Tech
www.m2tech.biz
50
40
dB
30
20
10
0
Hz
0
00
0
16002000
125
1
2500
312
5
4000500
0
63008
00
0
RIAA
FFRR
Capitol
Columbia
HMV
RCA
Figure 23
To better understand the effect of using the wrong equalization curve to play a record,
Figure 24 shows the relative level versus frequency of the music on a Decca FFRR record
when it is played through a RIAA phono input of a modern amplifier.
7
stage
32
6
5
4
3
2
dB
1
0
-1
-2
-3
Hz
Figure 24
Copyright © 2012, M2Tech Srl
Page 33

JOPLIN
384kHz/32bit ANALOG-TO-DIGITAL CONVERTER
REVISION PRB – SEPTEMBER 2012
See how low frequencies are excessively exalted due to the different turnover frequency
(50Hz for RIAA, 100Hz for FFRR), while high frequencies are attenuated more than
required due to the different roll-off (13.7dB for RIAA, 10.5dB for FFRR).
The sound of this setup would be much heavier and darker than intended by the recording
engineer, with booming low frequencies and muffled highs. A good recording would be
turned into a terrible one!
Now the need for a large collection of phono equalization curves is apparent.
M2Tech
www.m2tech.biz
9.2. List of phono equalization curves available on the Joplin
Joplin and notes
JoplinJoplin
on their usage
The Joplin is provided with 16 curves for microgroove LP’s and 7 curves for 78rpm’s. A
quick search on the Internet will allow you to find that the old record labels were more than
the figures above and that sometimes the same record label used different curves during
the years. Actually, it can be seen that some labels used the same curve as other labels
(e.g. Mercury used the same curve as Capitol), so the curve set provided with the Joplin is
the one which covers almost all the labels producing records between 1925 and 1954.
To find out more about which curve to use with a specific record, extensive literature may
be found on the Internet (for example: http://www.shellac.org/wams/wequal.html,
http://midimagic.sgc-hosting.com/mixcurve.htm ).
9.2.1. RIAA
It’s the standard curve of present days, used from almost all the record labels since 1954.
Its use is generally indicated on the record label and/or on the cover. It is actually the
same curve as the RCA’s “New Orthophonic”, so it can be used to play RCA records
claiming the use of that curve also.
During the years, RIAA made some amendments to the curve. The most relevant, after an
indication from IEC, was the addition of a 16Hz high pass to cope with the rumble
produced by warped records or noisy turntables. Not all cutting plants adopted this
amendment and it’s very difficult to tell whether or not it’s been adopted for a certain
pressing, as the curve is always indicated as RIAA.
The Joplin has not a specific RIAA/IEC curve, but it can be obtained by selecting RIAA
and the high-pass filter at 16Hz (see Section 8.3.7).
9.2.2. AES
AES (Audio Engineering Society) proposed a phono equalization curve back in 1951. As
far as we know, no label explicitly adopted it, but the discerning record collector may be
aware of its use, so it’s been included for completeness.
Copyright © 2012, M2Tech Srl
33
Page 34

JOPLIN
384kHz/32bit ANALOG-TO-DIGITAL CONVERTER
REVISION PRB – SEPTEMBER 2012
M2Tech
www.m2tech.biz
9.2.3. Angel (ANG)
Angel was a record label incorporated by EMI who produced great records.
9.2.4. Audiophile (AUDP)
Audiophile is known amongst record collectors for her great recordings, on both 78rpm
and microgroove LP. Acoustic Sounds proposed the reissue of some Audiophile
recordings on coloured heavy weight vinyl some 15 years ago. The label was mainly
devoted to jazz and blues.
9.2.5. Capitol (CAP)
Capitol had a large production of very good mono recordings.
9.2.6. Columbia (COL)
Columbia is the inventor of microgroove LP, which got to success after a market war
against RCA, who was sponsoring a 45rpm microgroove standard.
9.2.7. HMV
HMV (His Master’s Voice, after the painting with the dog Nipper listening to a
gramophone), formerly The Gramophone Company, is one of the oldest record labels
ever. It later became part of EMI when the latter bought Capitol, and had RCA as
shareholder for a certain time. From 1948 to 1954 recorded a lot of jazz, pop and classical
music, pressing LP’s with her proprietary curve.
9.2.8. Decca/London FFRR
The English Decca developed her FFRR LP curve based on the 78rpm eq curve with the
same name. Most of the great recordings of the stereo era (after 1954) were also
produced in mono and used to make the mono LP’s cut using the FFRR curve.
9.2.9. MGM
The famous entertainment company also produced LP’s during the mono era using her
proprietary curve.
Copyright © 2012, M2Tech Srl
34
Page 35

JOPLIN
384kHz/32bit ANALOG-TO-DIGITAL CONVERTER
REVISION PRB – SEPTEMBER 2012
M2Tech
www.m2tech.biz
9.2.10. NAB
NAB (National Association of Broadcasters) was founded by commercial radio companies
to address many aspects of their activity. Amongst these, the technical issue related to
broadcasting. NAB proposed a phono curve to be used for the records which were made
at the time especially for broadcasting, with live and rare recordings of famous artists. The
record collector who own these records should use this curve to play them.
9.2.11. Oiseau-Lyre (OYLR)
Before being purchased by Decca, Oiseau-Lyre made many great recordings of classical
music.
9.2.12. Pacific Jazz (PACJ)
Jazz was a great business in USA after WWII, so some specialized labels chose to
develop their eq curves to press their microgroove LP’s. Pacific Jazz was one of them.
9.2.13. Philips
Of course, Philips, one of the greatest European brands related to music, developed its eq
curve.
9.2.14. RCA (RCA1, RCA2 and RCAO)
RCA developed many equalization curves, to be used with her 45rpm’s and, later, for the
microgroove LP’s after losing the format war against Columbia, so it’s difficult to say which
curve was used for a certain record. The Joplin offers three choices, based on record’s
year of cutting. RCA1 is the oldest. The newest, RCA Orthophonic, is the one on which the
“New Orthopohonic” was developed, thus leading to RIAA.
9.2.15. Brunswick
Brunswick is a very old record company who mainly produced 78rpm’s. The curve offered
with the Joplin is the one used for the 78rpm’s.
9.2.16. Columbia 1925, Columbia 1938 and Columbia England (CO25, CO38
and COLE)
Columbia was very active cutting 78rpm’s before introducing the microgroove LP. She
used different curves in different years: one between 1925 and 1938 and one from 1938
Copyright © 2012, M2Tech Srl
35
Page 36

JOPLIN
384kHz/32bit ANALOG-TO-DIGITAL CONVERTER
REVISION PRB – SEPTEMBER 2012
on. Not only: her English branch, Columbia England, developed her own curve for 78rpm’s
cut in Great Britain.
M2Tech
www.m2tech.biz
9.2.17. Decca FFRR 78rpm (DEC)
This is the equalization curve for 78rpm used by Decca, from which the LP FFRR was later
developed.
9.2.18. MGM 78rpm (MGM7)
Before cutting LP’s, MGM produced 78rpm’s, which were cut using MGM proprietary curve
for 78rpm.
9.2.19. Victor 1938-47 and Victor 1947-52 (VIC3 and VIC4)
Victor is an old company, later purchased by RCA, who produced 78rpm since 1925. The
curve adopted between 1925 and 1938 is same as Columbia type 1925 (See 9.2.16), later
curves are offered with specific choices.
9.3. Equalizing tapes: why and when
Recording and playback heads used in tape recorders have a frequency response which is
strongly non linear and heavily dependent on the magnetic flux in the tape. Moreover, the
tape hiss increases with frequency. For this reason, also tapes are equalized. Two
equalization standards exist: NAB, mainly used in USA and Japan, and CCIR (later IEC),
mainly used in Europe. To make things more complicated, each standard has different
curves for different tape speeds, as flux changes with speed.
The main difference between records and tapes is that almost no turntable is provided with
a built-in phono amplifier/equalizer, while almost all reel-to-reel tape recorders are. Thus,
providing tape equalizations could seem to be useless.
Not always. Reel-to-reel recorders lovers know that most of the machines around, built
between ’60 and the beginning of ’80, have generally great transports and heads but
barely adequate, if not poor, electronics. For this reason, some recorders owners ask
technicians to jump the playback circuit of the recorder, taking the signal right out of the
playback head and feeding a dedicated external amp/equalizer.
Same thing can be done with the Joplin, connecting the playback head of a tape recorder
to its analog inputs (eventually via an impedance adaptor), adjusting the gain as required
and selecting the appropriate equalization curve for the tape being played back. The signal
is acquired, equalized in digital domain and sent to a computer for recording or to a DAC
or digital amplifier for real-time listening. The ample bandwidth of the Joplin set to 96, 192
or 384kHz, and its high resolution are more than adequate to accommodate the tape
recorder performance.
Copyright © 2012, M2Tech Srl
36
Page 37

JOPLIN
384kHz/32bit ANALOG-TO-DIGITAL CONVERTER
REVISION PRB – SEPTEMBER 2012
The Joplin is provided with 4 curves for tapes, 2 for NAB and 2 for CCIR/IEC.
M2Tech
www.m2tech.biz
9.3.1. CCIR/IEC for 9.5cm/s and 19cm/s (3¾ ips and 7½ ips) and CCIR/IEC for
38cm/s (15 ips) (IEC1 and IEC3)
CCIR (Comité Consultatif International pour la Radio) was an European Committee similar
to NAB. They proposed an equalization for reel-to-reel tape recorders which was adopted
by most European manufacturers. It has been said by many that the CCIR equalization is
better than the NAB one. Anyway, the choice of one or the other standard is only an option
when recording, as some tape recorders have both equalizers. For playback, the choice
depends on the standard used to record the tape. For the record, all commercial prerecorded tapes available on eBay or other auction sites are made using NAB.
9.3.2. NAB for 9.5cm/s (3¾ ips) and NAB for 19cm/s (7½ ips)
NAB proposed two equalization curves for tapes, one for 3¾ ips (curve B) and one for 7½
ips (curve A), plus an amendment for 15 ips which, anyway, was suggested to avoid (7½
ips was the preferred speed for tape recorders used in broadcasts). The Joplin offers both
curve A and curve B.
9.4. Acquiring with equalization
When no equalization curve is used, then the rightmost led of each VU-meter bar turn on
right before clipping (that is, when the input signal is -1dBFS). Should the input signal
further increase its amplitude, the ADC saturates and the “CLIP” warning is displayed on
the display. User should avoid getting the “CLIP” warning appear at any time during
acquisition.
When an equalization curve is used, then the VU meter is not consistent with the effective
risk of saturation, as it indicates the signal downstream the equalization. User should then
pay attention to “CLIP” warning appearing even when the bar is not completely lit. As a
general rule, ADC clipping may occur when using equalization at a VU meter level such as
the 4-5 rightmost leds are still off (this indicates a post-equalization level of -5/-8dB).
9.5. Interfacing a cartridge or a tape head
The Joplin has an input impedance of 47 kOhms, that is a standard value that fits all linelevel sources and also MM cartridges. On the other hand, MC cartridges and also tape
heads may need a different load impedance.
Due to the small size of the Joplin back panel, no room was available to add some
impedance matching switches. Should an impedance matching be necessary, we suggest
users to use a “T” adaptor and RCA plugs in which tip and ring are connected with a
resistor or a capacitor of the required impedance value.
Copyright © 2012, M2Tech Srl
37
Page 38

JOPLIN
384kHz/32bit ANALOG-TO-DIGITAL CONVERTER
REVISION PRB – SEPTEMBER 2012
M2Tech
www.m2tech.biz
9.6. Recording programs
When acquiring on a computer with the Joplin, a suitable program of application needs to
be used. Several different programs of packages are available for Windows, Mac and
Linux, some of them are freeware, others need to be purchased.
M2Tech
them, nevertheless some indications are useful for the Joplin owner in order to have a
glance of the available features and the possibilities offered by the various programs.
A free package for Windows is Audacity (http://audacity.sourceforge.net/?lang=en) which
allows for recording up to 192kHz 24bits and generates files in WAV, FLAC and other
compressed formats. Several options dedicated to the vinyl are available, as automatic
tracks cut to divide the acquisition of an LP side into the single tracks, and de-clicking.
A much more professional package, Cubase, is sold by Steinberg
(http://www.steinberg.net/en/products/cubase/start.html) and can operate up to 192kHz
32bits.
Mac users may take advantage from PureVinyl (http://www.channld.com/pure-vinyl.html)
by Channel D, as well as from SoundBlade by Sonic Studio
(http://www.sonicstudio.com/sonic/products/sonic_productoverview.html). For sure, free
apps are available as well.
For a very complete list of ripping programs, please check
http://www.recordcollectorsguild.org/modules.php?op=modload&name=sections&file=inde
x&req=viewarticle&artid=6&page=1.
cannot be aware of all the available programs, nor specifically recommend any of
Copyright © 2012, M2Tech Srl
38
Page 39

JOPLIN
384kHz/32bit ANALOG-TO-DIGITAL CONVERTER
REVISION PRB – SEPTEMBER 2012
M2Tech
www.m2tech.biz
10. Using a power supply different from the standard one
The Joplin comes with a 15V/1A wall adapter. This unit has been tested to comply with
the Joplin’s power and supply quality requirements and allows for very high performance.
Nevertheless, a better (and more expensive) unit could squeeze the last degree of
performance from the Joplin.
M2Tech
Joplin, called PALMER POWER STATION (www.m2tech.biz/palmer.html ). It is the best choice
to push the Joplin performance to the highest level possible.
We advice users that using a different power supply than the one included in the package
or the PALMER POWER STATION will void the warranty: no warranty claim will be
acknowledged for damages due to the use of power supply different from the one included
in the package or other units specifically designed by
Should the user decide to use another power supply, the specifications listed in section 12
must be observed.
manufactures a high-quality, battery-powered power supply to be used with the
M2Tech
for the Joplin.
11. Cleaning the unit
The Joplin should be cleaned with a soft, damp cloth. Do not use alcohol or other cleaning
liquids to avoid damaging the unit.
Copyright © 2012, M2Tech Srl
39
Page 40

JOPLIN
384kHz/32bit ANALOG-TO-DIGITAL CONVERTER
REVISION PRB – SEPTEMBER 2012
M2Tech
www.m2tech.biz
12. Technical Specifications
Sampling frequencies: ...................... 44.1, 48, 88.2, 96, 176.4, 192, 352.8*, 384kHz*
Resolution:........................................ 16 to 32 bits**
USB: ................................................. 2.0 high speed (USB 2.0 Audio compliant)
Clock precision: ................................ +/-10ppm 0 to 60°C, 2ppm typical @ 25°C
Analog input sensitivity: .................... 1.7V
0.95mVrms (0dBFS, gain = 65dB)
Analog input impedance: .................. 47 kOhms
Analog input gain .............................. 0, 10-65dB (1dB steps)
S/PDIF input sensitivity: .................... 0.5Vpp +/-0.1V
S/PDIF input impedance: .................. 75 Ohms
S/PDIF output voltage:...................... 0.5Vpp +/-0.1V
S/PDIF output impedance:................ 75 Ohms
AES/EBU output voltage:.................. 2Vpp +/- 0.5V
AES/EBU output impedance:............ 110 Ohms
THD+N:............................................. 0.0004% (1kHz @ 0dBFS, fs=192kHz, 0-20kHz)
S/N ratio:........................................... 122dB (A-weighted, fs=384kHz)
Minimal requirements:....................... 1.3GHz CPU clock, 1GB RAM, 2.0 USB port
Supply voltage: ................................. 15VDC
Power consumption: ......................... 290mA
Size: ................................................. 200x50x200mm (w x h x d, cabinet)
200x55x210mm (w x h x d, with connectors and feet)
360x120x260mm (w x h x d, box)
Weight:.............................................. 1.7kg (ADC only)
2.5kg (box)
* USB only.
** 32 bits are provided on USB output only.
(0dBFS, gain = 0dB)
rms
Copyright © 2012, M2Tech Srl
40
 Loading...