

Manual
PC-Software Save`n carry PP 50 pro
©

1 Directory
Directory
1
Directory .............................................................................2
2 Introduction........................................................................3
2.1 Product description ..............................................................3
2.2 Pictograms...........................................................................3
2.3 Software installation.............................................................4
2.4 Hardware installation............................................................5
3 Program start and languages............................................8
3.1 Start icon..............................................................................8
3.2 Define type of time switch....................................................8
3.3 Adjustment of the language ................................................. 8
4 Overview, menu and symbols...........................................9
4.1 Program overview................................................................9
4.1.1 Table.................................................................................................9
4.1.2 Chart.................................................................................................9
4.1.3 Switch the mode of view...................................................................9
4.1.4 Refresh chart ..................................................................................10
4.1.5 Choose the period you are interested in!........................................10
4.2 Menu bar - overview...........................................................11
4.3 Toolbar...............................................................................11
5 Programming of a new switching time...........................12
5.1 Programming of a standard switching time ........................12
5.2 SP special program (yearly time switch)............................ 13
5.2.1 Activation of a special program (yearly time switch).......................14
5.3 Add-Ons.............................................................................15
5.3.1 Extra switching time........................................................................15
5.3.2 Permanent programm.....................................................................15
6 Data key functions...........................................................16
6.1 Read data-key.................................................................... 16
6.2 Write data-key....................................................................16
7 Further information.......................................................... 17
7.1 Refreshing the chart...........................................................17
7.2 Duplicate............................................................................17
7.3 Cycle function .................................................................... 18
7.3.1 Cycle activation and definition ........................................................18
7.4 Saving / Location project files ............................................ 18
8 Address and Updates......................................................19
8.1 Address Hugo Müller..........................................................19
8.2 Updates..............................................................................19
Seite 2
2 Introduction
2.1 Product description
Introduction
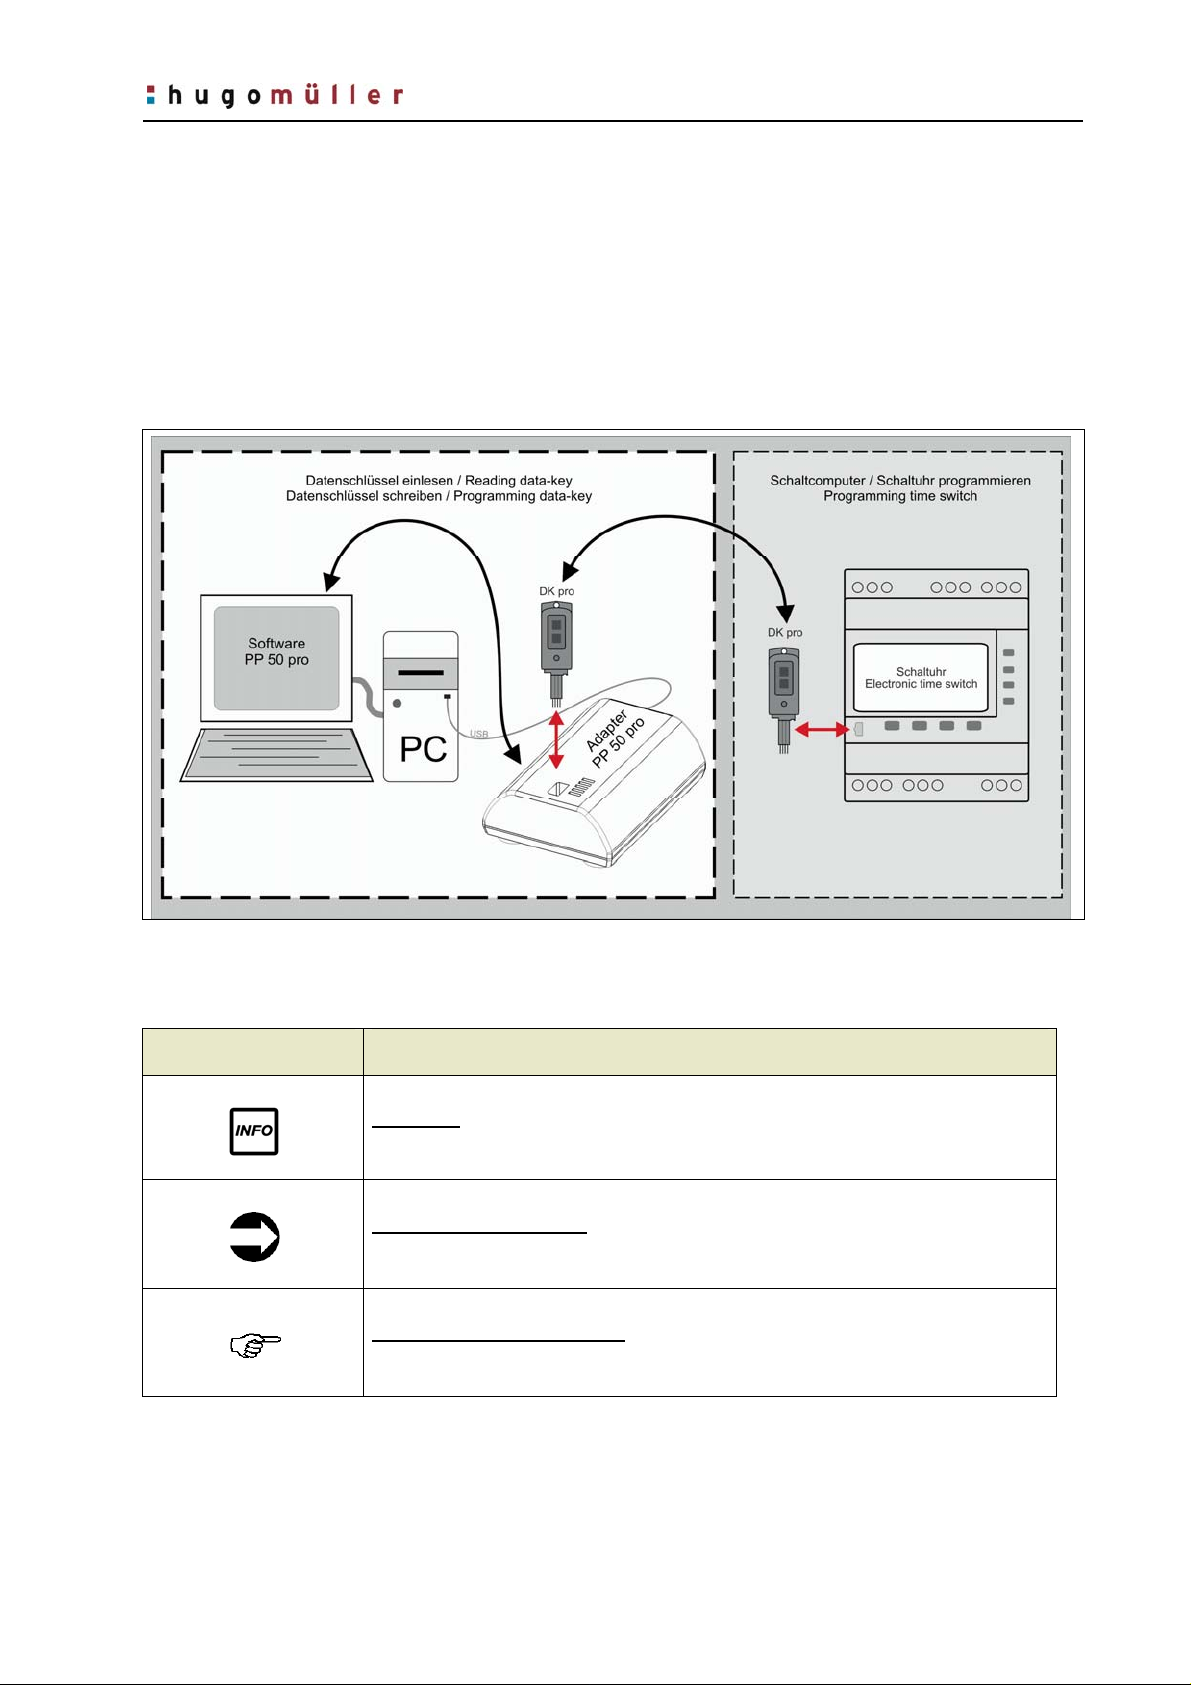
The PC-Software „Save`n carry PP 50 pro“ is a tool for a qu ick and
easy creation of a switching program. Via USB-adapter an d data key
„DK pro“ the switching program can be transferred between the PC
and the PC.
2.2 Pictograms
Pictograms Definition
Information
The pictogram offers helpful information.
Title of a handling sequence
The pictogram shows the handling sequence.
Elements of a handling sequence
The pictogram prompts the user to carry out an action!!
Seite 3
2.3 Software installation
Introduction
Please carry out following instructions for installing the
programming software Save`n carry PP 50 pro successfully under
Windows (2000, XP, VISTA):
 Software installation
) Insert CD Save`n carry PP 50 pro into CD/DVD-drive.
) Installation starts automatically, please carry-out advises of
the routine.
Save`n carry PP 50 pro will add an icon on the desktop and
will be added within the start menu
(Start menu: Start -> programs -> Save`n carry -> PP 50 pro)
If the installation does NOT start automatically please
carry out following sequence:
) Open CD-directory and execute file PP50pro.exe
) Follow the on screen instructions
Seite 4
2.4 Hardware installation
Introduction
Please carry-out following instructions for installing the USB
adapter PP 50 pro successfully under Windows (2000, XP, VISTA):
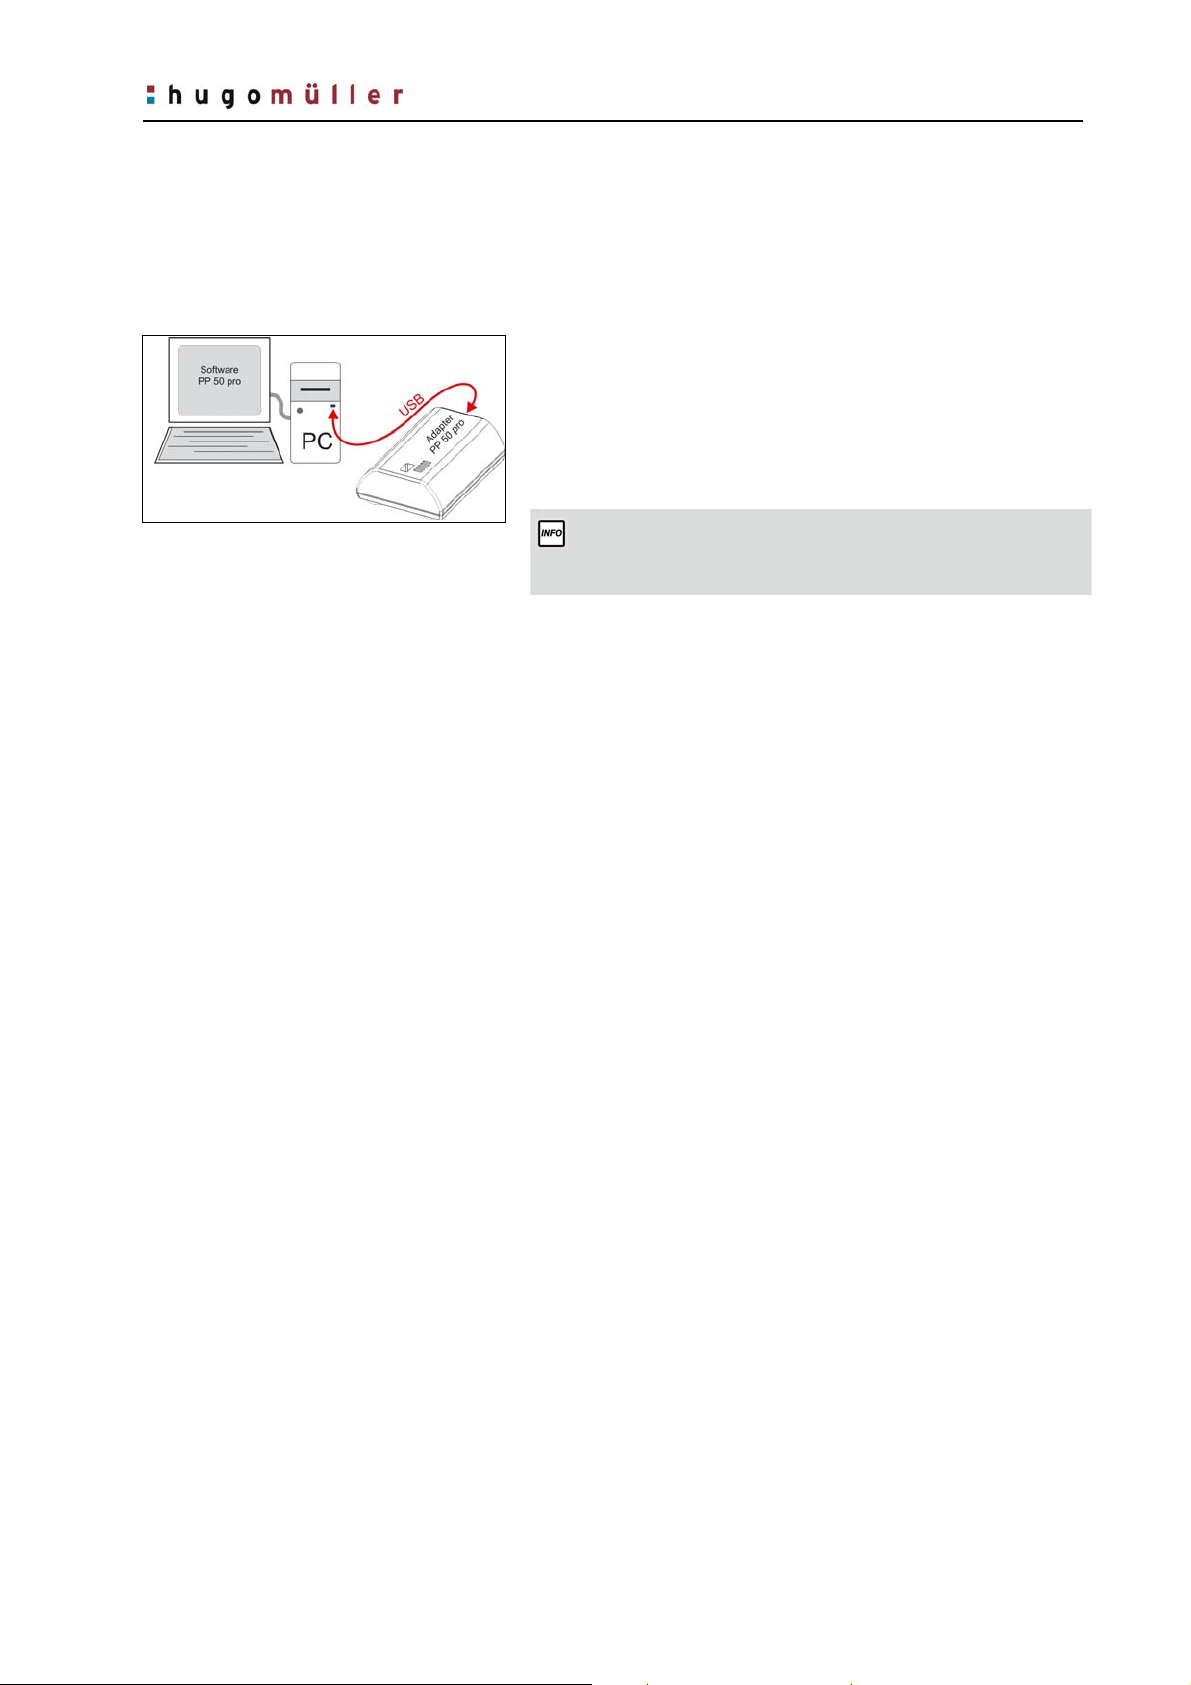
 Step 1 – Connect USB-cable
) Connect B-USB-connector of the cable (included in delivery)
to adapter PP 50 pro.
) Connect A-USB-connector of the cable with your computer
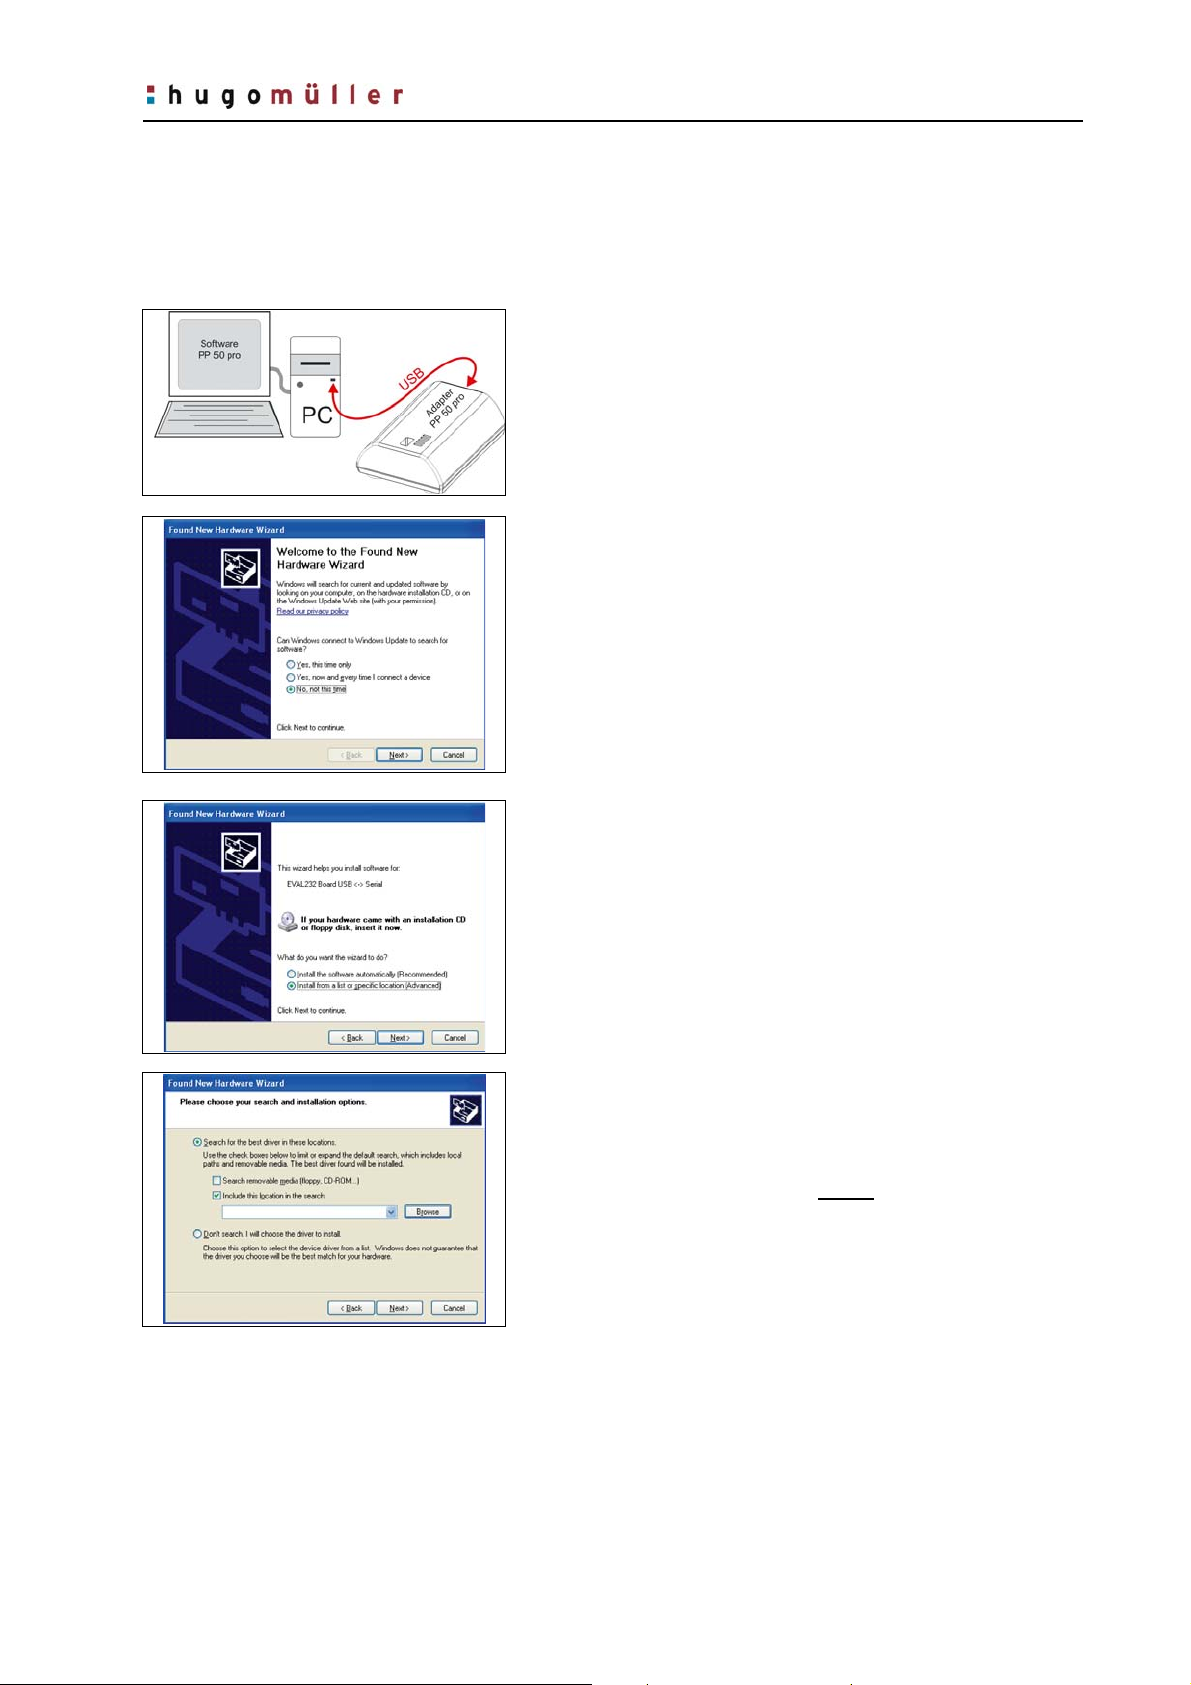
 Step 2 – Driver installation
After Step 1 the hardware installing tool of windows starts
automatically:
) Choose: „No, ...“
) Confirm with „Next >“
) Choose: „Install from a list or specific location“
) Confirm with „Next >“
) Confirm: „Search for the best driver in these location“
) Confirm: „Include this location in the search“
) ´Click „Browse“
) Enter the path to sub-folder „treiber
PP 50 pro“
“ on CD „Save´n carry
) Confirm with „Next >“
Seite 5
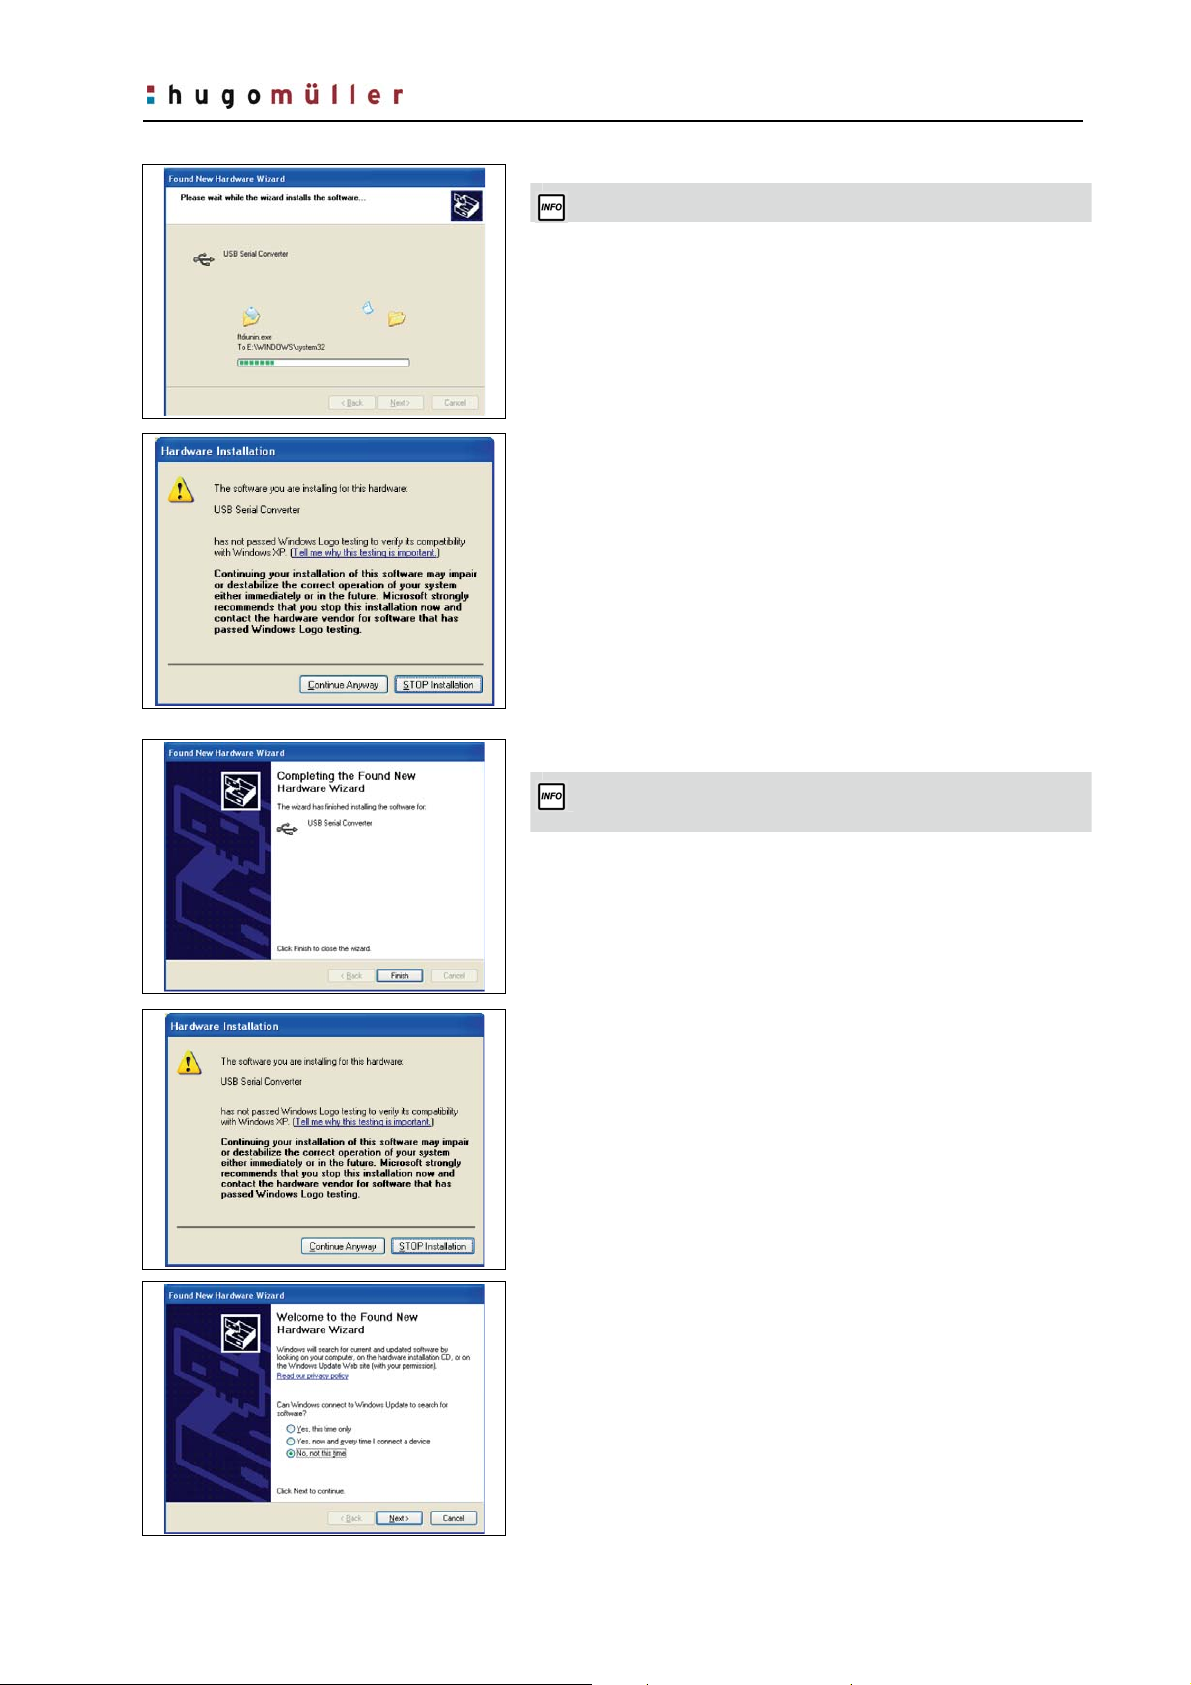
Windows copies driver
Introduction
) Confirm security note with „Continue Anyway“.
) Complete the first part of the installation by clicking „Finish“.
Further installation Steps required, the procedure will start
automatically.
) Confirm again security note with „Continue Anyway“.
) Choose: „No, ...“
) Confirm with „Next >“
Seite 6

Introduction
) Choose: „Install from a list or specific location“
) Confirm with „Next >“
) Confirm: „Search for the best driver in these location“
) Confirm: „Include this location in the search“
) ´Click „Browse“
) Enter the path to sub-folder „treiber
PP 50 pro“
“ on CD „Save´n carry
) confirm with „Next >“
Windows copies driver
) Complete the the installation by clicking „Finish“.
The hardware is now ready to use
Seite 7

3 Program start and languages
3.1 Start icon
Program start and languages
) Start the PC-software Save`n carry PP 50 pro by a double
click of the PP 50 pro start-symbol
OR
) Execute Save`n carry PP 50 pro within “windows” start
menu Start -> Programs -> Save`n carry -> PP 50 pro.
3.2 Define type of time switch
3.3 Adjustment of the language
The program starts with a welcome window.
) Choose the desired product type.
) Confirm with „Next“
 Step 1
To change the languages please proceed as follows:
) Click menu „Adjustment“
) Click menu „Language“
 Step 2
) Choose language
) Confirm with „OK“
 Step 3
) Restart the program
The new language configuration will be activated only after a
restart of the software
Seite 8

4 Overview, menu and symbols
4.1 Program overview
You have the choice between two different views of your switching
program: Table and chart.
4.1.1 Table
Default view is „table“ and the switching Steps are listed as lines.
4.1.2 Chart
Overview, menu and symbols
4.1.3 Switch the mode of view
You always have the possibility to switch between table and chart.
If you switch to chart, three different charts with time dependent
switching status of all channels will appear.
PLEASE NOTE: Special program (SP 1 … 10) and extra switching
times (EXTRA) will NOT shown in the chart!!!
 Show chart / Refresh chart
) Click „Refresh chart“ symbol
 Show table
) Click „Show table“ symbol
Seite 9

4.1.4 Refresh chart
If you are working with the chart, new switching times will only be
shown if you refresh the chart by click „Refresh chart” symbol.
 Refresh chart
) Click „Refresh chart“ symbol
4.1.5 Choose the period you are interested in!
Overview, menu and symbols
New switching Steps will only be shown after refreshing the
chart.
The more memory locations you use, the longer it takes to
refresh/show the chart. This can take up to 1 minute!
1. Yearly / 2. Weekly / 3. Daily / 4. Hourly
Seite 10

4.2 Menu bar - overview
File
New project
Open
Open last project
Close project
Save project
Save project as…
Export file as CSV
Edit
New switching time
Duplicate
Delete
Data-key
Reading data-key
Programming data-key
4.3 Toolbar
The toolbar of Save`n carry PP 50 pro is as follows:
Adjustments
Language
Project description
Channel description
Astro settings
Cycle settings
Location project files
Overview, menu and symbols
View
Status bar
Toolbar
Show chart
Show table
Help
Manual
About…
Icon Name: Description
New switching time: Enter new switching time
Duplicate: Enter new standard switching time on the basis on an existing one
Open project: Open existing project file
Save project
Delete: Delete marked switching Step
CSV export: Export switching program as coma separated file
Reading data-key: Read memory of the data key into the PC
oder
Programming data-key: Write switching program from the PC-program to the data key
1. Cycle settings (black): Open cycle settings
2. Cycle settings (gray): Cycle function is not available for this time switch
Refresh chart: Refreshes or shows charts of the time dependent switching functions
Show table: Show switching program as table
Seite 11

5 Programming of a new switching time
5.1 Programming of a standard switching time
 Step 1
) Click „New switching time“
OR
) Double click an empty line within the table
Window „new switching time“ opens!!
 Step 2
) Choose the channel / channels for which you would like to
enter a switching time
) Confirm with „OK >>“
Programming of a new switching time
 Step 3
) Choose program type STANDARD
) Confirm with „OK >>“
 Step 4
) Choose the desired switching function
Standard weekly time switch: On-/Off or Pulse
Astro timers: On-/Off or ASTRO
Weekly time switch with cycle function:: On-/Off, Pulse, Cycle*
Yearly time switches: On-/Off, Pulse, Cycle*
*Will only be offered after activation of Cycle(s)
) Confirm „OK >>“
 Further steps
Further programming steps depend on the choice of the switching
function (Step 4). Follow further advices within window „new
switching time“
Seite 12

5.2 SP special program (yearly time switch)
The yearly function is fulfilled by the use of so called special
(weekly) programs (SP) which are later activated (called up) by
date as often as required. You can define up to 10 different special
programs with arbitrary switching Steps (of course only within the
total number of 300 memory locations).
The SP will only be applied if activated by date (SP Activation by
date see point 5.2.1).
 Step 1
) Click „New switching time“
OR
) Double click an empty line within the table
Window „bew switching time“ opens!!
Programming of a new switching time
 Step 2
 Step 3
 Step 4
) Choose the channel / channels for which you would like to
enter a switching time
) Confirm with „OK >>“
If you define a new switching time „SP = special program“,
you have to choose a SP-Number FIRST (SP 1 – SP 10).
You can enter within each special program (SP 1 – SP 10)
as many switching Steps as required (limited only by the
max. quantity of memory locations).
) Choose program type SP 1 – SP 10
) Confirm with „OK >>“
) Choose the desired switching function
Within yearly time switches: On/Off, Pulse, Cycle*, (Activate SP**)
*Will only be offered after activation of Cycle(s)
**activation SP is NO switching function
) Confirm with „OK >>“
Seite 13

Programming of a new switching time
 Further steps
Further programming steps depend on the choice of the switching
function (Step 4). Follow further advices within window „new
switching time“
A SP will only be applied after Activation (call up by date) -> see
point 5.2.1.
5.2.1 Activation of a special pr ogram (yearly time switch)
Special programs will only be applied if activated (called up) by
date. SP can be called up as often as required (limited only by the
max. quantity of memory locations).
The activation requires start date and end date of the date period.
 Step 1
) Click „New switching time“
OR
) Double click an empty line within the table
Window „new switching time“ opens!!
 Step 2
) Choose the channel(s) for which you would like to activate a
special program
) Confirm with „OK >>“
 Step 3
) Choose the SP (SP 1 – SP 10) to be activated
) Confirm with „OK >>“
 Step 4
) Choose „Activate SP“ as switching function
) Confirm with „OK >>“
Seite 14

Programming of a new switching time
 Step 5
) Enter „start date“ and „end date“ of your special program
) Confirm with „OK >>“
 Step 6
) A „Special function“ can be activated optionally (standard is
NO special function).
) Confirm with „OK >>“
5.3 Add-Ons
5.3.1 Extra s witching time
5.3.2 Permanent program
The following functions are NOT included in all types of time
switches!!!
Extra switching time is one single additional switching time that can
be programmed by date. This switching time is executed
additionally to the active switching program.
If you like to program an extra switching time choose “EXTRA” as
program type.
The program type permanent (permanent by date, holiday
program) is a permanent On or Off status for the desired channel
and activated by date (start date till end date). A permanent
switching program can be called up as often as required (limited
only by the max. quantity of memory locations).
If you like to program an extra switching time choose
„PERMANENT“ as program type.
Seite 15

6 Data key functions
6.1 Read data-key
Data key functions
For a successful data transfer the time switch and the type of time
switch of the PC project must be identical!!!
 Step 1
) Click symbol „read data-key“
Window „Save`n carry pro“ opens if project is empty!!
 Step 2
) Click „read data-key“
Data is now read from the data key!!
6.2 Write data-key
 Step 3
) Confirm with „OK“
All switching times will be shown on the screen of the PC!!
 Step 1
) Click symbol „programming data-key“
Window „Save`n carry pro“ opens!!
 Step 2
) Click „write to data-key“
Data is now written to the data-key!!
Existing data on the data-key will be lost
 Step 3
) Confirm with „OK“
All switching times which are marked for transfer are written
to the data-key and can be copied to the time switch of the
same type. If you do so, the existing switching program of
the time switch will be over written.
Seite 16

7 Further information
7.1 Refreshing the chart
7.2 Duplicate
Further information
While working with the chart view and if you enter a new switching
time you have to refresh the chart before you see the switching
time in the diagram.
 Refresh chart
) click „Refresh chart“ symbol
New switching Steps will only be shown after refreshing the
chart.
The more memory locations you use, the longer it takes to
refresh/show the chart.
This can take up to 1 minute!
Standard switching times “On/Off“, “Pulse“ or “Cycle“ can quickly
and easily be duplicated.
 Step 1
) Click symbol „duplicate“
Window „Save´n carry pro“ opens!!
 Step 2
) This offset value is added to the switching time chosen for
copy
) Confirm with „OK“
Seite 17

7.3 Cycle function
7.3.1 Cycle activation and definition
Further information
The cycle is not offered as switching function until you have defined
a cycle. You have to define the cycle you would like to use first as
follows:
 Step 1
) click symbol „cycle-settings“
Window „cycle settings“ opens!!
 Step 2
7.4 Saving / Location project files
Up to 4 different cycles can be activated and defined within this
window.
) Activate the desired cycle number (click)
 Step 3
The max. pulse and pause length is 9:59:59 (h:mm:ss) each
) Define Pulse and Pause length
) Confirm with „OK“
 Location of project files
) Click „Adjustments“
) Click sub-menu „Location project files“
) Define a project directory
Seite 18

8 Address and Updates
8.1 Address Hugo Müller
8.2 Updates
Address and Updates
Hugo Müller GmbH & Co KG
Sturmbühlstraße 145-149
D-78054 VS-Schwenningen
Tel.: +49 7720 80 836
Fax: +49 7720 31 083
E-Mail: info@hugo-mueller.de
Internet: www.hugo-mueller.de
The most current version of „Save`n carry PP 50 pro“ is available
on the website of Hugo Müller:
www.hugo-mueller.de
Seite 19
 Loading...