

Lytx SF Series, ER-SF64, ER-SF1, ER-SF300 Installation Instructions Manual

Lytx®SF-Series Event Recorder
Installation Instructions
(North America Edition)
Last updated: 4/1/2019
THE DEVICE SHOULD BE INSTALLED AND MAINTAINED BY QUALIFIED TECHNICIANS. Only a properly qualified technician
should install and maintain the SF-Series device. Any electrical work should be performed only by an ASE (minimum T6
& L2), MECP or equivalent certified technician with an expertise in installing and troubleshooting advanced vehicle
onboard components including multiplexed circuits. Lytx, Inc. disclaims all responsibility for any damages arising from
improper installation a nd maintenance of the SF-Series device.
This guide is protected as co nfidential and proprietary information of Lytx, Inc. Copying and use of this guide for any
purpose other than installing SF-Series in vehicles of Lytx, Inc.’s customers is expressly prohibited. Information
contained in this guide was in effect as of the date set forth above and is subject to change without notice or liability.
Lytx, Inc. reserves the right to revise the information presented or to discontinue the production of pa rts described at any
time.
©2019 Lytx, Inc. - Confidential & Proprietary.
Page 1 of 51
(North America Edition)

Contents
Safety Instructions 4
Installation Safety Warnings 4
Driver Safety Warnings 4
Adherence to Applicable Local, State and Federal Laws 5
USA Federal Communications Commission (FCC) Notice 5
Canada – Industry Canada Notice 6
Suppliers Declaration of Conformance 7
Device Installation Overview 8
What’s Covered in the Installation Procedures 8
Installation Warnings 8
Before You Begin 8
Materials 9
Required Tools 11
Optional Tools 11
Optional Parts 11
Device Overview 12
Download and Install the Lytx Installation Tool 12
System Requirements for the Lytx Installation Tool 13
Instructions for Download and Installation 13
SF-Series Installation Procedures 15
Mount the Bracket and Event Recorder 15
Review Mounting Location Guidelines 16
Prepare the Mounting Location 18
Attach the Bracket and Event Recorder 19
Connect Electrical Wiring 19
Wiring Safety Warnings 20
Electrical Connection Overview Diagram 21
Wiring and Wire Termination Suggestions 23
Basic Event Recorder Electrical Connections 25
Connect to the Vehicle J1939 Network 27
Connect Turn Signals and Brake Inputs (ER-SF300 devices only) 28
Route the Device Power Cable 29
Run Testing and Complete Installation 30
Test Event Creation and Upload 31
Test Wire Connections and Settings in the Lytx Installation Tool 31
Camera Measurements (ER-SF300 devices only) 32
Initiate Diagnostic Mode 33
Complete Installation 34
Conduct Final Checks 34
Installation of Optional Parts 36
Overhead Mounting Bracket Installation Procedures 36
©2019 Lytx, Inc. - Confidential & Proprietary.
Page 2 of 51
(North America Edition)

Materials 36
Attach the Overhead Mounting Bracket and Event Recorder 36
Extended Mounting Arm Installation Procedures 38
Materials 38
Mounting Arm Overview 38
Alternative Mounting Locations 38
Installation Instructions 39
Remote Push Button Installation Procedures 40
Materials 41
Mount the Remote Push Button 41
Assign the Input in the Lytx Installation Tool 41
Maintenance & Troubleshooting 42
Maintenance 42
Troubleshooting Installation Issues 42
Troubleshooting Issues After Installation 45
Initiate Diagnostic Mode 46
Troubleshooting in Diagnostic Mode 47
Uninstalling the Device 49
Materials 49
Instructions 49
Contact Technical Support 51
©2019 Lytx, Inc. - Confidential & Proprietary.
Page 3 of 51
(North America Edition)

Safety Instructions
Installation Safety Warnings
Read and follow the instructions and precautions in this guide and all documents referenced
in this guide when installing this device. Always refer to the vehicle manufacturer’s service
manual for proper installation and wiring of any aftermarket devices, including the SF-Series
device. Failure to do so may result in property damage and/or personal injury.
WARNING: Park the vehicle on a level surface before beginning any maintenance or install-
ation. Block the wheels to prevent the vehicle from moving. Never work under a vehicle
supported only by jacks as jacks can slip and fall over.
WARNING: All wires that carry electrical current to the Lytx device must be fused. Failure to
fuse the power, ground, and ignition wires can lead to serious personal injury and/or property damage. If any wires or cables containing fuses/fuse boxes need to be cut or otherwise
shortened, always be certain to replace such fuses/fuse boxes or install new ones.
WARNING: Wire Protection: Take all necessary measures to protect all wire runs through a
metal surface with a grommet or other device and all wire runs outside the vehicle cab with
a loom. Always protect against wire fatigue and harness abrasion by properly attaching
wires at closely spaced intervals, while avoiding contact with sharp edges or doing anything
else that might result in exposed wires. All wires should be secured with tie wraps at least
every one foot (30 cm/300 mm) or less. Do not over-tighten any tie wraps.
EXPLOSION HAZARD: Do not disconnect equipment unless power has been removed and the
area is known to be non-hazardous.
WARNING: Substituting or supplementing components may impair suitability and perform-
ance. If you are missing any components contact Lytx Technical Support Center at
925.732.4246 or email support@lytx.com.
WARNING: Wear safe eye protection to prevent serious eye injury when you perform vehicle
maintenance or service.
Driver Safety Warnings
WARNING: In order to reduce the potential danger of injuries, the driver and front passenger
must always be correctly seated with seat belts correctly fastened when operating the
vehicle.
DISCLAIMER: The Lytx Event Recorder is a driver aid only, not a substitute for a safe,
conscientious driver. The Lytx Event Recorder cannot compensate for a driver who is
distracted, inattentive or impaired by fatigue, drugs or alcohol. Whether or not the Lytx Event
Recorder is in use, it is always the responsibility of the driver to take appropriate corrective
action. Never wait for the device to provide a warning before taking measures to avoid an
accident. Failure to do so can result in serious personal injury or death or severe property
damage.
©2019 Lytx, Inc. - Confidential & Proprietary.
Page 4 of 51
(North America Edition)

Always, it is the driver’s responsibility to:
l Use safe driving techniques
l Exercise proper judgment
l Maintain a safe speed and distance between vehicles
l Take measures to avoid an accident
l Comply with all applicable laws and regulations
WARNING: In certain conditions, including inclement weather, low visibility, certain road
conditions (including poor lane markings, construction zones, dirt roads, heavy or complicated traffic, and curvy and winding roads), the Lytx Event Recorder may have limited to no
functionality. The Lytx Event Recorder may not detect certain objects such as motorcyclists,
bicyclists or pedestrians even in the most ideal conditions. Always keep the lens and view of
the Lytx Event Recorder unobstructed and properly calibrated so as not to inhibit function.
Driving in certain conditions or any interference with the Lytx Event Recorder can result in
false, few or no warnings. The driver must always monitor traffic and surroundings and take
measures to avoid an accident; failure to do so can result in serious personal injury or death
or severe property damage.
WARNING: If the Lytx Event Recorder is not functioning properly at any time, please contact
your supervisor and have the device inspected immediately to correct the issue. Whether or
not the Lytx Event Recorder is functioning, it is the driver’s responsibility to maintain vehicle
control; failure to do so can result in serious personal injury or death or severe property
damage.
CAUTION: While cleaning the device or the vehicle cab, do not apply compressed air or
cleaning solutions (such as Windex) to the Lytx device. Usage of these products may cause
damage to the device.
WARNING: The optional livestream feature may have an approximate delay of 10 seconds.
Livestream should never be used to assist the driver in operating the vehicle. The driver is
responsible for the safe operation of the vehicle at all times and must always take measures
to avoid a collision.
Adherence to Applicable Local, State and Federal Laws
WARNING: Some countries/regions/jurisdictions have adopted, or may in the future adopt,
laws that prohibit objects from being mounted on a vehicle’s windshield or other locations in
a vehicle. You are responsible for complying with such laws, and Lytx, Inc. does not accept
responsibility for your failure to do so.
USA Federal Communications Commission (FCC) Notice
This device complies with part 15 of the FCC Rules. Operation is subject to the following two
conditions: (1) This device may not cause harmful interference, and (2) this device must
accept any interference received, including interference that may cause undesired operation.
©2019 Lytx, Inc. - Confidential & Proprietary.
Page 5 of 51
(North America Edition)

CAUTION: Changes or modifications to this product not expressly approved by Lytx, Inc. could
void the user's authority to operate this equipment.
NOTE: This equipment has been tested and found to comply with the limits for a Class B
digital device, pursuant to part 15 of the FCC Rules. This equipment generates, uses, and can
radiate radio frequency energy and, if not installed and used in accordance with the instructions, may cause harmful interference to radio communications.
It is recommended that the antenna must not be co-located or operating in conjunction with
any other antenna or radio transmitter.
CAUTION: Exposure to Radio Frequency Radiation. To comply with FCC RF exposure compli-
ance requirements, for mobile configurations, a separation distance of at least 20 cm must
be maintained between the antenna of this device and all persons. This device must not be
co-located or operating in conjunction with any other antenna or transmitter.
Canada – Industry Canada Notice
This device complies with Industry Canada license-exempt RSS standard(s). Operation is
subject to the following two conditions: (1) This device may not cause harmful interference,
and (2) this device must accept any interference received, including interference that may
cause undesired operation.
This Class B digital apparatus complies with Canadian ICES-003.
Cet appareil est conforme aux normes RSS exemptes de licence d'Industrie Canada. Son utilisation est soumise aux deux conditions suivantes: (1) Cet appareil ne doit pas causer
d'interférences nuisibles et (2) cet appareil doit accepter toute interférence reçue, y compris
les interférences susceptibles de provoquer un fonctionnement indésirable.
Cet appareil numérique de la classe B est conforme à la norme NMB-003 du Canada.
CAUTION: Exposure to Radio Frequency Radiation.To comply with RSS 102 RF exposure
compliance requirements, for mobile configurations, a separation distance of at least 20 cm
must be maintained between the antenna of this device and all persons. This device must not
be co-located or operating in conjunction with any other antenna or transmitter.
Pour se conformer aux exigences de conformité 102 RSS RF exposition, pour des configurations mobiles, une distance de séparation d'au moins 20 cm doit être maintenue entre
l'antenne de cet appareil et toutes les personnes. Cet appareil ne doit pas être co-localisés
ou fonctionnant en conjonction avec une autre antenne ou transmetteur.
©2019 Lytx, Inc. - Confidential & Proprietary.
Page 6 of 51
(North America Edition)

Suppliers Declaration of Conformance
We, Lytx, Inc., hereby declare that the
product listed below, to which this Declaration of Conformity relates, is in
conformity with the Standards and other
Normative Documents listed below:
Manufacturer’s Name & Address:
Lytx, Inc.
9785 Towne Centre Drive
San Diego, CA 92121 USA
Declares that the following product:
Product Name: Video Event Recorder
Product Model:
l ER-SF1 (DC-6000-001)
l ER-SF64 (DC-6000-001)
l ER-SF300 (DC-6000-030)
The product specified above carries the
marking, by complying with the essential
requirements and provisions. Conformity
is based upon the following standards:
Manufacturer’s Contact:
Lytx, Inc.
9785 Towne Centre Drive
San Diego, CA 92121 USA
Phone Number: (858) 430-4000
Fax Number: (858) 430-4001
EMC & Radio:
CFR Title 47 FCC Part 15, Subpart B and C,
Class B
Industry Canada ICES-003, Class B
Industry Canada RSS-Gen
Industry Canada RSS-210 (applicable only to
cellular modem variant)
Industry Canada RSS-247
Mexico IFETEL
Mexico NOM-001-SCFI-1993
©2019 Lytx, Inc. - Confidential & Proprietary.
Page 7 of 51
(North America Edition)

Device Installation Overview
What’s Covered in the Installation Procedures
The following instructions are for installation of the Lytx SF-Series event recorder with
optional ECM connectivity for ECM data collection. These instructions cover these sections:
1. Mounting of the device using the standard method
2. Electrical connections and cable routing
3. Testing
These instructions also cover installation of these optional parts:
l Overhead Mounting Bracket
l Extended Mounting Arm
l Remote Push Button
Installation Warnings
THE DEVICE SHOULD BE INSTALLED AND MAINTAINED BY QUALIFIED TECHNICIANS. Only a
properly qualified technician should install and maintain the SF-Series device. Any electrical
work should be performed only by an ASE (minimum T6 & L2), MECP or equivalent certified
technician with an expertise in installing and troubleshooting advanced vehicle onboard
components including multiplexed circuits. Lytx, Inc. disclaims all responsibility for any
damages arising from improper installation and maintenance of the SF-Series device.
THIS GUIDE IS NOT A SUBSTITUTE FOR A QUALIFIED TECHNICIAN.
THE DEVICE SHOULD NOT INTERFERE WITH THE VEHICLE’S COMPUTER SYSTEMS. The SFSeries device interfaces with the vehicle’s computer systems to capture data for safety
analysis. However, it should not interfere with any of the vehicle’s computer systems. If there
is a malfunction of the vehicle’s computer systems after installation, contact Lytx Technical
Support Center at 925.732.4246 or email support@lytx.com immediately. Lytx recommends
that you do not drive the vehicle until the malfunction is resolved. Lytx, Inc. disclaims all
responsibility for any damages arising from improper installation and maintenance of the
SF-Series device.
Before You Begin
1. Read and understand all instructions and procedures provided for the vehicle and the
SF-Series device. This guide must be read in conjunction with the vehicle manufacturer’s service manual, the Mounting Regulations, all instructions and procedures
issued by Lytx, Inc., and any applicable federal, state, provincial and local laws that
prohibit mounting devices on vehicle’s windshield or other locations in a vehicle.
©2019 Lytx, Inc. - Confidential & Proprietary.
Page 8 of 51
(North America Edition)
2. Read and observe all warnings, cautions, and safety notices in the instructions and
procedures. They provide information to avoid serious personal injury, damage to
components or both.
3. Follow the vehicle’s maintenance, service, installation and diagnostic guidelines
provided by the manufacturer of the vehicle.
4. Check for laws or regulations that prohibit objects from being mounted on a vehicle’s
windshield or other locations in a vehicle. You are responsible for complying with such
laws and regulations, and Lytx, Inc. does not accept responsibility for your failure to do
so.
5. Use special tools and safety equipment to avoid serious personal injury and damage to
components.
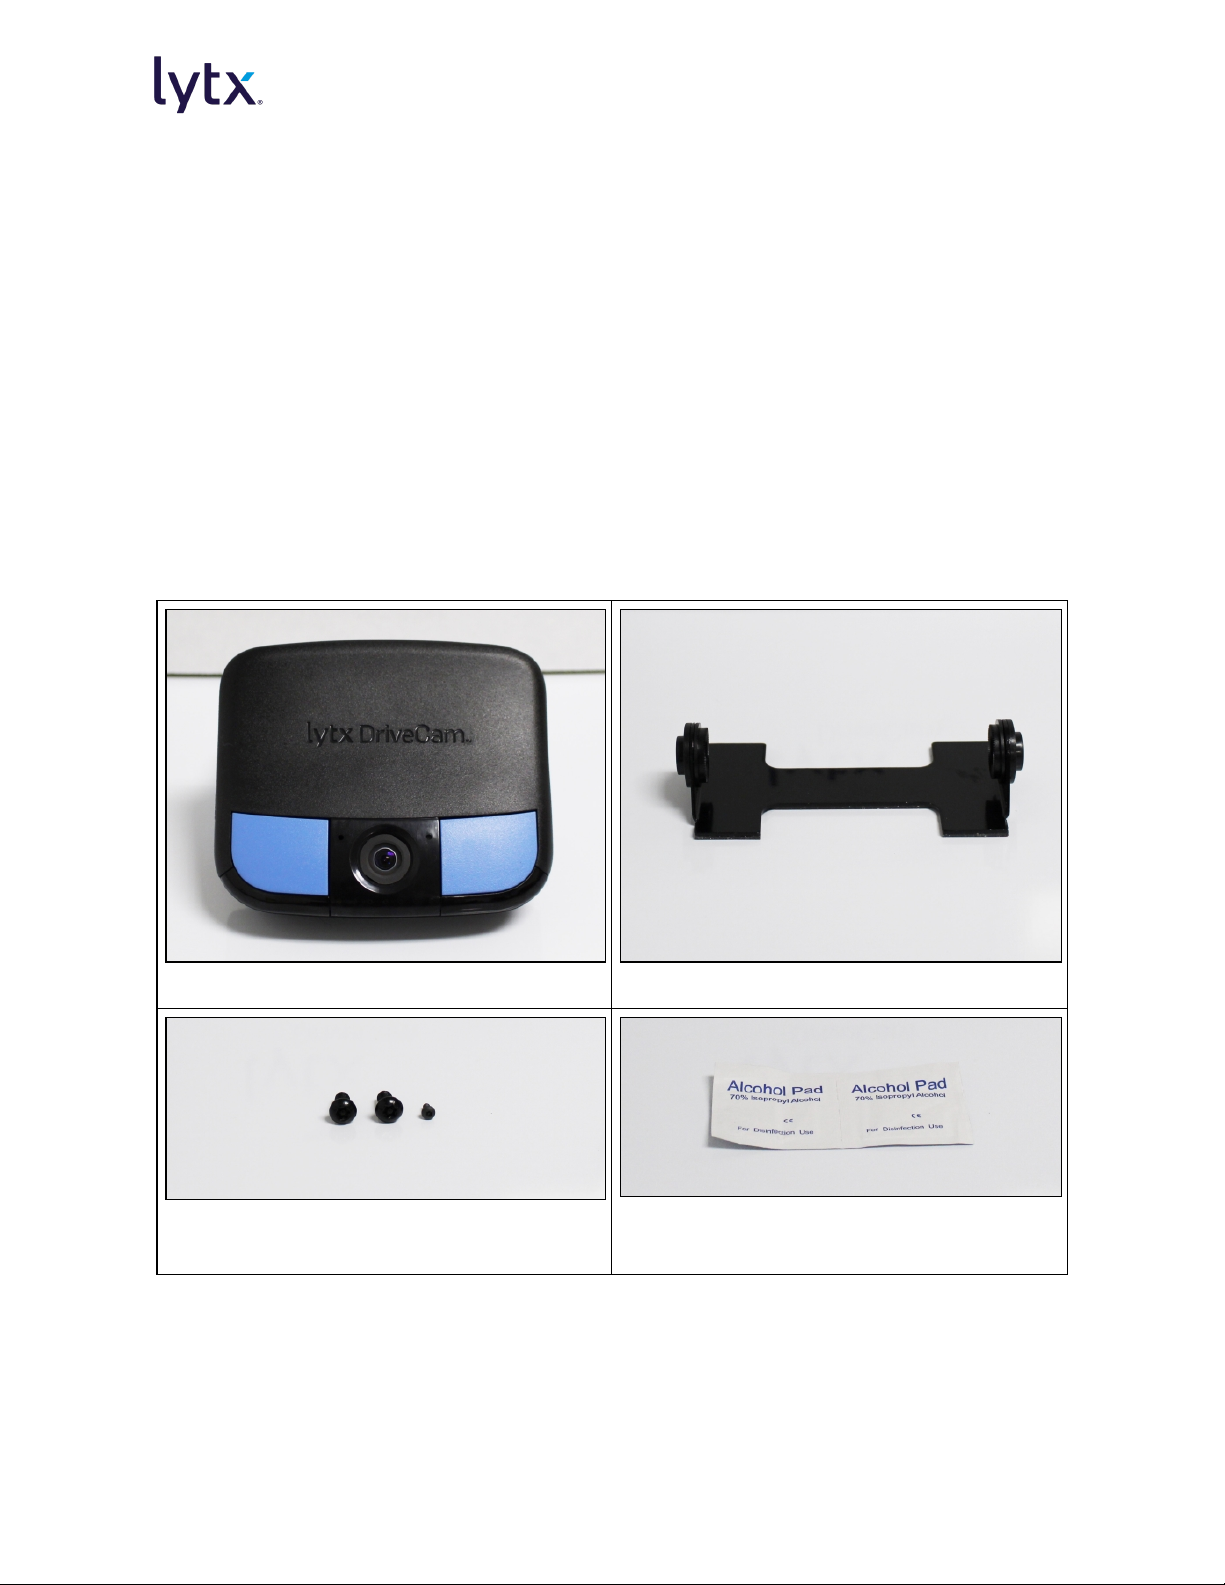
Materials
The following materials are included in your SF-Series Event Recorder kit:
SF-Series unit Standard mounting bracket
Two (2) T-27 security Torx screws
One (1) T-8 security Torx screw
©2019 Lytx, Inc. - Confidential & Proprietary.
Alcohol wipe
Page 9 of 51
(North America Edition)
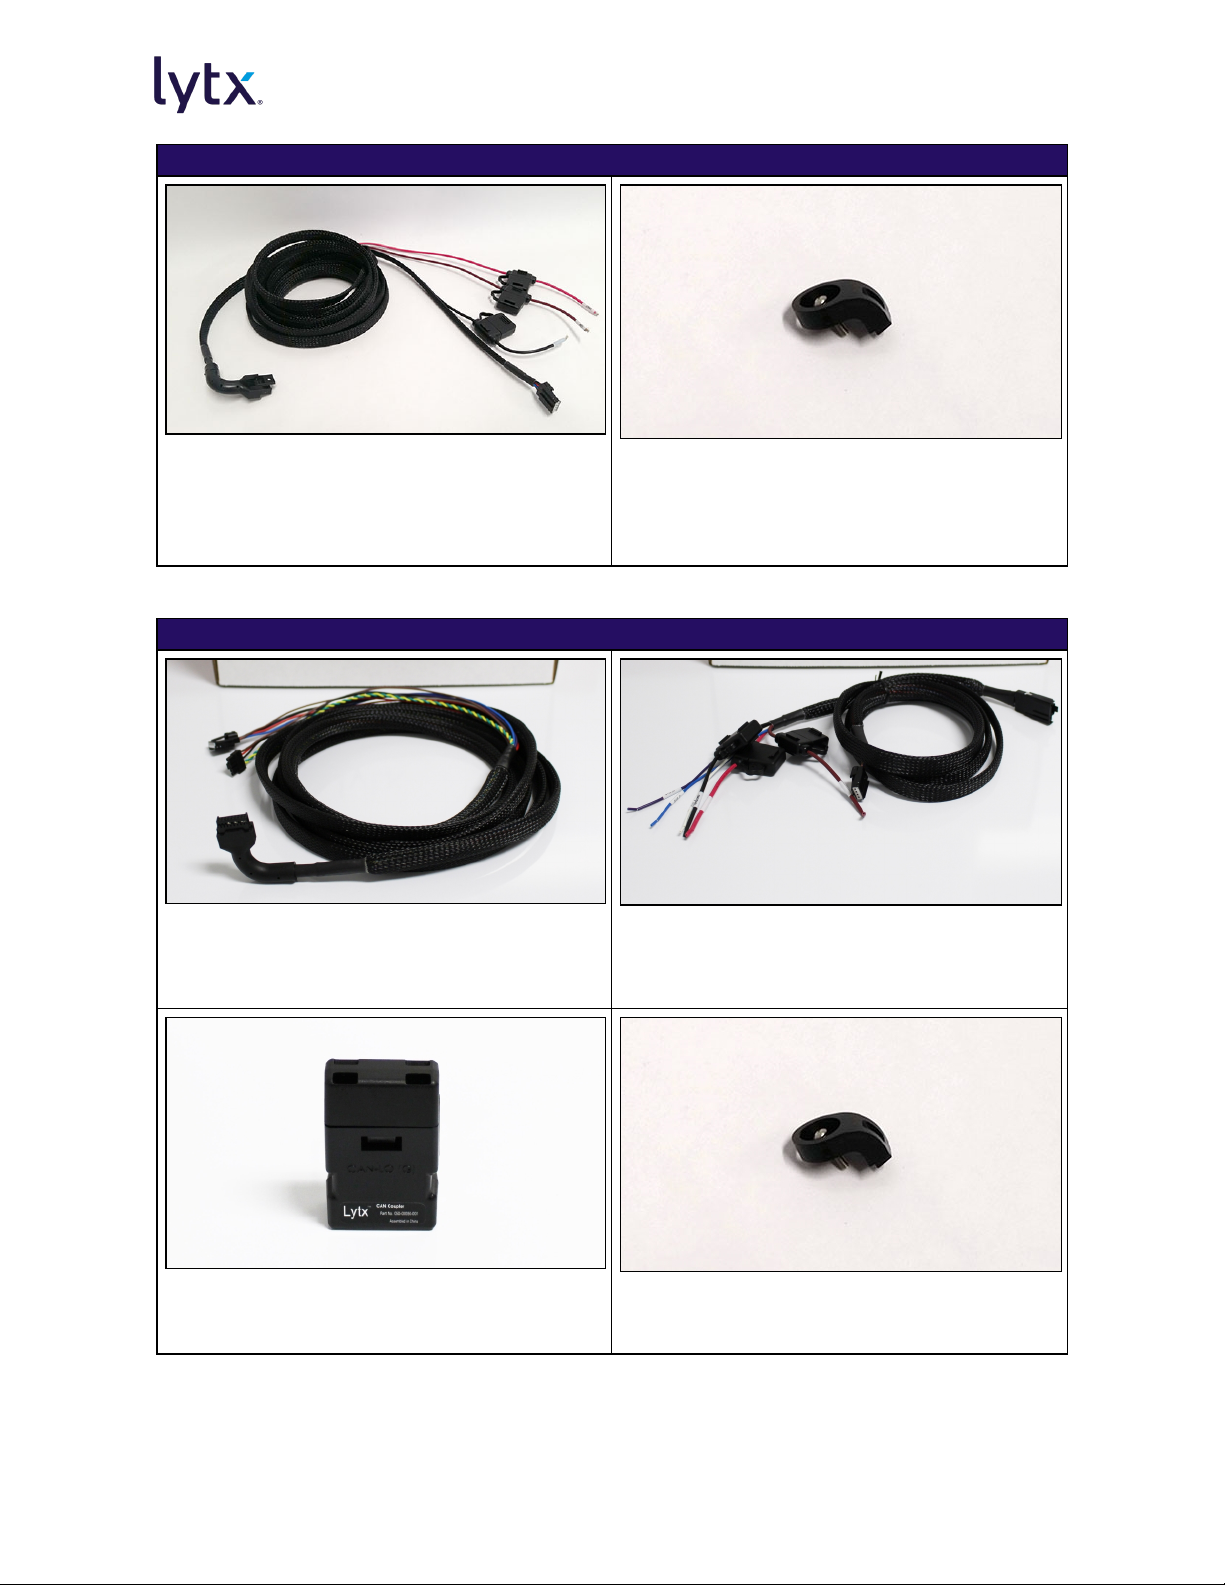
For standard, power-only installations:
Non-ECM, Device Power Only Cable with
inline fuses:
Red and Black wires = 5-amp fuses
Brown wire = 1-amp fuse
For installations including J1939 and/or ActiveVision connections:
Device Power Cable
Tamper Prevention Clip
Vehicle Interface Cable with inline fuses:
Red and Black wires = 5-amp fuses
Brown wire = 1-amp fuse
J1939 CAN Coupler
Only included in kits for J1939 networks
©2019 Lytx, Inc. - Confidential & Proprietary.
Tamper Prevention Clip
Page 10 of 51
(North America Edition)

If you are missing any materials, contact the Lytx Technical Support Center at 925.732.4246
or email support@lytx.com to obtain the necessary materials before beginning installation.
Supplementing or substituting shipped materials could impair suitability and performance.
Required Tools
In addition to all guides and reference documents that you should read before beginning
installation, the following tools are required for installation:
l Wire cutter
l Wire crimper
l Voltmeter or multimeter
l Vehicle panel removal tool
l Flat-blade screwdriver
l Cable ties
l Phillips screwdriver
l Electric tape
l Tape measure
l Marking pen
l T-27 security Torx bit
l T-8 security Torx bit
l Micro USB cable
l Vehicle manufacturer recommended tools
Consult the vehicle’s maintenance, service, installation, and diagnostic guidelines provided by
the manufacturer of the vehicle for any additional tools needed.
Optional Tools
The following tools are not required for installation but can be helpful:
l Cordless driver
l Add-a-circuits or vehicle-specific connectors
l Grommets and looms
l Flashlight
l Vehicle-specific panel clips
l Heating torch
l Heat shrink
l Soldering iron
l Paper towels/shop towel
l Utility knife
Optional Parts
The following optional parts may be purchased from Lytx:
l Overhead Mounting Bracket
l Extended Mounting Arm
l Remote Push Button (Standard)
l Clamshell Security Cover (Both Lenses)
l Power Cable Extension (20-ft)
©2019 Lytx, Inc. - Confidential & Proprietary.
l Solder
l Self-amalgamating tape
Page 11 of 51
(North America Edition)
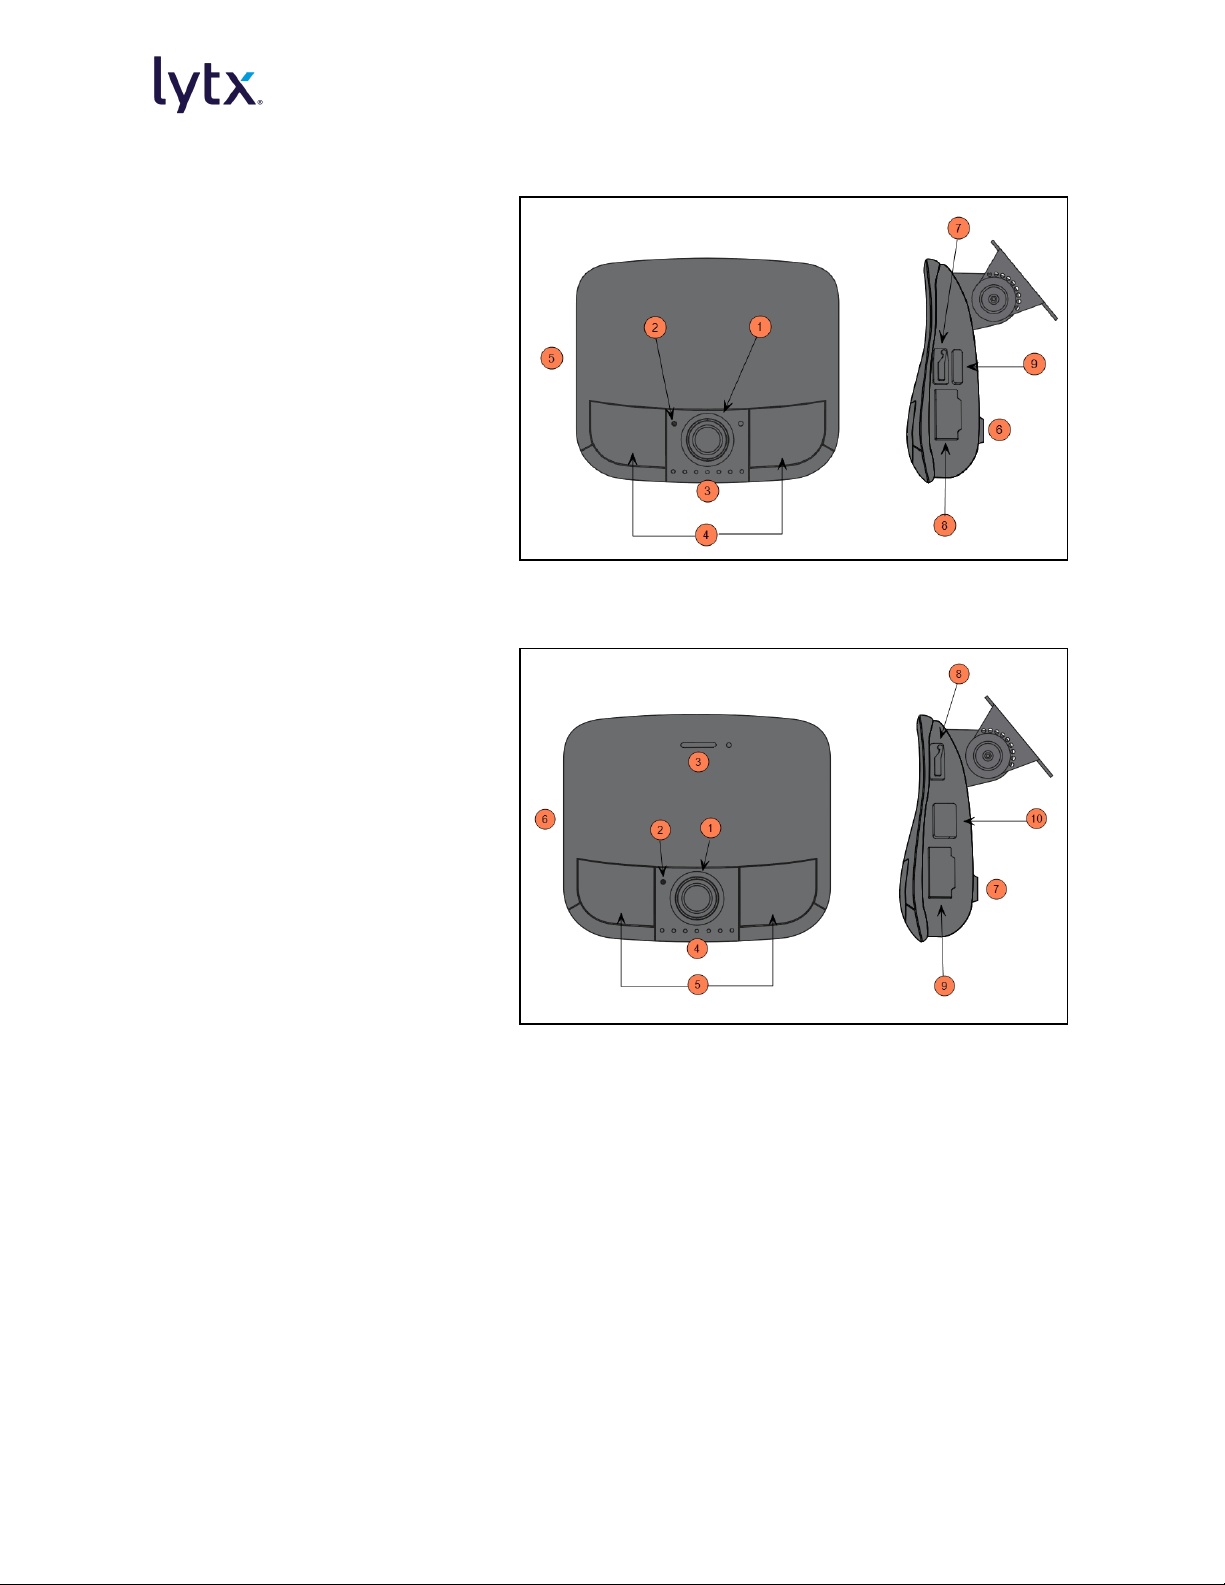
Device Overview
ER-SF1 and ER-SF64 devices:
1. Interior-facing lens
2. Microphone
3. LED status lights
4. Manual record buttons
5. Serial number (on side of
device)
6. Exterior-facing lens
7. Micro-USB port
8. Device Power Cable port
9. SIM card port
ER-SF300 devices:
1. Interior-facing lens
2. Microphone
3. Ambient light sensor
4. LED status lights
5. Manual record buttons
6. Serial number (on side of
device)
7. Exterior-facing lens
8. Micro-USB port
9. Device Power Cable port
10. SIM card and SD card port
Download and Install the Lytx Installation Tool
The Lytx Installation Tool is a software wizard that walks you through device testing step-bystep at the end of installation. If this tool hasn't already been downloaded and installed on
your laptop prior to device installation, follow the steps below.
©2019 Lytx, Inc. - Confidential & Proprietary.
Page 12 of 51
(North America Edition)
Obtain the Job File
In addition to downloading and installing the Lytx Installation Tool, you must also obtain
the correct job file prior to device installation. Obtain this from the client's Implementation Services Specialist.
System Requirements for the Lytx Installation Tool
Before installation, ensure your laptop meets these minimum requirements:
l Operating System: Windows 8 or newer
l Hard drive space: 256 MB
l USB port
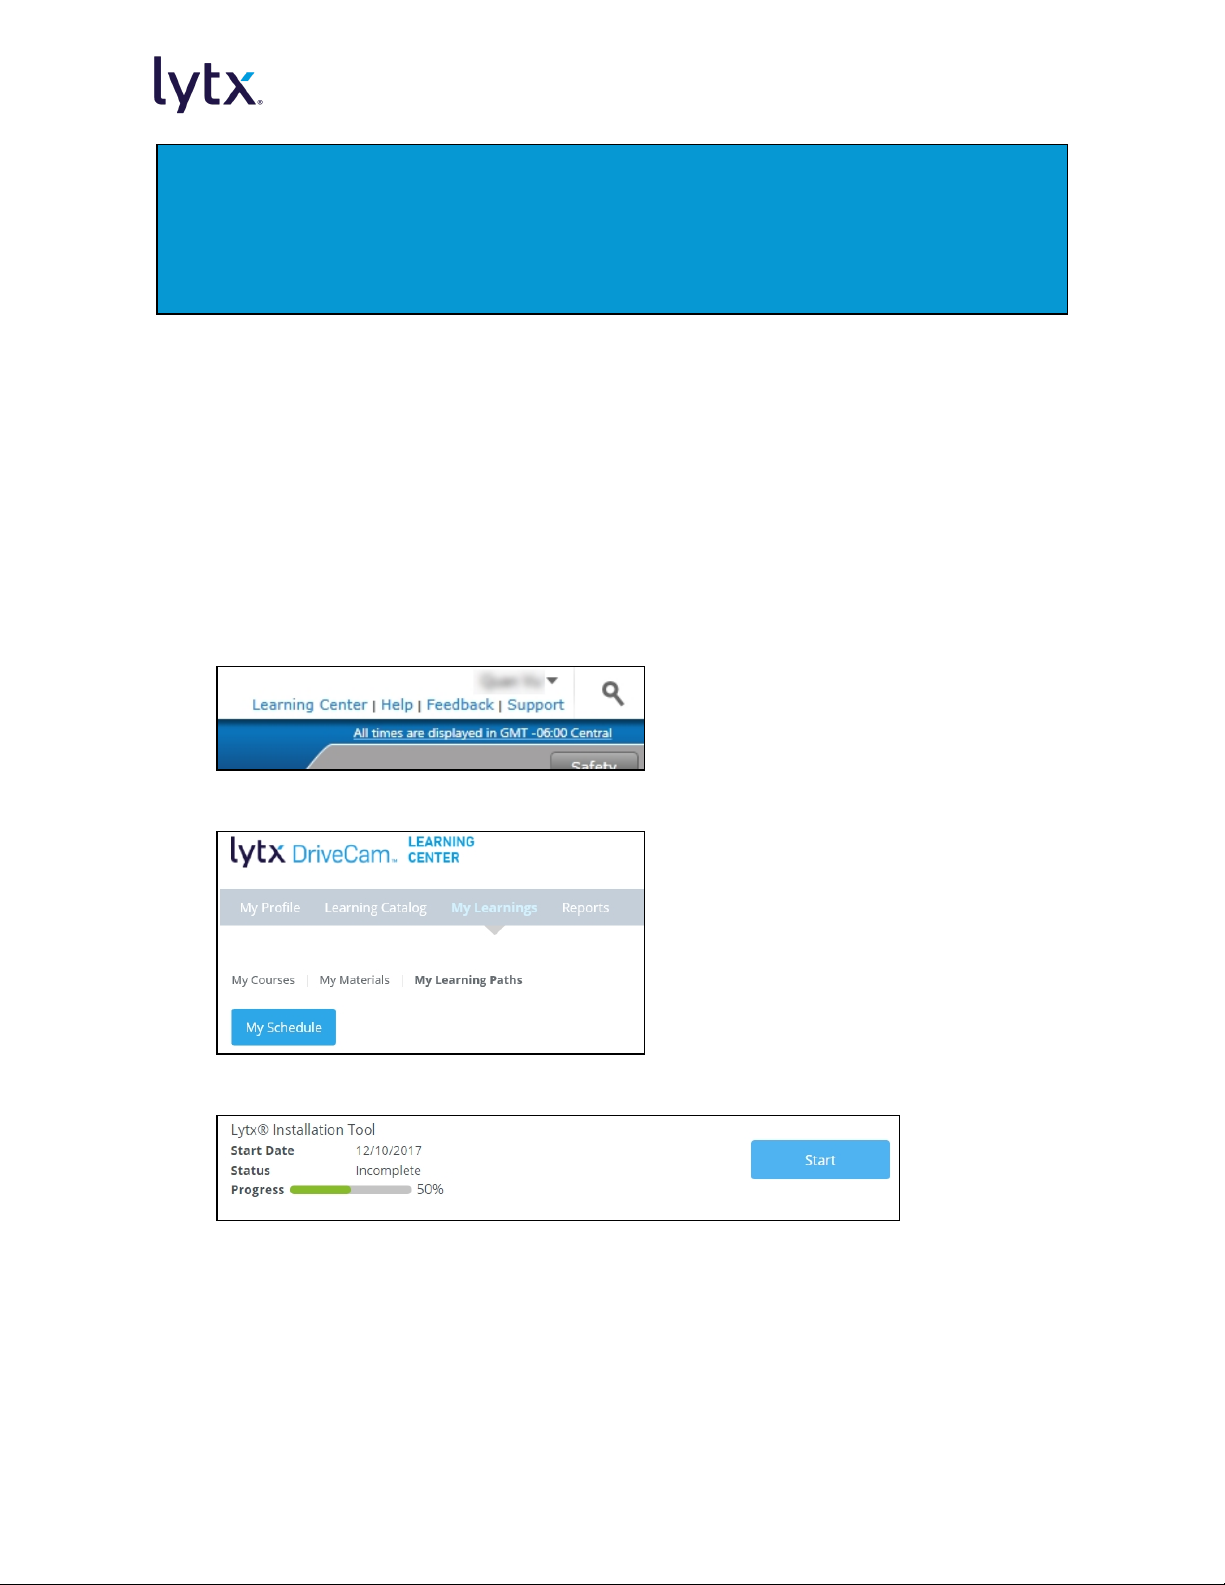
Instructions for Download and Installation
1. Using the Internet Explorer browser, log into the DriveCam Online® portal. In the upperright corner, click on Learning Center.
2. Go to My Learnings. Then go to My Learning Paths.
3. Browse and find the learning path, Lytx Installation Tool. Press Start.
©2019 Lytx, Inc. - Confidential & Proprietary.
Page 13 of 51
(North America Edition)

4. Browse and find the course for "Lytx Installation Tool Download". Press Register. Then
press Start.
5. Download the installation file to your computer.
6. Open the file. Follow the prompts to install the tool.
©2019 Lytx, Inc. - Confidential & Proprietary.
Page 14 of 51
(North America Edition)

SF-Series Installation Procedures
Installation of the SF-Series event recorder consists of these main sections. Each section
has its own subsections as well:
Mount the Bracket and Event Recorder 15
Connect Electrical Wiring 19
Run Testing and Complete Installation 30
Pre-Installation Check
Before beginning the installation, turn the vehicle on. Verify that no Check Engine lights,
error codes, or warnings appear on the gauge console, dashboard, or vehicle display. It
may be necessary to cycle through displayed messages or screens to verify.
If any Check Engine lights, error codes, or warnings appear, report these to the site
contact before proceeding.
Mount the Bracket and Event Recorder
WARNING: Before mounting the bracket and event recorder, consult the vehicle
manufacturer's recommendations and any applicable federal, state, provincial and local
laws that restrict mounting devices on a vehicle’s windshield or other locations in a
vehicle.
Mounting the bracket and event recorder consists of these subsections:
1. Review Mounting Location Guidelines
a. Mounting Location Recommendations and Restrictions
2. Prepare the Mounting Location
3. Attach the Bracket and Event Recorder
Alternative Mounting Methods
The subsections, "Prepare the Mounting Location" on page18 and "Attach the Bracket
and Event Recorder" on page19, cover the recommended standard windshield mounting
method only. However, if windshield mounting is not possible/permitted in the vehicle
or jurisdiction, alternative mounting methods are available. For instructions on alternative mounting methods, please review the mounting location guidelines and see "Installation of Optional Parts" on page36.
©2019 Lytx, Inc. - Confidential & Proprietary.
Page 15 of 51
(North America Edition)
Review Mounting Location Guidelines
CAUTION: An improperly positioned event recorder can reduce program effectiveness.
The event recorder should be mounted in a location that provides an unobstructed view of
the driver and the road in front of the vehicle.
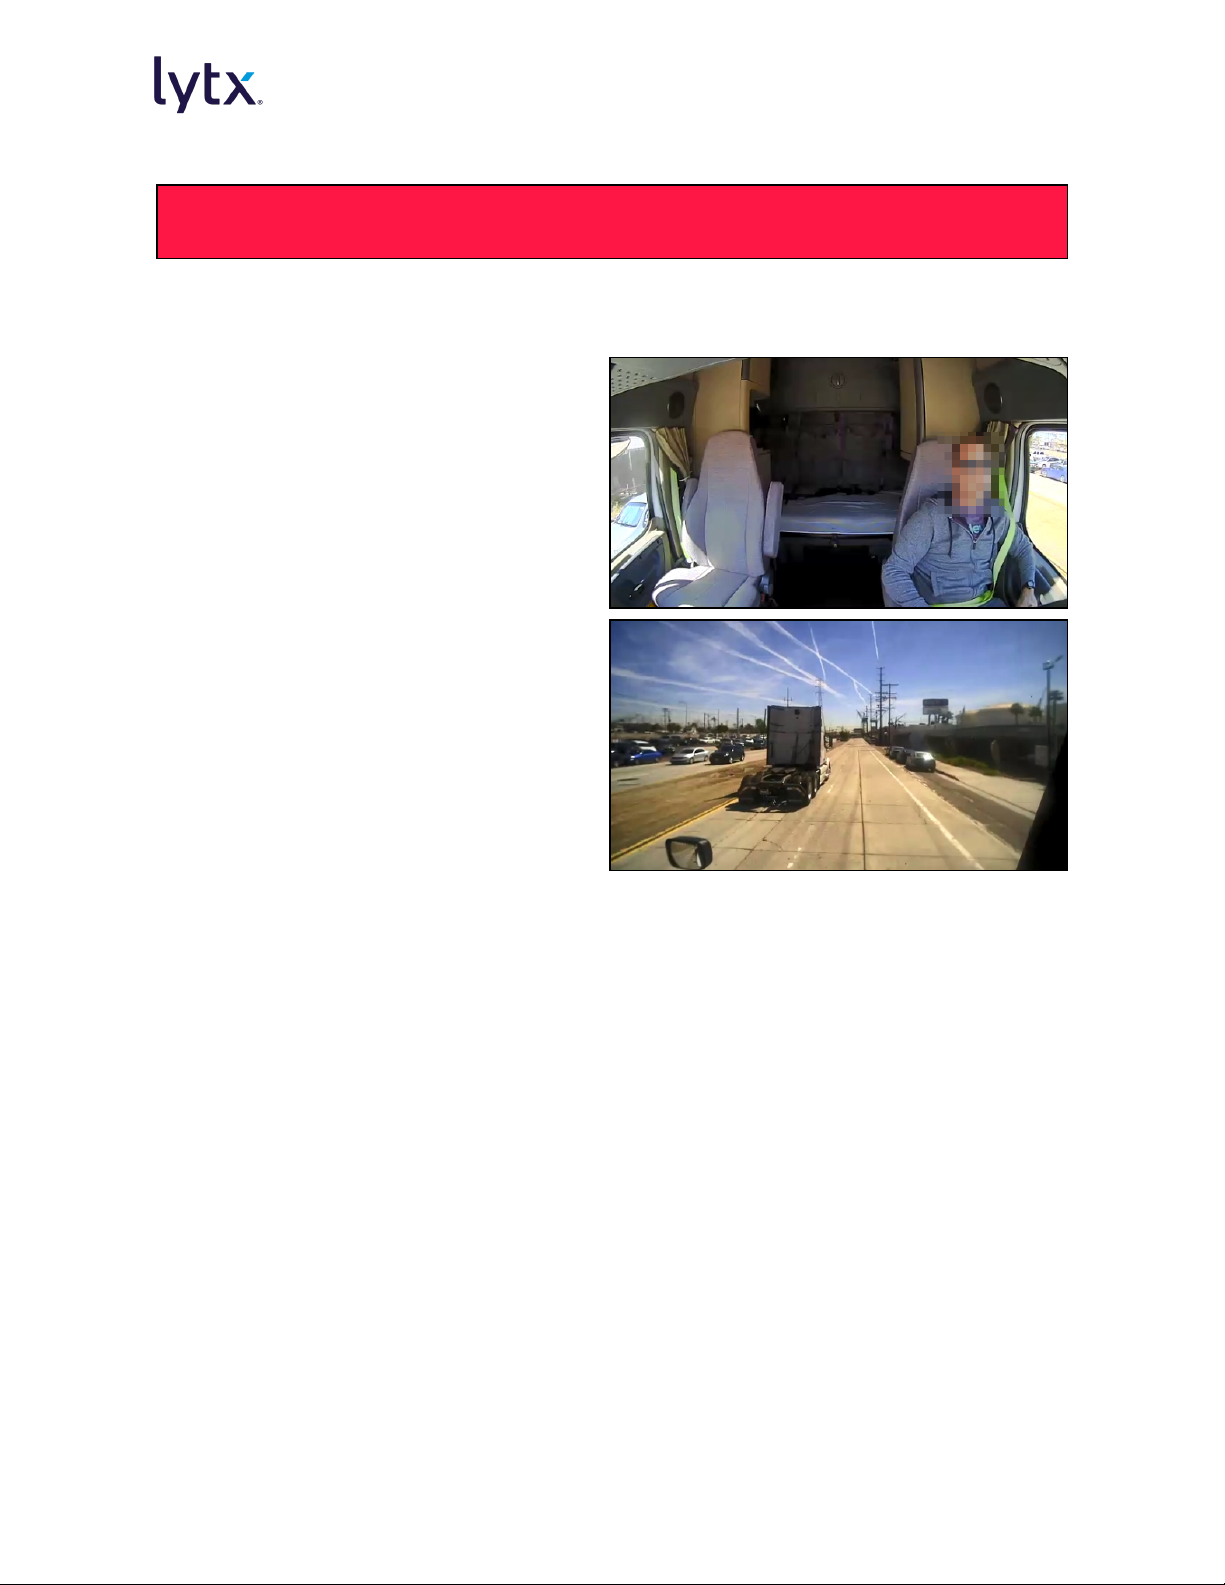
1. Interior-facing Lens View: Should
span from the outside shoulder of the
driver to the outside shoulder of a
front seat passenger. If possible, it
should show the lap band of the seatbelt.
2. Exterior-facing Lens View
a. Should be inside the path of the
wiper blades.
b. Should capture a clear view of
everything in front of the vehicle,
beginning as close to the front of
the vehicle as possible without
cutting off the horizon.
To use the event recorder to temporarily
gauge the best position, first loosen the
Torx screws so the event recorder can
rotate in the bracket. Then hold it up to the
windshield.
©2019 Lytx, Inc. - Confidential & Proprietary.
Page 16 of 51
(North America Edition)
 Loading...