

Page 1
PTG 1802
™
Testor | lite 3G
Revision 1.1 Firmware 641 and above
User Guide
LYNXTechnik AG | Broadcast Television Equipment
Page 2

Contents
Connecons / Layout .......
What’s in the Box .............
User Interface ..................
Power / Charging .............
Charging ............................
Charge Times .....................
Power ON/OFF ................
Switching ON .....................
Switching OFF ....................
Automac Shutdown .........
SDI Outputs .....................
270Mbit and 1.5Gbit .........
3Gbit ..................................
Seng Video Format .........
Selecng Test Paerns .....
Color Bars ...........................
Flat Field .............................
Mono Paerns ....................
Misc Paerns ....................
Using 3D paerns ..............
3D paerns ........................
Selecng Overlays ...........
Circle Overlay .....................
Text Overlay .......................
Cage / Markers Overlay ...
Seng Audio ..................
2
Audio Generators ...............
3
Audio Embedders ..............
3
Sync Output.....................
4
4
User Sengs....................
System Sengs..................
4
Baery Timeout.................
5
Oscillator..............................
5
User Presets....................
5
5
USB Port..........................
Firmware Upgrade.............
5
Baery Replacement.......
5
6
Service & Support............
6
Warranty & Registraon...
Product Registraon.........
7
Warranty............................
7
7
7
8
8
9
9
9
9
10
© LYNXTechnik AG
10
10
11
11
11
11
11
12
12
13
13
13
13
14
14
14
Page 3
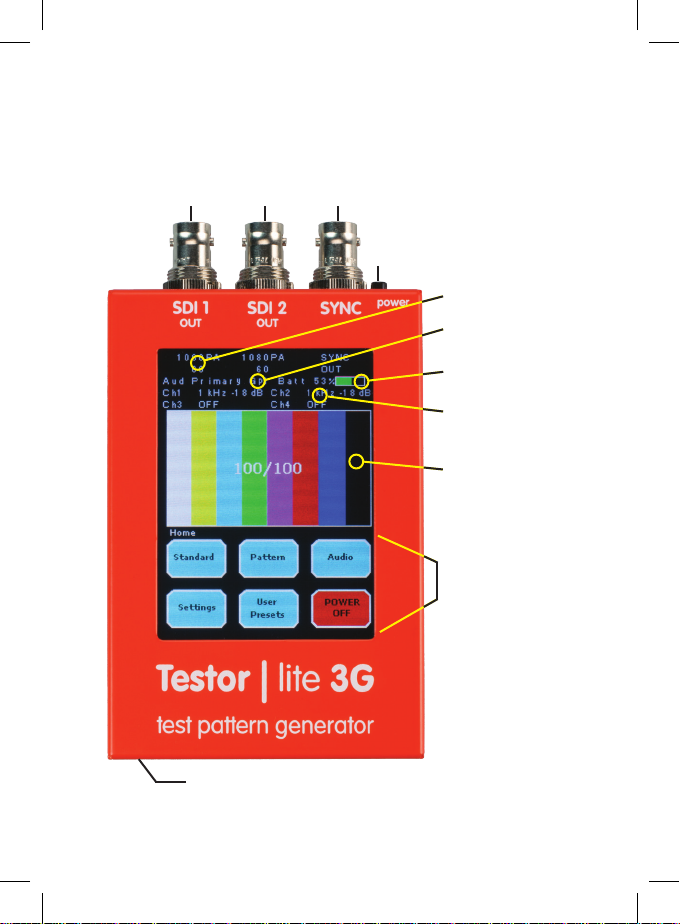
Connecons / Layout
The image below shows the connecons / controls and basic layout of the
integrated touch-screen display.
SDI Outputs Sync Output
Power Switch
Video Format
Audio Group
Baery Level
Audio Sengs
Selected Paern
Navigaon
Menu
USB Port
(Power/Charging/Firmware updates)
2
Page 4
What’s in the Box
The Testor lite 3G is supplied with the following accessories: USB-DCP
charger (plus a variety of regional AC plug adapters) a USB Cable and this
User Guide.
We recommend you fully charge the unit when you rst receive it. Please refer to
the “Power and Charging” secon of this guide for more details.
User Interface
The Testor lite 3G is equipped with a simple and intuive user interface
that is accessed with the integrated touch screen display. The lower half
of the display is dedicated to the menu system which is used to operate
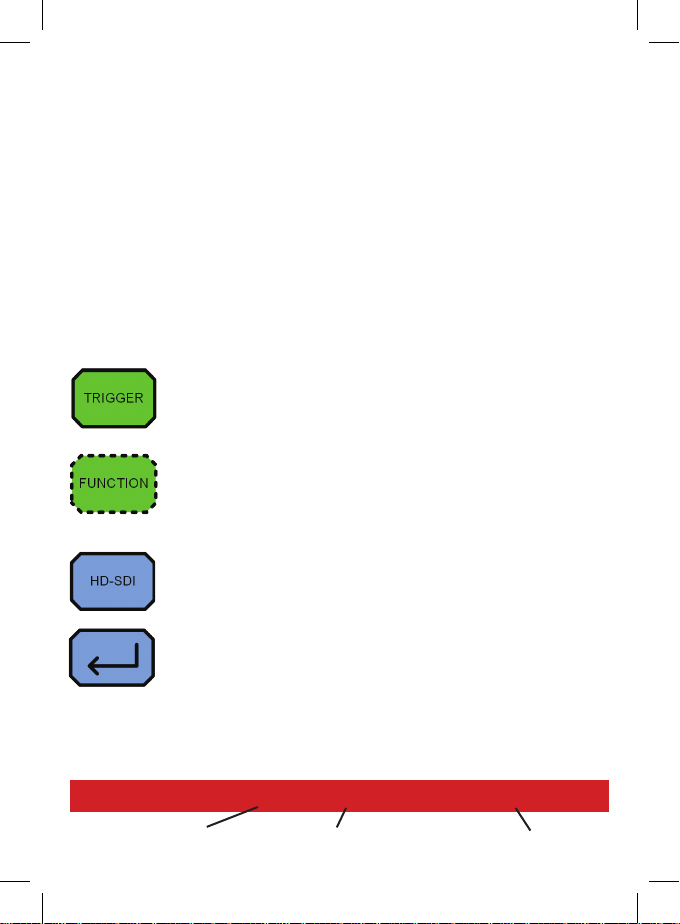
the unit. The basic touch screen buon funcons are shown below:
This type of buon triggers a funcon. i.e. if pressed the
selected funcon will be set as a direct result.
This type of buon shows when a selecon is acve.
Pressing again will have no eect.
This is a menu navigaon buon, pressing it will navigate
deeper into the menu system. As a result the buons
displayed will change to a new set of choices.
This is a “back” buon and pressing this will navigate back
to the previous menu screen.
To assist with the use of the menu system a navigaon aid is provided
aer each feature or funcon’s descripon, an example of the navigaon
aid is below:
Navigaon: HOME > PATTERN > SDI (X) > COLOR BARS (make selecon)
[buon selecons] [x=specic channel e.g. 1 or 2] [perform acon]
3
Page 5

Power / Charging
Charging
The Testor lite 3G uses the USB port for external power and charging.
A USB DCP (dedicated charging port) charger and heavy gauge USB cable
are provided to charge the Testor lite 3G. We recommend that you use
the supplied accessories. Using an alternave USB cable may result in the
unit not charging.
The Testor lite 3G can be connected to any standard USB 2.0 port
(computer) to charge the baery. It will take signicantly longer to charge
this way (lower available charge current) and cannot be used while in
operaon.
place and the Testor lite 3G will run on internal baery power)
If using a USB DCP power source then the Testor lite 3G can be used and
charged at the same me. The device automacally detects if a dedicated
USB DCP charger is connected and will draw higher charge current.
Charge Times
When the baery is empty, the following approximate charge mes are
required to fully charge the baery:
• 120 min. from a USB-DCP supply when unit is turned OFF
• 180 min. from a USB DCP supply when unit is turned ON
• 360 min. from a computer USB 2.0 port when unit is turned OFF
A charge status indicator is always visible on the display. A full charge will
provide approximately 4 hours use. When the baery is empty the Testor
lite 3G will shut down automacally.
Baery life is approximately 500 charge cycles. A replacement baery is
available when needed. Part: PTG-BATT
(If the unit is powered using a PC USB port then no charging will take
Note: The rechargeable baery is sealed inside the unit. It is not designed for
frequent baery exchange using a spare charged baery. Only change the
baery when the installed unit is no longer holding charge. Some disassembly is
required. Refer to “Baery Replacement” secon of this guide.
4
Page 6

Power ON / OFF
Switching ON
When powered OFF, pressing the power buon for 1 second or longer
will power up the unit and it will be fully operaonal within 5 seconds.
The unit will resume with the last used sengs before the unit was shut
down.
(Current sengs are automacally stored on shutdown)
The unit will power up automacally when connected to a USB-DCP
charger.
Switching OFF
There are two ways to manually switch the unit o, and both are
designed to prevent accidental power down.
Automac Shutdown
With no user acvity (touch screen use) the unit will shut down
automacally aer a given me period to preserve baery life.
This can be preset to 5, 10 or 20 minutes or NEVER. Refer to the “Baery
Timeout” sengs in this guide to preset this funcon.
(The unit can be manually switched OFF to facilitate faster charging)
• When the device is powered ON, tapping POWER OFF on the home
screen will ask for a conrmaon before switching o.
• When the device is powered ON, pressing and holding the POWER
buon for 5 seconds or longer will also switch o the unit.
SDI Outputs
SD-SDI (270Mbit) and HD-SDI (1.5Gbit) SDI Operaon
When the Testor lite 3G is congured for an SDTV video format (270Mbit)
or an HDTV (1.5Gbit) video format, each SDI output is always the same
video format but can have a dierent paern assigned. Each SDI output
can also have dierent embedded audio and the overlays switched ON or
OFF independently (overlays are the same for both outputs)
5
Page 7

3G-SDI (3Gbit) Operaon
The 3G-SDI formats (1080p/50/59/60) can be streamed in one of three
possible formats:
• Two individual 1.5G SDI streams, one per BNC connector. SMPTE 372
(Dual Link)
• Two individual 1.5G SDI streams mulplexed into one 3G-SDI stream.
SMPTE 425 Level B (Dual Link)
• One real 3G-SDI stream. SMPTE 425 Level A (Direct Mapping)
The factory default seng is specied as “3G-SDI, SMPTE 425 Level A”
To set the 3G streaming modes:
Navigaon: HOME > STANDARD > 3G STREAMING FORMAT (set mode)
Seng Video Format
The Testor lite 3G can be congured to provide test signals in the
following formats/standards:
SMPTE 259M (SDTV):
525 (480i/59) / 625 (576i/50)
SMPTE 292M (1.5G HDTV)
[1080i 60], [1080i 59.94], [1080i 50], [1080p 30], [1080p 29.97],
[1080p 25], [1080p 24], [1080psf 25], [1080psf 24], [1080psf 23.97],
[720p 60], [720p 59.94], [720p 50], [720p 30], [720p 29.97], [720p 25],
[720p 24], [720p 23.97]
SMPTE 424M (3G HDTV)
[1080p 60], [1080p 59.94], [1080p 50]
2 x SDI outputs are provided. The signal format and frequency is idencal
on both outputs but independent paerns can be selected for each
output. (exepons are dynamic paerns, which are on both outputs)
Navigaon: HOME > STANDARD (select video format)
6
Page 8

Selecng Test Paerns
The Testor lite 3G includes a wide variety of test paerns. Each SDI output
can have a dierent stac paern assigned to it. (Dynamic or moving
paerns will be on both outputs)
Stac Color Bar Paerns:
• Full Field Color Bar 100/100
• Full Field Color Bar 100/75
• Split Color Bars 100/100
• Split Color Bars 100/75
• SMPTE 219 Bars
Navigaon: HOME > PATTERN > SDI (X)> COLORBARS (select paern)
Stac Flat Field Paerns:
• Full Field Red
• Full Field Green
• Full Field Blue
• Full Field White
• Full Field Black
Navigaon: HOME > PATTERN > SDI (X)> FLAT FIELD (select paern)
Stac Mono Paerns:
• Pluge
• Cross-Hatch
• 5-Step
• Valid Ramp
• Limit Ramp
Navigaon: HOME > PATTERN > SDI (X)> MONO (select paern)
7
Page 9
Miscellaneous paerns
• Mul-burst
• Frequency Sweep
• Pathological EQ/PLL (split)
• Moving Boxes (Dynamic paern)
• EBU AV Sync (Dynamic paern)**
(Note: leaving the EBU menu will cause the sequence to stop)
Nav: HOME > PATTERN > SDI (X)> MISCELLANEOUS (select paern)
**For a compressive guide on the use of the EBU AV sync test paern, please visit
our website for more informaon:
www.lynx-technik.com/en/products/testor/ebu-av-sync-paern
Using 3D (stereoscopic) Test Paerns
3D (stereoscopic) test paerns, consisng of two 1.5G HD-SDI streams
for Le Eye (LE) and Right Eye (RE) can be selected. This is accomplished
by assigning the individual 3D paerns for LE and RE from the provided
3D paerns. The SDI format has to be set to one of the 1.5G HD-SDI
standards (not 3G-SDI).
By default, these two dierent signals will be streamed as two individual
1.5G SDI streams for LE and RE, one per BNC connector, according to
SMPTE 292-1.
As an alternave way of streaming these two 1.5G HD-SDI signals, the
user can enable the “3G Level B Dual Stream” mode. When enabled, the
two individual 1.5G signals will be mulplexed into a single 3G-SDI Level B
Dual Stream signal according to SMPTE 425. In this case, both SDI outputs
have the same signal.
Two dedicated 3D paerns are provided which provide a 3D eect when
viewed in a 3D environment. These comprise of two slightly dierent
paerns for le eye (LE) and right eye (RE).
8
Page 10

3D Test Paerns
• 3D Boxes
• 3D Grey Boxes
Nav: HOME > PATTERN > 3D STEREOSCOPIC (Select LE,RE paerns)
NOTE: When seng the Testor Lite for 3D operaon, please rst select an
appropriate SDI format and 3D SDI Streaming mode.
To set the 3D streaming mode:
Nav: HOME > STANDARD > 3D/HD STREAMING FORMAT (set mode)
Selecng Overlays
Several overlay elements can be superimposed into each of the SDI
outputs. Congured overlays are the same for both outputs but can be
turned ON and OFF independently.
Circle Overlay
A 16:9 or 4:3 circle overlay can be superimposed. The circle center point
of the circle is the geometric center of the image.
Navigaon: HOME > PATTERN >SDI (X) > OVERLAY > CIRCLE
Text Overlay
A text-overlay can be added to each SDI output. A maximum of 16
characters can be inserted on one line. The following characters are
available for text inseron:
ABCDEFGHIJKLMNOPQRSTUVWXYZ
abcdefghijklmnopqrstuvwxyz
01234567890-_*()/ [SPACE]
Navigaon: HOME > PATTERN >SDI (X) > OVERLAY > TEXT > (select text)
9
Page 11
Cage / Markers Overlay
Blanking edge/safe acon/safe tle boxes can be superimposed onto
each SDI output. The posions of the boxes are at 90% (safe acon) and
80% (safe tle), as specied in SMPTE RP218-2002.
The following selecons are available:
• OFF [Default]
• Blanking Edge
• SMPTE safe acon (90/90) according to SMPTE RP218-2002
• SMPTE safe tle (80/80) according to SMPTE RP218-2002
Navigaon: HOME > PATTERN >SDI (X) > OVERLAY > CAGE > (select)
Seng Audio
Audio Generators
Two audio generators are provided, each generator has four channels and
each channel can be congured independently. The following selecons
are available
• Frequencies: 50Hz, 100Hz, 200Hz, 250Hz, 400Hz, 500Hz, 800Hz,
1kHz, 2kHz 3kHz, 4kHz, 8kHz, 16kHz [Default 1kHz]
• Adj. Amplitude: 0dBFS to -79dBFS in 1dB steps [Default -18dBFS]
• IDENT – [ON or OFF] typically used to put a small
repeang break (or pause) in the audio signal to easily idenfy a
specic channel [Default OFF]
• BREAK [ON or OFF]. Switch the selected channel ON (silent) or OFF
[Default OFF]
To congure Audio Generator A
Navigaon: HOME > AUDIO > GEN A
To congure Audio Generator B
Navigaon: HOME > AUDIO > GEN B
10
Page 12

Audio Embedders
Once the audio generators have been congured, the audio channels can
be mapped into the SDI outputs for embedding. Each SDI output can have
a dierent audio embedder conguraon.
The embedder for each SDI channel supports 4 groups (16 channels) of
audio and the audio generators can be mapped as required.
Nav: HOME > AUDIO > EMBEDDER SDI (X) > (select group and assign)
Note: If Testor lite 3G is congured for a SMPTE425 Dual Stream or Dual Link
output signal, audio is embedded into both streams.
Sync Output
The reference output (or Sync Output) generates an analog reference
sync signal in the same video standard as the SDI outputs.
• In SDTV, the device will generate a Bi-Level Sync (no Color Burst or
acve video content).
• In HDTV, the device will generate an appropriate Tri-Level Sync.
User Sengs
System sengs
The Testor lite 3G provides access to the following system sengs:
• Key Clicks ON or OFF [Default ON]
• Factory RESET (Reset the Testor lite 3G back to factory defaults)
• Show System Version (Firmware revision)
Navigaon: HOME > SETTINGS > SYSTEM (make selecon)
Baery Timeout
When the device is powered from the internal baery, the Testor lite
3G will power down when no user interacon (touch screen use) has
been detected for a certain me period to preserve baery life. The me
period can be preset to one of the following sengs:
11
Page 13
• 5 minutes [Default]
• 10 minutes
• 20 minutes
• Never
Note: The power saving funcon is acve only when the device is powered
from the internal baery. When the device is powered from an external power
source then this temporarily defaults to “Never”.
Navigaon: HOME > SETTINGS > BATTERY TIMEOUT (make selecon)
Oscillator
It is possible to change the seng of the internal oscillator to generate an
incorrect (or out of spec) test signal with respect to frequency. This may
be useful for tesng the device under test for tolerance to out of spec
video signals. Frequency deviaon is adjustable +/- 50ppm around the
calibrated default value in increments of 1 ppm. The factory calibrated
default value is easily restored.
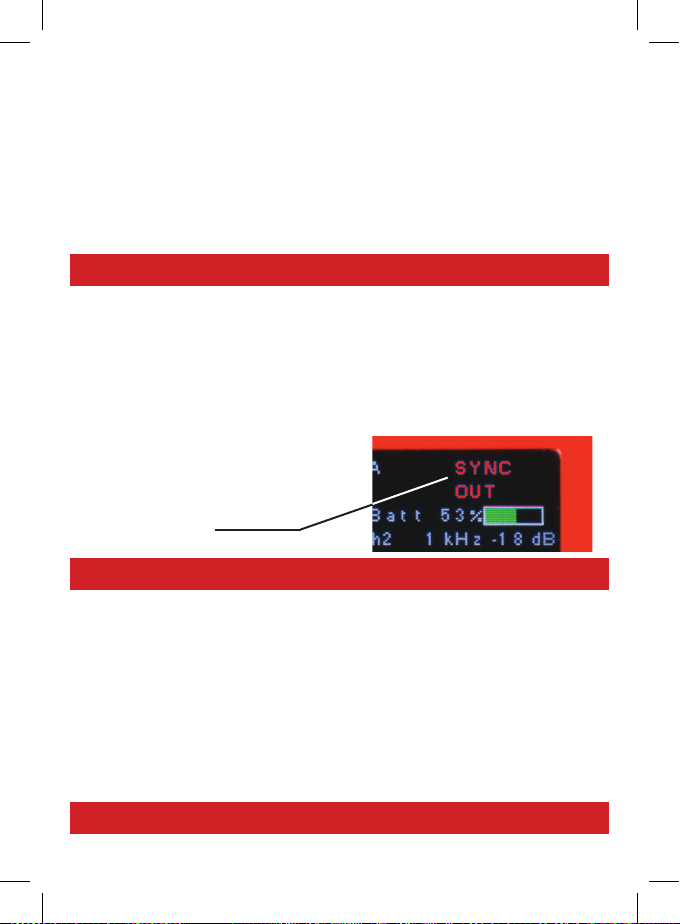
Note: When Oscillator is set to
uncalibrated “SYNC OUT “ on the touch
screen display will be in RED
Nav: HOME > SETTINGS > OSCILLATOR FREQUENCY (make changes)
User Presets
There are 3 user presets which can be used to store a specic
conguraon for the Testor lite 3G. The sengs are stored in internal
ash RAM and will survive a power cycle.
Simply select the desired preset (1, 2 or 3) and then select SET to store
the current module conguraon as a new preset, or press RECALL to
recall the stored sengs if one was previously saved.
Navigaon: HOME > USER PRESETS (make selecon)
12
Page 14
USB Port
The USB port is provided for power / charging and rmware updates
Firmware Updates
Firmware updates will be provided as a free download from the LYNX
Technik website, download secon:
www.lynx-technik.com > Support > Download Area
Baery Replacement
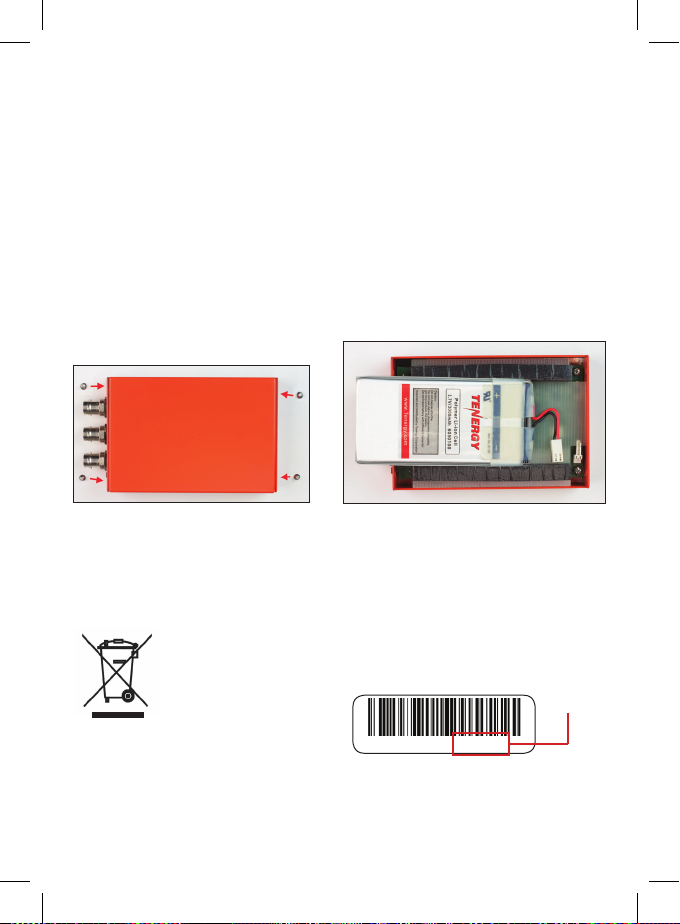
The baery will last for approximately 500 charge cycles. A replacement
baery is available (Part PTG-BATT). Follow the procedure below to
exchange the baery.
1. Remove screws where shown
2. Remove cover
Note: Only use OEM replacements from LYNX Technik AG. Please do not try to
substute an equivalent or generic replacement. This could damage the unit and
will void any product warranty.
Please dispose of the old baery responsibly and respect
any applicable local laws and ordinances regarding baery
disposal.
Service and Support
If you have quesons, or are experiencing problems with your Testor lite
3G, please visit the technical support secon of our website
www.lynx-technik.com to request assistance. Please have the serial
number available (refer to barcode scker on the rear of the unit).
3. Unplug and remove old baery
4. Install new baery & reassemble
Serial #
PTG 1802 S 0101
13
Page 15

Warranty + Registraon
Product Registraon
Please take the me to register your product to acvate your warranty
coverage. Registering also lets us provide you with push nocaons
(via email) of any free rmware updates for bug xes, new features and
product enhancements when they become available.
Goto www.lynx-technik.com Support > Register Product
Warranty
LYNX Technik AG warrants that the Testor lite 3G will be free from defects in materials and
workmanship for a period of three (3) years from the date of shipment, and the rechargeable
baery free from defects for a period of six (6) months from the date of shipment. If this
product proves defecve during the warranty period, LYNX Technik AG at its opon will either
repair the defecve product without charge for parts and labor, or will provide a replacement
in exchange for the defecve product.
In order to obtain service under this warranty, customer must nofy LYNX Technik AG of
the defect before expiraon of the warranty period and make suitable arrangements for
the performance of service. Customer shall be responsible for packaging and shipping the
defecve product to the service center designated by LYNX Technik AG, with shipping charges
prepaid. LYNX Technik AG shall pay for the return of the product to the customer if the
shipment is within the country which the LYNX Technik AG service center is located. Customer
shall be responsible for payment of all shipping charges, dues, taxes and any other charges
for products returned to any other locaons.
This warranty shall not apply to any defect, failure, or damage caused by improper use or
improper or inadequate maintenance and care. LYNX Technik AG shall not be obligated to
furnish service under this warranty a) to repair damage resulng from aempts by personnel
other than LYNX Technik AG representaves to install, repair or service the product; b) to
repair damage resulng from improper use or connecon to incompable equipment; c) to
repair any damage or malfuncon caused by the use of non LYNX Technik AG supplies; or d) to
service a product which has been modied or integrated with other products when the eect
of such modicaon or integraon increases the me or diculty servicing the product.
THIS WARRANTY IS GIVEN BY LYNX TECHNIK AG WITH RESPECT TO THIS PRODUCT IN LIEU
OF ANY OTHER WARRANTIES, EXPRESS OR IMPLIED. LYNX TECHNIK AG AND ITS VENDORS
DISCLAIM ANY IMPLIED WARRANTIES OF MERCHANTABILITY OR FITNESS FOR A PARTICULAR
PURPOSE. LYNX TECHNIK AG RESPONSIBILITY TO REPAIR AND REPLACE DEFECTIVE PRODUCTS
IS THE SOLE AND EXCLUSIVE REMEDY PROVIDED TO THE CUSTOMER FOR BREACH OF THIS
WARRANTY. LYNX TECHNIK AG AND ITS VENDORS WILL NOT BE LIABLE FOR ANY INDIRECT,
SPECIAL, INCIDENTAL, OR CONSEQUENTIAL DAMAGES IRRESPECTIVE OF WHETHER LYNX
TECHNIK AG OR THE VENDOR HAS ADVANCE NOTICE OF THE POSSIBILITY OF SUCH DAMAGES.
14
Page 16
Testor | lite 3G
Opons
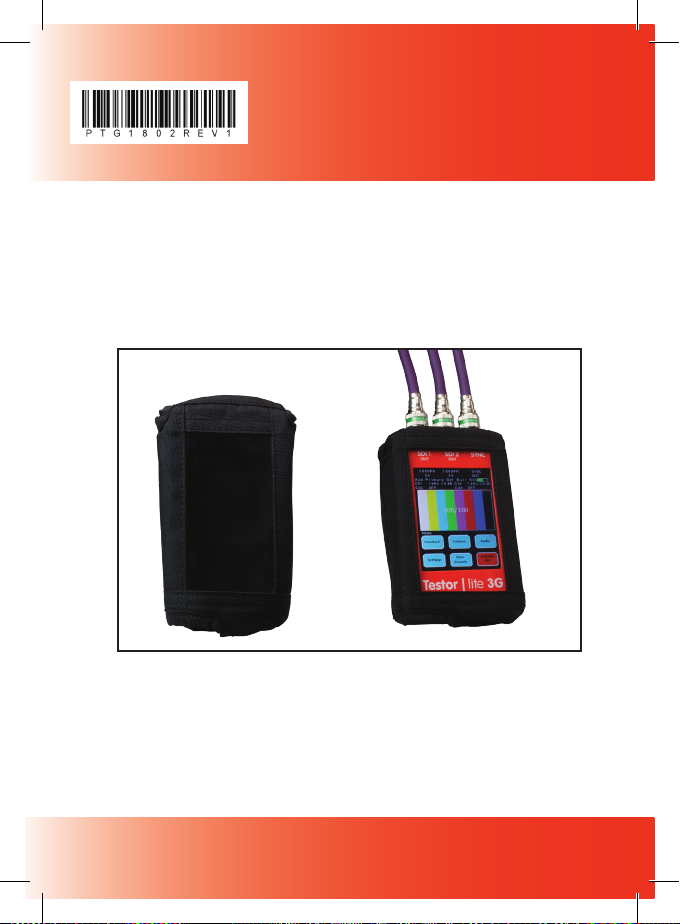
Protect your Testor lite 3G with a durable protecve cloth case / pouch.
This incorporates a transparent window to view and operate the touch
screen, as well as a belt clip. Part PTG-CASE
™
Please visit our website for the latest product informaon
and news
www.lynx-technik.com
All LYNX Technik AG products are designed and manufactured in Germany
The contents of this guide and specicaons are subject to change without prior noce
LYNXTechnik AG | Broadcast Television Equipment
 Loading...