

Page 1

200SM070 V1.3 Page 1 of 34
Touch Screen Display
User Guide
Page 2

200SM070 V1.3 Page 2 of 34
Contents
Powering Up the Device .......................................................................................................................... 4
Set the Locale .......................................................................................................................................... 5
Connecting to a Source attached to a router over Wi-Fi – DHCP enabled ............................................. 6
Connecting to a Source attached over Wi-Fi – Static IP Enabled.......................................................... 22
Connecting to a Source over Ethernet – DHCP enabled ....................................................................... 28
Connecting to a Source over Ethernet – Static IP Enabled ................................................................... 31
Note: Although screeenshots depict specific devices, be assured this system is designed to work
with most HTML5 webservering product. A list of such devices can be supplied upon request.
Page 3

200SM070 V1.3 Page 3 of 34
Powering Up the Device
Once the installation of the display has been completed, a power source is connected, and the
preferred communication method is known and available, power up the tablet by doing the
following.
• Press the power button once quickly and release. The battery indicator should appear.
• Once the battery indicator is on screen, press the power button again, but hold the
button on.
• When the battery indicator disappears and a screen showing 4 x penguins appears,
release the power button.
• The unit will now power up.
• Any time while using the display, if you wish to power down or reboot the Source, press
and hold the power button until a popup display appears to give you these options.
Page 4
200SM070 V1.3 Page 4 of 34
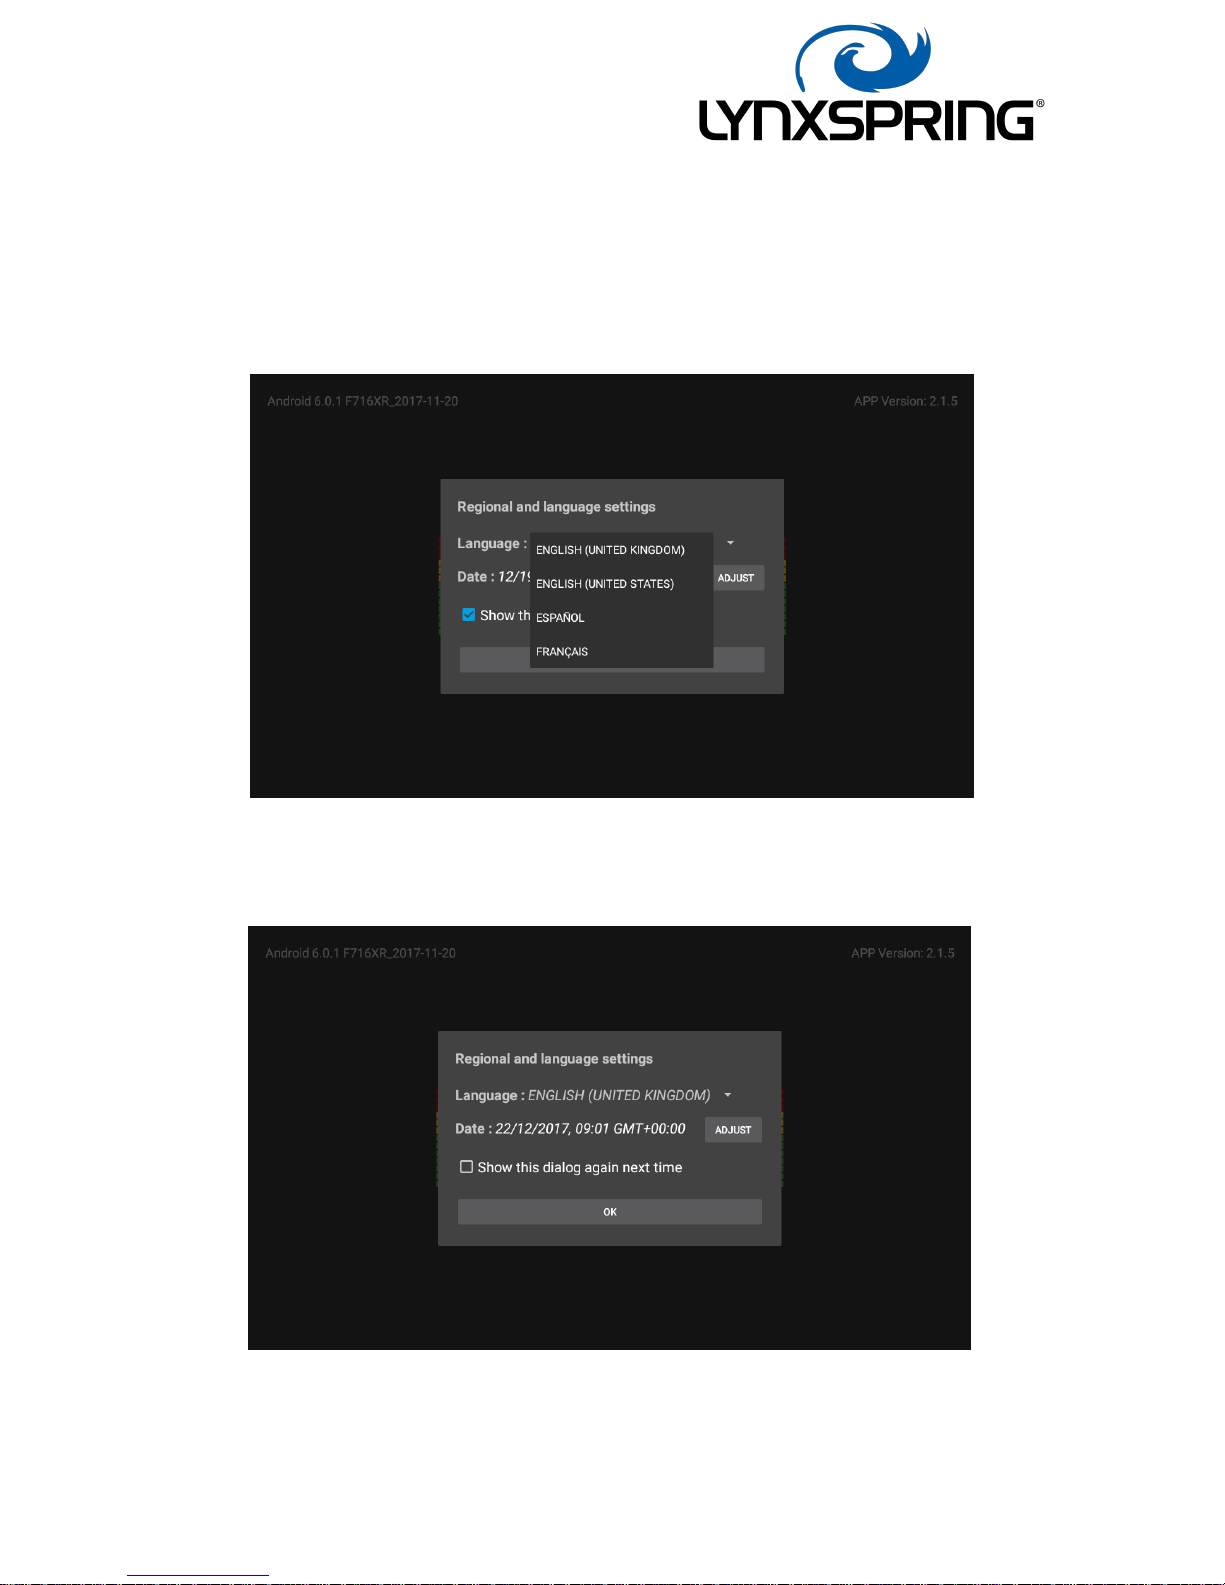
Set the Locale
1. Turn on the display. If for the first time, or there are no historical settings, you will see the
screen display as below. Pick the desired language. Time can also be set now if incorrect.
2. Untick the box if you do not want to see this dialog box again. Locale configuration is also
available in General Settings.
Page 5
200SM070 V1.3 Page 5 of 34
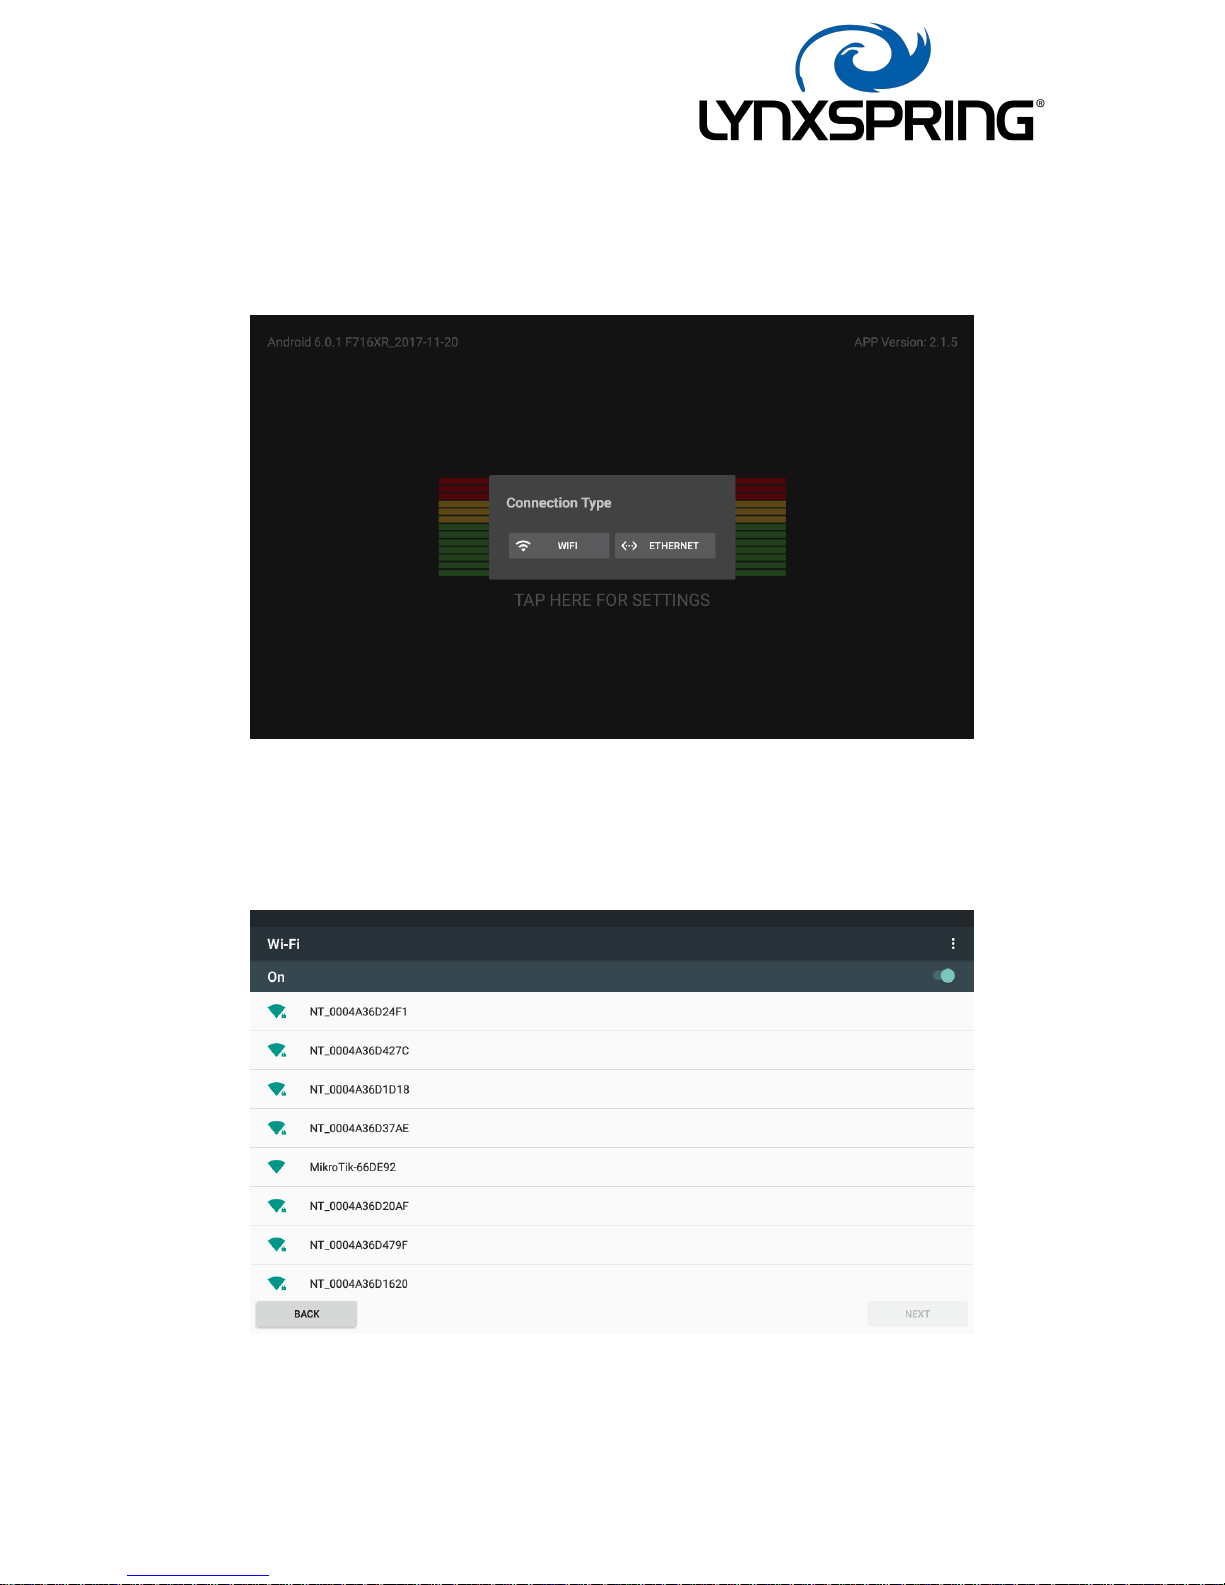
Connecting to a Source attached to a router over Wi-Fi – DHCP enabled
1. If there are no historical settings, you will see this screen. Pick the desired connection type:
2. Select the network or source you wish to connect to from the list.
Page 6
200SM070 V1.3 Page 6 of 34
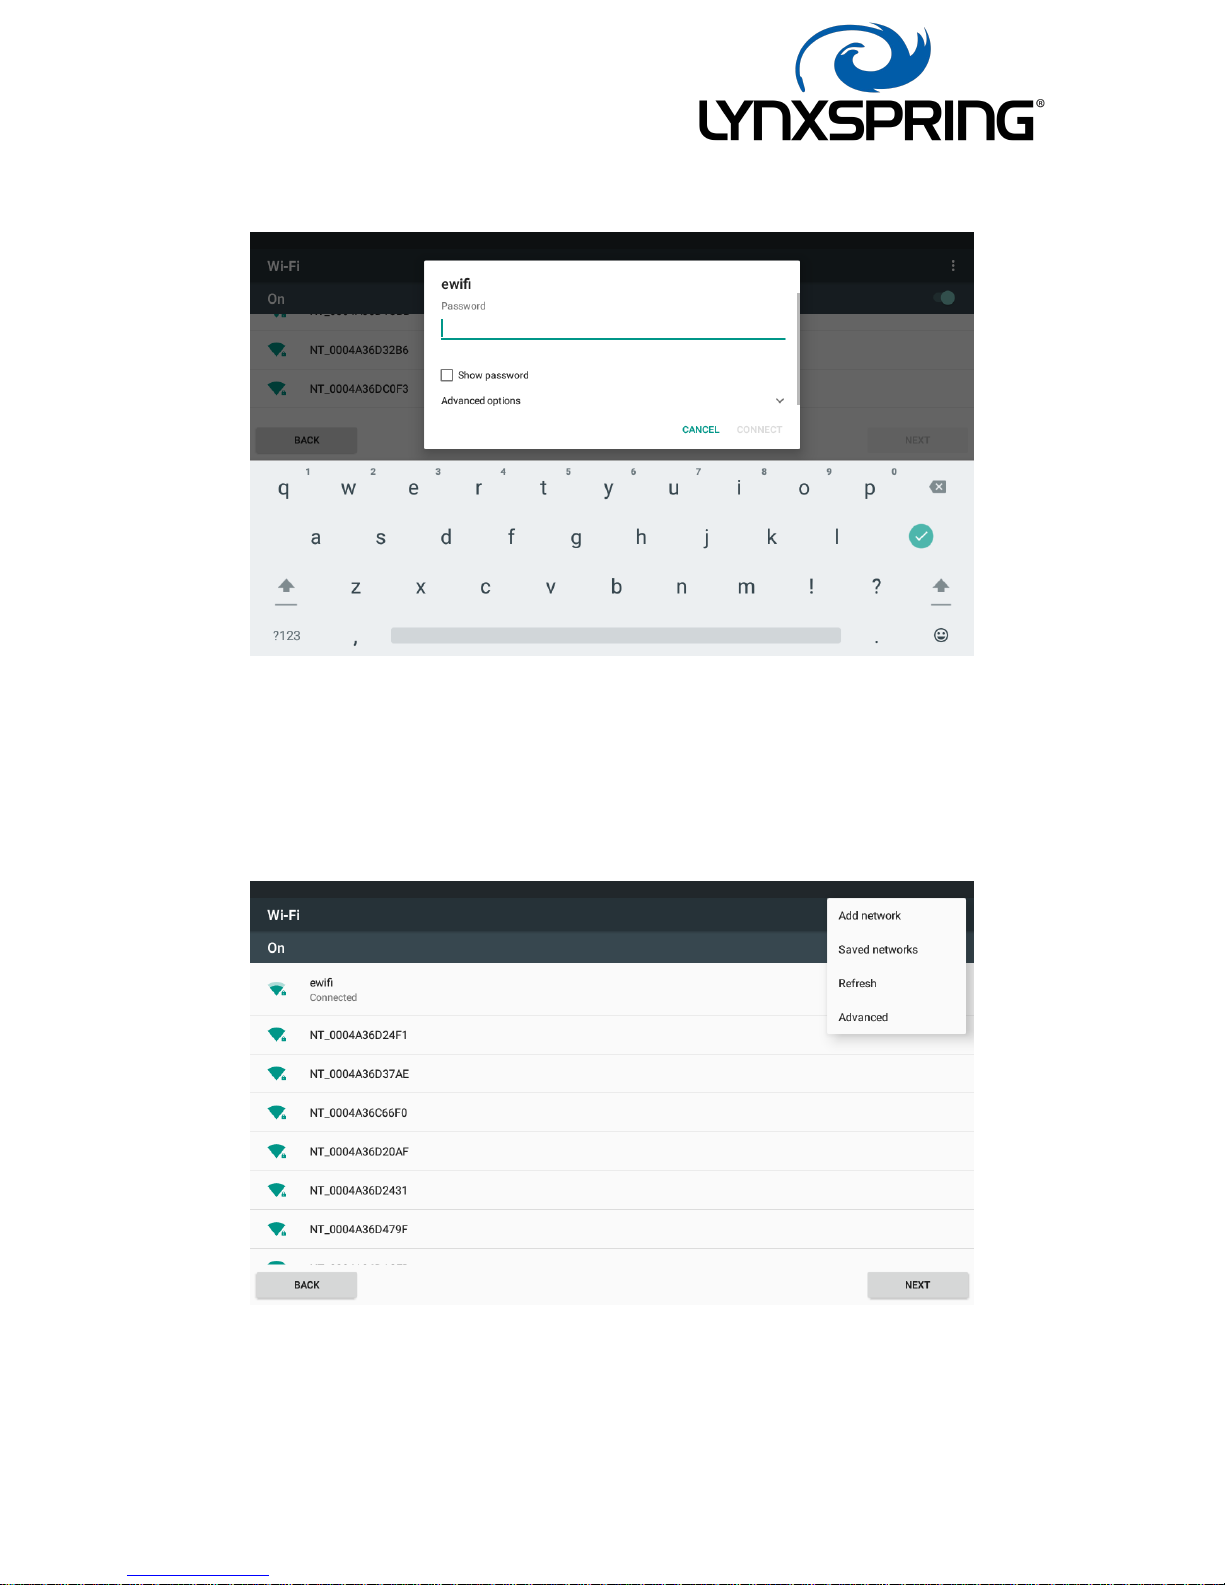
3. Enter the password for the network or source and click connect:
4. If WPS is available on your network or Source, select the top right tab & select ‘Advanced’
Page 7
200SM070 V1.3 Page 7 of 34
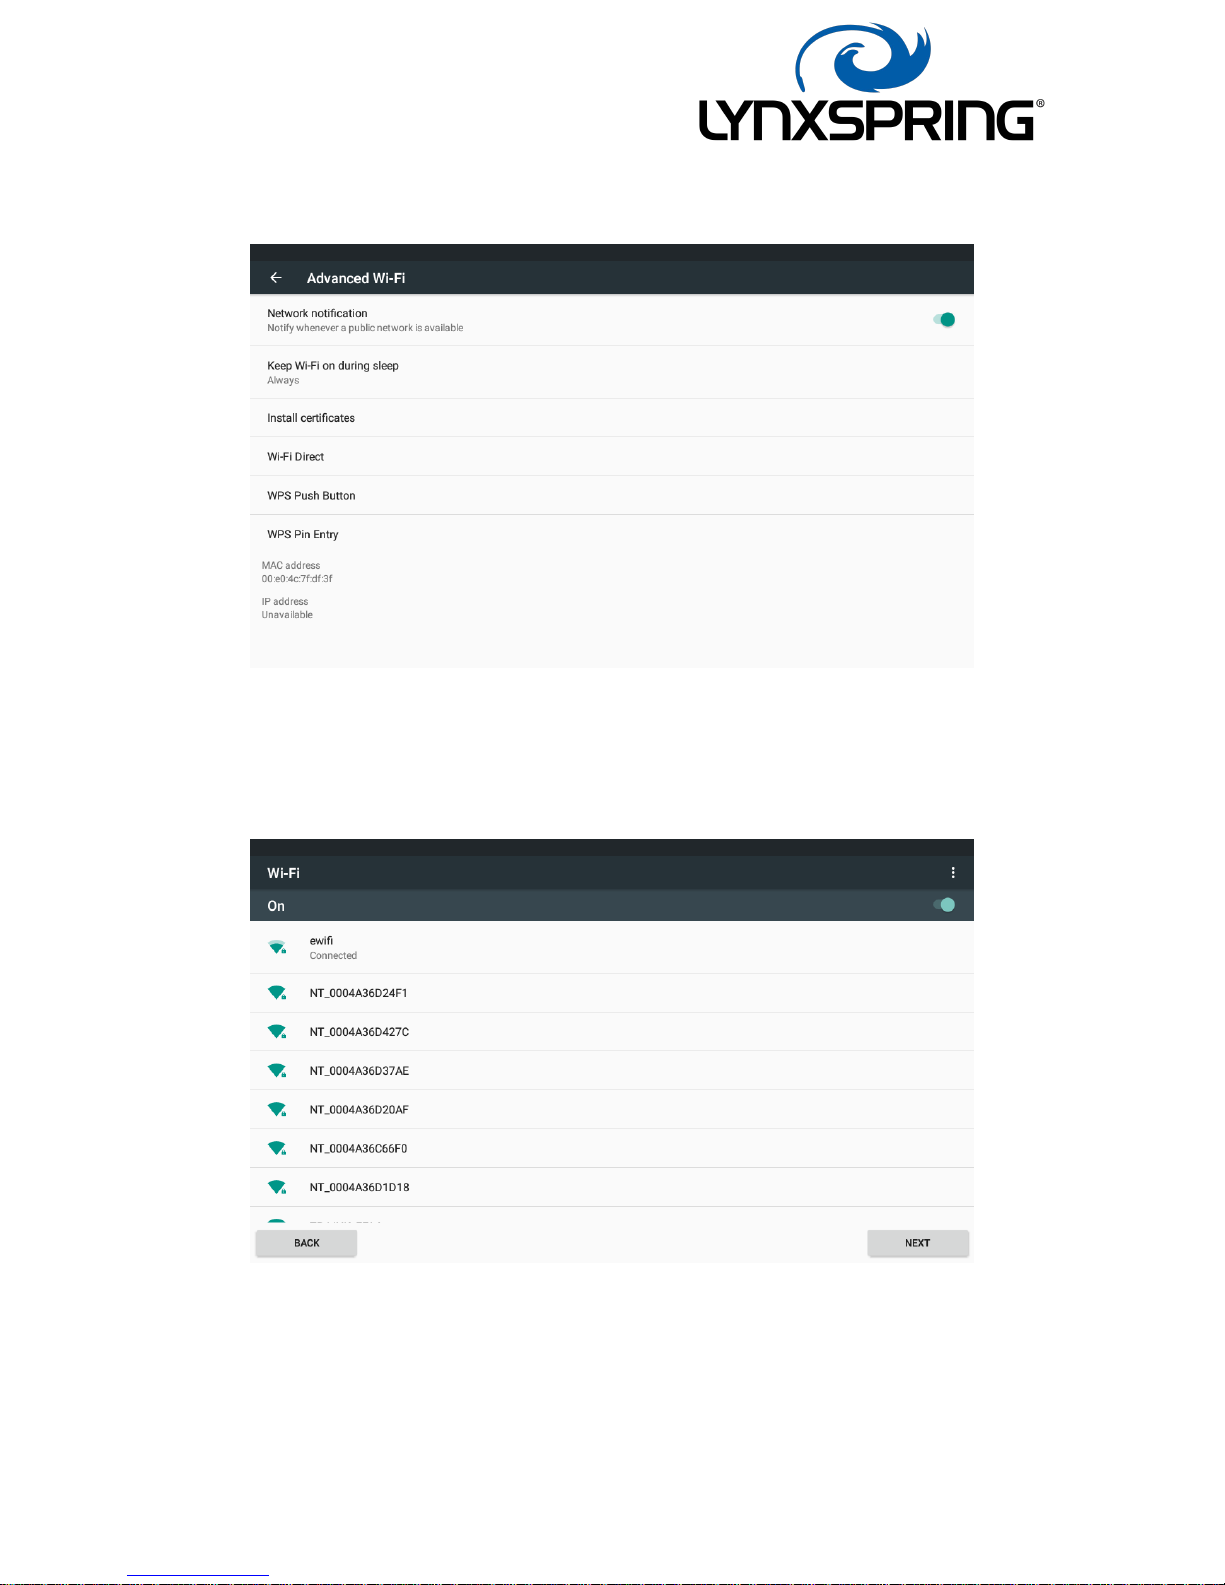
5. Select the WPS push button feature and enable WPS on your source at the same time:
6.The WPS system should now connect. Once connected, click ‘Next’
Page 8
200SM070 V1.3 Page 8 of 34
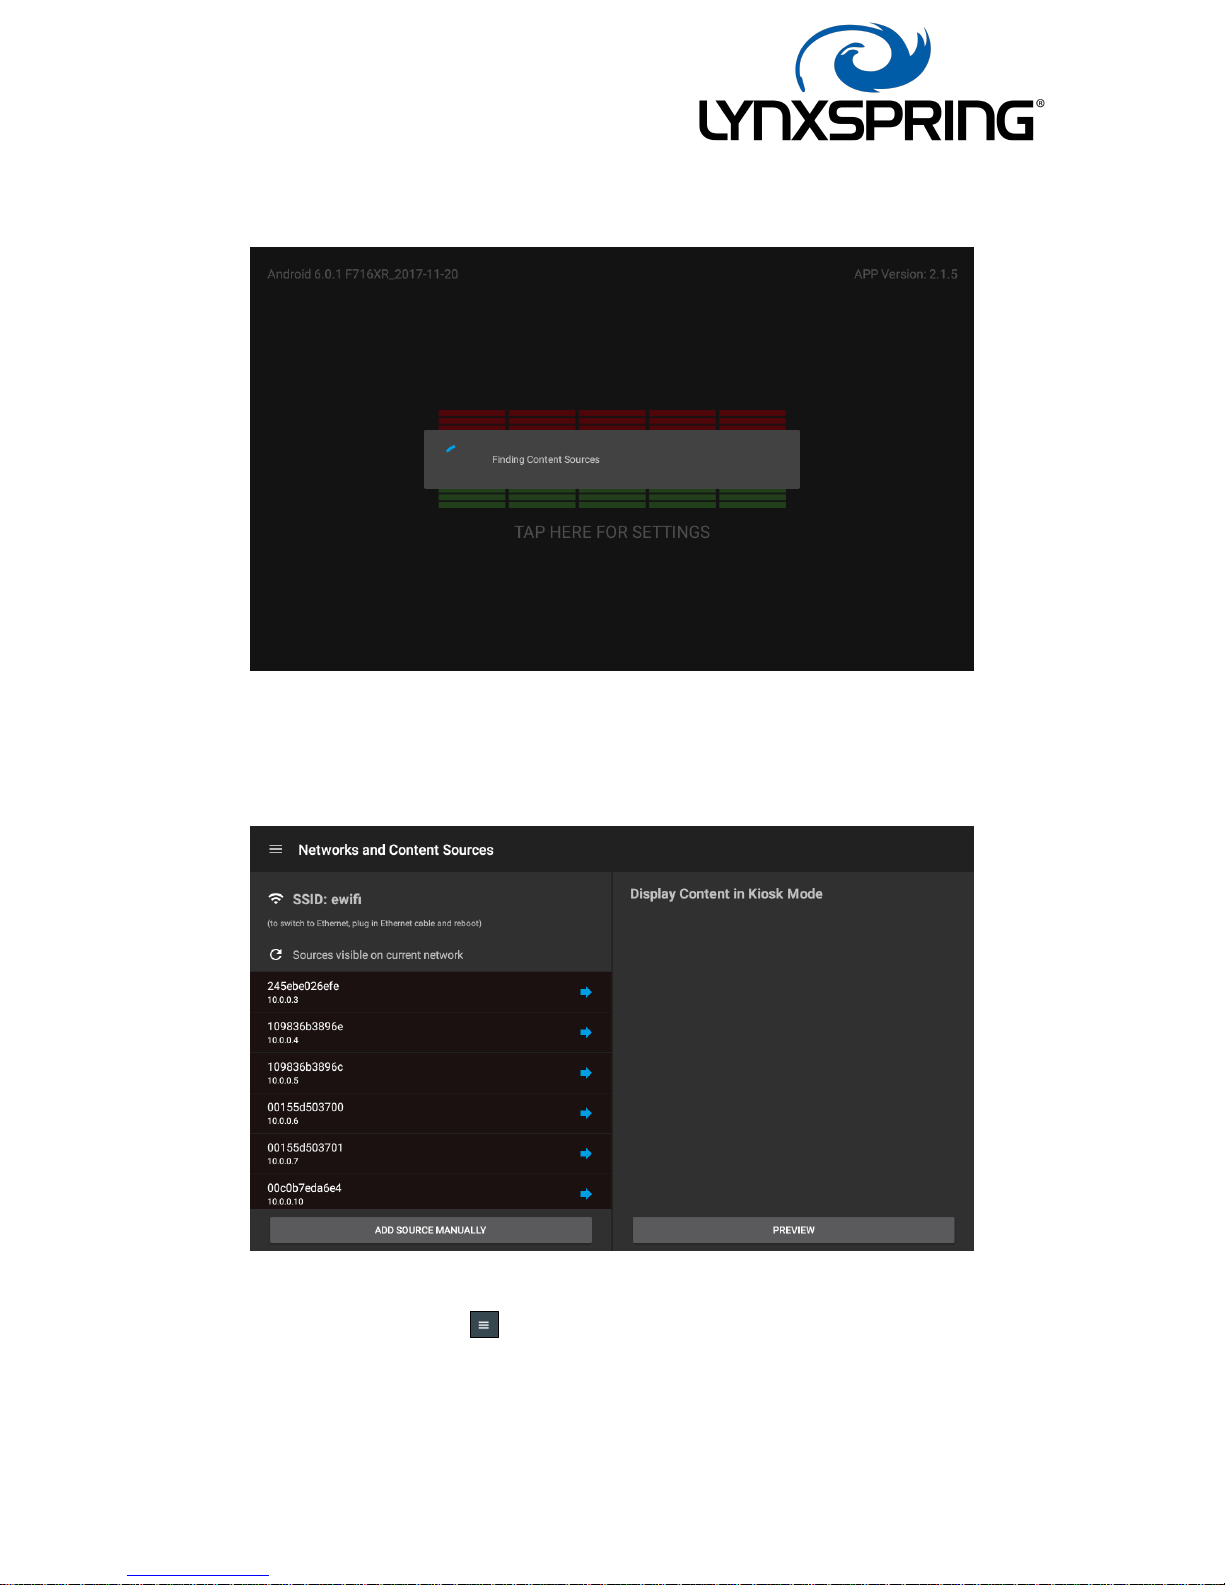
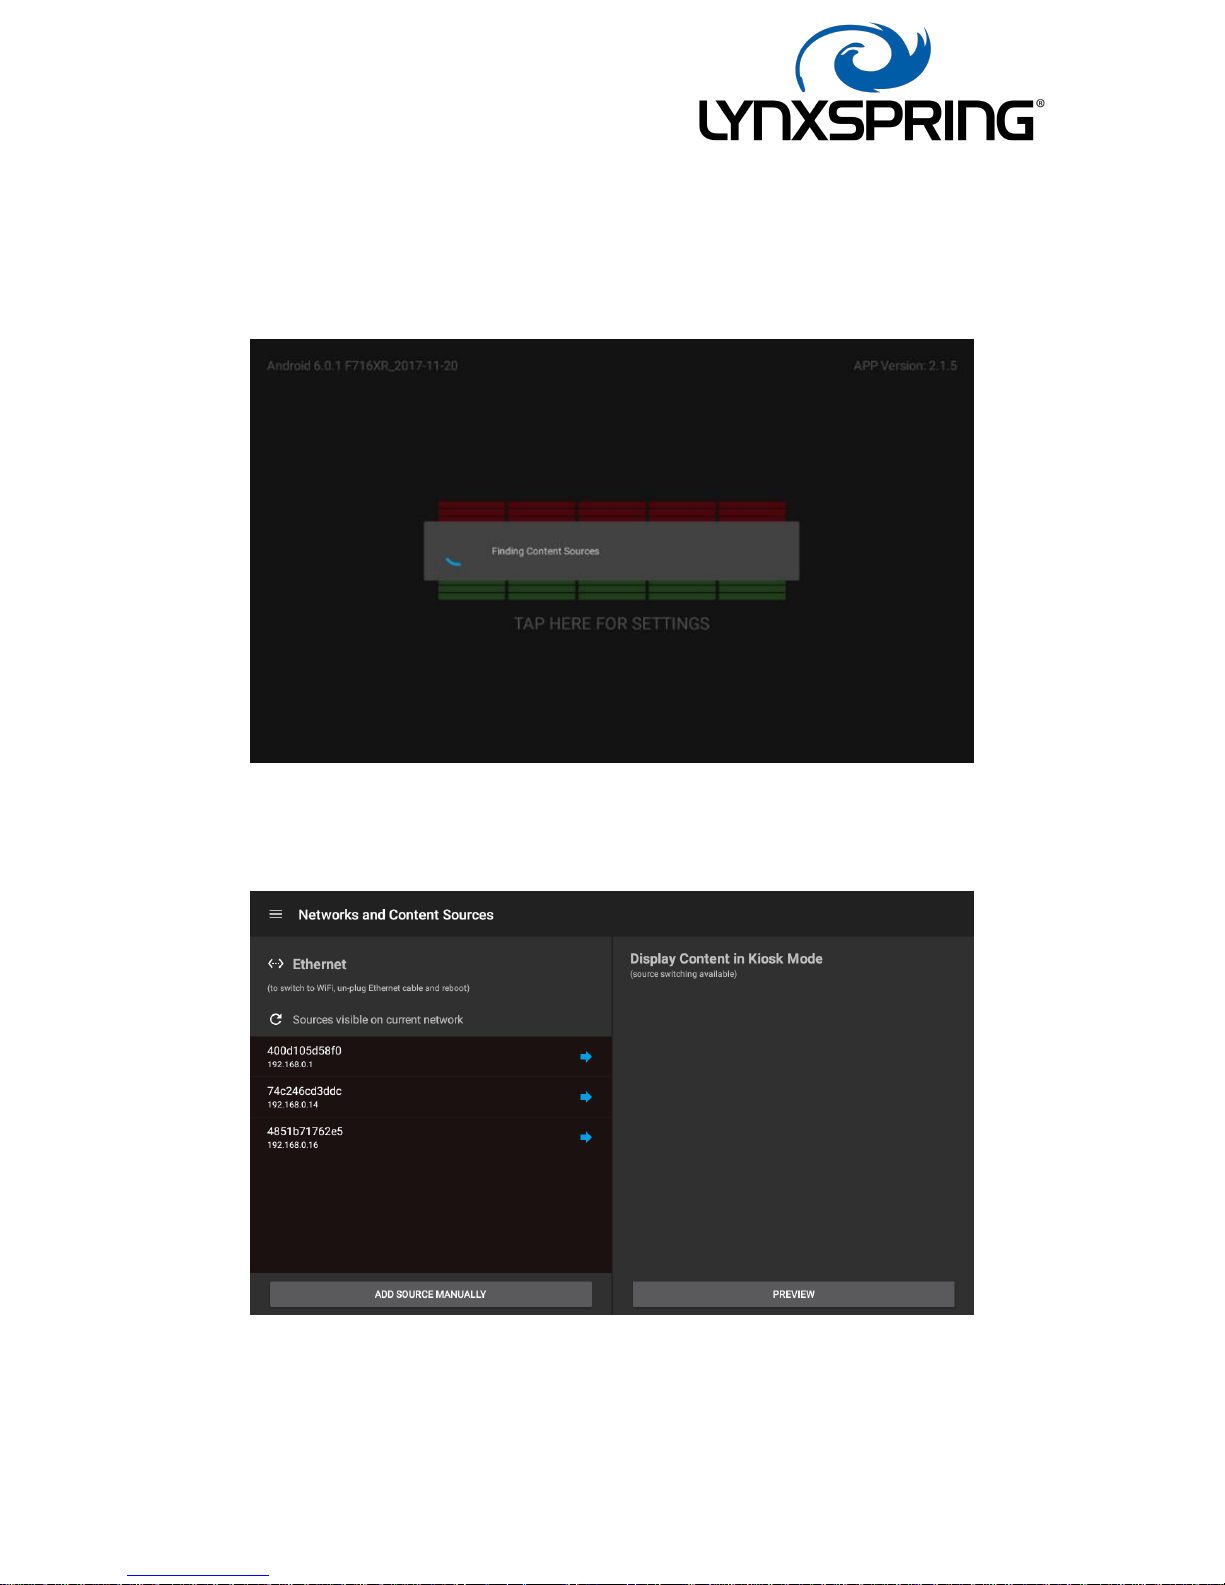
7. The application will search and find all the Sources on the network:
8. Once search and discovery is complete, the Networks and Content Sources configuration
screen is shown:
• NOTE: Select the button (top left) or swipe from the left edge of the screen to
access the Menu.
Page 9
200SM070 V1.3 Page 9 of 34
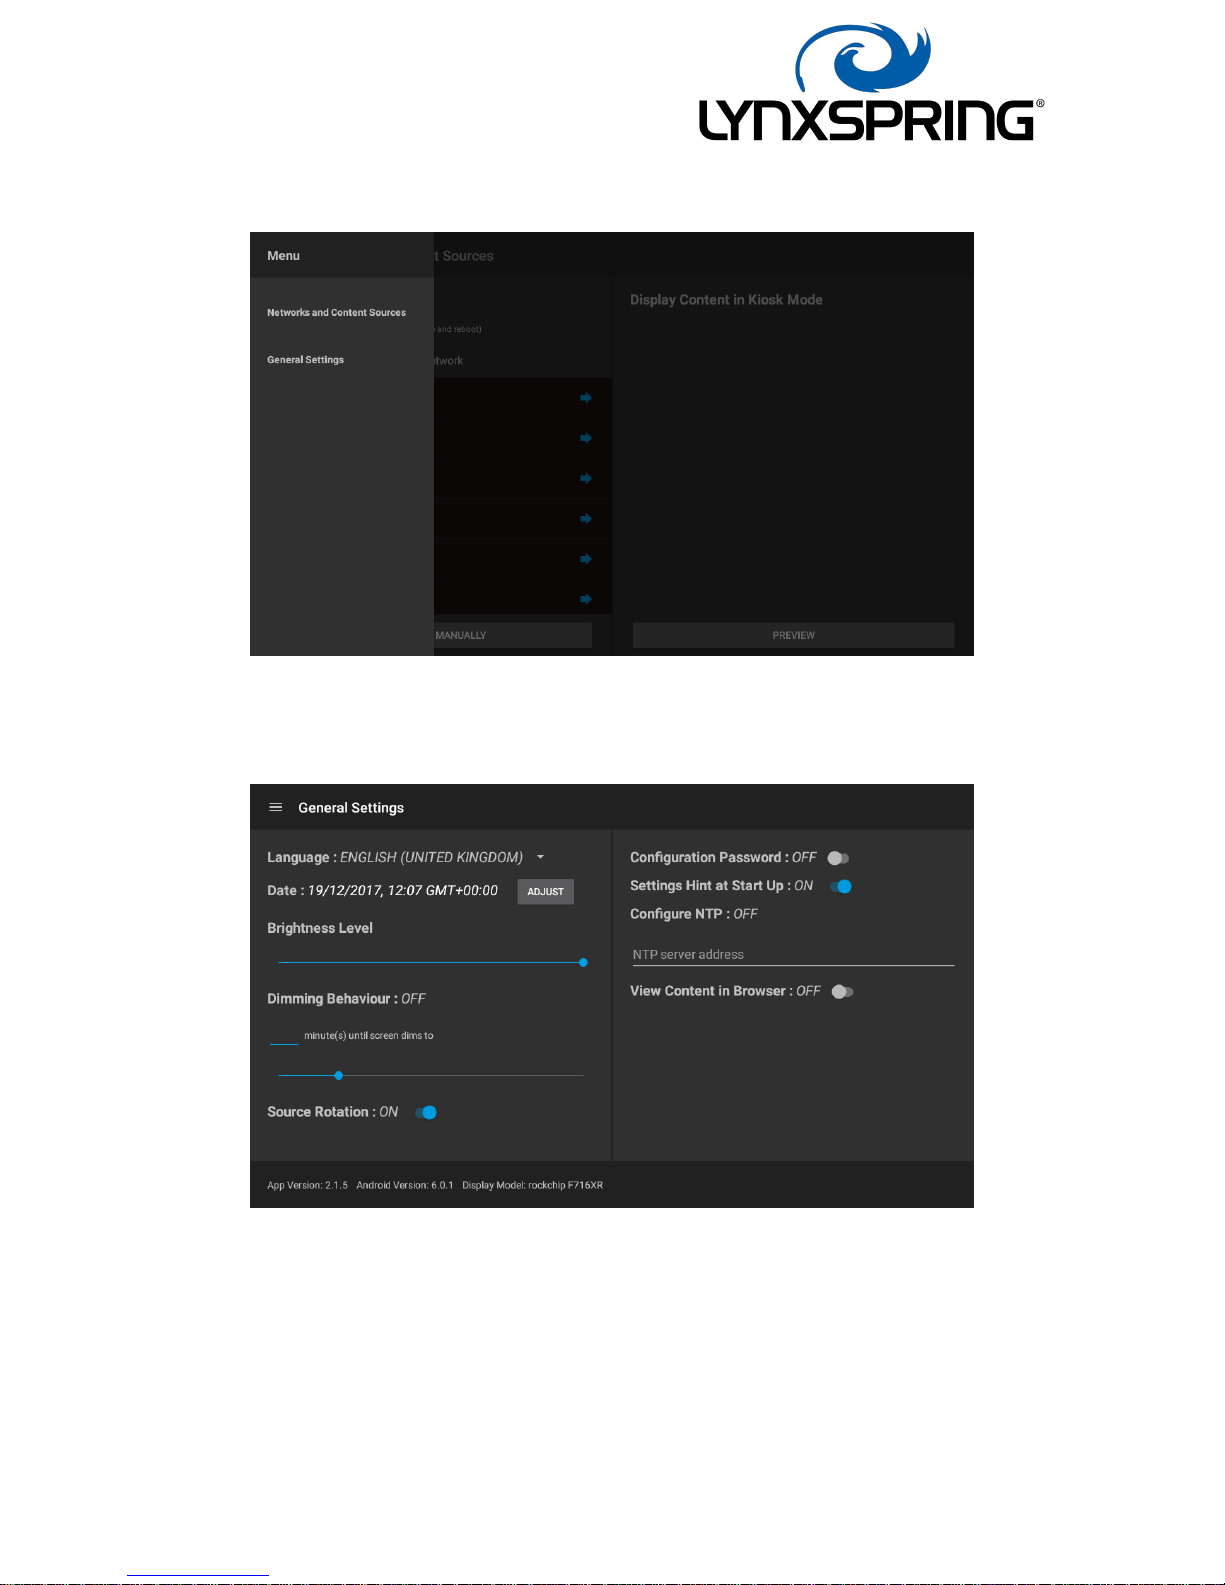
9. Various display settings can be configured by selecting General Settings:
10. General Settings
• Change the language.
• Change the Date / Time / Time Zone.
• Adjust the dimming behaviour,
To turn dimming off:
o Set the dimming value to 0 or blank
Page 10
200SM070 V1.3 Page 10 of 34
o Make the brightness level and dimming level the same
NOTE: if you turn off dimming, the display may be affected by temporary image
ghosting if a static image is displayed for a prolonged period.
• Switch off source rotation enabled if more than 1 source has been configured. Default is
ON.
• Enable the password for the configuration screen.
• Add an NTP server if required.
• Configure how you view content served by saved sources. Detailed further in point 13
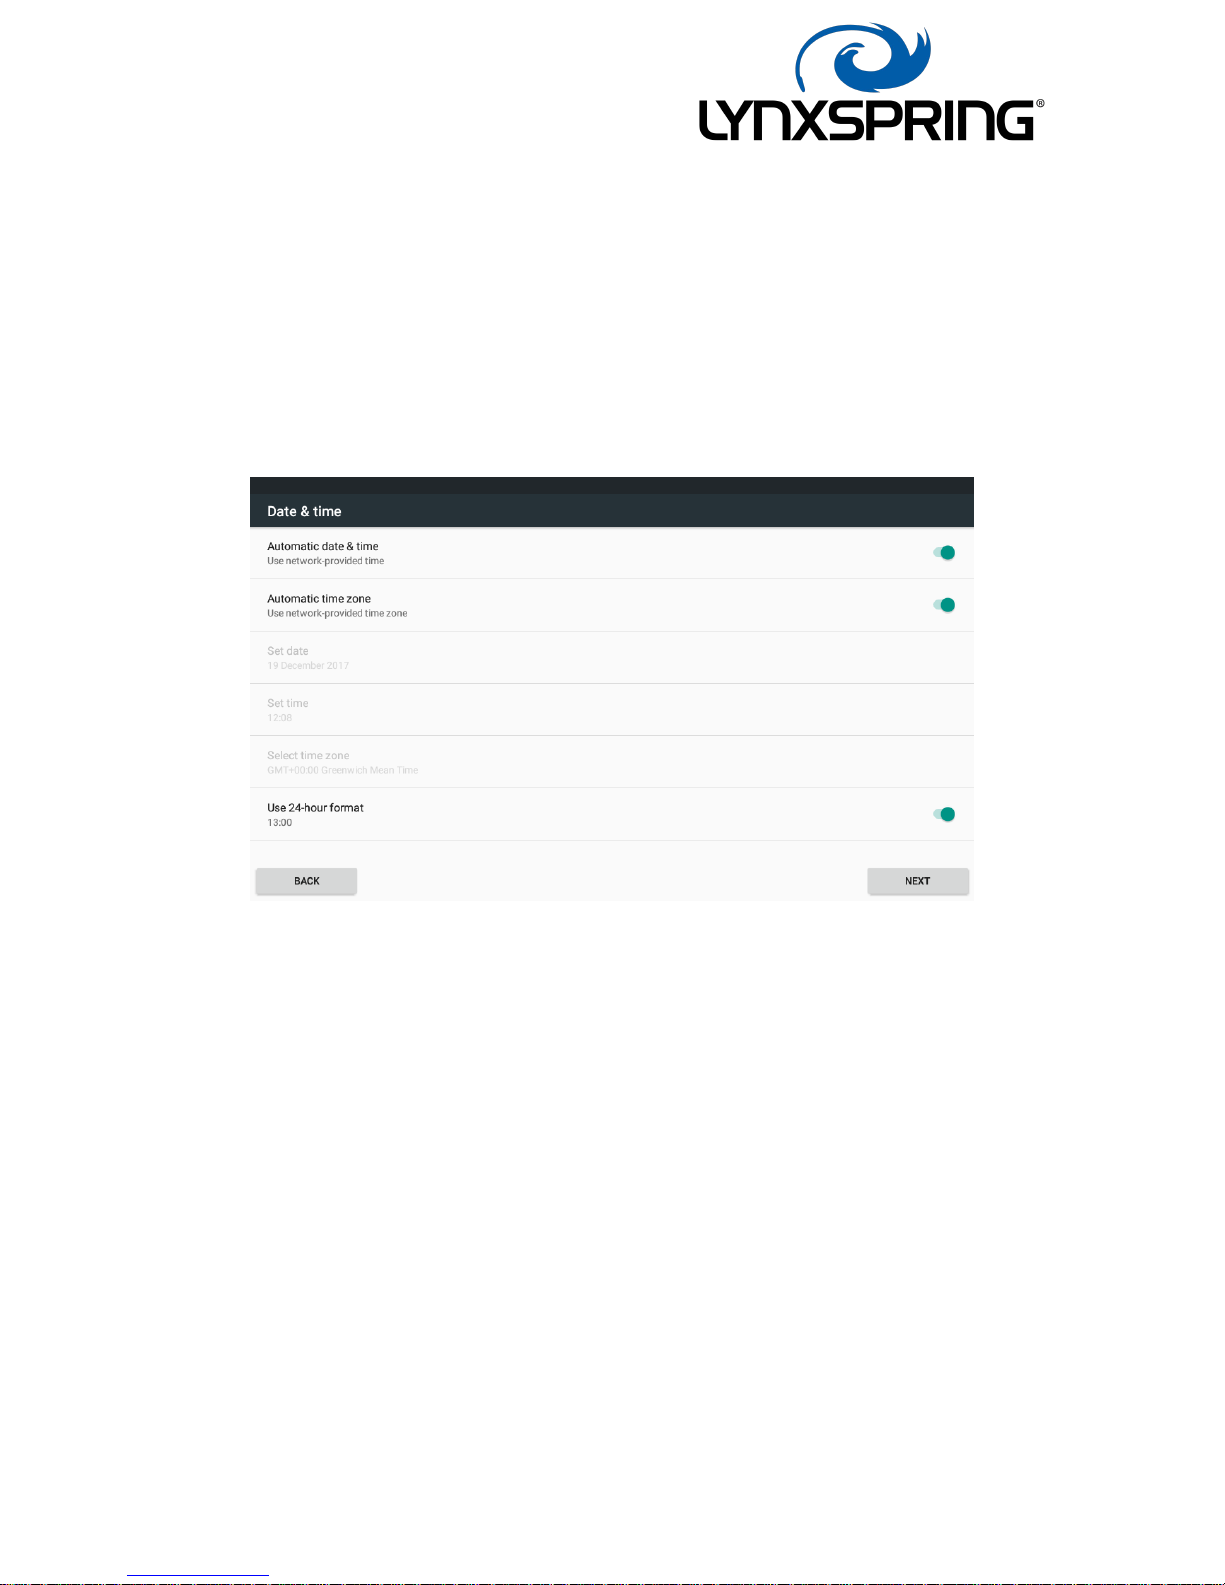
• To change the Date or Time, click ‘Adjust’.
• Deselect Automatic date & time and time zone, then adjust as required. Reselect Automatic
buttons once finished, then click next.
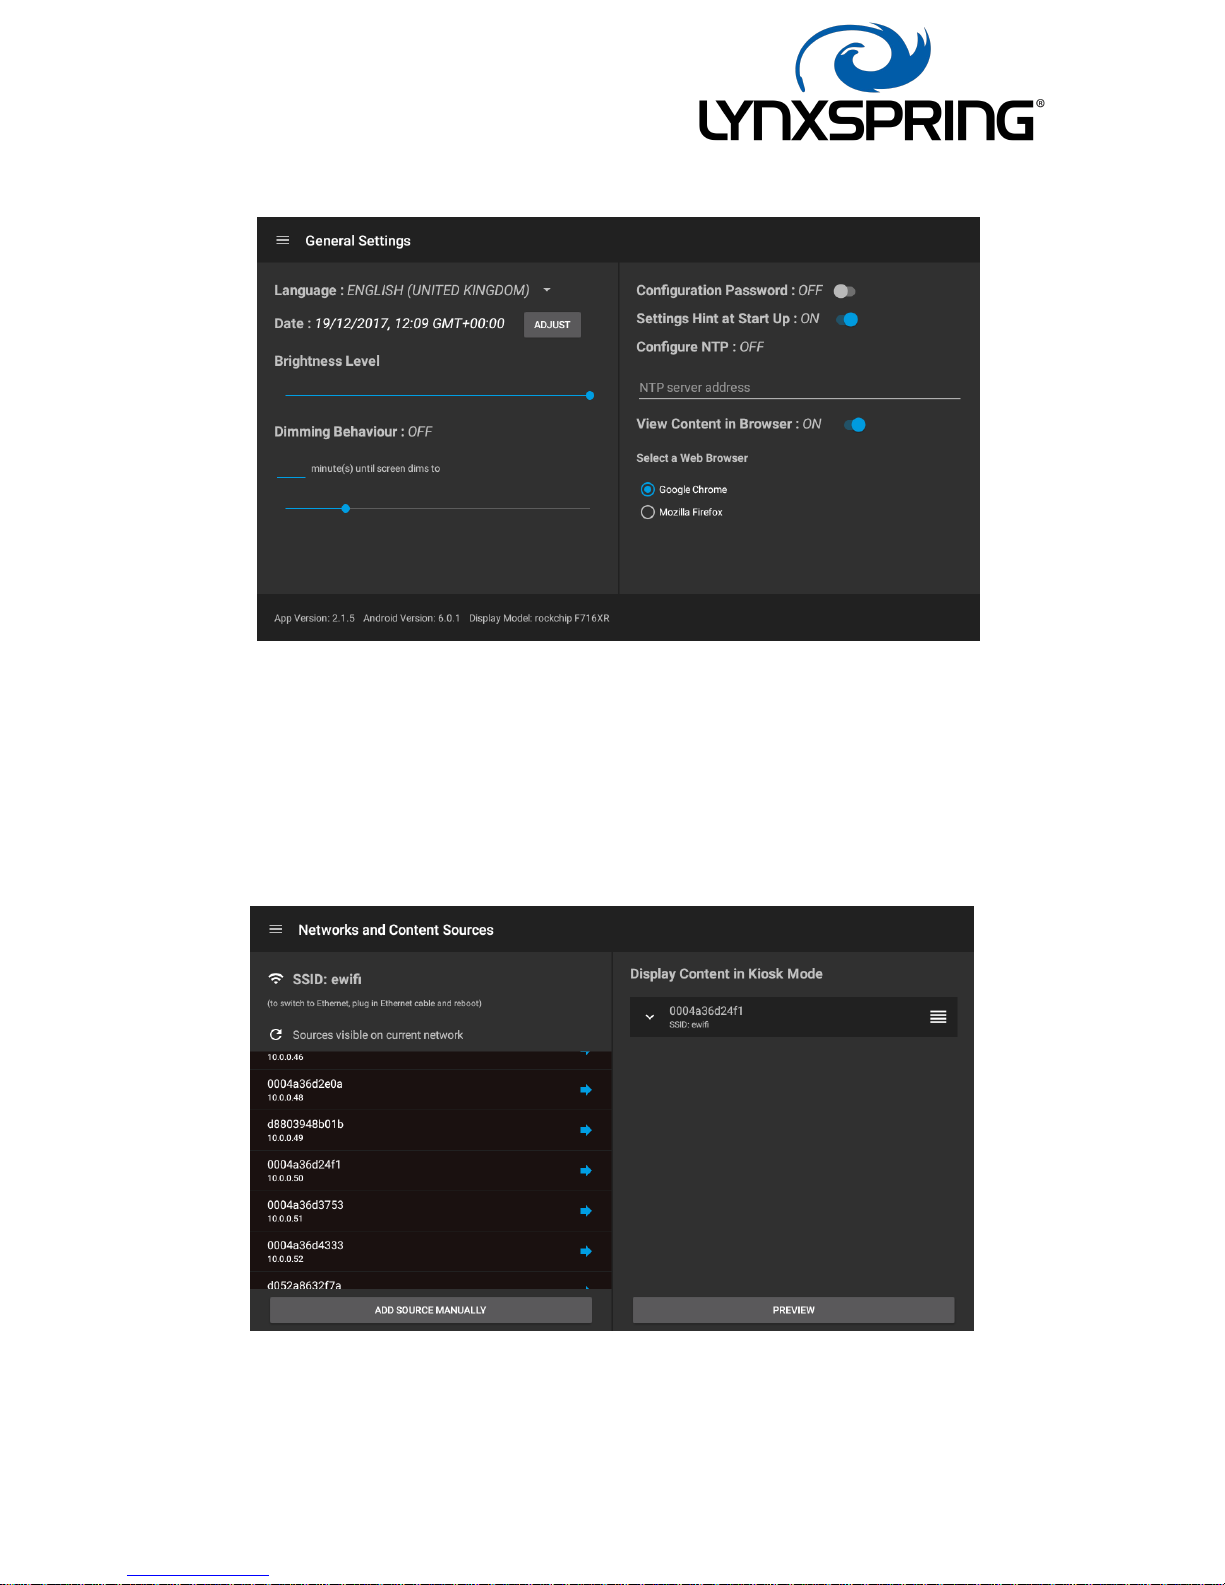
Enabling content browsers. By default, this is off. The content will be displayed by the Kiosk browser,
within Lynxspring APP. This gives a full browser experience in a full frame environment. If, however
your content design is such that you need or prefer to use a typical internet browser, the options
below are available.
a. Open content in Chrome Browser
b. Open content in Firefox Browser
Page 11
200SM070 V1.3 Page 11 of 34
Selecting to enable this function, presents either of these options.
• Once you have selected your browser & are happy with all the other settings, return to the
Network Settings page.
11. Once the display has finished its discovery mechanism the Sources found are displayed, they
will be listed showing the MAC address and the associated IP address. The list is sorted by IP
address in ascending order. Select your source or sources
• Note: any number of sources can be selected, or if desired, the same source can be selected
numerous times, with a different manually added URL. For example, different sources or
different pages from the same source.
Page 12

200SM070 V1.3 Page 12 of 34
12. Click on the box to expand and view configuration options.
c. The source can be renamed if required.
d. Https can be enabled.
e. A custom URL can be added. Include any custom port numbers in the URL, :8080,
:8443 etc. A colon must be used before port numbers.
f. Click to collapse the box and save any changes.
NB: If any sources are expanded when preview is clicked, the application will automatically
save any changes that have been made to that source.
Example:
Source name - first floor
Https - yes
Custom URL - :8443/first-floor/index.html
Expand the source you want to configure
Page 13

200SM070 V1.3 Page 13 of 34
Set the name
Enable https
Page 14

200SM070 V1.3 Page 14 of 34
Set custom url including custom port number
Collapse the box to save
Page 15

200SM070 V1.3 Page 15 of 34
13. Repeat steps 13 and 14 for each source you want to configure.
14. To reorder press and hold the drag and drop handle found on the right of each saved source,
then drag up or down. The source at the top of the list is always displayed first.
Page 16

200SM070 V1.3 Page 16 of 34
15. To remove a Source, swipe left from the centre and click the remove button. This only
removes this reference to the Source. It remains available in the device list.
16. Sources can also be added manually by using the ‘Add Source Manually’ button.
Page 17

200SM070 V1.3 Page 17 of 34
17. After clicking preview, web content from the top saved content source is displayed. A
preview bar is display giving you easy access back to the Configuration screen.
• If you have chosen more than one Source at launch point, then an additional ribbon will be
superimposed at the bottom of the loaded screen, as above. This displays the current Source
name, with a button offering you the ability to swap between Sources quickly. If clicked, the
below screen will show a list of ‘pre-loaded’ Sources. Select the desired one and it will load up
accordingly.
Page 18

200SM070 V1.3 Page 18 of 34
18. When you are happy with the loaded content, click launch. Clicking ‘No’ will simply close the
dialog. Clicking ‘Yes’ will put the display kiosk mode and a reboot will be required to make
any further changes.
19. If you have selected to view content within a browser, such as Chrome, then the display will
start the content within this browser. For convenience, the APP will create a web page at
launch, displaying all the Sources you have enabled at the launch screen.
For speed and ease going forward, it is suggested this page is bookmarked on first loading. Clicking
on the tabs for any of the Sources added, will launch that content in a separate Tab.
Page 19

200SM070 V1.3 Page 19 of 34
If you need at any point to change the network connection or change the launch sequence, re-boot
the display by pressing the power button once only. When you see the Lynxspring splash screen
below, tap the screen and the system will return to the network setup screen, where you can
adjust to your requirements. You will see a message saying, ‘Config Mode Active’.
The settings hint can be turned off in General Settings.
• The version number of the APP can also be seen top right during the splash screen, if
required or requested.
If you have enabled the password for the settings screen, the login page will appear after tapping
the splash screen. The password is ‘ipd_admin’
Page 20

200SM070 V1.3 Page 20 of 34
The operation of the Display, as detailed to this point, are typical of all network connection methods.
Please refer to the specific area of the document for your connection type and return to this section
once connected.
Page 21

200SM070 V1.3 Page 21 of 34
Connecting to a Source attached over Wi-Fi – Static IP Enabled
1. Turn on the display
2. Select the network
Page 22

200SM070 V1.3 Page 22 of 34
3. Click Advanced options and scroll down
4. Select static
Page 23

200SM070 V1.3 Page 23 of 34
5. Give the display a Static IP to use on the network. Add other custom values if required, for
example DNS 1.
6. Enter the password and click connect
Page 24

200SM070 V1.3 Page 24 of 34
7. Once connected to the network click next
8. The application will find all the Sources on the network
Page 25

200SM070 V1.3 Page 25 of 34
9. The Networks and Sources configuration screen is shown
10. After clicking preview, web content from the top saved content source is displayed. A
preview bar is display giving you easy access back to the Configuration screen.
Page 26

200SM070 V1.3 Page 26 of 34
11. When you are happy with the loaded content, click launch. Clicking ‘No’ will simply close the
dialog. Clicking ‘Yes’ will put the display kiosk mode and a reboot will be required to make
any further changes.
12. After clicking launch, the Web App from the Source is displayed.
Page 27
200SM070 V1.3 Page 27 of 34
Connecting to a Source over Ethernet – DHCP enabled
1. Boot the Source when connected via Ethernet. The connection type dialog is bypassed and
the display finds all the Sources on the LAN.
2. Networks and Sources screen displaying all discovered Sources on LAN
Page 28

200SM070 V1.3 Page 28 of 34
3. Scroll to find the Source you want to connect to and click the blue arrow
4. Set the name and/or custom URL. This is where any ports are entered. In this case :3000 for
the Niagara box we are connecting to
Page 29

200SM070 V1.3 Page 29 of 34
5. Once the source has been previewed and you click launch, the app will display whatever
content the source serves. In this case the Niagara login screen.
Page 30

200SM070 V1.3 Page 30 of 34
Connecting to a Source over Ethernet – Static IP Enabled
1. Boot the Source when connected via Ethernet. There is no DHCP so the connection type
dialog is displayed
.
2. Select Ethernet from the list to administer the network settings
Page 31

200SM070 V1.3 Page 31 of 34
3. Scroll to the bottom of the screen and select Ethernet IP mode. Select the desired option.
4. Enter network settings for static Ethernet connection. A value must be added to each
field before the settings can be saved.
Page 32

200SM070 V1.3 Page 32 of 34
5. Any Sources already connected to the same network will be found.
6. Scroll to find the Source you want to connect to and click the blue arrow
Page 33

200SM070 V1.3 Page 33 of 34
7. Set the name and/or custom URL. This is where any ports are entered. In this case :3000
for the Niagara box we are connecting to
Page 34

200SM070 V1.3 Page 34 of 34
8. Once the source has been previewed and you click launch, the app will display whatever
content the source serves. In this case the Niagara login screen.
 Loading...