

Page 1
Connecting to the JENEsys-Edge 100
A 10/100-Mbit Ethernet connection is provided on the JENEsys-Edge 100.
This is an RJ-45 port. Use a standard Ethernet patch cable f or connecting to an
Ethernet Hub or Switch or for connecting directly to your computer. The RJ-45
port has two LEDs. When the device is connected to a network, the amber
LINK
LED is lit and the green
ACTIVITY
LED flashes when activity occurs.
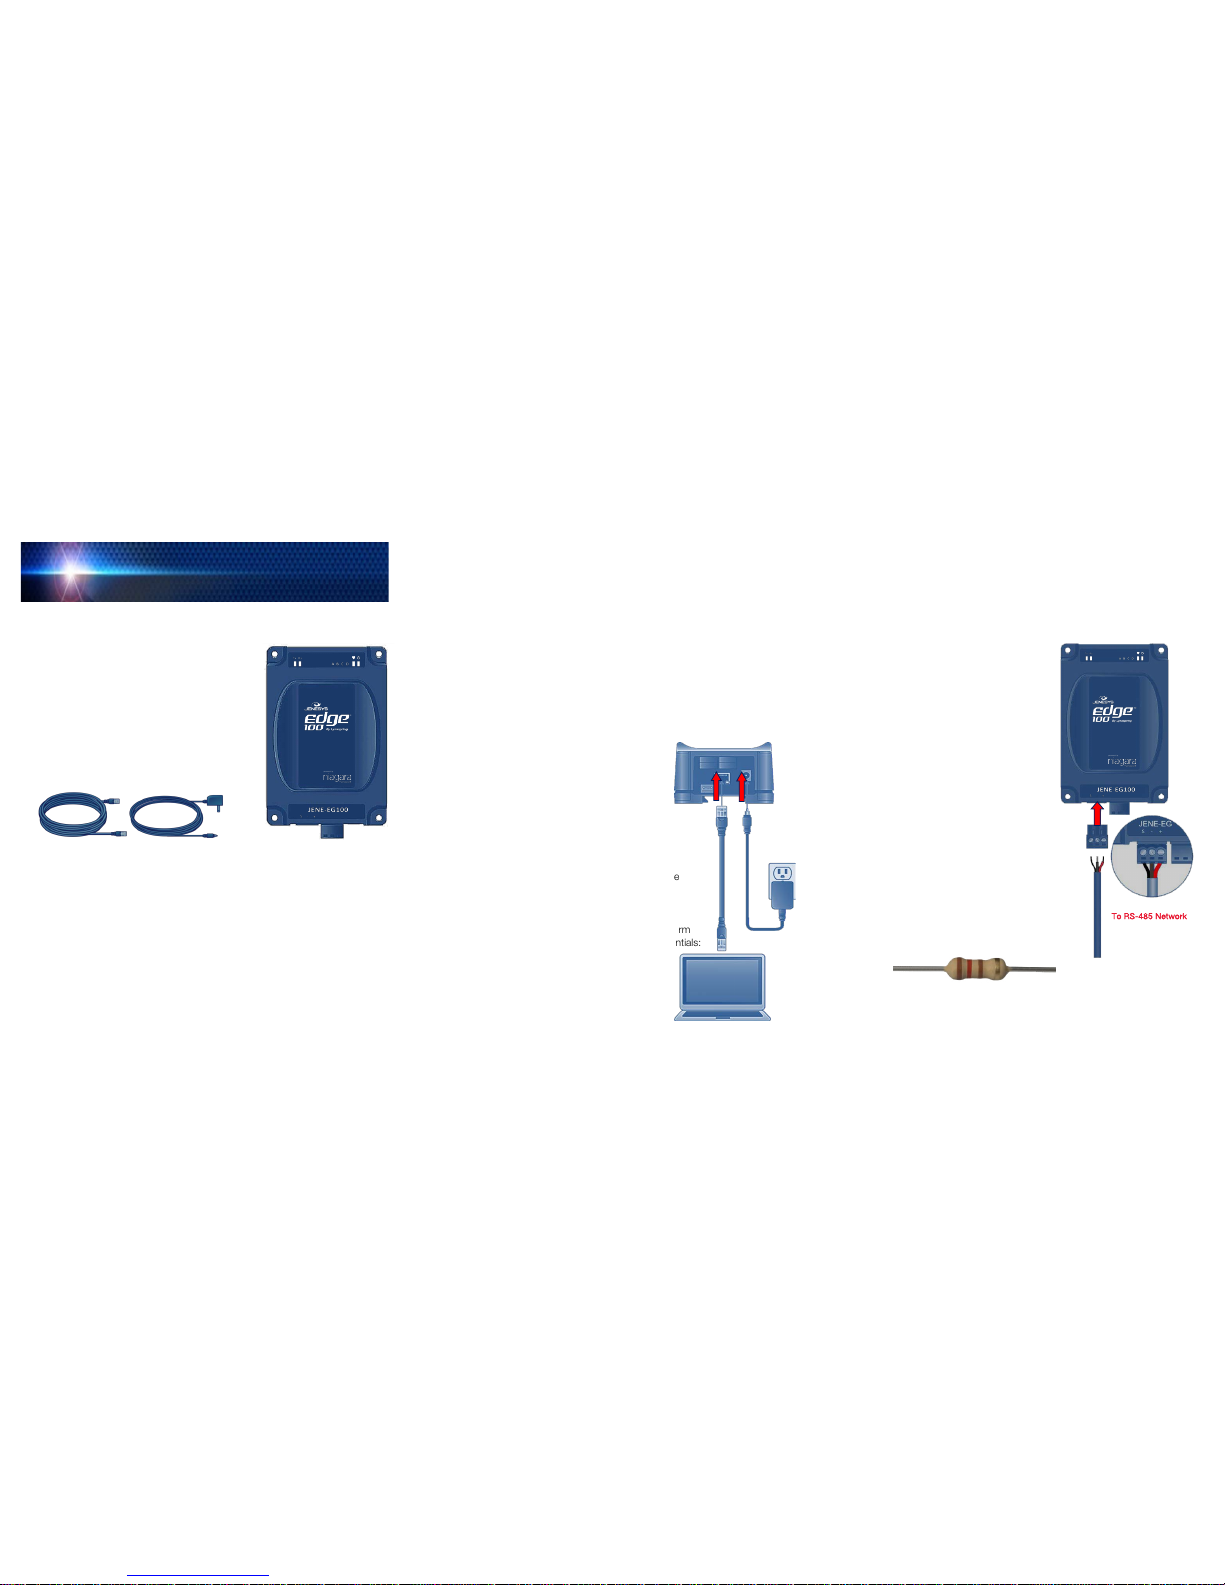
Step 1: Connect one end of the Ethernet cable to your JENEsys-Edge 10 0’s
RJ-45 port and the other end to the internet port on your computer.
Step 2:
Connect the power adaptor to the JENEsys-Edge 100 and then plug
it into an outlet. Wait for the power LED and heartbeat LED to turn on.
If none of the LEDs turn on, make sure the barrel connector on the end
of the power adaptor is pressed firmly into
the JENEsys-Edge 100.
Step 3:
Temporarily change your computer’s
network settings so your IP address is in
the range:
192.168.1.1
to
192.168.1.254
(without using the JENEsys-Edge 100’s
default address as described in Step 4).
Make note of your computer’s current
network settings.
Step 4:
With ProBuilder 3.8.111 installed on your
computer, make a platform connection to the
JENEsys-Edge 100 using the factory default
IP address
(192.168.1.12n, where the last
numeral (n) matches the last numeral in the
JENEsys-Edge 100’s Host ID number)
, platform
daemon port (3011), and the foll owing credentials:
Username:
tridium
Password:
niagara
Step 5:
Refer to the JENEsys-Edge 100’s
USER GUIDE ADDENDUM
and your local
copy of the
NIAGARAAX USER G UIDE
for
detailed instructions on how to configure the device using Niagara.
Ethernet Cable
Power Adaptor
Preparing to Install the JENEsys-Edge 100
Decide where you want to place the JENEsys-Edge100. You can use wall
mounting screws
(not provided)
to mount the JENEsys-Edge 100 in an open
space or mount on a 35mm wide DI N rail utilizing the mold ed DIN rail slot located
on the base of the device.
Make sure the selected location is:
Not in direct sunlight or near a heater or heating vent.
Not cluttered or crowded. There should be at least 4 to 6 inches
(10-15 cm)
of clear space on the side where all of the n etwork and power
connections are made.
Well ventilated
(especially if enclosed in a cabinet).
JENE-EG100
Estimated installation tim e: 5-10 minutes
Package Contents:
One JENEsys®-Edge 100
(JENE-EG100)
One 7ft Ethernet Cable
One AC Power Adaptor
One JENEsys-Edge 100 Installation
Guide
(this document)
One 3-Position Terminal Connector
One 3-Position Blank Terminal Connector
Ethernet Cable Power Adaptor JENEsys Edge 100
Connecting RS-485 Network to JENEsys-Edge 100
The RS-485 port uses a 3-position, screw terminal con nector. The screw
terminals
(from left-to-right)
are shield, minus (-), and positive (+). The transmit
(Tx) and receive (Rx) LEDs located on the JENEsys- Edge 100 cover w ill flash
when there is network activity detected.
Step 1: Unplug the left, 3-position screw
terminal connector from the
JENEsys-Edge 100.
Step 2:
Insert the positive wire from your
RS-485 network to the positive
terminal
(far right terminal)
on the
3-position, screw terminal connector
and tighten down the screw.
Step 3:
Insert the negative wire from your
RS-485 network to the negative
terminal
(center terminal)
on the
3-position, screw terminal connector
and tighten down the screw.
Step 4:
Insert the shield wire to the shield
terminal
(far left terminal)
on the
3-position, screw terminal connector
and tighten down the screw.
Step 5:
If located at the end of the network,
Lynxspring recommends installation
of a 120 ohm end-of-line resistor on
the + & - terminals.
Step 6:
Plug the 3-position, screw terminal
connector back into the RS-485
port on the JENEsys-Edge 100.
To RS-485 Network
RJ-45
Port
JENEsys® Edge 100
INSTALLATION GUIDE
Page 2
©2017 by Lynxspring, Inc. All rights reserved. The information and/or specifications published here
are current as of the date of publication of this document. Lynxspring, Inc. reserves the right to change
or modify specifications without prior notice. The latest produc t specifications can be fou nd by
contacting our corporate headquarters in Lee’s Summit, Missouri. Product s or features contained
herein are covered by one or more United States or foreign patents. Other brand and product names
are trademarks or registered trademarks of their respective holders. This document may be copied
by parties who are authorized to distribute Lynxspring produ cts in connection with distribution of
those products, s ubject to the contracts that authorize such distribution. It may not otherwise, in
whole or in part, be c opied, ph otocopied, reproduced, translated, or reduced to any electronic
medium or machine-readable form without prior written consent from Lynxspring, Inc. C omplete
Confidentiality, Trademark, Copyright and Patent notifications can be found at:
http://resources.lynxspring.com.
Lynxspring®, JENEsys®, Onyxx®, and Helixx® are registered trademarks of Lynxspring, Inc.
JENEsys Edge™ is a trademark of Lynxspring, Inc.
Niagara Framework® are registered trademarks of Tridium, Inc.
Corporate Headquarte rs
1210 NE Windsor Drive
Lee’s Summit, MO 64086
P: 816-347-3500 | F: 816-347-0780
Troubleshooting
If you are unable to make a platform connection to the JENEsys-Edge 100:
Make sure the JENEsys-Edge 100 is fully up and running. Its power
LED should turn on and its heartbeat LED should be flashing.
Make sure the Ethernet cable is connected firmly to the Ethernet port
on the JENEsys-Edge 100. The LEDs on the Ethernet port will
indicate if the JENEsys-Edge 100 is connected to the network.
The amber
LINK
LED will indicate the JENEsys Edge 100 is
connected to a network and the green
ACTIVITY
LED will indicate the
JENEsys-Edge 100 is transmitting and receiving on the network.
If you are connecting directly from your computer to the JENEsys-
Edge 100, ensure your computer’s network settings are set so that
your computer’s IP address is anything other than the device.
If you are connecting the JENEsys-Edge 100 through a network
make sure your computer’s network setting is set to
DHCP
.
Close and re-open the browser to make sure that the browser does
not cache the previous page.
Statement of Conditions
In the interest of improving internal design, operational function, and/or
operability, Lynxspring reserves the right to make changes to the product
described in this document without notice. Lynxspring does not assume
any liability that may occur due to the use or application of the product(s)
or circuit layout(s) described herein.
Technical Support
Thank you for selecting Lynxspring products. Please contact our Support
Team if you have any questions about installing or setting-up your new
JENEsys-Edge 100
(JENE-EG100).
support@lynxspring.com
|
toll free: 877-649-5969
Specifications
PLATFORM
Operating System
Helixx™ Framework by Lynxspring ®
Niagara® AX 3.8
Processor
1 GHz AM335x ARM Cortex A-8
Memory
512 MB DDR3L 800 MHz, 4 GB 8-bit Embedded MMC
on-board Flash
RTC
Real-Time Clock: Battery-powered clock included to
store description or setup values including: current time
(year, month, date, hours, minutes and seconds).
Back-up module with an
embedded button cell lithium
battery
Battery provides a 5-minute fail over backup in case of
power loss. This prevents loss of data in transmission or
data being written to a data base during a power loss by
providing a power backup and shut down.
COMMUNICATION PORTS
Ethernet Port
10/100 Mbps
(RJ-45 Connector)
RS-485 Port
Optically-isolated RS-485 serial port with 3-screw connector
Mini B-USB
USB Client Connector utilizes 5 pin Mini-B USB cable
POWER
Power Input
External 9 to 15 VDC 1A power supply
CHASSIS
Construction
Base: Plastic, DIN rail or screw mount
Cover: Plastic
Cooling
Internal air convection
Dimensions
3.75” (9.53 cm) width x 5.60” (14.22 cm) length X 2.55”
(6.48 cm) depth
Mounting
Flat panel and 35mm DIN rail mounting options standard
ENVIRONMENT
Operating Temperature Range
0 – 60 °C (32 –140 °F)
Storage Temperature Range
0 – 70 °C (32 –158 °F)
Relative Humidity Range
5 – 95% RH, non-condensing
CERTIFICATIONS
Compliance
FCC Part 15 Class A, RoHS, CE, CAN ICES-3(A)/NMB-3(A)
Lithium Battery
UL 1642; FAA AC 120-76C; UN38.3; UL 2054;
UL 60950-1; and IEEE 1725.
Revised 5/22/2018 | JENE-EG100-V1
Proper Disposal
This product contains a lithium battery.
The U.S. Environmental Protection Agency (EPA) does not regulate the
disposal of batteries in small quantities; large quantities are regulated
under the Universal rules of Hazardous Waste regulations
(40 CFR PART
273)
. Lithium batteries are not currently being collected by manufacturers
for recycling. While there are no federal regulations for disposal of l ithium
batteries, individual states can establish their own guidelines for battery
disposal, and should be contacted for any lo cal dispos al guidelines.
The shipment of live or discharged lithium batteries is governed by the
Department of Transportation (DOT) in t heir Code of Federal Regulations
(49 CFR), paragraph 173.185(j).
Remember that before any type of
disposal the batteries should be discharged c ompletely. Tape the contacts
with electrical tape and package so as to prevent contacts accidentally
coming together at any time.
This symbol was placed in accordance with the European Union
Directive 2002/96 on the Waste Electric an d Electronic Equipment
(the WEEE Directive).
If disposed of within the European Union, this
product should be treated and recycled in accordanc e with the laws of
your jurisdiction implementing the WEEE Directive.
 Loading...