

LynRus Aut-O-Loc 3 Installation Instructions Manual
Aut-O-LocTM 3 Installation Instructions
General Warnings
● Read all instructions prior to installation and use.
● This unit is not a person fall protection device.
● This unit must be replaced after catching a falling load.
● Ensure all people are clear of backstop when operating hoisting
equipment. ( Use only supplied hardware, do not substitute)
● This unit is intended for indoor use only
● Use appropriate lock-out and tag-out procedure for backstop hoist
when installing Autoloc.
● During installation, use a tether on the Autoloc that will prevent the
Autoloc from falling.
● Ensure that people are well clear of work area, and that no-one is un-
derneath work platform. When installing unit ensure that work platform
is stable and clear of moving equipment during hoist operation. Work
platform (i.e. man lifts) may tip when extended to great heights. Make
sure the work platform is clear of the backstop when testing the movement of the backstop and Autoloc.
● Belt must move freely through the range of backstop motion. Belt
must not rub against anything as backstop moves; abrasion may cause
Belt failure.
● Keep loose clothing, long hair and jewelry clear of equipment while
installing Autoloc.
2. Locate the Autoloc just above and as close to the pick up point (where the lifting cable attaches) on the backstop mast as possible. The warning tear tab
should be just below the white roller guides at the bottom when the backstop is
in the fully raised position and facing outward so it can be seen easily if deployed.
1. The basketball backstop must be in its deployed (down) position for installation
of the Autoloc.
Unit should be oriented so
the warning tear tab
Is visible from the front of
the basket.
Rev. 6-27-18
Warning Strip
will deploy on
side opposite
the sewn loop
if unit catches
a load.
List of contents in the box:
Description Quantity
Aut-O-Loc
TM
3 1 each
Instruction Set 1 each
Hardware packet containing:
Nut, Hex , 3/8” Flange Lock 1 each
Nut, Hex, 1/2” Flange Lock 2 each
Nut, Hex 5/8” Flange Lock 1 each
Bolt, 3/8” x 3” 1 each
Bolt, 1/2” x 3” 1 each
Bolt, 1/2” x 4” 1 each
Bolt, 5/8” x 4.25” 1 each
Clamp, Belt, Buckle 1 each
Clamp, Pipe (for belt buckle) 1 each
Following is a list of necessary tools:
3/4 inch six or twelve point socket
3/4 inch combination open/box end wrench
9/16 inch socket & wrench (open or adjustable)
15/16 inch socket & wrench (open or adjustable)
5-100 ft lb torque wrench
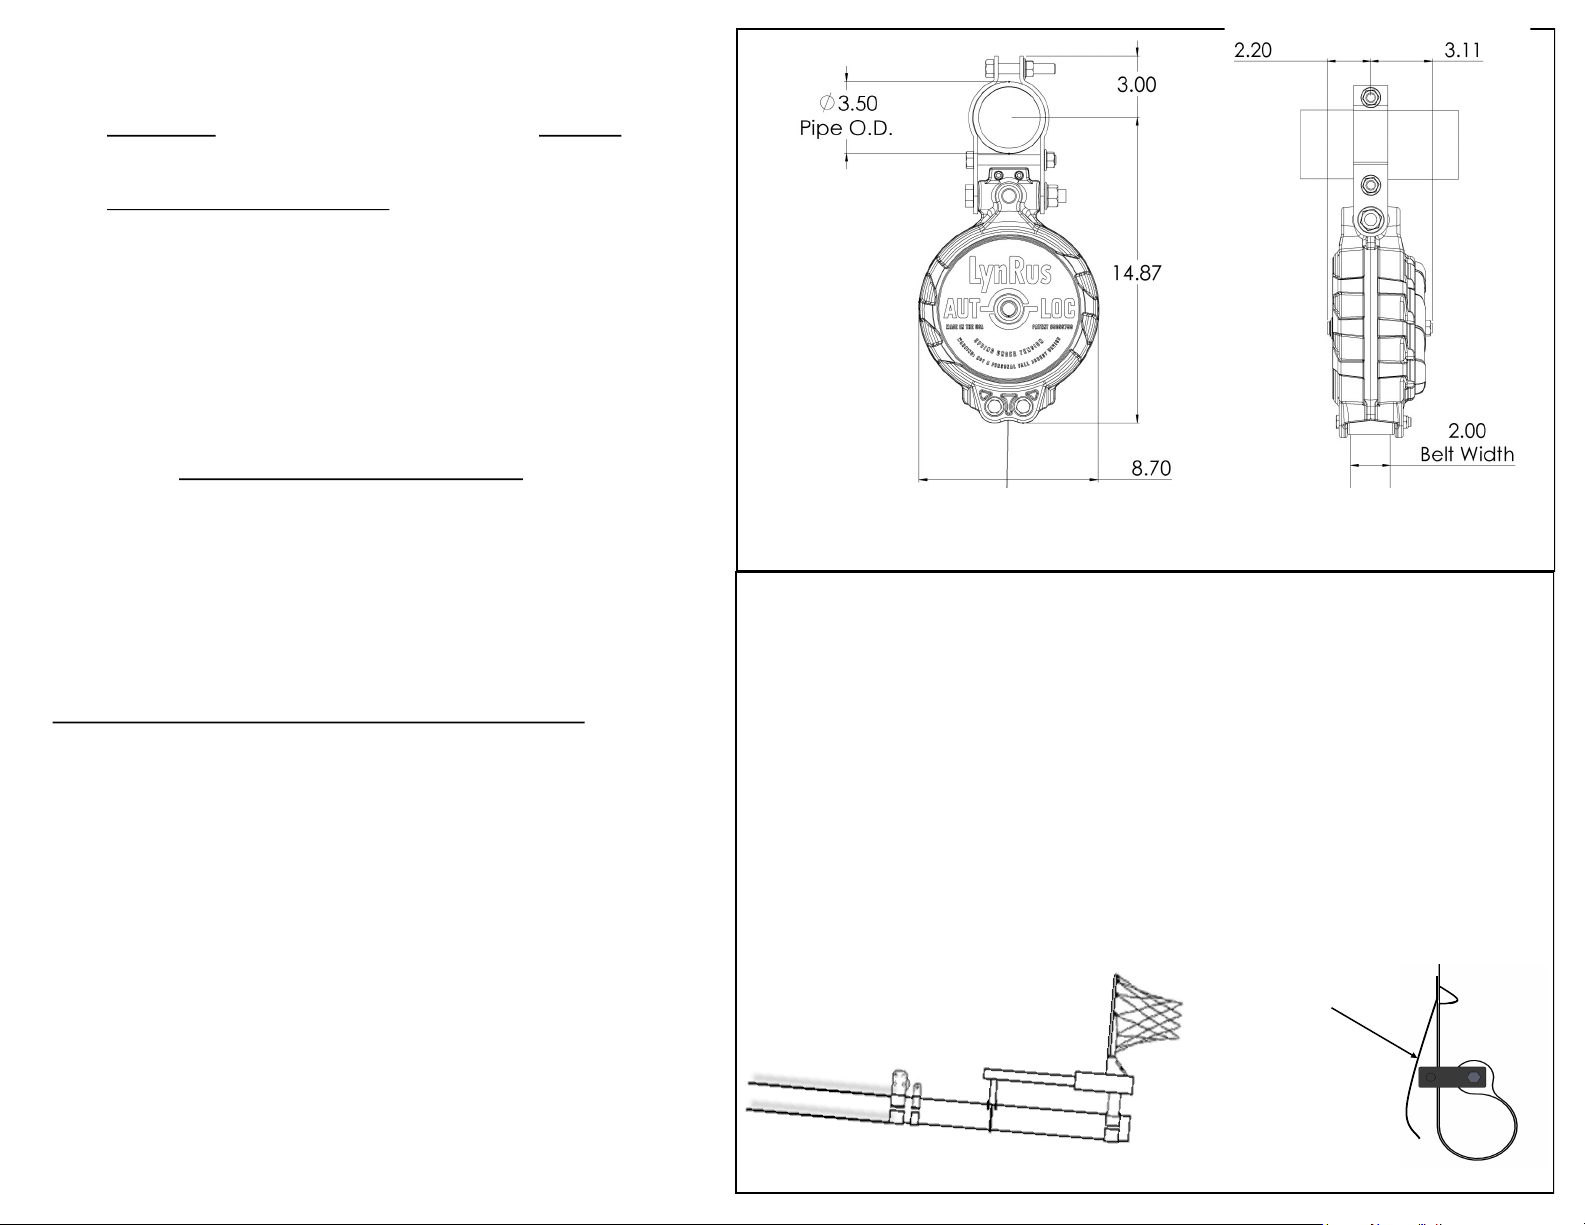
Pictured here as
installed with 3”
pipe. The universal pipe clamp will
also accept 4”
tube.
SHIPPING WEIGHT:19 LBS
CAPACITY: 1000 LBS MAXIMUM BELT TRAVEL: 35 FEET
Aut-O-LocTM 3 Installation Instructions
3. Insert 1/2 x 3” bolt in top clamp hole and finger tighten into opposite half
clamp using 1/2” nut. Place clamp over mounting pipe. Lift Autoloc unit up
to clamp, insert 5/8”x 4.25” bolt through bottom hole in both clamp halves
and Autoloc unit and finger tighten using 5/8” nut. If mounting to 3” pipe,
Insert 1/2” x 4” bolt in middle clamp hole and finger tighten nut; 4” tube
will not require this 1/2” x 4” bolt. Position the Autoloc and hand tighten all
bolts so that the Aut-O-Loc will remain in position on the pipe.
* When mounting to 4”
tube, it is not neces-
sary to use the 1/2” x
4” bolt & matching nut
on the pipe clamp.
*
1/2 nut
1/2 nut
5/8” nut
5. The Autoloc must be mounted in the
center plane of backstop motion and the
belt should not angle to the side or rub
against any surface. Maximum belt side
angle should not be greater than 1º at
maximum belt payout.
1° Maximum belt side angle
Rev. 6-27-18
8. The belt should only have a slight bend when
the basket is in the down position.
The Autoloc belt should never form a slack
loop at any point during the movement of the
backboard (see figure B).
If a loop has formed, make sure the Autoloc is directly in line with the pick up point and is not inter-
fering with a retractor reel or other obstruction
9.75
14.61
3.00
3.50
Pipe O.D.
2.00
Belt Width
3.492.19
Figure A
9.75
14.61
3.00
3.50
Pipe O.D.
2.00
Belt Width
3.492.19
Figure B
7. Tighten all bolts on the pipe mount and belt
clamp. When mounting to 4” tube, tighten the
5/8” bolt so the pipe clamp is tight against the
surface of the cast housing.
6. The Autoloc Belt should be clear of obstructions
throughout its sweep. These angles are installa-
tion dependent
4. Wrap end around mast attach point. Place sewn tail of belt loop on the
outside of the loop. Insert bolt through the clamp and clamp tube and tight-
en 3/8” nut on opposite side. You should see a small loop of black material
near the end of the belt that contains the catch warning flag. The flag will
show on the side opposite the loop
when deployed. You should wrap
the strap so the warning strip will be
most visible if deployed in a fall.
Bolt, 3/8” x 2-1/2”
Clamp, Pipe
Nut, Hex 3/8”
Belt, Buckle
Warning Strip
will deploy on
side opposite
the sewn loop
if unit catches
a load.
1/2 x 3” bolt
*
1/2 x 4” bolt
5/8” x 4.25 bolt
 Loading...