

Lyngdorf DPA-1 Owner's Manual
Owner´s manual
DPA-1
RoomPerfect™
MENU
ENTER
MUTE
ANALOG
DIGITAL
DPA-1
Digital Pre-Amplifier

2

3
Table of Contents
Operating Voltage 4
Unpacking the DPA-1 4
Serial Number Registration 4
Introduction 5
Accessories 6
Front Panel 7
Display Indicators 8
Rear Panel 8
Remote Control 10
Connecting the DPA-1 12
- Connecting to sources and amplifiers 12
- Using Main and Line outputs 13
Menu System 14
- Navigating the Menu System 14
Menu Tree 15
Introduction to RoomPerfect™ 16
- Global Listening 16
- Focus Listening 16
- Voicing 16
RoomPerfect™ 17
- Guided Setup 17
- Setting the Measurement Volume Level 18
- Focus Measurement 19
- Room Measurements 19
- Adding more Room Measurements 20
- Calculation of Focus 1 and Global Filters 21
- Advanced Options 22
- Measure Focus Pos. 22
- Measure Room Pos. 22
- RoomKnowledge 23
- RoomCorrection 23
Display 24
- Display Timeout 24
- Disp. Brightness 24
- Volume Disp. Timeo. 24
Volume 25
- Def. Vol. 25
- Max. Vol. 25
Input Name 26
Input Sensitivity 26
Advanced Setup 27
- Communication 27
- Comm Address 27
- Comm Speed 27
- Master/Slave 27
- Digital Out 27
- Main Out 28
- Main Out Control 28
- Main Out Level 28
- Line Out 28
- Line Out Control 28
- Line Out Level 28
- Routing 29
- Crossover Frequency 29
- Filter Type 30
- Delay 30
- Trigger Setup 31
- Remote Control 31
- Firmware Versions 31
- Factory Reset 31
RoomPerfect™ Troubleshooting 32
Firmware Upgrading 33
Connectors 34
- Mains Connector 34
- Trigger Connector 34
- Optional AD Converter Board 34
- Balanced Inputs 34
- Unbalanced Inputs 34
Cleaning and Maintenance 34
Technical Specifications 35
- Audio 35
- Protection 36
- Mains 36
- Trigger 36
- Mechanical 36
Technical Assistance 37
Appendix 38
- Voicing Curves 38
Manual version 23-10-2012
4
Operating Voltage
The DPA-1 can be switched between 115V and 230V mains voltage.
In 115V mode the DPA-1 requires a mains voltage of 100V-120V at 50-60Hz.
In 230V mode the DPA-1 requires a mains voltage of 220V-240V at 50-60Hz.
The mains voltage setting for your DPA-1 can be changed on the rear selector.
Make sure the rear selector is in the correct setting and connect the power input
only to the appropiate AC source. The warranty will not cover any damage caused
by connecting to the wrong type of AC mains.
The DPA-1 has three power modes:
1. OFF
No circuitry is powered. Please note that some parts of the mains entry section still carry live mains.
2. STANDBY
The microprocessor is active.
3. ON
All circuits are active.
Unpacking the DPA-1
Carefully remove the unit and accessory kit from the carton, visually check for shipping damage.
Contact both the shipper and your Lyngdorf Audio representative immediately if the unit bears any sign
of damage from mishandeling. All Lyngdorf Audio equipment is carefully inspected before leaving our
factory.
Keep shipping carton and packing material for future use or in the unlikely event that
the unit needs servicing. If this unit is shipped without the original packing, damage
could occur and void the warranty.
Serial Number Registration
Please record the serial number of your DPA-1 here for future reference. The serial number is printed
on the label on the rear panel. You will need this serial number, should you ever require service for your
DPA-1.
DPA-1 serial number: _____________________

5
Introduction
Congratulations on the purchase of your Lyngdorf Audio DPA-1 with RoomPerfect™.
Besides being a state-of-the-art pre-amplifier, it also enables you to take advantage of the most advanced
room correction system on the market. It is implemented in such a way that you will always achieve the
perfect result. No computer needed, no acoustic knowledge needed, no user input needed. We leave
nothing to chance in the fully automated calibration process.
However, for the advanced user there are plenty of challenges since the DPA is also a complete ‘Control
Centre’ that allows you to build advanced multi-way passive or active speaker systems. This is possible
due to the very powerful built-in DSP ‘engine’ which facilitates signal routing, creation of active crossovers, delay settings etc.
In fact we believe it to be the most versatile pre-amplifier on the market today, a true state-of-the-art
device that sets new standards for what’s sonically possible to achieve in a real life environment.
6
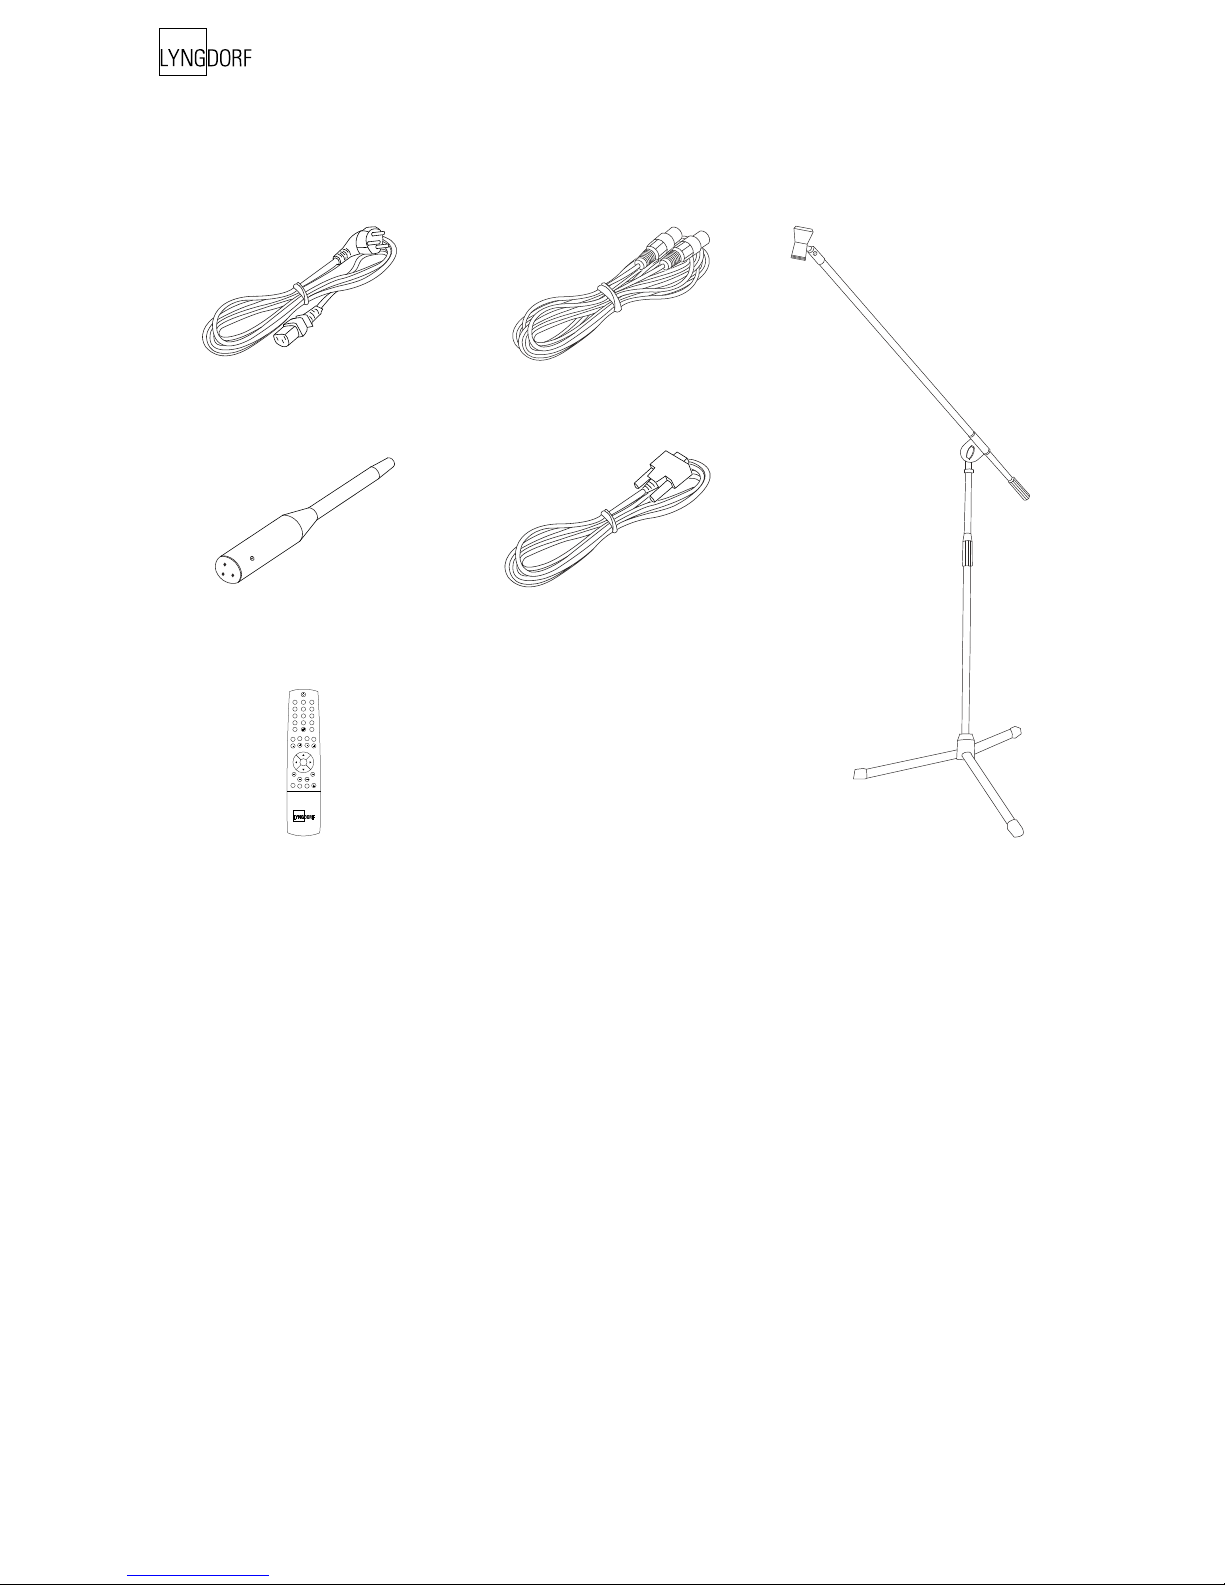
Accessories
You should find the following accessories included:
1
2 3
456
7
digital
info
analog
A/B
random
repeat
AMP
channel
ENTER
volume
RCS CD
TUNER
menu
8
0
9
Mains cord 8 m (26.25 feet)
XLR – XLR cable
Microphone
Programming cable
Remote control
Microphone stand with Mic clamp
(delivered in a separate carton)
7
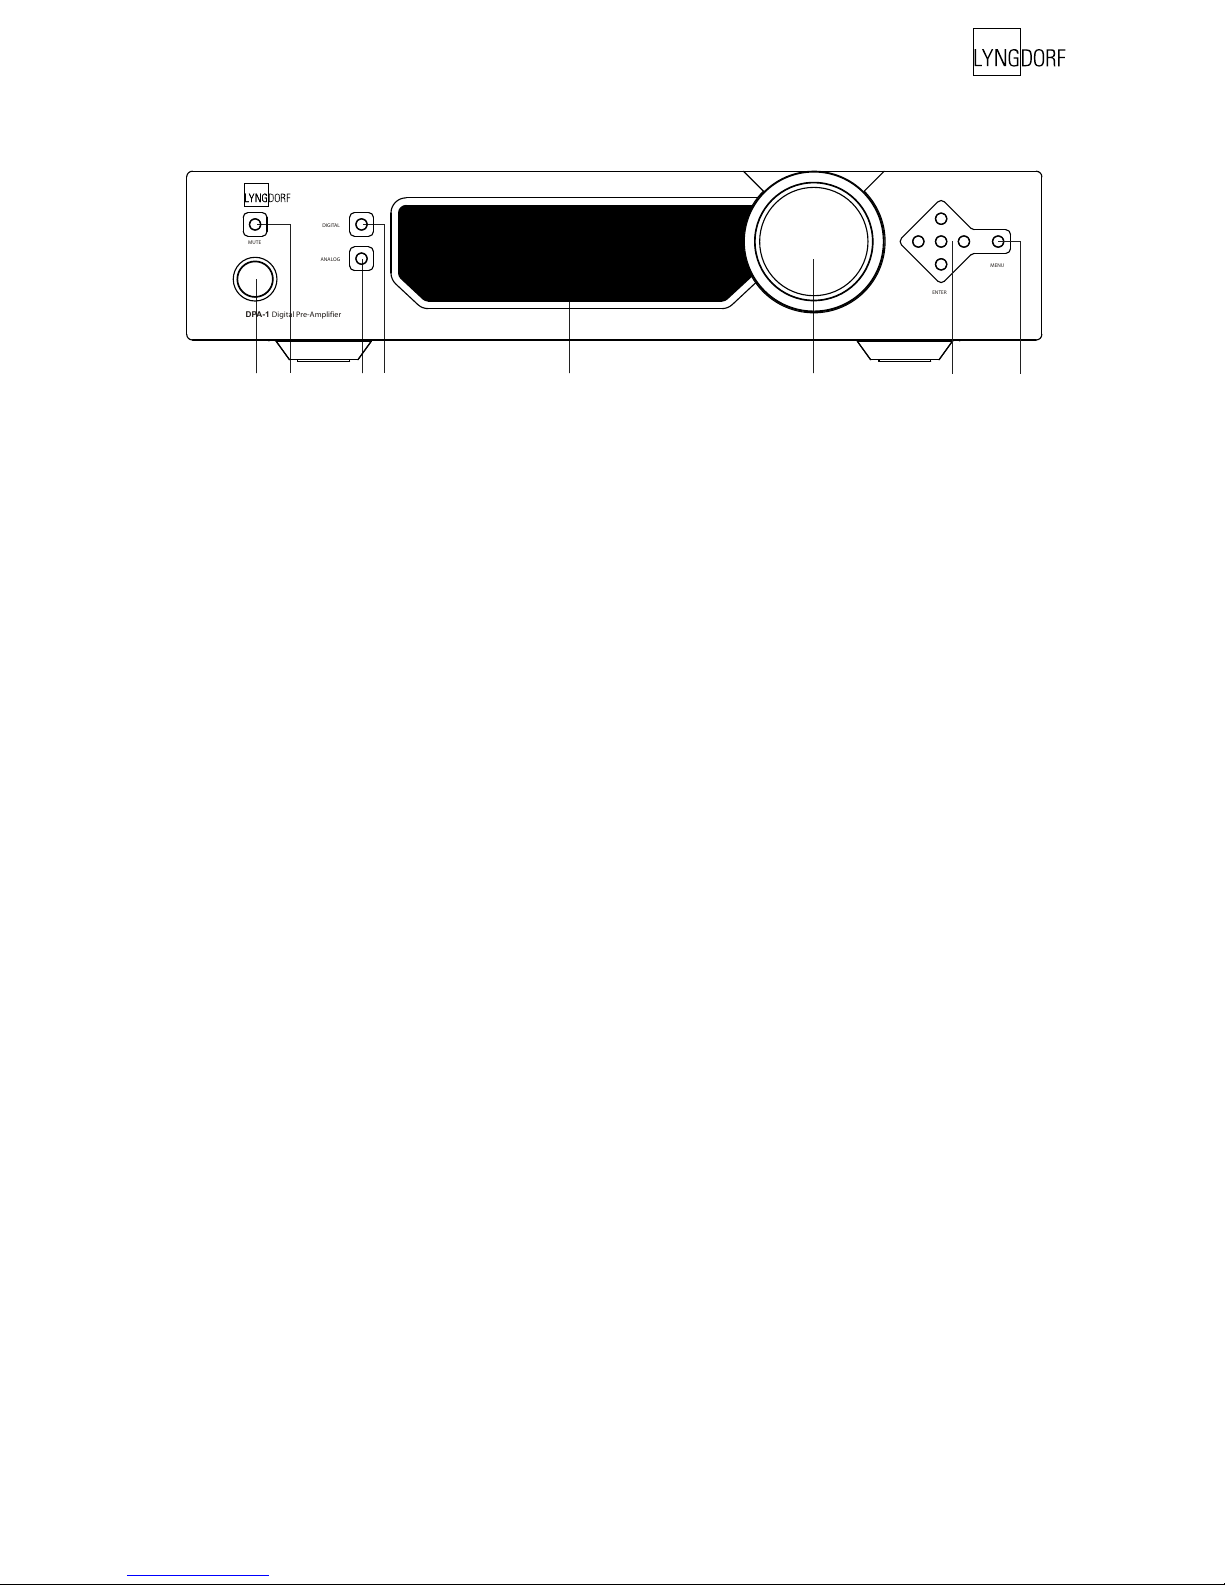
Front Panel
Controls
The buttons/controls on the front panel of the DPA-1 can all be operated either with direct presses or by
operating the corresponding keys on the supplied remote control. All the keys on the front panel (except
the Mains Switch) are duplicated onto the remote control as well.
1. Mains Switch
Powers the DPA-1 on/off.
2. Mute
Toggles Mute mode on/off.
Pressing the Mute button for 3 seconds will set the DPA-1 in stand-by mode.
3. Analog Input Selector
Changes to Analog input, or if already selected, cycles to the next Analog input.
In standby mode, press to turn On the DPA-1 with the last selected analog input.
4. Digital Input Selector
Changes to Digital input, or if already selected, cycles to the next Digital input.
In standby mode, press to turn On the DPA-1 with the last selected digital input.
5. Display
Display with all information on the menu system, status, active input selection and volume control.
6. Volume Wheel
Optical encoded volume control wheel.
7. Navigation Keys
In stand by mode, press Enter to turn On the DPA-1 with the last selected input.
In normal operation mode the Up/Down toggles between bypass and the available Focus and Global
filters. The Left/Right keys toggles between neutral and the available voicings.
In menu mode the keys are used for navigation in the menu system: Up/Down, Left/Right & Enter. Pressing and holding down the Up/Down, Right/Left keys, changes selected values fast.
8. Menu Button
Toggles Menu mode on/off
1 2 3 4 5 6 7 8
MENU
ENTER
ANALOG
DIGITAL
DPA-1
Digital Pre-Amplifier
MUTE
8
Display Indicators
D
A
1 2 3 4 5
1 2 3 4 5
1. A-D
Illuminates to indicate whether the active input is Analog or Digital.
2. Menu
Alphanumeric Display (2*20 Characters).
3. 1-5
Illuminates the active input.
4. RoomPerfect Logo
Is illuminated when a filter is active.
5. Volume Display
3 digits indicating Volume control setting from 00.0 to 99.9 – in dB’s.
Mute is indicated by the Volume control setting ‘---’.
Standby mode is indicated with the decimal dot from the volume indicator being lit only.
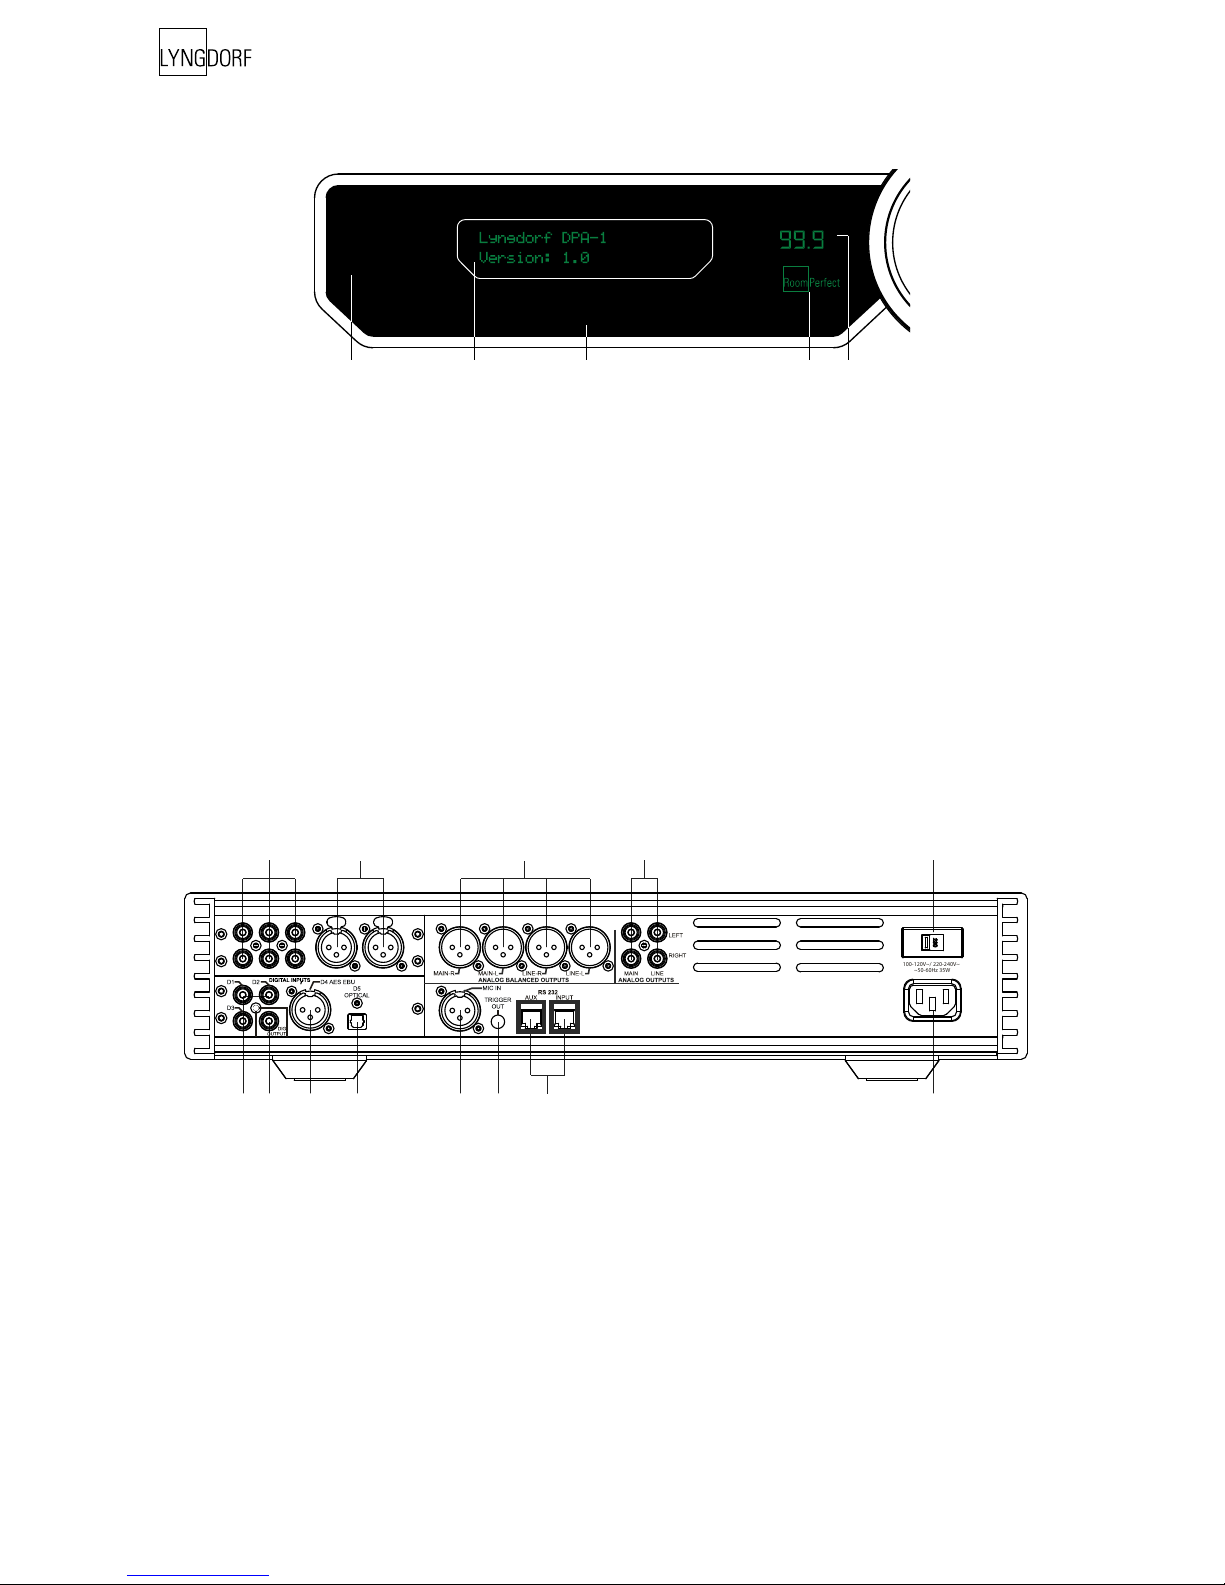
Rear Panel
6 7 8 10 139 11 12
1 52 3 4
100-120V~/ 220-240V~
~50-60Hz 35W
1. Analog Input 1-3
Unbalanced/RCA Left/Right Analog input pairs
2. Analog Input 4
Balanced/XLR Left/Right Analog input
3. Analog Output
Double pair of balanced/XLR Left/Right analog outputs (Main and Line out).
4. Analog Output
Double pairs of unbalanced/RCA Left/Right analog outputs (Main and Line out).

9
5. 115V and 230V Mains Voltage Switch.
Switches between 115V and 230V mains input voltage.
Make sure the rear selector is in the correct setting and connect the power input
only to the appropiate AC source. The warranty will not cover any damage caused
by connecting to the wrong type of AC mains.
6. Digital Input 1-3
RCA connectors for SPDIF input
7. Digital Output
The digital output can be selected as the main or the line channel. In both cases the output can be selected as Full Scale or Regulated.
The sample rate is fixed at 96 kHz. This output is also active when Analog input is selected.
8. Digital Input 4
XLR Connector for AES input
9. Optical Digital Input 5
Connector for Toslink input
10. Mic. In
Mic. in for connection of RoomPerfect™ microphone.
11. Trigger Out
DC Trigger out for remote start of SDA 2175, power amplifiers or other suitable equipment with a remote
start.
The output voltage is 12V and a maximum current of 50mA can be drawn from the output.
12. RS232 Input/Aux
RS232 communication connectors for communication with a PC, remote control from other Lyngdorf
equipment with broadcast commands or linked control between several other amplifiers or other suitable
equipment with a remote start.
• The ‘INPUT’ is used for connection to a PC, or as a control input from a Lyngdorf master amplifier.
• The ‘AUX’ connection is output in Master mode for controlling slave amplifiers, or bypasses input
from other master amplifiers to the next amplifier.
13. Mains Input
10
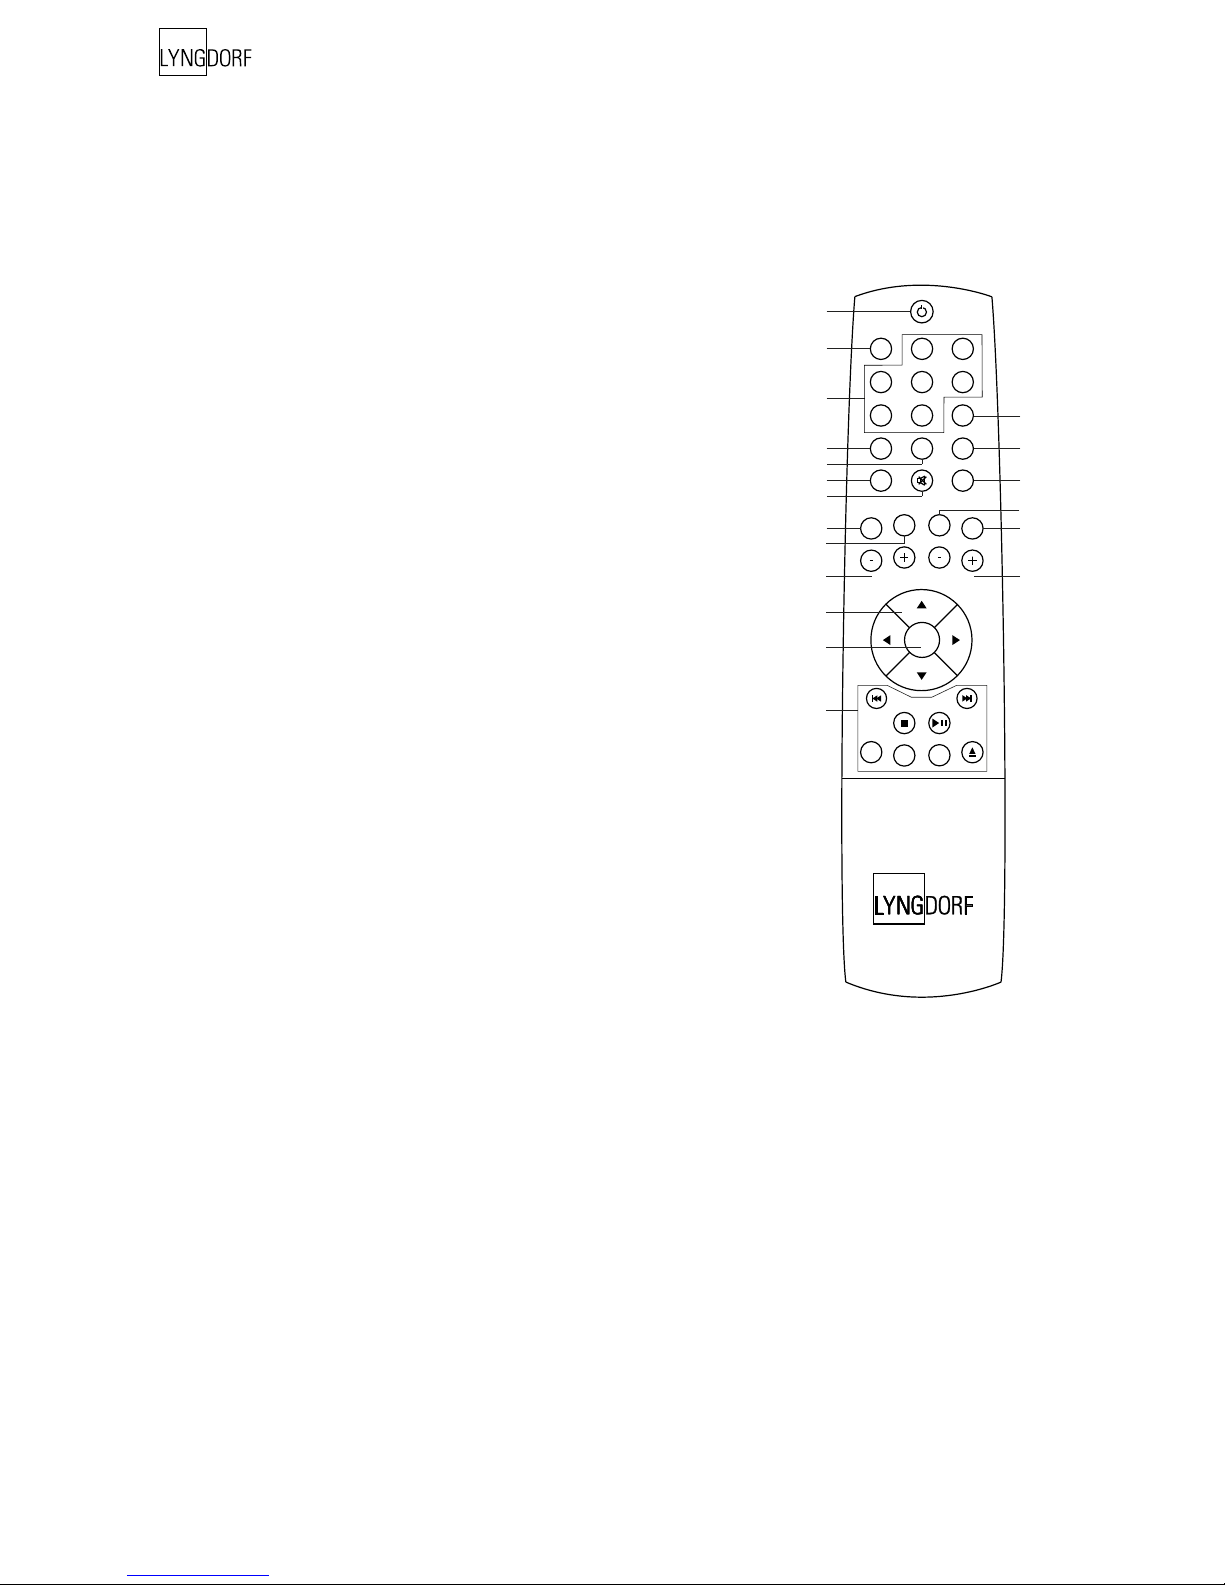
Remote Control
The remote control is used to access the menu system as well as the buttons directly accessible on the
front panel. To control the DPA-1 the AMP key must be pressed (please note the DPA-1’s volume and
mute buttons still work when in other modes).
The functionality of the buttons when AMP is pressed are as follows:
1
2 3
4
5
6
7
digital
info
analog
A/B
random
repeat
AMP
channel
ENTER
volume
RCS CD
TUNER
menu
8
0
9
1
2
3
5
6
4
7
13
10
14
8
9
11
12
15
17
18
19
16
1. Standby
The standby button puts the DPA-1 in stand-by mode.
2. Numerical Buttons 1-8
Selects Focus listening mode (up to 8 different listening positions can
be stored in RoomPerfect™).
3. Numerical Button 9
Selects global listening mode.
4. Digital
Turns On the DPA-1 from stand-by mode in the last selected digital
input.
Selects Digital input, or if already selected, cycles to the next Digital
input. To select a specific Digital input, press the ‘Digital’ button followed by numerical button 1-5 within 2 seconds.
5. Numerical Button 0
Selects bypass listening mode (no room correction filter selected).
6. Info
Hold down for 2 seconds to show the current samplerate.
To select a specific Voicing filter, press the ‘Info’ followed by numerical
button 0-6 within 2 seconds.
7. Analog
Turns On the DPA-1 from stand-by mode with the last selected analog
input.
Selects Analog input, or if already selected, cycles to the next Analog
input. To select a specific Analog input, press the ‘Analog’ button followed by numerical button 1-4 within 2 seconds.
8. Mute
Toggles Mute function on/off.
9. Menu
Activates or de-activates the Menu system on the Main display.
10. AMP
Selects the remote for operation with a Lyngdorf Amplifier/Pre-amp.
11. RCS
Selects the remote for operation with a Lyngdorf Room Processor.
12. CD
Selects the remote for operation with a Lyngdorf CD Player.

11
13. Tuner
No function.
14. Channel -/+
Toggles down/up between inputs.
15. Volume Up/down
Increases or decreases the volume in the chosen direction.
16. Up / Down / Left / Right
In normal operation mode the Up/Down toggles between bypass and the available Focus and Global
filters and the Left/Right toggles between neutral and the available voicings.
In menu mode they are used for navigation in the menu system. Pressing and holding down a key
changes selected values fast.
17. Enter
Turns the DPA-1 On from stand-by mode with the last selected input and works as Enter in menu system.
18. No Function.
12
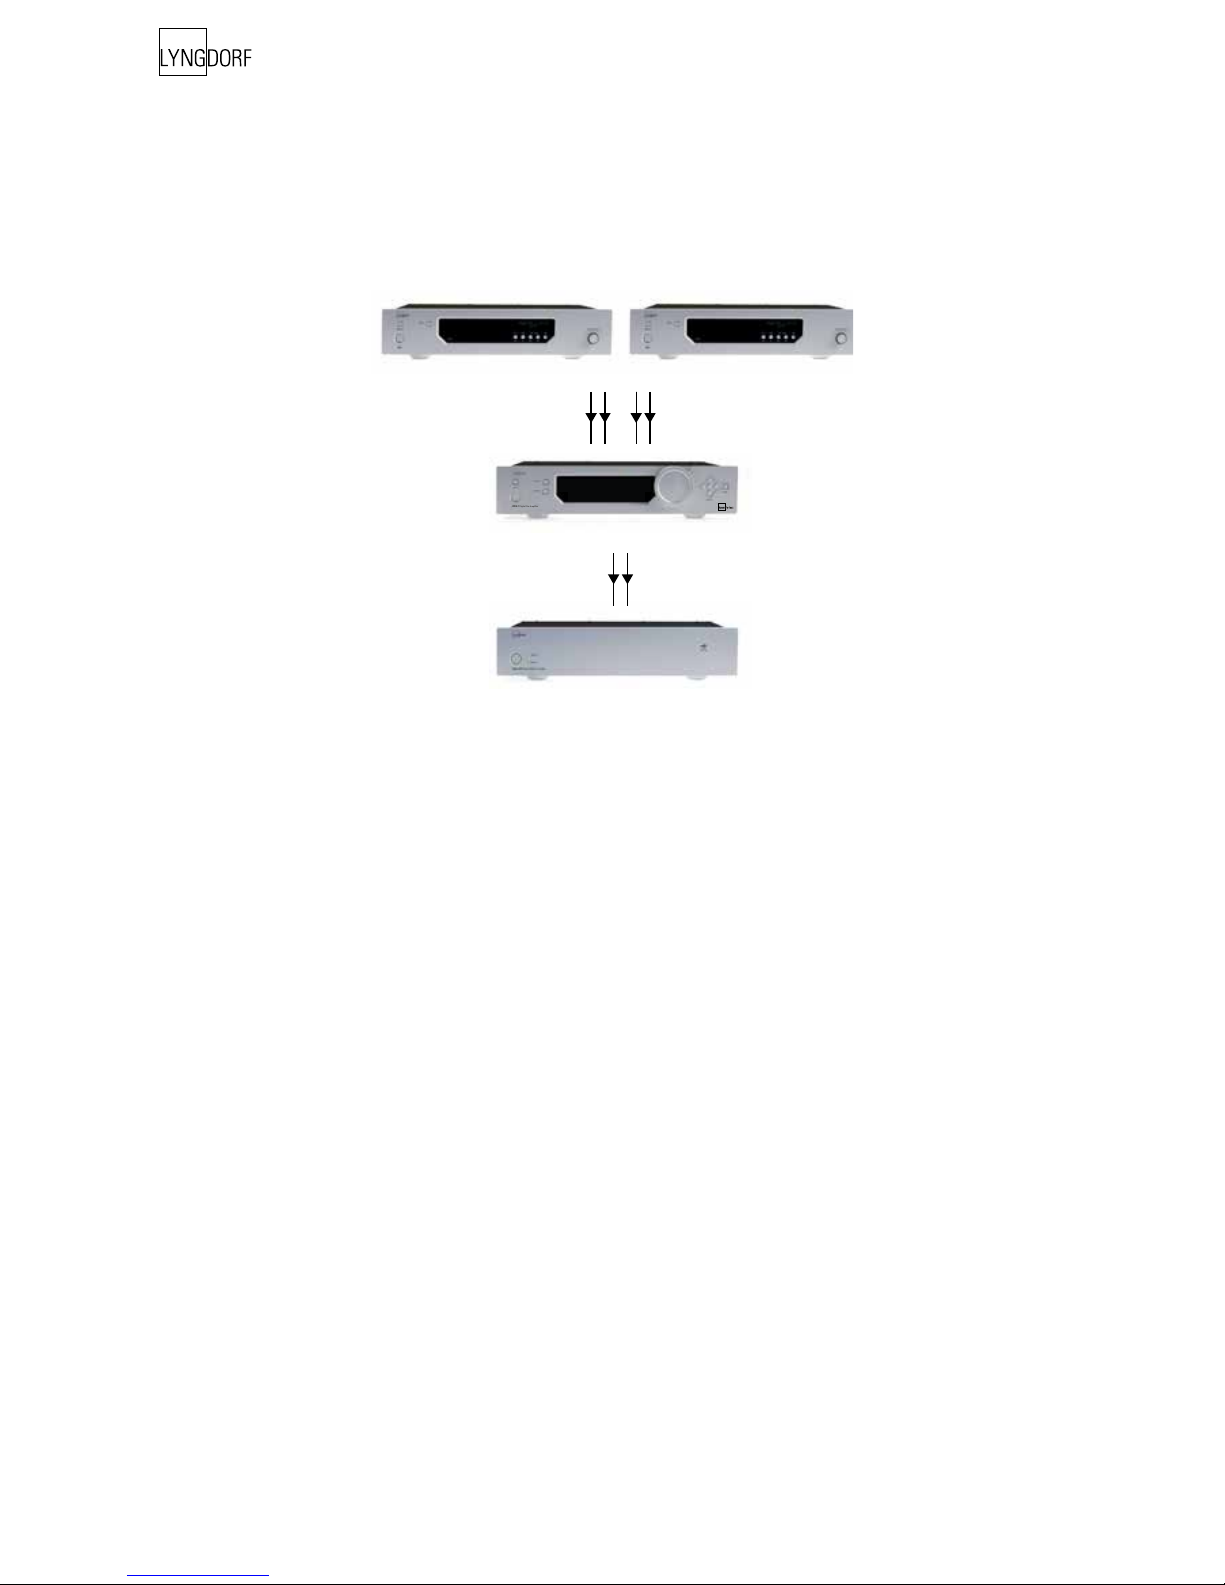
Connecting the DPA-1
Connecting to sources and amplifiers
The DPA-1 is very simple to hook up.
1. Connect all sources to the DPA-1.
Then connect the DPA-1 output signal to a poweramplifier.
Source(s)
DPA-1
Poweramp
DPA-1
Digital Pre-Amplifier
 Loading...