


www.lyngbox.com/manual

/english/
art no E-0000-0028 version 1.0, 070820

Content
page chapter
6 1.0 For Your Safety
7 2.0 Quick Start
7 2.1 Connect the LyngBox
7 2.1.1 Before You Start
8 2.1.2 Cables
9 2.1.3 Connect Antennas and Network
10 2.1.4 Connect Audio and Video
11 2.2 First Startup
13 2.3 Start Using the LyngBox
14 3.0 Navigate in the LyngBox
14 3.1 Menu Structure
16 3.2 The Remote Control
17 3.2.1 Universal Remote Control
17 3.3 The Display
18 4.0 Watch TV
18 4.1 Channel Navigation
18 4.1.1 Channel Lists Menu
19 4.1.2 TV Mode
20 4.2 Time Shifting Live TV
20 4.3 Favorite Lists
22 4.4 The TV Guide
page chapter
23 4.5 Manage Users
23 4.6 Conditional Access
24 5.0 Record a Show
24 5.1 Record the Current Program
24 5.2 Recording from the TV Guide
25 5.3 Manual Recording
25 5.4 Watch Recordings
25 5.5 Manage Timers
26 6.0 Media Manager
26 6.1 Watch Recordings
27 6.2 Edit Recordings
27 6.3 Transfer Media
28 7.0 Configure the LyngBox
28 7.1 User Preferences
28 7.2 Output Settings
29 7.3 Regional Settings
29 7.4 Language Settings
29 7.5 Access Control
29 7.6 Network Settings
30 7.7 E-mail Settings
page chapter
30 7.8 TV Reception and Antenna Search
30 7.8.1 Antenna Configuration
32 7.8.2 Signal Reception
32 7.8.3 Complete Channel Search
32 7.8.4 Manual Channel Search
32 7.9 Software Update and Reinstallation
33 8.0 Add an Extra Tuner
34 9.0 When Support is Needed
34 9.1 Troubleshooting
35 9.2 When More Help Is Needed
36 10.0 Technical Specification
37 11.0 Trademarks and Licenses
1.0 For Your Safety
Allow clear space around the LyngBox for sufficient ventilation
Do not cover the LyngBox or place it on a unit that emits heat
Never allow liquids, sprays or other materials to come into contacts with the inside of the LyngBox
Do not connect or modify cables on the LyngBox when the mains power is connected
Do not remove the cover
Do not allow the unit to be exposed to hot, cold, or humid conditions
Service shall be carried out only by authorized LyngBox service personnel
Ensure correct and safe installation and interconnection of the apparatus in multimedia systems
The mains plug is used as the disconnect device, make sure it is readily operable at all time
•
•
•
•
•
•
•
•
•
6 7
1.0 For Your Safety
Allow clear space around the LyngBox for sufficient ventilation
Do not cover the LyngBox or place it on a unit that emits heat
Never allow liquids, sprays or other materials to come into contacts with the inside of the LyngBox
Do not connect or modify cables on the LyngBox when the mains power is connected
Do not remove the cover
Do not allow the unit to be exposed to hot, cold, or humid conditions
Service shall be carried out only by authorized LyngBox service personnel
Ensure correct and safe installation and interconnection of the apparatus in multimedia systems
The mains plug is used as the disconnect device, make sure it is readily operable at all time
•
•
•
•
•
•
•
•
•
2.0 Quick Start
This part of the manual describes how to connect and make a basic configuration of your LyngBox. This should only take a few
minutes.
Before advancing with the installation you need to make sure that everything is included in the LyngBox installation package.
The installation package should include the following:
LyngBox
Power Cable
HDMI Cable
Ethernet Cable
Remote Control
2 x AA Batteries
If something is missing, please contact your retailer.
2.1 Connect the LyngBox
This section describes installation of the LyngBox for the most common set-ups.
2.1.1 Before You Start
Before installing the LyngBox you need to have a satellite dish directed toward a specific satellite position installled (unless
it is motorized), a terrestrial antenna, or both. It is recommended to have the LyngBox connected to Internet as the LyngBox
uses services from LyngSat Network, which requires an Internet connection. Without Internet access, the functionality of your
LyngBox is reduced.
During the installation you will be asked about your location (city), parabolic dish size, DiSEqC equipment, if your dish is
motorized, and the satellite position your dish is directed towards. Make sure you know these facts before starting the
installation; It will make the setup process much smoother.
•
•
•
•
•
•
Correct Disposal of This Product
(Waste Electrical & Electronic Equipment)
(Applicable in the European Union and other European countries with separate collection systems)
This marking shown on the product or its literature, indicates that it should not be disposed with other household wastes at
the end of its working life. To prevent possible harm to the environment or human health from uncontrolled waste disposal,
please separate this from other types of wastes and recycle it responsibly to promote the sustainable reuse of material
resources.
Household users should contact either the retailer where they purchased this product, or their local government office, for
details of where and how they can take this item for environmentally safe recycling.
Business users should contact their supplier and check the terms and conditions of the purchased contract. This product
should not be mixed with other commercial wastes for disposal.
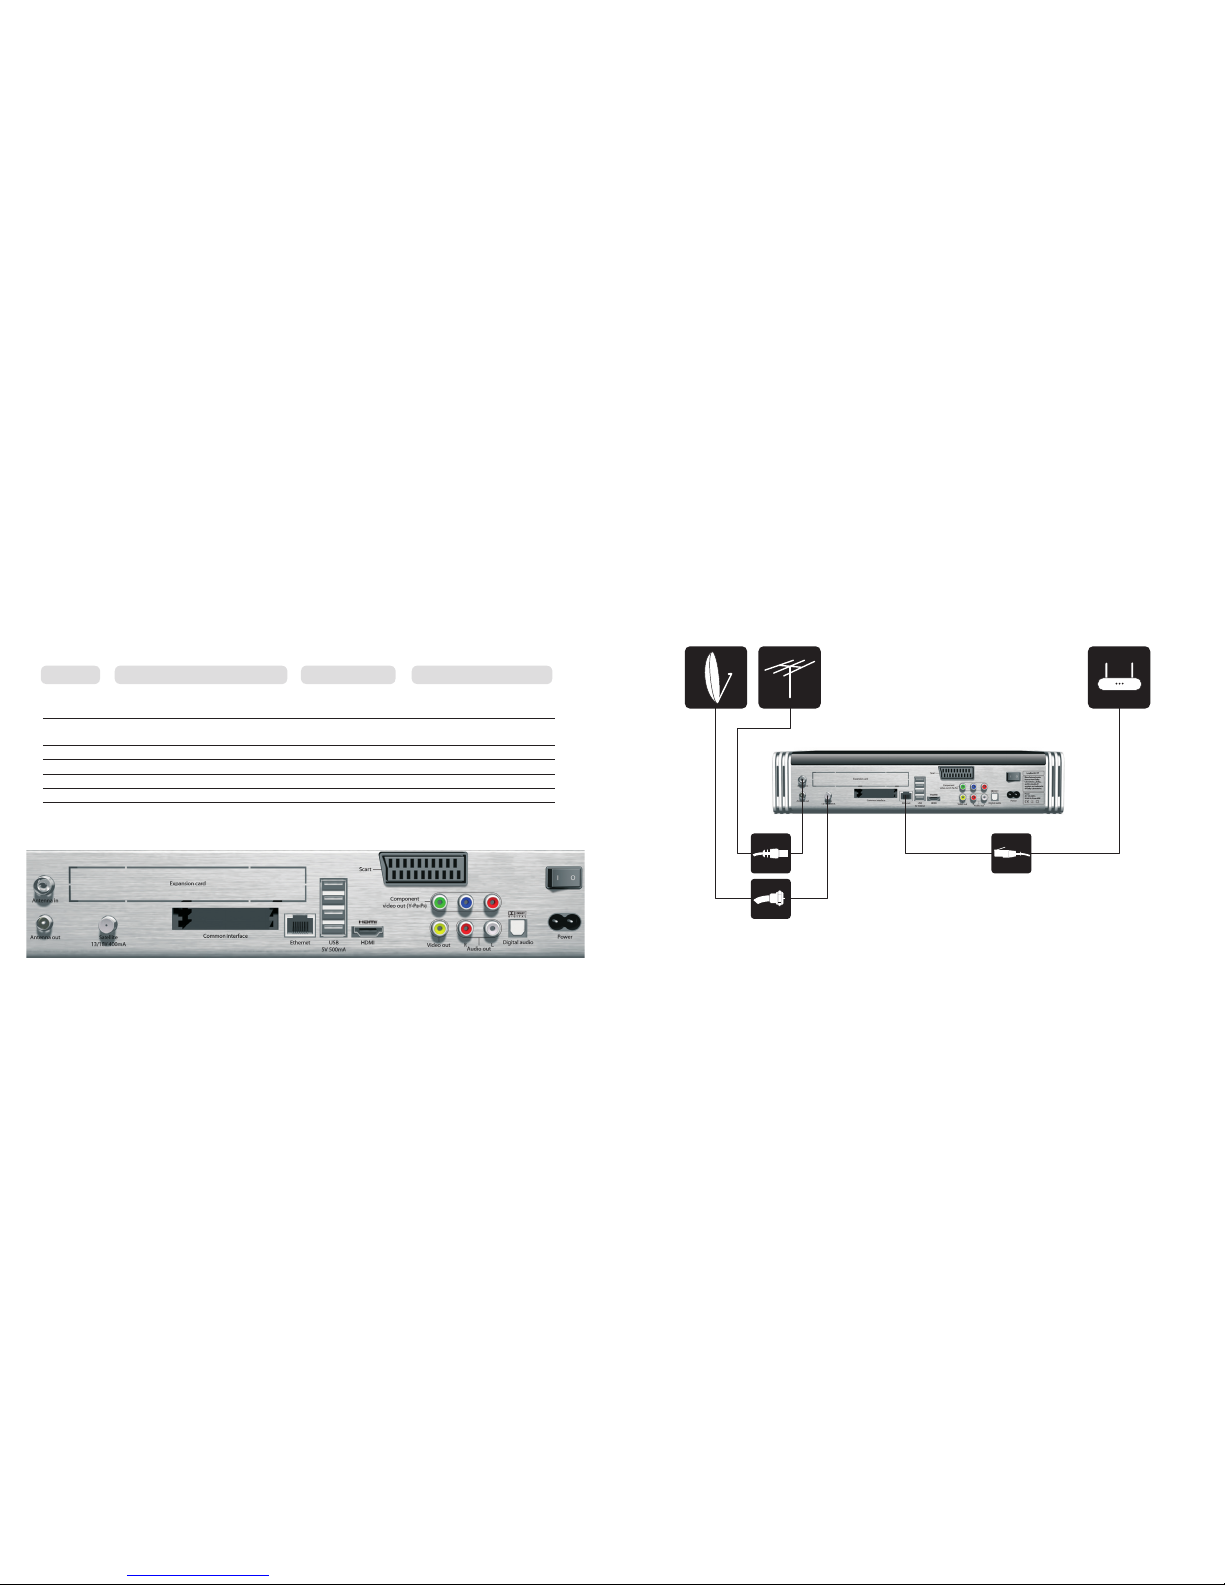
2.1.2 Cables
The following cables can be connected to the LyngBox. Look at figure 1 for guidance. When there are several alternatives they
are listed in priority order (i.e. ordered by best picture or sound quality).
2.1.3 Connect Antennas and Network
Connect the cable from the satellite dish to the connector marked “Satellite”.
Connect the cable from the terrestrial antenna to the connector marked “Antenna in”.
Connect an Ethernet cable from your broadband router to the connector marked “Ethernet”.
1.
2.
3.
fig. 1
Note that seperate audio cables are not necessary when using HDMI or SCART if the internal speakers of the TV-set are used.
1 2 3
fig. 2
98
lyngbox connectorusage alternatives connected device
Video HDMI, Component, HDMI, Component, TV or Projector
SCART, or Composite SCART, or Video out
Audio Toslink (optical) Digital Audio External amplifier or
audio cable (2xRCA) Audio Out 5.1 receiver
Satellite signal Satellite cable (with F-connector) Satellite Satellite Dish/LNB
Terrestrial signal 75Ω antenna cable Antenna in Terrestrial antenna
Internet Ethernet cable Ethernet Broadband router
Power Power cable Power Wall power socket
Pay-TV Conditional Access Module (optional) Common Interface -
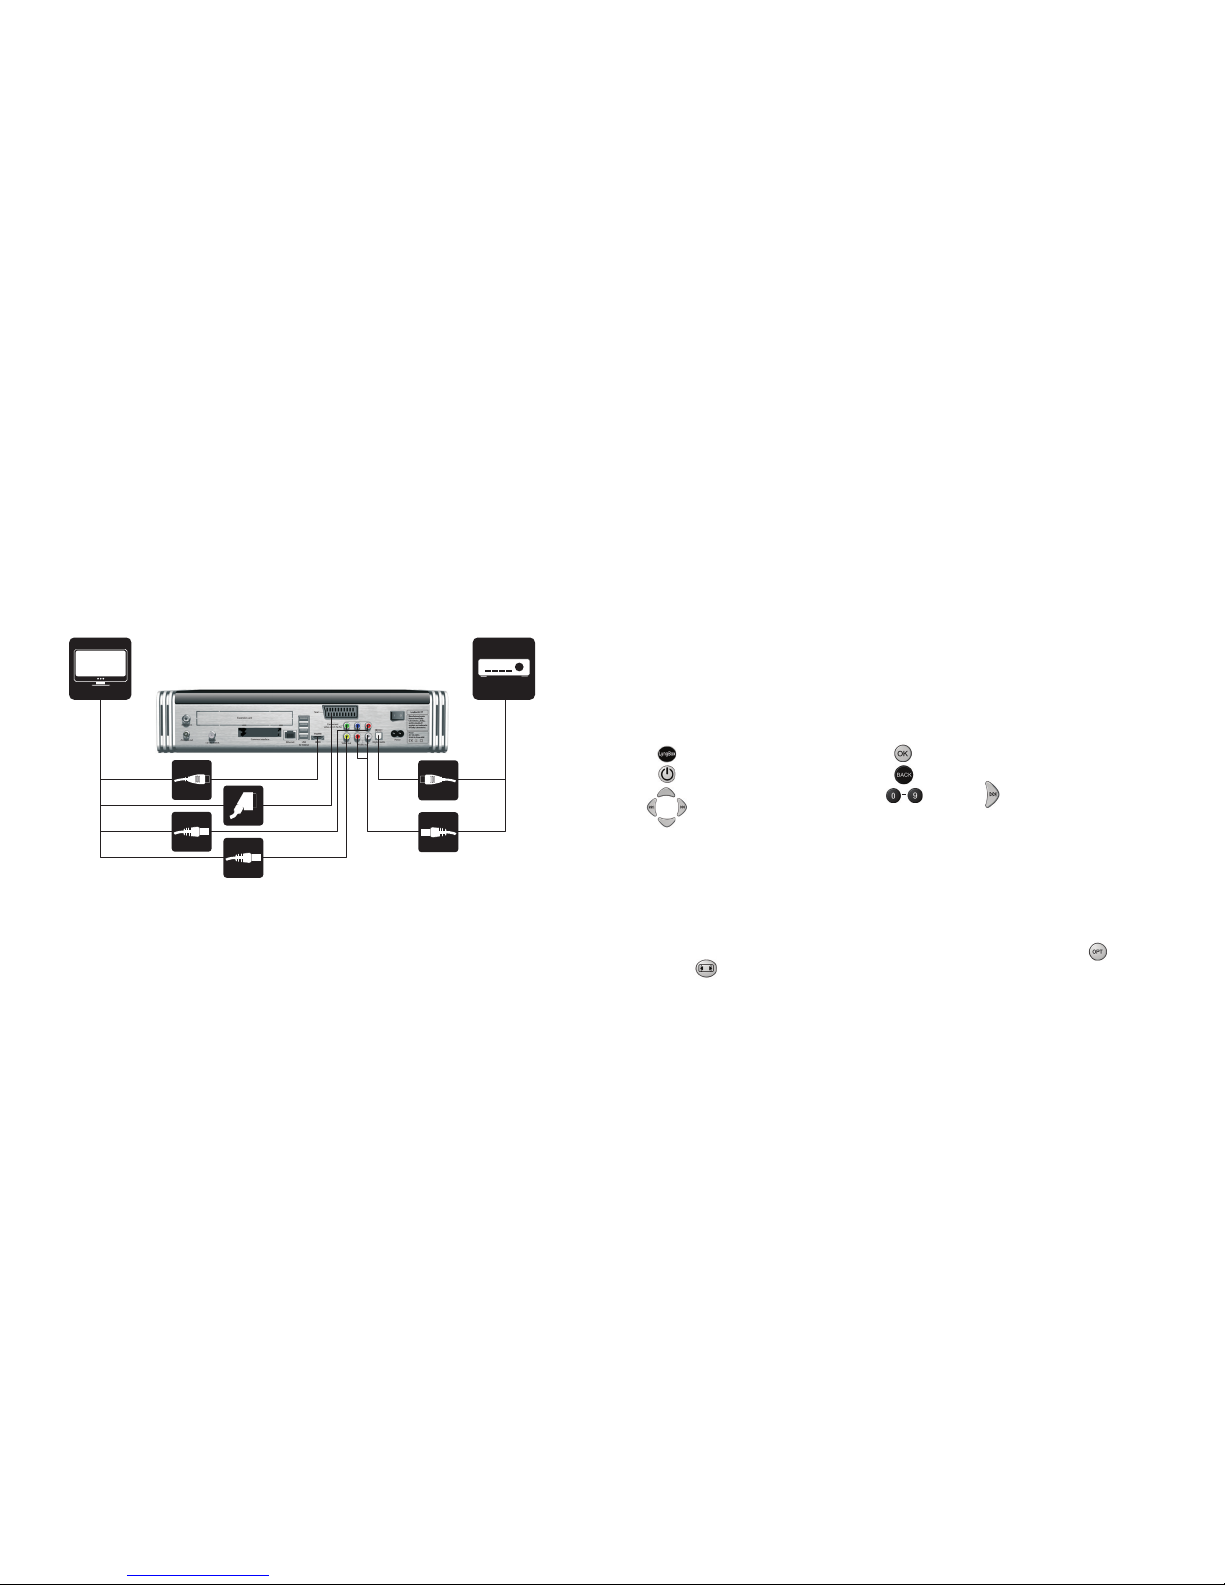
2.1.4 Connect Audio and Video
Connect the LyngBox to the TV-set using one of the following cables.
1. HDMI (marked “HDMI”)
2. Component video (color coded RCA connectors, marked “Component video out”)
3. SCART (marked “SCART”)
4. Composite (yellow RCA connector, marked “Video out”)
For audio output from the TV-set, no additional cables are needed when using HDMI or SCART. To get audio output when
using Component or Composite video cables you will need to connect extra audio cables to the TV-set. For guidance, see the
description for amplifiers below.
To use an external audio amplifier one of the following cables needs to be connected between the LyngBox and the amplifier.
Optical digital audio cable (marked “Digital audio”)
Analogue stereo audio cable (red and white RCA connectors, marked “Audio out”)
2.2 First Startup
The following buttons are used during the first configuration of the LyngBox:
Set remote control in LyngBox mode
Power up the LyngBox
Navigate in the menu system
When everything is connected you are ready to start the LyngBox.
Insert batteries into the LyngBox remote control.
Start the TV-set.
Switch on the main power of the LyngBox. The LyngBox is now in stand-by mode.
Press the LyngBox button on the remote control to make sure it controls the LyngBox. Next, press the power button on
the remote control. The LyngBox logotype should be displayed on the front-panel display and the menus for LyngBox
first startup should be displayed on the TV. Note that starting for the first time can take a while.
If nothing can be seen on the TV after 2-3 minutes and everything is connected correctly, then your TV is probably not
compatible with the default video mode of the LyngBox. To cycle between video modes, first press and then press
down for at least one second. Repeat the procedure until you get an image on the TV.
1.
2.
1.
2.
3.
4.
x 3
x 2
1
3
2
4
1
2
fig. 3
1110
Confirm a choice
Exit from a submenu
Enter digits, to move decimal point
See text cues in menus for usage
[red][green]
[yellow][blue]

2.3 Start Using the LyngBox
This section gives you a very brief introduction on how to use the LyngBox to watch TV, after you have gone through the first
configuration.
When the LyngBox is first started it will display the first channel in the channel list with all free TV channels. The following
buttons on the remote control are used for basic navigation in TV mode and menus:
Next channel Display the menu
Previous channel Exit from the menu
Display the channel list; select the marked Exit to previous menu
channel or menu choice
Navigate in the channel list and menu
You will be requested to enter the following information.
a. Language selection
b. Country and city
c. Network settings
d. DiSEqC equipment
e. Dish size
f. Direction of the parabolic dish(es)
g. Whether a terrestrial channel search shall be performed
Enter the requested information using the navigation buttons on the remote control. Select the “next” field and press to
move to next view.
6. The LyngBox will now do the following:
a. First contact the LyngSat Maps service to receive information on which satellites that can be reached with the
specified equipment.
b. Next contact LyngSat and download channel information for all available satellites.
c. Search for terrestrial channels. If no Internet connection is available, the LyngBox will also search for satellite channels.
d. Store all channels in the global channel list.
The initial set-up is now ready and you can start watching TV. To further enhance your experience you can configure the
LyngBox to use your TV in the best way. See section 7.2 for further help on output settings.
5.
1312
System Information
The System Information menu gives information on your LyngBox id and password. This information is important to have
when logging on to the LyngBox website (http://www.lyngbox.com) and for remote control of recordings from the website of
the LyngSat Guide TV guide (http://www.lyngsat-guide.com). The System Information menu also displays the software version
of your LyngBox, which can be good to have accessible when support is needed.
Conditional Access
The LyngBox has two Common Interface slots for Conditional Access Modules. See chapter 4.6 for more information on how to
use Conditional Access cards with the LyngBox.
Guide
The TV guide from LyngSat Guide presents program information from a number of channels. See chapter 4.4 and 5.2 for
information on how to browse and schedule recordings from the TV guide.
Media Manager
The Media Manager is the interface to watch recordings and photos in the LyngBox. See chapter 6.0 for more information.
E-mail and Support
The LyngBox has an inbuilt e-mail client that can be reached from E-mail & Support in the main menu. E-mails can be
received and displayed using the remote control. If you connect a keyboard you can also send a-mails. The new mail indicator
on the display will light up when you have unread mail.
The e-mail client in the LyngBox lets you communicate with the LyngBox Media technical support personnel. See chapter 9.0
for help on technical support.
3.0 Navigate in the LyngBox
This chapter gives a brief overview of the menu structure, the buttons on the remote control, and the display in the front of
the LyngBox.
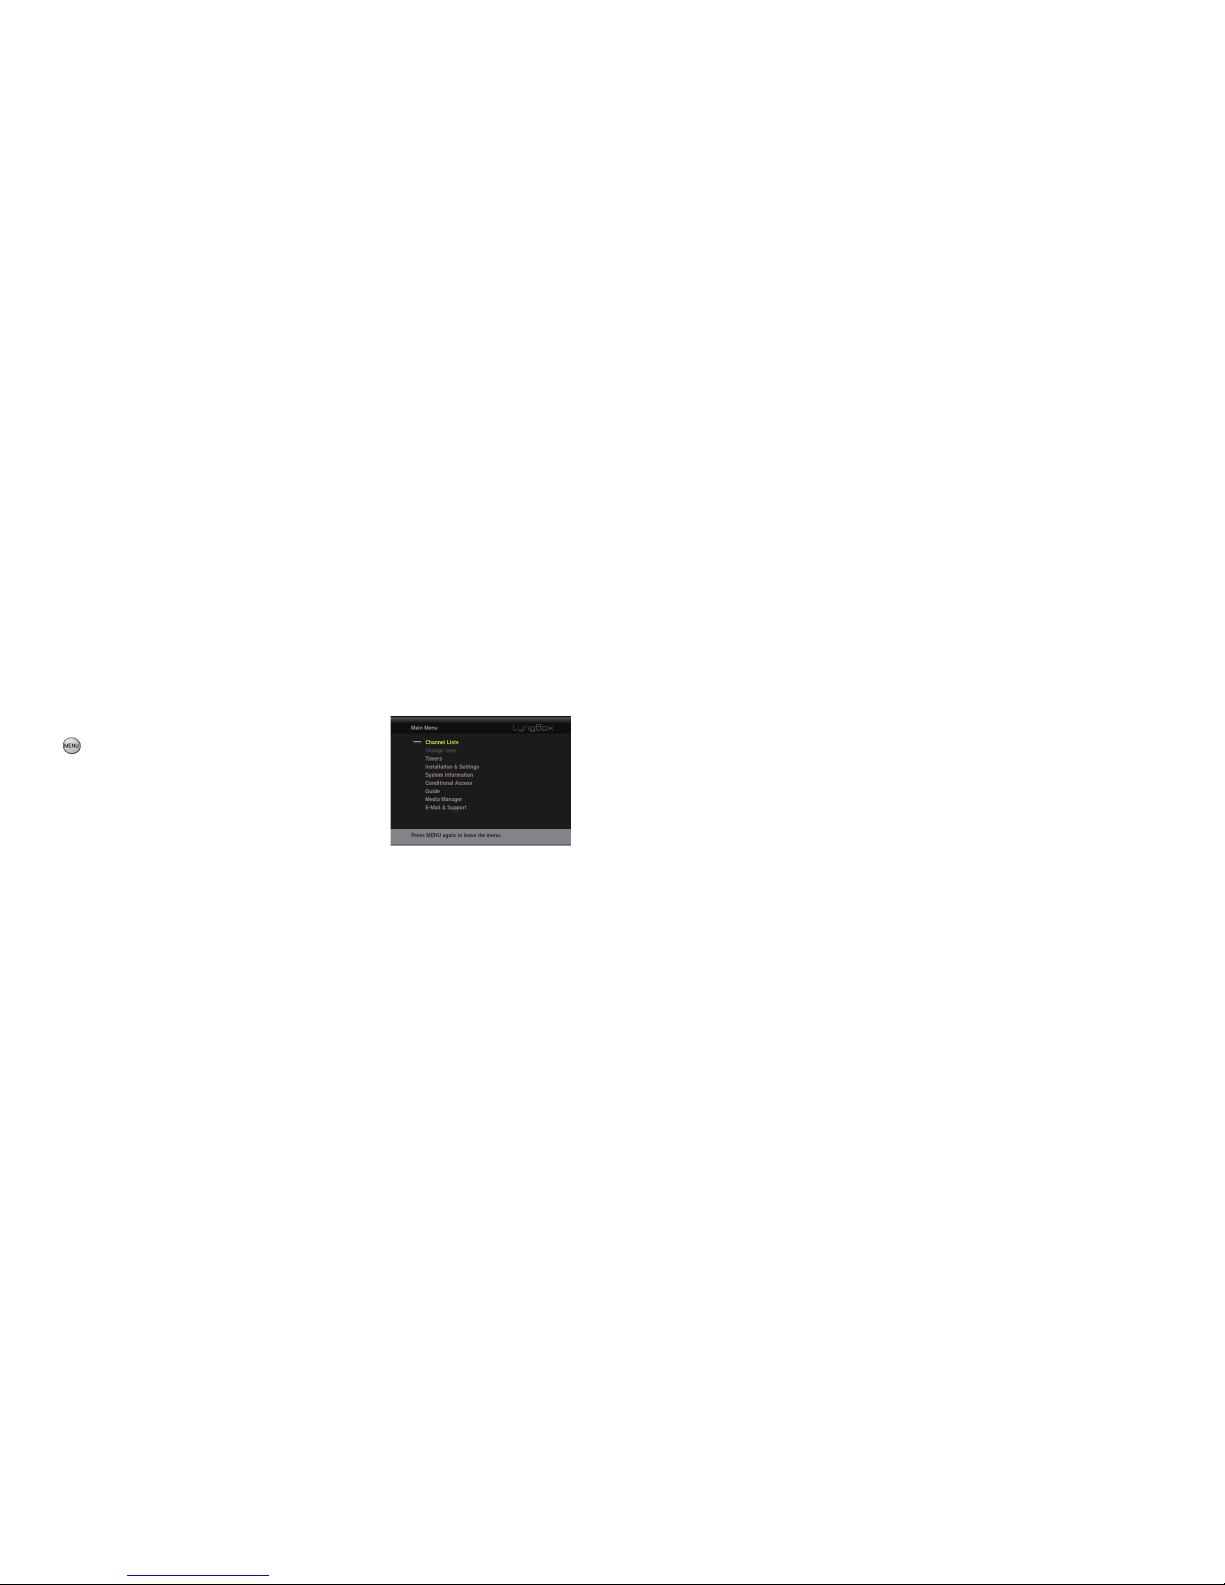
3.1 Menu Structure
This section describes the menu choices in the Main Menu, with directions on
where more information can be found.
Press to display the menu.
Channel Lists
It is possible to define several favorite channel lists to make channel
navigation easier. See chapter 4.3 for more information.
Change User
The LyngBox lets different users define their own favorite channel lists. Some
users can have parental lock enabled to protect from unsuitable content. See
chapter 4.5 for user management and parental lock, 4.1.1 for more information
on channel lists.
Timers
List all active recording timers and schedule manual recordings. See chapter 5.0 for more information on recordings.
Installation and Settings
Here you can change the set-up and behavior of your LyngBox. See chapter 7.0 for information on how to configure the
LyngBox.
1514
fig. 4

3.2.1 Universal Remote Control
The LyngBox remote control is a Universal Remote Control, i.e. it can be used to operate other devices than a LyngBox.
The button sets the remote control to operate a TV-set and the button set the remote control to operate a DVD
player. See the LyngBox website for more information on how to set up your remote control for other devices (http://www.
lyngbox.com).
If the LyngBox does not respond to your commands. Make sure the remote control is set to operate the LyngBox by pressing
the LyngBox button.
3.3 The Display
The display on the front of the LyngBox gives you a short summary of what is currently happening. The Display changes
appearance in different modes.
3.2 The Remote Control
1716
fig. 6
fig. 5
Power on/off
Change TV/Radio
Start Photo Manager
Start Recording Manager
Info button
Next Channel
Previous Channel
Record button
Mute
LyngBox button
Back button
Increase Volume
Decrease Volume
Stop
Fast Reverse
Play/Pause
Display Menu
OPT
[red]
[green]
Delete button
DVD device button
Navigate Right/ Skip Forward
OK button
Fast Forward
Slow Forward
Teletext
[blue]
[yellow]
Numerical buttons
Confirm Numerical
TV Guide
Widescreen button
TV device button
Exit button
Navigate Left/ Skip Backwards
Navigate Up/ Down
Indicates new mail Transmission in high definition PVR playback
Indicates multichannel Transmission in standard definition PVR paused
Recording
Dolby Digital audio

4.0 Watch TV
This chapter describes all functionalities that are interesting for watching TV.
4.1 Channel Navigation
There are two ways to navigate between channels in the LyngBox: in TV mode and using the channel lists. By creating user
specific favorite lists you have easier access to your most frequently watched channels.
4.1.1 Channel Lists Menu
By using the Channel Lists menu you get easy access to all channel lists.
All TV – contains all TV channels, including scrambled
All Radio – contains all radio channels, including scrambled
Free TV – contains only free TV channels
Free Radio – contains only free radio channels
One TV channel list per satellite position
One Radio channel list per satellite position
Terrestrial TV channels
Several user configured channel lists (see section 4.3 for editing)
The following buttons are used to navigate in the Channel Lists menu:
•
•
•
•
•
•
•
•
4.1.2 TV Mode
The LyngBox gives you all necessary means of navigating between channels while watching TV. A number of the more
advanced features can also be reached while in TV mode.
The following buttons are used in TV mode:
Basic navigation Advanced features
1918
Empty favorite lists are hidden by default. Press [red] to show all lists.
next channel in current channel list
previous channel in current channel list
enter channel number, up to four digits
can be used.
accept numeric input without wait for more digits
change to next channel list
change to previous channel list
list all channels in the active channel list,
choose the marked channel in the channel
increase audio volume
decrease audio volume
mute audio
display the TV guide for the current channel
display teletext
change channel list between TV and radio
access the recording manager
access the photo manager
1st press, show info bar, 2nd press, show program
info, use switch between next and
current program
show quick viewing options
- Language for subtitles
- Change widescreen picture format
- Audio language
- SCART release – release the SCART active signal
(necessary for some TV sets)
When a keyboard is connected, channels can be selected by typing the name of the channel (or the beginning of the name)
on the keyboard.
navigate in the menus
display the selected favorite list or watch the select
channel
enter channel number, up to four digits can be used
leave the current channel list or menu
leave the menu to watch TV
show technical info for the selected channel
fig. 7

4.2 Time Shifting Live TV
It is possible to pause the live TV transmission and resume watching later. The following buttons are used for time shifting.
pause the live TV and start time shifting
resume from the paused position
playback in fast forward mode
playback in fast reverse mode
skip forward
skip backward
leave time shift mode and return to the live transmission
4.3 Favorite Lists
This section desribes how to create favorite lists for the channels you want easy
access to. There can be several different favorite lists. The favorite lists can be
found in the Channel Lists menu.
Empty favorite lists are hidden by default. Press [red] to show all lists.
Press [blue] to start editing a favorite list.
The favorite list editor will be displayed. It has two columns:
- The left column contains channel lists.
- The right column contains favorite lists.
•
Use to navigate in the lists. Change column with .
While in the left column, press to place a channel in a favorite list.
While in the right column, press + to move the channel up or down in the list. again to release the channel
in the selected position.
While in the right column, press + to remove a channel from a favorite list.
Press [red] or [green] to change channel list and press [blue] or [yellow] to change favorite list.
When finished editing, press to return to the Channel Lists menu. Press [red] to hide empty favorite lists.
In addition to selecting individual channels for a favorite list, criterias for filtering out channels can be specified. Once a set of
rules has been associated with a favorite list, channels matching the rules are automatically included in the favorite list, even as
new channels are added. Channels that are added by criteria filters are shown in a different color.
To add a criteria filter, press [red] or [green] until the channel list displays one of the alternatives available for filtering. Available
criteria are language, country, category and CA system. Choose what conditions you want for your filter by adding them to a
favorite list. NOTE: filters can only be used when you are connected to the Internet. Filters work like this:
One of the rules from the same criteria must be fulfilled; e.g. language could be either English or Swedish [language:
English, language: Swedish].
The combination of rules from different criteria must be fulfilled; e.g. language could be either English or Swedish, but
category must be nature [language: English, language: Swedish, category: nature].
All users of the LyngBox can have their own favorite lists. Read more on user management in section 4.4.
•
•
•
•
•
•
•
•
2120
fig. 8

4.4 The TV Guide
The TV Guide behaves differently depending on if the LyngBox has an Internet connection or not. When there is an Internet
connection the TV Guide will access a special version of the LyngSat Guide website, where it is possible to browse between a
large number of channels.
are used to navigate in the TV Guide
opens the selected link
schedules the selected program for recording
exit from the TV Guide
When no Internet connection is available, broadcasted information from the satellite or terrestrial transmission is used.
Availability of information is depending on what information the current channel transmits.
[red] sort by channel
[green] sort by start time
show more info on the selected program
schedule the selected program for recording
exit from the TV Guide
The TV Guide for a specific program can be accessed directly from TV mode by pressing the [guide] button. The TV Guide for
the corresponding channel will be displayed using LyngSat Guide if the channel exist there, otherwise using the broadcasted
guide.
4.5 Manage Users
The LyngBox can have several users with different channel lists. User accounts can be password protected and it is possible to
add parental control to accounts.
The current user can be changed from the Change User menu. A list of all users is displayed. Select a user by pressing . If
the user account is password protected, input password with .
User management is done from the User Preferences menu, found in Installation and Settings. In this menu is it possible to
change the appearance of the LyngBox for the current user, create new users, delete users, and activate parental control on
certain users.
To create a new user, press [green]. The create user menu is now presented where it is possible to change the username and
password for the new user. Press to confirm.
To delete users, press [red]. Delete users by pressing . Press to exit.
To lock users, press [yellow]. Lock users by pressing . Press to exit. A cross is shown in front of locked users. Locked
users can only access the channels in their favorite lists. New channels cannot be manually added to favorite lists. Channels can
still be automatically added by the criteria filters.
User management can also be done in the Access Control menu. This menu also gives the possibility to set a system-wide
password for the settings menu; making it impossible for anyone that does not know the password to alter settings and
unlock users. The combination of locking users and setting the system password gives parental control on user-level. This
menu also gives the possibility to change channel lists for locked users.
4.6 Conditional Access
The LyngBox has two Common Interface slots for CA modules. CA modules are automatically detected and subscribed
channels are unscrambled. Installed modules can be listed in the Conditional Access menu. Select a module and press to
enter the module’s internal menu system. Things that can typically be done in the menus of CA modules are to view
subscription status and enter pin codes.
2322

5.0 Record a Show
It is possible to control recording in several ways:
Record the current program when in TV mode
Schedule recordings from the TV guide
Manually schedule recordings
5.1 Record the Current Program
To record the remaining part of the program you are currently watching, press . The LyngBox will immediately start
recording, stopping when the running program ends.
Press to stop recording.
5.2 Recording From the TV Guide
When browsing the TV guide, select a program and press [rec] to schedule the program for recording. The new timer can be
found in the Timers menu.
It is also possible to access the TV Guide from the website http://www.lyngsat.guide.com using an ordinary PC. If you login
with your LyngBox id and password you can schedule recordings for your LyngBox remotely. The LyngBox id and password
can be found in the System Information menu.
See section 4.4 for more information on the TV Guide.
•
•
•
5.3 Manual Recording
In the Timers menu you can manually schedule recordings.
To set a new timer or edit a timer you need to do the following:
Select an existing or empty timer and press .
Select channel using and .
Select date with the numerical buttons .
Select start time using the numerical buttons .
Select end time using the numerical buttons .
Select whether the timer shall repeat. Timers can repeat daily or weekly.
Select ‘store’ and press .
A new timer has been created and put in the list of timers.
5.4 Watch Recordings
All recordings can be found in the Recording Manager that is part of the Media Manager.
The recording manager can also be reached by pressing the button while watching TV.
To playback a movie, select it and press . To stop watching, press .
More information on the recording manager can be found in section 6.0.
5.5 Manage Timers
Management of timers is done in the Timers menu. This works for both manually set timers and timers set from the TV guide.
To edit a timer, select the timer and press .
To delete a timer, select the timer and press [red].
To cancel an ongoing recording, press .
1.
2.
3.
4.
5.
6.
7.
2524

6.0 Media Manager
The Media Manager is used to access recordings and photos stored on the hard disk. It is also possible to make alterations to
the files, such as renaming.
6.1 Watch Recordings
The Recording Manager is a browser for PVR recordings. It can be accessed
either through the Media Manager or by pressing while watching TV.
A recording is selected by using the arrow buttons. is used to start playback
of the selected recording.
[red] is used to change criteria for sorting the recordings
[blue] edit the selected recording
[green] mark the recording for transfer to a connected device
delete the selected recording
By default, the recording manager shows only recordings that are stored on the
internal hard disk. Recordings can also be accessed on USB connected storage
devices such as USB memory sticks. The button is used to change to a
connected device.
While watching a recording the following buttons can be used for control:
pause playback fast forward sk ip backwards
resume playback fast reverse playback in slow motion
stop playback skip forward
The name of recordings can be changed by using a connected keyboard.
6.2 Watch Photos
The Photo Manager is a browser for photos. It can be accessed either through the Media Manager or by pressing while
watching TV.
A photo is selected by using the arrow buttons. is used to view the selected photo. The photo is scaled to fit the screen in
maximum resolution.
Buttons in the browser
[red] is used to change criteria for sorting the photos
[green] transfer the photo to a connected device
delete the photo
Buttons when viewing photos
show next photo
show previous photo
[red] zoom in
[green] zoom out
By default, the Photo manager shows only photos stored on the internal hard disk. Photos can also be accessed on USB
connected storage devices such as digital cameras. The button is used to change to a connected device.
The name of photos can be changed using a connected keyboard.
6.3 Transfer Media
This is how you transfer files to and from connected storage devices.
To transfer files, use [green] to mark files for transfer in the Recording Manager or Photo Manager. To start the transfer press
on one of the files selected for transfer. A menu will be presented where it is possible to select the target device.
2726
fig. 9

7.0 Configure the LyngBox
All configuration settings for the LyngBox can be found in the Installation and Settings menu.
7.1 User Preferences
In this menu is it possible to change the appearance of the LyngBox for the current user and to create and manage user
accounts. See section 4.5 for more information on user account management.
7.2 Output Settings
The LyngBox supports several different output formats and connectors. All formats
and connectors cannot be active simultaneously, which is why the user has to
specify how the LyngBox is connected to the TV set.
One of the following display connectors can be selected: HDMI, Component, SCART
Selecting SCART also gives a signal on the composite video out.
Available display resolutions: 1080i, 720p, 576i, 576p
It is possible to activate several display resolutions. The LyngBox will select the
most appropriate resolution for each program based on the resolution of the
source material.
TV aspect ratio: 4:3 or 16:9
Widescreen scaling for 4:3: Letterbox (black borders on top/bottom) or Pan & Scan (zoom)
Widescreen scaling for 16:9: Black borders (on the sides) or zoom
Digital audio format: Dolby Digital or PCM
Audio Delay: 0-200 ms
Note: if you are not satisfied with scaling in standard definition you can try to activate only output in higher resolutions to let
the LyngBox do the scaling instead of the TV.
7.3 Regional Settings
In this menu the user can specify country, city and time zone adjustment for the LyngBox. The location of the LyngBox is
important for the LyngSat Maps service for calculating which satellites that can be received at the current location.
If no city is close enough it is possible to specify coordinates (latitude and longitude in decimal degrees). In this case, GMT is
used as time zone.
Time zone adjustment is relative to the official time zone for the selected country.
7.4 Language Settings
Languages can be specified for the user interface, subtitles, and audio.
Subtitles and audio can have both a primary and secondary language. The primary language is chosen when both are
available.
7.5 Access Control
The LyngBox can be configured to require a pin-code for access to the settings menus. S etting a system pin-code and locking
certain users give parental control functionality. Modifying favorite lists for locked users is possible in this menu. See section
4.3 for more information on how to edit favorite lists.
See section 4.5 for more information on how to manage users.
7.6 Network Settings
This menu is used for network configuration. The following options for configuration are available.
a. None: The LyngBox is not connected to a network
b. Automatic: The LyngBox tries to find a DHCP server to receive an automatic network configuration
c. Manual: User has to specify IP address, netmask, gateway, and DNS server
The network settings menu let the user configure how often the channel information shall be updated from LyngSat and how
often the LyngBox shall connect to LyngSat Guide to look for new remotely scheduled recording timers.
2928
fig. 10

7.7 E-mail Settings
Displays your LyngBox e-mail address and e-mail configuration.
7.8 TV Reception & Channel Search
This menu holds all menus for configuring satellite equipment and performing channel search. Installation and updates of
channels are normally taken care of automatically by the LyngSat Maps service, but can be further tweaked or managed
completely manually.
7.8.1 Antenna Configuration
This menu is used to configure the equipment used for satellite reception.
The dish size and signal strength threshold for LyngSat Maps can be configured
by pressing [blue]. This is usually set in the installation wizard, but can also be
altered here.
Specify what kind of DiSEqC equipment that is used (none/2-way/4-way/
motorized antenna/other)
a. DiSEqC switch: Specify LNB type and satellite for each port
b. Motorized antenna: Specify satellite for each motor position.
Rotate the motor using [red] and [green] to find the correct satellite
positions. When a satellite position has been identified, select index for storage in the motor and press [blue] to save
the position. Alternatively predefined motor positions can be used. Select an index and press to rotate
the motor to this position, next select satellite. Position is automatically saved. Rotation boundaries can be defined in
the advanced menu, accessible with [yellow].
1.
c. Other: Can be used to define up to 64 LNBs. See the figure below for guidance.
i. P: First four port DiSEqC switch
ii. 1: Two port unallocated level one switch (SW1)
iii. 2: Two port unallocated level two switch (SW2)
iv. 3: Two port unallocated level three switch (SW3)
v. 4: Two port unallocated level four switch (SW4)
Specify what kind of LNB that is used. Regardless of LNB type, a +1V offset can be set for each LNB to compensate for
long cables, press [yellow] to configure the offset.
a. KU-band Universal
b. C-band Normal
c. C-band Extended
d. Other: User defined local oscillator (LO) frequency and spectrum invert. Press [yellow] to define values.
Associate each LNB with a specific satellite. For motorized antennas each motor index has to be associated with a satellite
position.
2.
3.
3130
1
2
3
4
P
SW1
A
B
SW2
A
B
SW2
A
B
SW3
A
B
SW4
A
B
fig. 11
fig. 12

7.8.2 Signal Reception
This menu shows signal strength and quality for the current satellite and terrestrial signal.
Pressing the button shows more details and technical info.
7.8.3 Complete Channel Search
Use this menu to order a complete channel search. The channel search is based on information set in Antenna Configuration. It
is possible to order a channel search for only terrestrial or satellite, or for both at the same time.
A complete channel search for satellite channels becomes most interesting if no Internet connection is available. No Internet
connection means no access to the LyngSat Maps services.
7.8.4 Manual Channel Search
This menu is used to perform a channel search for a specific transponder, using explicitly given tuning parameters. Parameters
are frequency, polarization, symbol rate, and whether a network search shall be included. The manual search can be performed
for either terrestrial or satellite.
7.9 Software Update and Reinstallation
This is where you reset all stored settings and start the first-time installation guide. Note that all settings will be lost.
It is also possible to request a search for updated software. The search for new software is made on the LyngBox servers on the
Internet.
8.0 Add an Extra Tuner
It is possible to install an additional tuner in the LyngBox. By doing this you can record and watch channels from the same
source simultaneously.
An expansion card with an additional tuner can be purchased at most stores selling the LyngBox. An installation guide is
supplied with the tuner card.
3332
Expansion card slot
fig. 13

9.0 When Support is Needed
9.1 Troubleshooting
Solutions to the most common problems can be found here:
9.2 When More Help Is Needed
To get help as quickly as possible we recommend that you:
Try to find your issue in the Support FAQ on http://www.lyngbox.com
Try to find your issue in the Support Forum on http://www.lyngbox.com
Add a new question to the Support Forum on http://www.lyngbox.com. Support personnel from LyngBox Media are
reading and answering questions in the forum. Remember to thoroughly describing your issue.
Contact your retailer if you suspect your LyngBox has a hardware failure.
1.
2.
3.
4.
3534
Problem Solution
My LyngBox does not respond to
input from the remote control.
Make sure the remote control is set to controlling the LyngBox by pressing the
LyngBox button. The LyngBox button should light up when commands are
transmitted to the LyngBox.
Check the batteries in the remote control.
I have no image on my TV/
projector
First check that all necessary cables are connected between the TV and the
LyngBox, next check that the TV is set to take input from the LyngBox.
If no image is displayed now, the LyngBox is probably set to an incorrect video
mode. To c ycle between the video modes, first press [opt], next press and hold
[widescreen] for at least one second. Repeat this procedure until you see an image.
No signal or weak signal
Poor picture
Adjust the antenna and check the antenna cable for breaks.
If you cannot solve the problem you might need to consult an installer for making
adjustments.
I cannot watch scrambled
channels
Verify that your CA Module is correctly installed in the LyngBox.
See subscription status for your CA Module in the Conditional Access menu.
I cannot make recordings The hard disk might be full, remove old recordings to make place for new ones.
No sound Check that audio cables are connected correctly.
Increase the volume on your TV and on the LyngBox.
Check that neither your TV nor the LyngBox are muted.

code of all included GPL software, please send an e-mail to
info@lyngbox.com
GNU GENERAL PUBLIC LICENSE
Version 2, June 1991
Copyright (C) 1989, 1991 Free Software Foundation, Inc., 51 Franklin Street,
Fifth Floor, Boston, MA 02110-1301 USA
Everyone is permitted to copy and distribute verbatim copies of this license
document, but changing it is not allowed.
Preamble
The licenses for most software are designed to take away your freedom to
share and change it. By contrast, the GNU General Public License is intended
to guarantee your freedom to share and change free software--to make sure
the software is free for all its users. This General Public License applies to most
of the Free Software Foundation’s software and to any other program whose
authors commit to using it. (Some other Free Software Foundation software
is covered by the GNU Lesser General Public License instead.) You can apply
it to your programs, too.
When we speak of free software, we are referring to freedom, not price. Our
General Public Licenses are designed to make sure that you have the freedom
to distribute copies of free software (and charge for this service if you wish),
that you receive source code or can get it if you want it, that you can change
the software or use pieces of it in new free programs; and that you know you
can do these things.
To protect your rights, we need to make restrictions that forbid anyone to
deny you these rights or to ask you to surrender the rights. These restrictions
translate to certain responsibilities for you if you distribute copies of the
software, or if you modify it.
For example, if you distribute copies of such a program, whether gratis or for
a fee, you must give the recipients all the rights that you have. You must make
sure that they, too, receive or can get the source code. And you must show
them these terms so they know their rights.
We protect your rights with two steps: (1) copyright the software, and (2) offer
you this license which gives you legal permission to copy, distribute and/or
modify the software.
Also, for each author’s protection and ours, we want to make certain that
everyone understands that there is no warranty for this free sof tware. If the
software is modified by someone else and passed on, we want its recipients to
3736
11.0 Trademarks and Licenses
‘LyngBox’ and the LyngBox logo are trademarks of LyngBox Media.
Manufactured under license from Dolby Laboratories.
‘Dolby’ and the ‘double-D’ symbol are trademarks of Dolby Laboratories.
This product contains one or more programs protected under international and U.S. copyright laws as unpublished works.
They are confidential and proprietary to Dolby Laboratories. The reproduction or disclosure, in whole or in part, or the
production of derivative works therefrom without the express permission of Dolby Laboratories is prohibited. Copyright 19932002 by Dolby Laboratories. All rights Reserved.
HDMI, the HDMI logo and High-Definition Multimedia Interface are trademarks or registered
trademarks of HDMI Licensing LLC.
The LyngBox software contains source code licensed under the GNU General Public License (GPL). For access to the source
Technical Features
HDTV support (720p and 1080i)
Supports H.264/MPEG-4 AVC and
MPEG-2
Tuners for satellite TV (DVB-S/DVBS2) and terrestrial TV (DVB-T)
Expansion slot for extra tuner card
PVR functionality with inbuilt hard
disk
4:3 and 16:9 TV screen format
support and teletext decoding
Dual Common Interface slots for
usage with pay-TV-channels
DiSEqC 1.1 and 1.2 support
Multifunction remote control as
standard
Wireless remote keyboard as
accessory
Possibility to store recordings on
external storage devices connected
with USB
View images from a digital camera
connected to the LyngBox
The LyngBox can store up to 50000
channels
•
•
•
•
•
•
•
•
•
•
•
•
•
In the Box
LyngBox
Power cable (EU or UK)
Remote control
2 x AA batteries
HDMI cable
Ethernet cable
Interfaces
DVB-S/S2 antenna input
DVB-T antenna input + output
(pass-through)
Expansion slot for additional tuner
card
2 Common Interface slots
HDMI™-output.
Component output (Y, Pb, Pr)
Composite output
SCART output (RGB and composite)
S/PDIF optical output with AC-3
support
Stereo audio (2 RCA)
4 USB 2.0 ports
Ethernet connector (100BaseT)
•
•
•
•
•
•
•
•
•
•
•
•
•
•
•
•
•
•
Hardware Specifications
STMicroelectronics CPU (three
cores: 1x266 MHz, 2x384 MHz)
96 MB System Memory
160 GB Hard Disk
OLED front panel display
DVB-S2 performance: 10-30
Msymbols/s
DVB-S performance: 1-45
Msymbols/s
Size (WxHxD): 384x83x256 mm
Weight 3.8 kg
Expansion
Expansion slot for extra tuner card
•
•
•
•
•
•
•
•
•
10.0 Technical Specification

know that what they have is not the original, so that any problems introduced
by others will not reflect on the original authors’ reputations.
Finally, any free program is threatened constantly by software patents. We
wish to avoid the danger that redistributors of a free program will individually
obtain patent licenses, in effect making the program proprietary. To prevent
this, we have made it clear that any patent must be licensed for everyone’s free
use or not licensed at all.
The precise terms and conditions for copying, distribution and modification
follow.
GNU GENERAL PUBLIC LICENSE
TERMS AND CONDITIONS FOR COPYING, DISTRIBUTION AND MODIFICATION
0. This License applies to any program or other work which contains a notice
placed by the copyright holder saying it may be distributed under the terms of
this General Public License. The “Program”, below, refers to any such program
or work, and a “work based on the Program” means either the Program or
any derivative work under copyright law: that is to say, a work containing
the Program or a portion of it, either verbatim or with modifications and/or
translated into another language. (Hereinafter, translation is included without
limitation in the term “modification”.) Each licensee is addressed as “you”.
Activities other than copying, distribution and modification are not covered
by this License; they are outside its scope. The act of running the Program is
not restricted, and the output from the Program is covered only if its contents
constitute a work based on the Program (independent of having been made
by running the Program). Whether that is true depends on what the Program
does.
1. You may copy and distribute verbatim copies of the Program’s source
code as you receive it, in any medium, provided that you conspicuously and
appropriately publish on each copy an appropriate copyright notice and
disclaimer of warranty; keep intact all the notices that refer to this License and
to the absence of any warranty; and give any other recipients of the Program
a copy of this License along with the Program.
You may charge a fee for the physical act of transferring a copy, and you may
at your option offer warranty protection in exchange for a fee.
2. You may modify your copy or copies of the Program or any portion of it,
thus forming a work based on the Program, and copy and distribute such
modifications or work under the terms of S ection 1 above, provided that you
also meet all of these conditions:
a) You must cause the modified files to carry prominent notices stating that
you changed the files and the date of any change.
b) You must cause any work that you distribute or publish, that in whole or in
part contains or is derived from the Program or any part thereof, to be licensed
as a whole at no charge to all third parties under the terms of this License.
c) If the modified program normally reads commands interactively when run,
you must cause it, when started running for such interactive use in the most
ordinary way, to print or display an announcement including an appropriate
copyright notice and a notice that there is no warranty (or else, saying that
you provide a warranty) and that users may redistribute the program under
these conditions, and telling the user how to view a copy of this License.
(Exception: if the Program itself is interactive but does not normally print such
an announcement, your work based on the Program is not required to print
an announcement.)
These requirements apply to the modified work as a whole. If identifiable
sections of that work are not derived from the Program, and can be reasonably
considered independent and separate works in themselves, then this License,
and its terms, do not apply to those sections when you distribute them as
separate works. But when you distribute the same sections as part of a whole
which is a work based on the Program, the distribution of the whole must be
on the terms of this License, whose permissions for other licensees extend to
the entire whole, and thus to each and every part regardless of who wrote it.
Thus, it is not the intent of this section to claim rights or contest your rights to
work written entirely by you; rather, the intent is to exercise the right to control
the distribution of derivative or collective works based on the Program.
In addition, mere aggregation of another work not based on the Program with
the Program (or with a work based on the Program) on a volume of a storage
or distribution medium does not bring the other work under the scope of this
License.
3. You may copy and distribute the Program (or a work based on it, under
Section 2) in object code or executable form under the terms of Sections 1
and 2 above provided that you also do one of the following:
a) Accompany it with the complete corresponding machine-readable source
code, which must be distributed under the terms of Sections 1 and 2 above on
a medium customarily used for software interchange; or,
b) Accompany it with a written offer, valid for at least three years, to give
any third party, for a charge no more than your cost of physically performing
source distribution, a complete machine-readable copy of the corresponding
source code, to be
distributed under the terms of Sections 1 and 2 above on a medium
customarily used for software interchange; or,
c) Accompany it with the information you received as to the offer to
distribute corresponding source code. ( This alternative is allowed only for
noncommercial distribution and only if you received the program in object
code or executable form with such an offer, in accord with Subsection b
above.)
The source code for a work means the preferred form of the work for making
modifications to it. For an executable work, complete source code means
all the source code for all modules it contains, plus any associated interface
definition files, plus the scripts used to control compilation and installation of
the executable. However, as a special exception, the source code distributed
need not include anything that is normally distributed (in either source or
binary form) with the major components (compiler, kernel, and so on) of the
operating system on which the executable runs, unless that component itself
accompanies the executable.
If distribution of executable or object code is made by offering access to copy
from a designated place, then offering equivalent access to copy the source
code from the same place counts as distribution of the source code, even
though third parties are not compelled to copy the source along with the
object code.
4. You may not copy, modify, sublicense, or distribute the Program except as
expressly provided under this License. Any attempt otherwise to copy, modify,
sublicense or distribute the Program is void, and will automatically terminate
your rights under this License.
However, parties who have received copies, or rights, from you under this
License will not have their licenses terminated so long as such
parties remain in full compliance.
5. You are not required to accept this License, since you have not signed
it. However, nothing else grants you permission to modify or distribute the
Program or its derivative works. These actions are prohibited by law if you do
not accept this License. Therefore, by modifying or distributing the Program
(or any work based on the Program), you indicate your acceptance of this
License to do so, and all its terms and conditions for copying, distributing or
modifying the Program or works based on it.
6. Each time you redistribute the Program (or any work based on the Program),
the recipient automatically receives a license from the original licensor to
copy, distribute or modify the Program subject to these terms and conditions.
You may not impose any further restrictions on the recipients’ exercise of the
rights granted herein. You are not responsible for enforcing compliance by
third parties to this License.
7. If, as a consequence of a court judgment or allegation of patent infringement
or for any other reason (not limited to patent issues), conditions are imposed
on you (whether by court order, agreement or otherwise) that contradict
the conditions of this License, they do not excuse you from the conditions
of this License. If you cannot distribute so as to satisfy simultaneously your
obligations under this License and any other pertinent obligations, then as
a consequence you may not distribute the Program at all. For example, if a
patent license would not permit royalty-free redistribution of the Program by
all those who receive copies directly or indirectly through you, then the only
way you could satisfy both it and this License would be to refrain entirely from
distribution of the Program.
If any portion of this section is held invalid or unenforceable under any
particular circumstance, the balance of the sec tion is intended to apply and
the section as a whole is intended to apply in other circumstances.
It is not the purpose of this section to induce you to infringe any patents
or other property right claims or to contest validity of any such claims; this
section has the sole purpose of protecting the integrity of the free sof tware
distribution system, which is implemented by public license practices. Many
people have made generous contributions to the wide range of software
distributed through that system in reliance on consistent application of
that system; it is up to the author/donor to decide if he or she is willing to
distribute software through any other system and a licensee cannot impose
that choice.
This section is intended to make thoroughly clear what is believed to be a
consequence of the rest of this License.
8. If the distribution and/or use of the Program is restricted in certain countries
either by patents or by copyrighted inter faces, the original copyright holder
who places the Program under this License may add an explicit geographical
distribution limitation excluding those countries, so that distribution is
permitted only in or among countries not thus excluded. In such case, this
License incorporates the limitation as if written in the body of this License.
9. The Free Software Foundation may publish revised and/or new versions
of the General Public License from time to time. Such new versions will be
similar in spirit to the present version, but may differ in detail to address new
problems or concerns.
Each version is given a distinguishing version number. If the Program specifies
a version number of this License which applies to it and “any later version”, you
have the option of following the terms and conditions either of that version or
of any later version published by the Free Software Foundation. If the Program
does not specify a version number of this License, you may choose any version
ever published by the Free Software Foundation.
10. If you wish to incorporate parts of the Program into other free programs
whose distribution conditions are different, write to the author to ask
for permission. For software which is copyrighted by the Free Software
Foundation, write to the Free Sof tware Foundation; we sometimes make
exceptions for this. Our decision will be guided by the two goals of preserving
the free status of all derivatives of our free software and of promoting the
sharing and reuse of software generally.
38 39

NO WARRANTY
11. BECAUSE THE PROGR AM IS LICENSED FREE OF CHARGE, THERE IS NO
WARRANTY FOR THE PROGRAM, TO THE EXTENT PERMITTED BY APPLICABLE
LAW. EXCEPT WHEN OTHERWISE STATED IN WRITING THE COPYRIGHT
HOLDERS AND/OR OTHER PARTIES PROVIDE THE PROGRAM “AS IS” WITHOUT
WARRANTY OF ANY KIND, EITHER EXPRESSED OR IMPLIED, INCLUDING, BUT
NOT LIMITED TO, THE IMPLIED WARRANTIES OF MERCHANTABILITY AND
FITNESS FOR A PARTICULAR PURPOSE. THE ENTIRE RISK AS TO THE QUALITY
AND PERFORMANCE OF THE PROGRAM IS WITH YOU. SHOULD THE PROGRAM
PROVE DEFECTIVE, YOU ASSUME THE COST OF ALL NECESSARY SERVICING,
REPAIR OR CORRECTION.
12. IN NO E VENT UNLESS REQUIRED BY APPLICABLE LAW OR AGREED TO
IN WRITING WILL ANY COPYRIGHT HOLDER, OR ANY OTHER PARTY WHO
MAY MODIFY AND/OR REDISTRIBUTE THE PROGRAM AS PERMITTED ABOVE,
BE LIABLE TO YOU FOR DAMAGES, INCLUDING ANY GENERAL, SPECIAL,
INCIDENTAL OR CONSEQUENTIAL DAMAGES ARISING OUT OF THE USE OR
INABILITY TO USE THE PROGRAM (INCLUDING B UT NOT LIMITED TO LOSS
OF DATA OR DATA BEING RENDERED INACCURATE OR LOSSES SUSTAINED BY
YOU OR THIRD PARTIES OR A FAILURE OF THE PROGRAM TO OPERATE WITH
ANY OTHER PROGRAMS), EVEN IF SUCH HOLDER OR OTHER PARTY HAS BEEN
ADVISED OF THE POSSIBILITY OF SUCH DAMAGES.
END OF TERMS AND CONDITIONS
How to Apply These Terms to Your New Programs
If you develop a new program, and you want it to be of the greatest possible
use to the public, the best way to achieve this is to make it free software which
everyone can redistribute and change under these terms.
To do so, attach the following notices to the program. I t is safest to attach
them to the start of each source file to most effectively convey the exclusion of
warranty; and each file should have at least the “copyright” line and a pointer
to where the full notice is found.
<one line to give the program’s name and a brief idea of what it does.>
Copyright (C) <year> <name of author>
This program is free software; you can redistribute it and/or modify it under
the terms of the GNU General Public License as published by the Free
Software Foundation; either version 2 of the License, or (at your option) any
later version.
This program is distributed in the hope that it will be useful, but WITHOUT
ANY WARRANTY; without even the implied warranty of MERCHANTABILITY or
FITNESS FOR A PARTICULAR PURPOSE. See the GNU General Public License
for more details.
You should have received a copy of the GNU General Public License along
with this program; if not, write to the Free Software Foundation, Inc., 51
Franklin Street, Fifth Floor, Boston, MA 02110-1301 USA.
Also add information on how to contact you by electronic and paper mail.
If the program is interactive, make it output a shor t notice like this when it
starts in an interactive mode:
Gnomovision version 69, Copyright (C) year name of author
Gnomovision comes with ABSOLUTELY NO WARRANTY; for details type
`show w’.
This is free software, and you are welcome to redistribute it under certain
conditions; type `show c’ for details.
The hypothetical commands `show w’ and `show c’ should show the
appropriate parts of the General Public License. Of course, the commands
you use may be called something other than `show w’ and `show c’; they could
even be mouse-clicks or menu items--whatever suits your program.
You should also get your employer (if you work as a programmer) or your
school, if any, to sign a “copyright disclaimer” for the program, if necessar y.
Here is a sample; alter the names:
Yoyodyne, Inc., hereby disclaims all copyright interest in the program
`Gnomovision’ (which makes passes at compilers) written by James Hacker.
<signature of Ty Coon>, 1 April 1989
Ty Coon, President of Vice
This General Public License does not permit incorporating your program
into proprietary programs. If your program is a subroutine library, you may
consider it more useful to permit linking proprietary applications with the
library. If this is what you want to do, use the GNU Lesser General Public
License instead of this License.
40


 Loading...