

LY International H-6800 User Manual
H-6800 Conference set User manual
1

H-6800 Conference set User manual
2
A) Specifications………………………………………………………………................. 3
B) Description………………………………………………………………...................... 4
a. Main Unit Description…………...........……………………………................ 4
b. Microphone Description ……………………................................................ 6
C) Connections……………………………………………………………........................ 7
D) Operating………………………………………………………………………............. 8
E) Main Unit Menu...................................................................................................... 9
a. Conference Mode……………………………………………………............... 9
b. Video…..…………………………………………………................................ 9
c. LCD Contrast……………………………………………………….................. 9
d. Code Setting.........…………………………………………………….............. 10
e. High-frequency Compensation………………………………………............. 10
F) Microphone Menu…………………………………................................................... 11
a. Volume..........………………………………………………………….............. 11
b. LCD Contrast...…………………………………………………...................... 11
c. Video…………………………………………………...................................... 11
G) Auto-track function……………………….….……………………………….............. 12
H) Technical specifications………..……………………………………………............. 13
I) Operation of Software……………………….….……………………………............ 15
a. System Setting..........…………………………………………….................... 17
i. Basic setting….……………………………………………................ 17
ii. Video Setting………………………………………………................ 18
iii. Venue Configuration………………………………………................ 19
b. Line Detect...………………………………………………....…...................... 21
c. Preparation…………………………………………………............................ 22
i. Create/Edit Conference….………………………………................. 22
ii. Create/Edit Proposal………………………………………............... 23
iii. Create/Edit Delegate Data………………………………................. 24
d. Start Conference………………………………………………....................... 25
i. Discuss….……………………………….......................................... 25
ii. Sign In........………………………………………............................. 26
iii. Start Ballot……………………………….......................................... 27
iv. Documents………………………………......................................... 29
v. Insert Display………………………………...................................... 30
e. After Conference………………………………………………....................... 30
i. Conference Management…………………..................................... 30
ii. Sign In Report........……………………………………….................. 31
iii. Print Results………………………………....................................... 31
iv. Documents………………………………......................................... 31
f. Help………………………………………………........................................... 32
g. Exit………………………………………………............................................. 32

H-6800 Conference set User manual
3
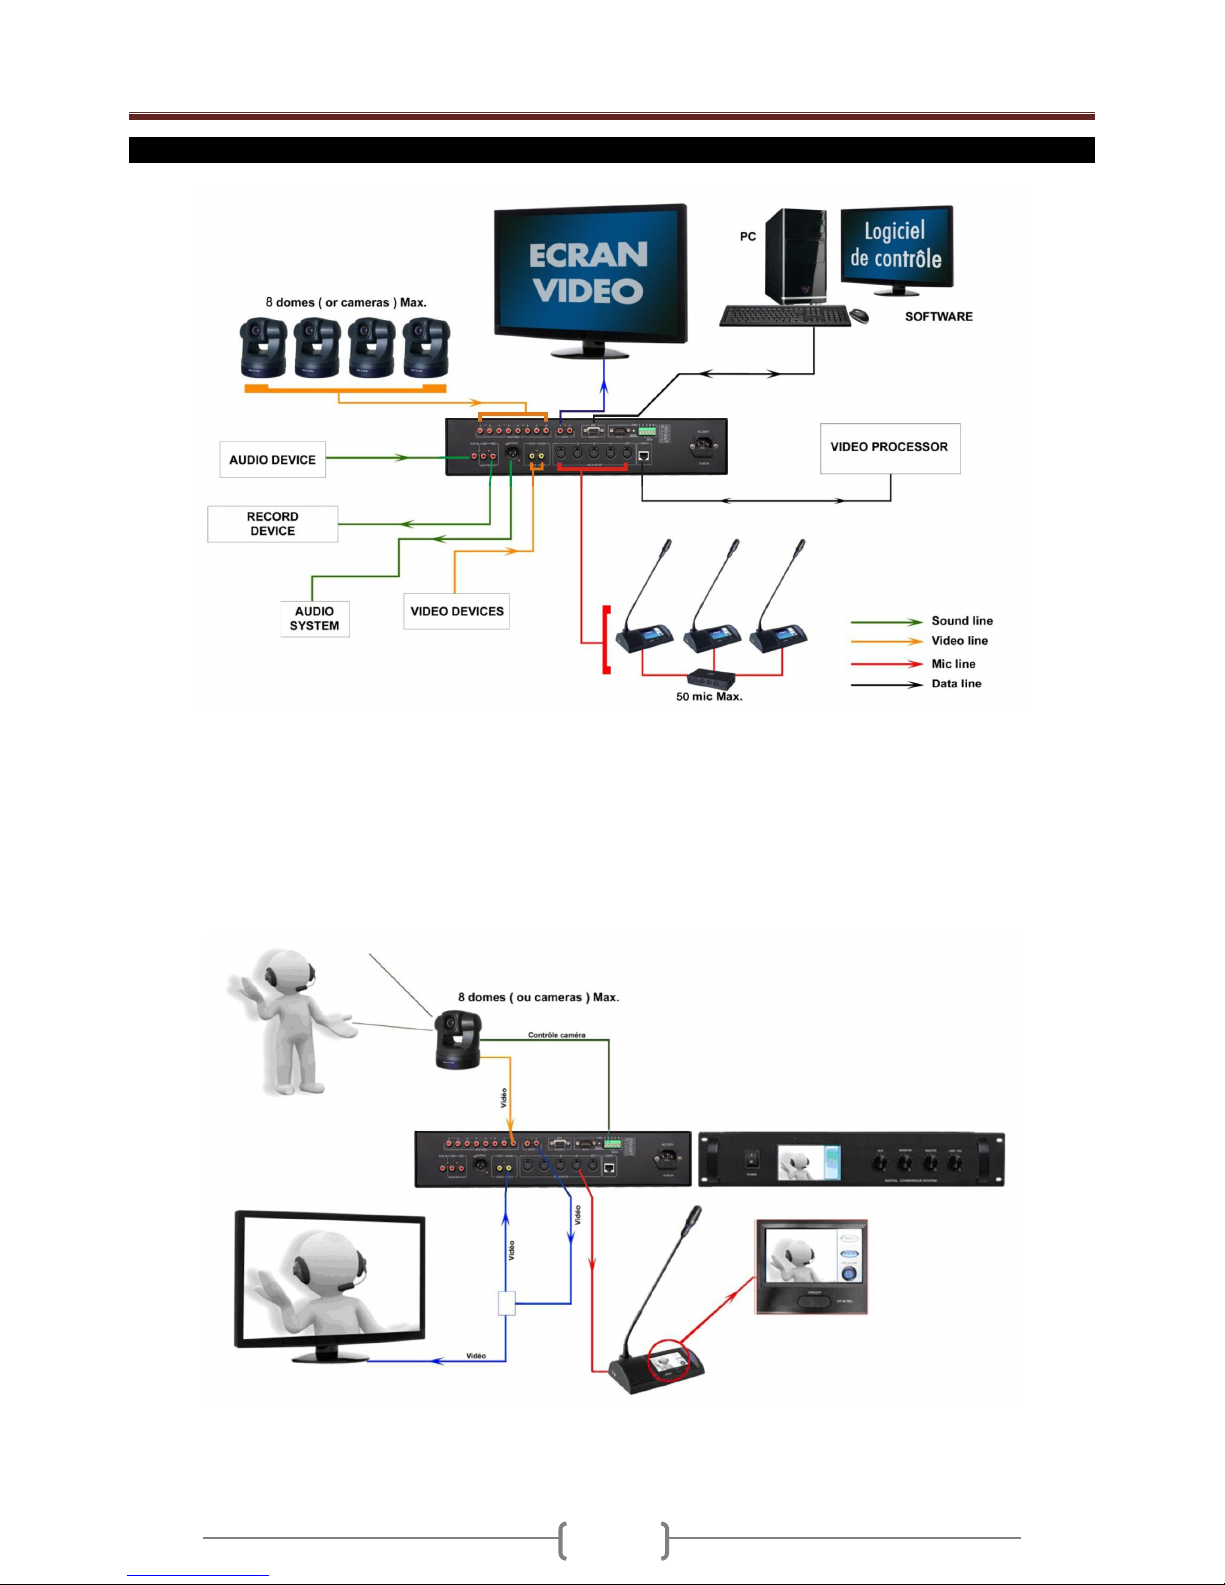
A) SPECIFICATIONS
Sound / Video conference set
- The main unit can control up to 50 mic ( 1 chairman & 49 delegates )
- This set can be use with or without computer
- Touch screen on main unit and mic
- Main unit and mic can display videos from camera or external video devices
- Built-in speaker on mic and main unit
- 3 conference mode : mode free, mode FIFO , mode limit ( 1 to 9 mic in same time )
- Mode vote ( yes, no, abstain )
- Mode elect ( up to 5 candidates )
- Mode score
- 1 aux input ( RCA)
- 1 line output(RCA )
- 1 rec output (RCA )
- 1 master output ( XLR )
- 2 DVD video inputs ( RCA )
- 8 cameras ( or domes ) inputs ( RCA )
- 2 auto-tracking cameras control
- 2 video output ( BNC )
- 5 mic connectors
- 1 computer control connector ( RS-232 )
- IEC914 & ISO
H-6800 Conference set User manual
4
B) DESCRIPTION
a) MAIN UNIT DESCRIPTION
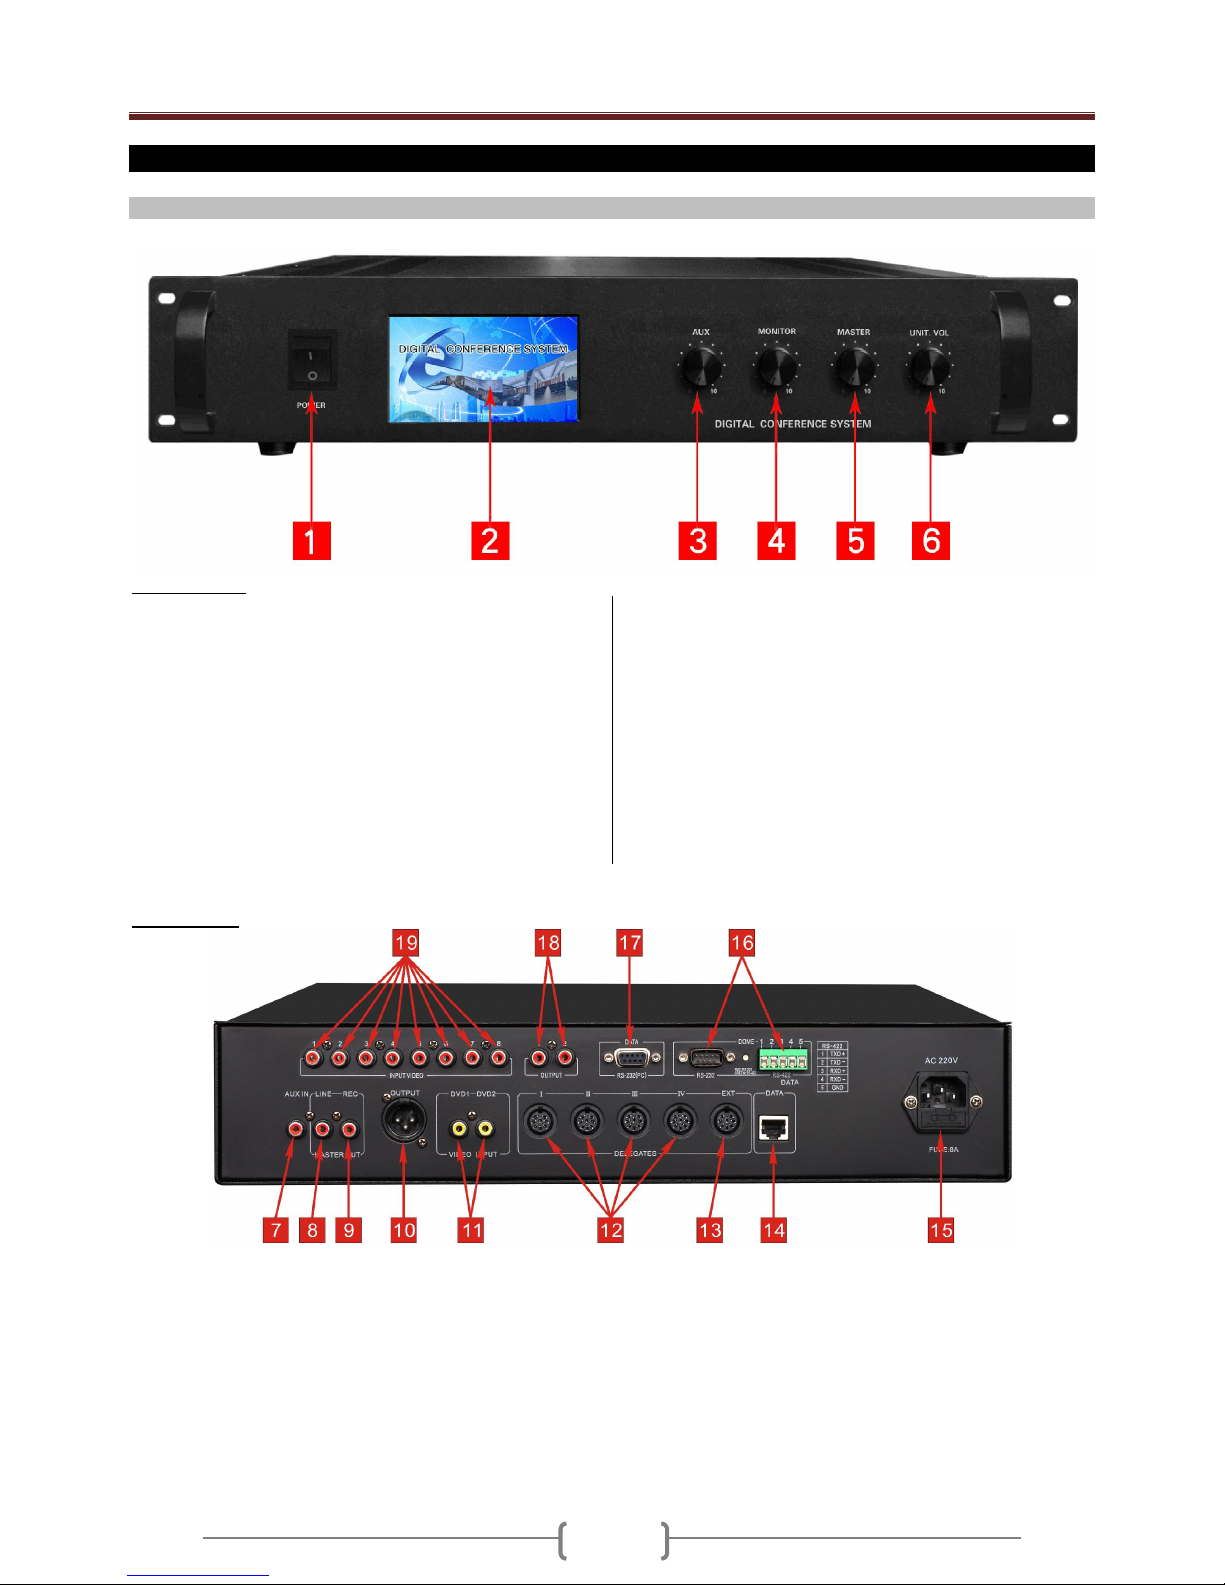
Front panel :
1. POWER SWITCH
Use this button to switch on or to switch off the main unit
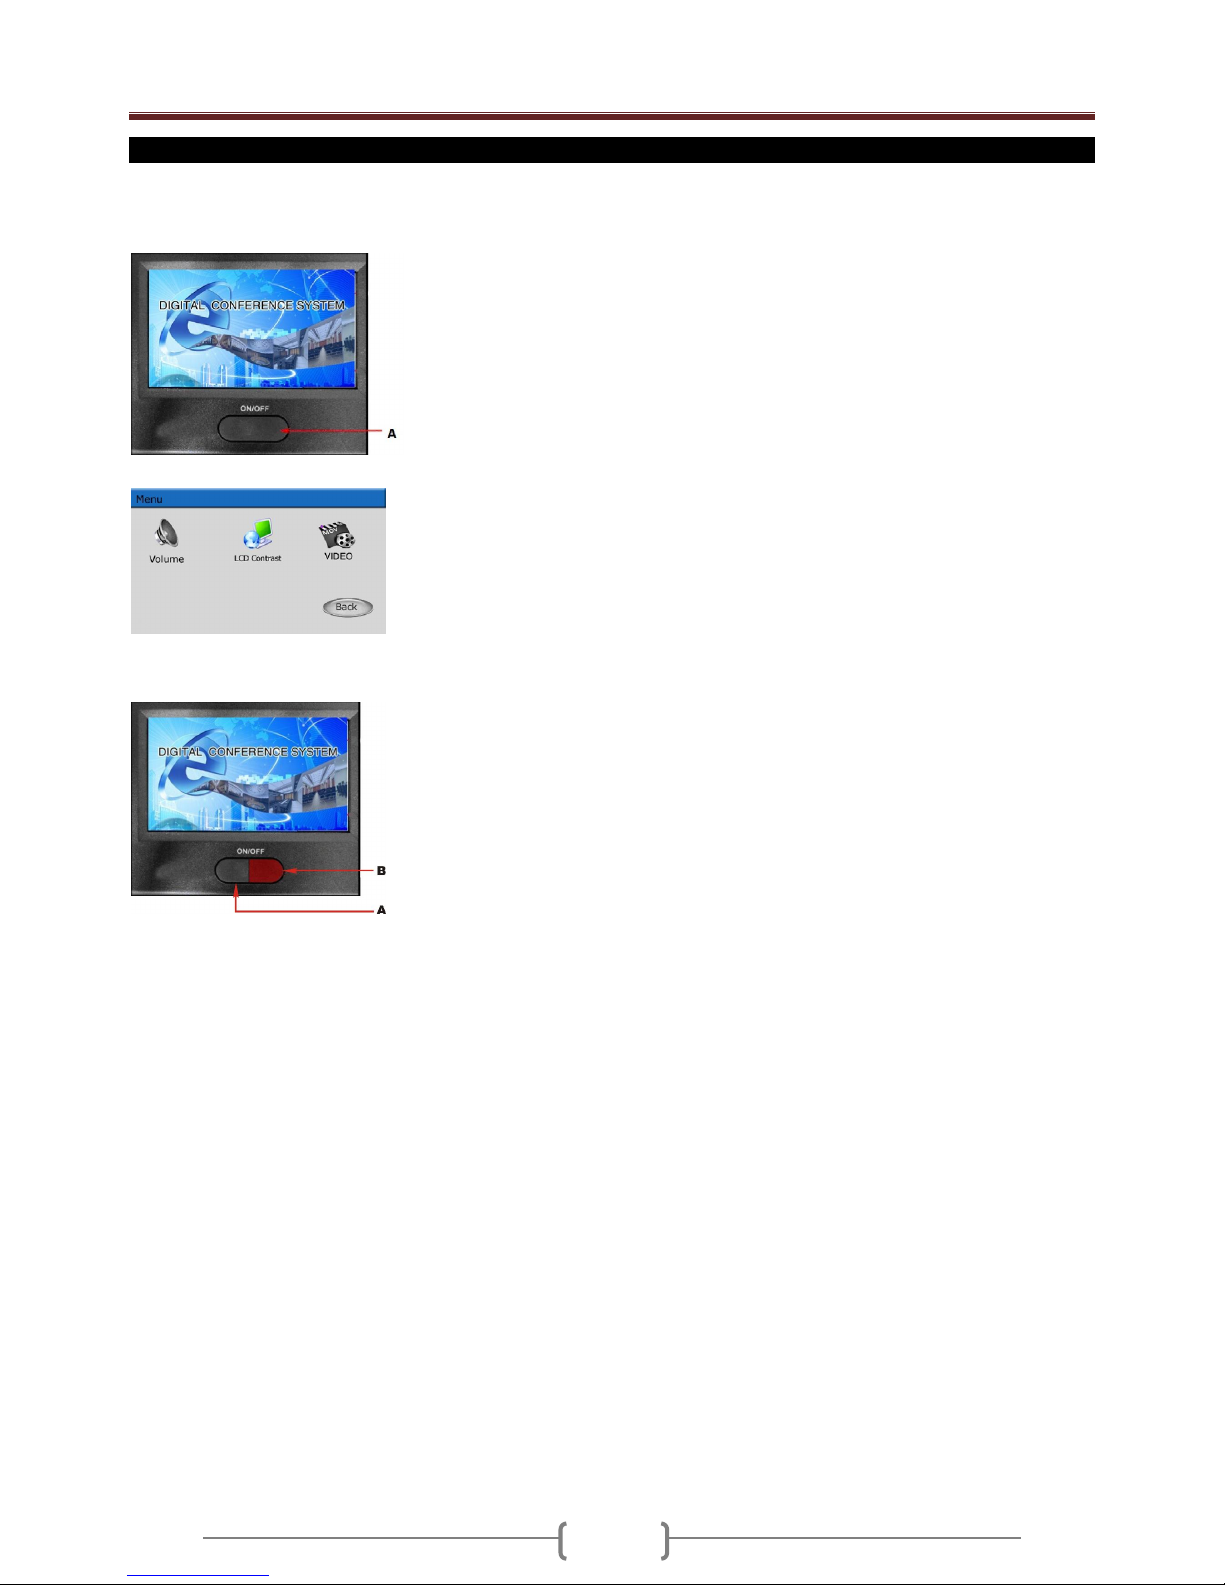
2. TOUCH SCREEN DISPLAY
On this touchscreen, you can display the video devices
connected on the main unit (camera 1 to 8 iputs, dvd 1 and 2
inputs) and setup system working mode
3. AUX LEVEL CONTROL
This button is used to adjust the level of the input volume the
audio device connected on the input (7). This device will be
listen on all the mic connected to the s ystem. Correctly adjust
the level do don’t saturate the sound.
4. BUILT-IN SPEAKER LEVEL CONTROL
Main unit is composed of a built-in speaker to monitor the
conference. This button is us ed to adjust the level of the built-
in speaker. Correctly adjust the level to don’t saturate the
sound of the speaker.
5. MASTER LEVEL CONTROL
Main unit have a master output to send conference sound to
an external sound system. This button is used to adjust the
level of the line/rec/master output (8,9,10).
6. MIC SPEAKER LEVEL CONTROL
The mic are composed of built-in speakers. This button is used
to adjust the maximum volume level of these speakers.
Rear panel :
7. AUX IN INPUT
Aux level type. Connect on this input a device with level line such as a cd player, a dvd player, a mixer,… This device will be diffused on
the speakers of all the micro connected to the system.
8. LINE OUTPUT
This socket is used to connect an external sound system (power amplifier or mixer). The conference is reproduced on a system more
powerfull
9. REC OUTPUT
This output is used to record the conference. Connect on it a recording device as cd recorder or tape recorder
10. MASTER OUTPUT
This socket is used to connect an external sound system (power amplifier or 100v power amplifier). The conference is reproduced on a
system more powerful
H-6800 Conference set User manual
5
11. VIDEO DVD INPUTS
This system allows the display of video devices on the built-in touchsreen. Video can be movies from DVD player or video from cameras.
Connect on these inputs devices as DVD player, video ouput from computer,...
Device (DVD 1 or 2 inputs ) is selected directly from touchscreen display of main unit ( A = DVD 1, B = DVD 2 ).
12. MIC CONNECTORS
Use this connectors to connect all the mic. If you have more than 4 mic, you must to us e connection box (in option). You can connect up to
50 mic
Note: Video & sound of the mic are in the same cable.
13. LINK OUTPUT
If you have more than 32 mic, use this connector to connect an additional power supply.
14. DATA CONNECT OR
Connect to this socket a central control system
15. POWER SOCKET
Connect on this socket the power supply cable ( 220V )
The fuse is used to protect the main unit. If the fuse use is defect replace it by a fuse with same size and same value
16. CAMERA CONTROLE CONNECTOR
If you use dome in place of camera you can control pan and tilt move directly from software. Connect this socket to the control c onnector of
domes..
Note : To know connections, read the user manual of the dome.
17. PC CONNECTOR
Connect this socket to your c omputer to setupr the auto-track function.
18. VIDEO OUTPUT
Use this output to display camera video on an external video screen.
Note : You cannot display video from camera inputs directly on the mic touchscreen ( except special connection explain later )
19. VIDEO CAMERA INPUTS
Connect these inputs to your camera. Up to 8 c ameras max.
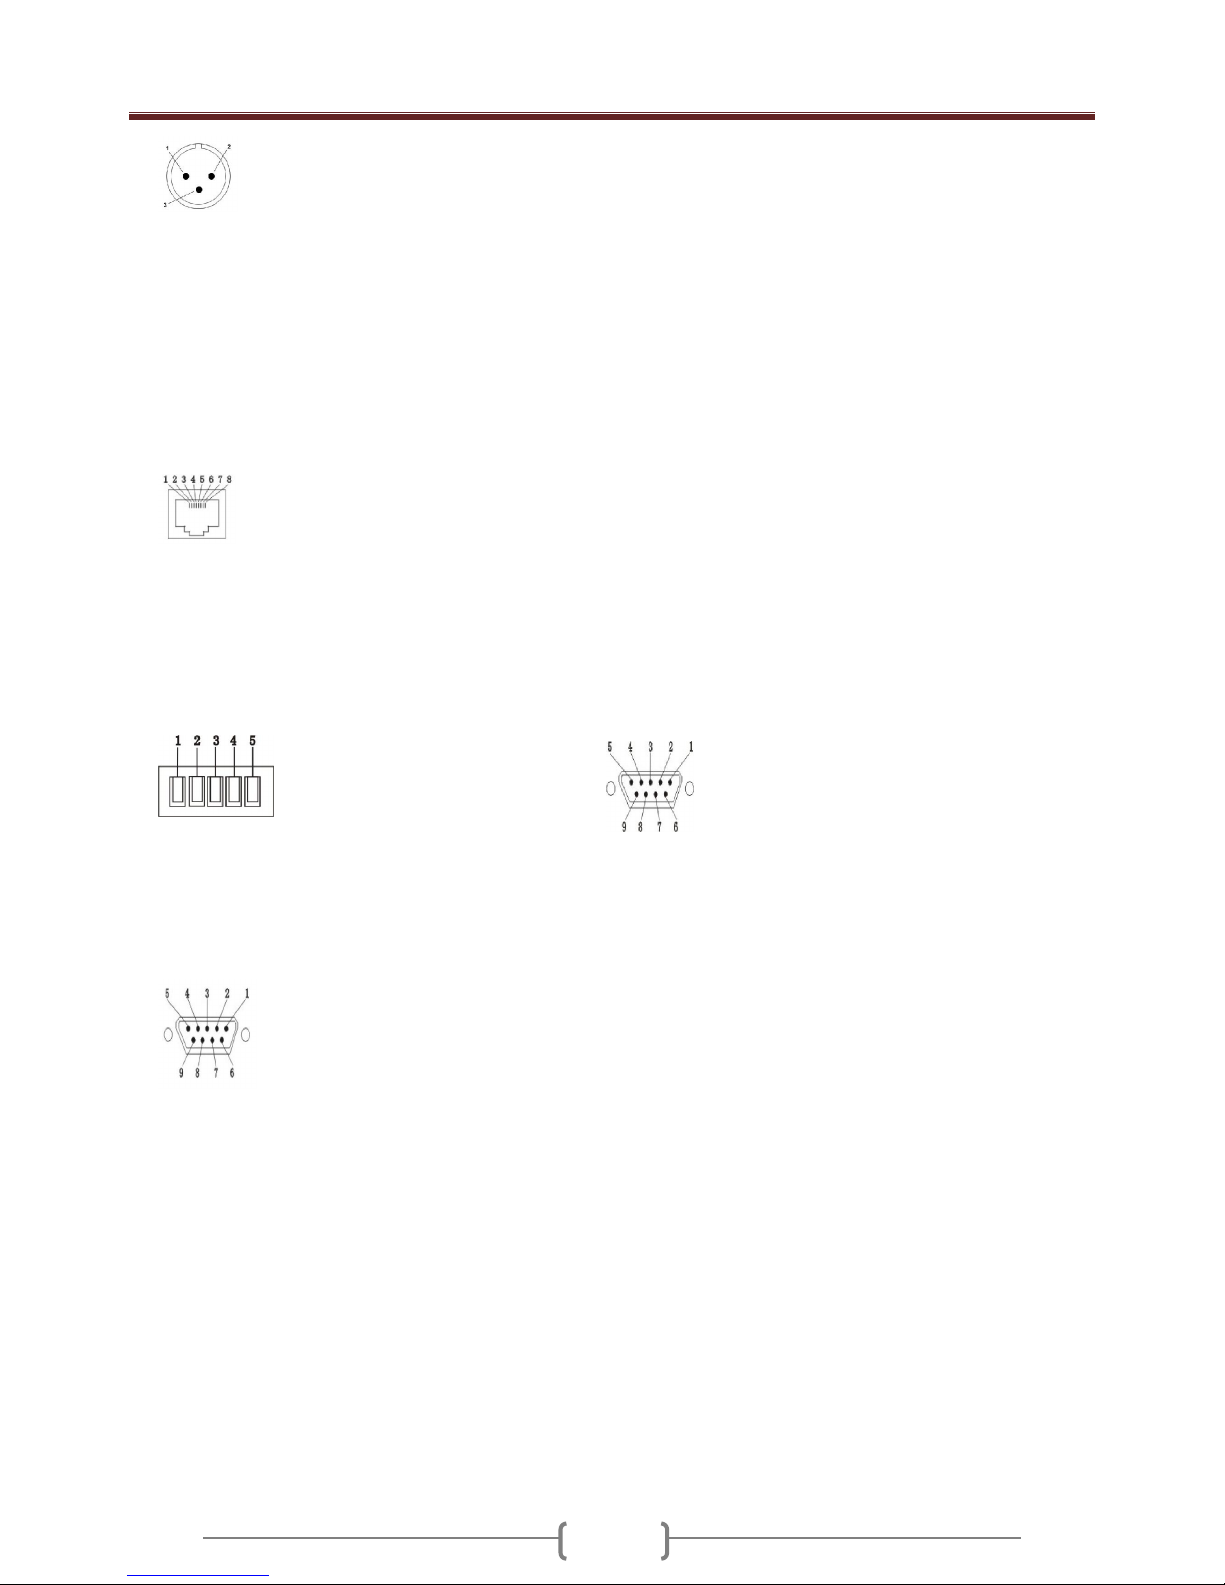
XLR socket
1- GND
2- +
3- -
RS-232 (PC) female
1- NC
2- TXD
3- RXD
4- NC
5- GND
6- NC
7- NC
8- NC
9- NC
RS-422 (Green LED)
1- TXD +
2- TXD 3- RXD +
4- RXD –
5- GND
RJ-45
1- GND
2- GND
3- RS-485A+
4- RS-485B-
5- NC
6- NC
7- GND
8- GND
RS-232 Male (Red LED)
1.NC
2.TXD
3.RXD
4.NC
5.GND
6.NC
7.NC
8.NC
9.NC
H-6800 Conference set User manual
6
b) MICROPHONE DESCRIPTION
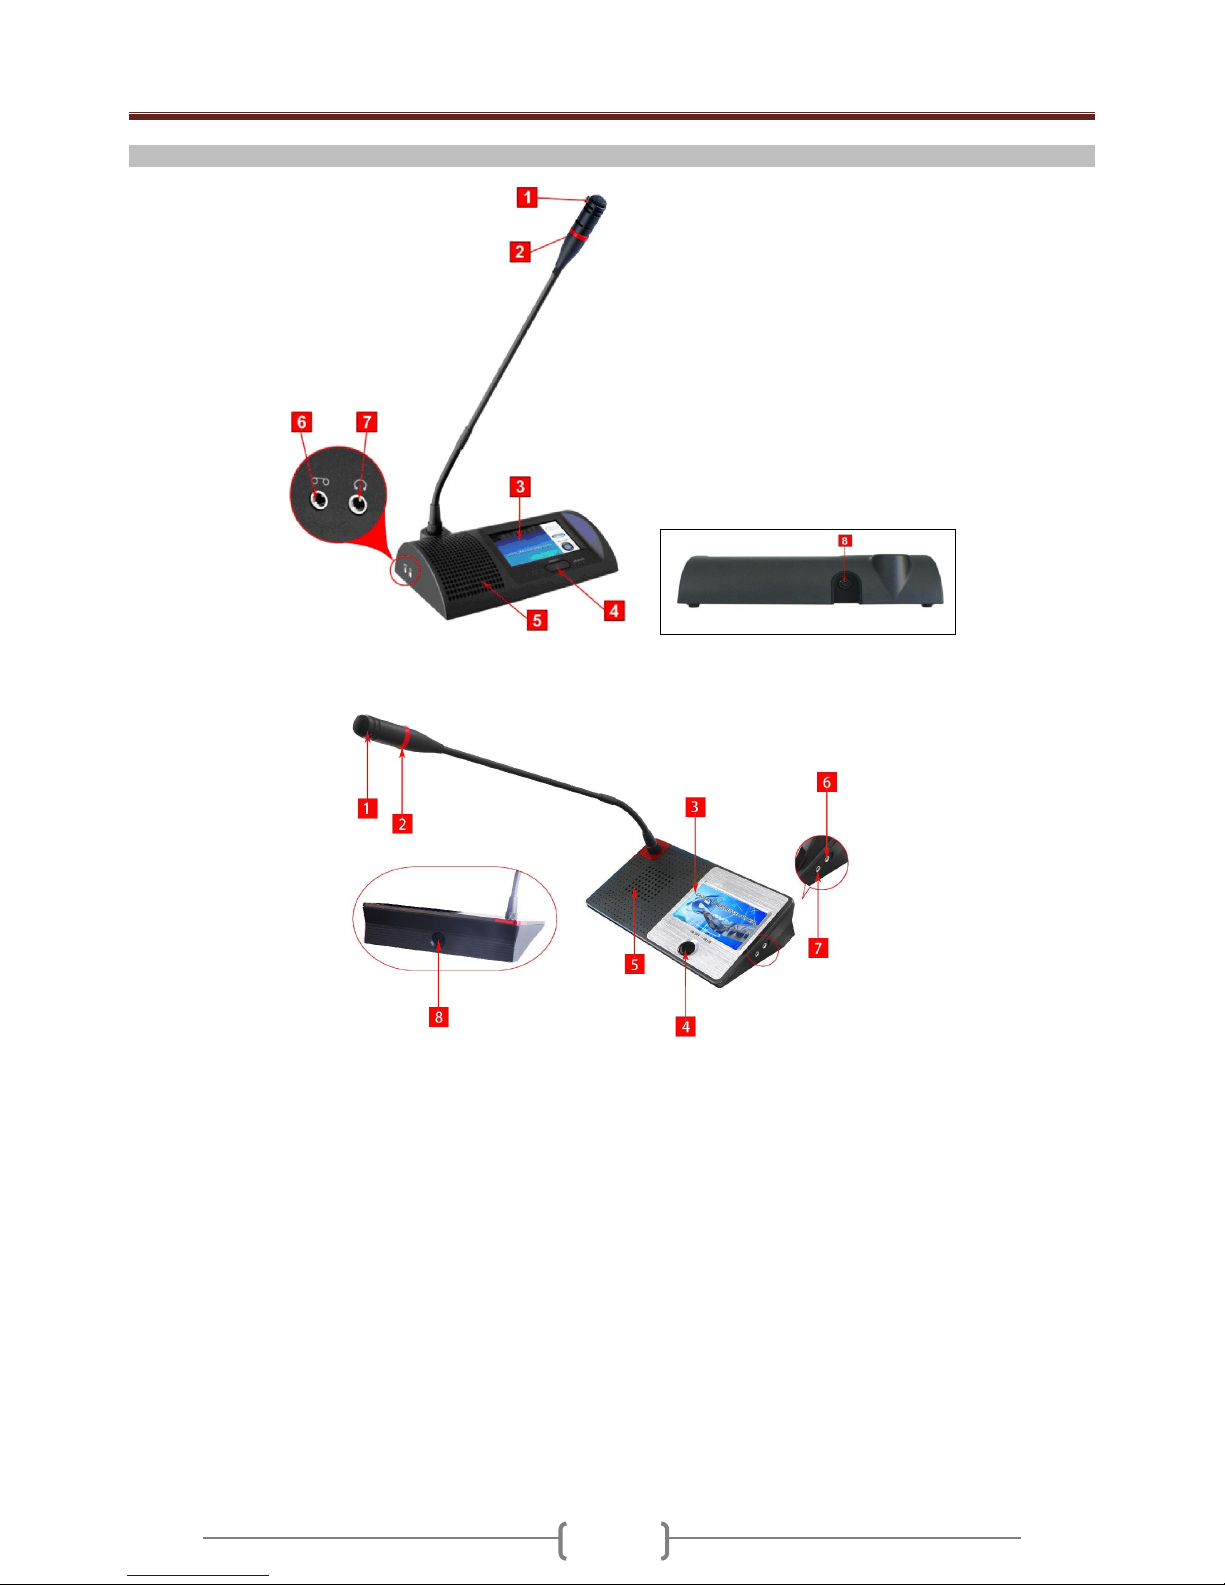
1. CARTRIDGE
The cartridge is the part of mic where you must to talk. Don’t speak too near from cartridge otherwise the sound will be saturate
2. LIGHT
This light is on when the mic is on and off when the mic is off.
3. TOUCHSCREEN LCD
This touchscreen can display video from devices connected on main unit. It’s used also to enter in all the menu (Microphone speaker
volume, LCD contrast, video…).
4. ON/OFF BUTTON
This button is used to switch the mic on or off.
5. BUILT-IN SPEAKER
All the mic are composed of a built-in speaker. You can adjust the volume of this speaker directly on the s ystem setup menu
6. HEADPHONE CONNECTOR
This socket is used to connect a headphone. When you connect a headphone, the built-in speaker will off automatically.
7. REC OUTPUT
This socket is used to record the conference.
8. MAIN UNIT CONNECTOR
Connect this socket directly on the main unit or on the connection box
H-6800 Conference set User manual
7
C) CONNECTION
- Video devices can be : camera output, DVD player, Blueray outpur, MP4 player output or computer(video output)
- Sound devices can be : CD player, MP3 player, Tape player, computer ( sound output ) or a mixer
- Record devices can be : Mp3 recorder, Tape recorder, a computer sound input,...
- Sound system can be : Power amplifier / Mixer.
The main unit can control up to 50 mic. If you want to control more than 50 mic, you must to use extension power supply
( in option ).
Important :
You cannot display on mic the video from camera. If you want to display , please connect Video output (RCA) to DVD1 or DVD2 (RCA).
If you want display the camera video both on Vid eo screen and mic LCD, please use video distributor (video input) connect to Video output
(RCA), then connect vieo distributor (video out) to main unit DVD 1 or DVD2 (RCA )input and extral Video screen( such as projector, TV)
H-6800 Conference set User manual
8
D) OPERATING
When all the system is full connected, the operating is very simple.
Delegate mic :
Chairman Mic :
Note :
In limit/Fifo mode, only some mic can be on in same time
This number is setup in main unit ( in conference mode menu ) ( between 1 to 9 mic in same time ) or by software. If the max number of active
mic is reached, system cannot switch on the mic until another mic will be off .
.
..
To talk, push the ON/OFF button (A). When the mic is on, the light on goosneck mic is on
( red light )
Push another time the ON/OFF button (A) to switch off the mic.
Touch the LCD enter in the menu of delegate mic. You can setup vol ume, contrast of LCD
and video..
The chairman mic have the same operaing as delegate mic but the chairman mic have the
priority button (B). When you push the priority button (B), you switch off all the delegate mic.
All the delegate mic stay off until the priority function of chairman will be on.
Please note: if chairman mic has only one on/off button and does not have priority button
please hold the button 2 secs,to achieve priority function
H-6800 Conference set User manual
9
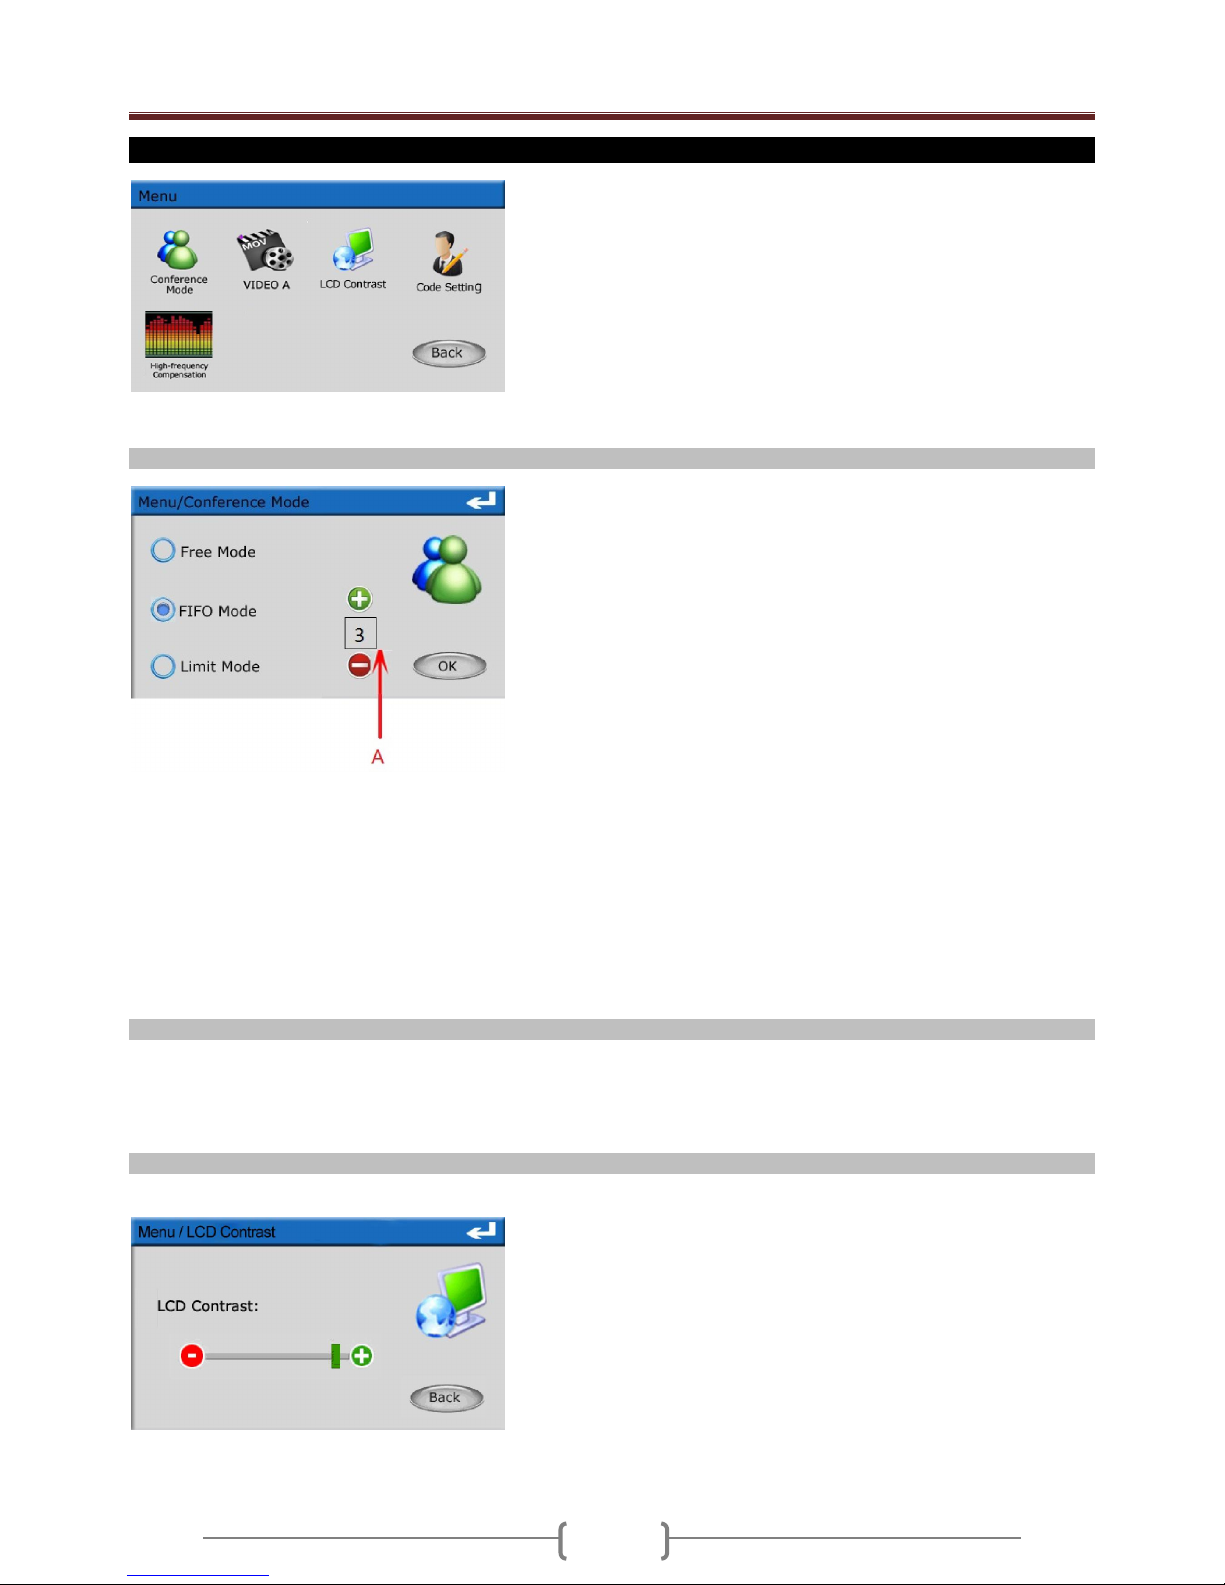
E) MAIN UNIT MENU ( )
a) Conference mode
- FIFO mode :
In this mode, you can adjust the max number of simultaneous delegates between 1 to 9.
Push on the A part to select the number of active delegate mic ( 1 to 9 mic ). For example, if you setup 2, only 2 delegates mic
(plus the chairman mic) c an be active in same ti me.
When the number 1 is setup:
o Push the on/off button; you switch off directly the mic of the precedent delegate.
When the setup number is 2 to 9 :
o Push the on/off button of the mic
o If no delegate mic is active, you can talk directly.
o If the setup delegate number is reached, the mic of the first active delegate mic is switch off and your mic switch on.
o If another delegate push the on/off button, the second active mic delegate is switched off and the mic of the new delegate is
switched on.
This limit is not available for chairman mic
b) Video
Note: a.The main unit LCD will display video if there has video input the system (DVD1, DVD2 ) , touch the LCD to enter the main menu.
b. Please select the video input by VIDEO A & VIDEO B
c. The main unit LCD will display the standby picture if there has no video input t he system, touch the LCD to enter the main menu and
select the video input.
c) LCD Contrast
You have the choice between 3 modes :
- Free mode :
There is no limit in the number of active mic. All the mic can be on
in same time
- Limit mode :
In this mode, only some delegate mic can be on in same time.
Push on the A part to select the number of active delegate mic ( 1
to 9 mic ). For example, if you setup 3, only 3 delegates mic
(plus the chairman mic) c an be active in same ti me.
This limit is not available for chairman mic
The main unit control some the functions of the system : conference mode
setup, setup code, high-frequency compensation, system video input and
main unit LCD contrast.
.
You can adjust the contrast of the touch screen.
Push + and – buttons to adjust then push Back b utton if you want to leave menu
without save the setup
H-6800 Conference set User manual
10
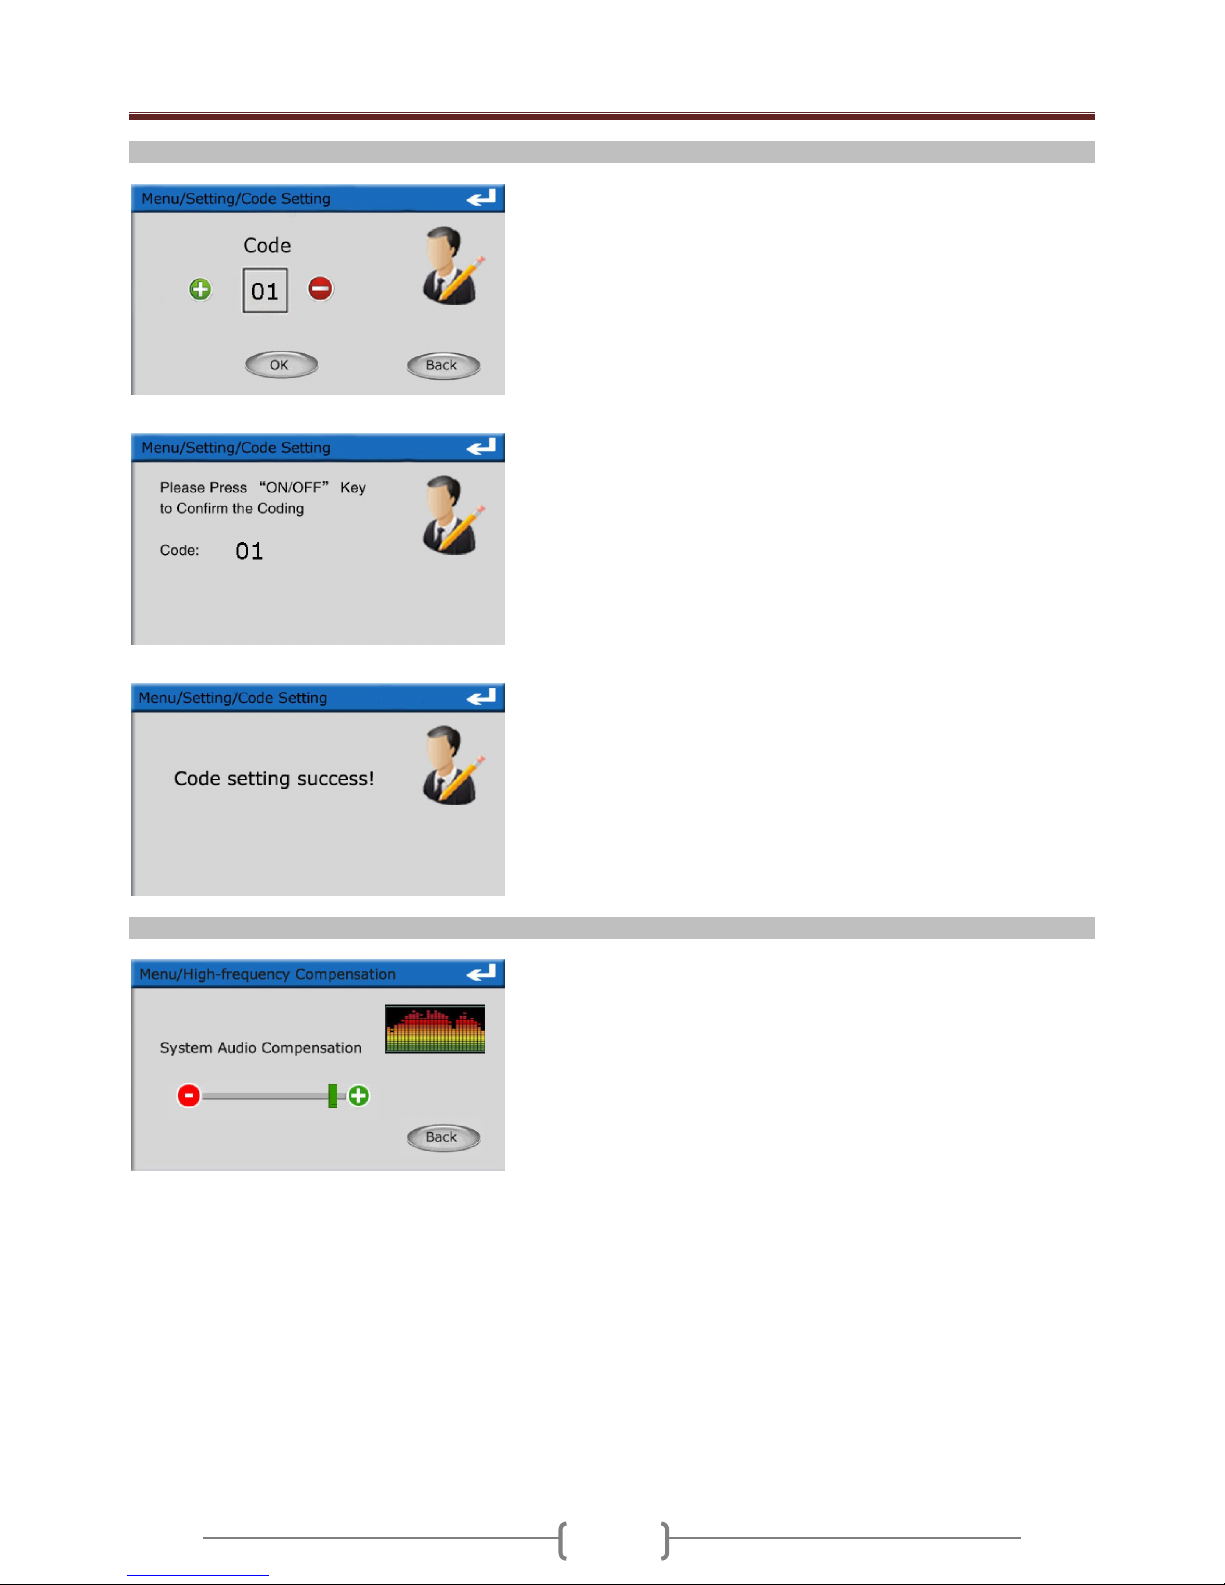
d) Code Setting
Main unit diplay
Mic display
e) High-frequency Compensation
Each mic has a number ID which is affected (very important to setup the autotrack function (this function will be explained later).
Main unit:
- The main unit starts the setup of the mic code by selecting the number. For
that, use the buttons + and - touch screen.
- Once the selected number, press on button OK, usually system setup the
code from 1
- In general, you assign number 1 to the chairman mic.
- The following codes are transmitted to all the delegate mic.
- When all the mic ID are affected, press on the button Back for exit of the menu
.
Microphone:
- This message is displayed on all the microphone touch screen. Press the
on/off button of the corresponding mic to the affected the number.
- The other mic are always this message posted but with an incr emented
number of a unit. Press then on button on/off of the mic concerned and so on
until all the mic are assigned to a number.
- All mic LED will start flash during setup code, the LCD will off after setup code.
- Please restart the system to save the system code setup of mic
You can adjust the treble of the system audio output.
Push + and – buttons to adjust then push Back b utton if you want to leave menu
without save the setup
 Loading...