

Page 1
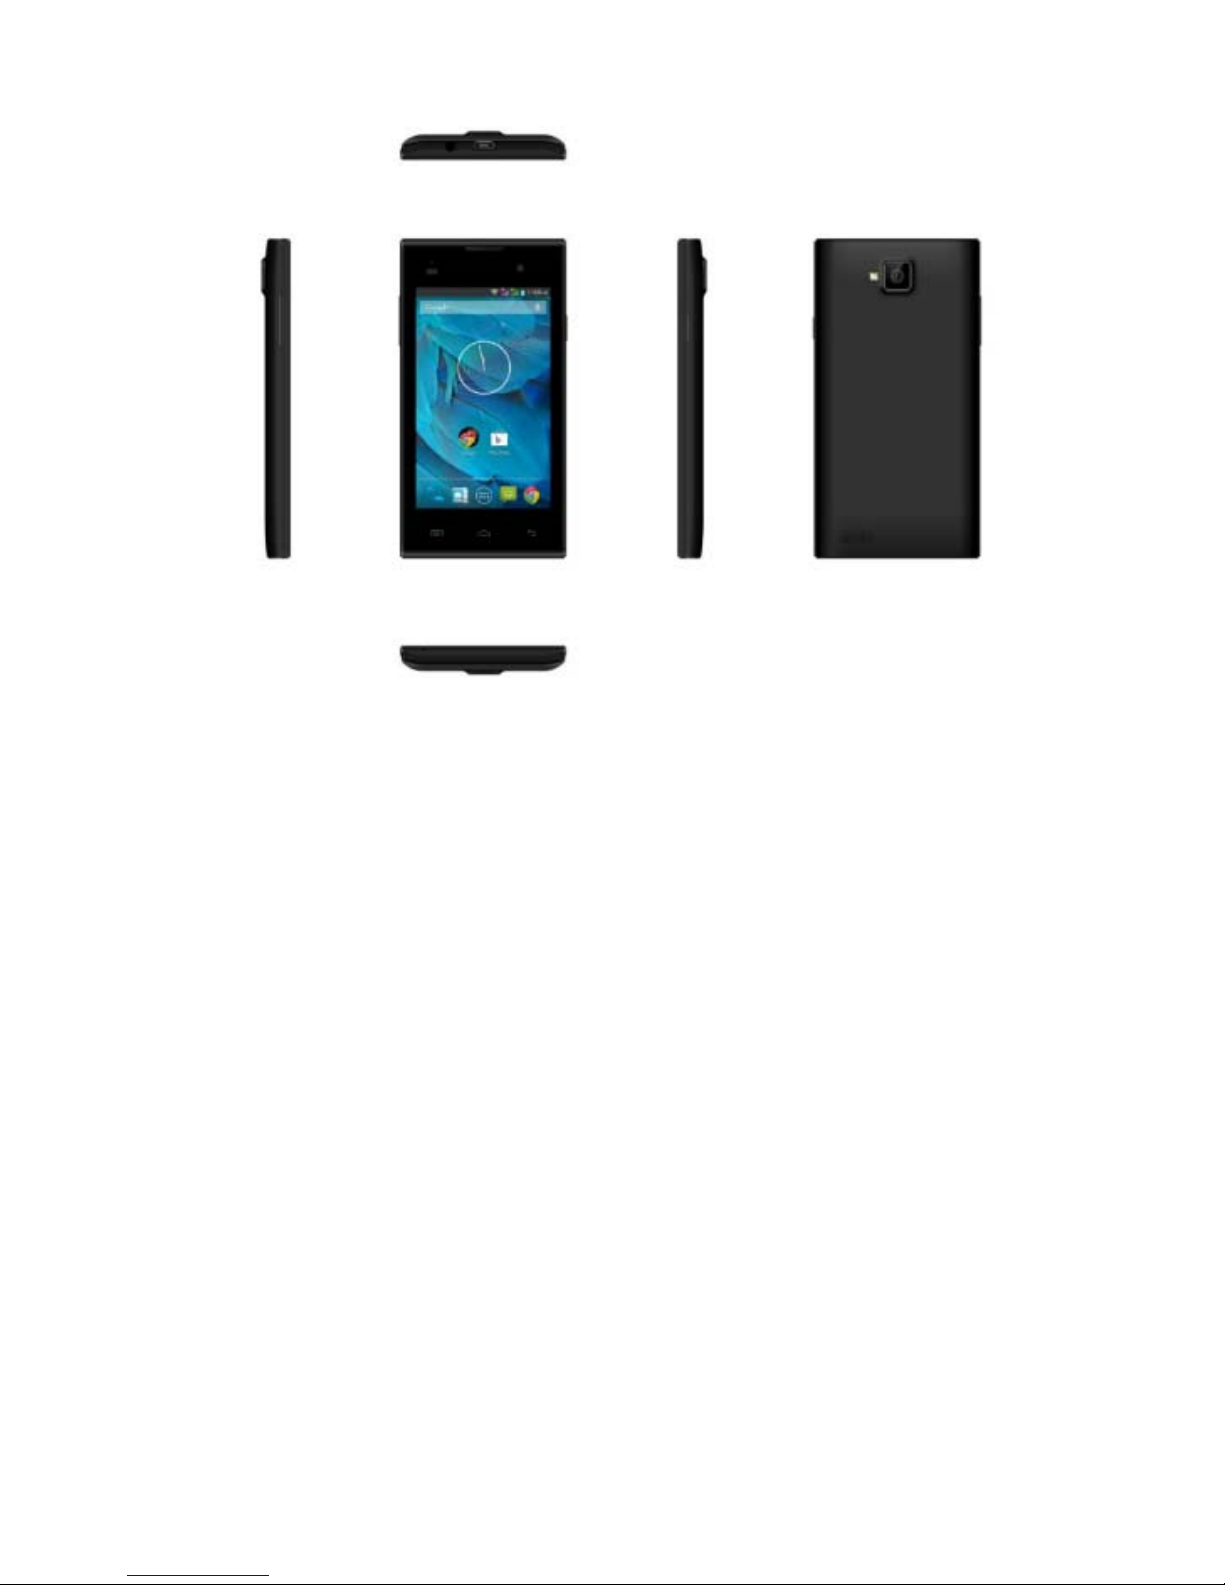
USER MANUAL
L8
Page 2

Table of Contents
1. Welcome
1.1 Exciting Features………………………………………………….3
1.2 Technical Specification…………………………………………3
General……………………………………………………………3
Screen……………………………………………………………..3
Hardware…………………………………………………………3
Communication……………………………………………….4
2. Phone layout…………………………………………………………………….4
2.1 Keys and components………………………………………….4
2.2 Icons and Indicators……………………………………………..5
3. Getting started………………………………………………………………….5
3.1 Insert SIM card……………………………………………………..5
3.2 Insert Memory card………………………………………………5
3.3 Unlock the phone………………………………………………….6
3.4 Touch Screen usage………………………………………………6
3.5 The phone buttons usage……………………………………..7
3.6 Context Menus……………………………………………………..8
3.7 Options menus……………………………………………………8
3.8 Menu Icons…………………………………………………………8
3.9 Charge the battery………………………………………………9
4. Making or receiving calls…………………………………………………9
4.1 Make a Call…………………………………………………………9
4.2 Disable Phone Calls (Airplane mode)………………….9
4.3 Disable SIM card…………………………………………………10
5. The Home Screen……………………………………………………………10
5.1 Open and Close the Launcher…………………….……….10
5.2 Switch to Recently Application……………………………11
5.3 Customize Home Screen…………………………………….12
6. Connect to the Internet…………………………………………………...13
6.1 Configure the Internet:………………………………………..13
6.2 Access Internet via Wi-Fi……………………………………..14
7. Managing Notifications………………………………………………....14
7.1 Open the Notifications Panel…………………………….
14
7.2
Respond to Notifications…………………………………..15
7.3 Close Notifications Panel…………………………………..15
8. Messaging……………………………………………………………………..15
8.1 Message environment & Settings……………………..15
8.2 Using the Soft Keyboard……………………………………16
8.3 Multimedia Message…………………………………………17
8.4 More options of message:…………………………………17
8.5 Lock a Message…………………………………………………17
9. Multimedia…………………………………………………………………….18
9.1 Camera………………………………………………………………18
9.2 Gallery……………………………………………………………….19
9.3 Share an Album…………………………………………………19
9.4 Music…………………………………………………………………19
9.5 FM Radio……………………………………………………………19
9.6 Record audio……………………………………………………...20
9.7 Take screenshot………………………………………………….20
10. Connections………………………………………………………………….21
10.1 Connect to PC…………………………………………………..21
10.2 Connect to Internet……………………………………….....21
10.3 Connect to Wi-Fi Networks………………………………21
10.4 Pair with Bluetooth Devices………………………………22
10.5 Make an access point……………………………………….22
10.6 Install Secure Certificate from SD Card…………….23
11. Download Applications…………………………………………………24
12. Phone Settings……………………………………………………………...24
13. Health and Safety Information………………………………………26
Page 3

1.Welcome
1.1 Exciting Features
Congratulations on becoming a proud owner of the
L8 Android mobil
ephone. You have now joined the
millions of satisfied customers spread across
theGlobe. Your device offers you these exciting
features and much more:
Android 4.4.2OS
Google Play Market (Play Store)
4GB Built-in memory, 512B free available for user
4 inch Screen
Cameras (front and back)
1.2 GHz Processor
External Memory (Expandable to 32 GB)
Dual SIM
Multimedia player
GPS
Gravity sensor
Light sensor
Wi-Fi
Bluetooth
1.2 Technical Specification
General
Android 4.4.2
Dimensions: 123.3 x 66.8 x 10.2mm / Weight: About
140g (with battery)
3.7V/1500mAh Li-ion Battery
Screen
4" Capacitive touch screen
WVGA (800X480) IN
Hardware
1.2GHz Processor
Page 4
4GB
built-in memory, 1GB free available for user
External SD-card slot up to 32GB
5.0MPx Back Camera + 0.3MPx Front Camera
White LED flash
Gravity Sensor
Light sensor
Communication
DUAL SIM: Sim1 (WCDMA): 3G / SIM2 (GSM): 2G
Support GPRS
networks,
GSM850/900/1800/1900MHz / WCDMA 850/1700/1900MHz
Support GPS and AGPS (Subject of the installation
of the relevant software)
Bluetooth 4.0
Wi-Fi 802.11 b/g/n
3.5mm Jack Plug
Micro-USB 2.0 receiver
2.Phone layout
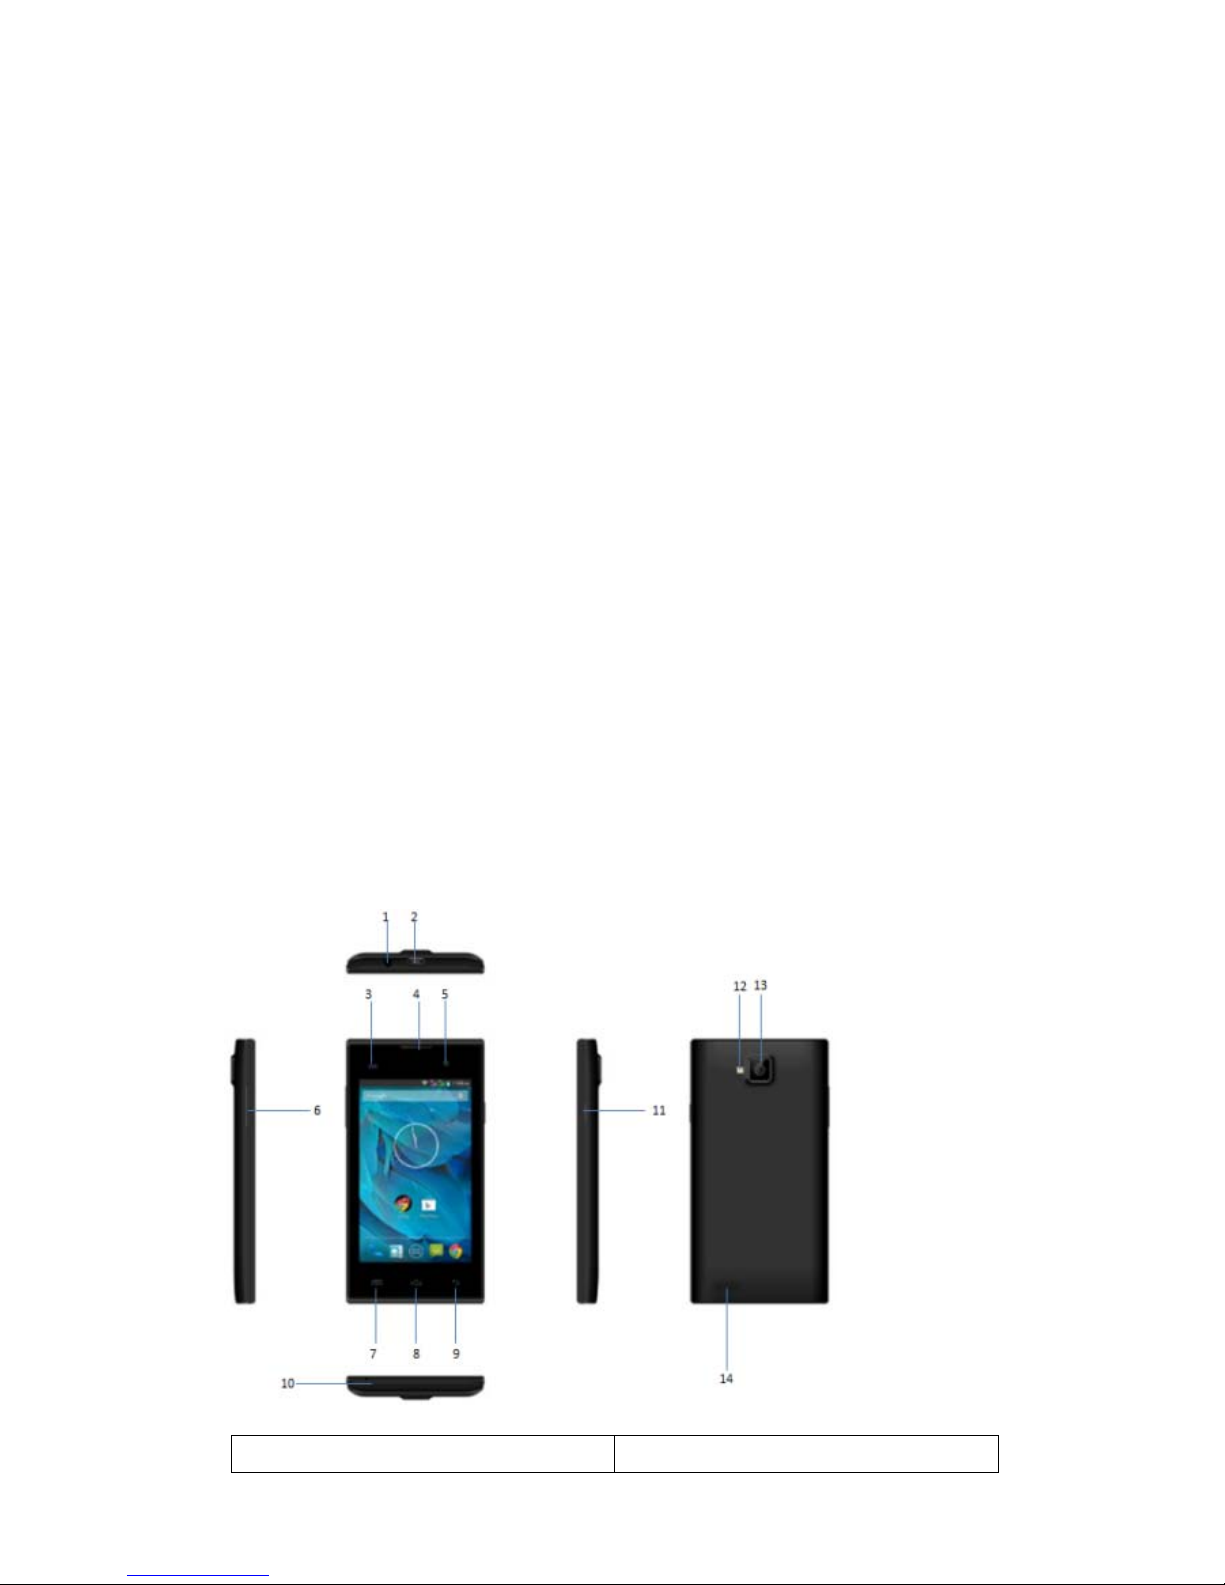
2.1 Keys and components
1
Earphone socket 8 Home key
Page 5
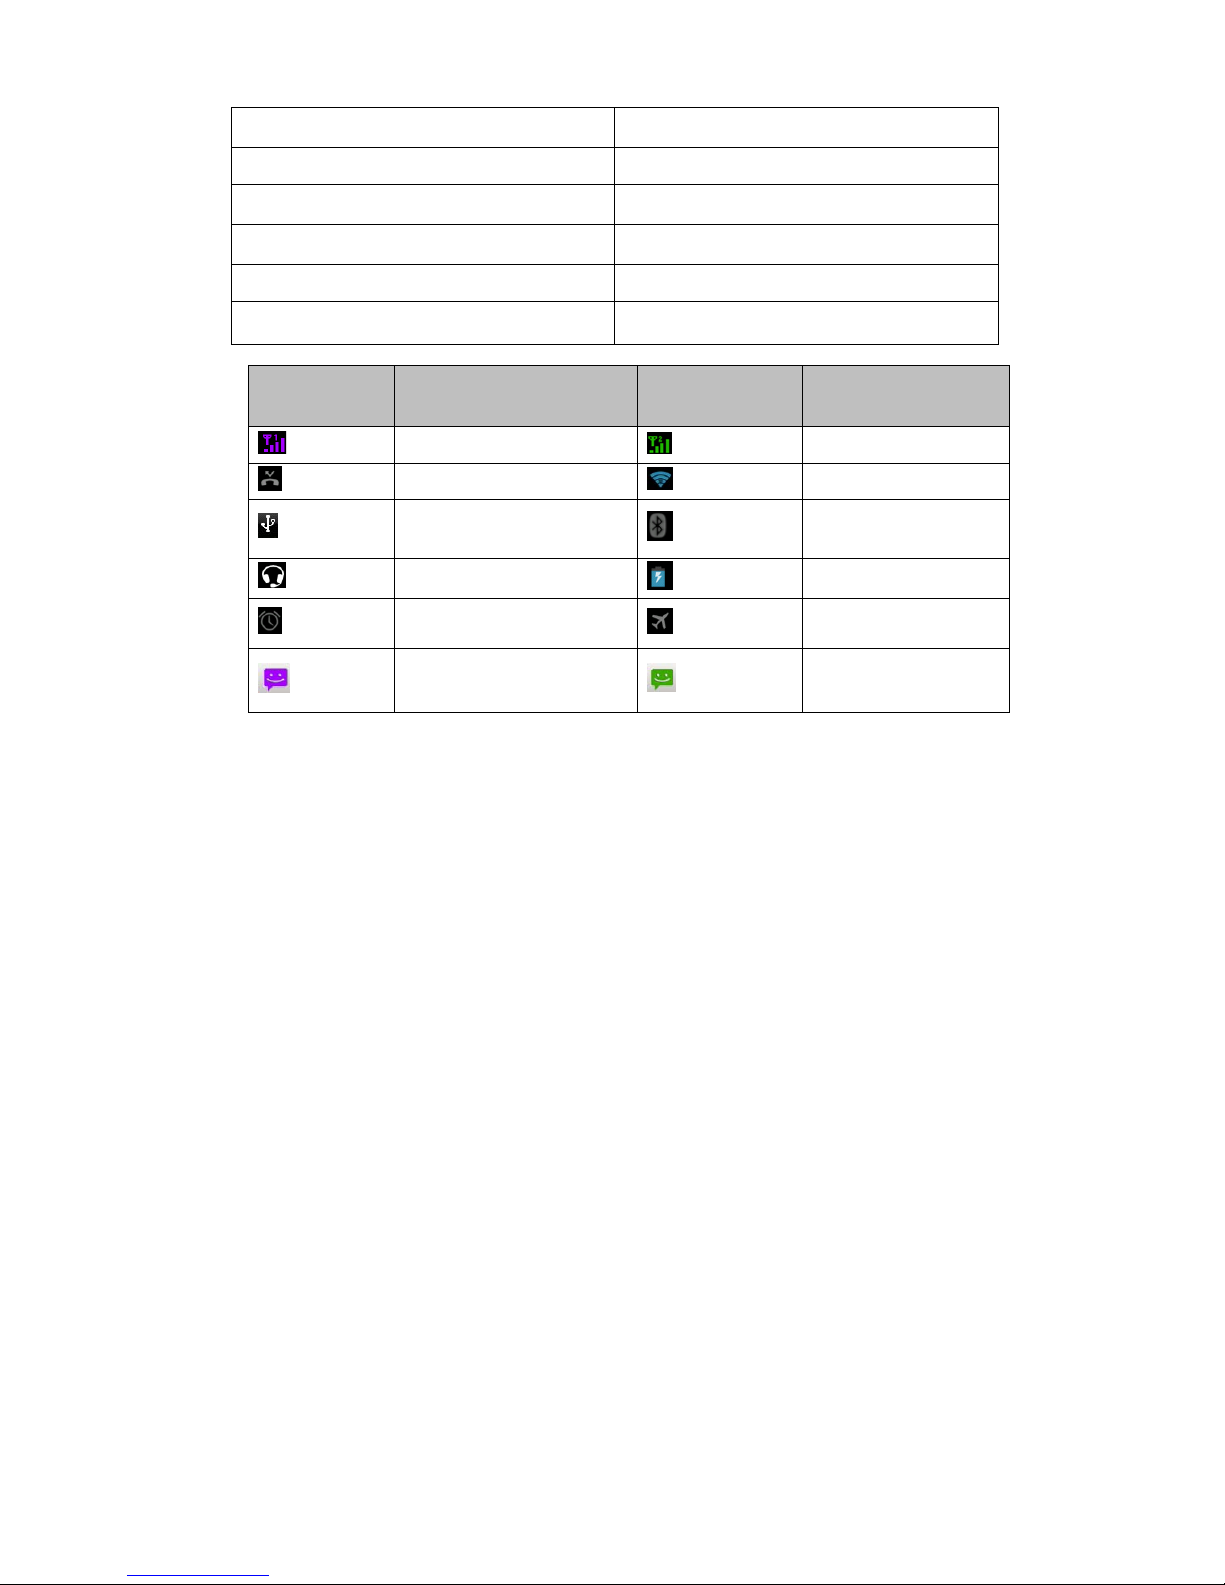
2 USB slot9 Return key 9 Return key
3 G/P/L sensor 10 MIC
4 Receiver 11 Power key
5 Front camera 12 Flash light
6Volume key 13 Back camera
7 Menu Key 14 Speaker
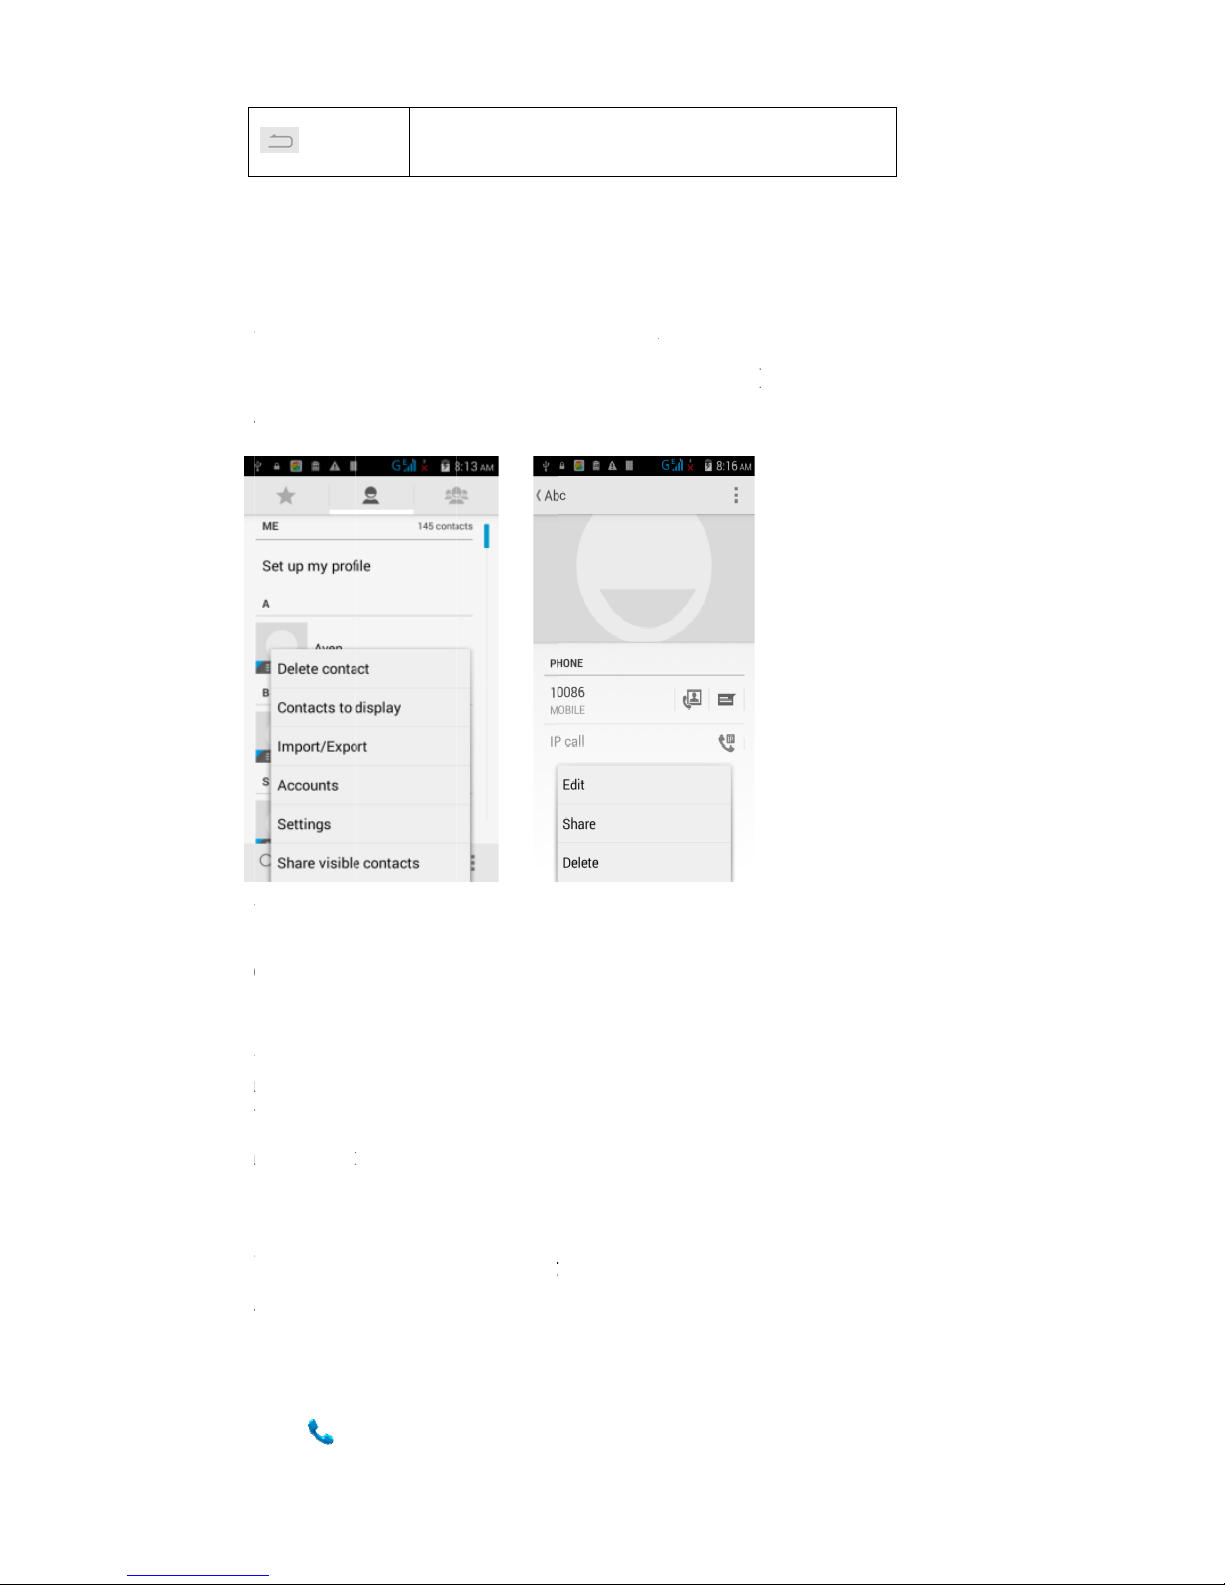
2.2 Icons and Indicators
Icons
Indicators
Icons
Indicators
Signal strength indicator
from SIM1
Signal strength indicator
from SIM2
New missed calls
Wi-Fi is activated
USB is connected
Bluetooth is on
The headphone is being used
Battery charging symbol
Alarm has been set
Airplane mode is
activated
New message from SIM 1
New message from SIM
2
3. Getting started
3.1 Insert SIM card
The FRV410 is a Dual SIM mobile phone allowing you
to use the facility of two networks. To insert SIM
card(s):
Switch off the mobile phone and remove the rear
cover and battery.
Insert the SIM card correctly in the card slot(s)
WCDMA slot is for 3G network; GSM is for 2G.
Insert SIM card carefully.
Finally insert the battery and replace the rear
cover of the mobile phone.
3.2 Insert Memory card
The FRV410 allows you to expand internal memory with
a micro SD card up to 32GB):
Power off the mobile phone, and then remove the rear
cover and battery.
Insert the memory card into the slot.
Page 6

Finally insert the battery and the rear cover of
the mobile phone.
Use only compatible memory cards approved by with
this device.
Incompatible memory cards may damage the card or the
device and corrupt the data stored in the card.
3.3 Unlock the phone
You may need to provide PIN, Password, or draw a
pattern to unlock your sample.
To unlock the screen:
Press the power key to wake up the phone.
Hold and drag the unlock icon to the right to unlock
You may be required to unlock your phone based on the
unlock method in settings.
To set the unlock method:
On main menu, touch Settings > Security.
Touch set up screen lock.
Choose the type of locking as desired. You can set
your screen lock on the basis of pattern, PIN,
Password or none.
3.4 Touch Screen usage
You can use the touch screen in the following ways:
Page 7

Touch: Acts on items on the screen, such as
application and settings icons, to type letters and
symbols using the onscreen keyboard, or to press on
screen buttons.
Touch and hold: Touch and hold an item on the screen
until any pop-up or action come out.
Drag: Touch and hold an item and move your finger
on the screen until you reach the target position.
Swipe or slide: Quickly slide your finger across
the surface of the screen,(without dragging an
item). For example, slide the screen up or down to
scroll a list,
Double-tap: Tap quickly twice on a webpage, map,
or other screen to zoom. For example, double-tap a
section of a webpage in Browser to zoom that section
and fit the width of the screen. You can also
double-tap to control the zoom, in Maps, and in other
applications.
Pinch: In some applications (Such as Maps, Browser,
and Gallery) you can zoom in and out by placing two
fingers on the screen at once and pinching them
together (to zoom out) or spreading them apart (to
zoom in).
Rotate the screen: On most screens, the orientation
of the screen changes as you rotate it. You can turn
this feature on and off.
3.5 The phone buttons usage
The phone buttons offer lots of functions and
shortcuts.
Button Press
M
enu: opens context menu w
ith furth
er options and
actions, content depends directly on
applications.
Home: returns to Home screen. Hold it to access the
list of last used applications.
Page 8
Th
emen3.6
Ysa
E
3
Ooh
mWm
3
Y
a
phone
us for
Contex
t
ou can
o
creens
h
pplicat
xamples
.7Optio
ptions
m
n the s
c
olding
a
enus.
hen you
enu ope
n
.8Menu
ou have
ccess i
Bac
k
wor
k
appl
provid
e
access
i
Menus
pen con
ave con
ion tha
t
of con
t
ns menu
enus co
n
reen.
Y
n item
o
touch a
n
s.
Icons
the f
o
ts impo
r
Opens
t
: returns
ing in, e
ication. C
a
s you
w
ng the
text me
n
text me
n
has no
ext me
n
s
tain t
o
ou can
n the s
c
d hold s
llowin
g
tant f
e
he dialer
to the pre
ven if it
n be used
t
ith Co
n
feature
u by to
u
us. If
y
contex
t
u from
ols tha
t
open a
n
reen. N
o
ome ite
m
menu
i
atures:
vious scre
e
was in
a
o hide the
text m
e
s in an
u
ching
M
ou touc
h
menu,
Contac
t
apply
t
option
t all i
t
s on a s
c
cons t
o
n you wer
e
differen
t
keyboard.
nus an
d
intuit
i
enu k e
y
h
Menu k
nothing
s envir
o speci
by tou
c
ems hav
reen,
a
easil
y
Optio
n
ve way.
. Not a
l
ey insi
d
happen
s
onment:
fic ite
m
hing a
n
e optio
n
n Optio
n
let y
o
s
l
e
.
s
d
s
s
u
Page 9

3.
9ChaAttshaacc
4.
MYoucon
4
4
W
o
o
Charg
e
rge th
e
ention
:
ll be i
essibl
e
aking
o
can d
tacts.
.1Make
Tap the
the des
Touch t
h
a call
f
To dial
key to
e
interna
t
number
Touch
o
Press t
h
You can
screen.
While d
u
.2Disab
e may b
e
f our ta
r
n airpl
a
Press a
n
Opens
m
Opens
t
Opens
t
Opens
t
the b
a
batte
r
For
p
nstalle
.
r rece
i
ial a
p
You can
a Call
icon
ired nu
m
e ic
o
rom ca
l
an int
e
nter t
h
ional
c
r ic
e Volum
e
get t
o
ring a
le Phon
e
requi
r
r
gets,
i
nes or
i
d hold
essaging
he main m
e
he contac
t
he browse
r
ttery
y with
luggabl
d near
t
ving c
a
hone n
u
also m
a
on mai
n
ber.
n on ma
i
l log,
rnation
e Plus
ountry
on to c
a
Up/Do
w
Call
L
call,
t
Calls
ed to
t
ncludi
n
n hospi
the Po
w
nu
s list
AC char
e equi
p
he equi
lls
mber o
r
ke from
menu o
r
n menu
o
contac
t
al numb
e
(+) sy
m
prefix,
ll wit
h
n keys t
ogs, C
o
ouch t
h
(Airpl
a
urn of
f
g calli
n
tals. S
o
er but
t
ger and
ment,
t
pment a
n
touch
the cal
t h e h o
m
r the h
o
, grou
p
r, tou
c
bol, an
follo
w
SIM 1
o adjus
t
ntacts
e ico
n
ne mod
e
the ne
t
g, Wi-F
i
we can
on.
USB ca
b
he soc
d shal
l
a numb
e
l log o
r
e scre
e
me scre
e
s or fa
h and h
d then
e
ed by
t
or SIM
the cal
from t
h
to en
d
)
work c
o
, Bluet
do as f
o
le.
ket-out
be eas
r in y
o
contac
t
n to di
a
n to ma
k
vorites
.
old the
nter t
h
he pho
n
2.
l volum
e
e dial
e
a cal
l
nnecti
o
ooth et
c
llowin
g
let
ily
ur
s.
l
e
0
e
e
.
r
.
n
.
:
Page 10
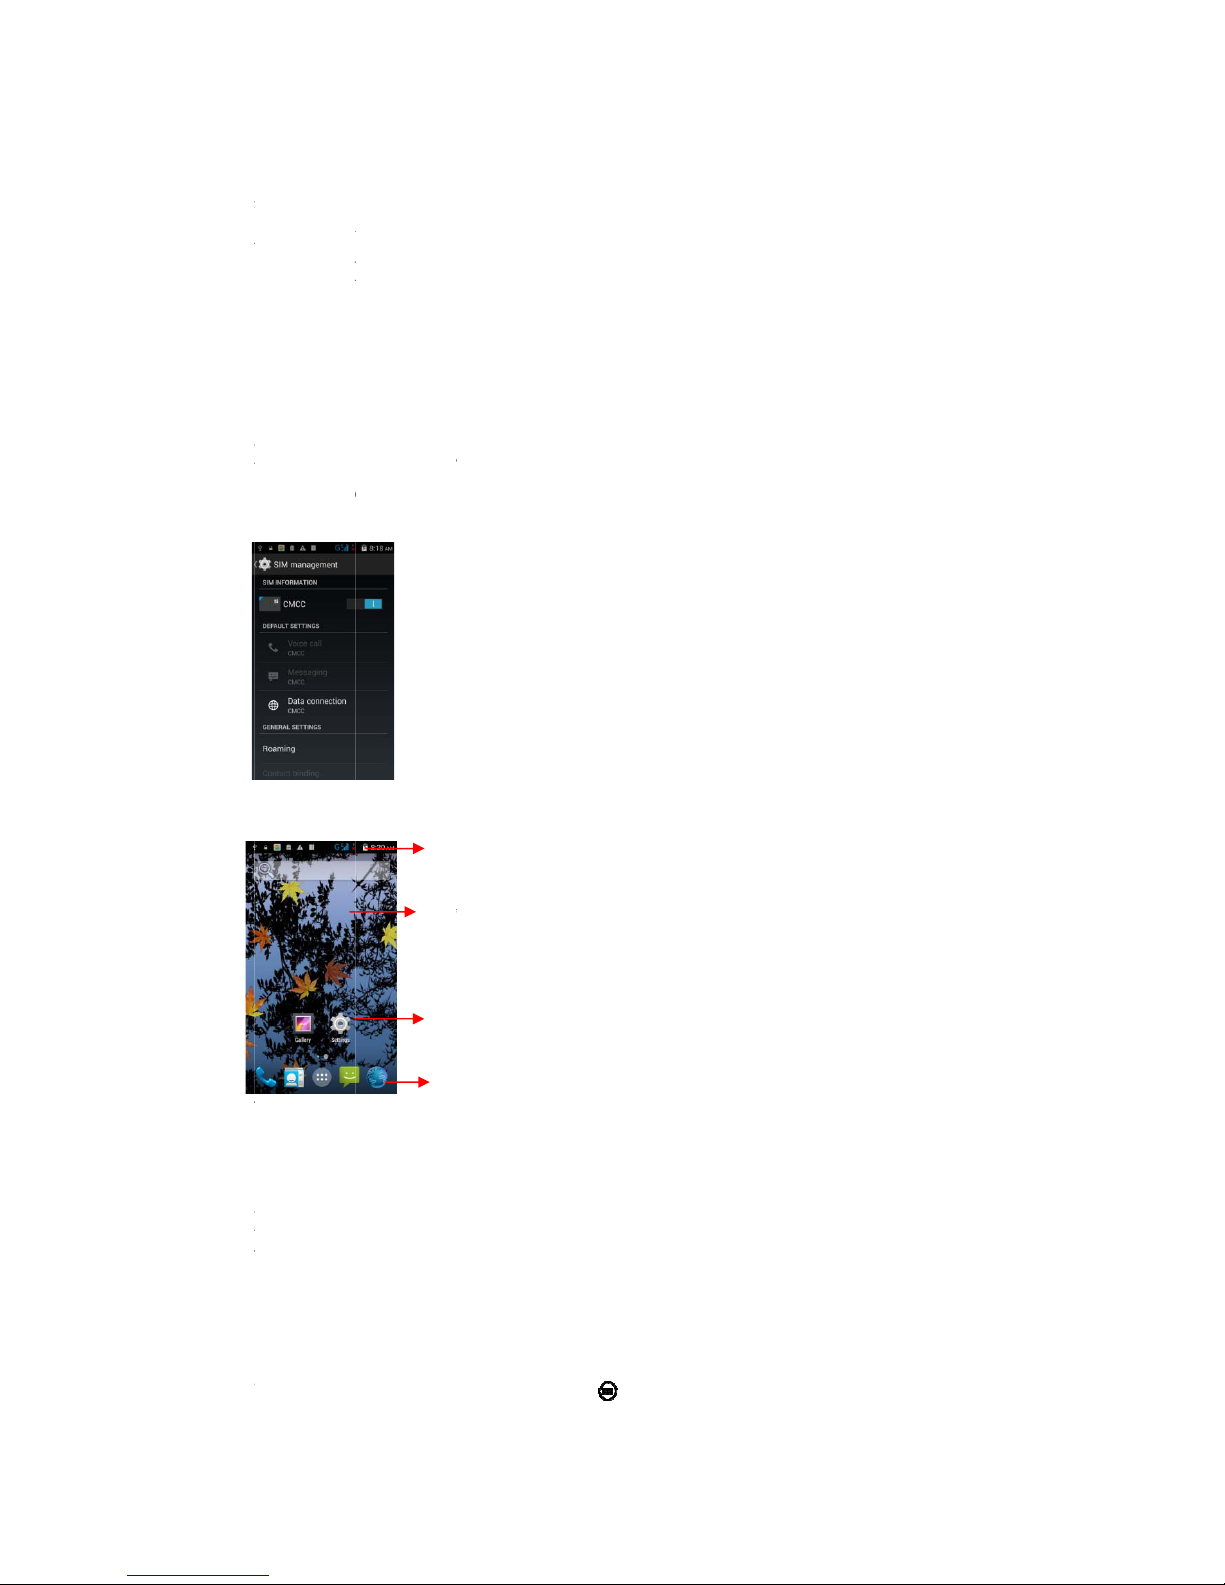
4
A
o
S
>
H
s
5.
W
H
f
b
5.
1
T
Touch t
h
.3 Disa
s we ha
v
ne of t
h
ettings
SIM car
ere you
howing
o
The Ho
m
hen you
ome scr
eatures
ottom o
f
Open
a
ouch t
h
e Airp
l
ble SIM
e duel
S
em or
b
d manag
e
can en
a
n the
p
e Scre
e
sign i
n
een is
on you
r
the sc
r
nd Clo
s
e Laun
c
Touch
chang
e
Swipe
screen.
The sta
t
strengt
h
notifica
t
Touc
h
corre
s
icons
scree
n
Touc
h
icon
o
ane mo
d
card
IM card,
oth. T
h
ment
ble or
icture
be
n
, the
h
your st
a
phone.
een to
v
e the
L
her Ic
o
and hold an empty s
p
wallpaper.
left / right to change d
e
us bar shows the time, si
, battery status, and
t
ion.
an icon to laun
c
ponding application;
are accessible from all
d
s.
and hold to move or re
m
r a widget.
e.
while
y
en we
c
disabl
e
low.
ome sc
r
rting
p
Touch
t
iew all
aunche
r
n to
ot to
sktop
gnal
h the
bottom
d
esktop
ove an
ou can
c
an go
a
any S
I
een op
e
oint t
o
he main
instal
l
get to
hoose t
s follo
M by t
h
ns.
acces
s
menu ic
ed appl
i
the m
a
o disab
l
wing:
e swit
c
all t
h
on at t
h
cation
s
in men
u
e
h
e
e
.
.
Page 11

Then you would have access to all applications installed
on your device and their widgets when available.
Touch any application to open and launch it.
To add an application shortcut to the main screen: press
and hold it until it vibrating and shifting to home
screen. Place it and release your finger. Slide the
Launcher left or right to view more icons or shortcuts.
New apps should come to the app list as soon as finished
installing.
At right side of applications panel, we can get to
WIDGETS interface as following
Press and hold it until it vibrating and shifting to home
screen. And a context menu opens to configure the widget
or resize it, naturally, it depends on the widget.
Click Home icon or Back icon to close the Launcher.
5.2Switch to Recently Application
Press and hold the icon for a few seconds.
Touch any icon to reactive it or press
return to the
current application.
Page 12

5
YiwApp
Wi
d
In
Wa
lWaldef
.3Custo
m
ou can
tems t
o
allpape
r
licati
o
Press
Touch
t
To add
press
a
home s
c
gets:
Press
Touch
t
Touch
w
main w
i
Move b
e
Drag a
w
vibrat
i
releas
e
If you
figure
lpaper
s
lpaper
ault d
a
m
ize Ho
m
add ap
p
any
p
s.
ns:
to ge
he Lau
n
an app
nd hol
d
reen.
P
to op
e
he Lau
n
idgets
dgets
s
tween
s
idget
t
ng and
your
f
want t
o
before
:
could c
tabase.
e Scre
e
licati
o
art of
t to th
e
cher I
c
licatio
n
it unt
lace i
t
n the
H
cher Ic
on the
creen,
creens:
o a hom
shifti
n
inger.
drop t
h
it pla
c
ome fro
m
n
ns, sh
o
the
m
home
s
on t
o
short
c
il it v
i
and r
e
ome sc
r
on on
top of
we can:
Swipe
e scree
n
g to h
o
e widg
e
ed on
h
image
s
rtcuts,
ain sc
r
creen.
open
t
ut to
t
bratin
g
lease
y
een.
your h
o
creen.
left or
: press
me scr
e
ts. Th
e
ome sc
r
in Gal
l
widge
t
een an
he main
he mai
n
and sh
i
our fin
me scr
e
right
and ho
l
en. Pl
a
n just
l
een.
ery or
s, oth
e
d chan
g
menu.
scree
n
ifting
t
ger.
en.
d it un
t
ce it
a
ose yo
u
the sys
t
r
e
:
o
il
nd
r
em
Page 13

Touch and hold on any free parts on desktop, then the
options list would come as following:
o Gallery: Choose from pictures that you’ve taken with
camera or downloaded to your device.
o Live Wallpaper: Choose from a scrolling list of
animated wallpapers.
o Wallpaper: Choose from thumbnails of default images.
For set wallpaper, touch CROP at the top of the screen
(for Gallery images) or set wallpaper.
Folders: You can very easily manage desktop icons in a
folder on screen to save space.
Touch and hold any icon on desktop screen to move it.
Go on another icon and release to create a folder
containing both icons.
Then add as many icons as folder can hold, name it and
move to wherever you want.
You have all the tools to customize yourFRV410
Smartphone.
6. Connect to the Internet
6.1Configure the Internet:
Get to Settings> Wireless & Networks >More > Mobile
Networks >Tap Data Enabled.
By default, your network provider would send the Access
Point settings via SMS, or integrated automatically with
your SIM card. You may need to apply these settings. Then,
you can choose from the access point list. If the access
point names are not listed by default, please contact your
network provider for further information.
To add any operator Access point Name, go to
settings>More>Mobile networks>Access Point Name.
WARNING: to avoid any over cost , please contact your
operator to get more information about Access Point Name
regarding your subscription.
After you have selected or configured the access point
name, go to Settings> Wireless & Networks >Data usage>Tap
Page 14

Mobile Data to enable Internet connection.
6.2 Access Internet via Wi-Fi
To browse the Internet via Wi-Fi:
Go to Menu> System settings> wireless & networks and then
tap Wi-Fi.
Next, go to Menu> settings> wireless & networks>Wi-Fi
Settings and enable Wi-Fi. Then, select the WIFI connection
listed under Wi-Fi networks. Input password correctly if
necessary and enjoy the internet after seconds of
connecting.
7. Managing Notifications
Notifications inform you about new messages and events.
When you receive a notification appears in the status bar,
along with a summary.
7.1 Open the Notifications Panel
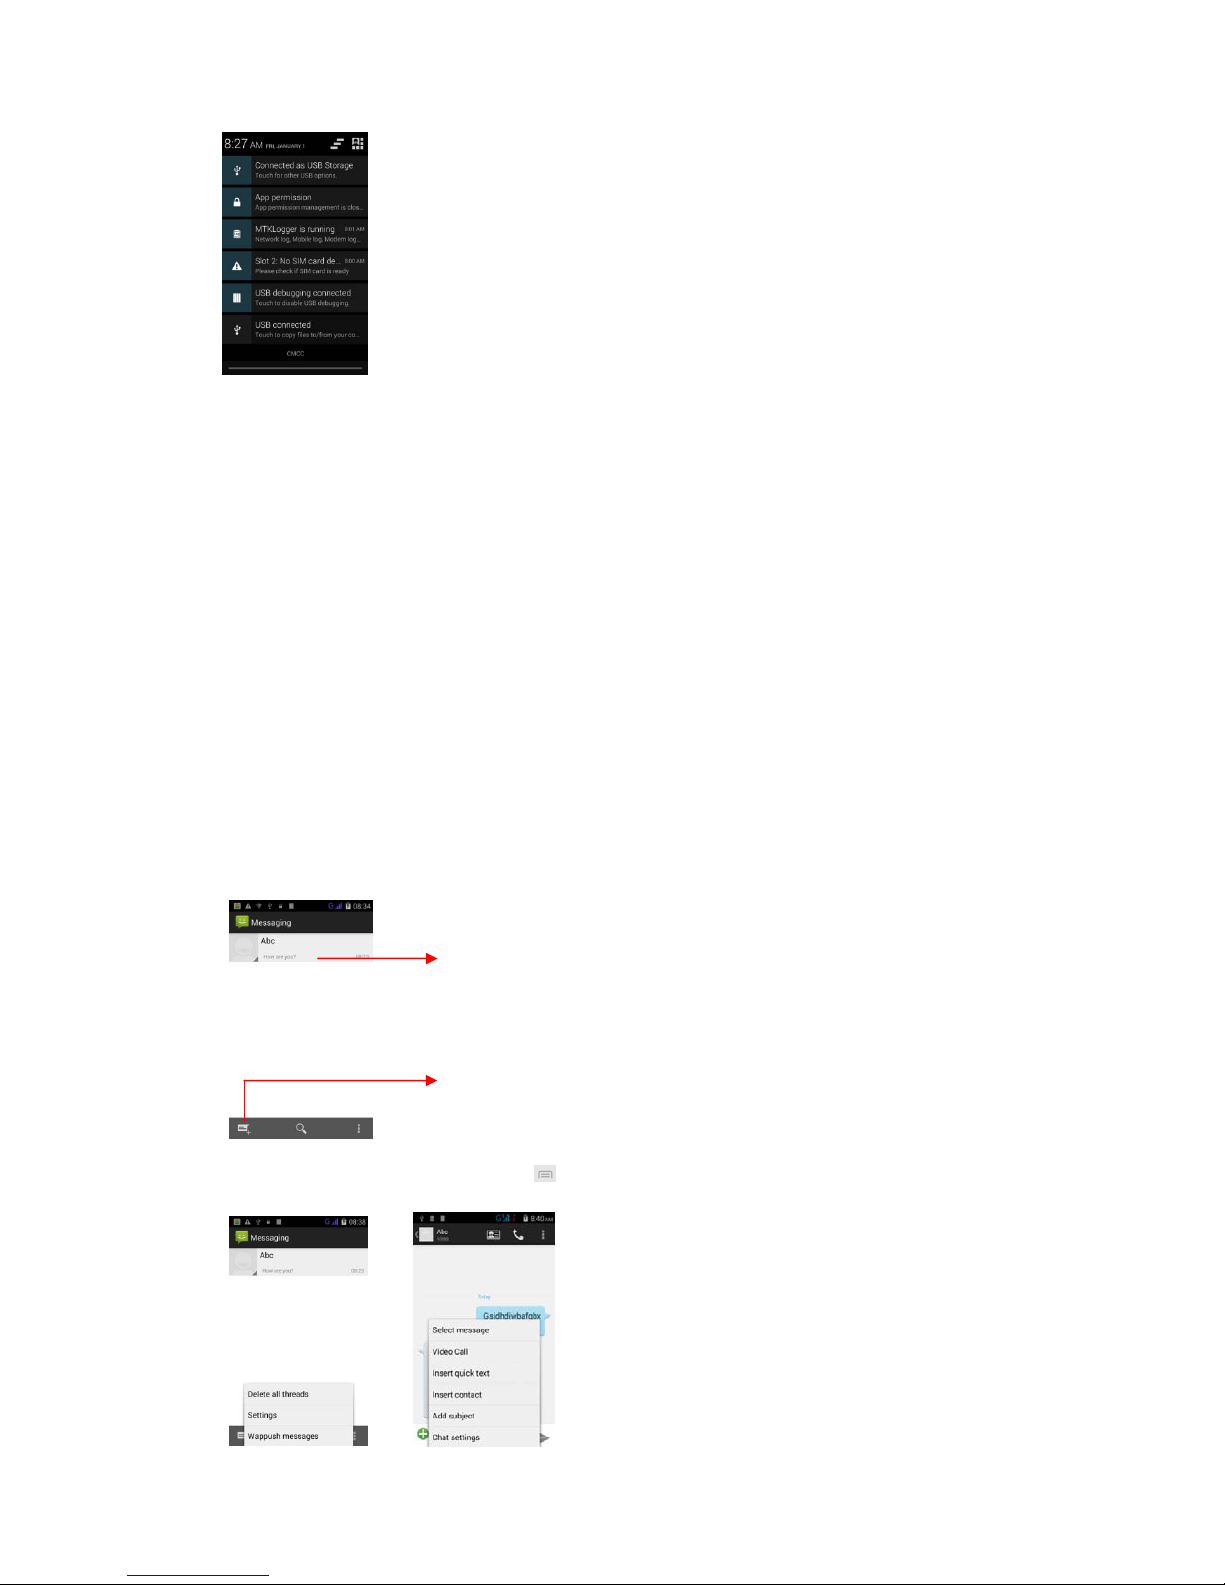
Drag the status bar down from the top of the screen.
The Notifications panel displays your network provider
name and list of your current notifications.
This option allows you to delete yourmessages and event
notifications at the same time.
This option allows you to access to shortcuts for certain
functionalities such as Wifi, Bluetooth, Settings,
Airplane mode, etc. as following:
Page 15
7.2 Respond to Notifications
Open the notification panel and touch a notification to
respond. Then you can follow the events or news itself.
7.3 Close Notifications Panel
Drag the tab of Notifications panel back or just press the
back button. The panel would also close when you touch any
notification to respond.
8. Messaging
8.1 Message environment & Settings
Messaging is designed to communicate with your friends by
text or multimedia messages.
You can also press the key and open the context menu to
Touch to compose a new text or
multimedia message.
Touch to open
a
messaging conversation
Page 16
go
Th
enot
so
th
i
Wkey
Tou ch o
n
thenextl
e
and hold
Caps Loc
Secondar
y
panelsp
numbers
Input
y
o
typing, p
r
thekeyb
o
Tou ch a
n
opename
with m
e
messa
g
ificat
i
on.Exp
l
ngs.
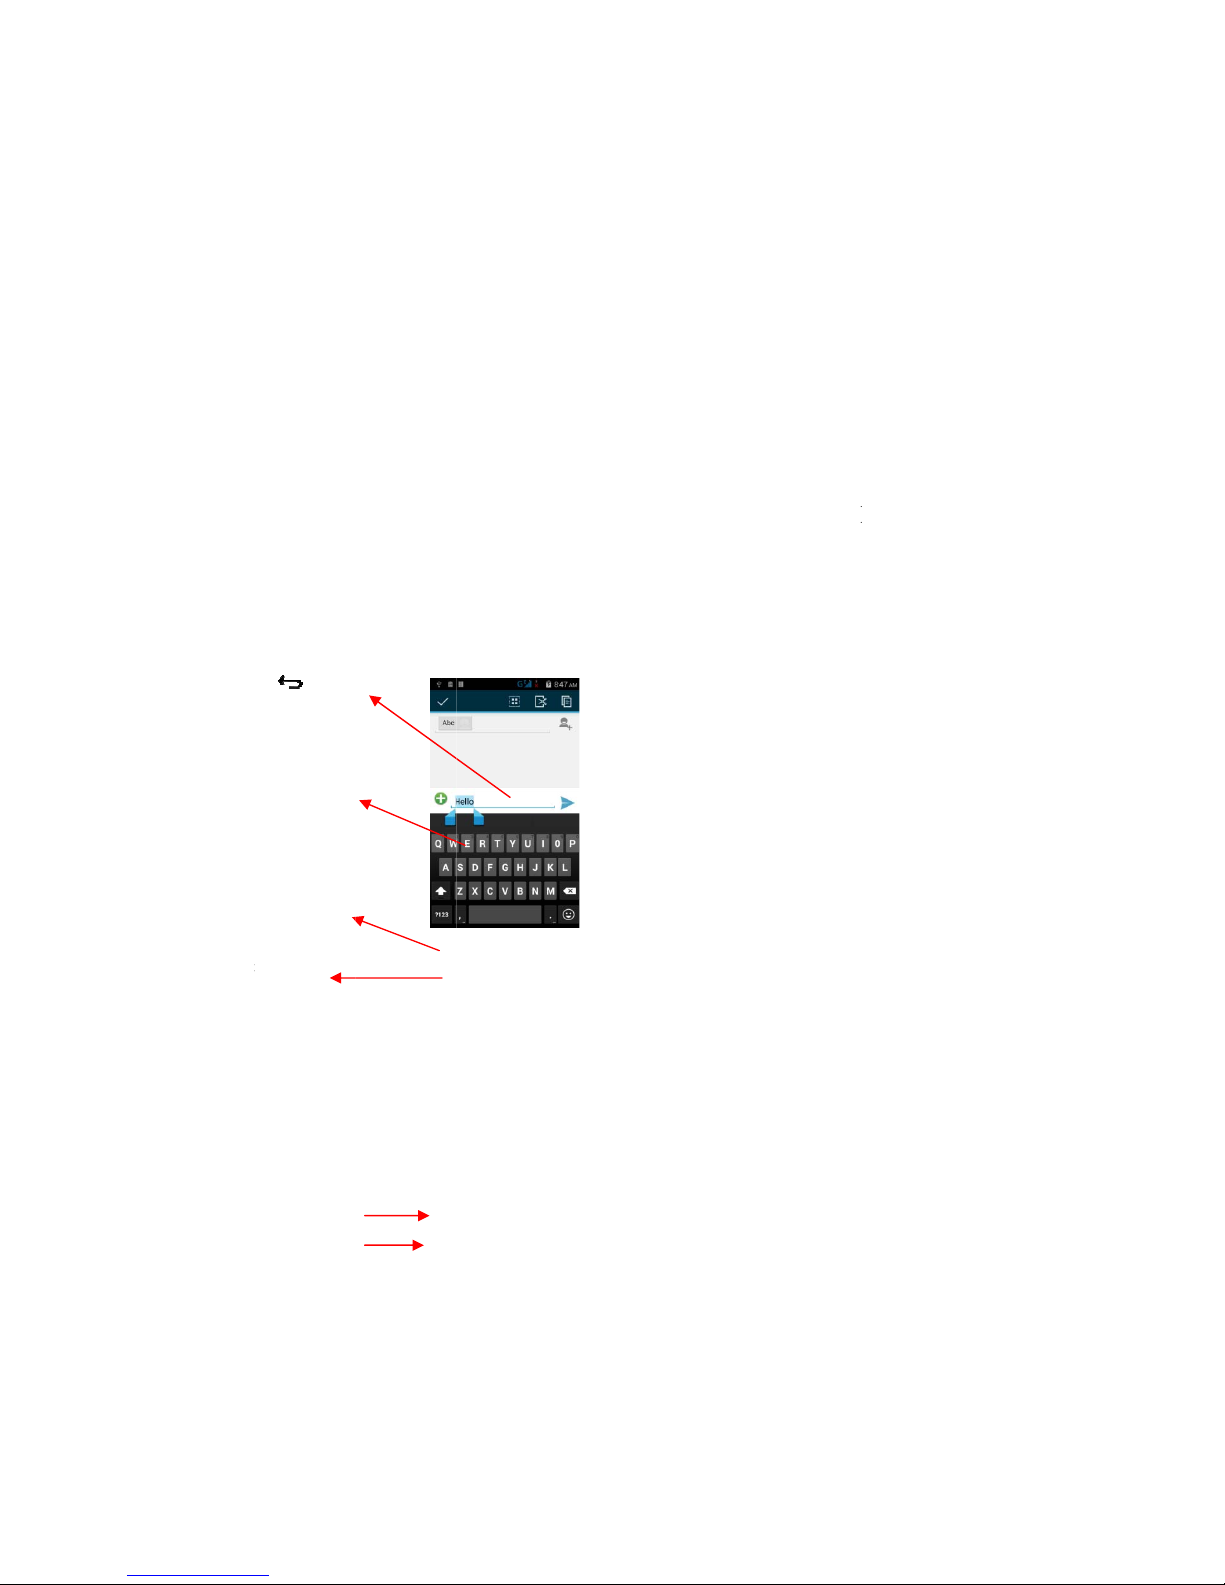
8.2Usi
n
e can
a
board
i
e time to capitalize
e
tteryoutype.Touch
ordoubletapfo
r
k.
y
characters
ecial,symbols,
urmessagehere. A
f
r
ess icon to cl
o
ard.
d hold the text field
nuandto
copy/cut
.
ssages
es set
t
ons, vi
ore mes
s
g the
S
ctive
s
s not
a
This i
s
te
r
o
se
to
This
i
devel
o
and th
e
ings a
l
brate o
r
ages s
e
oft Ke
y
oft ke
y
ctive
b
to erase characters
i
s smiley menu, hol
d
p and see more
ir sett
low yo
u
ringt
o
ttings,
board
board
b
y defau
to
ings.
to se
nes, de
l
you’l
l
y touch
lt.
t SMS/M
M
ivery
r
find i
any in
p
S limi
t
eports
a
nterest
p
ut box
s,
nd
ing
if
Page 17
8.3 Multimedia Message
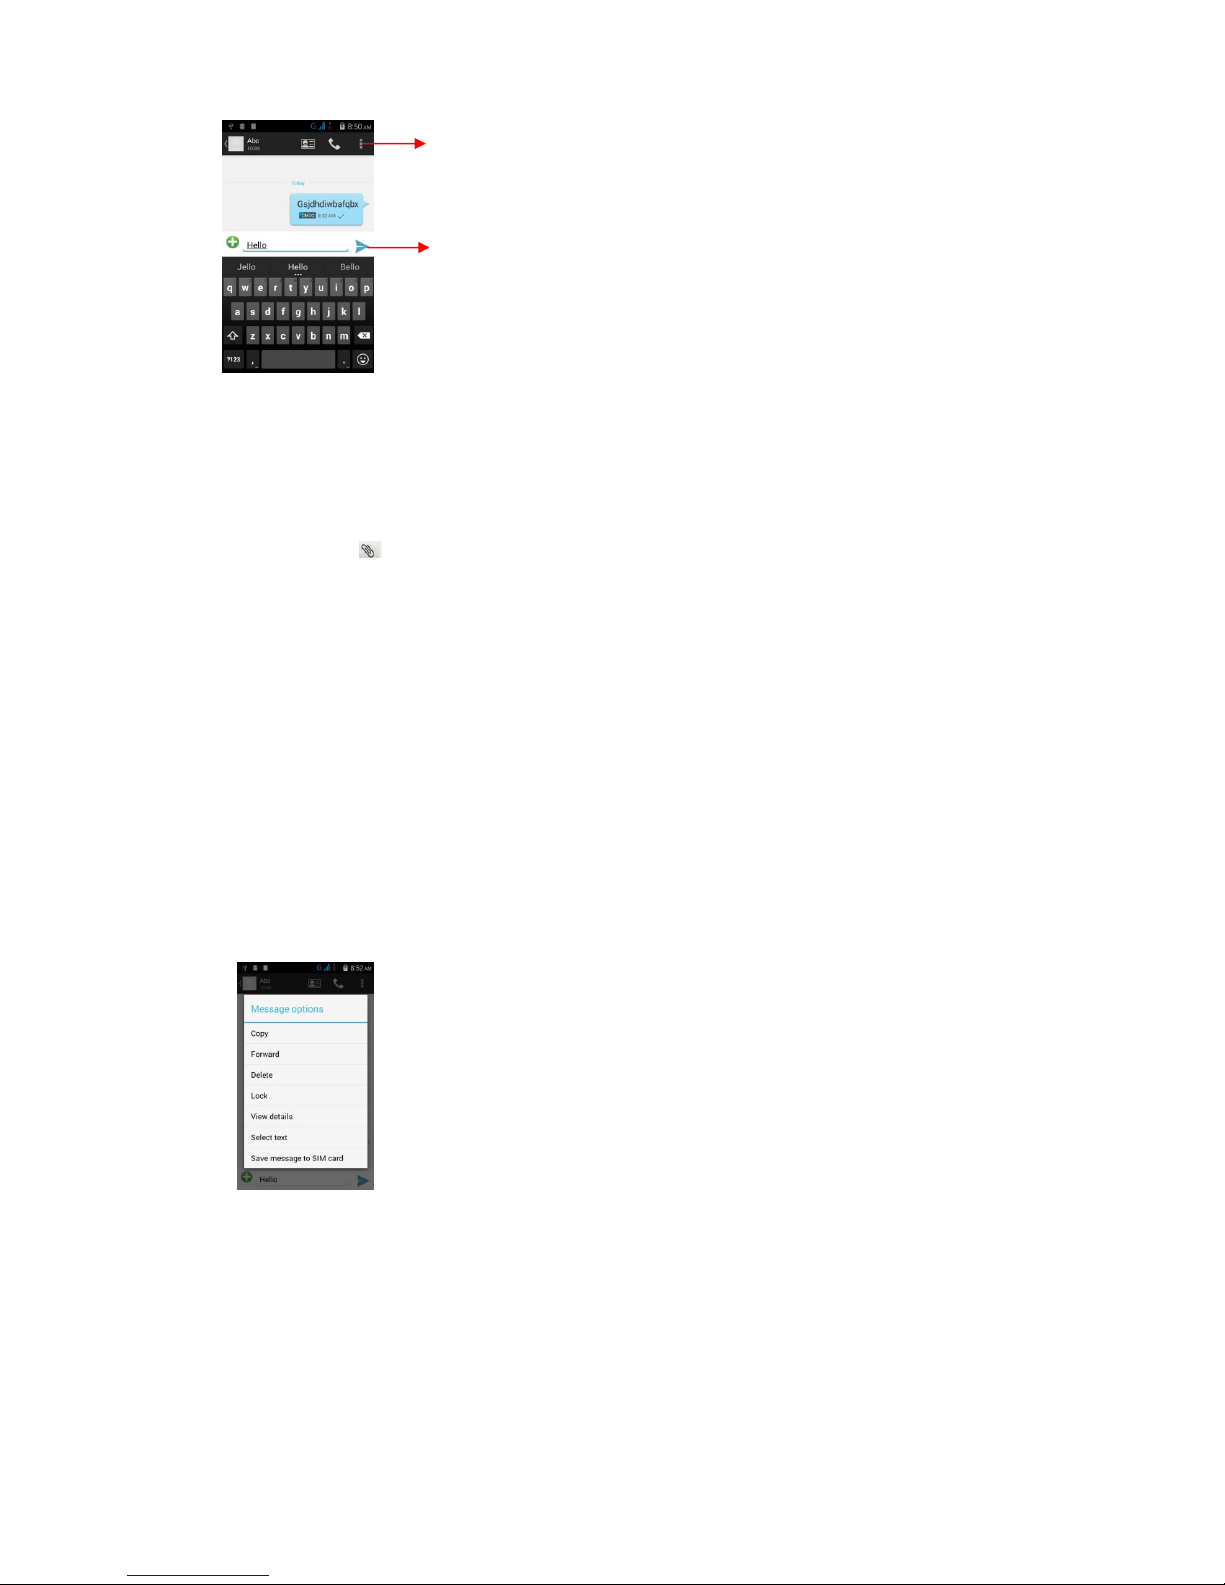
MMS means message with attached files. And we can send MMS
as following:
Touch button to attach different types of files.
Send the MMS.
8.4More options of message:
Open the message
Touch and hold this message until a popup menu coming
as following:
Make your choice, like forward this message
Touch “Forward” in this menu.
Add a contact.
Send the message.
Hold message content for a while, there will
have some other options like: Copy message
text, Forward message, delete message and View
message details.
8.5Lock a Message
Recipient zone: write the name,
the number or tap the icon o
n
right to get to conta cts list.
Tap to send your message
Page 18
You can lock a message so it won’t be deleted without high
permissions
Touch and hold message in a message window.
Touch Lock message in the menu that opens.
Unlock a message by touching and holding it and then touch
Unlock message.
9. Multimedia
9.1 Camera
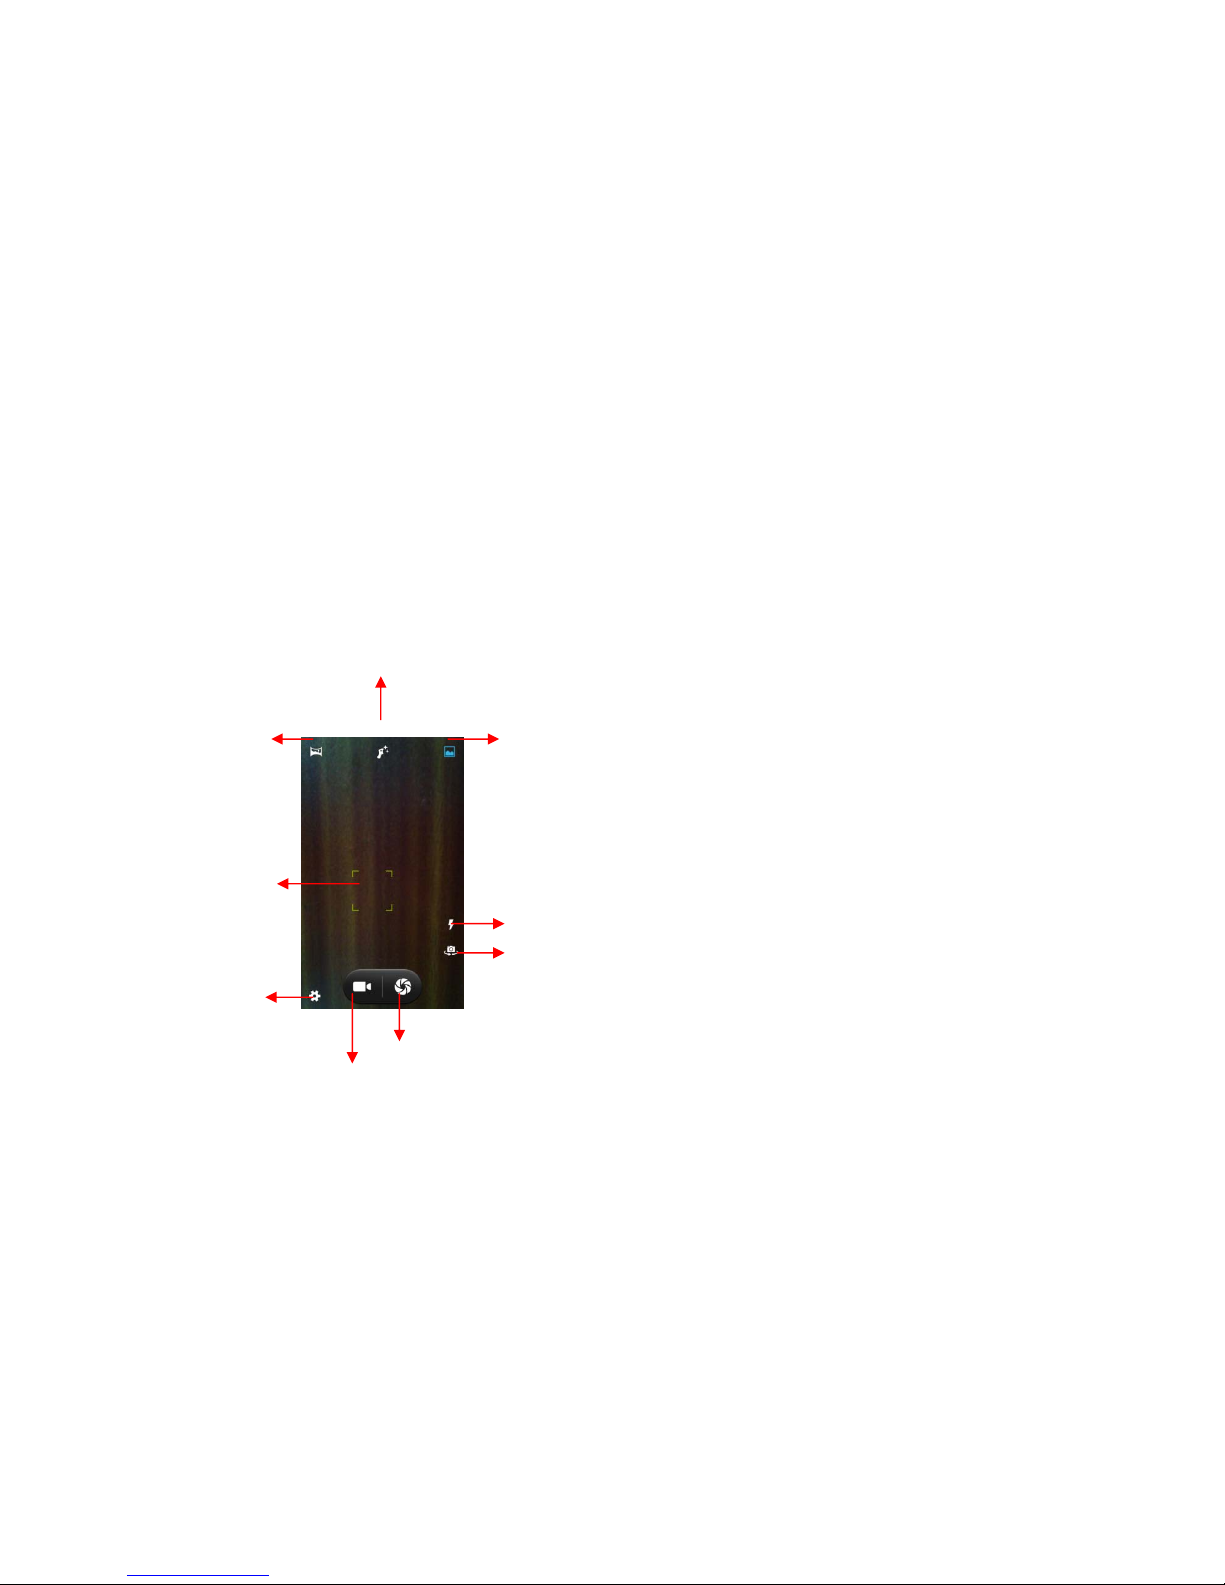
Pictures and videos would be saved in SD card and
device at the same time. So we can copy them from both
sources to a PC and vice versa.
Panorama
mode
Touch to change between
recording modes
Touch to make camera working.
Setting switch
Shift between front and
back camera
Change flash mode
N
ormal mode
Hold and move to
set exposure point
Face beauty mode
Page 19

9.2Gallery
You can use the Gallery to view pictures, play videos
and share files.
Touch the Gallery icon in the main menu.
Touch an album to open and view inside.
Touch a picture or a video in an album to play.
9.3 Share an Album
Open the main Gallery interface.
Select the albums you want to share.
Touch the icon at the top of screen to share via
Bluetooth, Email, or touch the message icon at the
top of screen to share via MMS.
9.4 Music
You can easily transfer your favorite music from your
PC to SD card and enjoy them.
Touch the
key or the intuitive buttons and icons
on the phone in music interface to experience the
features of music player.
Press volume up/down keys on the right side of the
mobile phone to adjust the volume.
9.5 FM Radio
You can listen to your favorite FM channels with the
inbuilt FM receiver earphone (as antenna).
Touch the
key or the intuitive buttons and icons
on Radio interface to explore and enjoy the features
of your FM radio:
Record programs
Save your favorites FM channels
With out-speaker
Press volume up/down keys on the right side of the
mobile phone to adjust the volume.
Troubleshooting: it happens sometimes that
applications crash and stop working. Please reboot
Page 20

the target if it crashed.
9.6 Record audio
Touch the Sound Recorder in the main menu.
Tap to start recording a voice clip. “Recording”
appears while it is on going.
Tap to stop and save the recording.
9.7Take screenshot
Press and hold for one second both Volume Down and
Power buttons at the same time, you can get the
screenshot.
Page 21
10. Connections
It is easy to connect our phone to networks or devices
via Wi-Fi, GPRS, Bluetooth and USB cable. It can work
well with BT headsets or PC data exchange.
10.1 Connect to PC
Connect the phone to a computer with attached USB
cable.
Go to Notifications bar
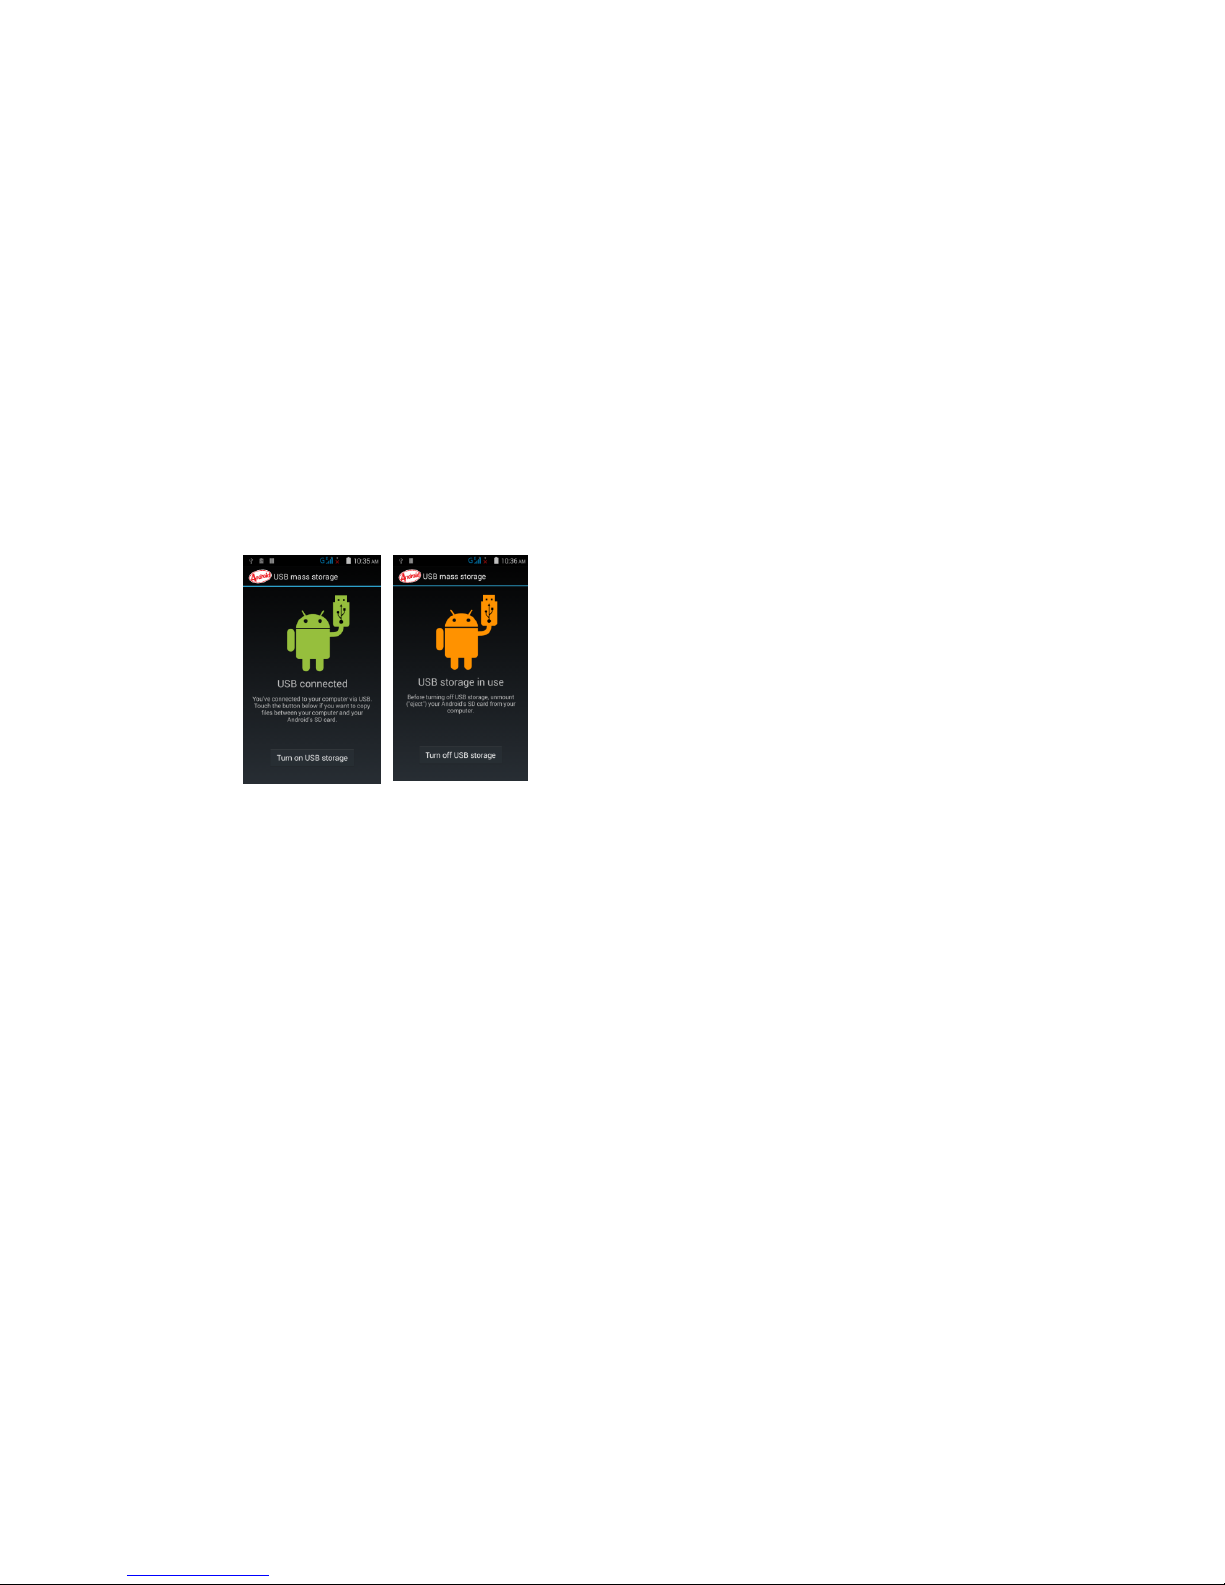
Touch "USB connected". Then touch “Turn on USB
storage” as following:
Then we mount the external SD card and internal
memory as USB disk. And it is possible to manage your
phone data directly on your computer.
Once finished, click“Turn off USB storage“to
release SD card from computer.
WARNING: during USB connection, SD card is not
available to the phone. All apps related to SD card
cannot work. Please don't erase/move applications
data also.
10.2 Connect to Internet
Refer to section 6 for details.
10.2 Connect to Internet
Refer to section 6 for details.
Page 22

10.3 Connect to Wi-Fi Networks
Refer to Section 6 for details.
10.4 Pair with Bluetooth Devices
Go to Settings > Wireless & networks> Bluetooth
settings.
If Bluetooth is off, check Bluetooth to turn it on.
Your phone scans and displays the Bluetooth devices
in range.
If the device you want to pair with is not in the list,
make it visible.
If your phone stops scanning before you make the
other device visible. Scan for devices again.
Touch the ID of the target device in the list Settings
to pair them. If you are prompted to for a password,
set any password on one device and input the same
password in the other device to pair. You phone would
connect automatically to the target device after
pairing successfully.
10.5Make an access point
You can browse the Internet on your PC with your
mobile phone while it was working as an access point
(AP):
Connect your mobile phone to your PC via the USB
adaptor.
Go to Settings> Wireless & Networks>More>Tethering
& portable hotspot and then touch USB Tethering.
A prompt for installation will appear on your PC.
Proceed as suggested.
In case of Linux, Windows 7 and Vista OS, the drivers
get automatically installed. However, in case of
Page 23

Windows XP, you need to manually install the drivers.
10.6 Install Secure Certificate from SD Card
If your VPN or Wi-Fi Network relies on secure
certificates, you must obtain the certificates and
store them in your phone’s storage, before you can
configure access to those VPN or Wi-Fi networks on
your phone.
You may need to download the certificates from a
website.
Copy the certificate from your computer to the root
path of the SD card.
Touch Settings> Security.
Install from SD card under Credential Storage.
Touch the file name of the certificate to install.
Only certificates that you have not installed in your
phone would be displayed.
If prompted, enter the certificate’s password and
touch OK.
Enter a name for the certificate and touch OK.
Page 24
11. Download Applications
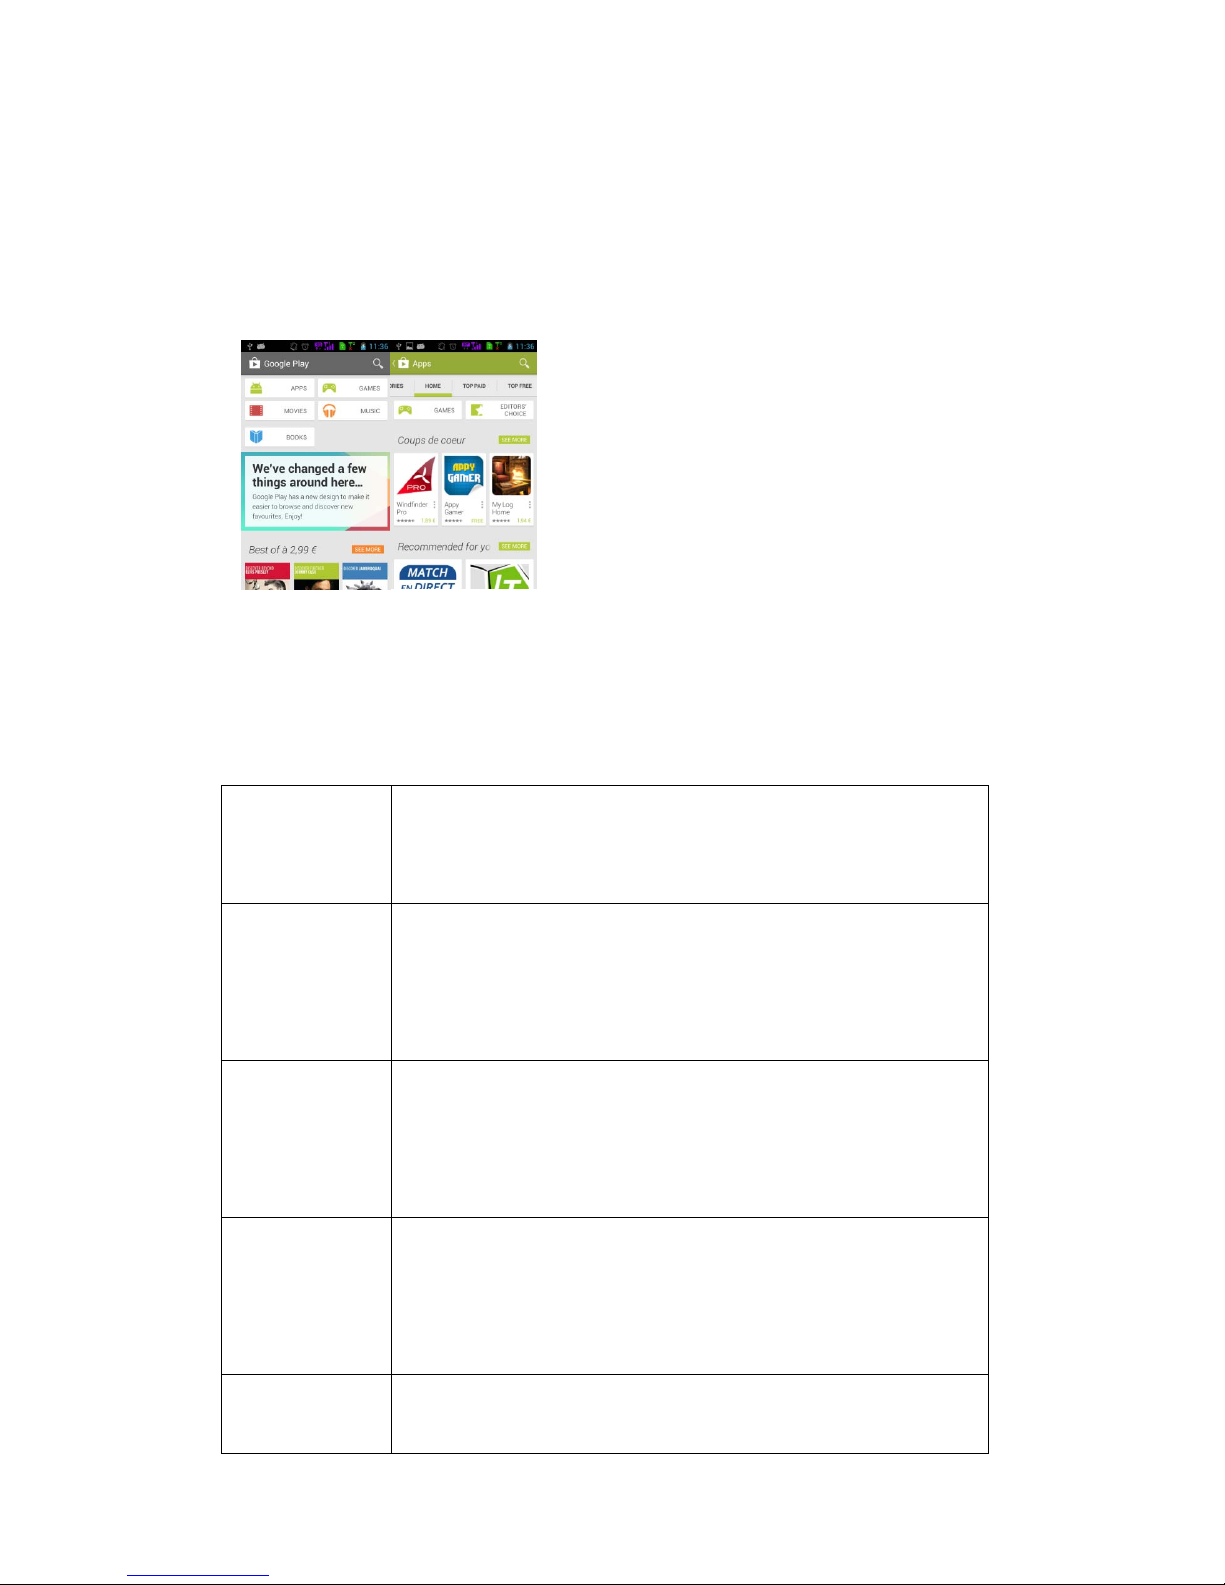
We already integrated some popular applications
inside the system. While you can download any apps
you want from Google Play with internet connection
and a Google account:
12.Phone Settings
You can go to Settings to customize your phone’s
preferences and behavior in a variety of ways:
Wi-Fi Let you configure and manage
connections to networks and devices by
Using Wi-Fi.
Bluetoo
th
Let you manage Bluetooth
tocommunicate with other Bluetooth
devices, such as headsets and other
portable devices.
SIM
card
managem
ent
Let you turn on or turn off your SIM
card and configure your SIM card to be
used to voice call, video call, SMS
send and data connection.
SIM
card
managem
ent
Let you turn on or turn off your SIM
card and configure your SIM card to be
used to voice call, video call, SMS
send and data connection.
Data
usage
Data usage refers to the amount of data
uploaded or downloaded by your device
Page 25
during a given period.
More… Let you configure and manage
connections to networks and devices.
Call
setting
s
Let you configure phone call settings,
such as call forwarding, call waiting,
Call filter and other special features
offered by your carrier.
Sound Let you configure how and at what
volume the phone rings, vibrates etc.
Display Let you configure brightness and other
screen settings.
Storage Let you see and manage available space
on your phone and on your SD card.
Battery Let you check the battery level and
status.
Apps Let you view all applications
downloaded or on SD card and manage all
running applications in devices.
Account
s & sync
Let you add, remove and manage your
Google and other supported accounts.
Page 26

Locatio
n
service
s
Let you set the location related
settings like Wi-Fi and mobile
network, GPS settings for your
phone and
check to take account of your locat
ion in search results and other ser
vices.
Securit
y
Let you protect personal information,
like adjust your phone's lock, set SIM
card lock etc.
Languag
e &
input
Let you select the language for the
text on your phone and for configuring
the onscreen keyboard.
Backup
& reset
Let you backup your personal data and
settings and reset your phone.
Date &
time
Let you choose preferences such as
format and time zones.
Accessi
bility
Enable your installed accessibility
applications and adjust related
settings.
Develop
er
options
Let you enable or disable USB debug and
set interface animation effect.
About
phone
View information about your phone,
such as signal strength, status,
phone information and battery use.
13.Health and Safety Information
Please read the following guidelines regarding the
use of your phone. Not following them may be
dangerous or illegal.
Page 27

FCC Warning:
Any Changes or modifications not expressly approved by the party responsible for complianc e
could void the user’s authority to operate the equipment.
This device complies with part 15 of the FCC Rules. Operation is subject to the following two
conditions: (1) This device may not cause harmful interference, and (2) this device must
accept any interference received, including interference that may cause undesired operation.
Note: This equipment has been tested and found to comply with the limits for a Cla ss B digital
device, pursuant to part 15 of the FCC Rules. These limits are designed to provide
reasonable protection against harmful interference in a residential installation. This
equipment generates, uses and can radiate radio frequency energy and, if not installed and
used in accordance with the instructions, may cause harmful interference to radio
communications. However, there is no guarantee that interference will not occur in a
particular installation. If this equipment does cause harmful interference to radio or television
reception, which can be determined by turning the equipment off and on, the user is
encouraged to try to correct the interference by one or more of the following measures:
—Reorient or relocate the receiving antenna.
—Increase the separation between the equipment and receiver.
—Connect the equipment into an outlet on a circuit different from that to which the receiver is
connected.
—Consult the dealer or an experienced radio/TV technician for help.
Specific Absorption Rate (SAR) information
SAR tests are conducted using standard operating positions accepted by the FCC with the
phone transmitting at its highest certified power level in all tested frequency bands. Before a
new model phone is available for sale to the public, it must be tested and certified to
the FCC that it does not exceed the exposure limit established by the FCC, Tests for each
phone are performed in positions and locations (e.g. at the ear and worn on the body)as
required by the FCC.
For body worn operation, this model phone has been tested and
meets the FCC RF exposure
guidelines when used with an accessory designated for this product or when used with an accessory that
Contains no metal and that positions the handset a minimum of 1.0 cm from the body. Non compliance
with the above restrictions may result in violation of RF exposure guidelines.
Page 28

Safe Driving
Do not use the phone while driving. When you have to
use the phone, please use the personal hands-free
kit.
Please do not put the phone onto any passenger seat
or any place from which it may fall down in case of
vehicular collision or emergency braking.
During Flight
Flight is influenced by interference caused by the
phone. It is illegal to use a phone on the airplane.
Please turn off your phone or switch to flight mode
during a flight.
In Hospitals
Your Phone’s radio waves may interfere with the
functioning medical devices. Consult a physician or
the manufacturer of the medical device to determine
whether they are adequately shielded from external
Radio Frequency. Switch off your device when
regulations instruct you to do so.
Do not carry the wireless device in the breast
pocket.
Turn off the phone if there is any reason to suspect
that interference is taking place.
Unsafe Areas
Please turn off your phone when you are close to
a gas station or in the vicinity of any place where
fuel and chemical preparations, or any other
dangerous goods are stored.
Taking Care of Your Device
Your device is a product of superior design and
craftsmanship and should be handled with care: The
following suggestions will help you protect your
phone:
Page 29

Keep the device dry. If your device gets wet, remove
the battery without turning on the device, wipe it
with a dry cloth and take it the service center.
Do not store the device in high or cold temperature.
High temperatures can shorten the life of electronic
devices and damage batteries.
Do not use or store the device in dusty, dirty areas.
Its moving parts and electronic components can be
damaged.
Do not attempt to open the device other than as
instructed in this guide. Repairing the phone by
yourself other than our authorized service
agents/centers goes against the warranty rules.
Do not drop, knock, or shake the device. Rough
handling can break internal circuit boards and fine
mechanics.
Do not use harsh chemicals, cleaning solvents, or
strong detergents to clean the device. Only use a
soft, clean, dry cloth to clean the surface of the
device.
Do not store your device near magnetic fields or
allow your device to come in contact with magnetic
fields for extended period of time.
The power supply must be replaced by a new one in case
of
malfunction, because this power supply is not
repairable.
Battery Recommendations
CAUTION:
Do not expose your battery to temperature over 50°C
Never throw battery into fire, there is a risk of
explosion
Never short-circuit your battery
Only certified technicians are qualified to repair
Page 30

your smart phone.
Please put the battery in a well-ventilated place out
of direct sunlight. Charge the battery at room
temperature range.
If the time span of the battery after charging
becomes much shorter than usual, the battery life is
at an end. Replace the battery with a new battery of
the same make and specification.
Do not discard the battery with household trash.
Please dispose of used battery according to your
local environmental laws and guidelines.
Use manufacturer approved batteries, chargers,
accessories and supplies. We will not be responsible
for user’s safety when using unapproved batteries
or accessories.
Recycle Your Phone
The WEEE logo (shown at the left) appears on the
product (battery, handset, and charger) to
indicate that this product must not be disposed off
or dumped with your other household wastes. You are
liable to dispose of all your electronic or
electrical waste equipment by relocating over to the
specified collection point for recycling. of such
hazardous waste.
Collection and proper recovery of your electronic
waste equipment at the time of disposal will allow
us to help preserve the environment. Recycling of the
electronic waste equipment will ensure safety of
human health and environment.
Disclaimers
The colors and specifications shown/mentioned in the
user manual may differ from the actual product.
Images shown are for representation purpose only.
Page 31

Other product logos and company names mentioned
herein may be trademarks or trade names of their
respective owners.
The content of this manual may vary from the actual
content displayed in the mobile phone. In such a
case, the later shall govern.
Keep the right to make modifications to any of the
content in this user guide without public
announcement or prior notification.
For devices with external power supplies, plug
socket should be placed in short distance and easily
accessible.
Using the wrong type battery replacement there is a
danger of explosion, be sure to follow the
instructions disposal of used batteries.
Copyrights
All rights reserved. Reproduction, transfer,
distribution or storage of part or all of the
contents in this document in any form without the
prior written permission of is strictly prohibited.
To prevent possible hearing damage, do not
listen at high volume levels of long periods.
 Loading...