

Page 1
Page 2

Document Name:
Colibri X user’s manual
Version: 1.0
Page 1 of 34
Colibri X
User’s manual
(version 1.0)
Refers to Colibri X FW version 1.0
For a new world experience.
Tkalska ulica 10
SI 3000 Celje
Tel.: 00 386 3 490 46 70
Fax.: 00 386 3 490 46 71
info@lxnavigation.si
www.lxnavigation.com
Page 3

Document Name:
Colibri X user’s manual
Version: 1.0
Page 2 of 34
CONTENTS
PART ONE – INTRODUCTION .............................................................................................................................. 3
1.1 Preamble............................................................................................................................................ 3
1.2 Overview ............................................................................................................................................ 5
1.3 Technical specification ....................................................................................................................... 7
Hardware ....................................................................................................................................... 7
Physical specification ..................................................................................................................... 7
1.4 Basic use & gestures .......................................................................................................................... 8
PART TWO – INTERFACE ................................................................................................................................... 11
2 Main pages overview ........................................................................................................................... 11
2.1 Vario page ........................................................................................................................................ 13
2.2 TP page ............................................................................................................................................ 14
2.3 APT page .......................................................................................................................................... 15
2.4 TSK page .......................................................................................................................................... 16
2.5 NRST page ........................................................................................................................................ 18
2.6 GPS page .......................................................................................................................................... 19
2.7 Flight statistics page......................................................................................................................... 19
2.8 Setup page ....................................................................................................................................... 20
Pilot .............................................................................................................................................. 20
Gliders .......................................................................................................................................... 21
Vario ............................................................................................................................................ 22
units ............................................................................................................................................. 22
Logger .......................................................................................................................................... 23
Warnings ...................................................................................................................................... 23
Passwords .................................................................................................................................... 24
Transfer ........................................................................................................................................ 24
Logbook ....................................................................................................................................... 26
Graphics ................................................................................................................................... 27
Info ........................................................................................................................................... 29
PART THREE – FLYING WITH COLIBRI X ............................................................................................................. 30
PART FOUR – CONNECTIVITY ............................................................................................................................ 32
4.1 SD card ............................................................................................................................................... 32
4.2 Bluetooth and WiFi ............................................................................................................................. 32
4.3 Micro USB ........................................................................................................................................... 32
TIPS, TRICKS & TROUBLESHOOTING ................................................................................................................. 33
Page 4

Document Name:
Colibri X user’s manual
Version: 1.0
Page 3 of 34
PART ONE – INTRODUCTION
1.1 Author’s note
You are one of the first, who have received a Colibri X. We would like to congratulate you on being a part of
this club and wish you many safe flights.
This document is a working title of the Colibri X manual. With each new version, new features will be
unlocked and explained in a manual published on our webpage
(http://www.lxnavigation.com/support/manuals/).
1.2 Preamble
Why LX Navigation?
LX Navigation is one of the oldest glider navigation brands. Its founders started experimenting with glider
computers way back in the 70's and the Company has been working on improving your flight performance
ever since.
Throughout the last 40 years or so it has been working on instruments that most pilots will have used at
some time. In fact, our equipment can be found in almost any gliding club!
Our equipment has always been ground-breaking.
Our motto?
Be the first. Be the best. Be different.
Why Colibri X?
Because Colibri X represents the cutting edge of portable IGC loggers. The 3.5’’ transflective LCD display will
show you the way when flying tasks, cross-country flights, or just plain airfield soaring.
With the Wi-Fi/Bluetooth module inside, you are stepping into the age of connectivity.
The dedicated vario page will help you turn those tight lifts and improve your feel for the thermal with our
thermal assistant. Always know your position and heading, with clearly visible lift or sink, thanks to our
gradient digital needle.
The Colibri X is a miniature package that includes everything a glider pilot needs from his logger. From vario
information, navigation, statistics, up to the very root of this device – IGC certified logger.
Devices
We offer a wide range of instruments suitable for both club and competition soaring.
Our systems combine two components:
Page 5

Document Name:
Colibri X user’s manual
Version: 1.0
Page 4 of 34
First, a glider computer (LX Zeus) which is used for calculating and displaying all of the key information used
by pilots. This glider computer is the brain of the operation.
The second part of the system is a variometer (Era, Helios, and Era). Its job is to gather the information
which the Zeus uses. The vario has pressure connections as well as the GPS antenna connection which is
required for IGC logs.
There is a wide variety of choice for varios and for LX Zeus display sizes.
All our varios are standalone devices which can be used without a glider computer for displaying flight
parameters such as final glide information, Speed Command (SC) as well as basic navigation. Our varios also
have an internal battery which means that your IGC logs do not depend on your glider`s batteries.
System extensions (second seat unit, remote control (LX Joy), NavBox, MOP, Flap sensor, AHRS ...) are also
possible. Everything is connected using a CAN bus (single cable for power and data). All connections are plug
and play, which means no specialist is required to install the system.
With the Colibri X we introduce something completely new that is a technology ahead of any other device in
its class on the market.
Page 6

Document Name:
Colibri X user’s manual
Version: 1.0
Page 5 of 34
1.3 Overview
The Colibri X is an IGC certified standalone logger with a bright, transflective technology display, which offers
the pilot multiple navigation and vario pages. It is a flight recorder, final glide calculator and navigation system
with an internal battery, audio warnings, vario beeps and voice messages.
The unit is capable of providing APT (airport), TP (turnpoint), and TSK (task) and NRST (nearest landable)
navigation on four dedicated navigational pages. Navigation pages feature Navboxes, which can be
personalised by the pilot to his requirements. Airspace, airports and turnpoint information is shown
graphically.
The Colibri X is designed to sit comfortably in your hand or be mounted with one of our mounts into a space
in your cockpit.
The Colibri has a dedicated pressure sensor for determining your altitude, providing a more accurate altitude
reading in comparison with GPS-altitude based systems. A minimum sampling rate of 100 Hz is applied to all
sensors.
As an integral part, it has a 3.5” sunshine readable transflective LCD display to show all user-defined data
during flight.
For accessing all system options, innovative gestures are used, much like the ones you are used to from your
current phone touchscreen devices. A voice module is also built-in for audio warnings.
We use a high-end capacitive-type touch panel for our device, allowing us the benefits of multi-touch and
giving that high-quality feel of a modern touch-handheld device.
An integral IGC approved flight recorder with ENL level detector will record flights to internal solid-state
memory (16GB). All flights can be copied to an external SD card after the flight.
Colibri X features are:
- 3.5˝ 640x480 transflective technology sunlight readable display
- Capacitive touchscreen technology
- 50ch GPS receiver as an integral part of the system
- Completely new design using latest pressure transducers technology
- Fast vario data acquisition technology
- Internal memory space for flight recorder, enough for a lifetime of flights
- ENL (Environment Noise Level) sensor
- Internal speaker (for vario sounds, voice warnings & Flarm warnings)
- micro USB port with serial communication (19200 bauderate)
- Built-in Bluetooth interface
- Built-in WiFi interface
- Voice module as an integrated part of the system
- External SD Card interface, for firmware updates, flight downloads, and TP/TSK/APT/Airspace
transfers
- The built-in rechargeable battery which provides 15 hours of autonomy
- Internal battery (can be charged from the instrument power supply)
- Pre-loaded polar database
Page 7

Document Name:
Colibri X user’s manual
Version: 1.0
Page 6 of 34
Functions:
- Variometer
- World maps
- 4 independent navigational pages – TP (turnpoint), APT (airport), TSK (task) and NRST (nearest
landable turnpoint or airfield)
- Final glide calculator based on GPS data (for TP, APT, TSK and NRST)
- Complete TP/APT/TSK/NRST navigation with airspace information and warnings
- Highest level IGC approved flight recorder
- Flarm radar screen
- Thermal assistant screen
- Logbook
- Flight information with Barograph
- Multi glider support (polar databases)
- Accurate wind calculation in straight flight and circling
- Voice alerts
- User warnings
The unit has the capability to be updated to any later FW version free of charge. (see:
www.lxnavigation.com)
Please refer to Setup/Transfer/Update to learn how to update the system.
Page 8

Document Name:
Colibri X user’s manual
Version: 1.0
Page 7 of 34
1.4 Technical specification
Hardware
- 3.5” 640 x 480 capacitive touchscreen transflective display
- LX One Chip
- 16 GB of internal solid state memory
- Built-in GPS receiver and antenna
- Built-in battery with charger (5V via USB)
- Pressure altitude sensor measuring up to 16000 metres
- USB interface (mass storage device)
- IGC flight recorder with Engine noise level sensor
- WiFi & Bluetooth
- micro USB port
- Built-in speaker
Physical specification
Dimensions: 102 x 71 x 14 [mm]
Mass: 145g
Page 9

Document Name:
Colibri X user’s manual
Version: 1.0
Page 8 of 34
1.5 Basic use & gestures
Gestures
The Colibri X user interface consists of two input tools.
First is the physical button on the left side of the unit, which has the following functions:
- Short press (>1 second), when turned off, turns the unit on.
- Short press (>1 second), when turned on, offers the power off option.
- Short press (<1 second), when turned on, turns the backlight off, leaving the unit turned on. This
saves the battery while allowing the device to log the flight.
- Long press (5 seconds), when the device is turned on, turns the device off on a hardware level (‘hard
reset’). Using this option should be avoided unless no other possibility is working.
The second input method is the unit’s touchscreen.
Most gestures needed, in order to handle the device, are mimicked from gestures we use on our modern
mobile phones:
- Swiping left slides to the left menu
- Swiping right slides to the right menu
- Swiping down, from the top edge, will bring us the ‘Drop-down’ menu.
- Pinching in will zoom in on maps
- Pinching out will zoom out on maps
- Double tapping will give us the maximum zoom available. Double tapping again will revert us to our
previous zoom level.
- On navigation pages (TP, TSK, APT and NRST), swiping from the bottom edge upwards, opens
additional options for the said page – pull up menu.
Page 10

Document Name:
Colibri X user’s manual
Version: 1.0
Page 9 of 34
Numeric input
Press and hold anywhere on the roll bar and starting turning right (clockwise) for higher values or left
(counter clockwise) for lower values.
Alphanumeric input
The keyboard is a standard QWERTY type keyboard with two layouts. The first one is an alphabetic keyboard
and the second one is punctonumeric, consisting of punctuation marks and numbers.
To switch from alphabetic to punctonumeric, press the ‘123’ button in the bottom left corner.
To switch from punctonumeric to alphabetic, press the ‘ABC’ button in the bottom left corner.
Page 11
Document Name:
Colibri X user’s manual
Version: 1.0
Page 10 of 34
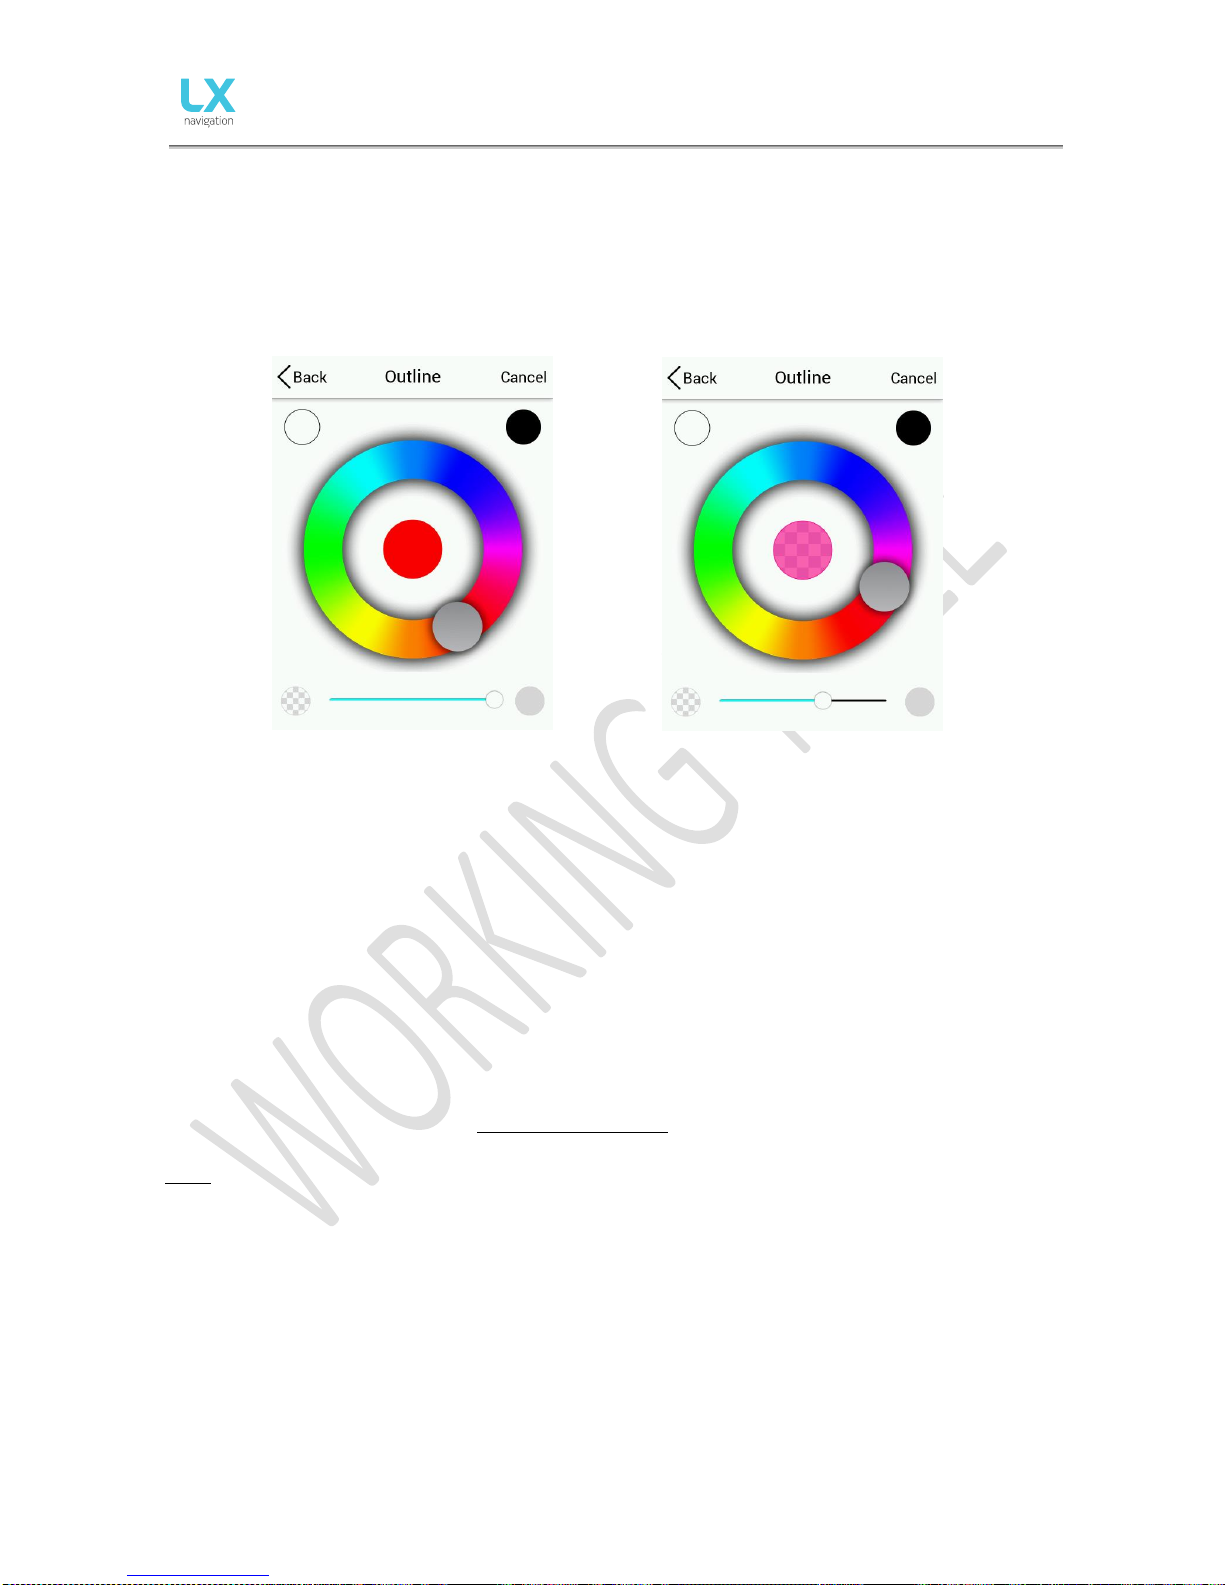
Colour input
In order to set the colour, press anywhere on the roll bar and choose your colour. White and black presets
are ready in the left and right upper corner, respectively.
Use the slider in the bottom to set the transparency and use the colour indicator in the middle to check it.
Colour and transparency set to none 30% transparent
In general, when exiting a setup menu page, after making a change, selecting the ‘< Back’ option in the
upper left corner will save this setting, and selecting ‘Cancel’ will disregard the change you’ve made and
keep the old setting.
Updating procedure
To start the updating procedure, gently eject the micro SD card on the left side of the device. Turn off the
device. Connect the micro SD card via the provided adapter or with the card reader to a computer. Open the
micro SD card folder. Copy and paste the file for update (x.xx.lxu) to the root of your micro SD card. Carefully
and gently insert the micro SD card in the Colibri X and power up the device.
Go to Setup > Transfer > Software update and select the desired file. A password input dialog will appear.
Type in the provided password (from info@lxnavigation.com).
Note: Until version 1.0, the password is ‘00000’.
Page 12

Document Name:
Colibri X user’s manual
Version: 1.0
Page 11 of 34
PART TWO – INTERFACE
2 Main pages overview
The main pages represent a row of pages in the graphical user interface, which allow the user to access
different information screens and flight parameters.
The user will go through the following pages, in their respective order, if he swipes to the right:
Vario > TP > APT > TSK > NRST > GPS > Statistics (if in flight) > Setup > Vario (continuing the cycle).
Page 13

Document Name:
Colibri X user’s manual
Version: 1.0
Page 12 of 34
Drop down page
Another page, which can be accessed from any main page, is the Dropdown page.
On the main vario page access drop down menu by pressing and pulling
down the header with LX navigation logo.
On this page you can quickly access and set with a sliding action the
following parameters:
Volume (Use slider to set the volume)
Brightness (Use slider to set the brightness)
MacCready (Use the slider to set m/s or kts MacCready)
Bugs (Use the slider to set % of bugs)
Ballast (Use the slider to set ballast)
On the bottom of the page you can find icons for:
Bluetooth (turn on/off by pressing - when off the icon is crossed)
WiFi (turn on/off by pressing - when off the icon is crossed)
Mute (turn on/off by pressing - when off the icon is crossed)
Setup (quick access to setup page)
Icons are grey when disabled and blue when enabled.
To close the drop-down page press the arrow on the bottom of the page. The menu will disappear upwards.
Initial setup
Initial setup appears every time the device is powered on.
It consists of two essential pieces of information:
1. Elevation (QNH)
2. Glider
Always check the information before confirming the elevation and glider
settings.
Press confirm button on the bottom of the page to access the vario
page.
Page 14

Document Name:
Colibri X user’s manual
Version: 1.0
Page 13 of 34
2.1 Vario page
The vario page is the first page displayed, upon power on.
It consists of a header, wind icon, thermal assistant, vario with 3 fixed indicators and a navbox line, with
different lines of 3 navbox indicators.
The header consists of Status icons, a clock and battery level indicator.
Wind icon consists out of two numerical values (wind speed and wind direction) and a graphic
representation of the wind.
The vario scale features a gradient colour pallet, which, in a graphical way, represents the thermal strength.
There are fixed indicators inside the vario scale (AVG – average thermal, ALT – QNH altitude and GS –
Ground speed).
The bottom row navboxes can be configured by long-pressing and choosing from a list. It can also be
changed for another row, by swiping it left or right, or by pressing the left/right arrows.
Page 15

Document Name:
Colibri X user’s manual
Version: 1.0
Page 14 of 34
2.2 TP page
In order to use this page to its maximum extent, the user should first
import turnpoint, and airfield files. For more information on this subject,
please refer to Setup/Transfer/Load TP.
Navigation is always “track up”.
Below the TP name, a steering symbol tells the pilot by how many
degrees (°) he needs to correct his track in order to fly towards the
selected turnpoint. In the upper right corner, time is displayed, as well as
battery status.
In the left part of the screen, standard wind information can be read.
The Arrow shows the wind relative to the glider with its direction relative
to North in degrees and its speed being shown below.
On the right side, we have final glide information.
In the bottom of the screen, there is a configurable row of navboxes. In
order to find out how they are configured, check ‘2.1 Vario page’.
By pressing on the bottom row of navboxes, or swiping them upwards,
two additional options are presented to us.
The first is ‘Select Turnpoint’ and the second one is ‘Waypoint Info’.
By pressing ‘Select Turnpoint’, we are given a list of turnpoints, from our
.cup file, a search field and two sorting parameters – Name and
Distance.
Selecting a turnpoint gives us additional info on this turnpoint. Pressing
the bottom option starts the navigation towards this turnpoint.
Select Turnpoint subpage Go To Waypoint info subpage
Page 16

Document Name:
Colibri X user’s manual
Version: 1.0
Page 15 of 34
2.3 APT page
In order to use this page to its maximum extent, the user should first
import turnpoint and airfield files. For more information on this subject,
please refer to Setup/Transfer/Load TP.
Navigation is always “track up”.
Below the APT name, a steering symbol will inform the pilot by how
many degrees (°) he or she needs to correct track in order to fly towards
the selected airport. In the upper right corner, time is displayed, as well
as battery status.
In the left part of the screen, standard wind information can be read.
The Arrow shows the course of the wind in regards to the glider, the
degrees of its direction from the North and the speed is shown below.
On the right side, we have final glide information.
In the bottom of the screen, there is a configurable row of navboxes. In
order to find out how they are configured, check ‘2.1 Vario page’.
By pressing on the bottom row of navboxes, or swiping them upwards,
two additional options are presented to us.
The first is ‘Select Airport and the second one is ‘Airport Info’.
By pressing ‘Select Airport, we are given a list of airports, from our .af
file, a search field, and two sorting parameters – Name and Distance.
Selecting an airport gives us additional info on this airport. Pressing the
bottom option starts the navigation towards this airport.
Select Airport subpage Go To Waypoint info subpage
Page 17

Document Name:
Colibri X user’s manual
Version: 1.0
Page 16 of 34
2.4 TSK page
In order to use this page to its maximum extent, the user should first
import turnpoint, and airfield files. For more information on this subject,
please refer to Setup/Transfer/Load TP.
Navigation is always “track up”.
Below the name of the current TP we are navigating to, a steering
symbol will inform the pilot by how many degrees (°) he or she needs to
correct track in order to fly towards the selected turnpoint. In the upper
right corner, time is displayed, as well as battery status.
In the left part of the screen, standard wind information can be read.
The arrow shows the wind direction relative to the glider, its direction in
degrees relative to North with wind speed being shown below.
On the right side, we have final glide information.
In the bottom of the screen, there is a configurable row of navboxes. In
order to find out how they are configured, check ‘2.1 Vario page’.
By pressing on the bottom row of navboxes, or swiping them upwards,
three additional options are presented to us.
The first is ‘Previous waypoint’ and the second one is ‘Waypoint Info’.
By pressing ‘Edit Task’, TSK SETUP is activated where a task can be
created or edited. Additional TP’s can be added, removed, zones
changed etc.
Task setup
In order to create a task, first open the Task setup page, by going to the
Task navigation page, swiping the navboxes upwards, and pressing ‘Edit
task’.
Take off and Landing locations do not need to be filled in.
Choose your start point and start inserting additional points (which can
be either from the .cup turnpoint database, or from the .af airfields
database.
Choose the finish point.
Now, set the turnpoint zones and recheck everything.
Page 18

Document Name:
Colibri X user’s manual
Version: 1.0
Page 17 of 34
Note!
When importing tasks (from a microSD card, via Bluetooth, or othewise),
zone information is not imported. Be sure to check that the zones are
correct.
When clicking on a turnpoint, a list of options will show, depicted on the
right picture.
Tapping on ‘Insert APT’, ‘Insert TP’, ‘Select APT’ and ‘Select TP’ will offer
you a list of turnpoints or airports to choose from.
Choosing ‘Insert’ will insert a new TP into the task, and choosing ‘Select’
will set the TP for the selected slot.
Delete option deletes the point from your task.
Edit zone will open a new dialog, which enables you to adjust the sector
parameters.
Preview will show the Zone.
Page 19

Document Name:
Colibri X user’s manual
Version: 1.0
Page 18 of 34
2.5 NRST page
In order to use this page to its maximum extent, the user should first
import turnpoint, and airfield files. For more information on this subject,
please refer to Setup/Transfer/Load TP.
Navigation is always “track up”.
The NRST (nearest) page always navigates us to the nearest landable
location, be it either an airfield or a turnpoint, designated as a landable
in the .cup file.
Below the TP/APT name, a steering symbol will inform the pilot by how
many degrees (°) he needs to correct his track in order to fly towards the
selected airport. In the upper right corner, time is displayed, as well as
battery status.
In the left part of the screen, standard wind information can be read.
The Arrow shows the course of the wind in regards to the glider, the
degrees of its direction from the North and the speed is shown below.
In the bottom of the screen, there is a configurable row of navboxes. In
order to find out how they are configured, check ‘2.1 Vario page’.
By pressing on the bottom row of navboxes, or swiping them upwards,
one additional option is presented to us – Waypoint info.
By pressing Waypoint info, we are shown additional info on this
waypoint.
Page 20

Document Name:
Colibri X user’s manual
Version: 1.0
Page 19 of 34
2.6 GPS page
GPS page shows us the current GPS status, date, latitude, longitude and
a map of satellites above us.
2.7 Flight statistics page
Appears only when in flight mode.
It shows us our barograph, with time on the x-axis and altitude on the yaxis.
Tapping anywhere on this screen during flight will give us an option to
end the flight.
The flight should always be ended before turning the device off.
Page 21

Document Name:
Colibri X user’s manual
Version: 1.0
Page 20 of 34
2.8 Setup page
By swiping left on main vario page you get to the setup page. Under
setup, the pilot can set all parameters of the unit. The menus are
following:
1. Pilot
2. Gliders
3. Vario
4. Units
5. Logger
6. Warnings
7. Password
8. Transfer
9. Logbook
10. Info
Pilot
All entered data (except for weight), will be written to the .igc log file as
pilot declaration info. In order to have accurate information enter your
name, surname, weight, reserve (altitude) and, in case you are flying
with a two-seater, copilot name, surname, and weight.
- Pilot name: edit the name of the pilot.
- Pilot surname: edit the surname of the pilot.
Pilot’s weight is added to the whole weight of the glider to calculate
actual wing loading.
- Weight: edit the weight of the pilot.
- Co-pilot’s data is visible in the flight declaration (IGC file).
- Copilot name: edit the name of the copilot.
- Copilot surname: edit the surname of the copilot.
Co-pilot’s weight is added to the whole weight of the glider.
- Copilot weight: edit the weight of copilot.
Reserve is added to final glide calculation and is always added for safety.
The pilot should set the actual QNH and elevation of the take-off airport on the initial setup screen.
Changing the QNH setting during flight will change the altitude calculation for final glide. Changing QNH
while on the ground will not change the altitude calculation and it will remain the same as set during initial
setup.
Reserve is the safety arrival altitude that is added to the required final glide altitude so that the glider arrives
over the destination at the selected reserved altitude (AGL).
Page 22

Document Name:
Colibri X user’s manual
Version: 1.0
Page 21 of 34
Gliders
In the glider`s menu you can select, edit, add new or delete a glider.
To make your custom glider go to Add new.
First, select the glider. You will find a list of gliders already defined. If you
cannot find your glider on this list, please select the option user-defined,
found at the top of the list.
When user-defined has been selected you will have to manually insert A,
B and C polar information, Empty mass, Reference mass and Maximum
mass.
When you select a glider from the list, the polar information and mass
information are automatically inserted. Enter your registration number
and Competition ID (call sign).
Once you have entered all the needed information, you can leave the
glider menu by pressing the back button. In the select menu, you can
find your new glider. When selected, you will find the tick on the right
side of the row.
To edit a previously created glider go to edit and select the glider you
want to edit.
To delete the glider you have created go to delete and select the glider
you want to delete.
Page 23

Document Name:
Colibri X user’s manual
Version: 1.0
Page 22 of 34
Vario
In this menu pilot can set vario settings:
- Zero frequency is a frequency generated at 0 m/s
- Positive frequency is the frequency at maximum climb shown on the
scale (depends on range setting)
- Negative frequency is the frequency at maximum sink shown on the
scale (depends on range setting)
- The audio test will generate vario movement from +5m/s to -5m/s so
the user can check the audio setting in this range
- The range is the scale for vario. Three options are available – 2.5, 5 and
10 m/s (5, 10 and 20 kts, according to user selected units).
- The filter defines the dynamics of the vario needle and sound. The
smaller the time the faster is the response and vice versa
- Integration time defines integration period for averaging the vario data
in seconds
Units
The units menu holds the units options for all flight parameters, shown
as either an indicator, navbox, widget or digital needle. Pilot can set
units for:
- Vario (m/s, kts)
- Altitude (m, ft)
- Distance (km, nm, mi)
- Speed (km/h, mph, kts)
- Wind (km/h, mph, kts, m/s)
- Pressure (mbar, inHg)
- Temperature (°C, °F)
- Weight (kg, lb)
- Area (m2, ft2)
You can chose and edit each parameter one by one or go to the preset
menu and select between Metric, Imperial or US units. By selecting one
of the presets all the units will be affected.
Page 24

Document Name:
Colibri X user’s manual
Version: 1.0
Page 23 of 34
Logger
The pilot can set Interval, Event interval (fixed to 1s) and Event fixes.
Input data is then seen as a declaration in every IGC flight file.
Set number of Event fixes and Event record interval.
An event can only be activated when in flight mode by going to setup
menu – logger and selecting the event.
Warnings
Warnings are used to inform the pilot that some flight-related data is
outside set margins. When a warning state is detected by Colibri X, the
pilot will get a red warning message box with a description of what is
outside margins.
The pilot can enable (box is checked) audio warnings and Flarm
warnings.
- Audio: if disabled, voice warning will not be generated – only visual
warning message box
- Altitude warning: warning when flying over selected altitude
Page 25

Document Name:
Colibri X user’s manual
Version: 1.0
Page 24 of 34
Passwords
To access some options, a password is required. Available passwords
are:
- 46486: sets Colibri X to factory settings.
- 99999: clears all flights from flight recorder – logbook is emptied.
- 28346: audio player (will play any .wav file 8-bit 16kHz mono from the
root of external SD card).
- 66666: clears actual task
- 55555: clears internal TP database
Transfer
The transfer page is used for transferring turnpoint and task files (.cup),
airport files (.af), airspace files (.cub) and software updates (.lxu).
It is also used for selecting active files and deleting old files.
‘Load’ is used to upload a file from the microSD card to internal memory.
‘Select’ is used to select between multiple files from internal storage.
Turnpoints
After selecting “Turnpoints” option, multiple options are shown:
- Load is used for uploading files from microSD to device
- Delete is used for erasing files from the device
- Select is used for selecting and activating file
- Deselect is used for deselecting and deactivating the file
A list of .cup files (up to 20) found in the root of external microSD card will be listed under Load Turnpoint.
Select a file from which you wish to import TPs and tasks to the internal database.
After importing, the process can take from 5 sec. up to 10 min (depends on the number of TPs and
alphabetical sort inside CUP file). The number of TPs is not limited but we recommend that you use a CUP
file with up to only 6000 points.
Page 26

Document Name:
Colibri X user’s manual
Version: 1.0
Page 25 of 34
Name of every TP will be shortened to max 11 characters after import.
Load Task
After selecting “Load TSK” option, a list of all CUP files (up to 20) found on the external SD card in LX/TP
folder will be listed here.
Select a file from which you wish to import TSK to internal memory.
After selecting the file from which you wish to import task, first 20 tasks found in the file will be listed. Select
the task you wish to import and press enter.
Observation zones will be loaded as well if defined in the file, if not, then standard FAI zones will used.
Warning: Due to internal task limitations, only first 18 points of the selected task will be loaded from a file.
Wait until loading is finished.
Airports
After selecting “Airports” option, multiple options are shown:
- Load is used for uploading files from microSD to device
- Delete is used for erasing files from the device
- Select is used for selecting the active file
- Deselect is used for deselecting the file
A list of all .af files (up to 20) found in the root of external microSD card will be listed under Load Airports.
Select the file from which you wish to import APTs to the internal database.
.af file is commonly used file for transferring APTs.
Airspace
A list of all .cub files (up to 20) found in the root of external microSD card will be listed under Load Airspace.
Select the file from which you wish to import Airspace data to the internal database.
.cub file is commonly used file for transferring Airspace data.
Software update
To start the updating procedure, gently eject the micro SD card on the left side of the device. Turn off the
device. Connect the micro SD card via the provided adapter or with the card reader to a computer. Open the
micro SD card folder. Copy and paste the file for update (x.xx.lxu) to the root of your micro SD card. Carefully
and gently insert the micro SD card in the Colibri X and power up the device.
Go to Setup > Transfer > Software update and select the desired file. A password input dialog will appear.
Type in the provided password (from info@lxnavigation.com).
Note: up to version 1.0, the password is ‘00000’.
Page 27

Document Name:
Colibri X user’s manual
Version: 1.0
Page 26 of 34
Logbook
The pilot can copy take-off/landing time to personal logbook and
transfer flight to external SD card for OLC upload.
Last 50 flights are listed. Any older flights will be erased from logbook
list.
Press enter on a selected flight to open flight info, where "Transfer to SD
card" option is available to transfer flight to external SD card on the
bottom of the page.
Flight is copied to external SD card
into LX/FLIGHT folder.
Page 28

Document Name:
Colibri X user’s manual
Version: 1.0
Page 27 of 34
Graphics
The Graphic setup is where you can set custom colours for Airspace,
Map and Task, as well as set font sizes for map objects.
Airspace
In the Airspace menu you following submenus to edit:
- Controlled Zone
- Prohibited
- Restricted
- Danger
- Terminal area
- Airway
- Glider
- Military
- Other
- Class A, B
- Class C
- Class D
- Class E
- Class F
Under each submenu you can find Outline and Fill row. Some have only
Outline. By selecting each row you enter the menu with scroll bar for
selecting the colour. As described in point 1.4 Basic use & gestures.
Once you have adjusted the colour you want to use, press back on the
top left corner of display and the settings will be saved and you will
return to submenu.
The same logic applies to set colour for Fill.
Map
With selecting the Map, you will find different settings. First is the color
palette - Select between numerous different presets.
TP/APT text color allows you to add custom color to the text, which
appears on the map.
TP/APT text size allows you to add custom size to the text, which
appears on the map.
Double tap zoom sets the amount of zoom, which is applied when you
double tap on the map.
Page 29

Document Name:
Colibri X user’s manual
Version: 1.0
Page 28 of 34
We offer 12 different Map pallets, which can be seen below.
LX Navigation 1 LX Navigation 2 LX Navigation 3 LX Navigation 4
Imhof 1 Imhof 2 Imhof 3 Swiss Atlas
ICAO Orange UK Black and white
Page 30

Document Name:
Colibri X user’s manual
Version: 1.0
Page 29 of 34
Info
By choosing info page, you can view the following Colibri X information:
Serial number, FW version, HW version, IGC serial and production date
of the device.
Page 31

Document Name:
Colibri X user’s manual
Version: 1.0
Page 30 of 34
PART THREE – FLYING WITH COLIBRI X
To get the best out of the Colibri X, it is important that some preparation is done prior to the flight – trying
to configure the instrument or set up a task while flying the glider may spoil your whole day! Pre-flight
preparation will ensure that the flight will be both successful and enjoyable.
Flight preparation on the ground
- Check if you have desired TP, APT and Airspace database uploaded.
- Prepare a task.
- Check pilot information (this information is written into the flight declaration)
- Check logger settings
Before take off
- Switch the unit ON at least 3 minutes before take-off (this will ensure sufficient GPS reception and will
create a baseline of the baro trace).
- Select correct glider and elevation on initial setup.
- Check if the task is correct using the Task setup menu.
- During the take-off, the task will automatically be declared in the flight recorder.
During flight
The Colibri X hardware and software concept is so well optimized that the pilot doesn’t have to spend too
much time operating the unit during flight.
A helpful indication that the unit has changed to the flying mode is the appearance of statistics page.
Set QNH
The pilot should input actual QNH value for the airfield he or she is to take-off from. This action should be
carried out on the ground, prior to take-off. It is very important to do it correctly and accurately.
Wind calculation
Colibri X measures wind using two different methods. Wind calculation results are shown on the main vario
and navigation pages. Colibri X will switch between straight and circling mode automatically and wind
history will be included in the new measurements.
Circling
Wind calculation is based on ground speed (GS) variations due to wind influence during circling. The method
is exclusively active during climbs. The process starts automatically once circling is detected. The calculation
is based on the fact that the ground speed is affected by wind. GS is at a maximum with a tailwind and
minimum with a headwind. This GS difference is used to calculate the wind.
Straight flight
During the straight flight, the wind is calculated using an iterative method that is based on IAS, GS and TRK
measurements.
Page 32

Document Name:
Colibri X user’s manual
Version: 1.0
Page 31 of 34
Influence of wind in final glide
The actual wind data (speed and direction) influences the final glide calculation. In task mode, the final glide
indication is based on the remaining distance over all TPs until finish (not over turn points already passed).
Wind influence for individual legs is based on current wind data.
Event function
The user has the option to set one of the user inputs to Event. If Event switch is pressed during flight, it will
enable faster record interval in flight recorder (recording in shorter intervals as default for a limited time).
Event parameters can be set in Setup/Logger on LX Era unit. The action is accompanied by a clear message.
Task start
The task is started automatically when glider leaves start TP observation zone and navigation to the next
point will start. If the pilot wishes to navigate back to the starting point, he must simply use pull up menu
(pull up NavBox line in TSK page) and select the Previous waypoint. Please refer to Task page chapter.
After landing
It is recommended that you keep the instrument ON for a few minutes after landing. This will ensure a
baseline of the baro trace.
The unit can be switched OFF or the flight can be downloaded anytime after landing.
Downloading flights
Make sure the micro SD card is properly inserted in Colibri X. In the setup page, select logbook and search
for a flight that you wish to download. Select the flight. On the bottom of the page, you will find "Copy to SD
card" icon. By selecting it, the transfer will begin. A progress window will inform pilot when the flight is
copied to external SD card. The file format of flight is .IGC.
Page 33

Document Name:
Colibri X user’s manual
Version: 1.0
Page 32 of 34
PART FOUR – CONNECTIVITY
4.1 SD card
Always copy data to the root of SD card. Always use the SD card provided with the new device.
All the data and flights are on the root of SD card. Always safely remove SD card when connected to a
computer.
4.2 Bluetooth and WiFi
The Colibri X has internal Bluetooth and WiFi modules. You can switch them on and off at the bottom of the
drop-down page each marked with its own icon. Turn both off to save the battery.
4.3 Micro USB
The micro USB port is used for power supply. Always use the cable and adapter provided with the device.
Page 34

Document Name:
Colibri X user’s manual
Version: 1.0
Page 33 of 34
TIPS, TRICKS & TROUBLESHOOTING
Storing the device
Store the Colibri X in a dry environment, with a temperature below 25°C.
When you store the Colibri X for a long period, it is recommended that the battery charge be kept to at least
50%. Regularly check the battery status (every one to two weeks) and charge if needed.
Security - IGC seal
If the security seal is lost you will receive the message while powering on the device. To continue, you will
have to confirm. The lost seal does not influence the functions of the device, but the flights will not be
digitally signed for a valid IGC record.
For resealing the device always contact your local dealer or manufacturer.
Battery
To charge the battery, plug the Colibri X to the micro USB port and the wall plug with cable and wall plug
provided with the new device. To charge the device faster, turn off the Bluetooth and WiFi in the drop down
page.
Page 35

Document Name:
Colibri X user’s manual
Version: 1.0
Page 34 of 34
Do not try to open the Colibri X. The battery can only be replaced by authorized dealer or manufacturer.
 Loading...