

Page 1

Colibri II
Flight recorder and navigation instrument
Manual version: 1.7
LX navigation d.o.o., Tkalska 10 SLO 3000 Celje, tel: + 386 3 490 46 70, fax: + 386 3 490 46 71
support@lxnavigation.si , http://www.lxnavigation.si
Page 2

Contents
Introduction .................................................................................................................................................. 4
GPS receiver .............................................................................................................................................. 4
Power supply ............................................................................................................................................. 4
Controls ..................................................................................................................................................... 5
Connectors ................................................................................................................................................ 5
SD card reader........................................................................................................................................... 5
Main page ..................................................................................................................................................... 6
Thermal assistant ...................................................................................................................................... 6
Flarm radar page ........................................................................................................................................... 7
TP Navigation page ....................................................................................................................................... 9
TSK Navigation page ..................................................................................................................................... 9
Task TP navigation selection ................................................................................................................... 10
Task TP edit ............................................................................................................................................. 10
GPS information page ................................................................................................................................. 11
Logbook/statistic page ................................................................................................................................ 11
Flight options .......................................................................................................................................... 12
Setup page .................................................................................................................................................. 12
QNH/ALT ................................................................................................................................................. 12
Vario ........................................................................................................................................................ 13
Units ........................................................................................................................................................ 13
SD Card .................................................................................................................................................... 14
Logger...................................................................................................................................................... 15
I-record ................................................................................................................................................ 15
Event ................................................................................................................................................... 15
Warnings ................................................................................................................................................. 16
ENL .......................................................................................................................................................... 16
Display ..................................................................................................................................................... 16
NMEA ...................................................................................................................................................... 17
Password ................................................................................................................................................. 17
Flarm ....................................................................................................................................................... 17
Info .......................................................................................................................................................... 17
Colibri II – Flight recorder and navigation instrument Page 2
Page 3

Battery information and power management ............................................................................................ 18
Flight Recorder Management ..................................................................................................................... 19
Start and Stop of flight recording ........................................................................................................... 19
Flight evaluation...................................................................................................................................... 19
IGC file structure ..................................................................................................................................... 20
Baro trace check (calibration) ................................................................................................................. 21
Cooperation with other units ..................................................................................................................... 21
Data exchange with 3rd party units ......................................................................................................... 21
Installation .................................................................................................................................................. 22
How to power on and off ........................................................................................................................ 22
External power supply ............................................................................................................................ 22
Pin out of USB mini B connector ............................................................................................................. 22
Flying with Colibri II ..................................................................................................................................... 23
List of standard parts and options .............................................................................................................. 24
Options .................................................................................................................................................... 24
Colibri II power and data interface .................................................................................................... 24
Optional mounting frame ................................................................................................................... 24
Appendix ..................................................................................................................................................... 25
Connection Flarm to Colibri II ................................................................................................................. 25
Revision history ........................................................................................................................................... 26
Colibri II – Flight recorder and navigation instrument Page 3
Page 4

Introduction
The unit’s main functions are flight data recording and the generation of files that meet IGC regulations.
Due to its excellent HW configuration many supplemental navigation functions are also offered to the
pilot. The most important feature is a sunshine readable color display with a unique variometer
function, including both an audio and needle presentation.
Key features are:
-Extremely small outline: 40 x 62 x 22 mm
-Completely new design approach
-Sunshine readable color display as a central part of the system
-Simple manipulation via one multifunction switch
-Built in GPS receiver and GPS antenna
-NMEA output
-Internal battery ensures up to 10 hours of autonomy
-Built in battery charger (5V via USB cable)
-External power input
-micro SD card for data transfer
-Variometer with audio as a standard solution
-Basic navigation
-IGC Approved Flight recorder
GP S re ceiver
A highly sensitive GPS receiver with built in antenna is an integral part of the unit so there is no longer a
requirement for an external antenna. The internal antenna allows for either a vertical or horizontal
installation of the unit. For horizontal installations, the unit must be mounted with the display up for
proper GPS reception.
Power supply
The unit contains an internal battery that is capable of powering the unit for up
to 10 flying hours. External power may also be connected via a converter that
converts the 12V glider battery power to 5V. An external power supply module
can be ordered as an option.
The internal battery can be recharged via the included USB cable from a PC or
the wall adapter (220V to 5V) that is included with the unit. Charging time is
typically 3 hours. The internal battery is also recharged when external power is
connected. When the battery is charging, a “plug” symbol appears in top right
corner of main page as shown in the figure to the right. After battery is full, charging symbol disappear!
Colibri II – Flight recorder and navigation instrument Page 4
Page 5
Controls
Note!
There is no USB port carried out, this means no direct communication from the Colibri II to a PC via USB.
It can only be used for external power in (5V max) and NMEA data out to external units.
Note!
Flight data is stored in the internal memory, so the SD card does not need to be inserted during flight.
There is one multifunction switch, the navigation switch, on the front of the unit
that is used to control the Colibri II. The navigation switch allows five motions:
- Move up or down
- Move left or right
- Push button (in) = Enter
Connectors
An USB Mini B type plug is located on the right bottom side of the unit and is used for external
power supply of the unit and for communication via the Colibri II power and data interface.
SD card reader
The unit has an integral micro SD card reader positioned on the left side.
The SD card is used to:
-Upload TP (CUP format)
-Upload task (CUP format)
-Download flights from the internal memory (IGC format)
-Upload the flight declaration in LX format (.HDR )
Colibri II – Flight recorder and navigation instrument Page 5
Page 6
Main page
Note!
Altitude reading doesn’t correspond to IGC recorded altitude, if QNH setting is different than 1013.
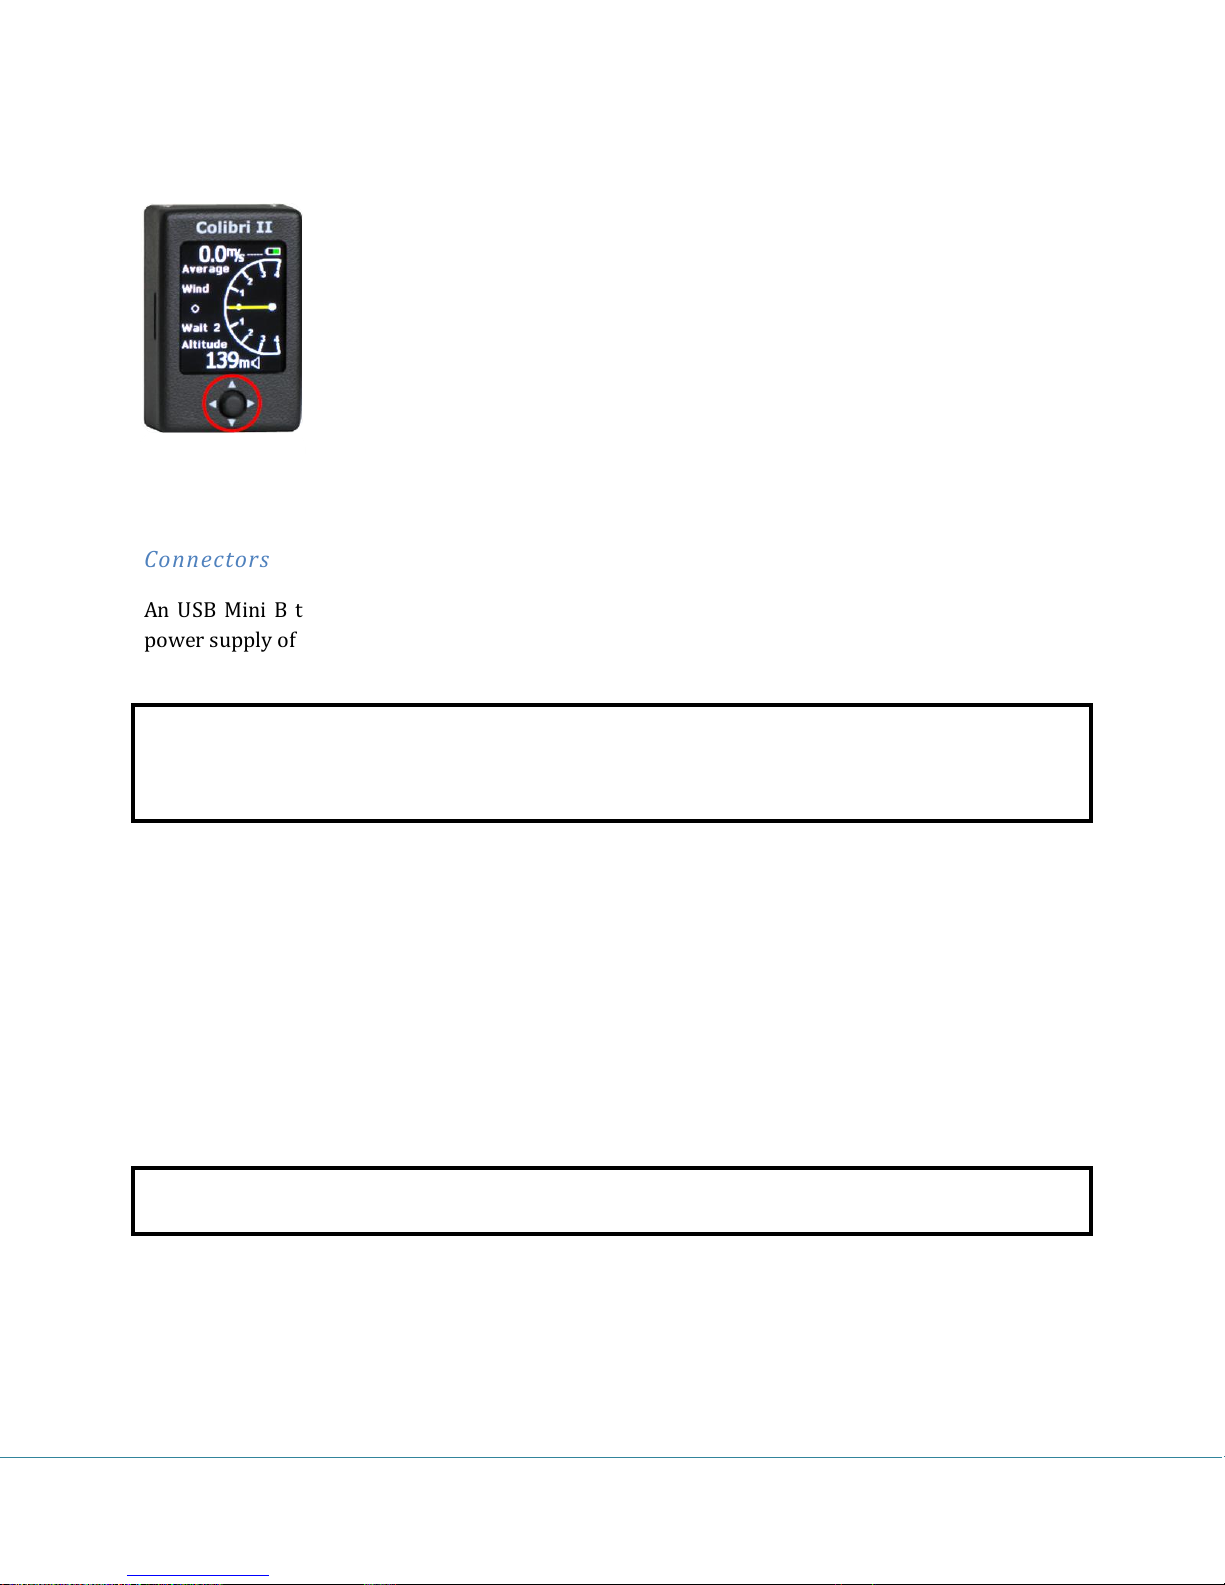
The main page consists of basic flight parameters. In the left upper corner
ground speed information is shown. To the right of the ground speed display,
the GPS signal status is shown (green bars), where 1 bar represent 3 satellites
and 5 bars for more than 6 satellites. The battery indicator is shown in the top
right corner. When the internal charger is charging the battery, the battery
indicator is replaced with the charging “plug” symbol. The central part of the
main page is the vario indicator with yellow needle and numeric average
indicator in middle. The vario needle deflection is ±4m/s (±8knots) but the
numerical average is not limited.
A wind indicator in the central left part of the display shows the wind direction and speed. An arrow
shows the wind direction with respect to your track. The first wind indication will appear after 2 full
turns. The lower part of the page shows a QNH altitude and the vario volume.
Buttons:
Left -> setup page
Right -> TP navigation page
Up, down -> vario volume change
In = Enter -> thermal assistant
Ther ma l assistan t
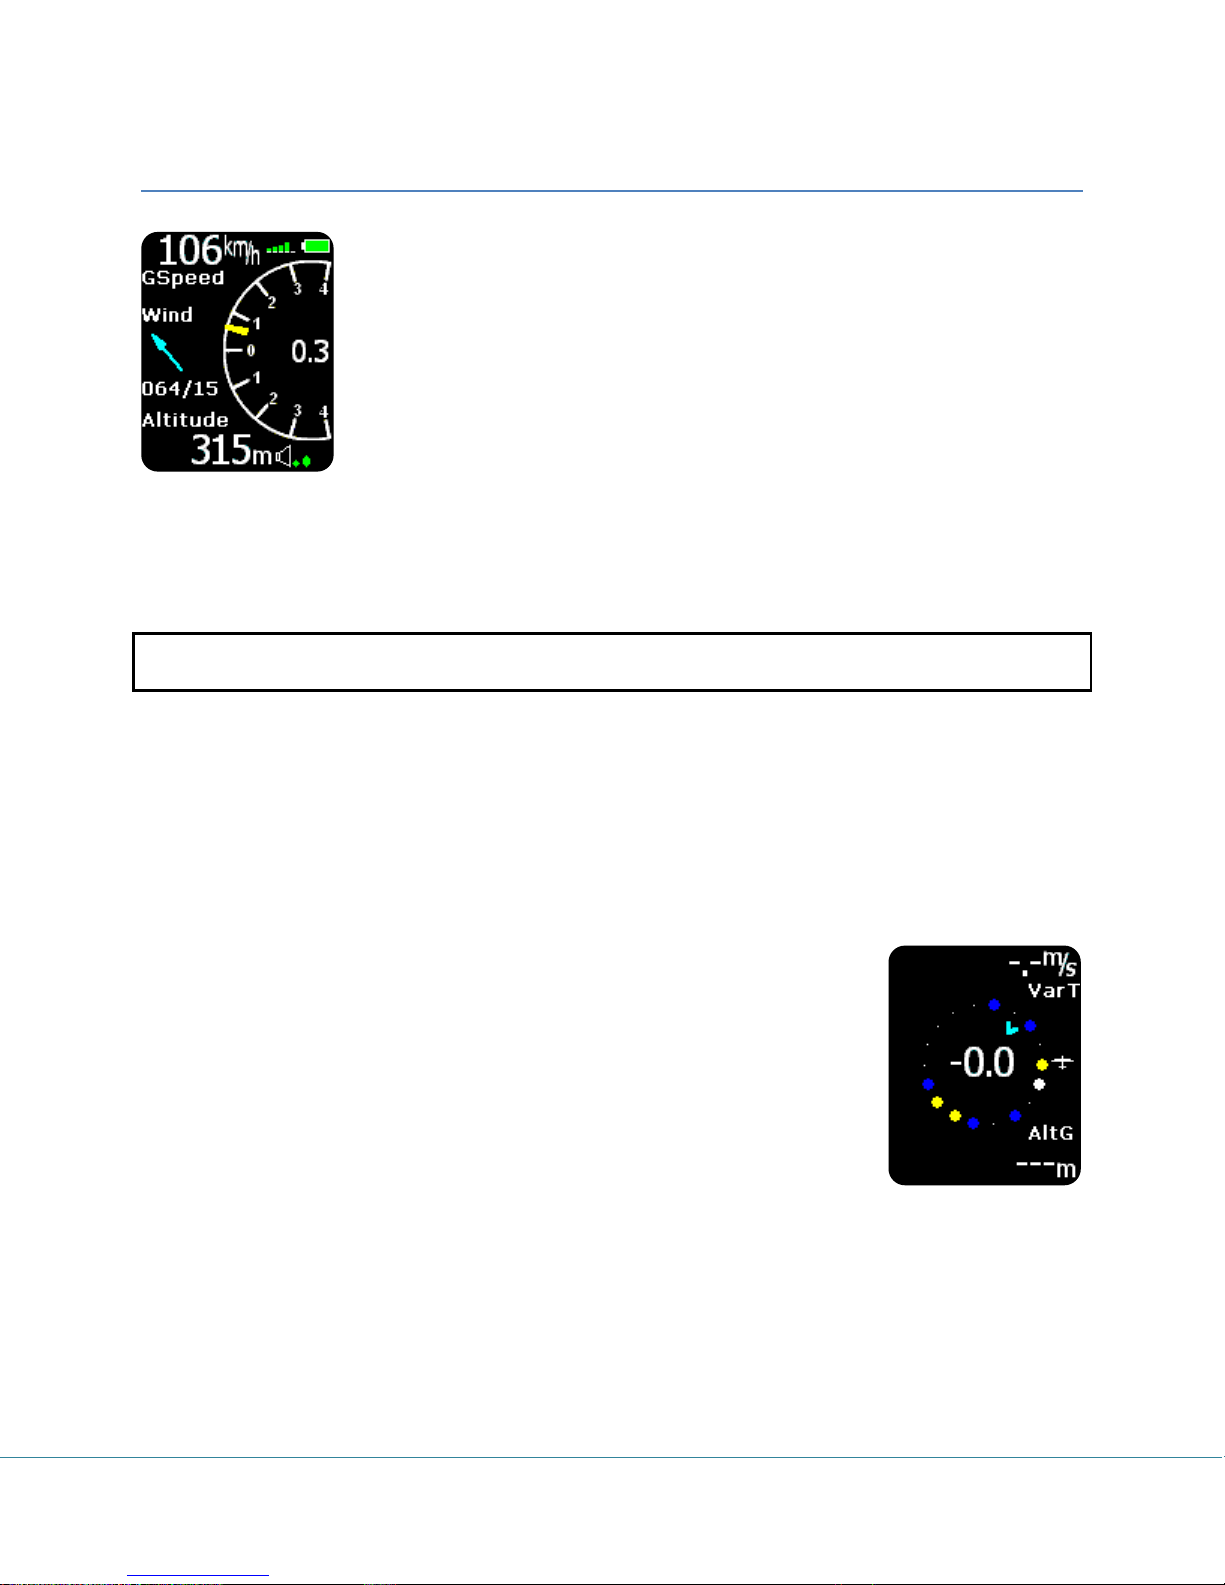
Pressing the enter button in the main page will activate the thermal assistant.
An automatic switch from the main page is also possible by selecting the
Thermal assistant item in the setup/vario menu. The Thermal assistant page
shows the thermal profile in colors as percent of the maximum climb rate in the
last circle. The red dots represent 70% or more, yellow 50-70% and blue less
than 50% of the maximum. No dot means negative vario and the white dot
shows the maximum. The top right corner of the screen shows the overall
thermal average which is the average climb rate from the start of the thermal
until the end of the thermal (total average). In the bottom right corner altitude
gain for the thermal is shown. The numeric figures inside the circle show the current vario and the arrow
shows wind direction.
Buttons:
Left -> setup page
Right -> TP navigation page / Flarm radar page
Up, down -> no effect
Enter -> main page
Colibri II – Flight recorder and navigation instrument Page 6
Page 7

Flarm radar page
Note!
Gliders presented as a dot on the screen, are gliders where pilots have intentionally activated the
PRIVACY mode on their Flarm unit. Gliders in privacy mode send limited data strings and can’t be
visualized completely. However, all warnings will appear regardless of privacy mode.
The graphic display is divided into 3 circular zones that are separated by the
selected zoom distance (1km, 2km, 3 km). The green glider symbol is always
positioned in the middle of the screen and shows the current position of the
Colibri II. Near gliders are displayed as yellow. All gliders located in radio
range will be shown simultaneously on the display. On the top right corner the
selected zoom is displayed. The left upper corner is reserved for custom name
of the flarm object. If the custom name is not entered the field is empty. In the
lower line vario and relative altitude of selected target are displayed.
The graphic display orientation is always track up. To improve orientation, N,
E, W and S are added to the display.
To select a different flarm target, use the up and down button. A White line will point to the selected
object.
Displaying of extended data
After a specific flarm target has been selected, an additional page
showing extended glider data, may be activated with a press on
enter button.
ID: ID number of the selected Flarm unit or Glider ID if programmed
by the owner
Dist: the distance to the glider
RelAlt: above or below in m or feet
BRG: bearing to the near glider
Var: vario of selected glider
Rx,Tx Status
GPS status
Age: Time from the last update
Edit of origin al IDs
A unique Flarm ID that has been received can be converted to a more useable form (maximum 3
characters) any time on the ground or in flight, providing the glider of interest that is showing on the
display and its Flarm data is currently being received with a new name. This makes it possible to identify
known nearby gliders very easily.
Colibri II – Flight recorder and navigation instrument Page 7
Page 8
Note!
This unique ID may only be created when Flarm data is being received from the other unit There is space
to store up to 50 unique IDs. These ID’s will be saved in the Colibri II for future flights.
The procedure:
- Select the glider of interest using the up and down button in the
main graphic screen
- Press enter and the extended glider data screen will appear
- Press enter again, and select the number under which the unique
ID will be stored (0-49). Press enter to continue.
- Unique ID input field will became active, enter the unique ID using
the up and down buttons. The left and right buttons move the cursor. Unique ID’s may consist of up to 3
alphanumeric characters.
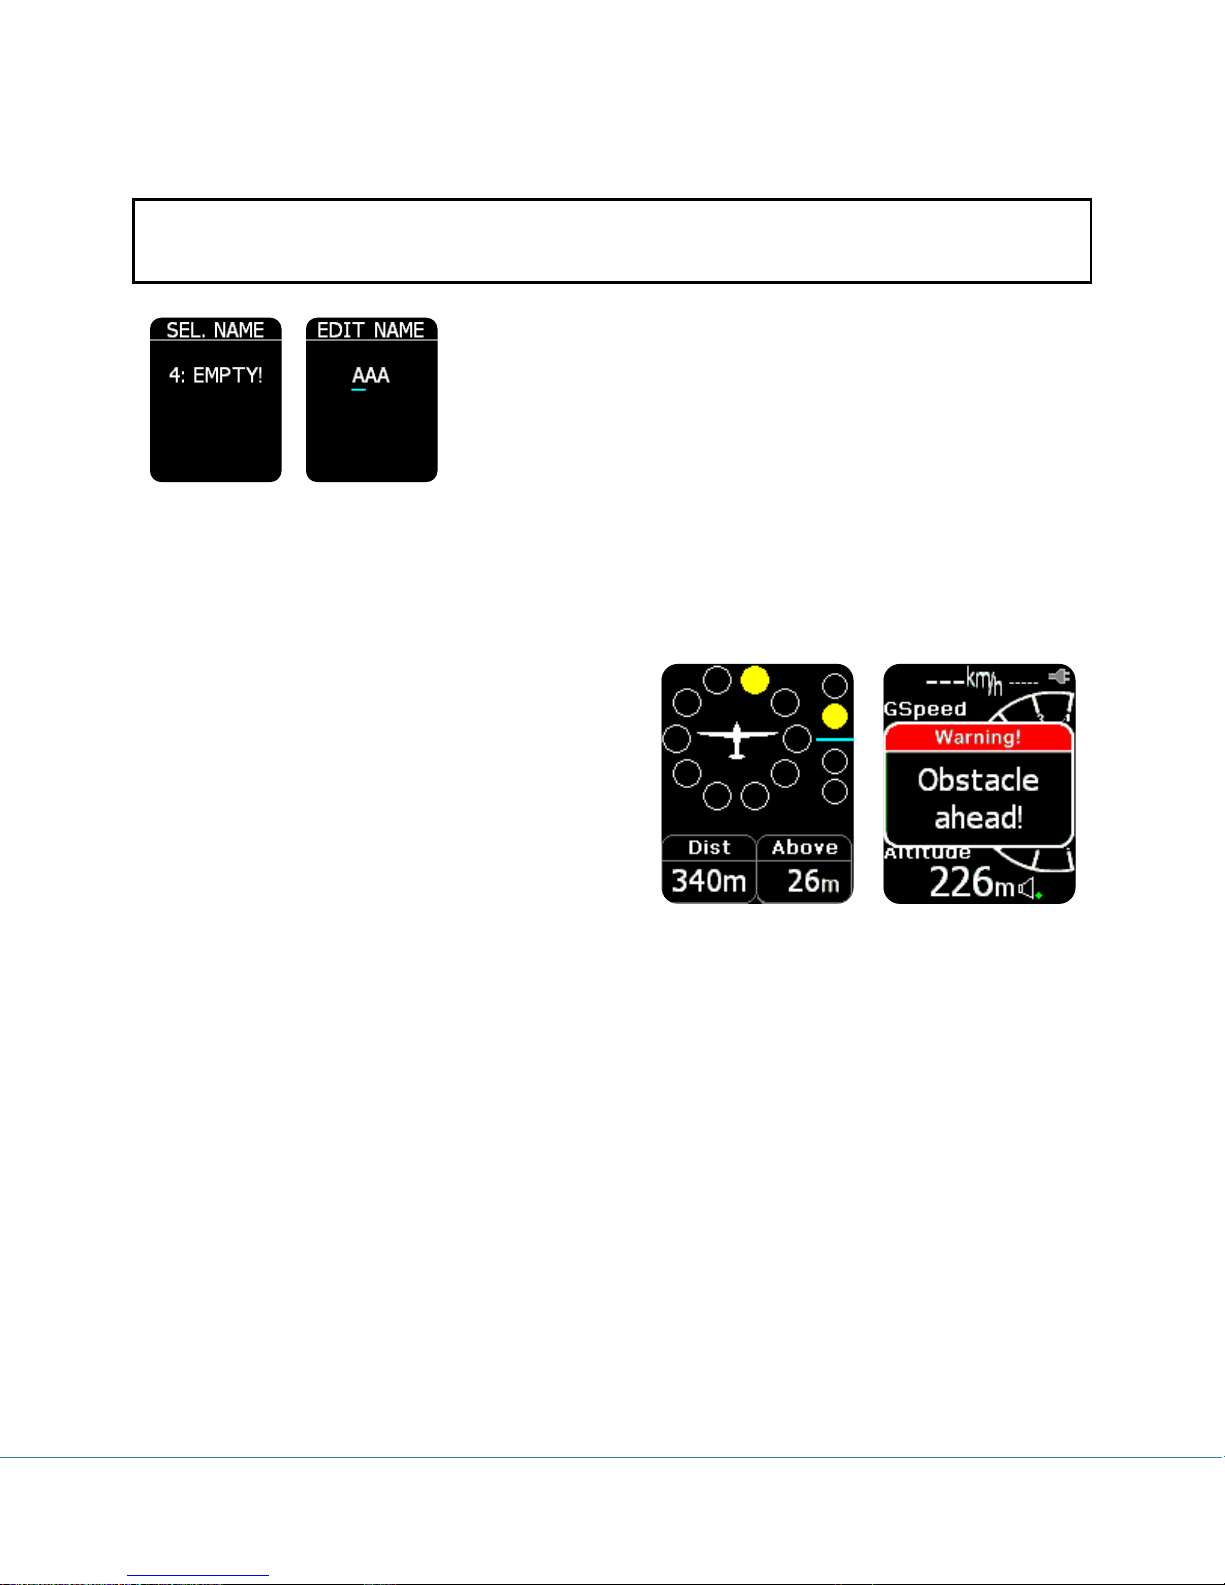
Expression o f collision warnings in grap hi c
After a warning is sent from the Flarm unit a new
screen will appear on the display, with above/below
indicators and the distance of the target. An audible
beep will also be provided with the same volume as
vario beep.
Colibri II – Flight recorder and navigation instrument Page 8
Page 9

TP Navigation page
Note!
TP files can only be loaded into the internal memory via the SD card, use Setup menu, SD Card.
On this page the pilot will find basic information about navigation and
additionally any TP stored in the internal TP database can be selected. In the
top left corner the TP name is displayed, followed by the distance. The yellow
arrow is a North indicator. In the central upper position steering information is
shown. On the bottom of the display there are two navigation boxes that show
track and bearing. Navigation is always track up.
Pressing the enter button, allows the selection of any TP stored in the unit’s
internal memory. It is suggested to use the filter (replace stars in the selection
with letters or numbers) to reduce the number of points in the selection list. To look for a point of
interest, use the Up/Down buttons. After the TP of interest is found, press the enter button and the turn
point will be selected. The unit will change over to the navigation page.
Buttons:
Left -> main page / Flarm radar page
Right -> TSK navigation page
Up, down -> changes TP
Enter -> TP select with filter
TSK Navigation page
The task page guides the pilot from the start point over turn points and then to
the finish line. All points of a task should be included in the unit’s internal TP
file. The task page provides navigation information to the pilot towards the
selected TP from a task. The screen shows the same layout and information as
the TP Navigation page and navigation is always orientated track up.
In addition to the information on the TP Navigation page, the TSK page shows
the TP zone is yellow and a green line shows the required track towards the
next TP of the task. When you enter inside TP zone, acoustic beep will be
generated and “Inside” word will be displayed on screen above TRK navbox.
Pressing the up or down button changes the zoom. After pressing the Enter button the task edit
function appears.
Colibri II – Flight recorder and navigation instrument Page 9
Page 10

If auto next mode is selected for a task TP then the navigation will switch to next TP automatically upon
Note!
Entering a task can be accomplished after the header transfer. Once the task has been prepared on the
PC, it can be transferred via a new .hdr file on the SD card.
zone entry. For AAT, auto mode should not be used and the switch to the next TP must be done
manually (refer to Task TP navigation section below).
Buttons:
Left -> TSK navigation page
Right -> GPS info page
Up, down -> changes zoom
Enter -> Task edit menu
Ta sk TP navigatio n select ion
To navigate to a specific TP in the task, press
Enter on the TSK page and the TASK EDIT menu
will appear. Use the up/down button to move
the white frame around the point to navigate
towards and then press right or left and
navigation will be to this TP.
Ta sk TP edit
Pressing the Enter button while the white frame is around a TP name opens the
TP edit menu. Use select to select a new turn point, and replace the existing
point of the task. Insert will insert a new turn point one position higher. Delete
will delete the existing point. Zone allows the creation of the sector geometry as
specified by the task sheet. Every sector consists of two angles and two
radiuses. Further inputs are zone orientation and Auto Next as discussed above.
Possible settings:
-A1 (angle 1)
-R1 (radius 1)
-A2 (angle 2)
-R2 (radius 2)
-A12 T (angle 12 type)
-A12 A (angle 12)
-Auto next option
Colibri II – Flight recorder and navigation instrument Page 10
Page 11

GPS information page
Note!
Pressing Enter on this screen will activate the Pilot Event “PEV” marker. After the PEV has been
activated more frequent recording will start for a limited period.
The GPS page shows basic GPS receiver information. The first line shows the
status and number of received satellites. When a good signal with a good
position fix is detected “3D” will appear followed by the number of received
satellites. When no satellites are received, “LAST FIX/0” is shown and means
that the coordinates, (latitude and longitude), are from the last known
position. The second and third line shows latitude and longitude information.
Below the coordinates the UTC time corrected by the local UTC offset as set in
the setup/units menu is shown. The bottom line on this page shows the
internal battery voltage.
Buttons:
Left -> TSK navigation page
Right -> logbook/statistic page
Enter -> triggers event
Up, down -> no effect
Logbook/statistic page
While flying, this page provides flight statistic to the pilot such as flight time,
maximum IGC altitude reached during the flight and the maximum climb and
sink speeds.
Buttons:
Left -> GPS information page
Right -> Setup page
Up, down, enter -> no effect
After flight, the statistic information will be replaced with the logbook showing
the date of flight, takeoff time, landing time and flight time.
Buttons:
Left -> GPS information page
Right -> setup page
Up, down -> moving up and down over logbook
Enter -> flight options
Colibri II – Flight recorder and navigation instrument Page 11
Page 12

Flight options
Important!
Adjusting the QNH or entering field elevation will not affect the flight recorder altitude reading. The
altitude stored in the flight log will remain based on QNH 1013
Setup page
Pressing enter on any flight of the logbook will enable the Copy to SD and View
Info function. Copy to SD will copy the selected flight to the SD card. View Info
will show the pilot and glider data.
The Setup page offers a wide range of system inputs.
Select input of interest and press enter.
Yellow colored frame shows ready for edit status and
you can change the data field with the Up/Down key.
To close the edit mode, press enter and the frame will
become inactive (white colored frame). To leave the
menu, use the left or right arrow.
QNH/ALT
QNH and altitude setting will update both the QNH and altitude reading,
regardless of which one is changed. This allows the pilot to use actual QNH data
or elevation data. In fact the pilot should enter airfield elevation before takeoff
if known. After correct input the Colibri II altimeter will show QNH altitude
(above sea level) in both cases.
Colibri II – Flight recorder and navigation instrument Page 12
Page 13

Vario
Audio mute: if checked, vario audio will be on mute and no volume control will
be possible.
Filter: set the vario filter here. Lower numbers mean faster vario response.
Thermal Assistance: if checked, an automatic switch to thermal assistant from
the main page will occur while circling and vice versa.
Units
Under this sub setup page you can set units for vario
(m/s, knots), altitude (m, ft), distance (km, nm, mi),
speed (km/h, mph, kts), pressure (mbar, inHg), UTC
offset to local time and format for GPS coordinates.
Colibri II – Flight recorder and navigation instrument Page 13
Page 14

SD Card
Important!
If the TP file has more than 500 points only the first 500 will be transferred, the rest will be cut off.
The SD card is a data transfer medium that allows the input of data (turn points, tasks, flight info) and
the export of flight log that are stored in the flight recorder. The flights are written to the card in .IGC
format allowing immediate flight evaluation and validation.
LOAD TP: Transfers turn point data from SD to device. Pressing the enter
button will show a list of first 20 *.cup formatted files in the LX/TP directory on
the card. Select the file of interest and start the transfer
with enter.
TP can be imported form CUP file by NAME or CODE.
LOAD TSK: Transfers task from SD to device. Pressing enter button
will show a list of first 20 *.cup formatted files in the LX/TP
directory on the card. Selecting file of interest will then give you a
list of first 20 listed tasks in selected cup file. Select task which you
wish to upload and the transfer of task is completed. Task must
have name in CUP file (1st parameter). If task doesn’t have name, it
will not be listed on task list. Example of task line in CUP format (500km is a name of task):
"500km","000SZEGEDAPT","099SZATYMAZAPT","016SZEGED16","124MORAHALM","000SZEGEDAPT"
LOAD INFO: Transfers header (declaration) files from SD to device. Pressing the enter button will show
a list of all *.hdr formatted files in LX/FLINFO directory. Select the file from which you wish to transfer
the declaration header.
SD INIT: Creates all needed directories on the SD card. (LX/TP, LX/FLINFO, LX/FLIGHTS)
FORMAT: Will format your micro SD card and create all necessary folders.
Colibri II – Flight recorder and navigation instrument Page 14
Page 15

Logger
This sub-setting page allows the
user to set the recording
interval for the logger and some
basic information about the
pilot and glider (the pilot and
copilot name and surname, reg.
number, competition ID, glider
name, class and 2nd pilot name
and surname). This basic
information will be recorded as part of the flight record.
To change the text string, press the enter button and a cursor will appear. Using the up and down
button changes the letters. The left and right buttons move the cursor position in the text string. The
entered string will end behind the cursor when enter button is pressed.
I-record
The pilot can select which additional data will be recorded in the IGC log. ENL
and FXA cannot be unselected and are always recorded (IGC regulation).
Event
When the pilot activates the event button, additional records are logged in the
IGC file (PEV marked records in the flight recorder). The interval parameter
defines how often fixes will be recorded and the number of fixes defines for
how long the additional fixes will be recorded after the PEV has been activated.
Colibri II – Flight recorder and navigation instrument Page 15
Page 16

Warnings
The Colibri II will alert with an audible alarm when a preset altitude, based on
QNH settings, is reached. A warning message will also be shown on the screen
and the pilot is obliged to acknowledge the warning with the enter button. To
turn altitude warning OFF, set altitude to minimum value and next value will
turn the altitude warning to OFF.
ENL
Every unit has a built in Engine Noise Level sensor that detects engine noise
when the engine is running. The value varies from 0 to 100%, and should typical
show values around 90% when the engine is running. This page does not allow
any input, but serves only as an ENL indicator. The ENL value is also stored in
the IGC file.
Display
If you activate the screensaver mode, then after the screensaver timeout
period, the LCD backlight turns off. Every 10s a message “Screensaver is
active!” will appear for one second to show that the unit is functioning.
Pressing any key will deactivate screensaver and will also reset its timeout. If
you intend to use the unit only as a flight recorder, then using the screensaver
mode can extend battery endurance by 3 hours to a total of 10 hours.
Orientation of display can be selected between 0°, 90°, 180° and 270°.
You can also customize your navboxes here. You can select between track,
bearing or ground speed options.
Colibri II – Flight recorder and navigation instrument Page 16
Page 17

NMEA
Note!
NMEA data sent out of the Colibri II doesn’t match the RS 232 standard. So a
level converter should be used. It is suggested to use the original LX Navigation
power and data adapter.
Note:
Volume for flarm warning beep is the same as volume for vario!
The Colibri II can be used as a GPS signal source for other navigation devices.
This menu allows the selection of the NMEA data strings that will be sent out at
selected Baud Rate. The NMEA data is available through the USB connector on
the unit.
Password
To access some special functions of the Colibri II unit you must enter different
passwords.
99999: Will erase all stored flights!
46486: All settings will have factory default values.
76253: Snake game will be activated.
66666: Erase task from memory.
Flarm
Settings for the flarm can be edited here. Zoom of the flarm radar screen and a
“mute” of all audible flarm beeps can be changed.
Info
This page shows information about the software version, serial number,
hardware version, etc …
Colibri II – Flight recorder and navigation instrument Page 17
Page 18

Battery information and power management
Note!
Always charge the device when you will not use it for a long time. Do not store the device with a low
battery level. During the off-season, periodically check the battery status to see if a charge is needed.
The battery provides power for the internal memory. If the battery becomes completely discharged, the
security seal will be broken and the unit must be re-sealed by an authorized LX Navigation repair facility.
The Colibri II is powered by a rechargeable battery. The battery can be charged and discharged hundreds
of cycles. Use only the approved wall charger included with the unit or a PC USB port to recharge the
battery.
Do not leave a fully charged battery connected to a charger for long durations, as overcharging may
shorten the battery life. If left unused a fully charged battery will lose its charge over time.
The battery endurance when using the display is typically 7 hours. If the screensaver mode is used,
duration can be extended for additional 3 hours.
The unit will automatically switch of, if it is not connected to external power and it is not in flight, after
30min of last press on any key. Before automatic switch off, message will be shown on display with
elapsed time until power off. Acoustic beeps will alert user in the last 5 min with intervals on one
minute. To abort automatic power down press any key.
If the Colibri II power and data interface is used, the internal battery will recharge itself and then use the
glider battery for Colibri II operation.
Colibri II – Flight recorder and navigation instrument Page 18
Page 19

Flight Recorder Management
The flight recorder doesn’t need any special care as it works nearly automatically without pilot
assistance. All the pilot should do is to adapt the logger settings, see the Setup page / Logger menu item.
Start and Stop o f flight recording
The unit will start recording immediately after start conditions are met. Start conditions are based on
ground speed and altitude change, so even if the GPS status is bad during takeoff, the unit will start
recording.
It is recommended to switch the unit on a few minutes before takeoff. This will ensure a straight base
line of baro trace (IGC regulation). Running time before takeoff will not reduce memory space of the
flight recorder, due to circular recording before takeoff.
After landing the unit will close the flight after approximately 10 minutes at standstill, so it is
recommended to keep the unit under power and GPS OK until the Calculating Security message appears
on the display. To determine if the flight recorder has closed the flight, move the button to the left or
right. If the Logbook appears, the recording has finished, if the statistic page appears, the recorder is
still active.
Flight evaluat io n
To check the flight data integrity use the IGC shell program. IGC shell is an IGC freeware program
specially designed to verify the flight record integrity. Use the latest LXN.dll file to validate Colibri II
flights.
Colibri II – Flight recorder and navigation instrument Page 19
Page 20

IGC file structu re
Recorder Sn. and flight number
Date of the flight
Flight declaration data as C record
ENL enabled
B records as position records
G record is a digital signature,
ensures data integrity and is always
the last record of the flight.
IGC flight record file is text file, meaningc the data are simply readable by any text editor.
Example of an IGC flight is printed below:
ALXNG88FLIGHT:1
HFDTE110509
HFFXA015
HFPLTPILOT:CRT.ROJNIK
HFGTYGLIDERTYPE:LAK19-15
HFDTM100GPSDATUM:WGS-1984
HFRFWFIRMWAREVERSION:1.0
HFRHWHARDWAREVERSION:1.0
HFFTYFRTYPE:LXNAVIGATION,COLIBRI II
HFGPS:uBLOXf_TIM-LP,16,max9000m
HFPRSPRESSALTSENSOR:INTERSEMA,MS5534A,max8000m
I023638FXA3941ENL
C110509143109110509000100
C4619767N02003217ESZATYMAZ
C4622930N02015629ETSKSTART
C4619767N02003217ESZATYMAZ
C4619767N02003217ESZATYMAZ
F0931560231110413071732232025
LLXNORIGIN0926594619153N02003303E
B0926594619153N02003303EA0006900091007000
B0927054619153N02003303EA0006800091007000
B0927114619153N02003303EA0006800091007000
B0927174619153N02003303EA0006900093007000
B0927234619153N02003303EA0006800093007000
B0927294619153N02003304EA0006900093007000
B0927354619153N02003304EA0007000093007000
B0927414619153N02003304EA0007000093007000
B0927474619152N02003304EA0007000091007000
B0927534619153N02003304EA0006900091007000
B0927594619152N02003304EA0006800091007000
B0928054619152N02003304EA0006800091007000
B0928114619152N02003304EA0006800093007000
B0928174619153N02003304EA0006800091007000
G33069178E3C800E8CE815DD7F0D6968983E2BC0F44C3DC20645F06CC9F78E84
GAF5B28F33E76C8DC5C105CB2B168472106BA50860B3DC93F72D9439C9B371975
G43221B
Colibri II – Flight recorder and navigation instrument Page 20
Page 21

Baro trace che ck (calibrat ion)
Unit
Declaration
TP data
Flight download
Remarks
LX 7007
√
SeeYou Mob.
√
Oudie
√
ConnectMe
√
LX 166*
√
LX 1606*
√
LX Mini Map*
√
Zeus
√ √
Will change logger and pilot settings
Each flight recorder should be periodically checked to verify that the built-in pressure sensor is still in
limits. The procedure is extremely simple and takes only minutes to finish. The most important action is
setting the Rec. interval in Logger Setup to 1 second otherwise the trace will not be uniform. The
procedure is as follows:
-Turn the unit on and put it into the pressure chamber
-Set QNH 1013 conditions in the chamber.
-Apply a pressure jump to start recording.
-Climb apr. 4m/s and make a stop for apr. 30 seconds every 1000 m.
-After reaching 8000m sink apr. 4 m/s and make stops after every 1000m.
-After reaching zero open the chamber and wait for 1 min. After 1 min switch off the unit and confirm
that you wish to end flight.
-Switch on the unit and download the “flight” from the logbook.
-Return Rec. Interval setting to previous value.
-Print baro trace using your preferred PC program, for instance LXe.
Cooperation with other units
The unit can be used as a GPS and pressure/altitude source for many navigation systems. The selected
NMEA data is sent at BR selected on SETUP/NMEA menu. The same rate is used for additional data in
the LXWP format.
Data exchange wit h 3rd party unit s
Colibri II is able to communicate with the units (programs) that are listed below. It is necessary to
arrange the suitable cable connections.
*depends on program which is running on PDA
Colibri II – Flight recorder and navigation instrument Page 21
Page 22

Installation
Important!
Never apply 12 V to the unit. The unit will be seriously damaged if 12V will be applied directly!
Pin number
Description
1
+5V input
2
Data in – input (TTL) BR19200
3
Data out –output (TTL) BR19200
4
Not used
5
GND
The installation process is simple due to the Colibri II HW configuration. If the unit will be used as a
standalone flight recorder (using the internal battery only) no installation work will be necessary. In fact,
the unit may be kept in a pocket or put anywhere in the cockpit. Due to its low weight some temporary
installation methods such as adhesive tapes or velcro can be used.
How to power on a nd off
A long press (approximately 2 seconds) on the push button of the navigation switch, will turn the unit
on. The first indication that the power has been applied is the presence of the LX Navigation logo. After
the logo appears, release the push button. If the button is held too long, the unit will switch off to filter
out any undesired power on.
To switch off simply apply a longer press on the push button and you will be asked if you wish to turn off
device. If there is no confirmation for 5s, unit will continue with its operation. If the flight mode is still
detected, you will be asked if you wish to finish flight or not.
External power sup ply
If external power supply is needed, use a special Colibri II power and data interface, which converts
glider 12V to the required 5V for the Colibri II unit.
Pin out of USB min i B connector
The Colibri II uses USB mini B connector for charging and data exchange.
Pins out of this connector are:
Pin number: 1 2 3 4 5
Colibri II – Flight recorder and navigation instrument Page 22
Page 23

Flying with Colibri II
To get the best out of the Colibri II, it is important that some preparation is done prior to the flight –
trying to configure the instrument or set up a task while flying the glider may spoil your whole day! Preflight preparation will ensure that the flight will be both successful and enjoyable.
After turning on the unit you the main page with vario indicator appears. Check if the units and vario
filter are set correctly in the setup menu. Also check if the automatic mode for the thermal assistant is
on or off (according to your preference) so you will not be disturbed in flight when thermalling.
Check the internal battery voltage and if needed recharge it.
Under setup/logger double check, that the pilot and glider information is correct. Check the logging
interval (typically in the 6-10 sec range). Any new or corrected data under this settings, will
automatically apply to the flight declaration.
On the TP navigation screen check if TPs of interest are preloaded. If not, upload them using the SD card
under setup/SD card/load TP.
Check the task in the TSK navigation page to ensure the correct task has been loaded. If you change or
edit any point in task setup, it will automatically declare the new task in the flight header. You can set
the task manually or transfer it with the *.hdr file from setup/SD card/load info.
Check if the screensaver mode is on or off. If you wish to use the Colibri II as a logger only then the
screen saver will extend battery duration for 3 hours.
Colibri II – Flight recorder and navigation instrument Page 23
Page 24

List of standard parts and options
Pin number
Description
1
+12V (red external wire)
2,3
Not used
4
Data out – output (RS232)
5
Data in – input (RS 232)
6
GND (blue external wire)
-Colibri II unit with built in battery
-USB Mini B to USB A cable
-Wall charger (220V to 5V)
-Manual
Options
Colibri II power and data interface
Colibri II power and data interface is a special unit that coverts 12V to
5V power supply for the Colibri II. It also converts TTL levels of serial
communication to RS232 levels. Maximum input voltage is 24V.
The unit has two plugs. On one side there is a standard USB A
connector. Use the included USB cable to connect the Colibri II on this side. On the other side is an RJ45
plug. This plug is a standard IGC 6-pin connector.
Pin out of RJ45 6-pin connector:
Optional mounting frame
A suitable mounting frame with snap in effect
can be delivered as an option; use of this option
makes installation of the Colibri II easy.
Pin number: 1 2 3 4 5 6
Colibri II – Flight recorder and navigation instrument Page 24
Page 25

Appendix
Connection of Fl arm to Colibri II
Colibri II – Flight recorder and navigation instrument Page 25
Page 26

Revision history
January 2012
Initial release of owner manual
February 2012
Added description: NMEA output at baud rate 19200.
April 2012
Changes based in FW v1.2
- Tp navigation on task is always to start point after takeoff.
- Added Flarm display / radar as option when Colibri II is used together with
Flarm system.
- Pressure units can be changed under “SETUP->UNITS” from inHg to mbar.
April 2012
Changes based in FW v1.3
- Automatic switch off.
May 2012
- Added description about broken seal if battery is discharged on chapter
Battery information and power management.
August 2012
Changes based in FW 1.6
-When entering in TP zone, word “Inside” is visible on TASK page and acoustic
beep will follow.
-Warning altitude is based on IGC altitude (1013mBar).
-Warning for altitude can be switch off.
-Baud Rate of NMEA output can be selected between BR4800, BR9600 and
BR19200
Changes based in FW 1.7
-Task can be uploaded from *.CUB files
-Total memory (in hours) is shown in Logger setup menu.
December 2012
Changes based in FW 1.8
-Load TP from CUP file by NAME or CODE.
-Added password: 66666 It will erase task from memory.
-Landscape/Portrait option under DISPLAY setup.
-Navbox customize added under DISPLAY setup.
-Before turn off you will be asked if you wish to do it to prevent any
unexpected turn offs.
July 2013
Changes based in FW 1.90
- Added FORMAT option in SETUP/SD CARD menu
- Supported orientations 0°, 90°, 180° and 270° under SETUP/DISPLAY menu.
Colibri II – Flight recorder and navigation instrument Page 26
 Loading...