

Page 1
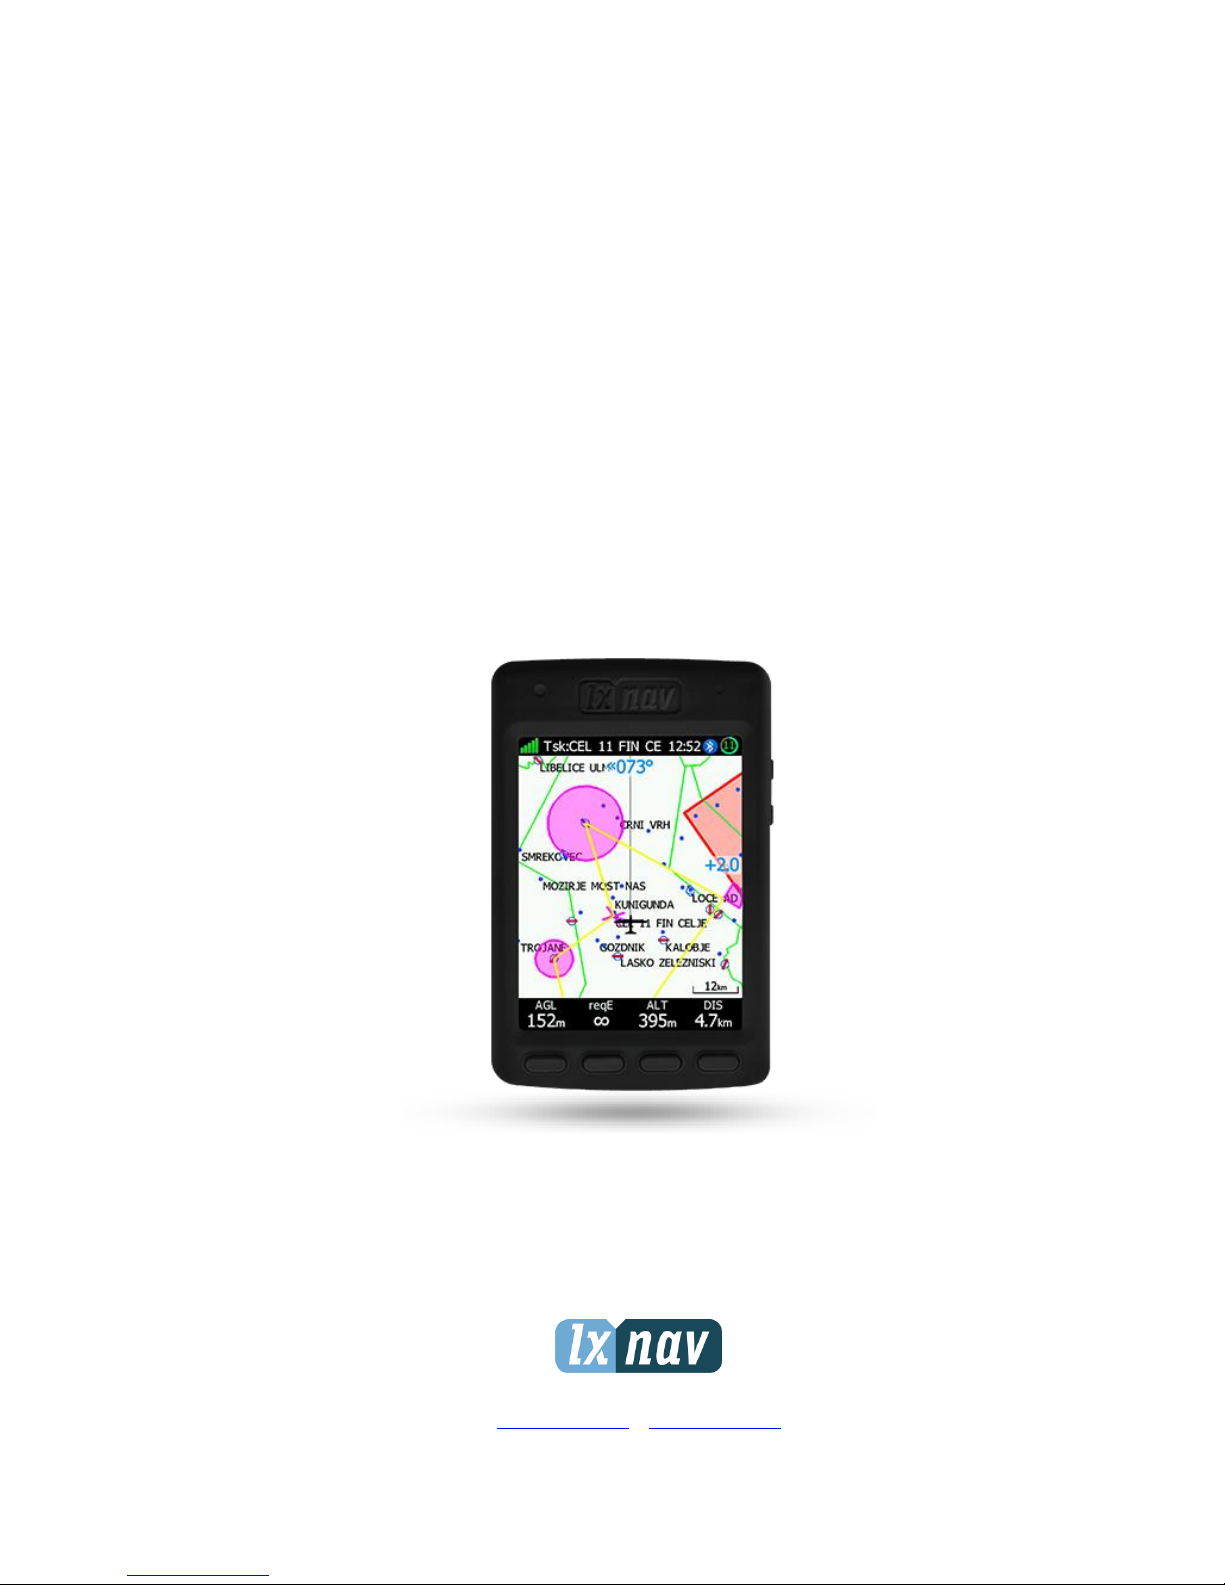
NANO
4
Touch screen flight recorder
Version 1.09
LXNAV d.o.o. • Kidričeva 24, 3000 Celje, Slovenia • tel +386 592 33 400 fax +386 599 33 522
info@lxnav.com • www.lxnav.com
Page 2

Version 1.09 February, 2018
Page 2 of 56
1 Important Notices 5
1.1 Limited Warranty 5
1.2 Sunburned display warranty 6
1.3 Battery information 7
1.3.1 Disposal of Old Electrical & Electronic Equipment 7
1.3.2 Disposal of waste batteries 8
2 Packing Lists 9
3 Basics 10
3.1 NANO4 at a glance 10
3.2 Technical data 11
3.3 Power button 11
3.4 Side buttons 11
3.5 Four push buttons 11
3.6 LED 12
3.7 ALS (Ambient light sensor) 13
3.8 NanoPower cable 13
3.8.1 Available cables for NanoPower 14
3.9 USB adapter (green shrink wrapped) 14
4 Operation 15
4.1 Powering on 15
4.2 User Input 16
4.2.1 Buttons on NANO4 17
4.2.1.1 Applying a longer push on the buttons 17
4.2.2 Text Edit Control 18
4.2.3 Selection Control 18
4.2.4 Line width selection 18
4.2.5 Color selection 19
4.2.6 Checkbox and Checkbox List 19
4.2.7 Slider selector 19
4.2.8 Spin control 20
4.3 Normal operation 20
4.4 Powering off 20
4.5 Security void 21
4.6 Connecting to a computer 21
4.7 Downloading flights 22
4.8 Bluetooth pairing 23
4.9 Charging battery 23
4.10 Calibration of battery 24
4.11 Storing the Nano4 24
4.12 Replacing the battery 25
5 Working with the NANO4 26
5.1 Tree structure 26
5.2 Main navigation screen description 26
5.3 Locked screen 27
5.4 Info screen 27
5.5 Flarm screen 28
5.5.1 Flarm symbols 28
5.6 Waypoint screen 28
5.7 Task screen 29
5.8 Setup Menu 30
5.8.1 QNH 30
5.8.2 Flight recorder 30
Page 3

Version 1.09 February, 2018
Page 3 of 56
5.8.3 Display 31
5.8.4 Graphics 32
5.8.4.1 System 32
5.8.4.2 Vario 32
5.8.4.3 Map 33
5.8.4.4 Airspace 33
5.8.4.5 Waypoints 33
5.8.4.6 Glider & Track 34
5.8.4.7 Task 34
5.8.4.8 Flarm 34
5.8.5 Warnings 35
5.8.6 Obs. Zones 35
5.8.7 Hardware 37
5.8.7.1 Vario 37
5.8.7.2 Communication 37
5.8.7.3 ENL 38
5.8.7.4 Battery health 38
5.8.7.5 Sounds 39
5.8.8 Flarm 39
5.8.9 Files 39
5.8.10 Units 40
5.8.11 Logbook 40
5.8.12 Polar & Glider 40
5.8.13 Wind 41
5.8.14 Password 42
5.8.15 About 42
5.8.16 Shutdown 42
6 Flarm on NANO4 43
6.1 Connecting a FlarmMouse to the NANO4 43
6.2 Connecting a Flarm to the NANO4 44
6.3 Connecting a Flarm to the NANO4 using the NanoPower-FL 44
6.4 Connecting a Flarm to the NANO4 using the NanoPower-PF 44
6.5 Connecting a LXxxxx Flarm port to the NANO4 using the NanoPower-FL 45
7 Configuring the NANO4 46
7.1 Directly on the NANO4 46
7.1.1 Pilot's information 46
7.1.2 Editing Navboxes 46
7.1.3 Setting MC 47
7.1.4 Declaration and editing of a task 47
7.2 On a PC with NanoConfig for Windows 49
7.2.1 Using the NanoConfig program 49
7.2.1.1 Pilot information 50
7.2.1.2 Task declaration 50
7.2.2 Changing parameters with NanoConfig 51
7.2.2.1 Flight recording interval 51
7.2.2.2 Automatically finish flight 51
7.2.2.3 Start recording on power on 51
7.2.2.4 Automatically turn off Nano4, when a flight ends 52
7.2.2.5 Bluetooth 52
7.2.2.6 NMEA output 52
7.3 Using Bluetooth or serial interface 52
7.4 NANO4 config for Android devices 52
Page 4

Version 1.09 February, 2018
Page 4 of 56
7.4.1 Connecting and pairing the NANO4 53
7.4.2 Main page 53
7.4.3 Downloading flights 53
7.4.4 Editing pilot info 54
7.4.5 Editing task for declaration 54
7.4.6 Configuring NANO4 54
8 Troubleshooting 55
9 Revision History 56
Page 5
Version 1.09 February, 2018
Page 5 of 56
1 Important Notices
The LXNAV system is designed for VFR use only as an aid to prudent navigation. All
information is presented for reference only. Terrain, airports and airspace data are provided
only as an aid to situation awareness.
Information in this document is subject to change without notice. LXNAV reserves the right
to change or improve their products and to make changes in the content of this material
without obligation to notify any person or organisation of such changes or improvements.
A Yellow triangle shows parts of the manual which should be read very carefully,
and are important for operating the system.
Notes with a red triangle describe procedures which are critical, and may result in
loss of data or any other critical situation.
A bulb icon shows when a useful hint is provided to the reader.
1.1 Limited Warranty
This LXNAV product is warranted to be free from defects in materials or workmanship for two
years from the date of purchase. Within this period, LXNAV will, at its sole discretion, repair
or replace any components that fail in normal use. Such repairs or replacement will be made
at no charge to the customer for parts and labour, provided that the customer shall be
responsible for any transportation cost. This warranty does not cover failures due to abuse,
misuse, accident, or unauthorised alterations or repairs. LXNAV Instrument displays damaged
by direct or magnified sunlight are not covered under warranty.
THE WARRANTIES AND REMEDIES CONTAINED HEREIN ARE EXCLUSIVE AND IN LIEU OF ALL
OTHER WARRANTIES EXPRESSED OR IMPLIED OR STATUTORY, INCLUDING ANY LIABILITY
ARISING UNDER ANY WARRANTY OF MERCHANTABILITY OR FITNESS FOR A PARTICULAR
PURPOSE, STATUTORY OR OTHERWISE. THIS WARRANTY GIVES YOU SPECIFIC LEGAL
RIGHTS, WHICH MAY VARY FROM STATE TO STATE.
IN NO EVENT SHALL LXNAV BE LIABLE FOR ANY INCIDENTAL, SPECIAL, INDIRECT OR
CONSEQUENTIAL DAMAGES, WHETHER RESULTING FROM THE USE, MISUSE, OR INABILITY
TO USE THIS PRODUCT OR FROM DEFECTS IN THE PRODUCT. Some states do not allow the
exclusion of incidental or consequential damages, so the above limitations may not apply to
you. LXNAV retains the exclusive right to repair or replace the unit or software, or to offer a
full refund of the purchase price, at its sole discretion. SUCH REMEDY SHALL BE YOUR SOLE
AND EXCLUSIVE REMEDY FOR ANY BREACH OF WARRANTY.
To obtain warranty service, contact your local LXNAV dealer or contact LXNAV directly.
January 2017 © 2017 LXNAV. All rights reserved.
Page 6

Version 1.09 February, 2018
Page 6 of 56
1.2 Sunburned display warranty
Any kind of display including LXNAV instrument display screens can be damaged / burnt by
strong sunlight magnified by canopies in certain positions. We suggest you to cover your device
from the direct sunlight, especially when the canopy is open.
LXNAV Instrument displays damaged by direct or magnified sunlight are not covered under
warranty
Page 7
Version 1.09 February, 2018
Page 7 of 56
1.3 Battery information
A rechargeable battery powers the NANO4. The battery can be charged and discharged
hundreds of times, but it will eventually wear out. Only use the approved battery and recharge
your battery only with approved chargers.
When not in use, unplug the charger from the electrical plug and the device. Do not leave a
fully charged battery connected to a charger, as overcharging may shorten its life. If left
unused, a fully charged battery will lose its charge over time. Use the battery only for its
intended purpose. Never use a charger or a battery that is damaged.
If the battery pack is mishandled, the battery pack can burst, cause a fire or even chemical
burns. Observe the following precautions.
• Do not disassemble.
• Do not crush and do not expose the battery pack to any shock or force
such as hammering, dropping, or stepping on it.
• Do not short circuit and do not allow metal objects to come into contact
with the battery terminals.
• Do not expose to high temperature above 60°C (140°F) such as in direct
sunlight or in a glider parked in the sun.
• Do not incinerate.
• Do not handle damaged or leaking lithium ion batteries.
• Be sure to charge the battery pack using the supplied battery charger or a
device that can charge the battery pack.
• Keep the battery pack out of the reach of (small) young children.
• Keep the battery pack dry.
• Replace the battery pack only with the same or equivalent type
recommended by LXNAV.
• Dispose of used battery packs promptly as described in these instructions.
1.3.1 Disposal of Old Electrical & Electronic Equipment
(Applicable in the European Union and other European countries with separate
collection systems)
This symbol on the product or on its packaging indicates that this product shall
not be treated as household waste. Instead it shall be handed over to the
applicable collection point for the recycling of electrical and electronic equipment.
By ensuring this product is disposed of correctly, you will help prevent potential
negative consequences for the environment and human health, which could
otherwise be caused by inappropriate waste handling of this product. The
recycling of materials will be a help to conserve natural resources. For more
detailed information about recycling of this product, please contact your local Civic Office, your
household waste disposal service, or the shop where you purchased the product.
Page 8
Version 1.09 February, 2018
Page 8 of 56
1.3.2 Disposal of waste batteries
(Applicable in the European Union and other European countries with separate
collection systems)
This symbol on the battery or on the packaging, indicates that the battery
provided with this product shall not be treated as household waste. By ensuring
these batteries are disposed of correctly, you will help prevent potentially
negative consequences for the environment and human health, which could
otherwise be caused by inappropriate waste handling of the battery. The
recycling of the materials will help to conserve natural resources. In case of
products that for safety, performance or data integrity reasons, require a permanent
connection with an incorporated battery, this battery should be replaced by a qualified service
staff only. To ensure that the battery will be treated properly, hand over the product at endof-life to the applicable collection point for the recycling of electrical and electronic equipment.
For all other batteries, please view the section on how to remove the battery from the product
safely. Hand the battery over to the applicable collection point for the recycling of waste
batteries. For more detailed information about recycling of this product or battery, please
contact your local Civic Office, your household waste disposal service or the shop where you
purchased the product.
(Applicable for Customers in the U.S.A. and Canada)
Lithium-Ion batteries are recyclable. You can help preserve our environment by
returning your used rechargeable batteries to the collection and recycling
location nearest you. For more information regarding recycling of rechargeable
batteries, call toll free 1-800-822-8837, or visit http://www.rbrc.org/
Do not handle damaged or leaking Lithium-Ion batteries.
Page 9
Version 1.09 February, 2018
Page 9 of 56
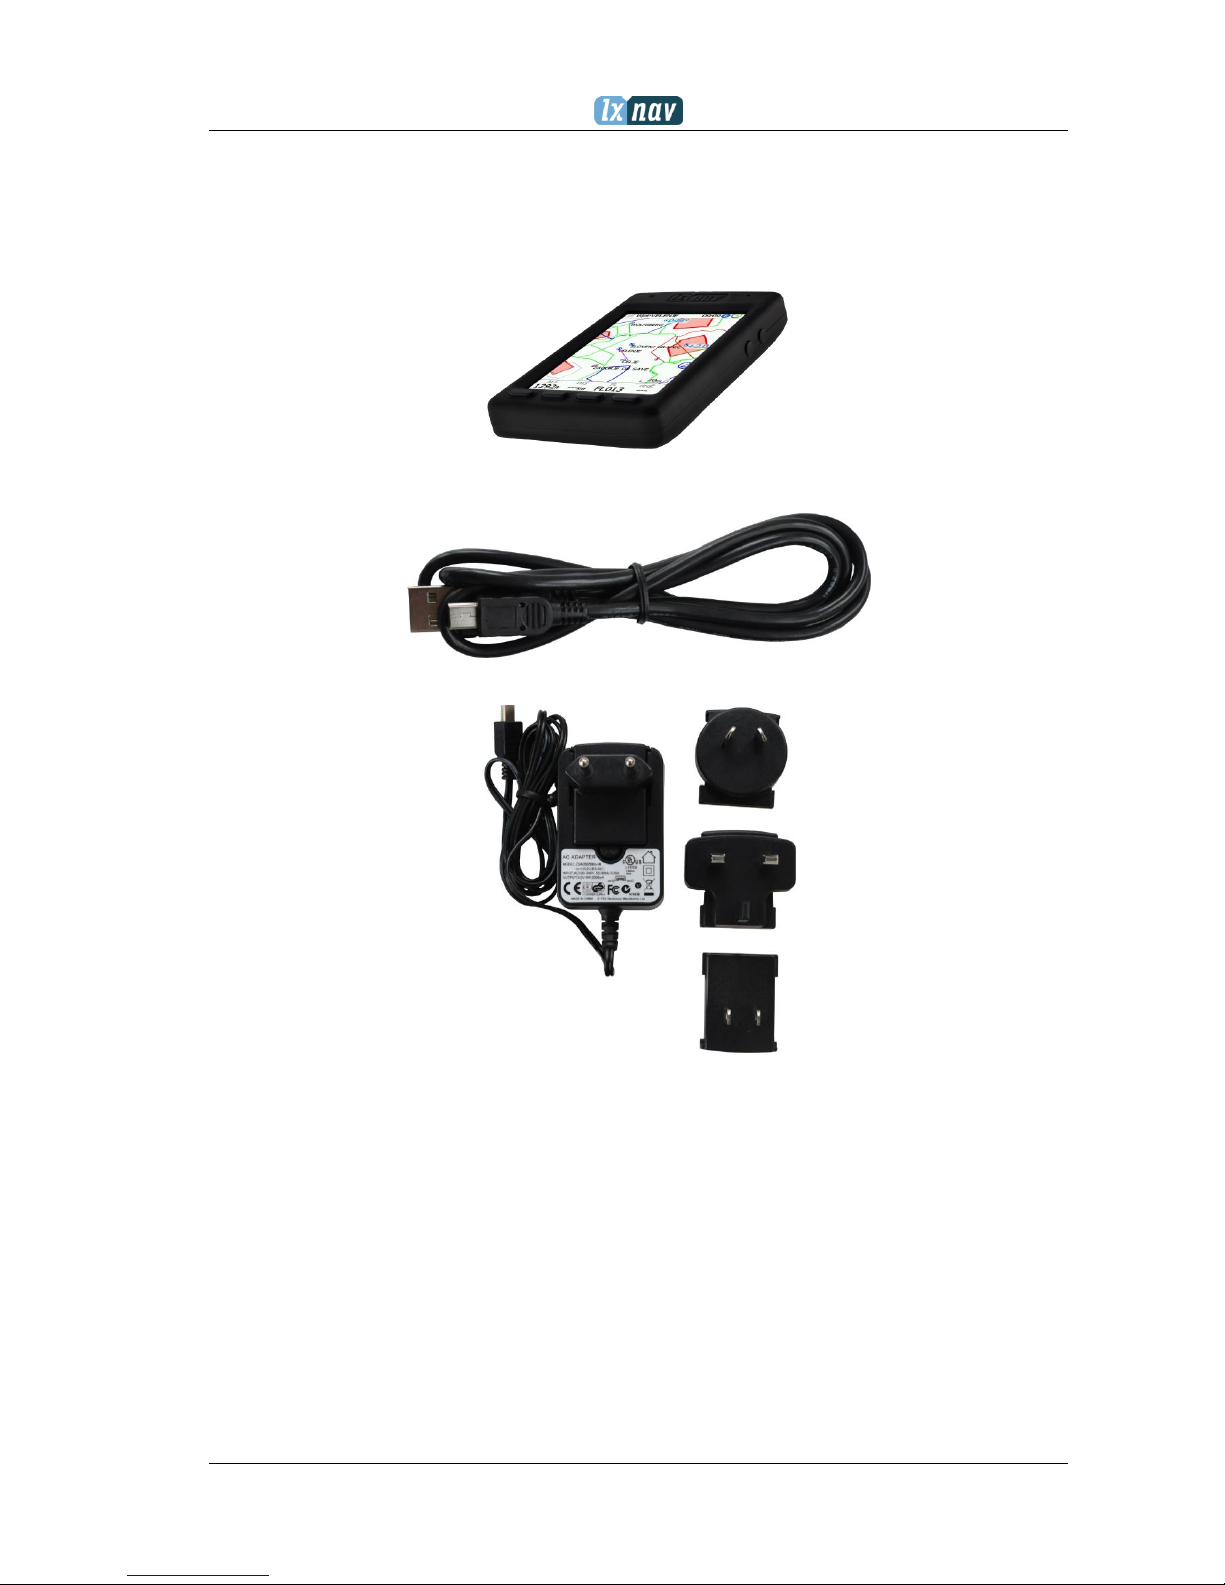
2 Packing Lists
In the box, you will find:
• A NANO
4
flight recorder with a preloaded NanoConfig program and a user manual which
is loaded on the USB stick
• A Micro USB cable
• A Wall charger with a Micro USB plug
• A Level converter (Only with NANO4 up to serial number 06099) (green, shrink-wrapped
USB adapter)
• A Barogram calibration chart
Page 10
Version 1.09 February, 2018
Page 10 of 56
3 Basics
3.1 NANO
4
at a glance
The NANO4 flight recorder is the smallest flight recorder designed in accordance with the IGC
“All Flights” specification. It has an IGC approval for all flights including world records. It
features an integrated 56-channel GPS receiver with a built-in antenna, an altitude sensor, an
ENL sensor, a security micro-switch, a Bluetooth module, a Wi-Fi module and a 2800mAh
battery.
The operational temperature for the NANO4 is from -20°C (68°F) to +60°C(140°F).
Higher temperatures may cause the battery to inflate.
The built-in battery allows up to 36 hours of stand-alone operation. The battery can be charged
when the flight recorder is connected to a computer, the Nano Power or a wall charger.
Bluetooth is used for easy data exchange with a PDA.
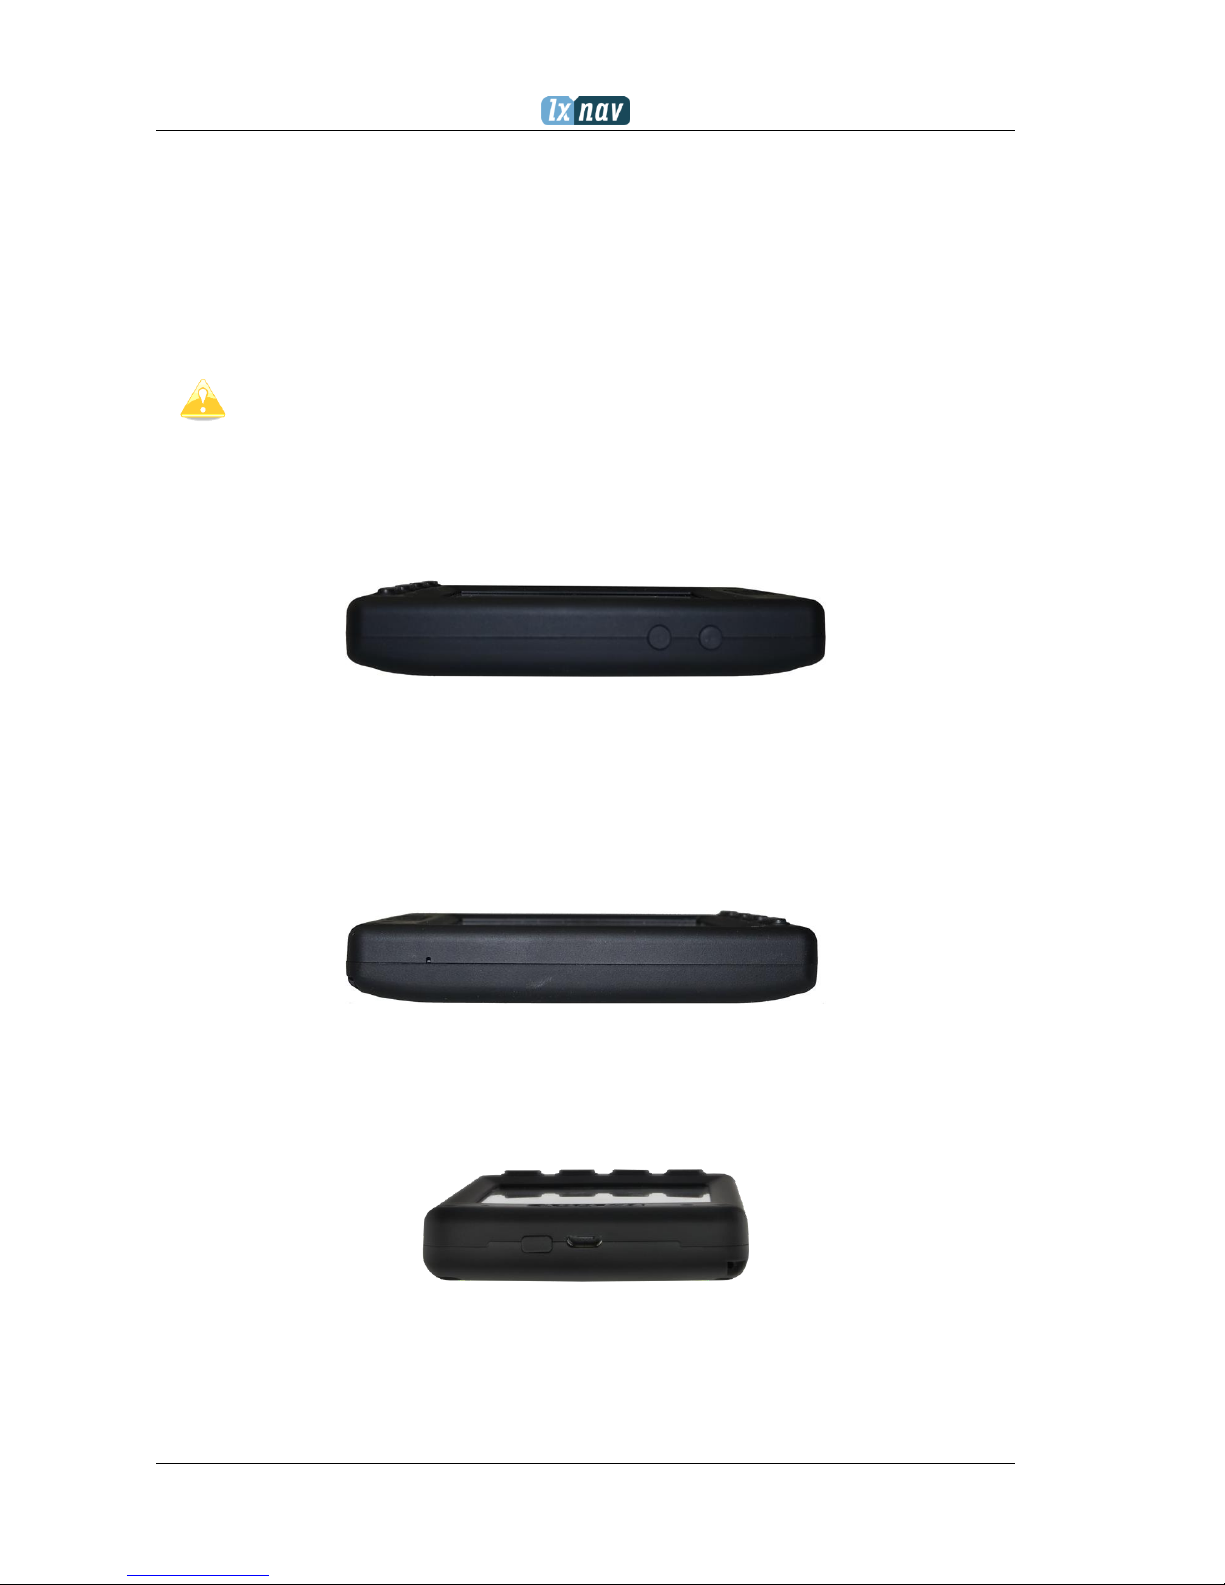
The housing is made of a robust ABS plastic. On the right side of the unit, there are zoom
buttons.
Data storage will be done on a 4 GB state disk... Flights are stored directly in the IGC format
and are downloadable through a USB connection compatible with all operating systems (MS
Win, Linux and Mac OS).
On the left side of the unit, there is a small hole with a reset button. If you need to reset the
unit, use a pin to press the reset button. In all normal operations, this button should never be
used.
At the top of the unit, there is a micro USB connector., It is used for charging and transfer
data. The power button is beside the micro USB.
The internal solid-state disk is preloaded with the NanoConfig program and the NANO4 Manual.
This program is used for uploading a flight declaration and/or changing the settings of the
Page 11
Version 1.09 February, 2018
Page 11 of 56
NANO4. One can also upload flight declarations by using a serial interface cable or a Bluetooth
connection by third party applications (SeeYou, XCsoar), or NanoConfig for Android.
3.2 Technical data
Hardware
• An ARM
• A 4GBytes memory solid state memory
• A VGA 640*480 colour pixel TFT sunlight readable LCD
• A 56-channel GPS receiver
• An engine noise level sensor
• A pressure altitude sensor measuring up to 16000m
Input and output
• A USB interface (mass storage device)
• A serial RS232 interface for PDA connection
• A Bluetooth interface for PDA connection
• A Wi-Fi interface
Size and weight
• Outline dimension: 106x70x18mm
• Weight: ~150g
3.3 Power button
Applying a long pressure on the power button will power on the NANO4. When the NANO4 is
running, a short pression on the power button will lock the NANO4 screen and shut down the
backlight of the screen. Another pressure will turn the screen back on. A longer pressure, when
the screen is on, will show a menu "two options, power off, or lock screen", with the options
to power off, or lock the screen.
When flying, a short push on the power button will record a pilot initiated event,
and the flight recorder will then log 30 fixes, with a recording rate of one fix per
second.
3.4 Side buttons
The side buttons have several actions. (Zoom, Volume, up/down in menu)
When on an info page, a push on the side buttons will increase, or decrease, the sound volume.
When on map pages, those buttons will have a zoom function, and while in the setup menu
you will be able to move from menu to menu.
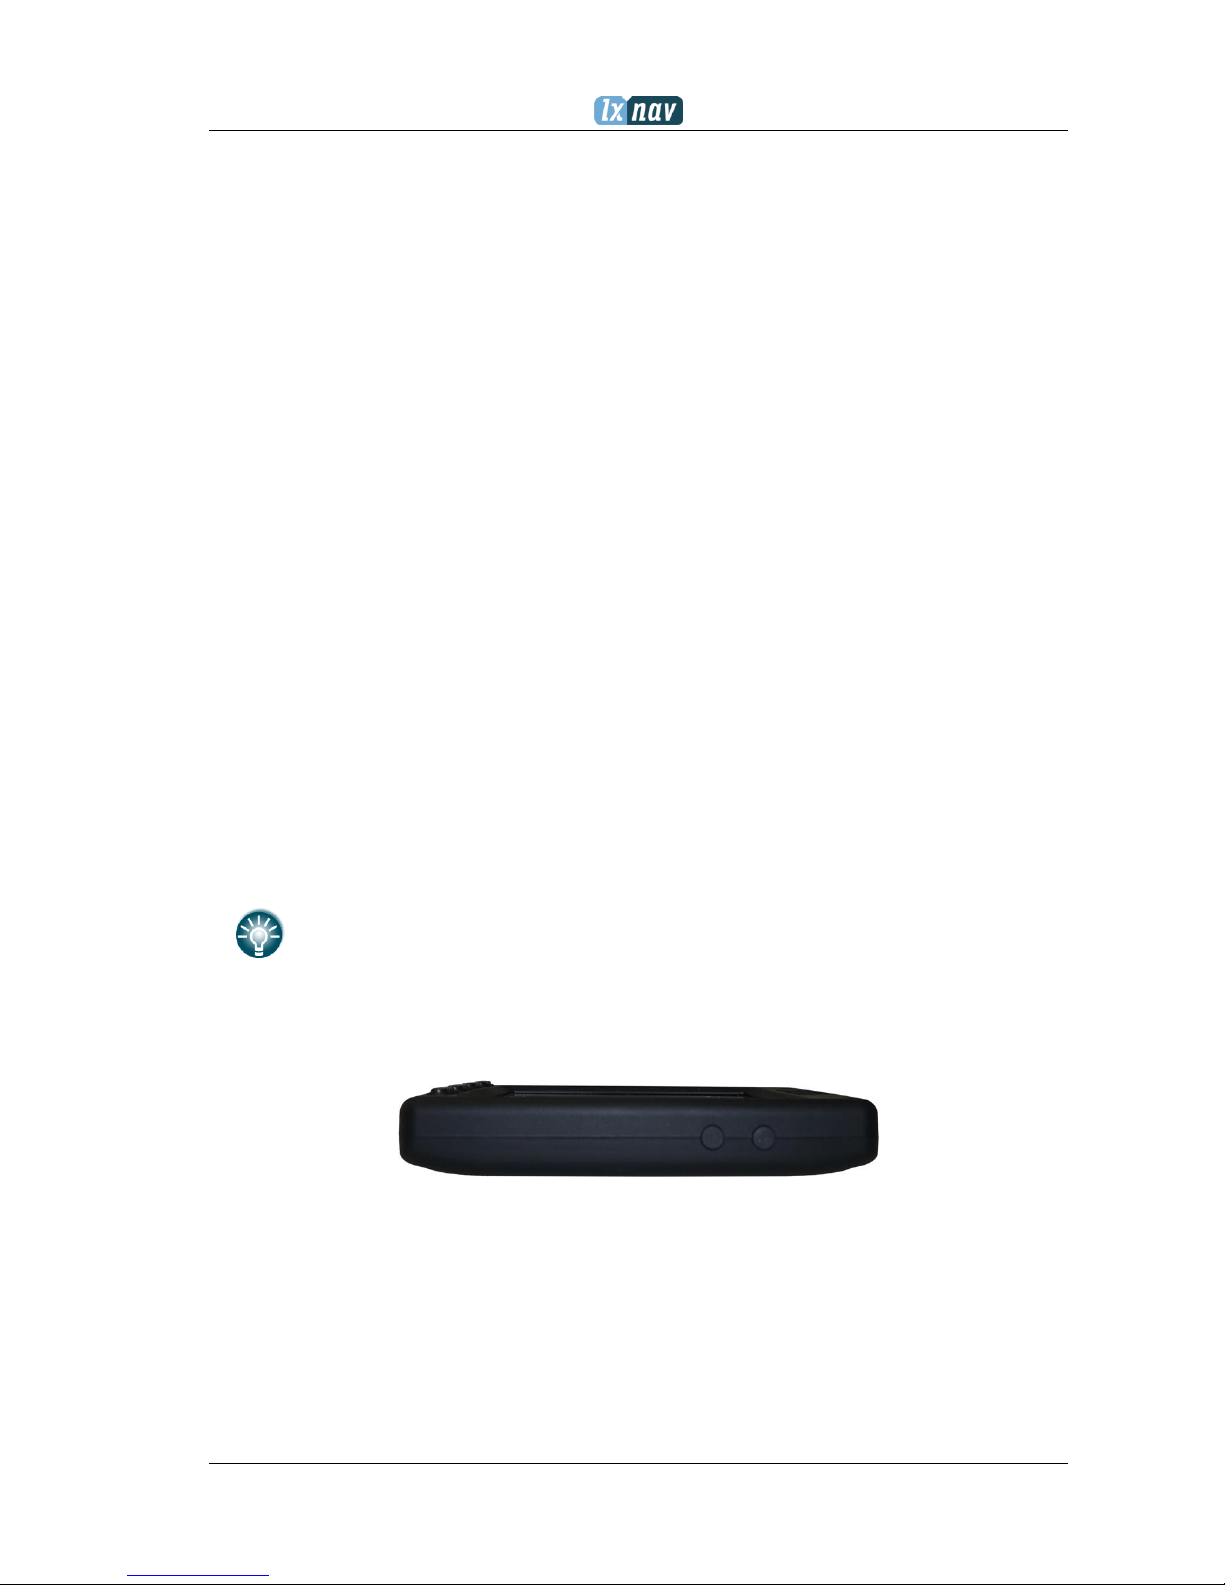
3.5 Four push buttons
The NANO4 has four push buttons, which have a dynamic function.
Page 12
Version 1.09 February, 2018
Page 12 of 56
The function of each push button is described on the label adjacent to the button
The functions of buttons are mostly related to the current page (Waypoint, Task, Flarm, Info,
Setup). If there is no label next to the button, this button has no function.
3.6 LED
On the top left corner of the NANO4, there is a multi-colour LED indicator.
At power on:
• Hold the power button until the blue light disappears.
• In case of any failure (security check, battery check), there is a red flash with a one
Hz period
Bluetooth operation (only, when the screen is off):
• At initialisation, there are rapid blue flashes (blue fast) with a 5Hz period
• In normal operation blue flashes occur every two seconds 2s
Battery (When the screen is off):
• When the NANO
4
is not charging, there are flashes every 10 seconds
• When the NANO
4
is charging, there are red flashes every 2 seconds, until it is full
(green)
• When the state of charge is below 30% the flashes will be yellow, when below 10%
the flashes will be red.
Power off:
• At all times, while holding the power button, red will constantly be on.
LEDs show the status only when the LCD is off. ????
Page 13
Version 1.09 February, 2018
Page 13 of 56
3.7 ALS (Ambient light sensor)
On the top right side, there is an ambient light sensor. If you have enabled "automatic LCD
brightness", the ALS will adjust the brightness of the screen.
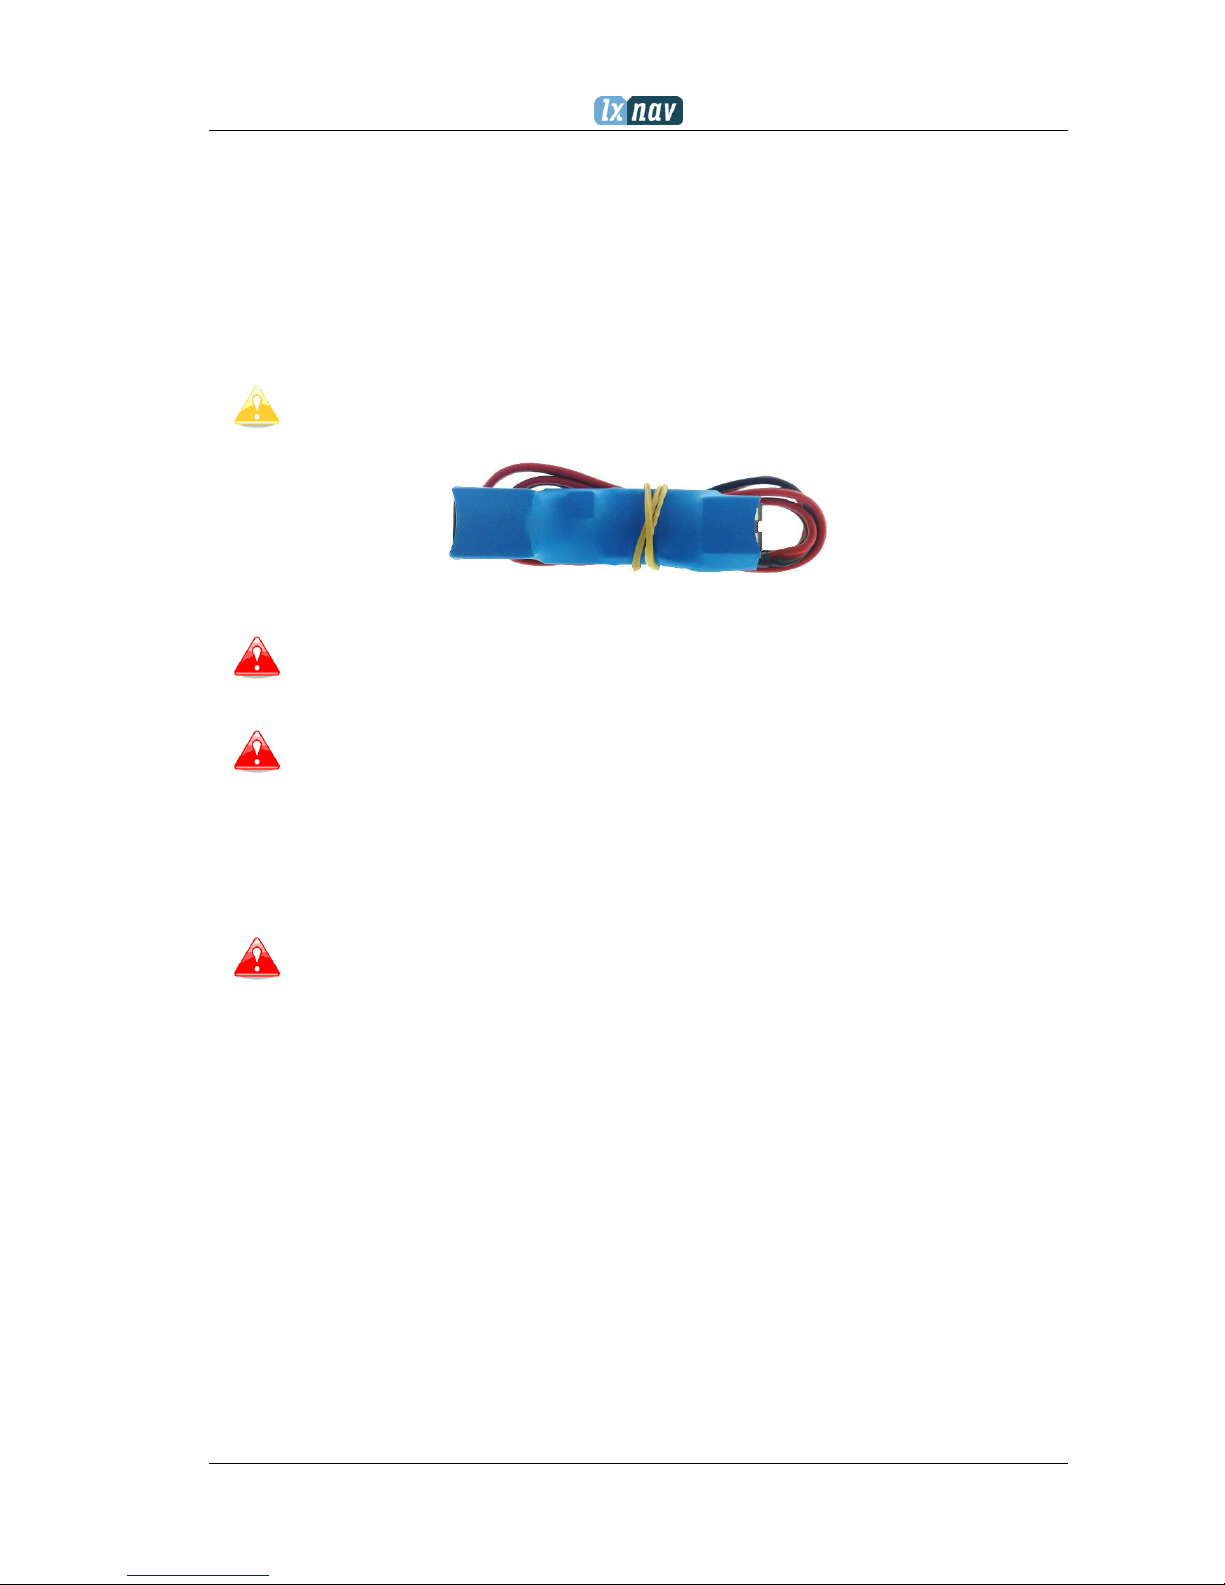
3.8 NanoPower cable
The NanoPower cable is a special device which converts 12V to 5V providing a power supply
for the NANO4 and a PDA. It also translates a serial signal to match the NANO4 signal level and
a PDA or computer signal level.
Nano Power is not a part of the package, therefore is has to be purchased
separately.
Connect the red and black wires to a 12V power supply. Red is positive.
The maximum input voltage is 24 Volts.
NANOs4 up to serial number 06099 need an additional level converter for
connection to NanoPower. This converter is included in the NANO4 box.
The NanoPower has two plugs. On one side, there is a standard USB-A connector. Please use
the included USB-A to a micro-USB cable and plug the NANO4 on this side. Any standard USBA to mini-USB cable can also be used. On the other side, there is an RJ45 plug. This plug is
designed for a PDA or a computer.
The RJ45 plug is NOT designed in accordance with the IGC standard. It can be
used with a dedicated cable only. Do not plug any unknown cable into it as this
may damage the NanoPower circuit.
Page 14
Version 1.09 February, 2018
Page 14 of 56
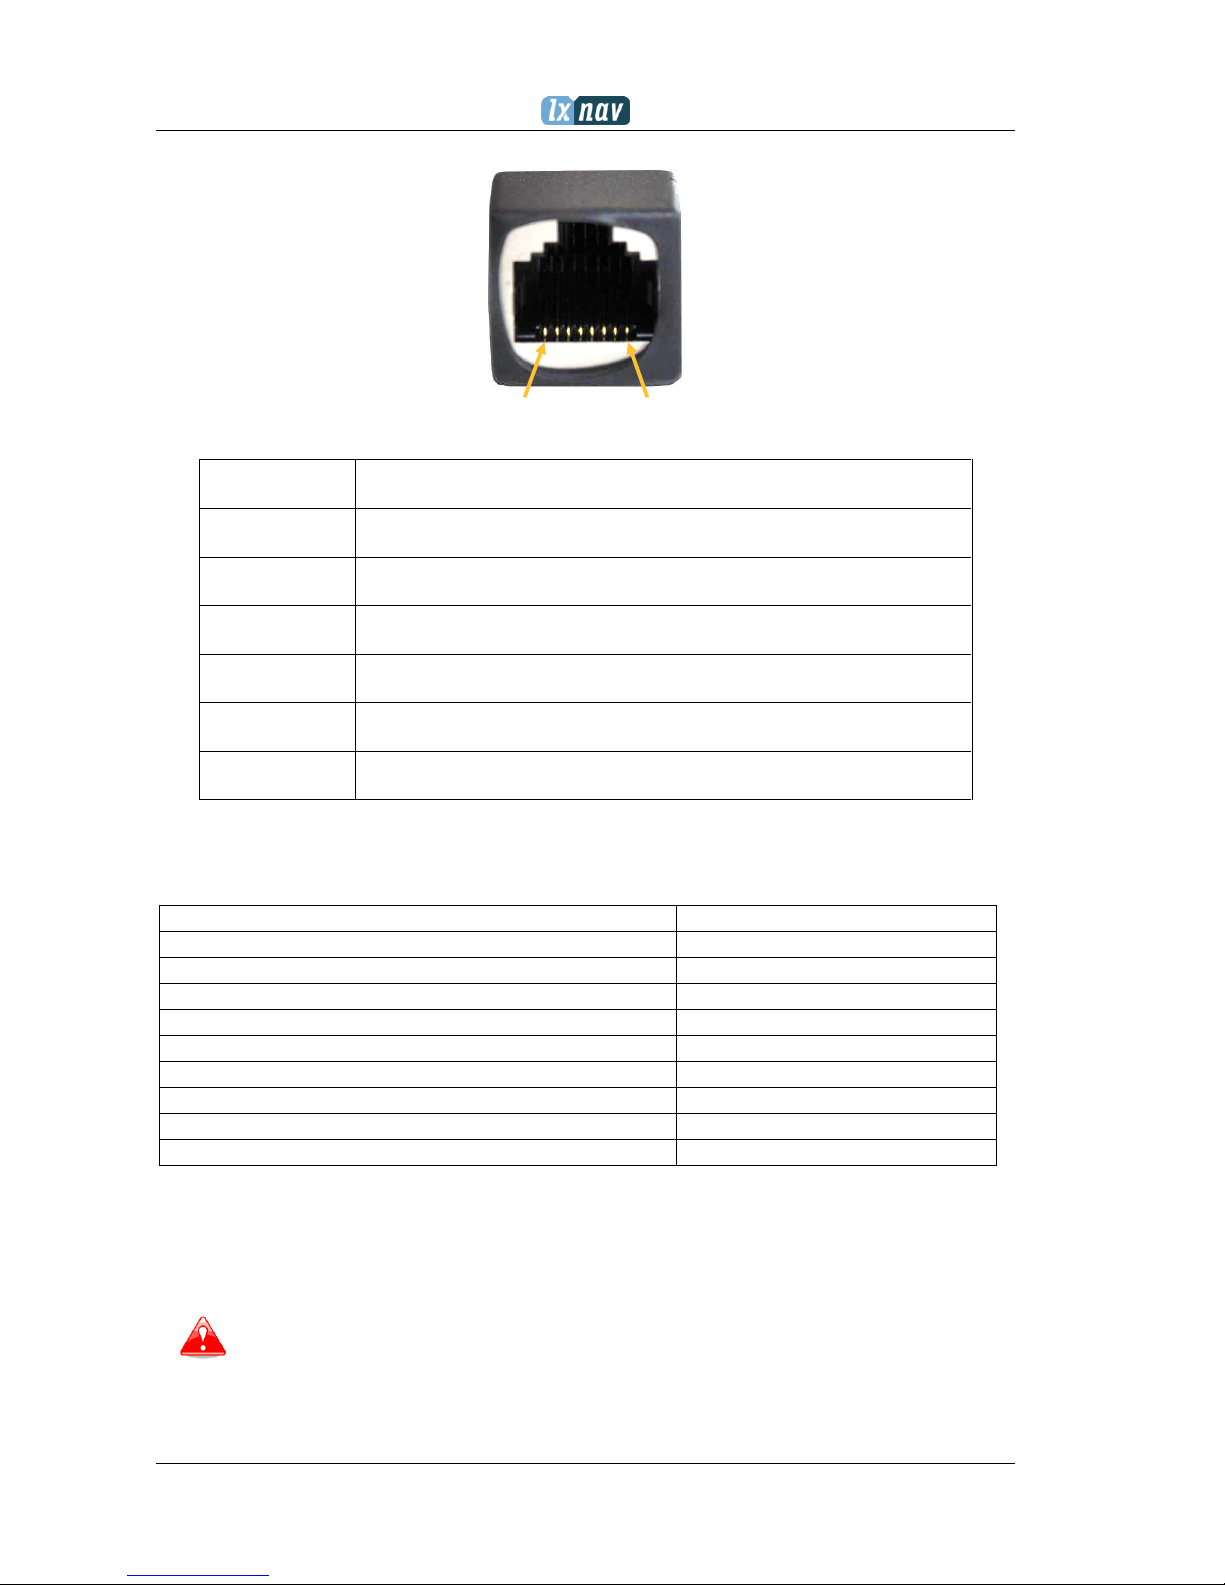
You will find a pin description on the NanoPower RJ45 in the picture below.
1 2 3 4 5 6 7 8
Pin numbers
Pin number
Description
1,2
Ground
3
(output) Transmit from NANO4 RS232 (e.g. Computer, V7)
4
(input) Receive to NANO4 RS232 (e.g. Computer, V7)
5
(output) Transmit from NANO4 LVTTL (e.g. Oudie, HP302)
6
(input) Receive to NANO4 LVTTL (e.g. Oudie, HP302)
7,8
5V OUTPUT (maximum 1A)
3.8.1 Available cables for NanoPower
Device
Cable code
OUDIE
CC-NP-OUDIE1
Generic RS232 with female DB9
CC-NP-232
IPAQ 310/314
CC-NP-IPAQ310
IPAQ 38/39xx/47xx
CC-NP-38
MiniMap
CC-NP-LX
Butterfly Connect
CC-NP-BFC
Flarm
CC-NP-IGC
NanoPower for PowerFLARM
NanoPower-PF
NanoPower for Flarm
NanoPower-FL
3.9 USB adapter (green shrink wrapped)
It is a voltage level converter used only for communication with third party devices (PNAs,
OUDIE….).
This adapter must not be used when using a USB connection to a PC
.
Page 15
Version 1.09 February, 2018
Page 15 of 56
4 Operation
There are two modes of operation: Data transfer mode, and Normal operation mode.
When in the data transfer mode, flights can be downloaded and the NanoConfig program can
be run. When in Normal operation mode, the logger is ready for recording flights.
The mode in which the NANO4 is operating can be determined from the main screen, or LEDs
when the screen is off.
When in data transfer mode, there will be a message on the screen “USB connected”,
whereas in the normal operation mode, the screen will display data only.
4.1 Powering on
There are three ways to power on the NANO4 flight recorder.
Press the power button and the NANO4 will power on. It will go directly to normal operation
mode. On start-up, a splash screen will appear with information containing the Serial number
and the version of the firmware. The NANO4 will then resume normal operation mode.
Connect the NANO4 to a computer using a USB cable. It will automatically power on. At
the same time, when the connection is established, you will see the first message “USB
connected”, and later “USB mounted” ... This indicates that the NANO4 flight recorder is in
data transfer mode. You may now run the NanoConfig program, or copy flights using standard
methods for copying files. You can exit to normal operation mode by pressing on any button.
If the Nano is in data transfer mode, and the USB cable is unplugged, the NANO4 will shut
down.
Connect the NANO4 to NanoPower cable. The NANO4 will then automatically power on, and
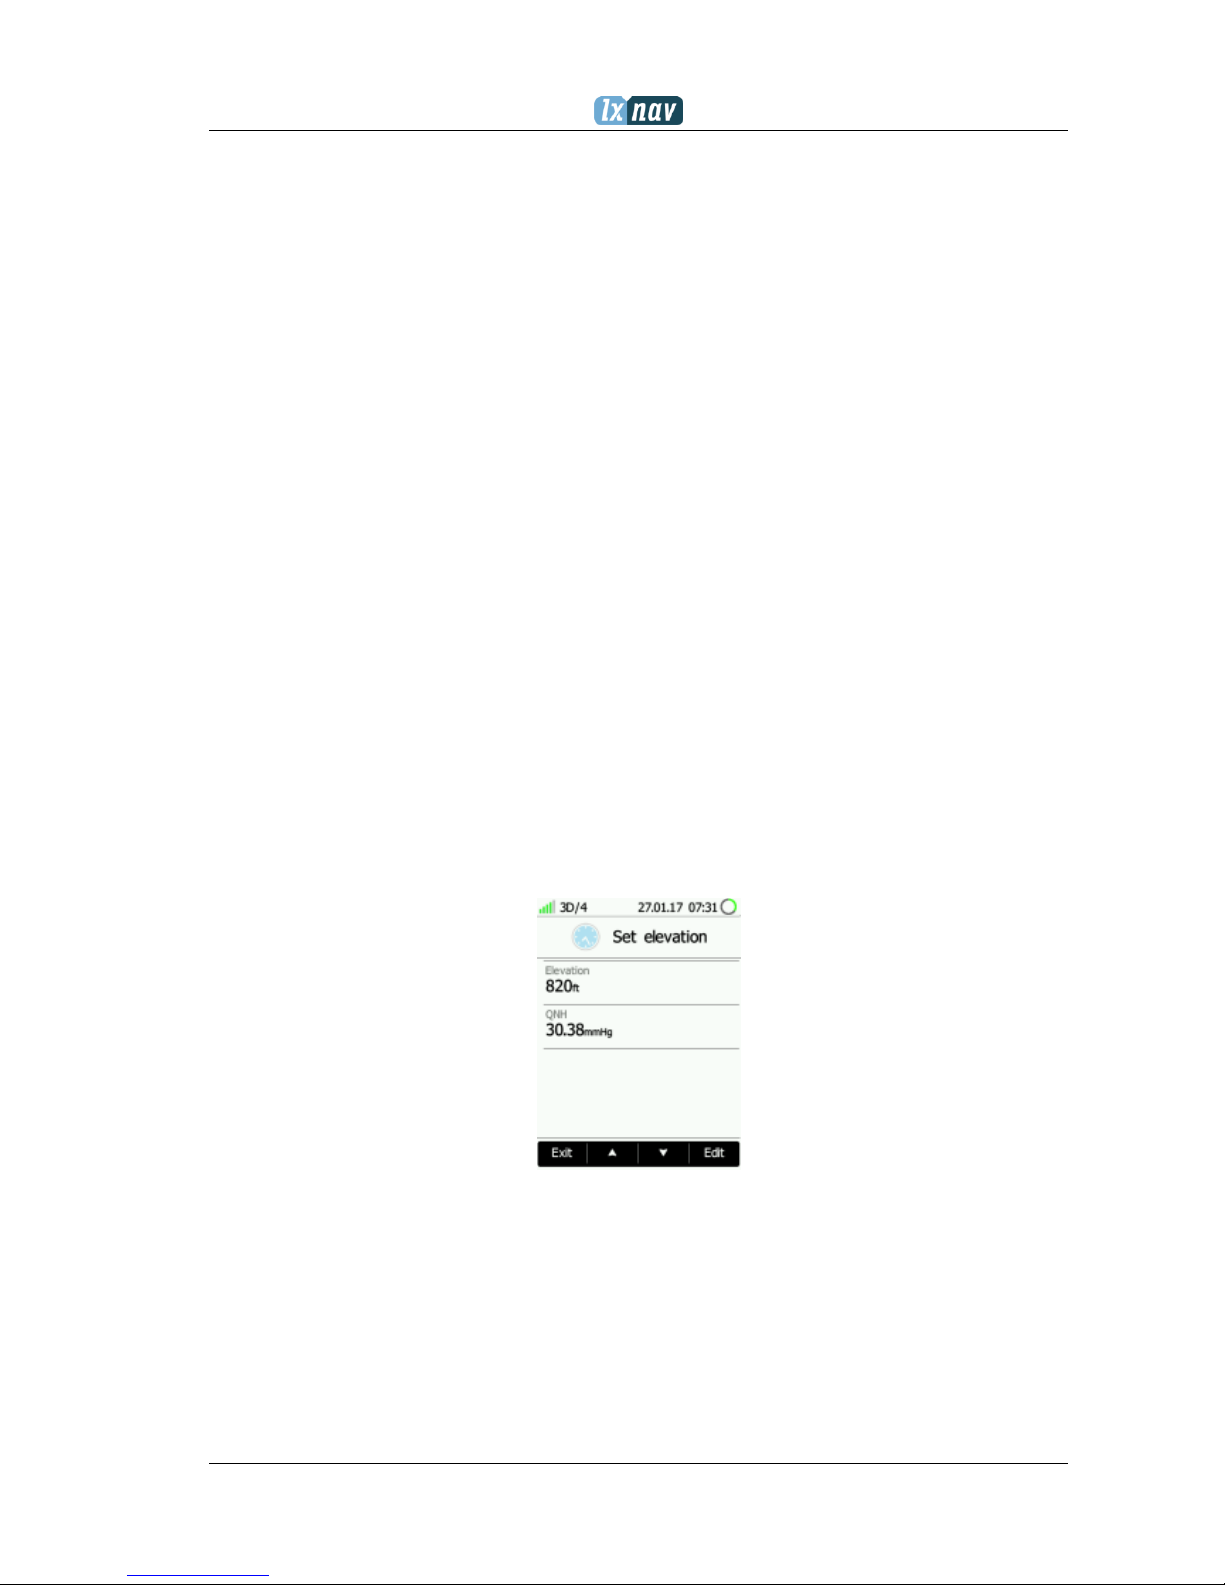
after approximately 20 seconds the NANO4 will go into normal operation mode.
The normal operating mode starts with a message “Loading elevations” and “Set
elevation”
When the NANO4 acquires a GPS fix, it will switch to the GPS info page. At any time, the user
can cancel the acquiring page by pressing any button. Acquiring a GPS fix may take between
a few seconds and a few minutes, depending on the satellite constellation and the NANO
4
position. The NANO4 has a very sensitive GPS receiver which can sometimes acquire a GPS
satellite signal in a room.
Page 16

Version 1.09 February, 2018
Page 16 of 56
When in the data transfer mode, if you press any button, the NANO4 will revert to
normal operation mode
4.2 User Input
The NANO4 user interface consists of many dialogues, which have different input controls.
They are designed to render input of names, parameters, etc., as easy as possible. Input
controls can be summarized as:
• Text editor
• Spin controls (Selection control)
• Checkboxes
• Slider control
• Line width control
• Colour selection
• “Hamburger” menus
To move the function from one control to the other, use the up or down buttons. By pressing
the Edit button, it is possible to access to the control that is displayed.
Page 17
Version 1.09 February, 2018
Page 17 of 56
4.2.1 Buttons on NANO
4
Buttons have dynamically set functions. Pressing a button will give more options. The main
text in the box will perform an action assigned in the context. When you press a button, a row
will appear with the action assigned to that button in that context.
On the main screen, the left button always performs the function of switching between pages.
A short push will cycle the pages in one direction. A longer push will cycle the pages in the
opposite direction. A short push means less than a second, almost instant. A longer push
means a second, not more.
The middle buttons help with target selection by cycling through available targets. The right
button has an EDIT /SELECT or EVENT function, where you can edit/view the currently selected
target.
4.2.1.1 Applying a longer push on the buttons
Page (P): P will cycle the pages in the opposite direction.
Sort (x): X will exit from the menu
Next (P): P will move the cursor back
OK (C): C will cancel the performed action
Ins. (D): D will delete the selected point
Page 18

Version 1.09 February, 2018
Page 18 of 56
4.2.2 Text Edit Control
Use the Text Editor to input an alphanumeric sequence; the picture below shows typical
options when editing a text. Use the keyboard on the touch screen, or the up/down button to
change the value at the current cursor position.
Pushing the next button will move the cursor to the right. A longer push on next (P), will
move cursor left. At the last character position, pushing the button will confirm the edited
value, a long press Ok. (C) will cancel editing and exit that control. If a longer push is available,
part of the button label will be in Red. For example, on the above, a longer push on the left
button Next P has a back function. A longer push on the right button has a Cancel function.
4.2.3 Selection Control
Use selection boxes, also known as combo boxes, to select a value from a list of pre-defined
values. Use the up/down buttons to select the appropriate value.
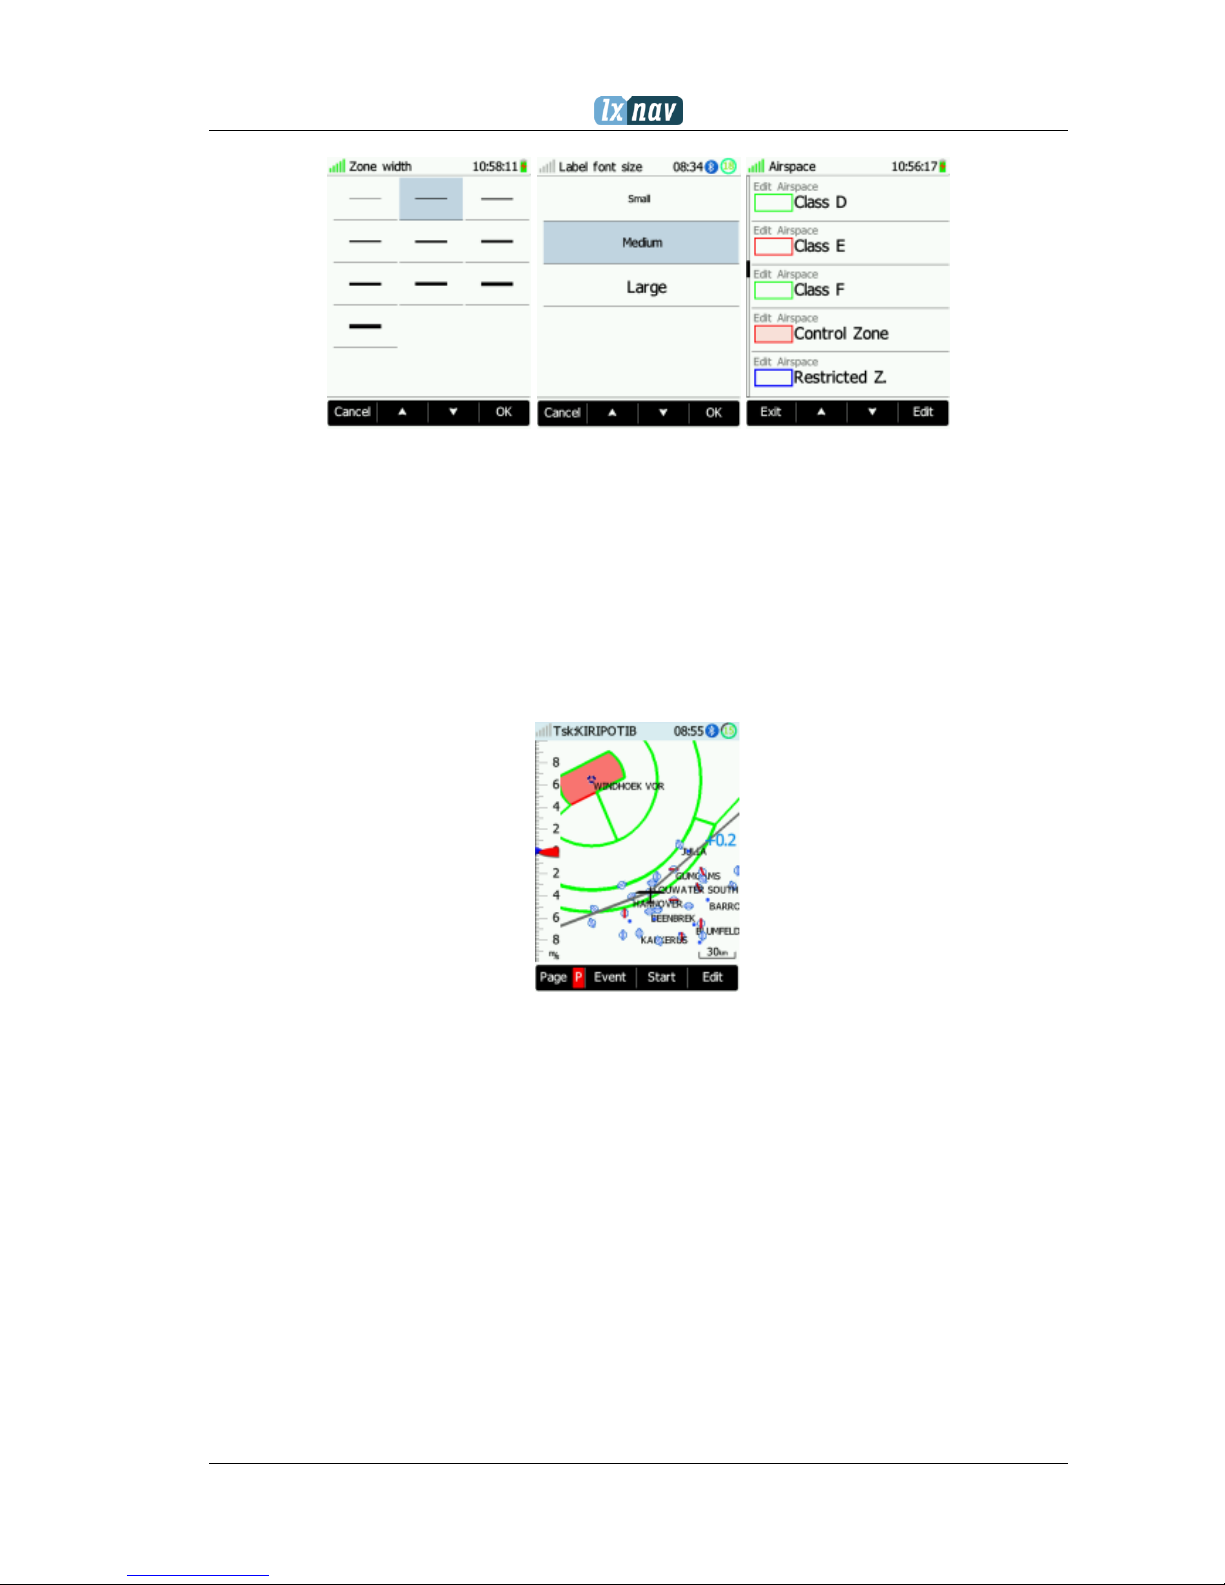
4.2.4 Line width selection
Use line width boxes, to select a line width from a list of predefined widths. Use the up/down
buttons to select the appropriate width.
Page 19

Version 1.09 February, 2018
Page 19 of 56
4.2.5 Color selection
Use colour selection boxes, to select a colour from a list of predefined colours. Use the
up/down buttons to select the appropriate colour.
4.2.6 Checkbox and Checkbox List
A checkbox enables or disables a particular parameter. Press the EDIT button to toggle the
value. If an option is enabled, a check mark will (be shown) be displayed ??, otherwise an
empty rectangle will be displayed.
4.2.7 Slider selector
Some values like volume and brightness are displayed as a slider
Page 20

Version 1.09 February, 2018
Page 20 of 56
With Edit or a pression on that area of the screen, you can activate slider control, then with
the up/down buttons or slide on screen, you can select the preferred value and confirm it
with the Ok push button.
4.2.8 Spin control
Using the touch screen, you can increment or decrement selected values. The same action
is possible too with the buttons.
4.3 Normal operation
There are four active pages and one additional page (information page, waypoint page, task
page, setup page, and Flarm radar- if the Flarm is connected). You can read more about all
pages in Ch.5.1. If the screensaver function is enabled, the screen will go off after the set time
period in seconds. When the screen saver is on, the pilot can still see the indicated status of
the NANO4 by monitoring the LED.
4.4 Powering off
Holding the power button will give two options. Lock screen or Power off. Click Power off.
Page 21

Version 1.09 February, 2018
Page 21 of 56
4.5 Security void
When the security (secret key) is lost at power on, the red light will be blinking, and a “DIGITAL
SIGNATURE FAILED” message will appear on the screen. To continue, press any button. The
Nano will be totally functional, but the flight will not be valid under the IGC rules.
In order to produce the IGC-certified files, the NANO4 flight recorder must be
returned to the dealer or manufacturer for resealing.
4.6 Connecting to a computer
You can connect the NANO4 to a PC if it’s on or off. If it is off, it will connect automatically. In
the case, it is already powered on, the NANO4 will ask you if you want to connect it to a
computer.
If the NANO4 is connected to a computer during flight, and if the user confirms a
USB connection, the flight will be forced to end.
Connect the NANO to a computer using the supplied USB cable or any other standard USB-A
to micro-USB cable. The NANO4 flight computer will be identified automatically and a new
removable storage device will be indicated. The name of the device will be
NANO4_<SERIALNUMBER>.
Open this device to see its content.
Page 22

Version 1.09 February, 2018
Page 22 of 56
In the root folder, you will find the flights created by the NANO4 and the NanoConfig program.
The NanoConfig program will run only on Microsoft Windows operating systems. Double click
to run it.
On the first connection of the NANO4 to a computer, it may not be recognized
immediately. Disconnect the NANO4 from the computer and connect it again in
order for it to be recognized.
4.7 Downloading flights
Turn off the NANO4 and connect it to a computer using a USB cable. Navigate to the root folder
of the NANO4 and use your preferred method of copying files.
Page 23

Version 1.09 February, 2018
Page 23 of 56
Flights are stored on files with the IGC standard filename. If you find it difficult to decode this
standard, we recommended that you switch to detailed view to see the date of the file.
In detailed view, the file date and time shows the landing time of the glider.
You can also download flights using the NanoConfig for Android devices. More details are in
Ch.7.4.
4.8 Bluetooth pairing
In order to connect to the NANO4 via Bluetooth, you have to search on a PDA for Bluetooth
enabled devices in range. (See chapter 5.8.7.2 to enable Bluetooth) The NANO4 will be
identified as LXNAV-NANO4-<SERIALNUMBER>. Click PAIR or CONNECT to connect to the
NANO4. A security pin must be entered. The pin code for the NANO4 is 1234 and cannot be
changed.
4.9 Charging battery
The battery will be charged when the NANO4 is connected to the external power through a
USB port. It can be charged from a wall adapter, or directly from a PC or from the NANO
4
power cable.
If you want a faster charge, then you must connect the NANO4 to a power supply, wait for it
to boot up and then press the button to switch the unit off. In this mode all the NANO4 functions
(GPS, Bluetooth, Memory) are turned off, and this will increase the charging speed.
In this mode the NANO4 can be fully charged in approximately 6 hours. The screen is still on,
but the backlight is off. It is still possible to monitor the level of charge. The level of charge is
also visible via the LED.
Page 24

Version 1.09 February, 2018
Page 24 of 56
Sometimes it may appear that the NANO4 battery level, when connected to a
charger, looks full. Then, when you disconnect the power, the battery level
drops to 90%. This is normal as the battery level indication is different when the
charger is connected, from when it is disconnected. To really fully charge the
NANO4, please continue charging for a few hours. In the fast charge mode, this
will take less time. Charge current must drop close to 0mA or you will see
indication FULL.
The battery is fully charged, when FULL battery status is displayed. This status
appears, when the current drops below 5mA and the battery voltage is more than
4.20V
4.10 Calibration of battery
One can calibrate the battery in the following way.
1. The NANO
4
must be fully charged
2. The NANO
4
is fully charged, when the charge current drops below 5mA, or there is a
message FULL
3. Disconnect the supply cable and leave the NANO
4
running until it shuts down due to an
empty battery
To be sure, that the NANO4 is really in discharge mode, the Battery Status row of
the INFO page text will show “DIP”, which means Discharge in Progress.
One can increase the speed of the discharge cycle, if one turns on the Bluetooth
module, sets up brightness of LCD to maximum, and turns off the screen fade.
After this procedure, the NANO4 has measured its battery capacity and with the next charge,
the indication will be more accurate.
The calibration of the battery is performed during the production of the NANO4. In case that
calibration data is wrong, a calibration cycle is necessary for a correct indication of the charge
level.
If the charge level does not show a correct value, compared to the battery voltage,
it is necessary to perform a battery calibration cycle. Example: Charge level: 99%
and measured voltage 3.6V.
4.11 Storing the Nano
4
The NANO4 must be stored in a dry environment, with a temperature lower than 25°C (77° F).
If you do not intend to use the NANO4 for an extended time, it is recommended that you
charge the battery to 50% beforehand.
The NANO4 and the BATTERY have protection circuits which protect the battery from being
overcharged or overly discharged. If you store the NANO4 with an empty or near empty
battery, eventually the battery will be discharged so much that it will not be possible to charge
it again.
Page 25

Version 1.09 February, 2018
Page 25 of 56
4.12 Replacing the battery
A user cannot replace the battery in the NANO4. The replacement of the battery can be done
only by an authorized dealer. When someone opens the NANO4 housing, the digital signature
will be lost and flights will not be signed any more. A reseal by an authorized dealer is
necessary.
Page 26

Version 1.09 February, 2018
Page 26 of 56
5 Working with the NANO
4
5.1 Tree structure
The NANO4 has 5 modes, Info, Flarm (if Flarm is connected), Waypoint, Task and Setup mode.
Info mode has two subpages, where you will find all the necessary information about the
status of the NANO4.
Info
Flarm
Waypoint
Task
Setup
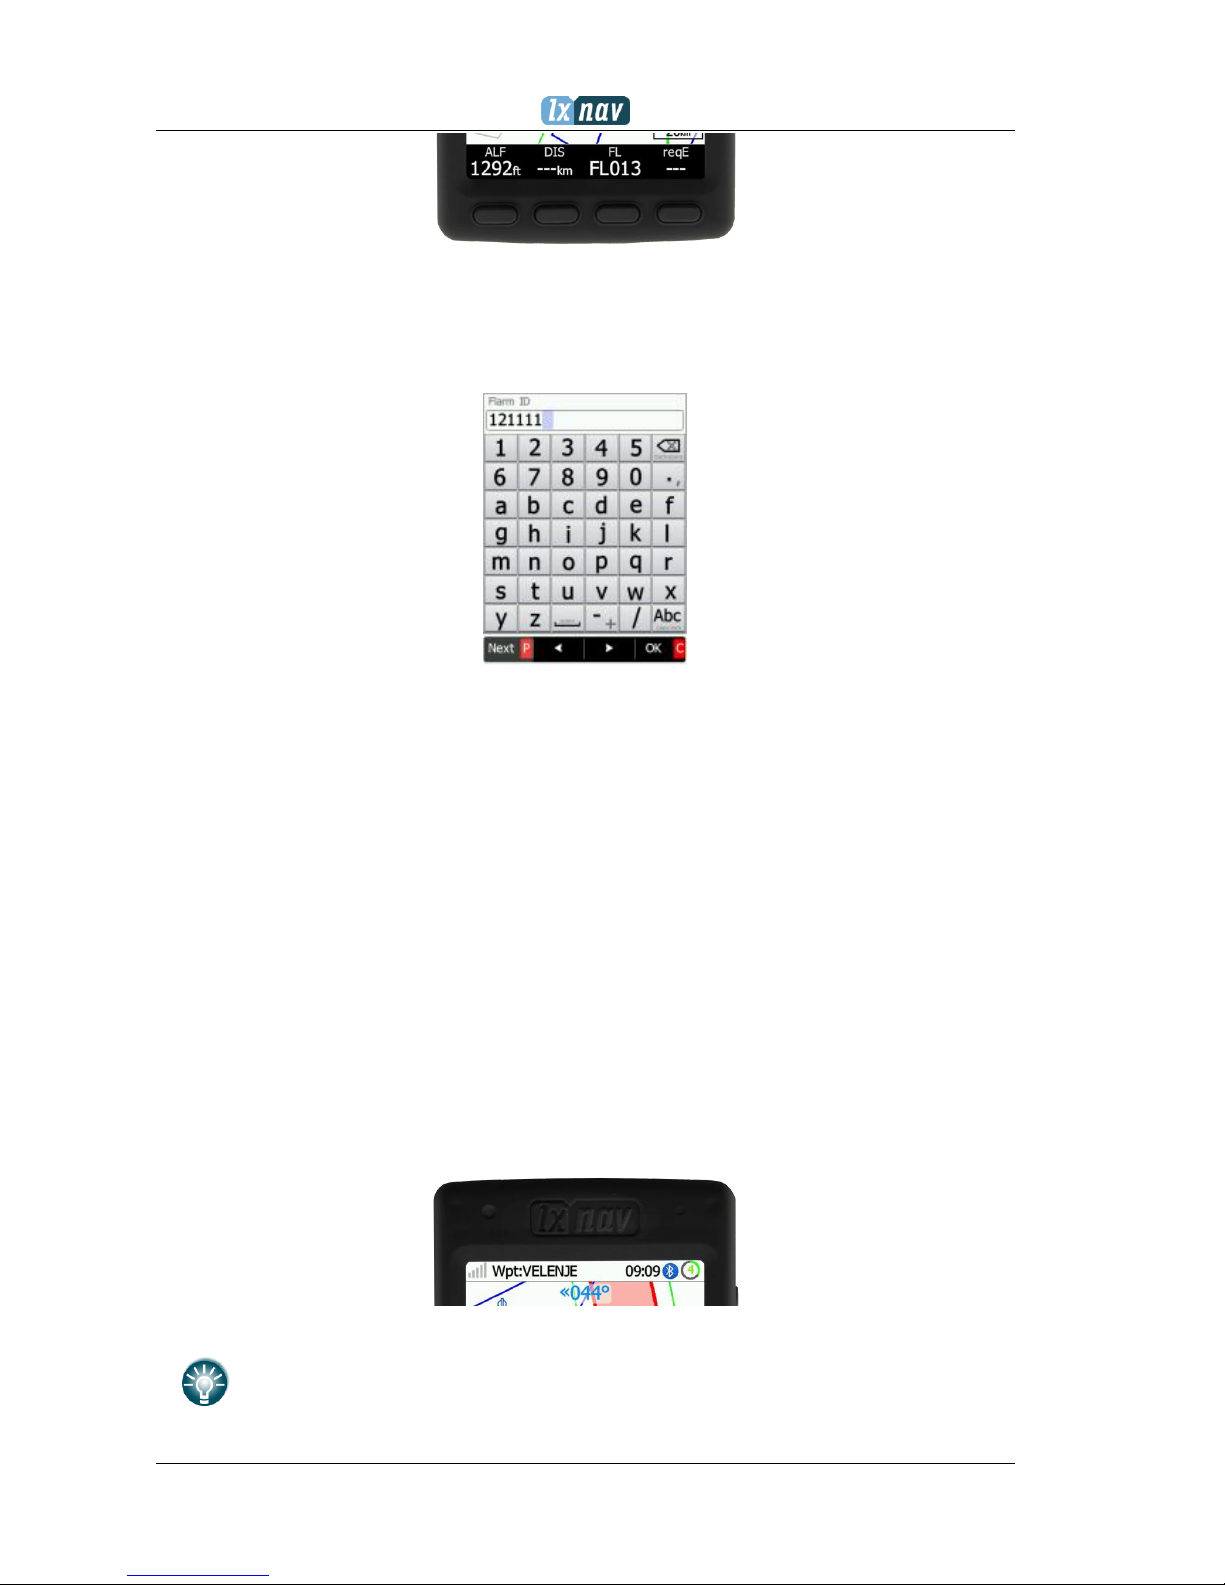
5.2 Main navigation screen description
The main navigation screen consists of a map with coloured Airspace, Waypoints with names
or Task (depending on which page you are looking at), Vario tape (optional) on the left and
status bar on the top.
The vario tape and vario dynamics can be configured in the Setup-Hardware-Vario menu. If
you don’t want to see the vario tape, you can switch it off.
The status line indicates the status of the GPS, indicates the chosen waypoint that you are
navigating to, the status of the Bluetooth device, the battery level and time.
Menu buttons appear, when you press any one of the buttons. Each button has its own function
which is described on the button label. The functions of the buttons are mostly related to the
page where you are (Waypoint, Task, Flarm, Info, Setup). If there is no label on the button,
this button has no function.
The battery level can be displayed in two ways, with the classic battery level indicator or a
round progress (circle) with a number inside, which indicates the remaining hours. Outside
progress indicates the percentage of the battery level. When the remaining time is calculated
to be less than 1 hour, the indication becomes red, and the inside number indicates the
remaining minutes, the outer ring shows the progress for the last hour (60 minutes).
Page 27

Version 1.09 February, 2018
Page 27 of 56
Classic battery indication
Indication of battery with
the remaining time
Indication of the charge
level, when the battery is
charging
When the battery is charging, the indication is as follows: the inside symbol indicates charging,
the outer ring is the percentage of the charge.
The accuracy of the battery life measurement depends on how accurate the battery capacity
has been measured. One can read more about battery calibration in chapter:Napaka! Vira
sklicevanja ni bilo mogoče najti.. At the top centre of the map there is an “off course”
(steering course) indicator, which helps the pilot to fly in the right direction.
At the bottom of the map screen, there are four navboxes, which the user can use. With a
long press on the nav box, the user can select many navbox options.
5.3 Locked screen
You can unlock the screen by sliding your finger over it.
On the locked screen there is an information about the flight recorder status, the GPS status,
the time, the state of the charge and the remaining time of the battery. More details are in
ch.7.1.2
5.4 Info screen
On the info screen, data is available about the GPS, the battery and the Flight recorder status.
GPS status
Battery level
Nav. target
BT status
Vario average
Vario needle
Nav boxes
Mc setting
Steering course
Page 28

Version 1.09 February, 2018
Page 28 of 56
5.5 Flarm screen
The Flarm screen is visible only when the NANO4 detects a Flarm connected to the external
port. Selection of Flarm targets and zooming is then available. If the NANO4 is connected to
the PowerFlarm, it is also able to show PCAS traffic.
5.5.1 Flarm symbols
5.6 Waypoint screen
On this screen, the pilot can navigate to a selected waypoint, Select waypoint from an opened
CUP file, or select a landable waypoint from the near list.
Page 29

Version 1.09 February, 2018
Page 29 of 56
A longer push on the map will bring the near airport/waypoint selection menu
around the pressed location on the map.
A longer push on the steering course will bring the near airport/waypoint
selection menu in the flying direction.
5.7 Task screen
In this screen, the user can navigate to waypoints from a task, switching between them, edit
task points and their zones. More on Ch. 7.1.3
Page 30

Version 1.09 February, 2018
Page 30 of 56
5.8 Setup Menu
5.8.1 QNH
Under this page, the pilot can change the QNH setting. If the QNH setting is correct, the NANO
4
will show the correct altitude.
A wrong QNH setting will have an effect only on wrong altitude warnings, and a
wrong final glide calculation. The QNH setting has no influence over the recorded
altitude in the IGC file
5.8.2 Flight recorder
Under this page, one can configure the flight recorder, pilot's information and glider data.
• Pilot's name must be entered here
• Co-Pilot's name must be entered here, if glider is a double seater.
• Competition (callsign / number ??) of the glider
• Registration number of the glider
• Recording interval sets the interval when the GPS position is stored in flight
• Auto Finish will allow the automatic finish of the flight, under certain conditions.
Uncheck this item for wave flying. (ground speed is used to indicate the end of a flight,
and in wave it is possible to be stationary or even fly backwards in relation to the
ground)
• Auto Off will power off the NANO
4
30 minutes after the flight is finished
• Logger always on will force the logging/write position to an IGC file immediately after
power on. Normally the NANO4 logger is triggered by a ground speed exceeding 40km/h
or a vario over 1m/s... Hang glider pilots are advised to use this function
• Pilot's weight
• CoPilot's weight
Page 31

Version 1.09 February, 2018
Page 31 of 56
5.8.3 Display
In this menu, one can set the following items:
• Automatic brightness control more details are under hamburger menu
o Minimum brightness
o Maximum brightness
o Get brighter in is Time to reach max brightness
o Get darker in is Time to reach min brightness
• Brightness at USB power will set the level of backlight, when the USB power is
present
• Brightness on battery will set the level of backlight, when the USB power is not
present
• Screen fade enables fading the screen to the level “Fade brightness” after “Fade
Timeout” time
Page 32

Version 1.09 February, 2018
Page 32 of 56
o Fade brightness is the level of brightness at which the screen will fade
o Fade timeout is the time the screen will fade to “fade brightness”
• Auto lock screen
o Auto lock timeout Is a time, after <which the screen will lock
• Wake screen on events enables turning on the screen, even if the screen is off
• Led brightness can be adjusted in this menu
5.8.4 Graphics
Graphics has many sub items which are related to System, Vario, Map, Airspace,
Waypoints, Glider& Track, Task, Flarm customization.
5.8.4.1 System
In this system submenu, the user can switch between light and dark theme, and adjust
colours for the navboxes and the banners.
5.8.4.2 Vario
In this menu, one can display or hide the vario tape. One can also choose the background
colour between light and dark style. The scale colour can also be set for positive as well as for
negative readings of the vario.
Page 33

Version 1.09 February, 2018
Page 33 of 56
5.8.4.3 Map
In this menu, one can set the Map orientation, the background colour and the wind
symbol.
Map foreground colour defines colour of the MC text and the steering course on the map
screen.
5.8.4.4 Airspace
Here, the pilot can set the display of airspace and colours for each type and class of the zone.
5.8.4.5 Waypoints
Here, the pilot can set the display of waypoints and their names.
Page 34

Version 1.09 February, 2018
Page 34 of 56
5.8.4.6 Glider & Track
Here, the pilot can set the display of the glider and its track.
5.8.4.7 Task
Here, the pilot can adjust the colours of task elements...
5.8.4.8 Flarm
Here, the pilot can adjust the colours of Flarm objects.
Page 35

Version 1.09 February, 2018
Page 35 of 56
5.8.5 Warnings
In this menu, the pilot can setup Altitude warnings, Flarm warnings and their conditions.
Flarm warnings are classified into three levels (See Flarm manual for details on
www.flarm.com)
• First level (Low) approximately 18 seconds before a predicted collision
• Second level (Important) approximately 13 seconds before a predicted collision
• Third level (Urgent) approximately 8 seconds before a predicted collision.
The Flarm timeout defines the time, when the user will not get a Flarm warning after
dismissing the Flarm warning of a particular Flarm object.
5.8.6 Obs. Zones
This menu defines the default observation zone geometry. One can choose the following:
start zone, turn point zone and finish zone.
Page 36

Version 1.09 February, 2018
Page 36 of 56
Each type of observation zone is defined with two angles, two radii and a mean bearing
(Angle12). These parameters enable the creation of any known zone geometry separately
for start, turn point and finish.
When using parameters in the zone dialogue, it is possible to describe all types of observation
zones. Angle12 defines the orientation of the observation zone. Available values for
Direction are:
• Symmetric: this is the most common selection for turn point.
• Fixed: this is mostly used for assigned areas.
• Next: this will move the observation zone in the direction of the outgoing leg. One usually
uses this option for the start.
• Prev: this will move the zone in the direction of the incoming leg. It is usually used for the
finish.
• Start: this always moves the sector towards the start.
If the Line checkbox is checked the sector will become a line type of observation zone. The
Radius 1 parameter describes half of width of line length. Use the UP/DOWN arrow buttons
to increase or decrease radius for step 0.1. A longer push will increase/decrease it up to 5.0.
If Line is not checked the Angle1 parameter will define the basic shape of the observation
zone. A value of 180° means that the zone is a cylinder whereas 45° is the classical FAI sector.
Use the Up/Down buttons to select the right angle.
Angle2 and Radius2 are used for more complex observation zone setups.
When changing observation zone parameters, the screen is automatically updated to display
the new zone.
Page 37

Version 1.09 February, 2018
Page 37 of 56
5.8.7 Hardware
There are five sub items in the hardware menu:
• Vario
• Enl
• Communication
• Sounds
• Battery
5.8.7.1 Vario
The vario submenu allows you to adjust the Vario filters for the Vario needle and the vario
sound, the time constant for average vario and vario tape range.
A higher number at the vario filters means a more damped vario signal.
5.8.7.2 Communication
Page 38

Version 1.09 February, 2018
Page 38 of 56
In the communication menu, you can enable or disable the Bluetooth device, enable or
disable the NMEA output on the USB port, and the baud rate for external serial interface.
"Communication" enables you to set the way the NANO4 will communicate with the Flarm.
"Target data NMEA” enables you can use NMEA data transmission (GPRMB and LXVTARG) to
other external GPS devices (Oudie, PDA’s, Smart phones...). "Target data source" enables the
NANO4 to communicate all information about the current target, depending on which page you
are (Task or Waypoint). The "AUTO option" automatically detects the page mode (whether
you are in Task or Waypoint page) and sends information about your current target.
5.8.7.3 ENL
This page is just for monitoring the engine noise level ENL. MOP (means of propulsion) is
provided to detect noises produced from JET engines.
How to use the Nano4 as a MOP recorder. Please read the IGC approval for the
Nano4.
5.8.7.4 Battery health
You can see the voltage of the battery. It is typically between 3,5V and 4,2V. Current
depends on the power consumption (LCD brightness, BT, Wi-Fi) and the voltage of battery.
Health can be described as:
- Excellent
- Good
- Bad
- Contact service (that may indicate end of the life of the battery).
Page 39

Version 1.09 February, 2018
Page 39 of 56
5.8.7.5 Sounds
In this menu, you can adjust various setting for sounds. The Volume of the vario sound, the
enabling of system sounds and the enabling of vario sounds. From version 1.5, there is
also a sound setting for Flarm warning.
The vario volume can also be adjusted by using side buttons, but only in the GPS
info page.
5.8.8 Flarm
If a Flarm is detected, the user can make some configuration setting changes on the Flarm
and get some Flarm status information.
5.8.9 Files
It is here that a pilot can select Airspace and waypoints files. The NANO4 supports CUP file
format for waypoints, and CUB file format for airspace. There is no limitation in file size or
Page 40

Version 1.09 February, 2018
Page 40 of 56
number of waypoints, but by reducing the size of the airspace area or number of waypoints,
one will improve the performance of the NANO.
In the same section, you can convert all IGC files loaded on the NANO4 to KML file format.
You can also load FlarmNet data in this section. It is useful only if the Flarm is connected to
the NANO
4
The Waypoint CUP file is limited to a maximum 1Mbyte size
The Airspace CUB file is limited to a maximum 5Mbytes size
The Flarm net FLN file is limited to a maximum 5Mbytes size
5.8.10 Units
In this menu, one can set the units for speeds, distances, altitudes…
5.8.11 Logbook
All flights recorded by the NANO4 are stored and sorted by date here. The user can find date,
take-off landing times, as well as the duration of the flight. Use the two middle buttons to
navigate through the list. A longer push on these buttons will get you faster to the first, or
last, flight recorded.
5.8.12 Polar & Glider
The Polar and Glider section allows you to load and edit a set of parameters for the polar of
your glider. You can select from a pre-defined list of nearly every common glider or make
your own polar.
Select a Glider from the List: it is an alphabetical list of all the common gliders and
associated polar data. All glider data will be copied from the chosen polar.
Page 41

Version 1.09 February, 2018
Page 41 of 56
You can modify the polar by changing coefficients a, b and c. A polar is defined as a quadratic
equation with the parameters a, b, and c.
Use the SeeYou program (Tools->Polar) to calculate coefficients a, b and c for a given glider’s
polar. The program requires three sink points entered at selected speeds (e.g.: 100 km/h,
130 km/h, and 150 km/h). The program will calculate the values of a, b and c, which should
be noted and entered into the NANO4.
• Class: options for Touring, Ultralight, World, Twin-seater, Club, 18-meter, 15-meter,
Open, Standard and Unknown are available.
• A, b, c: options can be adjusted or entered for a non-listed glider.
• Reference load (wing loading) value represents the value at which the polar was
measured.
• Reference weight corresponds to the weight value at which the polar was measured.
• Maximum take-off weight is the maximum take-off weight allowed for the glider.
It is not used in the calculation; it is just a reminder to the pilot of the maximum takeoff weight. Empty weight is weight of the glider without the pilot and ballast.
• Pilot weight is the weight of the pilot with a parachute and some baggage.
• Co Pilot Weight is the weight of the co-pilot with a parachute and some baggage.
5.8.13 Wind
In this section, the pilot can define a wind calculation method. Select Manual to manually
adjust wind speed and wind course. In the automatic mode, this will be done automatically
by the NANO4 based on GPS data.
The pilot can enter manually wind by sliding on the lower part of the screen
(arrow).
Page 42

Version 1.09 February, 2018
Page 42 of 56
5.8.14 Password
The following passwords are available for the users:
00666 - Resets all settings to factory default
00667 - Resets the battery calibration to the factory default (to be calibrated, the battery will
need a new calibration cycle).
32233 - Formats the internal flash memory (All data will be lost)
11111 - Prepares the battery for storage (discharge to 50%)
5.8.15 About
Under the About menu, the user can see the version and serial number of the NANO4
5.8.16 Shutdown
Pressing the button adjacent to this item on the NANO4 screen will shut down the NANO4 after
confirmation.
Page 43

Version 1.09 February, 2018
Page 43 of 56
6 Flarm on NANO
4
The NANO4 is able to display Flarm and PCAS traffic on the map or on a radar screen. The
radar screen is visible only when a Flarm object is detected by the NANO4. In case of a collision
warning, another screen will be displayed, which will inform the pilot which direction the threat
is coming from.
PCAS alerts on the map are represented as a dotted circle with a relative altitude, the PCAS
warning is represented by lights on the clock in red or orange.
Flarm warning can be dismissed with a short press of any button. A dismiss time can be
configured in setup.
6.1 Connecting a FlarmMouse to the NANO
4
CC-NP-IGC
cable
USB cable
NANO4
Flarm
Splitter
Flarm
Splitter
12V power
supply
Nano Power
Must be connected to 12V
Page 44

Version 1.09 February, 2018
Page 44 of 56
6.2 Connecting a Flarm to the NANO
4
6.3 Connecting a Flarm to the NANO
4
using the NanoPower-FL
6.4 Connecting a Flarm to the NANO
4
using the NanoPower-PF
Nano Power
Must be connected to 12V
USB cable
CC-NP-IGC
cable
NANO4
NanoPower-FL
gets 12V from Flarm
USB cable
NANO4
Flarm
NanoPower-PF
gets 12V from Flarm
PowerFlarm
Needs separate 12V supply
Flarm
USB cable
NANO4
Page 45

Version 1.09 February, 2018
Page 45 of 56
6.5 Connecting a LXxxxx Flarm port to the NANO
4
using the NanoPower-
FL
NanoPower-FL
gets 12V from LX
LX9000,
LX9050,
LX9070,
LX8080,
LX8000
USB cable
NANO4
Page 46

Version 1.09 February, 2018
Page 46 of 56
7 Configuring the NANO
4
One can upload flight declarations to the NANO4 in four different ways:
• Directly on the NANO
4
• Using the NanoConfig program on PC,
• Bluetooth (NanoConfig for Android, Oudie, XCsoar...)
• Serial interface (PDAs, Oudie, XCsoar)
Declarations are stored in the SYSTEM folder in a file called decl. The declaration file is
formatted as a standard IGC header file. It is recommended that you do not try to modify this
file yourself.
7.1 Directly on the NANO
4
7.1.1 Pilot's information
Detailed information is written in Ch.5.8.1
7.1.2 Editing Navboxes
At the bottom of the map screen, there are four nav boxes, which the pilot can choose. With
a longer push on the nav box, the user can select one of several nav box options.
The following nav boxes are available:
• Altitude
• Altitude in opposite unit (m<->ft)
• Arrival Altitude
• Arrival Altitude at Mc = 0 setting
• Bearing
• Distance
• Calculated final glide at chosen Mc
• Flight level
• Ground speed
• Height above ground
• Distance in opposite units (km<->nm)
• Required glide ratio to reach target at chosen Mc
• Required altitude to reach target at chosen Mc
• Task distance
• Task required glide ratio to reach task finish at chosen Mc
• Thermal vario
• Track
• Wind
Page 47

Version 1.09 February, 2018
Page 47 of 56
• Wind component
7.1.3 Setting MC
By touching the Mc value, the user can access the following screen.
On this screen Mc, Ballast and bugs can be adjusted. At same time, a calculated final glide
and speed are displayed on the lower part of the screen.
If buttons are used for switching between MC, BAL and Bugs, the left button
indicates, what will be selected by pressing on that button. The active slider is
white, others are in a gray colour.
7.1.4 Declaration and editing of a task
In the Task page, the pilot can enter or edit the task, which will then be automatically declared
when he leaves this page. One can load waypoints into a task from the active waypoint file.
A Task can be entered in a very simple way. In the task page, one can press the edit button.
Using the up or down button, one can highlight an existing waypoint or an empty space, and
then set a new waypoint. By pressing the Ins. (insert) button one can start browsing through
all of the waypoints in the selected CUP file.
Selecting from a list of waypoints is very intuitive. The NANO4 will offer the pilot a choice of
the sole characters that are available from the available list of waypoints names. Using the
button >> one can move to the next character (right), the red part of the label B indicates
one space back or, using a longer push of the button, one character to the left... A similar
Page 48

Version 1.09 February, 2018
Page 48 of 56
function is used for the OK button, where one can confirm a selected waypoint, or cancel the
selection of a waypoint using the C. The previous waypoint will then be selected.
When one is back in the Task menu, one can Insert or delete D waypoint.
To
insert
a waypoint, the pilot applies a short push Ins. And to
delete
a waypoint,
he depresses and holds down the D button for about (not more than) a second.
Each waypoint can have a custom zone or area applied. These areas can be modified by
pressing the Zone button.
Page 49

Version 1.09 February, 2018
Page 49 of 56
7.2 On a PC with NanoConfig for Windows
Use the NanoConfig program to configure the NANO4. Using this program, a flight declaration
can be uploaded or various parameters can be modified... The NanoConfig program consists
of two major screens. A flight declaration screen and a settings screen.
You may toggle between these two screens by pressing the Declaration or Settings buttons
in the upper left corner of the NanoConfig program.
Press the OK button to confirm the changes and exit from the program. Press Cancel to
abandon changes and exit without saving data.
It is important to run the NanoConfig program directly from the NANO4. Do not
copy the NanoConfig program to another location, as the settings and declarations
will not be written properly to the NANO4.
The version of the program is written in the lower left corner of the NanoConfig window. When
requesting support from LXNAV or reporting a bug, please always include the version of the
program in your email.
All NANO4 configuration variables are stored in the SYSTEM folder of the NANO4 in
a file named “system.ini”. It is strongly recommended that you do not modify this
file yourself. If you need more information about the “system.ini” file, please
contact us.
NanoConfig for OSX is also available. For more info, please
contactinfo@lxnav.com
7.2.1 Using the NanoConfig program
Run the NanoConfig program and go to the declaration screen. The declaration screen is split
into two groups. Pilot and glider related information is in the top group, and the task
declaration is in the bottom group.
Version of Nano config
application
Status of Nano4
firmware
Page 50

Version 1.09 February, 2018
Page 50 of 56
7.2.1.1 Pilot information
Enter pilot and glider information in the pilot section. In the top right you will find two icons.
The first icon will show a list of stored pilot information and the second will add the current
pilot information to the list.
7.2.1.2 Task declaration
Before creating a task, you have to load the waypoints from which the task will be created. To
load waypoints, press the Load Waypoints button. Waypoints can be loaded from a CUP
formatted file. Once waypoints are loaded, you can create a task by typing the names of the
waypoints. Use the icons in the upper left corner of the task declaration group to add or delete
a point, or to clear the whole task. Task points can also be deleted by pressing the DEL key,
or can be inserted by pressing the INS key.
Page 51

Version 1.09 February, 2018
Page 51 of 56
7.2.2 Changing parameters with NanoConfig
Run the NanoConfig program and go to the settings screen. The settings screen is split into
two sections. Settings dedicated to the NANO4and settings for NanoConfig.
Parameters for the NANO4 include a recording interval, a NMEA output and a Bluetooth enable
setting.
In NanoConfig you can change the distance units used in the task declaration and the lat/long
format.
7.2.2.1 Flight recording interval
The flight recording interval is set to one second by default. It is recommended that you keep
this setting. Even with the recording interval set to one second, the NANO4 is capable of storing
approximately 28000hours of flight. Having a recording interval of one second will allow you
to do more accurate post-flight analysis, and it increases the probability of obtaining a data
point in the observation zone.
If you wish to change these settings, use the up/down arrow or type a new value.
7.2.2.2 Automatically finish flight
If this option is enabled, the flight will automatically finish and be digitally signed once
conditions for finishing the flight are met. The NANO4 must fulfil the following conditions for
30 seconds. GPS status is ok, ground speed is below 4m/s, vertical speed is within 0.2m/s,
and altitude is below 3000m.
7.2.2.3 Start recording on power on
If this option is enabled, recording of a new flight will automatically start when the NANO4 is
powered on. If this option is disabled the NANO4 will start recording when vertical speed is
above 1m/s, and the ground speed is above 8m/s. This option is most useful for paragliders.
When this option is enabled, the Automatic finish option is ignored.
Page 52

Version 1.09 February, 2018
Page 52 of 56
7.2.2.4 Automatically turn off Nano4, when a flight ends
This option is very useful for the NANO,4 when it is installed more or less permanently into the
glider. If this option is enabled, the NANO4 will automatically switch off 30 minutes after the
flight is finished.
7.2.2.5 Bluetooth
Check the Enable Bluetooth checkbox if you want to turn it on. By default, Bluetooth is
disabled.
When Bluetooth is enabled, the NANO4 will consume more power and the total
endurance of a new and charged battery will be reduced to approximately 14
hours.
7.2.2.6 NMEA output
Check Enable NMEA output to output NMEA data. The NANO4 will transmit the following
NMEA sentences GPGGA; GPRMC, LXWP0 every second and LXWP1 once per minute.
NMEA can be output to either the serial interface or Bluetooth, but not to both simultaneously.
Change the NMEA baud rate, if you want to output NMEA at different baud rates.
7.3 Using Bluetooth or serial interface
One can also upload flight declarations using the serial interface or Bluetooth (See chapter
7.4.1 for Bluetooth pairing). The NANO4 must be running in normal operating mode.
When connecting through the serial interface, one should use the same baud
rate, as it is set for NMEA output on the NANO4.
When connected through Bluetooth baud rates are not important.
Please refer to the manual for the software used to upload flight declarations. (E.g. SeeYou
Mobile)
7.4 NANO
4
config for Android devices
One can download the NanoConfig from the LXNAV web site or Google Play Market. The
NanoConfig is a configuration tool for the NANO4. The pilot can easily modify all flight recorder
Page 53

Version 1.09 February, 2018
Page 53 of 56
parameters, edit pilot and glider information, edit the declaration, and transfer flights from the
NANO4 to a smart phone.
NanoConfig consists of five tabs: Main, Logbook, Pilot, Task and Settings.
7.4.1 Connecting and pairing the NANO
4
When you run the NanoConfig on a smart phone, the program will first ask you to turn on
Bluetooth, if it’s not already turned on.
Over the menu button one can access the scan function, which will scan for Bluetooth devices.
If the NANO4 is turned on and Bluetooth functionality in the NANO4 is enabled, it will appear
on the scanned list. Choose Nano. The first time one does it, it will be necessary to pair the
NANO4 and the Smart Phone together. Read more about pairing in Ch.4.9.
7.4.2 Main page
On the main tab, information about the NANO4 and its GPS status are shown/displayed.
7.4.3 Downloading flights
The first time one accesses this tab, the NanoConfig will automatically start reading flights
from the connected NANO4. Downloading always starts from the most recent to the oldest
flight. If you have a lot of flights in the NANO4’s memory, the transfer of the logbook can be
interrupted with the BACK button.
Page 54

Version 1.09 February, 2018
Page 54 of 56
After the downloading of the logbook data is finished, a short pression on the desired flight
will start the download process. If the flight size is large, the download may take more than
one minute. Flights are downloaded into the NanoConfig folder. With a longer push on the
flight, one can share the downloaded flight with other applications installed on a smart phone
(Gmail, SeeYou, OLC (not available), Google Docs, Facebook).
7.4.4 Editing pilot info
one can load the Pilot tab to edit information about the glider and its crew.
7.4.5 Editing task for declaration
Editing the task is very simple. First, it is necessary to choose a waypoint file in the CUP
(SeeYou) format. To select the CUP file, use the MENU button. On some devices you must
press for a long time to menu button. Press the Add waypoint button to add the waypoint to
the last position. A long pression on the waypoint will give you an option to insert a waypoint.
On the right-hand side of waypoint name, there is a trash box. Press the trash box to delete
the waypoint from the list. After a task has been entered, it can be transferred to the NANO3
by pressing the Write button.
7.4.6 Configuring NANO
4
In this tab one can configure the recording interval, automatic power off, and NMEA
settings.
Page 55

Version 1.09 February, 2018
Page 55 of 56
8 Troubleshooting
Q: My computer does not recognize the NANO4 as a USB mass storage device?
A: Make sure that the NANO4 is turned off before connecting it to the computer.
Q: Is the internal Lion battery for the NANO4 end-user replaceable or would I need to send
the unit back to LXNAV, or to a dealer to have the battery replaced?
A: Users cannot replace the Li-Ion Battery. See chapter 4.12
Q: I can't read the NANO4 on my notebook.
A: Change the power management scheme on your notebook, or connect the notebook to a
power supply.
Q: When I connect the NANO4 to my notebook, the message "USB device connected" would
appear, disappear, appear, etc. from the laptop screen.
A: Change the power management scheme on your notebook, or connect the notebook to a
power supply.
Q: Can I open files from the NANO4 on the Apple computer?
A: Yes.
Q: I run Ubuntu on my laptop, so I cannot run NanoConfig.exe.
A: NanoConfig is a Windows application, that runs only on a windows operating system.
Q: Can I declare a task with an OUDIE?
A: Yes, declaration can be done via a serial cable or over Bluetooth. Please read step by step
instructions
http://www.lxnav.com/downloads/manuals/FAQ_Upload_declaration_from_OUDIE%20to%2
0NANO.pdf
Q: When I run NanoConfig, I'm getting errors.
A: Probably a Microsoft Net Framework is not installed.
Page 56

Version 1.09 February, 2018
Page 56 of 56
9 Revision History
January 2017
Initial release of owner manual
May 2017
New chapters 5.5.1 and 3.9
September 2017
New Chapter 0
February 2018
English correction by JR
 Loading...