

Page 1
LX90xx and LX80xx
GPS-Navigation System with Variometer
Version 6.03
LXNAV d.o.o. • Kidričeva 24a, 3000 Celje, Slovenia • tel +386 592 33 400 fax +386 599 33 522
info@lxnav.com • www.lxnav.com
Page 2

Version 6.03, May 2017
1 Important Notices 7
1.1 Limited Warranty 7
1.2 Sunburned display warranty 8
2 Basics 9
2.1 The LX9xx/LX80xx series at a glance 9
2.1.1 Display Unit Features 10
2.1.2 V9 Vario Unit Features 10
2.1.3 V8 Vario Unit Features 11
2.1.4 V80 Vario Unit Features 11
2.1.5 Interfaces 12
2.1.6 Internal Options 12
2.1.7 External Options 13
2.1.8 Simulator 13
2.1.9 Technical Data 15
2.1.9.1 LX9000 System 15
2.1.9.2 LX9050 System 15
2.1.9.3 LX9070 System 15
2.1.9.4 LX8000 16
2.1.9.5 LX8080 16
2.1.10 Weight 16
3 Packing Lists 17
3.1 LX90xx with Flarm Option 17
3.2 LX90xx 17
3.3 LX90xxD 17
3.4 LX80xx with Flarm Option 17
3.5 LX80xx 18
3.6 LX80xxD 18
4 System Description 19
4.1 Rotary Switches and Buttons 19
4.1.1 Landscape orientation 19
4.1.2 Portrait orientation 21
4.1.3 Buttons 21
4.1.3.1 Power Button 21
4.1.4 Rotary Switches (Knobs) 21
4.2 Switching on the Unit 22
4.3 User Input 22
4.3.1 Text Edit Control 23
4.3.2 Masked Text Edit Control 23
4.3.3 Spin Control 24
4.3.4 Selection Control 24
4.3.5 Checkbox and Checkbox List 24
4.3.6 Colour Selector 24
4.3.7 Font Selector 25
4.3.8 Line pattern Selector 25
4.3.9 Pull down menu 26
4.4 Switching off 26
5 Operating Modes 28
5.1 Setup Mode 30
5.1.1 QNH and RES 30
5.1.1.1 QNH* 30
5.1.1.2 Safety Altitude 31
5.1.1.3 Altitude source 31
5.1.1.4 Magnetic Variation 31
Page 2 of 192
Page 3

Version 6.03, May 2017
5.1.1.5 ETA/ETE Calculation 31
5.1.1.6 Soaring Start* 31
5.1.2 Flight Recorder 32
5.1.3 Vario Parameters* 33
5.1.4 Display 34
5.1.5 Files and Transfers 35
5.1.5.1 Uploading User Airspace and Waypoints 35
5.1.5.2 Uploading Airspace and Airports Database (ASAPT) 36
5.1.5.3 Airspace 37
5.1.5.4 Airports 38
5.1.5.5 Waypoints and Tasks 39
5.1.5.6 Maps 41
5.1.5.7 Flights 43
5.1.5.8 Flights declaration 43
5.1.5.9 Formatting a SD Card 43
5.1.5.10 Update databases 44
5.1.5.11 PDF documents 44
5.1.5.12 Checklists 46
5.1.6 Graphics 50
5.1.6.1 Map and Terrain 50
5.1.6.2 Airspace 54
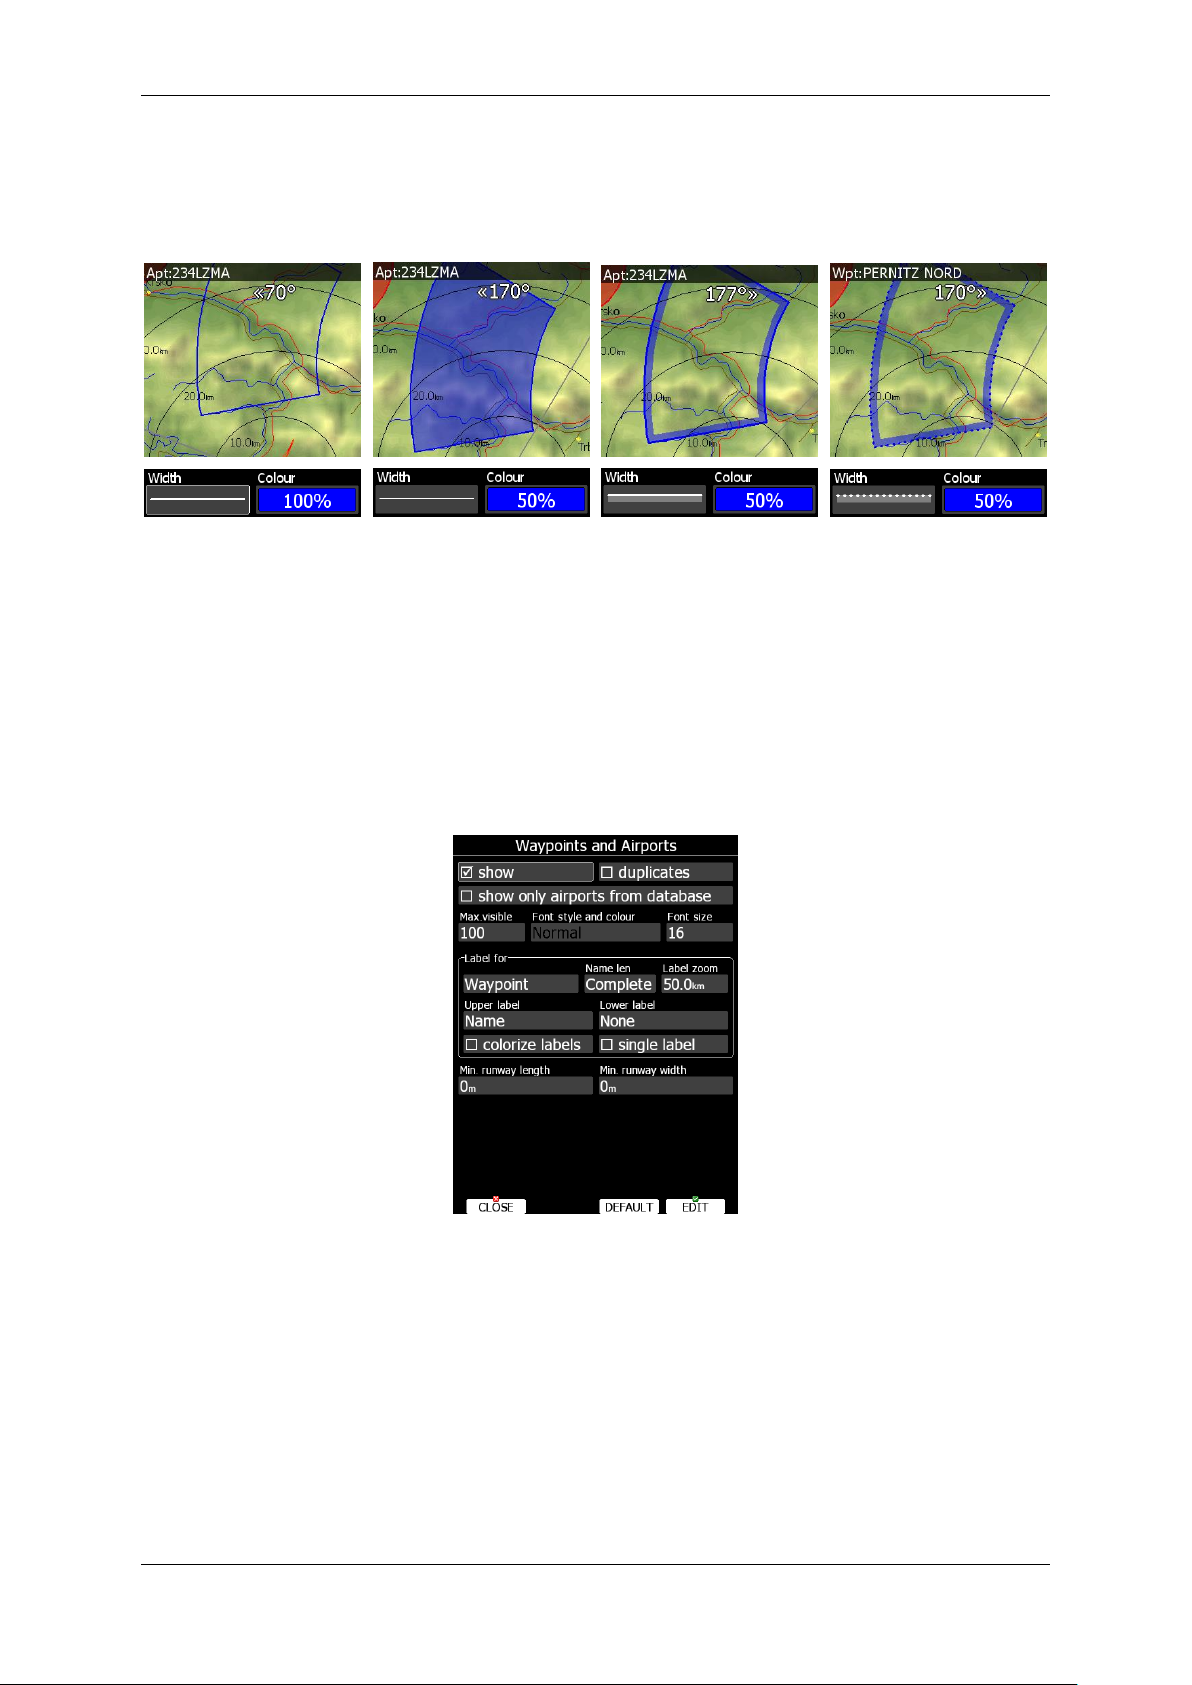
5.1.6.3 Waypoints and Airports 55
5.1.6.4 Glider and Track 57
5.1.6.5 Thermal mode 58
5.1.6.6 Optimization 58
5.1.6.7 Task 59
5.1.6.8 Flarm 60
5.1.6.9 Rain Radar 62
5.1.6.10 Misc 62
5.1.7 Sounds* 63
5.1.7.1 Audio Settings* 64
5.1.7.2 Voice* 65
5.1.7.3 Alarms* 65
5.1.7.4 Observation Zones 66
5.1.8 Optimization 68
5.1.9 Warnings 68
5.1.9.1 Airspace Warnings 69
5.1.9.2 Altitude Warning 70
5.1.9.3 Flarm Warnings 71
5.1.9.4 Time Alarm warning 72
5.1.9.5 Gear warning 73
5.1.9.6 Waypoint warning 73
5.1.10 Units 73
5.1.11 Hardware* 74
5.1.11.1 Vario unit settings – TE compensation* 75
5.1.11.2 Vario Indicator Setup* 77
5.1.11.3 Indicator I9* 78
5.1.11.4 Indicator I8/I80/V8/V80 79
5.1.11.5 LCD and USB-D Vario indicator* 87
5.1.11.6 Bridge 232* 87
5.1.11.7 Flarm* 89
5.1.11.8 Compass* 90
5.1.11.9 Rear Seat or Front Seat 92
Page 3 of 192
Page 4

Version 6.03, May 2017
5.1.11.10 Remote stick* 93
5.1.11.11 AHRS* 94
5.1.11.12 NMEA Output 95
5.1.11.13 Engine * 95
5.1.11.14 Network* 96
5.1.11.15 Flaps* 98
5.1.11.16 Battery Types* 98
5.1.12 Polar and Glider* 99
5.1.13 Profiles and Pilots 100
5.1.14 Language 103
5.1.15 Passwords 103
5.1.16 Admin mode 104
5.1.17 About 105
5.2 Information Mode 106
5.2.1 GPS Status Page 106
5.2.2 Position Report 107
5.2.3 Satellite Sky View 108
5.2.4 Network status 108
5.3 Near Mode 109
5.4 Statistics Mode 109
5.4.1 Logbook 110
5.4.2 Statistics during flight 111
5.4.2.1 General statistics 112
5.4.2.2 Detailed task statistics 112
5.4.2.3 OLC statistics 113
5.5 Airport Mode 114
5.5.1 Initial Navigation Page 114
5.5.2 Second Navigation Page 115
5.5.3 Third Navigation Page 116
5.5.4 Fourth Navigation Page 116
5.5.5 Fifth Navigation Page 117
5.5.6 Button actions related only to APT page 117
5.5.6.1 Select an Airport 117
5.6 Waypoint Mode 121
5.6.1 Button actions related only to WPT page 121
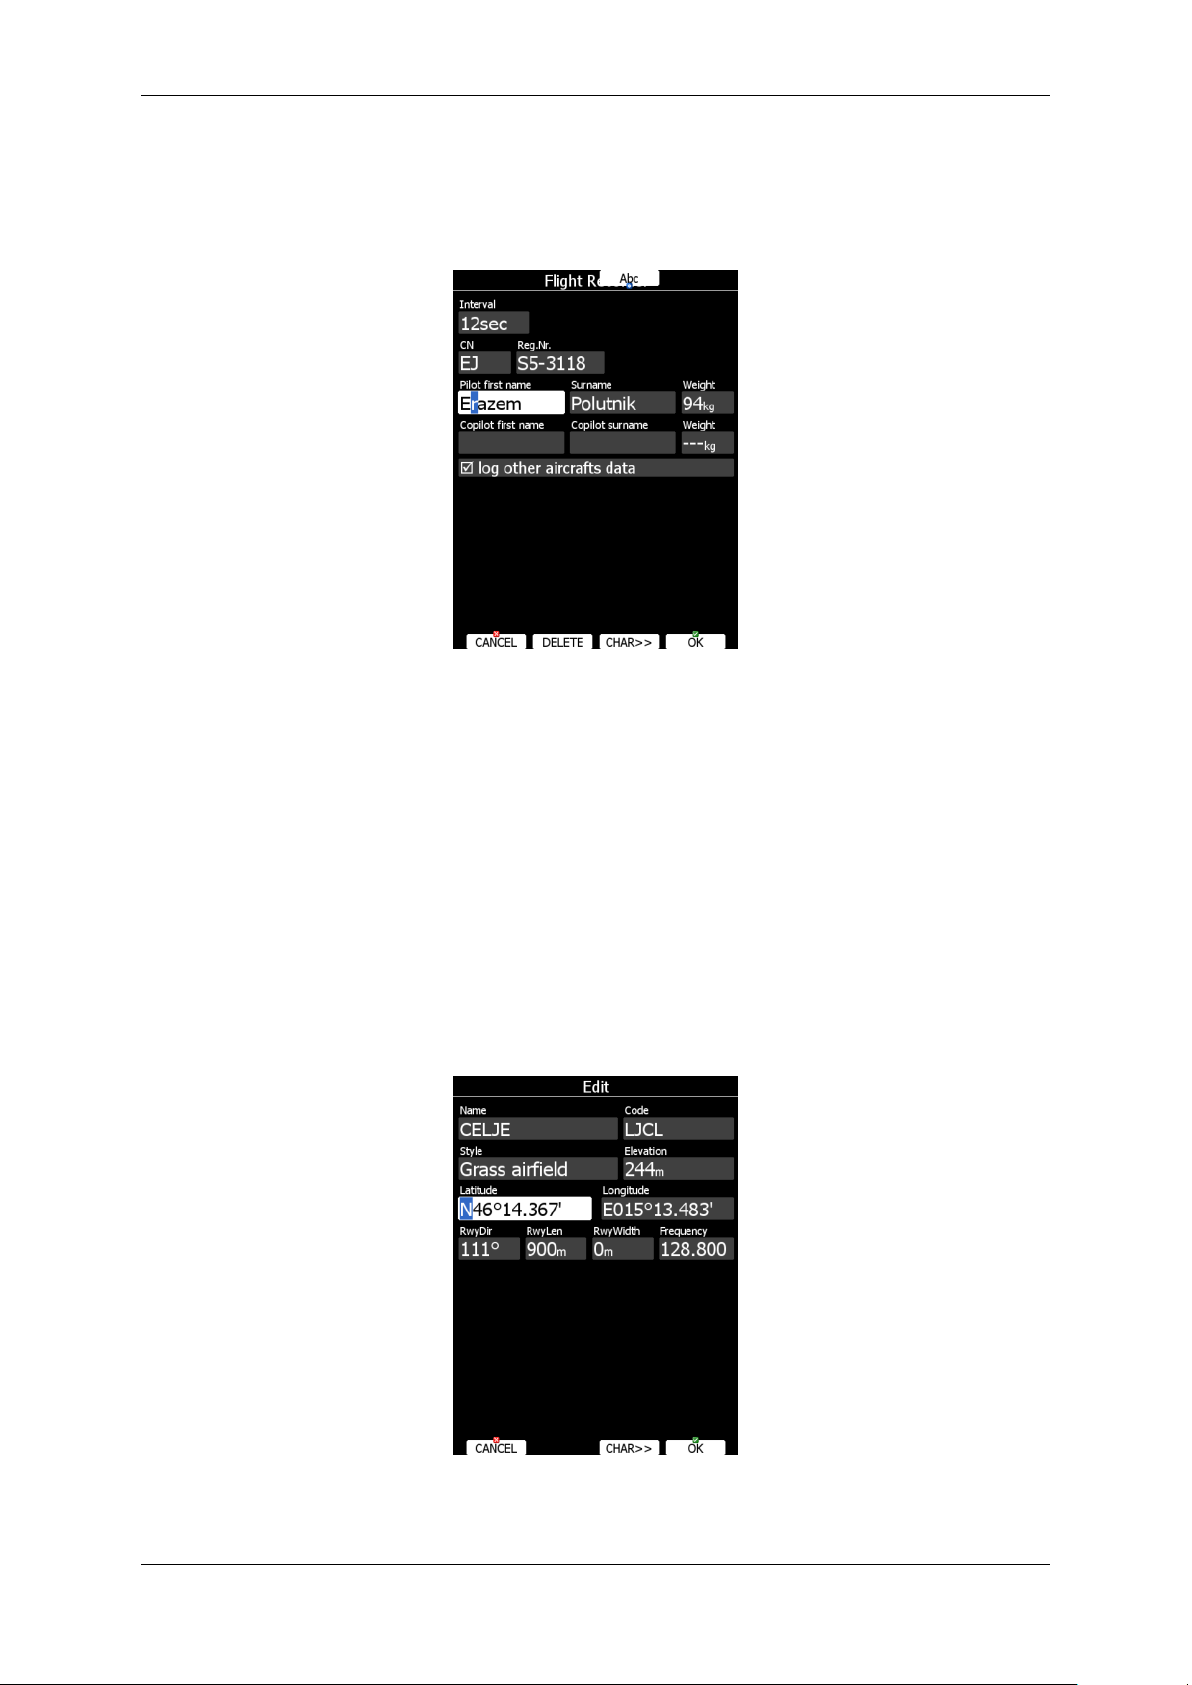
5.6.1.1 Editing Waypoints 121
5.6.1.2 New Waypoint 122
5.6.1.3 Delete waypoint 123
5.7 Task Mode 123
5.7.1 Button actions related only to TSK page 125
5.7.2 Task Edit 125
5.7.2.1 Starts (Multiple start points) 126
5.7.2.2 Zone (modifying zones) 126
5.7.2.3 Task Options 127
5.7.2.4 Saving a Task 130
5.7.3 NEW task (task creation) 130
5.7.4 Creating a task in SEEYOU 132
5.7.5 Loading a Task 133
5.7.5.2 Map edit mode 134
5.8 Thermal Mode 134
6 Navigational page layout 135
6.1 Edit page layout 136
6.2 Button Actions 137
Page 4 of 192
Page 5

Version 6.03, May 2017
6.2.1.1 MacCready, Ballast and Bugs Settings 139
6.2.1.2 Map Settings 139
6.2.1.3 Wind 141
6.2.1.4 Airspace 142
6.2.1.5 Mark 143
6.2.1.6 Xpdr 144
6.2.1.7 Radio 144
6.2.1.8 Team 145
6.2.1.9 Flarm 145
6.2.1.10 Pan 147
6.2.1.11 Rotate FAI Area 148
6.2.1.12 Layout 148
6.2.1.13 Night 148
6.3 Creating new symbol 149
6.3.1 Navboxes 150
6.3.1.1 Detailed description of NAVBOXES 151
6.3.2 Map and Plane (Plane symbol) 152
6.3.3 Orientation symbol 152
6.3.4 Final glide symbol 152
6.3.4.1 Final glide character explanation 153
6.3.5 Battery indicator 153
6.3.6 GPS indicator 153
6.3.7 Wind Arrow and Thermal Assistant 153
6.3.8 Zoom 154
6.3.9 Side View 154
6.3.10 Picture 154
6.3.11 History 155
6.3.12 Flarm radar 155
6.3.13 Artificial Horizon 155
6.3.14 Altitude Tape 156
6.3.15 Airspeed Tape 156
6.3.16 Vario Tape 158
6.3.17 Magnetic roses and HSI 158
6.3.18 Compass Tape 158
6.3.19 Flap tape® 159
6.3.20 3D Map – synthetic view 159
6.3.21 Vario Indicator 160
6.3.22 G-meter 160
6.3.23 Wi-Fi indicator 160
6.3.24 Wind profile 161
6.3.25 Thermal Graph 161
6.3.26 Meteogram 161
6.3.27 SC Vario 162
6.3.28 Flarm 162
6.4 Navigational page settings 162
7 Flying with the System 163
7.1 On the Ground 163
7.1.1 Power on Procedure 163
7.1.2 Profile Selection 163
7.1.3 Set Elevation and QNH 164
7.1.4 Pre-flight Check 164
7.1.4.1 MacCready, Ballast, Bugs 164
7.1.5 Preparing a Task 165
Page 5 of 192
Page 6

Version 6.03, May 2017
7.1.5.1 Assigned Area Tasks (AAT) 166
7.2 Flying a Task 168
7.2.1 Starting a Task 168
7.2.2 Restarting Task 170
7.2.3 Over Turn Point 170
7.2.4 Entering Assigned Area 171
7.2.5 Moving Point Inside Assigned Area 171
7.2.6 Task Finish 172
7.2.7 Graphical Final Glide assistants 173
7.3 Procedure after Landing 174
8 Firmware Update 175
8.1 Updating main display firmware 175
8.1.1 Updating via Wi-fi Module 176
8.2 Updating Vario unit or Vario indicator 177
Automatic vario update 177
8.2.1 177
8.2.2 Manual vario update 178
9 IGC Barograph Recalibration Procedure 179
10 Options 180
10.1 Flarm 180
10.1.1 Installation 180
10.1.2 Flarm Update Procedure 181
10.1.3 Uploading Obstacles 181
10.1.4 Flarm update procedure with FLARMtool from PC 182
10.1.5 Uploading obstacles with FlarmTool from PC 183
10.1.6 Uploading FlarmNet Files 184
10.2 External Flarm or Power Flarm 184
10.2.1 Installation 185
10.3 Rear Seat Device 185
10.3.1 Data Exchange 185
10.4 Remote Control 187
10.4.1 Functions 188
10.4.2 Installation 189
10.5 Compass 189
10.6 Flap sensor® 190
10.7 Secondary Vario Indicators 190
11 Revision History 191
Page 6 of 192
Page 7
Important Notices Version 6.03, May 2017
A Yellow triangle is shown for parts of the manual which should be read very
carefully and are important for operating the system.
Notes with a red triangle describe procedures which are critical and may result in
loss of data or any other critical situation.
A bulb icon is shown when a useful hint is provided to the reader.
1 Important Notices
The LXNAV system is designed for VFR use only as an aid to prudent navigation. All
information is presented for reference only. Terrain, airports and airspace data are provided
only as an aid to situation awareness.
Information in this document is subject to change without notice. LXNAV reserves the right
to change or improve their products and to make changes in the content of this material
without obligation to notify any person or organisation of such changes or improvements.
1.1 Limited Warranty
This LXNAV product is warranted to be free from defects in materials or workmanship for
two years from the date of purchase. Within this period, LXNAV will, at its sole discretion,
repair or replace any components that fail in normal use. Such repairs or replacement will
be made at no charge to the customer for parts and labour, provided that the customer shall
be responsible for any transportation cost. This warranty does not cover failures due to
abuse, misuse, accident, or unauthorised alterations or repairs. LXNAV Instrument displays
damaged by direct or magnified sunlight are not covered under warranty.
THE WARRANTIES AND REMEDIES CONTAINED HEREIN ARE EXCLUSIVE AND IN LIEU OF
ALL OTHER WARRANTIES EXPRESSED OR IMPLIED OR STATUTORY, INCLUDING ANY
LIABILITY ARISING UNDER ANY WARRANTY OF MERCHANTABILITY OR FITNESS FOR A
PARTICULAR PURPOSE, STATUTORY OR OTHERWISE. THIS WARRANTY GIVES YOU
SPECIFIC LEGAL RIGHTS, WHICH MAY VARY FROM STATE TO STATE.
IN NO EVENT SHALL LXNAV BE LIABLE FOR ANY INCIDENTAL, SPECIAL, INDIRECT OR
CONSEQUENTIAL DAMAGES, WHETHER RESULTING FROM THE USE, MISUSE, OR
INABILITY TO USE THIS PRODUCT OR FROM DEFECTS IN THE PRODUCT. Some states do
not allow the exclusion of incidental or consequential damages, so the above limitations may
not apply to you. LXNAV retains the exclusive right to repair or replace the unit or software,
or to offer a full refund of the purchase price, at its sole discretion. SUCH REMEDY SHALL
BE YOUR SOLE AND EXCLUSIVE REMEDY FOR ANY BREACH OF WARRANTY.
To obtain warranty service, contact your local LXNAV dealer or contact LXNAV directly.
Page 7 of 192
Page 8

Important Notices Version 6.03, May 2017
1.2 Sunburned display warranty
Any kind of display including LXNAV instrument display screens can be damaged / burned by
strong sunlight magnified by canopies in certain positions. We suggest you to cover your
device from the direct sunlight, especially if the canopy is open.
LXNAV Instrument displays damaged by direct or magnified sunlight are not covered under
warranty
May 2017 © 2017 LXNAV. All rights reserved.
Page 8 of 192
Page 9

Basics Version 6.03, May 2017
2 Basics
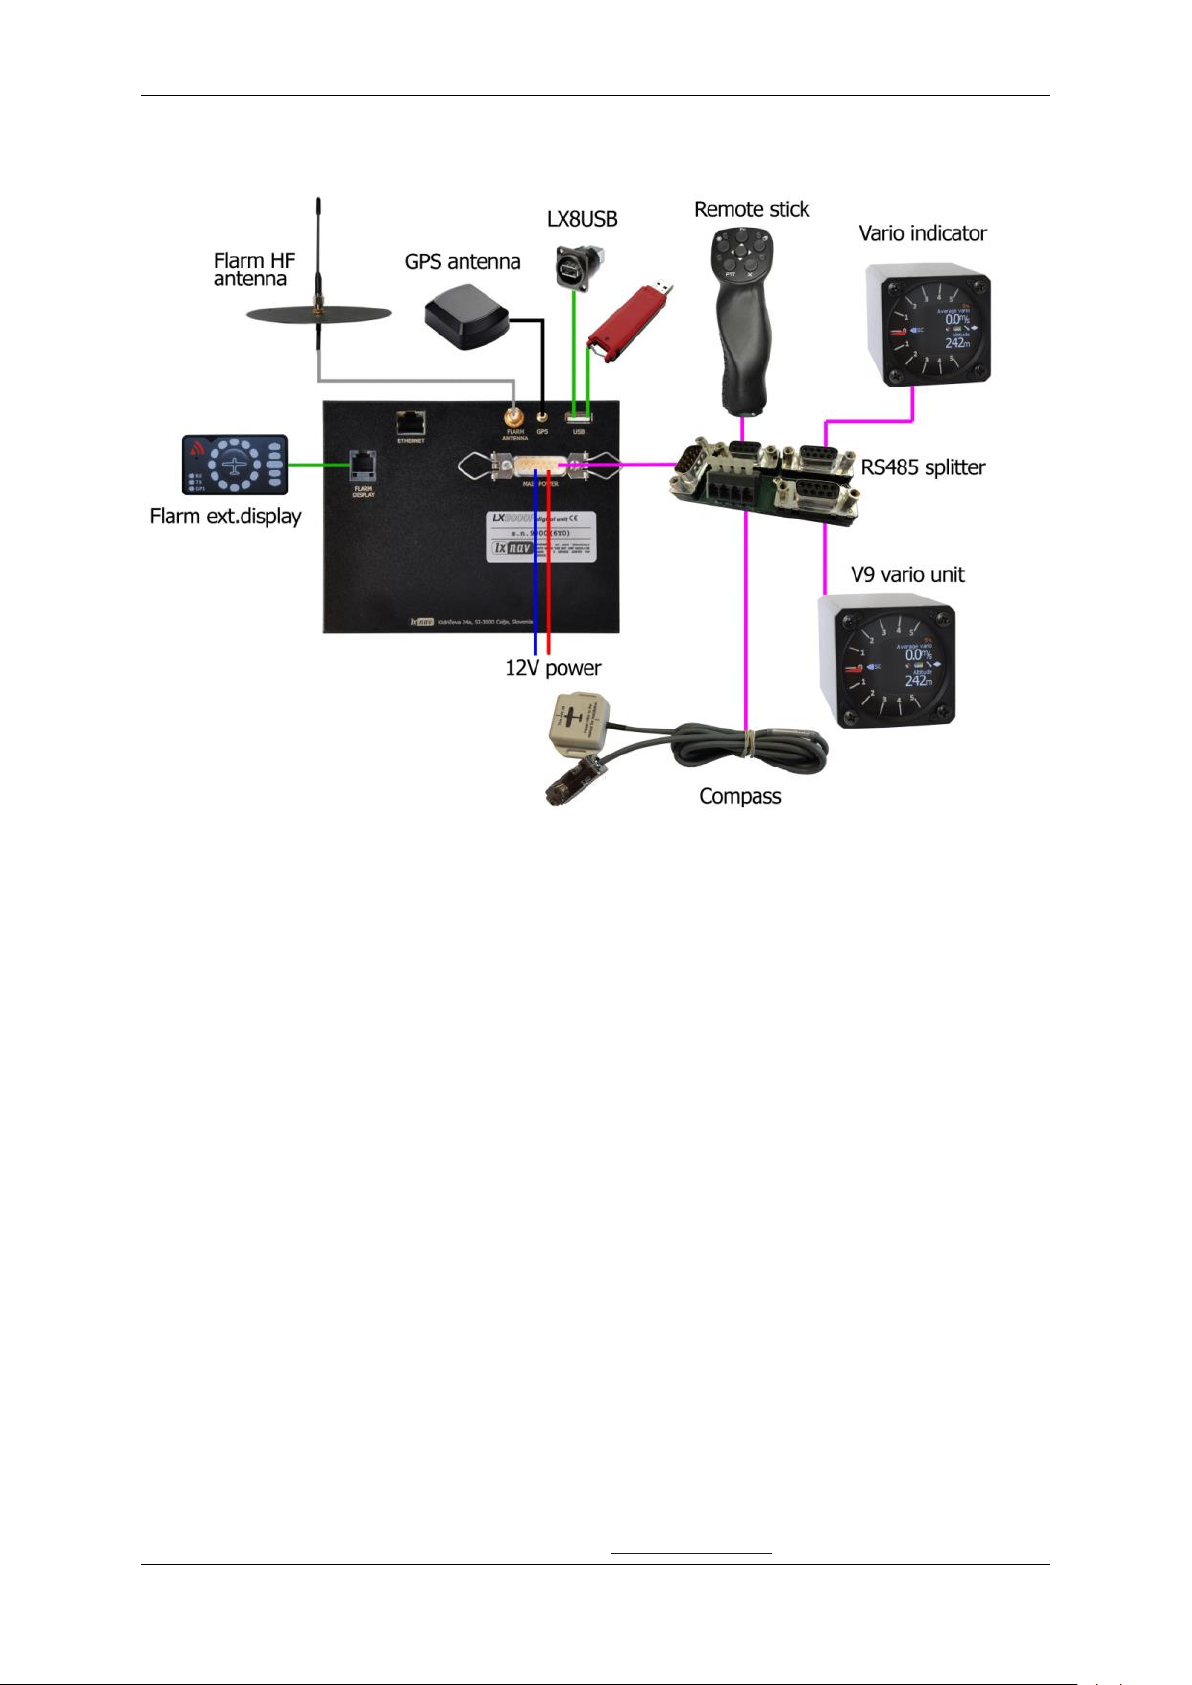
2.1 The LX9xx/LX80xx series at a glance
The system consists of two units; the main display unit and the vario unit. Within the main
display unit an integral 50-channel GPS receiver and a high brightness colour display are
fitted. An integrated SD card or USB interface is used for user friendly data exchange.
Some of the models are featuring also PDA port for easy connection on external PDA device.
The main display unit is equipped with a built-in flight recorder according to the most recent
IGC specification for all flights. Optionally the FLARM collision avoidance system can be
integrated into the main display unit.
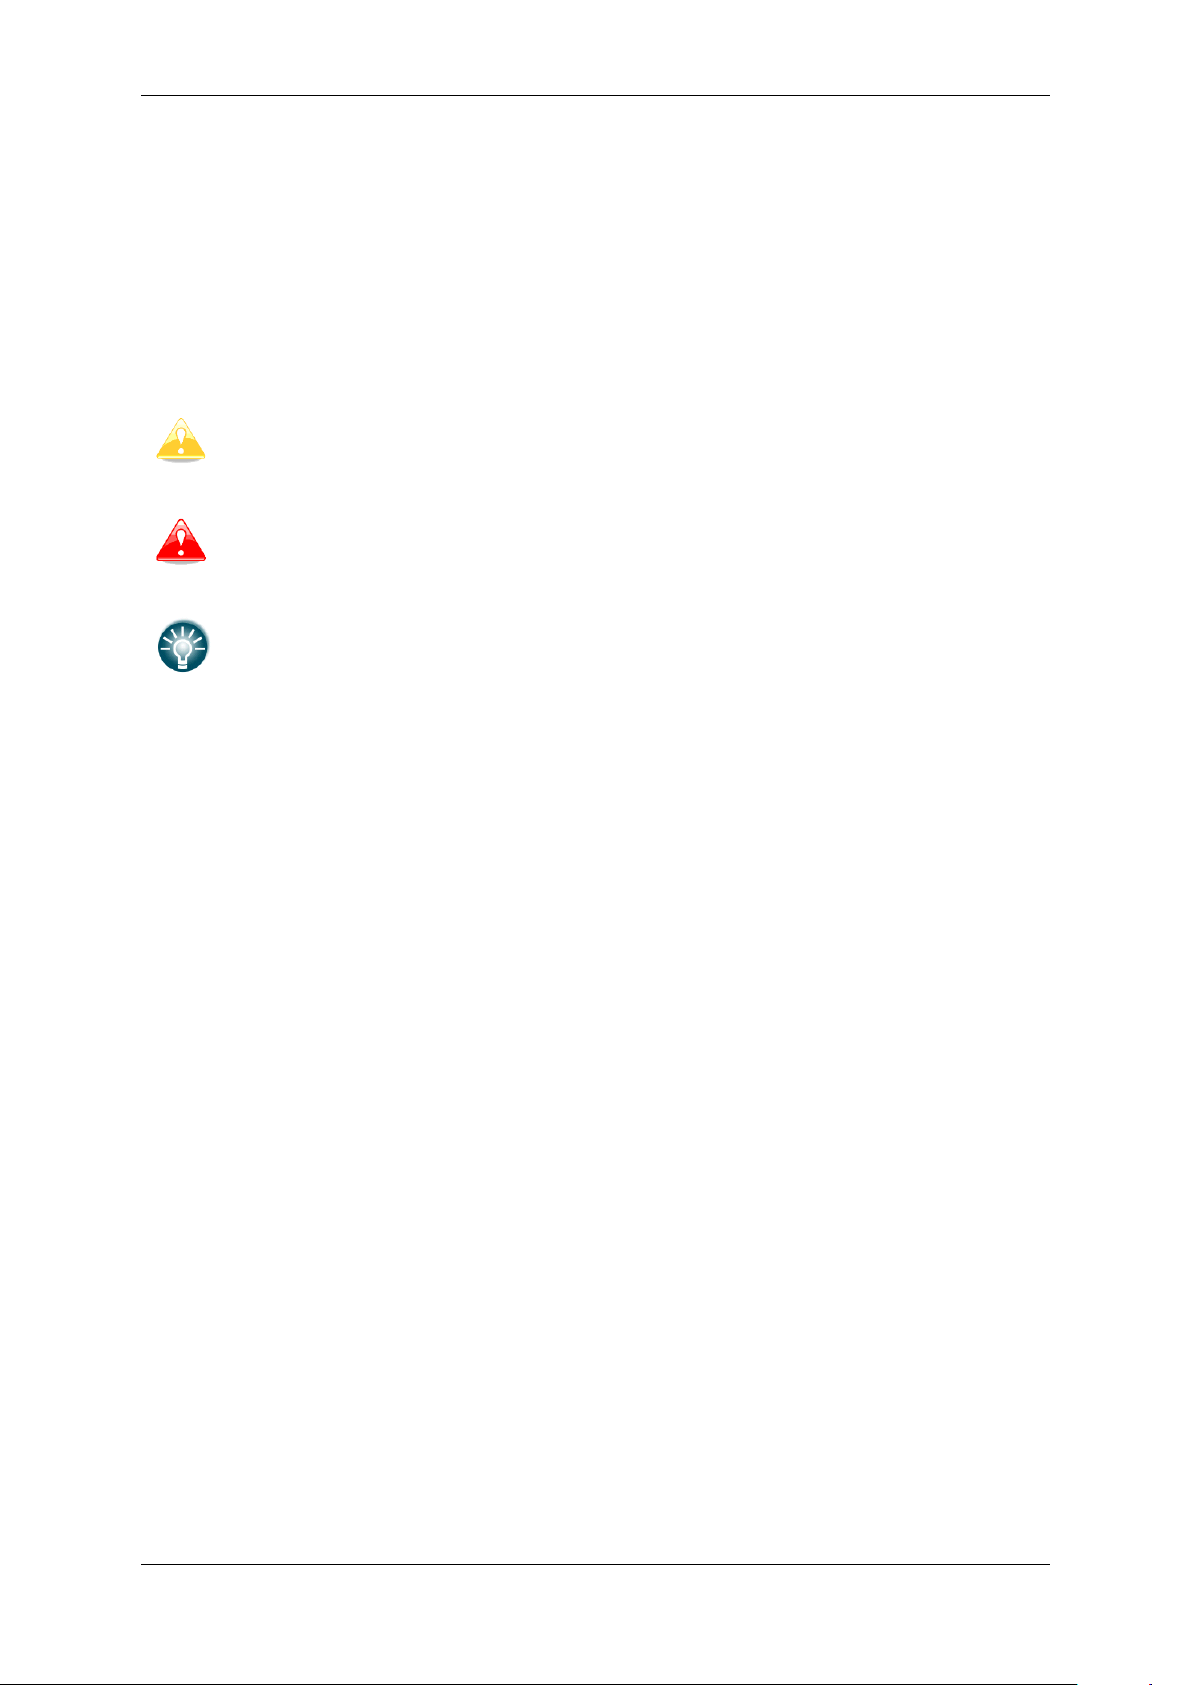
Main display unit comes in different forms:
LX8080 model with 2.8” screen and 320x240 pixels resolution,
LX8000 model with 3.5” screen and 320x240 pixels resolution,
LX9050 model with 5.0” screen and 800x480 pixels resolution,
LX9000 model with 5.6” screen and 640x480 pixels resolution,
LX9070 model with 7.0” screen and 800x480 pixels resolution.
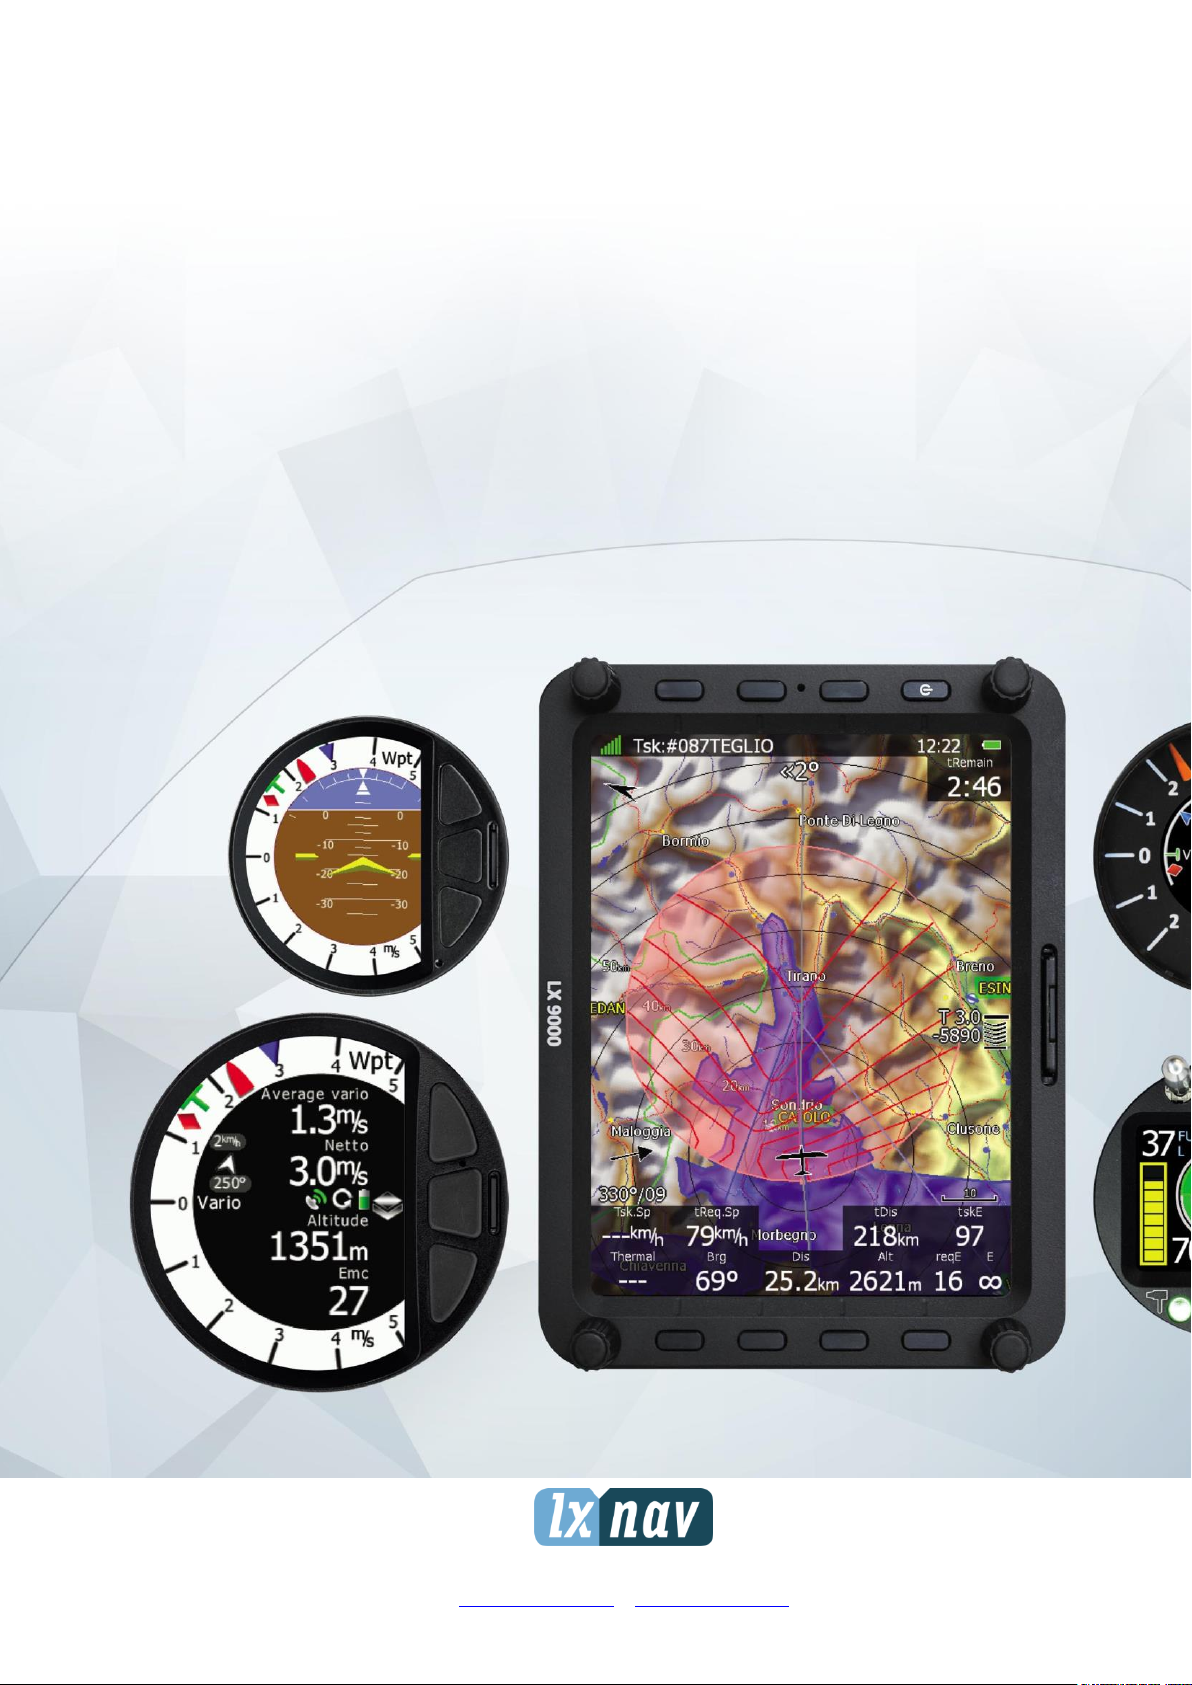
Standard part of system is also the V8 vario unit. It is a most modern variometer running
on very powerful processor with inertial platform using 3 axis accelerometer, 4 gyroscopes
(for inertial vario, AHRS and wind calculation), smooth audio output with audio equalizer and
integrated synthesized speech output. The unit communicates with the main display unit
over the RS485 system bus. V8 vario features 57 mm diameter (2¼") colour screen and
three additional buttons.
Optional vario units are available:
V80 vario features 80 mm diameter (3”) colour screen and three additional buttons
V9 vario with 57 mm diameter (2¼") indicator with mechanical needle and colour
display for additional data.
Optionally additional vario indicators and a wide range of interface devices can be daisychained using the RS485 bus.
Page 9 of 192
Page 10
Basics Version 6.03, May 2017
2.1.1 Display Unit Features
Extremely bright colour display readable in all sunlight conditions with backlight
automatically adapted using an ambient light sensor (ALS).
Using Linux operating system (not CE Windows) ensures fast and stable operation of the
firmware.
6 or 8 push buttons and 4 rotary switches (knobs) are used for input, which comprise
the well-known LX user interface. Optionally a remote stick is available for more
comfort.
Portrait or landscape orientation. (Portrait orientation is not available on LX80xx models)
Pre-loaded with worldwide terrain maps, airspace and airport databases.
Unlimited number of waypoints.
Unlimited number of tasks (with assigned area support).
Comprehensive flight and task statistics.
Display of nearest airports and out-landing fields.
Unlimited number of pilots/profiles.
Integrated flight recorder according to high-level IGC specification.
Real-time flight optimisation according to FAI and OLC rules.
Flights stored in IGC format are downloadable using the integrated SD Card.
Flight recorder functions include an integral pressure transducer based on 1013 mbar
level for altitude recording, engine noise level sensor, memory to store more than 1000
hours of flights and digital and mechanically security devices to ensure high level of
security.
Integrated FLARM collision avoidance system with graphic, sound and voice (optional)
presentation.
2.1.2 V9 Vario Unit Features
ARM Cortex-M4 processor running on 160MHz
Mechanical needle driven by stepper motor
QVGA (320*240pixels) sunlight readable display
Page 10 of 192
Page 11
Basics Version 6.03, May 2017
Digital temperature compensated pressure sensors for altitude and airspeed
inertial platform 3 axis digital +-6g accelerometer, 3 axis gyroscopes (for inertial
vario, AHRS and wind calculation)
Smooth audio output
Audio equalizer
integrated synthesized speech output
audible thermal assistant
6 digital inputs - SC, VP + 4 custom defined
Multilanguage user interface
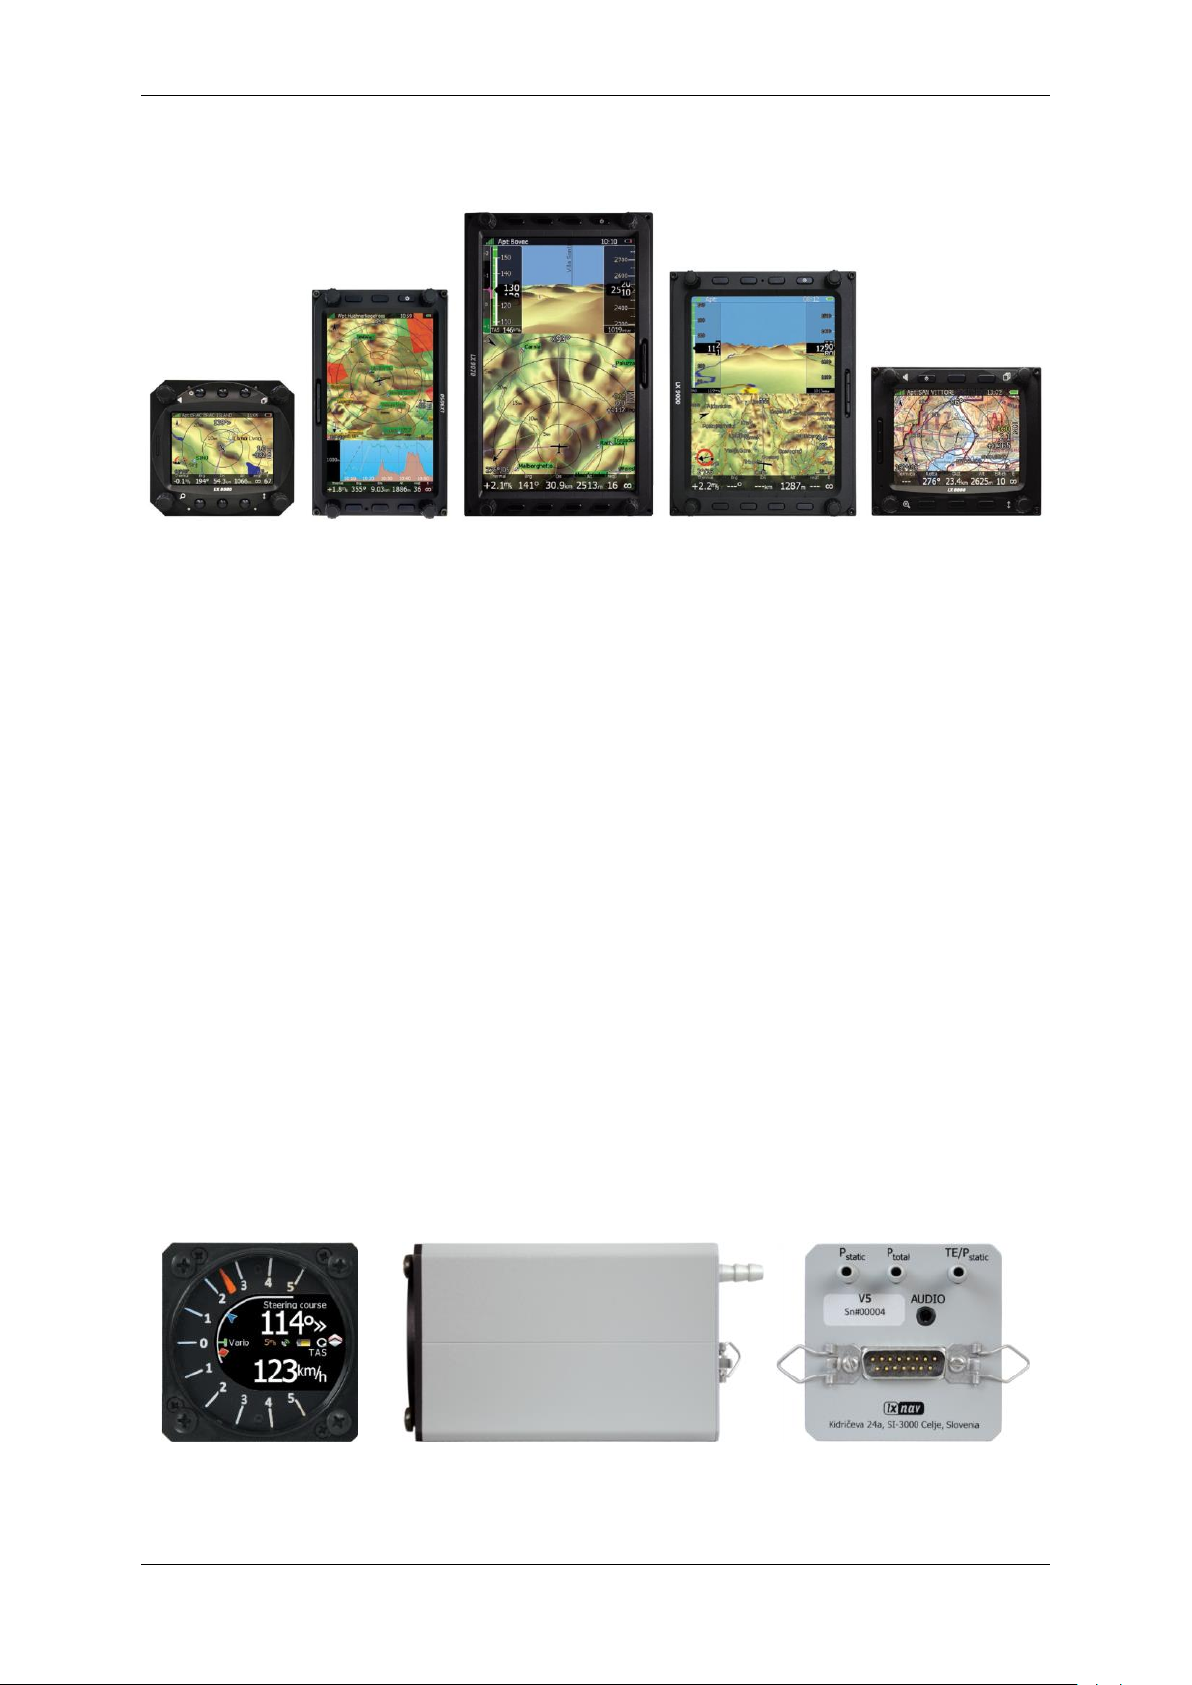
2.1.3 V8 Vario Unit Features
2.5'' QVGA sunlight readable screen with 1200nits
QVGA (320*240pixels) sunlight readable display
ARM Cortex-M4 processor running on 160MHz
Digital temperature compensated pressure sensors for altitude and airspeed
inertial platform 3 axis digital +-6g accelerometer, 4 gyroscopes (for inertial vario,
AHRS and wind calculation)
Smooth audio output with audio equalizer and many custom audio settings
integrated synthesized speech output
audible thermal assistant
External SD card for configuration, FlarmNet and firmware update
Push buttons for setting adjustments
ALS (ambient light sensor)
Additional Flarm radar screen and artificial horizon (optional).
Three buttons for toggling between screen and target selection
digital temperature compensated pressure sensors for altitude and airspeed
100Hz sampling rate for very fast response.
Speed to fly indication.
TE compensation can be selected to be either pneumatic TE probe or digital compensation.
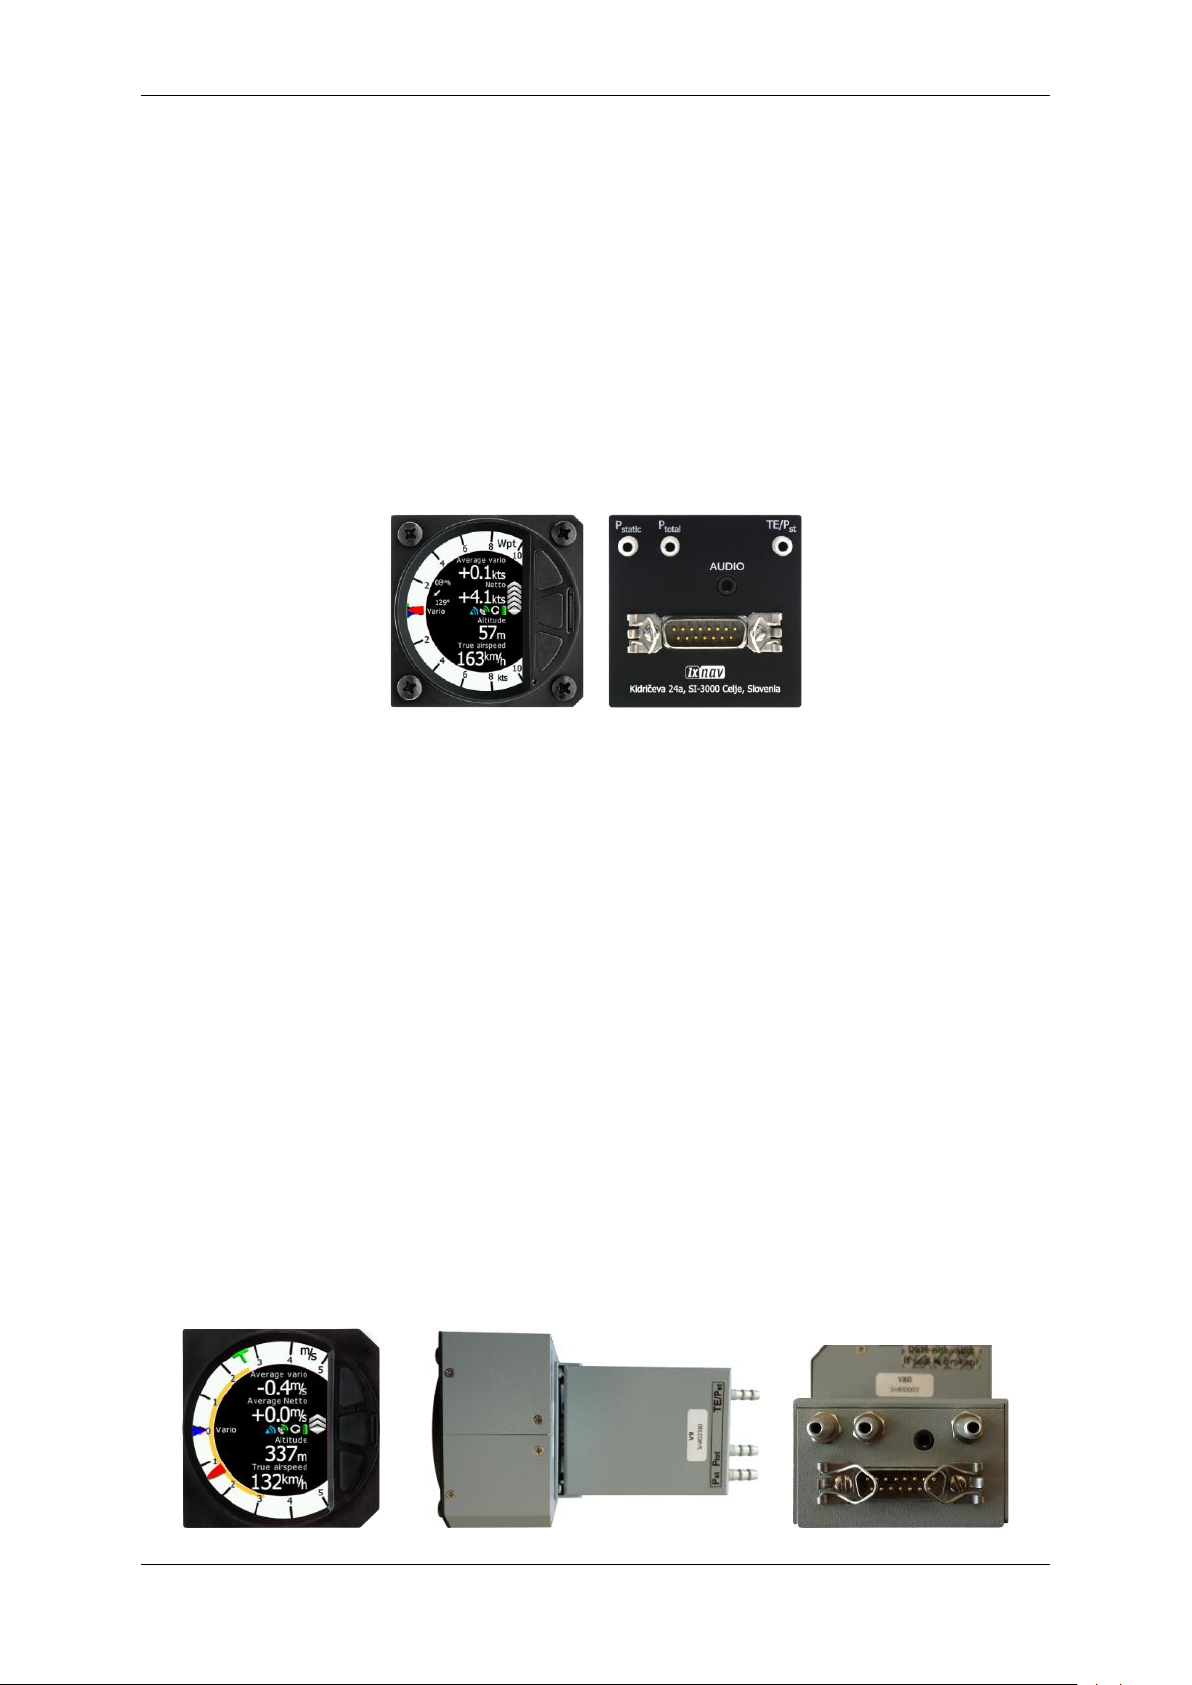
2.1.4 V80 Vario Unit Features
Page 11 of 192
Page 12

Basics Version 6.03, May 2017
3.5'' (8.8 cm) sunlight readable screen with 1200nits
QVGA (320*240pixels) sunlight readable display
ARM Cortex-M4 processor running on 160MHz
Digital temperature compensated pressure sensors for altitude and airspeed
inertial platform 3 axis digital +-6g accelerometer, 4 gyroscopes (for inertial vario, AHRS
and wind calculation)
Smooth audio output with audio equalizer and many custom audio settings
integrated synthesized speech output
audible thermal assistant
External SD card for configuration, FlarmNet and firmware update
Push buttons for setting adjustments
ALS (ambient light sensor)
Additional Flarm radar screen and artificial horizon (optional).
Three buttons for toggling between screen and target selection
digital temperature compensated pressure sensors for altitude and airspeed
100Hz sampling rate for very fast response.
Speed to fly indication.
TE compensation can be selected to be either pneumatic TE probe or digital compensation.
2.1.5 Interfaces
The RS232 interface has NMEA output for external devices.
An SD Card interface.
A USB slot for data transfer using USB memory stick.
2.1.6 Internal Options
Flarm module can be built into the main display unit. All necessary connectors are
available on the rear side of the unit (Flarm external indicator, Flarm antenna), which
guaranties the same comfort as with the original Flarm devices. It is very important to point
out that the whole system uses only one GPS receiver and therefore offers a low power
solution.
Artificial horizon can be enabled on main display unit. Vario sensor box is constantly
using data from inertial platform in order to make vario signal smoother, however if pilot
would like to see artificial horizon and software option to do so must be purchased.
Page 12 of 192
Page 13
Basics Version 6.03, May 2017
2.1.7 External Options
By using a RS485 bus system a wide range of optional interfaces can be easily connected to
the basic configuration with minimal installation work. The LXNAV bus system can be
extended easily by use of RS485 splitting units, which allow plug and play connection of
optional devices.
The following units can be connected to the main system:
Second Seat Device (LX9000D, LX9050D LX9070D LX8000D or LX8080D):
The unit installed in the rear seat of the glider is powered and receives all necessary
data from the main unit. The communication between both units is exclusively via the
RS485 bus system.
Remote Control: An extremely ergonomic leather-coated handle which includes 8
push buttons to operate the main display unit and also two additional buttons with open
wires. These two buttons can be used for instance as PTT for radio and SC/Vario
changeover command. A second remote control can be installed to control second seat
device or for side by side operation.
Electrical Compass Device
Secondary Vario Indicators (I8,I9 or I80 indicator)
Flap sensor
MOP box for jet engines
232 Bridge for radio or transponder
Wi-fi module
External Flarm module
2.1.8 Simulator
There are two options to stay in condition and familiar with your system. LXSim is free of
charge program, which you can download from www.lxnav.com or data from the Condor PC
Page 13 of 192
Page 14

Basics Version 6.03, May 2017
flight simulator (www.condorsoaring.com) can be received via the RS232 port after entering
suitable passwords (see Chapter 5.1.14).
These features are extremely useful for pilots who want to learn about the system and also
wish to refresh their knowledge after a winter break. Please note that altitude data will be
sent from the simulator which means that real final glide training will be possible.
Page 14 of 192
Page 15

Basics Version 6.03, May 2017
2.1.9 Technical Data
2.1.9.1 LX9000 System
Power input 10-16 V DC
Consumption at 12 V:
o 250 mA - minimum brightness without audio and options.
o 260 mA - minimum brightness without audio and with Flarm.
o 470 mA - maximum brightness without audio and options.
o 480 mA - maximum brightness without audio and with Flarm.
o 160 mA – additional for V8 vario unit
Cut-out dimensions of the LX9000 display unit are 109 x 143 mm; outline dimensions:
113 x 145 x 38 mm exclusive connector.
57 mm (2¼") standard aircraft cut-out for the V9 vario unit; length 92 mm (exclusive
connector).
57 mm (2¼") standard aircraft cut-out for the V8 vario unit; length 95 mm (exclusive
connector).
80 mm (3") standard aircraft cut-out for the V80 vario unit; length 130 mm (exclusive
connector).
2.1.9.2 LX9050 System
Power input 10-16 V DC
Consumption at 12 V:
o 250 mA - minimum brightness without audio and options.
o 260 mA - minimum brightness without audio and with Flarm.
o 470 mA - maximum brightness without audio and options.
o 480 mA - maximum brightness without audio and with Flarm.
o 160 mA – additional for V8 vario unit
Cut-out dimensions of the LX9050 display unit are 134 x 79 mm; outline dimensions:
136 x 83 x 61 mm exclusive connector.
57 mm (2¼") standard aircraft cut-out for the V9 vario unit; length 92 mm (exclusive
connector).
57 mm (2¼") standard aircraft cut-out for the V8 vario unit; length 95 mm (exclusive
connector).
80 mm (3") standard aircraft cut-out for the V80 vario unit; length 130 mm (exclusive
connector).
2.1.9.3 LX9070 System
Power input 10-16 V DC
Consumption at 12 V:
o 250 mA - minimum brightness without audio and options.
o 260 mA - minimum brightness without audio and with Flarm.
o 470 mA - maximum brightness without audio and options.
o 480 mA - maximum brightness without audio and with Flarm.
o 160 mA – additional for V8 vario unit
Cut-out dimensions of the LX9070 display unit are 109 x 179 mm; outline dimensions:
113 x 181 x 38 mm exclusive connector.
57 mm (2¼") standard aircraft cut-out for the V9 vario unit; length 92 mm (exclusive
connector).
57 mm (2¼") standard aircraft cut-out for the V8 vario unit; length 95 mm (exclusive
connector).
80 mm (3") standard aircraft cut-out for the V80 vario unit; length 130 mm (exclusive
connector).
Page 15 of 192
Page 16

Basics Version 6.03, May 2017
2.1.9.4 LX8000
Power input 10-16 V DC
Consumption at 12 V:
o 290 mA - minimum brightness without audio and options.
o 300 mA - minimum brightness without audio and with Flarm.
o 380 mA - maximum brightness without audio and options.
o 390 mA - maximum brightness without audio and with Flarm.
o 160 mA – additional for V8 vario unit
Cut-out dimensions of the LX8000 digital unit are 93.5 x 81.5 mm; outline dimensions:
98 x 88 x 115 mm exclusive connector.
57 mm (2¼") standard aircraft cut-out for the V9 vario unit; length 92 mm (exclusive
connector).
57 mm (2¼") standard aircraft cut-out for the V8 vario unit; length 95 mm (exclusive
connector).
80 mm (3") standard aircraft cut-out for the V80 vario unit; length 130 mm (exclusive
connector).
2.1.9.5 LX8080
Power input 10-16 V DC
Consumption at 12 V:
o 160mA at 50% LCD brightness (600nits still readable under sunlight)
o 260mA with integrated Flarm at 100% LCD brightness (1200nits)
o 160 mA – additional for V8 vario unit
Cut-out dimension of the LX8080 digital unit is 80 mm (3") standard aircraft cut-out;
outline dimensions are 81mm x 81mm x 65mm exclusive connector.
57 mm (2¼") standard aircraft cut-out for the V9 vario unit; length 92 mm (exclusive
connector).
57 mm (2¼") standard aircraft cut-out for the V8 vario unit; length 95 mm (exclusive
connector).
80 mm (3") standard aircraft cut-out for the V80 vario unit; length 130 mm (exclusive
connector).
2.1.10 Weight
LX9000 display unit: 650 g
LX9050 display unit: 515 g
LX9070 display unit: 650 g
LX8000 digital unit: 580 g
LX8080 digital unit: 400 g
V8 vario unit: 300 g
Page 16 of 192
Page 17

Packing Lists Version 6.03, May 2017
3 Packing Lists
3.1 LX90xx with Flarm Option
LX9000, LX9050 or LX9070 main display unit
V8 vario unit (optional V80 or V9)
Main power cable for main display unit
Cable for vario unit
SD card
Barogram calibration chart
GPS antenna
Flarm Antenna
Hex key “Inbus”
USB key containing the digital version of the Manual
3.2 LX90xx
LX9000, LX9050 or LX9070 main display unit
V8 vario unit (optional V80 or V9)
Main power cable for main display unit
Cable for vario unit
SD card
Barograph calibration chart
GPS antenna
Hex key “Inbus”
USB key containing the digital version of the Manual
3.3 LX90xxD
LX9000D or LX9050 or LX9070D
Main power cable
RS485 cable – 4 meter
RS485 splitting unit
Vario indicator I8 (Optional I80 or I9)
SD card
Hex key “Inbus”
3.4 LX80xx with Flarm Option
LX8000 or LX8080 main display unit
V8 vario unit (optional V80 or V9)
Main power cable for main display unit
Cable for vario unit
SD card
Barogram calibration chart
GPS antenna
Flarm Antenna
Hex key “Inbus”
USB key containing the digital version of the Manual
Page 17 of 192
Page 18

Packing Lists Version 6.03, May 2017
3.5 LX80xx
LX8000 or LX9080 main display unit
V8 vario unit (optional V80 or V9)
Main power cable for main display unit
Cable for vario unit
SD card
Barograph calibration chart
GPS antenna
Hex key “Inbus”
USB key containing the digital version of the Manual
3.6 LX80xxD
LX8000D or LX8080
Main power cable
RS485 cable – 4 meter
RS485 splitting unit
Vario indicator I8 (Optional I80 or I9)
SD card
Hex key “Inbus”
Page 18 of 192
Page 19
System Description Version 6.03, May 2017
In this manual all screenshots are given for portrait orientation of the LX9000
system, which is most commonly used. However all functionality is the same in
any other configuration of system. Small differences are going to be marked
further in manual.
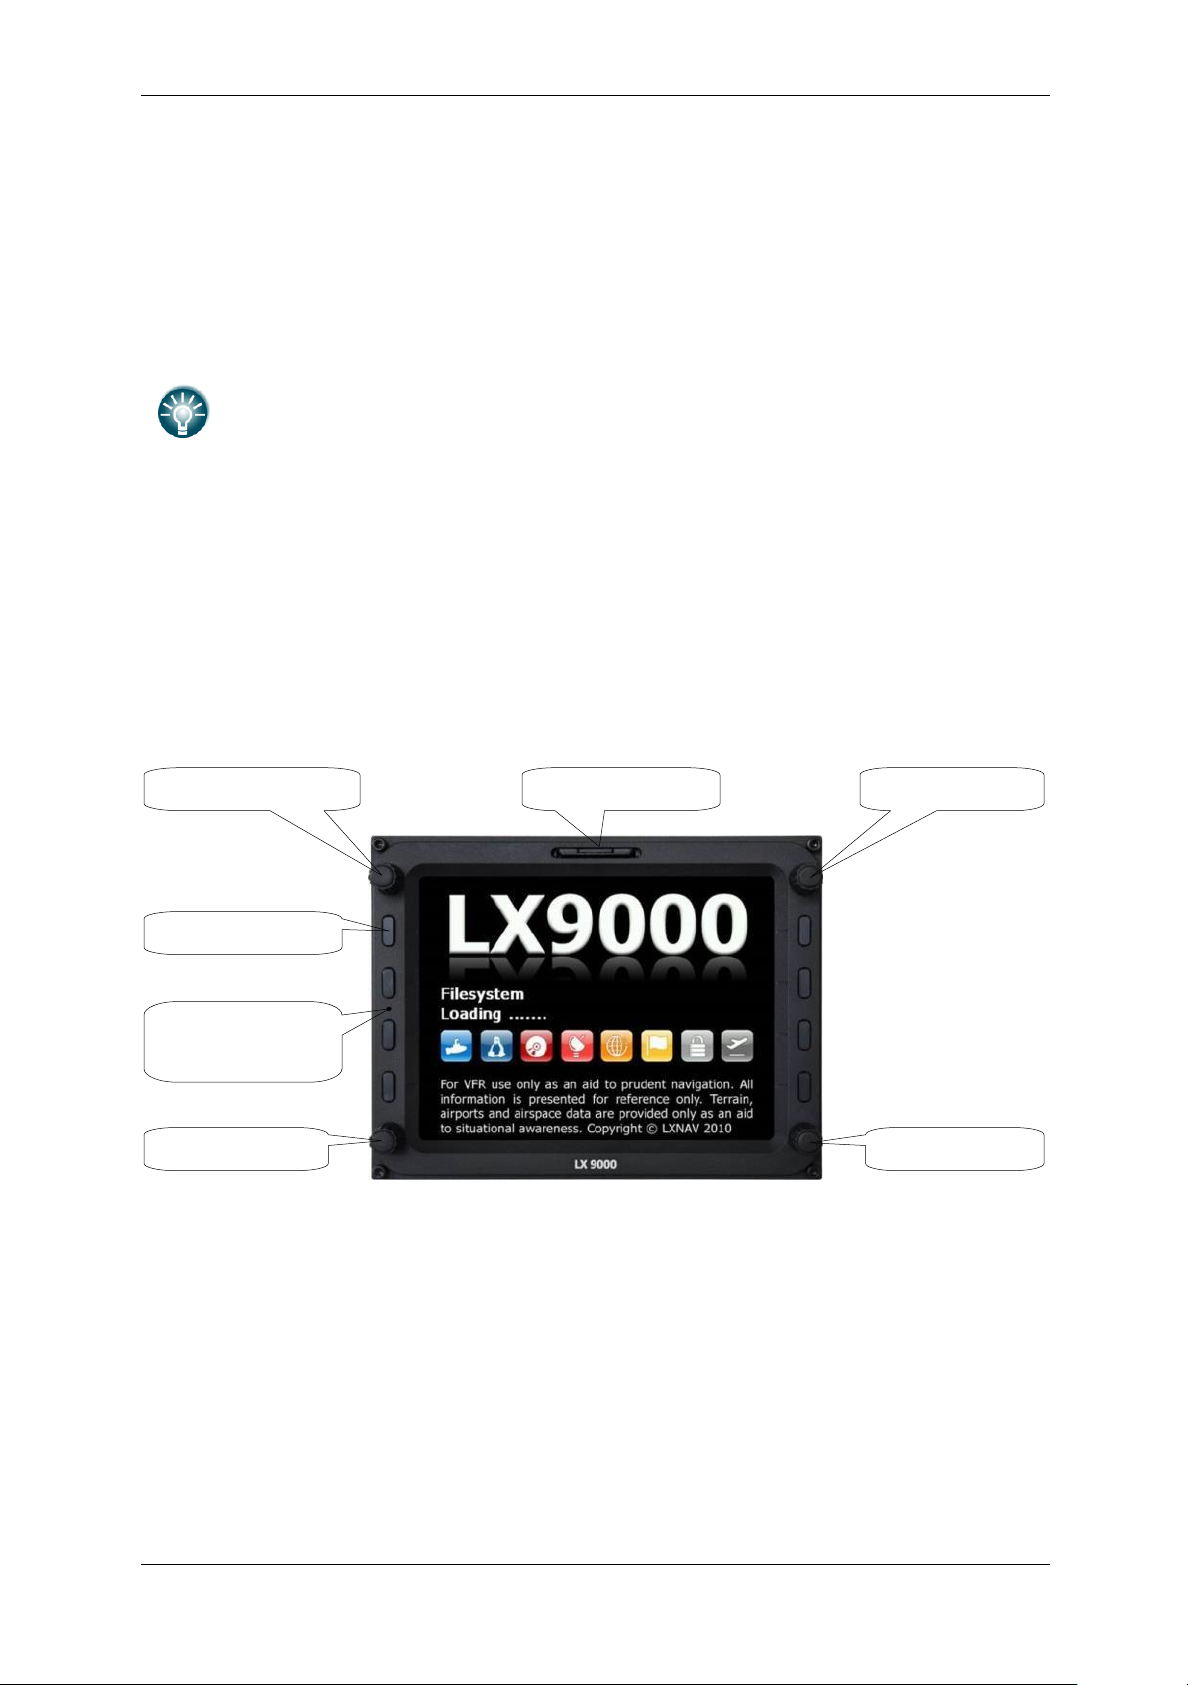
VOLUME selector
MODE selector
SD Card reader
ZOOM selector
PAGE selector
POWER button
Ambient light
sensor
4 System Description
The main display unit of LX90xx series can be mounted at portrait or landscape orientation.
Only After installing the main display unit, the orientation must be defined via the Display
menu (see Chapter 5.1.4).
The main display unit of LX80xx series can be mounted only in landscape mode.
4.1 Rotary Switches and Buttons
The following controls are mounted on the front face of the main display unit:
Four rotary selector knobs
Eight (lx90xx) or six (lx80xx) push-buttons
SD card reader
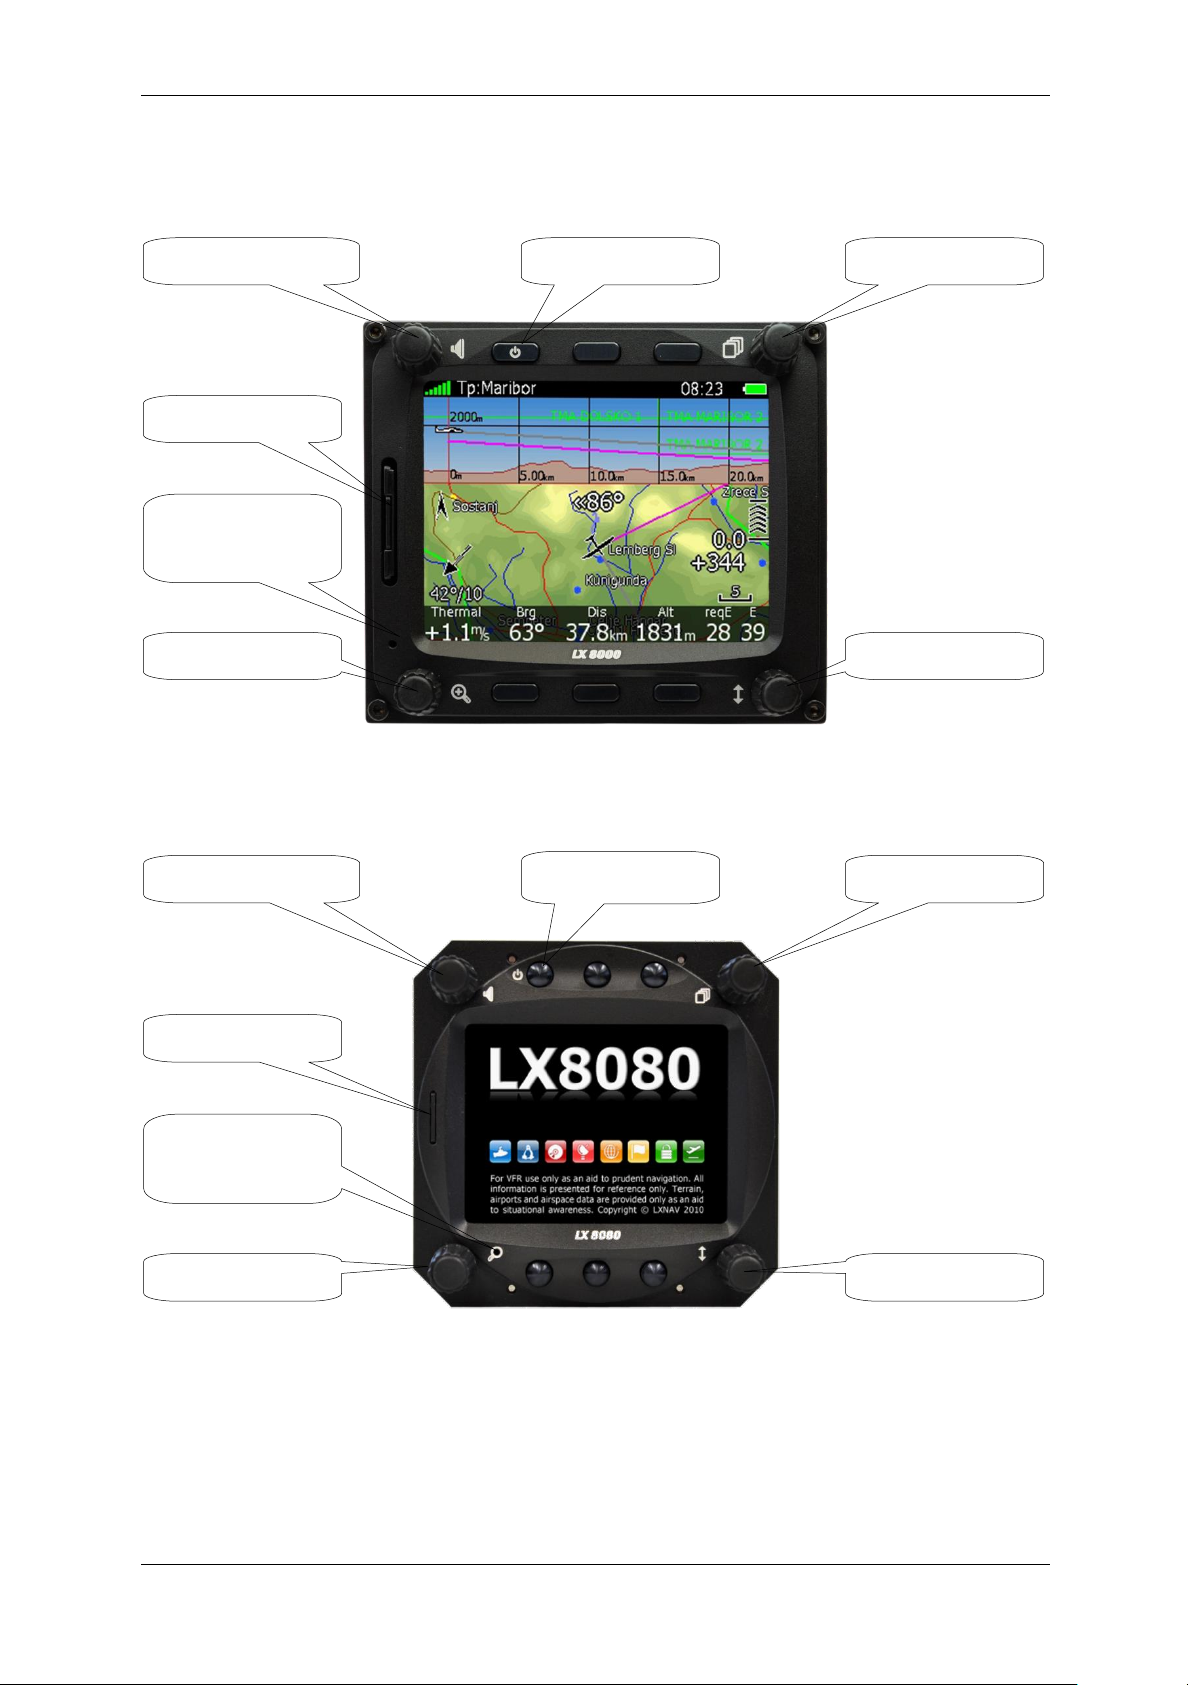
4.1.1 Landscape orientation
Page 19 of 192
Page 20
System Description Version 6.03, May 2017
VOLUME selector
MODE selector
POWER button
ZOOM selector
PAGE selector
SD Card reader
Ambient light
sensor
VOLUME selector
MODE selector
POWER button
ZOOM selector
PAGE selector
SD Card reader
Ambient light
sensor
Page 20 of 192
Page 21
System Description Version 6.03, May 2017
The V9 vario unit is an indicator only and has no controls. Information displayed
is controlled by the main display unit.
The V80/V8 vario unit is having three buttons to toggle between screens. More
information is given in chapter 5.1.11.4.
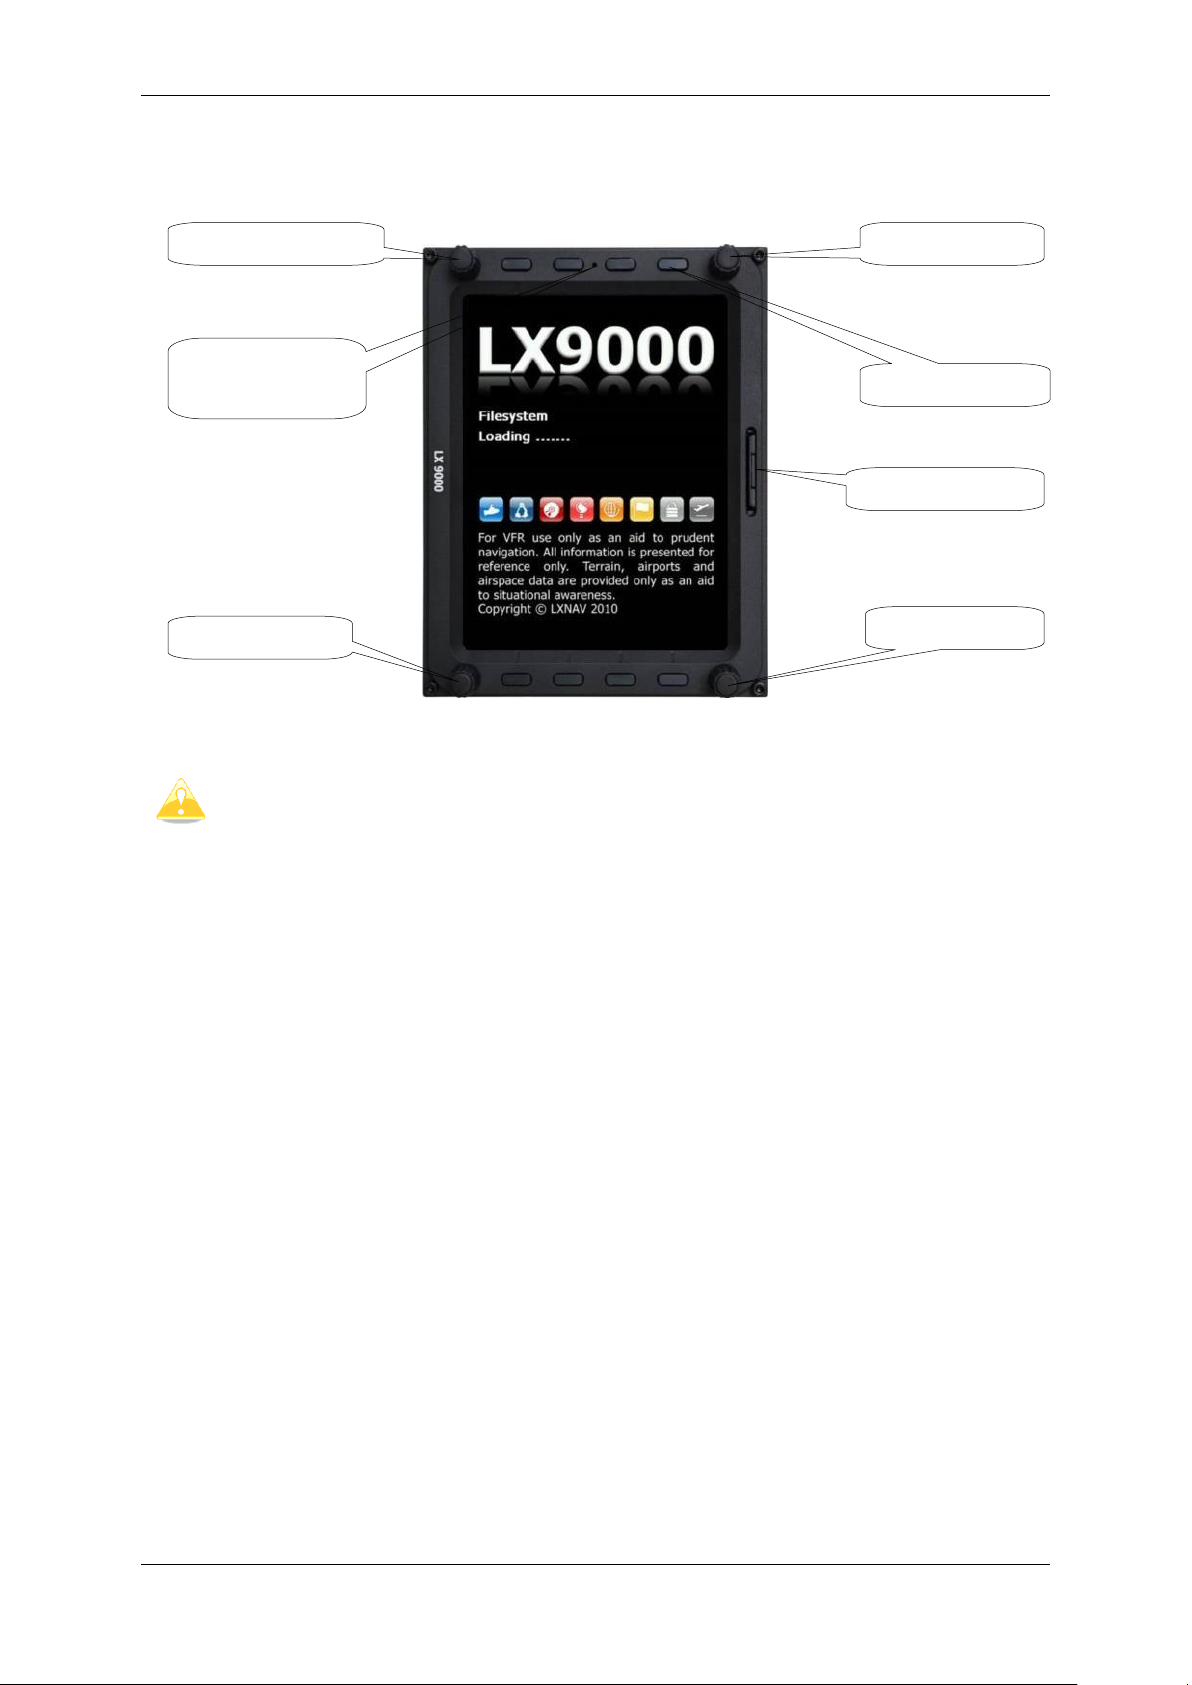
VOLUME selector
MODE selector
SD Card reader
ZOOM selector
PAGE selector
POWER button
Ambient light
sensor
4.1.2 Portrait orientation
4.1.3 Buttons
All buttons have a dynamic function; the first time one presses each button, it displays its
function without executing any action. Not all buttons have a function on every page. In
some cases buttons have a long press function.
4.1.3.1 Power Button
The power button is marked with the ON/OFF symbol. It has multiple functions. Primarily it
is used to switch the system on and off.
4.1.4 Rotary Switches (Knobs)
The main display unit has four rotary knobs. Each has a single function with the exception
of the zoom knob which has, in some cases, a function other than zoom. With the upperleft rotary knob the volume can be adjusted. The upper-right rotary switch is the mode
selector (it changes the mode of the operation). At the lower-right is the up/down knob
which is used for selecting sub-pages, sub-menus and editing menus. At the lower-left is
the zoom knob which is multifunctional. While its main function is to change the zoom level
within graphic mode, it can also be used if an error is made during editing; it is possible to
move the cursor back by rotating this knob. However this can only be done if 'editing' is
active which is shown by the cursor blinking.
Page 21 of 192
Page 22

System Description Version 6.03, May 2017
4.2 Switching on the Unit
After a short press of the power-on button the main display unit and vario unit will turn on
and a welcome screen will appear. The first screen shows the boot loader screen followed
by the Linux kernel screen and then the file system screen.
The boot procedure normally takes up to 20 seconds but in the case of a firmware update or
system check it can take more time. The final boot screen displays information about the
LX90xx system firmware and the IGC serial number. When the boot procedure is completed
the profile selection dialogue is shown. Please refer to Chapter 7.1 for more details about
starting up the system.
4.3 User Input
The main display unit user interface consists of many dialogues which have different input
controls. They are designed to make input of names, parameters, etc., as easy as possible.
Input controls can be summarised as:
Text editor
Masked text editor
Spin controls
Selection control
Checkboxes
Colour selector
Line width selector
To move the function from one control to another, rotate the PAGE selector knob (page
selector) as follows:
Clockwise rotation will select the next control.
Counter clockwise rotation will select the previous control. Press the SELECT button
(usually lower-right) to enter control input.
Page 22 of 192
Page 23
System Description Version 6.03, May 2017
4.3.1 Text Edit Control
The Text Editor is used to input an alphanumeric string of arbitrary length; the picture below
shows typical options when editing text. Use the bottom-right knob to change the value at
the current cursor position.
Press the CHAR>> button to advance the cursor to the next position. The cursor can also
be moved to next position using the bottom-left knob. Rotate it clockwise to move forward.
The Abc button is a toggle button and will change the letter case. Press it to toggle modes.
Abc mode will start every new word with a capital letter; subsequent letters will be
lower case.
ABC mode will enter only upper case letters.
abc mode will enter only lower case letters.
Pressing the DELETE button will delete the character at current cursor position. Continually
press the DELETE button to delete all characters after the current cursor position.
Press OK to confirm changes and leave control. Press CANCEL to abandon changes and
revert back to the values before entering this screen.
4.3.2 Masked Text Edit Control
The masked editor is a similar control to the text editor but only limited characters can be
entered at any particular position. It is designed to enter latitude, longitude and passwords.
Page 23 of 192
Page 24

System Description Version 6.03, May 2017
4.3.3 Spin Control
Spin controls are designed for numeric parameters. Rotate the bottom-right knob (page
selector) to increase/decrease the selected value. The bottom-left (zoom) knob will
increase/decrease the value with a different step compared to the page selector.
4.3.4 Selection Control
Selection boxes, also known as combo boxes on Windows operating system, are used to
select a value from list of predefined values. Use the page selector to scroll through the list.
4.3.5 Checkbox and Checkbox List
A checkbox enables or disables a particular parameter. Press SELECT to toggle the value.
If an option is enabled a check mark will be shown, otherwise an empty rectangle will be
displayed.
Use page selector to scroll through the checkbox list. Press the ALL to enable all options.
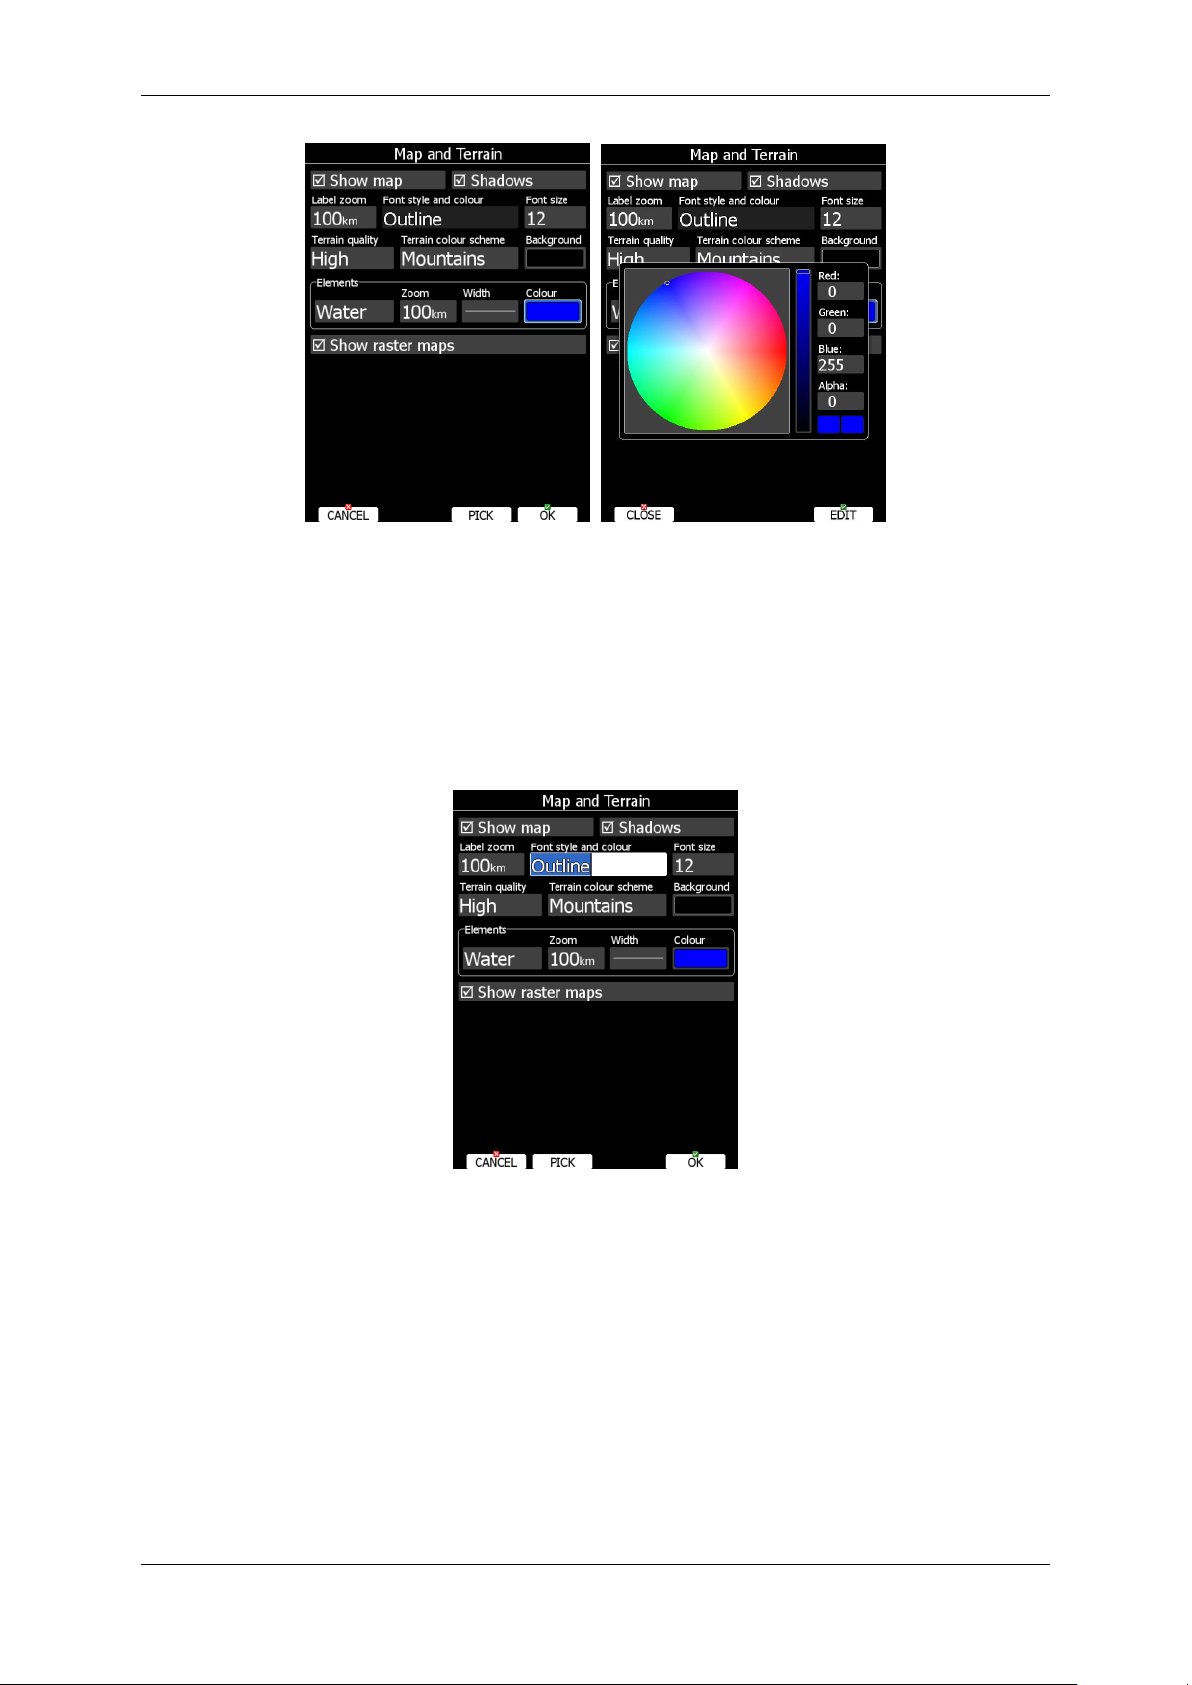
4.3.6 Colour Selector
Colours and fills are set via the colour selector control. Rotate the page selector to change a
colour.
Page 24 of 192
Page 25
System Description Version 6.03, May 2017
Rotating the zoom selector changes colour transparency. Transparency is very important for
fill colours which are used for airspace zones, observation zones and FAI area. If a fill
colour is not transparent (0%), all other map items will not be seen through it. If a fill
colour is 100% only the solid border will be drawn.
Press PICK button to define colour more precisely. A colour dialog will open, where you can
select colour from HSV circle or enter values for red, green and blue colour.
4.3.7 Font Selector
Using the font selector it is possible to define a font colour and style for a selected item.
Turn the PAGE selector knob (page-selector) to change the font style. Text is also rendered
in the selected font style. Turn the ZOOM selector knob (zoom-selector) to change the font
colour.
Press PICK button to define colour more precisely. A colour dialog will open, where you can
select colour from HSV circle or enter values for red, green and blue colour.
4.3.8 Line pattern Selector
Using line pattern selector it is possible to define width and pattern of line. Turn the PAGE
selector knob (page-selector) to change the width of line. Turn the ZOOM selector knob
(zoom-selector) to change the line pattern. Results are immediately visible on selected
item.
Page 25 of 192
Page 26
System Description Version 6.03, May 2017
4.3.9 Pull down menu
Pull down menu is used to select one of the options. Press button several times to select
appropriate item of turn PAGE selector knob. Pull down menu will automatically close after
few seconds.
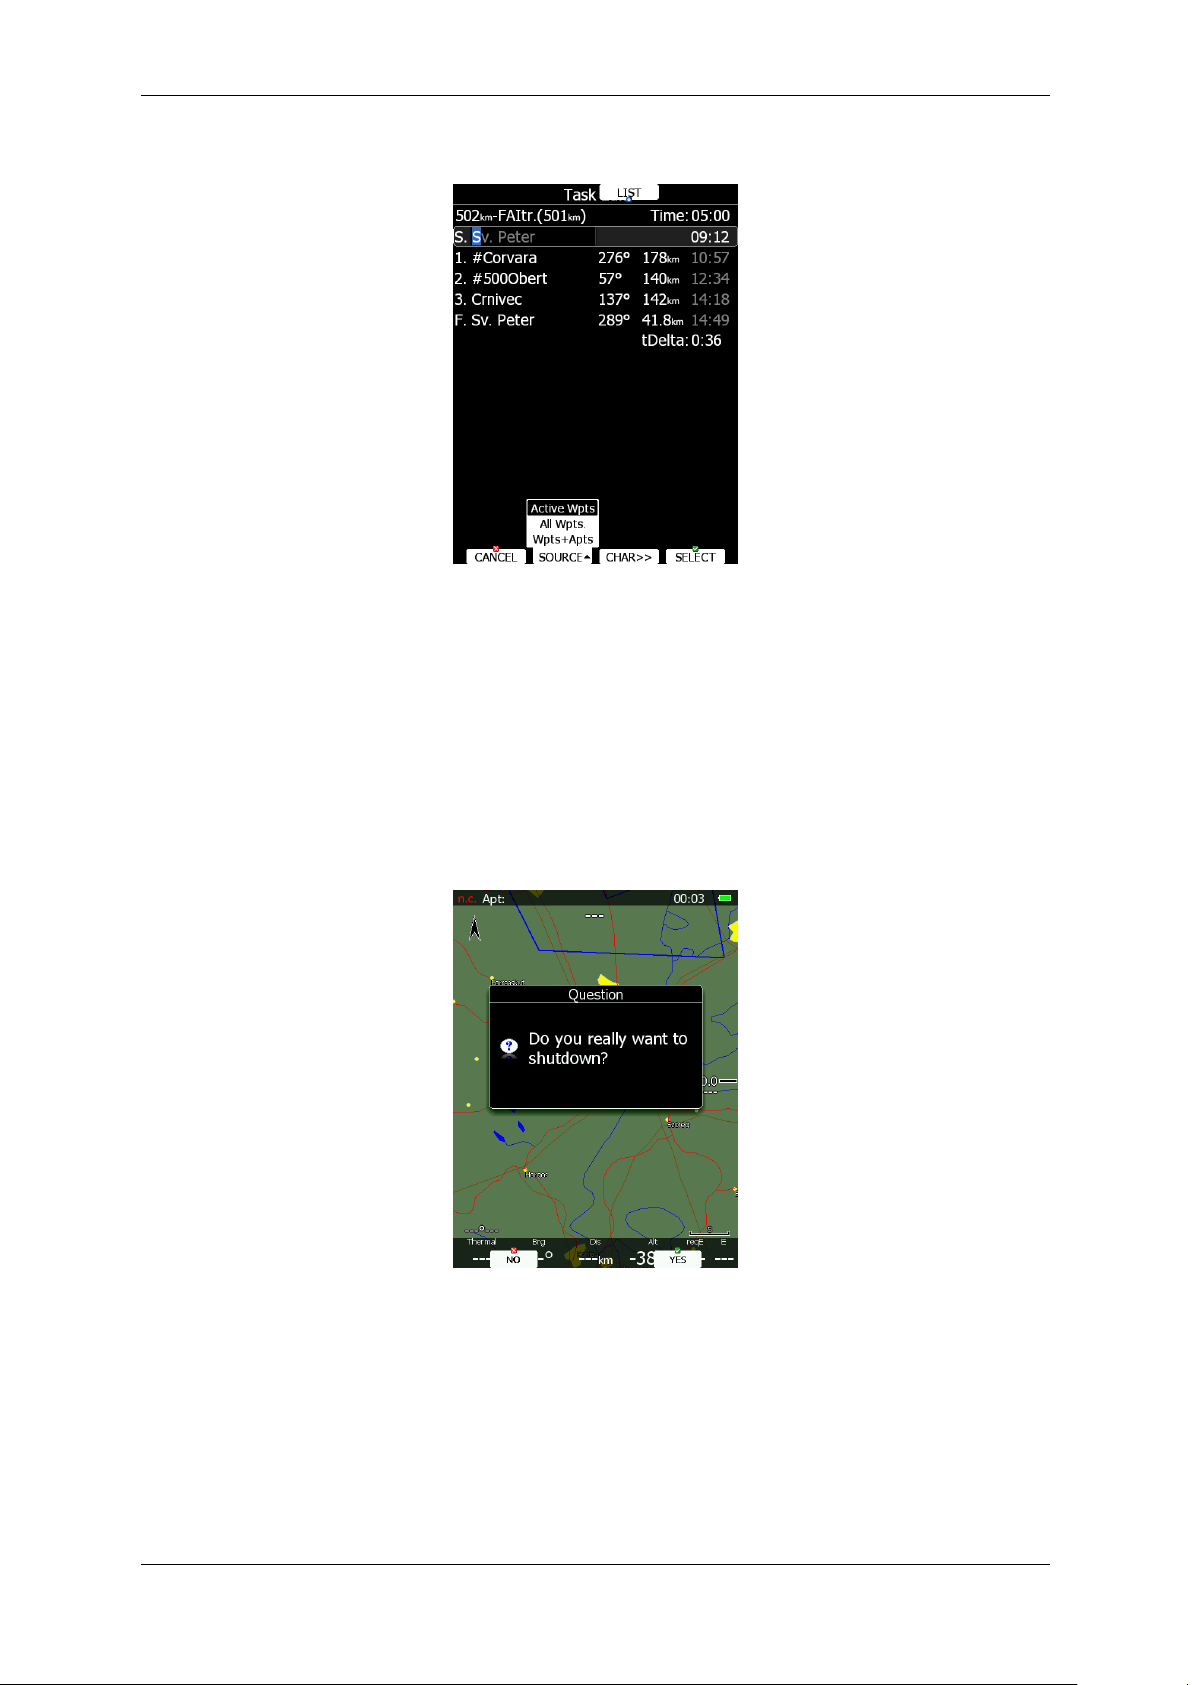
4.4 Switching off
Please use one of the following recommended methods for shutting down the LX90xx
system:
Method 1
Press the button with the OFF label which is displayed in navigational modes. See Chapter
5.5 for more details. A message to confirm shutdown will be shown.
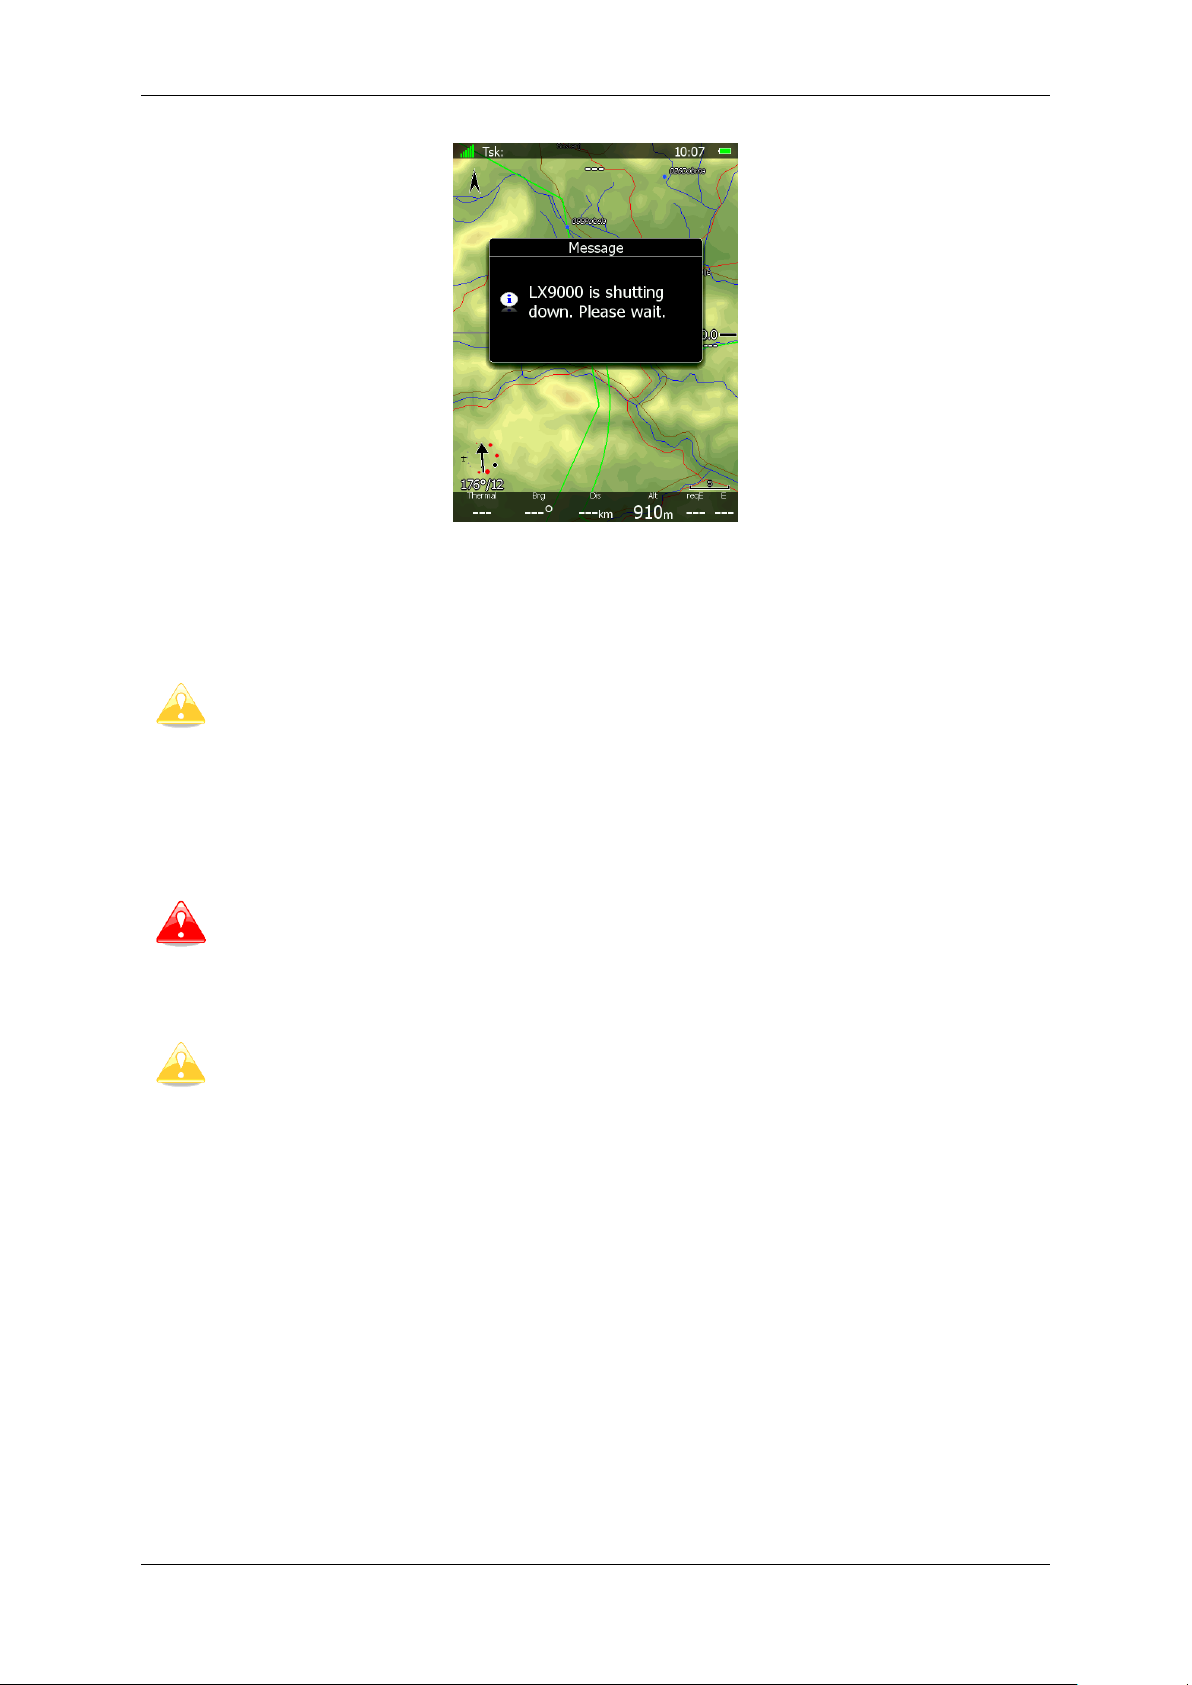
Method 2
Press the button with the OFF symbol for approximately 4 seconds. The OFF message will
be displayed and the instrument will shut down. When the message appears you must
release the power button.
Page 26 of 192
Page 27
System Description Version 6.03, May 2017
If you are using method 2 to switch off the system it is necessary to release the
button when you see the shutting down message. If you continue to press the off
button the main display unit may shut down by method 3.
It is important that the main display unit is switched off via software. Never
power down the system using the main power switch. The main display unit is
running the Linux operating system and sudden power loss may corrupt the file
system.
If main power is lost for a few seconds during flight the flight recorder will not
produce two flights. The most important flight parameter (altitude) will remain
which means that the final glide calculations are not affected.
Method 3
When the button with the OFF symbol is pressed for more than 8 seconds the system will
perform an unconditional shutdown. This method is recommended only in case that the
program hangs and it is not possible to shutdown with methods 1 or 2.
If the request for OFF is made during flight the instrument will ask for confirmation so that
the system cannot be switched off by mistake.
Page 27 of 192
Page 28

Operating Modes Version 6.03, May 2017
5 Operating Modes
The main display unit has seven modes or main menus. All of them are selectable by
rotating the upper-right knob which is also called MODE selector. The diagram below
shows the mode structure of the LX9000 running in portrait screen.
Airport Mode, navigation and selection airports.
Waypoint Mode, navigation, selection and editing waypoints.
Task Mode, Navigation, selection and editing task.
Statistics Mode shows statistical data for flight in progress or logbook.
Setup mode is used to configure the whole system.
Information Mode displays GPS status, altitude, flight level and height, sunrise and
sunset or position report to selectable point or satellite sky view (only if there is no
internal flarm).
Near Mode displays a list of all landable waypoints and airports.
The Navigation modes and statistics mode have additional pages which are accessible by
rotating the bottom-right knob also called the PAGE selector.
Page 28 of 192
Page 29

Operating Modes Version 6.03, May 2017
It is possible to fully customise all three main navigational pages using the
program LXStyler. This program can be downloaded from our webpage
www.lxnav.com.
It is also possible to customise selected navigational pages using STYLE menu
option. Refer to Chapter 6 for more details.
Database can be modified using program LXAsapt editor. This program can be
downloaded from our webpage www.lxnav.com
Three main navigational modes airport, waypoint and task mode are selected by
rotating the upper-right knob. All three options are similar and have similar basic navigation
data screens accessed by rotating the bottom-right knob.
In airport navigation mode the user can navigate only to airports stored in LXNAV's Airports
database. This database cannot be edited on device itself and is available at no charge on
our web pages. See Chapter 5.1.5.2 for more details how to obtain the latest databases.
In waypoint navigation mode the user is navigating to waypoints that were previously
loaded and selected in the Files and Transfer menu (see Chapter 5.1.5.4).
Task navigation mode is used for task creation and manipulation. Navigation in this page is
exclusively to task points.
Page 29 of 192
Page 30

Operating Modes Version 6.03, May 2017
Items which are marked with an asterisk (*) are available only in the front seat
setup menu.
5.1 Setup Mode
In the setup menu users can configure the main display unit and connected devices. Turn
the bottom-right knob - PAGE selector - or press the UP/DOWN arrow on the remote stick to
select the appropriate setup item. Turn the bottom-left knob - ZOOM selector - or press the
LEFT/RIGHT arrow on the remote stick to move faster over menu. Press the SELECT
button or push middle multi-directional button on the remote stick to enter a menu. A
dialogue or sub-menu will open.
The setup menu is slightly different on the rear seat device as not all options are applicable.
5.1.1 QNH and RES
Turn the bottom-right knob to select the required entry field. Press the EDIT button and
start editing the value.
5.1.1.1 QNH*
Using this feature it is possible to offset the altitude datum which could have changed due
to pressure changes during the flight. Since changing the QNH influences the indicated
Page 30 of 192
Page 31

Operating Modes Version 6.03, May 2017
Suggested methods for competition pilots are Avg.Speed & Vario or
Avg.Speed & Mc.
altitude, care should be taken when changing the value as an incorrect setting can upset the
final glide calculation.
5.1.1.2 Safety Altitude
This setting is the altitude reserve or safety altitude and is the height that the instrument
adds to the final glide altitude required so that the glider arrives over the final glide
destination at the selected safety altitude. Once the safety altitude has been specified, the
pilot has to keep the final glide indicator on 0 to arrive at the safety altitude.
5.1.1.3 Altitude source
The system has two pressure altitude sensors. One is built into the main display unit and is
used for the IGC recorder and the second one is built into the vario unit and is connected to
the glider pitot-static system. Changing the altitude source defines which sensor is used for
pressure altitude used in program.
5.1.1.4 Magnetic Variation
The main display unit has a built-in Earth magnetic field model. If Auto variation is checked
the magnetic variation is derived from this model, otherwise the user can enter a custom
value.
5.1.1.5 ETA/ETE Calculation
In changing this value you may choose from four different methods to calculate the
estimated time of arrival to the navigational point. Calculation is always divided into straight
flight and climb time calculations.
MacCready uses the Polar data and MacCready setting to calculate speed to fly and
climb rate.
Vario uses the last four thermals average to compute climb rate and uses this value to
calculate speed to fly.
Avg.Speed & Vario uses the average ground speed over the last 5 minutes for
distance and Vario statistics for climb rate.
Avg.Speed & MC uses the average ground speed over the last 5 minutes for distance
and MacCready.
All four methods of calculating ETA and ETE (Estimate Time of Arrival & Estimate Time
Elapsed) take into account glider altitude, wind and safety (arrival) altitude thus ensuring
that the calculation made is the best possible.
5.1.1.6 Soaring Start*
Soaring start is the time when the glider starts soaring (released from tow, engine switched
off). A soaring start time is needed to start the flight optimization.
Page 31 of 192
Page 32

Operating Modes Version 6.03, May 2017
There is no setup for glider type. Glider type is defined in the Polar and Glider
setup (see Chapter 0).
There are very few settings for the flight recorder compared to other instruments.
This is because main display unit will record all additional data such as wind,
speed and vertical speed by default.
5.1.2 Flight Recorder
The main display unit has a built-in flight recorder fully approved by the IGC (a subcommittee of the FAI) and will produce secure flight records that are acceptable for all FAI
requirements including world records.
Select the recording interval and enter the pilot name. Pilot weight is important if
ballast is specified in kilograms of water (see Chapter 5.1.9.5). If the system is used
in two-seat aircraft the name of the co-pilot may also be entered.
If a new pilot is entered, upon exiting the dialogue the message
profile with this pilot?”
will be asked. Answer YES if you want to quickly add a new profile.
“Do you want to create new
For more information about profiles see Chapter .
User can also enable options log other aircrafts data(Flarm data) and flap position.
Page 32 of 192
Page 33

Operating Modes Version 6.03, May 2017
5.1.3 Vario Parameters*
This option is used to set the vario parameters.
Following parameters are set:
Vario needle filter sets a time constant of the vario needle. The value can be adjusted
between 0.1 and 5 s with step 1.0 s or 0.1 s. Default value is 1.5 s.
Vario sound filter sets a time constant of vario sound. The value can be adjusted
between 0.1 and 5 s with step 1.0 s or 0.1 s. Default value is 1.5 s.
Vario range sets full scale range of the vario (2.5 m/s, 5 m/s or 10 m/s). Default value is
5 m/s (10 kts).
SC tab defines the width of the audio dead band in speed to fly mode. Default value is
±1 m/s.
Integrator time defines the integration period for the average vario in seconds. The
default is 20 seconds.
Auto SC defines the conditions when the instrument is switched automatically between
vario and speed command.
OFF: Switching is exclusively by an external switch connected to the vario unit.
GPS: When the GPS detects that the glider is circling an automatic change over to vario
will happen after approximately 10 seconds. Detection of straight flight will cause a
changeover to speed command.
G-load: When accelerometer detects increased g-load, because of circling, variometer
will change from cruise to climb mode.
IAS: When the IAS exceeds a pre-set value. The IAS at which switching occurs can be
selected in 5 km/h steps from 100 up to 160 km/h (or the equivalent in knots or mph).
Using Smart vario filter, vertical speed can be further filtered. Smart vario filter defines
maximum speed of vario needle. Higher the value is, slower will be the needle.
Beep at max will enable a short beep few seconds before a maximum in thermal is
reached.
Beep before max defines how many seconds before a maximum in thermal a short beep
will be heard.
Auto reset integrator resets the integrator to zero when the vario unit switches from
cruise to climb mode. If this item is not checked the integrator will not be reset to zero.
Netto filter sets a time constant of the netto vertical speed filter. The value can be up to
20 times bigger than vario needle filter. Default value is same as vario needle filter.
SC filter sets a time constant of the speed to fly (SC) filter. The value can be up to 20
times bigger than vario needle filter. Default value is same as vario needle filter.
Relative filter sets a time constant of relative vertical speed filter (also known as supper
netto vertical speed). The value can be up to 20 times bigger than vario needle filter.
Default value is same as vario needle filter.
Page 33 of 192
Page 34

Operating Modes Version 6.03, May 2017
The external switch wired to the vario unit has absolute priority and will override
all other switching methods.
It is recommended that the automatic brightness control is always enabled.
Reducing brightness will also reduce power consumption. See technical data for
more details (Chapter 2.1.9).
Netto time defines the integration period for the average netto vertical speed in seconds.
The default is 20 seconds.
5.1.4 Display
The display menu controls screen brightness. The main display unit has an ambient light
sensor which detects ambient light and automatically increases or reduces the brightness of
the screen.
If the Automatic brightness checkbox is selected, the instrument will automatically adjust
brightness according to current light conditions.
Minimum and Maximum brightness items control value limits. Use time values to setup
how fast adaptation to brighter conditions or darker conditions will occur. Default values are
tuned to human eyes and do not require change.
Night mode brightness defines maximum brightness when instrument is operating in
night mode. In night mode, brightness is reduced to very low value to reduce difference
between ambient light and device backlit.
If you want to set the brightness manually uncheck the Automatic brightness control and
set the brightness manually.
Change Display orientation if you would like to change the display unit screen orientation.
The main display unit will restart and start with new screen orientation.
Checking Auto brightness on vario while enable automatic regulation of brightness on
vario unit, if available. It this option is uncheck, vario unit will always run at full backlight.
Page 34 of 192
Page 35

Operating Modes Version 6.03, May 2017
5.1.5 Files and Transfers
The Files and transfer menu is used to manage the waypoint, airspace and airport
databases, recorded flights, flight declaration, PDF documents and Checklists.
Within a profile user can selected different airport databases, airspace and waypoint files.
Selected files can be stored inside main display unit or on inserted SD card or USB stick.
It is also possible to upload files from SD card or USB stick to main display unit.
Waypoints, Tasks and Flights can also be uploaded TO MAIL.
TO MAIL function:
After pressing TO MAIL, a window with required email details will pop up. User has to
insert recipient’s email address and press SEND. File can be sent as ZIP if option Add
attachment as zip is ticked.
EMAILS button stores all past recipient’s emails, it is a shortcut for faster sending to
already known email addresses.
SETTINGS button allows you to change Wi-Fi settings.
5.1.5.1 Uploading User Airspace and Waypoints
Databases can be loaded from a SD card or USB stick. Select the type of database you wish
to upload and press the LOAD button.
Page 35 of 192
Page 36

Operating Modes Version 6.03, May 2017
In next step the data source must be selected. Unavailable data source are going to be
greyed out. A dialogue with a list of all available files will be opened. Press the COPY
button to copy the selected file to the main display unit. The main display unit will accept
the following file formats:
Waypoints file: SeeYou CUP files, CUPX files, which may include also images and
Cambridge/Winpilot DAT files. When selecting DAT files, waypoints will be converted to
CUP format which is the format used for internal storage of points. There is no
limitation for the number of waypoints in a file and/or name length.
Airspace file: All types of CUB files are accepted.
5.1.5.2 Uploading Airspace and Airports Database (ASAPT)
LXNAV distributes free of charge airport and airspace database for the whole world. The
airport and airspace database is regularly maintained by LXNAV. The latest version of the
database can be found on our webpage www.lxnav.com.
The database is distributed as single file with .asapt extension. Copy this file to a SD Card
or USB stick. Plug the SD card or USB stick into the main display unit and select the
Update database menu item. If multiple ASAPT files are found on a SD card a dialogue to
select the appropriate one will be shown.
Databases are updated automatically and progress of the update will be shown on the
screen.
Page 36 of 192
Page 37

Operating Modes Version 6.03, May 2017
When an airspace file from USB or SD card is selected, it will be available only, if
SD card or USB stick is inserted in main display unit.
Selecting airspaces on SD card or USB allows you to create portable profiles,
which can be transferred from one device to another device.
5.1.5.3 Airspace
Select the Airspace menu item and press the SELECT button. A list of all available
airspace databases/files will be shown on screen. The distributed airspace databases are
shown first followed by user airspace files, followed by airspace file on SD card and at the
end are shown airspace files on USB stick.
Select the required airspace and press SELECT. If a check mark is shown in front of an
airspace item, this airspace file will be shown in the graphics and used for proximity
calculation, when enabled.
Button labels vary depend on airspace location. For distributed airspace, only buttons
SELECT and EDIT are available. For user airspace files stored on main display unit, button
DELETE, TO USB and TO SD are added.
To delete airspace file select the airspace item and press the DELETE button. Delete action
must be confirmed. Only user airspace files can be removed.
Press TO USB button to copy selected airspace to USB stick. Press TO SD button to copy
selected airspace to SD card.
When airspace file from SD or USB is highlighted LOAD button is displayed. Press LOAD
button to upload selected airspace to main display unit. Loading the airspace doesn’t mean
enabling it. If you wish to enable, please repeat the SELECT procedure as written above.
5.1.5.3.1 Edit Airspace
It is also possible to edit an airspace file. Select an airspace item and press the EDIT
button. A list of all airspace zones in this database/file will be shown. Use the page selector
to scroll through the items one by one or the zoom selector to move up or down for a whole
page. At the bottom of page, a map with selected airspace zone is drawn.
Page 37 of 192
Page 38

Operating Modes Version 6.03, May 2017
Pressing the VIEW button will toggle different views of the zone list.
Using the STATUS button the selected zone can be disabled for proximity warnings.
Repeated presses will toggle the following options:
OFF always: proximity warning is switched off for all the time.
OFF today: proximity warning is switched off for today only.
OFF hh:mm: proximity warning is switched off for 10 minutes.
If no label is shown airspace is enabled for proximity warnings.
Pressing the ALL option will disable all airspaces for TODAY or ALWAYS. To enable them
again press ALL and choose ENABLE.
Press EDIT to edit data for the selected zone. Airspace type, class and altitude borders can
be modified in this dialogue.
5.1.5.4 Airports
Select the Airports menu item and press the SELECT button. A list of all available airport
databases will be shown. Only distributed airport databases are shown in this menu; the
user cannot modify contents of a database within the main display unit. If an error is
suspected in our database please notify us via email info@lxnav.com.
If you wish to add additional airports to the system an ordinary waypoint file should be
created and uploaded as a waypoint file or use the LXAsapt editor program to modify the
airport database.
Page 38 of 192
Page 39
Operating Modes Version 6.03, May 2017
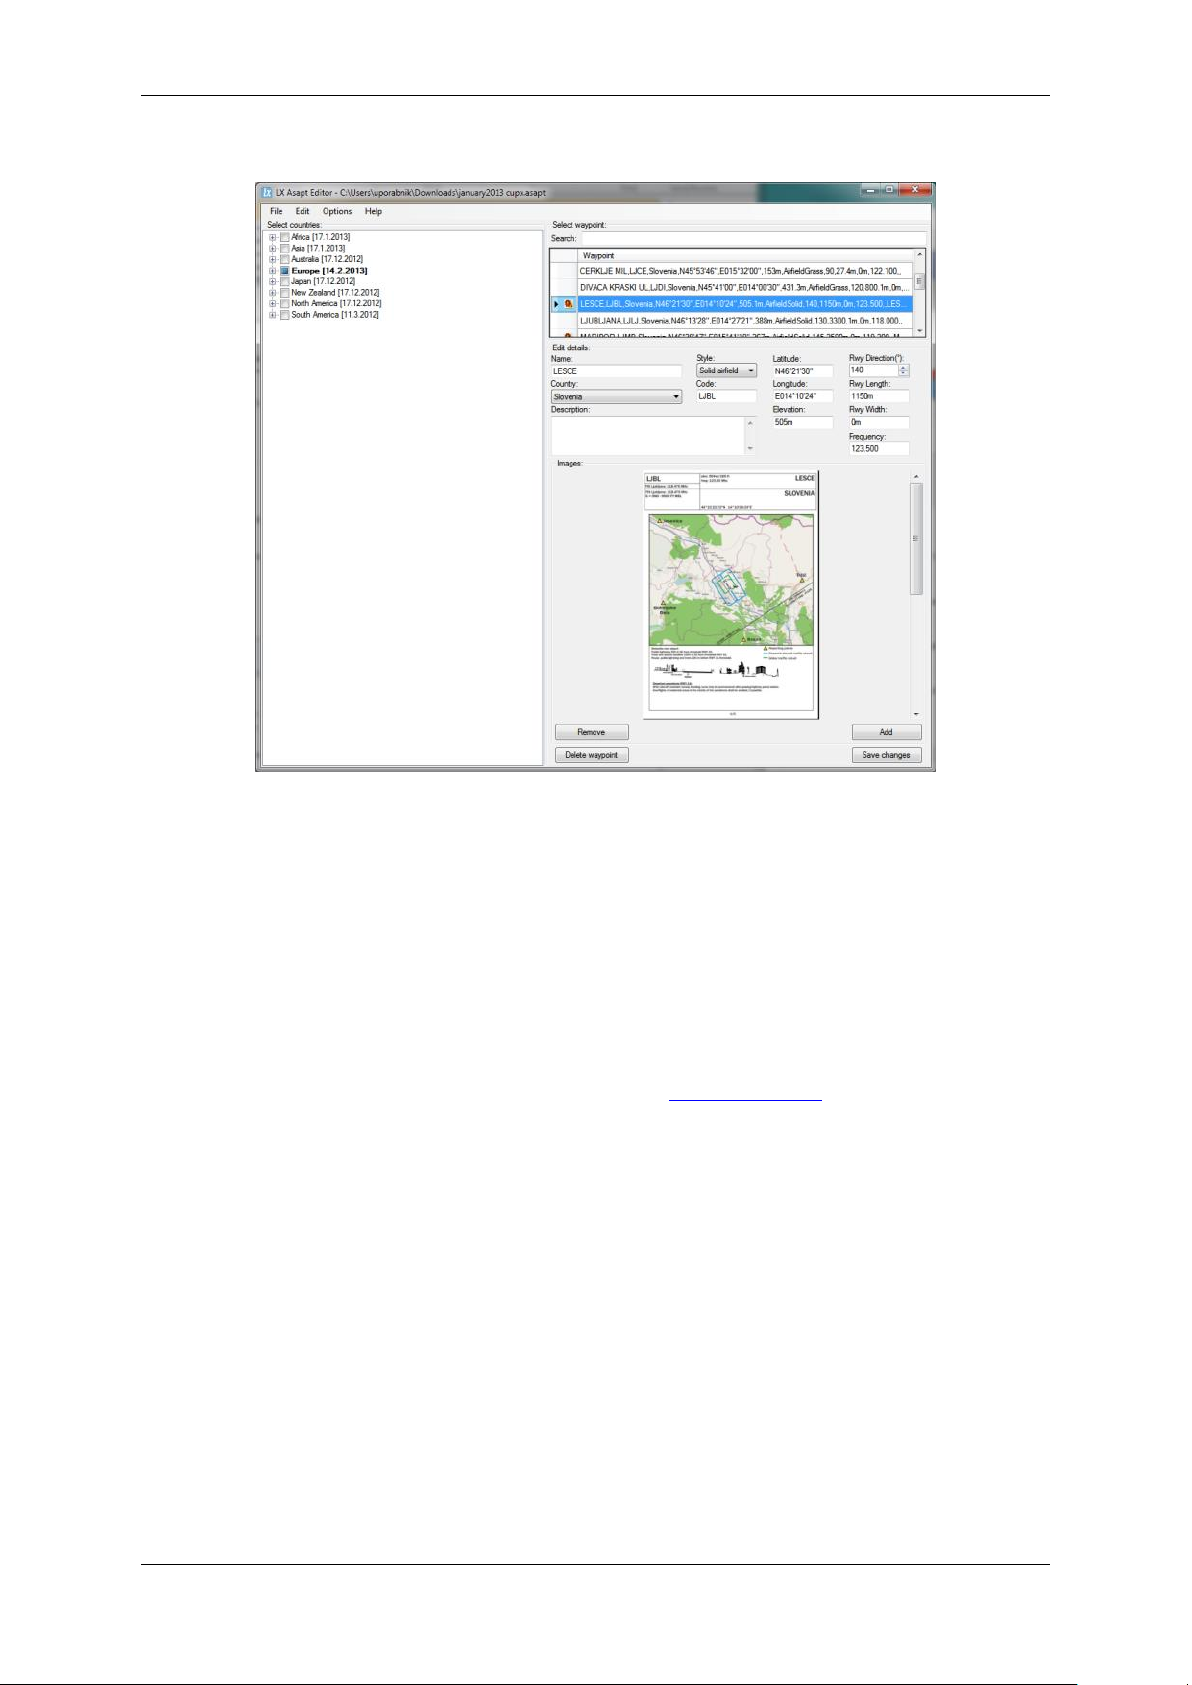
5.1.5.4.1 Managing Airports Using the LX Asapt editor
LX Asapt Editor allows you to edit any LXNAV airport database distributed as asapt files. You
can quickly filter the regions and find the airports you're interested in. View and edit all
details of the airports, add charts, photos (from files or clipboard) and any other information
you would like associated with them. You can also delete the regions you're not interested in
and add any new or missing airports anywhere in the world (for supported regions). The
application also monitors every change you make to the database, so you can simply apply
changes to a new database when it is released by LXNAV.
Modified airport data can readily be exported to the system as a (asapt) file and imported to
the main display unit using the standard procedure for database updates (see Chapter
5.1.5.2).
The original database can be restored only via the update database procedure using the
original database file. All databases are published on www.lxnav.com .
5.1.5.5 Waypoints and Tasks
Select the Waypoints and Tasks menu item and press the SELECT button. A list of all
available waypoint files will be shown on the screen.
Page 39 of 192
Page 40

Operating Modes Version 6.03, May 2017
When a waypoint file from USB or SD card is selected, it will be available only, if
SD card or USB stick is inserted in main display unit.
Selecting waypoint files on SD card or USB allows you to create portable profiles,
which can be transferred from one device to another device.
Multiple files can be selected. All checked files will be shown on the graphics page and used
in the near mode calculation, if the waypoint is of the proper type (airport or outlanding
place). However, only one file can be the active file. The active file is primary used for task
creation. Task can be loaded only from the active file.
Press the ACTIVE button to mark the selected file as active.
Press the DELETE button to remove the selected file from the internal storage of main
display unit.
If WiFi option is presented, button TO MAIL will be visible. Press this button to send
selected file to email.
If waypoints files from the SD or USB are selectable, button LOAD is visible. Press the LOAD
button to upload selected waypoint file to internal storage.
If waypoints file from internal storage is selected button SAVE is visible. Press the SAVE
button to save waypoints to the SD Card or USB stick. The save dialogue will be opened.
Page 40 of 192
Page 41
Operating Modes Version 6.03, May 2017
CUP and CUPX files also stores tasks. Tasks will also be uploaded to the main
display unit. This feature is very useful, if you wish to prepare tasks on a
computer using SeeYou or a similar program. You can subsequently easily select
a task via the Task->Edit->Load option. See Chapter 5.7.4 for more details.
Some of CUPX waypoint files with images are password protected and a valid
password must be obtained before using such a file. Please contact vendor to
obtain password for your display unit.
Change the filename if required. Press TO USB for saving to the USB stick or press TO SD
for saving to the SD card.
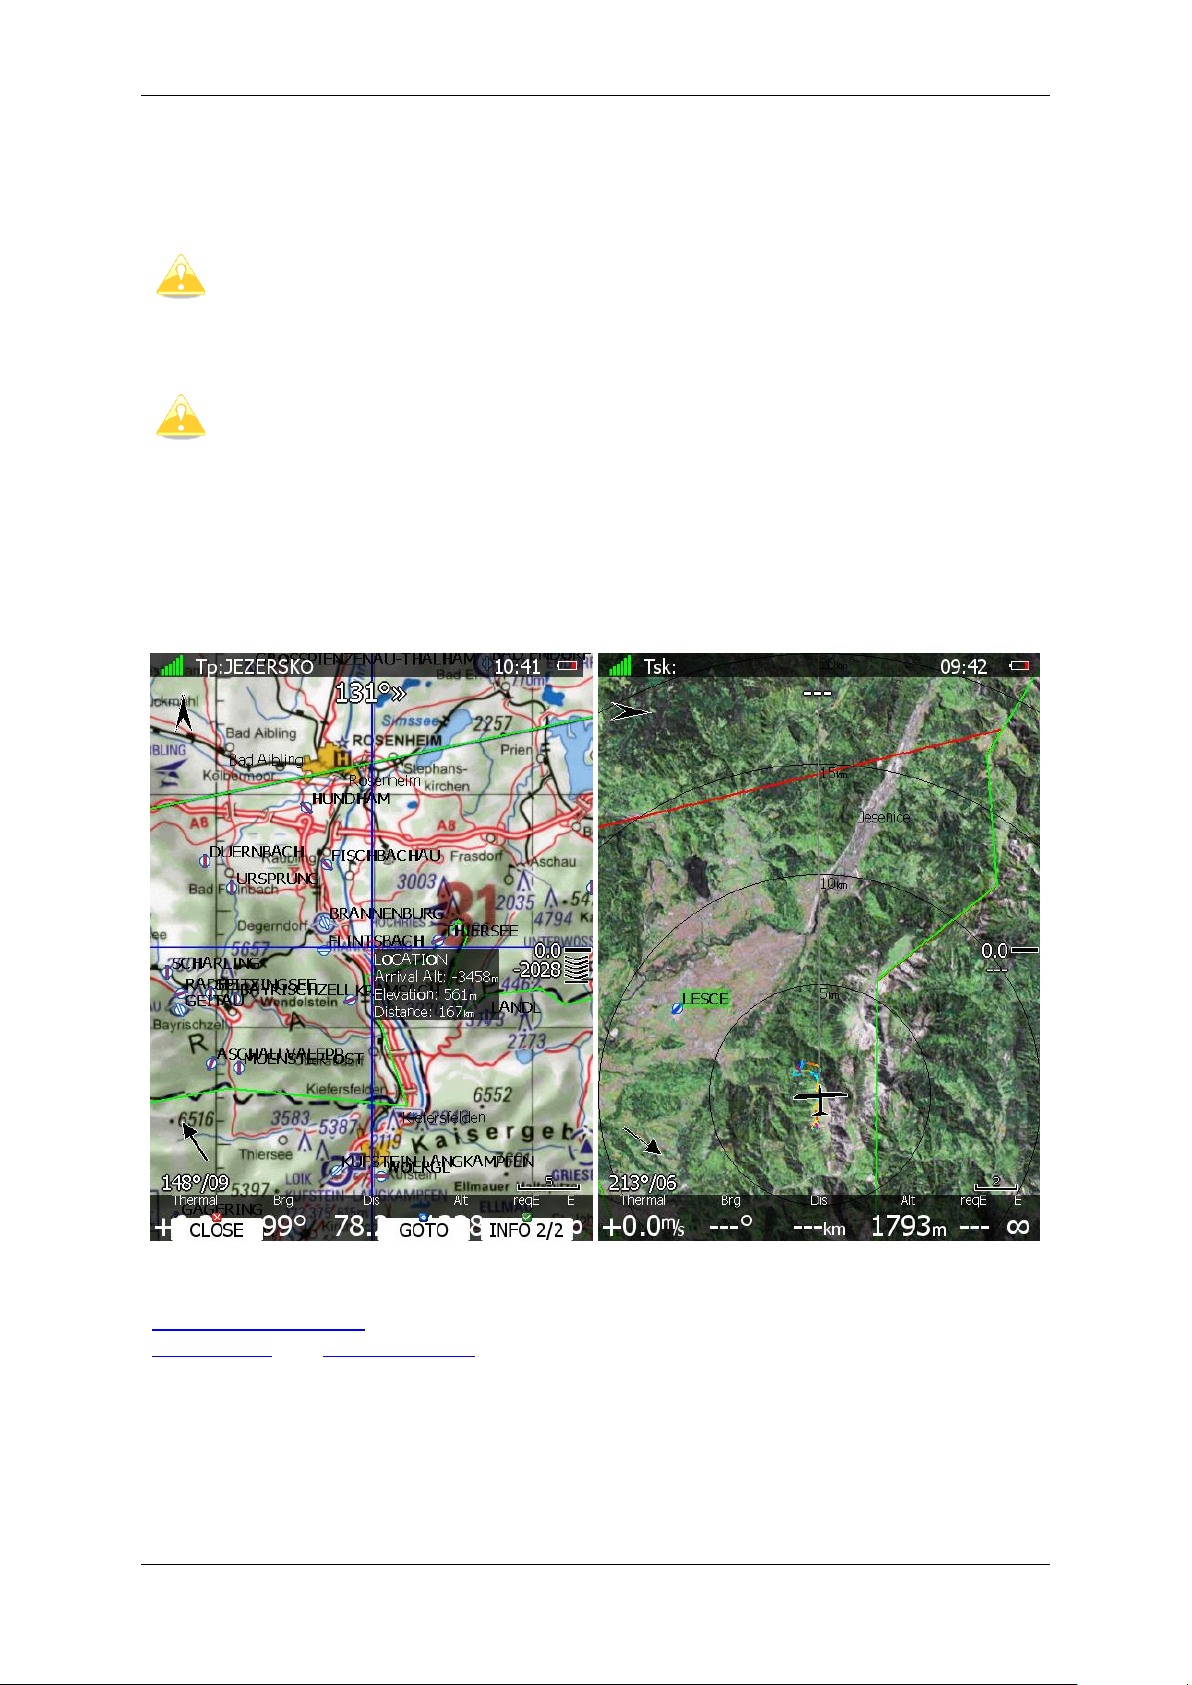
5.1.5.6 Maps
Main display unit is preloaded with terrain and vector map data for complete Earth. However
it is also possible to use scanned (rasterized) maps as background of navigational screen.
Next two images are showing example of scanned ICAO map and satellite imagery.
The system is supporting two file formats: CMR file format provided by SeeYou software
from Naviter. There are available free of charge sectional maps of USA
(www.soaringdata.info) and QMP file format provided by Ifos. Please contact Ifos
(www.ifos.de) or (www.strepla.de) to purchase scanned maps.
Page 41 of 192
Page 42

Operating Modes Version 6.03, May 2017
When a map file from USB or SD card is selected, it will be available only, if SD
card or USB stick is inserted in main display unit.
QMP maps are generated by IFOS and will work only on system with serial
number is same as registered serial number on QMP map. If serial number will
not comply, the map cannot be displayed.
Map files can be very big in size and can occupy a lot of space of internal storage
of main display unit. Selecting maps directly from SD card or USB allows you to
save space at no performance cost and create portable profiles, which can be
transferred from one device to another device.
High resolution maps requires a lot of internal memory space. In case of
insufficient memory, you must remove HGL packages from Setup->Files and
Transfer->Maps menu, pressing DELETE button.
Select the Maps menu item and press the SELECT button. A list of all available map files
will be shown on the screen.
Multiple files can be selected. All checked files will be shown on navigational page depend
on raster map setting.
Press DELETE button to remove selected map. Press LOAD button to upload selected map
to internal memory.
5.1.5.6.1 High resolution terrain HGL
High resolution terrain can be downloaded from Download->Maps section on
www.lxnav.com.
After downloading selected HGL package you can install it using password 89891. When
HGL package is installed, it can be enabled in Setup->Files and Transfer->Maps menu.
Page 42 of 192
Page 43
Operating Modes Version 6.03, May 2017
Formatting a SD Card will erase the entire contents of the SD card.
Maximum SD card size for old device (built before 2015) is 4gb.
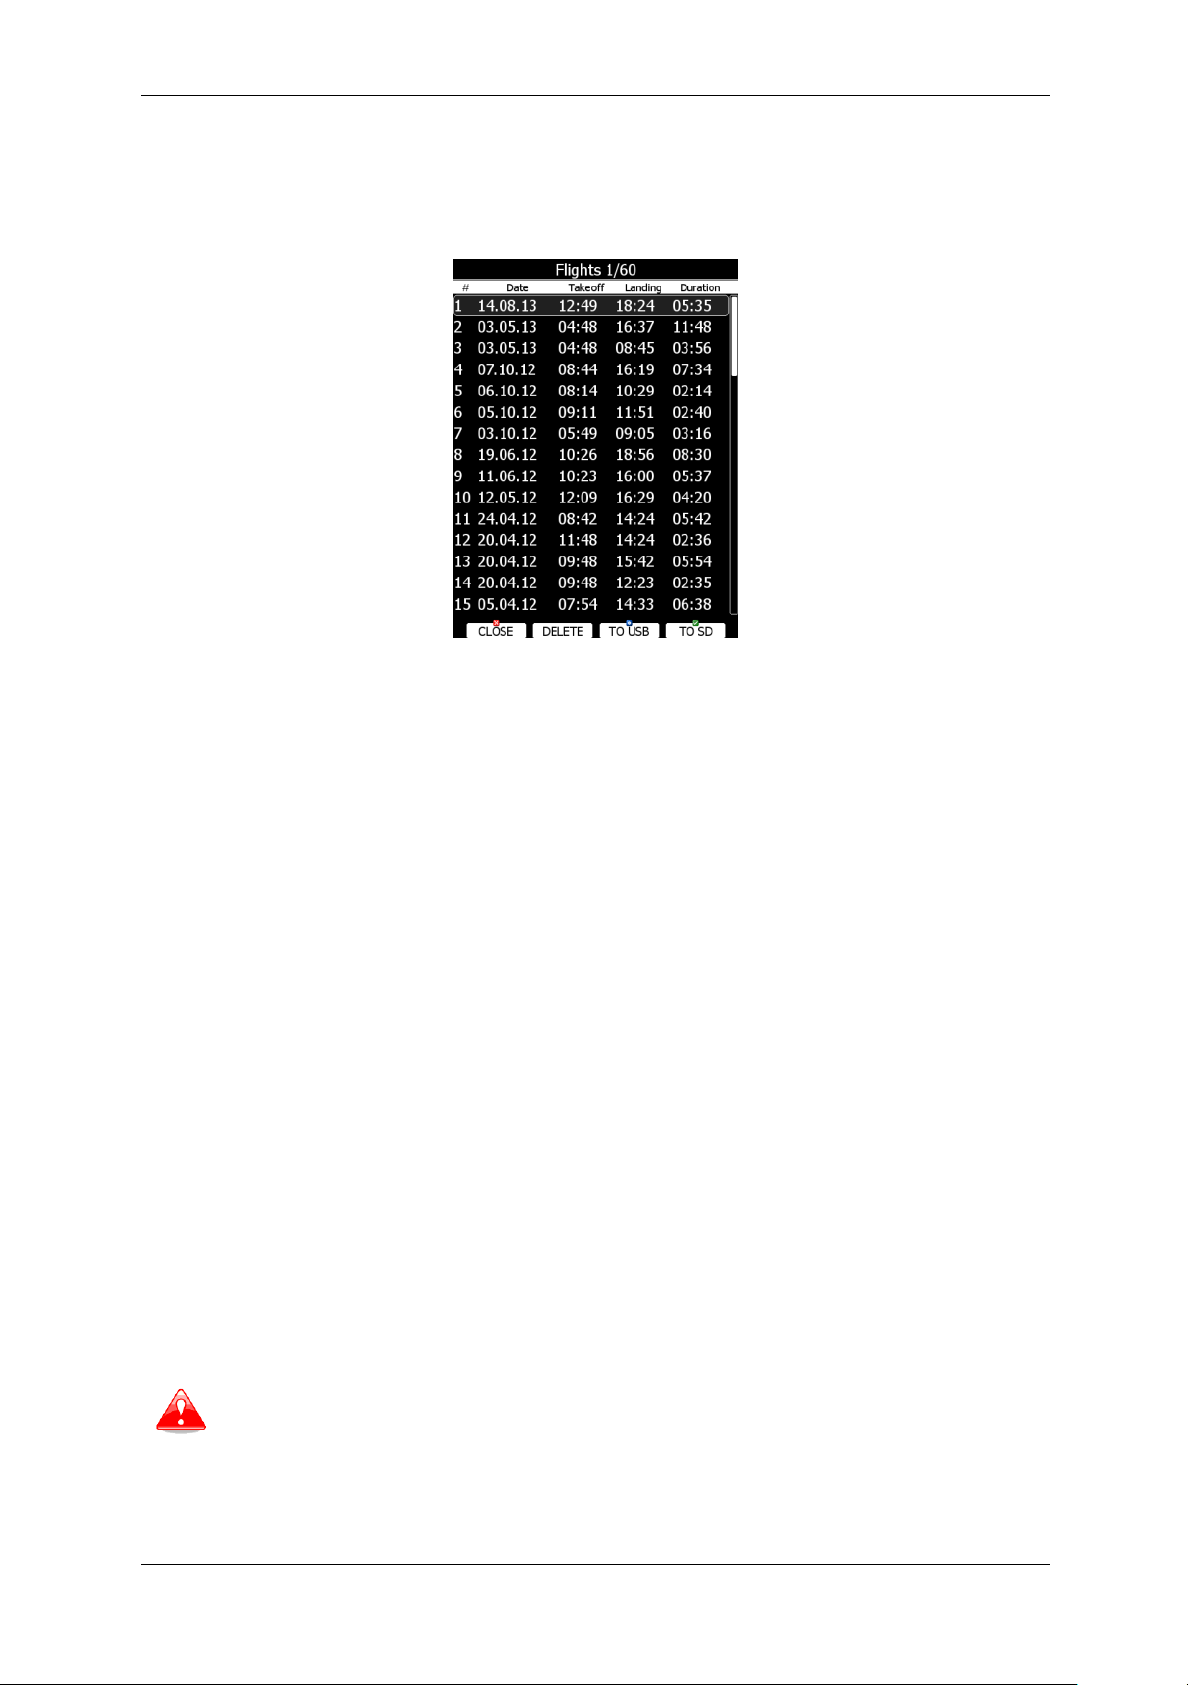
5.1.5.7 Flights
Select the Flights menu item and press the SELECT button. A list of all stored flights will
be shown. The main display unit is capable of storing more than 1000 hours of flight logs.
If a SD card or USB stick is inserted into the main display unit, flights can be copied to it
when the corresponded button is pressed. Flights can be removed from the main display
unit using the DELETE button. Press TO MAIL button to send selected flight to email
address.
If Wi-Fi option is enabled, buttons TO OLC and TO MAIL will be visible. Press the
corresponding button to send selected file to email or to OLC.
OLC upload
TO OLC automatically uploads flight file to OLC. This function is supported also on Logbook
page. First time user has to set parameters such as username and password. This can be
done each time the upload is performed or at: SETUP->PROFILES AND PILOTS->select
profile->press EDIT.
SeeYou Cloud upload:
Upload to SeeYou cloud is automatically performed. User has to insert SeeYou cloud KEY.
This can be done at: SETUP->PROFILES AND PILOTS->select profile->press EDIT.
5.1.5.8 Flights declaration
In this menu point pilot can check the current declaration settings (Pilot, Glider and Task
declared). Flight declaration can be SAVED and also LOADED (.hdr file).
5.1.5.9 Formatting a SD Card
Use this option if the main display unit cannot read SD card. The system uses the same
card format as used by the MS-Windows operating system (FAT). However sometimes
Windows does not format the SD card properly or a new card may not be formatted
properly. It is recommended to format new SD cards before using them.
Page 43 of 192
Page 44

Operating Modes Version 6.03, May 2017
5.1.5.10 Update databases
Under this section you can upload databases such as:
.asapt extension (airspace and airport database file provided by LXNAV)
.fln (flarmnet file)
.obs (flarm obstacle file)
LXNAV distributes free of charge airport and airspace database throughout the whole world.
The airport and airspace database is regularly maintained by LXNAV. The latest version of
the database can be found on our webpage www.lxnav.com.
The database is distributed as single file with .asapt extension. Copy this file to an SD Card
or USB stick. Plug the SD card or USB stick into the main display unit and select the
Update database menu point. If multiple ASAPT files are found on a SD card a dialogue
window to select the appropriate one will pop up.
Plug the SD card or USB stick into the main display unit and select the Update database
menu item. If multiple files are found on a SD card a dialogue to select the appropriate one
will be shown.
Databases are updated automatically and progress of the update will be shown on the
screen.
5.1.5.11 PDF documents
Main display unit can store almost unlimited number of PDF documents. User can store here
flight manual, maintenance manual, scans of all gliding documents and also checklists.
Page 44 of 192
Page 45

Operating Modes Version 6.03, May 2017
Documents can be very big in size and can occupy a lot of space of internal
storage of main display unit. There it not necessary to copy documents to internal
memory. Documents can be selected directly from SD card or USB at no
performance cost.
Select the PDF READER menu item and press the SELECT button. A list of all available
PDF documents will be shown on the screen. Select desired document using PAGE selector.
Press DELETE button to delete selected document. Press LOAD button to upload selected
document to internal memory.
Press SELECT button again to open selected document.
A document will load within few seconds. Use PAGE selector or NEXT and PREVIOUS
button to move up/down through document. Use ZOOM selector to zoom current page. Use
MODE selector to move left/right on the selected page. Press GOTO button to navigate to
specific page. A goto dialog will be open. Use PAGE or ZOOM selector to select desired page
Page 45 of 192
Page 46

Operating Modes Version 6.03, May 2017
A checklist file can be made / opened and manipulated with the LXStyler
program. LXStyler is a special program designed for customising layout
navigational pages. It can be downloaded free of charge from our web page
www.lxnav.com. For more information about LXStyler please refer to the
LXStyler manual.
It is also possible to set four independ bookmarks. Press BMARK1 to open bookmark drop
down menu. Press BMARK1 button once more to set a bookmark. A message will confirm
that bookmark has been saved.
5.1.5.12 Checklists
Use this dialogue to load checklist, delete checklists, save checklists or edit an existing
checklist file. The active checklist file is the profile which is currently being used. Select a
checklist file using PAGE selector knob. Press SAVE, where you will have an option to TO
USB or TO SD for the checklists file to be stored on a USB stick or SD card. A file is stored
in a file with the .checklists extension. Press the LOAD button to load a file from an SD
card or USB stick. A profile will be copied to the main display internal storage. Press the
EDIT button to edit the checklists file name.
Checklists can be found at the last page of APT/WPT and TSK page. Once the action of the
checklist is performed press the CHECK button. To move through the actions on the
checklist use the NEXT or PREVIOUS buttons.
Page 46 of 192
Page 47

Operating Modes Version 6.03, May 2017
Creating a checklist file
Open the latest version of LX Styler
Click on FILE->NEW CHECKLISTS
Select your instrument size and orientation
Double click on the blank black page, which will open the customization menu
Click on the icon Checklist
A new window create multiple labels will open
Now you can set gaps, vertical and horizontal space and text aligns
Put the text in the table left and right
Once finished, press create button
Page 47 of 192
Page 48

Operating Modes Version 6.03, May 2017
Press save to save the checklist file on the PC/SD card or USB. File has the
extension .checklists
Go to LXxxxx instrument Files and Transfer ->Checklists and load the file from the
SD card/USB key
Page 48 of 192
Page 49

Operating Modes Version 6.03, May 2017
Checklist is automatically added to the last page of the ATP/WPT and TSK screen.
Page 49 of 192
Page 50

Operating Modes Version 6.03, May 2017
5.1.6 Graphics
This dialogue allows the user to define the appearance of the map in navigational mode.
Select the Graphics menu item and press the SELECT button. A submenu will open.
5.1.6.1 Map and Terrain
The main display unit is pre-loaded with terrain and vector maps for the Earth. The
database includes: elevation contour lines, water bodies, roads, highways, railways, big
cities and a digital elevation model. The database is derived from the OSM free database.
The database cannot be modified by the user.
Check the Show map item to enable map displays in the navigational pages. If this item is
unchecked no map will be displayed. Check Shadows, if you terrain to be shaded. The
Label zoom value defines up to which scale of zoom city names are visible. 100km means
the whole width of the screen represents 100 km. The user can also modify size, font style
and colour via the Font style and colour item. Use the ZOOM selector knob to modify the
colour and the PAGE selector knob to modify the style. Press PICK button to define colour
more precisely.
Terrain can be rendered in three different levels. A higher level means more details. The
main display unit is optimised to work with high terrain quality. If the value off is selected
no terrain will be shown; only water bodies, roads, railways and cities.
The background colour is defined by the Background item. The default background is
black.
Page 50 of 192
Page 51

Operating Modes Version 6.03, May 2017
If you have checked shadows and you are flying on flat areas with elevation close
to MSL or below, on terrain will be displayed black spots. Black spots will
disappear, if you uncheck shadows.
Colours of terrain can be changed using different terrain colour schemes. The following
colour schemes are available:
Mountain is default setting with colours from green to white at 2000 m.
Flatland is setting where colours are changing up to 1000 m.
Flatland2 is setting where in low terrain is white, otherwise normal colours are used.
Low contrast: same as Mountain but colours are not so intensive.
High contrast: same as Mountain but colours are more intensive and from 0-100 m,
white colour is used.
Zebra alternating colours are used.
Zebra 2, less intensive alternating colours are used.
ICAO colouring is similar to ICAO maps.
Cliffs colours emphasis slopes and is similar to Google maps display
Atlas colour scheme is approximation of Imhof colouring widely used in map books.
Grayscale
OSM
Himalaya
Relative is a colour scheme related to the current altitude (unreachable area is
coloured from orange to red, reachable area is white coloured)
In the Elements group land features are setup separately. Zoom defines up to which
zoom level a selected land feature is visible. Also line width and colour can be setup.
Press the DEFAULT button to reset these settings back to default.
Following elements are available:
Water
Road
Highway
Railroad
Town
Track
Airport
Minor Water
Forest
Street
Minor roads
Check Show raster maps, if you would like to see also scanned maps (See also
chapter 5.1.5.6).
Page 51 of 192
Page 52

Operating Modes Version 6.03, May 2017
Alternatively, if you’re low on internal space, you can rename “.hglzip” extension of
the package to “.zip” and extract it in a folder on a SD/USB. After inserting such
SD/USB into the device your package will be immediately available for selection in
Maps dialog and will not require loading the data onto internal memory. WARNING:
Using this option you MUST NEVER remove the SD/USB before turning the device
OFF.
Check Show wind direction, if you would like to see lines indicating the direction of the
wind.
5.1.6.1.1 HGL – high resolution elevation data
HGL – high resolution elevation data is an add-on package which does not come preinstalled on the
device. It provides high resolution elevation data for better view of terrain, see images bellow. HGL
packages take a lot of space so we limit them to only selected regions.
Left: terrain rendered using normal maps, right: terrain rendered using HGL.
5.1.6.1.1.1 HGL-install procedure
HGL terrain can be downloaded from www.lxnav.com. After downloading selected HGL
package you can install it via Setup->Password->insert 89891. Package will be unpacked to
internal memory and available for selection in Maps dialog.
5.1.6.1.2 Maps CITv1/CITv2
CITv1: regular maps containing vector and elevation data. Preinstalled on all devices.
CITv2: New maps containing vector and elevation data. Supported by firmware version >
5.06 and preinstalled on devices produced from 2014 onwards.
Page 52 of 192
Page 53
Operating Modes Version 6.03, May 2017
Depending on when your device was manufactured it may already contain the new maps
(CITv2). Installed maps can be seen in “SETUP-ABOUT” dialog (after installing version
6.0+).
You will see "Installed maps: CITv1, CITv2 (used)", if you have newer maps installed. If not
then it will state "CITv1 (used)".
5.1.6.1.2.1 CITv2-install procedure
If CITv2 is not preinstalled then you will need to verify that enough free space is available
on your device before installing CITv2 maps.
Installation on device is as follows:
1. Verify that you have enough available free space on internal memory by going to Setup>Password and enter 00111. Verify that "FreeMem CF" value displayed is at least 3.8
GBytes.
2. Download CIT files from:
https://my.pcloud.com/publink/show?code=kZiiy0ZzEanvinK8pQ0dYferQPHo4Htxu7V
These files will also be automatically verified while being copied to your device. To prevent
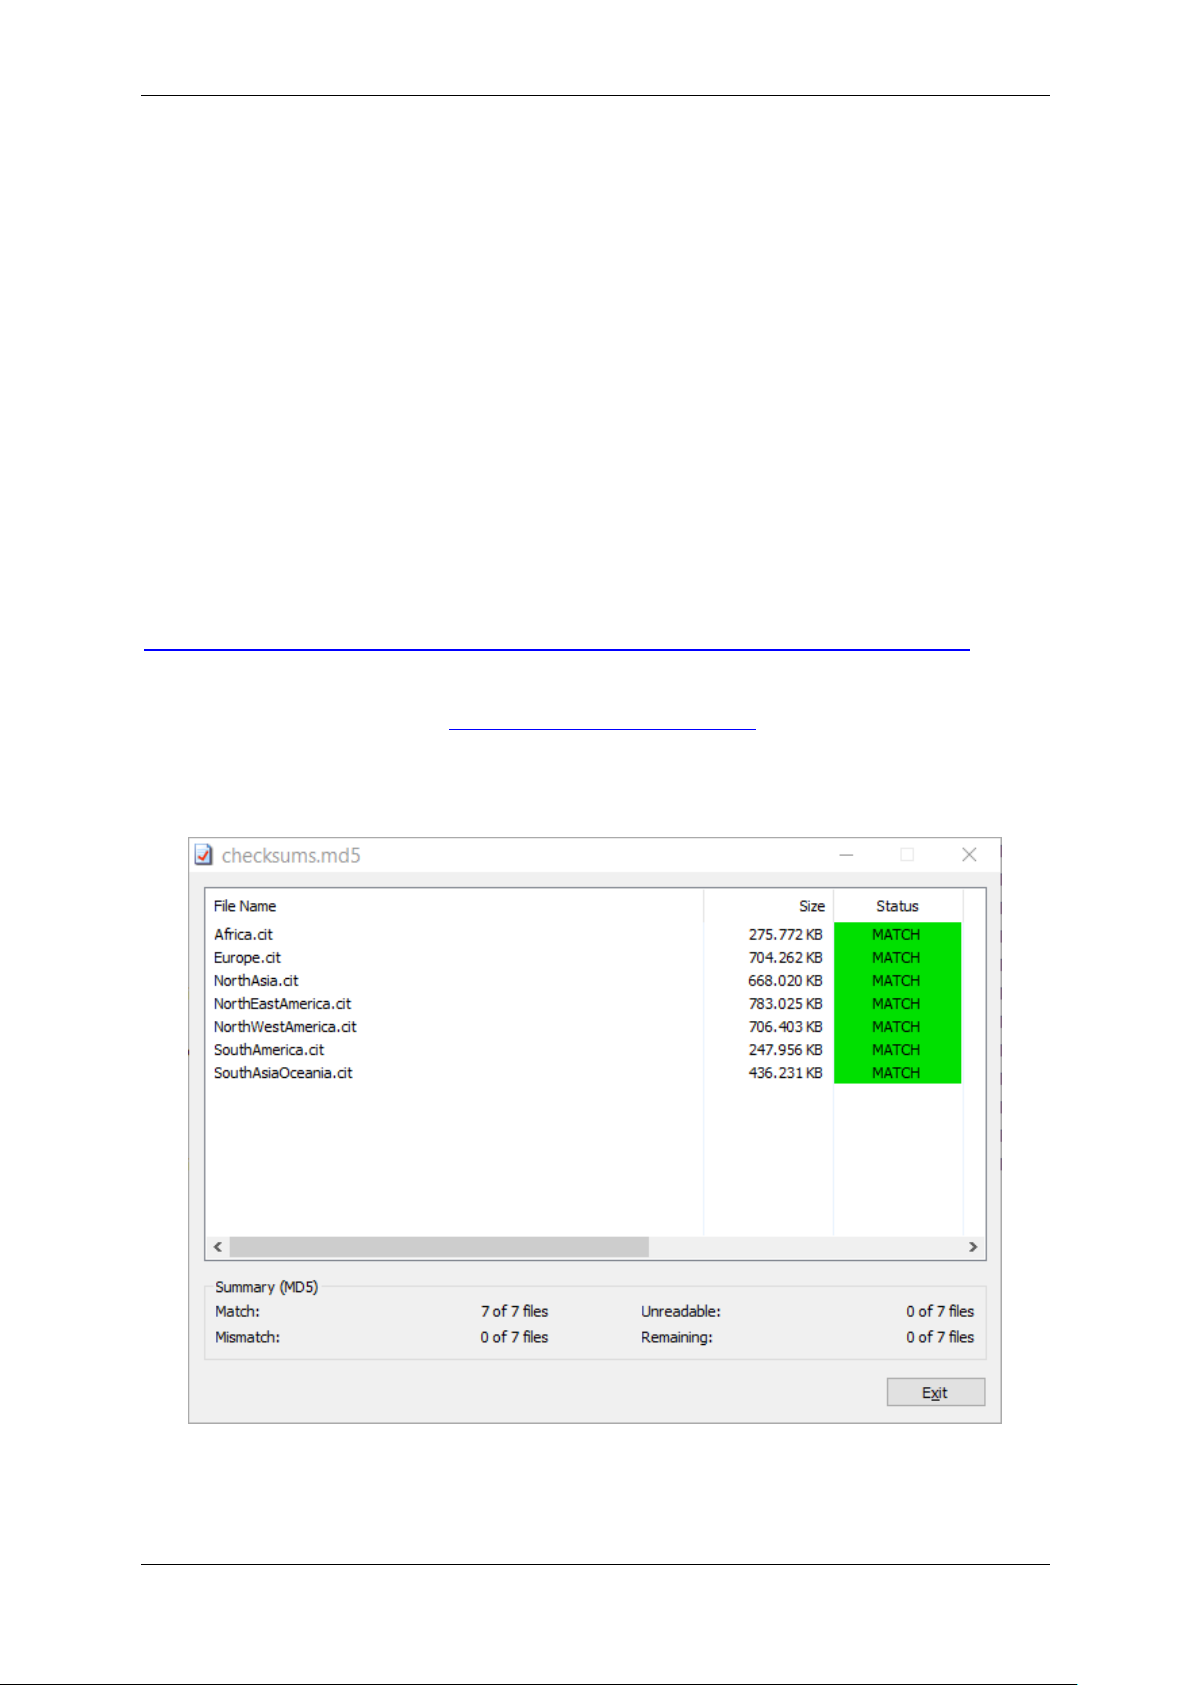
discovering a faulty download “on site” you can (optionally) verify downloaded files on your
PC using a tool like HashCheck http://code.kliu.org/hashcheck/
After installing HashCheck you can double click on checksums.md5 file to automatically
trigger verification of downloaded CIT files.
Verification of downloaded files with HashCheck tool.
3. Copy downloaded CIT files to USB or SD and use "Safely remove hardware or eject
media" (
Page 53 of 192
very important!
) before removing the SD or USB from the PC. This step prevents
Page 54

Operating Modes Version 6.03, May 2017
If you don’t have enough space available and if you wish to have the CITv2, you
should contact LXNAV about the HW/memory upgrade.
accidental removal of the media before files are fully written to it. Removal while files are
being written would result in corrupted files on the media.
4. Install latest version of the firmware on your device.
5. With SD/USB containing CIT files inserted into your device go to Setup->Password and
enter 00112. You will now be asked "Map (CIT) file(s) have been detected on external
media. Would you like to copy them to internal memory?" Press "Yes".
Copy procedure will begin and maps will be copied to internal memory. You will see an
estimation of time to finish (ETA) on your device. It may take up to an hour, so prepare
accordingly (enough battery, time).
After copying it should state 'OK' for all copied files. If it doesn't then it's likely that you have
a faulty CIT file on the external SD/USB media (return to step 3 or 2, if you suspect a faulty
download).
After exiting this dialog the device will automatically restart and when it starts again you can
verify installed and used maps in “About” dialog.
5.1.6.2 Airspace
In this dialogue you can define the airspace map presentation. Check the Show airspace
item to enable airspace displays in navigational pages. If this item is unchecked no airspace
will be displayed.
If the Show inactive zones option is checked then airspace zones with proximity warning
switched off will be shown. Use Show only airspace below to eliminate airspace which is
going to be too high for the day. For example, if the forecasted cloud base is to be 1500 m,
set this value to 1600 m and your screen will be much more readable. In the Type panel
you can specify how each airspace type is displayed. You should define each type of
airspace zone separately. First choose an airspace type from the list. Zoom value defines
to which zoom level this type is going to be visible. The Colour and Width items specify
how selected airspace zone will be drawn. You can also modify transparency of the selected
Page 54 of 192
Page 55
Operating Modes Version 6.03, May 2017
type. Turn the ZOOM selector knob to change the transparency value. 100% means
completely transparent and only the airspace zone outline will be shown. 0% means
completely solid (not recommended). Image below shows example of combinations of Width
and Colour property and rendering of airspace zone.
You can set separately airspace colour and border for side view and map view, if option
Copy styles to side view is not checked. Press the DEFAULT button to reset these
settings back to default.
5.1.6.3 Waypoints and Airports
The waypoint and airport look and feel is defined in this dialogue. Check the show
waypoints item to enable waypoints and airports display in navigational pages. If this item
is unchecked no waypoints will be displayed. If duplicates is checked, duplicated points
might be shown on map, when same waypoint(airfield) is defined in user file as in airport
database. Use show only airports from database to display only airports from database
on airport mode.
The Max.visible item defines how long waypoint labels and detailed symbols are shown. If
the maximum number of waypoints on the current screen is more than the defined value
only small blue dots will be shown for waypoints and no labels will be drawn.
Font style, colour and size can be defined using the Font style and colour item and the
Font size item. When editing style, turning the ZOOM selector knob will change the font
colour.
Waypoint labels can be setup to give even more detail. Label details can be defined for
each individual waypoint type (all types, all landable, unknown, waypoint, mountain top,
grass airfield, outlanding, glider site, solid airfield, mountain pass, sender, VOR, NDB,
Cooling tower, Dam, Tunnel, Bridge, Power plant, Castle, Intersection, Marker).
Page 55 of 192
Page 56

Operating Modes Version 6.03, May 2017
A label consists of two selectable values: upper label and lower label. If you prefer to have
labels in single line, the single label checkbox should be checked. A label can also be
coloured. Check the Colorize label item. Coloured labels are drawn with a green
background when the waypoint is within range with the current MacCready settings and
with a yellow background when waypoint is within reach with MacCready setting zero. No
background is shown if the waypoint is not reachable.
The label is selected from following options:
Name: waypoint name is shown. The name length item controls how the name is
displayed.
Code: will display the ICAO code or short name.
Elevation: shows waypoint elevation.
Arrival altitude shows arrival altitude taking into account current MacCready setting,
safety altitude and current wind. Due to complexity of the calculation it will not take the
wind profile into account.
Required altitude shows how much height is needed to reach the point. Required
altitude takes into account current MacCready setting, safety altitude and current wind.
Due to complexity of the calculation it will not take the wind profile into account.
Required Mc gives an estimate of the maximum MacCready value which we can use to
reach the point.
Required L/D shows the required glide ratio to the point taking into account the safety
altitude.
Team code: shows the team code for that waypoint.
Frequency will display the point frequency, if available.
Define minimum runway length and minimum runway width to filter our too short
and too narrow runways. Such landing places will be shown in nearest list anyway, but they
will be marked with red cross to indicate, they are not usable.
Press the DEFAULT button to reset these settings back to default.
Page 56 of 192
Page 57

Operating Modes Version 6.03, May 2017
5.1.6.4 Glider and Track
Navigational screen can show the coloured path flown, current track vector and target
vector with terrain collision warning.
Check the Show path item if you want to see the flown path. Path length defines how
much of the flown path will be shown. The path can be coloured using:
Fixed path style. Path colour is fixed and defined by path colour item.
Mc path style, which is based on current MacCready settings. Red colour indicates
segments of the flight where we have vertical speed higher than the current MacCready
setting. Orange colour shows vertical movements similar to the current MacCready
setting and blue for vario values below the MacCready setting. Grey depicts sink areas.
Vario path style, where red colour indicates positive vertical speed and blue colour
negative vario values.
Altitude path style, where red colour means low altitude and blue means high altitude.
Ground speed path style, where red colour means slow speed and blue colour means
fast speed.
Netto path style, where red colour indicates positive netto vertical speed and blue
colour negative netto values.
Check the Show current track item if you would like to see your current ground track
vector. Track colour and width defines the colour and width of the current track vector.
Selected target and current position are connected with a magenta line.
Check Show target if you would like to see this line. In the target colour and target width
you can select the Colour and Width of this line. You can also choose to show or hide the
terrain collision point and the target line itself. The terrain collision marker is a red square
which is only displayed when there is terrain between the navigational point and the current
position and therefore not enough altitude to reach the target with the current glider
settings. Font Style, Colour and Size define what font for terrain collision altitude and
range circles.
Enable Show range circles to plot range circles around aircraft symbol. Having range
circles on navigational screen, it is much easier to guess distance to nearest point of
interest. Range colour and range width define the way circles are rendered. A built in
engine noise level sensor detects, if engine is running or not. Use Engine colour and
width properties to visualize part of path, where engine was running.
Page 57 of 192
Page 58
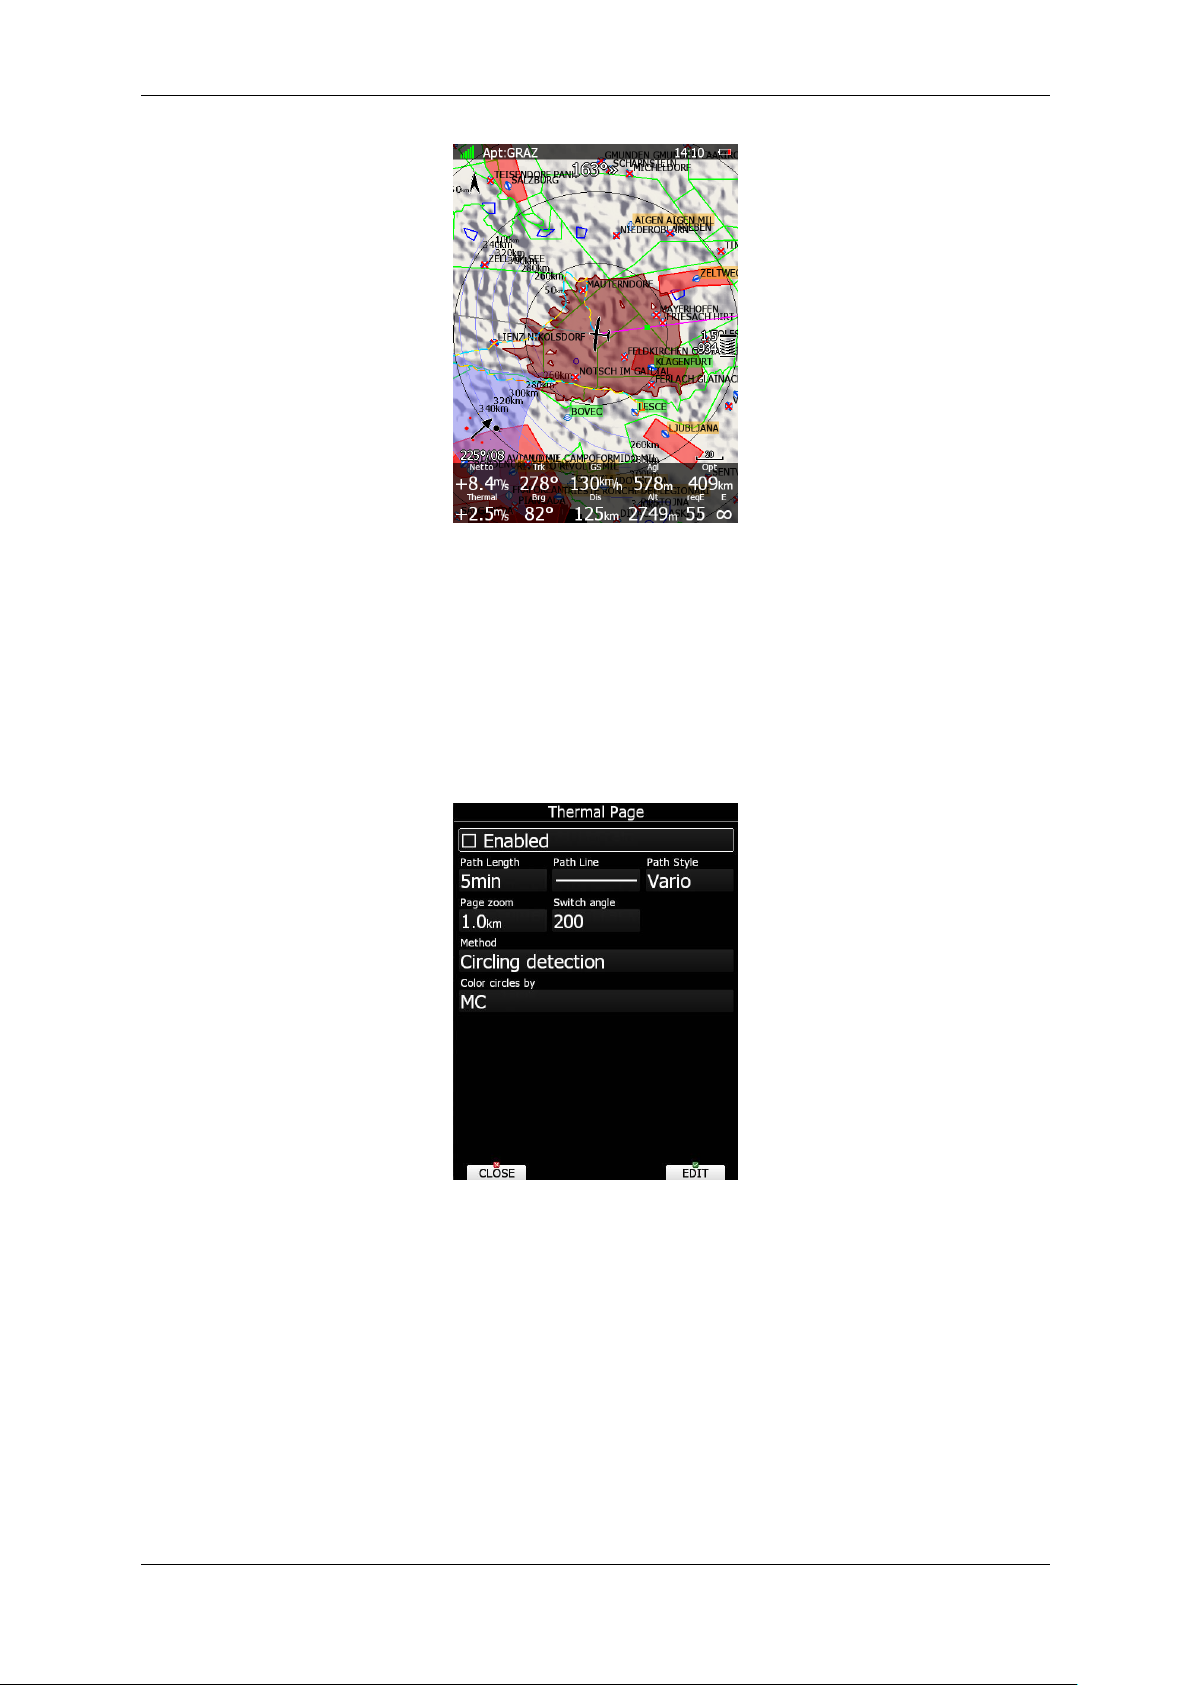
Operating Modes Version 6.03, May 2017
Use Show glider range area to display reachable area from current altitude with current
wind and MacCready settings. Use area colour and area border to define its properties.
Area can be filled outside or inside. Glide ratio defines the past flown average efficiency
which will be used for average efficiency calculation for glider range area.
Press the DEFAULT button to reset these settings back to default.
5.1.6.5 Thermal mode
When entering thermal, display unit can enter special page, which is called thermal page.
See chapter 6 or LX Styler manual how to define thermal page.
Check Enabled to enable thermal page option. Displayed path on thermal page can be
different from the one defined in Glider and track dialog. Use length, line and colouring
properties to define path display. Also page zoom is different and set to fixed value defined
with Page zoom property. Switching to thermal mode can be done in 2 ways: Circling
detection or Switching SC/Var. If you start circling the thermal mode will become active at
the angle of turn (set switch angle), or if you switch from SC to Vario mode. Circles are
coloured based on following methods: Auto span, MC or Average Vario.
5.1.6.6 Optimization
The main display unit calculates the optimised flown distance according to OLC or FAI rules
in real-time during flight (see Chapter 5.1.8). It calculates the available FAI triangle area,
which is also called the FAI triangle assistant. If you enter this area and return to the start
Page 58 of 192
Page 59
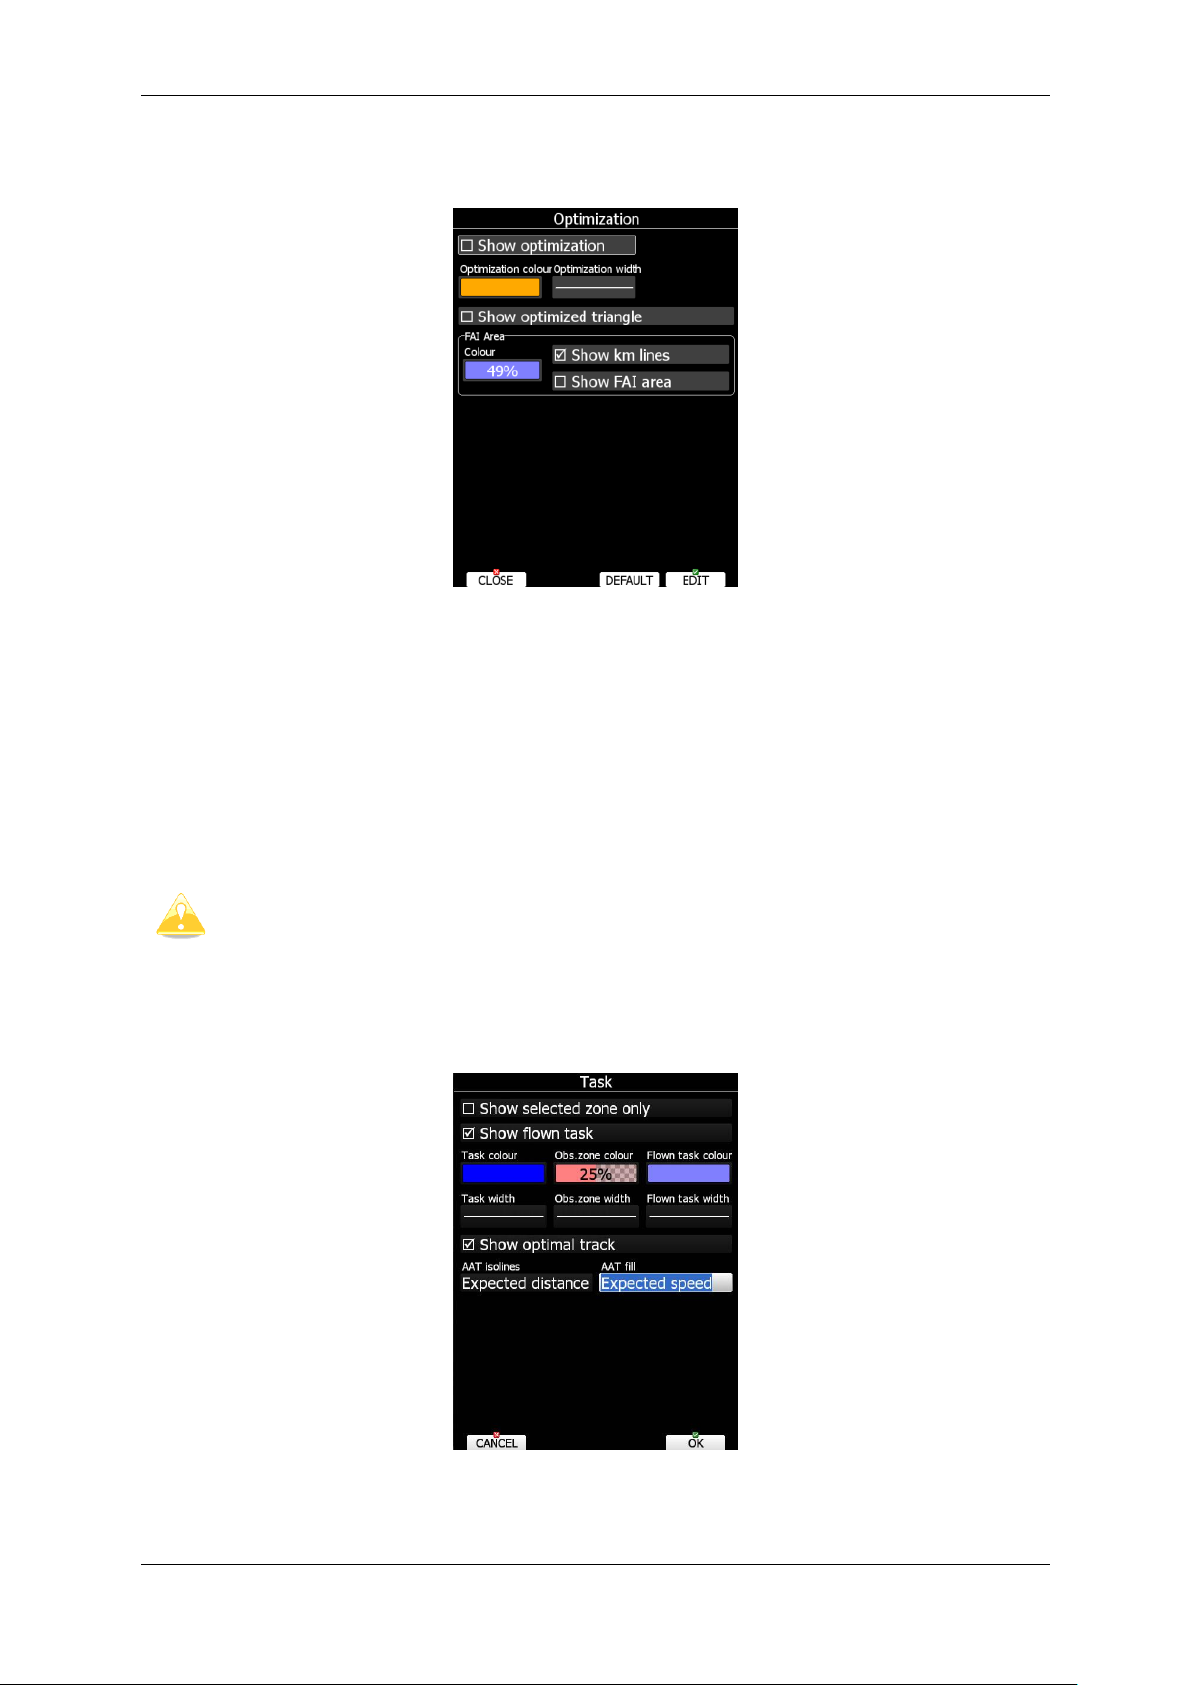
Operating Modes Version 6.03, May 2017
These lines will always be plotted in kilometres scale regardless of the Units value.
point your flight forms a triangle according to FAI rules. The Optimisation dialogue is used
to define the look and feel.
Check the Show optimization item to enable display of the optimised track.
Optimization colour and width defines the colour and width for these lines.
If Show optimized triangle is checked also lines for the largest optimised triangle are
shown. Please note this might not be a triangle according to FAI rules.
The FAI Area group defines how the FAI area is drawn. Select the Colour item to change
the colour of the FAI area. Use the ZOOM selector knob to change transparency of the
area. 100% means completely transparent and only the outline will be drawn. 0% means
completely solid (not recommended).
Check the Show km lines item to see lines which indicate what will be the size of the
completed triangle.
5.1.6.7 Task
Use this dialogue to define how a task is drawn in task mode.
Task colour defines the colour of task lines. Obs.zone colour defines colours for
observation zones. Use the ZOOM selector knob to change transparency of area. 100%
Page 59 of 192
Page 60

Operating Modes Version 6.03, May 2017
Flarm radar is not available if competition or privacy modes are active. Refer to
Chapter 5.1.11.6.
means completely transparent and only the outline will be drawn. 0% means completely
solid (not recommended). When Show flown task is checked also the flown task will be
drawn. This might be useful when flying assigned area tasks.
The Show selected zone only item controls whether all task observation zones are to be
displayed or, if there is only one, then that alone will be shown.
When Show optimal track is enabled, small blue arrow is drawn next to aircraft. This
arrow indicates most optimal direction to fly.
AAT isolines are showing expected speed, delta time or expected distance, which means if
you turn to a next point at any of the lines, you will have the results indicated next to the
line based on the calculation to the next turn point zone.
AAT fill is filling the zone. Zone becomes transparent if you are “too early, too short or task
delta time is not 0”, if the zone is solid colour, you are already “too late, flew too long in the
zone or your task delta time is not achievable”.
5.1.6.8 Flarm
The system can be equipped with the internal or external FLARM module. If your device is
equipped with FLARM this menu will let you to modify presentation of the Flarm radar
display.
Page 60 of 192
Page 61

Operating Modes Version 6.03, May 2017
Checking Show Flarm object will enable display of aircraft detected by FLARM.
Colours are designed to present three values. The colour for aircraft more than 100 meters
above your current altitude is defined by the Above Colour item. The colour for aircraft
more than 100 meters below your current altitude is defined by the Below Colour item.
The colour for aircraft that are less than 100 meters below or above your current altitude is
defined by the Near Colour item.
When a signal from a particular aircraft is lost the aircraft remains blinking on the screen for
the duration defined in the Lost device after item (default 120 seconds). After that time
the aircraft symbol will not be displayed.
Show labels combo box defines for which Flarm objects altitude and vertical speed are
displayed next to the aircraft symbol. The user can modify size, font style and colour.
Select the Font style and colour item. Use the ZOOM selector knob to modify colour and
the PAGE selector knob to modify style.
It is possible to display the flown path of tracked aircraft. Path colour and Path width
define width and colour of paths. Show paths combo box defines for which Flarm object
paths are going to be visible.
Symbol size defines size of symbol of Flarm object.
Check Show PCAS to see non-directional traffic on navigational screen. Non-directional
traffic will be draw with dotted circle at received distance from aircraft position. PCAS
timeout is setup separately in next time spin control.
Page 61 of 192
Page 62
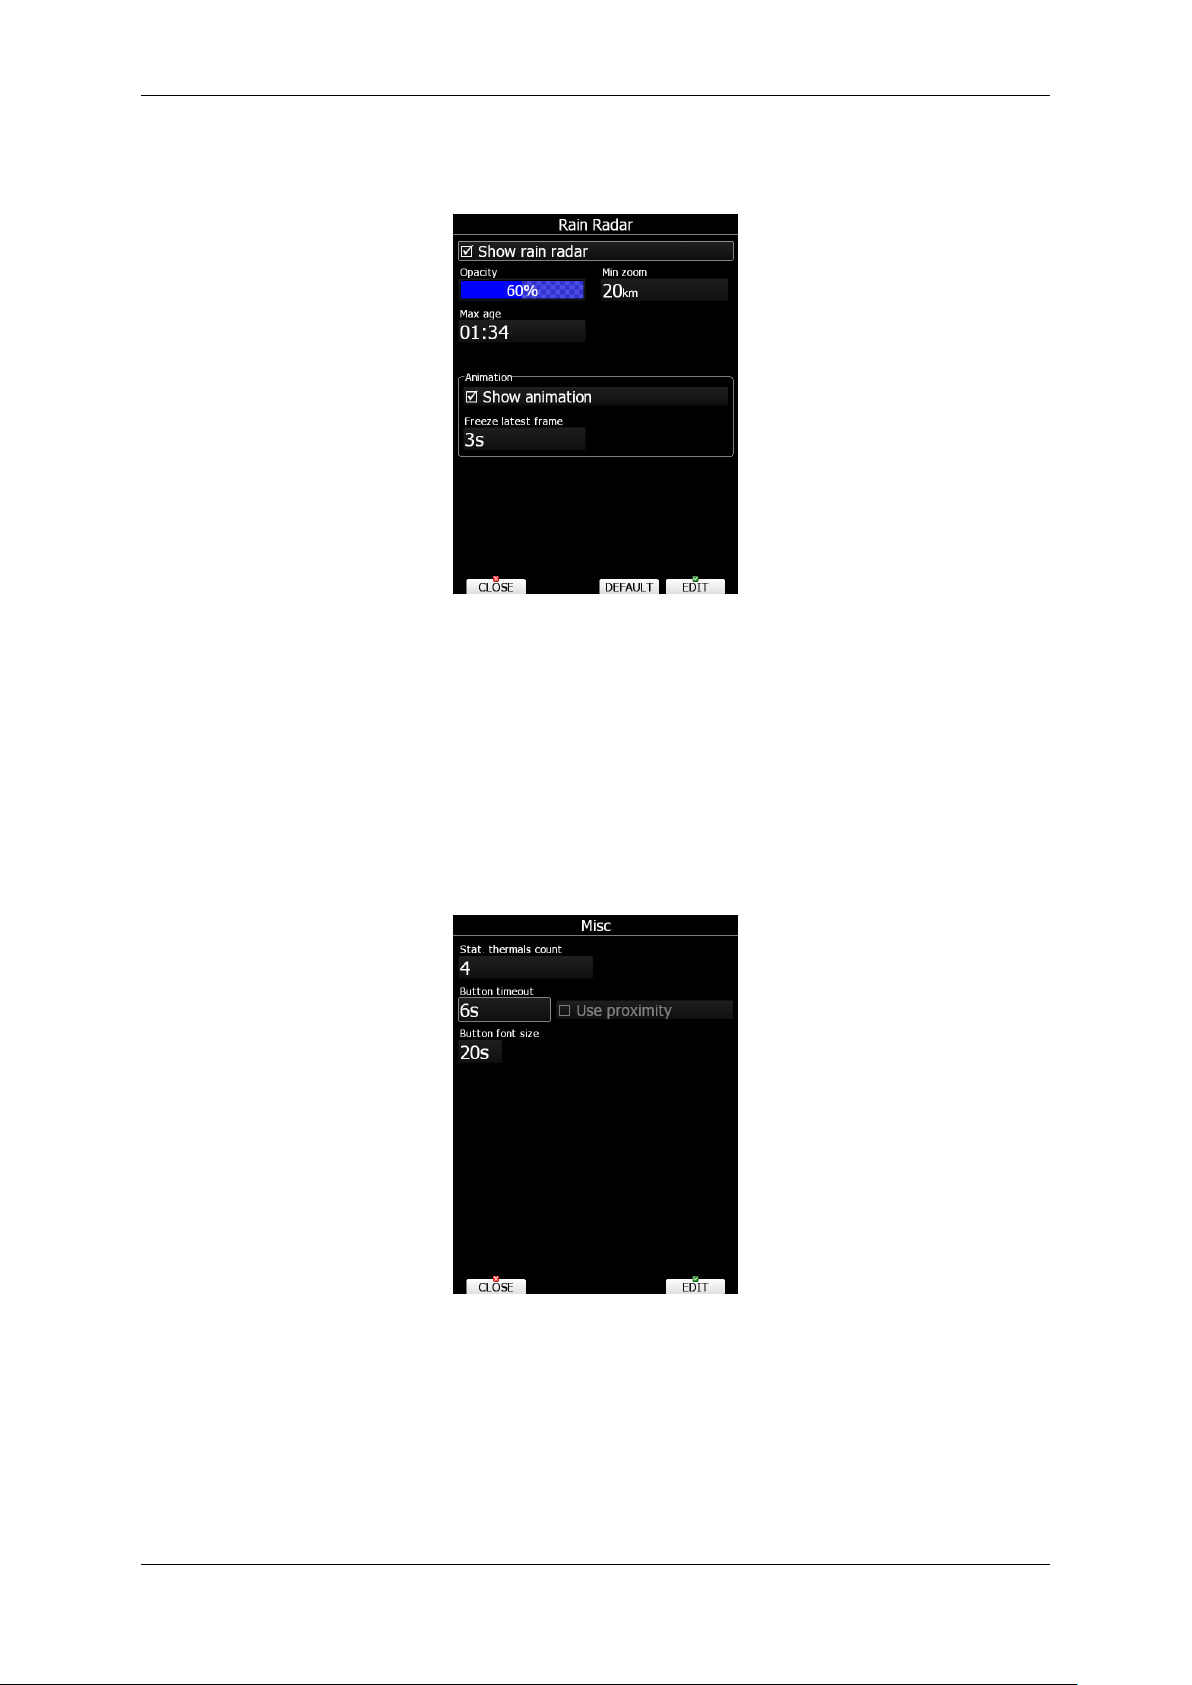
Operating Modes Version 6.03, May 2017
5.1.6.9 Rain Radar
If the Wi-Fi module is installed, rain radar menu is also available.
During flight, there is a possibility to get real time rain radar pictures, if Wi-fi module is
connected to the 3g hotspot and if the hotspot has mobile signal.
Show rain radar will automatically show the radar picture layer over the map. Opacity
defines the layer transparency over the map and zoom level sets when the layer can be
seen. Max age defines time since the last rain picture was received. Animation is showing
how the rain is moving over the map. Last picture can also be frozen and the duration can
be set by freeze latest frame.
5.1.6.10 Misc
Statistics thermals count and button settings can be set here.
Screen button appearance can be set by button timeout time. For newest instruments
proximity buttons can be used. Proximity will be detected after touch of a button if Use
proximity is ticked. Also button font size can be set here.
Page 62 of 192
Page 63
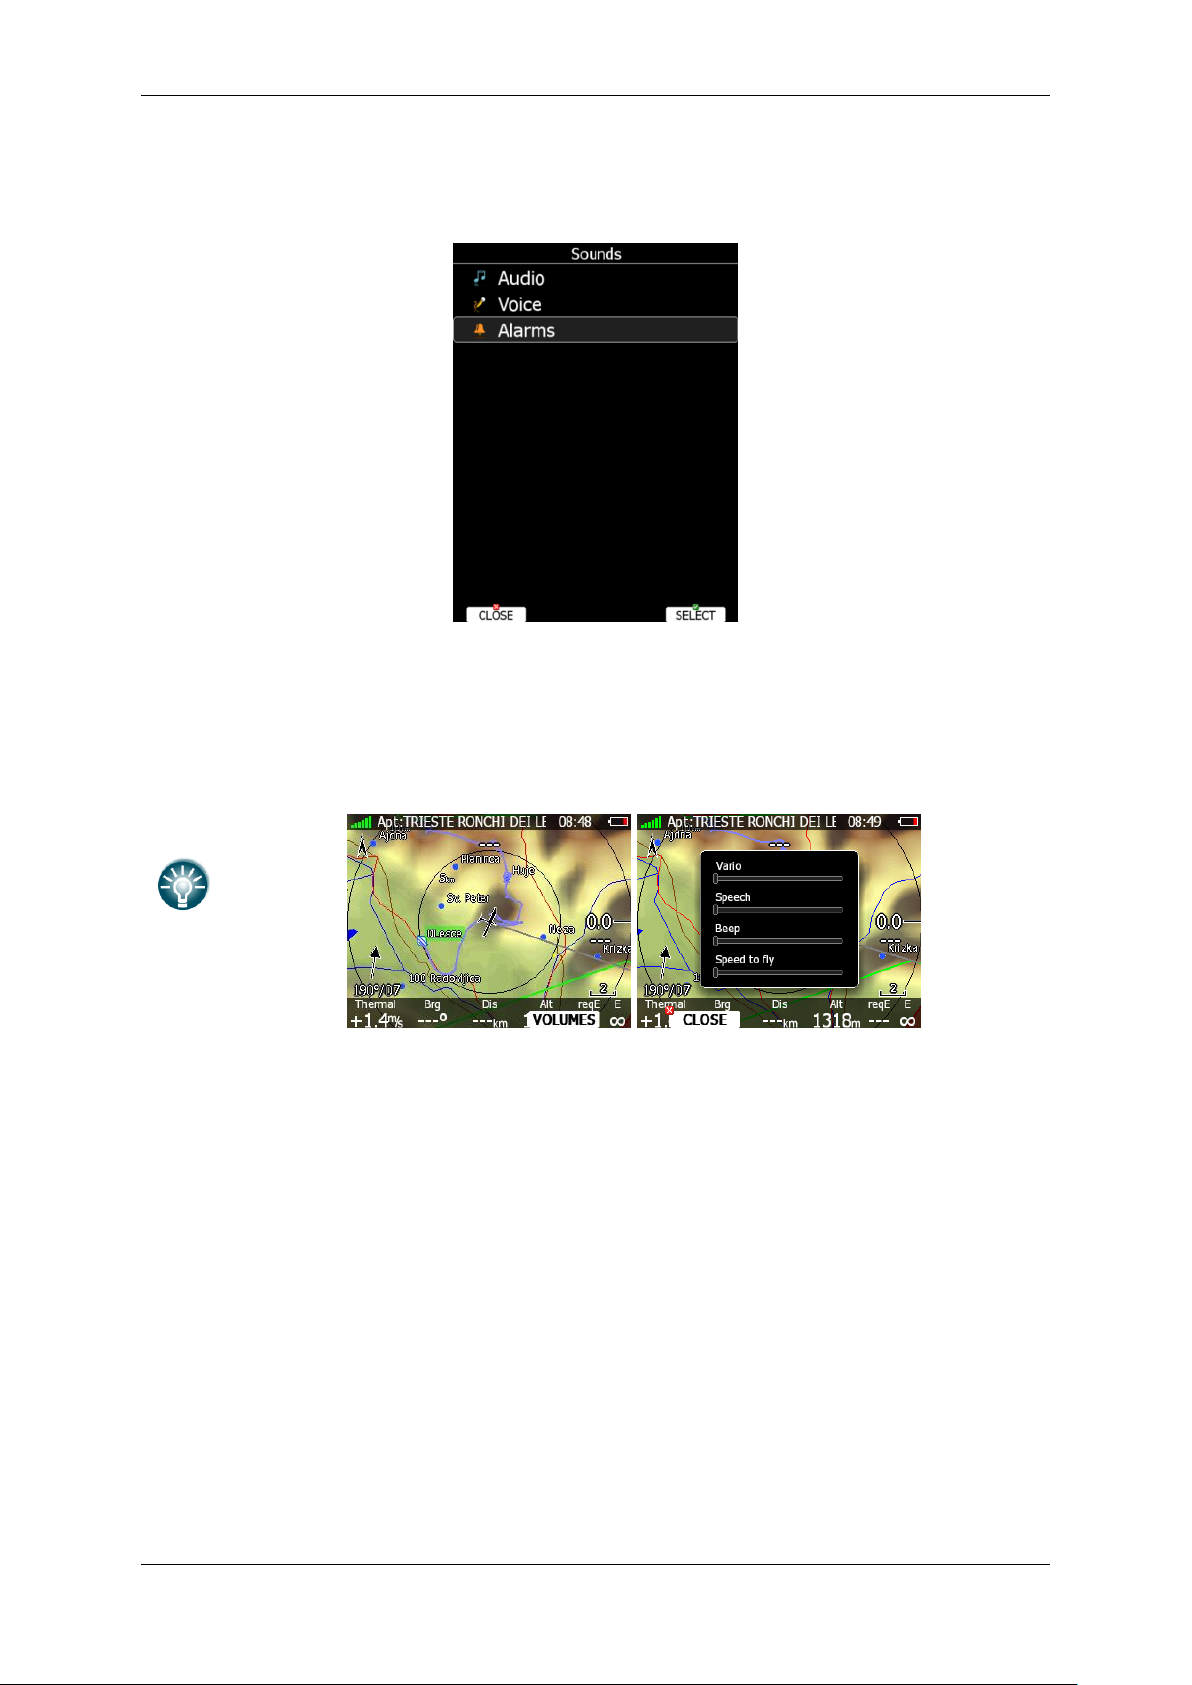
Operating Modes Version 6.03, May 2017
Volume can be also controlled using upper left rotary knob. Rotating it will
directly change volume for sounds, which is currently being played. For example,
if voice message is being played, voice message volume will be set. If alarm is
beeping, alarm volume will be set. In speed to fly mode, speed to fly volume is
set and in climb mode, vario volume is set.
When button VOLUMES is pressed a menu will appear, where it is possible to set
up all volumes at same time.
5.1.7 Sounds*
In the Sounds setup page audio settings, voice settings and alarms settings for the vario
unit can be modified.
Page 63 of 192
Page 64

Operating Modes Version 6.03, May 2017
SC volume item is visible only for variometer before V5 variometer, where it was
not possible to separately set volume for speed to fly mode and for climb mode.
It is highly recommended to upgrade variometer to newer one. Please contact
info@lxnav.com for more details.
5.1.7.1 Audio Settings*
Basically here we can set up two types of audio; audio sound for climb mode and another
for cruise mode (SC).
Vario audio mode has the following options:
Linear positive: sound is interrupted with silence every few milliseconds when the
needle is positive; on negative side sound is linear (not interrupted).
Linear negative: inverse function to Linear positive.
Linear: sound is linear and non-interrupted in full scale range.
Digital positive: similar to Linear positive, except frequency is not changing linearly
but with larger steps.
Digital negative: inverse function to Digital positive.
Linear positive only: sound is present only at positive values, for negative values
there is silence.
Digital positive only: similar function to Linear positive only, except the sound is
similar to the digital tone.
Press the DEMO button to hear the selected option.
SC audio mode has four modes:
SC positive: sound is interrupted with silence every few milliseconds when the needle
is positive; on negative side sound is linear (not interrupted).
SC negative: inverse function to SC positive.
SC: sound is linear and non-interrupted in full scale range.
SC Mixed: for positive relative values the sound represents relative; for negative
relative values the sound represents SC (for that setting it is recommended to set SC
needle to relative).
Netto speed: variometer will produce exactly the same sound as defined in Vario
audio, except it will follow netto vertical speed.
Freq at 0% defines the tone frequency at 0 m/s.
Freq at +100% defines the tone frequency at full + deflection.
Freq at -100% defines the tone frequency at full – deflection.
Page 64 of 192
Page 65

Operating Modes Version 6.03, May 2017
Mixed item is visible only for variometer before V5 variometer, where it was not
possible to separately set volume for voice messages. It is highly recommended
to upgrade variometer to newer one. Please contact info@lxnav.com for more
details.
Volume level (loudness) can be also set with volume rotary knob, when messages
are being played
5.1.7.2 Voice*
Voice module is integrated part of V5, V9 or V80 variometer. The voice module is 100%
controlled through the main display unit via the settings described in this menu.
In the Voice menu volume level (loudness) of the voice module can be adjusted. In the
Messages window each item can be set separately. Only checked items will be played by
the voice module.
5.1.7.3 Alarms*
The vario unit produces an audio alarm on reaching certain confirmation points. This screen
allows the parameters of the audio to be configured. If a particular message item is
checked the main display unit will generate an alarm at the time of event.
Frequency and Periods define the length and pitch of alarm. Press DEMO button to play
alarm sound. Change volume to define loudness of alarm.
Page 65 of 192
Page 66

Operating Modes Version 6.03, May 2017
Volume level (loudness) can be also set with volume rotary knob, when alarm is
being played
5.1.7.4 Observation Zones
This menu defines the default observation zone geometry. The following items can be
chosen: start zone, turn point zone, finish zone and templates.
Each type of observation zone is defined with two angles, two radii and mean bearing
(Angle12). These parameters enable the creation of any known zone geometry separately
for start, turn point and finish.
All stored tasks will match this “global” setting except those where the zone was modified in
the task edit menu (see Chapter 5.7.2).
Using parameters in the zone dialogue it is possible to describe all types of observation
zones. Angle12 defines the orientation of the observation zone. Available values for
Direction are:
Symmetric: This is the most common selection for turn point.
Fixed: This is mostly used for assigned areas.
Next: will orient the observation zone in direction of the outgoing leg. This is usually
used for start.
Prev: will orient the zone in direction of the incoming leg and is usually used for the
finish.
Start: orientates the sector always towards the start.
Page 66 of 192
Page 67

Operating Modes Version 6.03, May 2017
If the Line checkbox is checked the sector will become a line type of observation zone. The
Radius 1 parameter describes half of width of line length. Use the PAGE selector knob to
increase the radius by 0.1 of the selected distance units and the ZOOM selector knob to
increase the radius by 5.
If Line is not checked the Angle1 parameter will define the basic shape of the observation
zone. A value of 180° means that the zone is a cylinder and 45° is the classical FAI sector.
Rotate the PAGE selector knob to increase the angle by 0.5° or use the ZOOM selector knob
to choose values 22.5°, 45°, 90° or 180°.
Angle2 and Radius2 are used for more complex observation zone setups.
When changing observation zone parameters the screen is automatically updated to display
the new zone.
Check the AAT checkbox, if you want to make the selected zone an assigned area. The
AAT checkbox will be automatically checked when Radius1 is greater than 10 km.
By default navigation to task points will be automatically advanced; uncheck Auto next if
you do not want to change over to next point when reaching selected point. This option will
be automatically unchecked when Radius1 is greater than 10 km.
Use Template if you wish to modify start, point and finish zones at same time.
Available templates are:
500 m cylinders are used for start, points and finish.
500m and start line. The 500 m cylinder is used for turn points. A 1 km long line is
used for start and finish.
FAI and start line. 90° and 3 km long sector is used for turn points. A 1 km long line is
used for start and finish.
Page 67 of 192
Page 68

Operating Modes Version 6.03, May 2017
Optimisation will not take into account the 10 km distance between turn points
which is required by FAI rules.
5.1.8 Optimization
During flight the system optimises the flown path according to OLC or FAI rules. Use this
dialogue to change the way instrument performs this optimisation.
Number of points defines the type of optimisation. Use five for OLC optimisation. Use the
value three for FAI free flight optimisation.
The FAI triangle group defines the rules for FAI triangles and these rules can bend a little if
you do not want to fly marginal triangles.
Check Reset optimization on engine run to reset optimization counter each time engine
is started.
5.1.9 Warnings
There are four types of warnings available. Airspace warnings are shown when approaching
a particular airspace zone. Altitude warnings are shown when approaching to a defined
altitude, Flarm warnings are triggered when conflicting traffic is in the vicinity, Time Alarms
are raised at defined time interval to remind pilot to do specific task, Gear warning is
triggered at pre-defined above ground level altitude setting and Waypoint warning will be
given at set distance to Waypoint.
Use this dialogue to setup the behaviour of warnings.
Page 68 of 192
Page 69

Operating Modes Version 6.03, May 2017
5.1.9.1 Airspace Warnings
Airspace warnings are the most complex ones. An airspace warning is activated by two
triggers; First warning (orange) will be given when a projected position of flight for period,
which is defined in the Time item, is computed to cross an airspace zone.
Second warning (red) will be raised when a projected position of flight is computed to cross
airspace zone and the glider is already in the buffer zone in the vertical or horizontal
directions. Buffer zones are defined in the Horz.buffer and Vert.buffer items. Default
values are 1 km for horizontal buffer and 100 m for vertical buffer.
The first warning (orange) will also be given when you enter an airspace zone buffer but the
projected flight is computed to cross it.
An Airspace warning will be raised in all modes and dialogues. A warning for an alarmed
zone can be dismissed for a whole day, some minutes or just quit. Quit means that the
message will disappear. Use Dismiss for spin to define dismiss time in minutes. This time
will be shown in the lower-middle button after which the warning will be raised again.
However an alarmed zone will still be filled with transparent red colour and outlined with a
thick line and also the distance to the nearest point of the airspace zone will be shown.
To prevent dismissing by mistake check the Confirm dismiss checkbox and you will be
always prompted to confirm dismiss for a particular airspace zone.
The RESET button will reset the status for all airspace zones.
Page 69 of 192
Page 70

Operating Modes Version 6.03, May 2017
5.1.9.2 Altitude Warning
Altitude warnings will be enabled if Show warning is checked. Altitude is given in MSL.
Projection is calculated based on the 20 second average vertical speed and time which is
defined in the Time item.
If the projected altitude is greater than the set altitude, an altitude warning will be raised.
Altitude warnings will be raised in all modes and dialogues just as for airspace warnings.
Altitude warnings can be dismissed for 1 minute, 5 minutes or disabled.
Altitude warnings can be set for approaching from below defined altitude or from above
defined altitude.
Page 70 of 192
Page 71

Operating Modes Version 6.03, May 2017
On competition it is recommended to set to Medium or high alarms, otherwise too
many warnings will be displayed. Medium or High, means only the most important
alarms will be triggered.
5.1.9.3 Flarm Warnings
Flarm warnings will be raised only when system is receiving FLARM data from internal or
external FLARM module. Using this dialogue the user can define which warnings will be
shown and how they are going to be shown. There are three types of warnings:
Traffic warnings will be raised once a new aircraft is detected by FLARM.
Obstacles warnings will be displayed when a collision with a ground obstacle is
predicted. Obstacles file should be loaded.
Alert zones are marked by ground stations to notify pilots of active parachute
dropzones, RC/RPAS/UAS flying areas or similar
Low alarms, Medium and High alarms combo box defines alarm level at which
system will display collision warning.
Explanation of alarms:
Low alarms: For distant Flarm targets the main unit gives a short or long message,
just a beep or be turned off. (19-25 seconds before possible collision).
Medium alarms: For distant Flarm targets the main unit gives a short or long
message, just a beep or be turned off. (14-18 seconds before possible collision).
High alarms: For very close Flarm targets main unit gives a short or long message,
just a beep or be turned off. (6-8 seconds before possible collision).
If the voice option is installed it is also possible to hear the horizontal and vertical situation
to the current object. Uncheck appropriate items if you want to disable this part of the
message. You can also define the way direction to the Flarm object will be presented.
There are three options:
Relative bearing: In this option direction will be given relative to the glider’s nose
direction (e.g.
True bearing: Direction is give with absolute direction (e.g.
Traffic 3’ o clock
, which means traffic, is on your right side).
Traffic from 330°
Relative/True bearing is a combination of both methods. Relative bearings will be
given when flying straight and true bearings will be given when thermaling.
Graphical presentation. When this item is check, also a graphical presentation of
FLARM will be shown, when Flarm warning is displayed.
Page 71 of 192
)
Page 72

Operating Modes Version 6.03, May 2017
Picture above shows typical Flarm warning with graphical presentation and relative bearing
of object. Press CLOSE to dismiss warning, CIRC.OFF to dismiss for time of circling and 1min
to dismiss all Flarm warnings for one minute.
5.1.9.4 Time Alarm warning
Use this dialogue to define three independent time alarms that will be triggered at specified
periods.
Page 72 of 192
Page 73
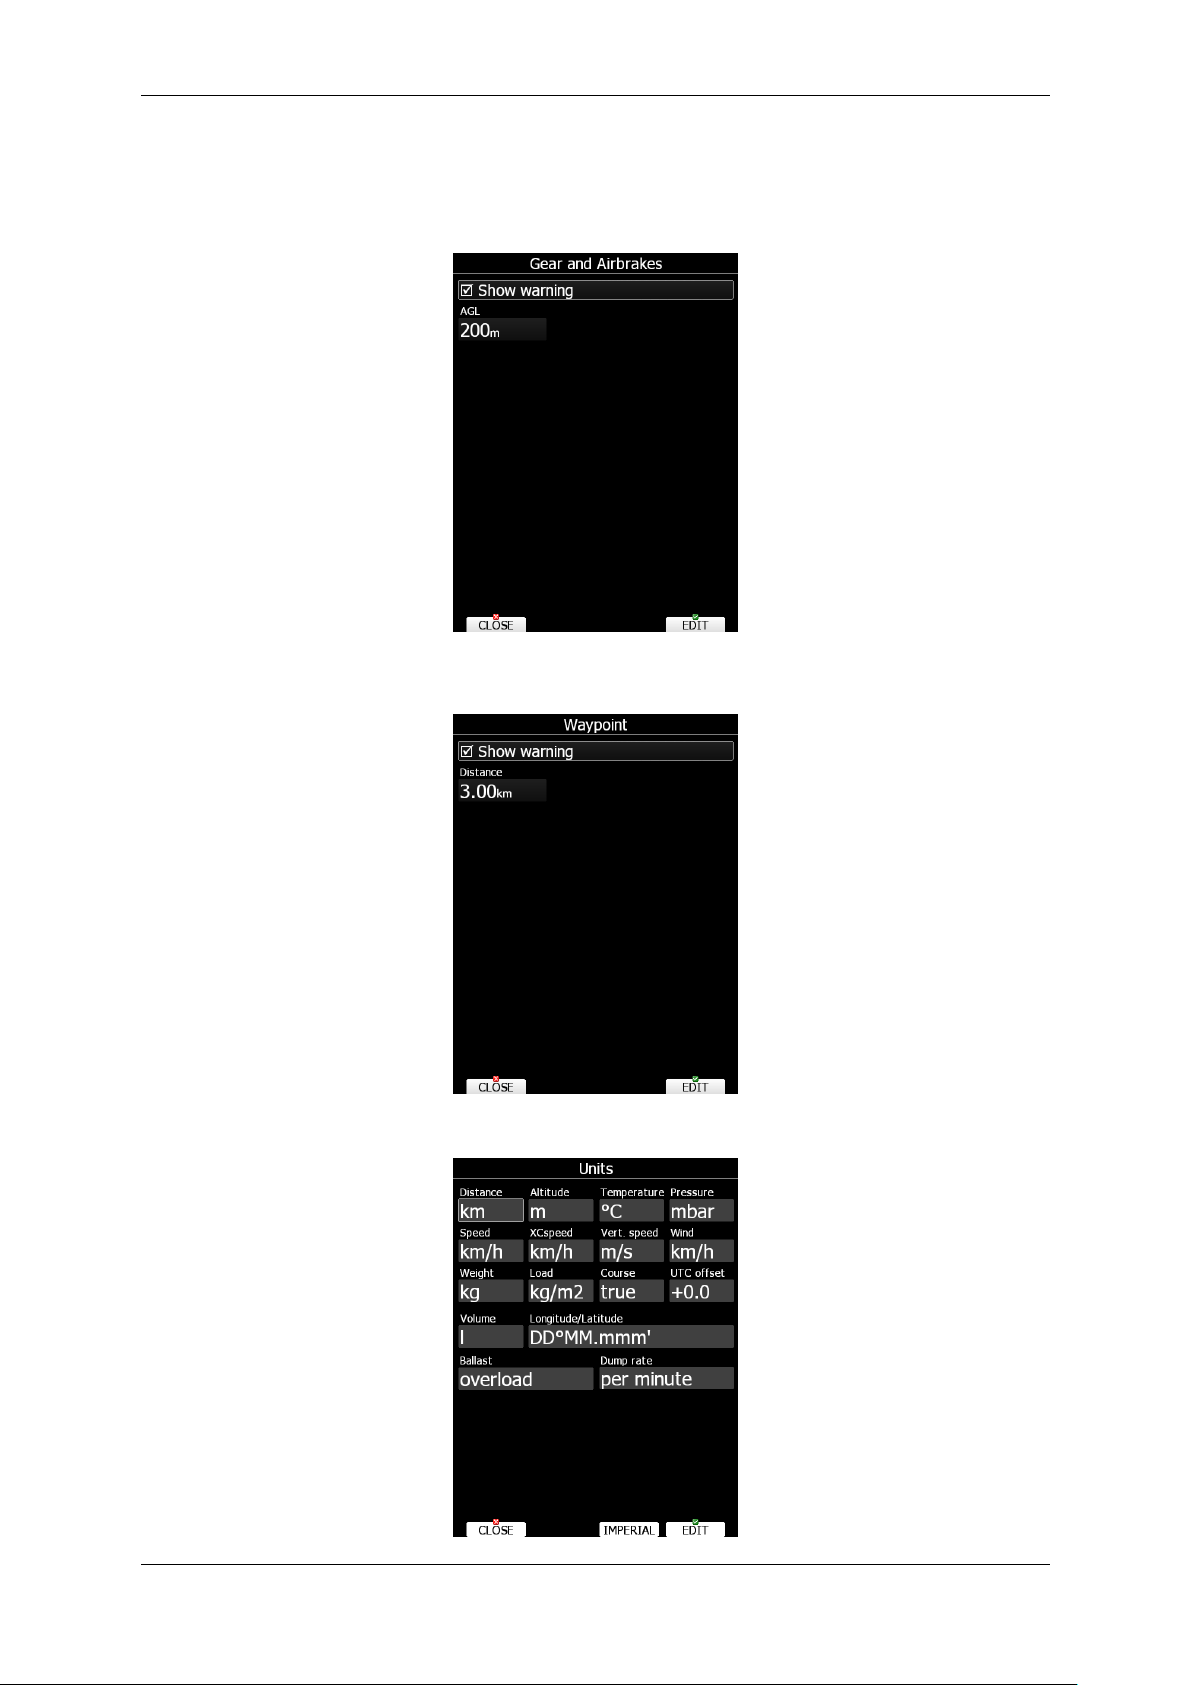
Operating Modes Version 6.03, May 2017
5.1.9.5 Gear warning
A gear warning can be set. The warning will be triggered by AGL altitude.
5.1.9.6 Waypoint warning
Waypoint warning will be triggered at defined distance from selected waypoint.
5.1.10 Units
Page 73 of 192
Page 74
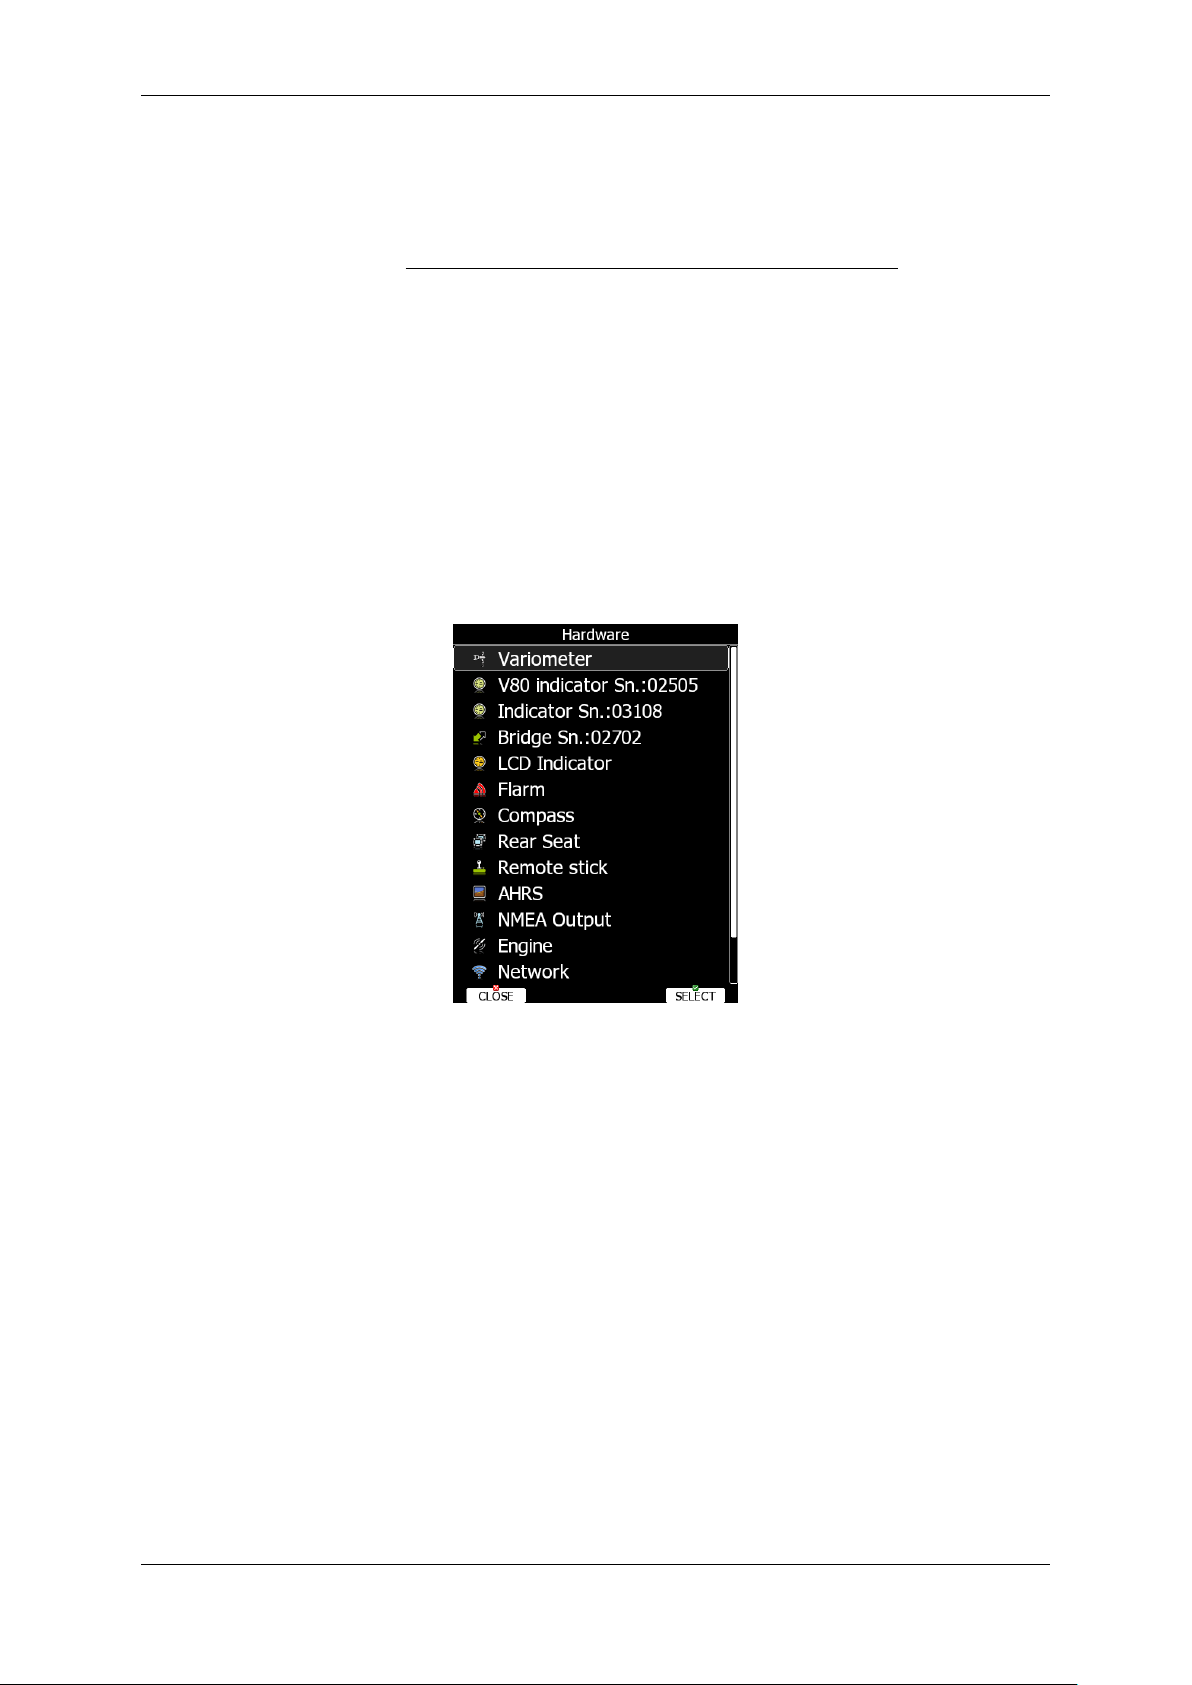
Operating Modes Version 6.03, May 2017
weightgliderREFERENCE
ballastWaterweightPilotweightgliderEmpty
overload
..
....
The lower-middle button will toggle all units between imperial and metric units.
Glider ballast can be entered as:
overload factor, which is defined as:
Load, which is entered in kg/m
2
or lb/ft2.
Weight of water ballast. If this option is used the weights of the glider and pilot
must be entered. Refer to Chapters 0 and 5.1.2 for more details of how to enter glider
and pilot weights.
5.1.11 Hardware*
Use this menu to define hardware properties such as total energy compensation, vario
indicators layout, compass calibration, FLARM module settings, AHRS settings, Wi-fi module,
NMEA output and data which will be exchanged between the rear and front display units.
Some items may be greyed out when the selected option is not available.
Page 74 of 192
Page 75
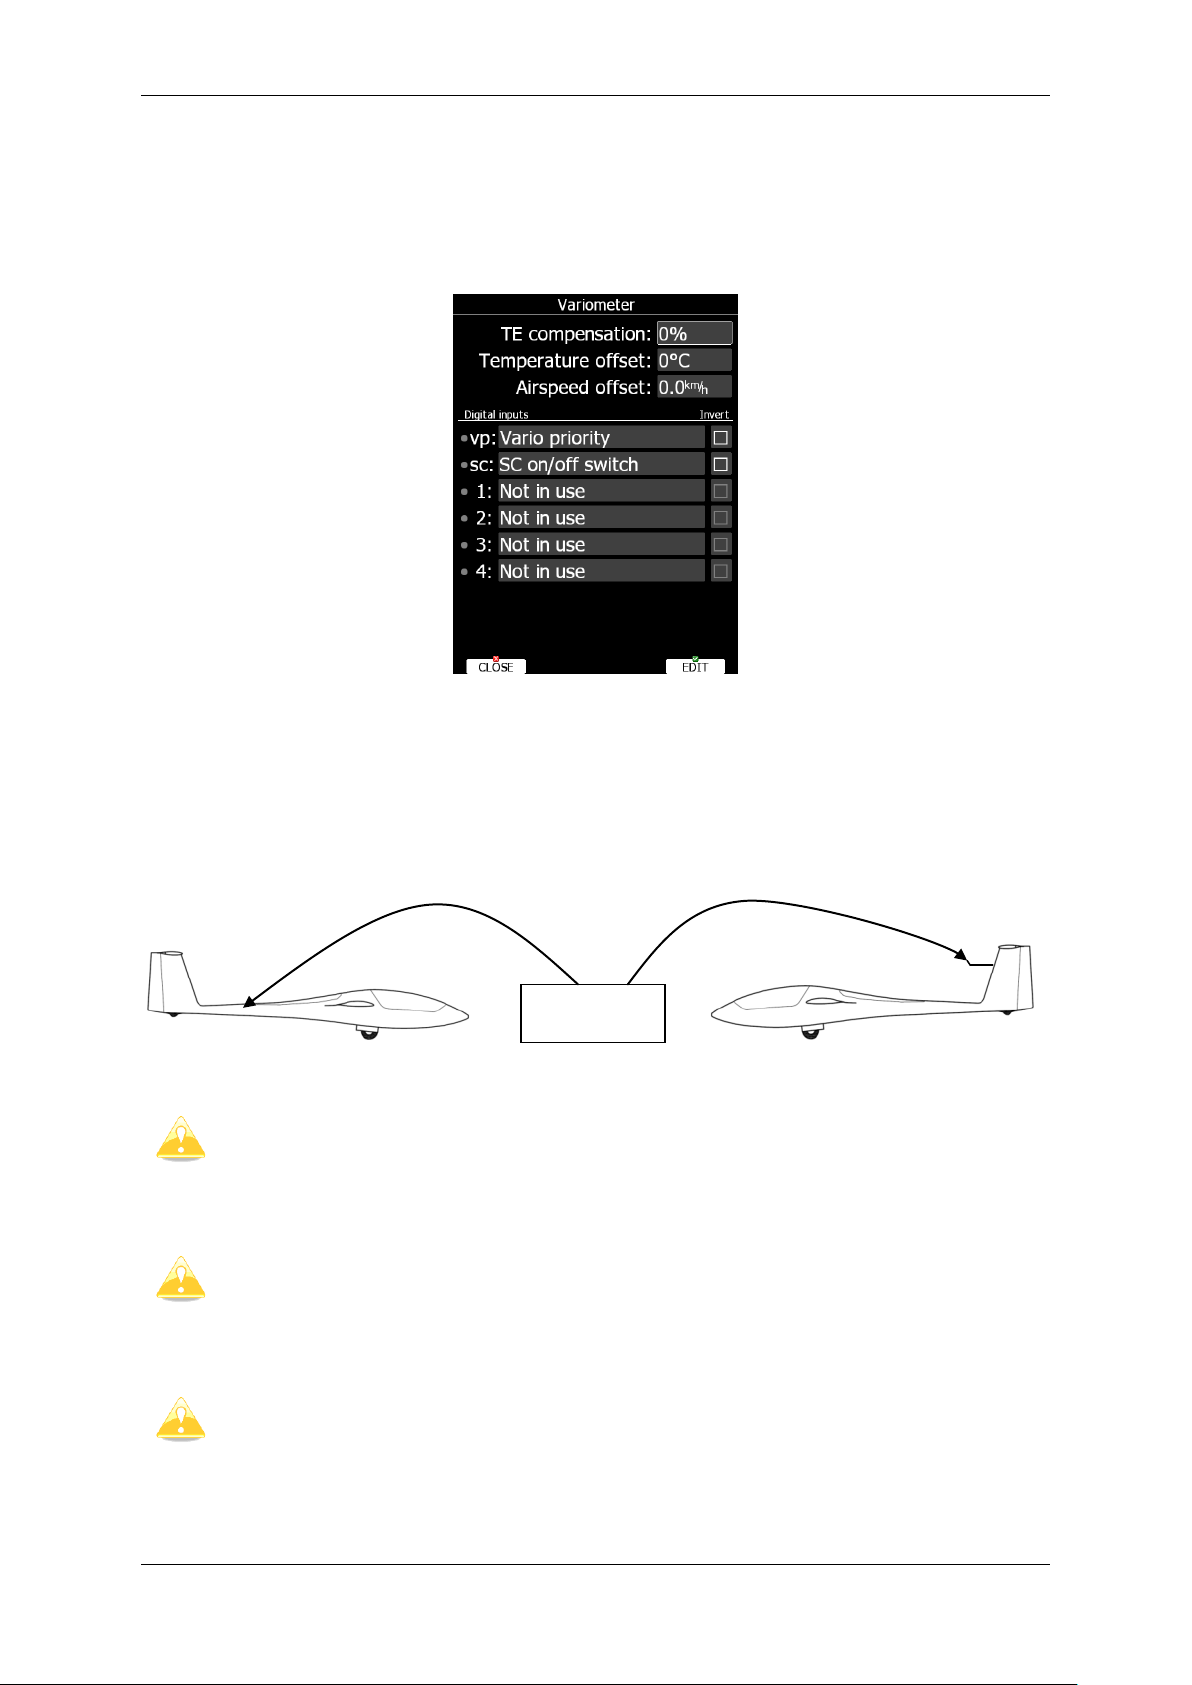
Operating Modes Version 6.03, May 2017
If the digital TE option has been used TE compensation should be set to 100%.
It is important to note that the method of TE compensation is set up when the
instrument is installed by virtue of the pneumatic connections made to the TE and
static ports. Changing the compensation type in the setup screen below WILL
NOT change the method of compensation - the pneumatic plumbing has to be
changed first.
If the TE tube has been connected TE compensation should be set to 0%. The
quality of the TE compensation depends entirely on the location, size and
dimension of the TE tube. The installation must be leak-proof.
TE (Pst)
Vario unit
Digital TE compenstaion
Compensation with TEprobe
5.1.11.1 Vario unit settings – TE compensation*
All settings in this menu are related to the glider and thus they do not depend on profile
selection. In this manual dialog description is given for firmware version 5.0 or higher with
V5, V8, V9, V80 variometer. In case older version or older variometer is being used, please
refer to previous version of manual.
Total energy compensation, temperature offset, airspeed offset and digital inputs are setup
in this menu.
5.1.11.1.1 TE compensation - Digital Total Energy Compensation
There are two ways by which the vertical speed can be corrected for total energy:
digital TE compensation based on speed changes with time
Pneumatic compensation with a total energy probe.
The digital TE compensation can be fine-tuned during flight using the following procedure.
It is essential that this is only done in smooth air; it is not possible to tune the TE accurately
in turbulent air.
Page 75 of 192
Page 76

Operating Modes Version 6.03, May 2017
There is another input called VARIO PRIORITY. When this input is activated by
grounding the appropriate wire the unit will change over to Vario immediately.
This input wire is set open (not grounded) as a factory default on delivery.
Vario indicator will ignore this setting and shows not corrected airspeed.
Set TE compensation to 100%. Accelerate up to approximately 160 km/h (75 kts) and keep
the speed stable for a few seconds. Gently reduce the speed to 80 km/h (45 kts). Observe
the vario indicator during the manoeuvre. At 160 km/h the vario will indicate about –2 m/s
(-4 kts). During the speed reduction the vario should move towards zero and should never
exceed zero (slightly positive indications are acceptable). If the vario shows a climb the
compensation is too low; increase the TE%; and vice versa. Try another “zoom” to assess
the change and make further adjustments if necessary.
Digital TE compensation is only effective when the Pitot tube and static sources are colocated and the pneumatic lines to the instrument are approximately the same length. The
best sensor to use is the combined Pitot/static Prandtl tube. If problems are experienced
with the digital TE compensation the most likely cause is the glider's static source. The
static source can be checked by plumbing the pneumatic tubes for digital TE compensation
and then setting the TE: to 0%. In still air accelerate to approximately 160 km/h and slowly
reduce the speed. Observe the vario indicator. If the static source is good the vario should
immediately start to move to show a climb. If the needle firstly shows increased sink and
then moves to a climb, the static source of the glider is unsuitable and there is no way to
provide successful digital TE compensation. The use of a dedicated and accurate finmounted Pitot/static source such as a Prandtl tube might help.
5.1.11.1.2 Temperature Offset
The system is supplied with an external outside air temperature (OAT) sensor. With the
offset setting it will correct static errors of temperature measurement.
5.1.11.1.3 Airspeed Offset
Some gliders are having quite big difference between calibrated airspeed and indicated
because of imperfect static ports (e.g.: Cirrus Standard). As airspeed effects wind
calculation. It is possible to define an airspeed offset to improve wind calculation.
5.1.11.1.4 Digital inputs
V9 or V5 variometer is having six programmable digital inputs. Two of them a bit special and
are labelled VP and SC (since August 2015 SC is no more wired via cable), others are
labelled with IN1, IN2, IN3 and IN4 on V5/V9 cable-set. See Installation manual for more
details on vario unit wiring diagram.
In current version digital input can represent the state of following actions:
SC on/off switch is used to change between SC (cruise) and climb mode using
on/off switch on remote stick of magnetic switches on flaps. Use invert check box to
invert working of switch.
SC toggle button is used to change between SC (cruise) and climb mode using
push button on remote stick. Use invert check box to toggle when button is pressed
down or released.
Vario priority is used to instantly change from SC (cruise) to climb mode as long as
push button is pressed.
Gear down and locked should be connected to gear only.
Airbrakes locked should be connected to airbrakes only.
Page 76 of 192
Page 77
Operating Modes Version 6.03, May 2017
Instead of using magnetic switch on flaps to toggle between SC (cruise) and
climb mode you can also use flap sensor for this operation. See chapter
5.1.11.14.
There is another input called VARIO PRIORITY. When this input is activated by
grounding the appropriate wire the unit will change to Vario immediately. This
input wire is set open (not grounded) as a factory default on delivery.
Remote stick type
SET: Input (SC) setting
LX NEW remote without SC cable
Not in use
Old LX remote with SC cable (before 8/2015)
»SC toogle button«
Old remote stick with SC switch
»SC on/off switch«
Using flap sensor
Not in use
Using magnetic flap sensor (AS style)
»SC on/off switch«
Gear and airbrake is used when you already have an old style of gear warning,
where gear and airbrakes are connected together in one loop.
Water ballast open is used to automatically calculate amount of dropped water.
See also chapter 0.
Canopy locked
Radio PTT active should be wired parallel to PTT button and it will mute vario
sound, when transmitting over radio.
Engine failure
Low fuel
Digital input shall be wired via switch to ground and it shall open or close, when selected
action is performed. A green light will light.
If necessary, check Invert check box, to reverse the operation of digital input.
Once digital inputs are connected the system will warn pilot, if airbrakes are open on takeoff and when gear is not locked prior to landing.
5.1.11.1.4.1 SC configuration with the NEW TYPE (from 2016) remote stick
The new LXNAV remote stick comes without the standard SC cable and VP cable, but the
function is still available.
With the new stick, there is no more need to solder these wires to the vario wiring loom.
The SC function is programmable through LX80/90xx (version 5.x )
Please make sure that none of the inputs is set to
“SC on/off switch” or "SC toggle button".
Configuration table for all SC switch options for new and old sticks:
5.1.11.2 Vario Indicator Setup*
The vario indicator is always part of the vario unit. However an unlimited number of
secondary vario indicators can be connected to the system using the RS485 system bus.
There are three different types of vario indicators; I9 vario indicator, which is standard
part of V5/V9 variometer, I8 vario indicator or I80 vario indicator, which is built-in part
of V8/V80 variometer and old LCD or USB-D vario indicator.
Page 77 of 192
Page 78
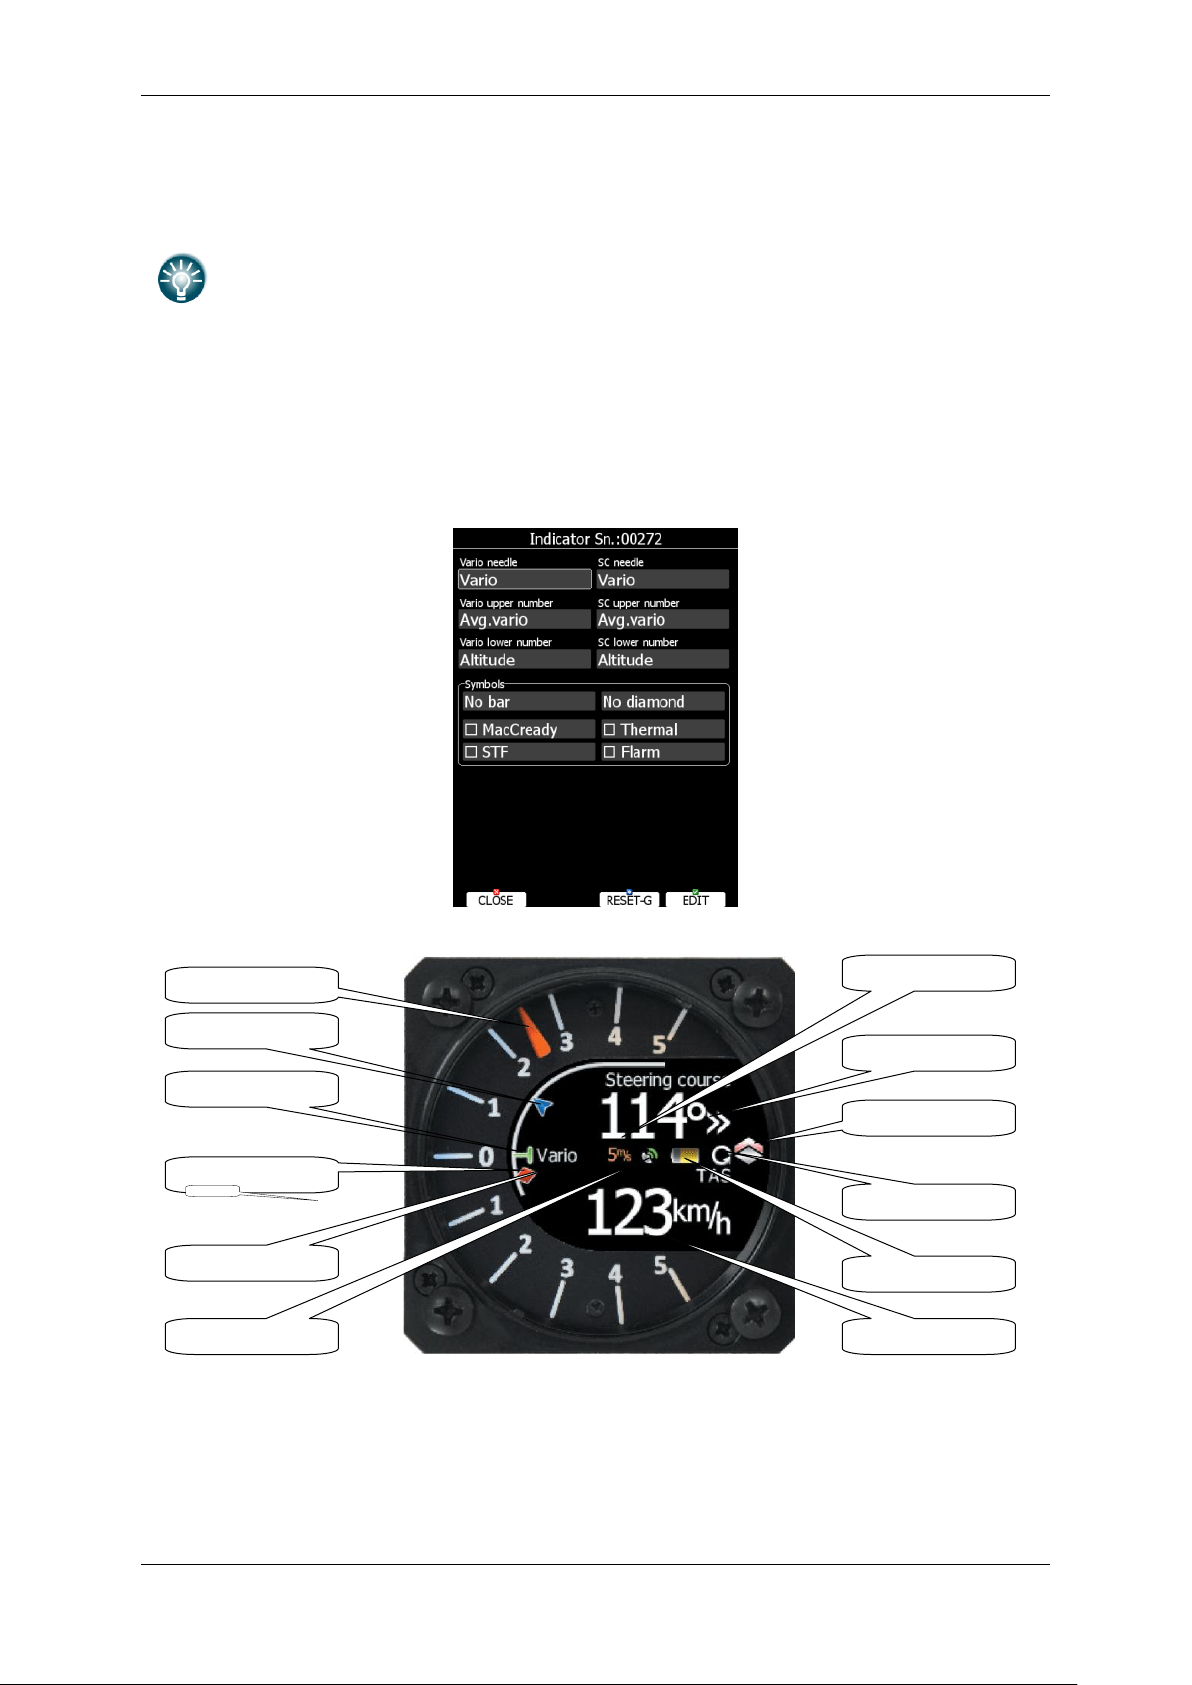
Operating Modes Version 6.03, May 2017
LXNAV is highly recommending upgrading old LCD or USB-D type of vario unit to
latest technology vario unit. Please contact local dealer or LXNAV for more
details.
Mechanical needle
Average
Mechanical needle
Thermal average
GPS status
Range
Upper number
Climb/cruise symbol
Battery
Needle type
MacCready symbol
Speed to fly symbol
Lower number
LCD vario indicator and USB-D type of indicator are setup through menu LCD Indicator,
whereas others, more modern vario indicators, are having its own menu item identified with
serial number.
5.1.11.3 Indicator I9*
I9 indicator is having mechanical needle and colour screen with 320x240 pixels resolution
on which user selectable data are displayed.
Each I9 indicator is identified by a serial number, which is also displayed on hardware menu.
Therefore literally unlimited number of vario indicators can be connected to RS485 bus and
each of them can be setup separately.
Description of indicator is shown on next picture.
Mechanical needle displays vario, netto, relative or speed to fly value. It can be setup
separately for climb mode or cruising mode. Printed scale can be chosen in range from -5 to
5 or from -10 to 10. Within software range can be set to 2.5, 5, 10m/s or 5, 10, 20kts or
500, 1000, 2000fpm.
Upper number and Lower number can be configured as average vario, time, flight time,
task remaining time, netto value, outside temperature, thermal average, indicated airspeed,
true airspeed, current altitude, distance to goal, arrival altitude, Last 60 minutes speed,
Page 78 of 192
Page 79

Operating Modes Version 6.03, May 2017
Most innovative feature of vario system is an upgrade. Firmware for vario unit can
be easily upgraded by customer with SD card. See Chapter 8 for more details.
Push button used for:
menus
Push button used for:
Push button used for:
altitude in feet, flight levels, voltage or average netto. It can be setup separately for climb
mode or cruising mode.
Speed to fly bar symbol is indicating which speed you have to fly according to current
MacCready setting, sink rate and speed. One arrow means 10units of speed faster or slower.
Up red arrows mean fly slower and down blue arrows mean fly faster.
Red diamond symbol can show average vertical speed, netto or current g-load.
Blue arrow symbol shows current MacCready value.
Green T symbol represents last thermal average value ->Thermal
White bar displays arc between minimum and maximum vertical speed value in last 20
seconds in white colour or minimum and maximum g-load in red colour, depending on
settings.
Flarm warnings can also be shown on the indicator if this box is ticked. By pressing DEMO
you can see how the warning is displayed.
Press RESET-G button to reset g-meter.
5.1.11.4 Indicator I8/I80/V8/V80
Indicator I8/I80 is without mechanical needle. I80 features 3.5” colour screen with
320x240 pixels resolution and I8 features 2.5” colour screen with 320x240 pixels resolution.
User selectable data are displayed on screen and needle is drawn. Each indicator is
identified by a serial number, which is also displayed on hardware menu. Therefore literally
unlimited number of indicators can be connected to RS485 bus and each of them can be
setup separately, however only one vario unit.
Indicator basic screen is split into two parts, white ring with needle and vario scale.
Additionally to needle, blue MacCready triangle, green thermal average T and red diamond
for 20 seconds average are shown. In the middle four user-customizable numbers are
shown. When middle button on indicator is pressed display will toggle between numeric
display, AHRS mode, Flarm radar display, Thermal assistant mode and after a long press on
the middle button you can enter the SETUP menu.
Page 79 of 192
Page 80

Operating Modes Version 6.03, May 2017
Navboxes set in the first and second line are also shown on the Thermal mode
page.
V8/V80/I8/I80 are not changing screen when toggling between cruise and climb
mode.
Number of navboxes can be set only on the vario indicator itself in the menu
SETUP->INDICATOR.
5.1.11.4.1 Indicator setup on the LX80/90xx device
Numeric screen can be also set on the main display unit.
In setup you can define navboxes (four user customizable numbers) for each line separately.
They can be configured as:
Average vario, Time, Flight time, Task remaining time, Netto value, Outside temperature,
Altitude, Distance to goal, Arrival altitude, TAS, last 60 seconds speed, Altitude in ft, Flight
level, Thermal average, IAS, Voltage, Average netto, Height, Total altitude, Altitude IGC.
Vario or SC needle can be set to: Vario, Sc, Netto or Relativ.
All settings can be tested by pressing DEMO button. G force can be reset by RESET-G
button
Page 80 of 192
Page 81

Operating Modes Version 6.03, May 2017
The colours in the thermal assistant indicate below average (blue), average
(yellow), above average (red) and the strongest point of thermal (white).
5.1.11.4.2 Indicator setup on the indicator
All settings can be set on the vario/indicator device in the SETUP menu.
In setup menu it is possible to setup indicator settings, Flarm settings, Thermal assistant,
Graphics, Display settings, load Flarment files and see the about screen.
5.1.11.4.2.1 Indicator
Number of navboxes on the numerical page can be set here. Minimum is 1, maximum are 4
navboxes.
5.1.11.4.2.2 Flarm
Flarm alarms can be enabled or disable. The warning dismiss time can be set from 0 to 120
seconds.
5.1.11.4.2.3 Thermal Assistant Mode
There are three options for the thermal assistant, Auto Span, MacCready and Average Vario.
If Auto Span is selected then the Thermal Assistant will use the average performance
of the last circle to calculate below, average and above average climb and indicate
accordingly i.e. red bubbles for strongest lift and blue dots for weakest lift or sink.
If MacCready is selected then the Thermal Assistant will use the current MacCready
setting to show rate of climb below, MacCready and above the MacCready setting
If Average Vario is selected then the Thermal Assistant will use the average vario for
the flight to show the rate of climb below average vario, average vario and above
average vario.
Switch to Thermal Assistant Mode
It will change to the Thermal Assistant mode by the 2 methods:
SC to Vario mode switch
In circling (auto – when you start circling)
It can be also disabled, in this case there will be only 2 navboxes.
5.1.11.4.2.4 Graphics
Map, Flarm and Theme graphics can be defined in this menu.
Page 81 of 192
Page 82

Operating Modes Version 6.03, May 2017
Gauge
Inner
White
Black (default)
White
White
Black
White
Black
Black
5.1.11.4.2.4.1
Map
Option to set Track Up or North Up.
5.1.11.4.2.4.2
Flarm
Traffic on Map
Check the dialogue box to display Flarm objects on the screen.
Select Target on Map Only
There will be only the selected target on the map.
Colours
Colours can be set for the following:
Glider Above Colour
Glider Below Colour
Glider Near Colour
Selected target Colour
Label Text
On the map it is possible to show additional, related text next to the Flarm object.
This option can be set to None, Competition sign, Climb rate and Relative vertical.
Active Timeout
Adjusts the time a glider symbol remains on the map after it has last been seen by the
Flarm.
Inactive Timeout
Adjusts the time for inactive gliders on the Flarm target list. Inactive gliders are gliders
where the Flarm signal has been lost for a period longer than the Active timeout. The
targets become inactive and remain only in the Flarm target list for this time.
Draw Line to Selected Target
Check this option to enable or disable a line drawn to a selected Flarm target.
Draw History
Select if a trail is to be drawn behind Flarm targets to show where the targets have been.
Plane Icon size
To adjust the pixel size of Flarm targets.
5.1.11.4.2.4.3
Theme
With this dialogue you can change the background colour of the vario gauge and the inner
information circle, the user message transparency and NavBox transparency.
Colour style – Gauge: Inner
With this dialogue you can change the background colour for the vario gauge (Outer ring)
and the background of the information circle within the gauge. You have the choice of the
following:
Page 82 of 192
Page 83

Operating Modes Version 6.03, May 2017
5.1.11.4.2.5 Display
Automatic Brightness
If the Automatic Brightness is checked then the brightness will be automatically adjusted
between the minimum and maximum parameters set. If the Automatic Brightness is
unchecked then the brightness is controlled by the brightness setting.
Minimum Brightness
Use this slider to adjust the minimum brightness for the Automatic Brightness option.
Maximum Brightness
Use this slider to adjust the maximum brightness for the Automatic Brightness option.
Get Brighter In
The user can specify in which time period the brightness can reach the required brightness.
Get Darker In
The user can specify in which time period the brightness can reach the required brightness.
Brightness
With the Automatic Brightness unchecked you can set the brightness manually with this
slider.
Night Mode Darkness
Set the percentage of the brightness to be used after a press on the NIGHT mode button.
5.1.11.4.2.6 Files
The Files menu allows you to upload FlarmNet database.
5.1.11.4.2.7 Password
There are several system passwords which run specific procedures as listed below:
RESET TO FACTORY DEFAULT 00666
AUTO ZERO 01043
REPORT TO SD CARD 00111
FORMAT INTERNAL MEMORY (all data will be lost) 32233
To enter the code, you have to select the number and long hold the lower push button.
Repeat the procedure also after entering the last number.
5.1.11.4.2.8 ABOUT
Information about software versions of indicator’s part and the sensor box.
Page 83 of 192
Page 84

Operating Modes Version 6.03, May 2017
Vario indicator
needle
MacCredy setting
Last thermal average
Red diamond
Needle type
Wind vector
GPS status
Battery
Lower selectable
navboxes
Range/units
Upper selectable
navboxes
Climb/cruise
Flarm status
Speed to fly bar /
Flaps tape/ Speed
tape/ Flaps &
Speed tape
Yellow Bar (Min/Max
vario or Min/Max g-
5.1.11.4.3 Numerical (navbox) Mode
Defaults are 4 NavBoxes: Average Vario, Netto, Altitude and True Airspeed. In addition, the
central line shows the status of the Flarm, GPS, Cruise/Climb and battery status.
The Vario Needle can display: the Vario, Netto, Relative or Speed to fly value
(Setup->Hardware->Indicator). The scale can be chosen in the range of +/5 +/-10 or +/-20 (in SETUP-> Vario Parameters). Within the software the
range can be set to m/s, kts, km/h, mph or fpm (in Setup, Units, Vertical
speed)
The Speed to fly bar symbol indicates which speed you have to fly relative
to the current MacCready setting, sink rate and speed. One arrow means 10
units of speed faster or slower. Up red arrows mean fly slower and down
blue arrows mean fly faster. It can be also set to Flaps tape, / Speed tape
/ Flaps & Speed tape
The Red diamond symbol can show Netto, Average Netto, Average vertical
speed or G-force.
The Blue arrow symbol shows the current MacCready value.
The Green T symbol represents last thermal average value.
The Yellow Bar can show Max and Min values of vario over defined time
(average vario) or G meter (over whole flight).
The Flarm Status symbol indicates the presence of a Flarm unit (grey), if
the Flarm receives any data from other Flarm units, the symbol becomes red.
The GPS symbol is green when GPS status id is OK, and red when GPS status
is bad. If GPS data is not detected, the symbol will disappear.
All these parameters can be set/adjusted on the LX80/90xx device at: SETUP->HARDWARE>”V8/V80/I8/I80” indicator SN:xxxxx.
Page 84 of 192
Page 85

Operating Modes Version 6.03, May 2017
The Pitch offset can be adjusted in the AHRS menu on the LX80/90xx device.
For competitions the artificial horizon can be disabled on the LX80/90xx device in
the AHRS menu. When the artificial horizon page is active a BFION event is
written to recorded flight for verification purposes.
5.1.11.4.4 AHRS Mode
To activate AHRS an activation code must be purchased.
The AHRS option can be activated on the LX80/90xx. For more information refer to:
5.1.11.11.
5.1.11.4.5 Flarm radar display
Flarm Mode will display a map of the relative positions of Flarm targets that are within
range. When you press either the upper or the lower button, you can see focus on ID
or zoom. Press on the middle button will move focus from one to the other.
Pressing up/down (upper/lower) buttons, when focus is active, will can change the
zoom level or switch between the active targets.
Data from a selected Flarm object can be seen in 4 corners, such as: Flarm Id, Distance,
Vario and Relative altitude (Above / Below). There is also an indication of how many Flarm
objects are present displayed as: TX/number.
5.1.11.4.5.1 Flarm Warnings
Regardless of which Mode you are in, if a Flarm target triggers an urgent (third warning
level) or important (second warning level) warning then the screen will change to the Flarm
warning mode automatically.
Page 85 of 192
Page 86

Operating Modes Version 6.03, May 2017
Extract from the Flarm manual:
Warnings are given in order of the time remaining before a potential collision, not the geometrical
distance. The first warning level for another aircraft or an obstacle is delivered at less than 19 - 25
seconds before the possible collision; the second warning level is delivered at less than 14 - 18
seconds before; the third level at less than 6 - 8 seconds before.
The central number and chevrons indicate if the Flarm target is below or above and by how many
meters/feet. The number in the bottom right indicates the range in meters/feet.
The numbers are related only to the closest or the most dangerous target.
5.1.11.4.6 Thermal assistant Mode
The Thermal Assistant mode displays a graphical representation of your location within the
thermal. If you are thermaling to the left there will be an aircraft symbol on the right of the
ring of bubbles and the bubbles will appear to rotate clockwise (towards the symbol of the
glider). If you are in a right hand thermal there will be an aircraft symbol on the left and
the ring of bubbles will appear to rotate anticlockwise (towards the symbol of the glider).
Large red bubbles indicate the strongest lift within the thermal and small blue dots indicate
the weakest lift or sink within the thermal. Yellow bubbles indicate lift equal to your
MacCready setting, average thermal or average climb rate depending on your preferred
setting. The point of strongest lift is indicated by a white large bubble.
You can use the thermal assistant to visually determine which part of the thermal has the
strongest lift and adjust your turn accordingly to maneuver the glider in the direction of the
strongest lift and away from the weakest lift or sink.
The two NavBoxes within the Thermal assistant Mode can be configured on the LX80/90xx,
the first and second navbox lines.
Page 86 of 192
Page 87

Operating Modes Version 6.03, May 2017
LXNAV is highly recommending upgrading old LCD vario indicators to latest
technology vario indicator unit. Please contact local dealer or LXNAV for more
details.
5.1.11.5 LCD and USB-D Vario indicator*
This is type of the older vario indicator. An LCD vario indicator or USB-D vario indicator
consists of:
Needle
Two numerical displays (upper and lower).
Labels and indicators.
These following functions can be set (see next picture):
Needle: vario needle (Vario, SC, Netto or Relative).
SC Ring: Displays speed command at all times.
Upper Numeric Display: Integrator, time, flight time, task remaining time. Upper line;
the parameter displayed can be configured in both Vario and SC modes.
Vario Mode Indicator: Shows current flight mode (vario or speed command).
Lower Numeric Display: Altitude (NN altitude), Distance (distance to the navigation
point), Glide diff. (final glide altitude difference), Speed (TAS), Leg speed (speed on
leg), QNH (ft) (NN altitude in ft), Flight levels. Lower line; the parameter displayed can
be configured in both Vario and SC modes.
The labels will automatically be displayed depending on the current function. The BAT
warning will be displayed when the supply voltage is below 11 volts.
5.1.11.6 Bridge 232*
Bridge 232 is an external device which is sold separately and is used to output NMEA data or
to connect radio or transponder to the system.
Page 87 of 192
Page 88

Operating Modes Version 6.03, May 2017
See installation manual for details on wiring of Bridge 232.
Once bridge 232 is plugged into 485 bus, Bridge Sn.:SNxxxx will appear in Hardware menu.
First functionality must be defined. Based on functionality, dialog will change and display
related items for selected functionality.
In NMEA output define baud rate at which NMEA sentences will be transmitted. Select
desired NMEA sentences. NMEA data is exactly the same as described in chapter 5.1.12.12.
Radio bridge is used to operate radio through main display unit. First type of connected
radio must be selected. At the moment following types are supported: KRT2, Trig TY91/92,
ATR833, Becker 620X. Support for other types is in progress. Please consult LXNAV for more
details.
Check Auto set target frequency, if you want to automatically select frequency, when
new target is selected in navigational mode. Ticking show target warnings will trigger
warnings generated from the device (example: radio is too hot).
Transponder bridge can operate the transponder with the main unit. Supported
transponders are: Becker BXP6402 and Trig TT21/22.
ICAO code, ID and SQUAWK could be set and send from LXxxxx device to the transponder.
It can also show target warnings from transponder.
Page 88 of 192
Page 89

Operating Modes Version 6.03, May 2017
Classical external flarm can be updated through the main device. Power flarm can
be updated only via USB key.
5.1.11.7 Flarm*
On the Flarm setup page, information about built in or external Flarm are visible.
Information like serial number, selected frequency, firmware version and database versions
are shown.
Press CLEAR button to delete all data on Flarm module. This will remove also obstacle
database.
If Flarm module is built in user can select operation mode. There are three different
operational modes available:
Power OFF - Flarm unit is switched off.
Power ON - Flarm unit is switched on.
Privacy ON - Flarm unit works in stealth mode. Other Flarm units will not receive
altitude and vario information concerning your glider. For collision warnings this mode
has no influence.
If there is no Flarm module built into the main display unit, then instead of operation mode
combo box, Baudrate selection will be displayed
Freq shows selected frequency depending on the continent, where system is located. Flarm
Frequency is automatically updated based on the current continent.
Port defines serial interface through which Flarm data are being received.
Internal is default setting and indicates that internal Flarm will be used, if installed this
option.
Ext. (Colibri) (only on LX8000 old model)– Use this mode, when you want to receive
external Flarm data through Colibri port on back side. (For example, if TRX1090 is
connected to LX8000.)
Ext. (PC) – Use this mode, when you want to receive externally connected Flarm on PC
port
Flarm – port is available on selected devices only and means that Flarm input will be
via port labelled Flarm.
GPS – port is available on simple type of devices only and means that Flarm input will
be via port labelled GPS.
See installation manual and Chapter 10.1 for more details.
Device ID shows the Flarm unique ID, which is transmitted to other FLARMs.
Page 89 of 192
Page 90

Operating Modes Version 6.03, May 2017
If you are flying in a competition it is sufficient to turn on Competition mode.
However if you do not want other aircraft to see you, you should switch mode to
Privacy ON.
We recommend you sign in at FLARMNET.org. This is free of charge. Registering
with FLARMNET allows others to see you not only with Device ID but also with
your contest number and name. Refer to Chapter 6.2.1.9.
Flarm internal number can be seen in the last row, next to the current SW
version. Internal number will not appear immediately after powering on the main
device, it can take up to 5 minutes. Internal flarm number can be also seen from
the IGC file.
It is very important that compass is installed away from power cables, other
compasses, speakers and all other magnetic components in the aircraft. Keep
maximum possible distance to such components (at least 30cm).
Competition mode is intended only for competitions. If this mode is enabled the pilot will
not be able to see any Flarm data on the navigational screens. The competition mode
status is recorded in the IGC file and can be checked during scoring.
Reduce warnings will significantly reduce Flarm warnings. Use this option if you are flying
in gaggles or areas with high density of other aircraft.
Send declaration check box is available only when external Flarm is connected. Check this
option, if you want that task declaration is automatically transferred to Flarm.
No tracking will disable tracking mode. If set, receiving ground stations do not process or
store position data of aircraf
You can also see your flarm serial number, version and obstacles loaded (if they are
loaded).
5.1.11.8 Compass*
When a compass is connected to the system use this menu to perform calibration of it.
Before calibration, please make sure that compass is installed properly. Refer to compass
and installation manual for more info about installation.
Page 90 of 192
Page 91

Operating Modes Version 6.03, May 2017
Compass will be enabled if check box Enable compass is ticked. If you would like to
perform in-flight calibration, check Enable in-flight calibration. It is not recommended to
do in-flight calibration in very turbulent conditions.
Press ALIGN button to align compass with AHRS, which is built-in V9/V8/V80 vario. When
installing compass, please make sure to align it as much as possible with V9/V8/V80
variometer. Deviation of few degrees is tolerated. When aligning compass with AHRS it is
important that cabin is closed and glider is not moving. Message will be displayed on screen,
when aligned.
Press CALIB button to start calibration of compass on the ground. Calibration process I very
straightforward. Make sure glider fuselage is levelled (use tail dolly), wings are levelled and
canopy is closed with pilot inside. Switch on all the avionics, which is normally switched on
while flying. Confirm calibration of compass to start calibration process. Assistant on the
wing should slowly rotate glider with wings levelled.
Page 91 of 192
Page 92

Operating Modes Version 6.03, May 2017
If compass is not calibrated, wrong wind calculation is made which also has an
influence on final glider parameters.
Keep rotating glider until progress reaches 100%. Calibration will automatically exit and
compass calibration is finished. Check compass directions afterwards, they should be within
+/-2 degrees. Press PTT on radio to see if there is any deviation in magnetic heading.
If more error is observed, install compass in different place and repeat calibration
procedure.
5.1.11.9 Rear Seat or Front Seat
In a two-seat configuration with the rear seat device it is possible to transfer selected data
between the front and rear seat device. Use this menu to define which data will be
automatically received from the other device.
Data are divided into two groups; flight parameters and navigational data. If a specific
value is checked this value will be automatically received from the other device.
Check MacCready, Ballast or Bugs to receive current MacCready value, current ballast
setting or bugs from other device.
If the Waypoint checkbox is checked a new waypoint target will be automatically assigned
when the user changes the waypoint target on other device. The message
received”
will be displayed on the screen and you will be navigating to the same waypoint as
“Waypoint target
Page 92 of 192
Page 93

Operating Modes Version 6.03, May 2017
When flying an assigned area task it is worth not having the task checkbox
checked. This will allow one pilot to play with “what if” scenarios. Once a proper
direction is found you can send the task to the other device using the SEND
action in task mode.
other device. Please note that it is not necessary to have this waypoint in your databases as
the complete waypoint information is transferred.
If the Waypoint checkbox is not checked it is still possible to send a target to the other
device using the SEND action in waypoint mode.
The same applies to the Airport checkbox. The message
“Airport target received”
is
displayed.
If the Task checkbox is checked the task will be synchronised with the other device.
5.1.11.10 Remote stick*
When a remote stick is connected to the system, it is possible to define type of remote stick
via this menu. In case LXNAV remote stick with six buttons is connected, user can specify
functionality of function button. There are several options available for function button:
SC toogle button will toggle variometer between speed to fly mode and vario
mode.
Vario priority will temporary put variometer in vario mode regardless of other
setting for speed to fly.
Toggle vario range will toggle between vario range 2.5m/s, 5m/s or 10m/s.
VOLUME will call volume menu on screen.
Toggle map settings will toggle between two stored map settings.
Toggle thermal mode will enter thermal mode or exit thermal mode.
SELECT will call airport select menu or waypoint select menu or task edit depending
on current navigational page.
MC/BAL will open MacCready and ballast dialog.
MAP will open map properties dialog.
WIND will open wind selection dialog.
AIRSPACE will open airspace zones dialog.
MARK will create a waypoint or marker at current position.
FLARM will display a list with all Flarm objects in vicinity.
PAN will set navigational screen into pan mode.
EVENT will mark an event into recorded IGC file
ROT.FAI will rotate FAI triangle area, if shown on navigational screen.
TEAM opens dialog to enter team partner code.
Page 93 of 192
Page 94
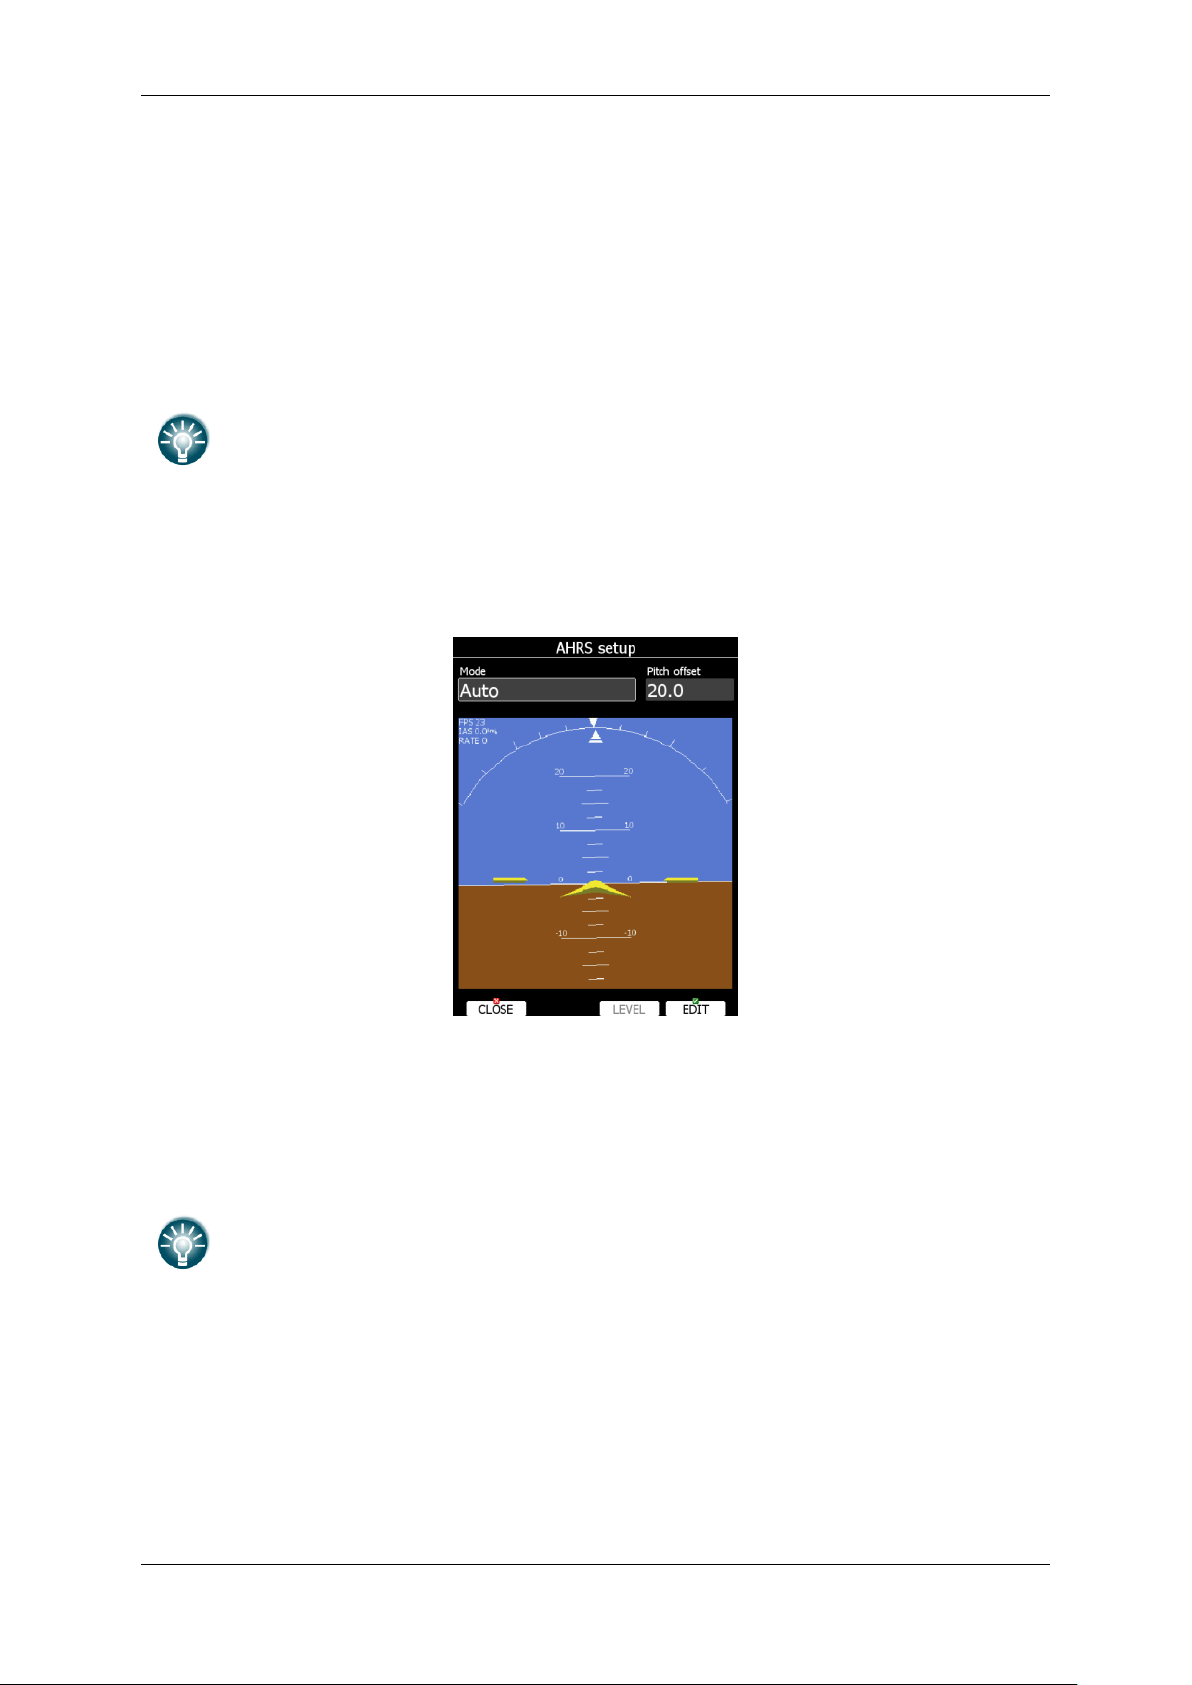
Operating Modes Version 6.03, May 2017
To activate Function button press FN on remote stick and the field in the menu
will become active, same procedure is for the Front SC button.
AHRS option is not enabled in the regular order. Option must be additionally
purchased.
Radio will call radio menu on screen.
Transponder will call transponder menu instantly on screen.
Screenshot will make a screenshot.
On remote sticks from 2016 and onward there are two function buttons available. Also SC
button in front of stick is available for any of above functions.
Check Use stick for front seat if there are two remote sticks installed and system without
rear seat device (e.g. Pipistrel Taurus, Stemme)
5.1.11.11 AHRS*
When AHRS device is connected to the system or AHRS option on V9/V8/V80 is enabled, this
menu is used to calibrate AHRS for installation error.
Place you glider in levelled position and press LEVEL button. You can also modify pitch
offset, if you rotate PAGE selector knob. More detailed can be pitch set using pitch offset
spin control.
Mode defines modes of operation of AHRS. AHRS can be switched to OFF mode. This will be
shown in the IGC file as a BFI sentence. If the AHRS is active there will be written BFION
Page 94 of 192
Page 95
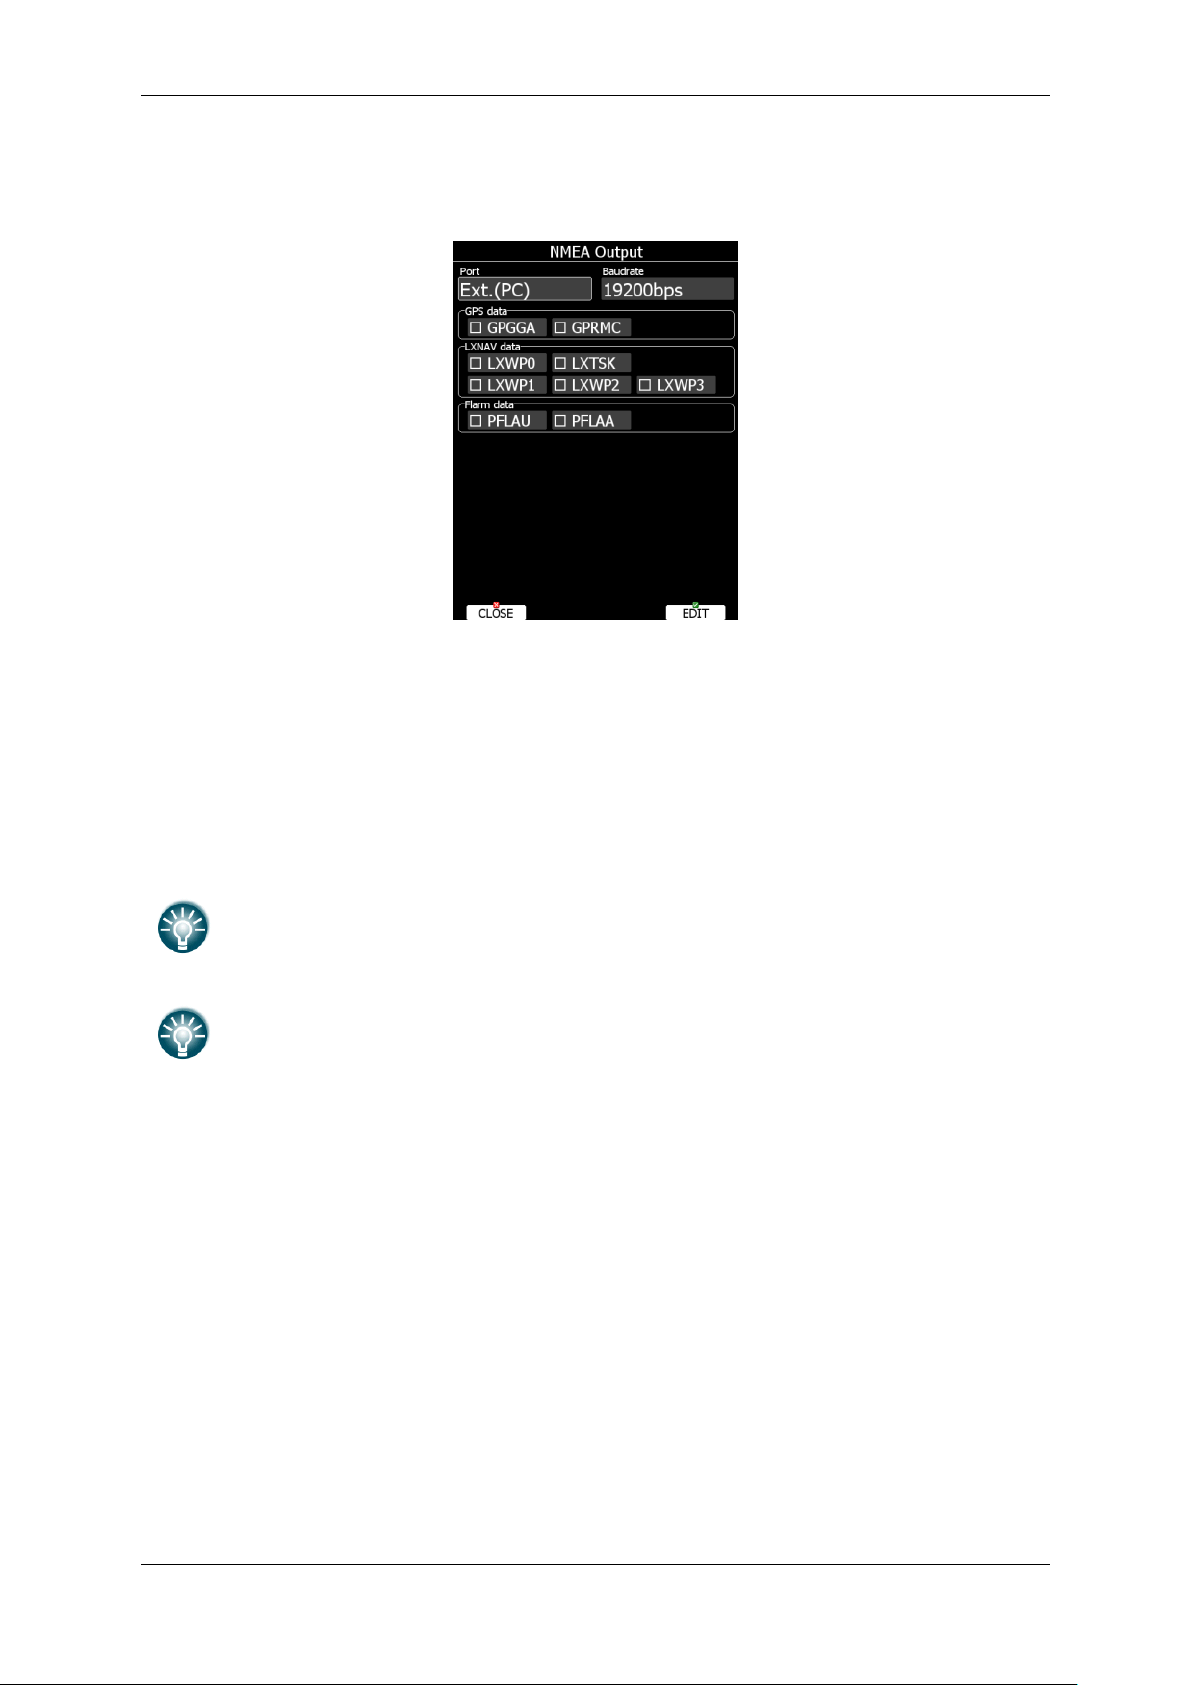
Operating Modes Version 6.03, May 2017
PDA can be connected to the LX80/90xx system through the NMEA bridge or on
the EXT.(PC) port.
NMEA data is available also on Flarm display port on main display unit and rear
display unit at 19200bps. However only Flarm data and GPS data.
5.1.11.12 NMEA Output
The main display unit is capable of transmitting position data sentences in NMEA format for
use by other devices.
Port defines on which serial interface data will be transmitted. Baud rate defines
transmission speed. Data is divided into three groups:
GPS data will output all GPS-related data such as time, longitude and altitude.
LXNAV data will output all variometer-related data such as vario, MacCready and
ballast.
Flarm data will output all Flarm-related data.
5.1.11.13 Engine *
Use this menu, when the system is installed into glider with engine. The current engine
noise level is shown as a progress bar. If external MOP sensor is installed also MOP level
will be shown.
Page 95 of 192
Page 96

Operating Modes Version 6.03, May 2017
Threshold setting has no influence on the flight recorded file, it is only important
for the statistics on the instrument, it sets when the engine is recognized, which
resets statistics.
Set Threshold to define when engine is running. By default threshold is set to 100%, which
means no engine run will be detected. Lower this value to approximately 80% to detect
engine running. Engine total time will be accumulated and displayed in total time box. If
necessary, total time can be adjusted, to match current engine total time. High ENL starts
logger will start the flight recorder, if this option is enabled.
5.1.11.14 Network*
When Wi-Fi option is available, this menu will setup all the parameters for network. Wi-Fi
can be turned ON all the time, on ground only or off completely. Use Wi-Fi state to define
state. SMTP Settings are used to configure server for sending email. It is recommend to
leave it as LXNAV, however user server can be configured. More options will be displayed in
case of other type of server. Flights can also be stored to SeeYou Cloud for which you have
to insert the key of the cloud. Auto upload will automatically upload flights to the SeeYou
Cloud.
Press LIST button to view list of all available networks. Use VIEW button to view more
details about selected network. When connected to a network, item will get blue color.
Page 96 of 192
Page 97

Operating Modes Version 6.03, May 2017
Press SCAN to scan for new networks. Use EDIT to enter password for selected network
and to connect to it.
Use preferred Wi-Fi network option, if you would like to connect to this network only. Press
CONNECT to connect to this network and press FORGET to forget this network.
Page 97 of 192
Page 98

Operating Modes Version 6.03, May 2017
5.1.11.15 Flaps*
When flap sensor is installed, use this menu to set flaps position. Use page selector to select
desired flap position. Press SET button to set position. Continue with procedure for all flap
positions.
When all flap positions are set, a green dot will be displayed with current flap position.
If flap labels are not set yet, press EDIT button to name flap label. Flap labels must me
entered with increasing speed range. It is recommended that flaps labels are set together
with speed range in Polar and Glider setup. See Chapter 0 for more details.
It is also possible to toggle between cruise and climb mode using flap sensor in this case
there is no need to define digital input for SC.
5.1.11.16 Battery Types*
This menu defines type of battery being used. Selecting type of battery is important in order
to correctly show low battery warnings.
Use Type combo to select appropriate type of battery (Lead Acid, LiFe, LiPo, custom). You
can see empty, low and full voltage for the selected type of battery. In case of voltage drop,
because of cable lengths, you can set up voltage offset there to the current voltage
measured.
Page 98 of 192
Page 99

Operating Modes Version 6.03, May 2017
5.1.12 Polar and Glider*
Use this dialogue to enter glider polar and other properties of glider. As default polar a
standard class glider is selected.
Polars for most modern gliders are already prepared. Press the LIST button and a dialogue
with a list of all available gliders will be shown.
Select the required glider using the PAGE selector knob and press the SELECT button. All
glider data will be copied from the chosen polar. You may quickly check the best glider ratio
and minimum sink rate to see if the polar data matches the glider performance. You can
modify the polar by changing coefficients a, b and c. A polar is defined as a quadratic
equation with the parameters a, b, and c. Use the LX-Polar program to calculate coefficients
a, b and c for a given glider’s polar. The program requires at least three sink points entered
at selected speeds (e.g.: 100 km/h, 130 km/h, and 150 km/h). The program will calculate
the values of a, b and c, which should be noted and entered into the system.
You can download program free of charge from www.lxnav.com
Weights must be entered if user enters ballast in kilograms. There are three weights to
enter. Ref.weight corresponds to the Ref.load value and represents the value at which
the polar was measured or recalculated. Reference weight or reference wing load value will
be automatically recalculated based on Wing area property. Max.weight is the maximum
take-off weight allowed for a glider. It is not used in the calculation; it is just a reminder to
the pilot of the maximum take-off weight. Empty weight is weight of the glider without
pilot and ballast. The overload factor is calculated as:
Page 99 of 192
Page 100

Operating Modes Version 6.03, May 2017
weightgliderREFERENCE
ballastWaterweightPilotweightgliderEmpty
overload
..
....
Pilot weight is set in the Flight recorder menu (see Chapter 5.1.2).
Ballast dump rate is used for calculation of water dump rate. If dump rate is specified and
water dump input is installed, system can measure amount of dumped water and thus
automatically adjust ballast. Use this table to specify dump rate for a selected amount of
water. At least one point must be entered. If there is only one point, it means dump rate is
constant all the time.
Press SPEEDS button to enter speeds dialog. In this dialog all speed for glider and flap
labels are set. Speeds should be given for a reference weight. Stall speed is used to
generate stall warnings which are available only with the LX Voice module. For aircraft with
flap, it is also recommended to enter flap position labels and speed range for corresponded
flap position. Speed range shall be given for reference wing load or reference weight.
Once speed range is entered, the system will be able to display requested flap position
based on current wing loading and g-factor.
5.1.13 Profiles and Pilots
All settings and navigational page layouts are stored in a profile. Profiles can be used in
different ways:
For club operation or multiple pilots sharing the same glider. Each pilot can have his
personal profile.
When the user is flying a glider which can have a different wing spans. In this situation
the pilot has two profiles, one for each configuration.
When a pilot is flying in several different locations. A separate profile for each location
can be created (examples: France, Spain, Namibia, WGC2014).
Profile consists of two parts:
Navigational page layout defines which navboxes and symbols are visible on
navigational page. It defines colour of navboxes, font sizes and colours, how many
navigational pages are visible and which modes are enabled. Navigation page layout
can be setup with LX Styler or on device itself (See chapter 6).
Device settings includes glider polar, selected databases, selected airspace and
waypoints file, map colours, vario indicator settings and flight computer properties.
Device settings can be modified on device itself through setup menu (See
chapter 5.1) or with LX Styler.
An active profile is selected when the system is powered on (see Chapter 7.1.2).
Page 100 of 192
 Loading...