

Page 1

VX8 Kärv Cradle Reference Guide
LXE | TRUX | Vehicle Mount Computer
E-EQ-VX8DKRG-B
2010 Copyright© by LXE®, Inc, An EMS Technologies Company. All Rights
Reserved.
Page 2

Notices
LXE Inc. reserves the right to make improvements or changes to published VX8 information at any time without notice. While
reasonable efforts have been made in the preparation of this publication to assure its accuracy, LXE assumes no liability
resulting from any errors or omissions in this publication, or from the use of the information contained herein. Further, LXE
Incorporated, reserves the right to revise this publication and to make changes to it from time to time without any obligation to
notify any person or organization of such revision or changes.
Trademarks
Copyright © 2010 by LXE Inc., An EMS Technologies Company, 125 Technology Parkway, Norcross, GA 30092 U.S.A. (770)
447-4224
LXE® and Spire® are registered trademarks of LXE Inc.
Microsoft®, ActiveSync®, MSN, Outlook®, Windows®, Windows Mobile®, the Windows logo, and Windows Media are
either registered trademarks or trademarks of Microsoft Corporation in the United States and/or other countries.
Intel and Intel XScale are trademarks or registered trademarks of Intel Corporation or its subsidiaries in the United States and
other countries.
Summit Data Communications, Inc. Summit Data Communications, the Summit logo, and “The Pinnacle of Performance” are
trademarks of Summit Data Communications, Inc.
The Bluetooth® word mark and logos are owned by the Bluetooth SIG, Inc. and any use of such marks by LXE, Inc. is under
license.
PowerScan is a registered trademark of Datalogic Scanning, Inc., located in Eugene, OR.
Symbol® is a registered trademark of Symbol Technologies. MOTOROLA® and the Stylized M Logo are registered
trademarks of Motorola®, Inc.
Hand Held® is a registered trademark of Hand Held Products, Inc., located in Skaneateles Falls, NY.
When any part of this publication is in PDF format: “Acrobat ® Reader Copyright © 2010 Adobe Systems Incorporated. All
rights reserved. Adobe, the Adobe logo, Acrobat, and the Acrobat logo are trademarks of Adobe Systems Incorporated”
applies.
Other product names mentioned within this publication may be trademarks or registered trademarks of other companies.
Page 3

Lithium Battery Safety Statement
Caution: Lithium battery inside. Danger of explosion if battery is incorrectly replaced. Replace only with same or equivalent
type recommended by battery manufacturer. (US)
Attention: Contient une pile de lithium. Risque d’explosion dans le cas où la pile ne serait pas correctement remplacée.
Remplacer uniquement avec une pile semblable ou equivalente au type de pile recommandé par le fabricant. (FR)
Forsigtig: Indeholder lithiumbattterier. Risiko for eksplosion, hvis batteriet udskiftes forkert. Må kun udskiftes med samme eller
tilsvarende type, som anbefalet af fabikanten. (DK)
Varoitus: Tämä tuote käyttää laservaloa. Skannerissa on jokin seuraavista tarroista. Lue Huomio-kohta. (FI)
Vorsicht: Enthält Lithium-Batterie. Bei unsachgemäßem Ersatz besteht Explosionsgefahr. Nur durch gleichen oder vom
Hersteller empfohlenen Typ ersetzen. (DE)
Attenzione: Batteria al litio. Pericolo di esplosione qualora la batteria venga sostituita in maniera scorretta. Sostituire solo con
lo stesso tipo o equivalente consigliato per il fabbricante. (IT)
Atenção: Contém pilha de lítio. Há perigo de explosão no caso de uma substituição incorreta. Substitua somente pelo mesmo
tipo, ou equivalente, recomendado pelo fabricante.
(PT) Varning: Innehåller litiumbatteri. Fara för explosion om batteriet är felaktigt placerat eller av fel typ. Använd endast samma
eller motsvarande typ batterier rekommenderade av tillverkaren. (SE)
Advarsel: Innmontert Lithium batteri. Eksplosjonsfare ved feil montering av batteri. Benytt kun batteri anbefalt av produsent.
(NO)
Cuidado: Pila de litio adentro. Peligro de explosión si la pila se reemplaza incorrectamente. Reemplace solamente con el
mismo tipo o equivalente recomendado por el fabricante. (ES)
Oppassen: Bevat Lithium-batterij. Incorrrecte plaatsing van batterij kan leiden tot explosiegevaar. Alleen vervangen door
hetzelfde of door fabrikant aanbevolen gelijkwaardig type. (NL)
Page 4
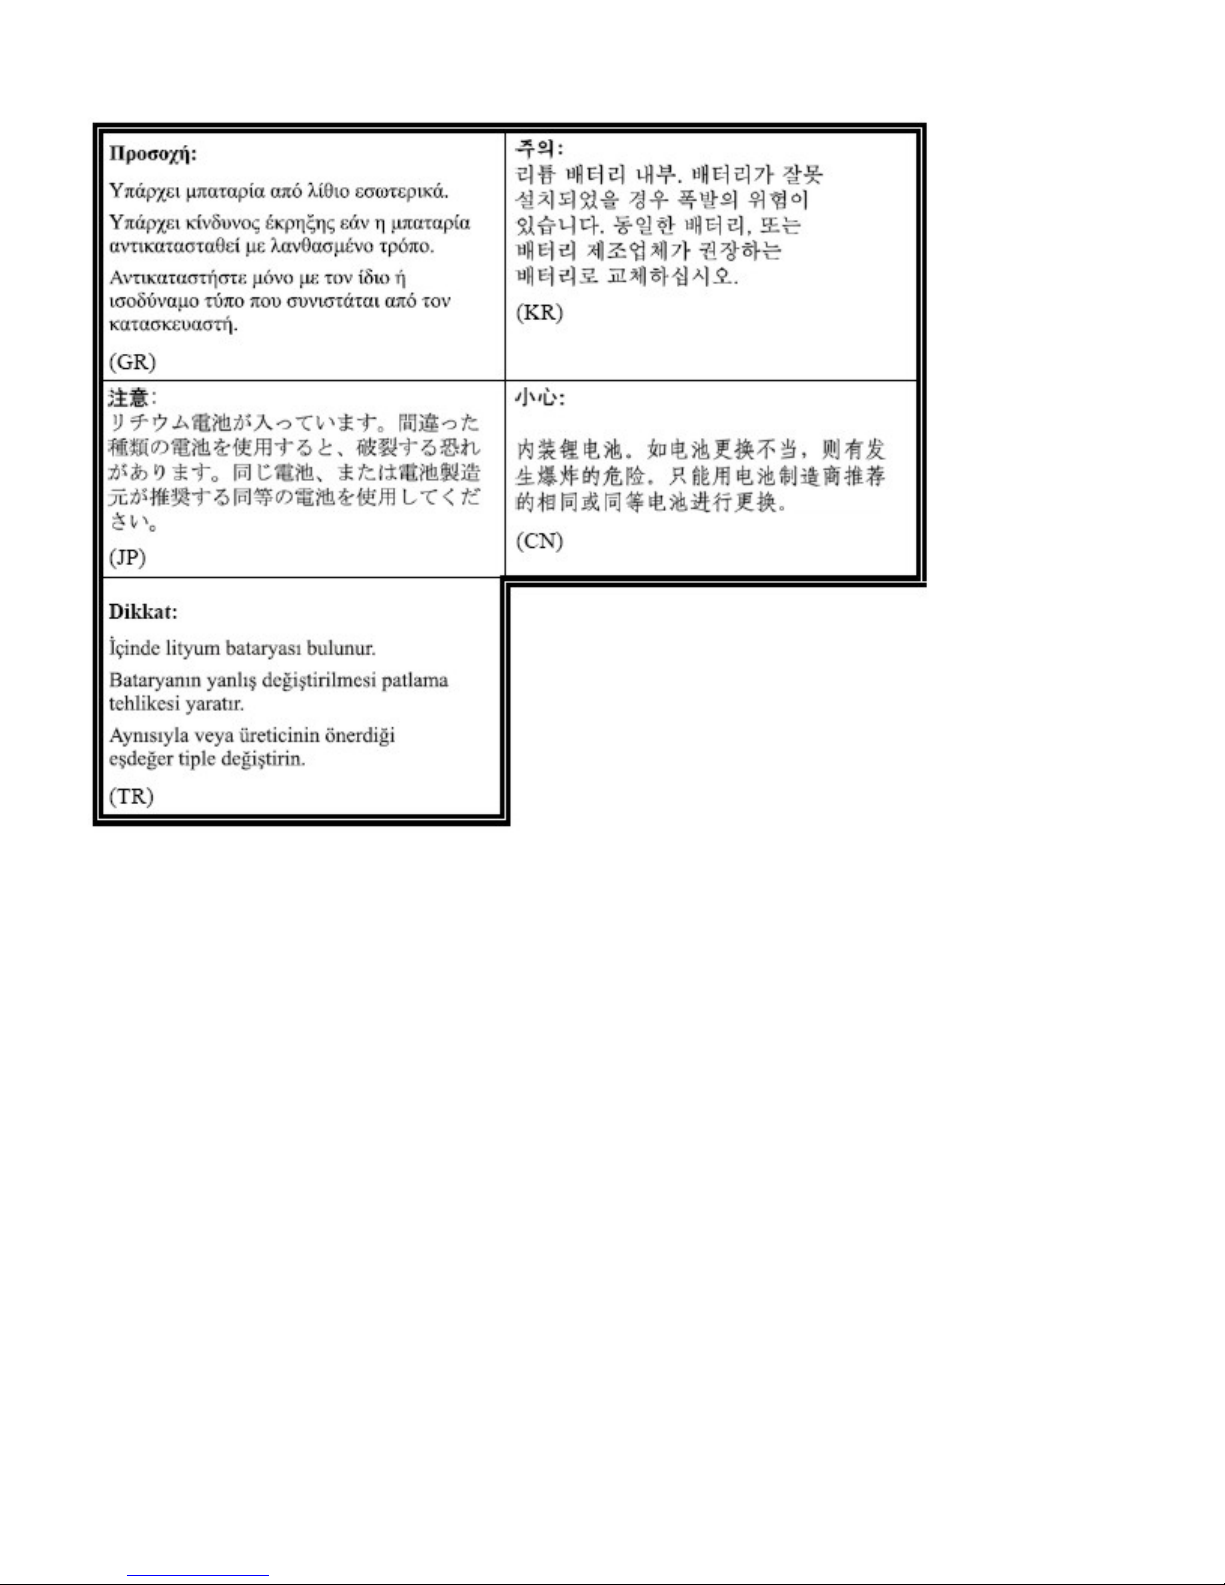
Legend: Danish – DK; English – US; Finnish – FI; French- - FR; German – DE; Greek – GR; Italian – IT; Norwegian – NO;
Portuguese – PT; Spanish – ES; Swedish – SE; Turkish – TR.
Page 5

Vehicle Power Supply Connection Safety Statement
Vehicle Power Supply Connection: If the supply connection is made directly to the battery, a five A slow-blow fuse should be
installed in the positive lead within 5 inches (12.7 cm.) of the battery positive (+) terminal. (US)
Raccordement de l’alimentation du véhicule Si l’alimentation est raccordée directement à la batterie, un fusible à action
retardée de 5 A doit être installé sur le câble positif à moins de 12,7 cm de la borne positive (+) de la batterie. (FR)
EL forsyning af køretøjet. Er forsyningsforbindelsen direkte tilknyttet til batteriet og og tilsluttet til den positive part indenfor
12,7 cm (+ delen). vil der være en langsom tændelse af 5 ampere. (DK)
Kytkentä ajoneuvon virtalähteeseen Jos virtaa otetaan suoraan akusta, 5 ampeerin hidas sulake on asennettava positiiviseen
johtoon enintään 12 cm:n etäisyydelle akun positiivisesta (+) navasta. (FI)
Anschluss an Fahrzeugbatterie Bei direktem Anschluss an die Fahrzeugbatterie sollte eine träge 5 A-Sicherung in die positive
Leitung zwischengeschaltet werden, und zwar nicht weiter als ca. 13 cm von der positiven (+) Batterieklemme entfernt. (DE)
Σύνδεση Τροφοδοτικού Ισχύος Οχήματος Αν η σύνδεση του τροφοδοτικού γίνει κατευθείαν στη μπαταρία, μια ασφάλεια
βραδείας τήξης των 5 A θα πρέπει να τοποθετηθεί στο θετικό καλώδιο εντός 5 ιντσών (12,7 εκ.) του θετικού (+) ακροδέκτη της
μπαταρίας. (GR)
Collegamento dell’alimentazione del veicolo Se il collegamento dell’alimentazione viene stabilito direttamente con la batteria, è
necessario installare un fusibile ad azione lenta da 5 A nel conduttore positivo a meno di 5 in. (12,7 cm) dal terminale positivo
(+) della batteria. (IT)
Tilkople strømforsyningen til kjøretøyet Hvis strømforsyningen koples direkte til batteriet, skal det installeres en 5 A treg
sikring i den positive ledningen innen 12,7 cm fra plusspolen (+) på batteriet. (NO)
Ligação do fornecimento de corrente do veículo Se a ligação de fornecimento de corrente for ligada directamente à bateria,
deve instalar-se um fusível de 5 A no terminal positivo, a 12,7 cm. do terminal positivo (+) da bateria. (PT)
Conexión de suministro eléctrico para el vehículo Si el suministro eléctrico se proporciona directamente a la batería, se debe
instalar un fusible de retardo de 5 A en el conductor positivo, como máximo a 12,7 cm (5 pulgadas) del terminal positivo (+).
(ES)
Fordonets strömförsörjningskoppling Om strömkopplingen görs direkt till batteriet, måste en 5 A-säkring installeras i den
positivt laddade ledningen inom 12.7 cm från batteriets pluspol (+). (SE)
Taşıt Güç Kaynağı Bağlantısı Kaynak bağlantısı doğrudan aküye yapılırsa, pozitif bağlantı kablosu üzerinde akünün pozitif (+)
kutbuna 12.7 cm mesafede 5 A’lık yavaş atan bir sigorta monte edilmelidir. (TR)
Legend: Danish – DK; English – US; Finnish – FI; French- - FR; German – DE; Greek – GR; Italian – IT; Norwegian – NO;
Portuguese – PT; Spanish – ES; Swedish – SE; Turkish – TR.
Page 6

Table of Contents
Powered Vehicle Mounting 1
Overview 1
Quick Start - Powered Vehicle Mounted Assembly 1
Briefly .... 1
RAM Mount Options 2
VX8 with single RAM ball option 2
VX8 with dual RAM ball option 2
Keyboard mounting options 2
Individual brackets 2
Install Mounting Brackets 3
Mounting Procedure 4
Step 1 – Mount Vehicle RAM Ball(s) 4
Step 2 – Prepare VX8 5
Step 3 – Attach Keyboard to Bracket 7
LXE Keyboards 7
Other Keyboards 7
Step 4 – Attach VX8 and Keyboard Assembly to RAM Base 8
Single RAM ball 8
Dual RAM balls 8
Completed Assembly 8
Removing the Port Lid 9
Connect Power Cable 9
DC to DC Power Supply Installation 10
Connecting Electrical Cables to Power Sources 10
Wiring Schematic 11
How To Connect Vehicle Electrical Connection 11
External AC Power Supply, Optional 13
Connect Antenna 15
External Antenna 15
Remote Antenna Installation Kit 16
802.11 Remote Mount Antenna 16
WAN Remote Mount Antenna 16
Typical Installation 17
Mounting Instruction 17
Securing Port Lid 18
Maintenance - Vehicle Mounted Devices 19
Cleaning 19
E-EQ-VX8DKRG-B [ i ] VX8 Cradle Reference Guide
Page 7

Table of Contents
Revision History 19
Index 20
E-EQ-VX8DKRG-B [ ii ] VX8 Cradle Reference Guide
Page 8

Powered Vehicle Mounting
Overview
Vehicle mounted brackets are specifically designed for vehicle mount applications. The vehicle mounted assembly restrains
the VX8 Kärv and isolates it from shock and vibration.
Overhead, dash and roof support pillar mounting is via a RAM Mount accessory which includes all the hardware required for
vehicle mounting.
In most cases, disconnect any power and peripheral cables from the VX8 before it is secured in the vehicle mounted assembly.
Never put the VX8 into the vehicle mounted assembly until the assembly is securely fastened to the vehicle.
Quick Start - Powered Vehicle Mounted Assembly
The powered vehicle mounted assembly should be secured to an area in the vehicle where it:
l Does not obstruct the driver's vision or safe vehicle operation .
l Will be protected from rain or inclement weather.
l Will be protected from extremely high concentrations of dust or wind-blown debris.
l Can be easily accessed by a user seated in the driver's seat while the vehicle is not in operation.
Briefly ....
1. Attach the vehicle mounting assembly to the vehicle.
2. Attach the cradle assembly to the vehicle mounting assembly.
3. Secure the VX8 in the mounted vehicle cradle.
4. Adjust the VX8 to the best viewing angle.
5. Connect any external or remote mount antennas.
6. Connect peripheral cables.
7. Secure the 12 VDC power connector from the vehicle mounted power supply to the Power port.
8. Secure all cables in strain relief cable clamps.
The VX8 in the powered vehicle mounted assembly is ready for use.
E-EQ-VX8DKRG-B [ 1 ] VX8 Cradle Reference Guide
Page 9

RAM Mount Options
RAM Mount Options
Several types of mounts are provided for the VX8. For a complete listing of mounting kits and the contents of each kit, please
refer to the VX8 & VX9 accessory catalog. Contact your LXE representative for catalog availability.
VX8 with single RAM ball option
If the VX8 is ordered with a single RAM ball, available mounting options include:
l Truck bracket with a single RAM ball (no keyboard mount provision)
l Truck bracket with a RAM ball for VX8 mount plus a RAM ball for keyboard mount
l RAM ball base with integrated keyboard bracket for back of VX8.
VX8 with dual RAM ball option
If the VX8 is ordered with dual RAM balls, available mounting options include:
l Truck bracket with a dual RAM balls (no keyboard mount provision)
l Truck bracket with dual RAM balls for VX8 mount plus a RAM ball for keyboard mount
Keyboard mounting options
They keyboard may be mounted using:
l Integrated keyboard bracket included in some single RAM ball mounting kits
l A RAM mount using the keyboard ball on some truck brackets
l A stand alone keyboard mount using a RAM ball attached to the vehicle
Individual brackets
l Many individual mounting brackets are also available.
E-EQ-VX8DKRG-B [ 2 ] VX8 Cradle Reference Guide
Page 10

Install Mounting Brackets
Install Mounting Brackets
Caution:
This device is intended to transmit RF energy. For protection against RF exposure to humans and in accordance
with FCC rules and Industry Canada rules, this transmitter should be installed such that a minimum separation
distance of at least 20 cm (7.8 in.) is maintained between the antenna and the general population. This device is
not to be co-located with other transmitters.
The following RAM balls are used to mount the VX8:
D-sized (2.25”) balls and arms
l Used to mount the VX8 when a single RAM ball is ordered on the back of the VX8. A D-sized ball is also used on the
truck.
C-sized (1.5”) balls and arms
l Used to mount the VX8 when dual RAM balls are ordered on the back of the VX8. A pair of C-sized balls is also used on
the truck.
l Keyboard brackets also use C-sized ball. A corresponding C-sized ball is either included as part of the VX8 mounting
bracket or mounted independently on the truck for the keyboard assembly.
E-EQ-VX8DKRG-B [ 3 ] VX8 Cradle Reference Guide
Page 11
Mounting Procedure
Mounting Procedure
Step 1 – Mount Vehicle RAM Ball(s)
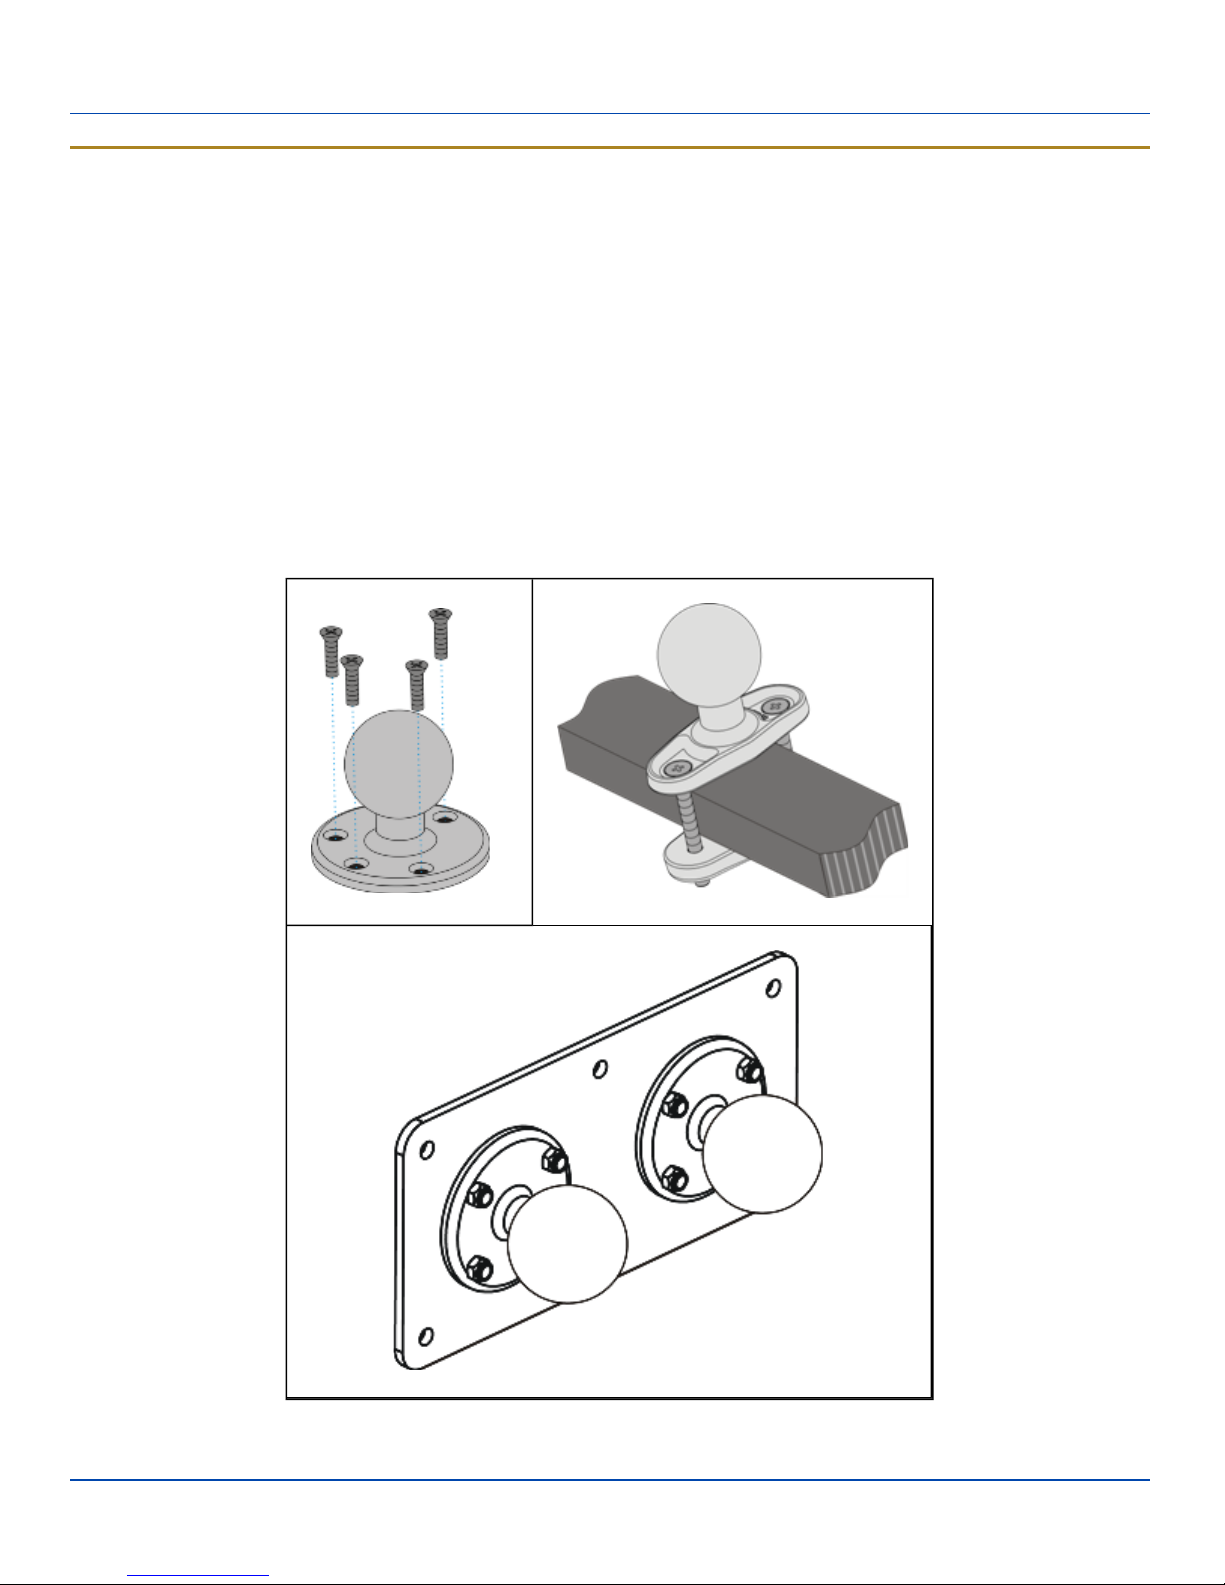
Determine the position for mounting the RAM ball(s). Be sure to position the RAM ball(s) to allow access to the switches and
ports on the bottom of the VX8.
Depending on the options ordered with the VX8, the RAM ball may be:
l A single or dual RAM ball mounted directly to the truck
l A single or dual RAM ball mounted to a plate. The plate then mounts to the truck.
l A single RAM ball integrated with a mounting plate
l A single or dual RAM squeeze clamp style ball
l A single or dual RAM pipe clamp style ball
Additionally, some mounting plates contain a provision for another RAM ball which is used to mount the keyboard.
Sample mounting options:
E-EQ-VX8DKRG-B [ 4 ] VX8 Cradle Reference Guide
Sample RAM Ball Mounting Options
Page 12
Step 2 – Prepare VX8
Step 2 – Prepare VX8
The VX8 is delivered with one or two RAM balls installed depending on the configuration ordered.
If an integrated keyboard bracket is to be mounted to the rear of the VX8, follow the procedure below. Otherwise, skip to the
next step.
1. The VX8 must be off and the power cord should not be attached during this procedure.
2. Place the VX8 face down on a stable surface.
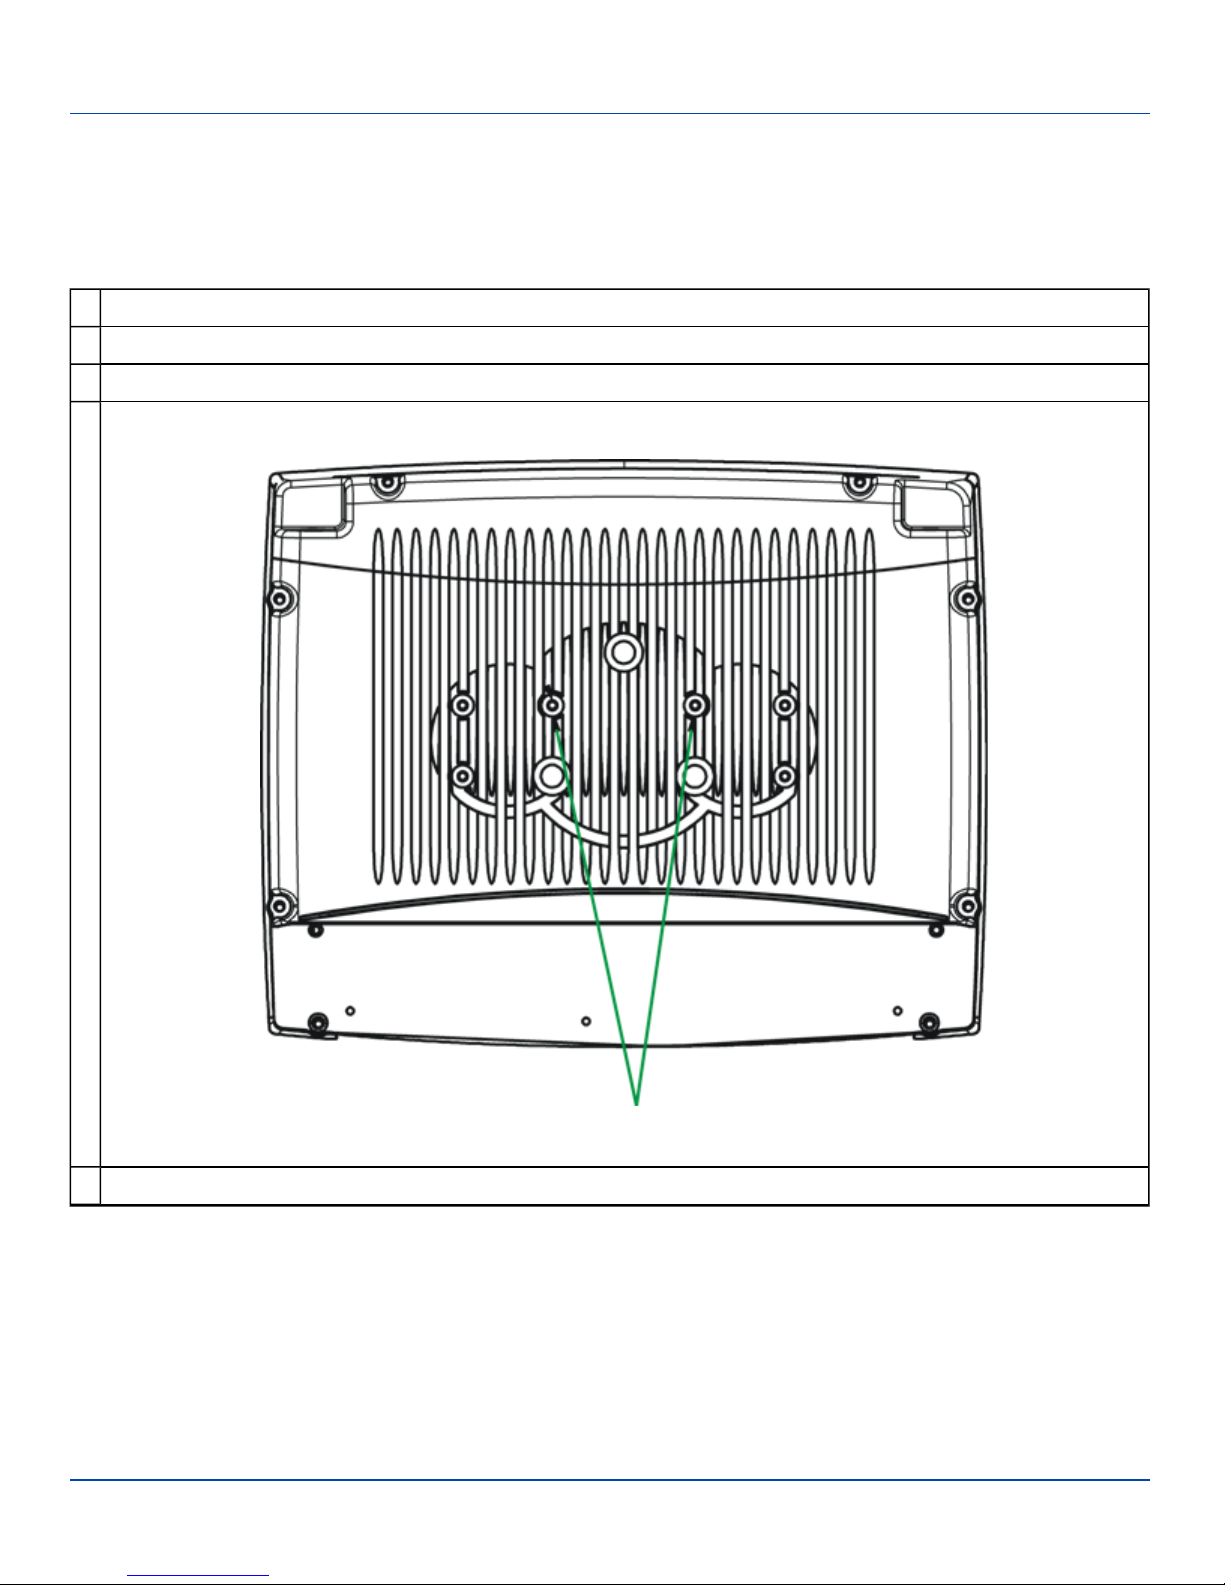
3. Remove the RAM ball from the back of the VX8. The hardware attaching the RAM ball is not reused.
Install the 2 M5x6 screws in the holes shown below.
4.
Screw Installation, VX8
5. Install the 1.5” (C-size) RAM ball on the keyboard bracket using four M5 locking nuts.
E-EQ-VX8DKRG-B [ 5 ] VX8 Cradle Reference Guide
Page 13
Step 2 – Prepare VX8
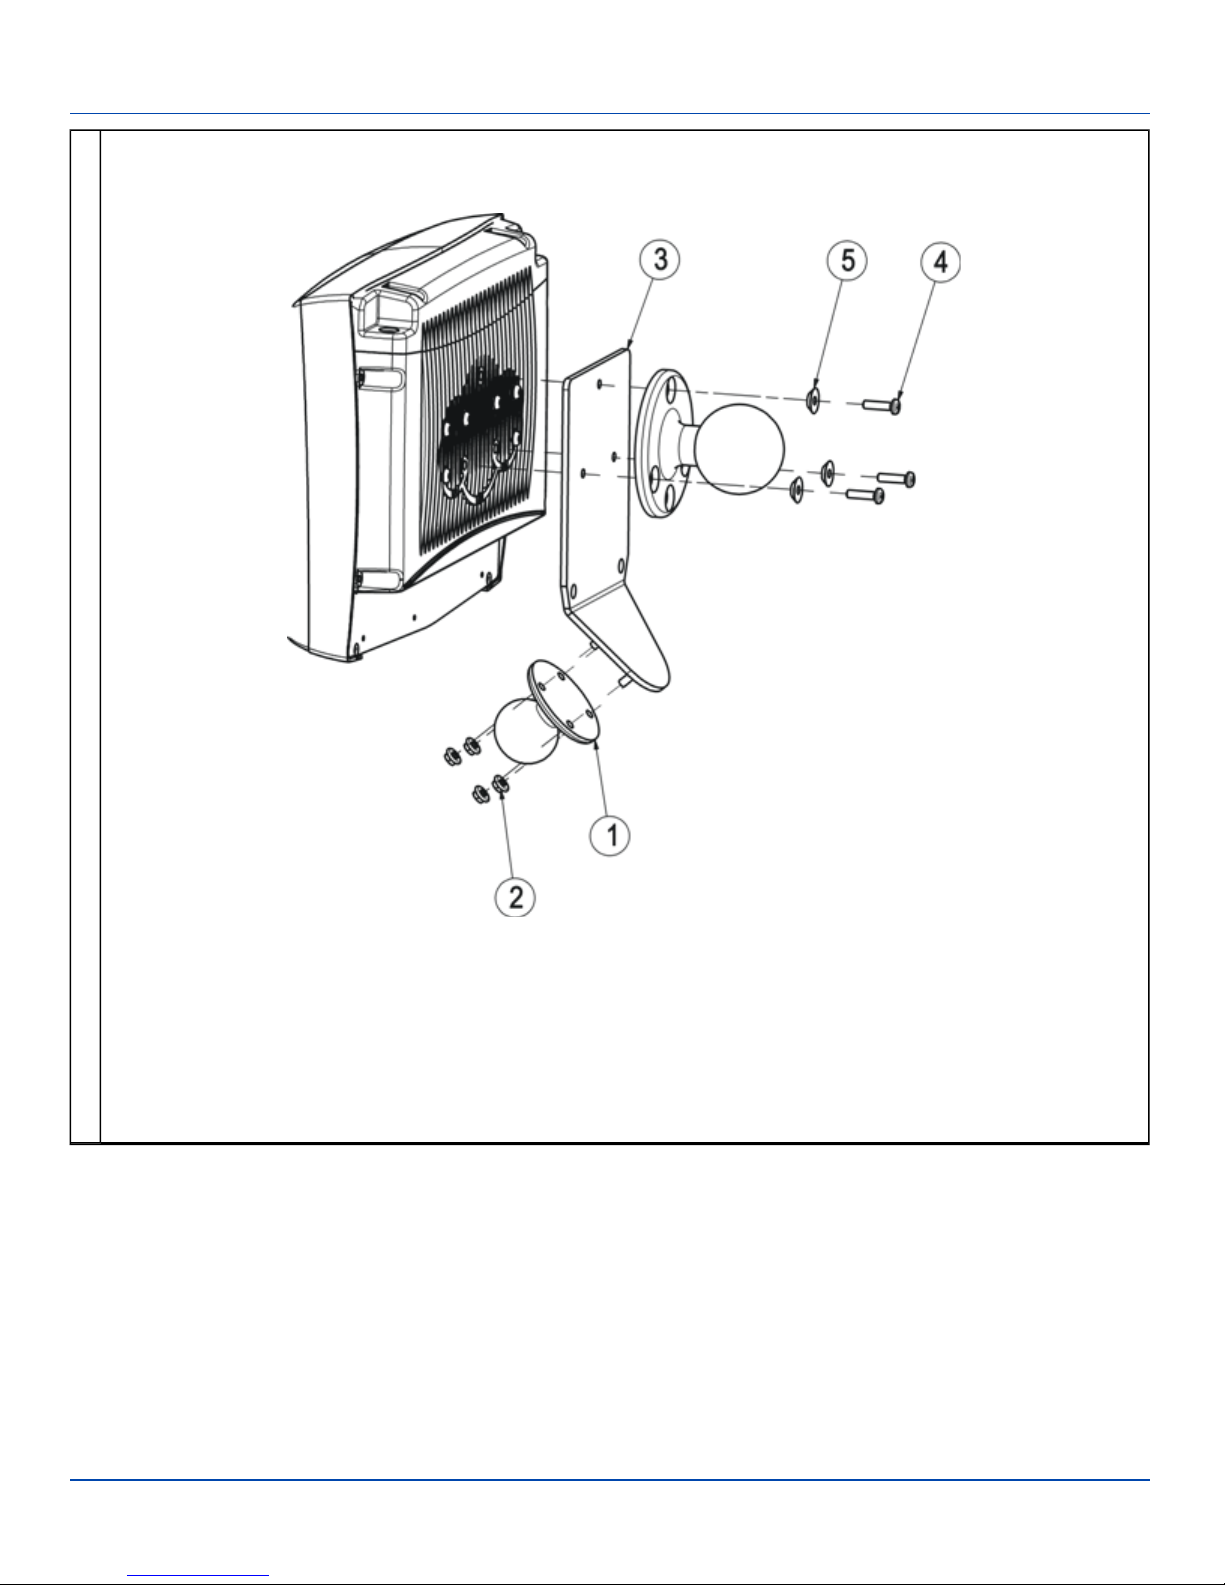
Install the keyboard bracket and the 2.25” (D-Size) RAM ball (removed previously) onto the back of the VX8. Use three
M5x20 screws with three tapered washers.
6.
Attach Keyboard Bracket
1. 1.5” RAM ball
2. Locking nut, M5
3. Integrated keyboard bracket
4. Screw, M5x20 (DO NOT reuse original screws)
5. Washer for RAM ball (DO NOT reuse original washers)
E-EQ-VX8DKRG-B [ 6 ] VX8 Cradle Reference Guide
Page 14
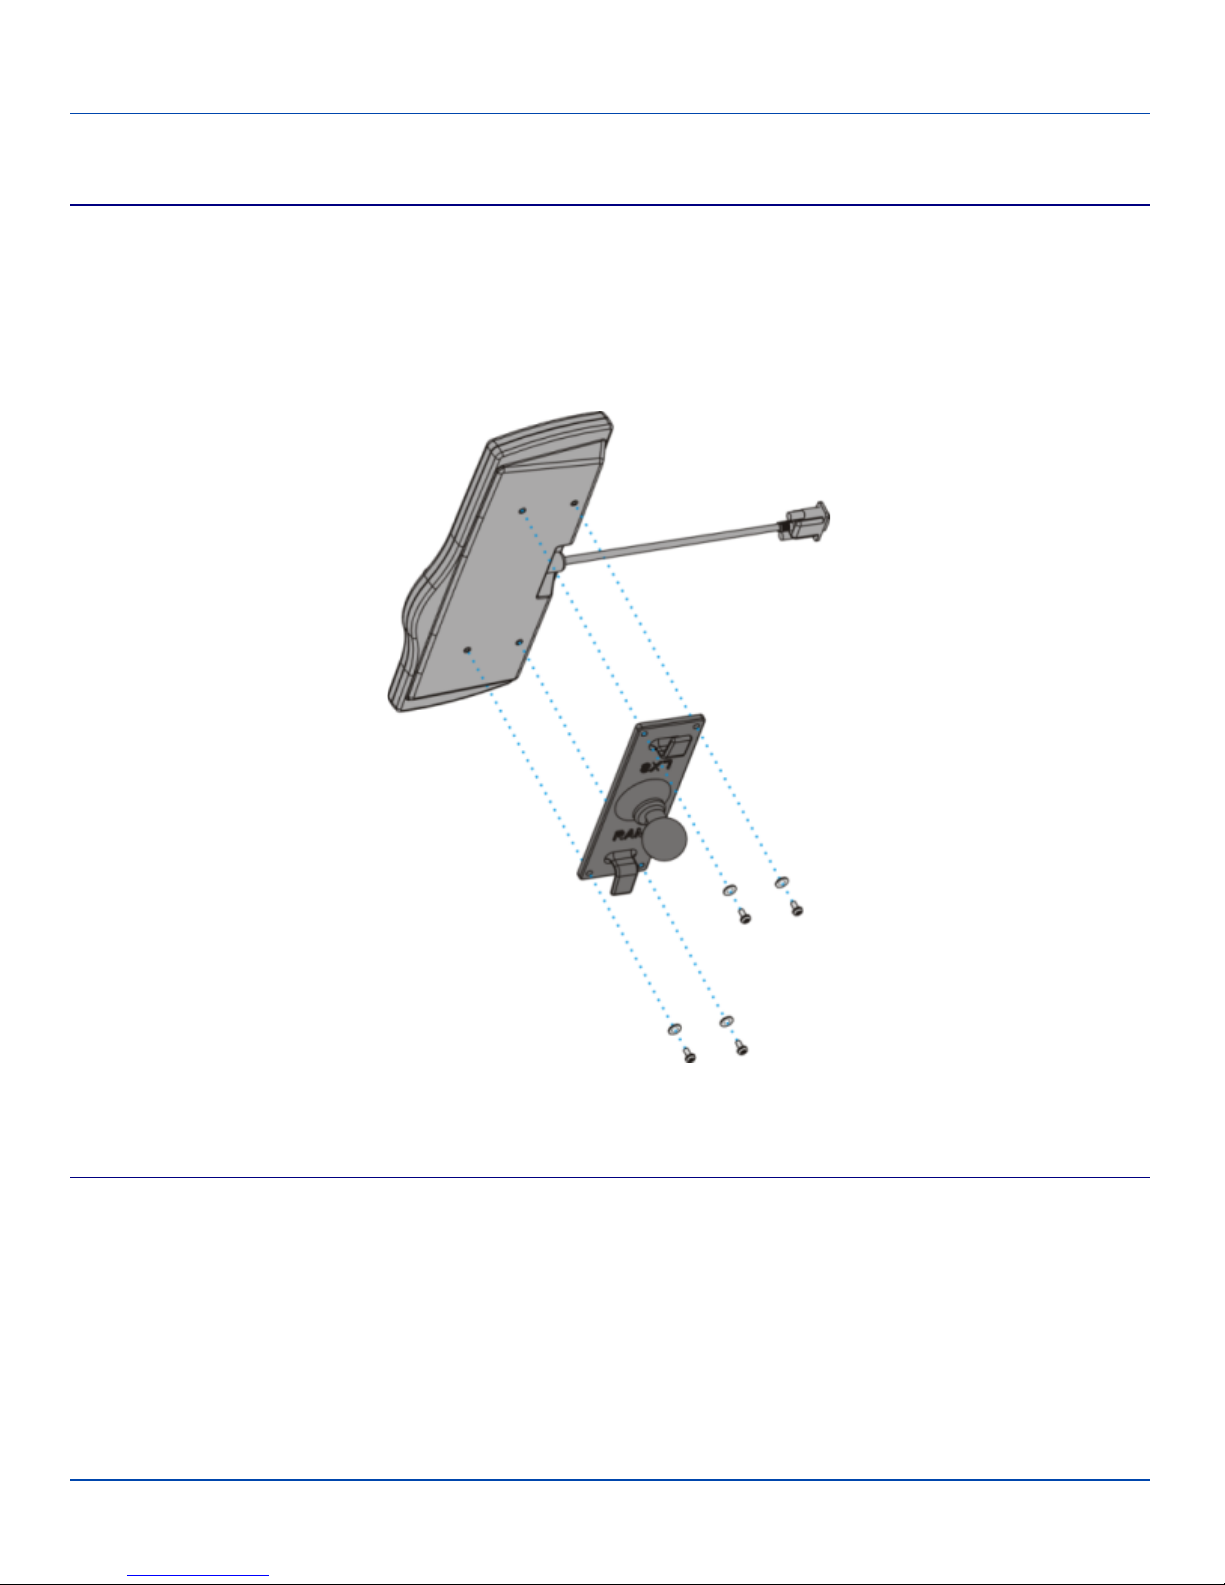
Step 3 – Attach Keyboard to Bracket
Step 3 – Attach Keyboard to Bracket
LXE Keyboards
If using the optional integrated keyboard mount, attach the keyboard to keyboard mounting plate, using the appropriate screws:
l For the 95 key keyboard, use four 8-32x5/8 screws
l For the 60 key keyboard, use four 10-32x5/8 screws
Note: 95-key LXE keyboard shown.
Note: Excess keyboard cable length can be looped around the hooks on the bottom of the keyboard mounting plate.
Other Keyboards
A generic keyboard plate is provided for non-LXE keyboards.
1. Attach the RAM ball to the keyboard mounting plate.
2. Attach the keyboard to the keyboard mounting plate. The mounting kit DOES NOT include hardware to attach the keyboard to the plate.
E-EQ-VX8DKRG-B [ 7 ] VX8 Cradle Reference Guide
Attach Keyboard to Mounting Plate
Page 15
Step 4 – Attach VX8 and Keyboard Assembly to RAM Base
Step 4 – Attach VX8 and Keyboard Assembly to RAM Base
Single RAM ball
1. Use a single D-sized RAM arm to attach the VX8 assembly to the RAM ball on the vehicle.
2. Use a single C-sized RAM arm to attach the keyboard assembly to the C-sized ball on either the VX8 keyboard bracket
or a C-sized ball on the vehicle.
Dual RAM balls
1. Use a pair of C-sized arms to attach the VX8 assembly to the RAM balls on the vehicle.
2. Use a C-sized arm to attach the keyboard assembly to a C-sized ball on the vehicle.
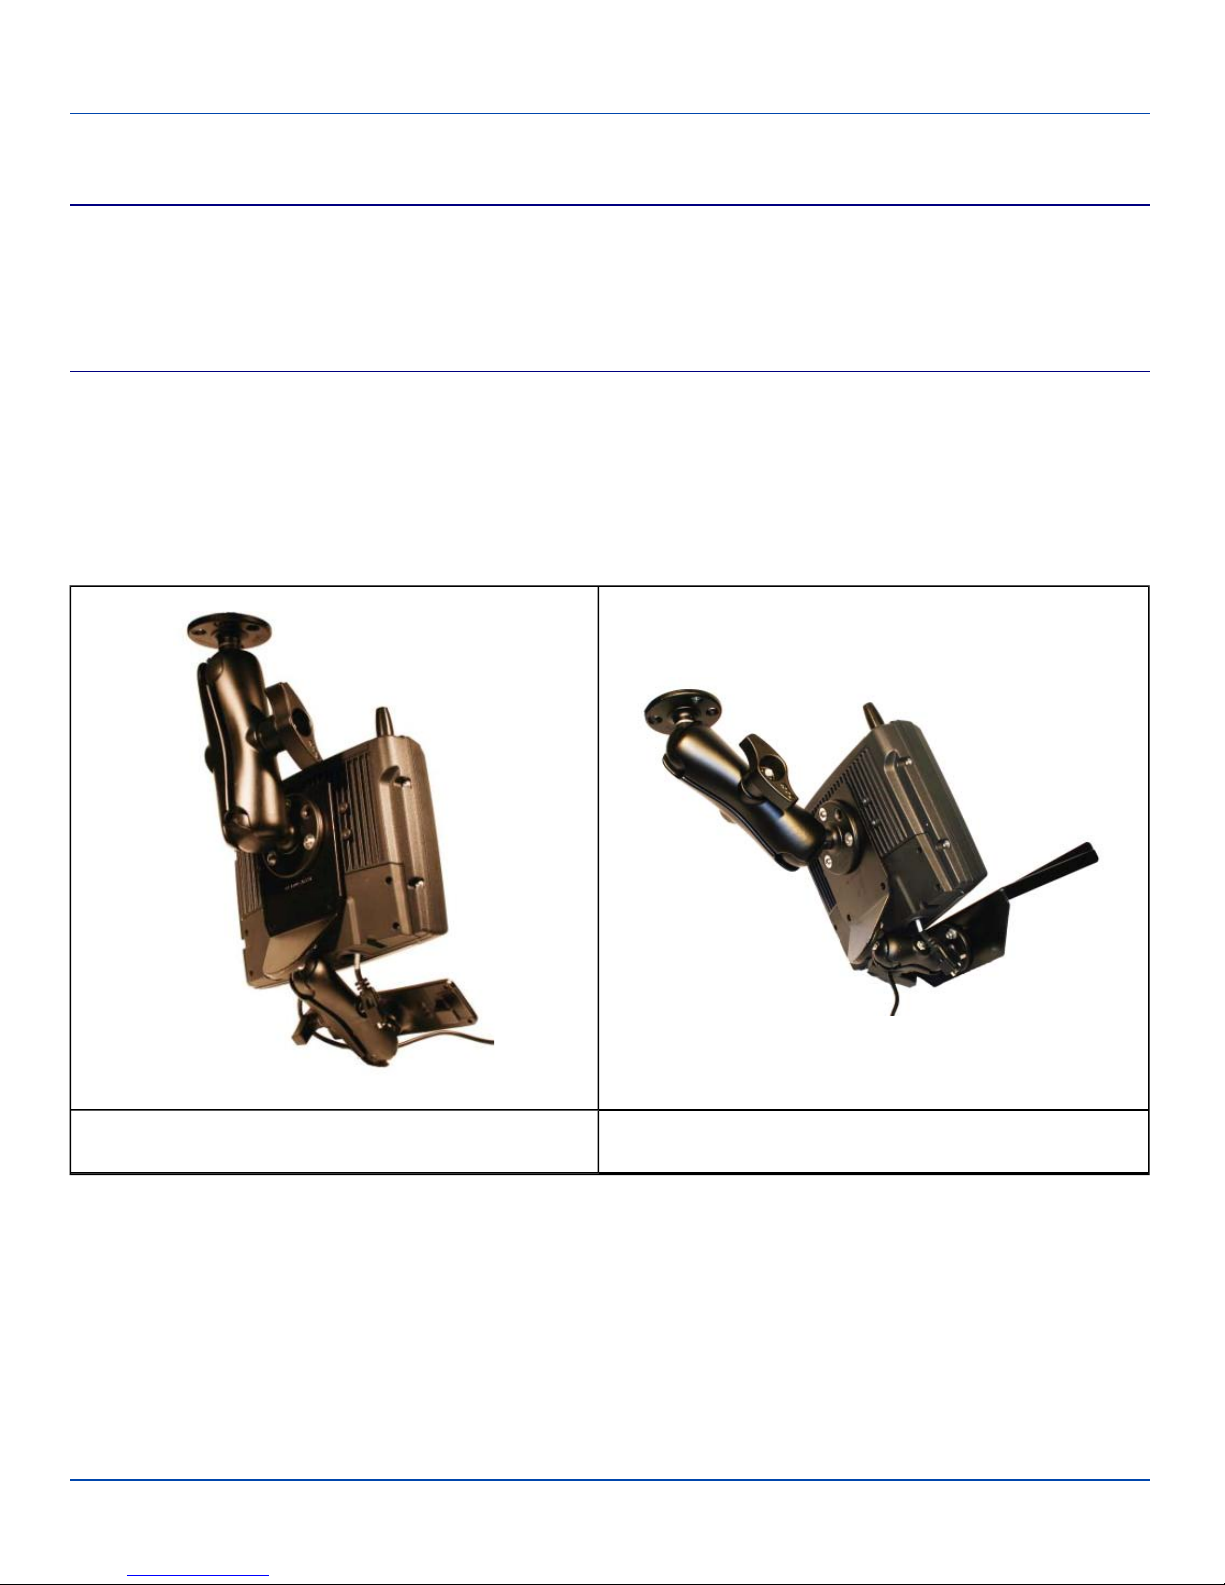
Completed Assembly
Samples of completed VX8 bracket assemblies are shown below
VX89A021KIT21 including RAM ball base and LXE
keyboard bracket
E-EQ-VX8DKRG-B [ 8 ] VX8 Cradle Reference Guide
VX89A025KIT25 including RAM ball base and generic
keyboard bracket
Completed RAM Mount Assembly
Page 16
Removing the Port Lid
Removing the Port Lid
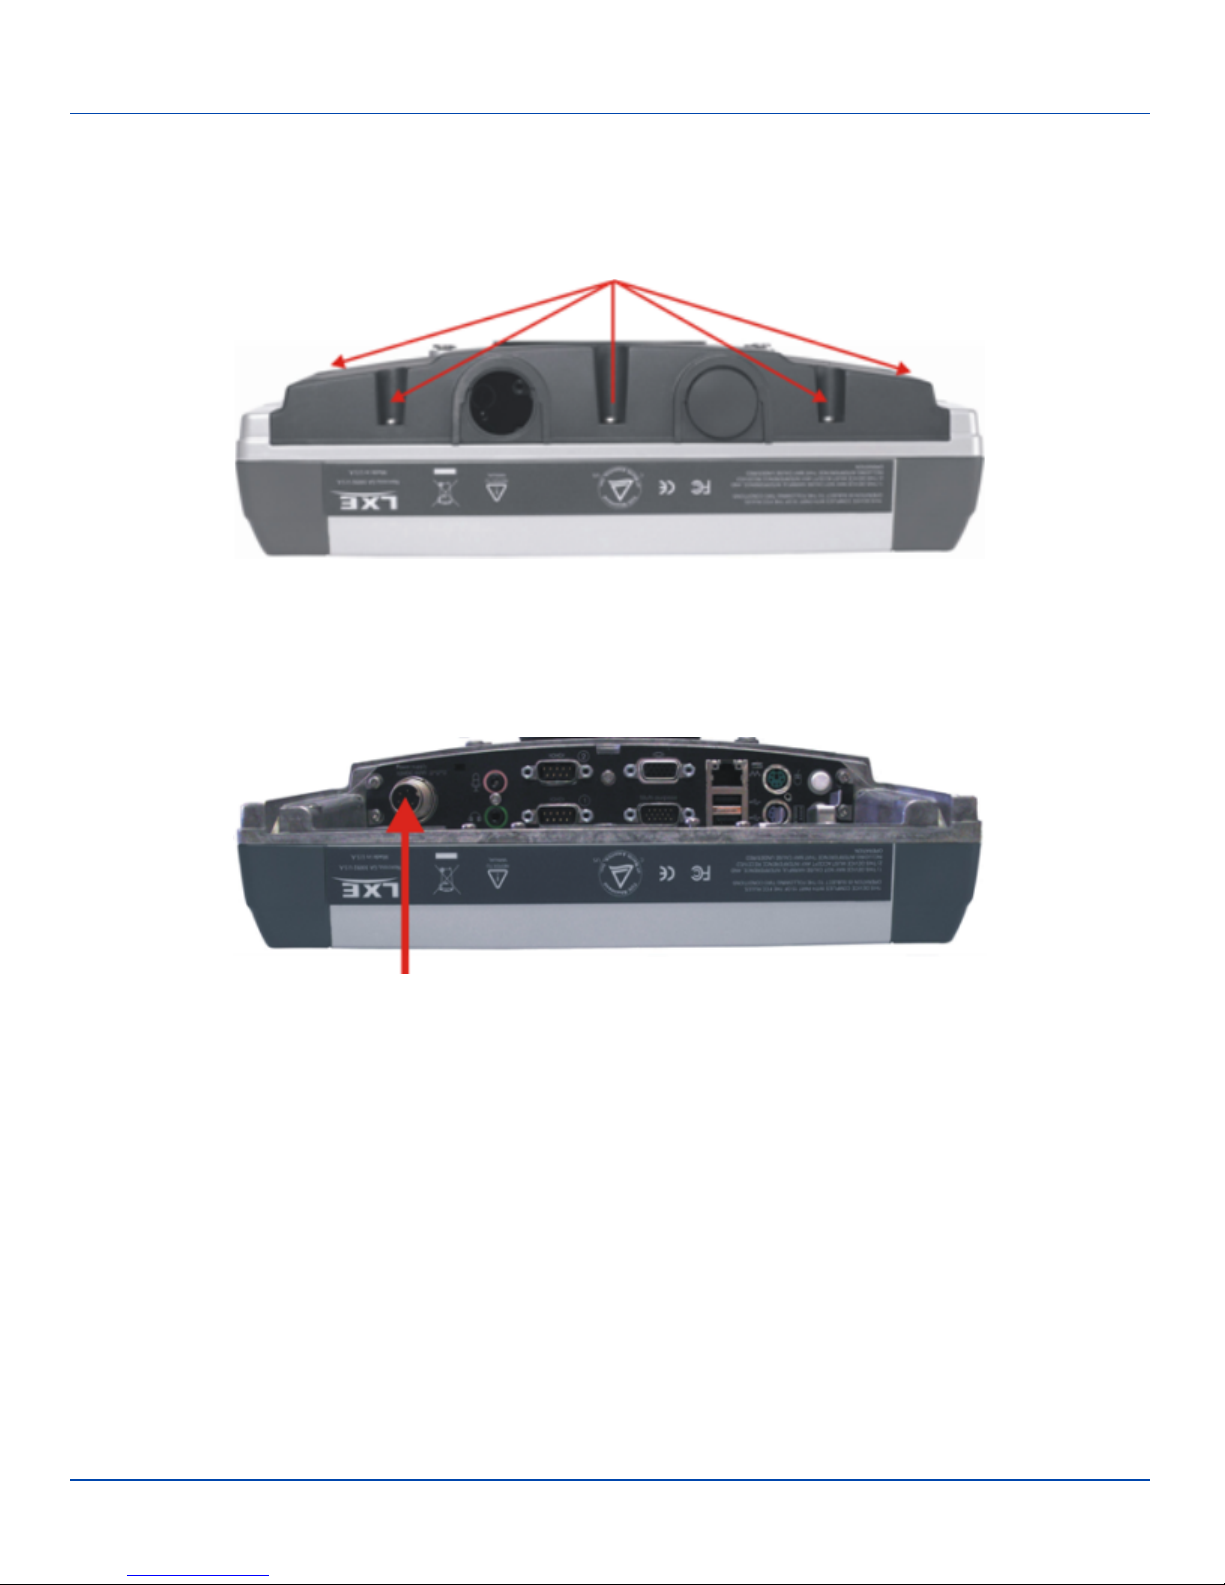
Before any cables can be attached to the VX8, the port lid must be removed. The port lid is held in place with eight (8) Torx 20
screws. Remove the screws and the port lid and set aside for reinstallation once all accessories are attached.
Removing the Port Lid
Reinstall the port lid after all cables are attached.
Connect Power Cable
Connect Power Cable to VX8
E-EQ-VX8DKRG-B [ 9 ] VX8 Cradle Reference Guide
Page 17
DC to DC Power Supply Installation
For use with LXE power supplies:
l VX89301PWRSPLY – Power Supply, DC to DC, 9 to 36V
l VX89A302PSDC48V – Power Supply, DC to DC, 18 to 60V
l VX89303PWRSPLY – Power Supply, DC to DC, 60 to 110V
l VX89305PWRSPLY – Power Supply, DC/DC, 9 to 36V
l VX89306PWRSPLY – Power Supply, DC/DC, 18 to 60V
Connecting Electrical Cables to Power Sources
The DC to DC power supply is used to power the VX8.
Specifications for Electrical Supply
Input Voltage
Always observe input voltage range specified on the DC to DC power supply and the optional screen
blackout box.
12 VDC ± 10%: VX89301PWRSPLY, VX89A302PSDC48V, VX89303PWRSPLY
Output Voltage
13.2 VDC ± 10%: VX89305PWRSPLY, VX89306PWRSPLY
50 W: VX89301PWRSPLY, VX89A302PSDC48V, VX89303PWRSPLY
Power
75 W: VX89305PWRSPLY, VX89306PWRSPLY
Fuse 5 A (slow blow fuse) 3 A (for optional screen blackout box). Fuses are USER SUPPLIED
Note: Refer to the Wiring Schematic for wiring colors and connections.
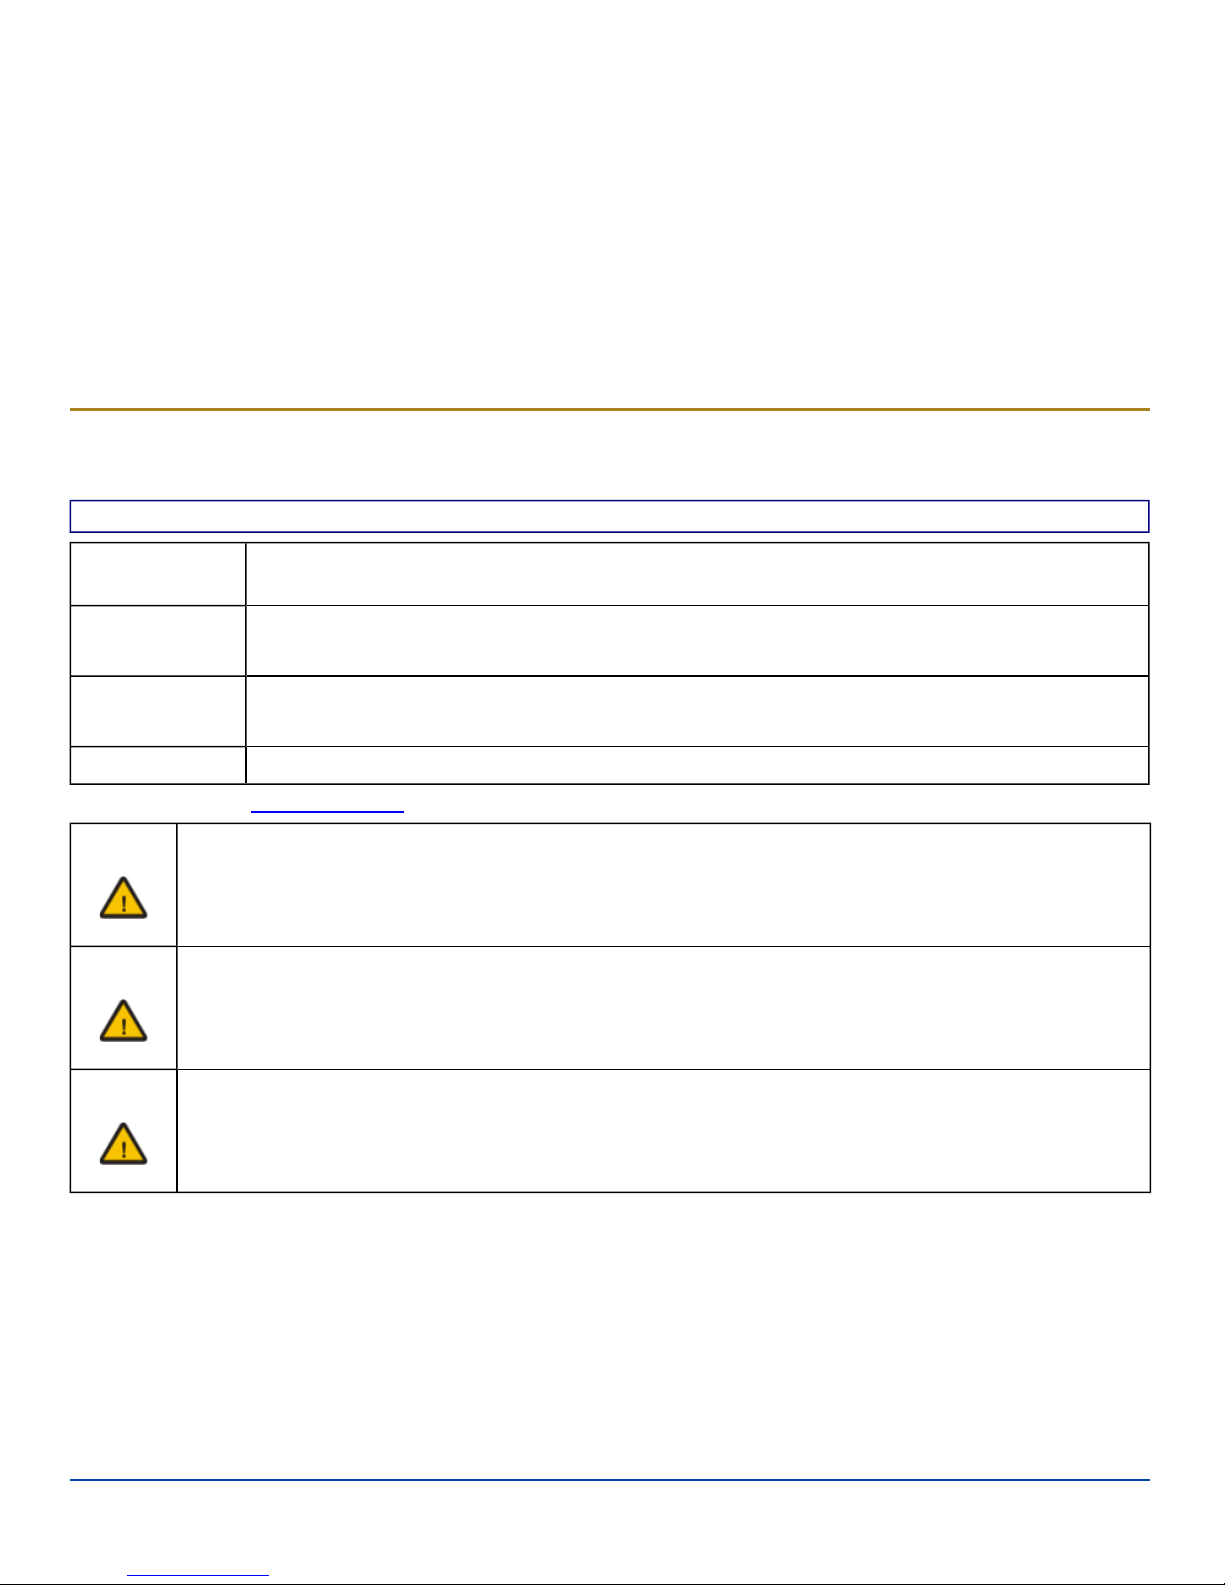
Caution:
For proper and safe installation, the input power cable must be connected to a fused circuit on the vehicle. This
fused circuit requires a five Amp maximum time delay (slow blow) high interrupting rating fuse. If the supply
connection is made directly to the battery, the fuse should be installed in the positive lead within 5 inches of the
battery positive (+) terminal. Note: For North America, a UL Listed fuse is to be used.
Caution:
For installation by trained service personnel only.
Warning:
Risk of ignition or explosion. Explosive gas mixture may be vented from battery. Work only in well ventilated
area. Avoid creating arcs and sparks at battery terminals.
E-EQ-VX8DKRG-B [ 10 ] VX8 Cradle Reference Guide
Page 18
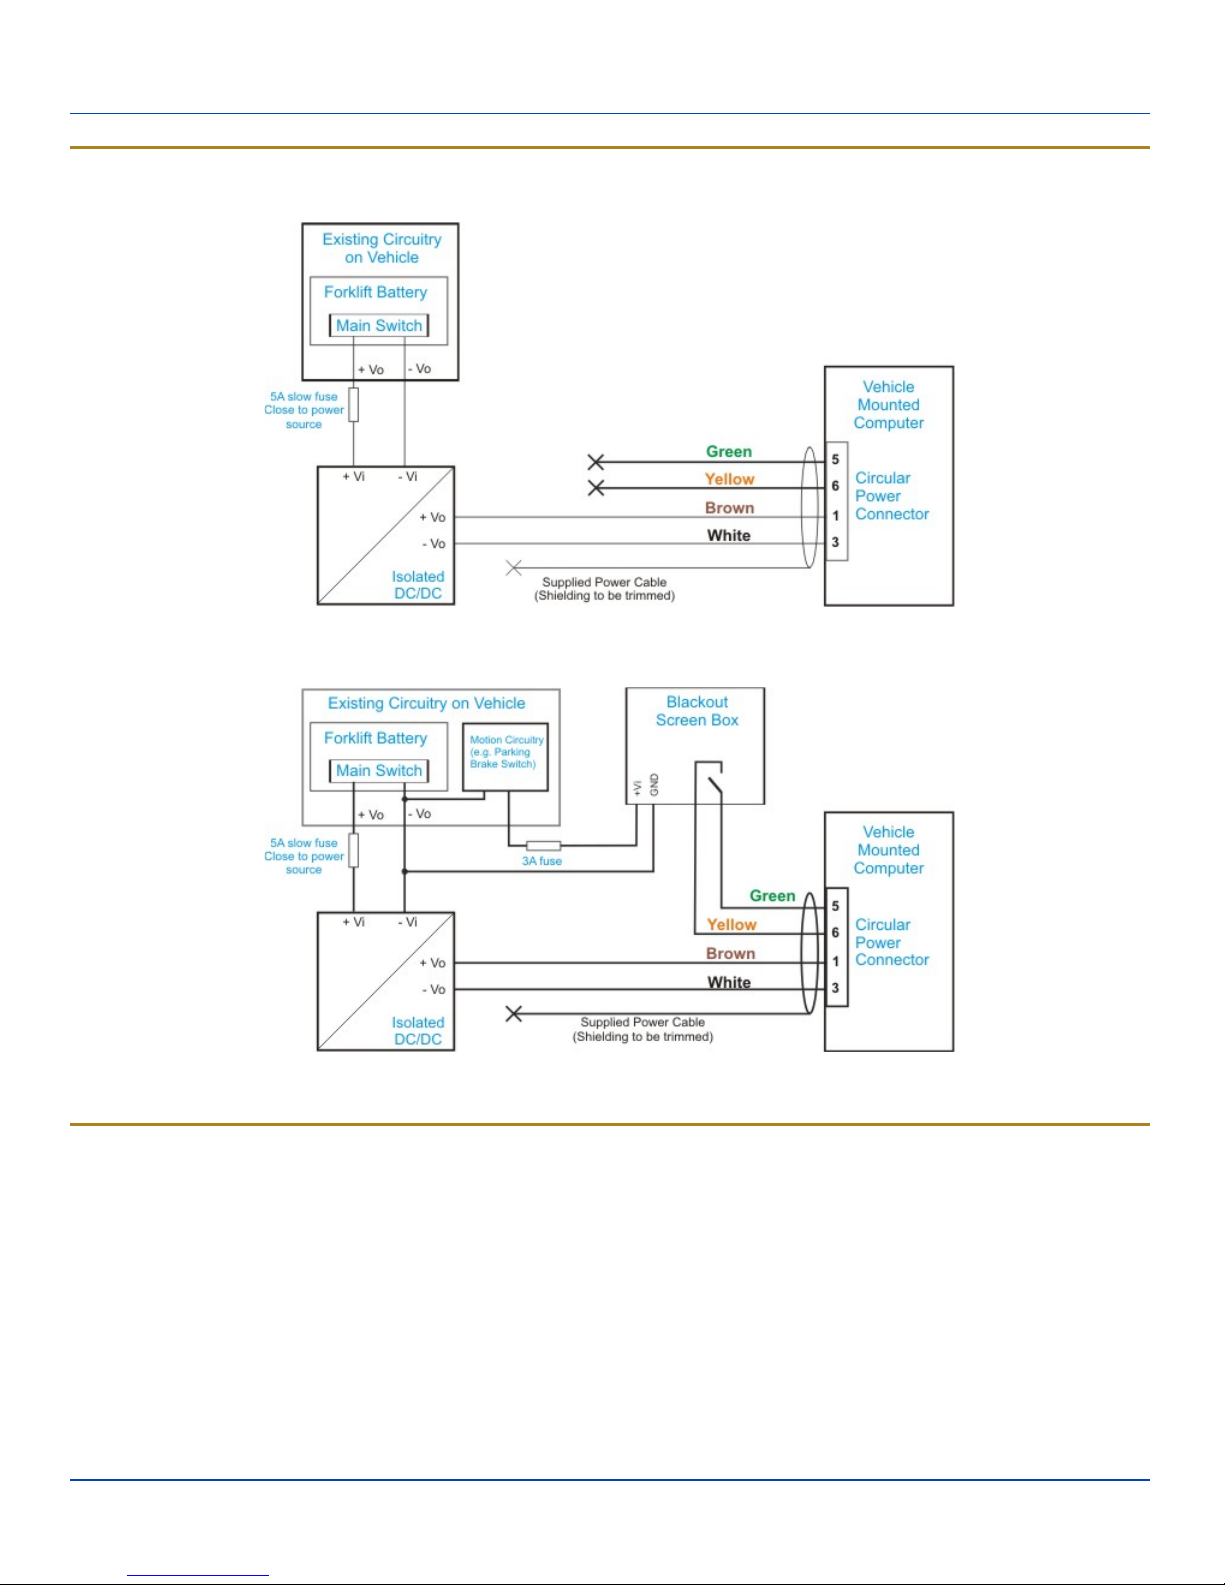
Wiring Schematic
Wiring Schematic
VX8 without Backout Screen Box
How To Connect Vehicle Electrical Connection
1. The device must be powered off.
2. Begin by connecting the power cable to the VX8. Work from this connection with the last connection being to the vehicle’s power source.
3. Route the cable from the VX8 to the DC to DC converter and, optionally for the VX8, the blackout screen box.
4. Cut the cable to length and strip the wire ends. For a VX8, if the blackout screen box is not used, do not strip the green
and yellow wires.
E-EQ-VX8DKRG-B [ 11 ] VX8 Cradle Reference Guide
VX8 with Backout Screen Box
Page 19
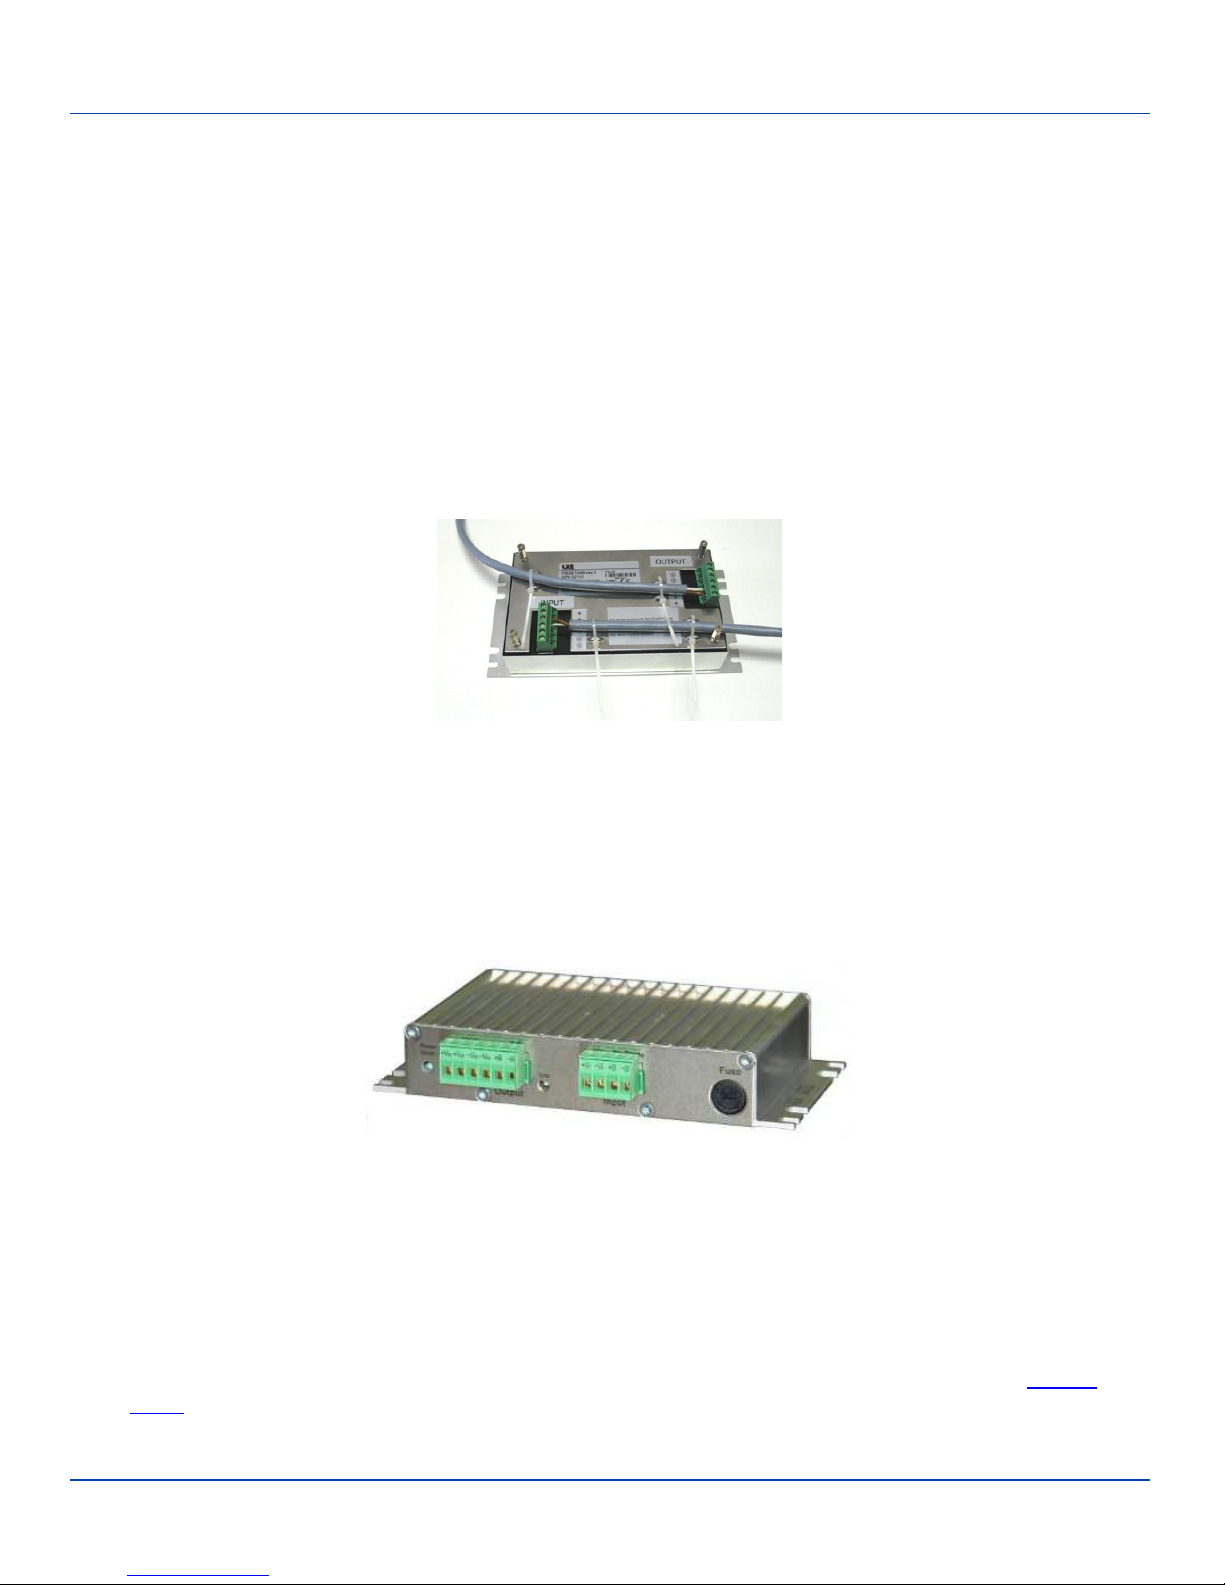
How To Connect Vehicle Electrical Connection
Route the power cable the shortest way possible. The cable is rated for a maximum temperature of 105°C (221°F).
When routing this cable it should be protected from physical damage and from surfaces that might exceed this
temperature. Do not expose the cable to chemicals or oil that may cause the wiring insulation to deteriorate. If the
vehicle is equipped with a panel containing Silicon Controller Rectifiers (SCR’s), avoid routing the power cable in close
proximity to these devices.Always route the cable so that it does not interfere with safe operation and maintenance of
the vehicle.
5. If the DC to DCconverter is equipped with a lid, remove the converter lid screws. Put them in a safe place and remove
the lid from the DC to DC converter.
6. Attach the stripped wire ends to the output side of the DC to DC converter.
7. Attach the stripped wire ends to the input side of the DC to DC converter.
8. For power supply models VX89301PWRSPLY, VX89A302PSDC48V and VX89303PWRSPLY:
l Attach the stripped wire ends to the output side of the DC to DC converter. Attach stripped wire ends to the input side of
the DC to DC converter.
l The input and output blocks each have two + and two – minus connectors. Either connector in the block can be used to
connect the matching polarity wire.
l Use the looms and wire ties to secure all wiring then reattach the lid with the screws.
4. For power supply models VX89305PWRSPLY and VX89306PWRSPLY
l Attach the stripped wire ends to the output side of the DC to DC converter. Attach stripped wire ends to the input side of
the DC to DC converter.
l The input block has one +Vi and one –Vi connection to connect the matching polarity wire.
l The output block has two +Vo and two –Vo connectors. Either connector in the block can be used to connect the match-
ing polarity wire.
l Use wire ties to secure all wiring, providing strain relief for the power supply connections.
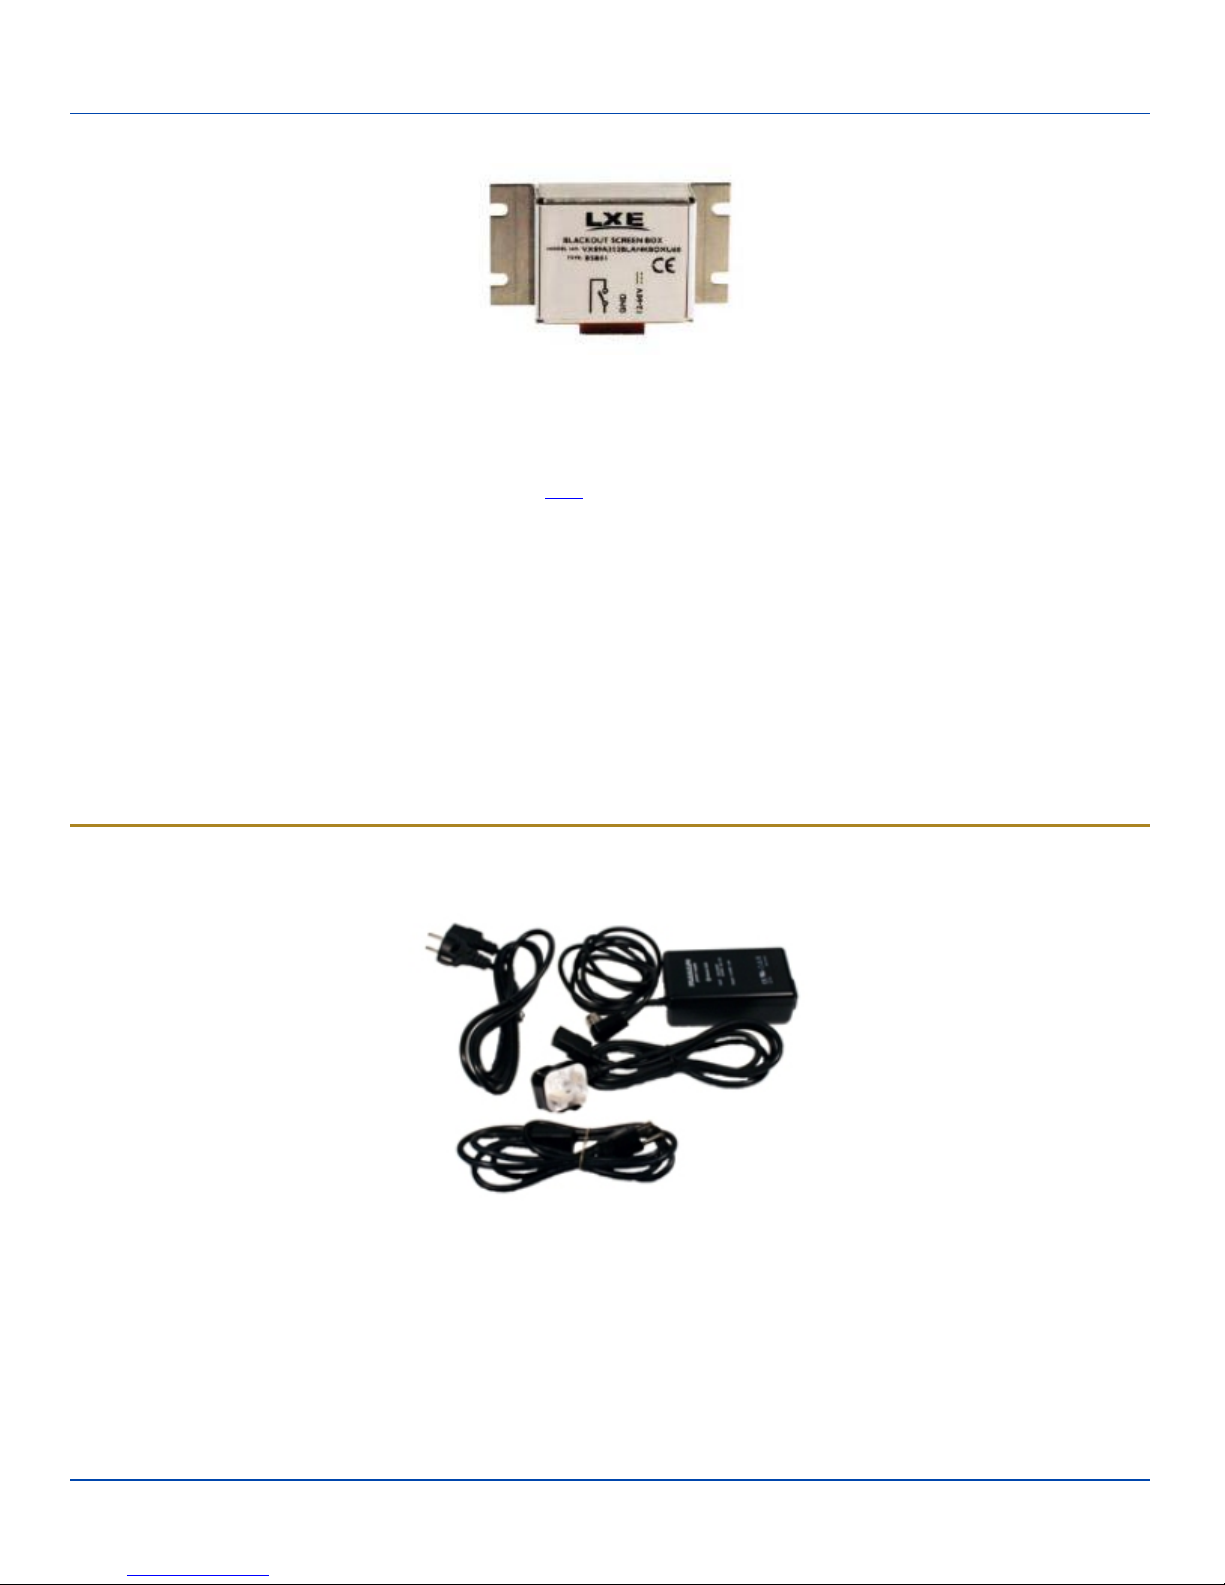
5. If the blackout screen box is used for a VX8 installation, attach the stripped wire ends to the box. Refer to this illus-
tration
E-EQ-VX8DKRG-B [ 12 ] VX8 Cradle Reference Guide
Page 20
External AC Power Supply, Optional
and the label on the blackout screen box for proper wiring connection.
6. Connect the DC to DC converter to the vehicle’s electrical system.
7. While observing the fuse requirements specified here, connect the power cable as close as possible to the actual battery terminals of the vehicle. When available, always connect to unswitched terminals in the vehicle fuse panel, after
providing proper fusing.
Note: ATTENTION: For uninterrupted power, electrical supply connections should not be made at any point after
the ignition switch of the vehicle.
8. If used, connect the wiring for the blackout screen box.
9. Use proper electrical and mechanical fastening means for terminating the cable. Properly sized “crimp” type electrical
terminals are an accepted method of termination. Please select electrical connectors sized for use with 18AWG (1mm2)
conductors.
10. Provide mechanical support for the cable by securing it to the vehicle structure at approximately one foot intervals, taking care not to over tighten and pinch conductors or penetrate outer cable jacket.
External AC Power Supply, Optional
Optional AC Power Supply
E-EQ-VX8DKRG-B [ 13 ] VX8 Cradle Reference Guide
Page 21

External AC Power Supply, Optional
How To: Connect External Power Supply
1. Turn the VX8 off.
2. Connect the appropriate detachable cordset to the external power supply.
3. Plug cordset into appropriate, grounded, electrical supply receptacle (AC mains).
Connect the watertight connector end to the VX8’s Power Connector by aligning the connector pins to the power connector;
4.
push down on the watertight connector and twist it to fasten securely.
5. Turn the VX8 on.
E-EQ-VX8DKRG-B [ 14 ] VX8 Cradle Reference Guide
Page 22

Connect Antenna
Connect Antenna
Several antenna configurations are available for the VX8. Options include:
l single 802.11 external antenna
l dual 802.11 external antennas
l remote vehicle mount 802.11 antennas
l remote mount WAN antenna
l external Bluetooth antenna
The VX8 has up to four antenna connectors.
l Generally, the two top antenna connectors are used for the 802.11 antennas.
l The two bottom connectors are used for the Bluetooth antenna and the remote WAN antenna.
Note: VX8’s are equipped with a radio and require an antenna. Some VX8’s may be equipped with a dual antenna option.
For these VX8’s, an external antenna must be connected to each antenna connector.
External Antenna
The external 802.11 and Bluetooth antennas are pre-installed.
To use a remote mount 802.11 antenna, unscrew the pre-installed antenna to remove and follow these instructions.
Repeat for second 802.11 antenna connector, if present.
Note: Substitution of antennas is not permitted unless authorized by LXE. Use of unauthorized antennas will void the
FCC emissions certification of the VX8.
E-EQ-VX8DKRG-B [ 15 ] VX8 Cradle Reference Guide
Page 23
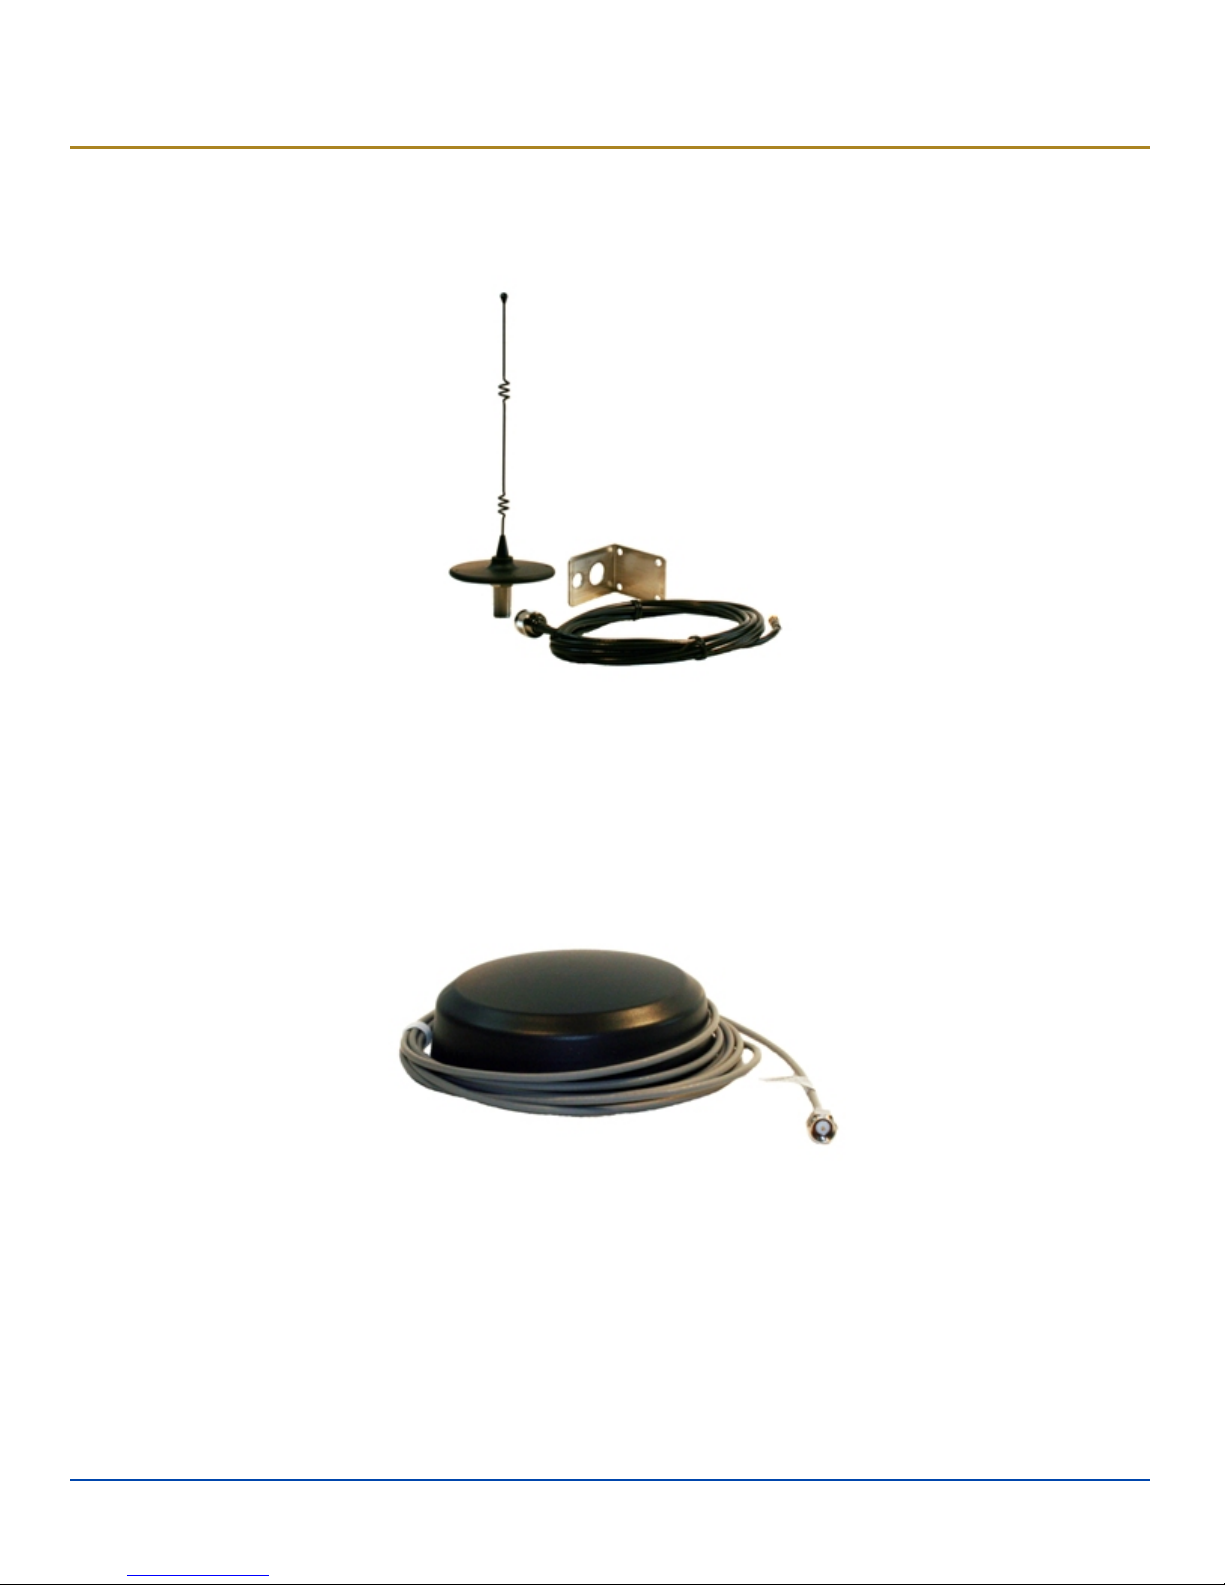
Remote Antenna Installation Kit
802.11 Remote Mount Antenna
802.11 Remote Mount Antenna
The Remote Antenna Installation Kit consists of the whip antenna, mounting bracket and cable. Tools are not included. For
radio antenna diversity, two remote mount antennas are required.
The remote antenna bracket is mounted on the top of a forklift, truck or other vehicle and cabled to the VX8 inside the vehicle.
WAN Remote Mount Antenna
Remote Mount WANAntenna
The Remote Antenna Installation Kit consists of the WAN antenna and integrated cable. Tools are not included.
The remote antenna is mounted on the top of a forklift, truck or other vehicle and cabled to the VX8 inside the vehicle.
E-EQ-VX8DKRG-B [ 16 ] VX8 Cradle Reference Guide
Page 24
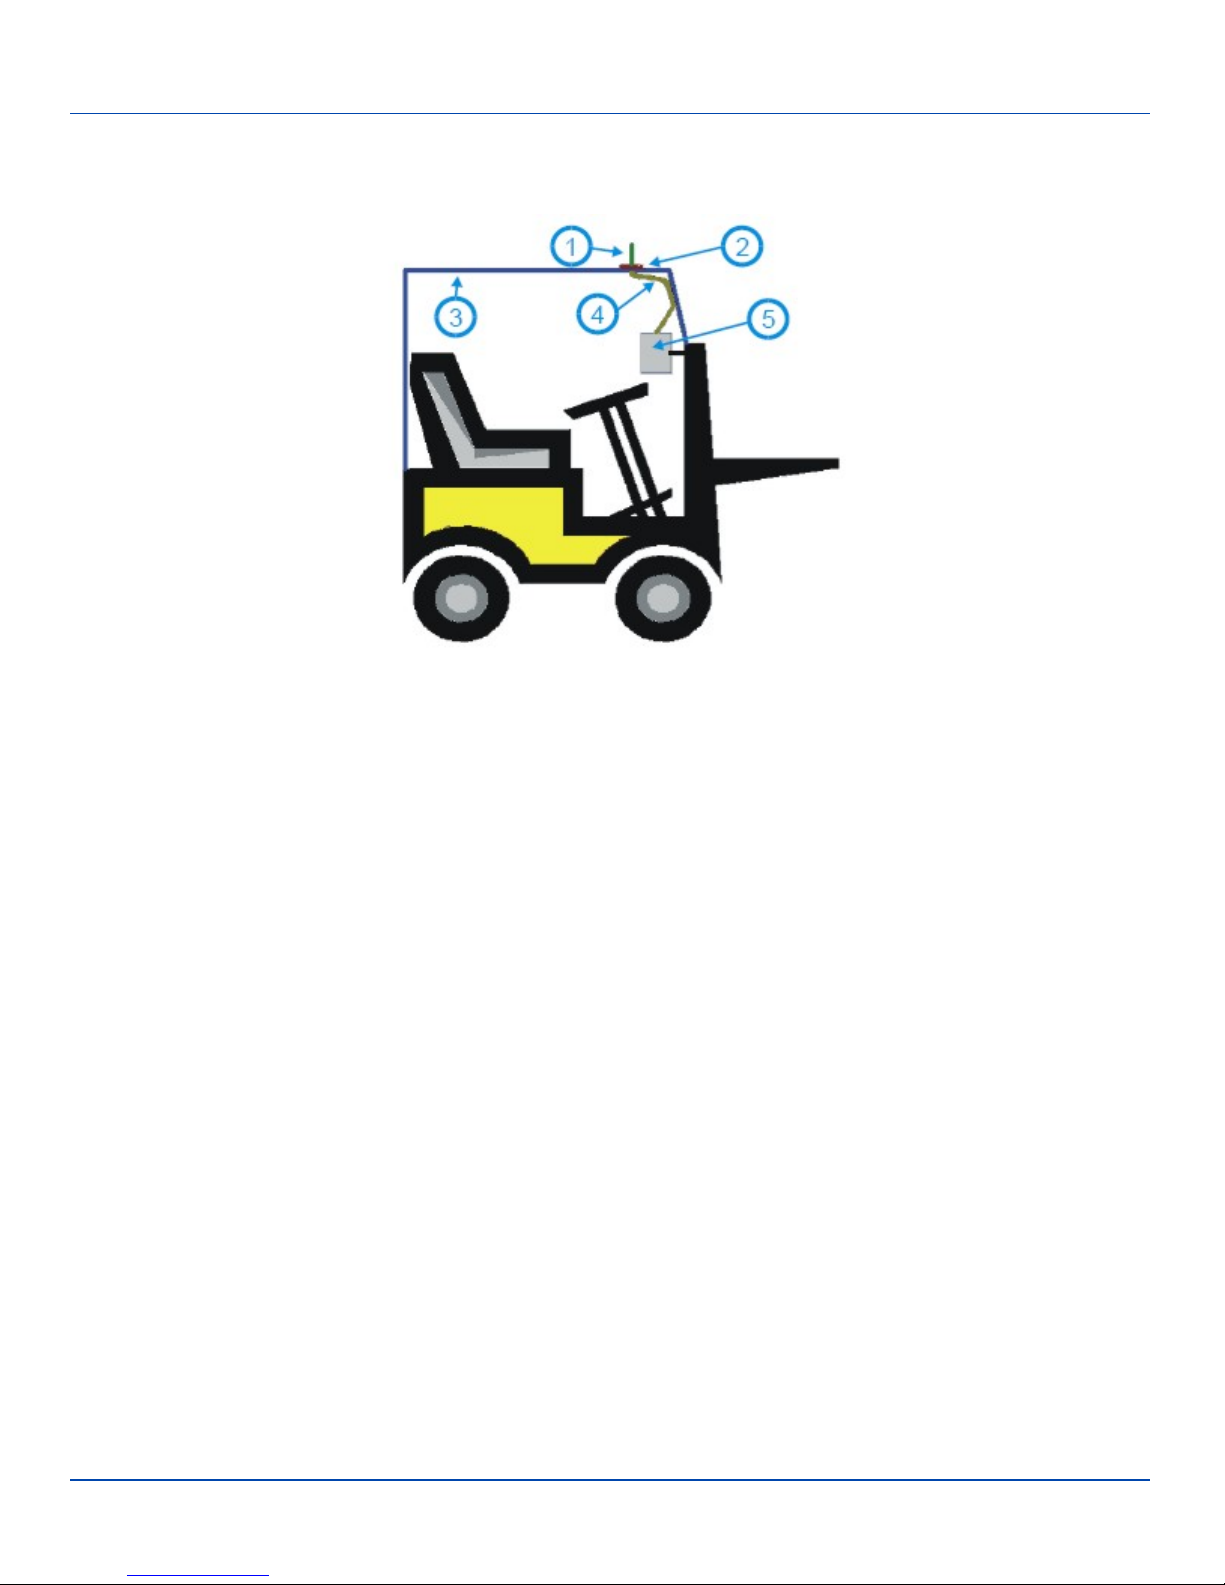
Typical Installation
Typical Installation
1. Antenna
2. Mounting Bracket
3. Vehicle Safety Cage
4. Cable
5. Vehicle Mounted VX8
Mounting Instruction
1. Attach and secure the mounting bracket (802.11 kit only) to the highest point on the safety cage, following these precautions:
l The plate must be mounted so the antenna is not damaged while the vehicle or any of its parts are mov-
ing.
l The antenna mounting portion of the bracket must be parallel to the floor.
l If the VX8 requires two antennas, they must be mounted at least 12 inches (304.8mm) apart.
2. Attach the female connector of the coaxial cable to the antenna connector on the vehicle mounted VX8.
3. Secure the whip antenna to the mounting bracket.
4. Connect the antenna cable to the whip antenna.
5. Use cable ties to secure the coaxial cable to the vehicle as necessary. Make sure the cable is routed so it is not damaged by any moving parts of the vehicle.
6. If the VX8 is using dual 802.11 antennas (diversity option), repeat these steps for the second antenna.
E-EQ-VX8DKRG-B [ 17 ] VX8 Cradle Reference Guide
Page 25
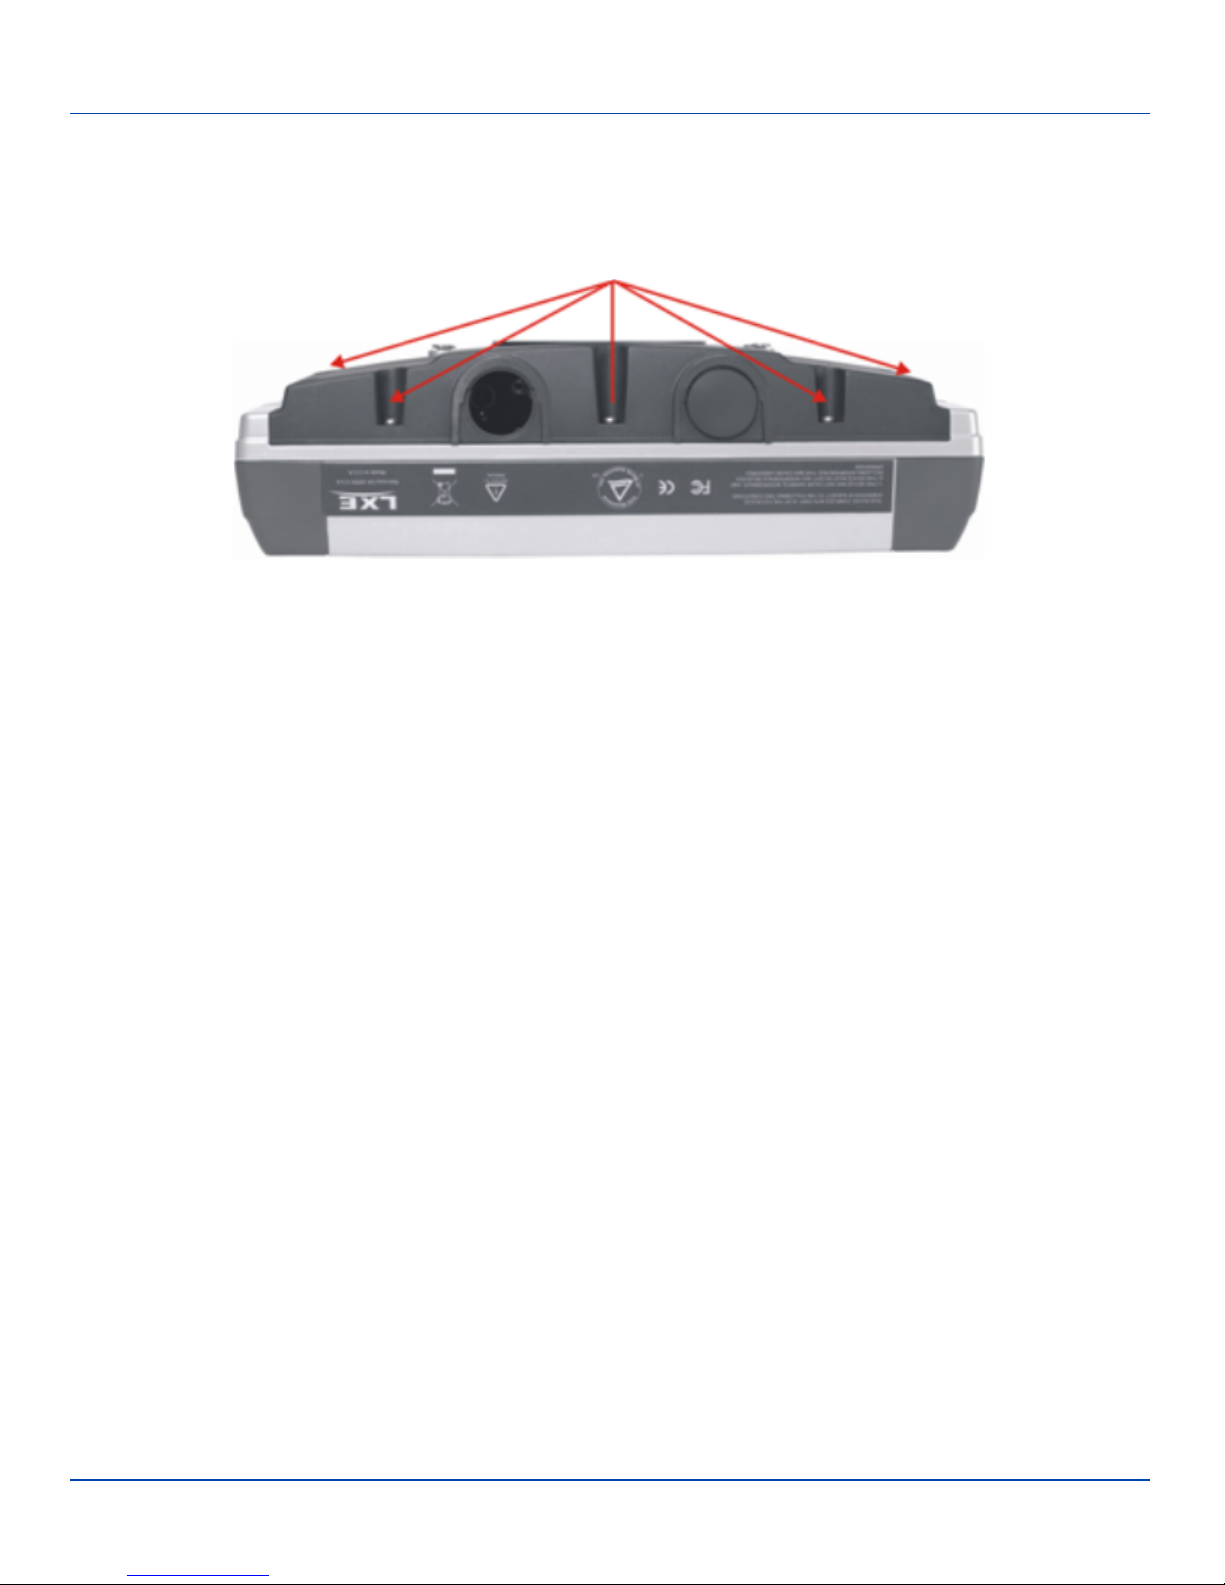
Securing Port Lid
Securing Port Lid
The screws used for the port lid should be alternately tightened to provide proper dust and moist protection (IP65 requirement).
There are eight (8) Torx 20 screws securing the port lid.
Mounting the Port Lid
Fasten the cable tube in the vehicle, without putting strain on the tube. Now the VX8 is ready to be mounted in the vehicle.
E-EQ-VX8DKRG-B [ 18 ] VX8 Cradle Reference Guide
Page 26

Maintenance - Vehicle Mounted Devices
Check the vehicle mounting hardware frequently and re-tighten if necessary.
There are no serviceable parts in the vehicle mounting hardware.
If the vehicle mounting hardware and connections become broken, loose or cracked, the assembly must be taken out of
service and replaced. Contact your LXE representative for assistance.
Cleaning
Do not use paper towels or harsh-chemical-based cleaning fluids since they may result in damage to the VX8 surfaces, cables,
connectors and mounting hardware.
Use a clean soft cloth to wipe any dirt, moisture or grease from the VX8, connectors, cables or the vehicle mounting hardware.
Do not use any liquid to clean the VX8, or connectors. Spray or dampen the cleaning cloth with the cleaning liquid. If possible,
clean only those areas which are soiled. Lint/particulates can be removed with clean, filtered canned air.
Revision History
Revision / Date Location Change
A / Dec 2009 Initial Release
B / Mar 2010 DC to DC Power Supply Installation Revised instructions for new DC to DC power supply options.
E-EQ-VX8DKRG-B [ 19 ] VX8 Cradle Reference Guide
Page 27

Index
C
Cleaning 19
Completed Assembly 8
Connect Antenna 15
Connect External Antenna 15
Connect Power Cable 9
D
DC to DC Power Supply Installation 10
DC to DC PS
Specifications for Electrical Supply 10
E
External AC Power Supply 13
External Antenna | EQ.VX6,EQ.VX7 15
R
RAM Mount Options 2
Remote Antenna Installation Kit 16
Removing the Port Lid 9
Revision History 19
S
Safety Statement
Lithium Battery 3
Vehicle Power Supply 5
Securing Port Lid 18
W
Wiring Schematic 11
H
How To
AC/DC Power Connection 14
I
Install Mounting Brackets 3
L
Lithium Battery Safety Statement 3
M
Mounting Instruction 17
Mounting Procedure 4
Q
Quick Start
Powered Vehicle Cradle 1
E-EQ-VX8DKRG-B [ 20 ] VX8 Cradle Reference Guide
 Loading...