

Made in Slovenia.
Copyright © 2018, LX navigation, all rights reserved.
User’s manual
version 1.2
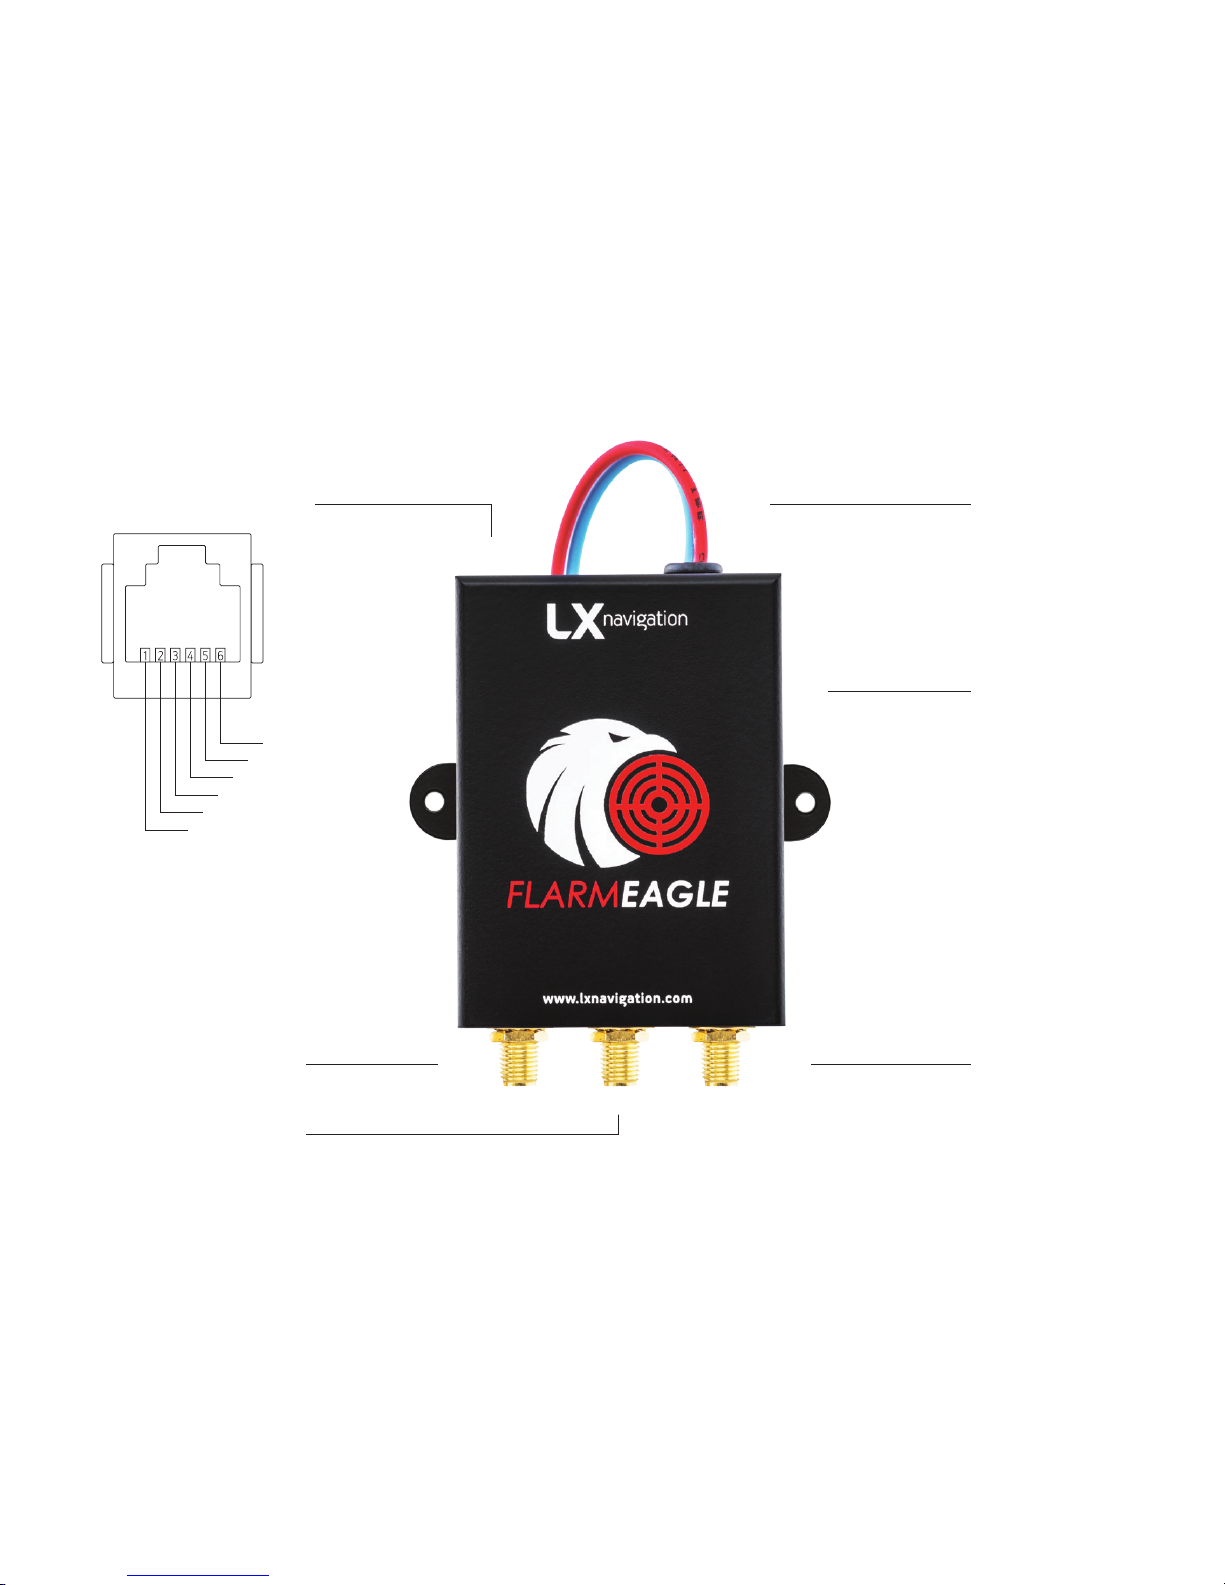
Main power supply
9-36 V DC
+ red wire
- blue wire
USB port
SMA FLARM RF
Optional*
SMA GPS
RJ 12 FLARM data port
*SMA ADS-B, Diversity
12 V
GND
3,3 V
RX (DATA IN)
GND
TX (DATA OUT)
Quick Guide
Congratulations for purchasing the LX FLARM Eagle.
Please congure the LX FLARM Eagle before rst
use. Set your ICAO 24-bit address, aircra type and
transponder conguration (chapter 1.2).
1. Installation
Aer unpackaging power the device with 9-36 V DC
power via main power supply or RJ 12 (1:1 cable),
connect and install GPS antenna facing the GPS sign of
the antenna towards the sky. Connect and install FLARM
RF antenna according to FTD-041 (www.arm.com) and
congure the unit.
1.1. Basic conguration of LX FLARM Eagle
The LX FLARM Eagle can be congured by the use of
the cong le stored on USB ash drive using program
1
FLARM Tools. Always use the latest version of 1FLARM
Tools program on your PC.
Default settings:
• Flight recorder logtime is set to 4 seconds.
• Communication baud rate is set to 19200 bps.
• Output data is set to “navigation & FLARM”.
• Horizontal detection range is set to 25500 meters.
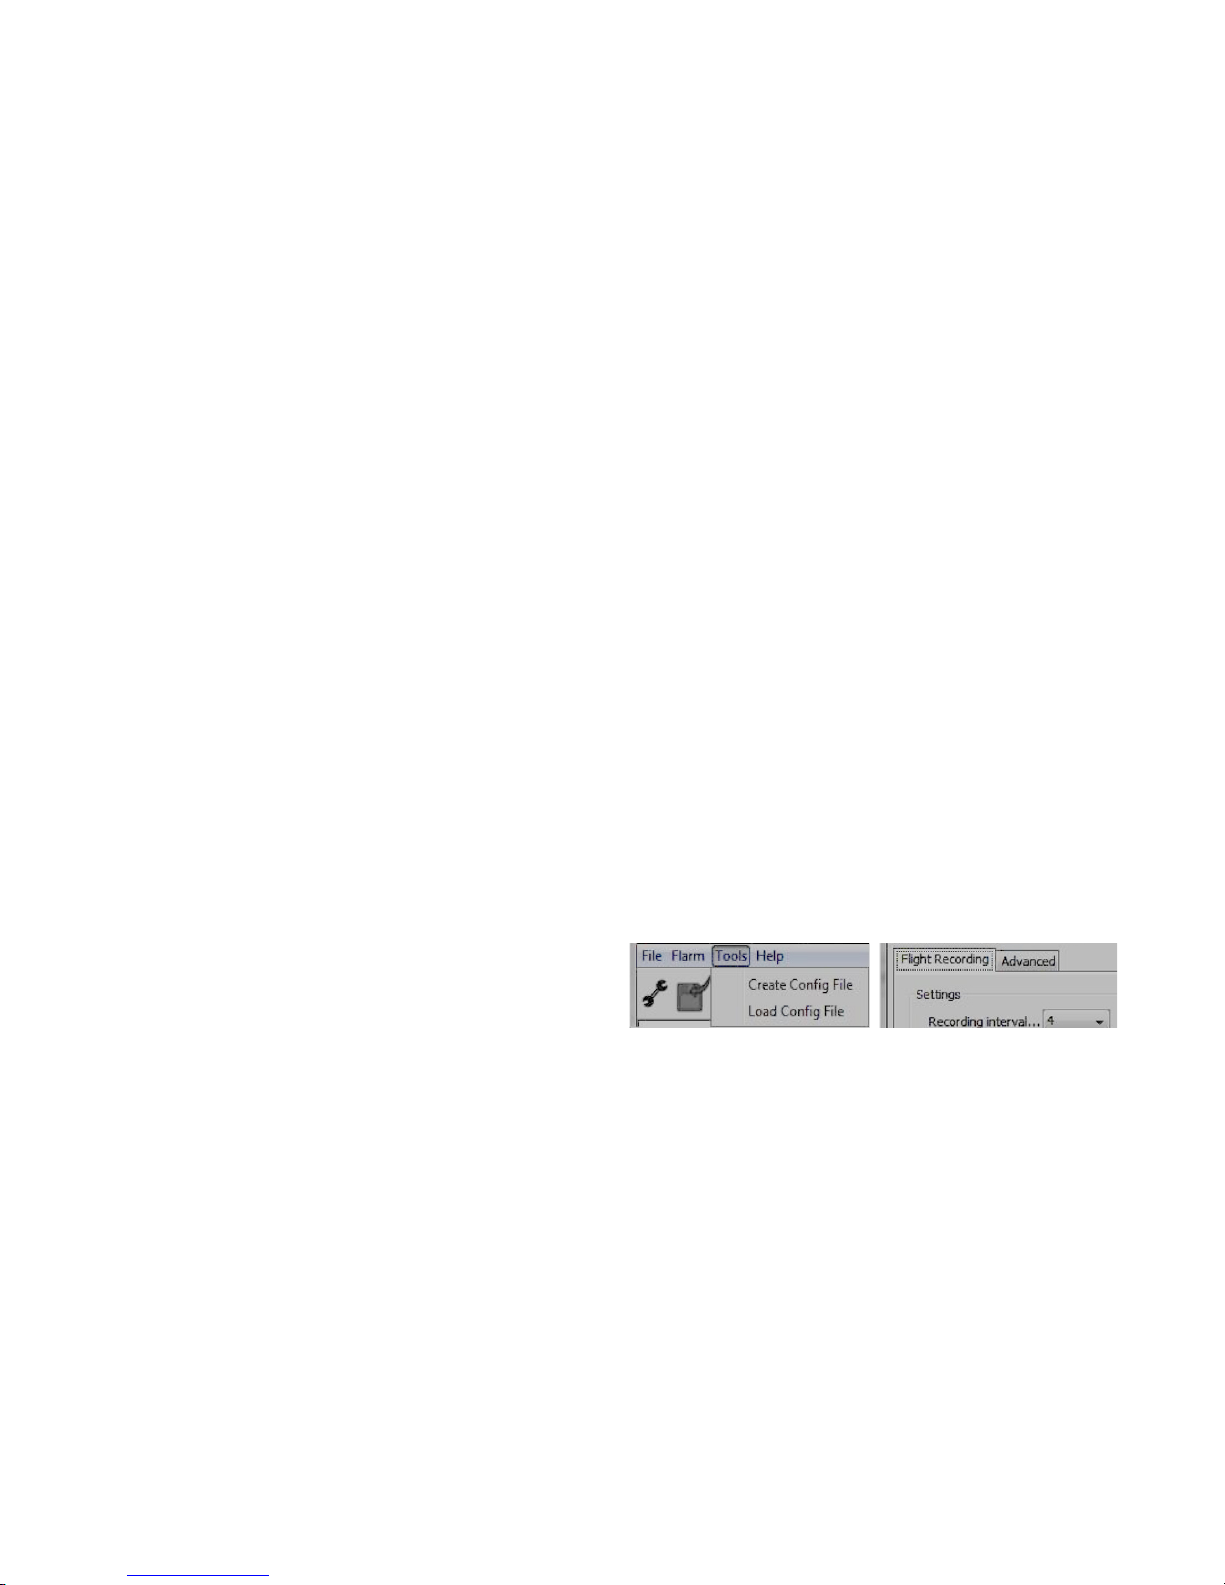
1.2 Conguration via USB ash drive
To create the cong le, open the latest version of
1
FLARM Tools program (www.arm.com). On the top
navigation bar go to option Tools/Create Cong File (le
picture). You are presented with Flight Recording and
Advanced subpages (right picture).
1
Latest FLARM Tools program - https://arm.com/wpcontent/uploads/man/FLARM_Tool_3_6_4_1f59603.exe

Under Flight Recording, you will nd options for
Recording Interval and Pilot/Airplane properties, under
Advanced you can nd Connection settings, Radio
settings, device ID for radio communication and ICAO
24-bit address in case you have transponder.
When appropriate settings have been made, click Save
to generate the cong le. Save the le to the root of
USB ash drive, insert it into LX FLARM Eagle and turn
it on. The conguration will start automatically. Wait 5
minutes and restart it. The LX FLARM Eagle is congured.
3. Flights/logbook download
The most convenient way to download ights is via USB
ash drive, as it is an automatic procedure. FLARM will
store all nished ights from internal memory to USB
ash drive (if it is inserted). Stored ights can be viewed
on PC (.igc format).
4. Updating LX FLARM Eagle
To update device, download the latest FW version at
www.lxnavigation.com/support/soware and copy it to
the root of USB ash drive. Insert the USB into the device
and power it on. Wait 5 minutes and restart it. The LX
FLARM Eagle is updated.
5. Completing the installation
Connect any compatible FLARM display to your LX FLARM
Eagle via RJ11 FLARM cable to get the full potential of
the system. LX FLARM Eagle will provide the necessary
power (12 V and 3,3 V) and data via single cable.
We recommend using LX FLARM Eagle with LX navigation
FLARM accessories - LX Trac monitor, LX FLARM Colour
display and LX FLARM LED display. Discover more at
www.lxnavigation.com.
Some settings in FLARM Firmware will not work correctly or will be limited if you do not use the latest FLARM
Firmware version. Ensure that LX FLARM Eagle is updated at least once per year.

End user license agreement
This agreement is made between the Customer
(the person and/or company that bought the End
Product, and all subsequent users and owners)
and LX Navigation d.o.o., Tkalska ulica 10, SI-3000
Celje, Slovenia (hereinaer ˝LXN˝).
Terms and termination of agreement
This agreement shall commence when the Customer
receives the product.
By buying and using the End Product, the Customer has
accepted the following terms and conditions.
If the Customer does not agree with the said terms and
conditions, he can return the product if it is undamaged
and without any sign of use, within 30 days of receiving
it, and receive a full refund, thus terminating this
agreement.
General information
The Customer is hereby notied of the annual Flarm
update scheme in its original form:
˝From the March 2015 Update, every FLARM device
needs to be updated to the latest rmware version at
least once per year (rolling 365 days). This has to be part
of the Aircra Maintenance Program (AMP). The entry in
the AMP is to be made during installation. If you have a
FLARM installation that is not previously monitored by
the AMP, an entry should be made as soon as possible.˝
Other legal and useful information can be found on
FLARM ocial webpage (www.arm.com).
End user license agreement
By buying and using the End Product, the Customer
has accepted the terms and conditions of FLARM
EULA (FTD-019), found at www.arm.com/manualsdocuments/.

Warranty
LX FLARM Eagle, soware, rmware, license keys,
and data are provided on an “as is” basis without
warranty of any kind — either expressed or implied
— including, without limitation, any implied warranties
of merchantability or tness for a particular purpose.
LXN does not warrant the performance of the device,
soware, rmware, license key, or data or that the
device, soware, rmware, license key, or data will meet
your requirements or operate error free.
LXN warrants this device for a period of two (2) years
aer the original date of purchase against defects due
to faulty workmanship or materials arising from normal
use of the device. The warranty covers working parts
that aect the function of the device. It does NOT
cover cosmetic deterioration caused by fair wear and
tear, or damage caused by accident, misuse or neglect.
Any attempt to open or take apart the device (or its
accessories) will void the warranty.
Limitation of Liability
In no event shall LXN be liable to the Costumer or any
party related to the Costumer for any indirect, incidental,
consequential, special, exemplary, or punitive damages
(including, without limitation, damages for loss of
business prots, business interruption, loss of business
information, loss of data or other such pecuniary loss),
whether under a theory of contract, warranty, tort
(including negligence), products liability, or otherwise,
even if LXN has been advised of the possibility of such
damages. In no event will LXN’s total aggregate and
cumulative liability to the Costumer for any and all
claims of any kind arising hereunder exceed the amount
of fees actually paid by the Costumer for the device,
license keys or data giving rise to the claim in the twelve
months preceding the claim. The foregoing limitations
will apply even if the above stated remedy fails of its
essential purpose.

Indemnication
The Costumer will, at their own expense, indemnify
and hold LXN, and all ocers, directors, employees and
resellers thereof, harmless from and against any and all
claims, actions, liabilities, losses, damages, judgments,
grants, costs, and expenses, including reasonable
attorneys’ fees (collectively, “Claims”), arising out of any
use of a LX FLARM Eagle, soware, rmware, license
key, or data by the Costumer, any party related to the
Costumer, or any party acting upon their authorization.
Amendments
LXN reserves the right, in its sole discretion, to amend
this Agreement from time to time by posting an updated
version of the Agreement on www.lxnavigation.com,
provided that disputes arising hereunder will be resolved
in accordance with the terms of the Agreement in eect
at the time the dispute arose. We encourage you to review
the published Agreement from time to time to make
yourself aware of changes. Material changes to these
terms will be eective upon the earlier of (I) your rst
use of the LX FLARM Eagle, soware, rmware, license
key, or data with actual knowledge of such change, or
(II) 30 days from publishing the amended Agreement
on www.lxnavigation.com. If there is a conict between
this Agreement and the most current version of this
Agreement, posted at www.lxnavigation.com, the most
current version will prevail. Your use of the LX FLARM
Eagle, soware, rmware, license key, or data aer the
amended Agreement becomes eective constitutes
your acceptance of the amended Agreement. If you do
not accept amendments made to this Agreement, then
it is your responsibility to stop using the LX FLARM Eagle,
soware, rmware, license key, and data.
Return address:
LX navigation d.o.o., Tkalska ulica 10, SI-3000 Celje,
Slovenia
Copyright © 2018, LX navigation, all rights reserved.

 Loading...