

MODEL
ADDITIONAL FEATURES
TN-1-NK
Stainless Steel
TN-1-NK-WD
Stainless Steel Washdown
DIGITAL WEIGHT INDICATOR
OPERATING MANUAL
TR-1-NK
TR-1-NK (WD) M-2-0312
STANDARD OPERATION FEATURES:
This unit has the Pounds to Kilogram conversion feature. If this feature is
enabled, be sure that all calibration is done in Pounds. A second output has
been added to provide data to a remote computer or display separate from a
printer.
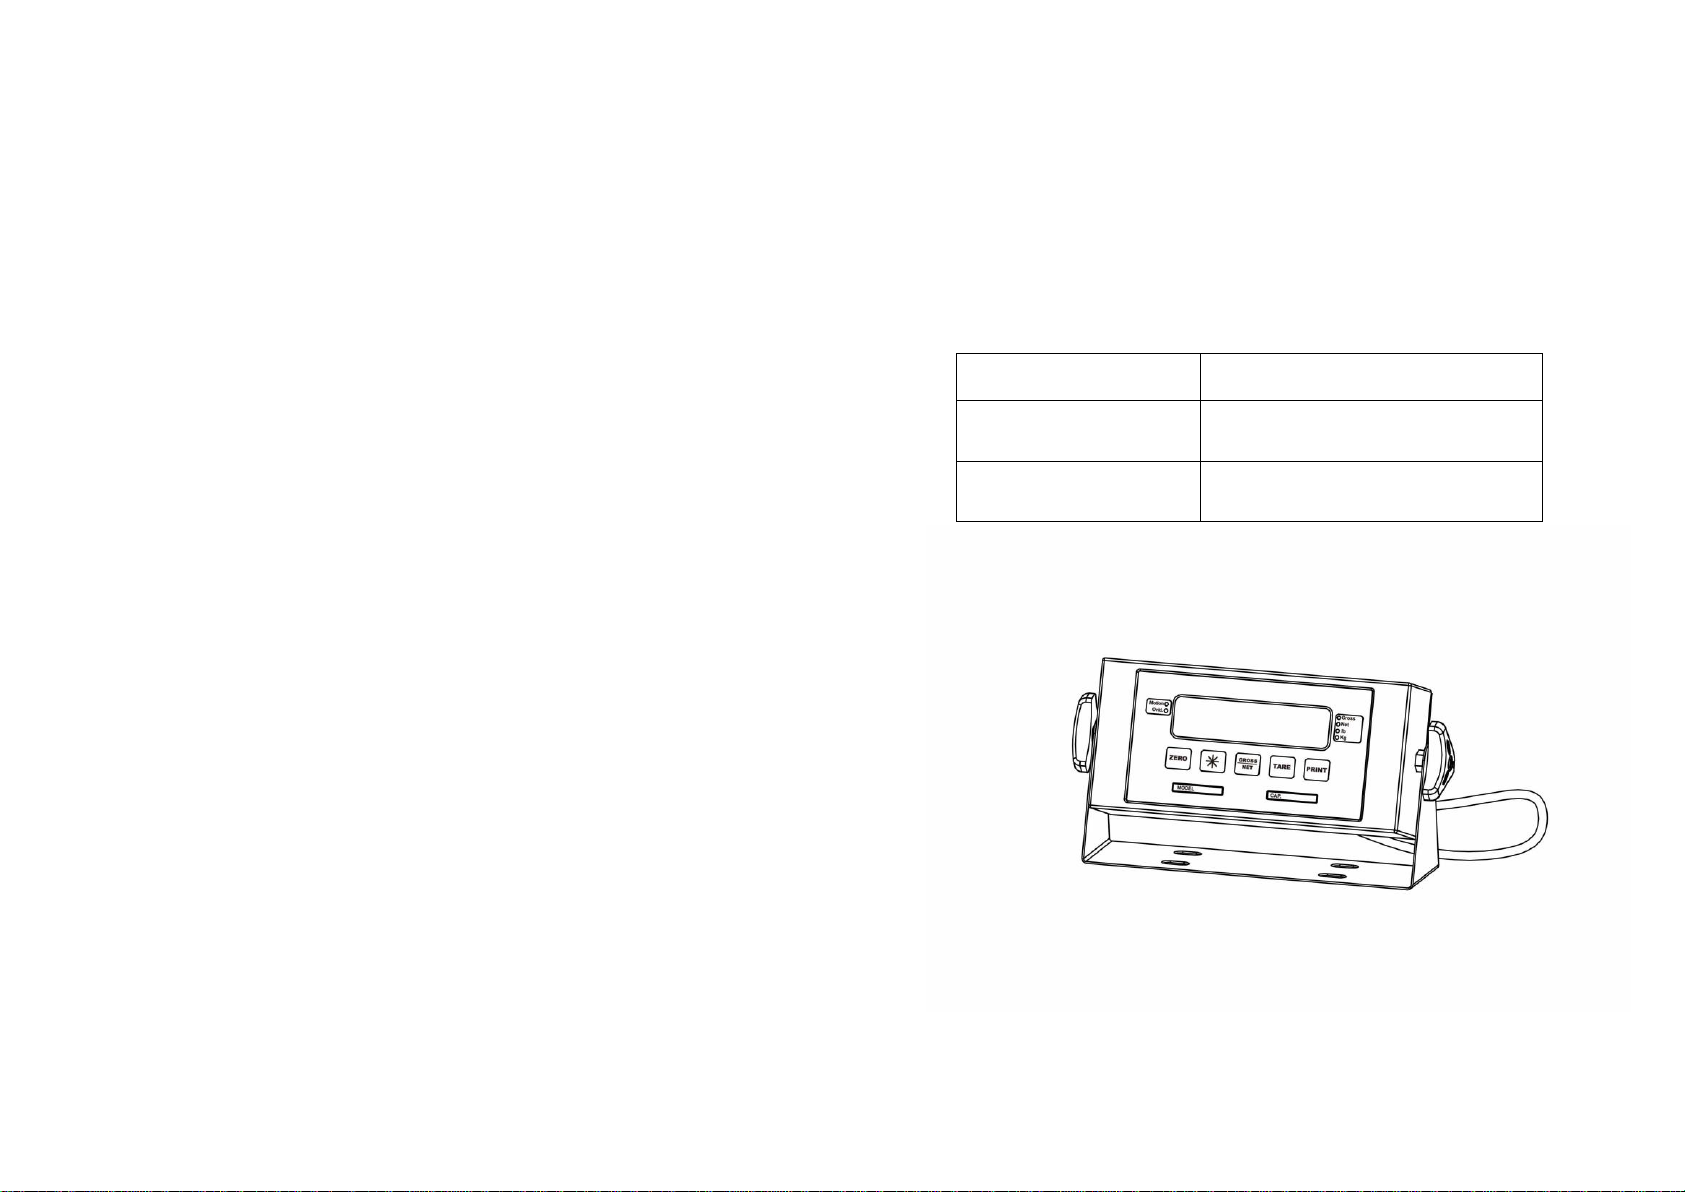
PANEL DESCRIPTIONS:
Front panel:
a. 0.54 inch 6 digit LED display
b. 6 LEDs for Motion,Ovld, Gross,Net,Ib,Kg
c. 5 function key
Annunciators:
MOTION: This light is on whenever the scale is motion.
OVLD: This light is on whenever the scale is overload
GROSS: Indicates that the indicator is displaying gross weight.
NET: Indicates that the indicator is displaying net weight.
Ib: Indicates the “lb” unit of the displayed weight.
Kg: Indicates the “kg” unit of the displayed weight.
-1-
KEY FUNCTION:
1. ZERO:
“Zero” feature works if load is between 0 to 100% of full capacity.
To bring the scale to a zero balance reading, press the ZERO button.
The button will not activate if the MOTION lamp is on.
2. ** (UNIT):
Push to switch between lb and kg. Each time the button is pushed,
the tare weight will be automatically cleared.
3. GROSS/NET:
Press this key switch between Gross or Net mode. The lamp will
Light to indicate which mode is being displayed.
4. TARE:
“Tare” feature works if load is between 0 to 100% of full capacity.
Multiple tare can be used provided the total mass does not exceed
the weighing capacity of the scale .
When the weight is stable(no motion), press the TARE button, and
hold for one display update. If the gross weight was not a negative
value, the tare weight now equals the gross weight and the display
will show a NET weight of zero.
5. PRINT:
Press this button to activate an optional printer.
-2-

WEIGHING
Before weighing
Whenever possible, please allow the scale to warm up for several seconds
after first turning the power on so that the scale will function properly and
accurately.
Weighing procedures
1. Press [ON/OFF] to turn on the scale.
When the power is turned on, all display segments appear for a few seconds
and "0" will appear on the display.
2. Select the weighing unit with [ ].
Press [ ] to switch between kg / lb.
3. Start weighing
If you do not use a container for weighing,
Verify the reading is "0". If not, press [ZERO] to display "0".
Place the items to be weighed on the platform.
If you use a container for weighing,
Place an empty container on the platform.
Wait for the stability weighing to be displayed and press [TARE].
Place the objects to be weighed in the container.
-3-
When to calibrate
Calibration is already done in factory. Do not calibrate the Scale unless it is not
accurate. Below steps need be followed strictly for calibration.
Calibration Instructions
Note: All calibration need be done in pounds
Steps:
Open the lower cover ,then press <CAL> key on the main board .When the
display shows “------”,press <TARE> to enter calibration .
1. Please make sure that the plate is empty first , then press
<ZERO> .
2. Put the calibration weight ( over 50% of capacity ,unit: Lb) )
3. Press < > key, then press <TARE> key to decrease or
<PRINT> key to increase displayed value. If need change
adjustment range, press <Gross/Net> key to decrease range of
adjustment .
4. When displayed value is the same to the calibration weight,
press <CAL> to confirm. Now it will return to weighing mode .
-4-

Parameter setting:
CODE
NAME
DESCRIPTION
CODE/
VALUE
0
LB/KG
units
conversati
on setting
nn=00: Power-on unit is lb and
units conversation is not available.
nn=0: Power-on unit is lb and units
conversation is available.
nn=02: Power-on unit is kg and
units conversation is available.
nn= other value, same to nn=02.
00,
0,
02,
nn
1
responding
rate for
sampling
nn=00:rate=6.25Hz ( the slowest)
nn=01:rate=7.5Hz
nn=02:rate=12.5Hz
nn=03:rate=15Hz
nn=04:rate=25Hz
nn=05:rate=30Hz
nn=06:rate=50Hz
nn=07:rate=60Hz (the fastest)
nn= other value ,same to nn=00.
00,
01,
02,
03,
04,
05,
06,
07,
nn
2
LB division
displayed
Minimum difference between two
weighing readings.
01,02…
nn
3
Overload
limit
nn=00:fixed 10000 point
nn=99:No overweight
nn=others:overweight
range=101*nn
00,
30
99.
nn
4
unstable
range (a
“d” as a
unit)
The OMT LED light out and the
weighing operation is enable while
motive reading is not exceeded
the limit of this selection.
01,02…
nn
Open the lower cover ,then press <CAL> key on the main board and it will
show “------”, press < Gross/Net > to enter menu.
Format of parameter: - x - - n n ("x" means the order of parameter; "n n"
means specific parameter.
Operation: <Gross/Net> : change X in circle
<TARE>:Displayed value increase 1 by pressing the key every time .
<PRINT>: Displayed value minus 1 by pressing the key every time.
Setup Menu Chart:
-5-
Setup Menu Description:
6
6

PIN NO
WIRE NAME
Color
1, 8
+Excitation
RED
3, 10
- Excitation
BLACK
5, 12
+Signal
GREEN
7, 14
- Signal
WHITE
CODE
NAME
DESCRIPTION
CODE/
VALUE
5
zero
tracking
range (a
“d” as a
unit)
Display maintain zero while the
reading is less than this selection
and stable
01,02,03
,04,05…
.
nn
6
LB number
of decimal
point
nn=00:no decimal place
nn=01:one decimal places
nn=02:two decimal places
nn=03: three decimal places
nn=04:four decimal places
nn=others ,same to nn=00
00,
01,
02,
03,
04,
nn
7
undefined
8
RS232
Output option for serial
communication port(9600,N,8,1)
with straight-through cable
nn=00:key output
nn=01:continuous output
nn=others ,same to nn=00
date format: STX,' '/'-',7Bit
Data,'lb'/kg',' ' ,'G'/'N','M'/' '。
CR,LF
00,
01,
nn
REMARK: Factory default settings are marked in bold with underline
-7-
RS232
FUSE socket
Input Power AC
LOADCELL socket
LOADCELL Socket :DB14
+
Back panel diagram for TR-1-NK
Switch power USB socket
-8-

PIN NO
WIRE NAME
2
RXD
3
TXD
5
GND
PIN NO
SOCKET NAME
1
AC 2 LOAD CELL
3
undefined
4
undefined
PIN NO
WIRE NAME
1
GND
2
TXD
3
RXD
RS232 TRANSMIT FUNCTION
1. RS232 interface:DB9
2. RS232 Transmission Agreement:
Mode:Simplex Asynchronous Serial
Baud rate: 9600
Data Bit:8
Parity Bit:NONE
Stop Bit:1
Data Format:ASCII
3. Transmission Information Format: 16 Byte ,blank=20H
<STX><POL><7Data><kg/lb><COM ><M>< ><CR><LF>
-9-
Back panel diagram for TR-1-NK WD
1 2 3 4
Socket :
RS232 connection:J2(mainboard)
-10-
 Loading...