

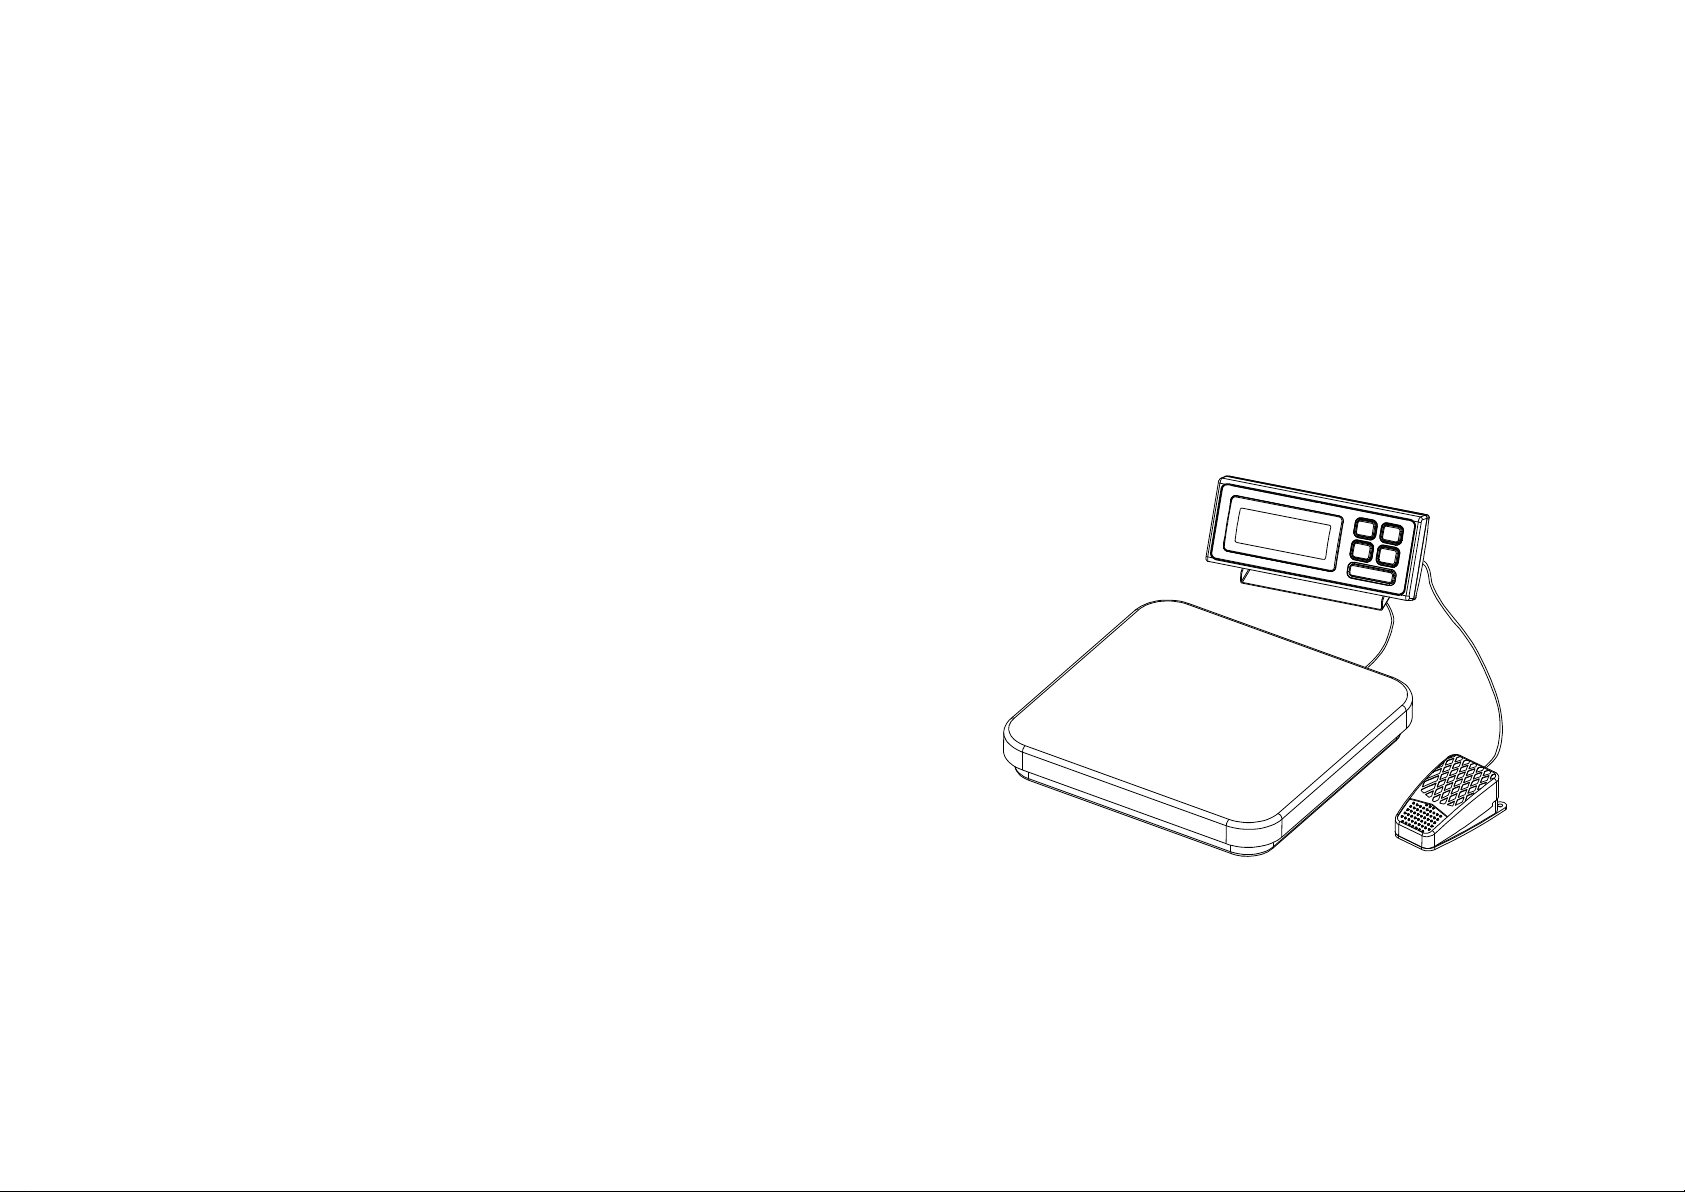
PIZA SCALE
INSTRUCTION MANUAL
PIZA M-1-0612

SAFETY PRECAUTIONS
△WARNING
Important information to alert you to a situation
that might cause serious injury and damage to
your balance if instructions are not followed.
△CAUTION
Important information that tells how to prevent
damage to equipment.
All safety messages are identified by the following the words "WARNING" and
"CAUTION". These words mean the following:
When using the scale/balance, the following safety precautions should always
be followed.
△ WARNING
Use only the AC adaptor supplied with the scale/balance. Other adaptor
may cause damage.
△ CAUTION
Avoid using the balance under direct sun light. This may cause discoloration or
malfunctions. Do not use scales onto the carpet base, it may cause scales
inaccurate and need re-calibration.
Do not mix batteries. Replace all other batteries at the same time. Do not
replace only a portion of the 6 batteries as this may cause a malfunction. If the
scale is not to be used for a long period of time, remove all batteries from the
battery compartment to avoid leakage, which may cause damage to this scale.
Avoid overloading the scale, as this may cause permanent damage and void
your warranty – do not EVER exceed the maximum capacity of the scale.
Keep the scale away from water – this scale is not water resistant. Shock, injury
and electrical damage can occur if used in a wet location!
1
SPECIFICATIONS
Model number
Capacity
Division
PIZA 12
12lb
0.002lb
PIZA 25
25lb
0.005lb
Platter size
320×310mm / 12.6 x 12.2 inch
Net/Gross weight
5.6kg(12.4lb)/6.4kg(14.1lb)
Packaging
Individual carton: 510x375x140mm /
20x14.6x5.5 inch
4 Units in one box: master carton:
525x610x393mm / 20.6x24x15.5 inch
Operating Temperature
0-40℃(32-104 F)
Power source
6×AA Batteries or AC/DC
Adaptor 9v/100mA(optional)
ON/OFF
HOLD
UNIT
ZERO
PRINT
9
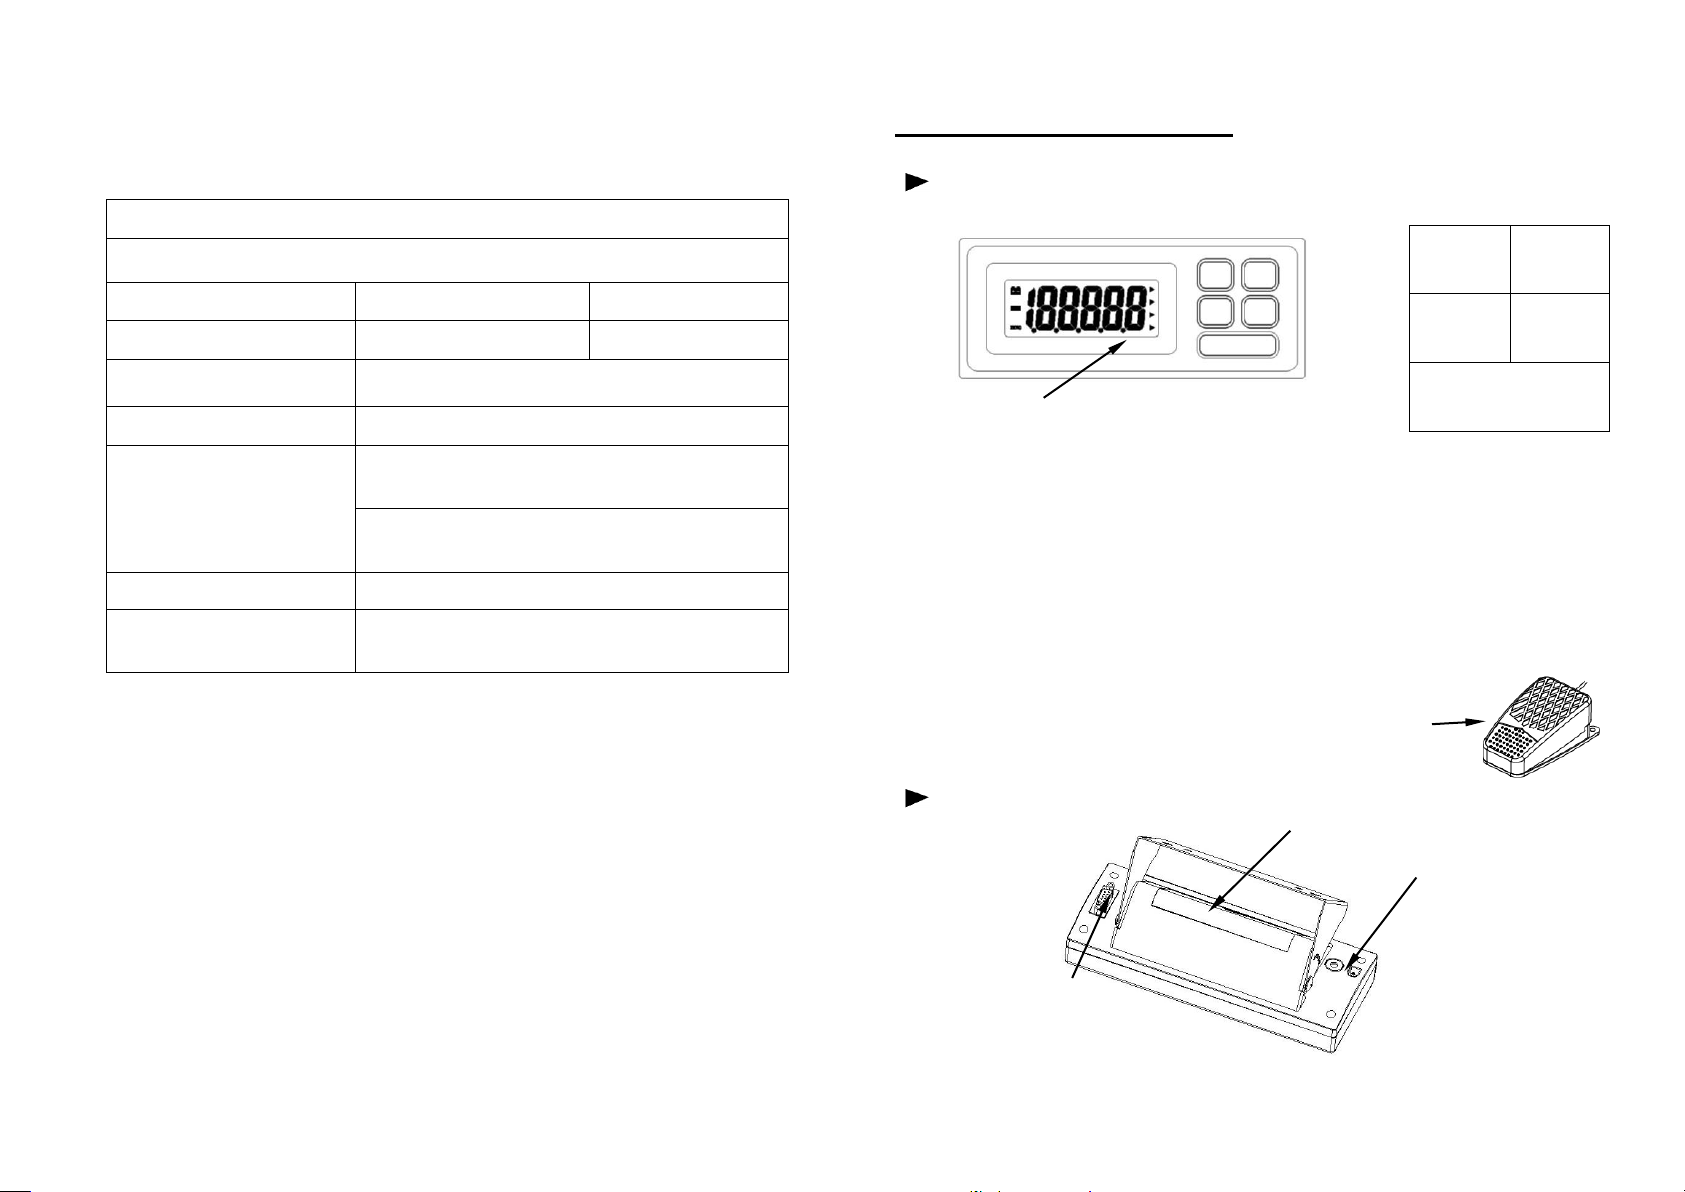
PARTS DESCRIPTIONS:
·TOP
·Display
1. ON/OFF: Turn the scale power on/off.
2. HOLD: Press this key to store weight value.
3. UNIT:Select weighing units: kg/lb/oz/lb:oz.
4. ZERO:(for TARE)
This key is “Zero” feature if load is below 10% of full capacity or a
negative value, and is tare function between 10% to full capacity.
It has multiple tare function, but total weight of before and after
Tare must be less than its full capacity.
5. PRINT: Press once and send weight information once.
6. Foot switch: With the same functions as ZERO key.
·BOTTOM
Battery Cover
AC Adaptor socket
RS232 socket
2

FUNCTION SETTINGS
1. Press and hold [HOLD] key then press [ON/OFF] key to turn on the scale, the
display will show A-ON or A-OFF, press [ZERO] key to select on or off (ON
means auto power off function activate, OFF means auto power off function
inactivate).
2. Press [UNIT] key, the display will show L-ON or L-OFF, press [ZERO] key to
select on or off (ON means auto backlight function activate, OFF means auto
backlight function inactivate).
3. Press [UNIT] key, the display will show P-XX. Press ZERO key to select OFF,
key, con and Stb. (OFF means RS232 function inactivates, KEY means that
output the data by pressing [PRINT] key. Con means that output the data
continually. Stb means that output the data when reading is stable)
4. Press [UNIT] key, the display will show J-ON or J-OFF, press ZERO key to
select ON or OFF. (ON means showing zero when turn on the power, OFF
means showing weight placed when turn on the power.)
5. Press [UNIT] key, the display will show F-Nor, F-PEA or F-Ani. Press ZERO
key to select Nor or PEA or Ani. (Nor means normal weighting function activate.
PEA means peak hold weighting function activate. Ani means animal weighting
function activate).
6. Press [UNIT] key, the display will show N-dsp or N-Ind. Press ZERO key to
select dsp or Ind. (dsp means it can display synchronously as a displayer for
Features:
1. Display options:5 digital LCD
2. Power:AC adapter 9V 100mA
3. Auto back light (selectable)
4. Auto off (selectable)
5. Operating Temperature:0-40℃(32-104℉)
6. Operating Humidity:25%~95%RH
7. 5 Keys:ON/OFF, ZERO, UNIT, HOLD, PRINT, and special foot switch for
TARE function
ZERO This key is “Zero” feature if load is below 10% of full
capacity or a negative value
UNIT Toggle among different units
ON/OFF Turns the scale power On or Off
HOLD Press this key to store weight value
PRINT Press once and send weight information once.
8. Zero Range (0 to 10% of full capacity)
9. Tare Range (10% to full capacity)
10. Error Message indication:
Err-0 Overload
Err-5 Unstable when power on
Err-c Calibration code is not enough or operation error.
Low battery indication
another indicator through the RS232 socket. Ind means it is only a indicator for
the scale)
7. Press [UNIT] key, the display will show Kd 50 or Kd 100 or Kd 200 or Kd400.
(press [ZERO] key to select animal scale anti-shock range among 50, 100, 200,
400)
3
11. Two calibration weight units (Optional): kg , lb
12. Open calibration capacity
13. Zero range: + 10% of full capacity
14. Three modes : Normal mode / Setting mode /Internal Auto Calibration
mode
15. RS232 function
8

When to calibrate
Note: Calibration is done in factory. Don't re-calibrate the Scale, unless
it is not accurate.
Calibration:
A. Press and hold [ZERO] key then press [ON/OFF], the display will show
“CAPU=”, press twice [HOLD] key, the display will show CALU=, press
[UNIT] key to select calibration unit kg or lb, it will have a small triangle on
the right to indicate kg or lb, press [HOLD] key to confirm the selection.
B. Press [HOLD] key again, the display will show CAL, press [UNIT] key to
set calibration weight. Press [UNIT] key to move the flash digit to right, then
press [ZERO] key to increase the flash digit, press [HOLD] key to confirm
the selection ( the calibration weight should be more than 2/3 of full
capacity), it will show CAL.
C. Press [PRINT] , it will show CAL and AD value.
D. Press [UNIT] key, the display will show the flash calibration weight, place
the shown weight on the platform, press [UNIT] key when the stable
indicator brightens up, the display will show “--------”, then the AD value.
Restart the scale and calibration has done.
Turn on the scale, place tested weight to check whether it is correct, if not,
please repeat above steps.
7
8. Press [UNIT] key, the display will show Fd 0.5 or Fd 3 or Fd 5 or Fd 10. (press
[ZERO] key to select animal scale filter range among 0.5, 3, 5, 10)
9. Press [UNIT] key, the display will show Ft 1 or Ft 2 or Ft 3 or Ft 4. (press
[ZERO] key to select animal scale filter time among 1,2,3,4)
***Please kindly note that Kd,Fd,Ft works only in F-Ani mode .
Peak Hold mode
1. In FUNCTION SETTING 5, if you choose F-PEA, it means peak hold
weighting function activated.
2. Before weighing, please press HOLD key .
HOLD FUNCTION
1) Place the item on the Scale platform.
2) Wait for the stable weight to be displayed.
3) Press the HOLD key. The " . " hold indicator will turn on.
4) Remove the item from the Scale platform, the item's weight reading will
remain on the display. Now you can also select units by pressing [UNIT] key.
5) Quit HOLD function: Once an item is weighed and the hold function is
enabled, you want to quit HOLD function, press the HOLD key again to cancel
the "." hold indicator and return the Scale to weighing mode.
4

interface:
1
2
3
4
5
6
7
8
9
1
0
1
1
1
2
1
3
1
4
1
5
1
6
1
7
1
8
1
9
2
0
W
/
M
:
+
_
C
R
L
F
M
=
o
v
e
r
l
o
a
d
m
o
d
e
W
=
n
o
r
m
a
l
w
e
i
g
h
i
n
g
m
o
d
e
=
w
e
i
g
h
t
i
n
f
o
r
m
a
t
i
o
n
:
W
e
i
g
h
t
i
n
f
o
r
m
a
t
i
o
n
U
n
i
t
f
o
r
m
a
t
i
o
n
x
a
m
p
l
a
:
1
2
3
4
5
6
7
8
9
1
0
1
1
1
2
1
3
1
4
1
5
1
6
1
7
1
8
1
9
2
0
W
:
+
C
R
L
F
5
0
k
g
.
0
5
0
k
g
1:signal interface:( microphone socket)
Red-------E+(positive source) / Yellow or Blue-------S+(positive
signal)
Black-------E- ( negative source ) / White or Green-------S(negative signal)
No sign -------GND
2: battery socket:
AC/DC 9V――――――external positive, inner negative
3:RS232 interface:DB9
RS232 TRANSMIT FUNCTION
1. RS232 interface:DB9
SCALE PC
RXD 2 2 RXD
TXD 3 3 TXD
GND 5 5 GND
2. RS232 Transmission Agreement:
Mode:Simplex Asynchronous Serial
Baud rate: 9600
Data Bit:8
Parity Bit:NONE
Stop Bit:1
Data Format:ASCII
3. Transmission Information Format: 20 Byte ,blank=20H
5

6
 Loading...