

Page 1
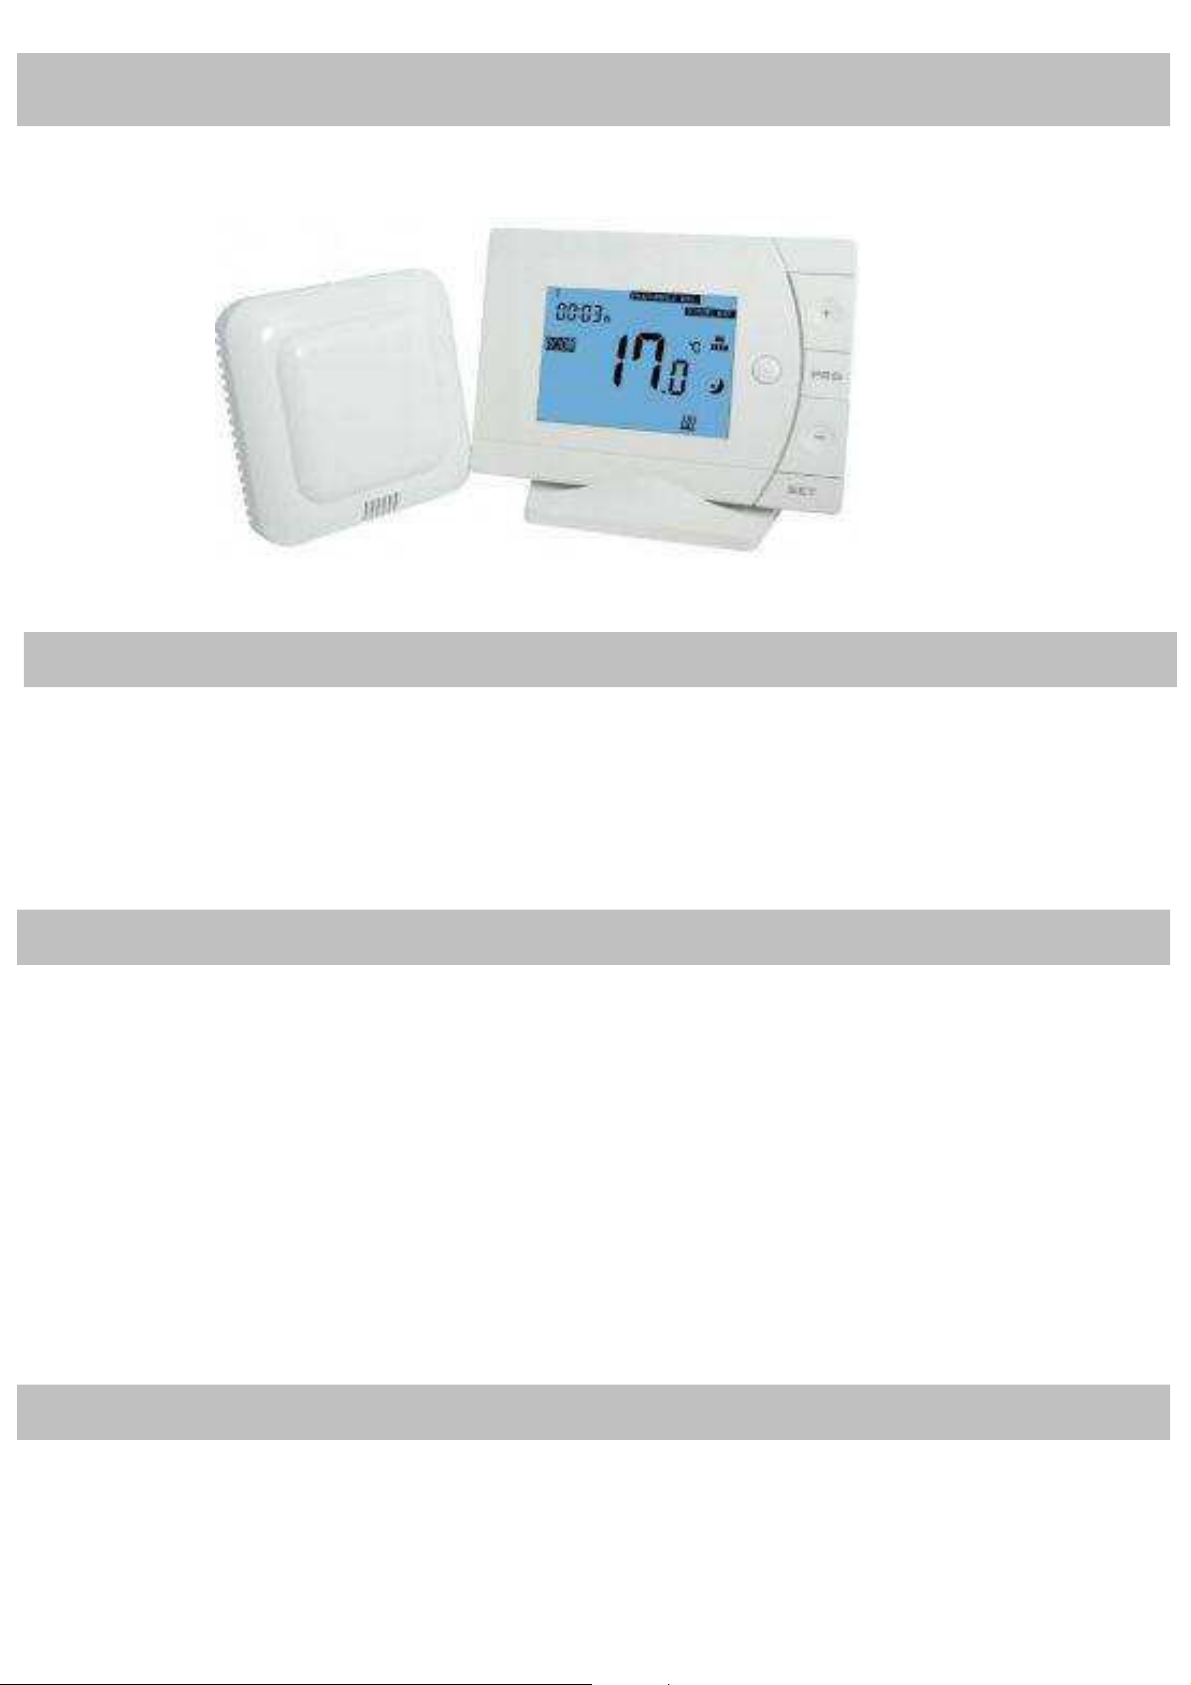
RF-OPTIMA BASIC PLUS THERMOSTAT
The OPTIMA-RF BASIC PLUS surface-mounted radio thermostat has been developed to be able to
switch electric and conventional heating- or cooling systems on and off using a set temperature and
time.
Options for and advantages of the OPTIMA-RF BASIC PLUS thermostat:
Large display can be clearly read with the background lighting.
Easy to fit thermostat and receiver.
Four buttons make it easy to use.
The display shows the set temperature as well as the measured temperature and time.
Temperature display in degrees Celsius.
Huge temperature range from 3°C up to 50°C.
Battery status display.
For heating or cooling.
Can be used also for automatic heating or cooling by heatpump.
The thermostat is supplied with a wall-fixing frame, base and a very compact receiver (flush-mounted or surface-mounted).
Technical data:
Thermostat operating voltage: 2 x AAA 1.5 V, alkaline batteries.
Backup storage: EEPROM
Receiver operating voltage: 230 VAC, 50/60 Hz
Maximum voltage / (ohmic) load: 250 VAC/10 A.
Maximum voltage / (inductive) load: 250 VAC/3 A.
Frequency: 868 MHz.
Channel selection: By programming the thermostat and the receiver.
Switching options: N A.
Switching thermostat (input): Heating or cooling, automatically heating or cooling
Receiver switch contacts: NO and NC.
Temperature settings: 3°C ~ 50°C, 0.5°C increments.
Accuracy: +/- 0.5°C (+/- 1°F).
Thermostat dimensions: Surface mounted, 134 mm x 94 mm x 28 mm.
Display dimensions: 69 x 49 mm.
Receiver dimensions: Flush-mounted/surface mounted, 86 mm x 86 mm x 23 mm.
Colour: White
IP protection rating thermostat: 30.
IP protection rating thermostat: 21.
Certification: CE.
Advice
Always switch off the voltage when carrying out installation work.
Read the operating instructions fully before installing the thermostat and the receiver.
The thermostat must be installed by a professional.
Installation must be carried out in accordance with (N)EN standards (within the EU).
Only use the thermostat as outlined in the operating instructions.
Always use alkaline batteries (e.g. Duracell) and charged batteries in the thermostat battery holder.
1
Page 2
2
RF-OPTIMA BASIC
PLUS THERMOSTAT
Location coding/Channel selection:
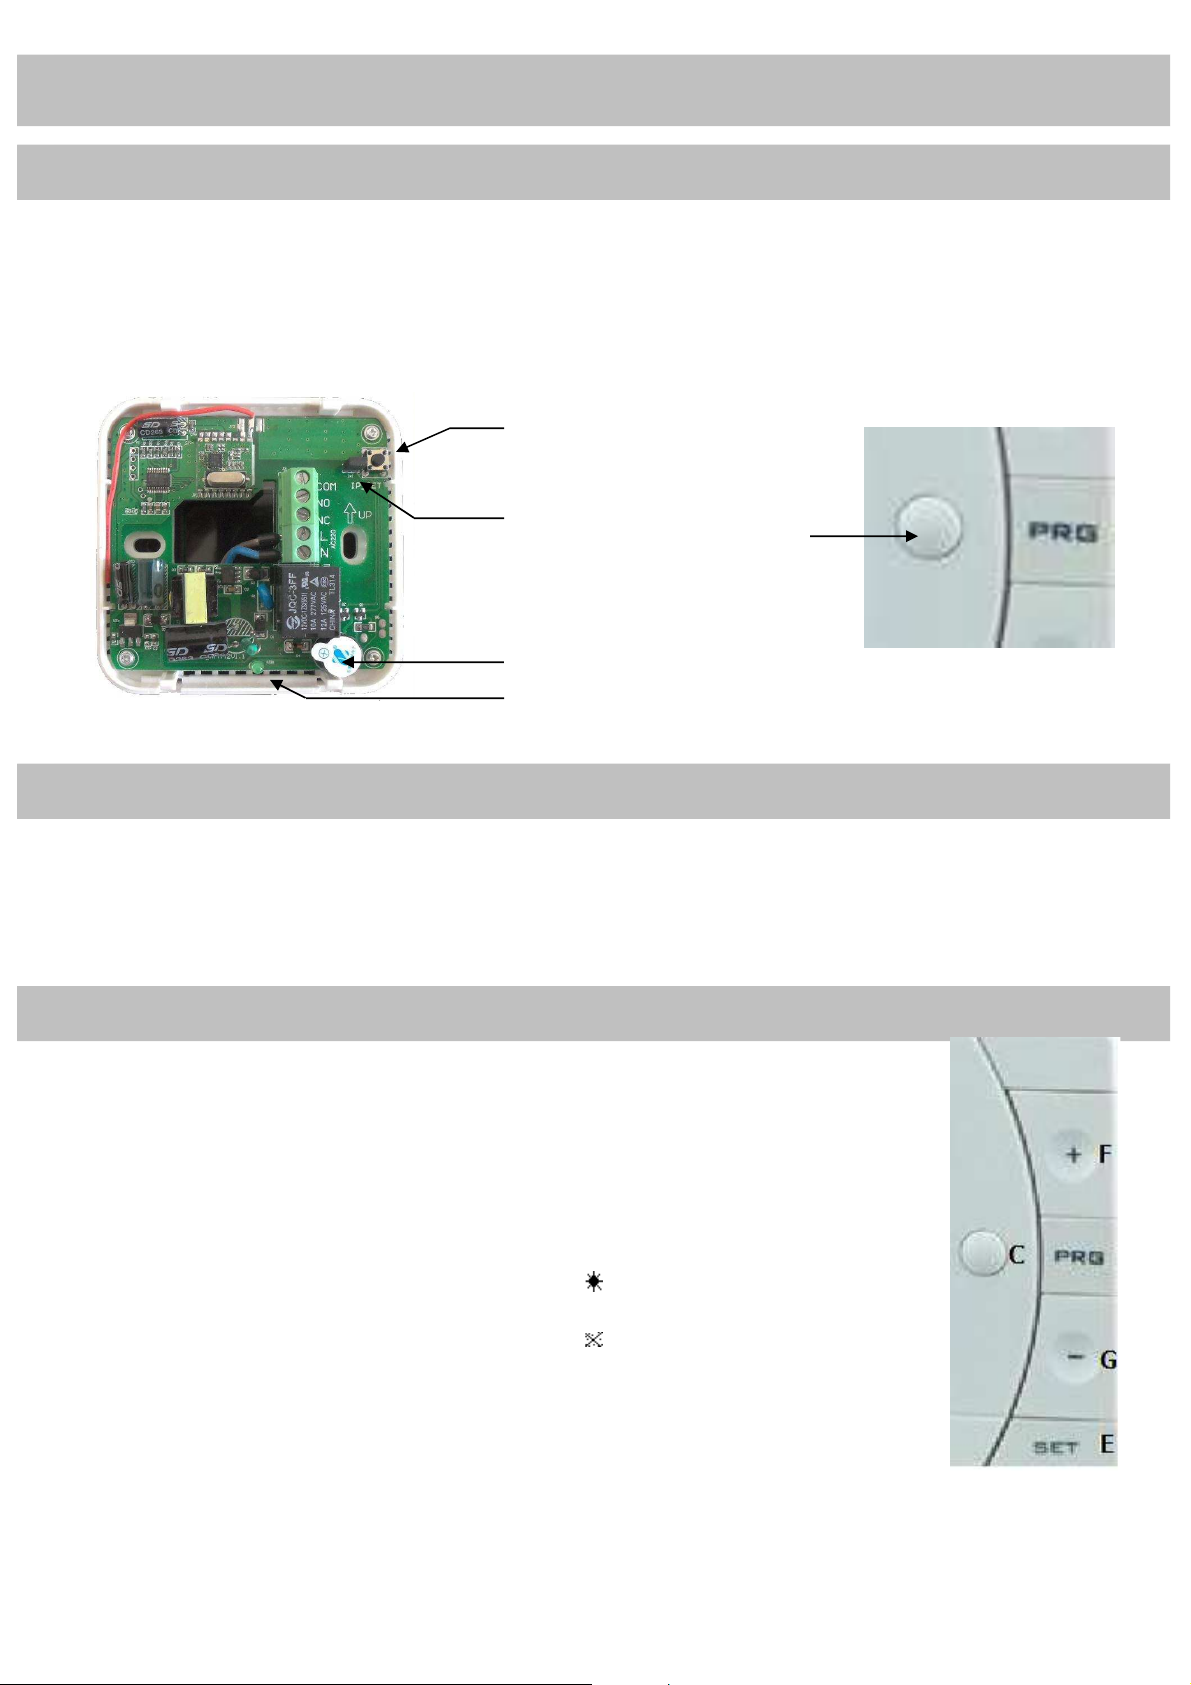
The RF-OPTIMA BASIC PLUS thermostat and the receiver have a binary code with which the channel can be set. The receiver has a button to link it
with the thermostat, which in turn has a button to link it. This linking has usually already been activated. Should this not be the case, the following steps
can be taken.
- Press the button on the receiver (A); the green LED light will flash (B).
-
Press and hold the SET (E) button on the thermostat for 3 seconds. You will hear a buzzing sound (D) and the LED lights on the
receiver will stop blinking.
-
The location (channel) will be shown on the thermostat display. The thermostat and the receiver are now linked. Press the SET
button (E), to continue.
A
E
C
D
B
The jumper (E) can be removed to switch off buzzer mode.
Calibrating the thermostat temperature:
The measured temperature of the RF-OPTIMA BASIC PLUS is easy to calibrate. Only use this function if the measured temperature deviates (this
happens if you place the thermostat in a drawer or similar), thermostat must be in off status!
-
Press and hold the SET (E) button on the thermostat for 3 seconds; the code (e.g. 8cAS )will be shown in the top left corner.
-
Use the + (F) and – (G) buttons to set the temperature value. This value can be adjusted by -8 to +8°C.
-
Press the SET (E) button on the thermostat to save this function and leave the menu. Press the O (C) button to turn on the
thermostat.
Setting the time, day and temperature on the thermostat:
To set the time and day with the following steps.
-
Press and hold the SET button (E) for around 3 seconds. The minutes display (top left in the display) flashes.
-
Change this value using the + (F) and – (G) buttons.
-
Press the SET button (E). The hour display (top left in the display) flashes.
-
Change this value using the + (F) and – (G) buttons.
-
Press the SET button (E). The day display (top left in the display) will flash as a number.
-
Change this value using the + (F) and – (G) buttons. Use 1 for Monday, 2 for Tuesday, 3 for Wednesday, 4
for Thursday, 5 for Friday, 6 for Saturday and 7 for Sunday.
-
Press the SET button (E). The set temperature for heatingmode can be made.
-
Change this value using the + (F) and – (G) buttons.
-
Press the SET button (E). The set temperature for coolingmode can be made.
-
Change this value using the + (F) and – (G) buttons.
-
Press the SET button (E), save the settings and leave the menu.
2
Page 3
RF-OPTIMA BASIC PLUS THERMOSTAT
Inserting/replacing the thermostat batteries:
Assembling and connecting the receiver:
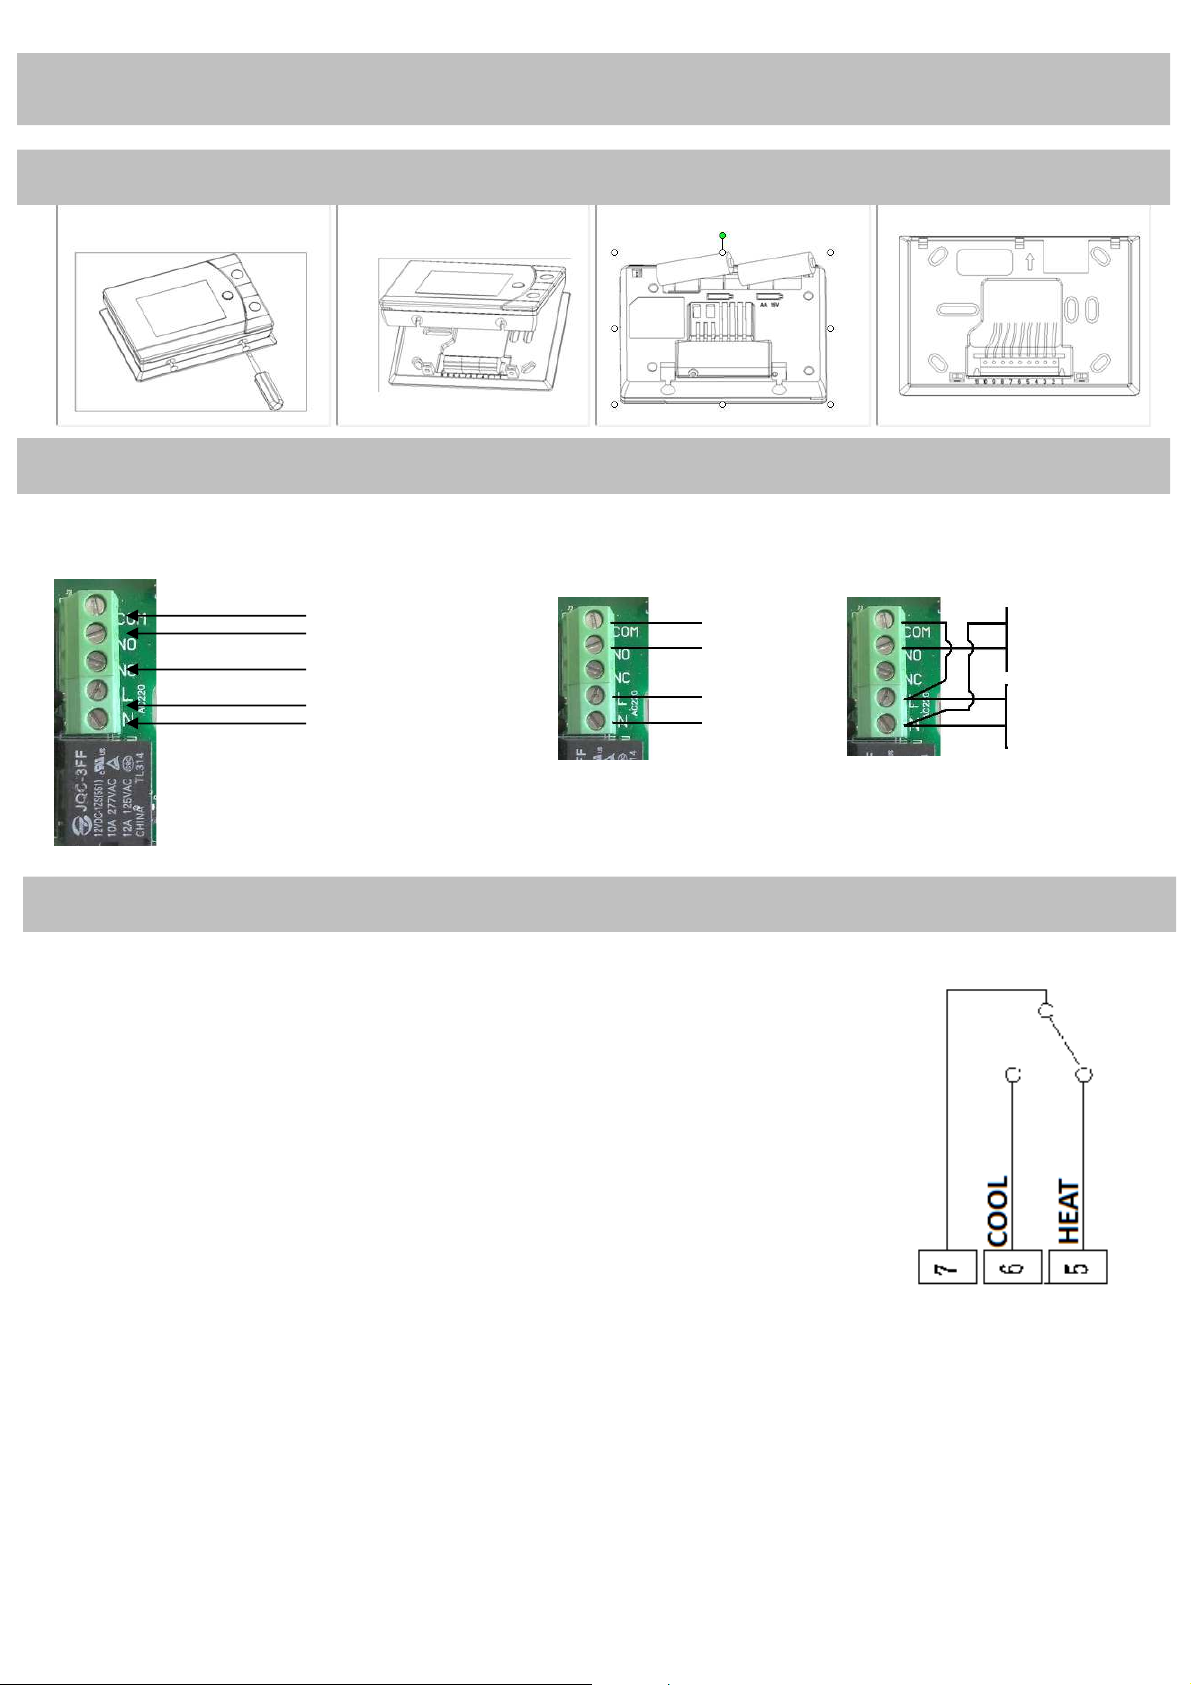
The receiver can be mounted directly on a wall or in a flush-mounted box. Remove the fascia panel first of all; there are two indentations on the bottom
side which can be pushed in using a screwdriver.
The receiver has a connecting terminal which has 5 connections.
COM: Common contact
NO: Normally-open contact
NC: Normally-closed contact
L + N: Electrical connection
230VAC.
Connection data Heating Electric heating
Heat or cool mode, automatic heat or cool mode
The RF Optima Basic Plus has also a connection terminal for heating or cooling OR for automatically heating/cooling by a heatpump
The RF thermostat has on the backside 3 pins which is connecting a green or black terminal on the mounting plate
which can be used for heating or cooling mode. The default setting is heat, but when the terminal 7 and 6 are being
connected, the thermostat is set for cool mode. This connection can be made with a thin electric wire 0,25mm2
When the thermostat must be act automaticly, e.g by heatpump, make the wiring as below.
The main heat/cool installation must have a volt free output!
– Connect on terminal 7 the COMMON wire.
– Connect on terminal 6 the COOL wire.
– Connect on terminal 5 the HEAT wire.
When the heat/cool installation generate heat, contact 7 and 5 should be activated. When the heat/cool installation
generate cooling, contact 7 and 6 should be activated.
Thermostatconnection
Boiler
Electrical
connection
230VAC.
;
Electric heating
element
(230VAC/10A)
Electrical
connection
230VAC.
Minimum wire thickness for this cable is 0,75mm2
3
Page 4

RF-OPTIMA BASIC
PLUS THERMOSTAT
Miscellaneous:
- Batteries should be replaced once a year to ensure accurate operation (use alkaline AA batteries, 1.5 V, e.g. from Duracell).
-
Treat the OPTIMA-RF BASIC PLUS thermostat and the receiver with care; the thermostat and the receiver have sensitive electronics.
-
The OPTIMA-RF BASIC PLUS cannot tolerate moisture and extreme heat; ensure that the thermostat and the receiver are suitably
protected.
We hope you enjoy using the OPTIMA-RF BASIC PLUS thermostat.
If you have any questions please contact:
Copyright © LVDS 4
 Loading...