

Page 1
INSTRUCTIONS
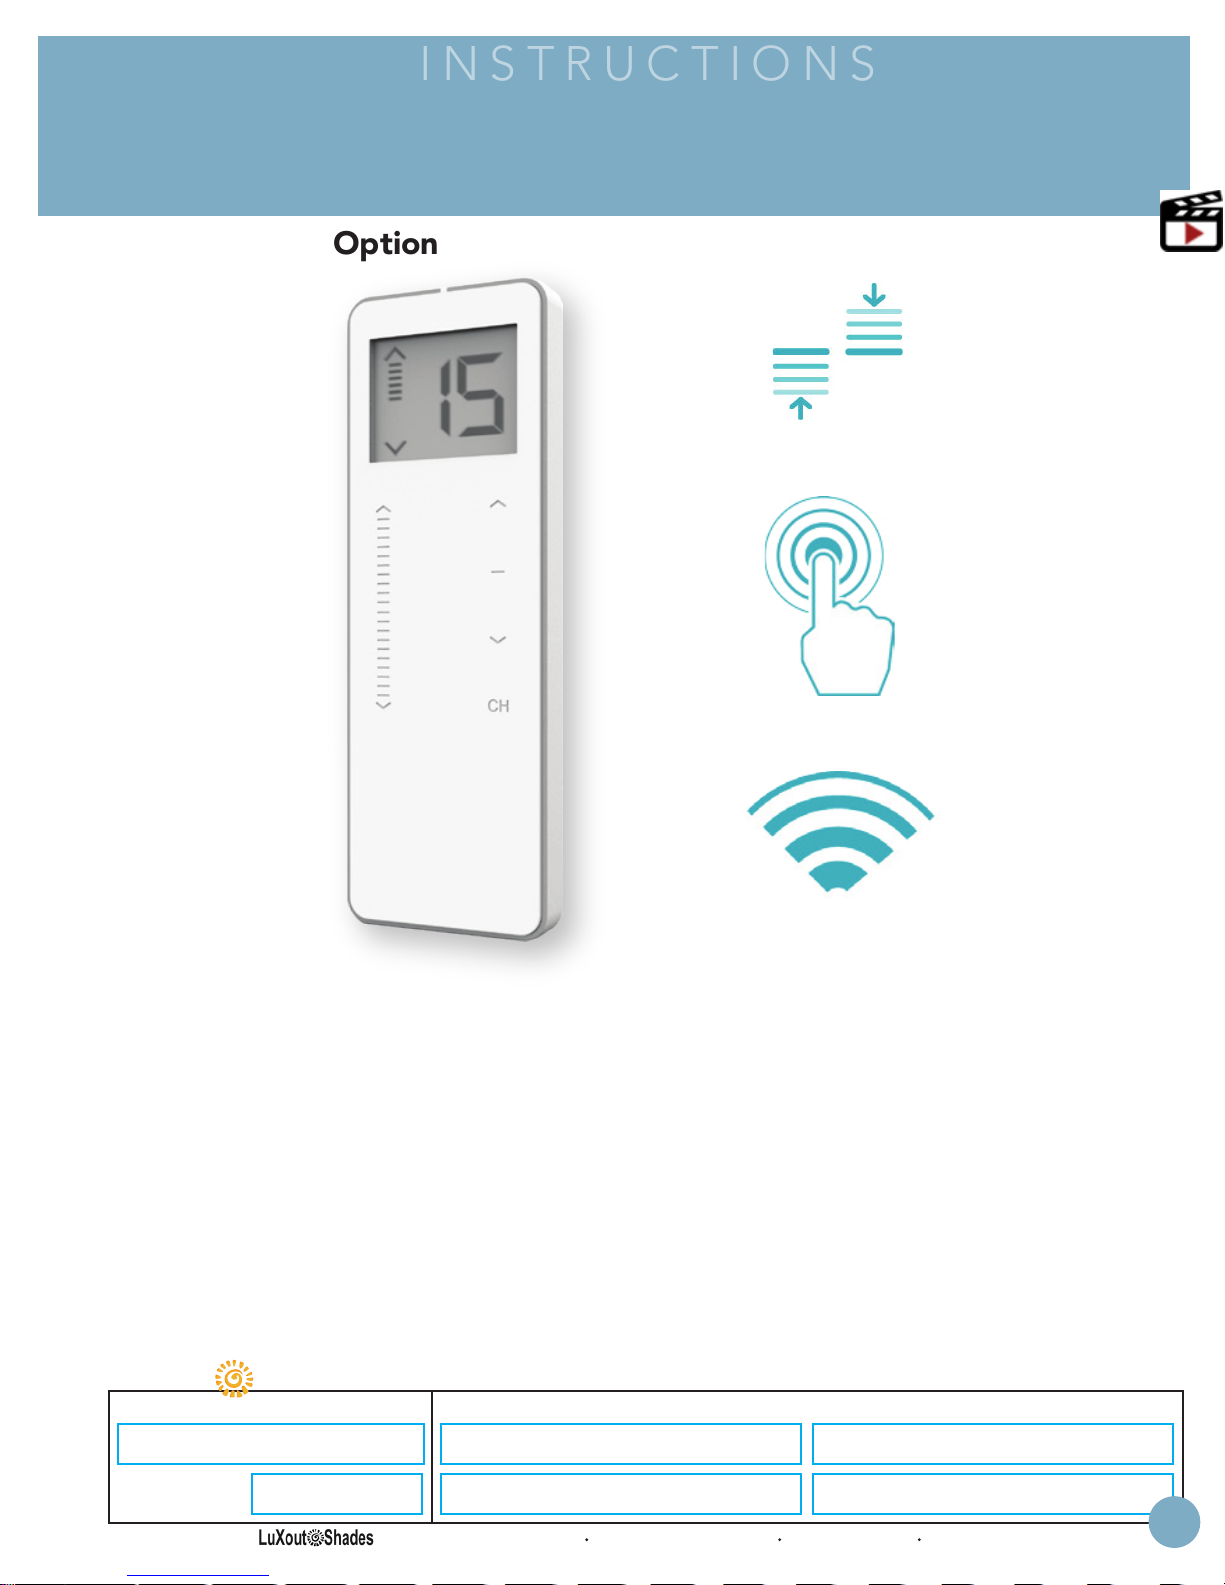
Multi-Channel Option
LuXout Shades
Multi-Channel Controller
Overview
LuXout Videos
Level Control
Touch Sensitive
433 MHz
About The Controller
The LuXout Shades Multi-Channel Controller features a contemporary design with touch sensivite controls. Each battery
and plug-in shade from LuXout Shades will come preprogrammed from the factory. The pre-programming assures the
remote is paired with the shade, the upper and lower operation limits are set, the remote is locked and the unnecessary
channels are hidden for ease of use. (15 available)
Features:
• Up to fifteen channel capacity.
• Touch sensitive buttons.
• Slim Magnetic wall mount.
• LCD display.
• Hide unused channel function.
• Levelling control.
• Individual/group contol.
Package Contents
• Remote
• Magnetic holder &
fixing screws
• Instruction Manual
• 3V - CR2450 Battery
SPECIFICATION SUBMITTAL
Job Name: Model Numbers:
Job Number:
1221 Admiral Street Richmond VA 23220 800-817-1204 LuXoutShades.com
I-47
Page 2
INSTRUCTIONS
Multi-Channel Controller
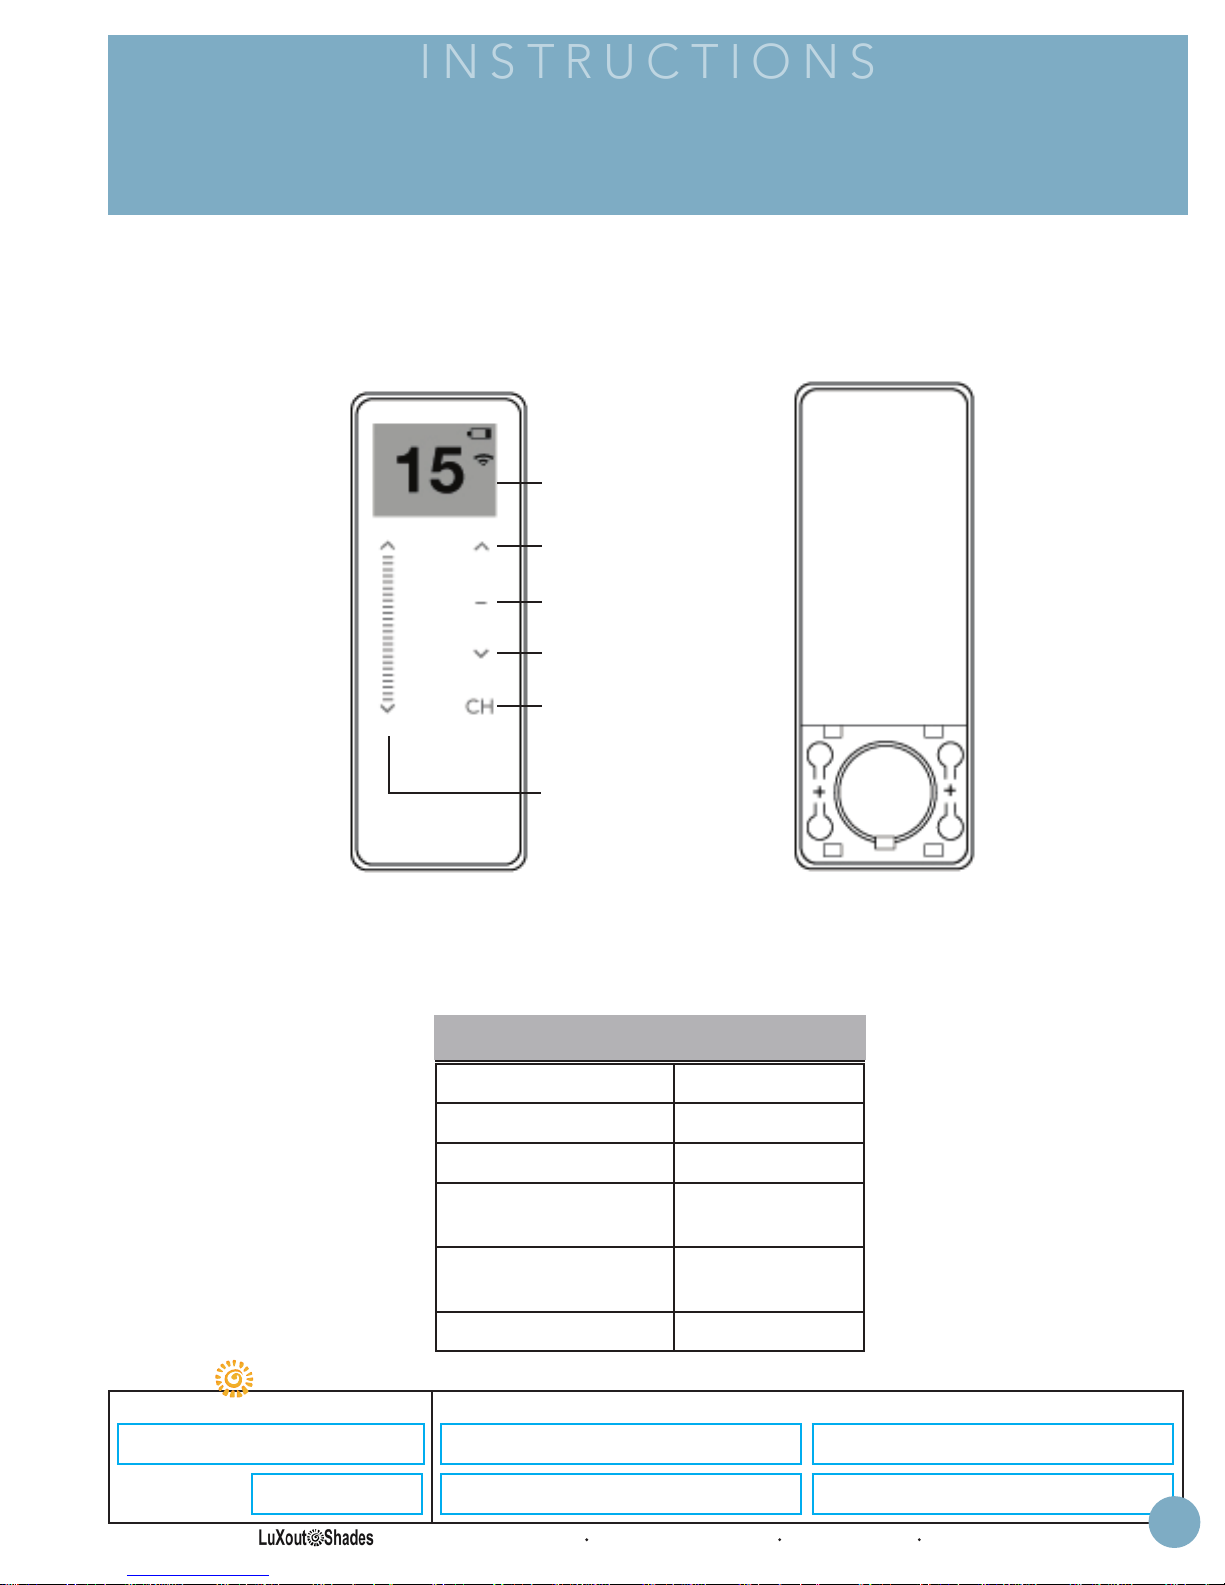
Multi-Channel Overview
LuXout Shades
Overview
FRONT
Multi-
Channel
LCD Screen
UP
STOP
DOWN
CHANNEL
SLIDE CONTROL
BACK
P2P2
Battery
Compartment
(Shown with
cover removed)
SPECIFICATION SUBMITTAL
Job Name: Model Numbers:
Job Number:
1221 Admiral Street Richmond VA 23220 800-817-1204 LuXoutShades.com
TECHNICAL SPECIFICATIONS
Voltage 3V (CR2450)
Frequency 433.92 MHz
Transmitting Power 10 milliwatt
Ambient Operating
Temperature
Transmission Distance Up to 200 meters
Battery CR2450
-10°C - 50°C
(open spaces)
I-48
Page 3
INSTRUCTIONS
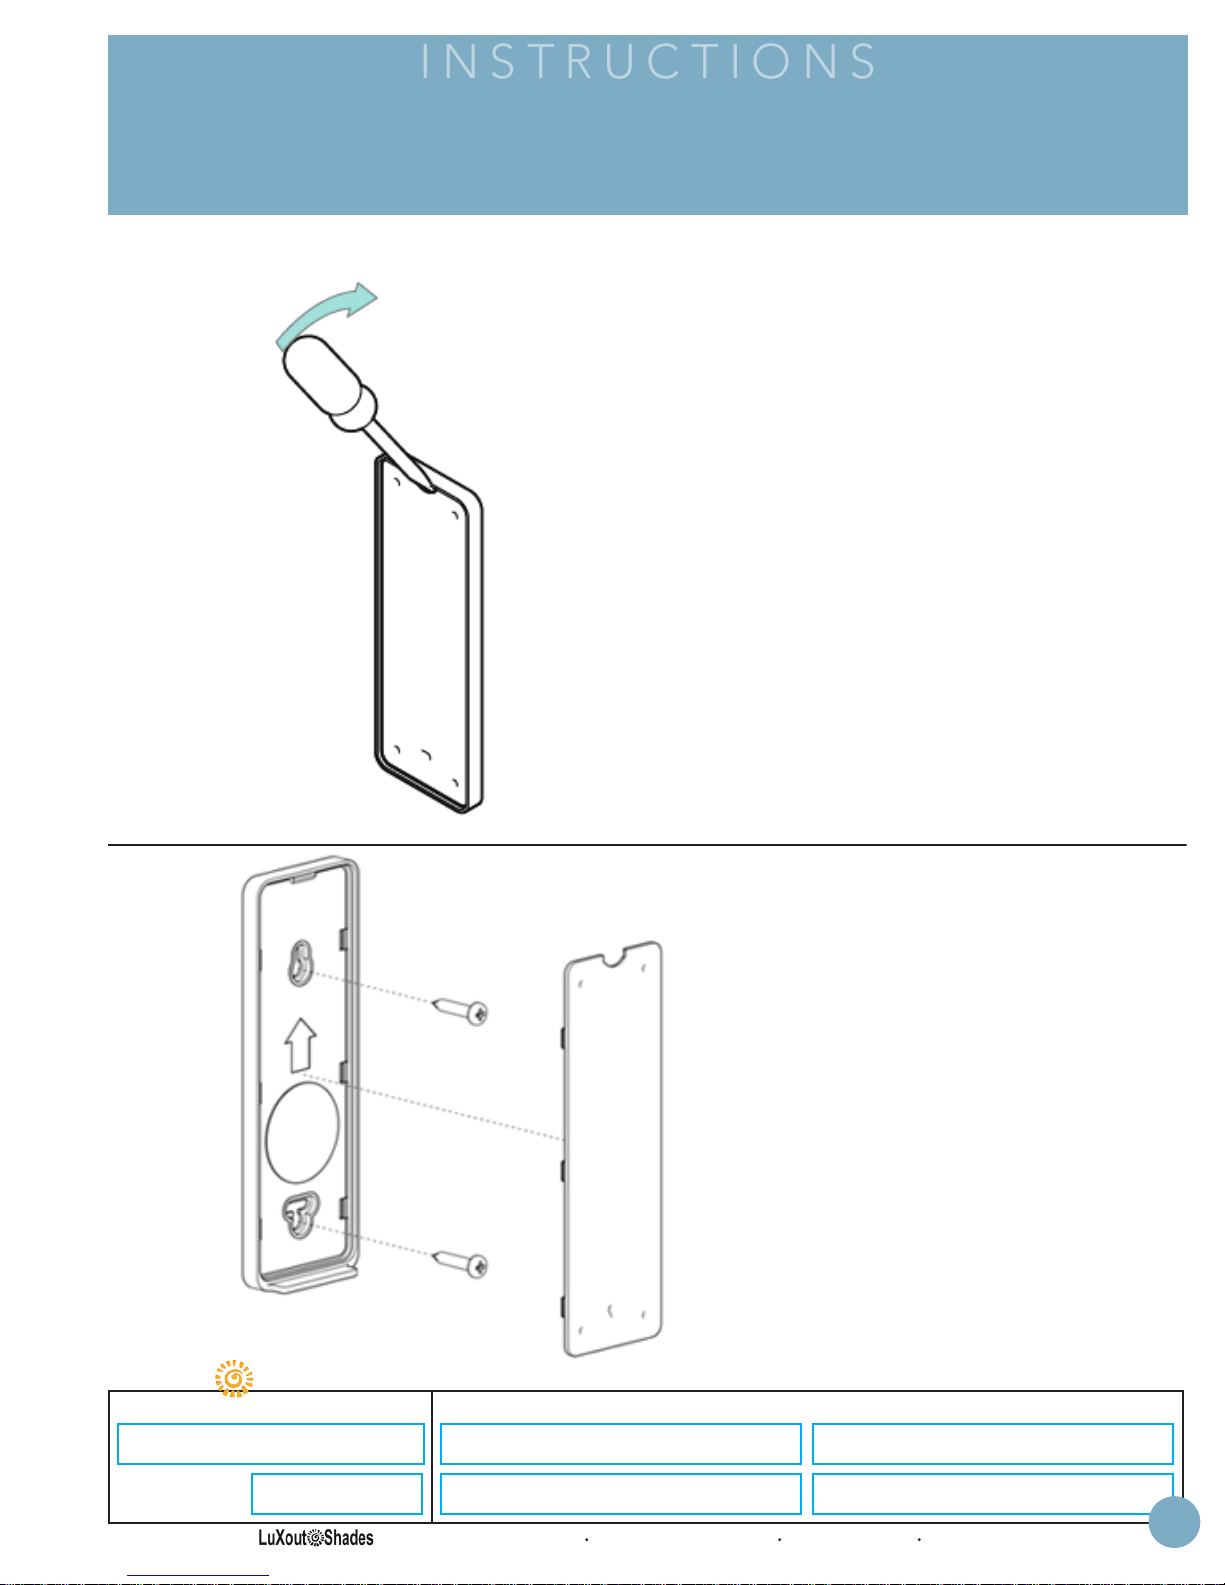
Install Wall Mount Holder
LuXout Shades
Multi-Channel Controller
Overview
Remove cover from base by prying with
flat head screwdriver
Use supplied fasteners to attach base to desired
surface as shown in figure
SPECIFICATION SUBMITTAL
Job Name: Model Numbers:
Assure screwdriver slot is facing up or
the controller will not be held in place
securely
Replace cover by pressing snap
latches into place
Job Number:
1221 Admiral Street Richmond VA 23220 800-817-1204 LuXoutShades.com
I-49
Page 4
INSTRUCTIONS
Multi-Channel Controller
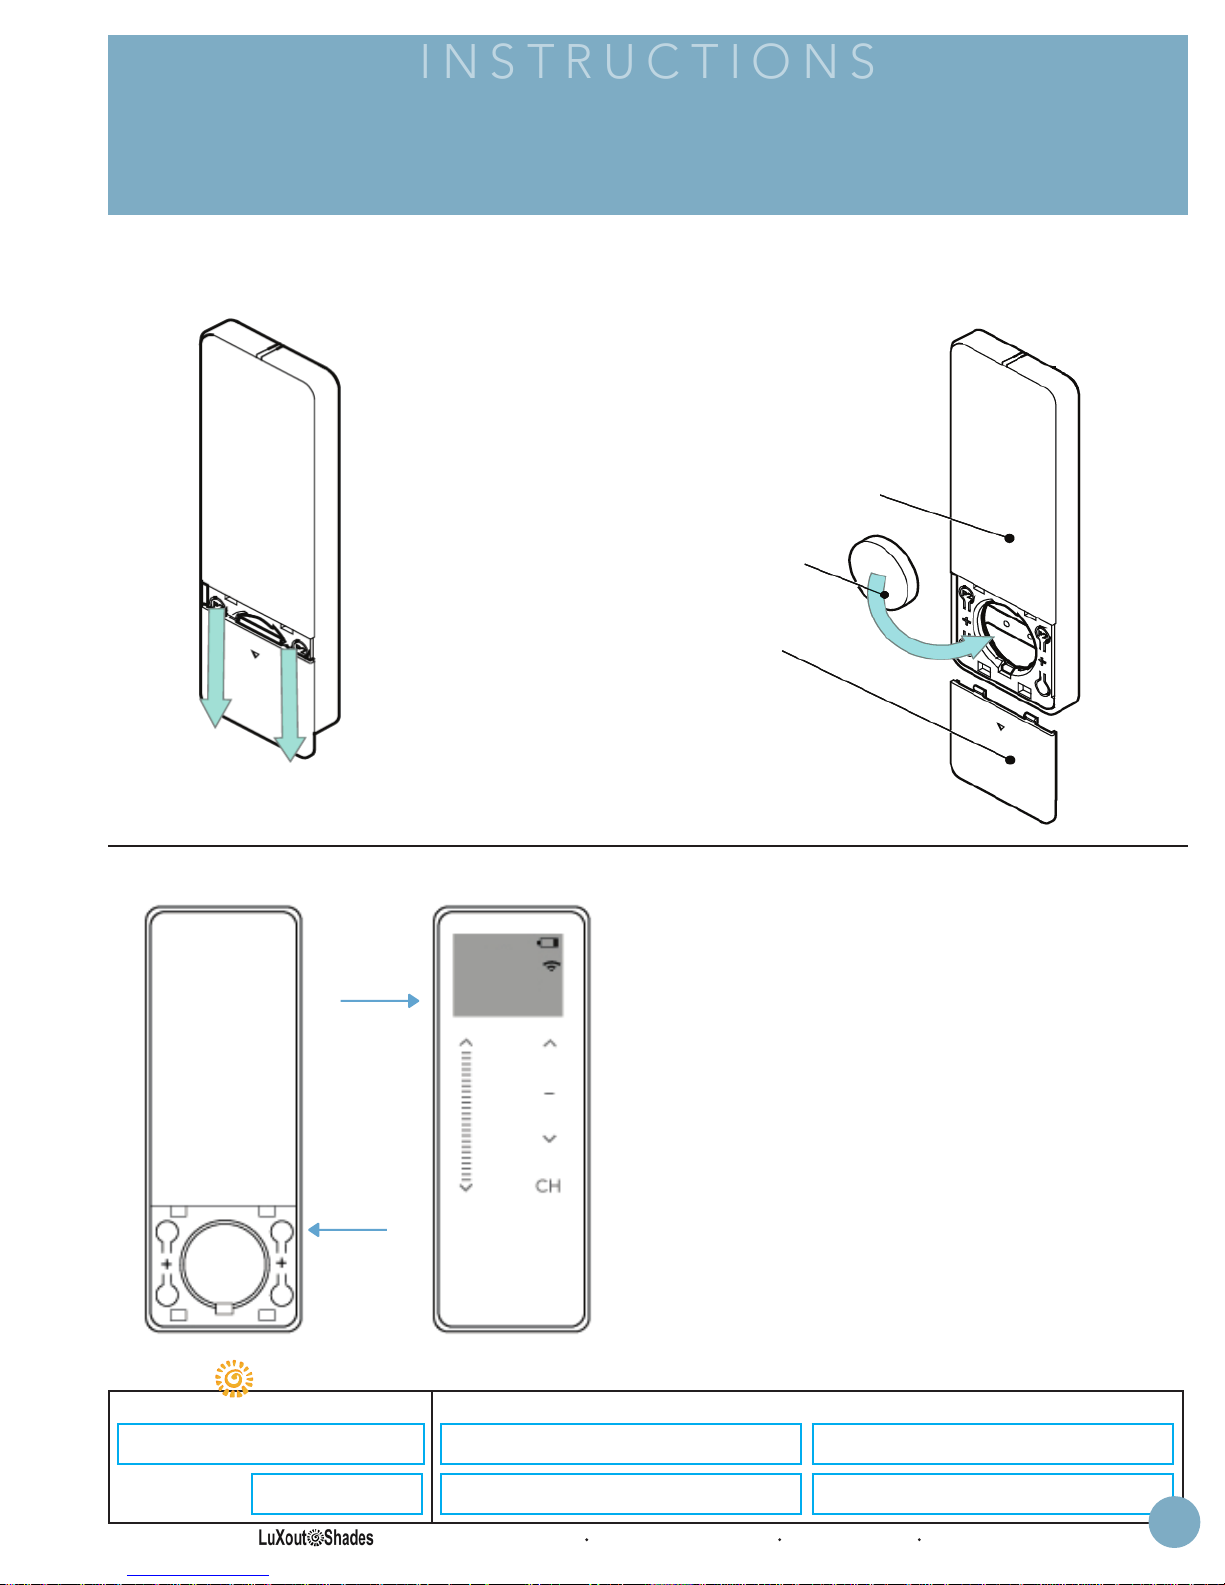
Install or Replace Controller Battery
LuXout Shades
Initial Setup
Unlock/Lock Controller - Limit Setting
‘U’
signifies
unlocked
U
Remove cover from
controller: with 2 fingers
placed in upper area of
cover, press gently in and
down to disengage cover
and slide down to remove
Install battery with
positive (+) side facing up
Replace cover by
reversing step 1
If limits need adjusting, follow the instructions
below to unlock the controller for limit setting:
Right
P2
P2P2
SPECIFICATION SUBMITTAL
Job Name: Model Numbers:
Job Number:
1221 Admiral Street Richmond VA 23220 800-817-1204 LuXoutShades.com
• Unlock the limit setting tool by pressing the right
P2 button on the back of the controller (remove
cover to expose the button)
• Press and hold the button until the LED display
shows a flashing “U”, then release.
• You will be required to set the controller back in to
“limit locking mode” once final adjustments have
been made. Simply repeat the above step until a
flashing “L” shows on the display (“U” for unlocked, “L” for locked).
I-50
Page 5
INSTRUCTIONS
Multi-Channel Controller
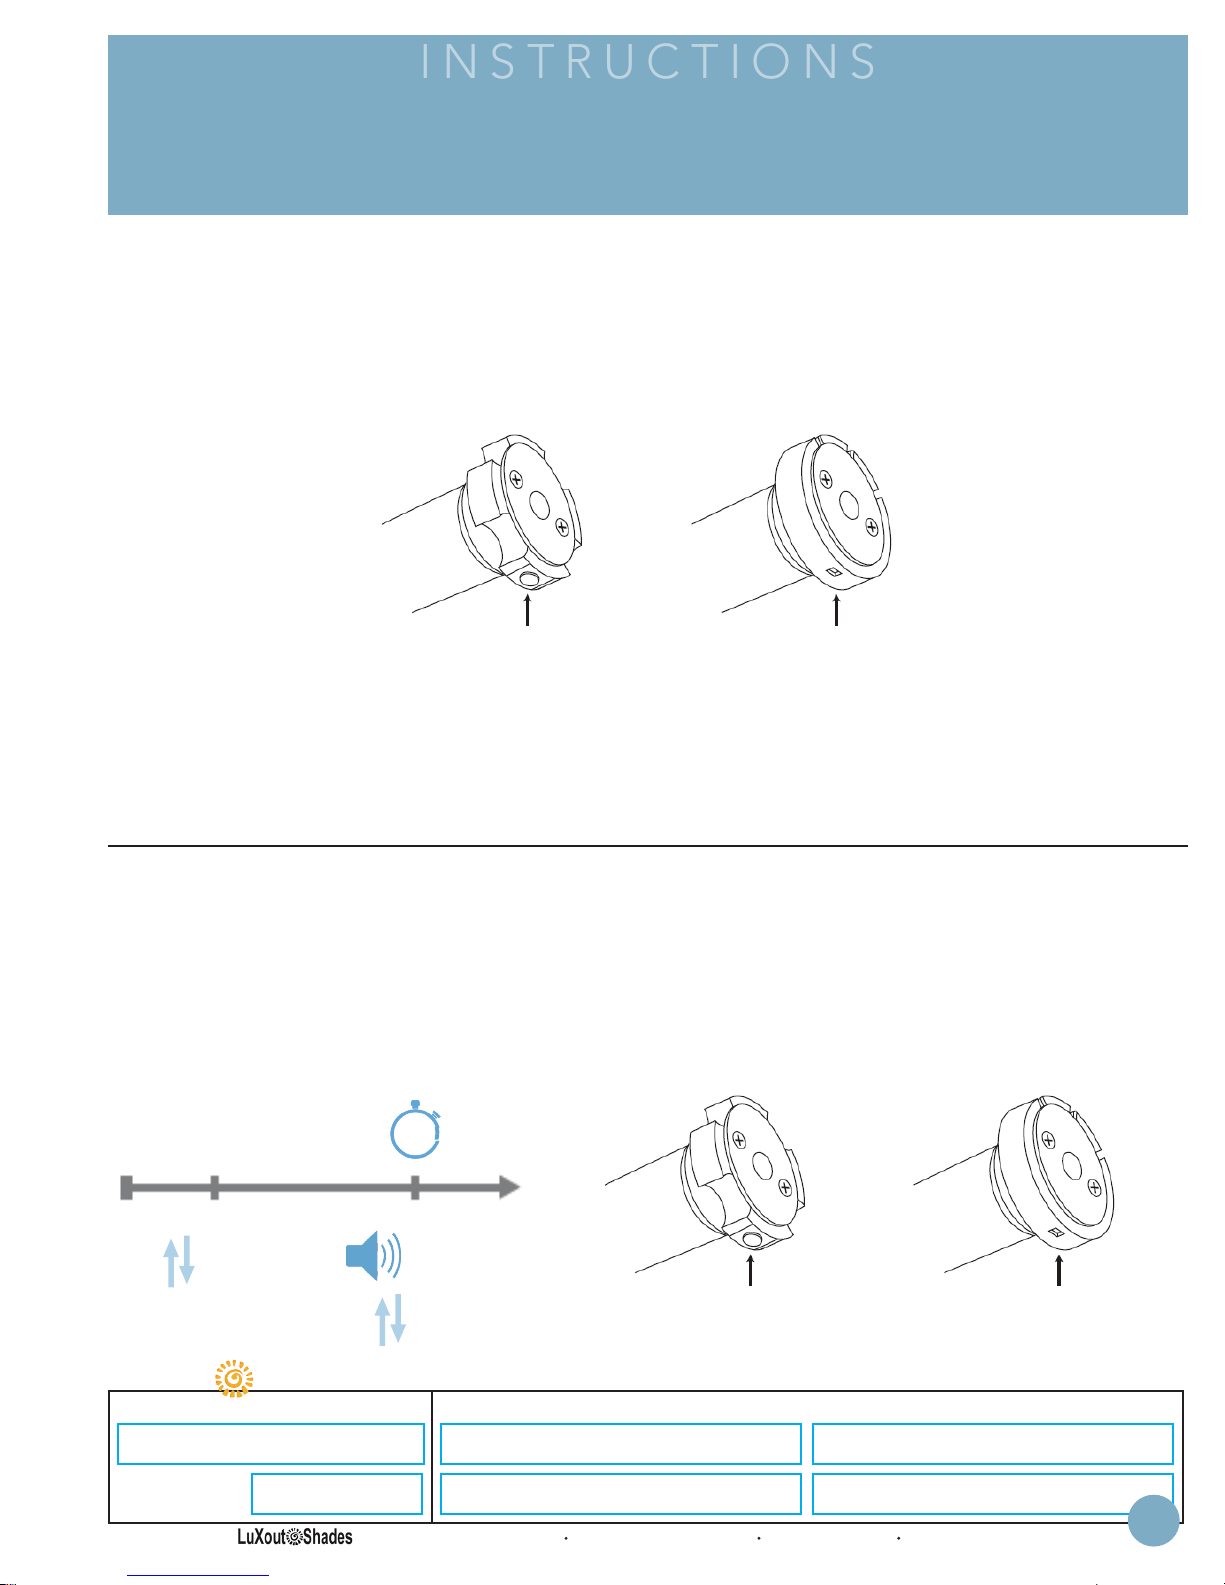
It is necessary to “Wake” the motor before operation and setup.
LuXout Shades
Sleep Mode
Each battery & plug-in motor comes preprogramed from LuXout Shades. Upon leaving the factory
the motor is placed into “Sleep Mode” to avoid accidental operation during shipping.
WAKE
To “Wake” the motor and exit Sleep Mode, assure the motor is installed and secured in the
mounting hardware.
Motor head
programming button
After the motor is installed in the brackets, press and hold the programming button on the motor head
until the motor jogs up and down once. It is now no longer in “Sleep Mode” and ready for further setup.
* Warning, if you press and release the programming button quickly, the motor will lower to
its lower limit. Be mindful of this during the install process.
SLEEP
If required, to place the motor back into “Sleep Mode” press and hold the programming button
for a period of 6 seconds. Release the button when the motor has jogged up and down twice.
The motor will beep twice to signify “Sleep Mode” has been activated.
HOLD
6
SEC.
Motor Response
JOG
x1
BEEP
x2
JOG
x1
Motor head
programming button
Motor head
programming button
Motor head
programming button
SPECIFICATION SUBMITTAL
Job Name: Model Numbers:
Job Number:
1221 Admiral Street Richmond VA 23220 800-817-1204 LuXoutShades.com
I-51
Page 6

INSTRUCTIONS
Multi-Channel Controller
LuXout Shades
Remote & Motor Pairing
Each battery & plug-in motor will come preprogrammed from LuXout Shades. The preprogramming assures the remote is paired with the motor, the upper and lower operation limits are set,
the remote is locked and the unnecessary channels are hidden for ease of use (15 available).
Follow the below steps to select the remote channel you want to pair with the motor(s) if required
at a later date.
Select Channel
CH CH CH
CH
A). Press any button
to wake controller.
HOLD CH (1 second)
LCD screen will flash
to confirm.
B). Within 4 seconds
Press UP or DOWN
to select desired
channel.
C). Press STOP to
confirm selection
OR controller will
auto confirm
after 4 seconds.
Pairing/Removing Motor From A Specific Channel
Press and HOLD
programming button
on motor head for
2 seconds.
Motor head
programming button
Motor Response
LONG
HOLD
2
Motor head
programming button
If you do not pair the controller in time the motor pairing sequence will time out, repeat
the above steps assuring to press and hold the STOP button within 4 seconds of the motor jog.
SEC.
BEEP
x1
JOG
x1
CH
Within 4 sec of activating
pairing mode, Press
& Hold STOP.
Motor Response
HOLD
BEEP
x3
2
SEC.
JOG
x2
SPECIFICATION SUBMITTAL
Job Name: Model Numbers:
Job Number:
1221 Admiral Street Richmond VA 23220 800-817-1204 LuXoutShades.com
I-52
Page 7
INSTRUCTIONS
Multi-Channel Controller
LuXout Shades
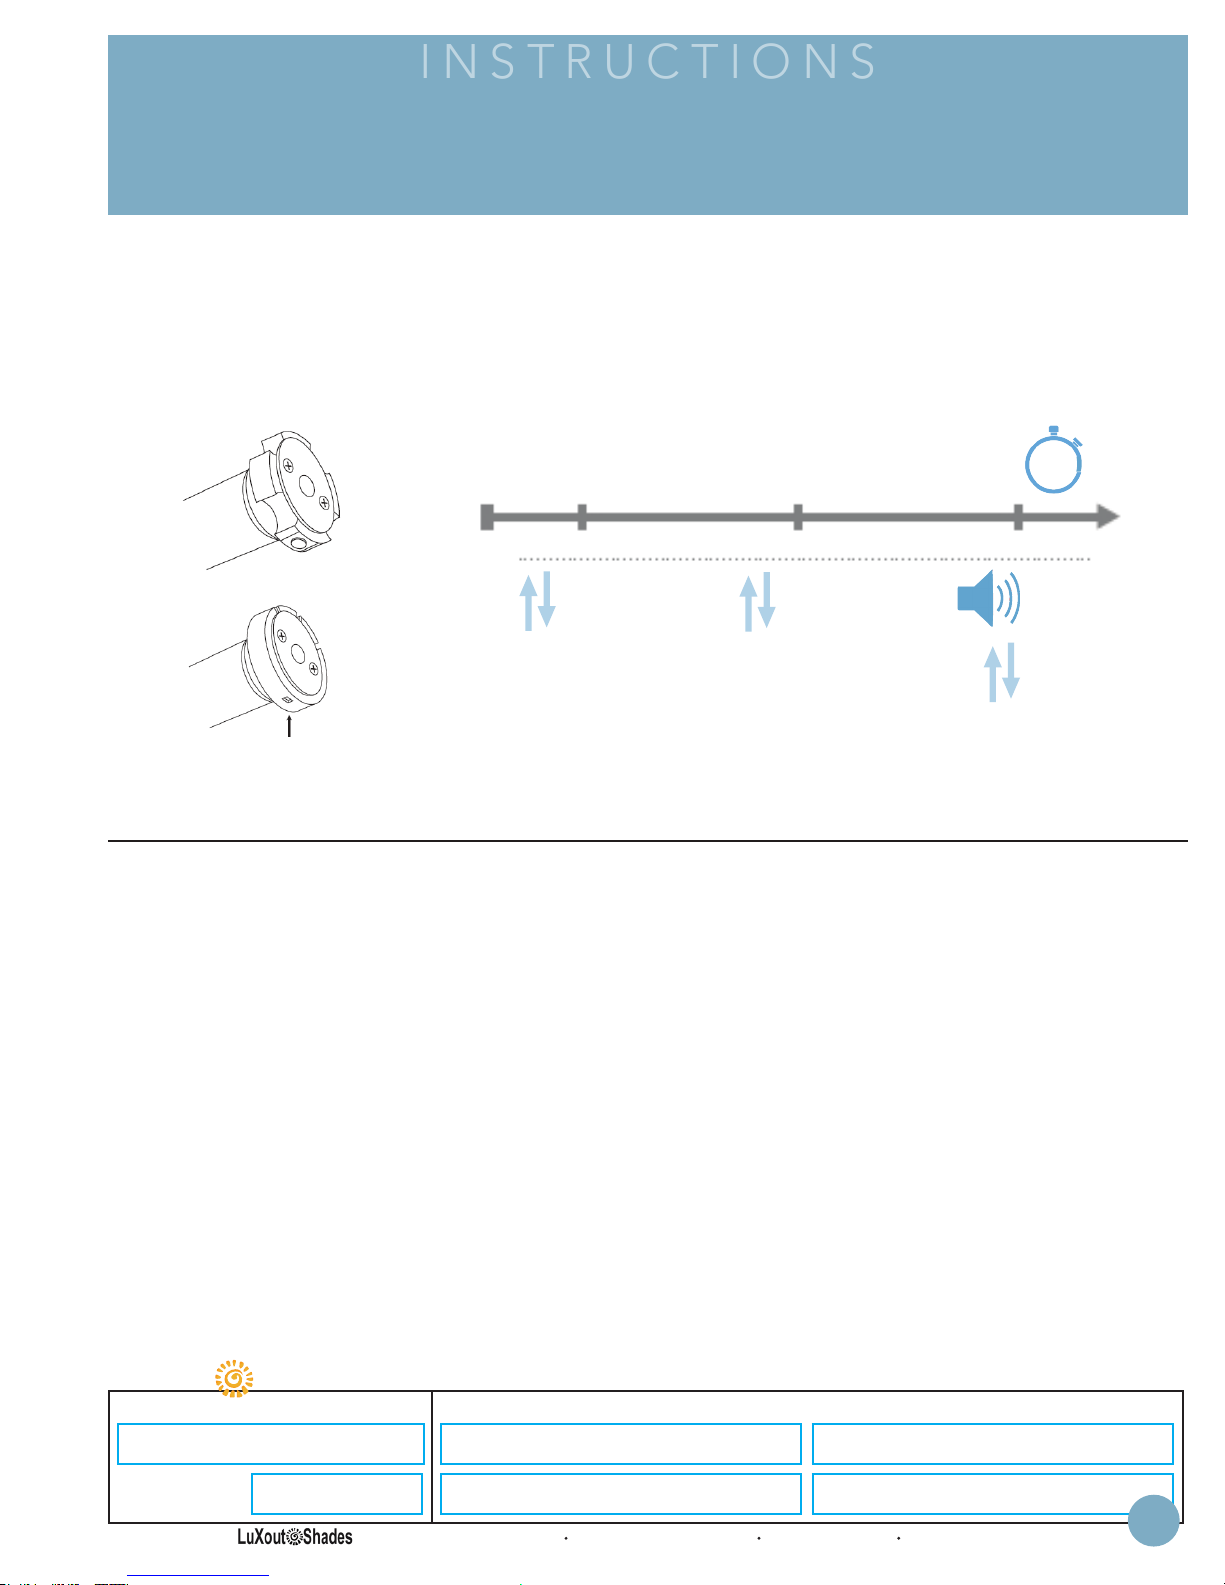
Reverse Motor Direction
To reverse the motor direction at any time, use the motor operation method shown below.
HOLD
Motor head
programming button
Motor head
programming button
Hold Programming Button (10 seconds)
JOG
x1
JOG
x1
10
SEC.
BEEP
x3
JOG
x1
SPECIFICATION SUBMITTAL
Job Name: Model Numbers:
Job Number:
1221 Admiral Street Richmond VA 23220 800-817-1204 LuXoutShades.com
I-53
Page 8
INSTRUCTIONS
Multi-Channel Controller
LuXout Shades
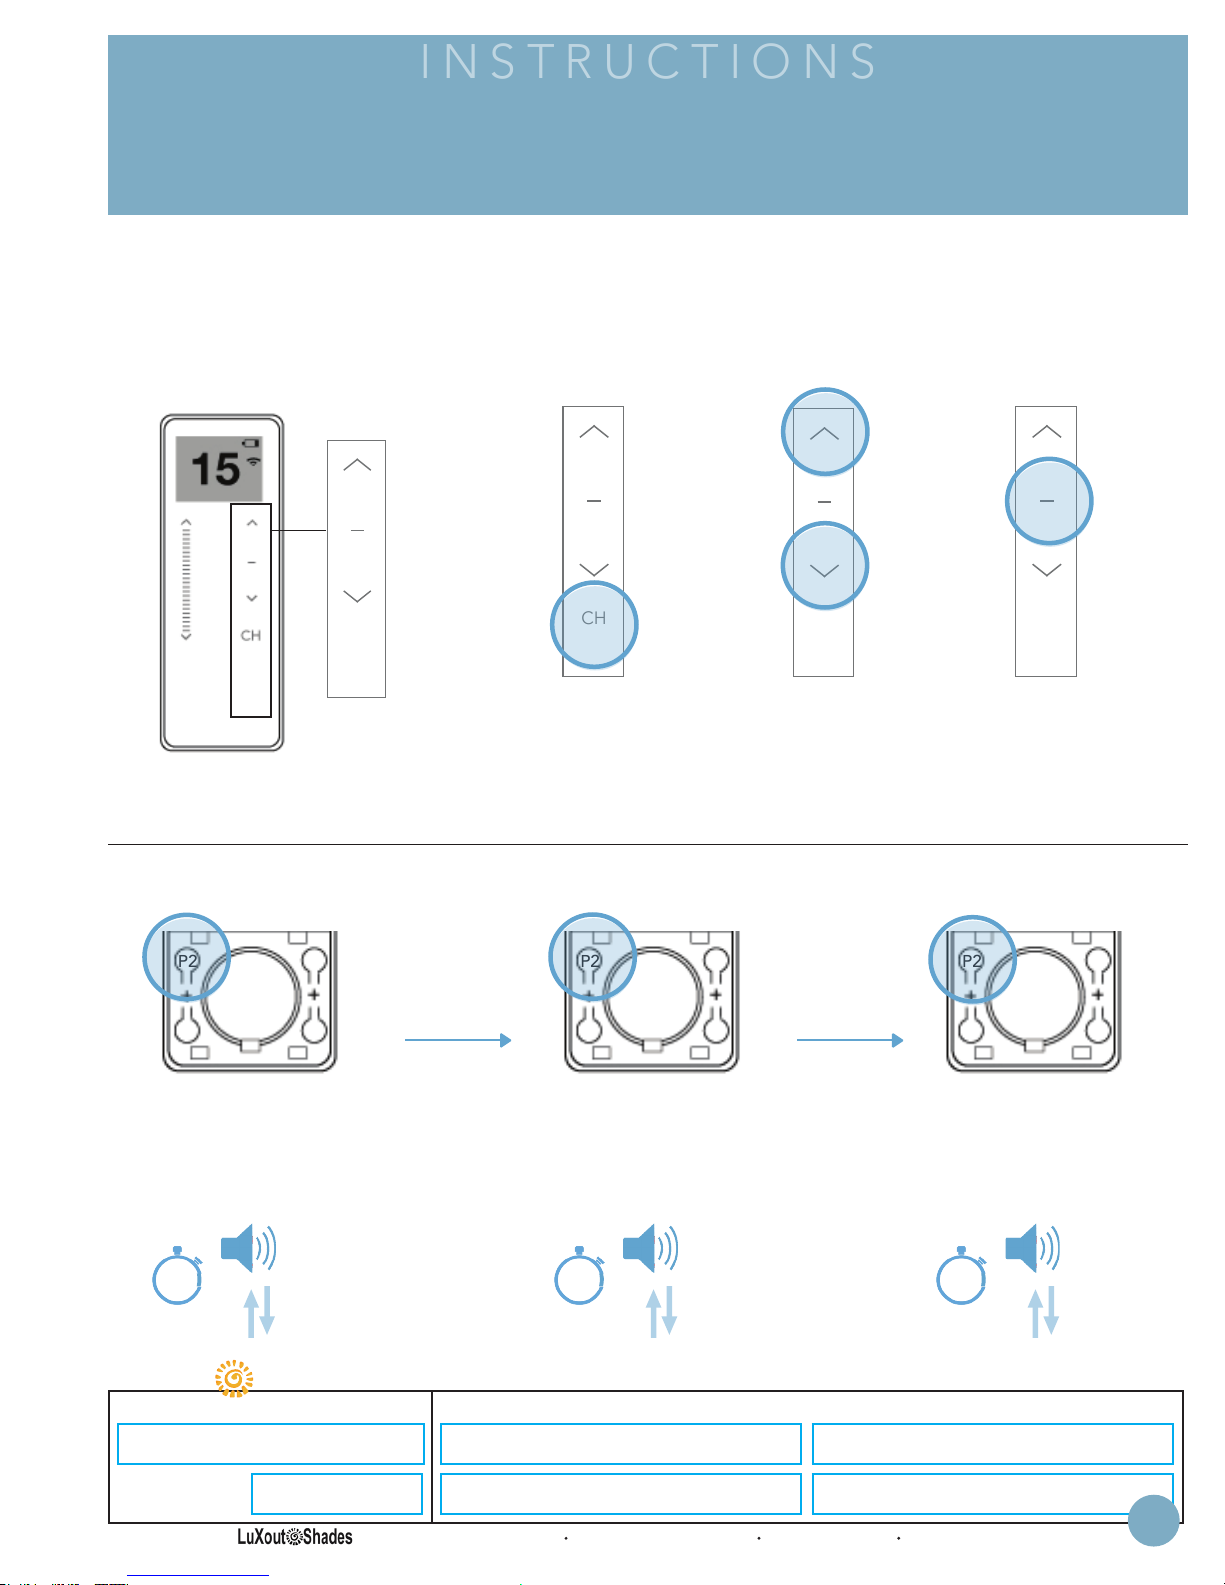
Mirroring Controllers
1). Select Channel On Existing Controller To Be Copied
Select channel on existing controller to be copied. Select channel on new controller where existing channel
will be copied.
CH
CH
A). Press any button
to wake controller.
HOLD CH (1 second)
LCD screen will flash
to confirm.
2). Add/Remove Controller Using An Existing Controller
P2P2
A). On existing
controller, press left P2
for 1 second.
Motor Response
HOLD
BEEP
B). On existing
controller, press left P2
for another 1 second.
Motor Response
HOLD
x1
1
SEC.
JOG
1
SEC.
x1
B). Within 4 seconds
Press UP or DOWN
to desired channel.
P2P2 P2P2
BEEP
x1
JOG
x1
CH
CH
C). Press STOP to
confirm selection
OR controller will
auto confirm
after 4 seconds.
C). On new
controller, press left P2
for 1 second.
Motor Response
HOLD
BEEP
x3
1
SEC.
JOG
x2
SPECIFICATION SUBMITTAL
Job Name: Model Numbers:
Job Number:
1221 Admiral Street Richmond VA 23220 800-817-1204 LuXoutShades.com
I-54
Page 9
INSTRUCTIONS
P2P2
LuXout Shades
Multi-Channel Controller
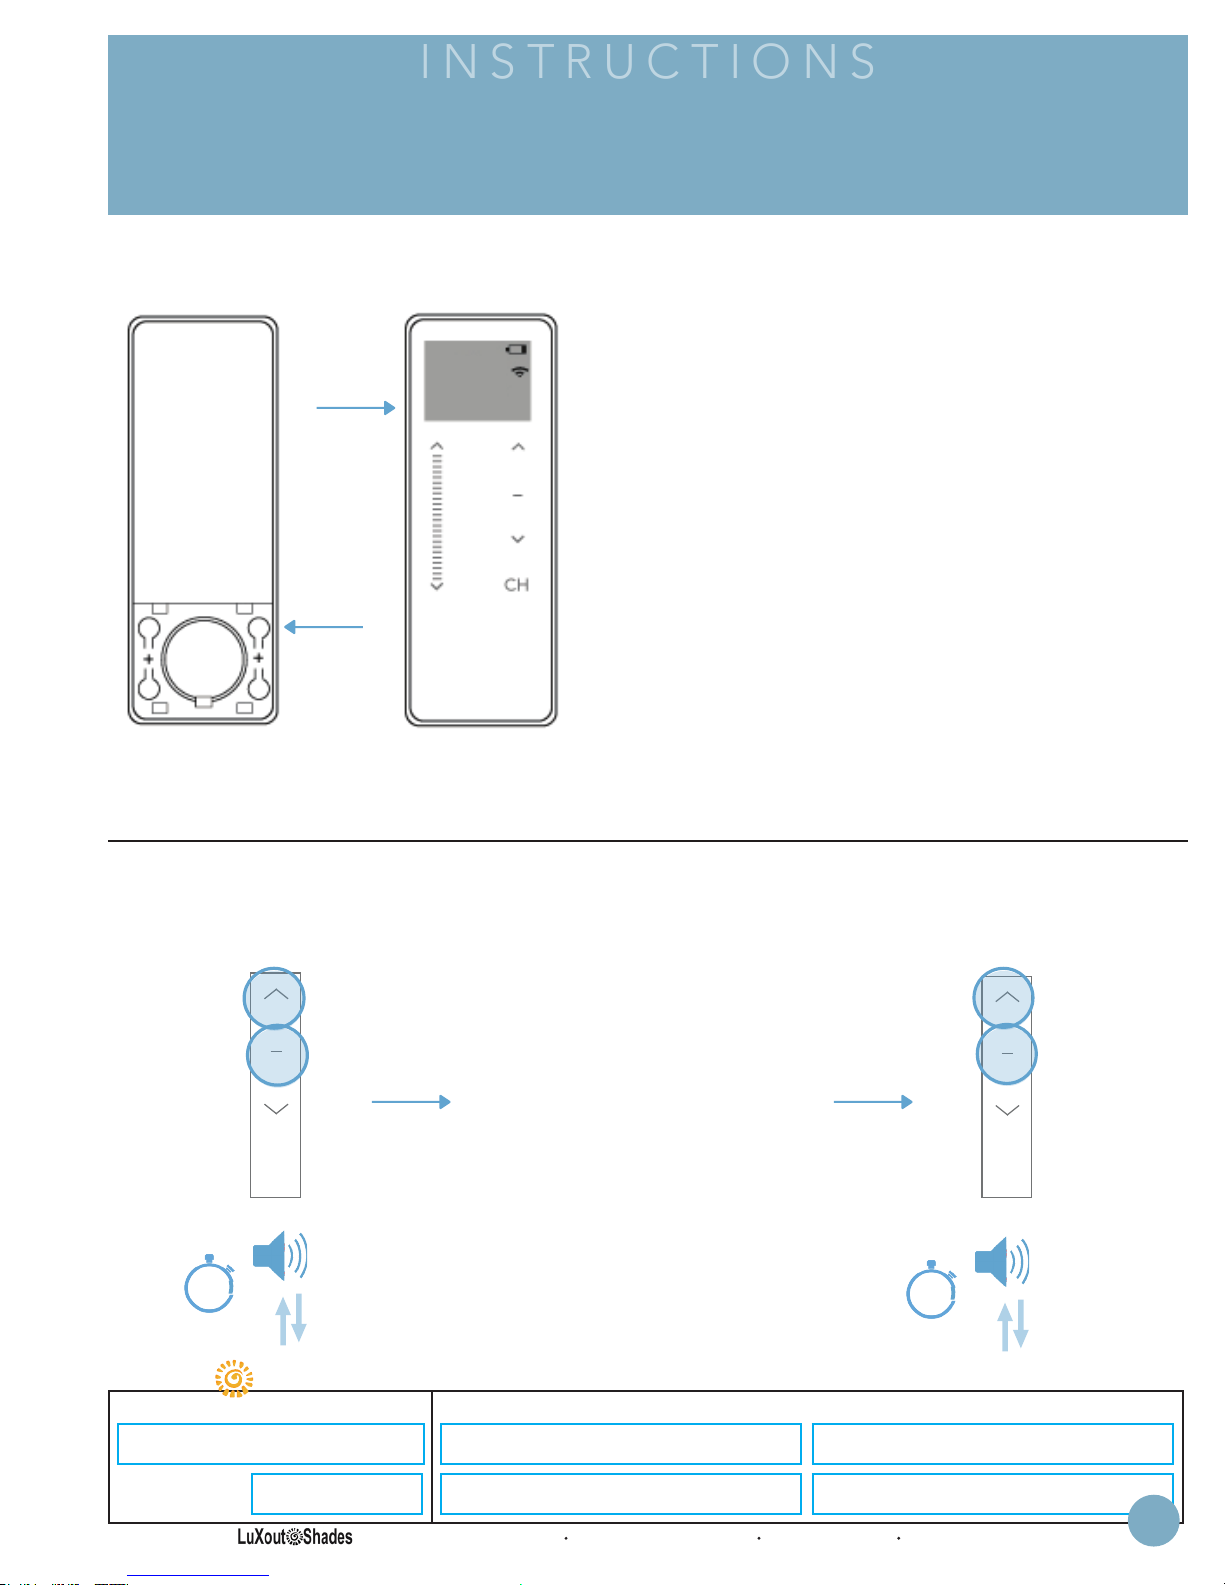
Adjusting Limits
‘U’
signifies
unlocked
Right
P2
U
If limits need adjusting, follow the instructions
below to unlock the controller for limit setting:
• Unlock the limit setting tool by pressing the right
P2 button on the back of the controller (remove
cover to expose the button)
• Press and hold the button until the LED display
shows a flashing “U”, then release.
• You will be required to set the controller back in to
“limit locking mode” once final adjustments have
been made. Simply repeat the above step until a
flashing “L” shows on the display (“U” for unlocked, “L” for locked).
Adjusting Upper Limits
Delete Top Limit
Press UP & STOP
5 seconds
Move the shade
to the new desired
position to be set
IMPORTANT!! Stop
CH
Motor Response
HOLD
BEEP
the shade before traveling
past the desired
lower limit.
x1
5
SEC.
JOG
x1
SPECIFICATION SUBMITTAL
Job Name: Model Numbers:
as limit.
Set Top Limit
Press UP & STOP
5 seconds
CH
Motor Response
HOLD
5
SEC.
BEEP
x3
JOG
x2
Job Number:
1221 Admiral Street Richmond VA 23220 800-817-1204 LuXoutShades.com
I-55
Page 10
INSTRUCTIONS
Multi-Channel Controller
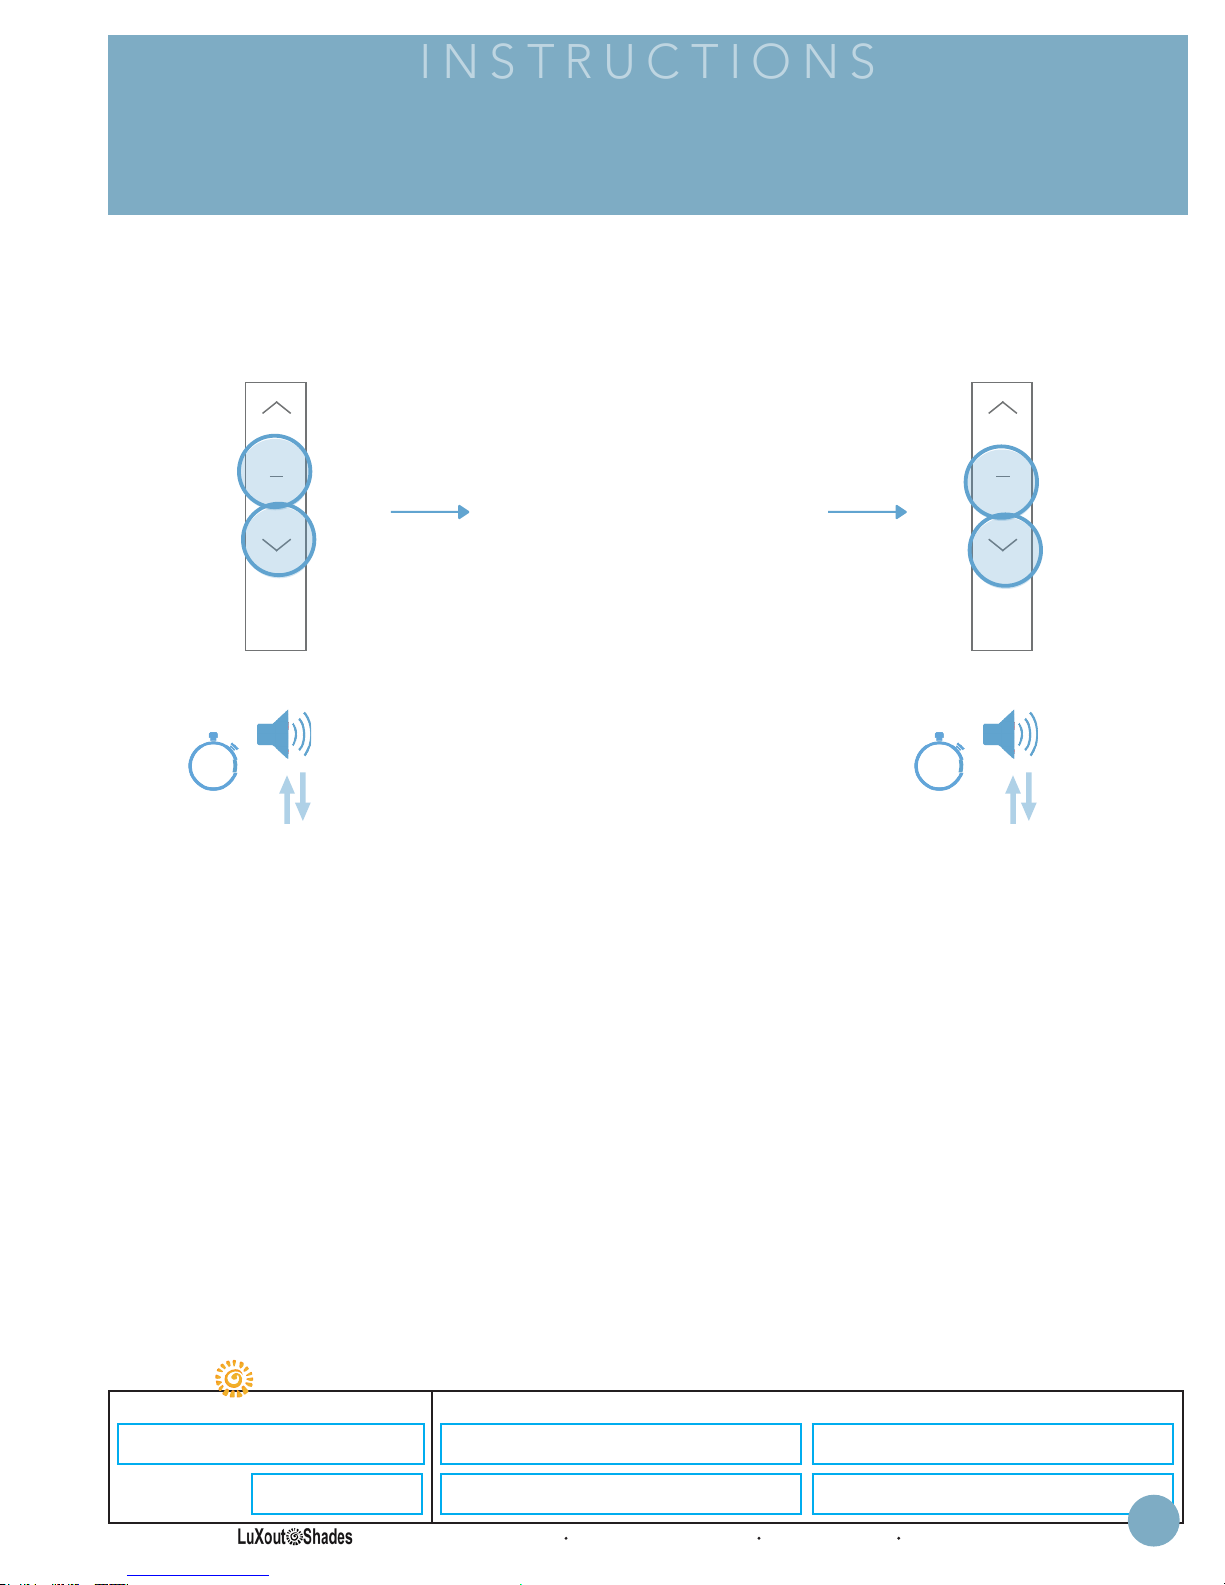
Adjusting Lower Limits
LuXout Shades
Adjusting Limits
Delete Lower Limit
Press DOWN & STOP
5 seconds
CH
Motor Response
HOLD
5
SEC.
BEEP
x1
JOG
x1
Move the shade
to the new desired
position to be set
as limit.
IMPORTANT!! Stop
the shade before traveling
past the desired
lower limit.
Set Lower Limit
Press DOWN & STOP
5 seconds
CH
Motor Response
HOLD
BEEP
x3
5
SEC.
JOG
x2
!!WARNING!! - Move shade in short increments by pressing the UP/DOWN button in 1 second intervals (press-
ing the UP/DOWN button for more than 3 seconds may send the shade past desired upper/lower limit and may
result in damage to the product). Once you have reached the desired upper/lower limit, you can adjust the limit with
either the UP and DOWN buttons. (remember to adjust in short increments!)
SPECIFICATION SUBMITTAL
Job Name: Model Numbers:
Job Number:
1221 Admiral Street Richmond VA 23220 800-817-1204 LuXoutShades.com
I-56
Page 11
INSTRUCTIONS
Multi-Channel Controller
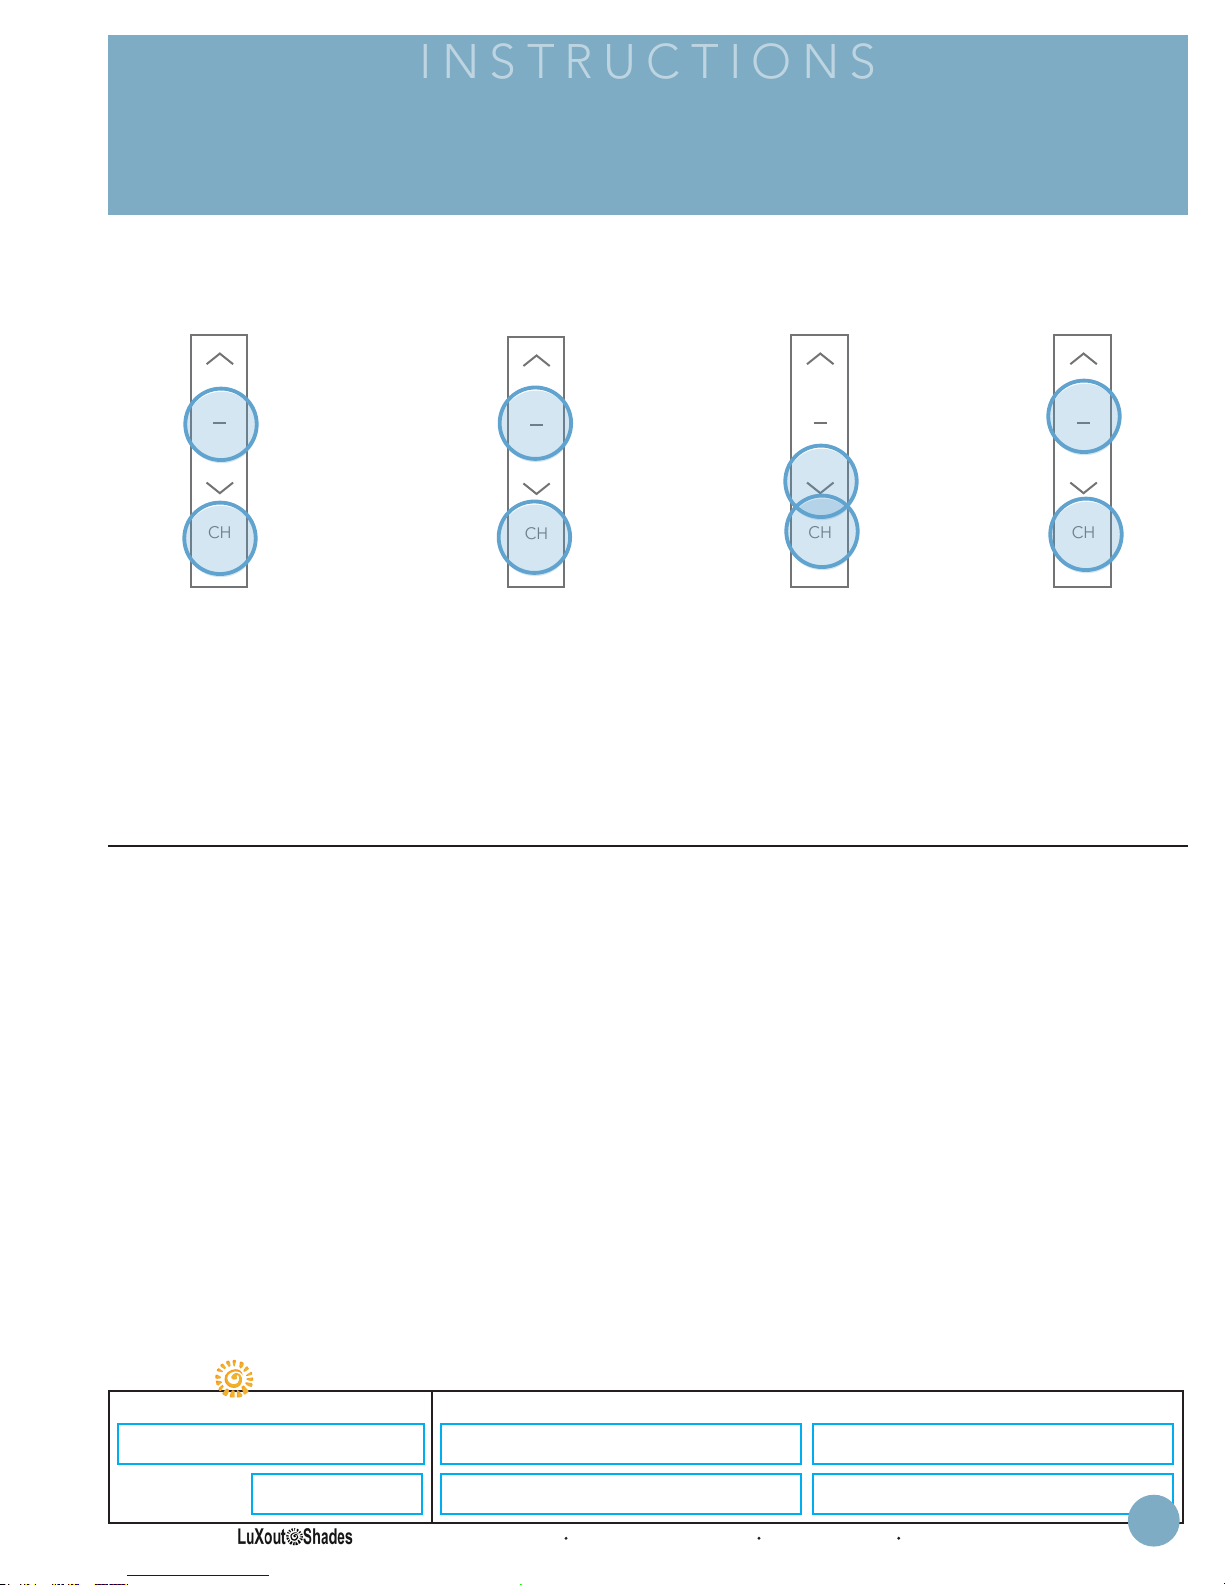
Hide/Unhide Controller Channels
LuXout Shades
Hide/Unhide Controller Channels
Release
CH
A). Press & Hold
STOP + CH
Controller Response
LCD screen flashes
“15” which defaults
controller control to 15
visible channels
Hold
B). Release only STOP
Keep CH pressed for
the entire procedure.
CH
CH CH
C). Press UP or DOWN
to select number of
active channels.
D). Press STOP, then
release CH to
confirm.
SPECIFICATION SUBMITTAL
Job Name: Model Numbers:
Job Number:
1221 Admiral Street Richmond VA 23220 800-817-1204 LuXoutShades.com
I-57
Page 12
INSTRUCTIONS
Multi-Channel Controller
x1
x1
HOLD
1
SEC.
LuXout Shades
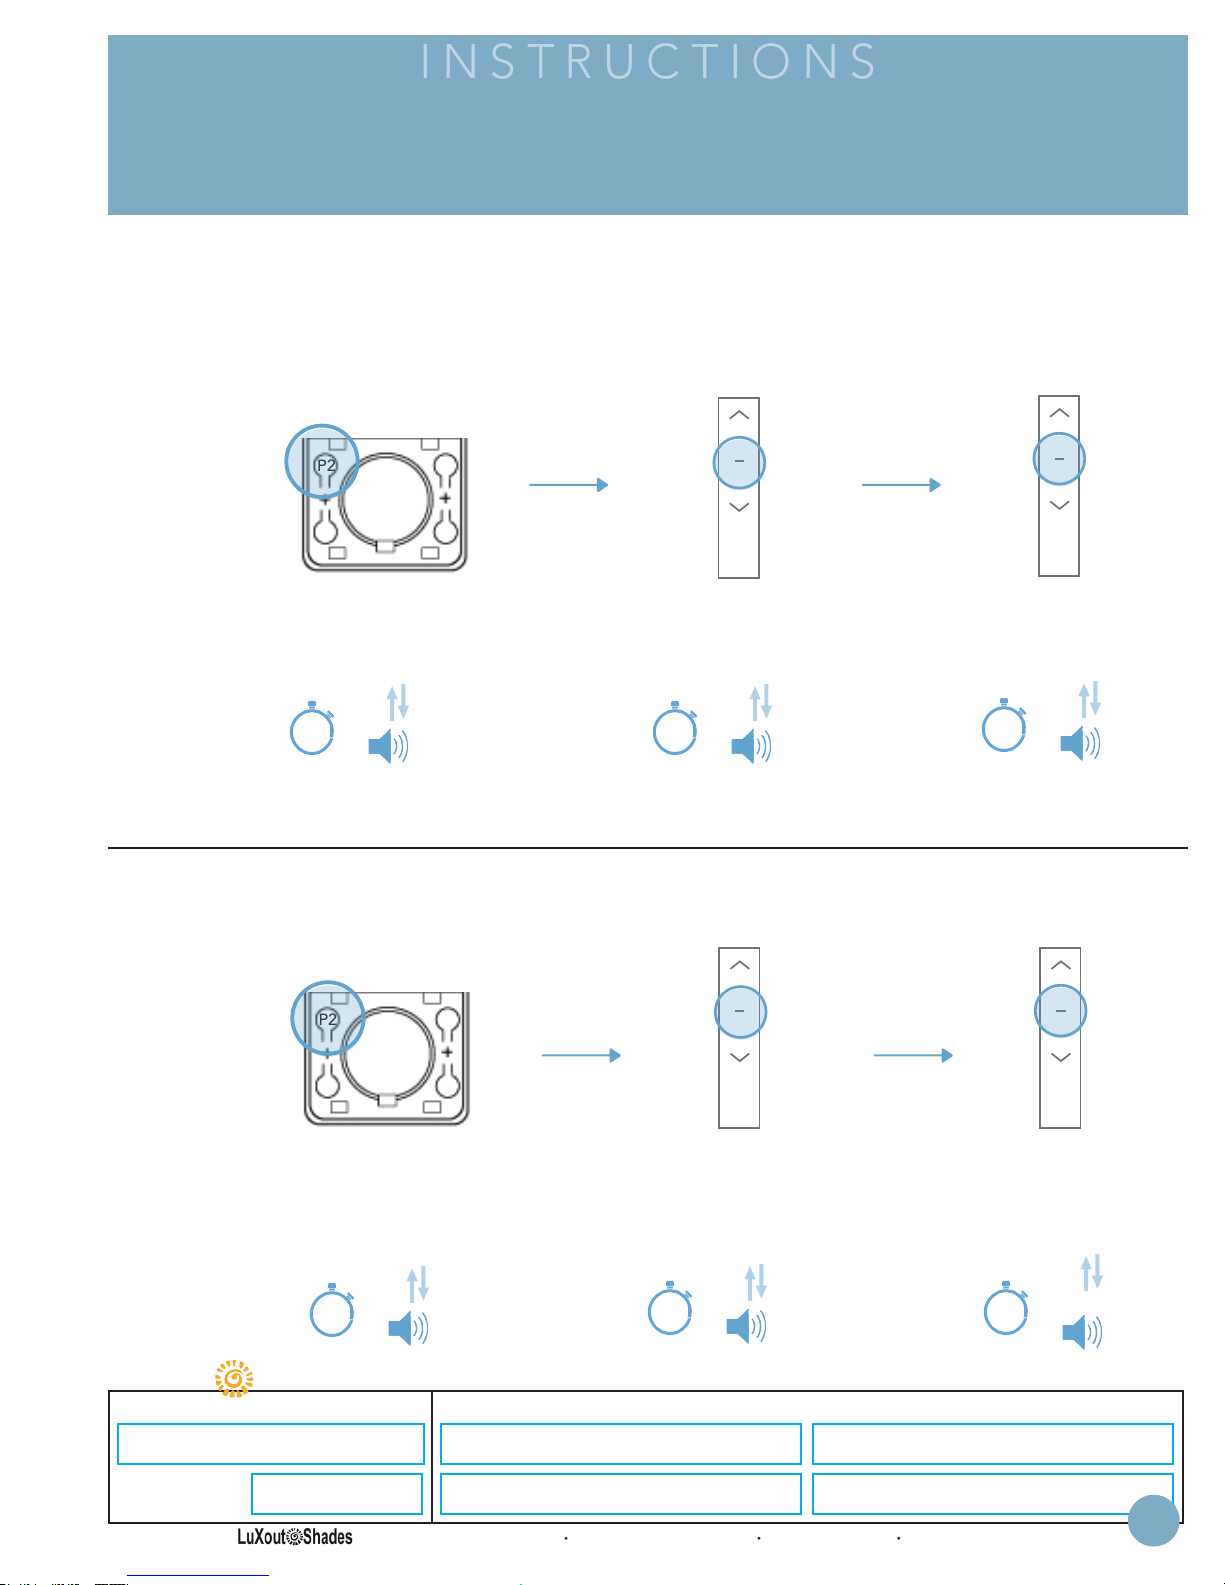
Favorite Positions
Follow the below steps to set a favorite position. The favorite position is used to set a custom stopping
point between the upper and lower limits. (1 favorite position per shade motor).
To set a favorite position for a shade motor, move to the desired position and press the STOP button to
pause the drive operation.
Setting Favorite
P2P2
A). Press UP or
DOWN to move
shade to desired
favorite position.
B). Press left P2.
CH
C). Press STOP.
CH
D). Press STOP
again.
Motor Response
HOLD
JOG
x1
1
SEC.
* Press STOP (3 seconds) to move shade to the Favorite Position from any location.
* Repeat Steps A - D for any additional motors.
Follow the below steps to set a favorite position. The favorite position is used to set a custom stopping
point between the upper and lower limits. (1 favorite position per shade motor).
BEEP
x1
Motor Response
HOLD
1
SEC.
JOG
x1
BEEP
x1
Motor Response
HOLD
1
SEC.
Delete Favorite
A). Press STOP
(3 seconds) to
send the shade
to the stored
favorite position.
B). Press left P2.
Motor Response
HOLD
1
SEC.
SPECIFICATION SUBMITTAL
Job Name: Model Numbers:
P2P2
JOG
x1
BEEP
x1
CH CH
C). Press STOP.
Motor Response
HOLD
1
SEC.
JOG
x1
BEEP
x1
D). Press STOP
again.
Motor Response
HOLD
1
SEC.
JOG
x2
BEEP
x3
JOG
x1
LONG
BEEP
x1
Job Number:
1221 Admiral Street Richmond VA 23220 800-817-1204 LuXoutShades.com
I-58
Page 13
INSTRUCTIONS
Multi-Channel Controller
LuXout Shades
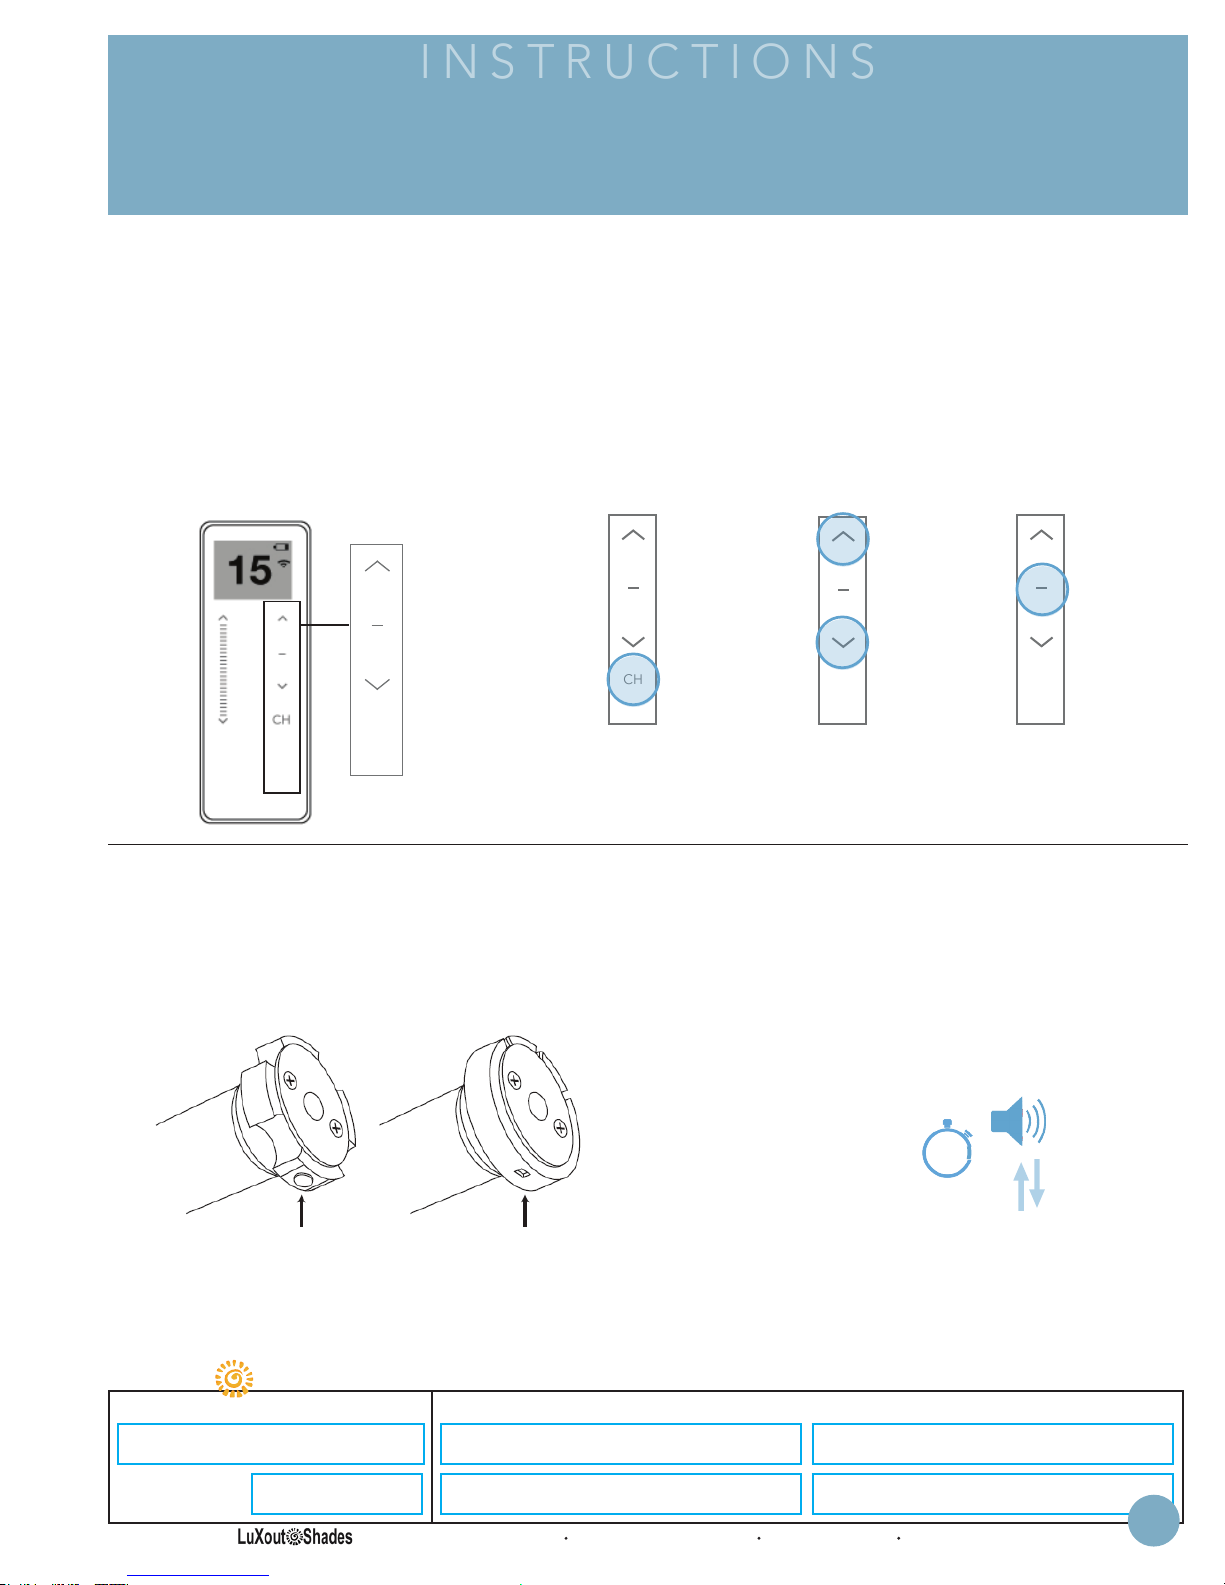
Group Control
Each battery & plug-in motor will come preprogramed from LuXout Shades. If multiple motors are paired
to the same 15 channel remote, the 0 channel is the default channel to control all motors at once. Follow
the steps below to group motors on a specific channel for simultaneous control.
To custom define a channel to control multiple motors, pairing in groups can be executed. This will allow
you to operate a series of motors in unison without needing to change channels. Each motor to be grouped
must be paired with the remote on its own channel prior to grouping.
1). Select Channel To Be Paired As A Group
CH
CH
A). Press any button
to wake controller.
HOLD CH (1 second)
LCD screen will flash
to confirm.
B). Within 4 seconds
Press UP or DOWN
to desired channel.
CH
2). Pairing Controller to Motor
Repeat for all motors to be added or removed from your desired group channel.
A). Activate Pairing Mode on Motor
Press and HOLD
programming button
on motor head for
2 seconds.
Motor head
programming button
Motor head
programming
button
CH
C). Press STOP to
confirm selection
OR controller will
auto confirm
after 4 seconds.
Motor Response
HOLD
2
SEC.
LONG
BEEP
x1
JOG
x1
SPECIFICATION SUBMITTAL
Job Name: Model Numbers:
Job Number:
1221 Admiral Street Richmond VA 23220 800-817-1204 LuXoutShades.com
I-59
Page 14
INSTRUCTIONS
B). Pairing Controller
LuXout Shades
Multi-Channel Controller
Group Control
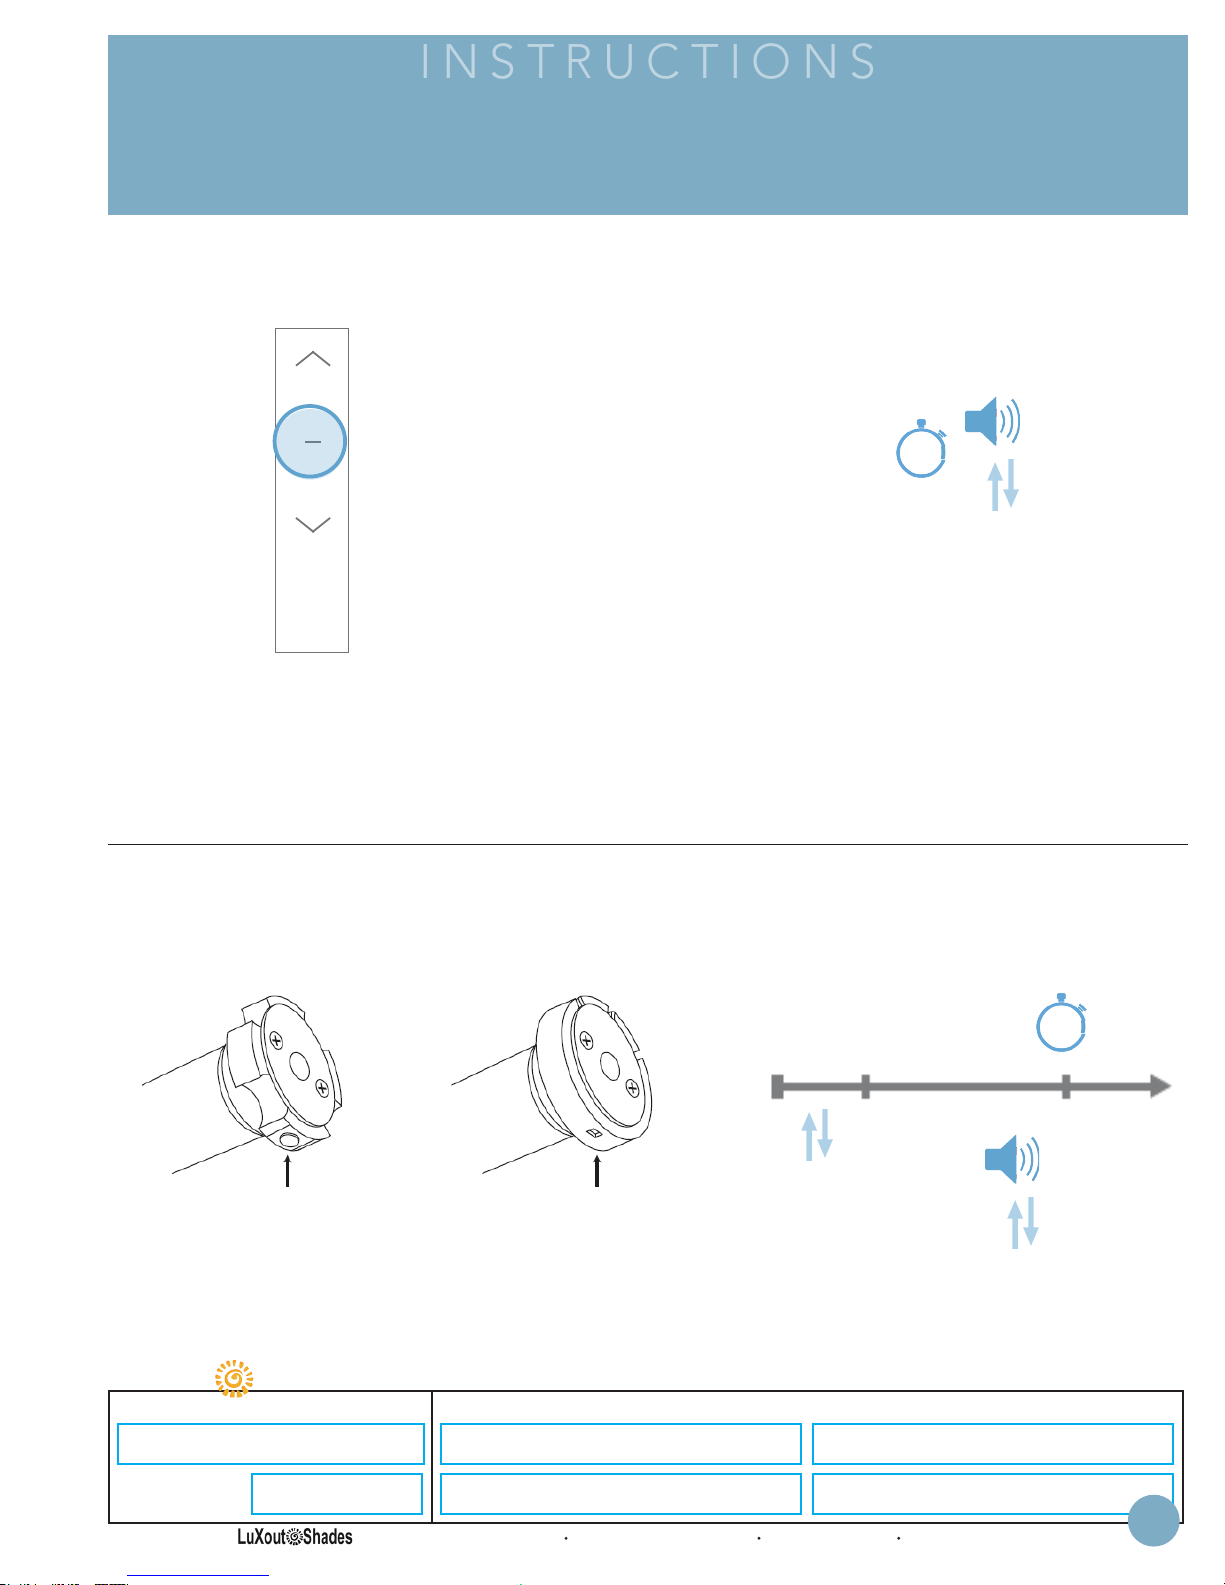
Motor Response
HOLD
Within 4 sec of activating
pairing mode, Press
& HOLD STOP.
CH
If you do not pair the controller in time the motor pairing sequence will time out,
repeat the above steps assuring to press and HOLD the STOP button within
4 seconds of the motor jog.
3). Adjusting limits of an individual shade paired on a group channel
To adjust the limits of a shade that is currently grouped on a channel with other shades, it is necessary to
place all shades, with the exception of the shade to be adjusted, to sleep.
2
SEC.
BEEP
x3
JOG
x2
HOLD
Motor head
programming button
Once all other shades have been put to sleep, unlock controller by pressing and HOLDING the upper left
P2 button under the battery cover until “U” is displayed on the LCD screen. Adjust the shade limits as
outlined below:
SPECIFICATION SUBMITTAL
Job Name: Model Numbers:
Job Number:
1221 Admiral Street Richmond VA 23220 800-817-1204 LuXoutShades.com
Motor head
programming button
JOG
x1
6
SEC.
Motor Response
BEEP
BEEP
x2
JOG
x1
I-60
Page 15
INSTRUCTIONS
Multi-Channel Controller
Adjusting Upper Limit Adjusting Lower Limit
LuXout Shades
Group Control
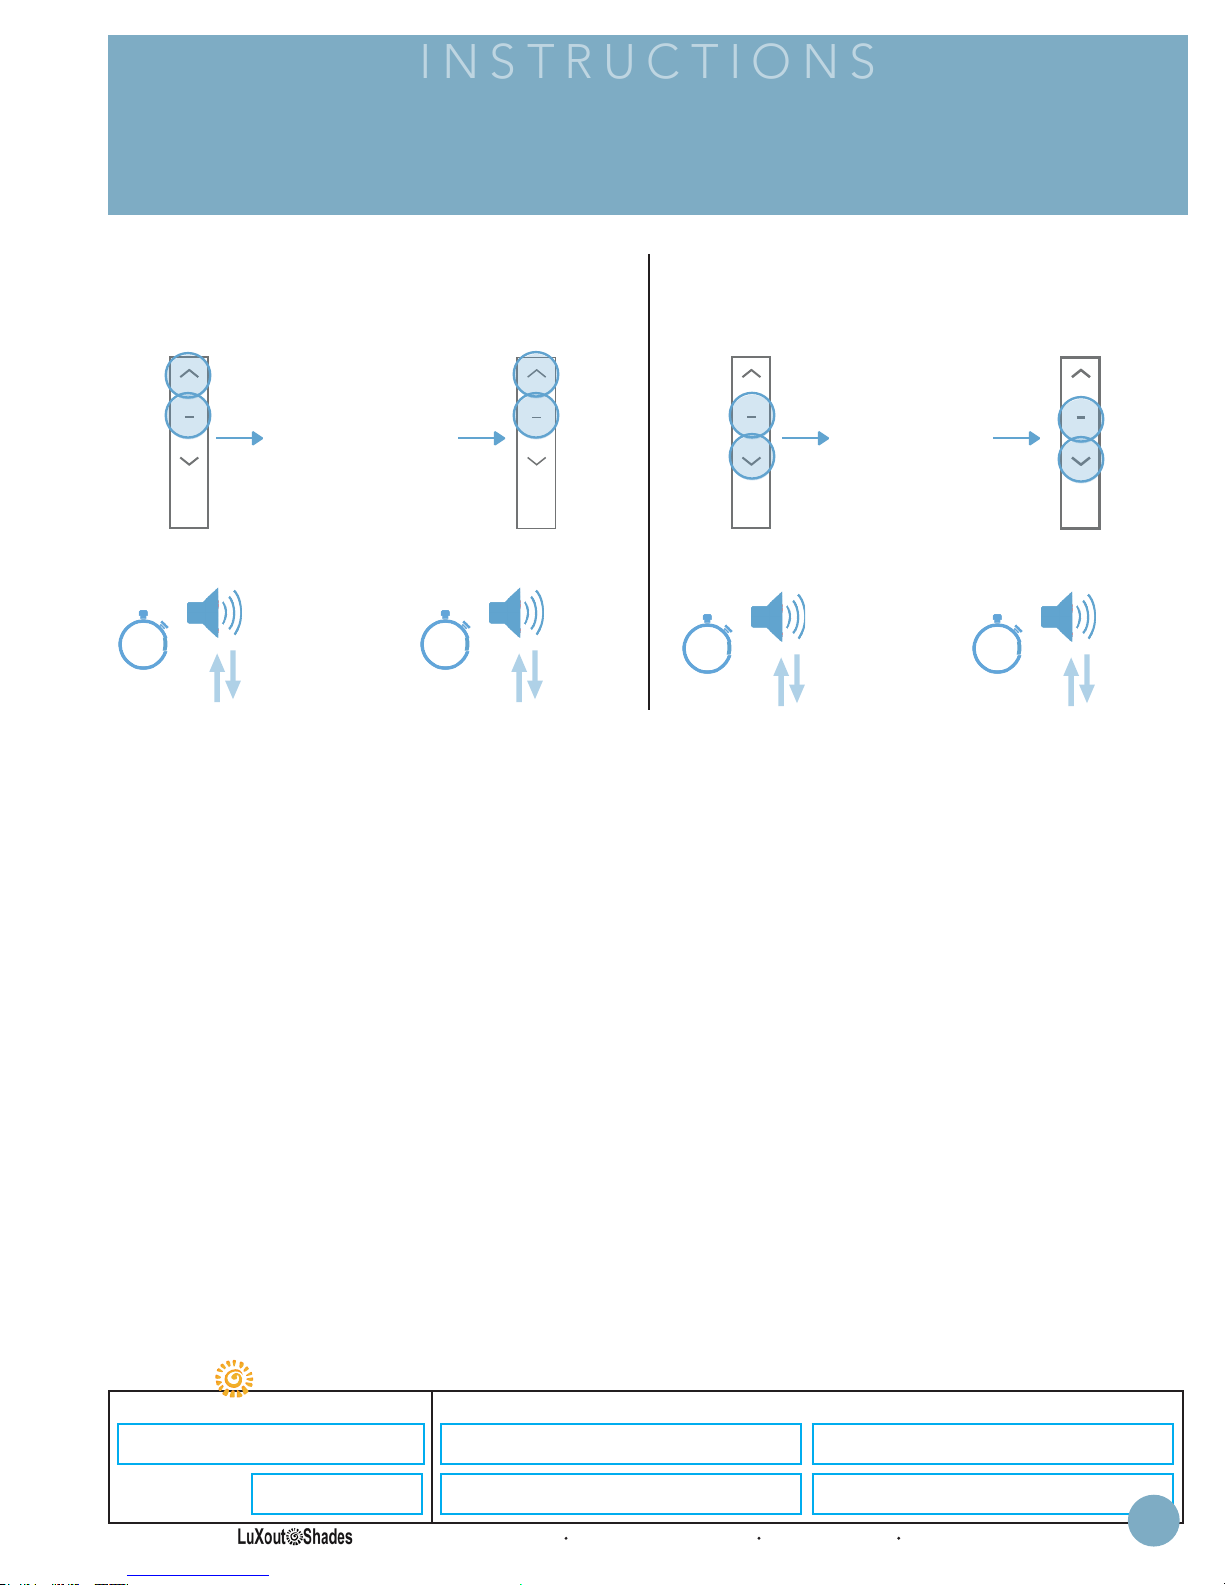
Delete Top Limit
Press UP & STOP
5 seconds
CH
Motor Response
HOLD
Move the shade
to the new desired
position to be set
as limit.
IMPORTANT!! Stop
the shade before traveling
past the desired
upper limit.
BEEP
HOLD
x1
5
SEC.
JOG
x1
!!WARNING!! - Move shade in short increments by pressing the UP/DOWN button in 1 second
intervals (pressing the UP/DOWN button for more than 3 seconds may send the shade past
desired upper/lower limit and may result in damage to the product). Once you have reached the
desired upper/lower limit, you can adjust the limit with either the UP and DOWN buttons.
(remember to adjust in short increments!)
Set Top Limit
Press UP & STOP
5 seconds
Motor Response
5
SEC.
CH
BEEP
x3
JOG
x2
Delete Lower Limit
Press DOWN &
STOP. 5 seconds
to the new desired
IMPORTANT!! Stop
the shade before traveling
CH
Motor Response Motor Response
HOLD
5
SEC.
BEEP
JOG
Move the shade
position to be set
as limit.
past the desired
lower limit.
HOLD
x1
x1
Set Lower Limit
Press DOWN & STOP
5 seconds
CH
BEEP
x3
5
SEC.
JOG
x2
Once the limits have been adjusted as desired, return the controller to “L” mode by
pressing and holding the upper left P2 button under the battery cover. The other grouped
motors can now be taken out of sleep mode by holding the programming button for 6 seconds.
SPECIFICATION SUBMITTAL
Job Name: Model Numbers:
Job Number:
1221 Admiral Street Richmond VA 23220 800-817-1204 LuXoutShades.com
I-61
Page 16
INSTRUCTIONS
Multi-Channel Controller
LuXout Shades
Reset To Factory Settings
Each battery & plug-in motor will come preprogramed from LuXout Shades. The preprogramming assures
the remote is paired with the motor, the upper and lower operation limits are set, the remote is locked and
the unnecessary channels are hidden for ease of use (15 available).
Follow the below steps to reset the motor to factory settings and delete all limits.
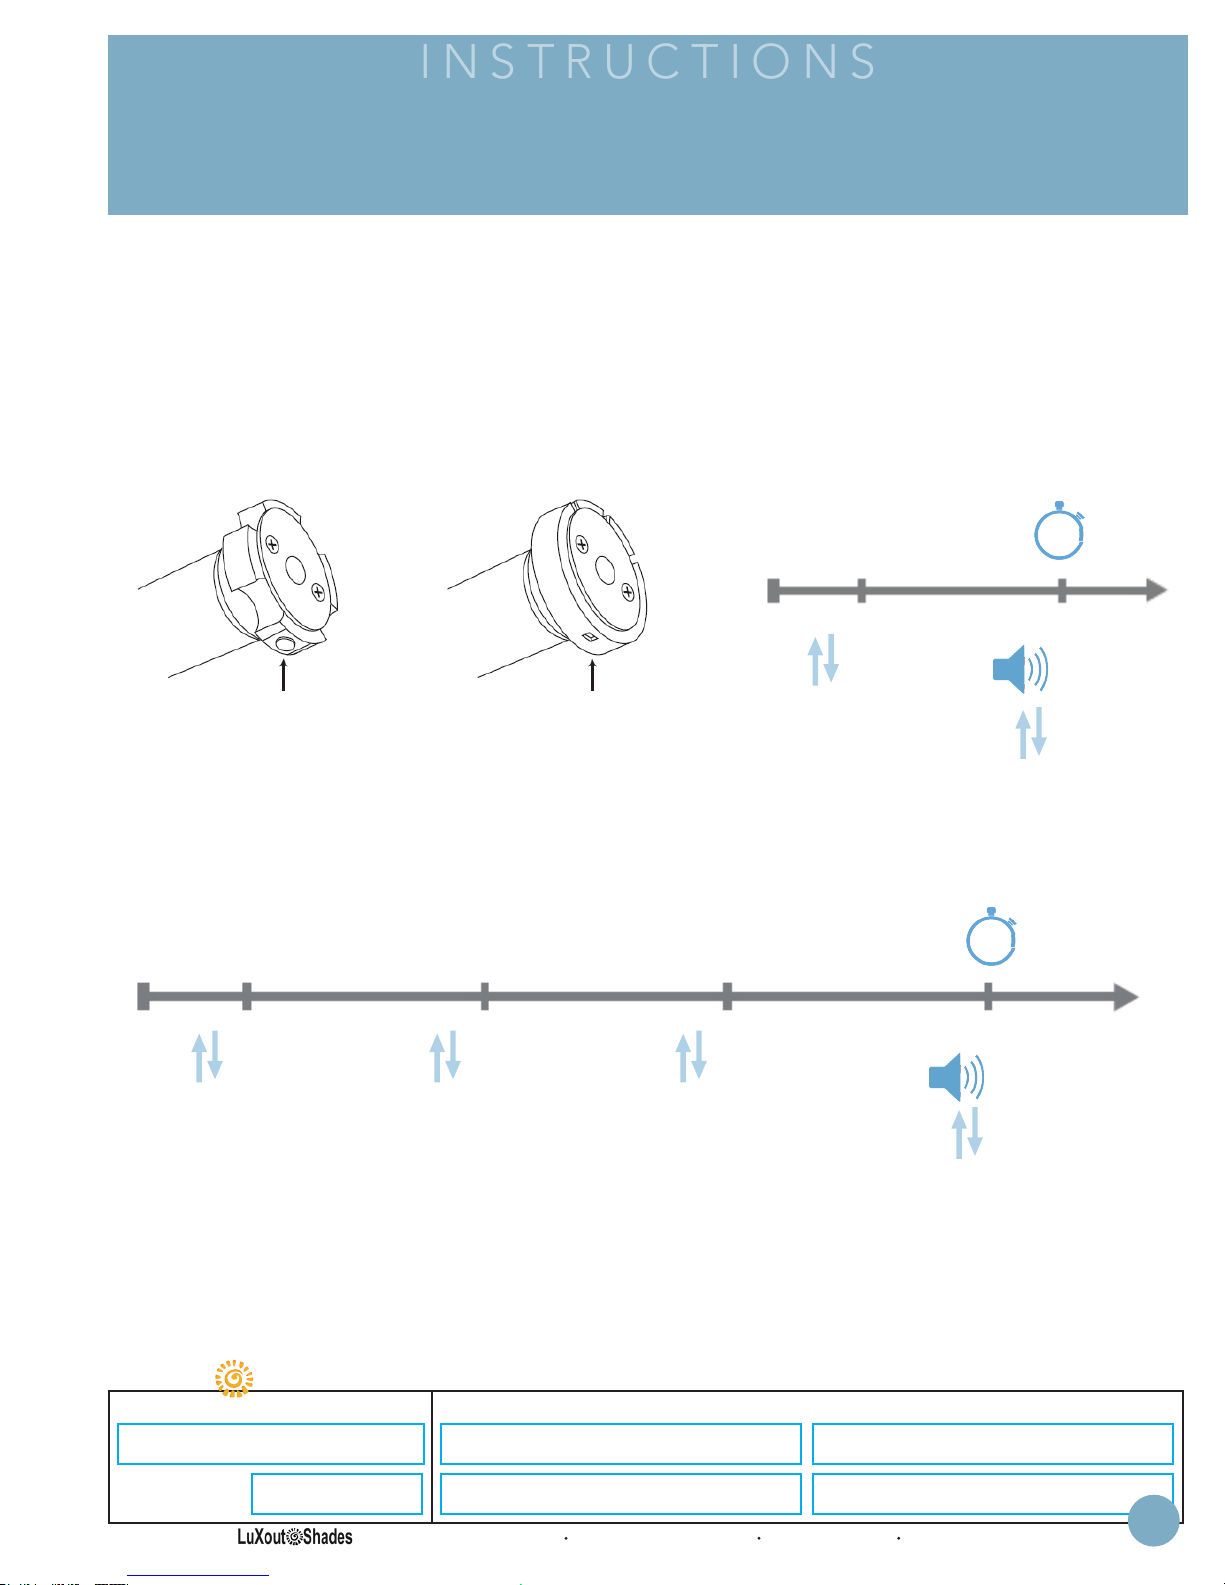
To reset the shade motor to factory settings with no stored limits locate the P1 button on the motor head.
HOLD the programming button for 14 seconds (4 motor jogs). External battery motors will jog 3 times for
a full factory reset.
HOLD
Approx.
6
SEC.
Motor Response
Motor head
programming button
JOG
x1
Motor head
programming button
BEEP
x2
JOG
x1
HOLD
14
SEC.
JOG
x1
JOG
x1
JOG
x1
JOGJOGJOG
Motor Response
BEEP
BEEP
x4
JOG
JOG
x1
The motor will jog 4 times before the reset is complete. The P1 button must be held the entire time. 4
beeps confirm the factory reset is complete.
Refer to the Initial Setup Programming section to program a shade after a factory reset.
SPECIFICATION SUBMITTAL
Job Name: Model Numbers:
Job Number:
1221 Admiral Street Richmond VA 23220 800-817-1204 LuXoutShades.com
I-62
Page 17
INSTRUCTIONS
Multi-Channel Controller
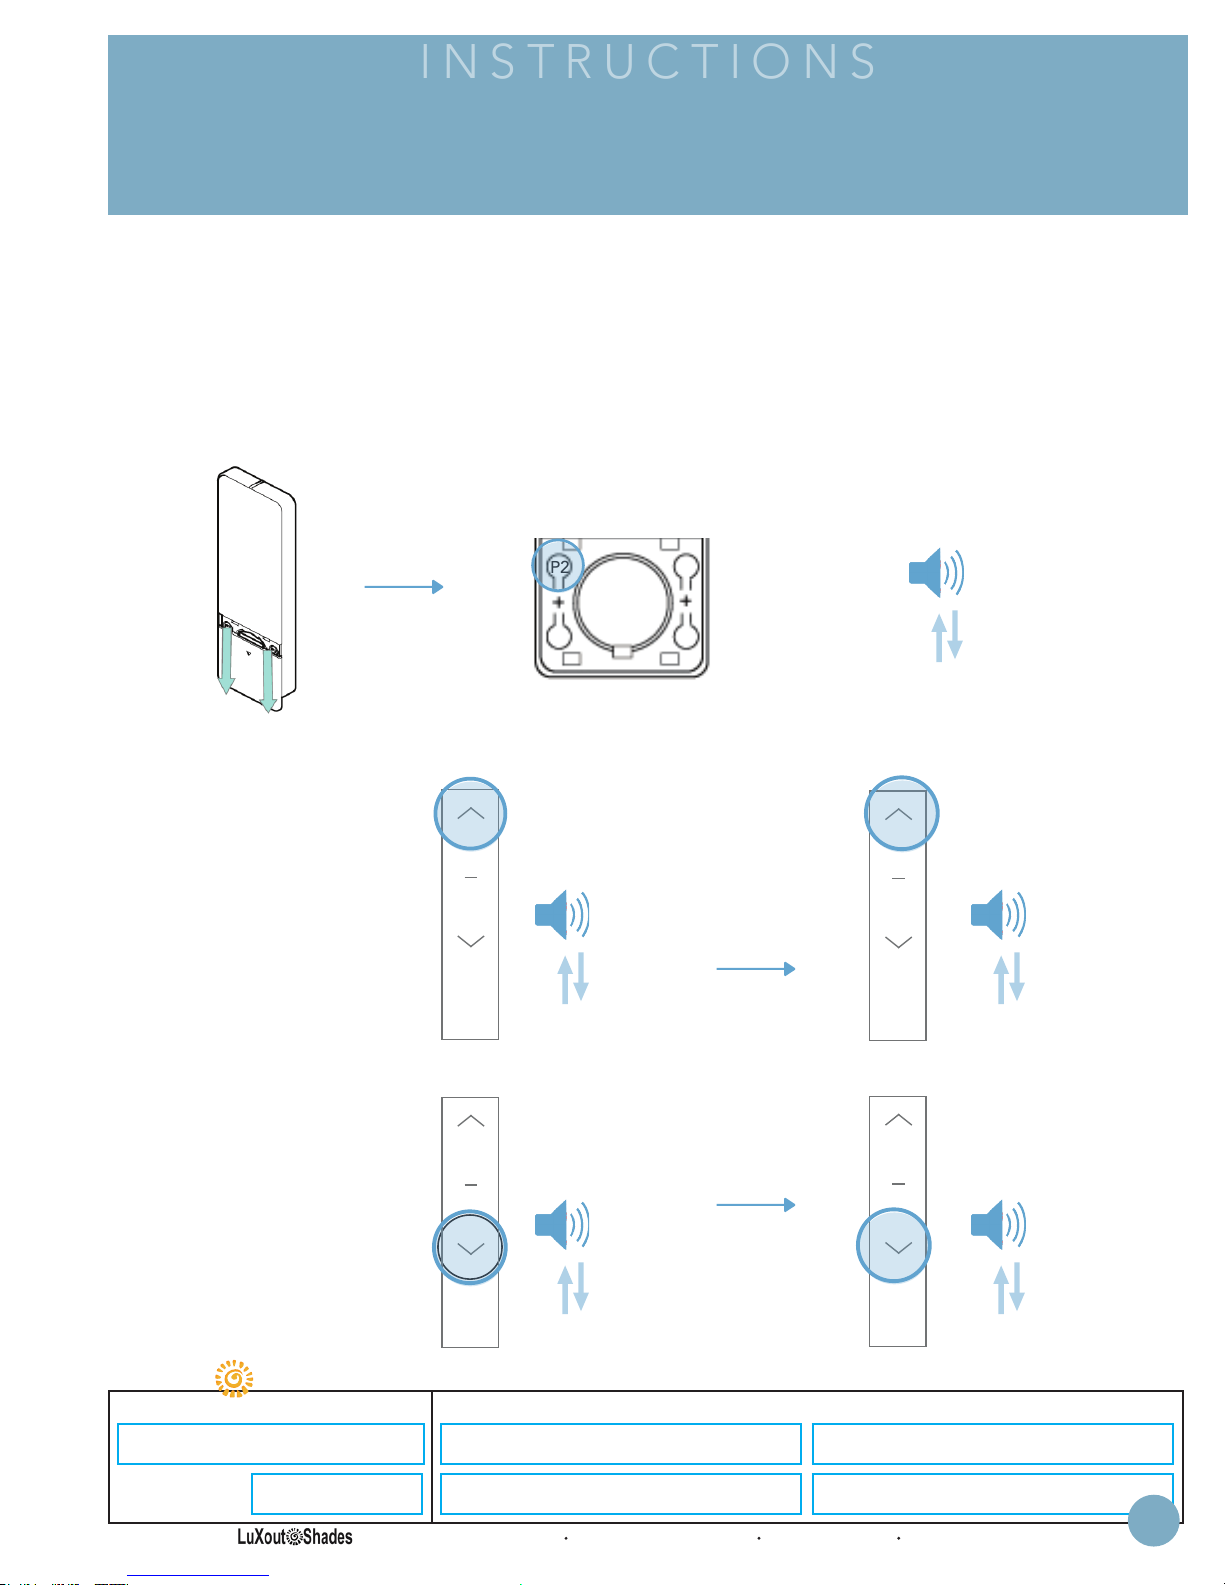
Follow the below steps to adjust the motor speed (ONLY APPLICABLE TO DC MOTORS).
LuXout Shades
Adjusting Motor Speed
To adjust the motor speed a remote must be paired.
To enter speed adjustment mode remove the rear battery cover of the remote. Press and HOLD the
left P2 button for 2 seconds. the motor will perform one up and down jog and beep once.
Motor Response
To Increase Speed
IMPORTANT
If motor does not react
to speed adjustment, the
maximum or minimum
speed has already been
reached.
To Decrease Speed
IMPORTANT
If motor does not react
to speed adjustment, the
maximum or minimum
speed has already been
reached.
CH
CH
Press U P.
Motor Response
BEEP
x1
JOG
x1
Press DOWN.
Motor Response
BEEP
x1
JOG
x1
P2P2
Repeat
Repeat
CH
CH
BEEP
x1
JOG
x1
Press U P.
Motor Response
BEEP
x1
JOG
x2
Press DOWN.
Motor Response
BEEP
x1
JOG
x2
SPECIFICATION SUBMITTAL
Job Name: Model Numbers:
Job Number:
1221 Admiral Street Richmond VA 23220 800-817-1204 LuXoutShades.com
I-63
Page 18
INSTRUCTIONS
Multi-Channel Controller
LuXout Shades
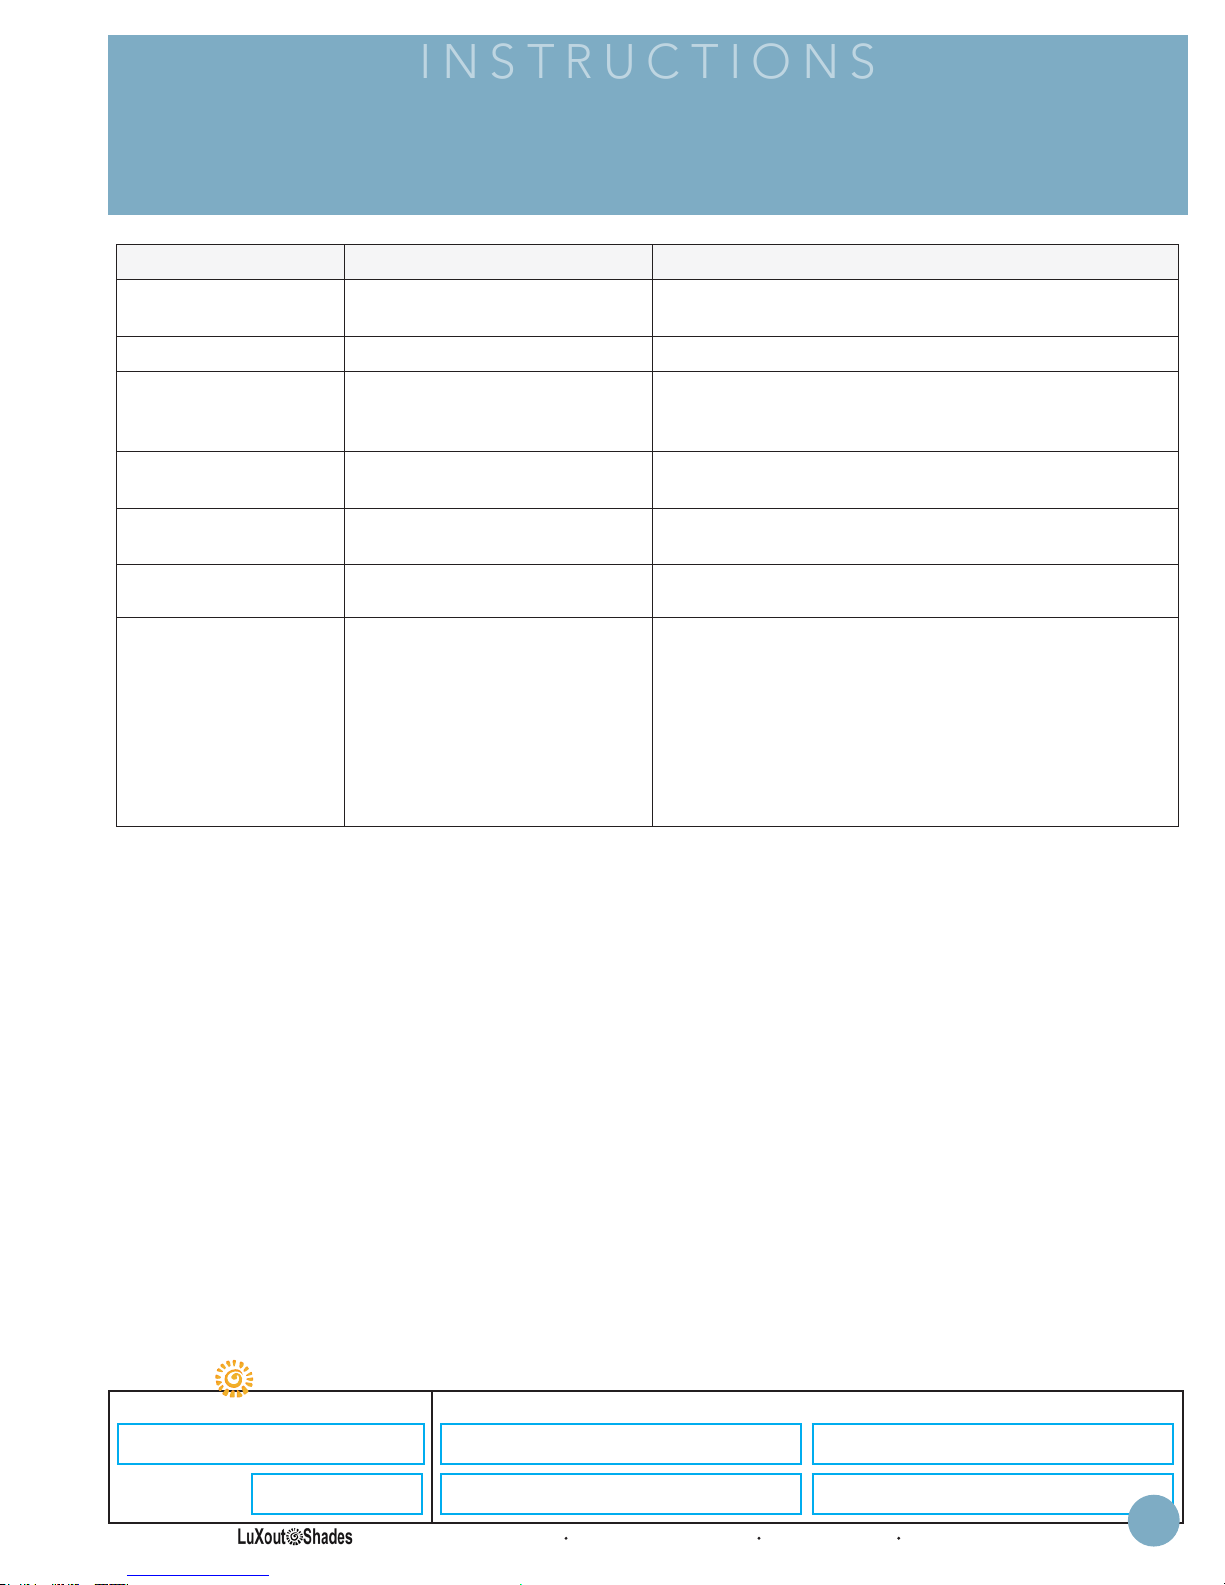
Troubleshooting
Issue Cause Solution
Motor is not
responding
Cannot set limits on
a single Motor (multiple motors respond)
Controller battery is
discharged
Battery is inserted incorrectly
Radio interference
Receiver distance is
too far from controller
Power failure
Incorrect wiring
Using ‘group’ channels
to adjust motor limits
/ Shielding
Replace battery
Check battery polarity
Ensure controller is positioned away from metal
objects and that aerial on motor or receiver is kept
straight and away from metal
Move controller to a closer position
Check power supply to motor is connected & active
Check wiring is connected correctly (refer to motor
installation instructions)
Always reserve an individual channel for
programming functions.
System Best Practice - Provide an extra
Multi-Channel Controller in multi motor projects
that provide individual control for each motor
for programming purposes.
SPECIFICATION SUBMITTAL
Job Name: Model Numbers:
Job Number:
1221 Admiral Street Richmond VA 23220 800-817-1204 LuXoutShades.com
I-64
 Loading...