

Page 1
Instruction Sheet - (QGXUD Model Tables
Models LP and Endura Mobile Tables
Models LP7ZR6KHOI0RELOH7DEOHV and LPThree Shelf Mobile Tables
Customer Service Dept
2245 Delany Rd
Waukegan, IL 60087
Ph: 847/244-1800 • 800/323-4656
Fax: 847/244-1818 • 800/327-1698
LP - Two Shelf Model LP - Three Shelf Model
PARTS LIST
Models LP26 & LP27
1 - Bottom shelf with casters sockets
1 - Top shelf with handle
4 - Long legs
4 - Casters (2 w/brake)
1 - Plug housing cover
2 - Sheet metal screws
Optional Electric Assembly:
1 - Electric cord
1 - Power cord retaining bracket
1 - Cord tie
3 - Sheet metal screws
Models LP34, LP40, LP42,
LP48 & LP54
1 - Bottom shelf with casters sockets
1 - Top shelf with handle
1 - Center shelf with eight leg posts
4 - Short legs
4 - Long legs
4 - Casters (2 w/brake)
1 - Plug housing cover
2 - Sheet metal screws
Tools Required:
1 - Rubber Mallet
1 - Slotted Screwdriver
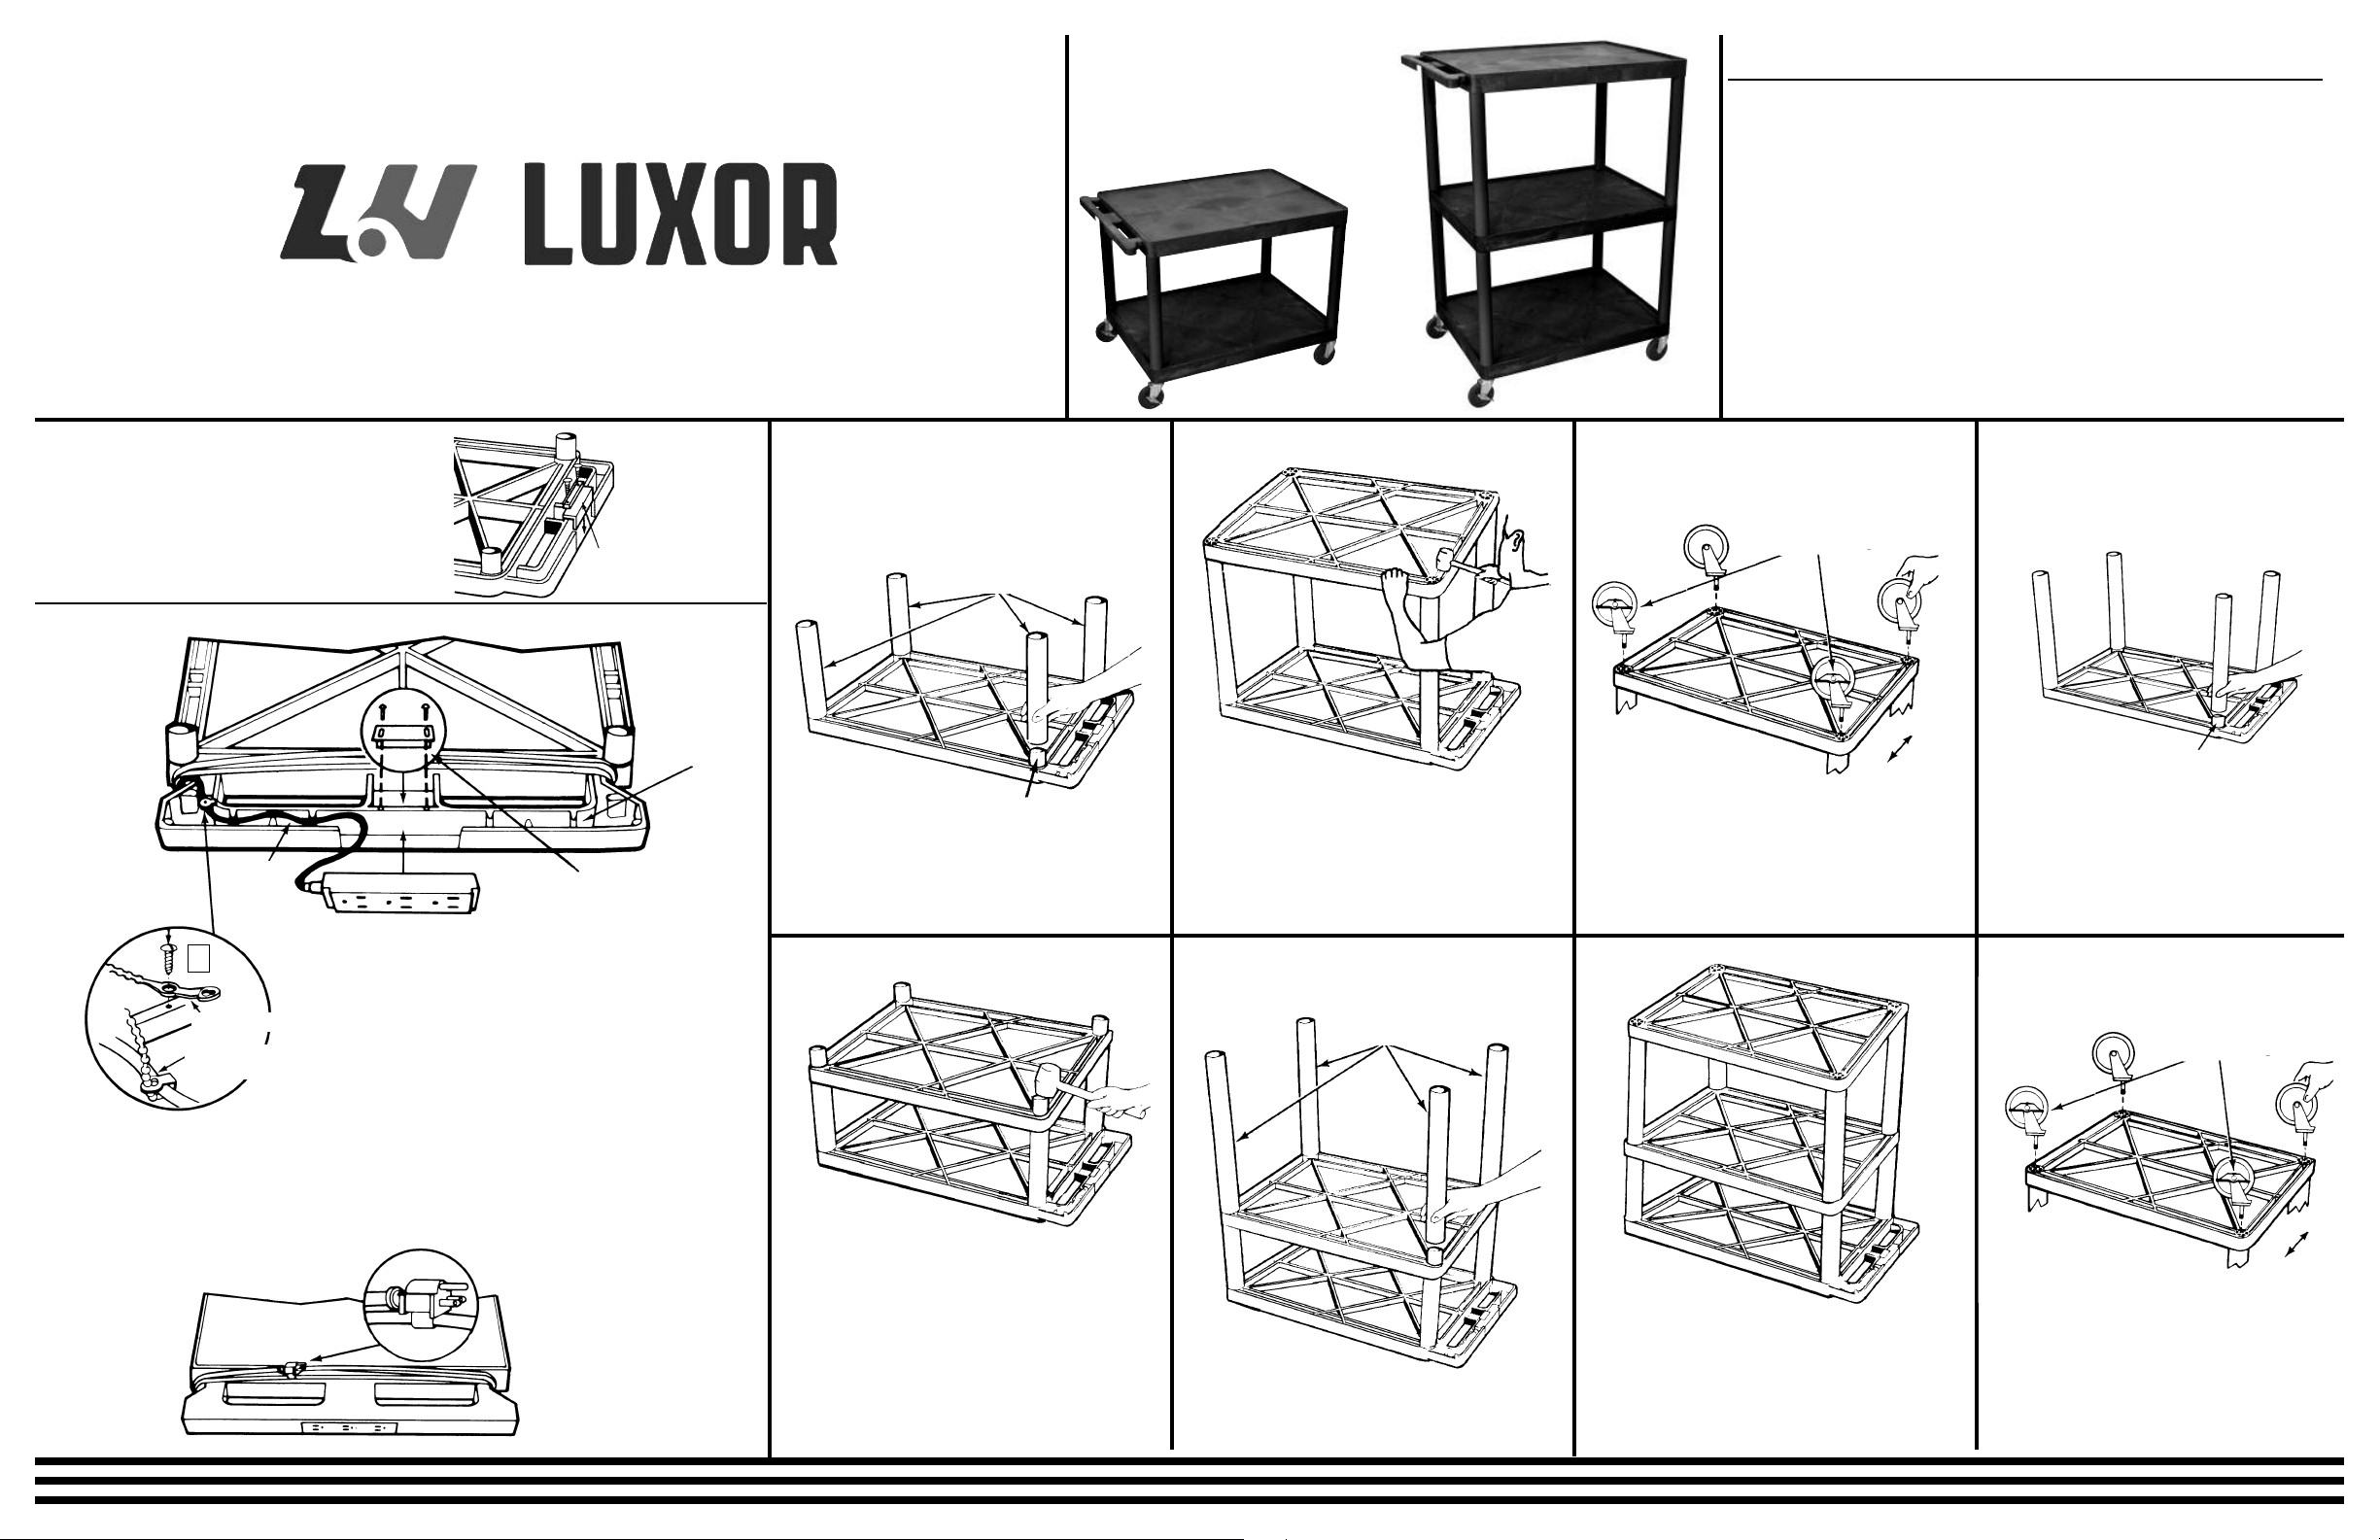
IMPORTANT:
If your LP table does not have the Optional
Electrical Assembly start by closing the electric plug housing in the handle of the top shelf
as illustrated. If your LP table has the Optional
Electric Assembly, see assembly instructions
below. Start by assembling electric.
CORD
RETAINING
TRACK #1
A
CORD MANAGEMENT TIE
TIE IS IN SECURED
POSITION
3 PLUG UNIT
PLUG
HOUSING
COVER
CORD
RETAINING
TRACK #2
POWER CORD PLUG
RETAINING BRACKET
1
Firmly seat electrical assembly 3 plug unit into
handle plug housing as illustrated. Secure with
power cord plug retaining bracket.Thread cord
through cord retaining track and out the opening in the side of the handle.
Models LP-26 and LP-27
LONG LEGS
LEG POST
1
Lay top shelf (with handle) ribbed side up on a
smooth surface. Push all 4 legs onto leg posts.
2
Position bottom shelf, ribbed side up, over the 4
legs and insert leg posts into legs. Using a
rubber mallet, firmly hammer bottom shelf into
legs until all 4 legs are seated (flush) against the
surfaces of both shelves.
*Models LP34 and LP40
use long legs second.
*Models LP42, LP48 and
LP54 use short legs second.
FOR BIG WHEEL
ASSEMBL
See instructions
in Big Wheel
hardware pack.
Y.
PLACE LOCKING CASTERS
AS ILLUSTRATED
BACK
FRONT
3
Push the four casters firmly into the holes in
each corner of the bottom shelf. Important:
Casters must be fully seated. Tap firmly with
rubber mallet to properly seat casters. Turn your
LP table right side up. It is now ready for use.
Models LP-34, LP-40, LP-42, LP-
48 and LP-54
*Models LP34 and LP40 use short legs first.
*Models LP42, LP48 and LP54 use long legs first.
LEG POST
1
Models LP-34 and LP-40: Lay top shelf (with
handle) ribbed side up on a smooth surface.
Push all 4 short legs onto leg posts.
Models LP-42, LP-48 and LP-54: Lay top
shelf (with handle) ribbed side up on a smooth
surface. Push all 4 long legs onto leg posts.
FOR BIG WHEEL
ASSEMBLY.
See instructions
Wheel
in Big
hardware pack.
PLACE LOCKING CASTERS
AS ILLUSTRATED
POWER CORD
MANAGEMENT TIES
3
Wrap the cord
around the
handle.
2
Secure power cord management tie into starter
hole with sheet metal screws. See illustration
A. Secure with power cord management tie by
wrapping tie around cord and fastening. Cut off
any unnecessary extra length of tie.
4
For safety and neat
appearance secure cord
plug to cord by utilizing
plug snap.
2
Position center shelf (with 8 leg posts) ribbed
side up, over the 4 legs and insert leg posts into
legs. Using a rubber mallet, firmly hammer center shelf into legs until all 4 legs are seated
(flush) against the surfaces of both shelves.
3
Push remaining 4 legs into leg posts of center
shelf.
4
Position bottom shelf, ribbed side up, over the 4
legs and insert leg posts into legs. Using a
rubber mallet, firmly hammer bottom shelf into
legs until all 4 legs are seated (flush) against the
surfaces of both shelves.
BACK
FRONT
5
Push the four casters firmly into the holes in
each corner of the bottom shelf. Important:
Casters must be fully seated. Tap firmly with
rubber mallet to properly seat casters. Turn
your LP table right side up. It is now ready for
use.
 Loading...