

Page 1

Page 2

CLAMPON DESKTOP
CHARGING UNIT
KBEPCGR
INSTRUCTIONS
Tools Required:
8mm Hex Wrench
In the Box:
Desktop Charging Unit
1
Clamp-On
8 mm Hex Wrench
Ships / Sold Separately:
Rechargeable Battery
2
A B
Test clamp fit by sliding clamp over edge of desk or table.
Ensure outer edge of desk fully reaches inner edge of clamp.
Ensure there is adequate clearance to insert and remove
Rechargeable Battery.
Battery Charging Options
Open Clamp-On Desktop Charging Unit
clamp by loosening 8 mm bolt.
3
Tighten bolt until clamp fits snugly on desk.
IMPORTANT: Do not over-tighten bolt.
4
Insert Rechargeable Battery into Clamp-On Desktop Charging Unit.
IMPORTANT: Battery must be fully charged before first use.
Page 3

5
6
USB-A
USB-C
AC OUTLET
Plug devices into corresponding
AC outlet and USB ports.
USB-C and USB-A ports will immediately
begin powering devices.
Press power button on top of clamp to activate
AC outlet.
7
Press power button on end of Rechargeable Battery to
activate indicator lights and monitor power consumption.
When only one LED is illuminated on Battery, replace with a
fully-charged Battery from Base Charging Station.
TROUBLESHOOTING
Power Button Flashing Green*
1. Reset Clamp-On Desktop
Charging Unit by unplugging
device(s) and pressing power
button.
2. Plug device in again. If power
button continues to flash,
device is not compatible with
EdgePower and should not
be used.
*Indicates a safety feature has
been triggerd by a device.
IMPORTANT: Plug a maximum of one device into each
corresponding outlet/port. Do not use a splitter to plug multiple
devices into one outlet and/or port, as this will damage the
Rechargeable Battery and Clamp-On Desktop Charging Unit.
Device Not Charging when
Plugged into AC Outlet:
1. Confirm power button
has been pressed and
green light is on.
2. Check the Rechargeable
Battery’s indicator lights for
power level.
3. Recharge Battery if one
or fewer indicator lights
are illuminated.
Device Not Charging when
Plugged into USB Ports.
1. Check the Rechargeable
Battery’s indicator lights for
power level.
2. Recharge Battery if one or
fewer indicator lights are
illuminated.
Page 4

Parts List
RECHARGEABLE
BATTERY
INSTRUCTIONS
1
KBEPBAT
Clamp-On Desktop Charging UnitRechargeable Battery
Tools Required: None
Ships / Sold Separately:In the Box:
Battery Charging Options
2
Insert Rechargeable Battery into Base
Charging Station.
When fully connected, Rechargeable Battery indicator
lights will blink to show charging status.
1st dot blinking
= 0 to 24% charged
2nd dot blinking, 1st dot solid
= 25 to 49% charge
3rd dot blinking, 1st & 2nd dot solid
= 50 to 74% charged
4th dot blinking, 1st, 2nd, & 3rd dot solid
= 75 to 99% charged
NOTE: Battery will ship only partially charged and
must be fully charged before first use.
Allow two (2) hours for Batteries to fully charge.
When all four indicator lights illuminate solid, the Battery
is fully charged.
3
Remove fully-charged Battery from Base Charging
Station and insert into Clamp-On Desktop
Charging Unit.
Page 5

4
TROUBLESHOOTING
Indicator lights not illuminating*
1. Ensure Base Charging Station is fully plugged
in and power switch is turned on.
2. Ensure Rechargeable Battery is properly connected to
Base Charging Station.
3. If steps 1 and 2 do not work, contact customer service.
Press power button on end of Rechargeable
Battery to activate indicator lights and monitor
power consumption.
When only one LED is illuminated on Battery,
recharge using a Base Charging Station.
*Indicates Rechargeable Battery is not charging
when insterted into Base Charging Station.
SAFETY AND CARE
Fully charge Battery before first use.
Fully charge Battery at least once every three (3)
months to maintain good battery health.
Keep Battery away from spills and moisture.
Never store Battery in a high-humidity environment.
Cannot be used by children without adult supervision.
Do not use if Battery is damaged.
Properly dispose of a damaged or end-of-life
Battery based on local laws and regulations, and
recycle if possible.
SPECIFICATIONS
Warranty: Limited 1-year
Output: 146.52 Wh
Cells: 18 at 2,200mAh, 3.7V each
Indicator lights: Shows 25%, 50%, 75%,
and fully-charged
Power switch: Turns indicator lights on and off
Designation: UN 3480 (primary lithium batteries —
forbidden for transport aboard passenger aircraft)
Page 6
Parts List
SINGLE BATTERY
CHARGER
INSTRUCTIONS
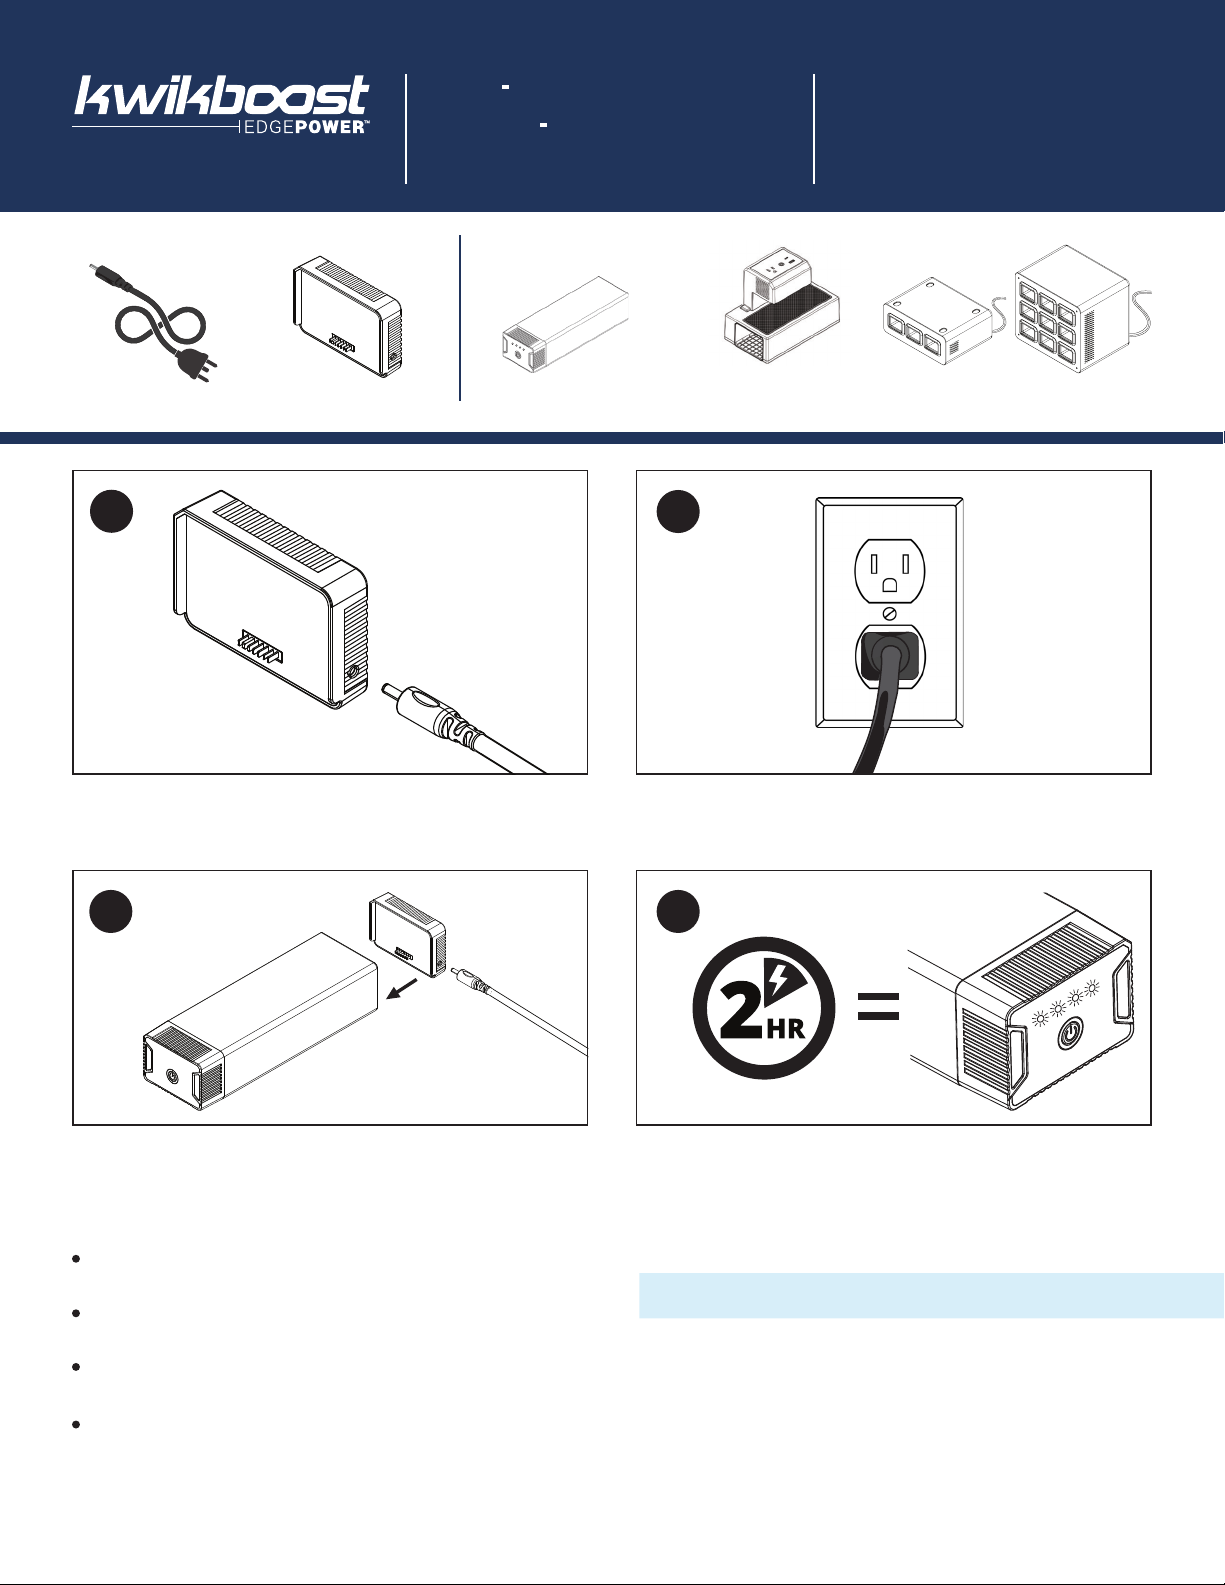
In the Box:
Power Cord
1
Single Battery Charger
KBEP-BASE1
Ships / Sold Separately:
Rechargeable Battery
Clamp-On
Desktop Charging Unit
2
Tools Required: None
Battery Charging Options
Plug male end of power cord into Single
Battery Charger.
3 4
Connect Rechargeable Battery to Single
Battery Charger.
When fully connected, Rechargeable Battery indicator
lights will blink to show charging status.
1st dot blinking
= 0 to 24% charged
2nd dot blinking, 1st dot solid
= 25 to 49% charge
3rd dot blinking, 1st & 2nd dot solid
= 50 to 74% charged
4th dot blinking, 1st, 2nd, & 3rd dot solid
= 75 to 99% charged
Plug power cord into available AC wall outlet.
Allow two (2) hours for Battery to fully charge.
When all four indicator lights illuminate solid, the Battery
is fully charged.
TROUBLESHOOTING
Indicator lights not illuminating
1. Ensure Single Battery Charger is fully plugged
in and connected to Battery.
2. If step 1 does not work, contact customer service.
*
NOTE: Batteries will ship only partially charged and
must be fully charged before first use.
*Indicates Rechargeable Battery is not charging
when connected to Single Battery Charger.
 Loading...