

Luxon Video MIPD1600, D-MIPD1600I User Manual
1080P/2 Mega-pixel (1900x1200) Flat Dome Camera
Indoor/Rugged
User Manual
Ver1.3
MIPD1600 & D-MIPD1600I

1
Table of Contents
1. Introduction.................................................................................................................3
1.1 Features........................................................................................................................3
1.2 Package Contents......................................................................................................... 4
1.3 Camera Overview.......................................................................................................... 4
2. Preparations for IP Camera Setup ............................................................................6
2.1 System Requirements................................................................................................... 6
2.2 Ethernet Connection...................................................................................................... 6
2.2.1 Indoor Camera............................................................................................... 6
2.2.2 Rugged Camera ............................................................................................ 7
3. Deleting the Existing DC Viewer ...............................................................................9
4. Accessing Camera ...................................................................................................12
5. Configuration & Operation.......................................................................................19
5.1 Browser-based Viewer Introduction ............................................................................ 19
5.2 Home Page ................................................................................................................. 21
5.3 System Related Settings............................................................................................. 23
5.3.1 Host Name and System Time Setting.......................................................... 24
5.3.2 Security........................................................................................................ 25
5.3.3 Network........................................................................................................ 28
5.3.4 DDNS........................................................................................................... 33
5.3.5 Mail.............................................................................................................. 34
5.3.6 FTP..............................................................................................................35
5.3.7 Motion Detection.......................................................................................... 36
5.3.8 Storage Management.................................................................................. 40
5.3.9 Recording .................................................................................................... 42
5.3.10 File Location ................................................................................................ 43
5.3.11 View Log File............................................................................................... 44
5.3.12 View User Information ................................................................................. 45
5.3.13 View Parameters ......................................................................................... 47
5.3.14 Factory Default ............................................................................................ 48
5.3.15 Software Version ......................................................................................... 49
5.3.16 Software Upgrade........................................................................................ 50
5.3.17 Maintenance................................................................................................ 53
5.4 Video and Audio Streaming Settings........................................................................... 54
5.4.1 Video Resolution and Rotate Type.............................................................. 54
5.4.2 Video Compression ..................................................................................... 57
5.4.3 Video OCX Protocol..................................................................................... 59
5.4.4 Video Frame Skip........................................................................................ 60
5.4.5 Video Mask.................................................................................................. 61

2
5.4.6 Audio Mode and Bit Rate Settings............................................................... 62
5.5 Camera Settings.......................................................................................................... 63
5.5.1 Exposure Setting ......................................................................................... 64
5.5.2 White Balance Setting ................................................................................. 65
5.5.3 Brightness Setting........................................................................................ 66
5.5.4 Sharpness Setting ....................................................................................... 66
5.5.5 Contrast Setting...........................................................................................66
5.5.6 Saturation Setting........................................................................................ 66
5.5.7 Hue Setting..................................................................................................67
5.5.8 TV System Setup......................................................................................... 67
5.6 Logout ......................................................................................................................... 68
6. CMS Software Introduction......................................................................................69
Appendix A: Technical Specifications...........................................................................70
Appendix B: Internet Security Settings .........................................................................72
Appendix C: DC Viewer Download Procedure..............................................................75
Appendix D: Install UPnP Components.........................................................................77

3
1. Introduction
Following high standard of Megapixel IP Camera, the Full HD Compact IP
Dome Camera is capable of serving real-time streaming and makes image
quality more smoothly.
In addition to MJPEG real time streaming, the Full HD Compact IP Dome
Camera develops superior H.264 codec to apply for high resolution digital
broadcast. Attributing to the IP Camera’s flexible platform, the camera can be
applied in various installation locations including shops, stores, banks, parking
lots, factories and building surveillance.
With Power over Ethernet (IEEE 802.3af) feature, the need of power outlets
could be totally eliminated; likewise installation and cabling cost would be
significantly reduced. Additionally, its light weight and compact size offer quick
and simple installation on the ceilings or walls of houses and vehicles.
1.1 Features
• Progressive Scan CMOS Sensor
• Full HD 1080p / HD 720p real-time at dual streaming
• H.264 and MJPEG compression
• f = 4 mm, F1.5
• Power over Ethernet (802.3af)
• Motion Detection
• Privacy Masks
• Weatherproof Dongle Cable*
• Weatherproof (IP66 international)
• Micro SD support*
• Security Torx against tampering
Note: Items marked with an asterisk (*) are optional
4
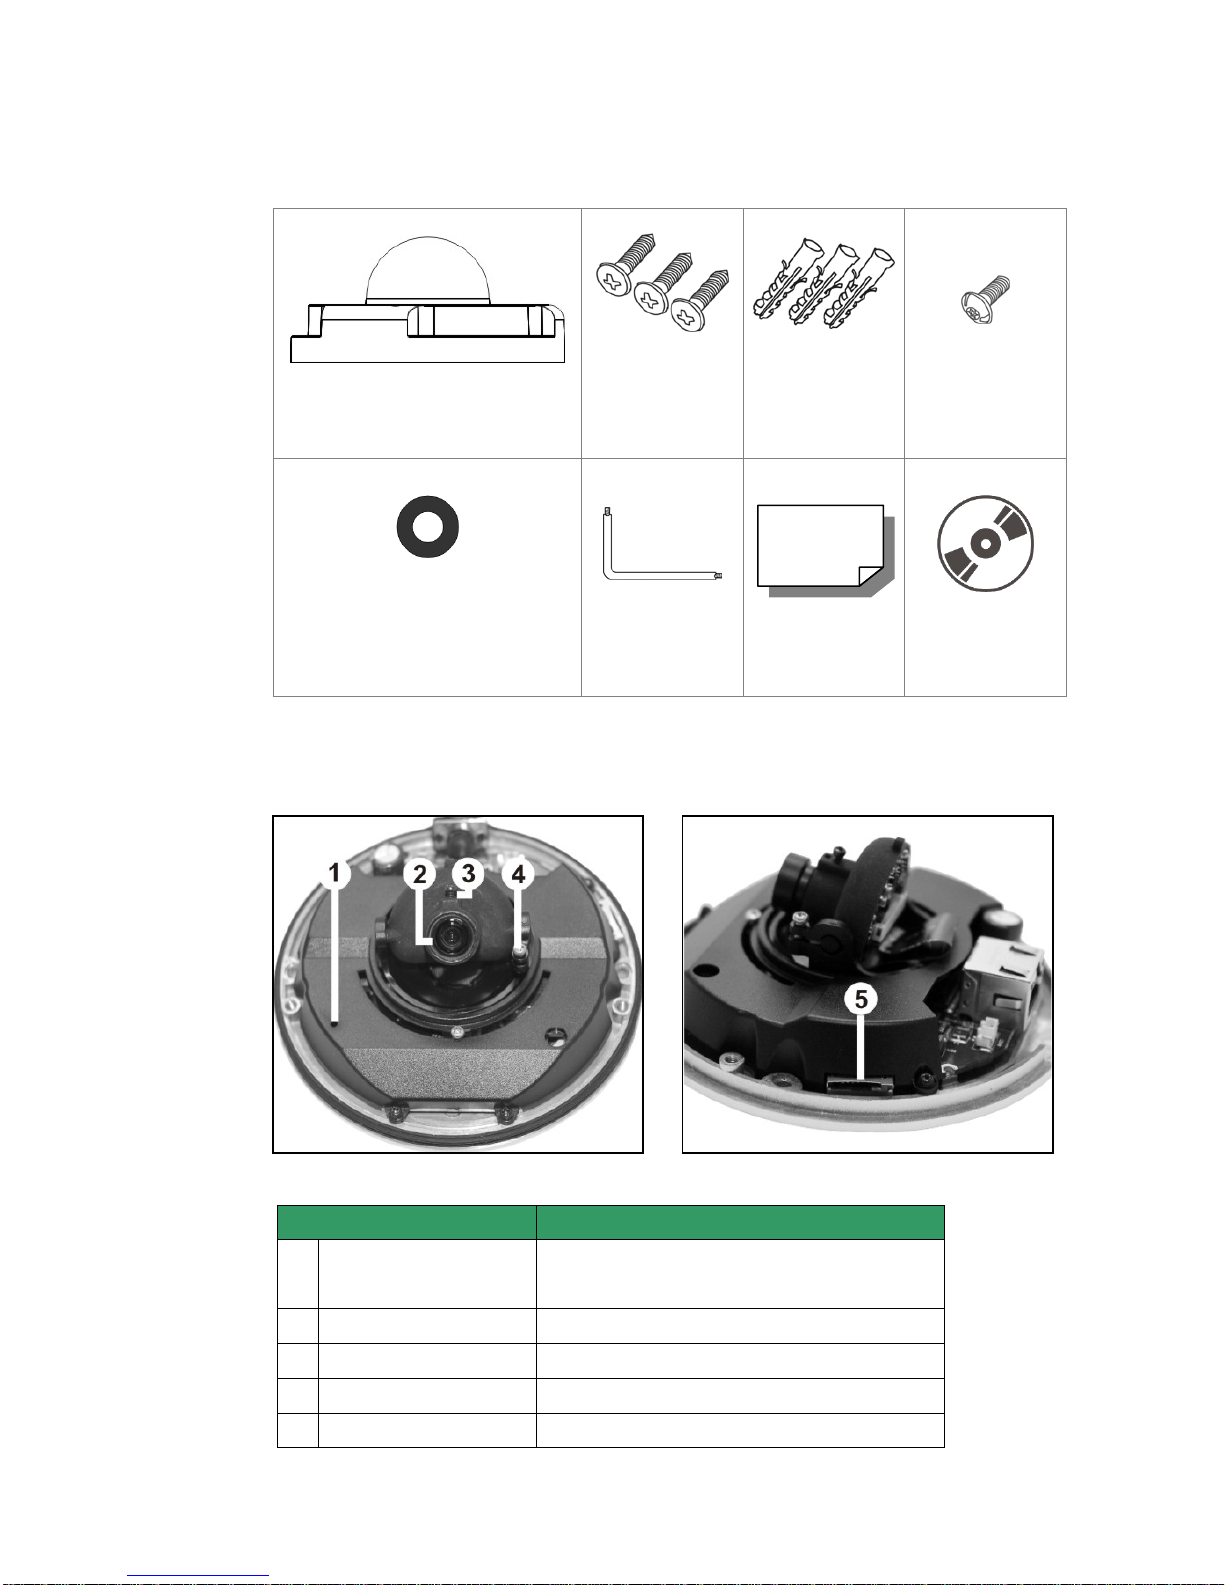
1.2 Package Contents
Please check the package contains the following items listed below.
Indoor Camera/
Rugged Camera (with Cable)
Self-tapping
screws (×3)
Plastic Anchors
(×3)
Security Screw
(×1)
Rubber Washer (×1, Casing)
Rubber Washers (×3, Baseplate)
(Rugged Camera only)
Security Torx
Quick Guide
CD
1.3 Camera Overview
Designation Description
1
Reset Button
Restore to default setting; press the
button with a proper tool
2
Lens Rotate the lens right/left to adjust focus
3
Focus Fixed Screw Loosen the screw to adjust the lens
4
Tilt Fixed Screw Loosen the screw to adjust tilt angle
5
Micro SD Card Slot Micro SD Card recording
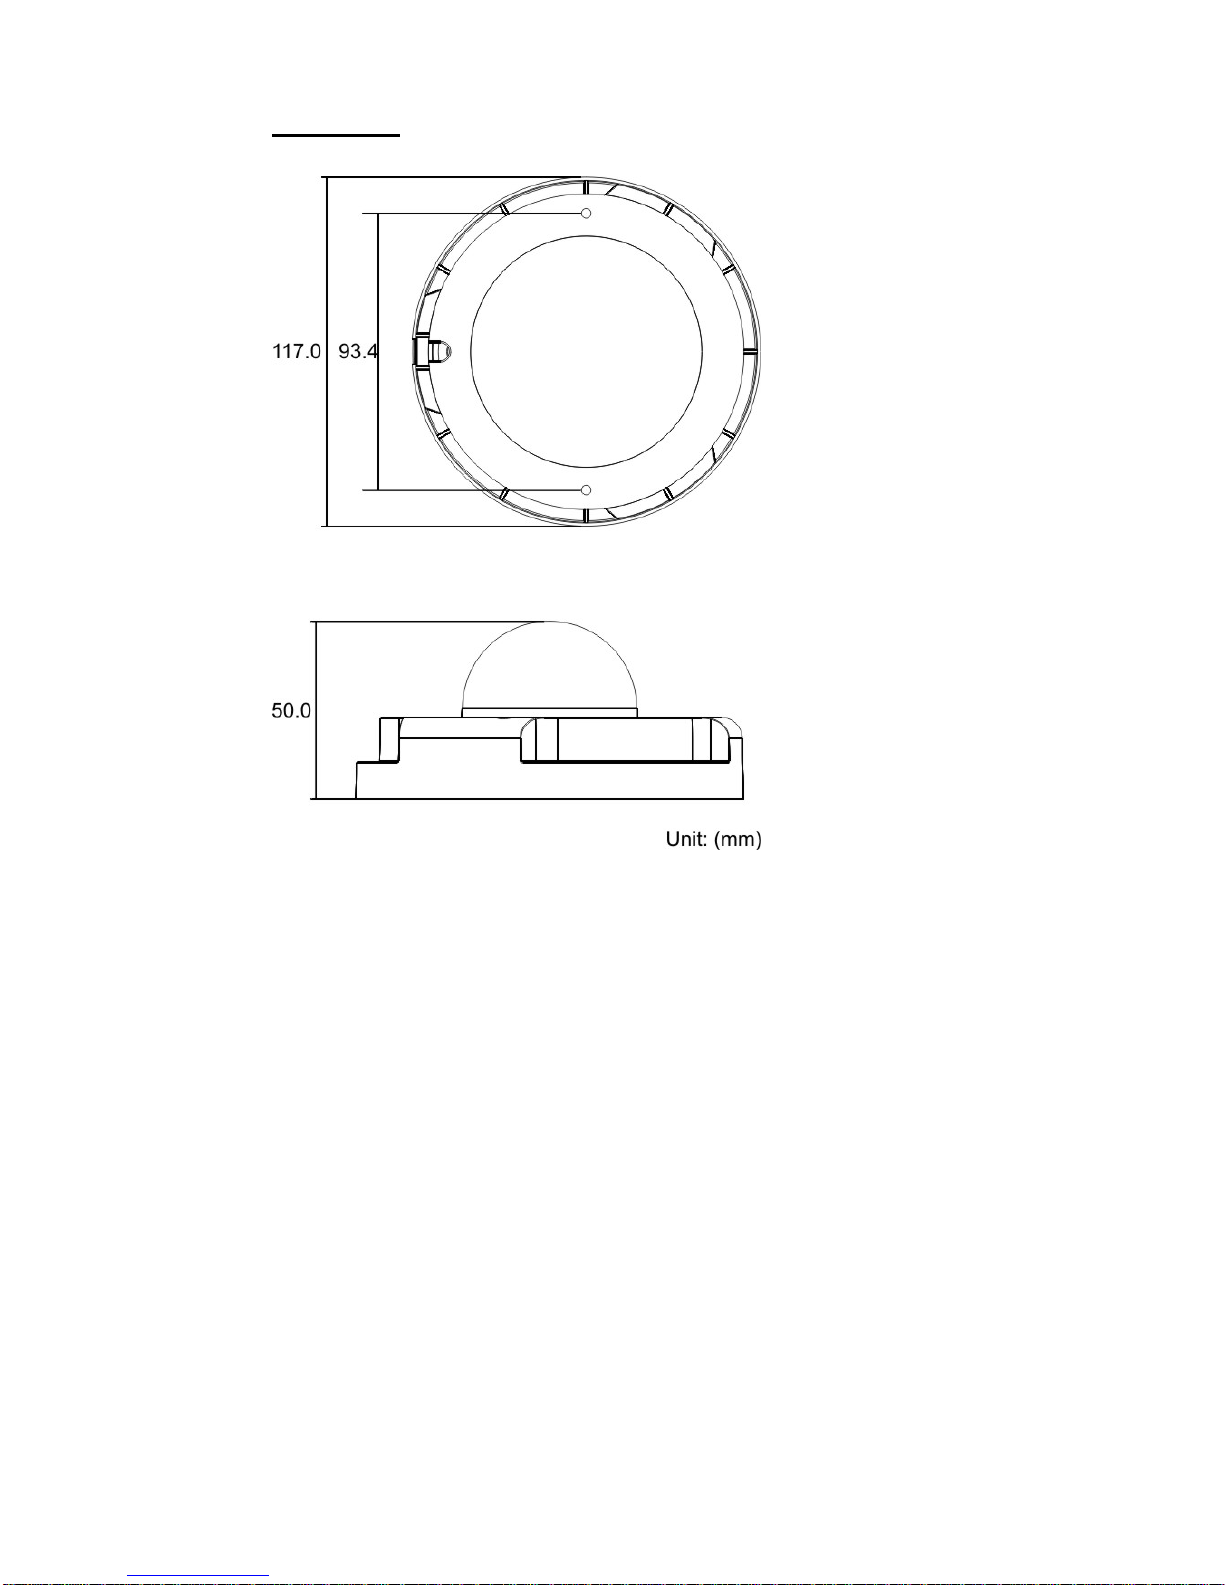
5
Dimensions

6
2. Preparations for IP Camera Setup
This chapter provides information about system requirements for IP Dome
Camera operation, power and Ethernet connection for Indoor/Outdoor IP Dome
Camera and ways to access to the camera.
2.1 System Requirements
To perform the IP Camera via web browser, please ensure your PC is in good
network connection, and meet system requirements as described below.
Items System Requirement
Personal Computer
1. Intel
○
R
Pentium
○
R
M, 2.16 GHz or Intel
○
R
CoreTM2 Duo,
2.0 GHz
2. 2 GB RAM or more
Operating System
Windows VISTA or Windows XP
Web Browser
Microsoft Internet Explorer 6.0 or later
Network Card
10Base-T (10 Mbps) or 100Base-TX (100 Mbps) operation
Viewer
ActiveX control plug-in for Microsoft IE
2.2 Ethernet Connection
Please follow the instructions below to connect Indoor/Rugged IP Dome
Camera’s Ethernet cable.
2.2.1 Indoor Camera
The Ethernet connector, which is located in the rear of the camera, is shown
below:
PoE Connection
Before connecting the Ethernet Cable, please open the dome cover first.
7
Connect one end of the Ethernet cable to the network port on the camera, and
the other end to Power Sourcing Equipment (PSE) like hubs or routers.
Check the status of the link indicator and activity indicator LEDs; if the LEDs are
unlit, please check the connections.
Green Link Light indicates good network connection.
Orange Activity Light flashes for network activity indication.
NOTE: Please use the RJ-45 connector without the booth cover for the
Indoor IP Camera.
After connecting the Ethernet Cable, please reinstall the dome cover.
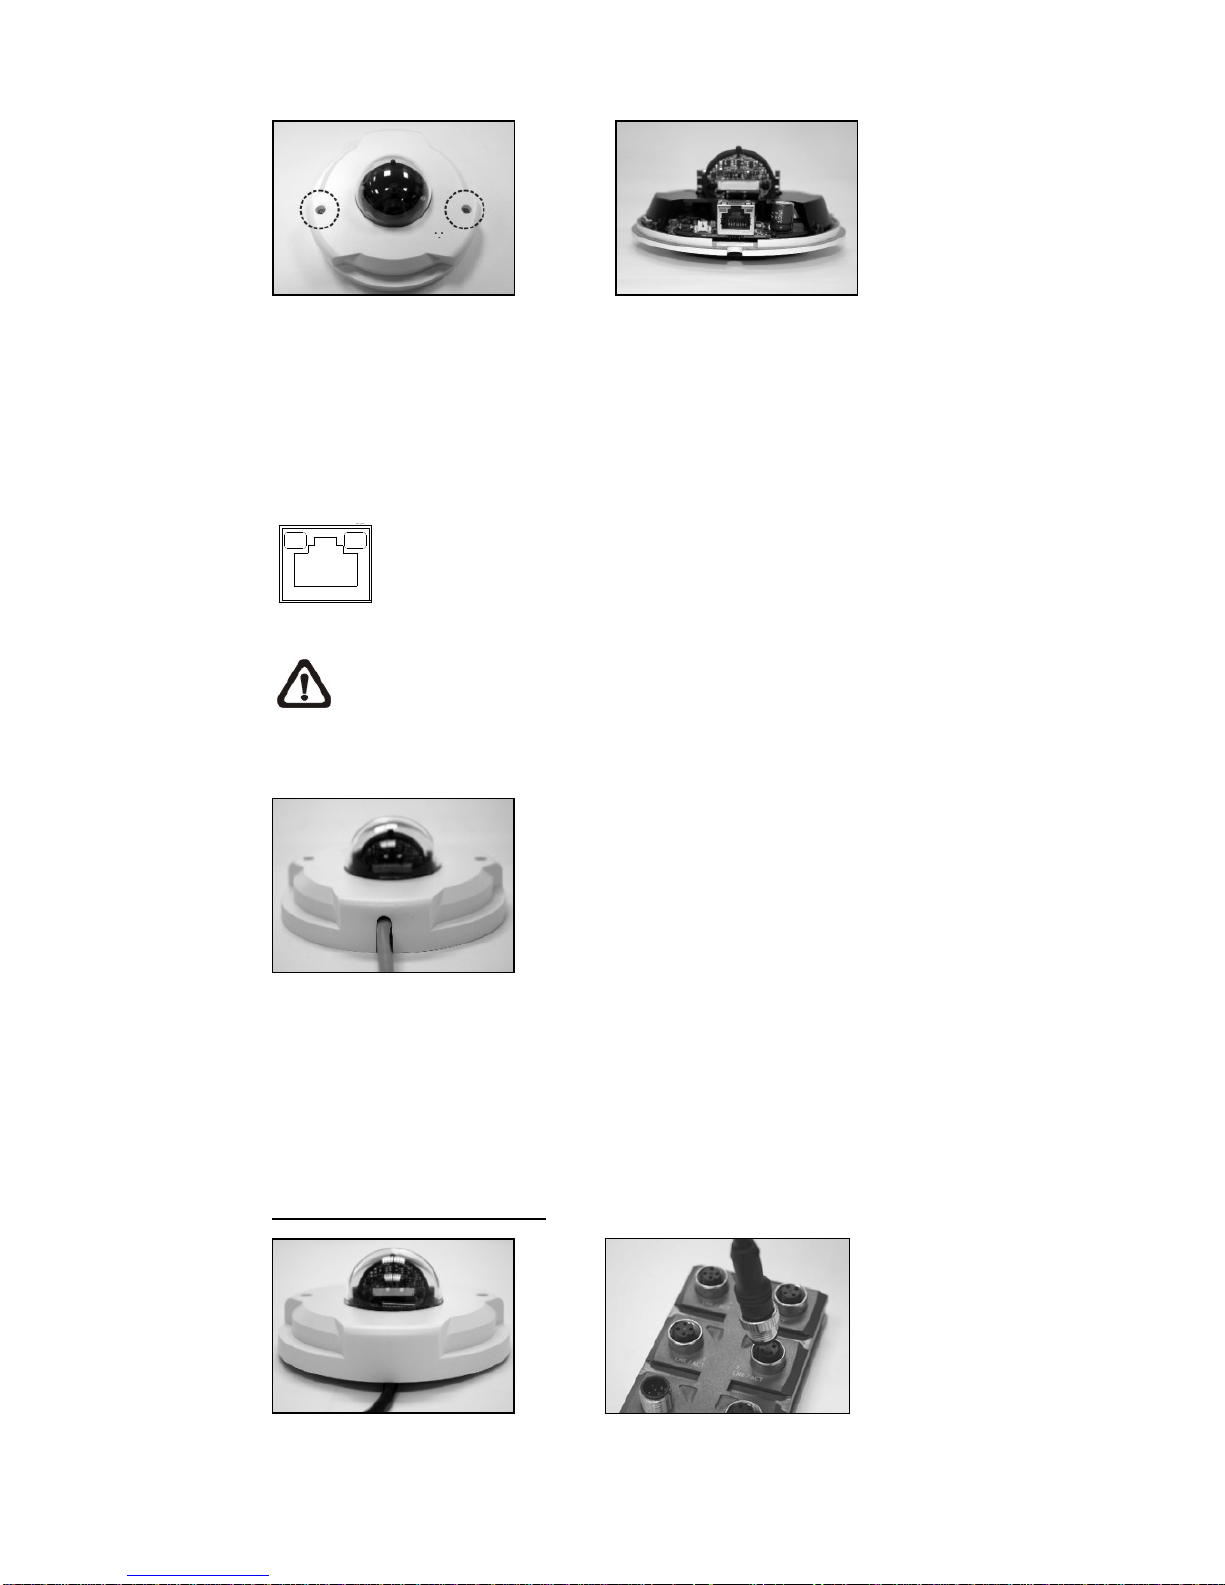
2.2.2 Rugged Camera
The Rugged IP Dome Camera supports two kinds of Ethernet cable; one is M12
D-Coded Cable, and the other is RJ-45 Dongle Cable.
M12 D-Coded Connection
M12 D-Coded Cable M12 PSE
8
z M12 D-Coded Connection
Connect the Rugged IP Dome Camera’s M12 D-coded cable to a M12
power source equipment (PSE) as shown above.
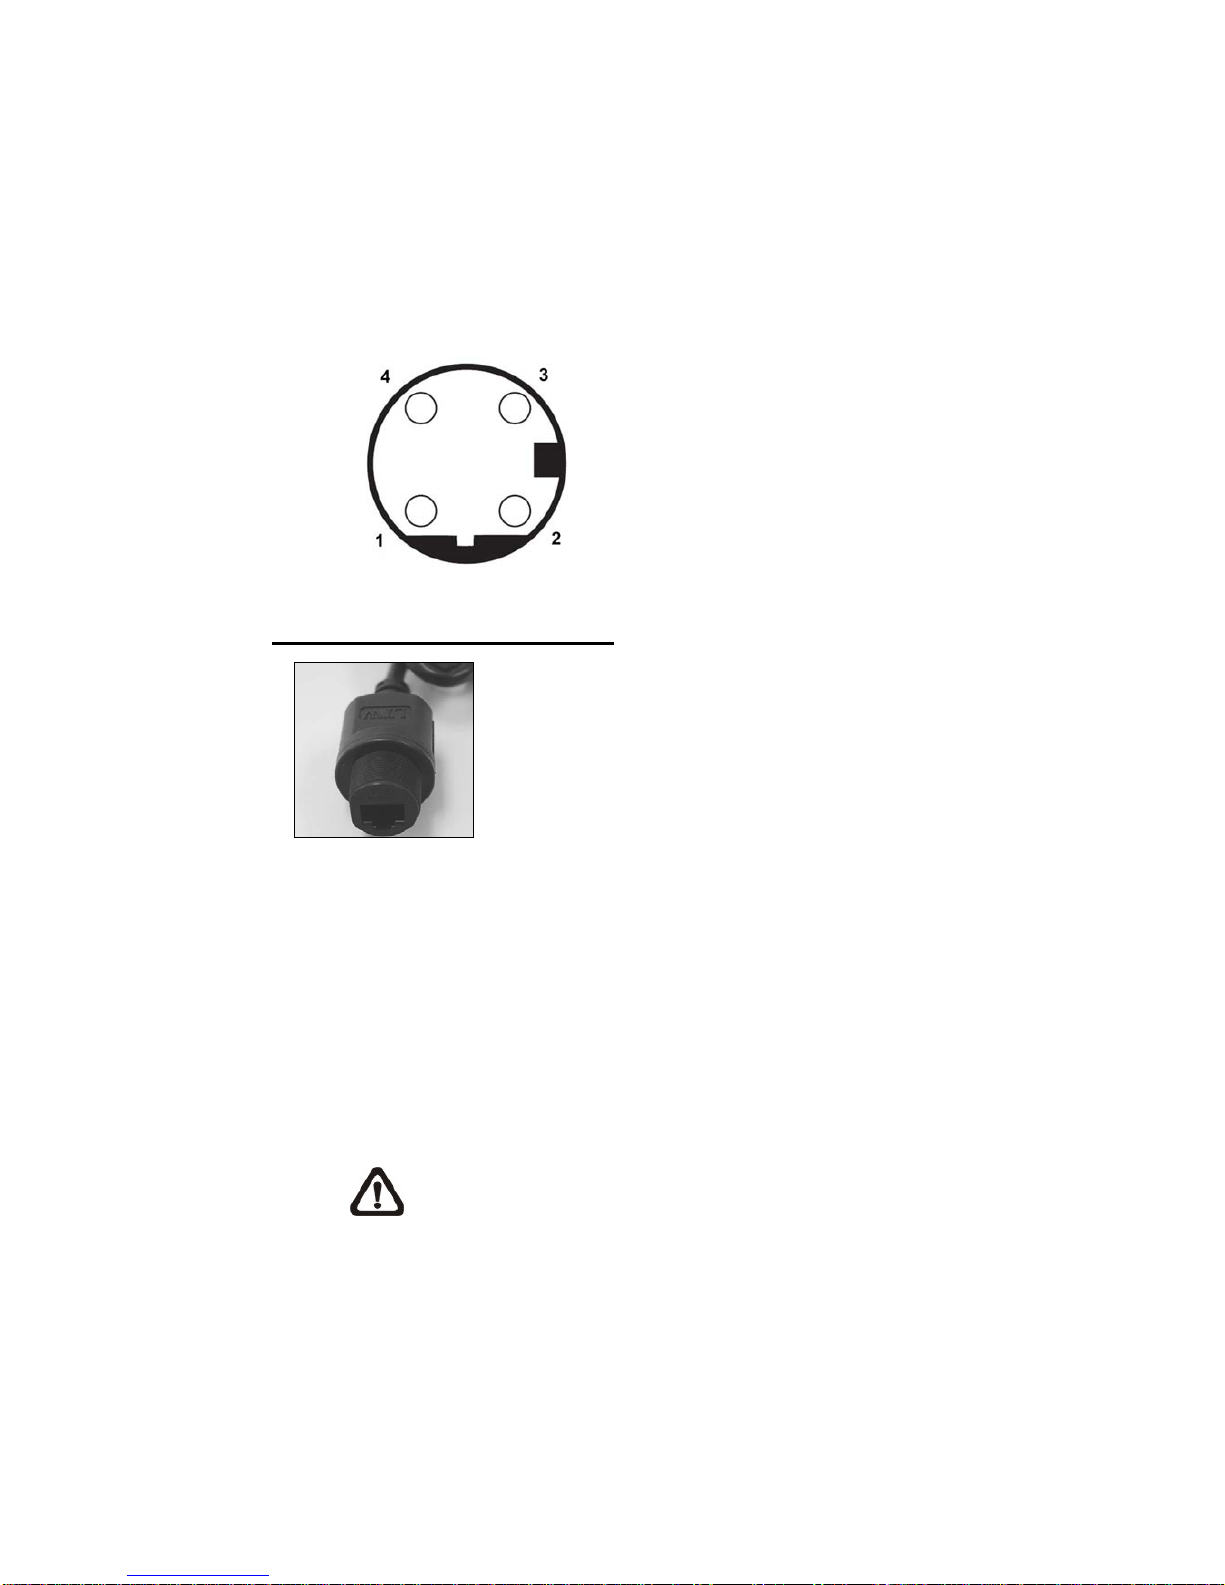
z M12 D-Coded Connector’s Pin Definition
Pin 1: Rx+
Pin 2: Tx+
Pin 3: Rx-
Pin 4: Tx-
RJ-45 Dongle Cable Connection
RJ-45 Dongle
z RJ-45 Dongle Cable Connection
Run the Ethernet cable through the Waterproof RJ-45 Screw-On Plug.
Then connect one end of the Ethernet cable to the RJ-45 dongle,
tightening the sealing nut of the Waterproof RJ-45 Screw-On Plug
completely. Later on connect the other end of the Ethernet cable to
Power Sourcing Equipment (PSE) like hubs or routers.
NOTE: Please use a PoE waterproof switch/hub so that the
camera can work.
9
3. Deleting the Existing DC Viewer
For users who have installed the DC Viewer in the PC previously, please first
delete the existing DC Viewer from the PC before accessing to the IP Camera.
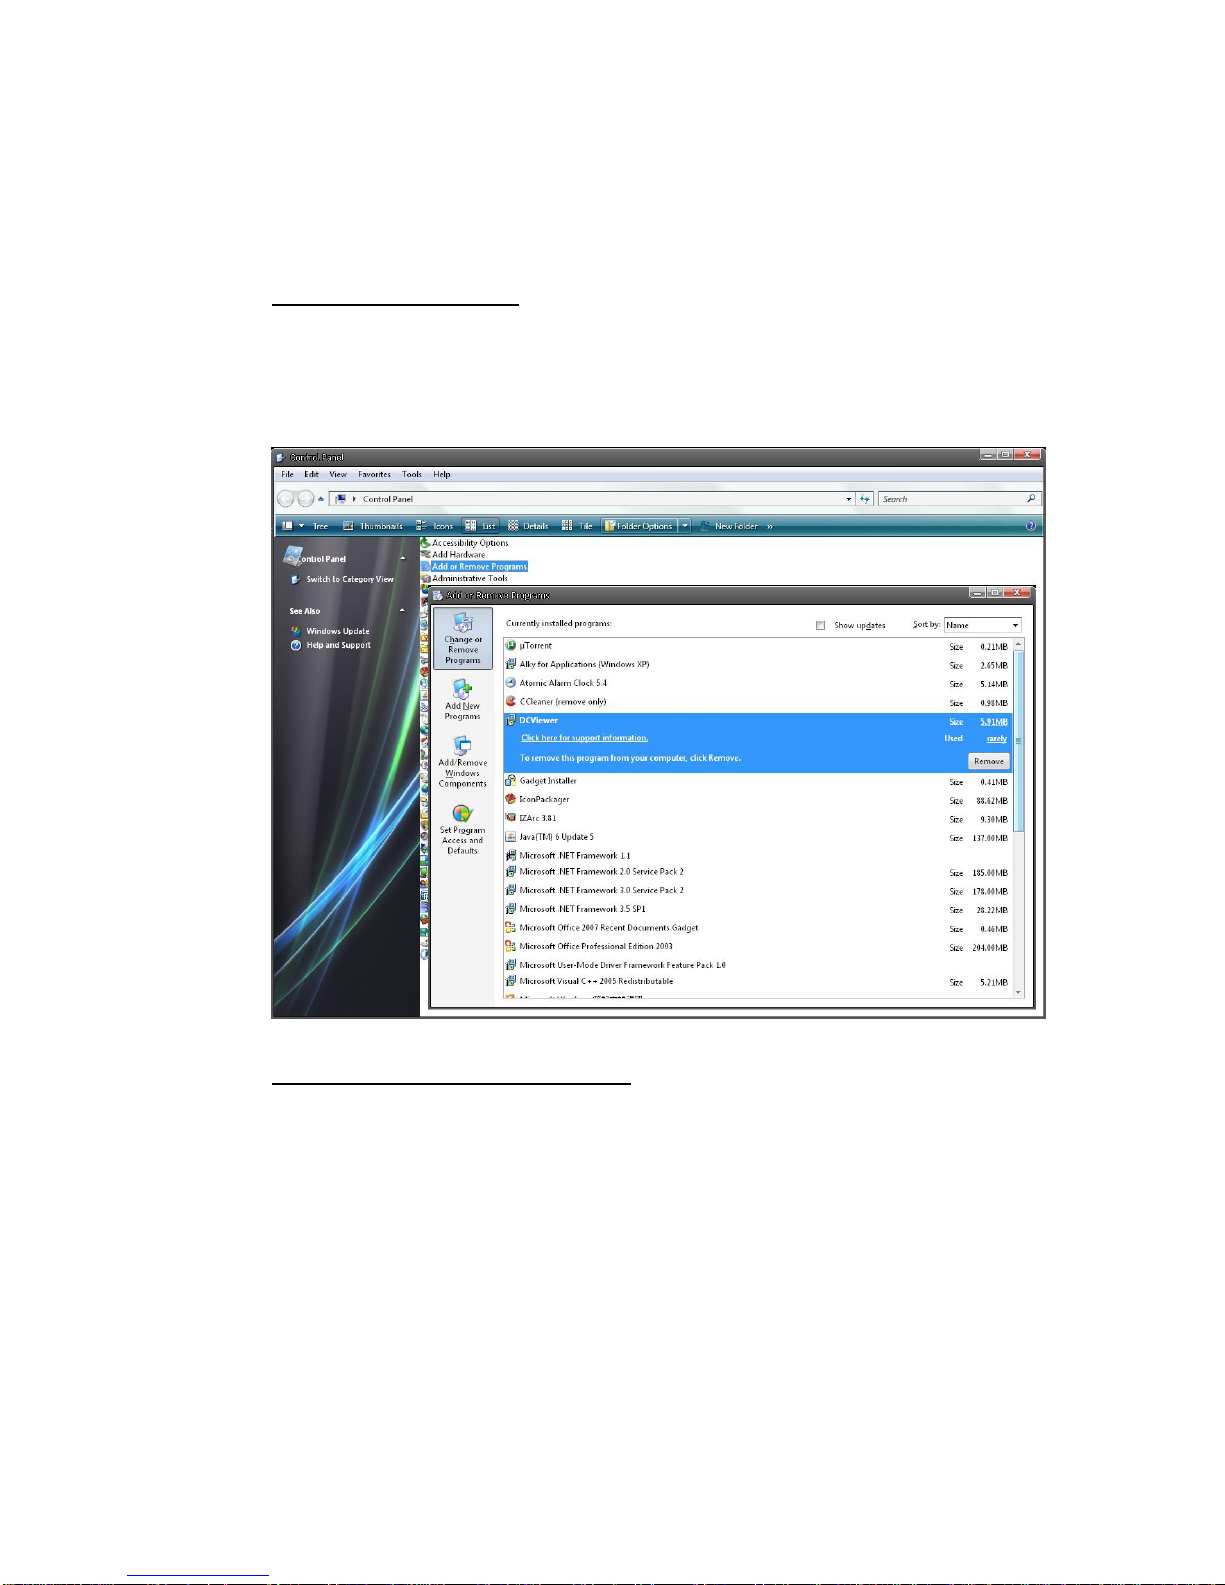
Deleting the DC Viewer
Click “Control Panel”, and then double click “Add or Remove Programs.” In the
“Currently installed programs” list, select “DCViewer” and click the button
“Remove” to uninstall the existing DC Viewer as shown in the figure below.
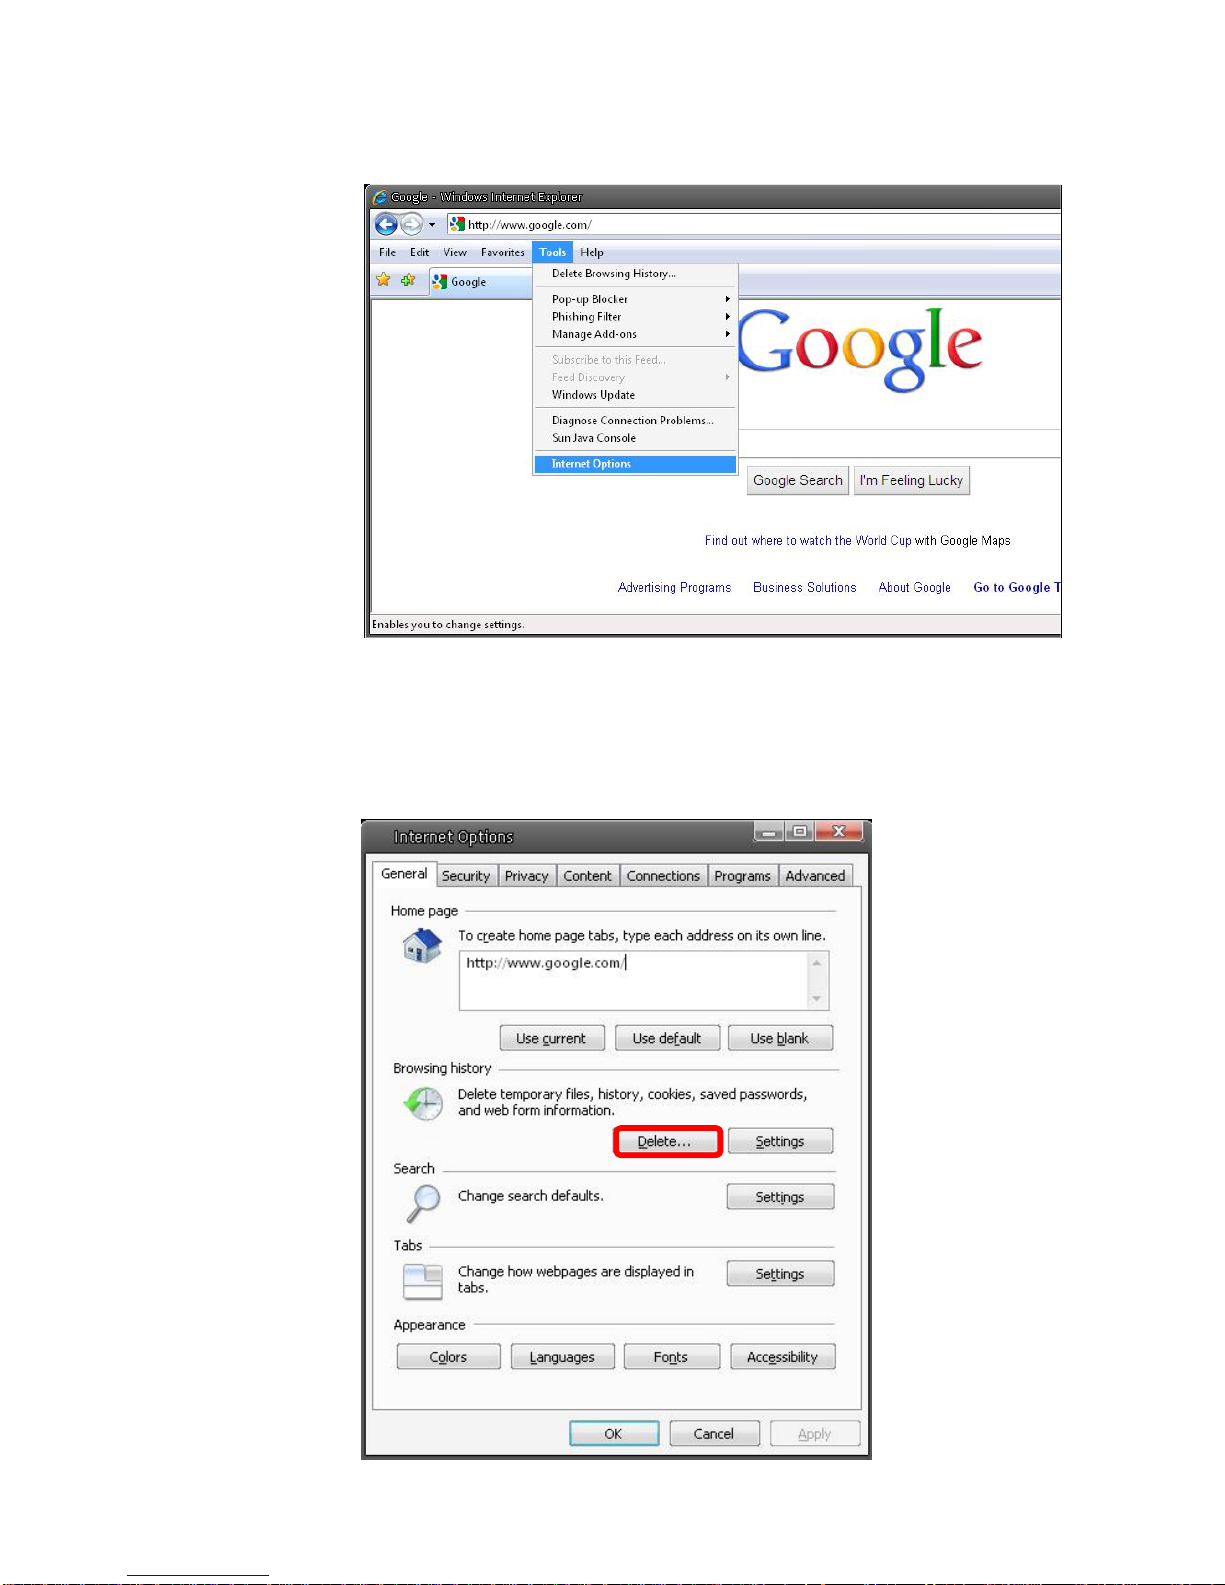
Deleting Temporary Internet Files
To improve browser performance, it is suggested to clean up the all the files in
the Temporary Internet Files. The procedure is as follows:
10
STEP 1: Click the “Tools” tab and select the option “Internet Options.”
STEP 2: Click on “Delete”, then tap the “Delete Files” in the “Temporary Internet
files” section.

11
The popup window for confirmation will come out as shown below. Click “OK” to
start deleting the files.
12
4. Accessing Camera
For initial access to the IP Camera, users can search the camera through the
installer program: DeviceSearch.exe, which can be found in “DeviceSearch”
folder in the supplied CD.
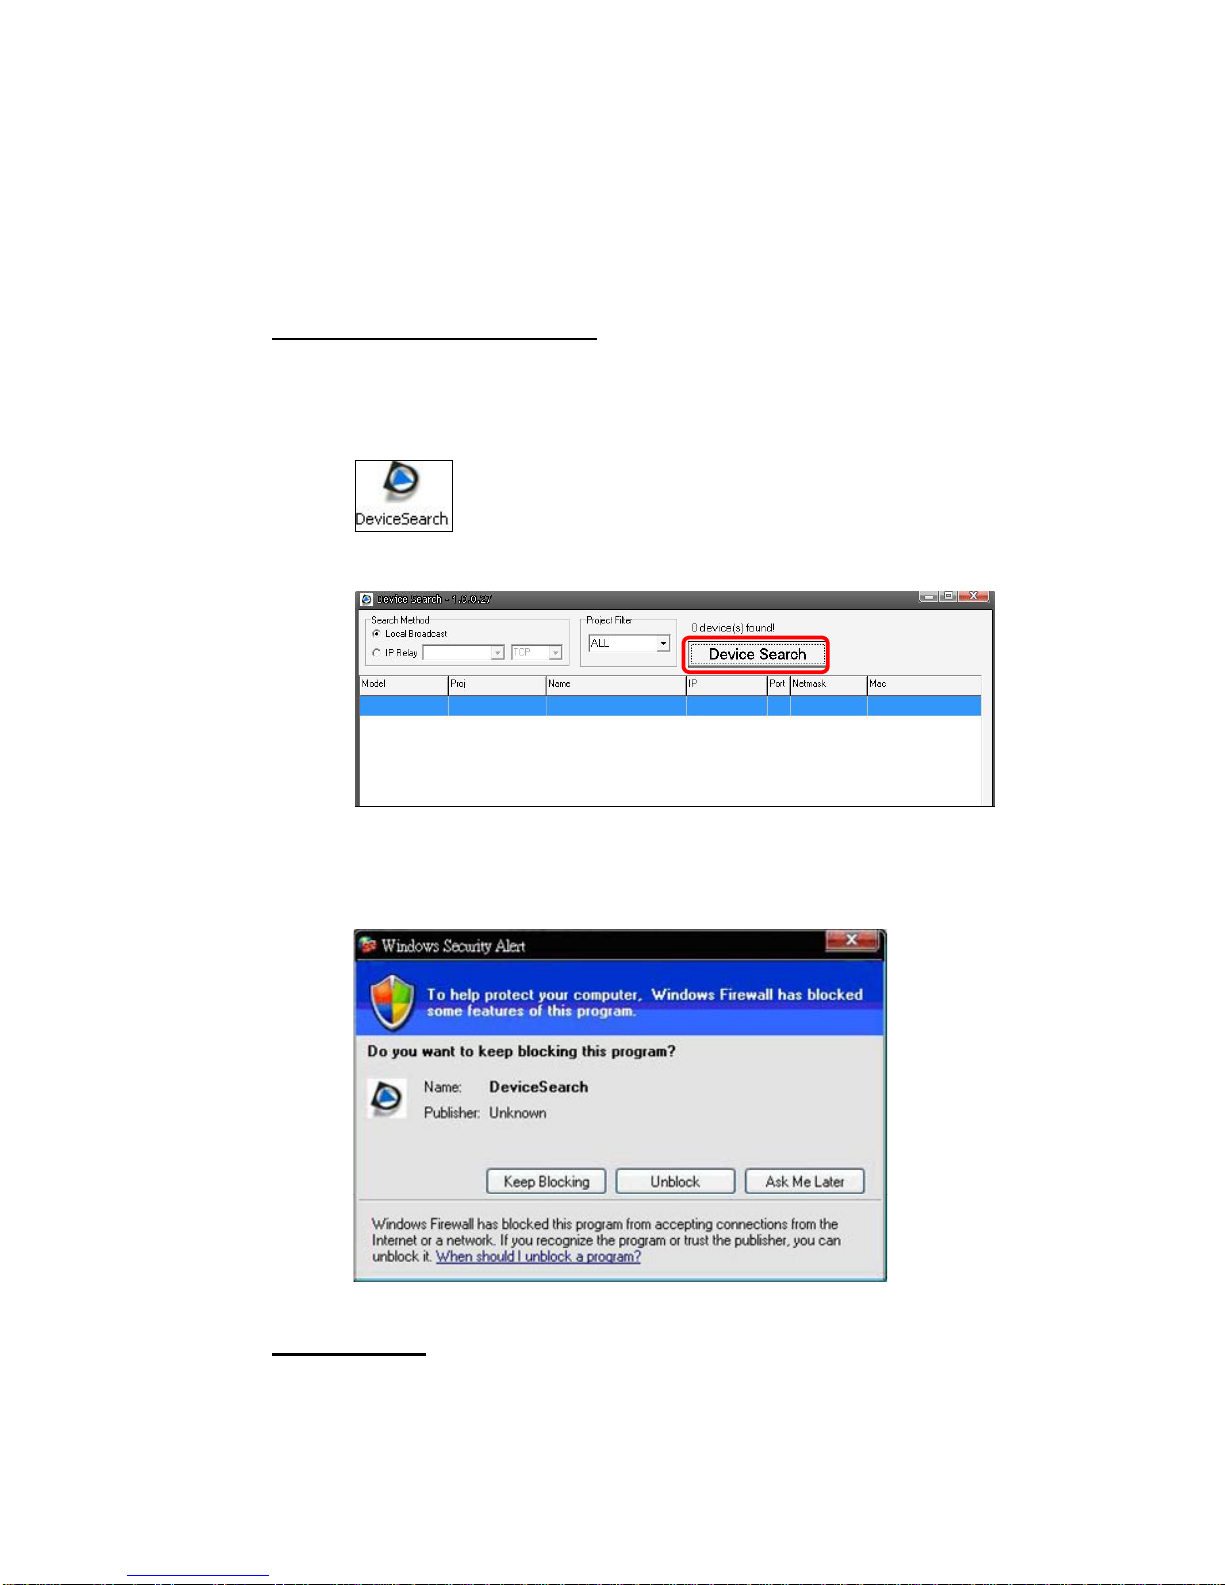
Device Search Software Setup
Step 1: Double click on the program Device Search.exe (see the icon below);
its window will appear as shown below. Then click the “Device Search”
button.
Step 2: The security alert window will pop up. Click “Unblock” to continue.
Device Search
Step 3: Click “Device Search” again, and all the finding IP devices will be listed
in the page, as shown in the figure below. The IP Camera’s default IP
address is: 192.168.0.250.

13
Step 4: Double click or right click and select “Browse” to access the camera
directly via web browser.
Step 5: Then the prompt window of request for entering default username
and password (as shown below) will appear for logging in to the IP
Dome Camera.
The default login ID and password for the Administrator are:
Login ID Password
Admin 1234
14
NOTE: ID and password are case sensitive.
NOTE: It is strongly advised that administrator’s password be
altered for the security concerns. Refer to section 5.3.2 Security
for further details.
Additionally, users can change the IP Camera’s network property, either DHCP
or Static IP, directly in the device finding list. Refer to the following section for
changing the IP Camera’s network property.
Example of Changing IP Camera’s Network Property
Users can directly change an IP Camera’s network property, ex. from static IP
to DHCP, in the finding device list. The way to change the IP Camera’s network
property is specified below:
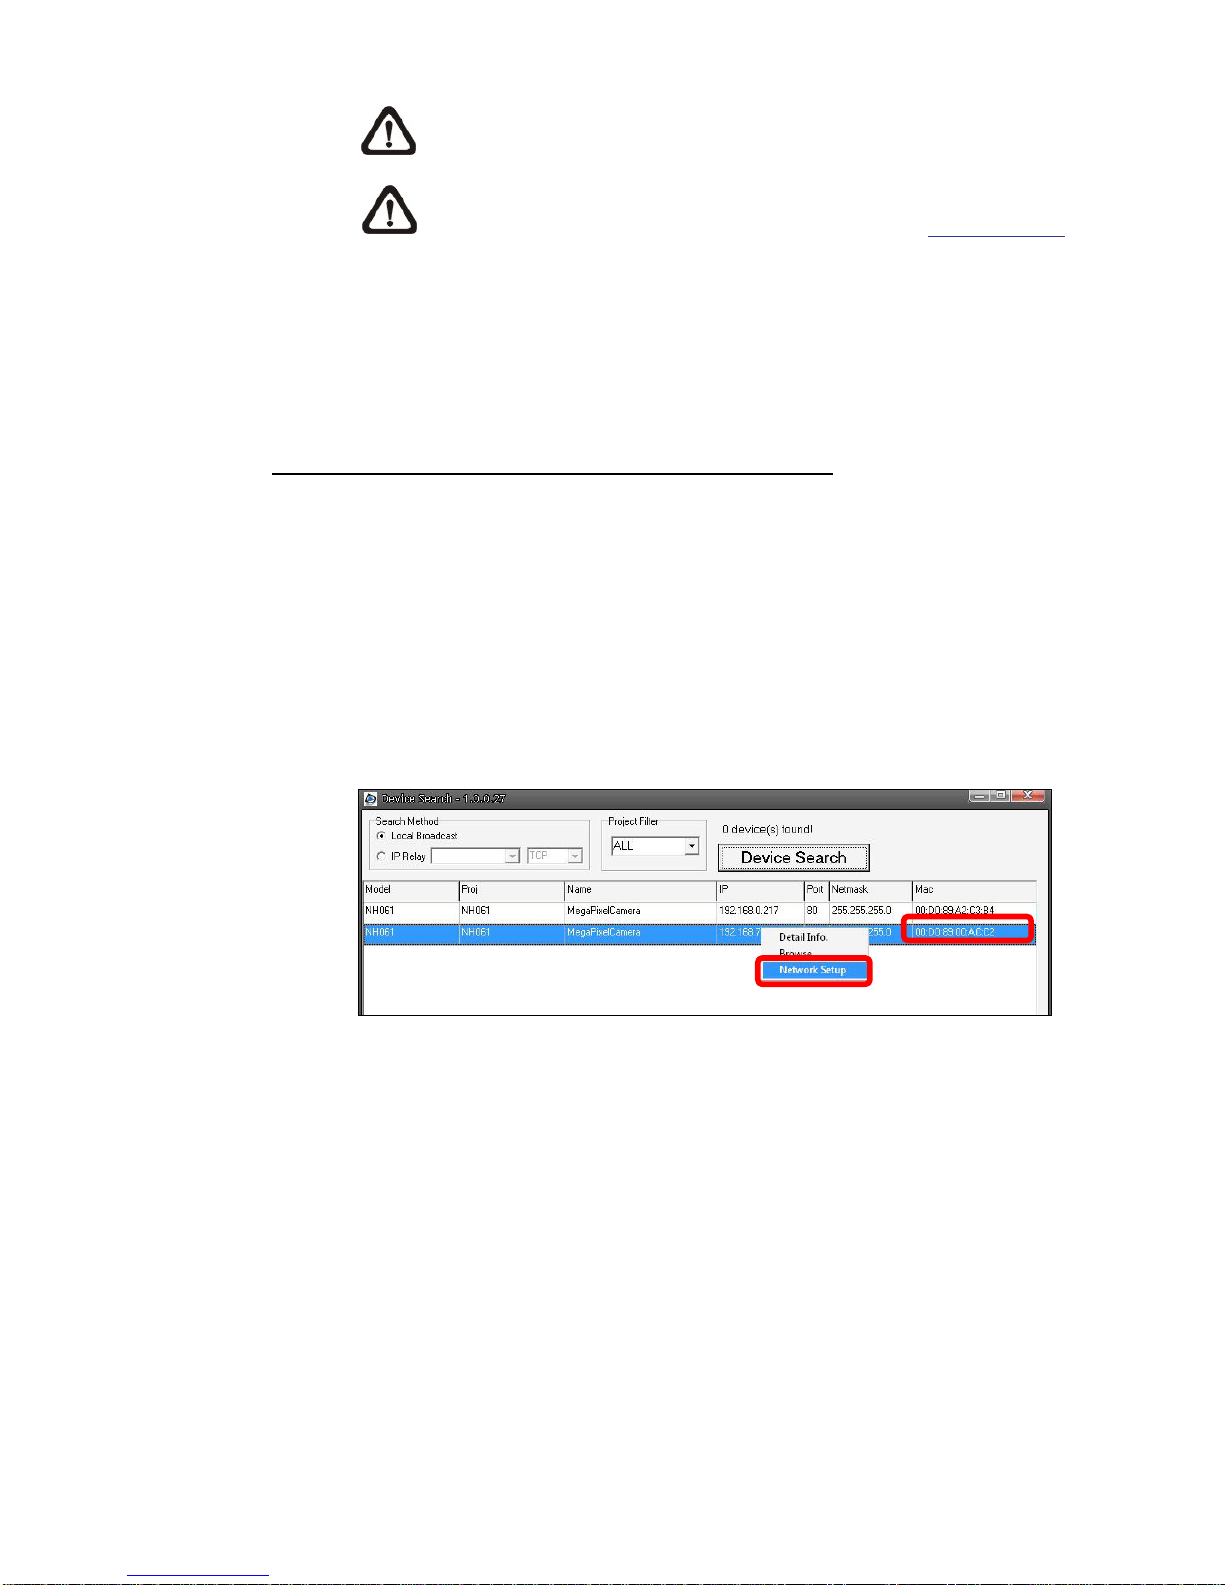
Step 1: In the finding device list, click on the IP Camera that you would like to
change its network property. On the selected item, right click and select
“Network Setup.” Meanwhile, record the IP Camera’s MAC address, for
future identification.
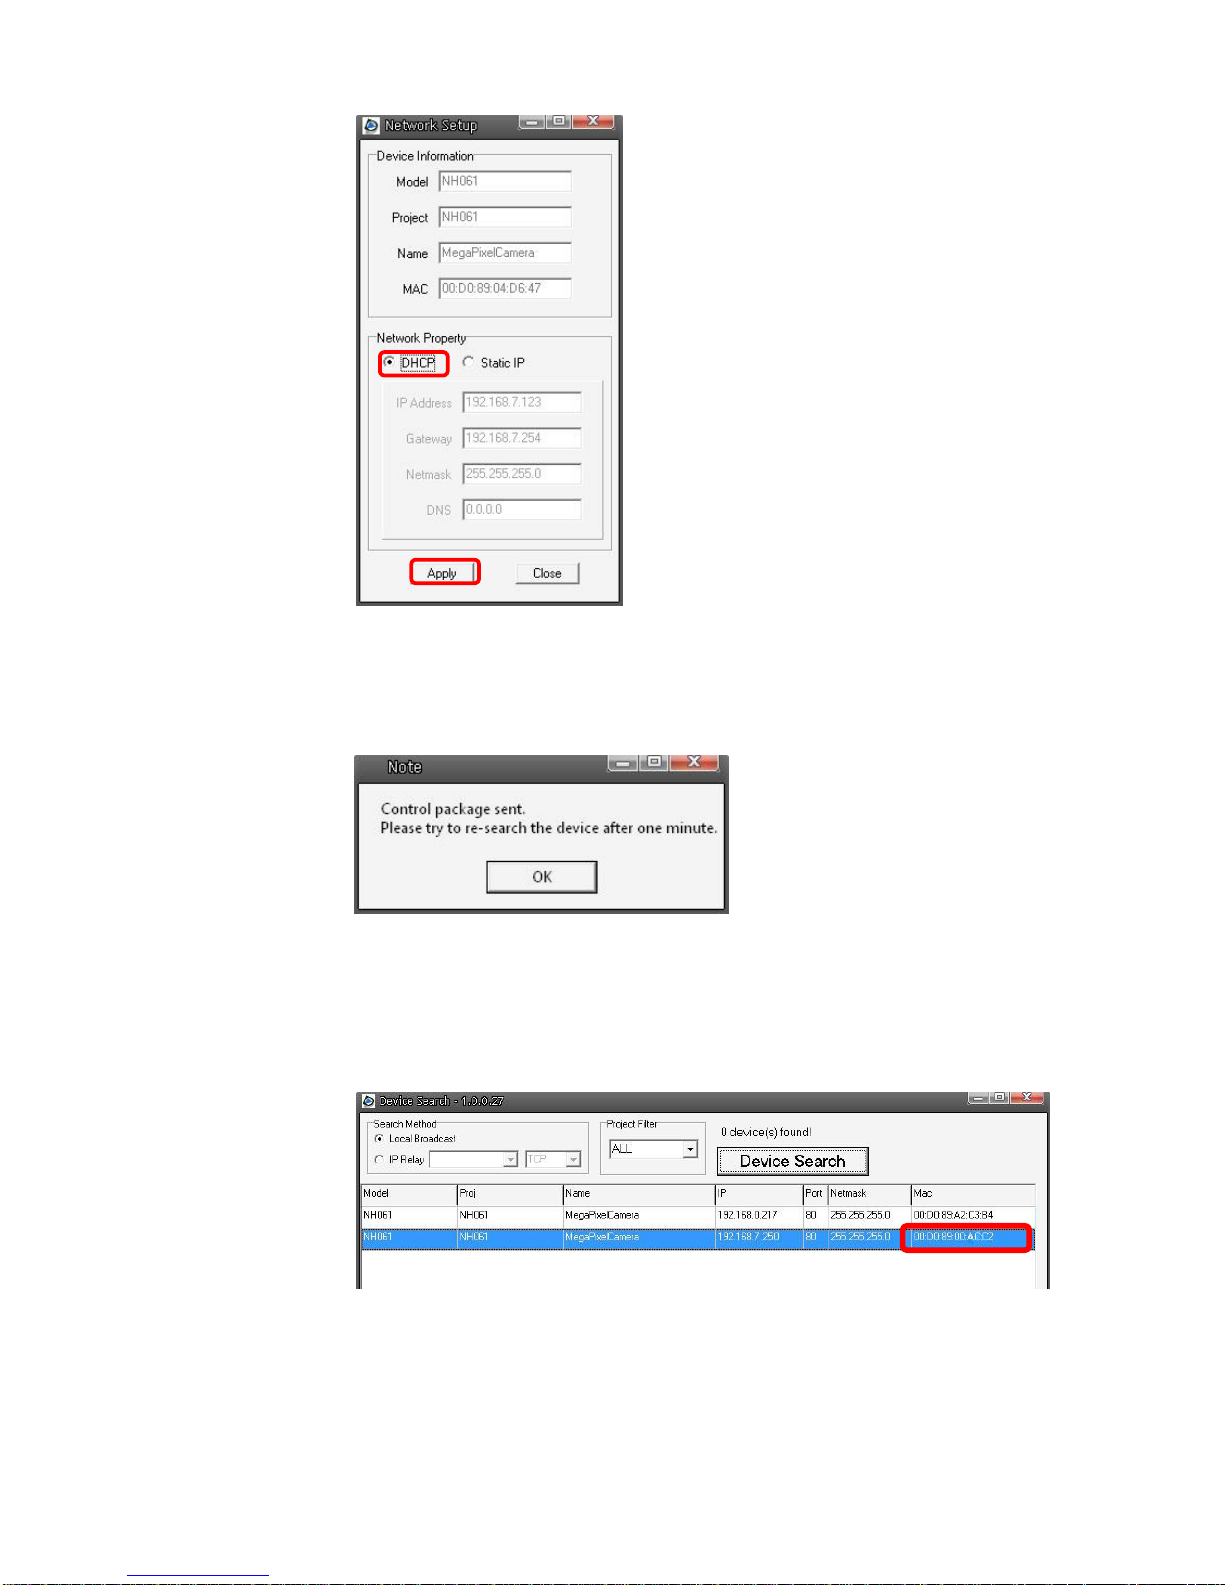
Step 2: The “Network Setup” page will come out. Select “DHCP,” and press
“Apply” button down the page.
15
Step 3: Click “OK” on the Note of setting change. Wait for one minute to
re-search the IP Camera.
Step 4: Click the “Device Search” button to search all the devices. Then select
the IP Camera with the correct MAC address. Double click on the IP
Camera, and the login window will come out.
Step 5: Enter User name and Password to access the IP Camera.

16
Installing DC Viewer Software Online
For the initial access to the IP Camera, a client program, DC Viewer, will be
automatically installed to your PC when connecting to the IP Camera.
If the Web browser doesn’t allow DC Viewer installation, please check the
Internet security settings or ActiveX controls and plug-ins settings (see
Appendix B: Internet Security Settings) to continue the process.
The Information Bar (just below the URL bar) may come out and ask for
permission to install the ActiveX Control for displaying video in browser (see the
figure below). Right click on the Information Bar and select “Install ActiveX
Control…” to allow the installation.
Then the security warning window will pop up. Click “Install” to carry on software
installation.
Click “Finish” to close the DC Viewer window when download is finished. For
the detailed software download procedure, please refer to Appendix C: DC
Viewer Download Procedure.
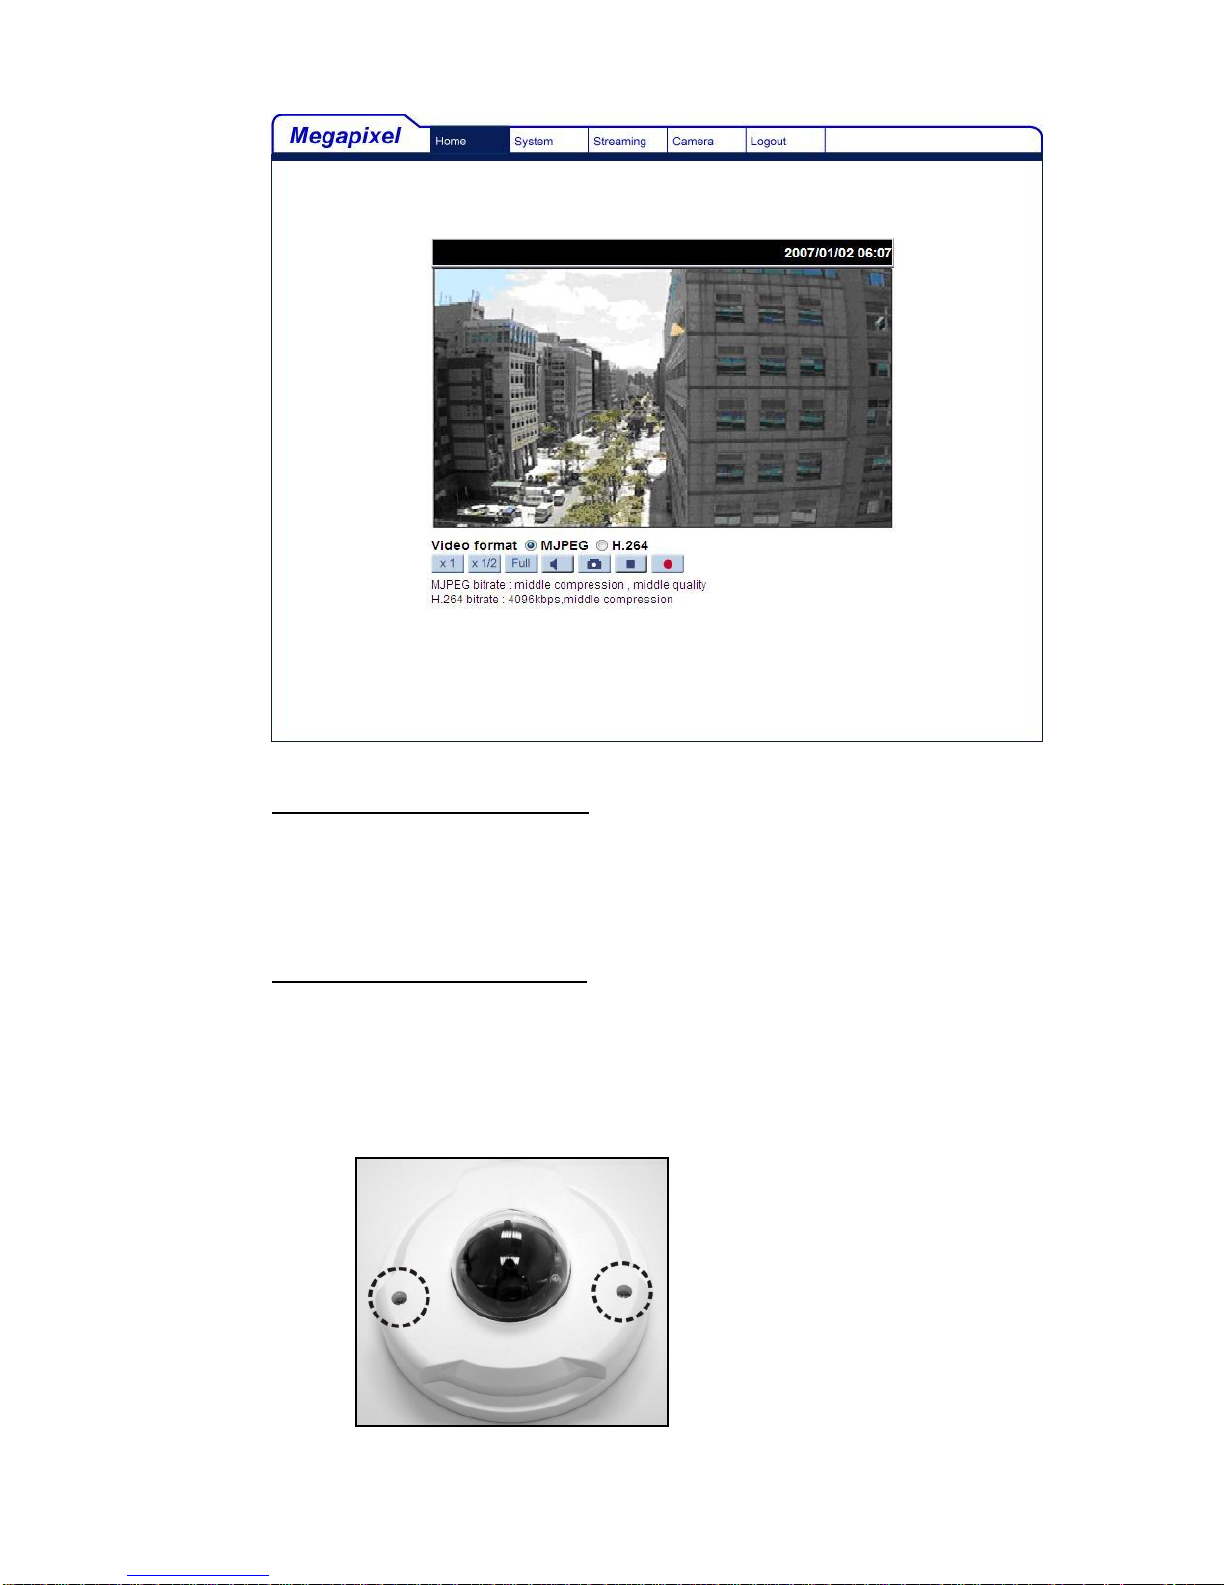
Once login to the IP Camera, users will see the Home page as shown below:
17
Administrator/User Privileges
“Administrator” represents the person who can configure the IP Camera and
authorize users access to the camera; “User” refers to whoever has access to
the camera with limited authority, i.e. entering Home and Camera setting pages.
Image and Focus Adjustment
The image displays on the Home page when successfully accessing to the IP
Camera. Adjust zoom and focus as necessary to produce a clear image.
Step 1: Unscrew the IP Dome Camera’s cover.
18
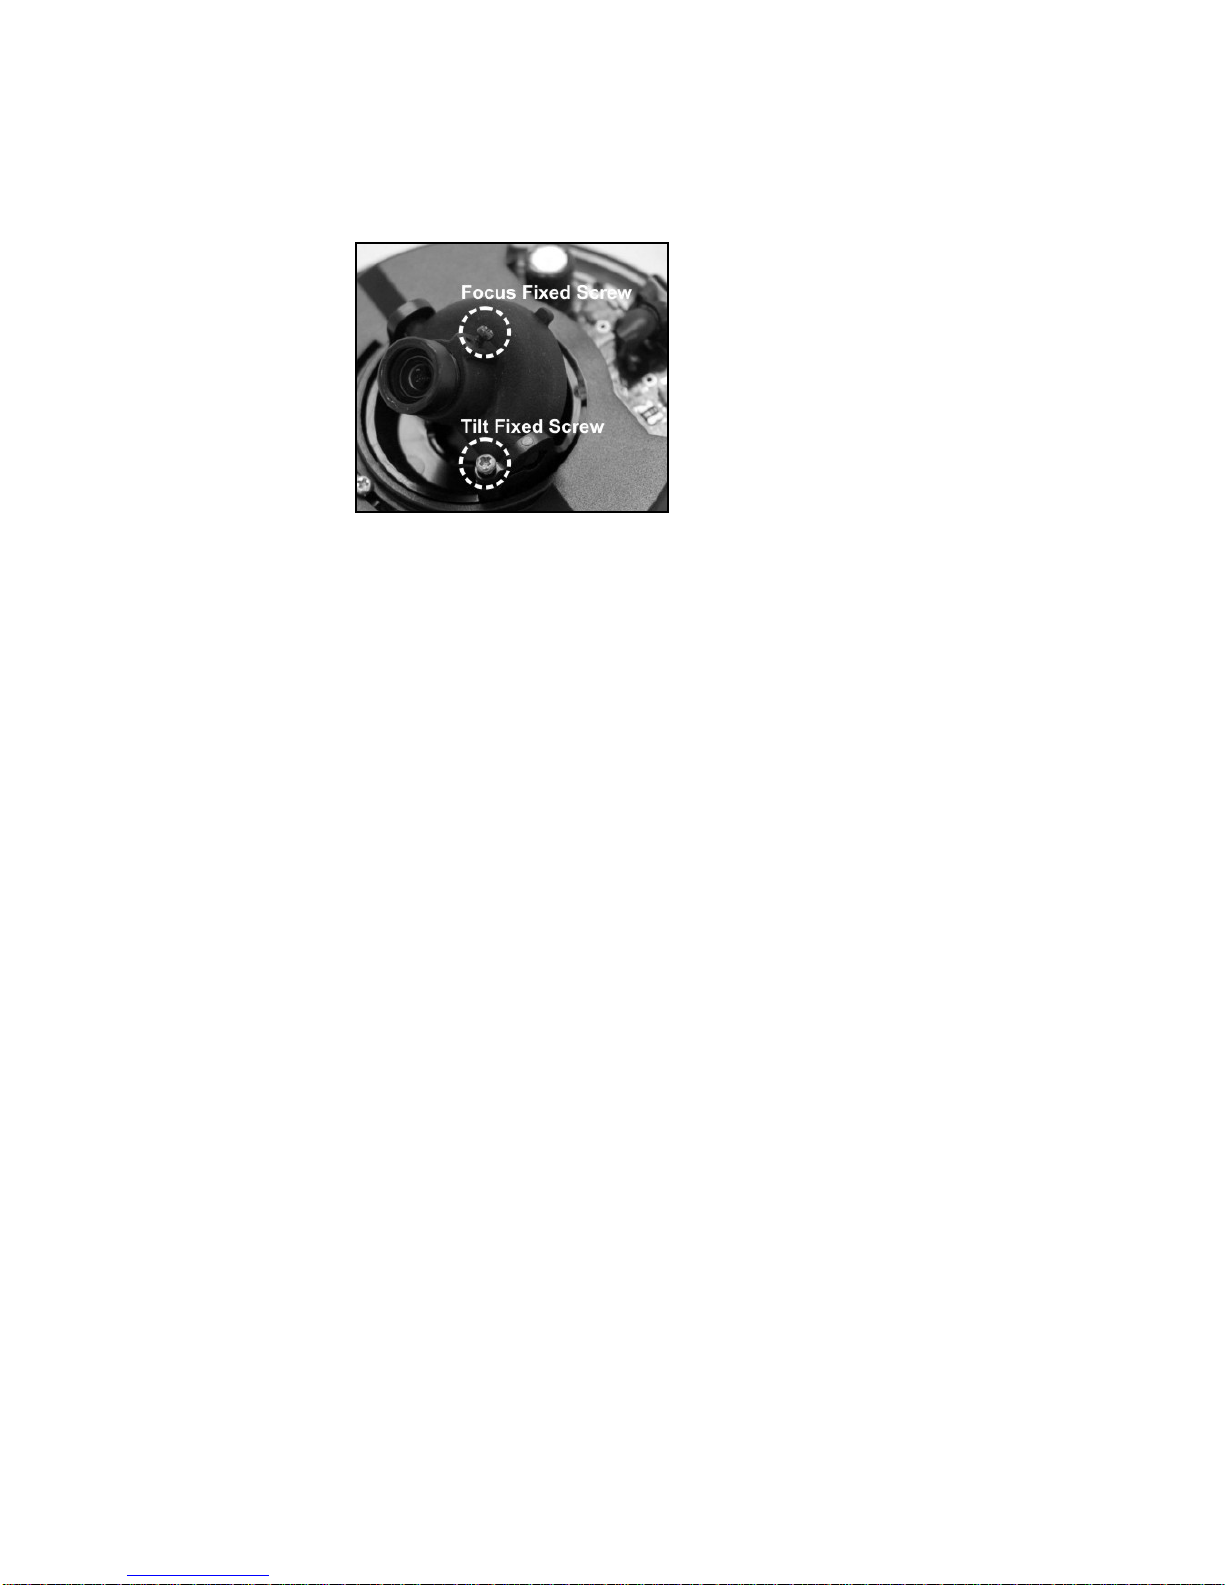
Step 2: Loosen the focus fixed screw, and rotate the lens counter-/clockwise t o
adjust focus; loosen the tilt fixed screw, and adjust the camera’s tilt
angle.

19
5. Configuration & Operation
The IP Camera is provided with a user-friendly browser-based configuration
interface, as well as a free bundled CMS (Central Management System) for
video playback and recording. In this chapter, information about main page
introduction, system related settings and camera settings will be described in
detail.
For further information about CMS software, please refer to 6. CMS Software
Introduction and CMS user manual.
5.1 Browser-based Viewer Introduction
The figure below shows the Home page of the IP Camera’s Viewer Window.
NOTE: Please note that the function buttons will vary depending on the
camera model.

20
There are five tabs: Home, System, Streaming, Camera and Logout on the top
of the viewer window.
Home
Users can monitor live video of the targeted area.
System setting
The administrator can set host name, system time, root password, network
related settings, etc. Further details will be interpreted in section 5.3 System
Related Settings.
Streaming setting
The administrator can modify video resolution and rotate type and select audio
compression mode in this page.
Camera setting
Users can adjust various camera parameters, including <Exposure>, <White
Balance>, <Brightness>, <Sharpness>, <Contrast> and <Digital Zoom>.
Logout
Click on the tab to re-login the IP Camera with another username and
password.
21
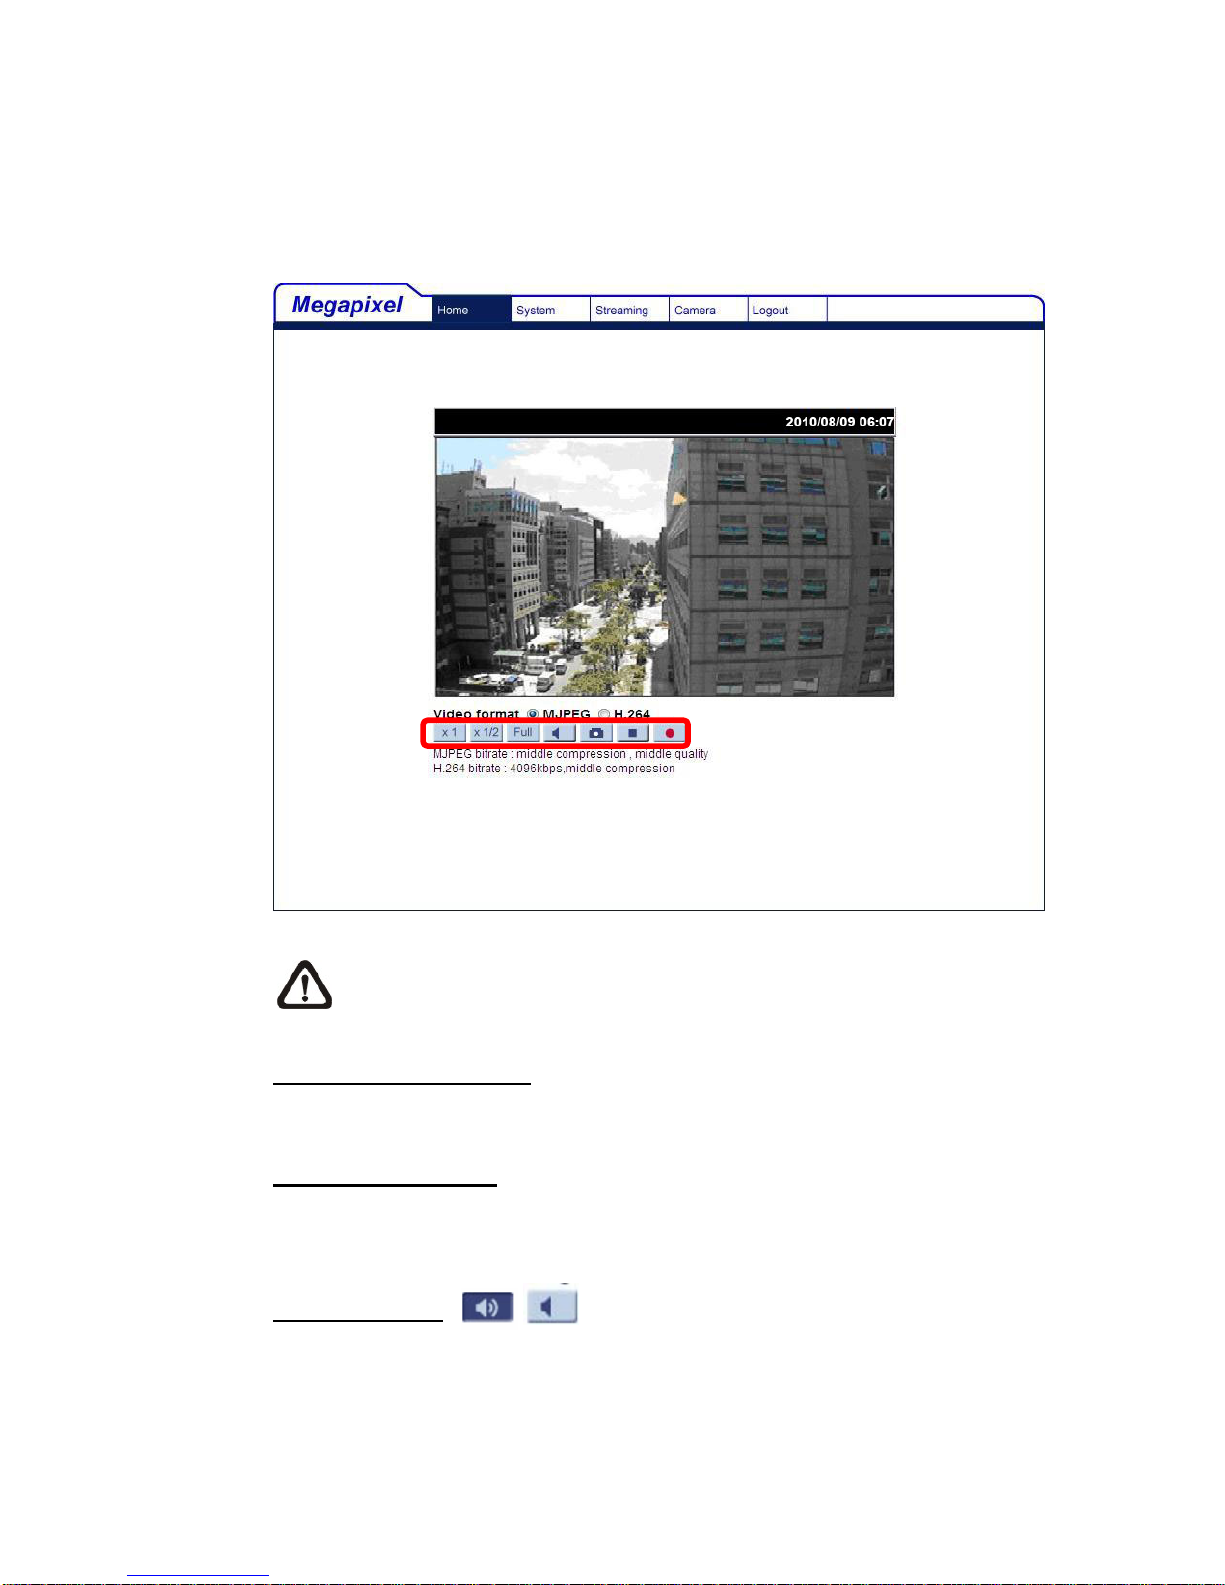
5.2 Home Page
In the Home page, there are several function buttons right down the displayed
image.
NOTE: Please note that the function buttons will vary depending on the
camera model.
Screen Size Adjustment
Image display size can be adjusted to x1/2 and full screen.
Digital Zoom Control
In the full screen mode, users can implement digital PTZ by rotating the mouse
wheel (for zoom in/out), and drag the mouse into any direction.
Speaker button
(on/off)
Press the Speaker button to mute/activate the audio.

22
Snapshot button
Press the button, and the JPEG snapshots will automatically be saved in the
appointed place. The default place of saving snapshots is: C:\. To change the
storage location, please refer to section 5.3.10 File Location for further details.
Video Streaming Pause /Restart button
(pause/restart)
Press the stop button to disable video streaming, the live video will be displayed
as black. Press the restart button to show the live video again.
Recording button
(on/off)
Press the button and the recordings from the Live View will be saved to the
location specified in the “File Location” (snapshot) page; see section 5.3.10 File
Location for further details.
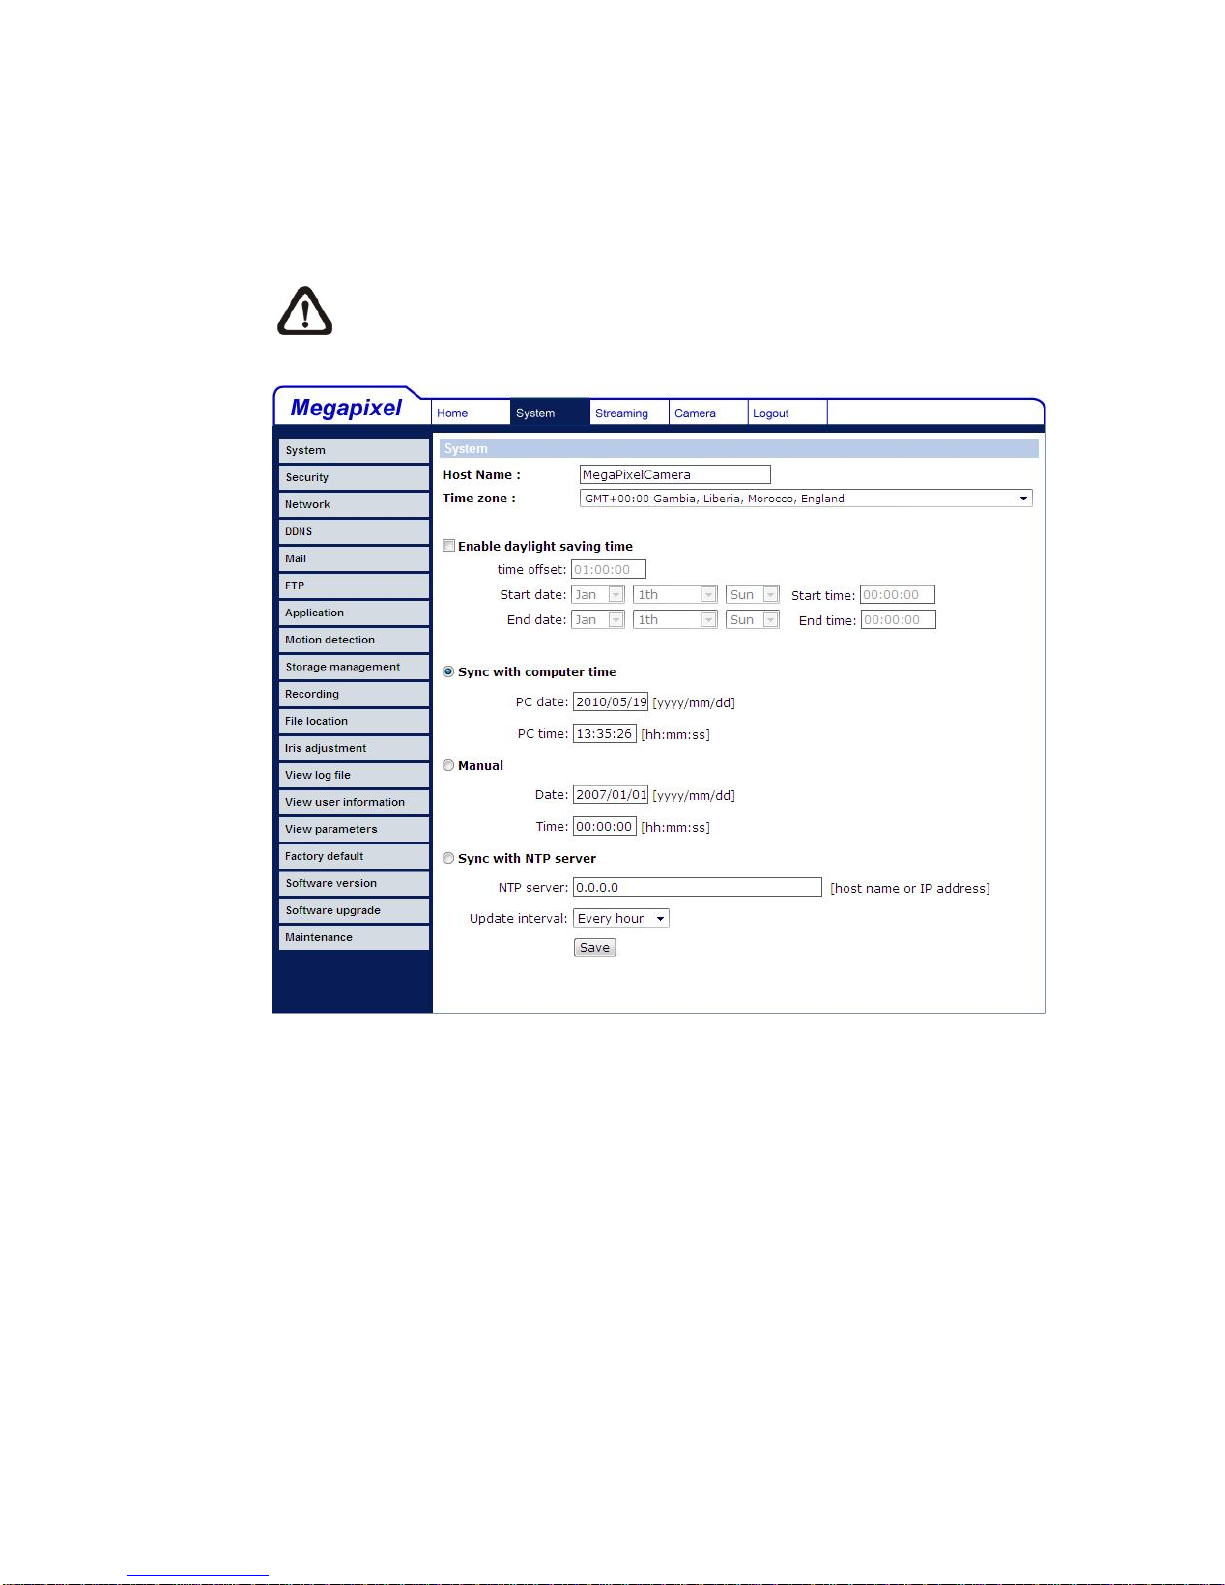
23
5.3 System Related Settings
The figure below shows all categories under the “System” tab. Each category in
the left column will be explained in the following sections.
NOTE: The “System” configuration page is only accessible by the
Administrator.
 Loading...