

Luxon Video C7DN User Manual

C7DN
User Manual

Day Night Box Camera·
User Manual
2
Mode
l
C7DN
Thank you for purchasing our product. If there are any questions,
or requests, please do not hesitate to contact the dealer.
This manual applies to following cameras:
This manual may contain several technical incorrect places or
printing
erro rs,
The updates will be added to the new version of this manual. We
will readily improve or update the products or p
in the manual.
and the content is subject to change without notice.
rocedures describe
d

Day Night Box Camera·
User Manual
3
DISCLAIM
ER STATEMENT
“Underwriters Laboratories Inc. (“UL”) has not tested the
performance or reliability of the security or signaling aspects of this
product.
UL has only tested for fire, shock or casualty hazards as
outlined in UL’s Standard(s) for Safety, UL60950-1. UL Certification
does not cover the performance or reliability of the security or
signaling aspects of this product. UL MAKES NO REPRESENTATIONS,
WARRANTIES OR CERTIF ICATIONS WHATSOEVER REGARDING THE
PERFORMANCE OR RELIABILITY OF ANY SECUR ITY OR SIGNALING
RELATED FUNCTIONS OF THIS PRODUCT.”

Day Night Box Camera·
User Manual
4
Regulatory Information
FCC Information
FCC compliance: Th is equipment has been tested and found to
comply with the lim its for a digital device, pursuant to part 15 of
the FCC Rules. These limits are designed to provide reasonable
protection against harmful interference when the equipment is
operated in a
uses, and can radiate radio frequency energy and, if not installed
and used in accordance with the instruction manual, may cause
harmful interference to radio communications. Operation of this
equipment in a residential area is likely to cause harmful
interference in which case the user will be required to correct the
interference at his own expense.
FCC Conditions
This device complies with part 15 of the FCC Rules. Operation is
subject to the follow ing two conditions:
1. This device m ay not cause harmful interference.
2. This device must accept any interference received, including
interference that may cause undesired operation
EU Conformity Statement
European standards listed under the Low Voltage Directive
2006/95/EC, the EMC Directive 2004/108/EC.
commercia
l environment. This equipment generates,
This product and - if applicable - the supplied
accessories too are marked with "CE" and comply
therefore with the applicable harmonized
Day Night Box Camera·
User Manual
5
2002/96/EC (WEEE directive): Products marked
with this symbol cannot be disposed of as unsorted
municipal waste in the European Union. For proper
upon the purchase of equivalent new
designated collection points. For more information see:
www.recyclethis.info.
symbol, which may include lettering to indicate
lead (Pb), or mercury (Hg).
to your supplier or to a designated collection point. For more
information see: www.recyclethis.info.
recycling, return this product to your local supplier
2006/66/EC (battery directive): This product
contains a battery that cannot be disposed of as
unsorted municipal waste in the European Union.
See the
product docume ntation
information. The battery is marked w ith this
equipment,
For
proper recycling,
or dispose of it at
for specific battery
cadm
ium (Cd),
return
the battery
Day Night Box Camera·
User Manual
6
Warnings Follo w these
safeguards to prevent
serious injury or death.
Cautions Follow these
precautions to prevent
potential injury or material
damage.
Safety Instruction
These instructions are intended to ensure that user can use the
product correctly to avoid danger or property loss.
The precaution measure is divided into “Warnings” and “Cautions”
Warnings: Serious injury or death may occur if any of the
warnings are neglected.
Cautions: Injury or equipment damage may occur if any of the
cautions are neglected.
Warnings
Please adopt the power adapter which can meet the safety
extra low vo ltage (SELV) request. And source with DC 12V or
AC 24V (depending on models) according to the IEC609 50-1
and Lim ited Pow er Source standard.
If the product does not work properly, please contact your
dealer or the nearest service center. Never attempt to
disassemble the camera yourself. (We shall not assume any

Day Night Box Camera·
User Manual
7
responsibility for problems caused by unauthorized repair or
maintenance.)
To reduce the risk of fire or electrical
product to rain or moisture.
This installation should be made by a qualified service person
and shou ld conform to all local codes.
Please install blackouts equipment into the pow er supply
circuit for convenient supply interruption.
Please make sure that the ceiling can support more than 50(N)
Newton gravities if the camera is fixed to the ceiling.
Cautions
Make sure the power supply voltage is correct before using t he
camera.
Do not drop the camera or subject it to physical shock.
Do not touch sensor modules w ith fingers. If cleaning is
necessary, use a clean cloth with a bit of ethanol and wipe it
gently. If the camera w ill not be used for an extended period of
time, put on the lens cap to protect the sensor from dirt.
Do not aim the camera at the sun or extra bright places. A
blooming or smear may occur otherwise (which is not a
malfunction however), and affecting the endurance of sensor
at the same time.
shock,
do not expose this

Day Night Box Camera·
User Manual
8
The sensor may be burned out by a laser beam, so w hen any
laser equipment is being used, make sure that the surface of
the sensor will not be exposed to the laser beam.
Do not place the camera in extremely hot or cold temperatures
(the operating temperature should be between -10°C ~ 60°C,
dusty or damp locations, and do not expose it to high
electromagnetic radiation.
To avoid heat accumulation, good ventilation is requ ired for a
proper operating env ironment.
Do not let water and any liquid flow into the camera.
While shipping, the camera should be packed in its original
packing, or packing of the same texture.
Improper use or replacement of the battery may result in
hazard of explosion. Replace with the same or equivalent type
only. Dispose of used batteries according to the instructions
provided by the battery manufacturer.

Day Night Box Camera·
User Manual
9
Table of Contents
1
Introduction ......................................................................10
1.1 Product
1.2 Overview
2 Ins
tallat io
2.1 Wall Mount ing
2.2 Wiring
3 Menu Oper
3.1 Menu Description
Features ....................................................
...............................................................
1.2.1 Rear Panel (A)
1.2.2 Rear Panel (B)
1.2.3 Rear Panel (C)
1.2.4 Rear Panel (D)
1.2.5 Rear Panel (E)
1.2.6 Rear Panel (F)
n........................................................................30
....................................................................
atio
ns ...............................................................39
3.1.1 Menu Overview
3.1.2 Lens Settings
3.1.3 Shutter/AGC Setting
3.1.4 White Balance Setting
3.1.5 Backlight Setting
3.1.6 Picture Adjust Setting
3.1.7 ATR Setting
3.1.8 Motion Detection Setting
3.1.9 Privacy Mask Setting
3.1.10 Day/Night Setting
3.1.11 NR Setting
3.1.12 Camera ID Setting
3.1.13 SYNC Setting
...............................................
...............................................
...............................................
..............................................
...............................................
...............................................
........................................................
(A)..............................................
.............................................
......................................... .......
.....................................
...................................
...........................................
....................................
...................................................
...............................
.....................................
.......................................
..................................................
......................................
..............................................
10
13
16
17
18
22
26
28
30
37
39
39
40
42
45
48
48
50
50
53
54
56
57
59

Day Night Box Camera·
User Manual
10
3.1.14 Language
3.1.15 Camera Reset Setting
3.1.16 Defective Pixel Correct Setting
3.1.17 RS-485 Setting
3.1.18 Save All/Exit
3.2 Menu Description
3.2.1 Menu Overview
3.2.2 Scene
3.2.3
Exposure.......................................................
3.2.4 Function
3.2.5
System .........................................................
3.2.6
Language ......................................................
3.2.7 Exit
Appendix...............................................................................87
1 Glossary
2 T
3 Technical Maint
...................................................................
roubleshooting.........................................................
Setting ........................................
..................................
.....................
...........................................
...............................................
(B)..............................................
.............................................
...........................................................
.........................................................
...............................................................
enance ...............................................
59
59
60
60
60
61
61
62
62
72
81
85
85
87
91
94

Day Night Box Camera·
User Manual
11
1 Introduction
1.1 Product Features
This camera adopts high performance sensor and advanced print
circuit board design t
low distortion, and low noise features, etc. It is extremely suitable
for surveillance system and image process system.
echno
logy. It possesses of high resolution,
Day Night Box Camera·
User Manual
12
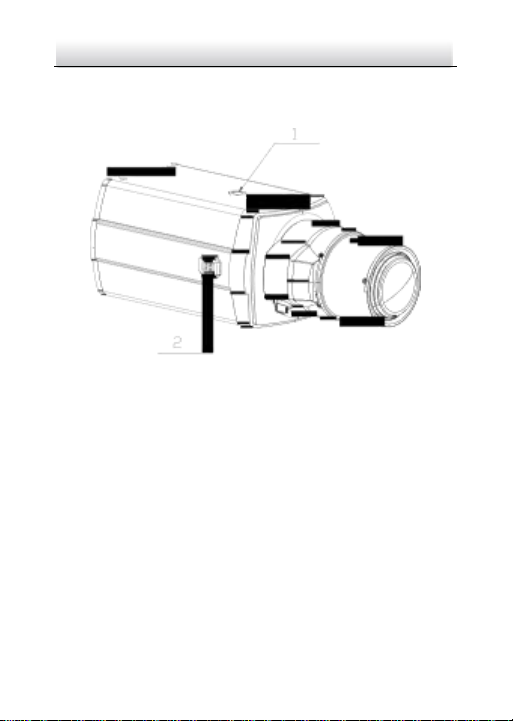
1.2 Overview
The appearances of the cameras are as follows:
Figure 1-1 O
vervie
w
1-Lock Screws: available both on top and botto m for ceiling
mounting and wall mounting respectively.
2-Auto-Iris Drive Interface: It connects the lens to the auto
drive circuit in the camera which outputs direct current to drive
the iris.
Day Night Box Camera·
User Manual
13
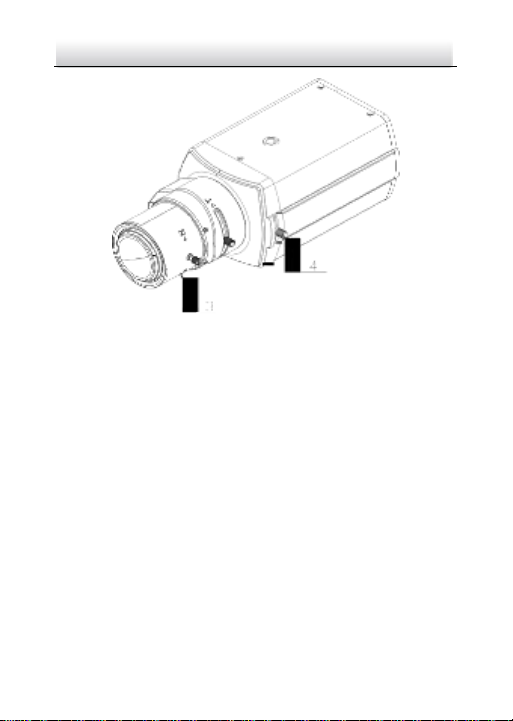
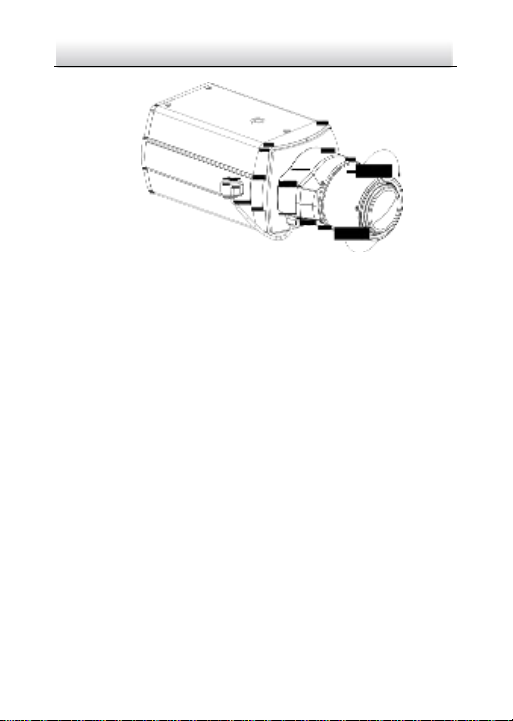
Figure 1-2 Side View
3-Lens: the optical lens adopted for the box camera (not provided.
Please purchase a compatible lens for the camera).
4-Back Focus Lever: It is set to optimum status by default. You
can also manually pull and adjust it for more accuracy focus.
Notes:
The back focus has been configured to optimum value by default.
But it can be adjusted slightly to coo rdinate with different lens.
Adjust the back focus lever when the lens connector has been
confirmed but the lens is still not focaliz ed.
The setting steps are as follow s:
Steps:
1. Rotate the lens to the camera tightly.
Day Night Box Camera·
User Manual
14
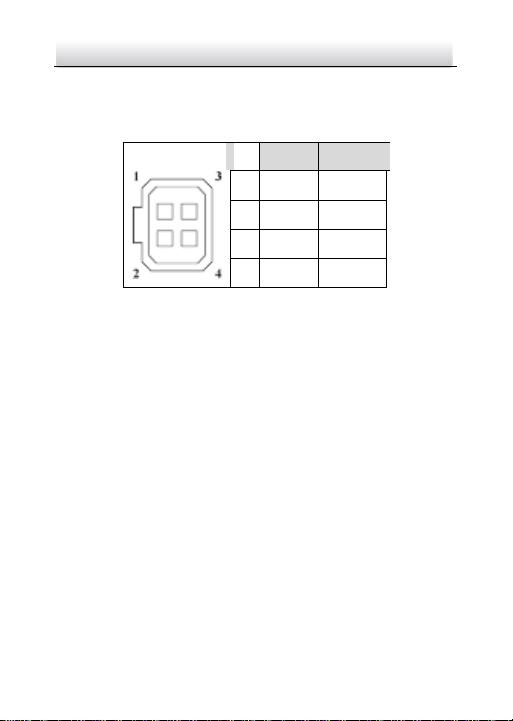
Video
DC
1 Power
Damp-
2 NC
Damp+
3 Video
Driver+
4 GND
Driver-
2. Loosen the set screw of back focus lever.
3. Adjust the stick left and right until lens gets clear image
4. Lock the set screw.
Figure 1-3 Pins of the Auto Iris Int
The auto iris interface is
Figure 1-3.
Pow er, Video and GND pins are used in video driven mode.
Damp+, damp-, drive+ and drive- pins are used in DC driven
mode.
com posed
of four square pins as shown in
There are two driven modes of auto iris as follows:
Video Driven: The camera inputs the video signal level into
lens interior, and internal drive circuit of the lens outputs
control voltage for the electronic motor to adjust lens iris.
Direct Current Driven: There is a drive circuit for electronic
motor of the iris in the camera. The drive circuit can directly
output DC control voltage to control electronic motor.
erface
Day Night Box Camera·
User Manual
15
No.
Items
Description
1
Alarm OUT, IN, GND
Interface
Support alarm in a nd
out.
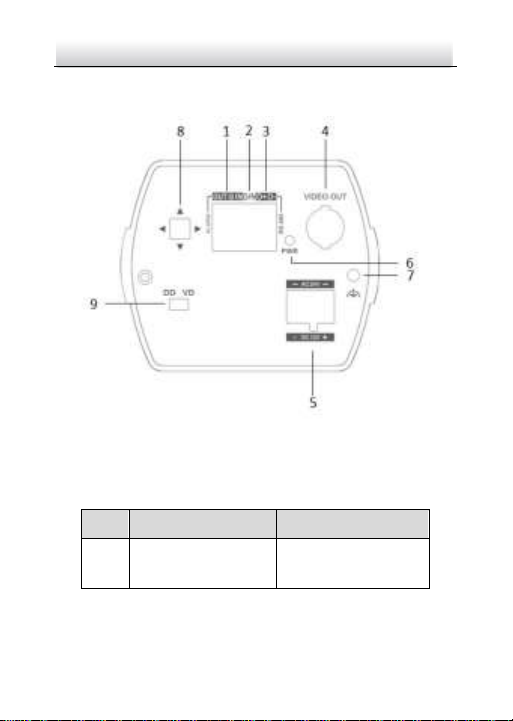
1.2.5 Rear Panel
The rear panel is show n as follow s.
Figure 1-8 Rear P
Table 1-7 Rear Panel
ane
Descr
l
iption

Day Night Box Camera·
User Manual
16
No. Items Description
2
D/N Interface
Used to sw itch
day/night mode
externally
3
RS-485 Interface
Used for remote
control by DVR,
keyboard, etc.
4
Video Output
Output up to 700 TVL
high-definition video.
5
Power Interface
Support both 12V DC
and 24V AC.
6
PWR Indicator
The indicator is on,
when the power is up.
7
Grounding Screw
8
Joystick
9
DD and VD Switch
Used fo r selecting the
iris mo de to DD(DC
Drive) or VD(Video
Drive).

Day Night Box Camera·
User Manual
17
2 Installation
Before you start:
Please make sure that the device in the package is in good
condition and all the assembly parts are included.
2.1 Wall Mounting
Steps:
1. Rotate the lens clockw ise onto the lens mount of the camera.
2. Plug the wire of auto iris lens to the auto iris interface of the
camera.
Notes:
Please prevent dust from entering between the lens mount and
the lens.
The weight of the lens must be less than 1kg. It ’s better to
install a lens with CS type interface. If the interface of lens is C
type, you need to install a C adaptor between the lens and the
camera.
Day Night Box Camera·
User Manual
18
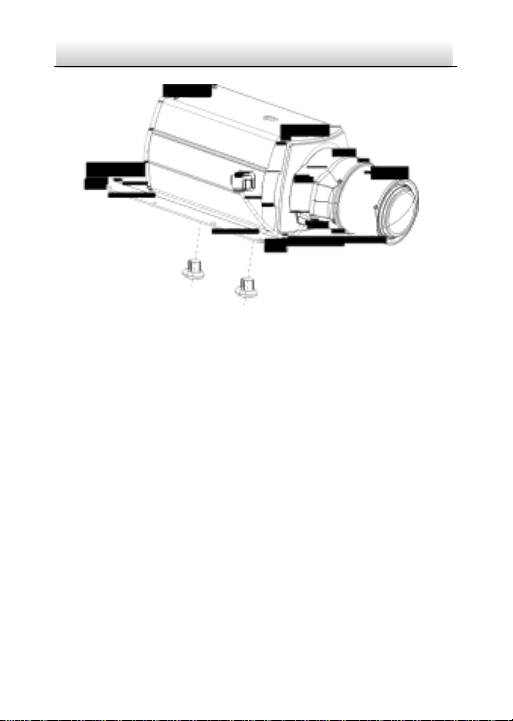
3. Attach the camera to the fixing metal plate and fix t hem
together with a 1/4# screw.
Note: Please install the camera correctly to avoid a reversed
image displayed in the monitor.
Figure 2-1 Lens Installation
Day Night Box Camera·
User Manual
19
4. Install the camera with the metal plate to the housing and fix
them with screws.
Figure 2-2 Install the Metal Plate
 Loading...