

Luxli TIMPANI-1x1 User Manual

USER MANUAL

Conduct an orchestra of lights.
The Luxli Orchestra series can produce a dazzling symphony of light. Synchronize LED light units
of all sizes, choose from millions of possible colors, apply lighting effects from four selectable
modes, and control them instantly with the powerful Conductor mobile app.
The Timpani 1 × 1 multicolor LED light features a highly accurate and versatile RGBAW LED panel.
It offers CCT, Filter, RGB, and Special Effects operating modes that provide remarkable control over
each variable with an easy-to-use interface. The light is equipped with Bluetooth 4.2 LE that pairs
with your tablet or smartphone the moment you open Luxli’s Conductor mobile app. Whether
controlled via the app or the intuitive interface on the unit itself, the Timpani will illuminate your
creative vision with endless possibilities.
For the latest version of the Conductor mobile app, rmware updates, as well as videos and ideas
for creative uses for the Timpani, visit luxlilight.com.
Precautions
• Keep this product away from water and ammable gases or liquids.
• Use only the correct, recommended voltage.
• Do not attempt to disassemble or repair this product.
• Clean this product with only a soft, dry cloth.
•
To avoid damage to this product, be careful not to overtighten or improperly thread any of
the threaded ttings.
• All images are for illustrative purposes only.
2

Troubleshooting
• If you encounter any problems, rst try turning the device off and then on.
• If the problem persists, remove the battery for 15 seconds, and then restart.
•
Go to luxlilight.com to make sure you have the most recent rmware update. If a new rmware
version is available, follow the instructions on how to download it to your light.
3
Overview
1
2
3
17
16
4 5 6 97 10 11 13128
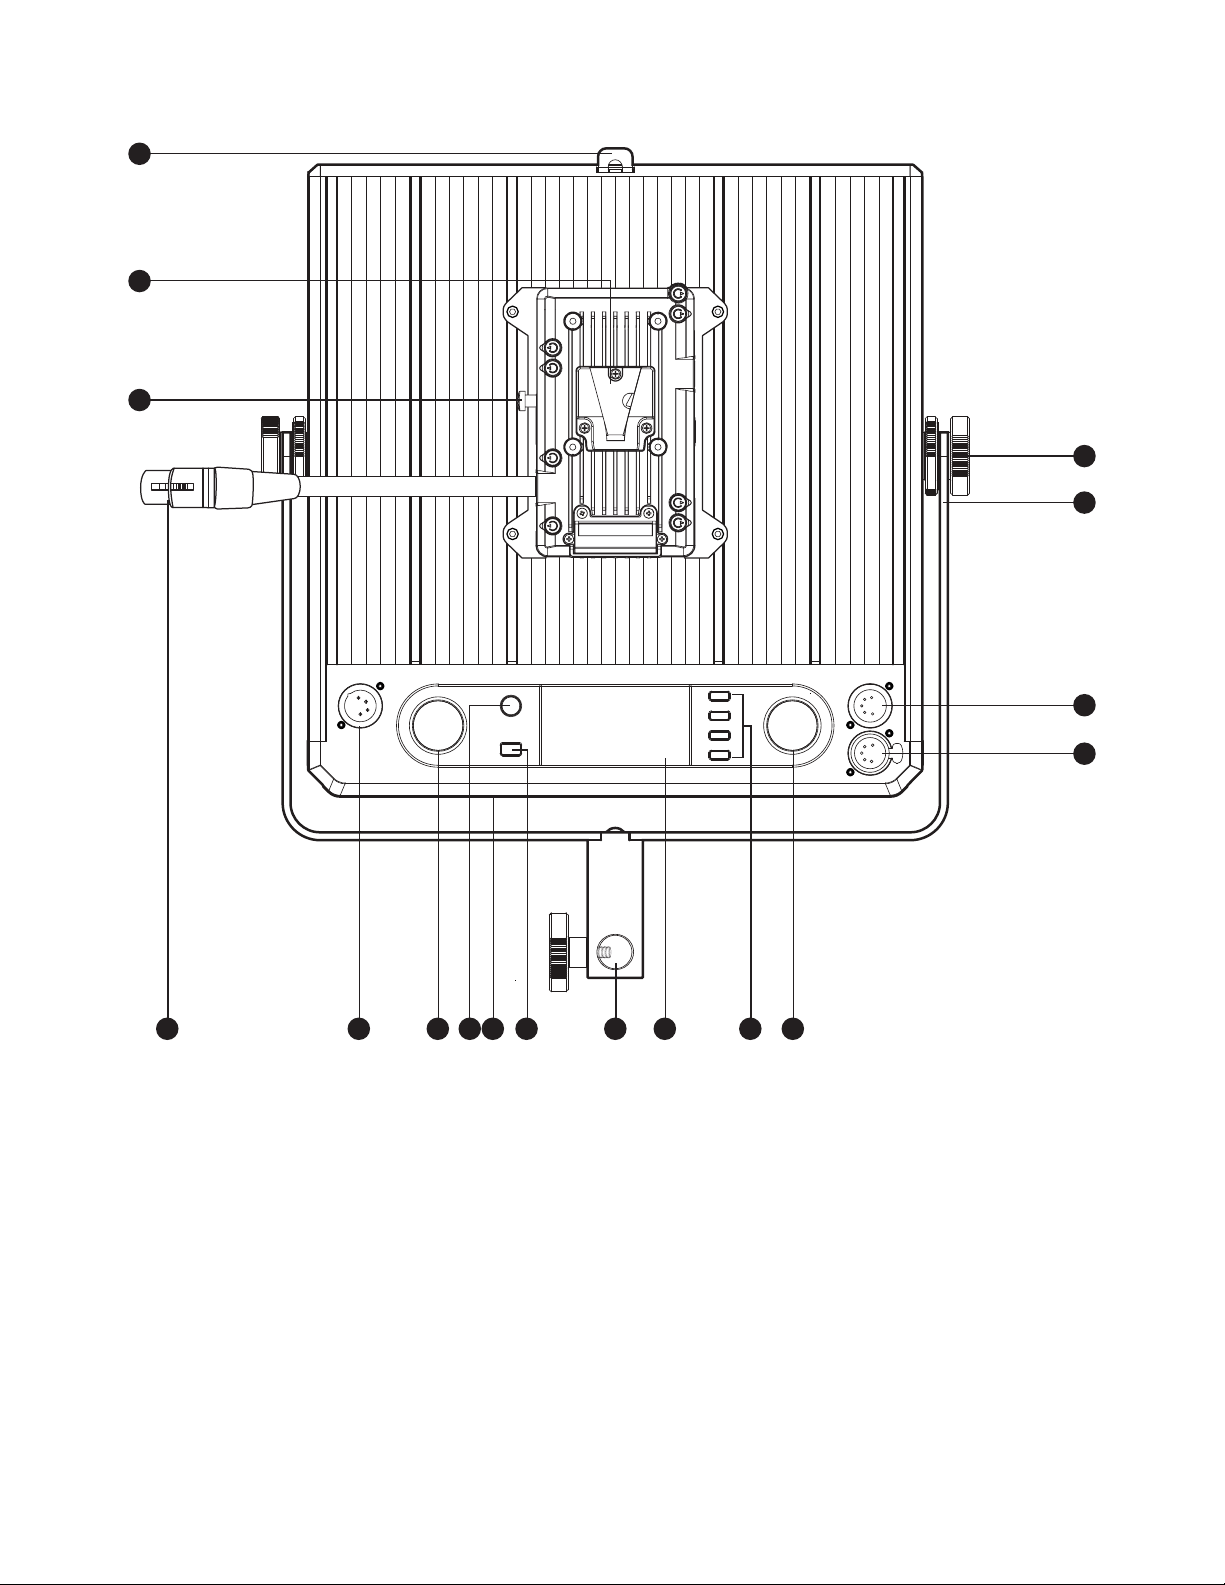
Back:
1. Barndoor hook
2. Battery slot (use V-mount batteries)
3. Battery release button
4. XLR power cable
15
14
9. Mode selector
10. 5/8 in. receiver
11. LCD screen
12. Function buttons
5. Power input
6. Dimmer
7. Power button
8.
Micro-USB port for firmware updates
(visit luxlilight.com for details)
13. Adjustment dial
14. DMX out
15. DMX in
16. Yo ke
17. Yoke adjustment screws
4
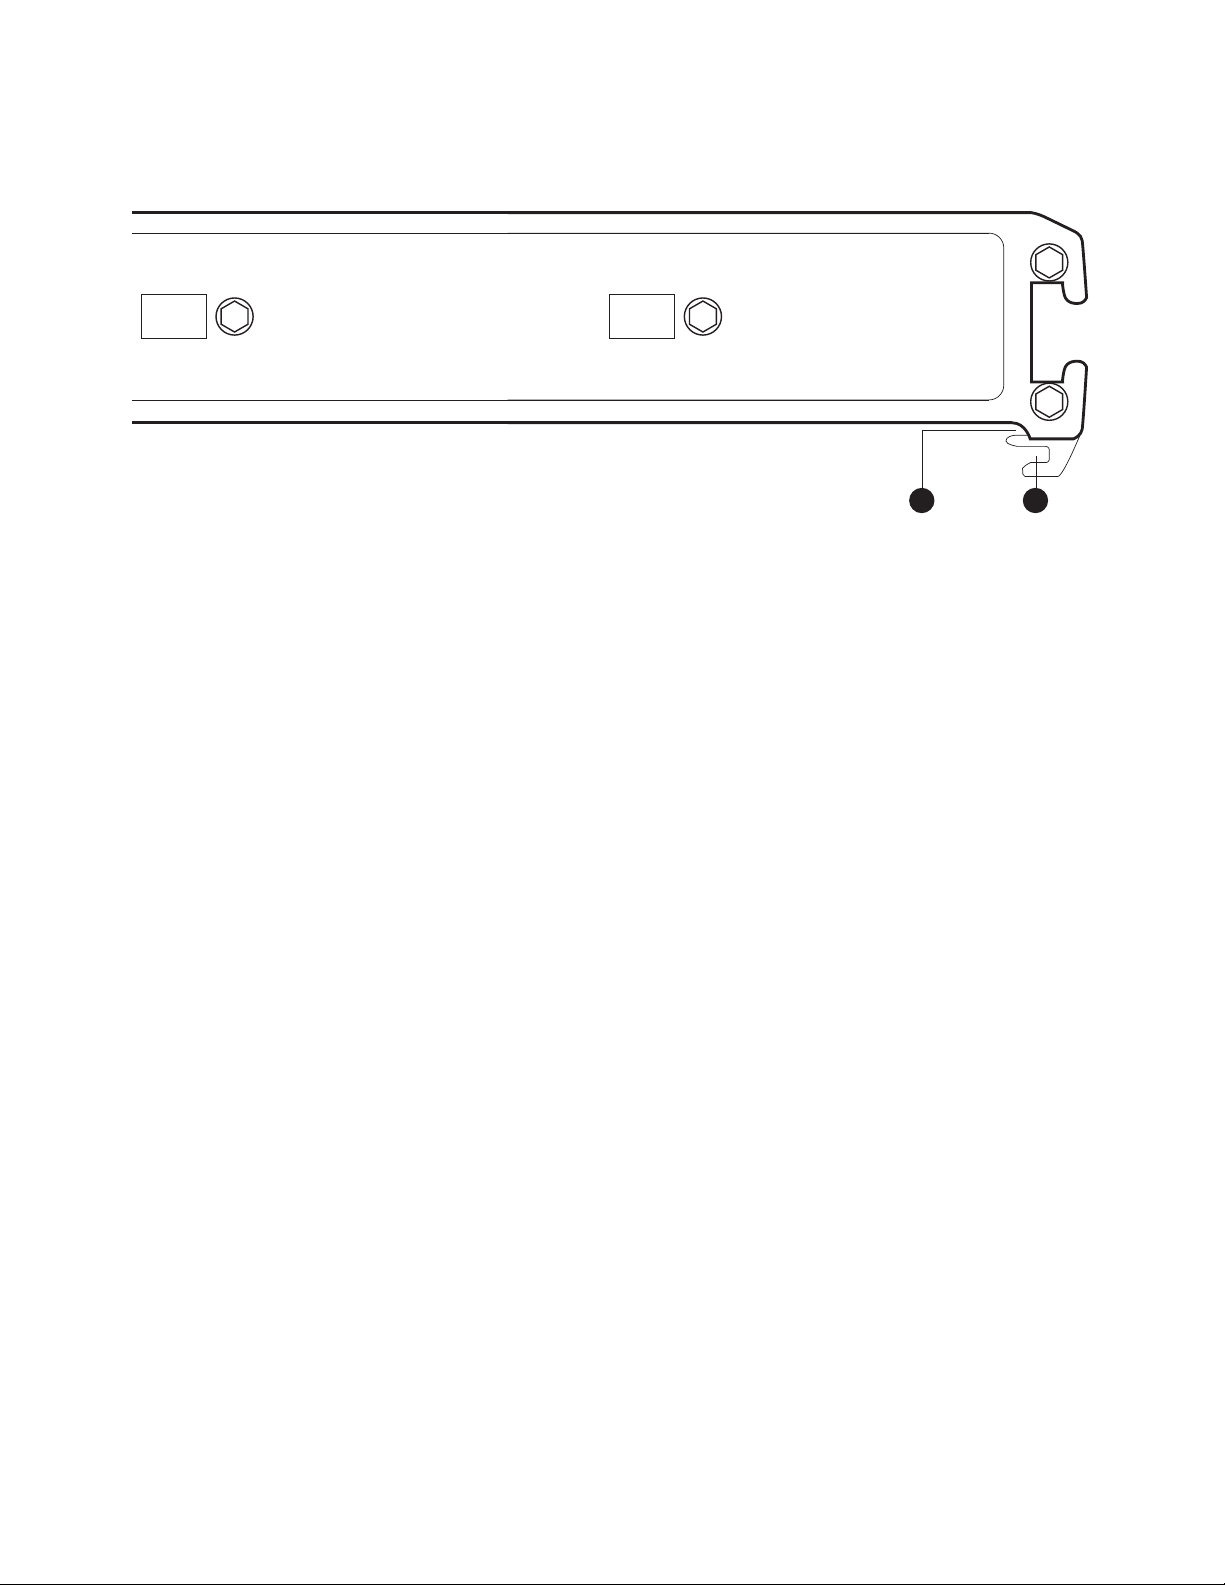
Top:
1. Diffuser slot 2. Barndoor slot
1 2
5

User Interface
Power Button
Press to power on or off.
The Timpani powers on to the last screen that was used.
The Timpani recalls the last settings in CCT, RGB, Filter, and Special Effects modes.
To use the factory presets, see Main Menu/Presets Menu below.
Mode Selector
Press the mode selector to cycle through the four operating modes: CCT, RGB, Filter, and Special
Effects.
Brightness Dial
In all operation modes, the Brightness dial adjusts the brightness from 100% to 0% in 1% increments.
In all operation modes, press the Brightness dial to toggle between the set brightness and 0%.
Function Buttons
The function buttons implement the action or access the menu indicated on the LCD screen
next to the button.
Adjustment Dial
In all operation modes, the Adjustment dial changes the value of the highlighted function.
In CCT mode, press the Adjustment dial to toggle between 3200 and 5600 K color temperatures.
6
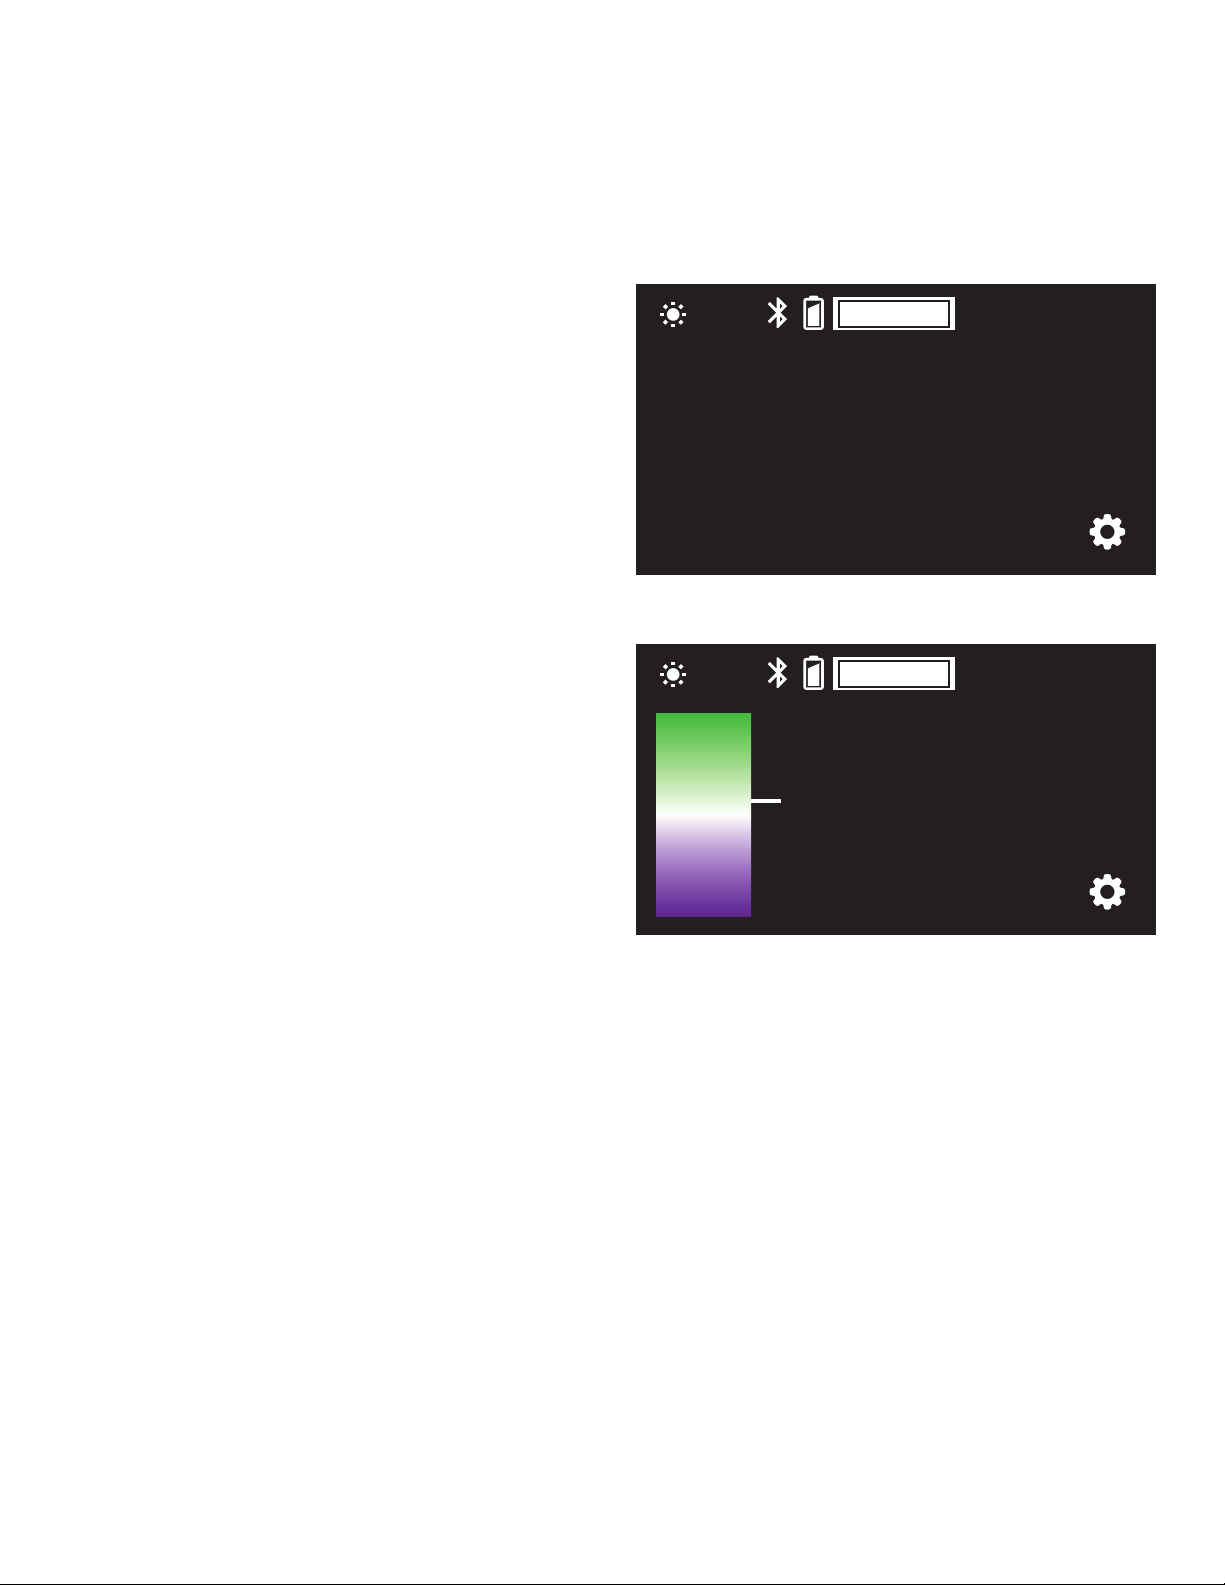
CCT Mode
Correlated color temperature (CCT) mode allows you to adjust the color temperature from 2800
to 10,000 K and set the green/magenta tint level.
CCT Screen
Adjusts the color temperature in 50 K
increments.
Press the Adjustment dial to toggle between
3200 and 5600 K color temperatures.
Tint (+/− Green) Screen
The +/− Green function lets you match the
Timpani’s color to an existing light source
by adjusting the green/magenta saturation
level. This is a particularly useful feature when
shooting under uorescent lights.
+/− Green sets the green/magenta saturation
32%
32%
3900K
32%
17%
CCT
0%
TINT
3900K
CCT
+/− GREEN
level in 1% increments from +100% (green) to
-100% (magenta).
Press the CCT button to exit the +/− Green
submenu and return to CCT mode.
7

RGB Mode
RGB mode lets you dial in almost any color by scrolling through the entire color wheel. This mode
controls hue and saturation levels.
Hue Screen
Adjusts the hue from 0° to 360° on the color
wheel.
The crosshair icon moves horizontally to
represent the location of the hue on the color
wheel.
The icon conveniently loops from 360° to 0°
when scrolling through the color wheel.
Saturation Screen
Controls the saturation of the hue from 100%
to 0% in 1% increments.
The crosshair icon moves vertically to represent
the level of saturation.
32%
32%
169
HUE
100
SAT
169
HUE
100
SAT
Press Hue to return to the Hue screen.
Note: The dimmer function remains active, and
you can independently adjust the Timpani’s
brightness while in Saturation mode.
8

Filter Mode
The Timpani is preset with 150 digital gel lters. Filter mode allows you to apply colored gels to
any CCT setting.
Gel Screen
Scrolls through the 150 digital gel lters.
The LCD displays the lter number and name
along with the color.
When Filter mode is selected, the Timpani
defaults to the gel selection screen.
CCT Screen
Adjusts the white-balance color temperature
without leaving Filter mode. The LCD continues
to display the current lter number.
Press Gel to exit the CCT screen.
Important! When the white-balance
temperature is changed in this mode, the
32%
54
32%
54
Medium Purple
Mauve
Bright Pink
Follies Pink
Rose Pink
Smokey Pink
Scarlet
S. Rose Pink
Bright Rose
Medium Purple
Mauve
Bright Pink
Follies Pink
Rose Pink
Smokey Pink
Scarlet
S. Rose Pink
Bright Rose
3900K
CCT
54
GEL
3900K
CCT
54
GEL
temperature in CCT mode is also changed
to this temperature setting. If the temperature
setting is changed in CCT mode, the Timpani
will set the same white-balance temperature
here.
9
 Loading...