

Page 1
Single Handle Kitchen Faucet with Pull Down Sprayer
Model Number:
KTS21-TB (Brushed Nickel)
KTS21-TC (Chrome)
KTS21-TO (Oil Rubbed Bronze)
KTS21-TM (Matte Black)
Features:
- Brass and Zinc Alloy Construction
- Single Hole Installation
- Drip Free Ceramic Cartridge
- Maximum ow rate 1.8 gpm at 60 psi
- Pull Down 2 Stage Sprayer Head
- Complies with:
NSF 61-9
ASME A112.18.1
CSA B125.1
IAPMO / UPC / cUPC
CA AB-1953
ADA
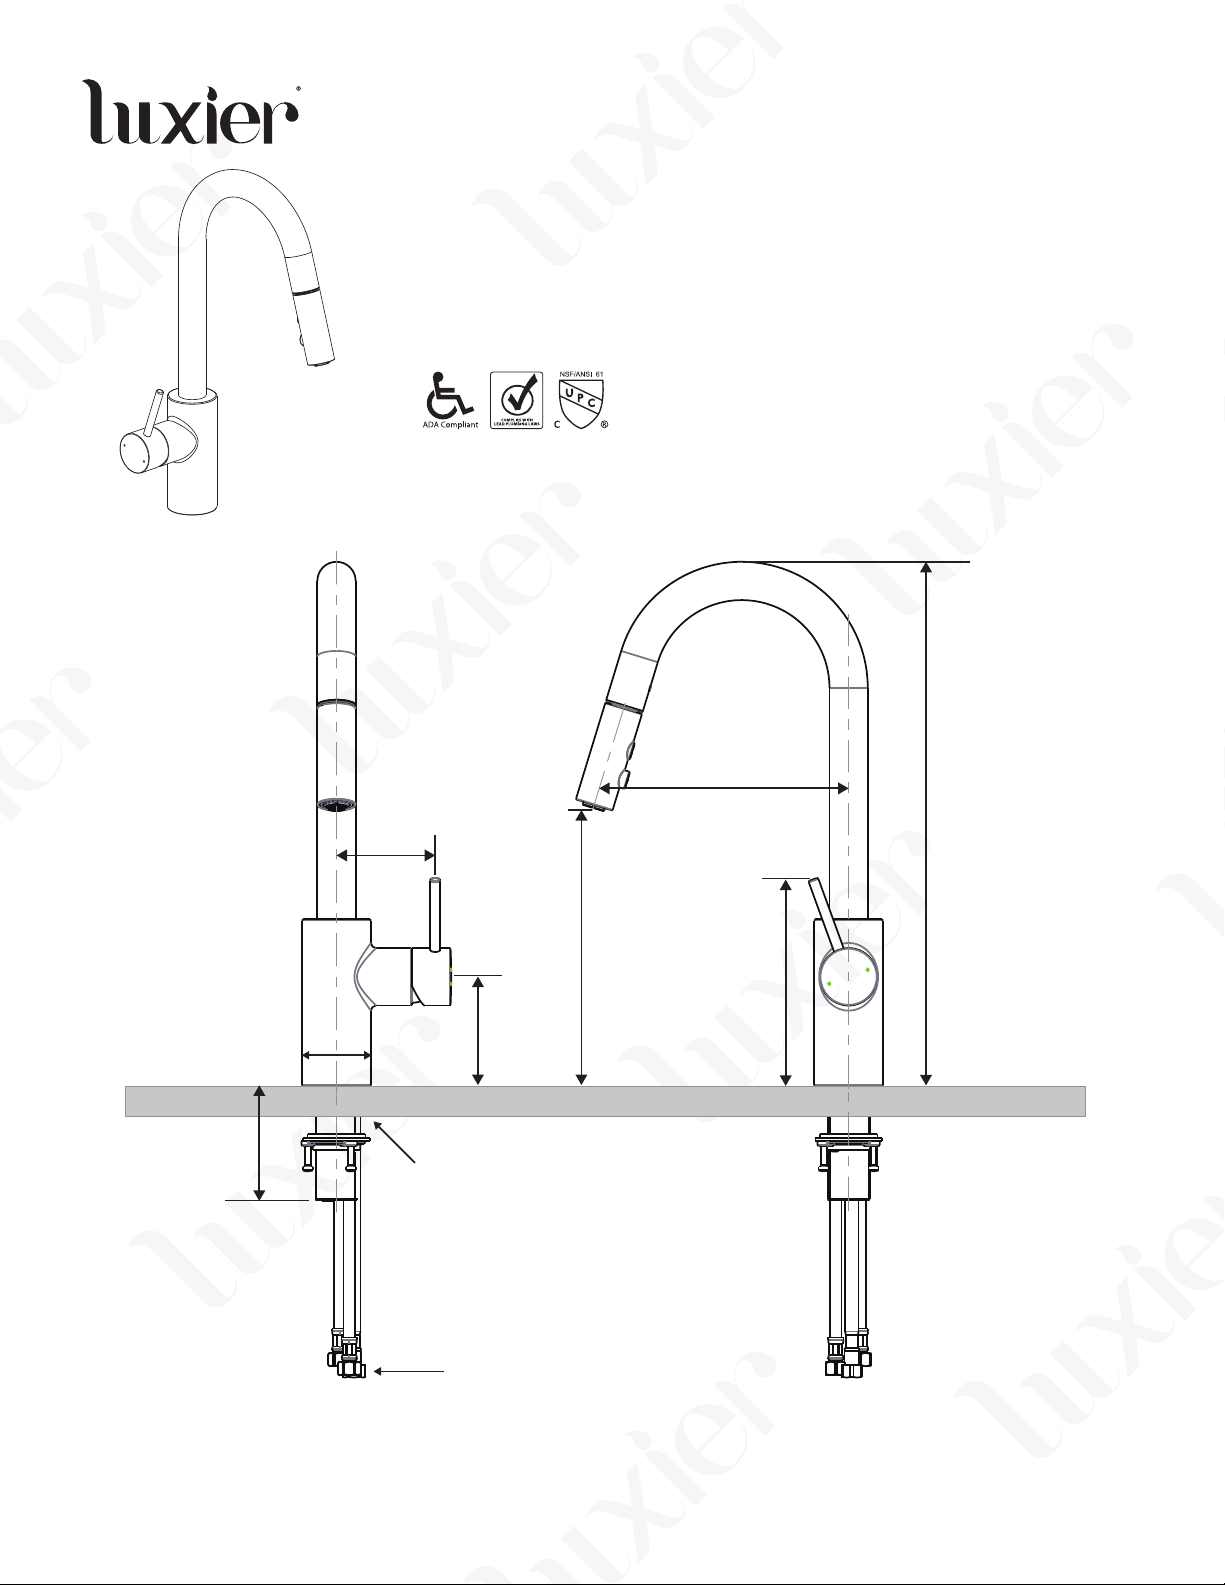
2 1/2”
7 13/16”
16 1/2”
3 3/16”
8 13/16”
6 11/16”
3 11/16”
2 1/8”
Max. Deck Thickness 2”
1 1/2” Hole Size
Luxier USA
3/8” Compression Fitting
1
* Drawing not to scale. All measurements are pproximate. *
KTS21 Rev.1 07/2018
Page 2

Thank you for purchasing Luxier products. Please read the information below and keep this
installation guide for future reference. If you require assistance, please contact our customer service
department at 1-877-711-8828, Monday - Friday 9AM - 5PM Pacifi c Time or by email at
[email protected].
Limited Lifetime Warranty (For USA Only)
The manufacturer warrants this product to be leak and drip free during daily normal household use for as long as it is
owned by the original purchaser of this product. Please keep a copy of the original invoice as proof of purchase.
Should a malfunction occur within the warranty period, Luxier USA will, as its option, (1) repair or replace the defective
part(s) or product at no charge; (2) issue a refund of the purchase price paid for the product (Valid within 30 days from
the date of purchase); or (3) issue a credit to be applied against the purchase of a new Luxier product. Shipping/delivery
charges may apply and are in Luxier USA’s sole discretion.
This limited warranty shall not apply to goods which have been subject to accident, negligence, improper installation,
product abuse, product misuse, or use of cleaners containing abrasives, alcohol or other organic solvents, whether per-
formed by a contractor, service company, or yourself, are excluded from this warranty.
Our responsibility under this warranty is limited to only to replacement parts and no other costs. Luxier USA will not be
responsible for labor charges and/or damage incurred by installation, repair or replacement, nor for any indirect inciden-
tal or consequential damages, losses, injury or costs of any nature relating to this faucet. Except as provided by law, this
warranty is in lieu of and excludes all other warranties, conditions, and guarantees, whether expressed or implied, statu-
tory or otherwise, including without restriction those merchantability of fi tness for use.
This limited warranty is non-transferable. This limited warranty only applies to products purchased and installed in the
United States. This limited warranty covers the original consumer purchase only and does not include business, commer-
cial or industrial use of this product. To obtain service under the Limited Warranty, please contact Luxier USA at
[email protected]. The Luxier USA Customer Care Department will determine whether to repair or replace your
product, issue a refund, or issue a credit.
Luxier USA
2
KTS21 Rev.1 07/2018
Page 3
Important Points
• This installation guide is subject to change without notice, please contact us to request the most
updated version of this installation guide.
• This is a general installation guideline, actual installation may vary. Consult a professional installer
if necessary.
• Read and understand this instructions completely before installation.
• Please follow all local building and plumbing codes.
• Product drawings in this installation guide is for illustration purpose only. Actual product may vary
depends on model.
• Always take extra precautions and wear appropriate safety equipment when installing this
product.
• Wrap all threaded connections, except the aerator in the spout, with Te on (TPFE) tape. Always
wrap in a counterclockwise direction.
• When installing your new faucet, fi rst hand tighten the water supply hoses then use a wrench to
give the compression nuts an additional (1/4) turn. Do not over tighten the compression nuts as it
will reduce the integrity of the sealed connection.
You may also need the following tools
1. Safety Glasses 5. Adjustable Wrench
2. Teon (TPFE) Tape 6. Screwdriver
3. Plumber’s Putty and Caulking
4. 1 3/8” Basin Wrench or
1 11/32” Shower Valve Socket Wrench
Maintenance Guide
Please follow the cleaning material manufacturer’s instructions. Damage caused by improper
treatment will not be covered by product warranty. In addition, pay attention to the following points:
• Regular cleaning can prevent mineral build up on faucet spout.
• Carefully read the cleaner product label to ensure the cleaner is safe for use on the material.
• Test the cleaner on a small area before using on the entire surface.
• Use a mild detergent such as liquid dishwashing soap and warm water for cleaning.
• Do not use abrasive / harsh chemical when cleaning the fi xture as they will damage and dull the
fi nish.
• When using spray cleaners, spray fi rst onto a soft cloth or sponge. Never spray directly onto the
faucet as droplets can enter openings and gaps and cause damage.
• After cleaning, rinse thoroughly with clean water to remove any cleaner residue.
Luxier USA
3
KTS21 Rev.1 07/2018
Page 4
Installation
A
B
C
09
10
11
12
13
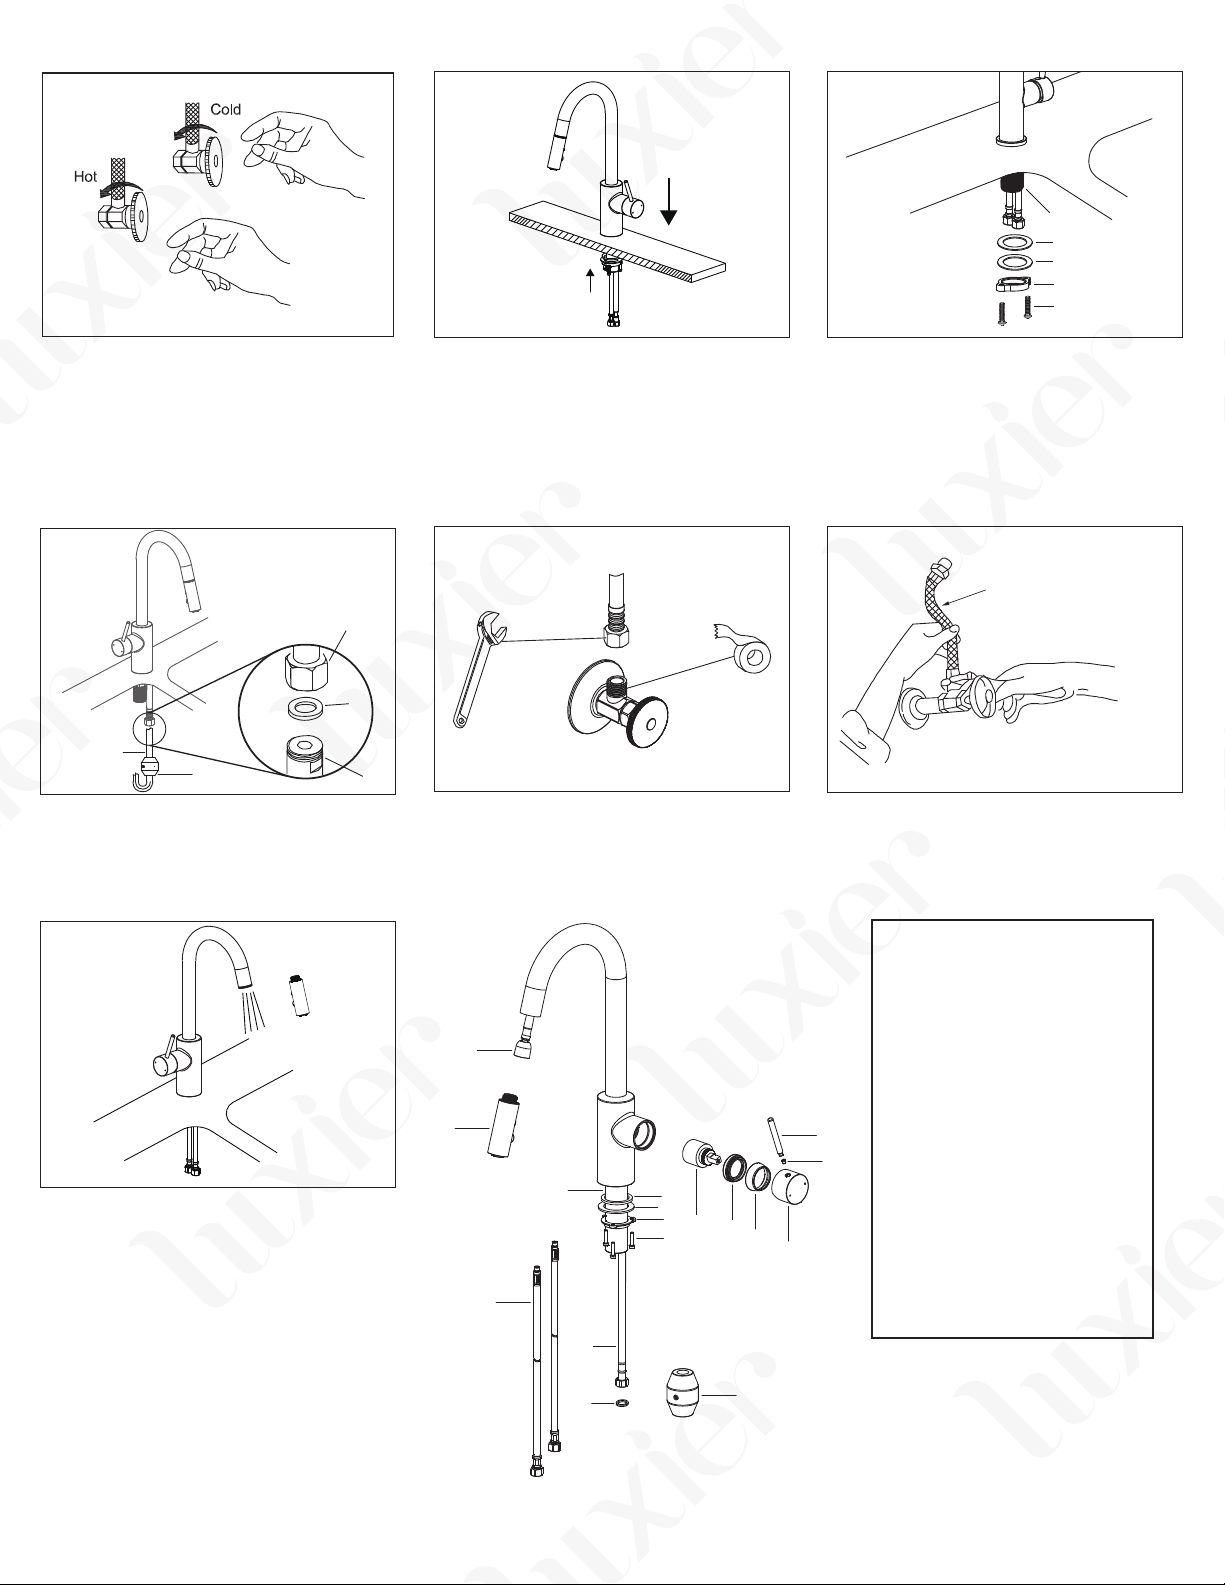
A. Shut o water supply at the valves.
Remove old faucet and clean the
mounting surface for installation of new
faucet.
D
16
17
07
14
07
D. Install counter weight (14) onto pull
out hose (07). Connect the pull out
hose to water inlet tube (16). Be sure
to install rubber washer (17). Do not
overtighten the connection.
F
F. Turn on water supply and remove
spray head from the pull out hose. Turn
on the faucet and let the water run for
about 1 minute to ush out any debris
in the system. Check for leaks at all
connection. Reattach the spray head
when done.
B. Insert the hoses and shank through
the hole. The faucet hole on the mounting surface should be 1 1/2” in diameter.
E1
E1. Apply Teon (TPFE) tape on the shut
o valves. Thread the tape in counterclockwise direction.
07
08
09
15
16
10
11
12
06
05
13
04
C. Remove the screws (13) from locking
nut (12). From under the sink, install
the rubber washer (10), steel washer
(11) and locking nut (12) onto the
shank (09) Tighten the locking nut with
a basin wrench or the socket tool and
install the screws (13) to secure the
faucet in place.
E2
Flexible water supply line
E2. Use an adjustable wrench to tighten
the water supply hoses, please do not
overtighten the connections.
01. Handle
02. Setscrew
03. Handle Base
04. Cap
05. Bonnet
06. Cartridge
07. Pull Out Hose
08. Sprayer Head
01
09. Shank
10. Rubber Washer
02
11. Metal Washer
12. Brass Nut
13. Screws
14. Counter Weight
03
15. Water Supply Hoses (non-
removable)
16. Water Inlet Tube
17. Rubber Washer
Luxier USA
17
4
14
KTS21 Rev.1 07/2018
 Loading...