

Page 1
Website: www.luxielectronics.com
Email: [email protected]
Phone: +1 (949) 654-2047
Address: Irvine, CA, USA
Thank you for purchasing the Luxi Electronics products with RS-232 features.
This setup guide will guide you thru the setup of the RS-232. Because the RS-232 cables and terminal
software are third party products, we cannot cover all the variety of the products you may use, we’ll do
our best to use the most common products as examples here and hopefully it can help you with your
slightly different products too.
All Luxi products use 3-pin 3.5 mm captive screen connectors for RS-232 port. The pin configurations
are uniformed as:
Pin 1 = Tx; Pin 2 = Rx; Pin 3 = Ground. The pins are counted from left to right when the female
connector on the Luxi device facing the user.
You need to source a cable with one end to match the RS-232 connector type on your control host side.
Every Luxi product with RS-232 feature comes with a 3-pin male captive crew plug in the package, so
you do not need to care what connector on the other side. You will cut off the connector on the other
side, strip off the cable jacket, and strip off exactly 5 mm insulation of the individual wires of each of
the 3 wires, and securely terminate them into the provided captive screw plug by loosening the screws,
inserting the wires, tightening the screws, and make sure that no short circuit or loose wires.
Here are the 3 cables to match the 3 commonly used RS-232 connector types on the control host side:
Type 1: 9-pin D-sub connector to 3-pin captive screw connector cable: The 9-pin D-sub connector is
most commonly seen on desktop PCs or
controllers, also known as “serial port”. The pin
numbers are usually molded on the connector.
You only need to connect 3 of the 9 wires of the Dsub connector:
Pin 2 = Tx
Pin 3 = Rx
Pin 5 = Ground
Note: please connect the pins with the identical
names of the Luxi 3-pin captive screw plug.
Type 2: USB to 3-pin captive screw connector cable: The USB connector is most commonly seen on
laptop computers. There’s an electronics circuit
board in between and comes with a USB driver for
that circuit. Please load the driver to the laptop
first. Regardless what connector is on the
opposite side, follow the instructions above to cut
off, strip and screw on the 3 wires to the provided
3-pin captive screw plug.
Document name: Luxi RS-232 setup guide Revision: 1.00 Date: 3/17/2014
Page 2
Website: www.luxielectronics.com
Email: [email protected]
Phone: +1 (949) 654-2047
Address: Irvine, CA, USA
Type 3: Mini (TRS) to 3-pin captive connector cable: The mini (also called TRS) connector is le ss
commonly used; it appears on some controllers for
the consumer electronics market. Here are the pin
configurations:
Tip = Tx
Ring = Rx
Sleeve = Ground
Note: please connect the pins with the identical
names of the Luxi 3-pin captive screw plug.
A female mini is shown in the picture. You’ll need
another common mini to mini audio cable to
connect this cable to the host. You can also use a cable with male mini plug and terminate the other
end with captive screw plug and only use this one cable for the connection.
Once the cable is ready, next is to install the terminal software. There are many terminal software
available, like HyperTerminal, or Docklight. We’ll use Docklight here as an example. This is a freeware
that can be downloaded here: http://www.docklight.de/ . Please follow all copyright requirements and
laws.
Here’s the startup screen of the Docklight; choose OK for a free trial usage.
After this screen, click Continue on the next screen.
Document name: Luxi RS-232 setup guide Revision: 1.00 Date: 3/17/2014
Page 3
Website: www.luxielectronics.com
Email: [email protected]
Phone: +1 (949) 654-2047
Address: Irvine, CA, USA
Next, click the “Project Setting” icon on the top tool bar (red circled), it would open a new window. Set
the communication port. Normally there will be two ports available under the drop down manual. Pick
the port with higher number for now. (If it does not work in the next steps, come back here to change to
the other port). Then change the other four parameters to the exact settings as in the 4 red circles,
which we normally call them as 9600, 8-N-1 settings. Note Luxi products only support these settings.
Click OK when done.
Next click the Start Communication icon on the top tool bar (red circled), you’ll see the broken link
between devices on the top left illustration become a linked line (red arrow pointed).
Document name: Luxi RS-232 setup guide Revision: 1.00 Date: 3/17/2014
Page 4
Website: www.luxielectronics.com
Email: [email protected]
Phone: +1 (949) 654-2047
Address: Irvine, CA, USA
Then click on the Turn On Keyboard icon on the top tool bar (red circled) to enable keyboard.
Now the RS-232 controls should be fully functional. See the commands and responses in this screen
shot. The locally typed in commands are in blue text while the responses are in red. Do NOT hit Enter
after each command. Luxi RS-232 commands do not have Enter (line return) so multiple commands
can be sent in a long string without pauses. This is very important in sending many ties of a matrix
switcher.
Document name: Luxi RS-232 setup guide Revision: 1.00 Date: 3/17/2014
Page 5
Website: www.luxielectronics.com
Email: [email protected]
Phone: +1 (949) 654-2047
Address: Irvine, CA, USA
Most responses have line return by itself, so the next text appears on the next line. But some pass thru
commands do not have line return due to the compatibility with the 3
text may be in the same line as the previous command text. This is normal.
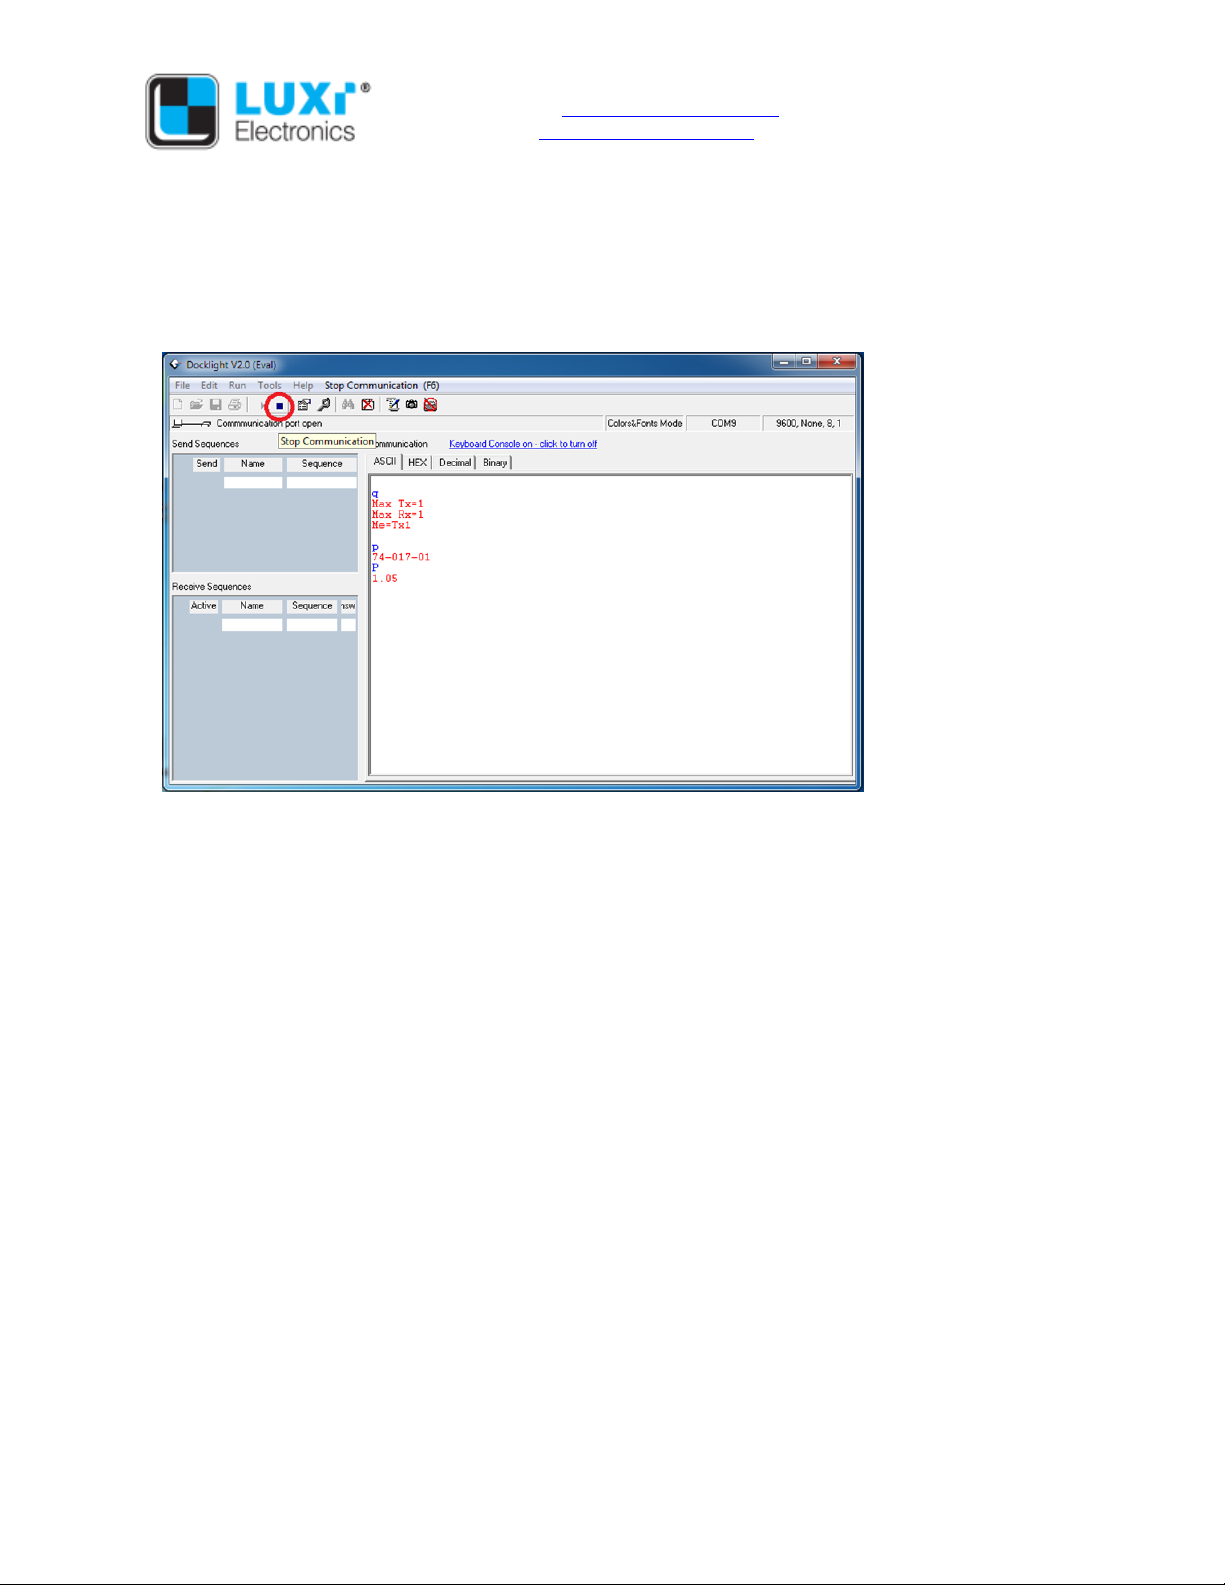
After the control cession, click the Stop Communication icon on the top tool bar, close Docklight
program if desired. Choose not to save project because the free trial version does not support save
project.
rd
party devices, so the response
If you need any additional support, please contact your local Luxi distributors for timely responses, or to
contact Luxi directly.
Thanks again for choosing Luxi products.
Document name: Luxi RS-232 setup guide Revision: 1.00 Date: 3/17/2014
 Loading...