

Luxeon D315M User Manual

D315M
ORDERCODE 100100

DLP Digital Projector User’s Guide
Safety
These safety precautions include information to prevent personal injury and damage to the
projector.
Safety Definitions
WARNING:
Statements identify conditions or practices that could result in personal injury.
CAUTION:
Statements identify conditions or practices that could result in damage to your
equipment.
Projector Safety
WARNING:
•
Please use the power cord provided. Connect the power cord to a receptacle with a
protective safety (earth) ground terminal.
•
Don’t look directly into the lens when the lamp is on. Doing so may cause eye
injury.
•
Servicing your own projector may expose you to hazards or create potential
hazards. Also, servicing your own projector will void the warranty. Refer all
service to qualified service personnel.
•
Do not loosen or remove any screws other than those on the lamp module cover
and the lamp module. Doing so may result in electric shock.
•
For information about use of a feature, please refer to this
•
Hot surface. Do not touch.
CAUTION:
•
Proper ventilation is important. Don’t block ventilation openings. Never operate
this projector in an enclosed area. Do not place the projector on a tablecloth or
other soft covering that may block the vents. With ceiling installations, use
approved mounting hardware. Do not put the projector near heaters, air cleaners,
transformers or other electrical devices. For permanent installations follow local
codes.
•
Don’t set liquids on the projector. Spilled liquids may damage your projector.
•
Don’t put the projector on a hot surface or in direct sunlight.
•
Do not drop the projector.
User Guide.
2

Lamp Safety
WARNING:
•
To replace the lamp, turn off the power and unplug the power cord. To avoid burns,
wait 45 minutes before opening the lamp door. Follow all instructions provided in
User’s Guide
this
•
When you open the lamp module door, be careful not to touch the hot surfaces
inside.
•
In the unlikely event of the bulb rupturing, thoroughly clean the area behind the
projector and discard any items that might have been contaminated with broken
glass.
DLP Digital Projector User’s Guide
. See “Changing the Lamp Module” on page 35.
CAUTION:
•
Never operate your projector without the lamp module or lamp module door.
Doing so may damage the projector.
•
Do not touch the glass portion of the new lamp module with your hands or allow it
to touch other objects as this may damage it and shorten its operational life.
•
Do not drop the lamp module as the glass may shatter.
Battery Safety
Read and follow all warnings and instructions supplied by the battery manufacturer.
WARNING: Keep batteries away from children.
CAUTION:
•
Store batteries in their original packaging.
•
When inserting batteries, verify that the (+) and (-) terminals are aligned correctly.
•
Replace all batteries of a set at the same time.
•
Do not mix new batteries with used ones.
•
Do not use batteries of different chemistries, capacities, brands or sizes together.
Leakage could result.
•
Do not disassemble, recharge, or short-circuit batteries.
•
Do not subject batteries to high temperature or fire.
•
Discard used batteries according to all applicable local and national regulations.
ENGLISH
Laser Safety
WARNING:
To reduce the risk of injury to the eyes, do not look directly into the laser light emitted from
the aperture on the Remote Control and do not point the laser light into anyone’s eyes. This
remote control is equipped with a Class IIIA laser that emits radiation.
NOTE:
Do not leave the remote control close to the cooling fan outlet of the projector.
3

DLP Digital Projector User’s Guide
FCC Warning
This equipment has been tested and found to comply with the limits for a Class B digital
device, pursuant to part 15 of the FCC rules. These limits are designed to provide
reasonable protection against harmful interference when the equipment is operated in a
commercial environment. This equipment generates, uses and can radiate radio frequency
energy and, if not installed and used in accordance with the instruction manual, may cause
harmful interference to radio communications.
Operation of this equipment in a residential area is likely to cause harmful interference in
which case the user will be required to correct the interference at his own expense.
Canada
This class B digital apparatus complies with Canadian ICES-003.
Cet appareil numérique de la classe B est conforme à la norme NMB-003 du Canada.
Safety Certifications
UL, CUL, TUV
EN 55022 Warning
This is a Class B product. In a domestic environment it may cause radio interference, in
which case the user may be required to take adequate measures. The typical use is in a
conference room, meeting room or auditorium.
Declaration of Conformity
We declare under our sole responsibility that the DLP Zoom Digital
Projector conforms to the following directives and norms:
Directive 89/336/EEC, Amended by 93/68/EEC
EMI: EN 55022 (1992) Class B
EMC: EN 50082-1 (1992)
EMC: EN 55024 : 1998
IEC61000-4-2, IEC61000-4-3, IEC61000-4-4, IEC61000-4-5,
IEC61000-4-6,IEC61000-4-11
Directive 73/23/EEC, Amended by 93/68/EEC
Safety: EN 60950: 2000, IEC 60950 Third edition, UL 60950 Third edition
Apr. 2001
Taiwan BSMI.
Disclaimer: The manufactory or reseller shall not be reliable for technical or editorial errors
or omissions contained herein; nor or incidental or consequential damages resulting from
furnishing this material, or the performance or use of this product.
In the interest of continuing product improvement, the manufactory or reseller reserves the
right to change product specifications without notice. Information in this document may
change without notice.
No part of this document may be copied, reproduced, or transmitted by any means, for any
purpose without prior written permission from copy owners.
© Copyright Dec. 2002. All rights reserved
4

DLP Digital Projector User’s Guide
Table of Contents
Safety .......................................................................................................... 2
Safety Definitions............................................................................................................. 2
Projector Safety ................................................................................................................2
Lamp Safety .....................................................................................................................3
Battery Safety ................................................................................................................... 3
Laser Safety......................................................................................................................3
Preface ........................................................................................................ 7
Package Contents ....................................................................................... 7
Optional Accessories ................................................................................... 7
Accessories Overview.................................................................................. 8
Power Cord.......................................................................................................................8
Computer and Video Cables ............................................................................................8
Others ...............................................................................................................................8
Product Profile ............................................................................................. 9
Front View........................................................................................................................9
Rear View......................................................................................................................... 9
Bottom Panel ....................................................................................................................9
LED Indicator & Control Pad on Projector ...................................................................10
LED Indicators Message .....................................................................................10
Control Pad Function ..........................................................................................10
Remote Control Instruction............................................................................................11
Installation Steps ....................................................................................... 13
Getting Started ............................................................................................................... 13
Connecting the Projector................................................................................................13
Connecting Input and Output Devices...........................................................................14
Starting the Projector .....................................................................................................15
Power on..............................................................................................................15
Turn on the source...............................................................................................15
Adjustment .....................................................................................................................16
Adjusting Projector Angle...................................................................................16
Adjusting the Zoom and Focus ...........................................................................16
Adjusting the Keystone Control..........................................................................17
Adjusting the Zoom and Pan...............................................................................17
Power Off .......................................................................................................................18
Restart.............................................................................................................................18
ENGLISH
On-Screen-Display Menu Format and Description..................................... 19
Input Source OSD ..........................................................................................................19
Ezkey OSD.....................................................................................................................20
Remote Control Buttons OSD .......................................................................................20
OSD Menu...................................................................................................................... 21
Main Menu ..........................................................................................................21
Setup Menu..........................................................................................................22
Color Manager Menu ..........................................................................................23
5

DLP Digital Projector User’s Guide
Language Menu ...................................................................................................24
Utilities Menu ......................................................................................................25
Status Menu .........................................................................................................26
Reference .................................................................................................. 27
Positioning the Projector ................................................................................................27
Remote Control Transmission Range ............................................................................29
Product Specification .....................................................................................................30
Timing Charts.................................................................................................................31
Troubleshooting .............................................................................................................32
Power Indicator ...................................................................................................32
Remote Control ...................................................................................................32
Sound ...................................................................................................................32
Image Source .......................................................................................................33
Image Quality ......................................................................................................33
Lamp ....................................................................................................................34
Maintenance ...................................................................................................................35
Changing the Lamp .............................................................................................35
Changing the Battery of Remote Control ...........................................................36
Cleaning..........................................................................................................................37
Cleaning the Projection Lens ..............................................................................37
Cleaning Exterior Case........................................................................................37
Cleaning the Projector .........................................................................................37
Customer Support...................................................................................... 38
6

DLP Digital Projector Quick Start Guide
Preface
Congratulations on purchasing a DLP™ (Digital Light Processing) projector.
The micro portable projector uses the Digital Light Processing (DLP™) technology along
with a built-in image manager. DLP ™ technology by Texas Instruments offers crystal clear
images with superior quality. A built-in image manager provides alternative settings for users
to optimize image quality. In addition, easy-to-use enhanced features, such as digital zoom,
keystone correction, wide-angle image and picture in picture, offer the users with versatility
and control functions.
In only minutes you can have your DLP Digital Projector ready to go. Just simply connect
the projector to an image source, Computer, DVD, VCR, or HDTV.
Package Contents
Make sure that all of the following components are included in the package. If anything is
missing, please contact your dealer immediately.
•
DLP Projector with lens cap
•
Standard Accessories:
- Power Cord
- Remote Mouse Cable with USB Connector
- S-Video Cable
- Computer Cable: DVI to D-Sub 15 pin VGA Cable
- Audio Cable: Stereo Min Jack to RCAx2 (Red & White)
- Remote Control, including two AAA Batteries
- Wizard CD, including User’s Guide in PDF format
- Quick Start Guide
- Carrying Case
Optional Accessories
The following cables are not standard accessories of this package. You are suggested to
contact your dealer whenever you need.
ENGLISH
•
Composite Video Cable
•
Component Video Cable: DVI-I to HDTV
•
Audio Cable: Stereo to Stereo
•
DVI Cable: DVI to DVI signal cable for computer with DVI graphics card
□ Save the original box and all packing materials for
further shipping needs.
7
DLP Digital Projector User’s Guide
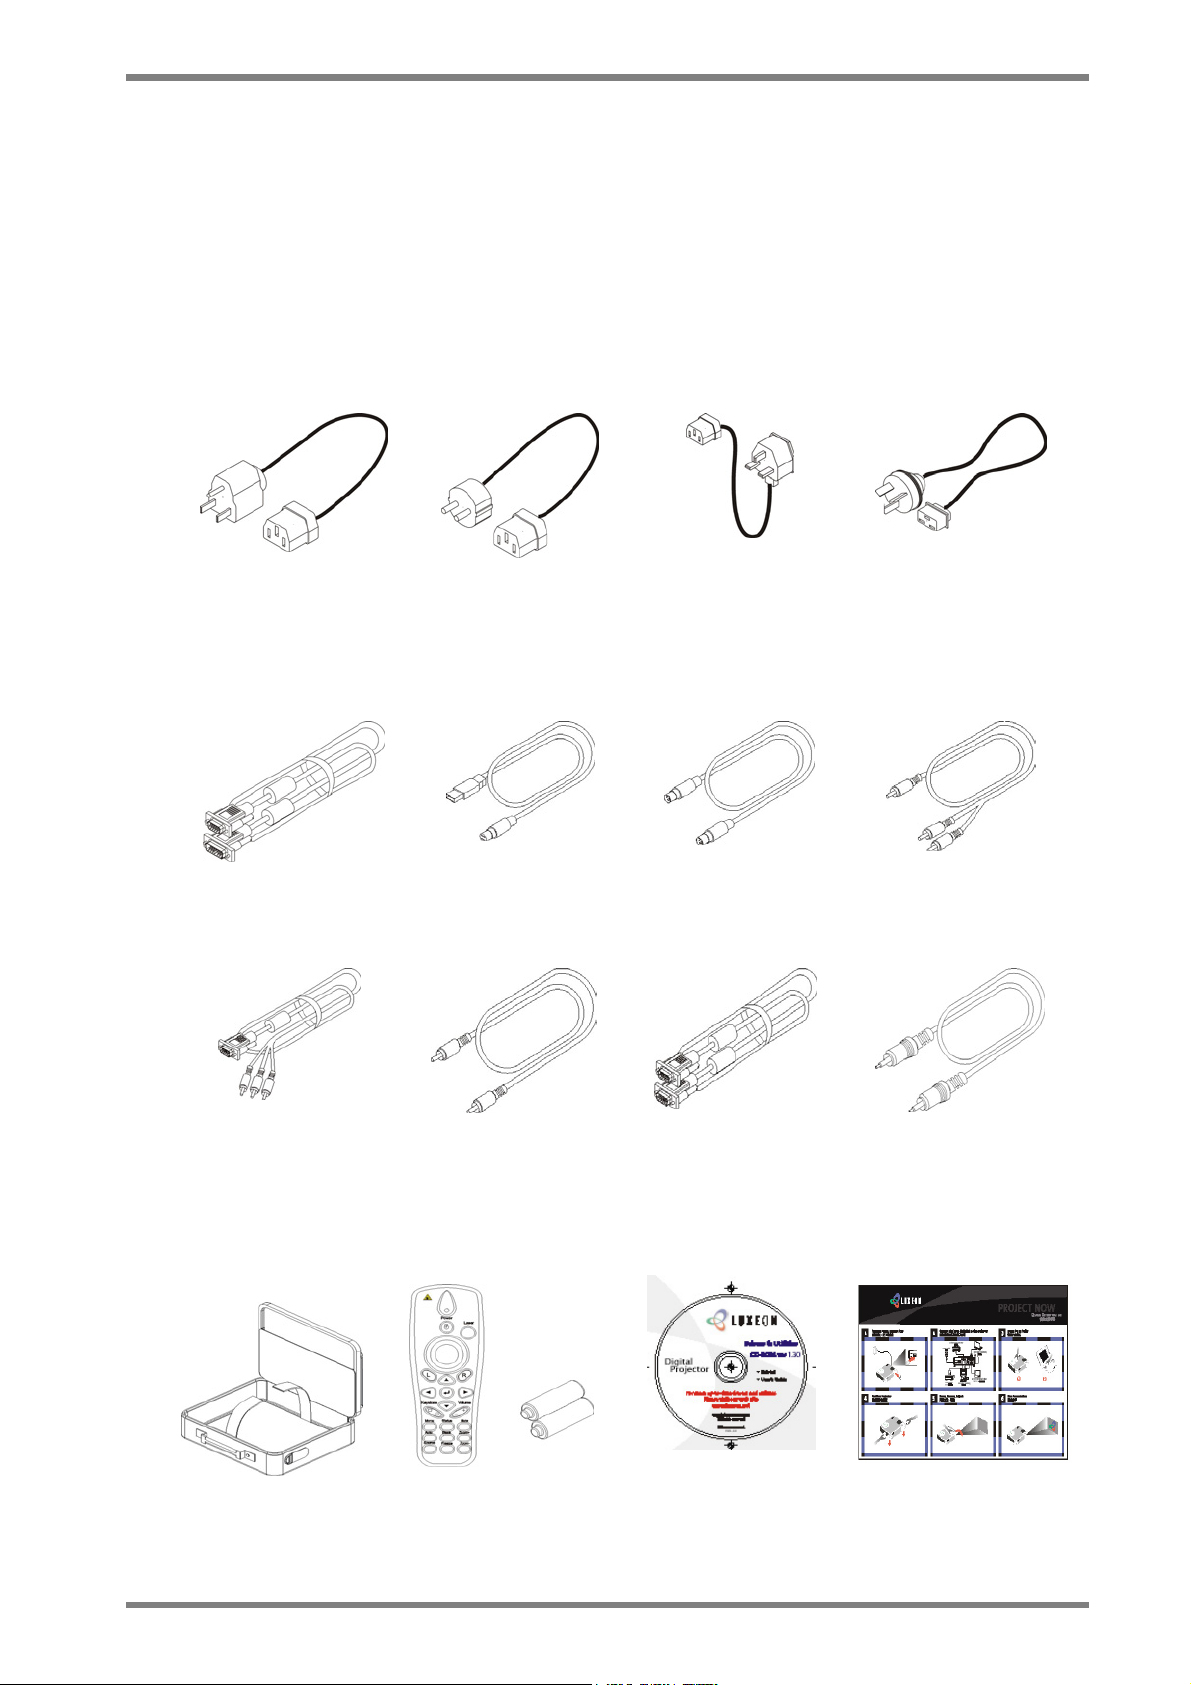
Accessories Overview
Power Cord
There are four different power cords for options, US type, UK type, Euro type and China
type. The appropriate Power Cord is included according to your geographical location &
safety requirement. If the standard kit does not satisfy your needs, then please contact your
dealer for further service.
Power Cord
(US type)
Power Cord
(UK type)
Computer and Video Cables
Computer Cable
DVI-I to DB-15 pin
VGA )
Component Video
Cable (DVI-I to
HDTV)
Remote Mouse Cable
with USB Connector
Composite Video
Cable
Power Cord
(Euro type)
S-Video Cable Audio Cable
DVI-DVI signal cable
(for computer with
DVI graphic cards)
Power Cord
(China type)
Stereo Mini Jack to
RCAx2
Audio Cable
Stereo to Stereo
Others
8
Carrying Case Remote Control with 2
AAA Batteries
Wizard CD Quick Start Guide
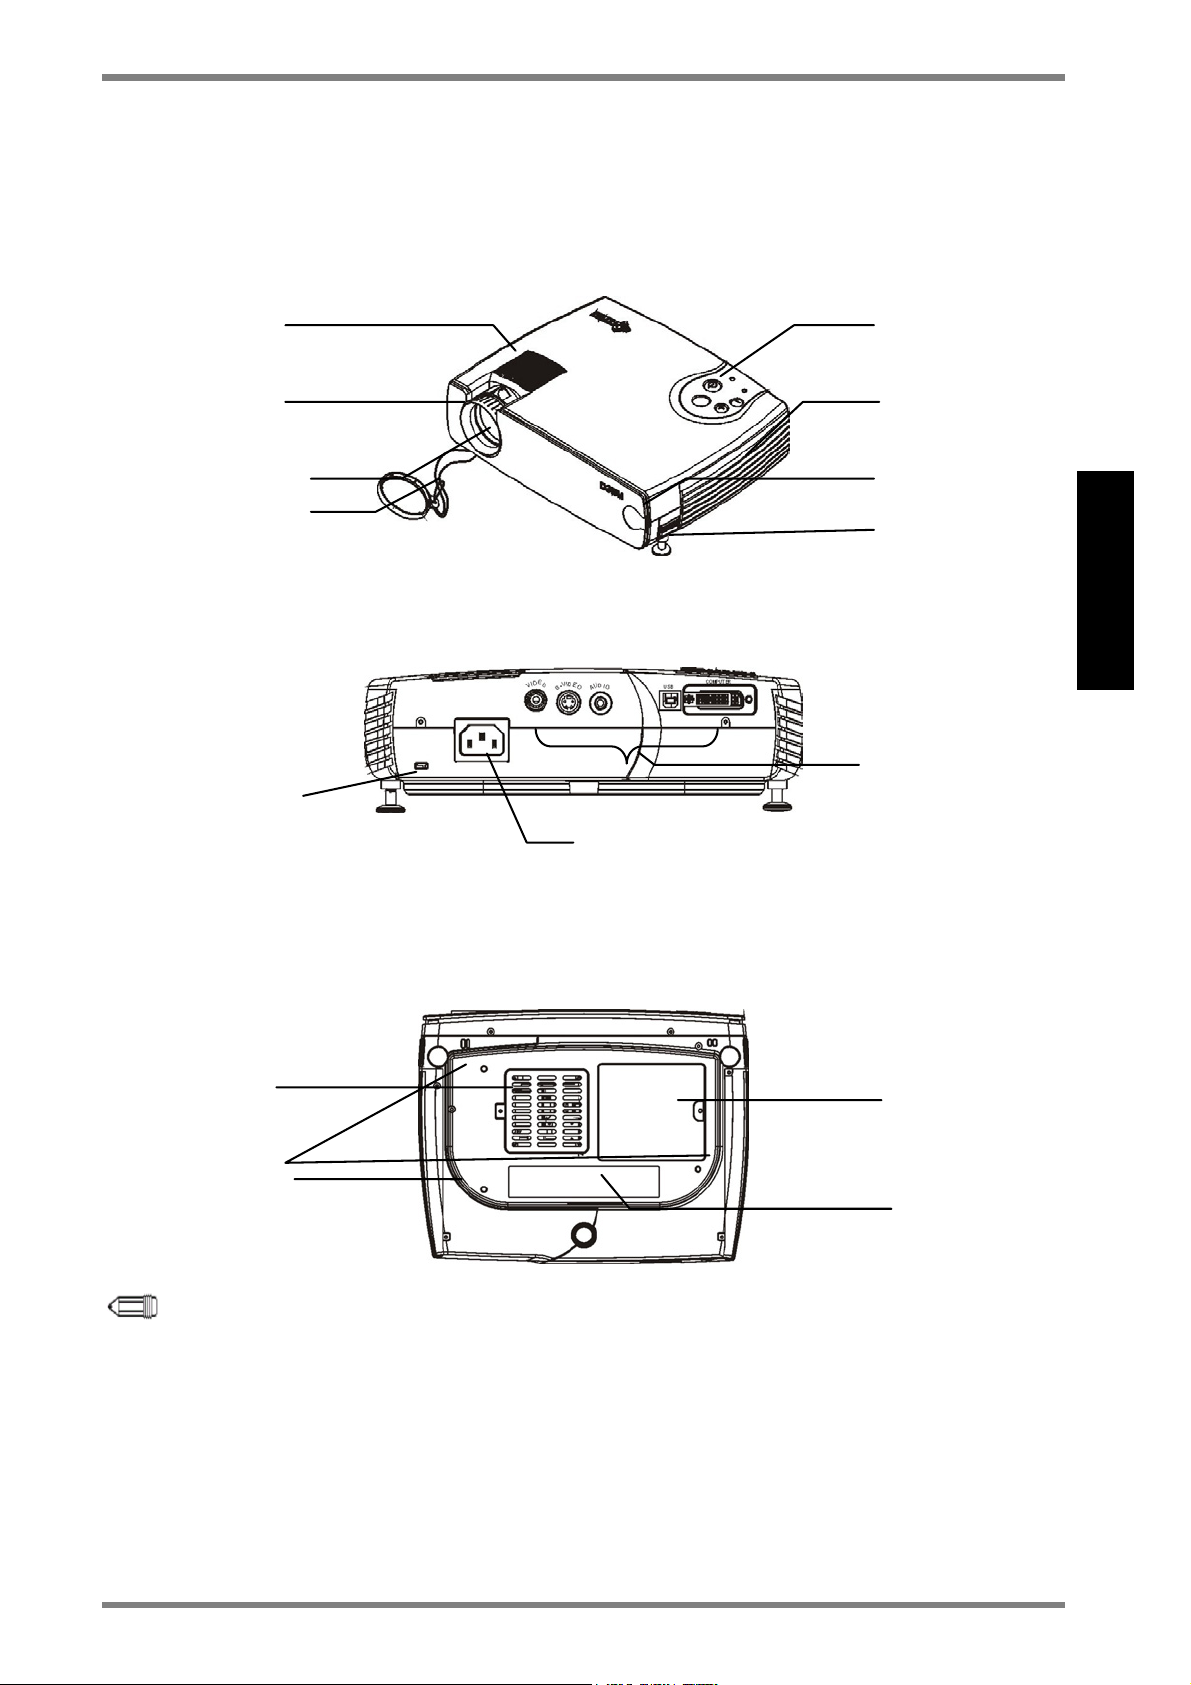
Product Profile
Front View
DLP Digital Projector User’s Guide
Speaker
Zoom Ring Ventilation Hole
Focus Ring
Lens Cover
Control Pad
IR Sensor
Adjuster Foot
Rear View
I/O Connectors
Kensington Security
Lock
AC IN Socket
ENGLISH
Bottom Panel
Fan Cover
Ceiling Mounted
Screw
NOTE:
•
With ceiling installations, use approved mounting hardware & M4 screw.
Min. distance from ceiling/wall: 30/50 cm, 12/20 inch for proper ventilation. For
permanent installations, follow local codes.
•
The security lock corresponds to Kensington’s MicroSaver Security System. If you
have any comment, contact : Kensington, 2853 Campus Drive, San Mateo,
CA94403, U.S.A. Tel: 800-535-4242, http: www.kensington.com/
Lamp Cover
ID Label
9
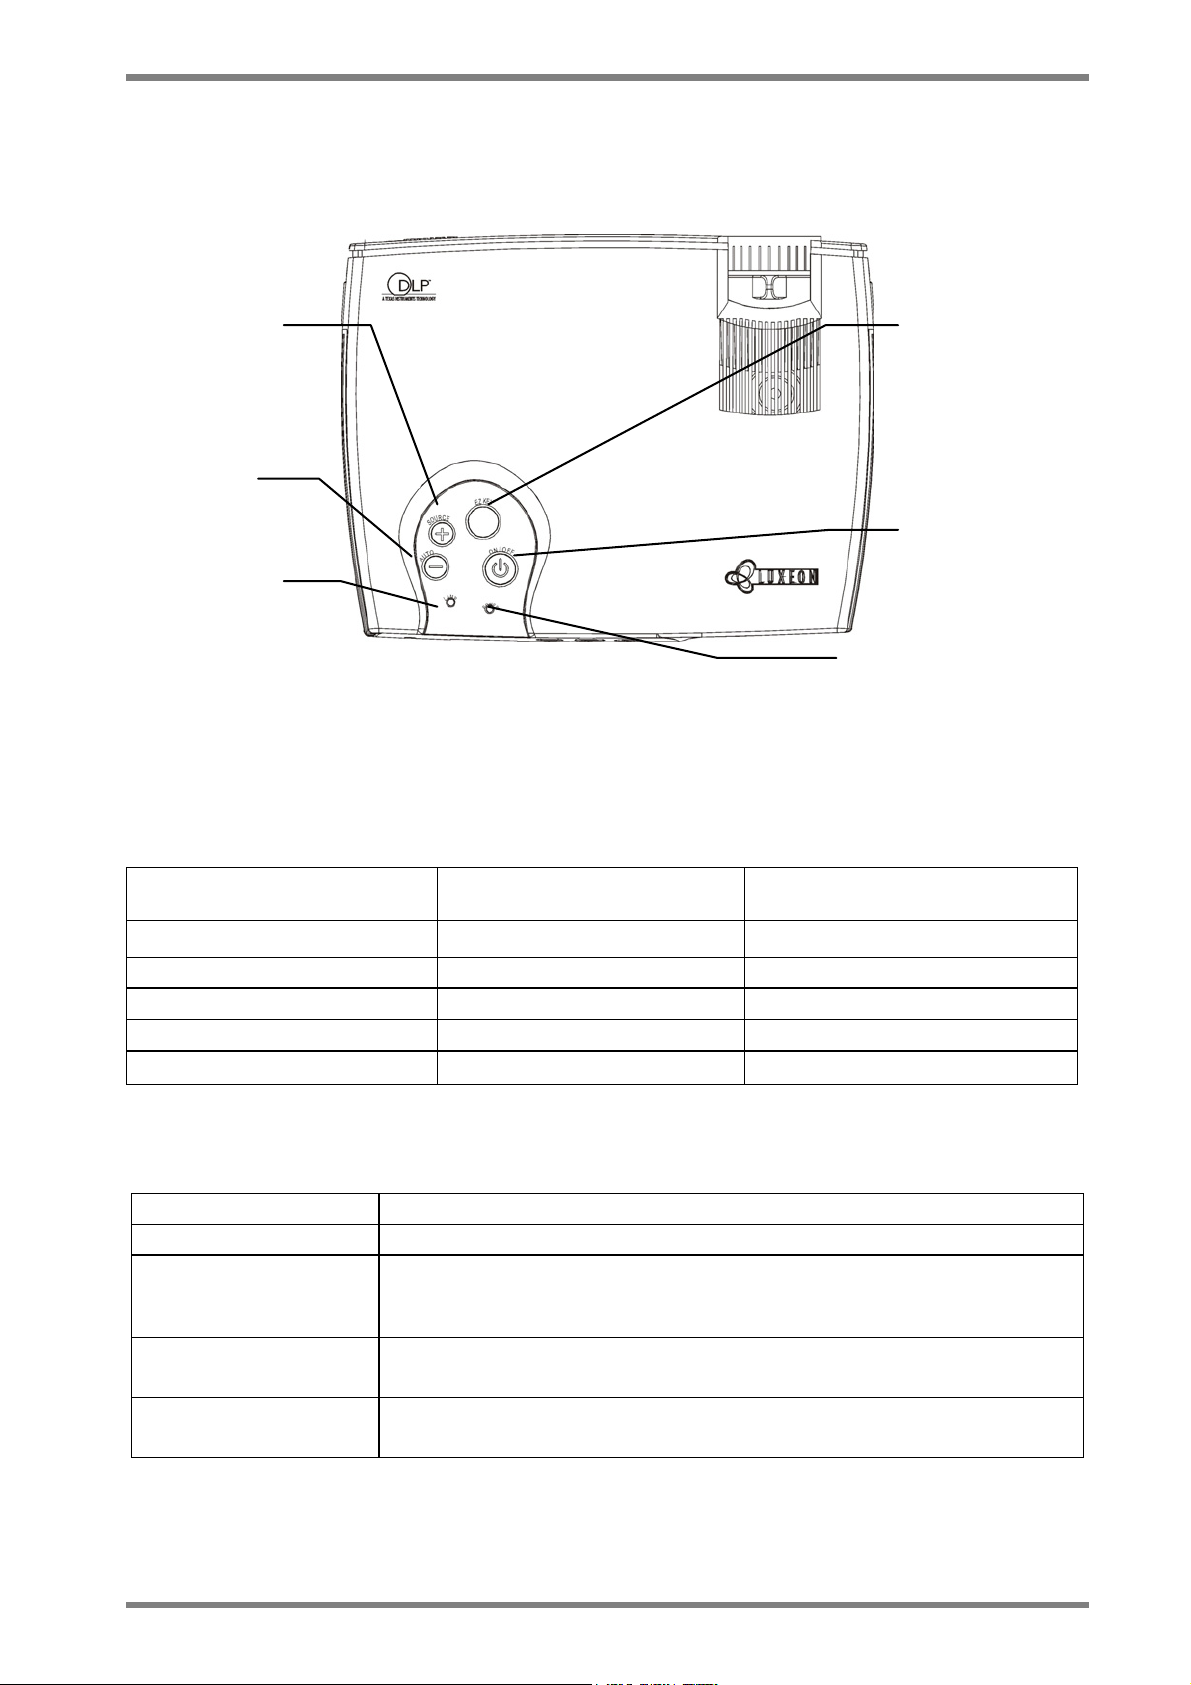
DLP Digital Projector User’s Guide
LED Indicator & Control Pad on Projector
Source Button (+)
Same as Source button
on the remote control
Auto (-)
Same as Auto button
on the remote control
Lamp Ready LED
Indicator
LED Indicators Message
Status
Power LED Indicator
Green Color
Plug in Power Cord Steady light Steady light
Lamp Ready LED Indicator
Orange Color
EZKEY
with function of
Keystone, Volume,
Frequency, and
Brightness for quick
selection.
Power Button
Same as Power button
on the remote control
Power LED Indicator
Power on without source Blinking light Light off
Power on with active source Steady light Light off
Power off in cooling stage Steady light Flashing light
System warming up Flashing light Light off
Control Pad Function
Description Function
Power Power on / off
EZ Key Quick adjustment on Keystone, Frequency, Volume, and Brightness
by repeatedly pressing to scroll through these functions.
Source (+) Input Source selection,
(+) to perform adjustment increasingly in EZ-Key function
Auto (-) Auto Image
(-)to perform adjustment decreasingly in EZ Key function
10
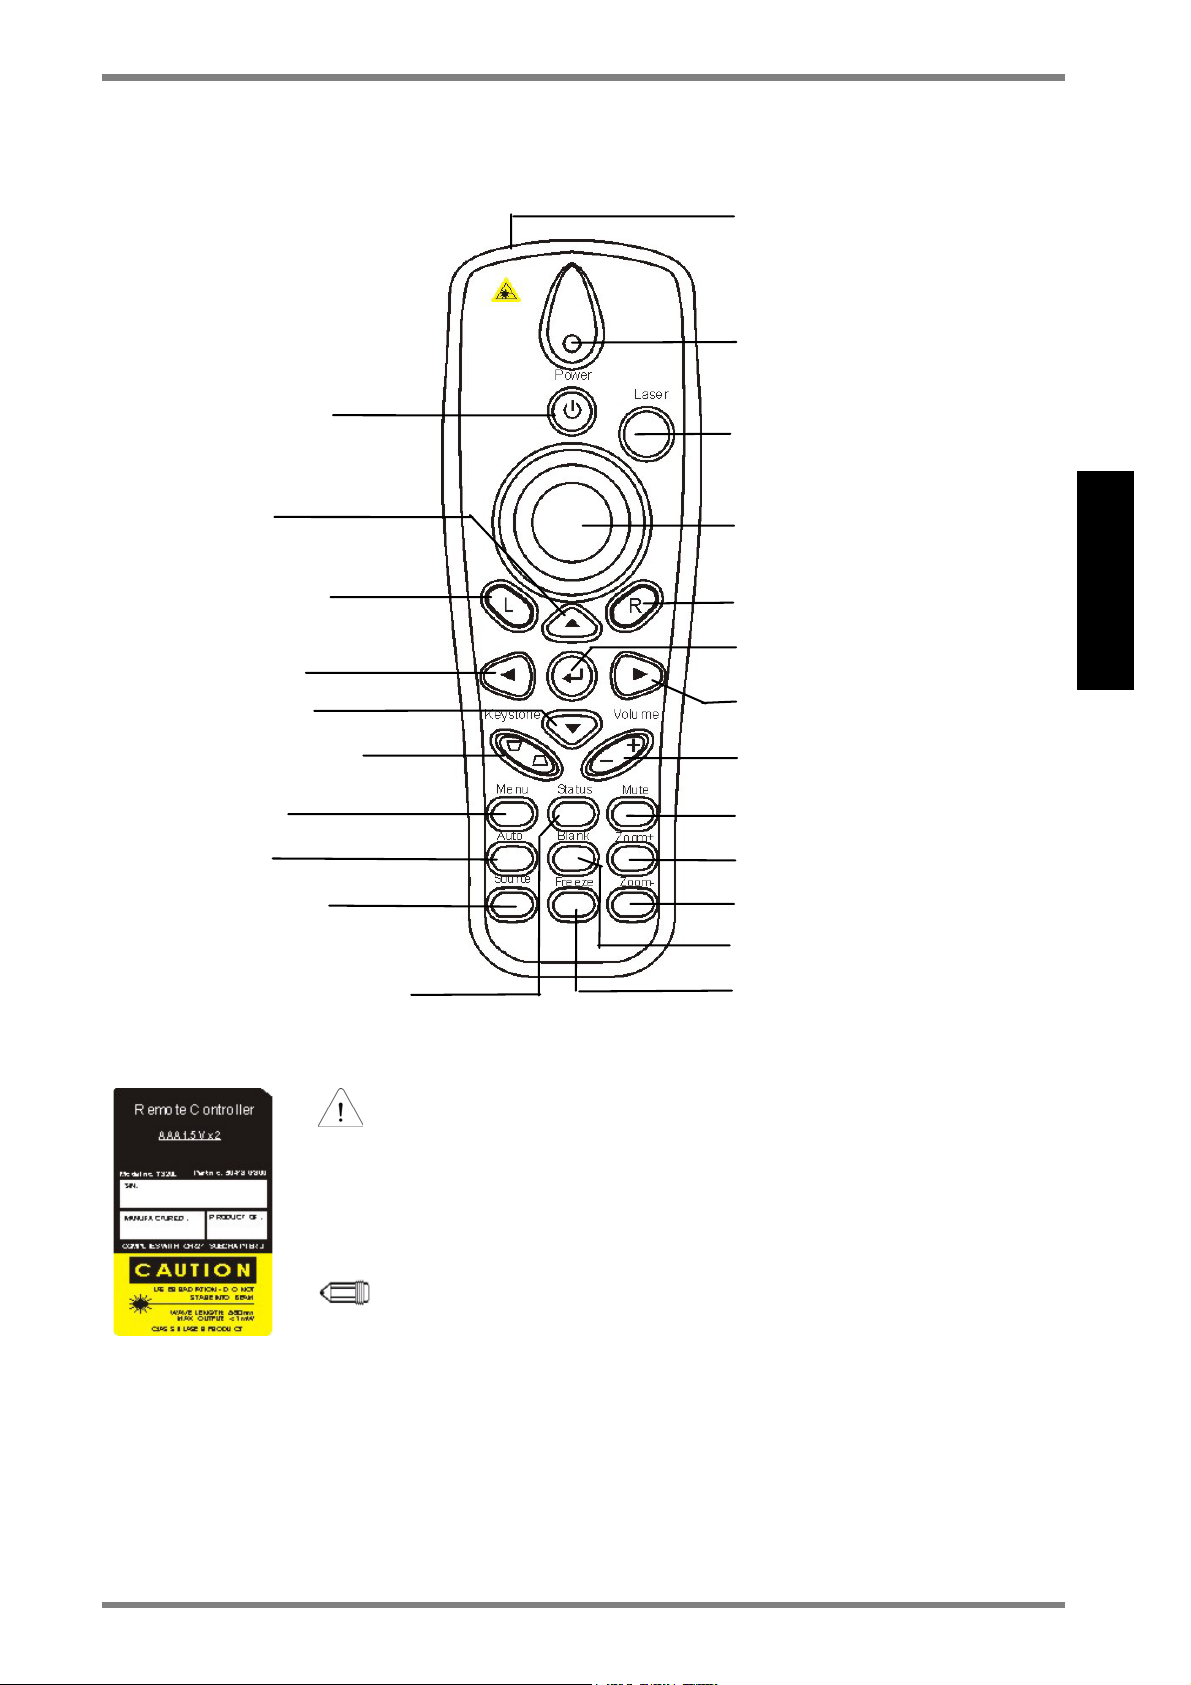
Remote Control Instruction
DLP Digital Projector User’s Guide
Power ON/OFF
Up direction
Left mouse button
Left direction
Down direction
Keystone correction
Setup menu
Auto sync
Video source: ie,
composite or component
Status of video information:
ie, resolution, frequency.
Laser aperture
(pointer/beam)
Power LED
Laser pointer ON
Mouse cursor
Right mouse button
Enter button
Right direction button
Volume (+/-)
Mute sound
Zoom (+)
Zoom (-)
Blank screen
Freeze screen
ENGLISH
WARNING:
To reduce the risk of injury to the eyes, do not look directly into the
laser light emitted from the aperture on the Remote Control and do not
point the laser light into anyone’s eyes. This remote control is equipped
with a Class IIIA laser that emits radiation.
NOTE:
Do not leave the remote control close to the cooling fan outlet of the
projector.
For the information of remote control transmission range, please refer
page 29.
11

DLP Digital Projector User’s Guide
The following buttons are located on the projector Control Pad
or on the Remote Control
Power Button Switch power on or off.
Use the Power button to begin the warm-up period. The power
light blinks green during warm-up and stays green when the
projector is ready to use.
Menu Button Use to display the On-Screen-Display Menus, which provide
several options for adjusting the projected image.
Auto Button Use to auto adjust the image quality.
Source Button Use to select input source.
Status Button Use to get projector’s operation status information
L Button Use as the left mouse cursor.
R Button Use as the right mouse cursor.
↵
Button Press to enter function.
4 Directional
Selection Buttons
Laser Pointer Button Use instead of a pointer to activate the laser pointer for use in
Volume +/– Button Use to adjust the volume of the audio output.
Keystone Button Use to adjust the image vertically and make it square.
Blank Button
Freeze Button Use to freeze or unfreeze the image
Mute Button
Zoom Button Use the Zoom (+/-) buttons to zoom the image in and out. Use
Input Source
Selection
Use to select or adjust control items.
presentations.
Use to blank the image and mute audio.
Use to turn on or off the speaker.
the 4 directional selection buttons to pan the image.
To select the correct device you are connecting with.
12
 Loading...