

Page 1
Guarantee, Installation and Operating Instructions
Luxaflex® Duette® & Plissé Blinds
year
5
Luxaflex®
Guarantee
Freehanging Models
Page 2
Guarantee, Installation and Operating Instructions
Luxaflex®Duette®& Plissé Blinds
Freehanging Models
Dear Customer,
We thank you for choosing Luxaflex
guarantee service is needed, please contact the dealer from whom the product was purchased. Alternatively you may contact a member of our authorised Luxaflex
to minimise any unnecessary inconvenience, we suggest that the product installation instructions
are read carefully before contacting the dealer on our service network.
GUARANTEE
®
Luxaflex
guarantees that all Luxaflex®window covering products are free from material and
assembly defects, provided that such products were properly installed in a domestic situation.
For non-domestic installations, refer to the Luxaflex
®
is limited to repair or replacement of the defective materials or components. Repairs
aflex
will be made with like or similar parts. The guarantee is limited to the original purchaser.
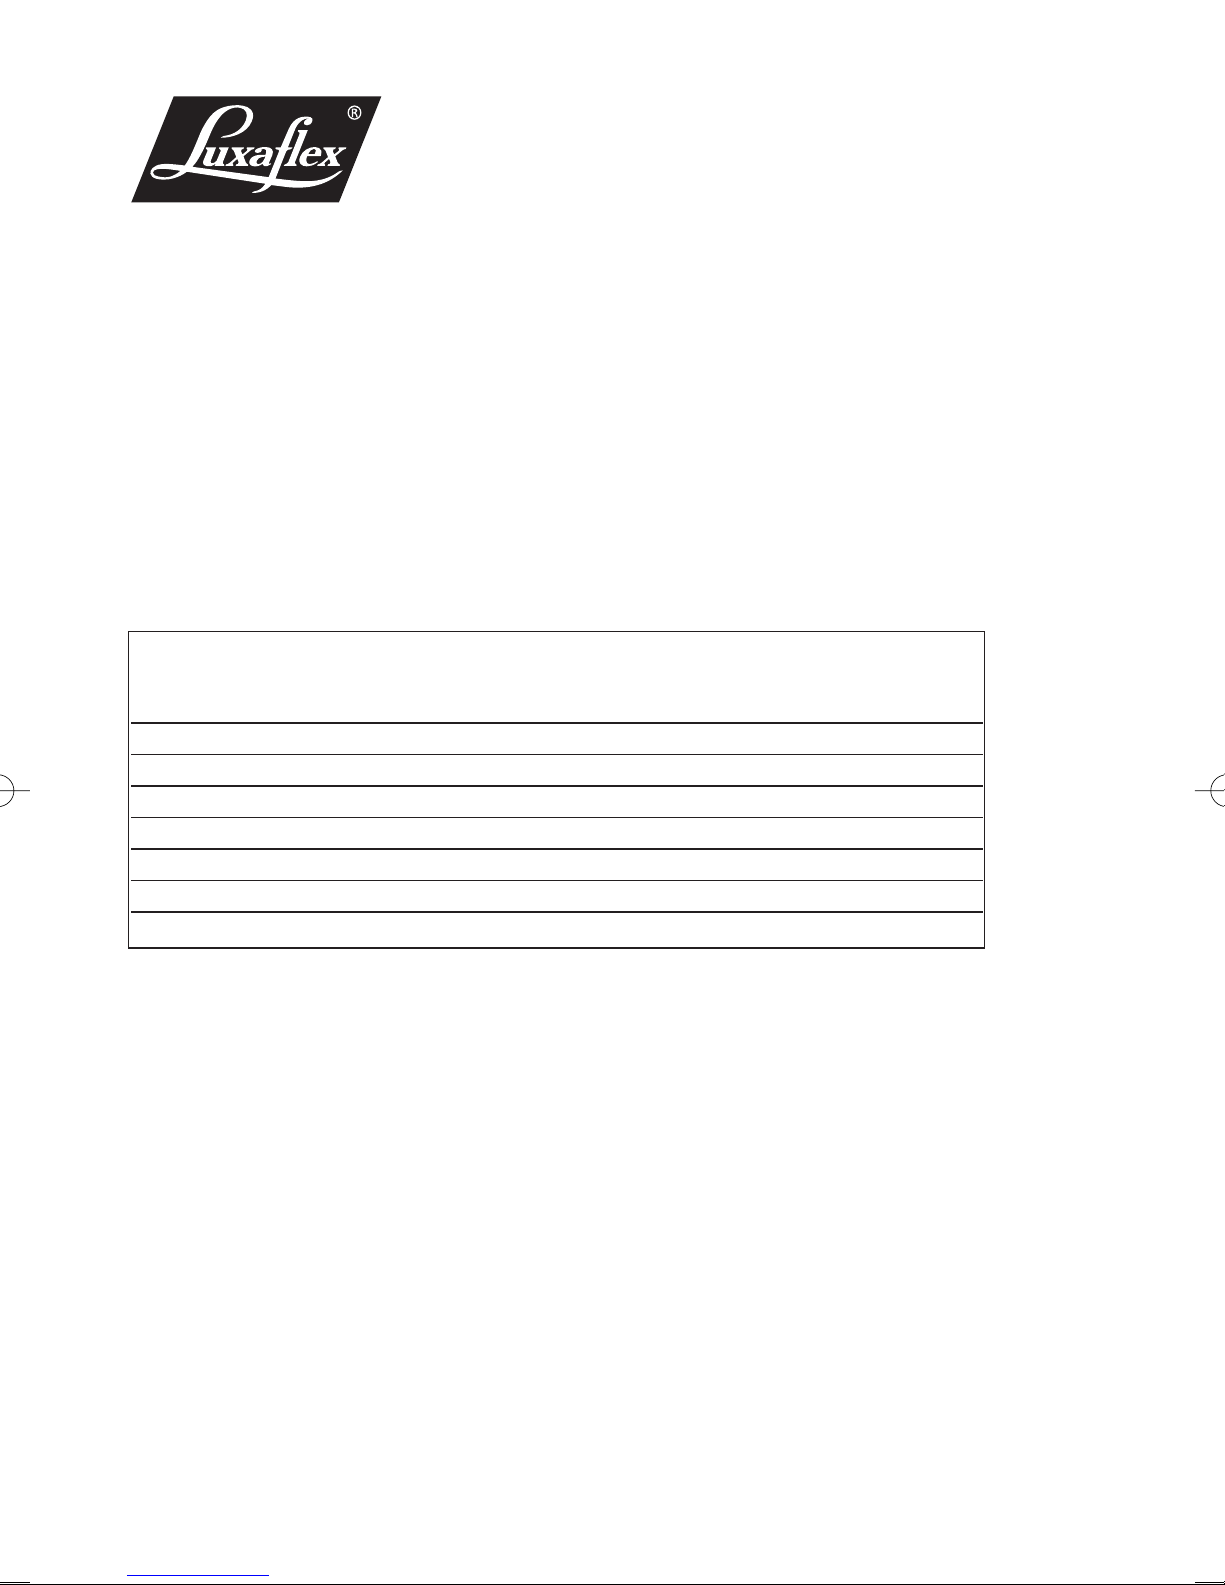
Scope of warranty Year since date of purchase
Removal of product from end user's window ✗✗✗✗✗
Carriage (to - from factory) ✓✗✗✗✗
Labour (assembly / repair) ✓✗✗✗✗
Re-installation of product at end users window ✗✗✗✗✗
Components (with like or similar parts) ✓✓✓✓✓
Cords ✓✓✓✗ ✗
Fabric (with like or similar fabric) ✓✓✓✗ ✗
Consequential loss ✗✗✗✗✗
®
products. In the unlikely event that the Luxaflex product
®
service network. In order
®
general sales conditions. The obligation of Lux-
1 yr 2 yrs 3 yrs 4 yrs 5 yrs
This guarantee is invalid if the damage or failure is caused by:
• Accident • Misuse/Abuse • Alteration • Motorised devices • Exposure to elements
• Normal wear and tear • Blinds that are not fitted in a domestic situation.
• Failure to follow measurement, installation, cleaning and maintenance instructions
The guarantee is exclusive and in lieu of all other obligations, liabilities or warranties. In no
event shall Luxaflex be liable or responsible for incidental or consequential damages or for any other
direct or indirect damage, loss, cost, expense or fee.
The guarantee does not affect the consumers statutory rights under applicable national laws in force,
nor the consumers rights against the dealer arising from their sales/purchase contract.
Page 3
Thank you for purchasing this Luxaflex®quality product. Please read and follow these installation and
operating instructions carefully. We cannot accept responsibility for problems caused by not adhering
to the instructions.
Installation and Operating Instructions for Freehanging Pleated Blinds
Please read the following instructions thoroughly before commencing installation:-
• Do not damage the product when using a sharp knife to open the packaging !
• Fitting screws: use a size 2 screwdriver, or use a 3.6v electric screwdriver at it’s lowest torque.
• Rail removal: use a flat blade screwdriver
• It is recommended that you use the screws supplied for fitting to prevent malfunction from using
screws with too large heads.
• There is a possibility that this product may not reach the required drop when lowered initially. This is
usually caused by the tight compression of the pleats during transit. Whilst the blind, if left hanging
would normally fall to its required drop over a short period of time, the following action could help
speed up the process. To relax the pleats and enable them to drop fully, we recommend the following
course of action:-
• Lower the blind as far as it will drop
• Gently ‘work’ the pleats open in a downward fashion (from the top of the blind either side down)
The blind should now reach the desired drop.
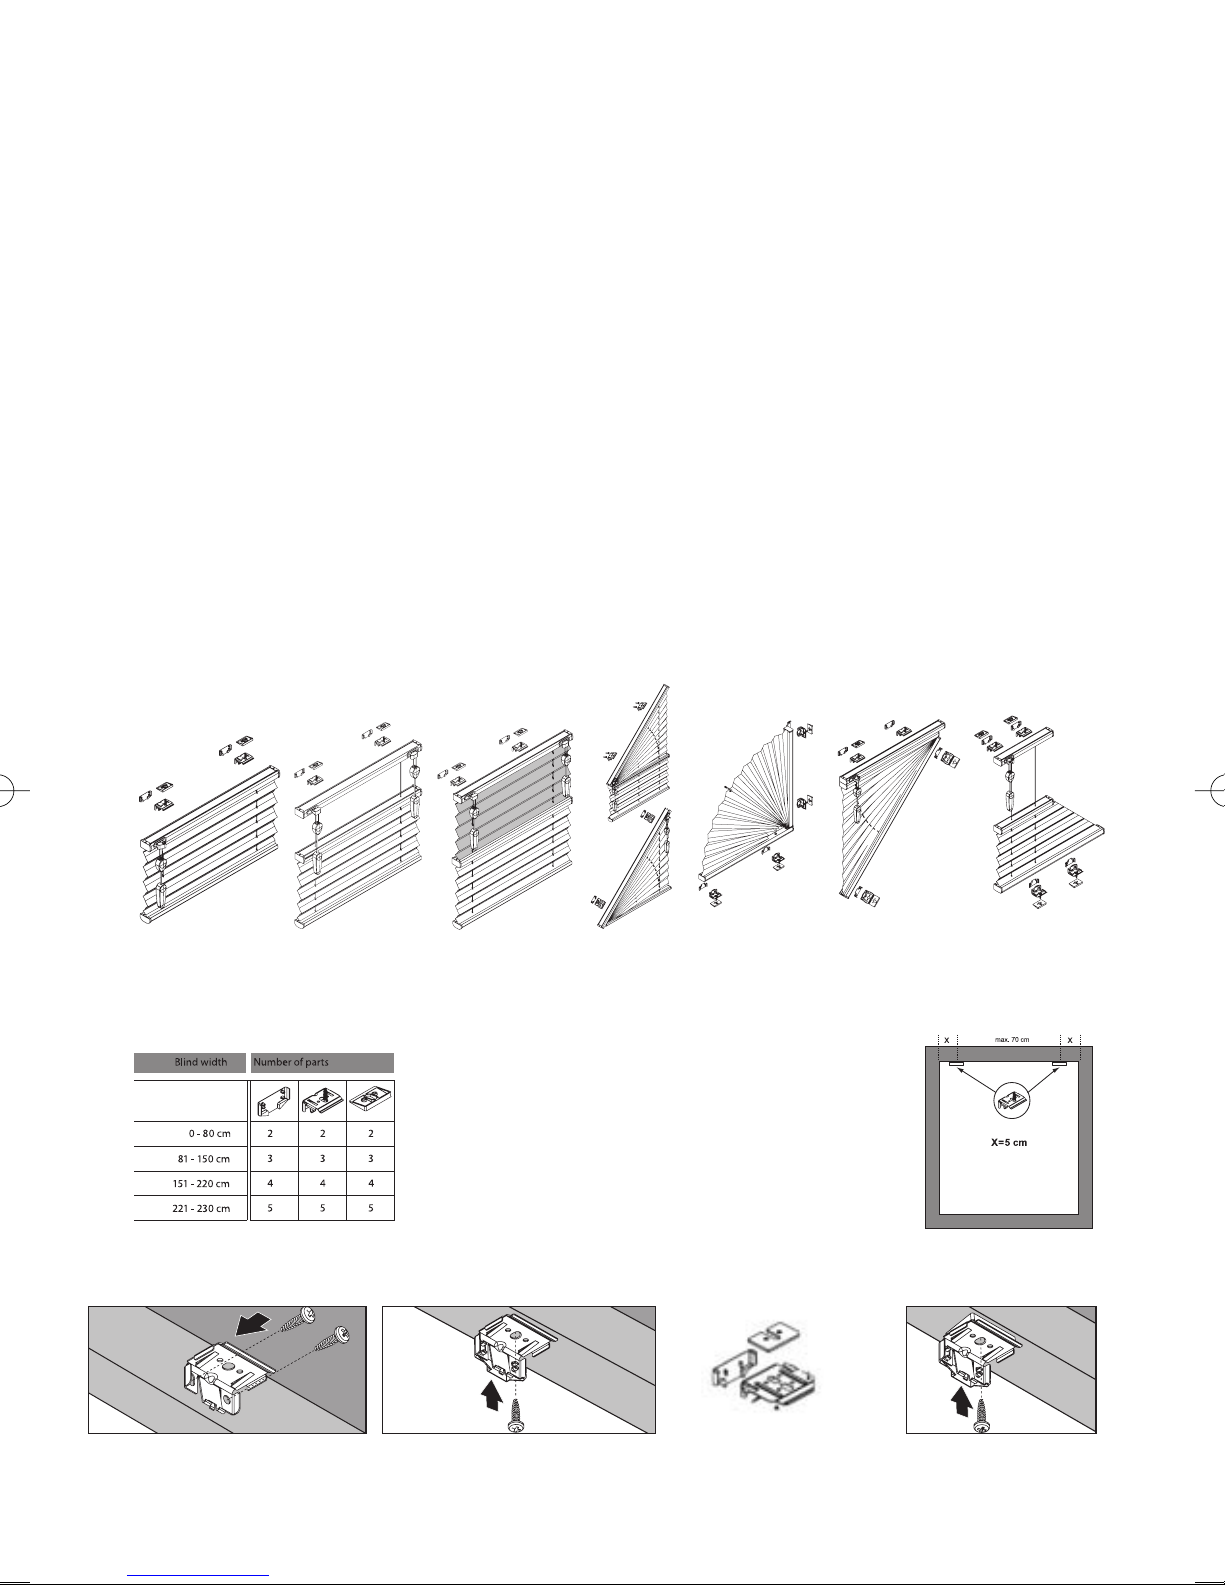
These instructions are suitable for the following models :
Models 110 & 113
Models 116, 120 & 124
(Model 116 has fixed bottom rail)
(Model 124 has no fixed headrails)
Models 130 Models 140
& 170
Fittings Supplied :
Recommended Bracket Positions :
(For models with fixed rails at the bottom or sloping
rails, the same distance dimensions should apply)
If your fixing surface is uneven, packing shims are
supplied which can be positioned above the
brackets to level the headrail.
Models 150 & 151
(model 151 Full arch)
Models 172 Models 160 & 161
(Model 161 slopes
both sides)
Bracket Face Fitted Bracket Top fitted
Interlockable packing
shims and back covers are
supplied if top fixing
11° wedges are supplied
and can be built up to fit to
angled frames up to 45°
Page 4
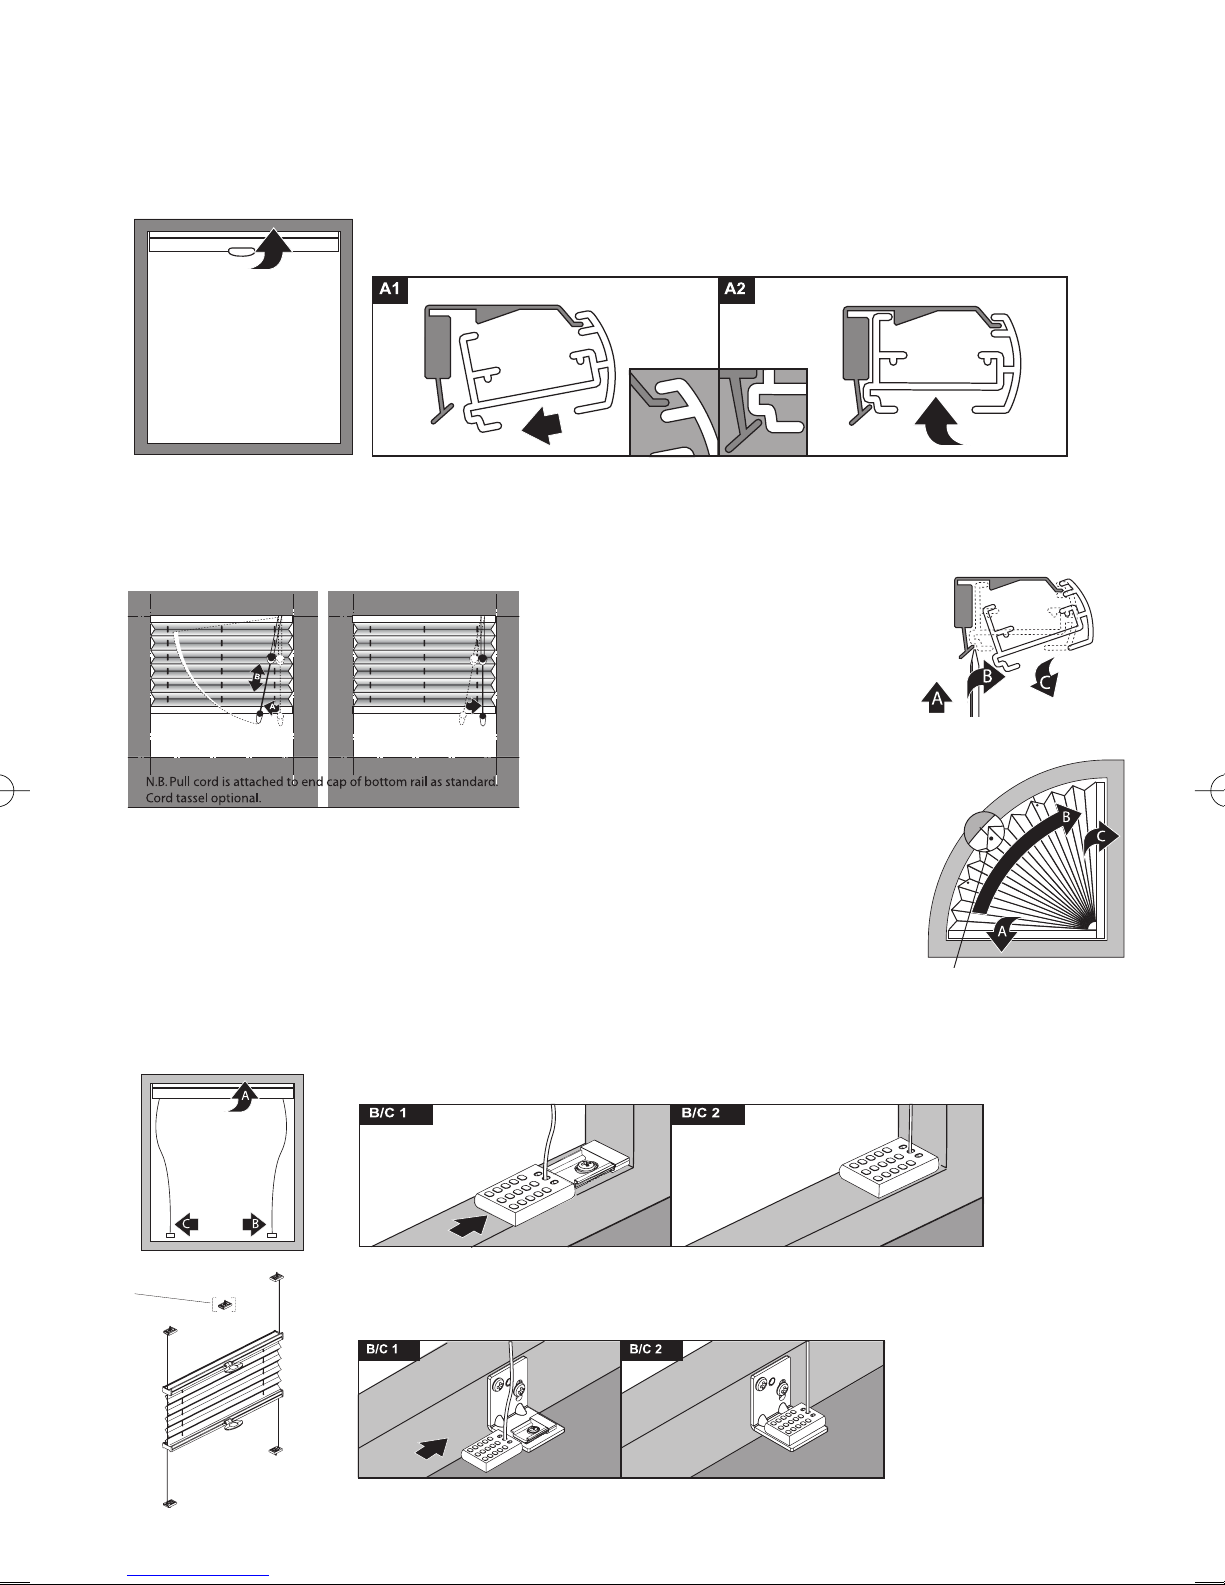
For models with fixed rails, such as Model 116 at the bottom or at the side these brackets are fitted in
the same way, but either sideways or upside down. These types of blind may have tensioned cords,
which means the rail may need to be forced down to reach the brackets.
Install headrails onto brackets as shown below:
Locate headrail onto lip of bracket (A1), push headrail up at rear until it
‘clicks’ into place fully (A2)
Cord Operation:
Pull cords towards centre of blind to
release cord lock
Pull cords towards edge of blind to lock.
Options:
Side Guiding SG1 or Hand control Models:
Install headrail first
Then install mounting plates by screwing inner section to sill then slide cover
onto inner as shown below, tensioning the cords in doing so.
Blind Removal:
To release rail, use flat blade screwdriver
to prise back of bracket off rail. Twisting may assist.
Arched Models:
Positioning the holes to be drilled for
the fastening hook(s)
• Click the pleated blind into place with
the lower rail and unfold it all the way
• Mark the hole positions on the frame,
in line with the eyes in the fabric. (Not
®
on Duette
)
• Remove the pleated blind, drill the
holes, install the screw hooks. With
®
Duette
you will receive arch support
clips, locate back of pleat between
the two ‘fingers’ to support fabric
• Install the rails and the blind as
shown in diagram
Mounting plates can be face fitted by using wall support brackets
N.B. For MODEL 124 –
There are NO
headrails on this
model, therefore you
will fit mounting
plates in all 4 corners
as above.
Page 5
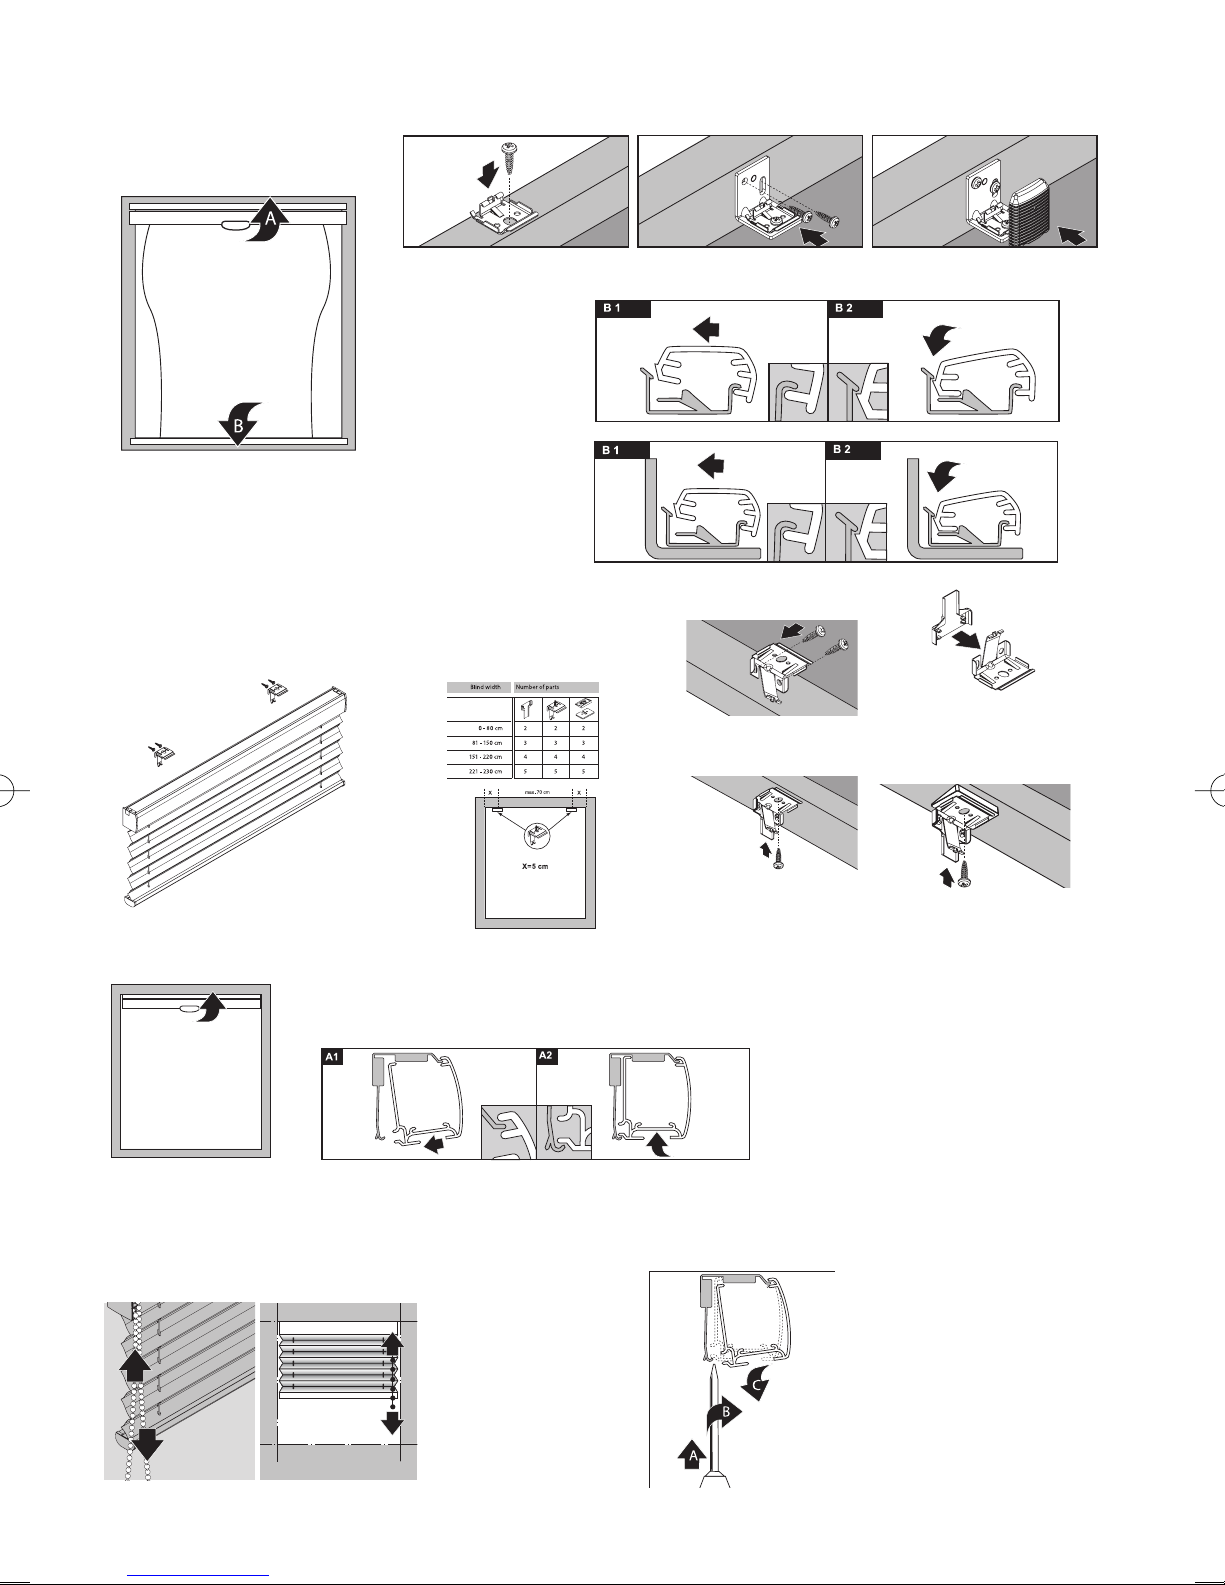
Side Guiding SG2:
Install Headrail first then
bottom
Fixed rail.
Screw brackets to sill Use Wall support bracket if face fitting
Mounting fixed rail to brackets:
Sill fix
Face fix
Endless Cord, Endless Chain or electric Models
Models with these control options are fitted with our larger
XL rail and therefore have different headrail brackets:
Install headrails onto brackets as shown below:
Locate headrail onto lip of bracket (A1), push headrail
up at rear until it ‘clicks’ into place fully (A2)
Bracket Face Fitted
Bracket Top fitted
If top fitting bracket
covers are supplied
11˚ wedges are
supplied and can be
built up to fit to angled
frames up to 45˚
Operation:
Pulling front cord/ballchain will raise blind
Pulling back cord/ballchain will lower blind
Holding cord/chain back and front will ease operation
Blind Removal:
To release rail, use flat blade screwdriver
to prise back of bracket off rail. Twisting may assist
Page 6

24 v Motorised Blinds:
Connection: The built-in motor (24 V DC) with automatic end position adjustment may only be connected to
the 230V mains using a stabilized 24 Volt DC Power Supply.
Only use Power Supplies and controls recommended by the manufacturer of the Pleated Blind, to prevent
damage or malfunctioning caused by non-compatible electric components!
When connecting electric components, the wiring diagrams provided by the manufacturer must be observed.
If you haven’t received a wiring diagram, please contact your supplier.
MAINTENANCE:
It is recommended that Pleated blinds should be stacked overnight, at least once a week, to help retain their
pleating and shape.
The fabric of both Duette
®
or Luxaflex®Plissé blinds cannot be separated from the headrail. To prevent the
Duette®or Luxaflex®Plissé fabrics from becoming dirty, the blinds should be cleaned regularly with a feather
duster or vacuum cleaner on a low setting. Stains should be removed as quickly as possible with a soft
sponge and lukewarm water containing a non-synthetic
detergent, if required.
N.B. Duette
®
and Luxaflex®Plissé fabrics with metalised coatings should NOT be cleaned with water, as this
could damage the coating.
In order to clean the whole blind, it is possible to submerge non-metalised coated Duette
®
or Luxaflex®Plissé
in a bath. This does not apply to Blackout fabrics. Steel weights should be removed from the bottom rail,
which can be accessed by removing bottom rail end caps and cover profile, before washing.
Proceed as follows:
Fill a container, bath or basin with lukewarm water (30°) and add a non-synthetic detergent, one cap full per
litre water. Lay the fabric in the water and hold the headrail above the water. The cleaning result will be
better if the pleats are not held in the water as a stacked bundle, but in an open position. Prevent creasing or
deforming the fabric or pleats. Use a soft sponge or brush on the fabric to clean any stains. Do not leave the
fabric in the water for longer than two hours. Hang the fabric out fully over the bath and spray clean it, front
and back, to ensure that dirt and soap residue is removed from the fabric.
Pull the fabric up carefully and ensure that the pleats fold correctly. Once the bundle of material has
completely been folded together, squeeze the head and bottom rail together, which will wring as much water
out of the fabric as possible. Replace the steel weights in the bottom rail. Remount the blind into it’s
brackets, and allow the blind to drop completely. You can try again to remove any stubborn stains or residue
with a slightly damp sponge. Now raise the blind to approximately 300mm below the headrail.
Raise the fabric once every hour and then allow to drop fully, before raising it again to 300mm below the
headrail. Repeat this cycle until the fabric is dry. If the shade is wider than the bath at your disposal, you can
clean the fabric with a soft sponge or have it cleaned by a
professional cleaning service.
Disclaimer:
The above recommendations have been drawn up with care. However, we are unable to accept responsibility
for the results of cleaning.
Page 7
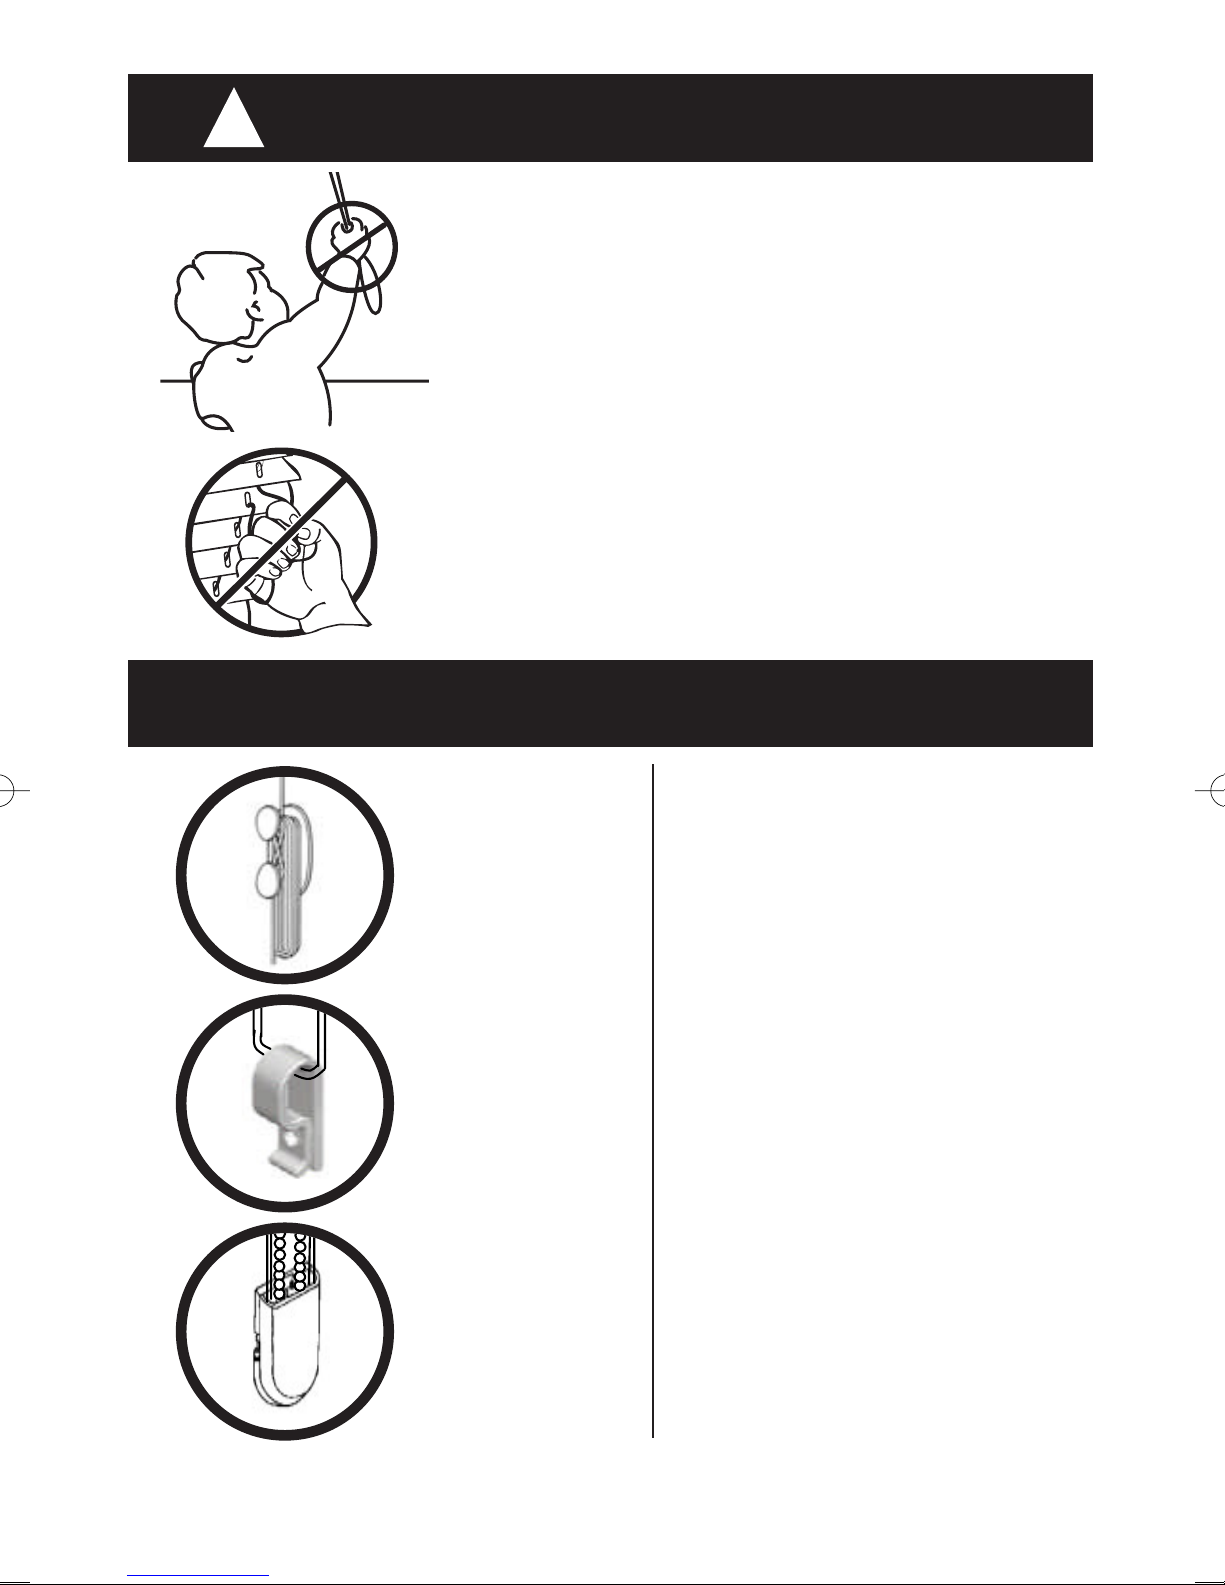
!
WARNING
• Young children can STRANGLE in the loop of pull
cords, chains and tapes and cords that operate
window coverings. They can also wrap cords
around their necks.
• To avoid strangulation and entanglement, keep
cords out of the reach of young children.
• Move beds, cots and furniture away from window
covering cords.
• Inner cords can pull down to form a loop, which
can STRANGLE a young child.
CORD SAFETY DEVICE
Cord Cleat
- supplied with
products having
single pull cord
Endless cord/
Chain retainer
- supplied with
products having
endless chain
or cord
Double chain &
cord retainer
- supplied with
vertical louvre
blinds having both
endless cord
and chain
Fitting
• First, ensure blind has been
installed as per instructions.
• Select suitable position to fit
appropriate retainer. If cord &
cleat, making sure it is out of
reach of children. If one of the
cord/chain retainers, fit at
position for length of chain/cord.
Fit so that the retainer takes out
slack but without over tightening.
• Mark and fix the retainer using the
fixing provided. Check that a
secure fixing has been achieved.
• In the case of single pull cord
products, make sure cords are
tied out of reach each time used.
Persons in charge of children are ultimately responsible for following the safety
instructions provided by the manufacturer.
Page 8
HunterDouglas Ltd. Window Fashion Division
Mersey Ind. Est., Heaton Mersey, Stockport, Cheshire SK4 3EQ.
Tel: 0161-442 9500 Fax: 0161-432 3200.
 Loading...