

Luvox F100, F120, F170, F190, F150 Information Manual
LUVOX
LCD MONITORS
ALL-IN-ONE SYSTEMS
INFORMATION GUIDE
REVISION 0.08 - JV April 27, 2010
- 1 -
Menu
1. Important Information ········································Page.2
Important Safety Instructions······························Page.2
Contact Information ··········································· Page.2
2. Introduction ·······················································Page.3
Description ·······················································Page.3
Standard Package Content ·································· Page.3
Standard Product Features ··································Page.4
Cleaning ···························································Page.5
Precautions ·······················································Page.5
3. LCD monitor Control Functions ·····························Page.6
Key functions ····················································Page.6
OSD functions ···················································Page.7
OSD overview ···················································Page.10
4. LCD Monitor Setup ·············································· Page.11
Connector layout ···············································Page.11
Driver installation ··············································Page.12
Touch Alignment (Calibration) ·····························Page.13
5. LCD Monitor Product Specifications ························ Page.14
6. All-In-One systems ·············································· Page.16
Description ·······················································Page.16
Connector layout ···············································Page.17
Accessing main board area··································Page.18
AIO (default) BIOS settings·································Page.19
Storage setups ·················································· Page.23
7. LUVOX Panel Mount Installation·····························Page.25
Securing with Front Mount Brackets ····················· Page.25
Securing with Side Skirt Bolts······························Page.26
8. LUVOX optional features ·······································Page.32
ProLine ····························································· Page.32
IP65 front ·························································Page.34
Rack Mount Bezel ·············································· Page.40
Rear Mount Brackets ·········································· Page.43
9. LUVOX Product Identification·································Page.50
10. LUVOX Service Information ·································Page.53
Appendix: LUVOX Dimensional Drawings ····················Page.54
- 2 -
Important Information
Important Safety Instructions
Caution
: To prevent electric shock, please do not remove any
covers or any internal components. Refer to a qualified technician
for service.
Caution
: Unplug the device from the power outlet before
cleaning. Use a soft damp cloth.
Caution
: Please follow the national guidelines for unit disposal.
Contact Information
:
DOBIT NV - Belgium
TEL: +32 (0)14 285 785
FAX: +32 (0)14 219 811
Industrielaan, 6
B-2250 Olen
Belgium
DOBIT BV - Holland
TEL: +31 (0)492 472 638
FAX: +31 (0)492 472 668
Steenovenweg, 5
5708 HN Helmond
The Netherlands
www.dobit.com
sales@dobit.com
support@dobit.com
- 3 -
Introduction
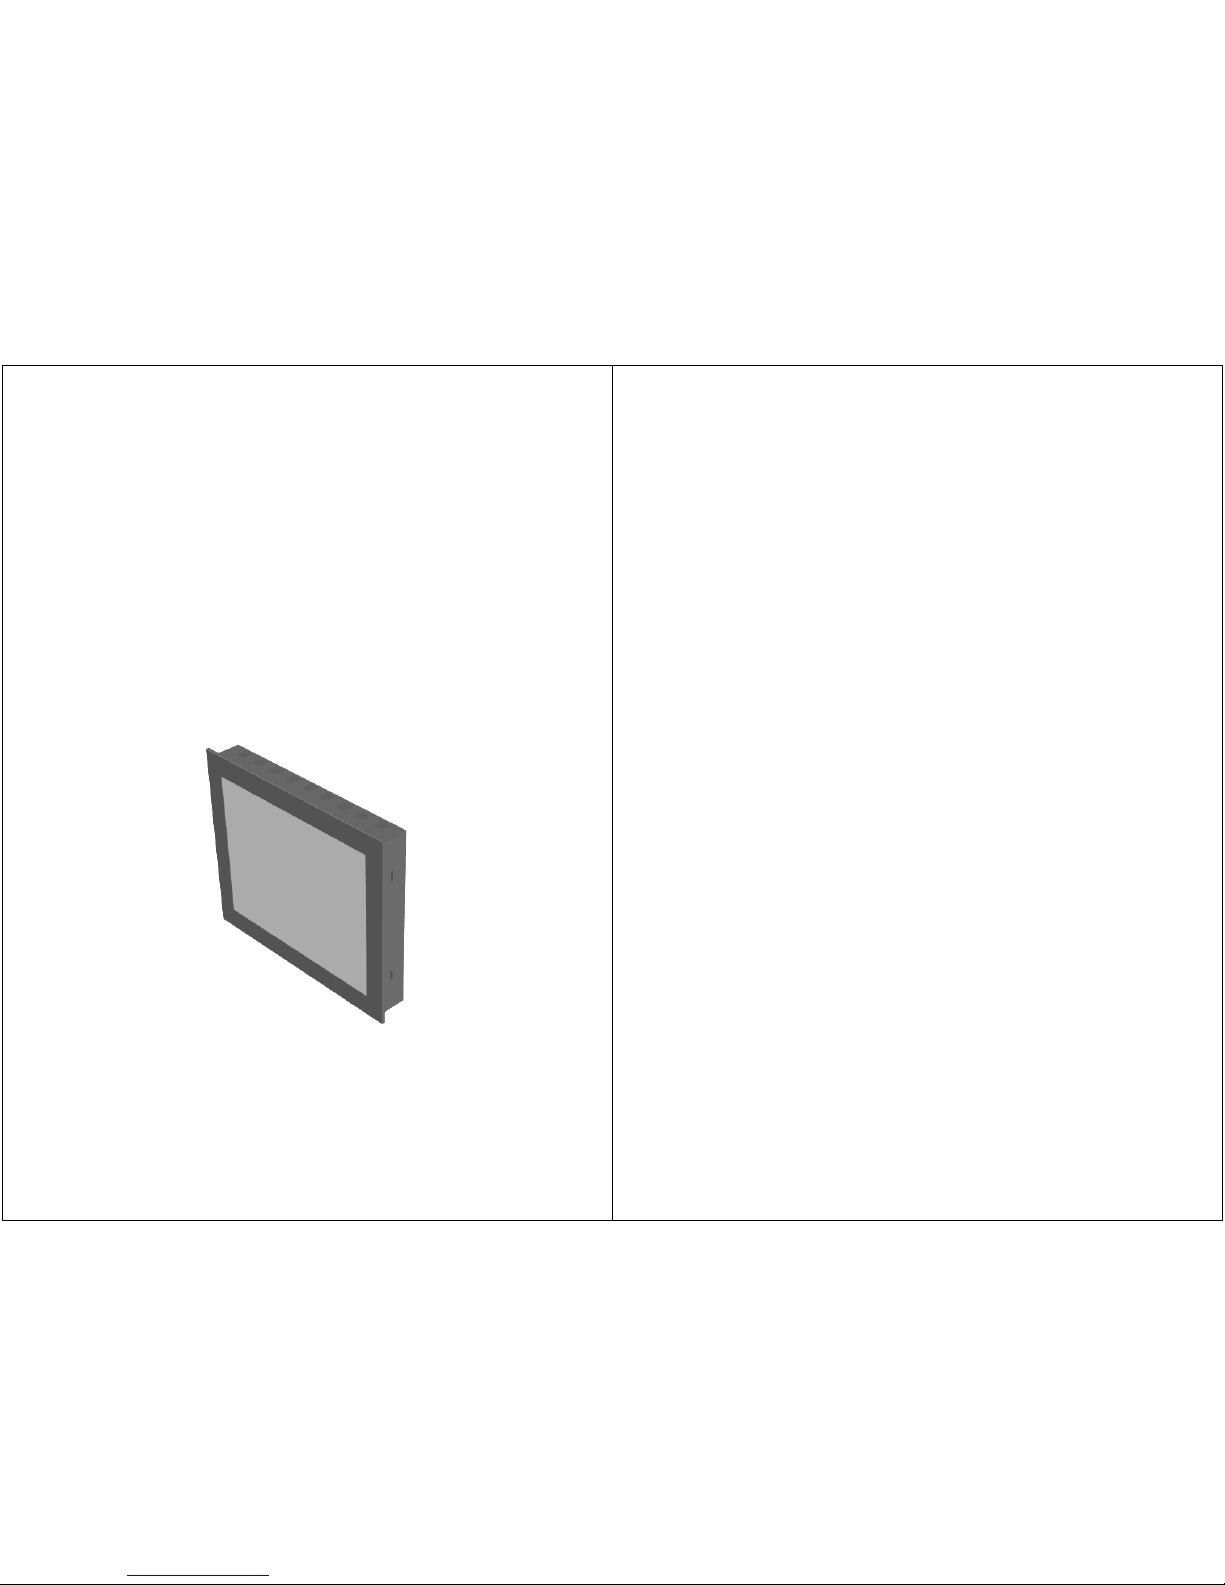
Description
Congratulations on the purchase of your new LUVOX device. Each
LUVOX professional LCD monitor or All-In-One system features a
color active matrix thin-film-transistor (TFT) liquid crystal display
to provide superior display performance with resolutions from
VGA 640x480 to SXGA 1280X1024. Each LUVOX device can be
optionally equipped with a wide range of ELO touch technologies.
The LUVOX product range represents a family of all-steel chassis,
rugged design, industrial LCD flat panel devices.
Standard LUVOX Package Content
Included with a standard LUVOX LCD monitor:
• LUVOX LCD monitor
• 15pin D-sub signal cable (VGA cable)
• Composite video & audio cable
• S-video cable
• AC power cable
• Power adapter (40W minimum)
• USB and/or RS232 touch interface cable (optional)
• ELO drivers CD-ROM (optional)
• Front mount brackets
• Screw set (4xM4x30, 4xM4x12, 8xM3x6)
Included with a standard LUVOX all-in-one system:
• LUVOX All-in-one system
• AC power cable
• Power adapter (60W minimum)
• Driver CD-ROM(s)
• Front mount brackets
• Screw set (4xM4x30, 4xM4x12, 8xM3x6)
• Additional model dependent accessories
- 4 -
Standard Product Features
Standard LUVOX LCD monitor
• 16M High contrast colors up to SXGA 1280X1024.
• Compatible with VESA standard and DDC1/DDC2B
• VGA, audio, composite video, S-Video signal inputs
• OSD and auto-color & -tracking control
• Display Power Management Signaling (VESA PDMS)
• Touch screen interface (optional)
• VESA 75/100mm Mounting
• Integrated 4 Watt Stereo amplifier for kiosk purpose
• All-steel rugged design
standard LUVOX All-In-One system
• 16M High contrast colors up to SXGA 1280X1024
• Integrated Socket 478 industrial MINI-ITX board
• Intel Pentium® M or Celeron® M based platform
• 400MHz FSB
• DDR SDRAM 200/266/333 MAX 1GB
• 10/100 Base-TX Ethernet, 4x USB 2.0, AC97
• 2x RS232, 1x Parallel port, 1x 1394, PS/2, Audio
• Type II True IDE Mode CF Socket(s) (optional)
• Touch screen operation
• VESA 75/100mm Mounting
• All-steel rugged design
More detailed information about the integrated MINI-ITX
embedded board can be found in the installation guide which is
delivered as documentation with your LUVOX all-in-one system.
More detailed information about ELO and the optionally integrated
touch screen technologies can be found on the ELO website:
www.elotouch.com
- 5 -
Cleaning
• Clean with a soft damp cloth
• Use non-ammonia glass cleaners
Precautions
• Read instructions carefully
• Opening or removing covers may expose you to dangerous
shock hazards or other risks.
• Handle with care when transporting and save packaging
• Do not block vent holes. Do not insert sharp objects or spill
liquid into the device. They may cause accidental fire, electric
shock, or failure.
• Do not attempt to service this product yourself.
• Do not remove the ground prong from the adapter or the AC
power plug.
• Do not disconnect any cables from a device in operation
• Make sure power source voltages are correct when not using
the standard power adapters.
• Place the device in a ventilated place.
• Ensure that sufficient space is available around the device to
provide air circulation.
• Keep the monitor away from extreme heat, cold, humid or
dusty environments. Avoid direct sunlight and equipment that
generate magnetic fields.
• If the equipment is not used for a long time, disconnect it
from the power source.

- 6 -
LCD Monitor Control Functions
(Chapter applies to standard LUVOX LCD MONITORS Only)
Each LUVOX LCD monitor has an internal microprocessor
dedicated to control display image. This microprocessor has the
capability to adjust the monitor to the source it is attached to.
This auto-adjustment is done when the unit is first installed,
connected and powered up, and each time the video input source
is changed. When the display image is not satisfying, the user can
adjust all settings by entering the OSD (On-Screen-Display) menu
functions with the control keys located on the backside of the
monitor.
LUVOX F100 & F120 LCD monitor series control keys:
(menu – select – power – down – up)
LUVOX F150, F170 & F190 LCD monitor series control keys:
(power – menu – select – down – up)
Key functions
1. Press POWER to turn on the monitor (power LED indicates
green), press POWER again to turn it off.
2. Press SELECT to select input source:
VGA <select> Composite Video <select> S-Video
(power LED indicates red for invalid signal sources)
3. Press UP to run the AUTO-COLOR balance function
4. Press DOWN to run the AUTO-ADJUST image function
(AUTO- functions are only possible in VGA mode)
- 7 -
OSD (On-Screen-Display) function
1. Press MENU to activate the OSD menu
2. Press UP / DOWN to navigate between the primary
functions.
3. Press SELECT to enter one of the primary functions
4. Press MENU to return one level in the menu
5. Press MENU in the main menu to exit OSD and save all
settings in memory.
Color
1. In the main menu select COLOR.
2. Press UP / DOWN to navigate
3. Press SELECT to adjust value with UP / DOWN
4. return to previous level with MENU
Brightness: Adjust intensity level of the image
Contrast: Adjust bright / dark level difference
Color Adjust: Adjust color of the screen’s image
Color Temp: 9300 and 6500 temperature setting
& RGB adjustable user temperature
Image Setting (2nd function in VGA mode)
1. In the main menu select IMAGE SETTING.
2. Press UP / DOWN to navigate
3. Press SELECT to adjust value with UP / DOWN
4. return to previous level with MENU
Clock: Adjust horizontal size of the image
Phase: Adjust focus of the image
Sharpness: Adjust clarity of the image
Video (2
nd
function in video mode)
1. In the main menu select VIDEO.
2. Press UP / DOWN to navigate
3. Press SELECT to adjust value with UP / DOWN
- 8 -
4. return to previous level with MENU
Hue: Adjusts NTSC phase (NTSC only)
Saturation: Adjusts color level (NTSC & PAL)
Sharpness: Calibrate image focus (NTSC & PAL)
Position
1. In the main menu select POSITION
2. Press UP / DOWN to navigate
3. Press SELECT to adjust value with UP / DOWN
4. return to previous level with MENU
H. Position: Adjust horizontal position of the image
V. Position: Adjust vertical position of the image
(H. Position & V. Position have no effect in video mode)
OSD Menu
1. In the main menu select OSD MENU
2. Press UP / DOWN to navigate
3. Press SELECT to adjust value with UP / DOWN
4. return to previous level with MENU
OSD H. Pos: Adjust the horizontal position of OSD
OSD V. Pos: Adjust the vertical position of OSD
OSD Timer: Adjust OSD closing time when no actions
Language
1. In the main menu select LANGUAGE
2. Press UP / DOWN to navigate
3. Press SELECT to adjust value with UP / DOWN
4. return to previous level with MENU
Language: Select desired OSD language
- 9 -
Miscellaneous
1. In the main menu select MISCELANNEOUS
2. Press UP / DOWN to navigate
3. Press SELECT to adjust value with UP / DOWN
4. return to previous level with MENU
Signal Source: Select default input signal source
Reset: Returns all controls to factory settings
Audio: Adjust volume of internal amplifier
Mute: Toggle internal amplifier ON/OFF
Exit
Exit OSD menu
(Press SELECT only once. Otherwise the display mode will be
switched to the next input source)
- 10 -
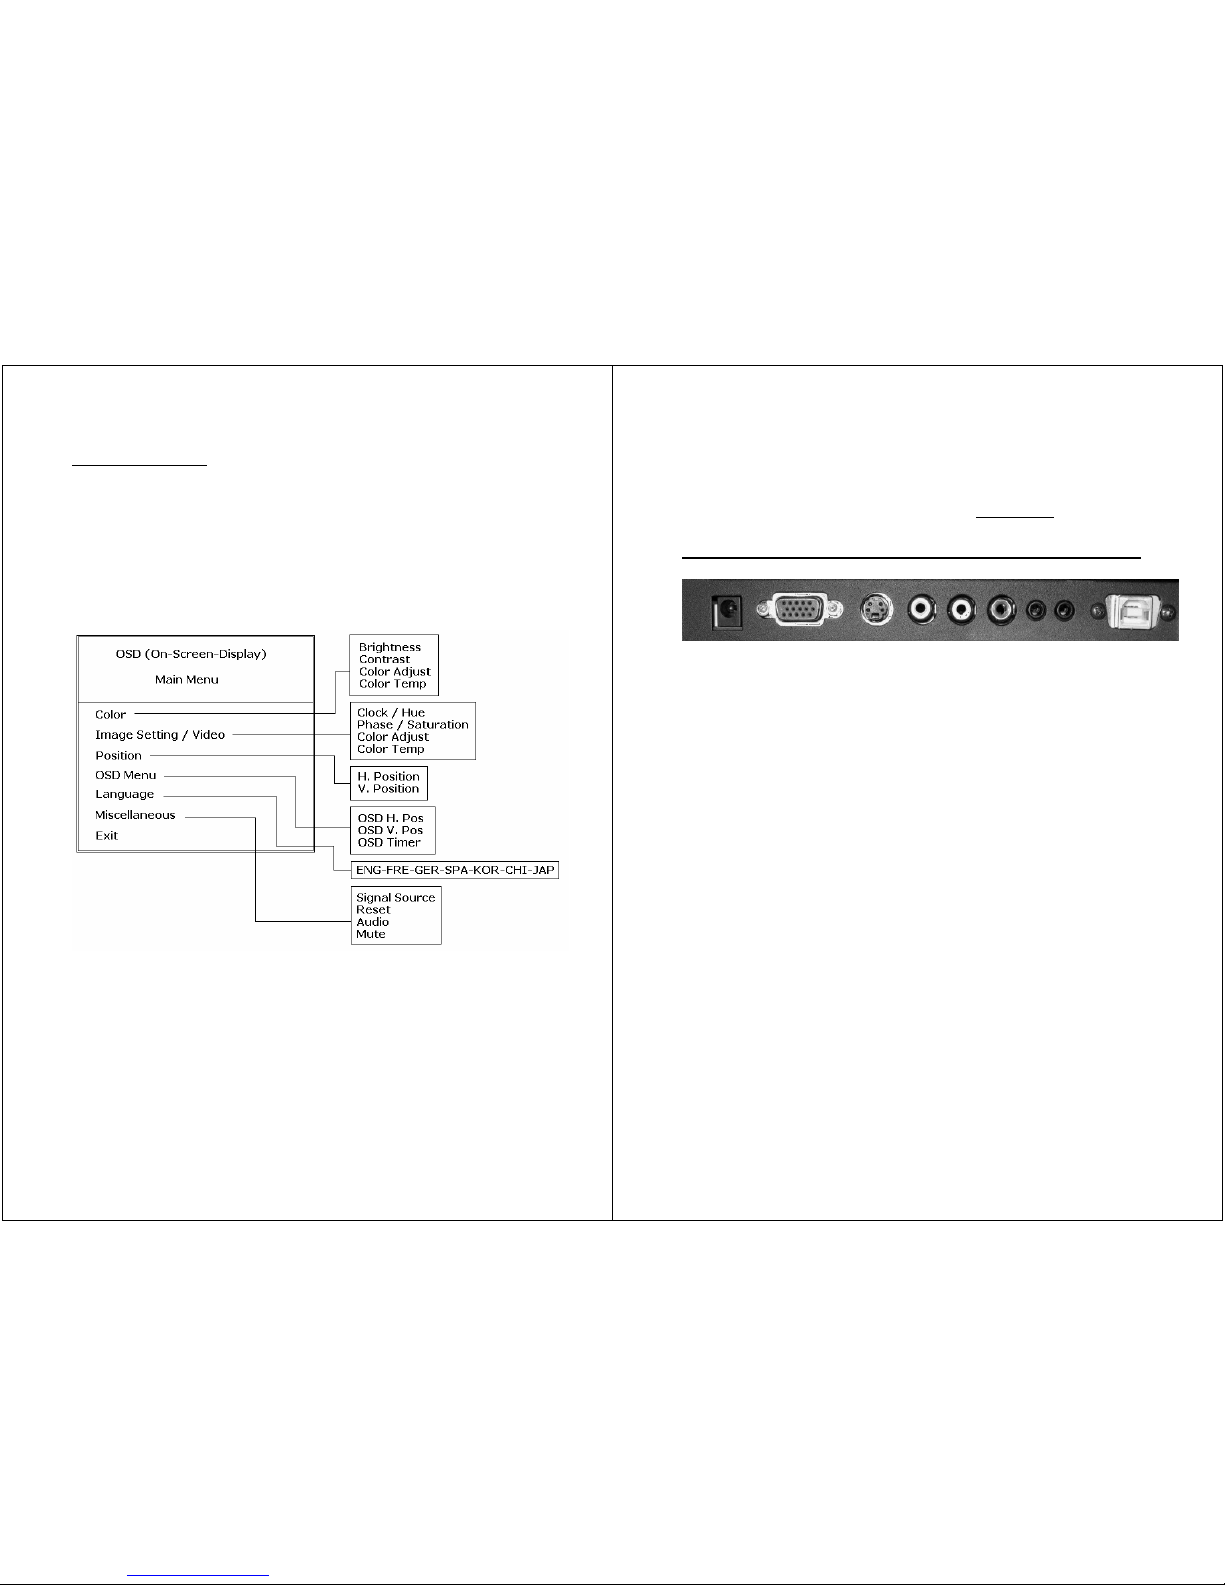
OSD Overview
- 11 -
LCD Monitor Setup
(Chapter applies to standard LUVOX LCD MONITORS Only)
connector layout (standard LUVOX LCD Monitor)
1. DC POWER INPUT: DC 12V jack (center pin +)
2. VGA: This can be connected with the D-Sub 15-pin connector
of any analog VGA RGB source
3. S-VIDEO IN: This can be connected to the S-Video connector
of any video source.
4. VIDEO IN: This can be connected to the RCA connector of
any video source.
5. RCA audio LEFT: left RCA audio input can be connected to
any RCA sound source
6. RCA audio RIGHT: right RCA audio input can be connected to
any RCA sound source
7. LINE IN: this input can be connected to any stereo source
(e.g. a PC sound card).
8. AUDIO OUT: this output can be directly connected to audio
speakers or headphones
9. USB or RS232 port (for touch monitors only): ports to be
connected to your PC for touch functionality.
NOTE: LUVOX professional monitors have a broad range of
optional features available. This means your monitor could have
extra connectors available for different purpose.

- 12 -
Driver installation
Each LUVOX device can be equipped with an ELO touch screen.
The 4 ELO touch technologies adapted in LUVOX devices are:
• ACCUTOUCH (5-wire resistive)
• CARROLLTOUCH (Infrared)
• INTELLITOUCH (Surface acoustic wave)
• SURFACE CAPACITVE (only produced on project basis)
Visit the ELOTOUCH corporate website for more information about
each available technology.
www.elotouch.com/Technologies/default.asp
Each LUVOX LCD monitor powered with an ELO touch screen
comes with an ELO driver CD-ROM in the accessory box. You will
need to install this driver CD-ROM before the monitor becomes
fully functional. Please insert the CD-ROM and follow the
instructions on the screen. After you have installed the driver, you
will be automatically asked to calibrate your monitor. Afterwards,
your monitor is ready to use.
If the driver CD-ROM is lost, damaged or out of date (Cfr use with
WINDOWS VISTA), you can download the latest driver version
from the ELOTOUCH website. Select the correct driver based on
your operating system and touch technology.
www.elotouch.com/Support/Downloads/dnld.asp
- 13 -
Touch Alignment (Calibration)
The touch response must be aligned to the video image (this is
called calibration). Normally this is done when the touch drivers
are initially installed. But in some conditions re-calibration may be
needed, for example after swapping or replacing monitors on the
same machine.
On regular Windows systems the Alignment/Calibration utility is
run from the Control Panel. This calibration procedure is also valid
on a LUVOX All-In-One system.
• Click the Start button.
• Select Settings, then Control Panel (on later operating
systems the Settings step is omitted)
• Open the Elo applet by double-clicking the Elo icon.
• On Windows XP it may be necessary to click the Show Classic
View button to see the Elo icon.
• The Alignment/Calibration button is always on the General tab
of the Elo Control Panel tab set
• Click the button, touch target in the upper left corner.
• The target will reappear in the lower right corner
• Touch the upper right target.
• The next screen is an alignment check. Touch various
positions and check the cursor movement.
• Clicking the redo arrow icon will display the targets again to
rerun the alignment routine.
• You must click the Accept button to store the new alignment
points.
NOTE: You may find other interesting features in the ELO control
panel regarding sounds, right mouse click emulation, etc…
- 14 -
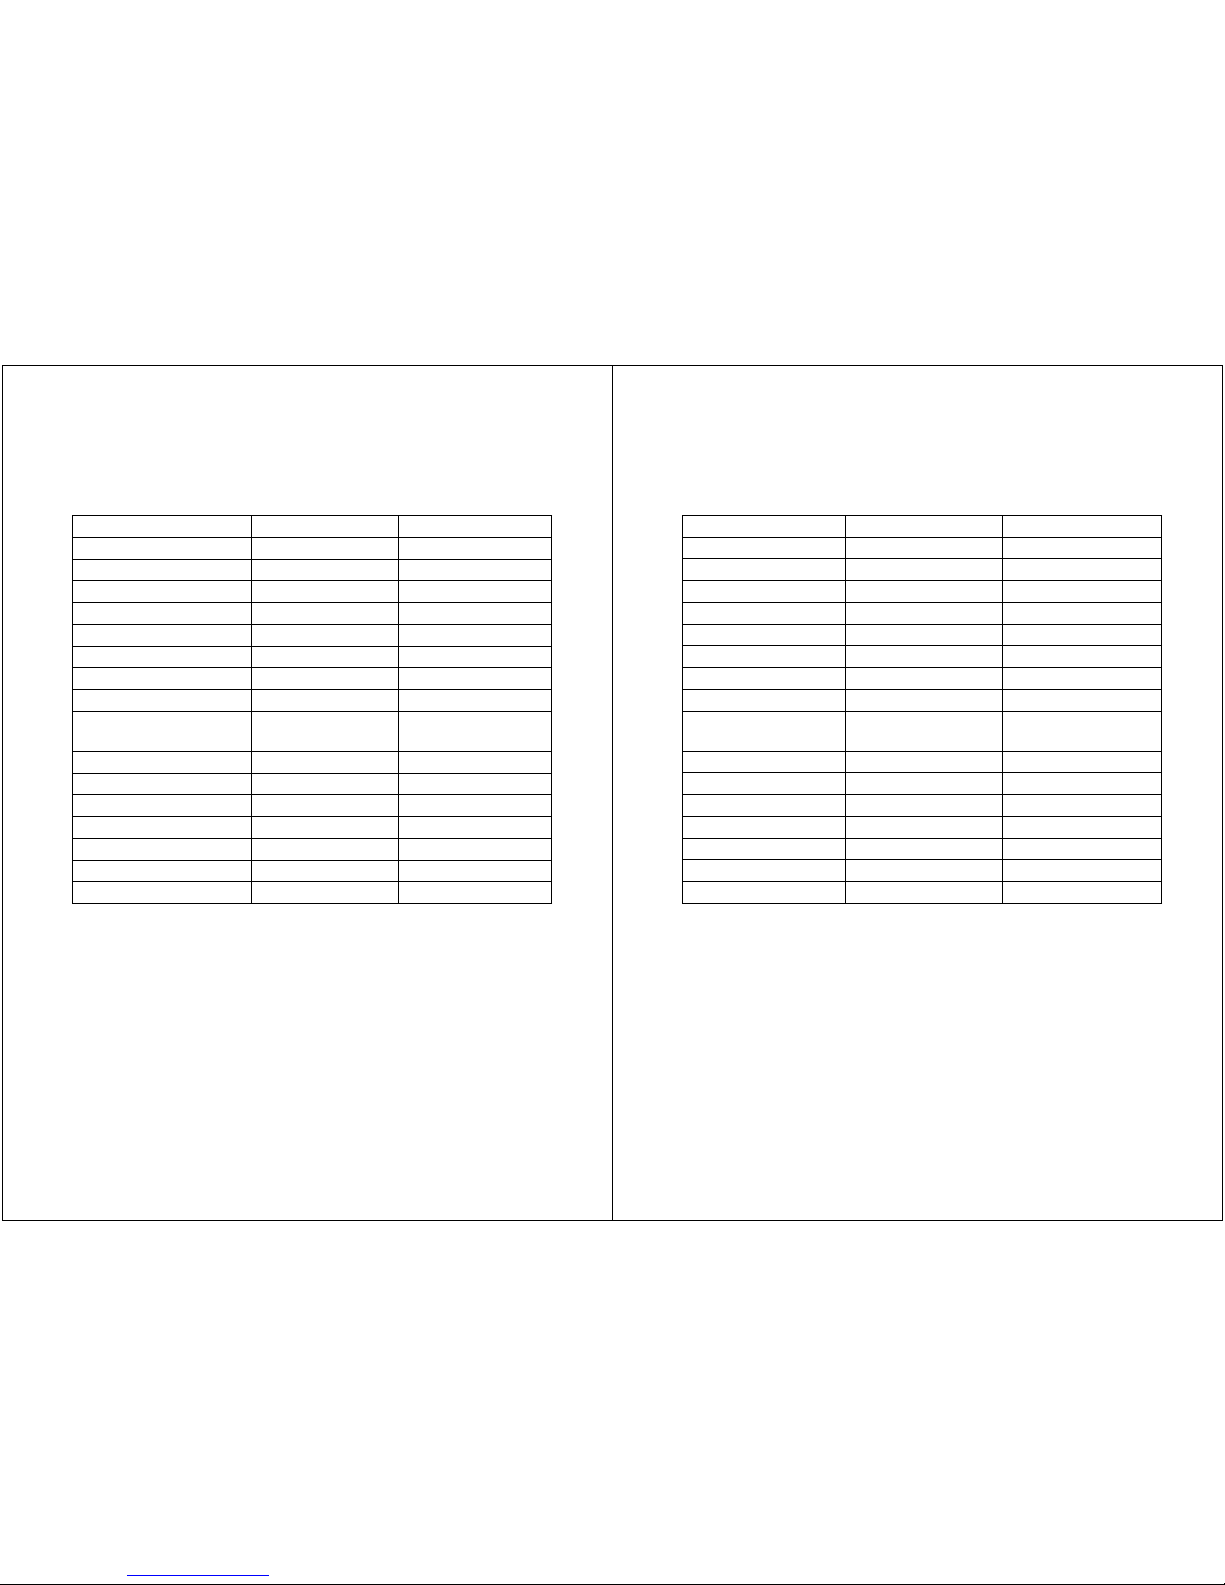
LCD Monitor Specifications
Specification/Model Standard F100 Standard F120
Panel Type VGA TFT SVGA TFT
Recommended Res. 640x480 800x600
Screen Diagonal Size 10.4 12.1
Display Colors 6bit 262K colors 6bit 262K colors
Brightness (Cd/m²) 400 400
Contrast ratio (X : 1) 300 500
Viewing angle L/R/U/D 60/60/40/50 60/60/40/55
Display Area (mm) 211.2x158.4 246.0x184.5
Input Signals
VGA, Comp & S-
video
VGA, Comp & S-
video
Power Consumption 30 Watt Max 36 Watt Max
Operating temp. 0-50°C 0-50°C
Storage temp. -20°C to 65°C -20°C to 65°C
Operating humidity 10-90% ** 10-90% **
Dimension (Standard) 289x236.4x43 319.5x260x45
Weight (kg) 2.5 – 4 3.2 – 4.6
** NOTE: Non Condensing
- 15 -
Standard F150 Standard F170 Standard F190
XVGA TFT SXVGA TFT SXVGA TFT
1024x768 1280x1024 1280x1024
15.0 17.0 19.0
16M Colors 16M Colors 16M Colors
300 300 300
550 800 800
80/80/80/80 80/80/70/70 89/89/80/80
304.1x228.1 337.9x270.3 376.3x301
VGA, Comp & S-
video
VGA, Comp & S-
video
VGA, Comp & S-
video
40 Watt Max 40 Watt Max 40 Watt Max
0-50°C 0-50°C 0-50°C
-20°C to 65°C -20°C to 65°C -20°C to 65°C
10-90% ** 10-90% ** 10-90% **
382x302x56 411x348x60 460x392x64.6
4.2 – 5.9 5.5 – 7.2 5.7 - 8.5
** NOTE: Non Condensing
- 16 -
LUVOX AIO (All-In-One) systems
Description
LUVOX models F150, F170 and F190 can be equipped with a
MINI-ITX embedded industrial grade motherboard. This creates
major advantages compared with traditional setups of PC and
monitors connected over VGA like smaller application designs and
reduced hardware costs. AIO image quality is also way above that
of a traditional VGA setup because the LCD component inside the
device interfacing with the motherboard on a digital level which
creates the clearest image possible.
Another advantage specific for LUVOX AIO systems is their broad
spectrum of possible ELO touch screen technologies. ELO touch
screens are available for a wide variety of uses, from point of sale
to kiosks, medical and industrial equipment, and gaming systems.
ELO is the global standard in high-end quality touch components
for over 30 years and includes reliability, accuracy, clarity and
responsiveness.
- 17 -
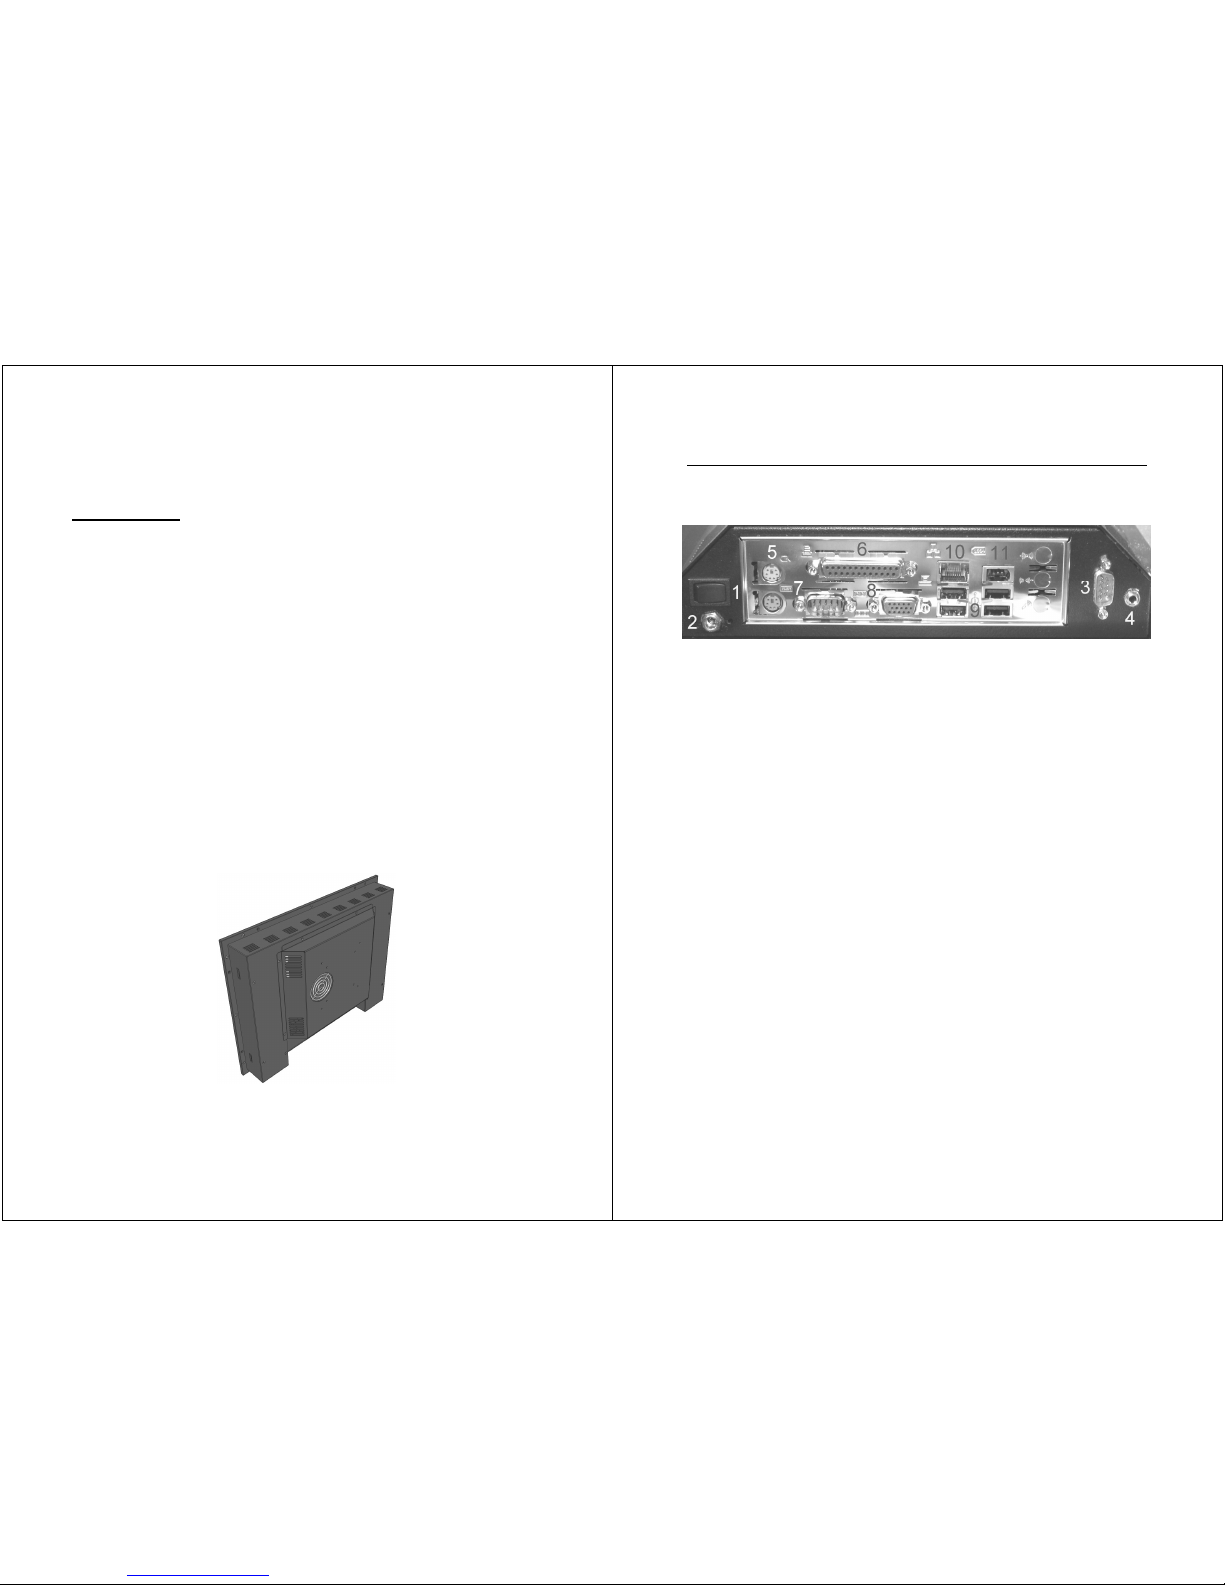
Connector Layout (standard LUVOX AIO system)
(Chapter applies to standard LUVOX All-In-One systems only)
1. POWER ON toggle switch (connected to main board)
2. DC POWER jack (Center pin +)
3. RS232 port - COM2
4. AUDIO (stereo line-out)
5. PS/2 Keyboard & mouse
6. PARALLEL port LPT1
7. RS232 port – COM1
8. VGA out (For Independent 2
nd
VGA monitor)
9. USB 2.0 (4x)
10. ETHERNET
11. FIREWIRE
NOTE: LUVOX AIO systems have a broad range of optional
features available and are frequently build in project based
custom series. This means your monitor could have extra
connectors available for different purpose.
 Loading...