

Page 1
LUVION Premium Baby products
SUPREME CONNECT
1
HANDLEIDING
INSTRUCTION MANUAL
Page 2

2
HANDLEIDING
INHOUDSOPGAVE
INTRODUCTIE 2
VEILIGHEIDSINSTRUCTIES 2
INHOUD VAN DIT PAKKET 3
ACCESSOIRES 3
OVERZICHT OUDER UNIT MONITOR 4
OVERZICHT BABY UNIT CAMERA 7
KLAARMAKEN VOOR GEBRUIK 9
MENU 13
PAIRING 19
PLAYBACK 21
PROBLEEM & OPLOSSING 22
TECHNICAL SPECIFICATIONS 23
INTRODUCTIE
Hartelijk dank voor uw aanschaf van de Luvion Supreme Connect. Vanaf nu kunt u uw baby horen én zien, zelfs tot
4 camera’s tegelijk. Zorg ervoor dat u altijd uw originele aankoopbewijs bewaart. Voor garantiegevallen zal u altijd
gevraagd worden om een kopie van uw aankoopbewijs te tonen. Voor garantiegevallen kunt u contact opnemen
met de Luvion dealer, of met de lokale Luvion vertegenwoordiger.
Meer informatie kunt u vinden op www.luvion.com
Deze handleiding verzorgt alle nodige informatie om veilig en met plezier gebruik te kunnen
maken van deze Luvion Supreme Connect babyfoon. Voordat u de babyfoon gebruikt adviseren wij u deze
handleiding aandachtig door te lezen. Wij vragen uw extra aandacht voor de veiligheidsinstructies.
LUVION
Delft, Nederland
www. luvion.com
VEILIGHEIDSINSTRUCTIES
- Houd kleine onderdelen weg van kinderen.
- Dit product is geen speelgoed. Laat kinderen er niet mee spelen.
- De babyfoon is geen vervanging van ouderlijk toezicht.
- Gebruik alleen de oorspronkelijk meegeleverde adapters.
- Gebruik de babyfoon niet in een vochtige omgeving of nabij water.
- Zorg dat de babyunit en het snoer van de adapter altijd minimaal 1,5 meter van de baby
- verwijderd zijn.
- Gebruik de babyfoon bij een temperatuur tussen 10°C en 35°C
- Demonteer nooit zelf de ouder- of babyunit. Dit dient door gekwali ceerd personeel te
gebeuren
Batterijen:
- Zorg ervoor dat bij het eerste gebruik de Supreme Connect volledig is opgeladen. Dit garandeert een
optimale levensduur van de batterij.
Page 3
LUVION Premium Baby products
INHOUD VAN DIT PAKKET
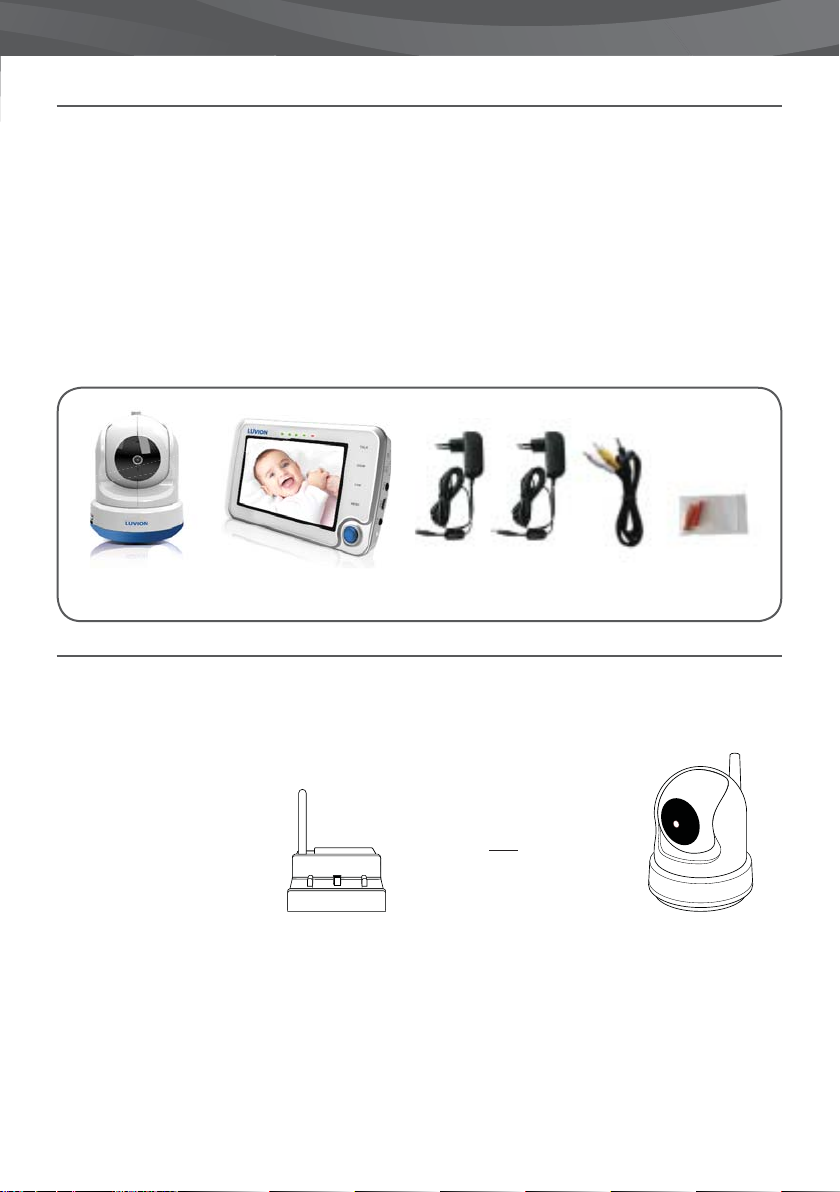
De Supreme Connect bevat de volgende onderdelen:
- 1 x ouder unit (monitor)
- 1 x baby unit (camera)
- 1 x adapter voor de ouder unit
- 1 x adapter voor de baby unit
- 1x baby unit montageframe
- 1 x set muur pluggen and schroeven
- 1 x RCA kabel (TV-Out)
Controleer of in uw pakket alle onderdelen aanwezig zijn.
3
RCA kabel
Baby Unit (Camera) Ouder Unit (Monitor) Adapters
ACCESSOIRES
De volgende accessoires zijn teven beschikbaar voor de Luvion Supreme Connect:
WIFI BRIDGE*
De Luvion Supreme Connect
WIFI Bridge geeft u de
mogelijkheid om de monitor
aan het internet te verbinden.
Zo kunt u video ontvangen
overal en waar u maar wilt; op
uw pc, laptop of telefoon.
*nog niet beschikbaar
EXTRA CAMERA’S
De Luvion Supreme Connect
ondersteund het gelijktijdige
gebruik tot vier camera’s. Zo
kunt u meerdere kinderen of
kamers tegelijk in de gaten
houden.
Pluggen, schroeven
& montageframe
Page 4
4
OVERZICHT OUDER UNIT MONITOR
21 3
VOORAANZICHT
TALK
ZOOM
CAM
MENU
4
5
6
7
8
9
10
ACHTERAANZICHT
12 1311
Page 5
LUVION Premium Baby products
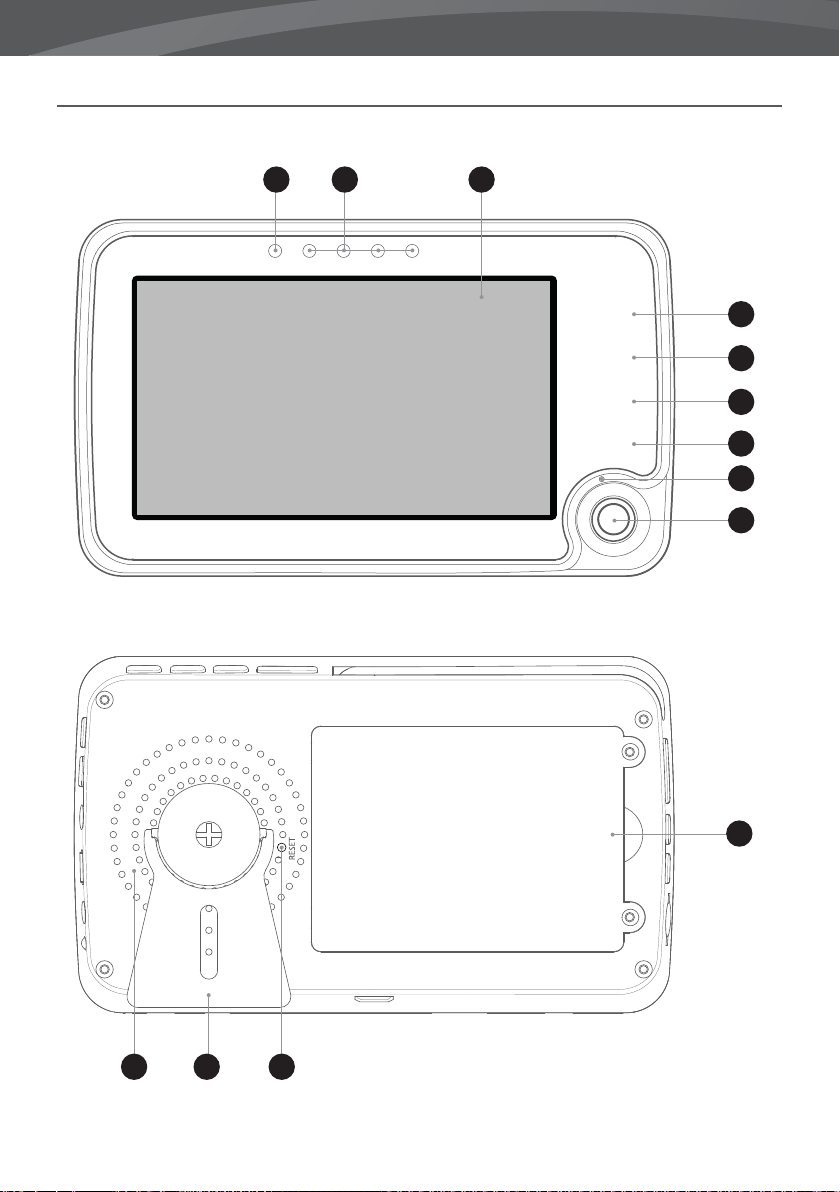
1. Power LED - Geeft aan of de monitor stroom krijgt. Indien de unit aan is, zal deze groen zijn. De LED zal
gaan knipperen wanneer de batterijen bijna op zijn. Gebruik de bijgeleverde adapter om de monitor
weer op te laden.
2. Geluidsindicator- Deze LED’s geven het geluidsniveau aan dat gedecteerd wordt door de camera. De
hoeveelheid LED’s geven het geluidsniveau aan. Zo kunt u het geluidsniveau in de kamer van uw kind in
de gaten houden, zelfs als het geluid van de ouder unit uitgeschakeld is.
3. Scherm - 4,3” TFT LCD Screen.
4. Talk-optie - Houd deze knop ingedrukt om te spreken via de baby unit met uw kind, bijvoorbeeld om
hem/haar gerust te stellen. Zodra het spreek icoon
U kunt het volume verhogen door gebruik te maken van het volumewiel op de baby unit. Indien u
gebruik maakt van meerdere camera’s, dan zal u spreken door de unit die op dat moment op uw scherm
weergegeven wordt.
5. Zoomknop- Druk op deze knop om in te zoomen op uw scherm, waarna het beeld 2 keer wordt
uitvergroot. Wanneer de video is uitvergroot kunt u met de joystick navigeren. Druk weer op zoom om
de zoom modus te verlaten.
LET OP: Het is niet mogelijk om met de camera te navigeren met de joystick wanneer u hebt ingezoomd (te
herkennen aan het ‘2X’ symbool). Druk weer op zoom om deze modus te verlaten.
6. Camknop - Druk op de Cam knop om tussen verschillende, aangesloten camera’s te wisselen. De
kanaalindicator geeft een nummer aan elk signaal.
7. Menuknop - Gebruik de menuknop om het hoofdmenu weer te geven. Druk op de
knop om het menu weer te sluiten (of een niveau hoger te gaan in het menu) zonder
gegevens op te slaan.
8. Microfoon - Ontvangt het geluid rondom de monitor en stuurt het naar de baby unit
(camera) wanneer de ‘Talk’ knop is ingedrukt.
9. Joystick - Gebruik de joystick om de camera van de babyunit te bewegen of te
navigeren binnen het menu. Druk op de joystick om een selectie te bevestigen en uw
instellingen te bewaren.
zichtbaar is, kunt u beginnen met spreken.
5
BOVENAANZICHT
ONDERAANZICHT
14 15
19 20
16 17 18
Page 6
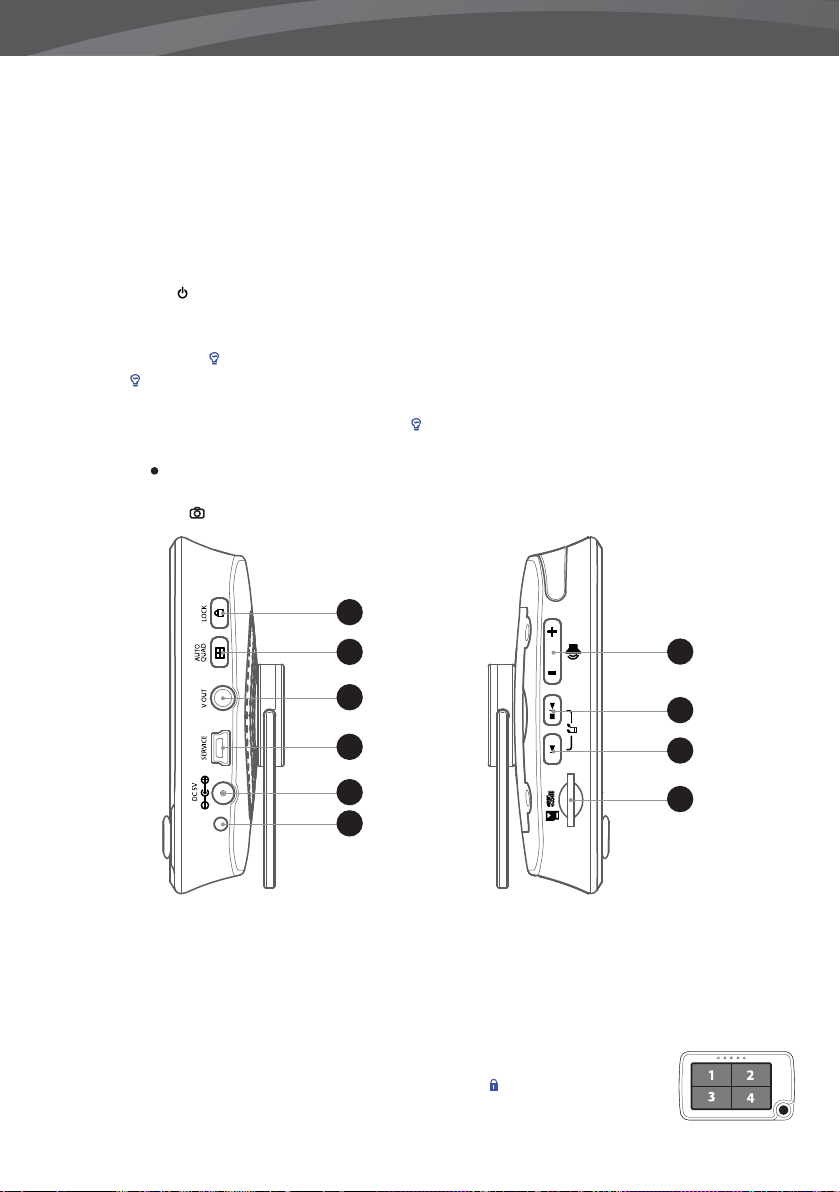
6
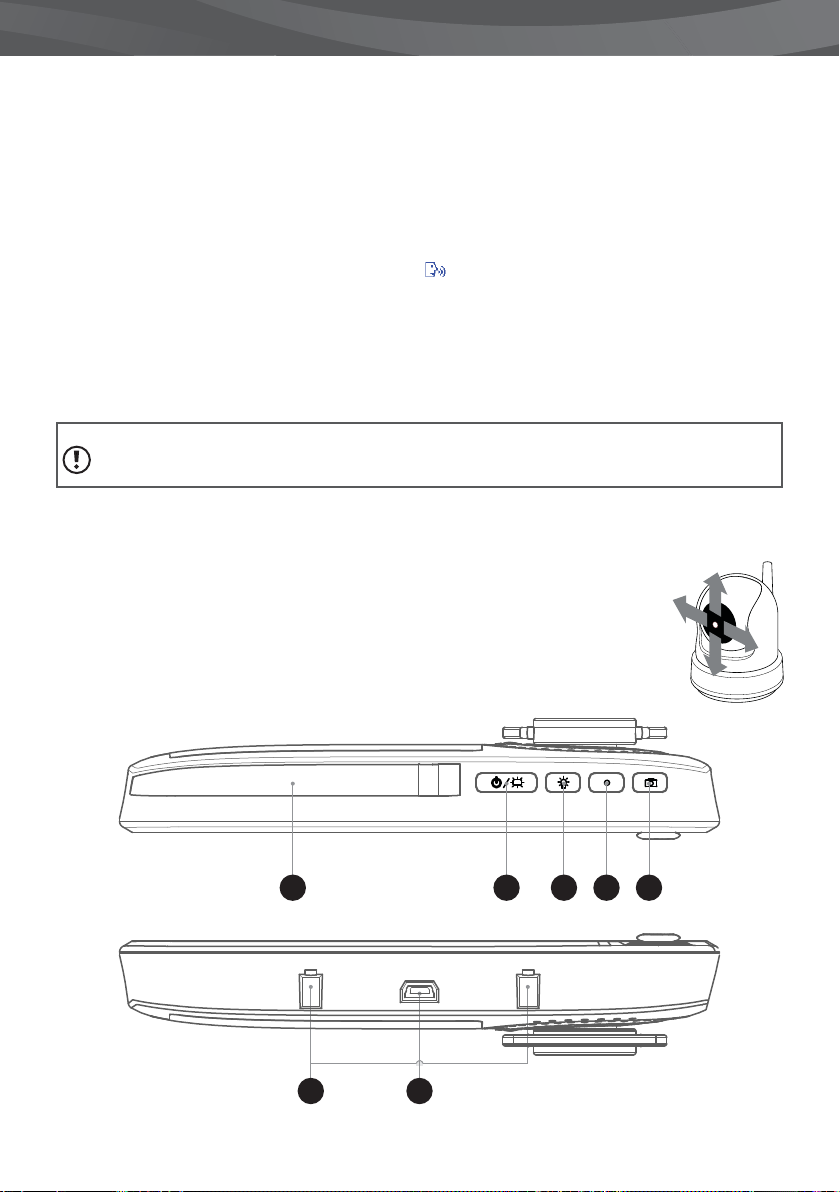
10. Batterijcompartement - U mag de batterij alleen vervangen met een o ciele Luvion Supreme Connect
batterij. Uw garantie komt te vervallen als u een andere batterij gebruikt.
11. Speaker - Verzorgt het geluid dat wordt ontvangen van de babyunit. Gebruik de volumeknoppen (27)
om het volume te veranderen.
12. Voet – U kunt de voet gebruiken om de monitor rechtop te houden.
13. Resetknop – Gebruik een paperclip om deze knop in te drukken in het geval dat uw ouder unit
vastloopt. Gebruik vervolgens de Aan/Uit knop om de ouder unit te resetten.
14. Antenne - Stuurt/Ontvangt signaal van de babyunit.
15. Aan/Uitknop
wanneer de ouder unit aan staat om de ‘audio-only’ modus te activeren. (Zet het scherm uit om batterij
te sparen).
16. Nachtlichtjeknop - Onze baby units zijn uitgerust met een speciaal nachtlichtje voor uw kind. Druk
op de ‘ ’-knop om op afstand het nachtlichtje van de baby unit te (de-)activeren (wanneer er meerdere
camera’s in gebruik zijn zal het nachtlichtje geactiveerd worden van de unit die op dat moment op uw
scherm weergeven wordt). Het nachtlicht-icoon ( ’) verschijnt op uw scherm wanneer deze geactiveerd
is.
17. Recorder - Gebruik deze knop om een video recording te starten. Een micro SD-card is vereist om deze
op te slaan. Wanneer men aan het opnemen is zal er een recorder icoon op het scherm verschijnen.
18. Snapshotknop - Gebruik deze knop om een foto te maken. Een micro SD-card is vereist om deze op te
- Druk en houd deze knop in om de ouderunit aan/uit te zetten. Druk kort op deze knop
21
22
23
24
25
26
SIDE VIEW SIDE VIEW
slaan.
19. Wi- Bridge connectors - Zorgt ervoor dat de ouder unit correct geplaatst kan worden in de optionele
Wi- Bridge.
20. Mini USB port - Verbinding voor de optionele Wi- Bridge.
21. Blokkeerknop - Blokkeert de touch interface op de voorkant van de ouderunit (monitor)
om onbedoelde veranderingen te voorkomen. Een sloticoon verschijnt op uw scherm
indien actief.
27
28
29
30
Page 7
LUVION Premium Baby products
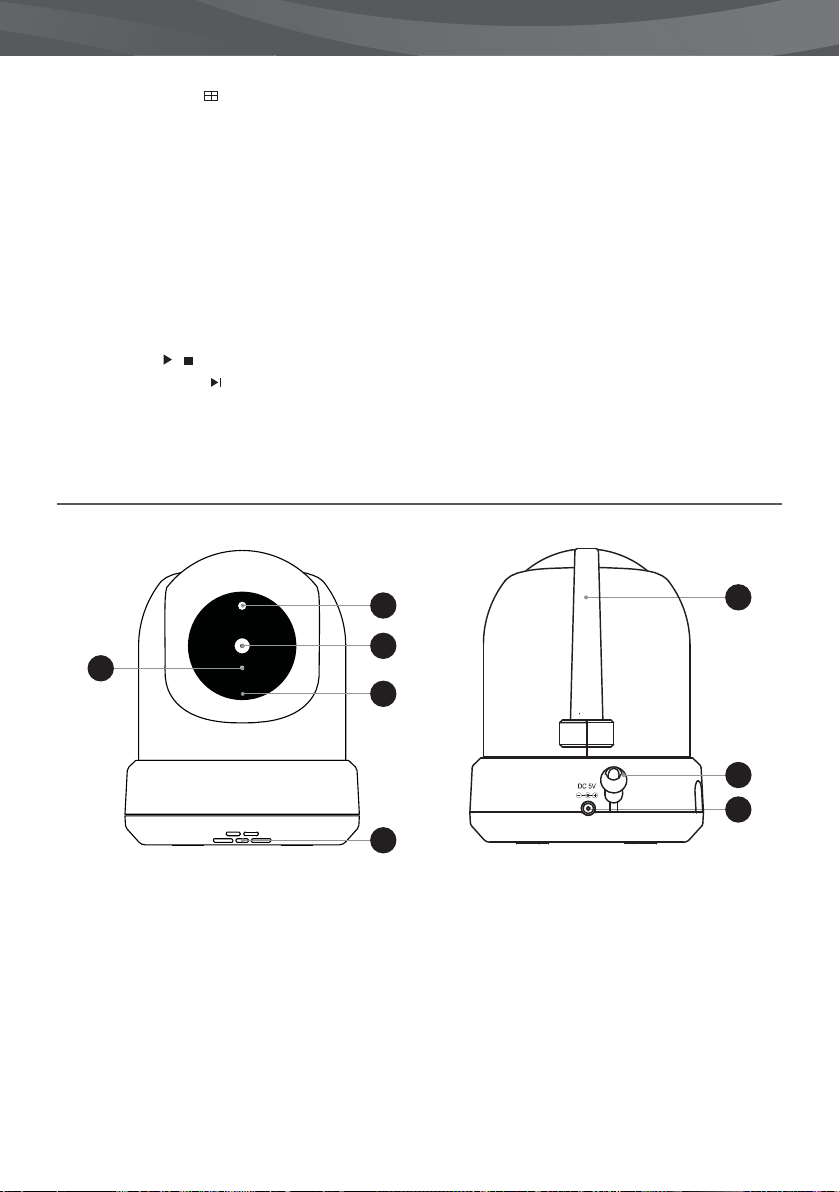
22. Quad/Auto knop - De ouder unit is uitgerust met een ‘quad-camera’ functie. Deze functie maakt het
mogelijk om gelijktijd 4 baby units (camera’s) te volgen. Druk eenmalig om te activeren. Druk nogmaals
om automatisch elke 3 seconden tussen baby units te wisselen.
wanneer de monitor in Quad/Auto mode staat.
23. AV-Out - De Audio / Video socket maakt het mogelijk om de ouder unit aan te sluiten op uw televisie met
behulp van de bijgeleverde kabels.
24. Service-Port - Verbindt de ouder unit met uw computer via een USB-kabel voor eventuele rmware
updates.
25. Power input - Input voor de bijgeleverde Luvion adapter 5V-1.5A.
26. Oplader LED - Wordt rood wanneer de batterij opgeladen wordt. Wanneer deze opgeladen is, zal hij naar
groen springen.
27. Volume knop - Zet het geluid van ouder unit Luider/Zachter.
28. Play/Pause
29. Next Song button - Hiermee kiest u het volgende slaapliedje.
30. Micro SD Slot - Druk een Micro SD card (Niet bijgeleverd) in dit slot om zo de video en foto
mogelijkheden te activeren. De ouder unit ondersteunt Micro SD cards tot 32 GB geheugen.
/ - Play/Stop een melodie, de baby unit speelt automatisch alle melodietjes af.
OVERZICHT BABY UNIT CAMERA
LET OP: Er is geen geluid beschikbaar
7
2
3
6
4
LUVION
5
BACK VIEWFRONT VIEW
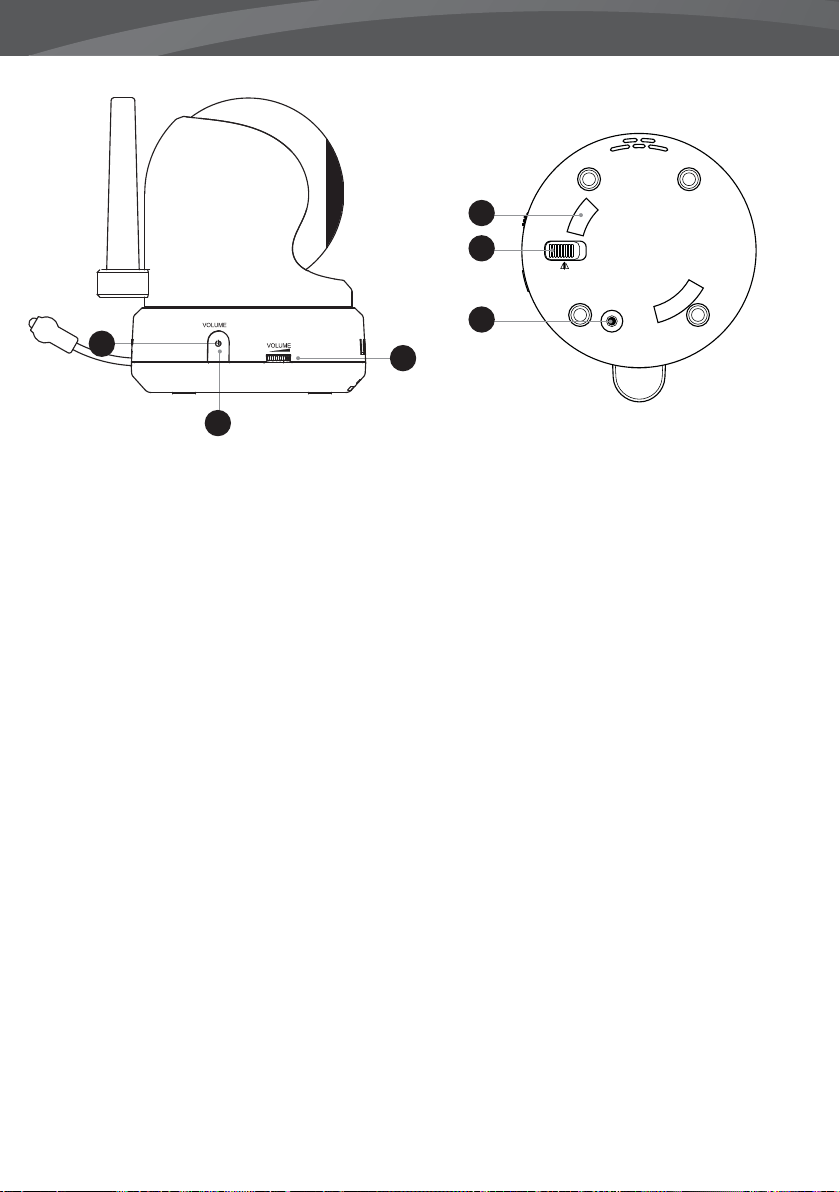
1. Temperatuursensor - De gemeten temperatuur wordt weergeven op het scherm van de ouderunit.
2. Lichtsensor - Corrigeert het beeld wanneer het licht van de omgeving verandert.
3. Cameralens - Registreert het beeld .
4. Microfoon - Ontvangt het geluid.
5. Speaker - Maakt het mogelijk om met uw kind op afstand te praten.
6. IR LED’s - Geeft 5m nachtzicht . De LED’s worden automatisch geactiveerd in een donkere omgeving.
7. Antenne - Stuurt en ontvangt data van de ouder unit.
8. Power input - Input voor de Luvion adapter 5V 1.5A
9. Volume - Wiel om het door de baby unit geproduceerde geluid aan te passen.Heeft alleen e ect op de
baby unit, bv. het volume van een melodietje of de ‘Talk’-functie.
7
1
8
Page 8
8
12
13
11
14
9
PAIR
10
BOTTOM VIEWSIDE VIEW
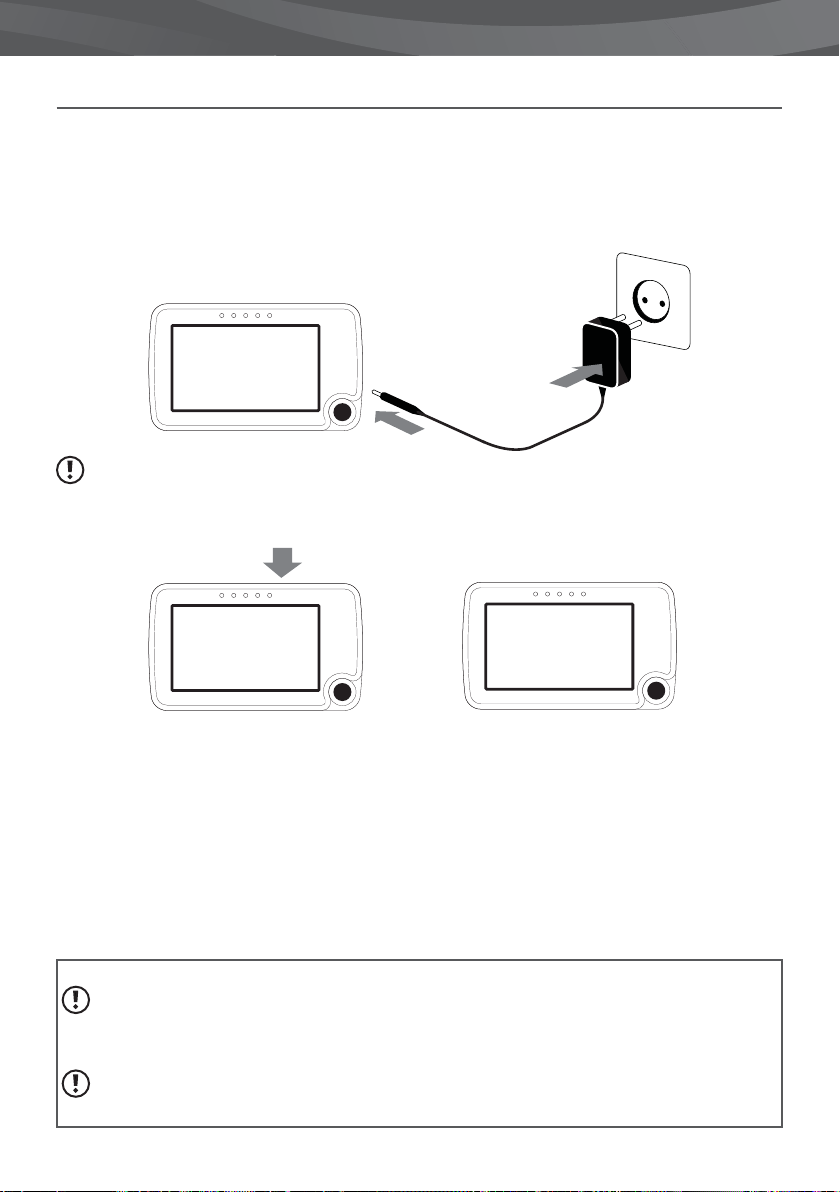
10. On/O knop - Houd deze knop ingedrukt om de baby unit aan of uit te zetten.
11. Power LED (Groen) - Geeft aan of de camera aan staat.
12. Mounting frame connectoren - Verbindt de baby unit met de bijgeleverde mounting frame welke
bevestigd kan worden aan muur of plafond.
13. Plafond switch - Zet het beeld ondersteboven. Gebruik deze schuifknop als u de baby unit op zijn kop
gebruikt, bv bij bevestiging aan het plafond.
14. Pairing button -Maakt een nieuwe verbinding tussen de baby unit en ouder unit wanneer het ‘pairing
proces’ in werking gesteld is. Pairing wordt gebruikt bij het toevoegen van een extra camera, of
wanneer de ouderunit de babyunit niet kan vinden (Buiten Bereik). Zie het Pairing hoofdstuk voor meer
informatie.
Page 9
LUVION Premium Baby products
KLAARMAKEN VOOR GEBRUIK
OUDER UNIT MONITOR
1. Haal voorzichtig de ouder unit (monitor) uit de verpakking.
2. Verbind de monitor met de bijgeleverde adapter, waarna de ouder unit zich zal opladen. Indien juist
aangesloten, zal de Oplader-LED rood branden. Deze Led zal op groen springen zodra de ouder unit
volledig is opgeladen. Laad de ouder unit bij het eerste gebruik volledig op.
L
ET OP: Laad de ouder unit volledig op bij eerste gebruik.
3. Houd de aan/uit knop ingedrukt. Het scherm zal nu het Luvion logo weergeven.
9
LUVION
BABY UNIT CAMERA
Bepaal eerst goed waar u de baby unit plaatst voordat u de unit gaat gebruiken. Probeer rekening te houden
met de lengte van de adapter snoeren en een beschikbaar stopcontact om zo de camera van stroom te
voorzien.
1. Haal de baby unit voorzichtig uit de verpakking.
2. Plaats of bevestig de baby unit. U kunt de baby unit plaatsen op een tafel of kastje of hem bevestigen
aan een muur of plafond met de bijgeleverde mounting frame, plugs en schroeven.
LET OP: Wees er zeker van, voordat u de baby unit permanent bevestigt, dat de draadloze verbinding tussen
de baby unit en de ouder unit voldoende is.Controleer dit door beide units te plaatsen op plek waar u ze wilt
gebruiken.
LET OP: Probeer dikke muren of andere obstructies to mijden tussen de baby- en ouderunit. Voor een goede
geluidsgevoeligheid en beeld raden wij aan om een afstand van minimaal 1,5 meter tussen kind en camera
te houden.
Page 10
10
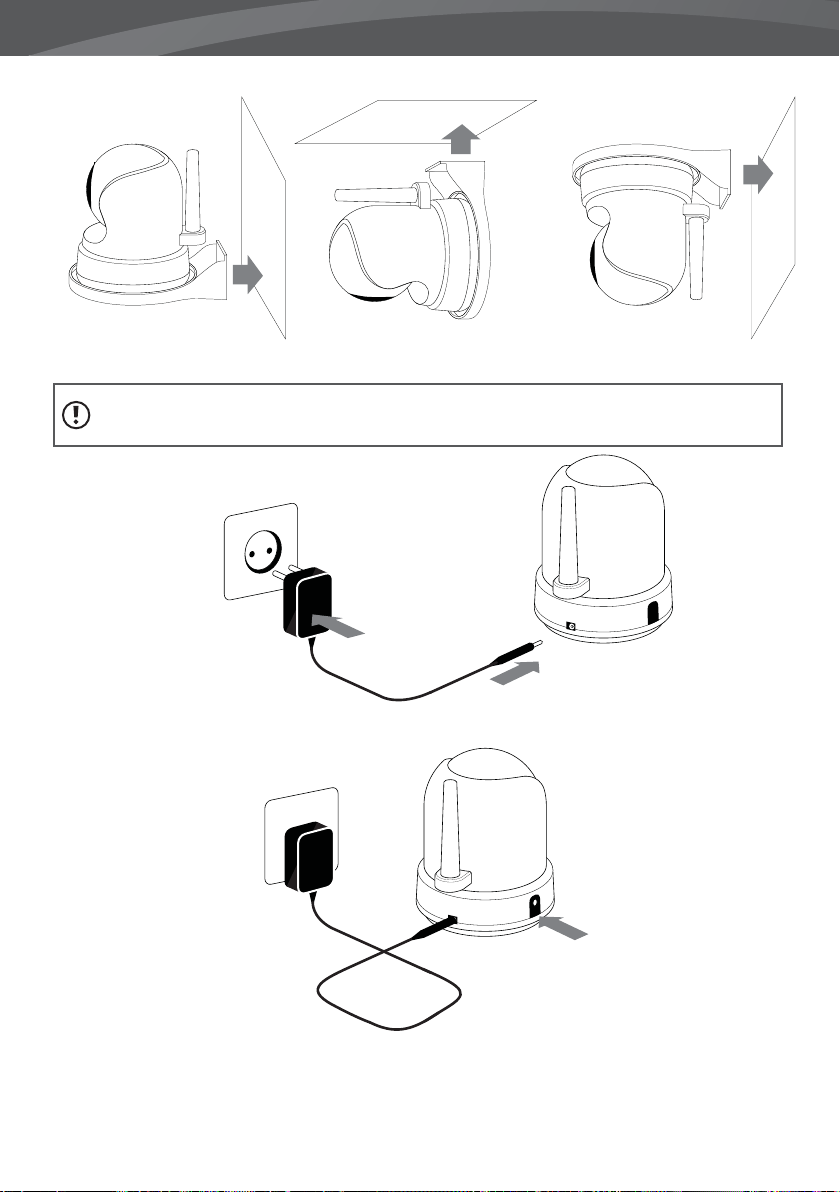
Muurbevestiging Plafondbevestiging Plafondbevestiging (Op zijn kop)
LET OP: Als u de baby unit op zijn kop aan het plafond wilt monteren, gebruik dan eerst het plafond switch
aan de onderkant van de camera om het beeld te corrigeren.
3. Verbind de adapter met de powerinput van de baby unit.
4. Houd de aan/uit knop ingedrukt. De Power-LED zal groen branden indien de unit aan staat.
De ouderunit zal de video weergeven van de babyunit indien beide aan staan en binnen bereik van elkaar
staan. Het bericht “Buiten Bereik” wordt weergeven op het scherm van de ouderunit wanneer de babyunit
buiten bereik staat, uit staat of wanneer de units elkaar niet herkennen. (Zie pairing hoofdstuk)
Page 11
GEBRUIK
LUVION Premium Baby products
11
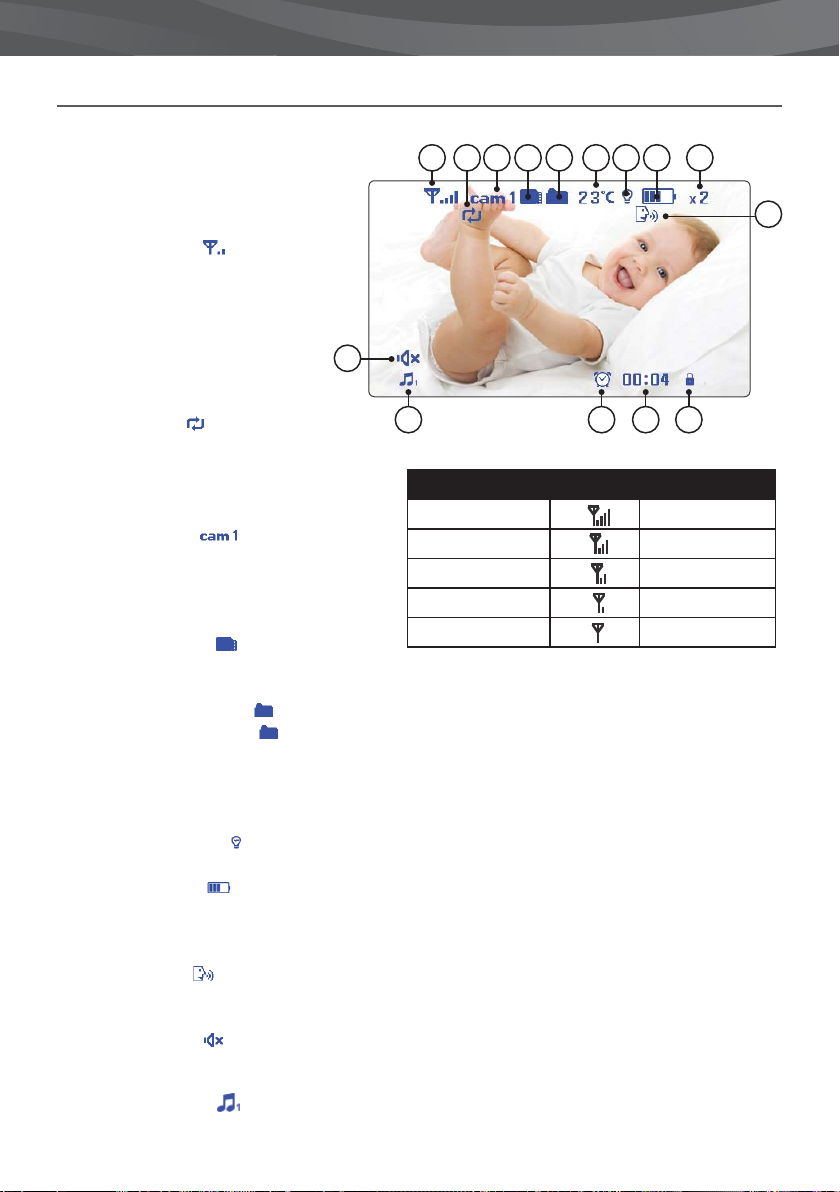
Het beeld van de baby unit wordt
weergeven als beiden aan staan. De iconen
op het scherm worden hier beneden
uitgelegd.
1. Signaalindicator
signaalindicator geeft aan hoe sterk
het ontvangen signaal is dat wordt
ontvangen van de baby unit. Een of
geen streepjes wijzen op een slecht
signaal terwijl 4 streepjes wijzen op
een sterk signaal (zie tabel).
2. Overschrijven indicator; wanneer u
‘ja’ hebt geselecteerd voor de SD-kaart
overschrij unctie, dan zal dit icoon
verschijnen.
De
11
1
2345 67 8 9
12
13 14 15
Signal sterkte Indicator Waarschuwing
10
Perfect Geen
3. Kanaalindicator De
kanaalindicator geeft het huidige
kanaal weer. Druk op de ‘CAM’-knop
(pag. 4) om te wisselen tussen kanalen.
4. SD-kaart indicator Het SD icoon zal
verschijnen wanneer een SD-kaart op de juiste manier in het SD-slot zit.
5. Volle SD-kaart indicator Dit icoon zal gaan knipperen wanneer het geheugen van uw SD-kaart vol is.
Nieuw bestand indicator Dit icoon verschijnt en zal gaan knipperen wanneer er een nieuwe video is
opgenomen maar nog niet bekeken is.
Goed Geen
Redelijk Geen
Laag Buiten Bereik
Geen Signaal Buiten Bereik
6. Temperature indicator Geeft de temperatuur gemeten door de baby unit weer.
7. Night-light indicator Geeft aan wanneer het nachtlichtje is geactiveerd.
8. Batterij-indicator Geeft aan hoe vol de batterij nog is.
9. Zoomindicator Geeft aan of de babyunit (camera) ingezoomd is.
10. ‘Talk’-indicator Verschijnt wanneer de Talk functie wordt ingedrukt, zolang u de knop inhoudt kunt u
met uw kind praten via de microfoon.
11. Geluidsindicator
volumeknoppen aan de zijkant van de ouder unit om het geluid weer aan te zetten.
12. Melodie-indicator Wanneer er een melodie wordt afgespeeld zal dit icoon verschijnen.
Wanneer het volume naar 0 is gezet, zal dit icoon verschijnen. Gebruik de
Page 12
12
13. Tijdsklokindicator Zal verschijnen wanneer er een timer is ingesteld.
14. Alarmtijd Laat de tijd zien totdat het alarm afgaat (in minuten).
15. Slotindicator
buttons op de voorkant van de ouderunit uitgeschakeld zijn.
Zal verschijnen wanneer de slotfunctie is ingeschakeld, dit zorgt ervoor dat de touch
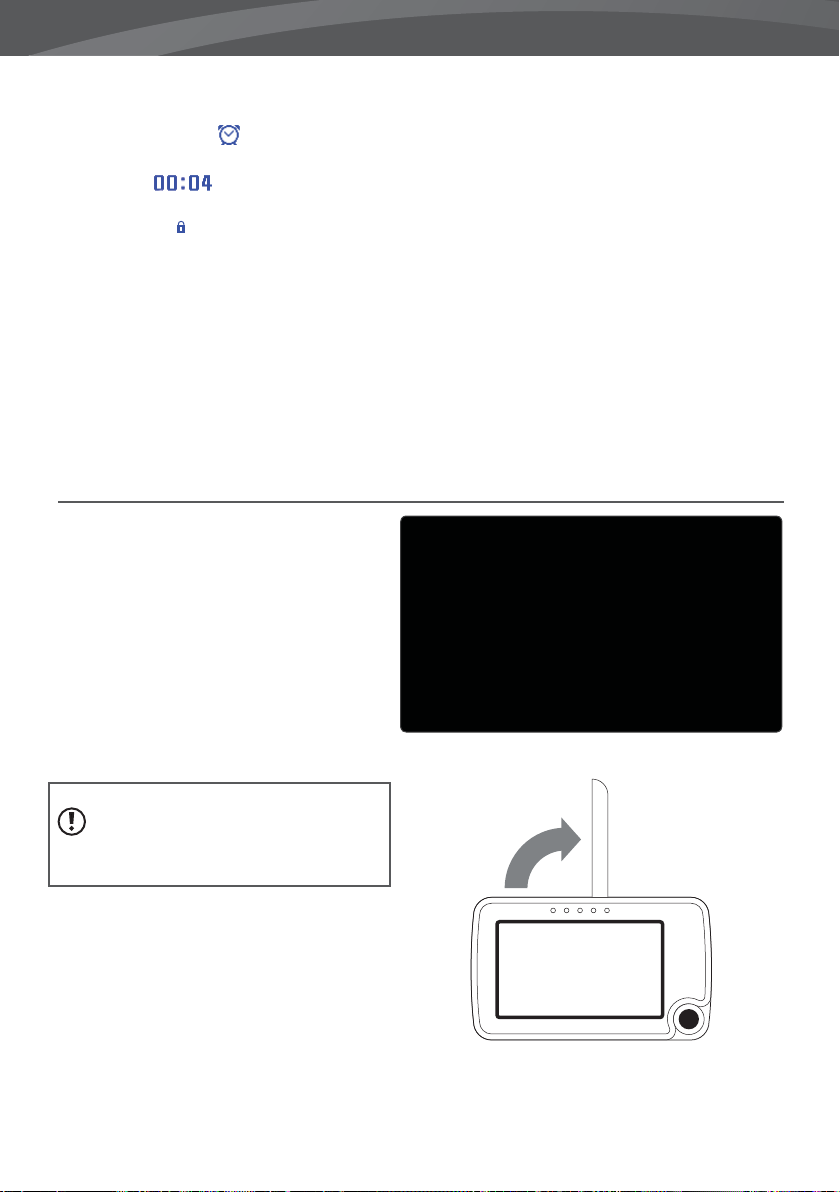
BUITEN BEREIK
Wanneer de baby unit zich te ver
van de ouder unit bevindt dan zal de
waarschuwingsboodschap ‘Buiten Bereik’ op het
beeldscherm van de ouder unit verschijnen.
Op het moment dat de ouder unit helemaal
geen verbinding meer heeft met de baby unit
dan wordt het beeldscherm zwart en blijft de
boodschap ‘Buiten Bereik’ in beeld.
Om het bereik te verbeteren kunt u de antenne
achterop de ouder unit uitklappen (zie
afbeelding)
LET OP: Als de ouder unit in alle gevallen
buiten bereik blijft aangeven, controleer dan
of de camera aan staat en probeer opnieuw
te ‘pairen’, zie ‘Pairing’.
BUITEN BEREIK
Page 13
LUVION Premium Baby products
MENU
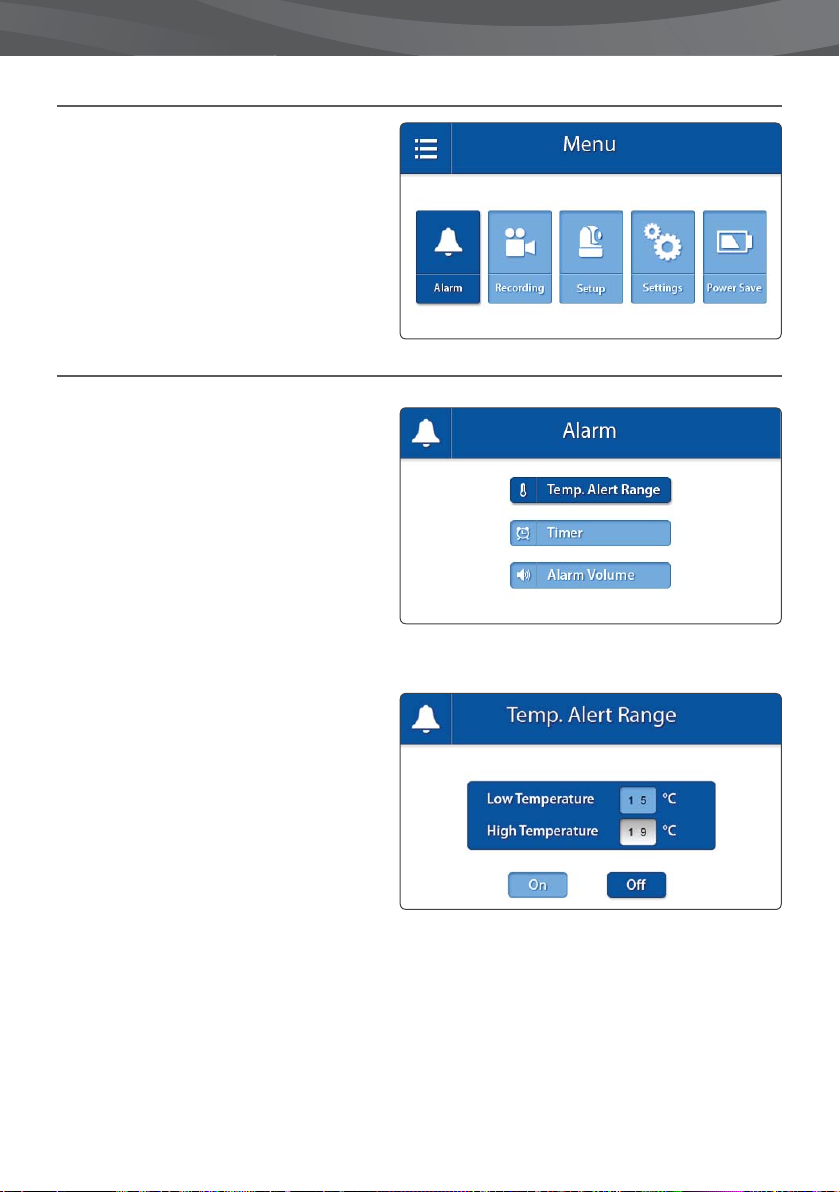
Open het menu van de Luvion Supreme
Connect om apparaatinstellingen te veranderen.
> Raak de menu knop aan op de ouderunit om
toegang tot het menu te krijgen.
> Beweeg met de joystick om te navigeren bin-
nen het menu.
> Druk op joystick om een selectie, donker-
blauw gekleurd, te bevestigen.
MENU > ALARM
De Luvion Supreme Connect heeft 2
verschillende alarmen, een temperatuur alarm
en een timer. In het Alarm submenu kunt u een
alarm of het volume instellen.
> Beweeg de joystick op en neer om een
selectie te maken.
> Druk op de joystick om een selectie te
bevestigen.
13
MENU > ALARM > TEMP. ALARM
De baby unit (camera) is uitgerust met
een temperature sensor. U kunt een
temperatuuralarm instellen om de temperatuur
van de kamer te monitoren. Deze functie is niet
bedoeld als een vervanging voor persoonlijke
supervisie over uw kind.
> Beweeg de joystick op en neer om te
navigeren tussen de Min. Temperatuur en de
Max. Temperatuur en de Aan/Uit knoppen.
> Beweeg de joystick naar links/rechts om de
temperatuurgrens te verlagen/verhogen.
Wanneer uw keuze van temperatuur grenzen
gemaakt is kunt u deze bevestigen:
> Om het alarm te bevestigen, navigeer naar
de ‘Aan’-knop met de joystick. Druk vervolgens
op de joystick om het alarm te activeren. Om het
Page 14
14
alarm uit te zetten, navigeer naar ‘Uit’ en druk
om te bevestigen.
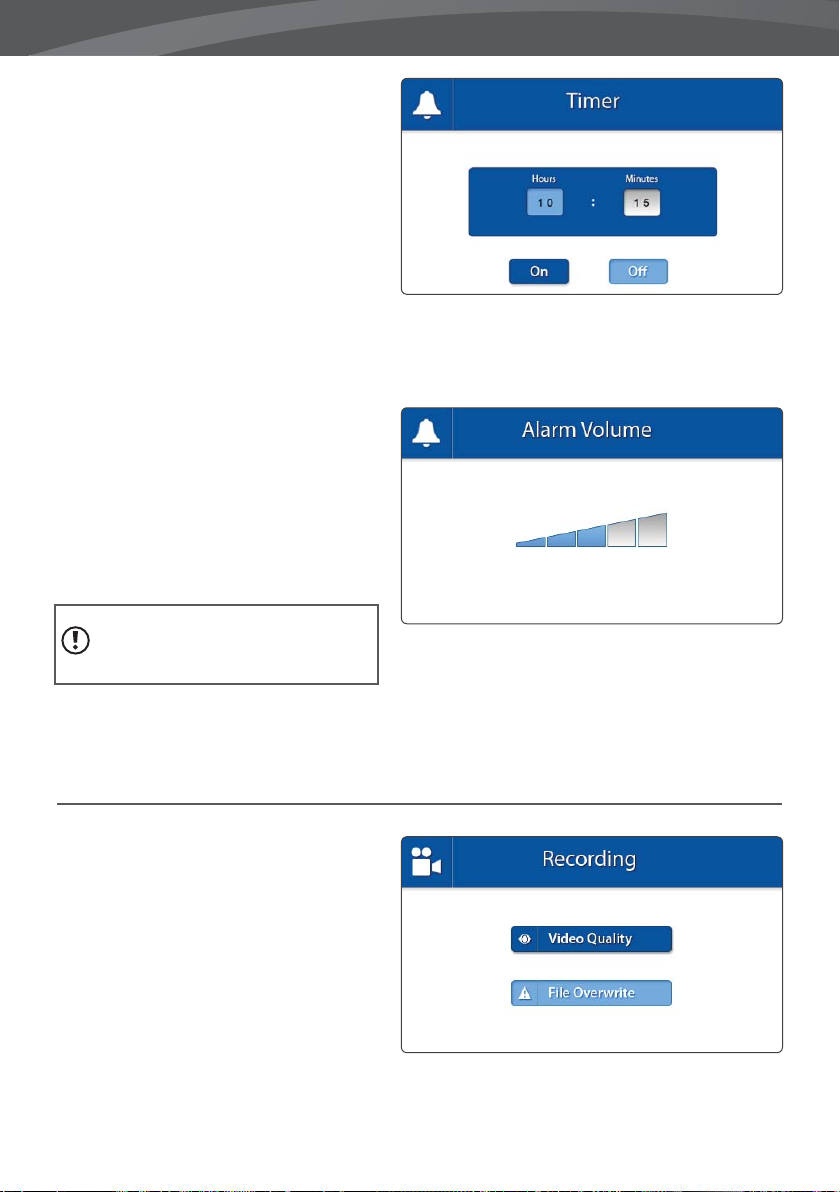
MENU > ALARM > TIMER
U kunt ook een timer zetten op de ouder unit
om u te herinneren aan uw baby’s slaap- en
voedingstijden. Stel de timer in als volgt:
> Beweeg de joystick naar rechts/links om uren
of minuten te selecteren.
> Beweeg de joystick op en neer om de uren of
minuten in te stellen.
> Druk op de joystick om deze tijd te
bevestigen.
> Selecteer ‘Aan’ of ‘Uit’.
> Druk op de joystick om uw keuze te
bevestigen.
MENU > ALARM > ALARM VOLUME
Het Alarm Volume geeft het volume van de
Temperatuur Alarm en Timer weer.
LET OP: Deze instelling verandert ook het
volume dat u hoort wanneer u een ‘Touch’knop aanraakt.
> Beweeg de joystick naar links/rechts om het
volume aan te passen. Maak alle balken grijs
voor stille modus. Druk op de joystick om uw
keuze te bevestigen.
MENU > OPNEMEN
In dit menu kunt u de instellingen voor de
opnames veranderen.
> Beweeg de joystick op en neer om een
selectie te maken.
> Druk op de joystick om een selectie te
bevestigen en een submenu te openen.
Page 15
LUVION Premium Baby products
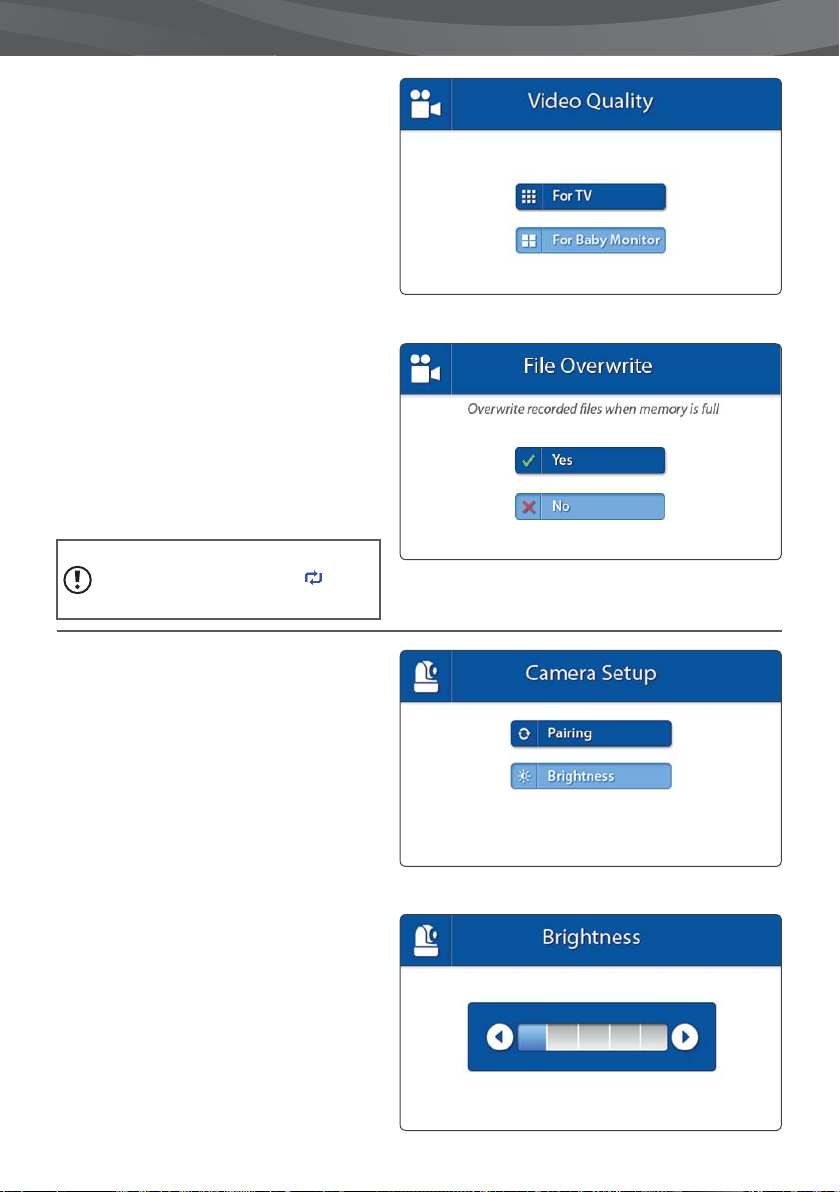
MENU > OPNEMEN > VIDEO KWALITEIT
In dit menu kunt u de resolutie van de videoopname instellen; TV of monitor kwaliteit. Kies
voor monitor kwaliteit tenzij de unit aan een
HD-televisie is aangesloten.
> Beweeg de joystick op en neer om een
selectie maken.
> Druk op de joystick om uw selectie te
bevestigen.
MENU > OPNEMEN > OVERSCHRIJF BESTAND
Deze optie zorgt ervoor dat u uw oude opnames
overschrijft indien de SD-kaart vol is.
> Beweeg de joystick op en neer om een selectie,
donkerblauw gekleurd, te maken.
> Druk op de joystick om deze te bevestigen.
LET OP: Indien de overschrijf functie actief
is, dan zal het overschrijf icoon
verschijnen op het scherm.
15
MENU > CAMERA
In het Camera menu kunt u de instellingen voor
de camera aanpassen.
> Beweeg de joystick op en neer om een
selectie te maken.
> Druk op de joystick om een selectie te
bevestigen en een submenu te openen.
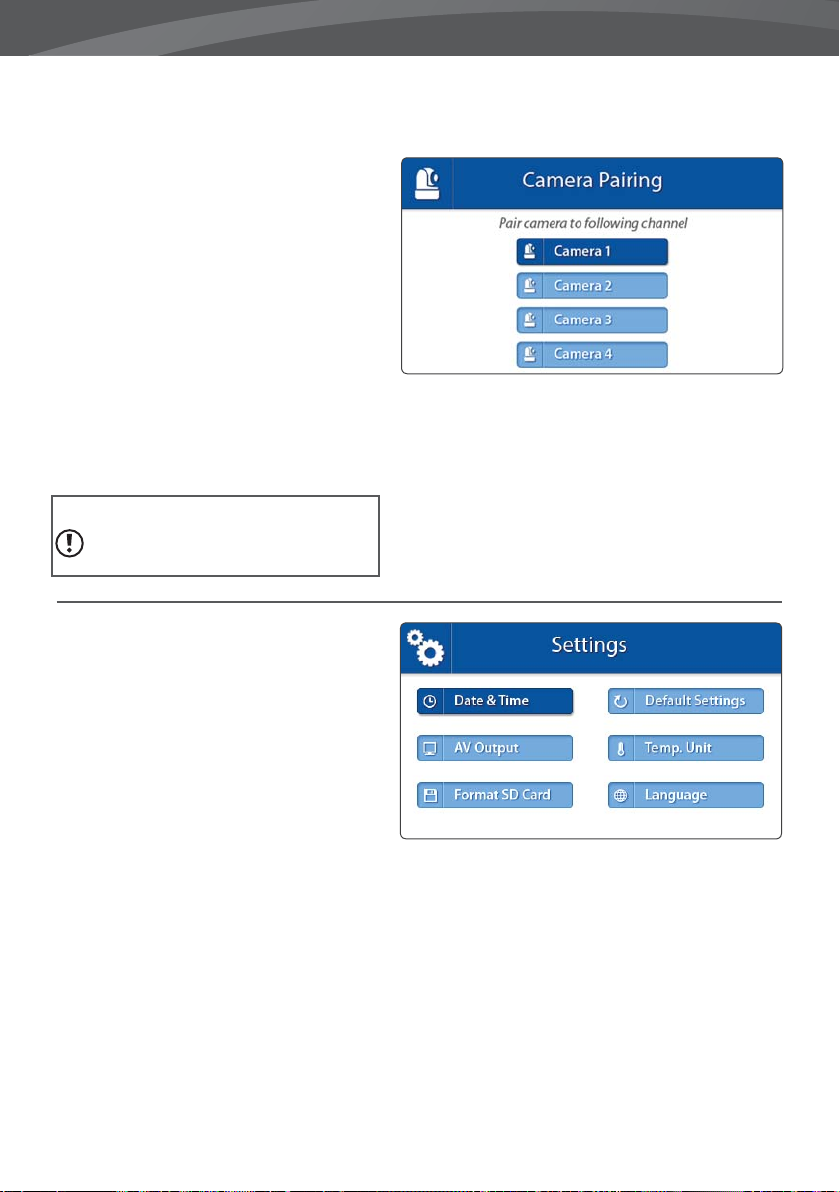
MENU > SETUP > BRIGHTNESS
Hier kunt u de helderheid van de video
aanpassen wanneer het beeld van de camera te
donker of licht wordt weergegeven.
De minimum helderheid is 0 blokjes en de
maximum helderheid is 5 blokjes.
> Beweeg de joystick op en neer om een
selectie te maken.
> Druk op de joystick om deze te bevestigen.
Page 16
16
MENU > SETUP > PAIRING
U kunt de pairing functie gebruiken om een
nieuwe verbinding te maken of te herstellen
tussen monitor en camera. Deze functie maakt
het tevens mogelijk om tot 4 baby units te
verbinden met uw ouder unit.
N.B. Een camera kan maar aan één ouderunit
tegelijk gekoppeld zijn.
> Beweeg de joystick op en neer om een
camera positie te selecteren.
> Druk op de joystick om keuze te bevestigen.
> De ouder unit zal nu aftellen. Druk nu kort
op de pair knop aan de onderkant van de
babyunit om te pairen.
L
ET OP: Zorg ervoor dat de ouder- en baby
unit verbonden zijn met elkaar voordat u de
baby unit permanent hebt bevestigd.
MENU > INSTELLINGEN
In dit menu kunt u de instellingen van uw set
veranderen.
> Beweeg de joystick op en neer om een
selectie te maken.
> Druk op de joystick om uw selectie te
bevestigen en een submenu te openen.
Page 17
LUVION Premium Baby products
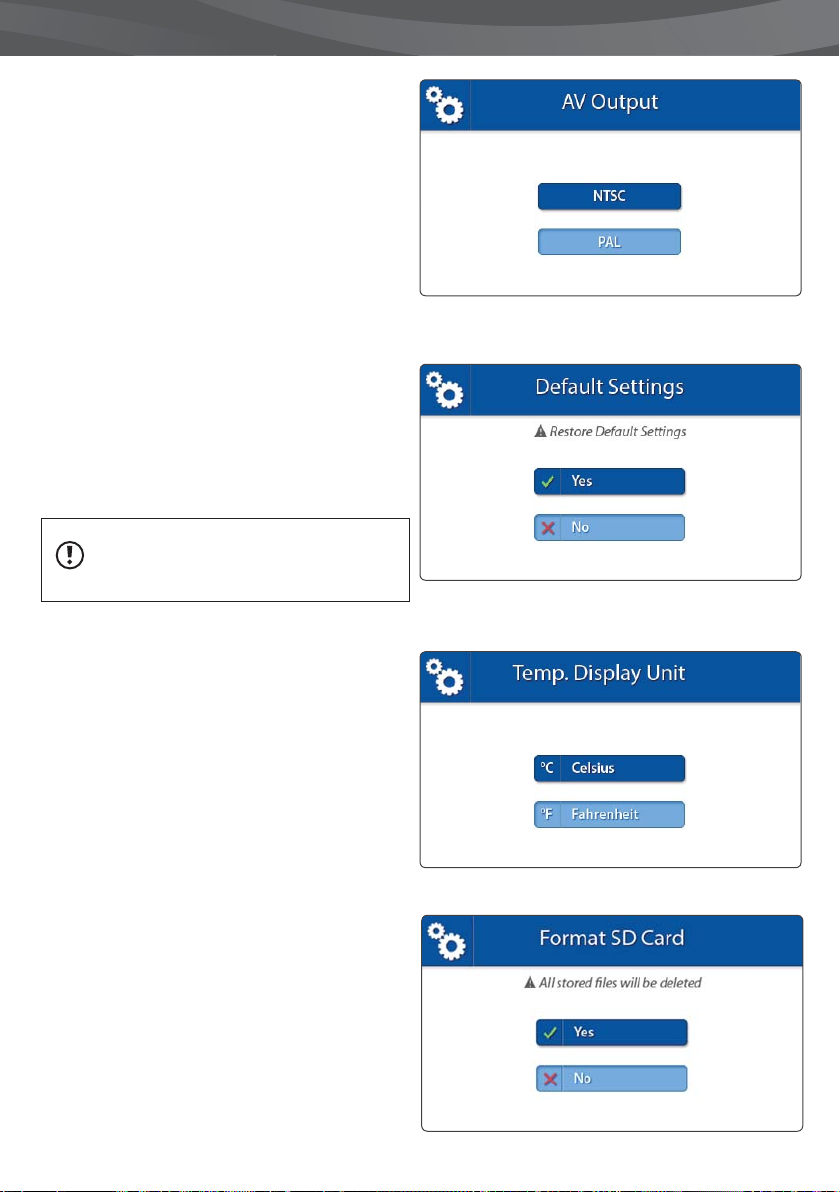
MENU > INSTELLINGEN > AVUIT
Gebruik de AV-kabel om uw ouder unit (monitor)
te verbinden met uw TV. In dit menu kunt het juiste
beeld format kiezen; NTSC (Noord-Amerika) of PAL
(Europa).
> Beweeg de joystick op en neer om het goede
format te kiezen.
> Druk op de joystick om uw selectie bevestigen.
MENU > INSTELLINGEN > DEFAULT INSTELLINGEN
Gebruik dit menu om de standaard instellingen te
herstellen.
> Beweeg de joystick om een selectie te maken.
> Druk op de joystick om uw selectie te bevestigen.
LET OP: Het herstellen van de default instellingen
heeft geen e ect op pairing. De baby unit(s)
zullen in verbinding blijven met de ouder unit.
17
MENU > INSTELLINGEN > EENHEDEN TEMPERATUUR
DISPLAY
De baby unit (camera) is uitgerust met een
temperatuursensor. De gemeten temperatuur
wordt weergegeven op de ouder unit (monitor). U
kunt kiezen tussen graden Celsius of Fahrenheit.
> Beweeg de joystick op en neer om een eenheid
te selecteren.
> Druk op de joystick om uw selectie te bevestigen.
MENU > INSTELLINGEN > FORMATTEREN SD CARD
Gebruik dit menu om alle data te wissen van de SDKaart die in de ouder unit is ingevoerd.
> Beweeg de joystick op en neer om een selectie te
maken (donkerblauw).
> Druk op de joystick om uw selectie bevestigen.
Page 18
18
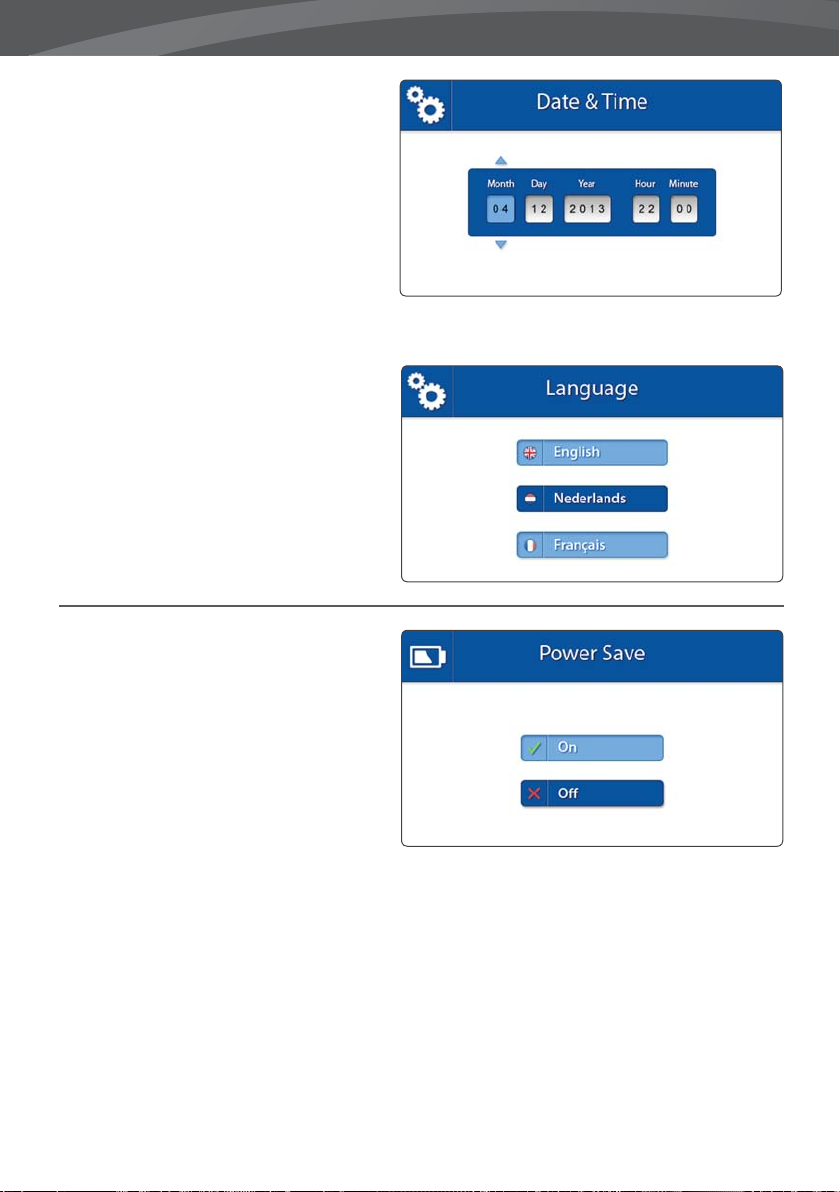
MENU > INSTELLINGEN > DATUM & TIJD
De Datum & Tijd worden gebruikt om
opgenomen bestanden een naam te geven.
> Beweeg de joystick rechts/links om een
eenheid te selecteren.
> Beweeg de joystick op of neer om de
hoeveelheid te bepalen.
> Druk op de joystick om selectie te bevestigen.
MENU > INSTELLINGEN > TAAL
De standaard taal van de Luvion Supreme
Connect is Engels. Naast Nederlands is tevens
Frans beschikbaar.
> Beweeg de joystick op en neer om een taal te
selecteren.
> Druk op de joystick om uw selectie te
bevestigen.
MENU > BESPAAR ENERGIE
De Bespaar Energie-mode zorgt voor minder
batterijverbruik door het scherm uit te zitten
wanneer de baby unit (camera) 3 minuten lang
geen harde geluiden heeft geregistreerd. Het
scherm zal aanspringen zodra er een hard geluid
wordt geregistreerd.
> Beweeg de joystick op en neer om ‘Aan’ of ‘Uit’
te selecteren.
> Druk op de joystick om uw selectie te
bevestigen.
Page 19
LUVION Premium Baby products
PAIRING
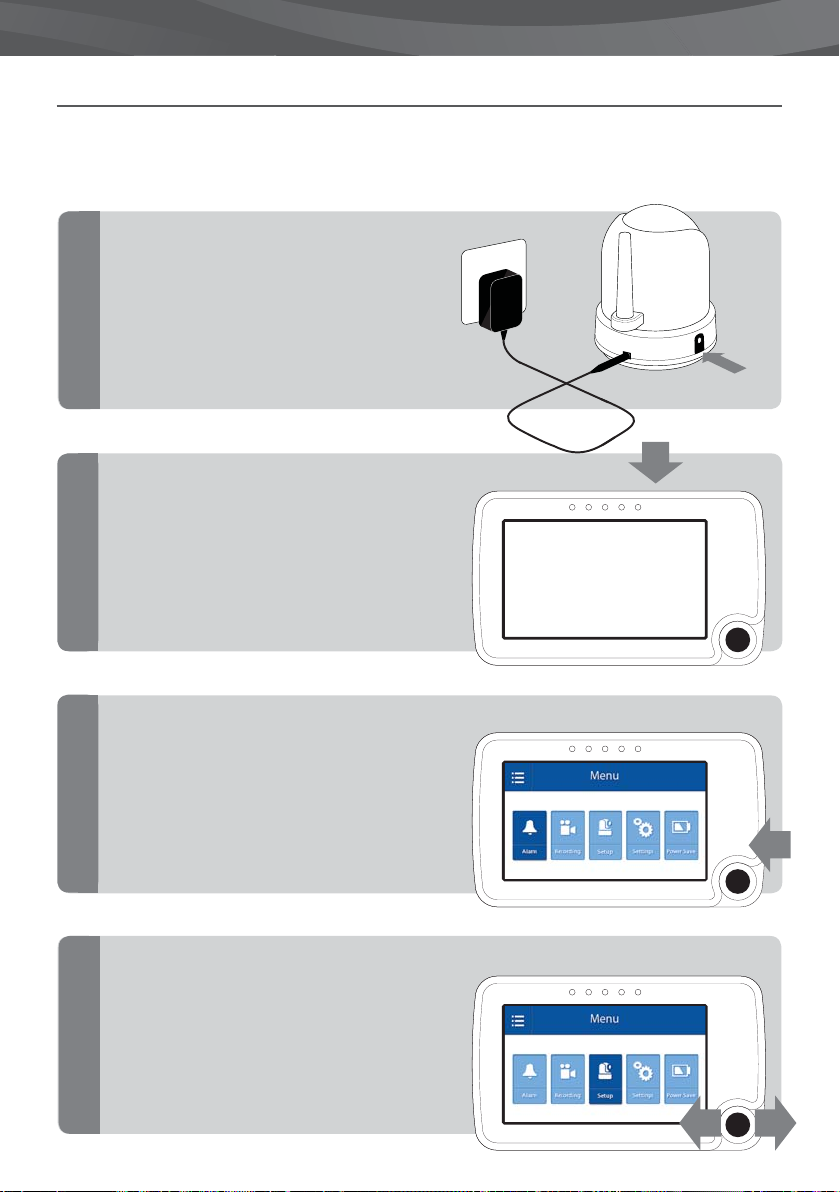
Gebruik Pairing om een baby unit (camera) te verbinden met de ouder unit (monitor). U kunt tot 4 baby units
aan 1 monitor verbinden. Deze moeten gepaird worden op de verschillende kanalen.
Zet de baby unit (camera) aan
door de aanknop ingedrukt te
houden totdat de LED op de
knop groen oplicht.
1
Houd de Aan/Uit Knop ingedrukt om de
ouderunit aan te zetten. Wacht totdat het
Luvion-logo verdwenen is.
19
2
LUVION
Druk vervolgens op de MENU knop
3
Beweeg de joystick naar rechts of links om
naar set.
Druk op de joystick om het CAMERA menu
4
te openen.
Page 20
20
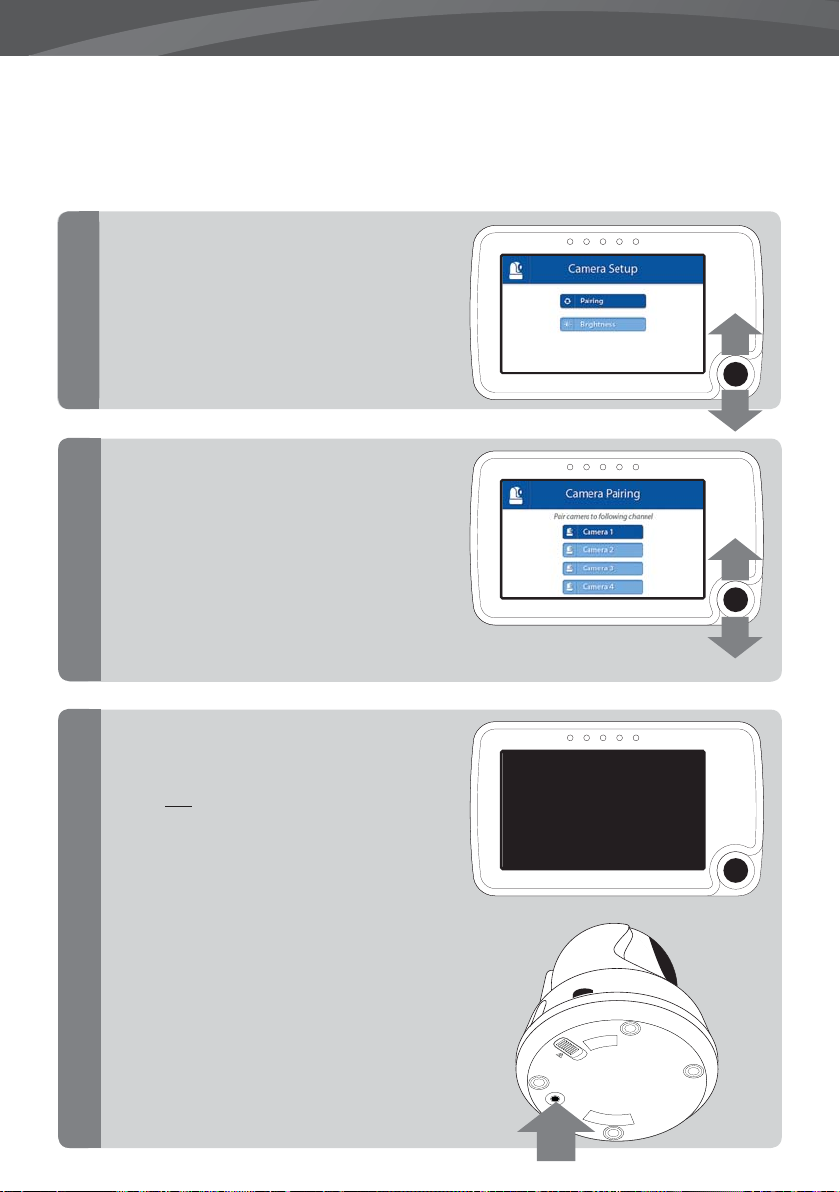
Beweeg de joystick op of neer om naar ‘Pairing’ te
navigeren.
5
6
Druk op de joystick om het pairing menu te
openen.
Beweeg de joystick op of neer om het
kanaal van uw voorkeur te selecteren.
U kunt maar 1 camera per kanaal pairen.
Bovendien kan een camera maar aan één
monitor gepairt zijn.
Druk op de joystick om het pairing menu te
openen.
De ouder unit zal nu gaan aftellen.
Druk kort op de Pairing-knop aan de
onderkant van de baby unit (camera) om deze
te verbinden met de ouder unit.
PLEASE PRESS
PAIR KEY
ON CAMERA SIDE
12
7
PA
IR
Page 21
LUVION Premium Baby products
PLAYBACK
OM UW BESTANDEN TE BEKIJKEN.
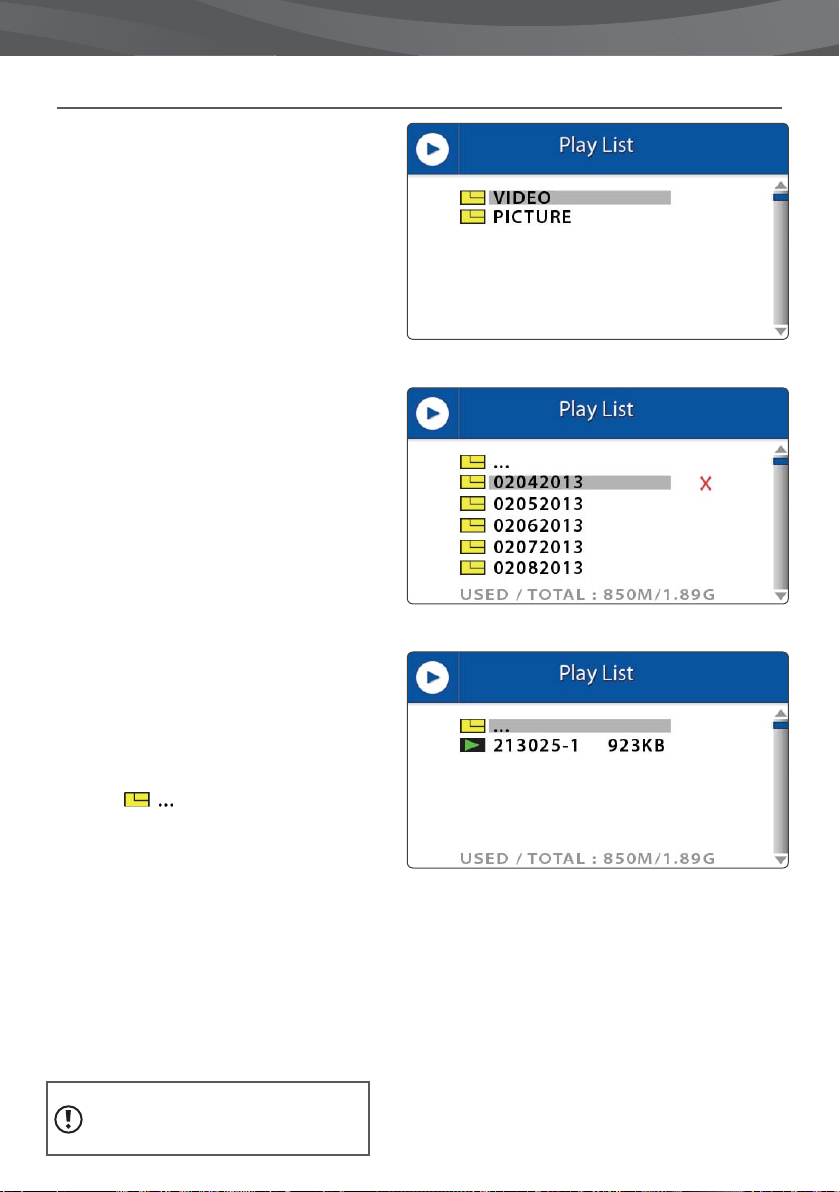
> Druk op de joystick om het Playback menu te
openen.
> Beweeg de joystick op en neer om video of
foto te selecteren (zie I.)
Alle opgenomen videos zijn te vinden in de
VIDEO map. Alle snapshots worden bewaard
in de PICTURE map.
> Druk op de joystick om een map te openen.
> Beweeg de joystick op en neer om te
navigeren. (img. II)
NOTE: De mappen worden vernoemd naar
maand/dag/jaar waarop deze is aangemaakt.
Bijvoorbeeld: een map met de naam
02042012 is aangemaakt op 4 februari 2013.
Foto’s en video’s worden vernoemd naar het
opnametijdstip (uu/mm/ss).
21
I: Select Video or Picture folder
> Druk op de joystick om een folder te openen.
> Selecteer een bestand dat u wilt bekijken. (III)
> Druk op de joystick om het bestand af te
spelen. Bij video, beweeg rechts voor fast
forward of links om terug te springen.
Druk op de MENU knop om terug te gaan naar
het bestand
Selecteer
gaan.
VERWIJDEREN VAN BESTANDEN/MAPPEN
> Selecteer het bestand of de map die u wilt
verwijderen.
> Beweeg de joystick naar rechts om de rode ‘X’
te selecteren.
> Druk op de joystick om het bestand te
selecteren.
> Selecteer ‘JA’ en druk op de joystick om het
bestand de nitief te verwijderen.
L
ET OP: De Video/Picture mappen kunnen
niet verwijderd worden.
om een map omhoog te
II: Select folder by date
III: Select video by time
Page 22

22
PROBLEEM & OPLOSSING
Mocht u tegen problemen aanlopen met de Luvion Supreme Connect dan is er vaak een snelle, simpele
oplossing beschikbaar:
Probleem Oplossing
Er is geen beeld op de
ouder unit.
Het beeld valt uit/ Ik heb
constant weinig bereik/
“Buiten Bereik”
Audio problemen 1. Controleer of het volume niet uit staat. Druk op de + volume knop
Het beeld hapert/ de
resolutie is slecht
De batterij loopt snel leeg Gebruik de power save mode of probeer de Luvion batterij te
De ouder unit loopt vast
en reageert nergens op.
Het beeld wordt op zijn
kop getoond.
1. Controleer de adapter van de baby unit. Controleer of de stekker
aangesloten is en of de groene power LED aan is.
2. Controleer of de ouder unit aan staat
3. Breng de baby unit dichterbij de ouder unit om het bereik te
versterken.
4. Controleer of de ouder unit in ‘audio-only’ mode staat. (Druk kort
op de power knop om uit audio-only mode te gaan)
5. Controleer of de ouder unit in power save mode staat. Ga naar
‘menu’ > ‘power save’ en schakel de power-save modus uit.
1. Breng de baby unit dichterbij de ouder unit.
2. Probeer de units uit de buurt van grote objecten of muren te
plaatsen om het bereik te verbeteren.
3. Klap de antenne uit de ouder unit voor een betere ontvangst.
4. Probeer de units opnieuw te pairen (zie Pairing Hoofdstuk)
aan de zijkant van de ouderunit.
2. Controleer of er wel geluid is in de omgeving van de baby unit.
3. Indien er een harde piep aanwezig is, breng de ouder unit verder
weg van de baby unit.
1. Probeer de units dichter bij elkaar te brengen.
2. Probeer de units uit de buurt van grote objecten of muren te
plaatsen om het bereik te verbeteren
3. Klap de antenne uit de ouder unit voor een betere ontvangst.
vervangen. Luvion batterijen zijn bij uw lokale dealer verkrijgbaar.
Gebruik de reset knop op de achterkant om de ouder unit uit te zetten.
Gebruik de Aan/Uit knop om de unit weer te activeren.
Gebruik de Plafondswitch aan de onderkant van de baby unit om het
beeld te corrigeren. (zie Overzicht Baby Unit)
Page 23
LUVION Premium Baby products
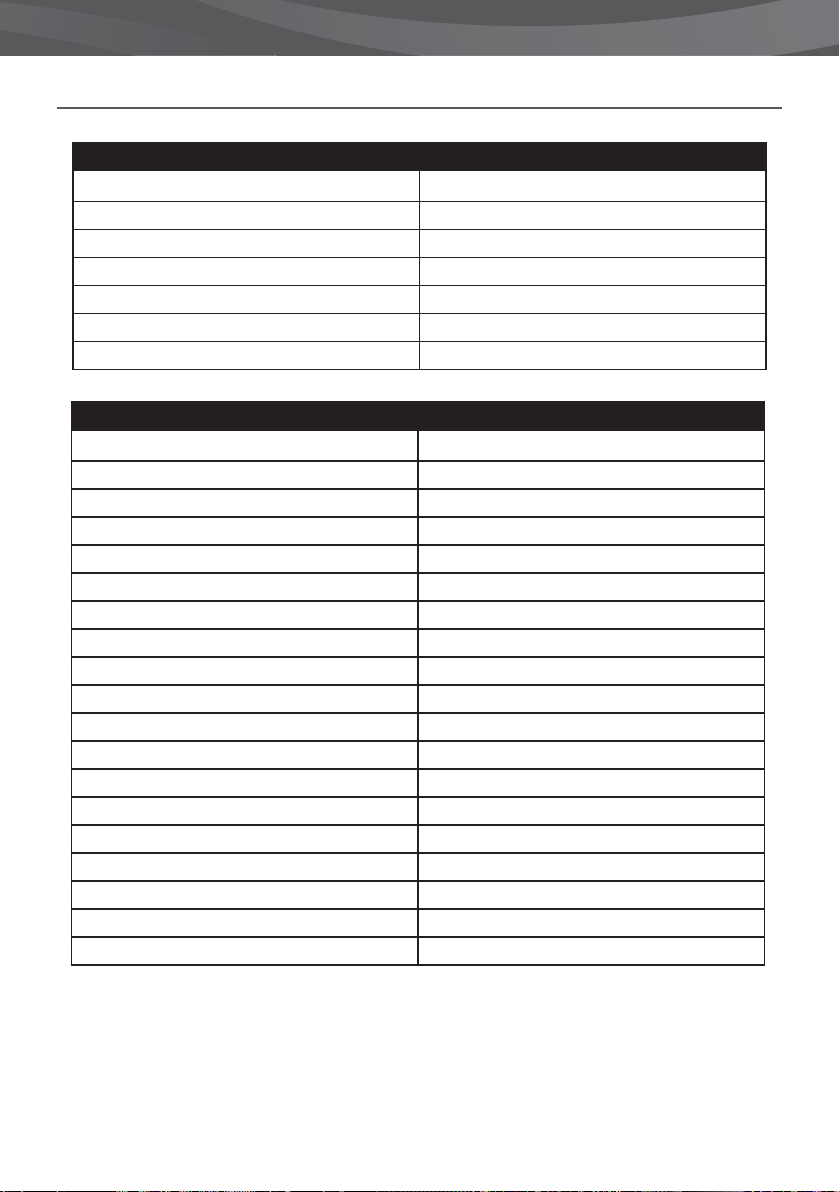
TECHNICAL SPECIFICATIONS
Technische Speci caties
Frequentiebereik 2.400 MHz ~ 2.483,5 MHz
Zendvermogen 15 dBm Max
Ontvangst gevoeligheid -81 dBm
Type Spread Spectrum FHSS 39 Channels
Type Modulatie GSFK
Data Snelheid 2 Mbps
Bereik 300 m (Line of Sight)
Baby unit (camera)
Beeld Sensor Type 1/6” v 7660 Color CMOS Image Sensor
Beeld resolutie H: 640 px, V: 480 px
Framerate 20 fps
Wit Balans Auto
Lens 3.0 mm, F 2.8
Field of View 60°
IR On/O 15-25 Lux O , 5-15 Lux On
IR LED Type/Nacht Visie 850 nm / 5 m
Speaker Output 0.5 W Max
Voedingsspanning 5 Vdc +/- 10%
Verbruik 600mA+/-20mA
Gebruikstemperatuur - 10° ~ 40°
Max Luchtvochtigheid 80% HR
Gebruiksomgeving alleen binnenshuis
Dimensies 72*46*41mm
Regulation Compliance FCC/CE
Materiaal Behuizing Plastic
Motor type Stappenmotor
Bewegingshoeken Op 90° Neer 20° Links/Rechts 135°
23
Page 24

24
Parent unit (monitor)
LCD Schermgrootte 4,3“ / 10,9 cm
LCD Resolutie H: 480 px, V: 272 px
Kijkhoek H: 150° V: 130°
A/V Out Resolution CCIR656 YUV640
Voedingsspanning 5 Vdc 1.5A +/- 5 %
Vebruik 360mA
Gebruikstemperatuur - 10° ~ 40°
Luchtvochtigheid 0% ~ 85%
Page 25

LUVION Premium Baby products
25
Page 26

26
INSTRUCTION MANUAL
TABLE OF CONTENTS
INTRODUCTION 26
SAFETY INSTRUCTIONS 26
CONTENTS OF PACKAGE 27
ACCESSORIES 27
OVERVIEW OF PARENT UNIT MONITOR 28
OVERVIEW OF BABY UNIT CAMERA 31
GETTING STARTED 33
OUT OF RANGE WARNING 36
MENU 37
PAIRING 43
PLAYBACK 45
TROUBLESHOOTING 46
TECHNICAL SPECIFICATIONS 47
INTRODUCTION
Thank you for purchasing the Luvion Supreme Connect. Now, you will be able to see and hear your baby (or even
more babies/children by using up to three additional camera’s) in and around the house.
Please keep the original dated sales receipt for your administration and proof of warranty. For service and warranty
issues, you will always be asked for a copy. For warranty issues, you may contact your Luvion dealer or your local
Luvion distributor. More information can be found on our website: www.luvion.com.
This user manual provides you with all information neccesary for a safe, pleasant, and easy use of the Luvion
Supreme Connect. Before use, we ask you to thoroughly read this user manual. We ask for your special attention for
the safety instructions below.
LUVION
Delft, The Netherlands
www. luvion.com
SAFETY INSTRUCTIONS
- Keep small parts away from children.
- This product is not intended as a toy. Please refrain children from playing with the product.
- This product is not intended as a substitute for adult supervision.
- Only use the original supplied power chargers.
- Do not use the product in humid conditions or nearby water.
- Only use the product between 10°C - 35°C.
- Always keep the camera and any cords of the power adapters at least 1,5 meter away from the baby.
- Do not attempt to open the product yourself or you may void your warranty, please contact your local
dealer or distributor.
Batteries:
- Fully charge the monitor before rst use, to ensure an optimal battery capacity. The battery is fully
charged when the charging light, on the side of the monitor, turns green.
Page 27
LUVION Premium Baby products
CONTENTS OF PACKAGE
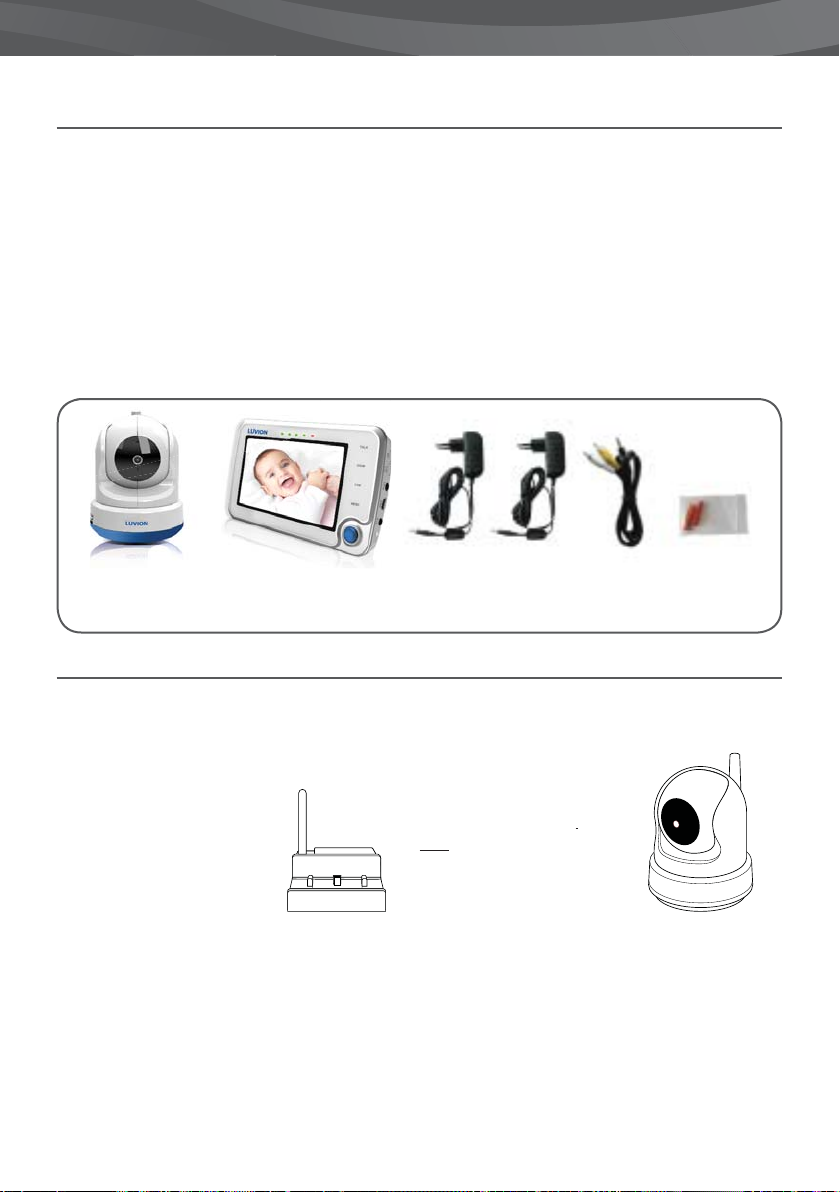
The system includes the following components:
- 1 x parent unit (monitor)
- 1 x baby unit (camera)
- 1 x power adapter for the parent unit
- 1 x power adapter for the baby unit
- 1x baby unit mounting frame
- 1 x wall plugs and screws
- 1 x RCA cable (TV-Out)
Check the package to con rm that you have received the complete system, including all components listed
above.
Baby Unit (Camera) Parent Unit (Monitor) Power Adapters RCA Cable Plugs, Screws
& Mounting Frame
27
ACCESSORIES
The following accessories are available for the Luvion Supreme Connect:
WIFI BRIDGE*
The Luvion Supreme Connect
WIFI Bridge enables you to
connect it to the internet. Now
you can view live video of
your child on your pc, laptop,
tablet and phone; anytime,
anywhere.
*Available soon
ADDITIONAL CAMERAS
The Luvion Supreme Connect
supports the use of up to
four cameras. Now you can
monitor multiple children or
rooms at the same time.
Page 28
28
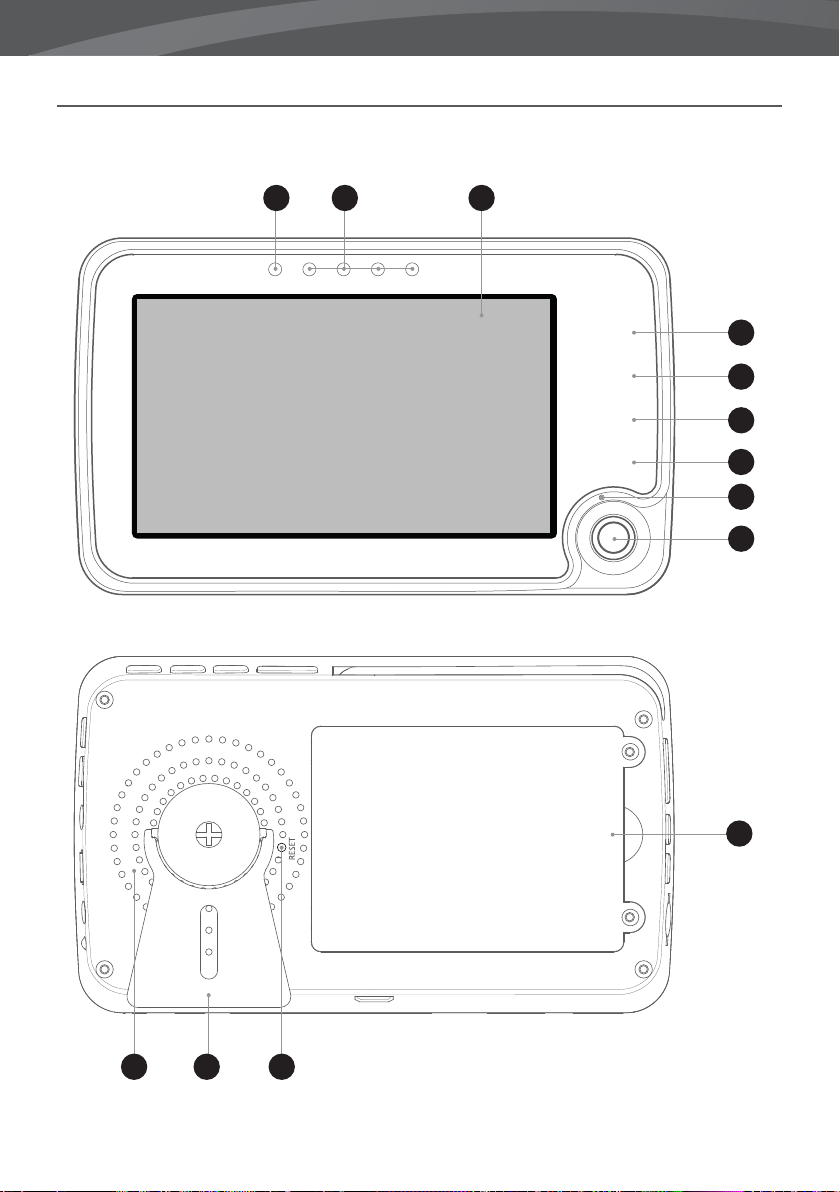
OVERVIEW OF PARENT UNIT MONITOR
21 3
FRONT VIEW
TALK
ZOOM
CAM
MENU
4
5
6
7
8
9
10
BACK VIEW
12 1311
Page 29
LUVION Premium Baby products
1. Power LED - This LED indicates whether the parent unit is switched on. When the parent unit is switched
on, the Power LED will turn green. This LED will start blinking when the battery of the parent unit is
running low. Please use the included power adapter to recharge the battery.
2. Sound Bar - These LED’s indicate the level of sound detected by the baby unit. The amount of LED’s that
are lit up indicate the intensity of the detected sound. This enable you to keep an eye on the sound levels
within your child’s room, even when the sound of the parent unit is muted.
3. Screen - 4,3” TFT LCD Screen.
4. Talk button - Press this button to speak through the baby unit to your child. Wait before speaking until
the Talk icon
the baby unit. When multiple cameras are used, you will speak only through the baby unit that is being
displayed on the screen.
5. Zoom button - Press this button to zoom in on the video. The video will then be doubled in size. 2X will
appear on the screen. When the video is magni ed, you can use the joystick to navigate to parts of the
video that are outside the range of the screen. Press zoom again to exit zoom mode.
NOTE: It is not possible to move the baby unit lens with the joystick when the parent unit is zoomed in (2x is
displayed on the screen). Zoom out to change the position of the baby unit lens.
6. Cam button - Press the Cam button to switch between the di erent cameras connected to the parent
unit. The channel indicator identi es the di erent cameras.
7. Menu button - Use the Menu button to open the main menu. Use it in a menu to close a menu (or move
up a level) without saving any new settings.
8. Microphone - The sounds detected by this microphone will be transmitted to the baby
unit (camera) when the Talk button is pressed.
9. Joystick - Use the joystick to move the camera lens of the baby unit and within in the
menu to change a selection. Press the joystick to con rm a selection and to save your
setting.
is displayed on the screen. You can increase the volume by using the volume button on
29
TOP VIEW
BOTTOM VIEW
14 15
19 20
16 17 18
Page 30
30
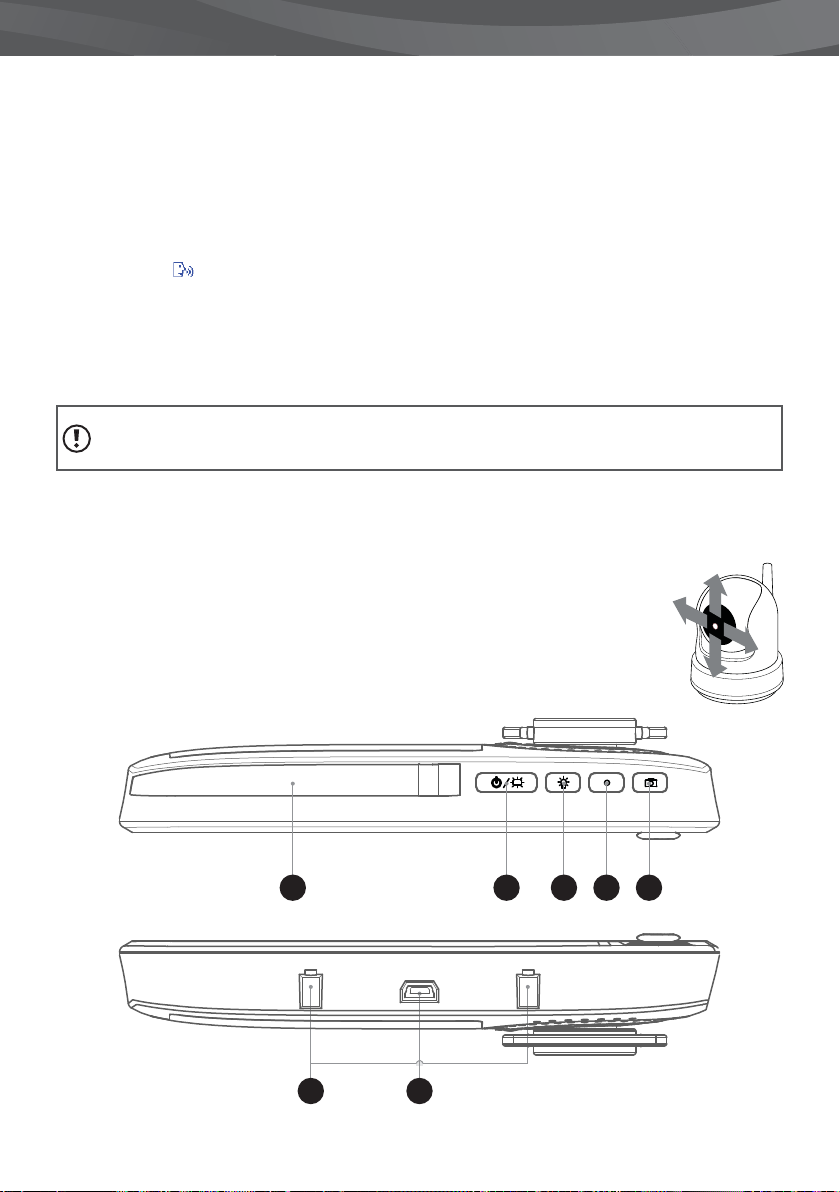
10. Battery compartment - Only replace the battery of your monitor with an authorized Luvion Supreme
Connect battery. Using a di erent battery will cause you to void your warranty.
11. Speaker - Produces the sound received from the connected baby unit. Use the volume buttons (27) to
decrease/increase the sound level.
12. Stand - You can use the stand to place the monitor in an upright position.
13. Reset button - Use a paperclip to press this button in the event of a frozen screen. You can then use the
on/o button to switch the parent unit back on.
14. Antenna - Sends & receives data to the baby unit.
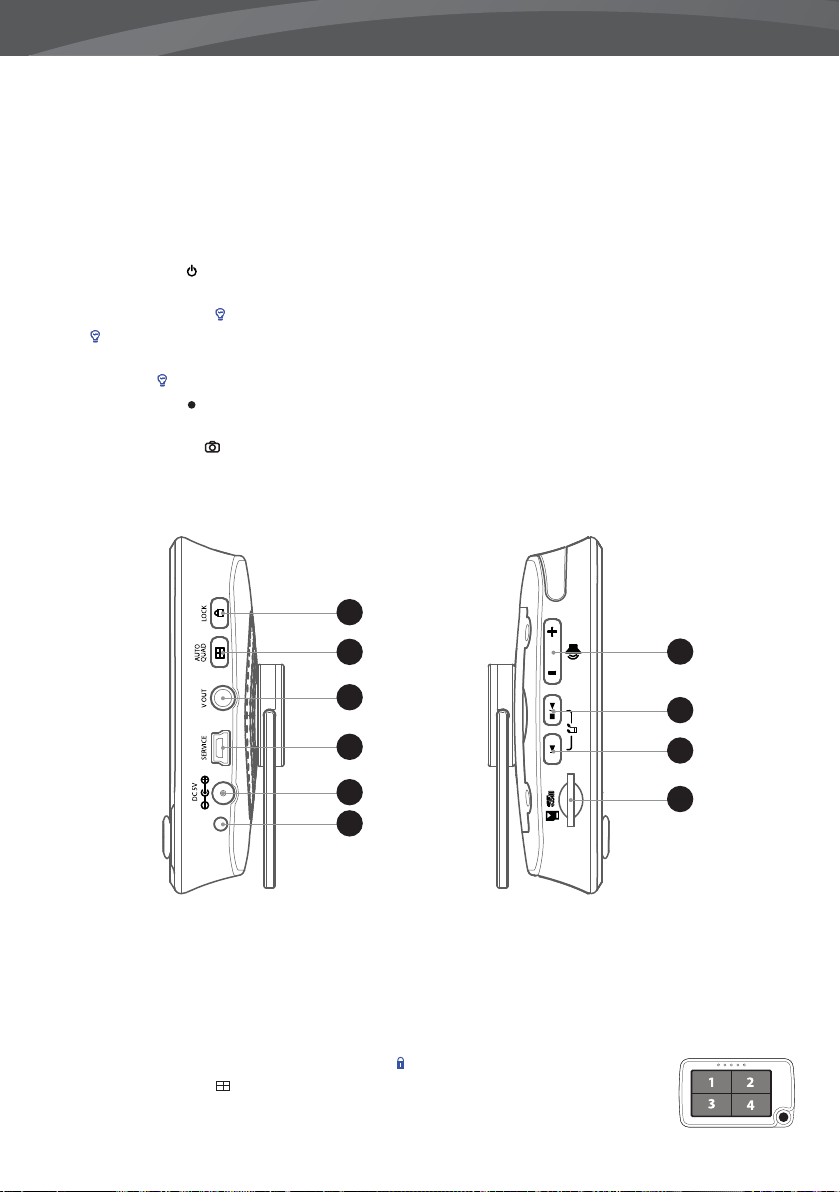
15. On/O button
when the parent unit is on to go to the ‘sound-only mode’ (Turning o your screen to save battery).
16. Night light button - Our baby units are tted with a special night light to comfort your child. Press the
‘ ’-Button to remotely (de-)activate the night light of the baby unit (When multiple baby units are in use,
the night light of the unit of which the video is currently displayed on the screen is controlled). The night
light icon ( ’) will appear on the screen when the night light of the baby unit is activated.
17. Record button - Use this button to capture a video recording. A micro SD-card (see 30, page 7) is
required to capture a recording. When activated, the recording icon will now appear on the screen.
18. Snapshot button - Use this button to make a snapshot of the video. An SD card is required before any
snaphots can be taken (see 30, page 7).
- Press and hold this button to switch the parent unit on/o . Brie y press this button
21
22
23
24
25
26
SIDE VIEW SIDE VIEW
19. Wi- Bridge connectors - Ensures that the parent unit will be correctly placed on the optional Wi-
Bridge.
20. Mini USB port - Connects to the optional Wi- bridge.
21. Lock button - Locks the frontal touch interface on the front of the parent unit (monitor) to prevent
accidental changes within settings. A lock icon is begin displayed when active.
22. Quad/Auto button - The baby monitor is equipped with a quad-camera function. This
function enables you to simultaneously observe 4 baby units (cameras). Press once to
activate. Press again to auto-switch between connected baby units every 3 seconds.
27
28
29
30
Page 31
LUVION Premium Baby products
NOTE: There is no sound available within quad mode.
23. AV-Out - The Audio / Video socket enables you to connect the parent unit to an analog connection on
your television set. An RCA cable is included.
24. Service-Port - Connects the parent unit to your computer with an USB cable for rmware updates.
25. Power input - Input for the included Luvion power adapter 5V 1.5A.
26. Charging LED - Becomes red to indicate when the built-in battery is being charged. Once fully charged,
the LED will turn green.
27. Volume button - Increase/decrease the volume of the parent unit speaker.
28. Play/Pause
29. Next Song button - Skips to the next lullaby.
30. Micro SD Slot - Insert a Micro SD card (Not included) in this slot to enable the recording and snapshot
functions. The parent unit supports Micro SD cards with memory up to 32 GB.
OVERVIEW OF BABY UNIT CAMERA
/ - Play/Stop a lullaby, the unit will automatically play through all lullabies.
31
2
3
6
4
LUVION
5
BACK VIEWFRONT VIEW
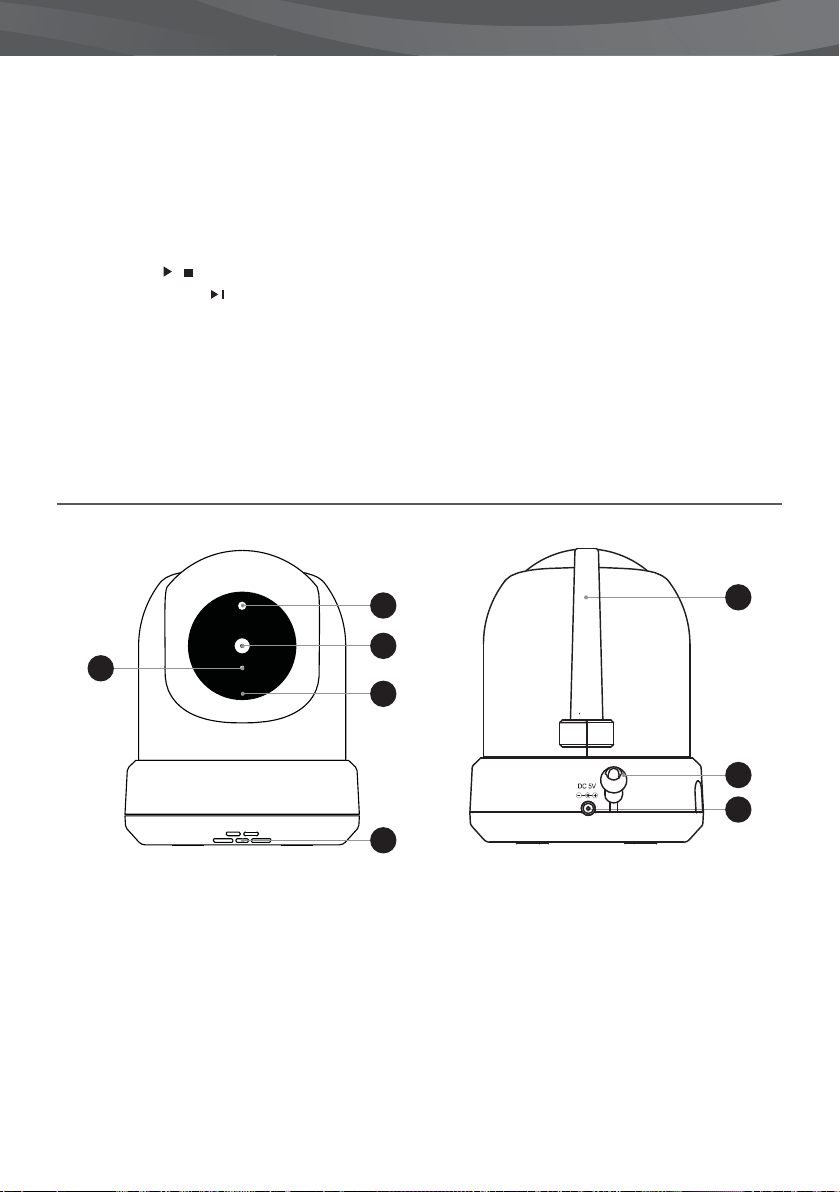
1. Temperature sensor - The measured ambient temperature is displayed on the screen of the parent unit.
2. Light Sensor - Allows the baby unit to correct itself under changing light conditions.
3. Camera lens - Detects the visual environment and sends this to the parent unit.
4. Microphone - Detects sound and sends this to the parent unit.
5. Speaker - Enables the ability to talk to your child over distance.
6. IR LED’s - Allows for 5m distance of night vision, automatically activates within low lights conditions.
7. Antenna - Sends data to and receives data from the parent unit.
8. Power input - Input for the Luvion power adapter 5V 1.5A.
9. Volume - Rotary wheel to increase/decrease the volume produce form the baby unit speaker. This
7
1
8
Page 32
32
12
13
11
14
9
PAIR
10
BOTTOM VIEWSIDE VIEW
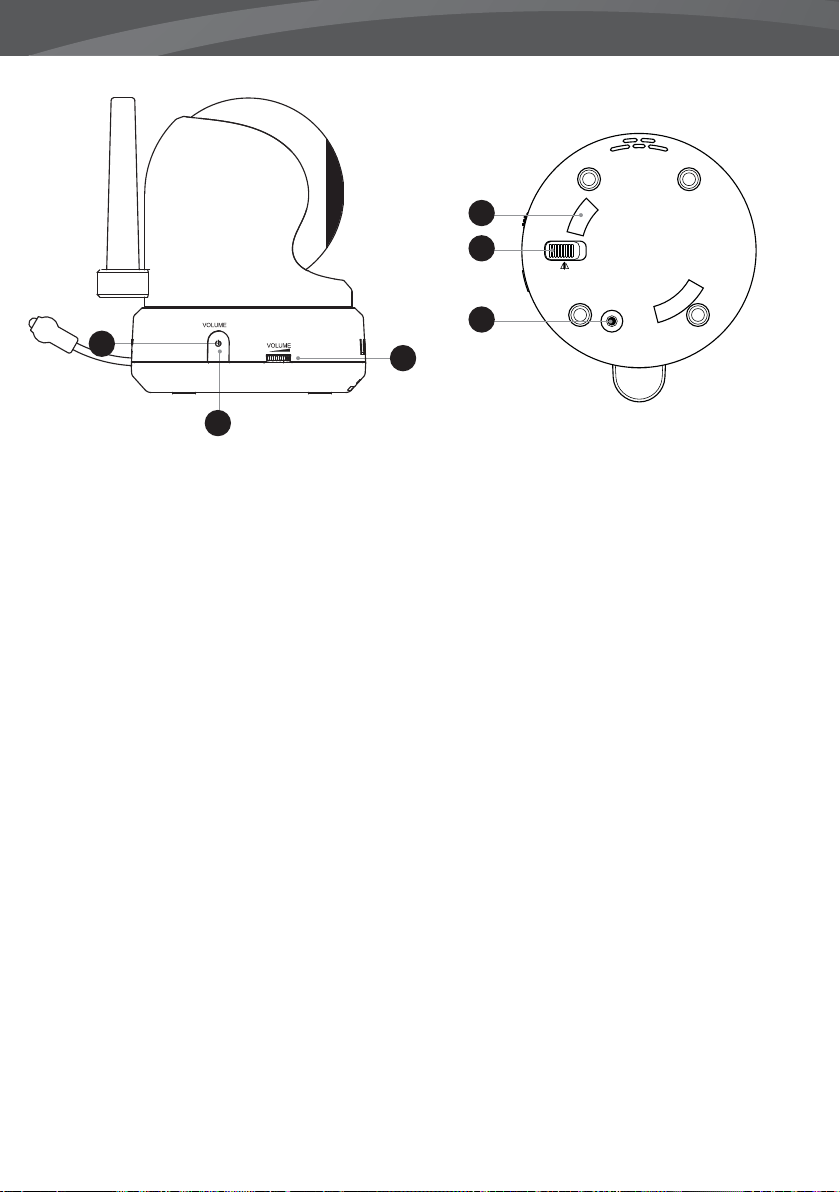
function only a ects the baby unit, e.g. the svolume of playing lullabies or the talk back function.
10. On/O button - Press and hold to switch the baby unit on/o .
11. Power LED (Green) - Indicates whether the baby unit is operational.
12. Mounting frame connectors - Connects the baby unit to the included mounting frame, which can be
attached to a wall or ceiling.
13. Ceiling mounting switch - Flips the image of the video upside down. Enable this switch in case when the
baby unit is mounted upside down, e.g. on a ceiling.
14. Pairing button - Establishes a new connection between the baby and parent unit during the pairing
process. Pairing should be used when installing an additional camera or when the monitor does not
recognize the baby unit (‘Buiten Bereik’). Consult page 19 for more information on the pairing process.
Page 33
LUVION Premium Baby products
GETTING STARTED
INSTALLING THE PARENT UNIT MONITOR
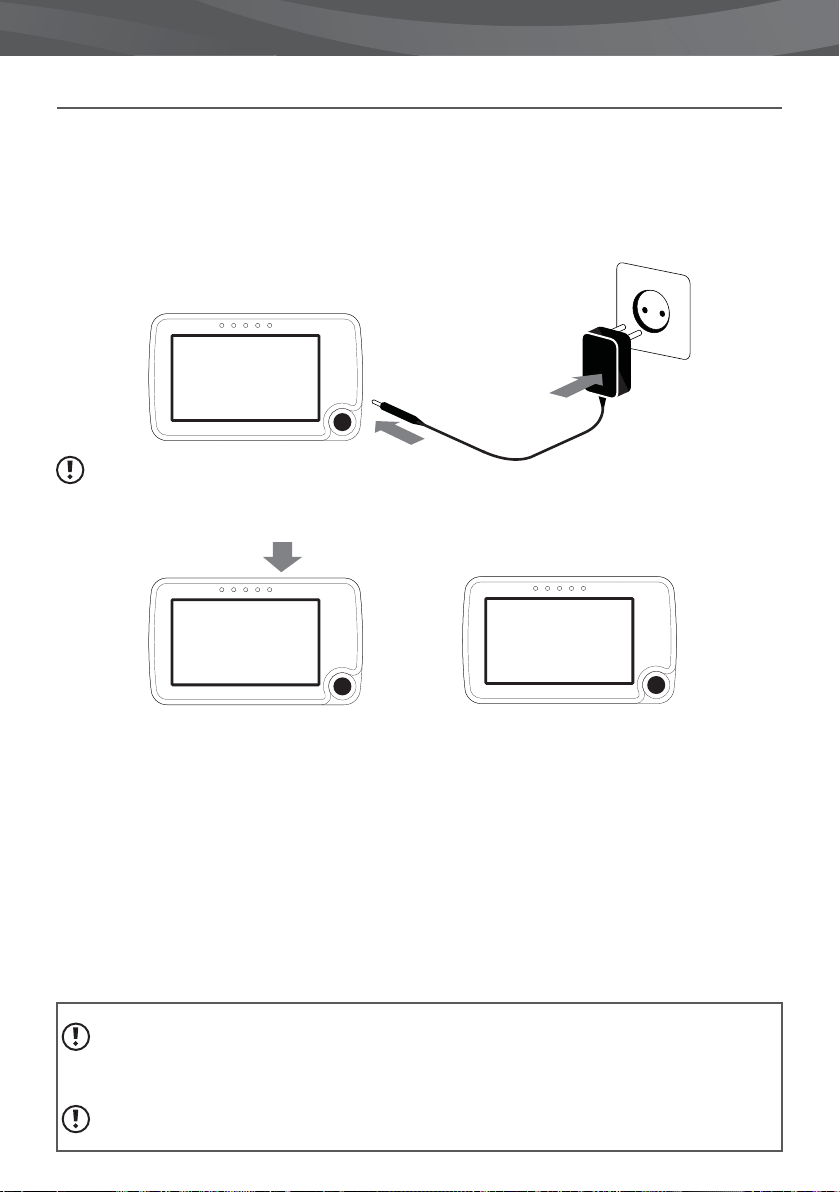
1. Carefully unpack the parent unit (monitor).
2. Connect the power adapter to the parent unit and power socket. The parent unit will start charging;
the indication LED will now light up (red). This LED will turn green when the parent unit is fully charged.
During rst use, please allow the unit to completely charge to ensure optimal battery capacity.
NOTE: Charge the parent unit completely before rst use.
3. Press and hold the on/o button. The screen will now show the Luvion introduction screen.
33
LUVION
INSTALLING THE BABY UNIT CAMERA
Before you install the baby unit (camera), carefully plan where and how you want to position it. Make sure
that you take in account the length of the power cable and the position of the power socket, because the
baby unit (camera) needs to be connected to the power grid.
1. Carefully unpack the baby unit (camera).
2. Place the baby unit in the preferred position. You can place the baby unit on a table/cabinet, or you can
mount it on a wall or ceiling. You can use the mounting frame to mount the camera on a wall or ceiling.
With the provided plugs and screws.
NOTE: Before permanently installing the baby unit (camera), make sure that the wireless connection
between the baby unit and parent unit is su cient. Verify this when both the parent unit and baby unit are
placed in the positions from which you would like to use them.
NOTE: Avoid installing the baby unit near walls or other obstruction between the baby and parent unit. For a
good sound sensitivity and image it is recommended to place the baby unit between a 1,5-3m distance .
Page 34
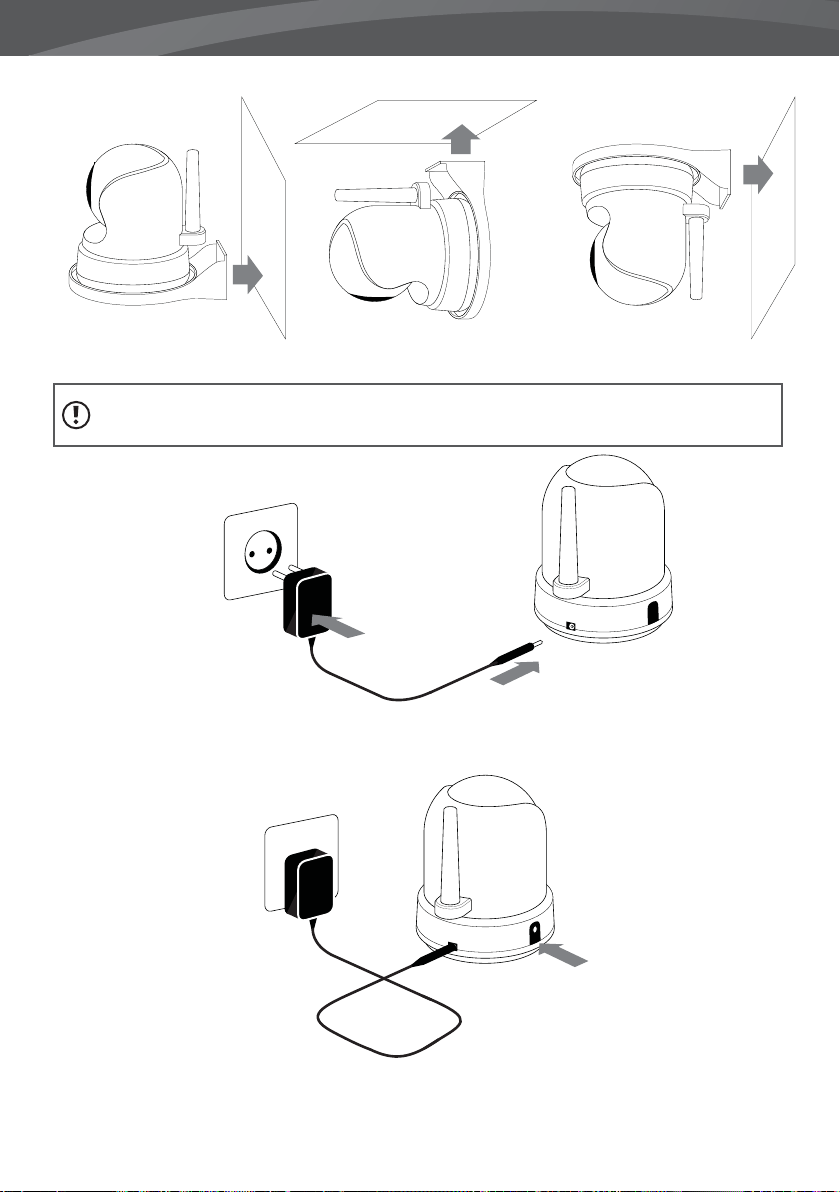
34
Wall mounted Ceiling mounted Wall mounted (upside down)
NOTE: If you mount the baby unit on the ceiling (upside down), use the Ceiling mounting switch at the
bottom of the camera to ip the video image of the camera.
3. Connect the power adapter to the baby unit and a power socket.
4. Press and hold the on/o button to switch the baby unit on. The power LED will now light up.
The parent unit will display the video of the baby unit, when both are switched on and within range of each
other. The message “Buiten Bereik” will be displayed on the screen of the parent unit when the baby unit is
outside the range of the parent unit or when the baby unit is not switched on or recognized.
Page 35
USING THE SYSTEM
LUVION Premium Baby products
35
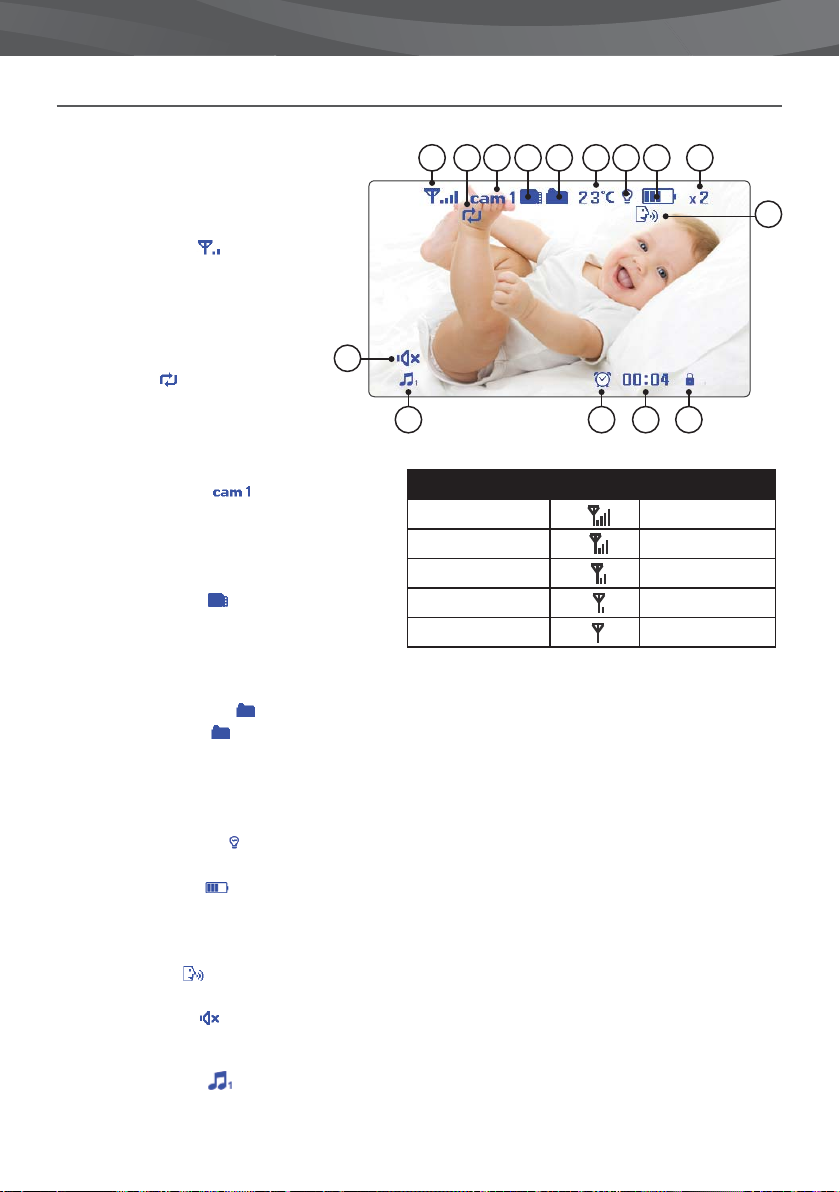
The video of the baby unit will be displayed
on the screen of the parent unit when both
are switched on. The icons on the screen are
explained below.
1. Signal indicator
indicator shows the strength of the
connection between units. no bars
indicate a poor signal and 4 bars
indicate the strongest signal (see table).
2. Overwrite indicator; when you have
selected “yes” for the SD-card overwrite
function. The icon will be displayed on
the screen.
3. Channel indicator The channel
indicator displays the current channel.
Press the CAM button (page 4) to switch
between the di erent channels.
The signal
11
1
2345 67 8 9
12
13 14 15
Signal strength Indicator Warning
Perfect None
Good None
Fair None
4. SD card indicator The SD icon will
appear when an SD card has been
properly inserted in the SD slot of the parent
unit.
5. Full SD card indicator The SD icon will start to ash on screen when the SD card is full.
New le indicator This icon will appear and icker when a new video has been recorded but has not
yet been watched.
Low Out of range
No Signal Out of range
10
6. Temperature indicator Displays the temperature measured by the baby unit.
7. Night light indicator Is being displayed when the night light on the baby unit is activated.
8. Battery indicator Indicates the battery life of the parent unit.
9. Zoom indicator Indicates that the video from the baby unit is zoomed in.
10. Talk indicator Appears when the talk button is pressed. You can now talk through the baby unit.
11. Sound indicator When the volume has been decreased to mute, the mute icon will be displayed on
the screen. Press the volume button to increase the volume.
12. Lullaby indicator When the play lullaby button is pressed the lullaby indicator is displayed on the
screen. Press next to switch between songs.
Page 36
36
13. Time alarm indicator Will appear on the screen when the timer is activated.
14. Alarm time
15. Lock indicator Will appear on the screen when the lock button is pressed to deactivate the touch
buttons at the front of the parent unit.
Displays the remaining time (in minutes) until alarm sounds
OUT OF RANGE WARNING
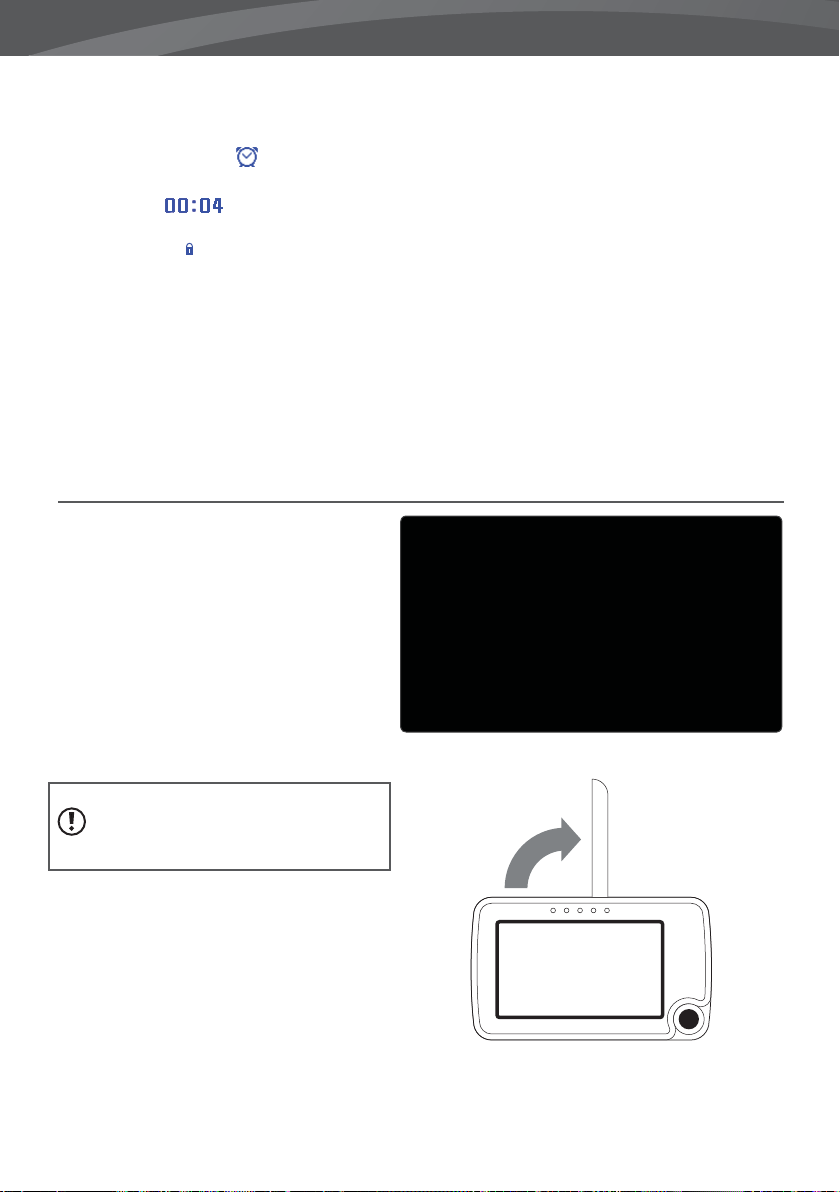
When the baby unit is positioned too far away
from the parent unit, the warning message “Out
of Range” will appear on the screen of the parent
unit and the video will start to icker. When
there is no connection between the baby and
the parent unit, the screen of the parent unit will
be black and display the warning message “Out
of Range”.
To improve the range of the baby monitor, move
the antenna of the baby monitor upwards.
OUT OF RANGE
NOTE: If moving the baby and parent unit
closer together does not help, try pairing the
baby and parent unit. see Pairing chapter.
Page 37
LUVION Premium Baby products
MENU
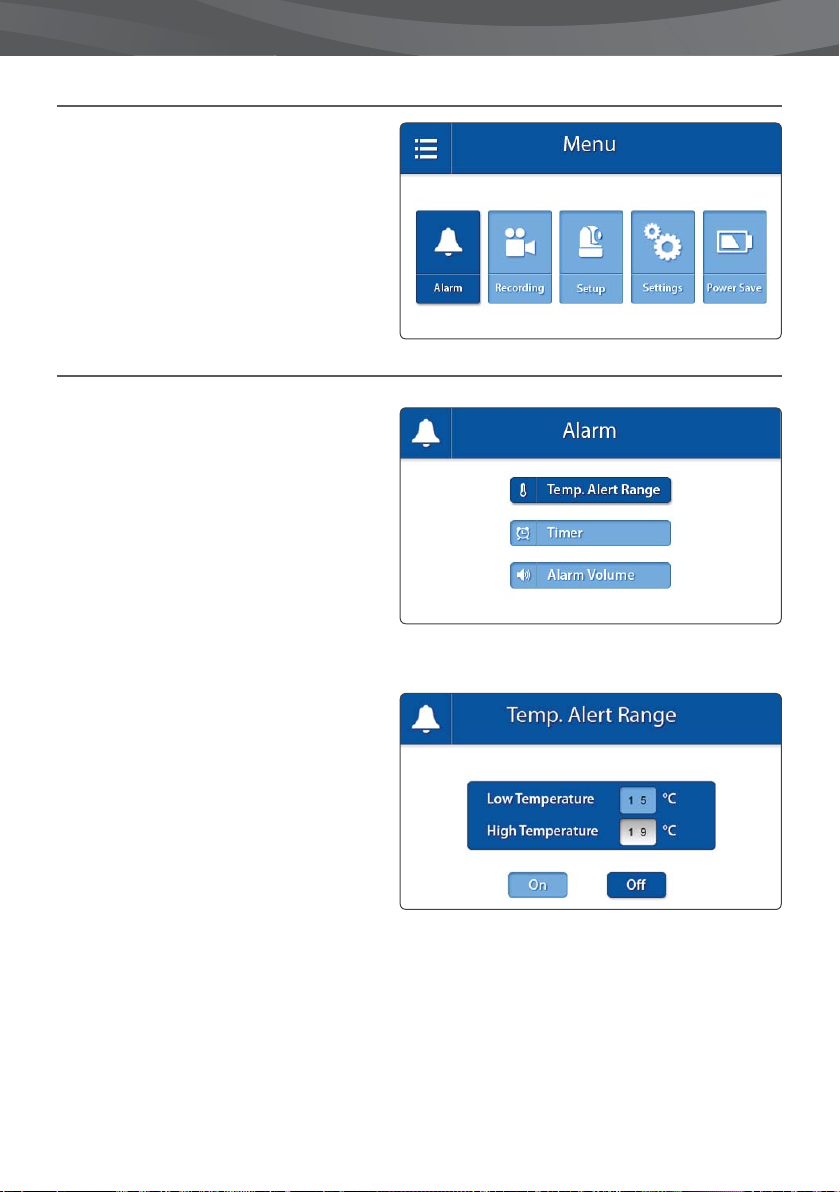
Open the menu of the Luvion Supreme Connect
to change device settings.
> Press the menu button on the parent unit to
open the menu.
> Move the joystick to the left/right to select a
submenu.
> Press the Joystick to con rm a selection,
marked dark blue, and open a submenu.
MENU > ALARM
The Luvion Supreme Connect has 2 di erent
alarms, a temperature alert and a timer. Use this
submenu to set an alarm and to change the
volume of these alarms.
> Move the joystick to the up/down to select a
submenu.
> Press the Joystick to con rm a selection, and
open a submenu.
37
MENU > ALARM > TEMP. ALERT RANGE
The baby unit (camera) is equipped with a
temperature sensor. You can set a temperature
alert to get noti ed when the temperature is
either too cold/hot. This feature is not intended
as a substitute for adult supervision.
> Move the joystick to the up and down to
move between Low Temperature and High
Temperature and the On and O buttons.
> Move the joystick to the right to increase the
temperature and to the left to decrease it.
When the Low and High Temperature are
correctly set:
> To set the alarm navigate to the On button
and press the joystick. To turn o the alarm
navigate to the O button and press the joystick.
Page 38
38
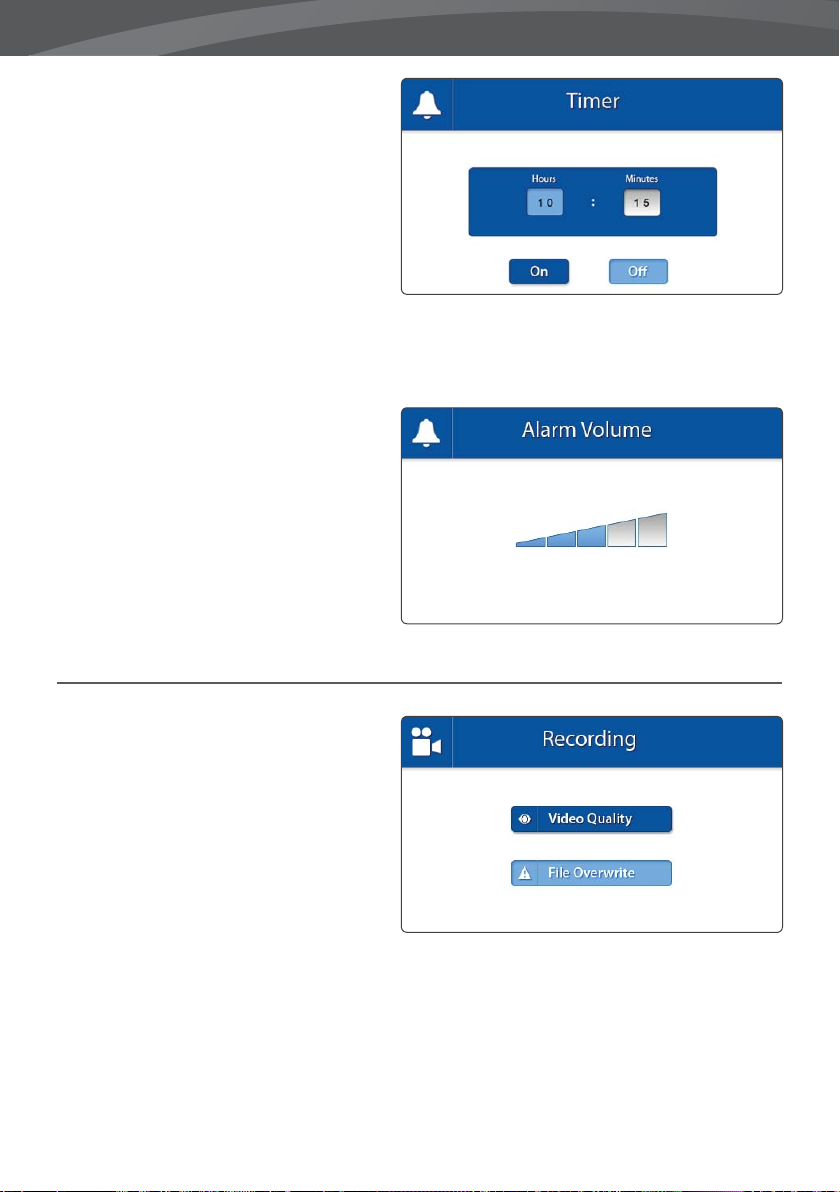
MENU > ALARM > TIMER
You can set a timer on the parent unit to help
you remind baby nap and feeding times. To set
the timer:
> Move the joystick to the left or right to select
hours or minutes.
> Move the joystick up and down to adjust the
hours/minutes.
> Press the joystick to set the time.
> Select ‘On’ to start the timer and ‘O ’ to stop it.
> Press the joystick to save your settings.
MENU > ALARM > ALARM VOLUME
The Alarm Volume sets the volume of the
Temperature Alert and Timer. This volume
setting will also change the volume of the beep
you hear when a button is pressed.
> Move the joystick to the left or right to
increase/decrease the alarm volume. To mute,
empty the bars all the way down. Press the
joystick to save your setting.
MENU > RECORDING
You can change the recording settings in this
menu.
> Move the joystick to the up/down to select a
submenu.
> Press the Joystick to con rm a selection and
to open a submenu.
Page 39
LUVION Premium Baby products
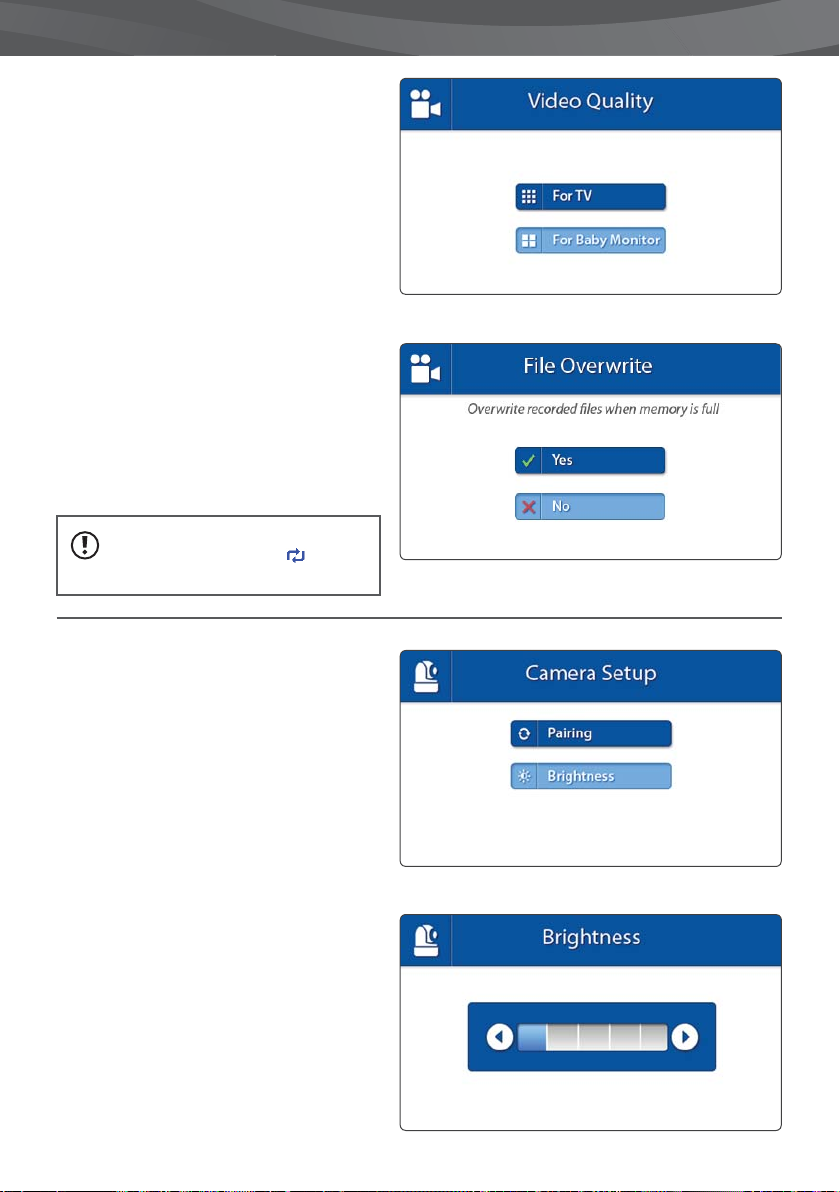
MENU > RECORDING > VIDEO QUALITY
You can set the resolution of the recorded
videos in this menu. There are two options: For
TV and For Baby Monitor. Unless connected to
an HD, refrain to the ‘For Baby Monitor’-option.
> Move the joystick up and down to select the
preferred quality.
> Press the joystick to con rm your selection.
MENU > RECORDING > FILE OVERWRITE
You can overwrite earlier recorded les when
the memory SD card is full.
> Move the joystick up and down to select Yes/
No.
> Press the joystick to con rm your selection.
NOTE: When the overwrite function is
enabled the overwrite icon will appear
on the screen.
39
MENU > SETUP
You can change the camera (baby monitor)
setup in this menu.
> Move the joystick to the up/down to select a
submenu.
> Press the Joystick to con rm a selection and
to open a submenu.
MENU > SETUP > BRIGHTNESS
You can change the brightness of the baby unit
video in this menu. When the image of the
video is too dark, try to increase the brightness.
The minimum Brightness is no bars and the
maximum Brightness is 5 bars.
> Move the joystick to the left or right to
increase/decrease the brightness.
> Press the joystick to con rm your setting.
Page 40
40
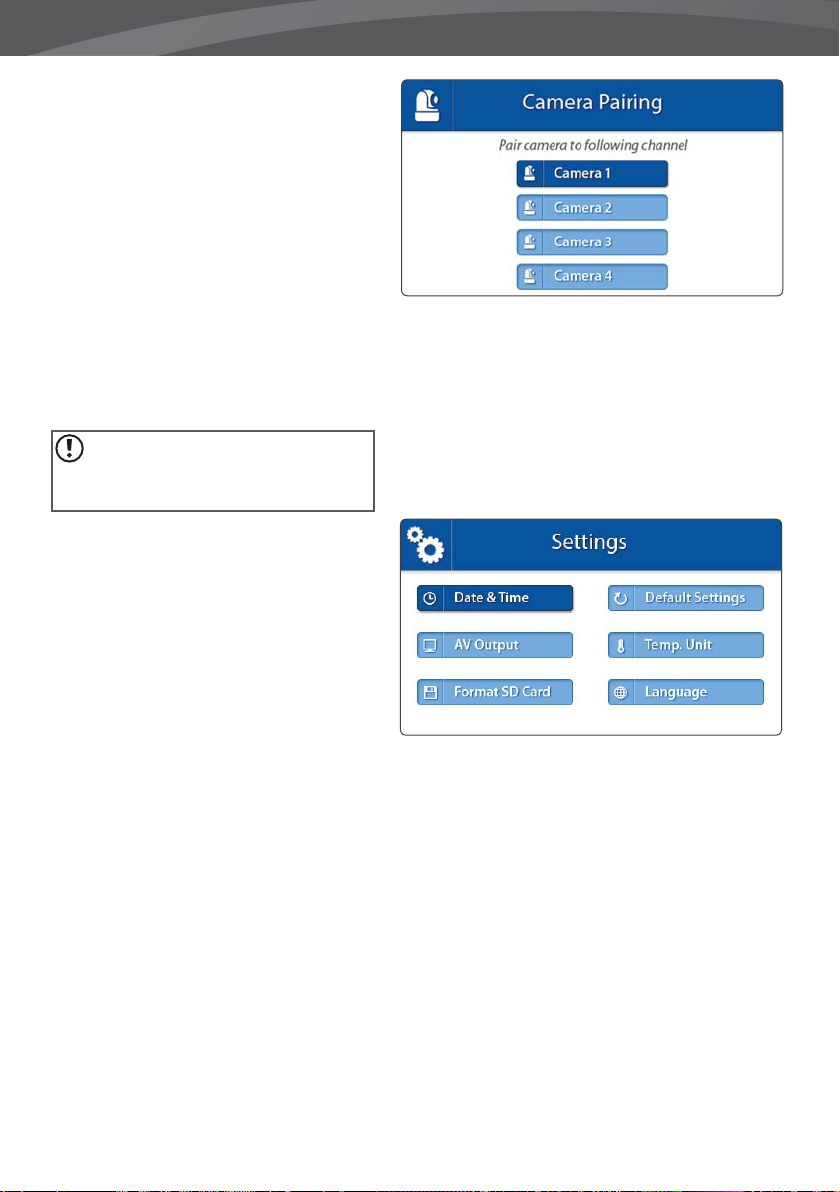
MENU > SETUP > PAIRING
You can use the pairing function to restore the
connection/or make a new connection between
the baby unit and parent unit. It also enables
you to connect additional baby units to the
parent unit. For more info see page 19.
> Move the joystick up or down to change the
camera channel you would like to pair.
> Press the joystick to con rm your selection.
> The parent unit will count down. Brie y press
the pair button on the baby unit during this
time.
NOTE: It is highly recommended to pair
the baby units to the parent unit before
permanently mounting them.
MENU > SETTINGS
You can change the settings in this menu.
> Move the joystick to the up/down/left/right
to select a submenu.
> Press the Joystick to con rm a selection and
to open a submenu.
Page 41
LUVION Premium Baby products
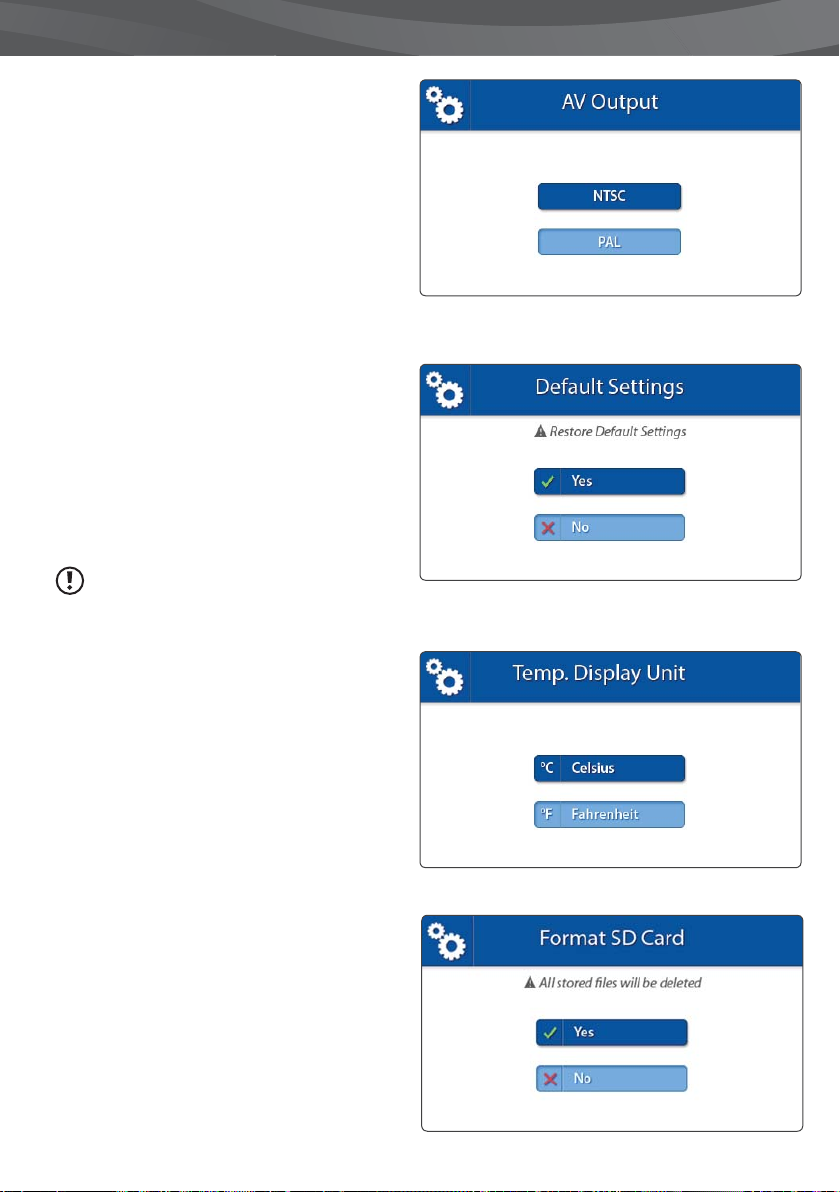
MENU > SETTINGS > AV OUTPUT
Use the AV cable to connect the parent unit
(monitor) to your TV. In this menu you can select
the right format for your TV system. You can
choose between NTSC (North America) and PAL
(Europe).
> Move the joystick up and down to select the
right output format.
> Press the joystick to con rm your selection.
MENU > SETTINGS > DEFAULT SETTINGS
Use this menu to restore the Default Settings
(factory settings).
> Move the joystick up and down to select Yes/No.
> Press the joystick to con rm your selection.
NOTE: Restoring the Default Settings will not
a ect the pairing settings. The baby unit(s) will
remain paired with the parent unit.
41
MENU > SETTINGS > TEMPERATURE DISPLAY UNIT
The baby unit (camera) is equipped with a
temperature sensor. This temperature is displayed
on the parent unit (monitor). Use this menu to
select the preferred unit. You can choose between
Degrees Celsius or Fahrenheit.
> Move the joystick up and down to select a
temperature display unit
> Press the joystick to con rm your selection.
MENU > SETTINGS > FORMAT SD CARD
Use this menu to delete all the data stored on the
Micro SD card currently inserted in the parent unit
(monitor).
> Move the joystick up and down to select Yes/No.
> Press the joystick to con rm your selection.
Page 42
42
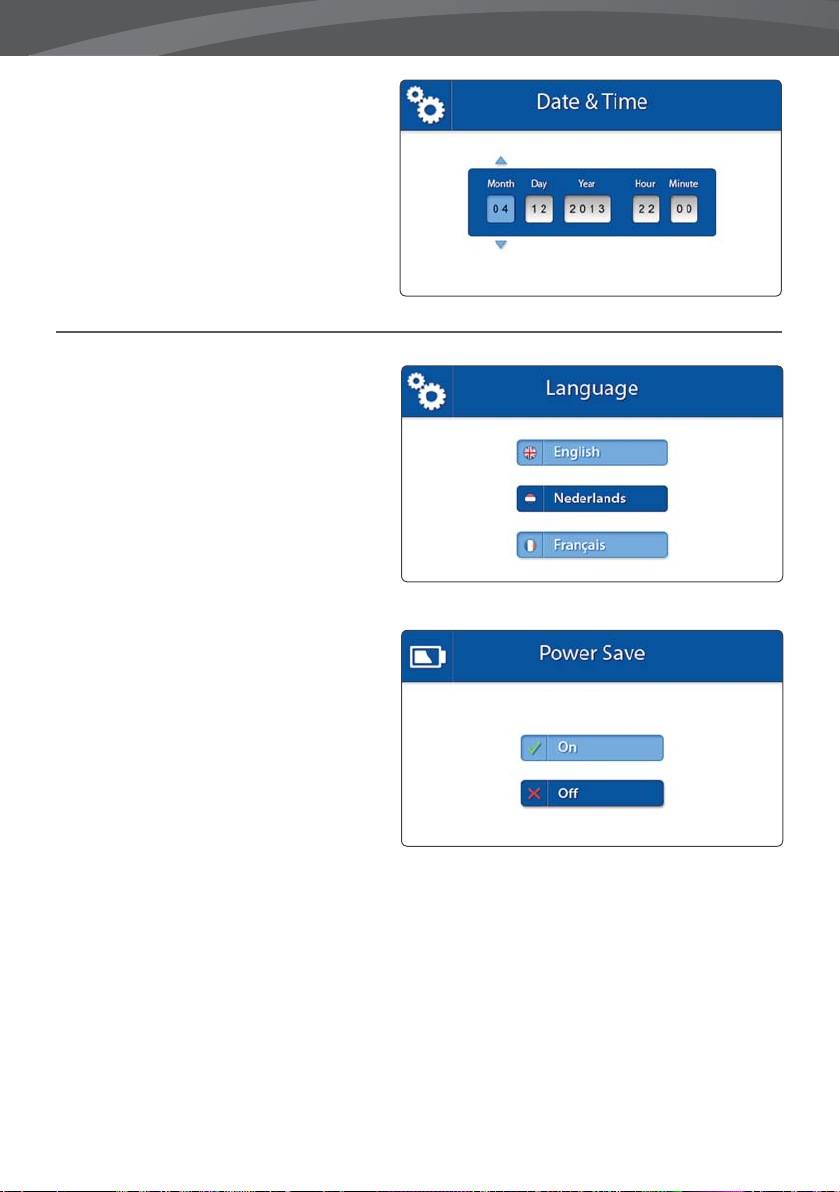
MENU > SETTINGS > DATE & TIME
The Date & Time are used to name recorded
videos.
> Move the joystick left and right to select an
input eld.
> Move the joystick up and down to change the
value of the input eld.
> Press the joystick to con rm your selection.
MENU > SETTINGS > LANGUAGE
The default language of the menus of the parent
unit is English. However, Dutch and French are
also available. Use this menu to change the
menu language.
> Move the joystick up and down to select a
language.
> Press the joystick to con rm your selection.
MENU > POWER SAVE
The Power Save mode is a battery-conserving
function that turns o the screen of the parent
unit when the camera has not detected any loud
sound for 3 minutes. When sound is detected,
the parent unit will turn back on.
> Move the joystick up and down to select
On/O .
> Press the joystick to con rm your selection.
Page 43
LUVION Premium Baby products
PAIRING
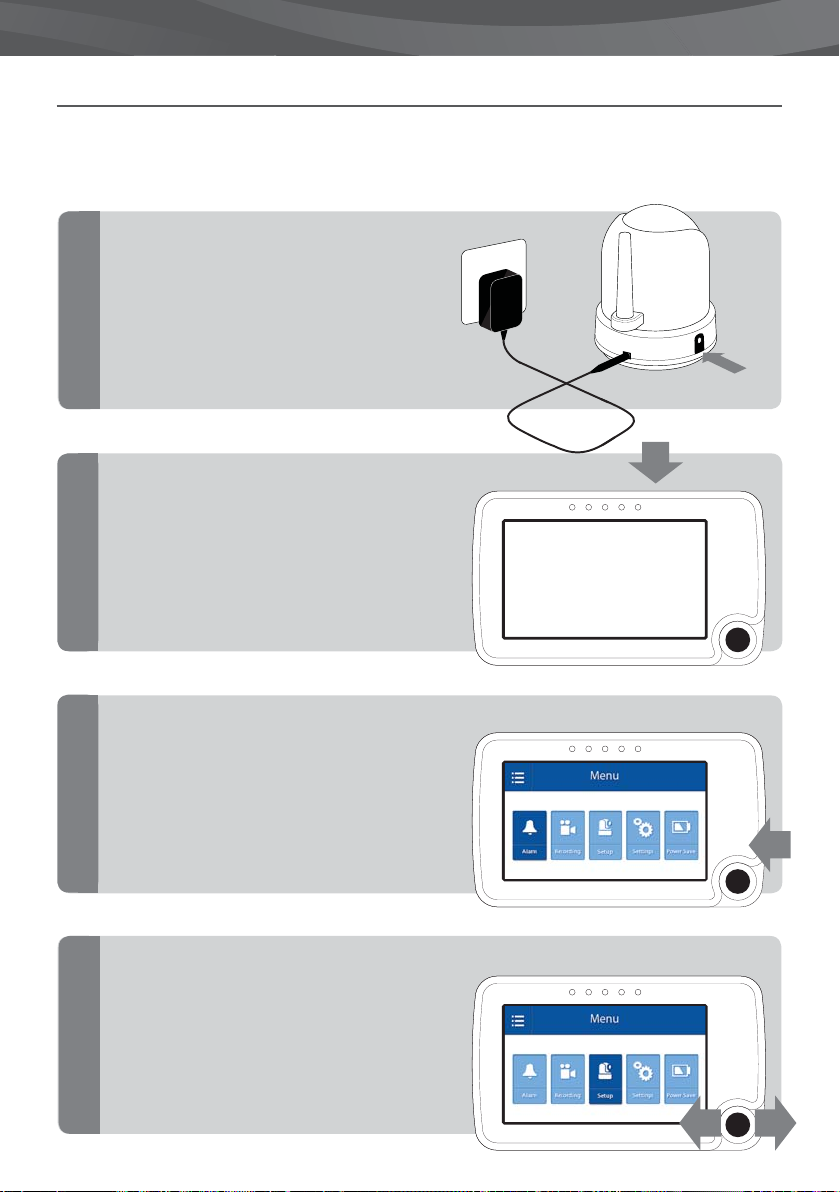
Use the Pairing function to connect a baby unit (camera) to the parent unit (monitor). Up to 4 baby units can
be connected to the monitor. They need to be paired on a di erent channel.
Switch the baby unit (camera)
on by holding down the power
button until the Power LED turns
green .
1
Hold and press the On/O button to switch
the parent unit (monitor) on.
2
LUVION
43
Press the MENU button
3
Move the joystick to the left or right to
select SETUP.
Press the joystick to open the
4
SETUP menu.
Page 44
44
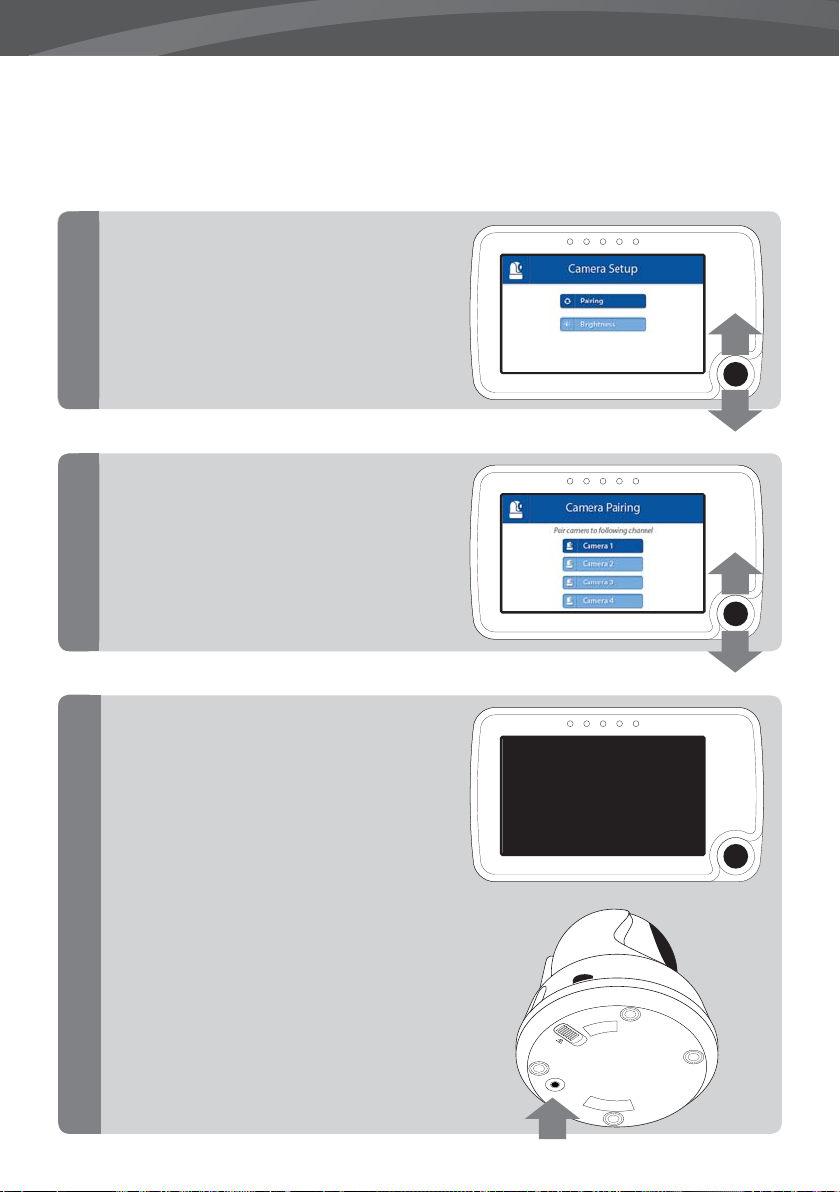
Move the joystick up or down to select pairing.
Press the joystick to open the pairing menu.
5
Move the joystick up or down to select the
desired pairing channel.
Press the joystick to con rm your selection.
6
A countdown will be displayed on the screen.
Brie y press the baby unit (camera) pair
button to pair the baby unit (camera) to the
parent unit (monitor).
The video from the camera should now be
displayed on screen.
7
PLEASE PRESS
PAIR KEY
ON CAMERA SIDE
12
PA
IR
Page 45
LUVION Premium Baby products
PLAYBACK
TO VIEW YOUR FILES
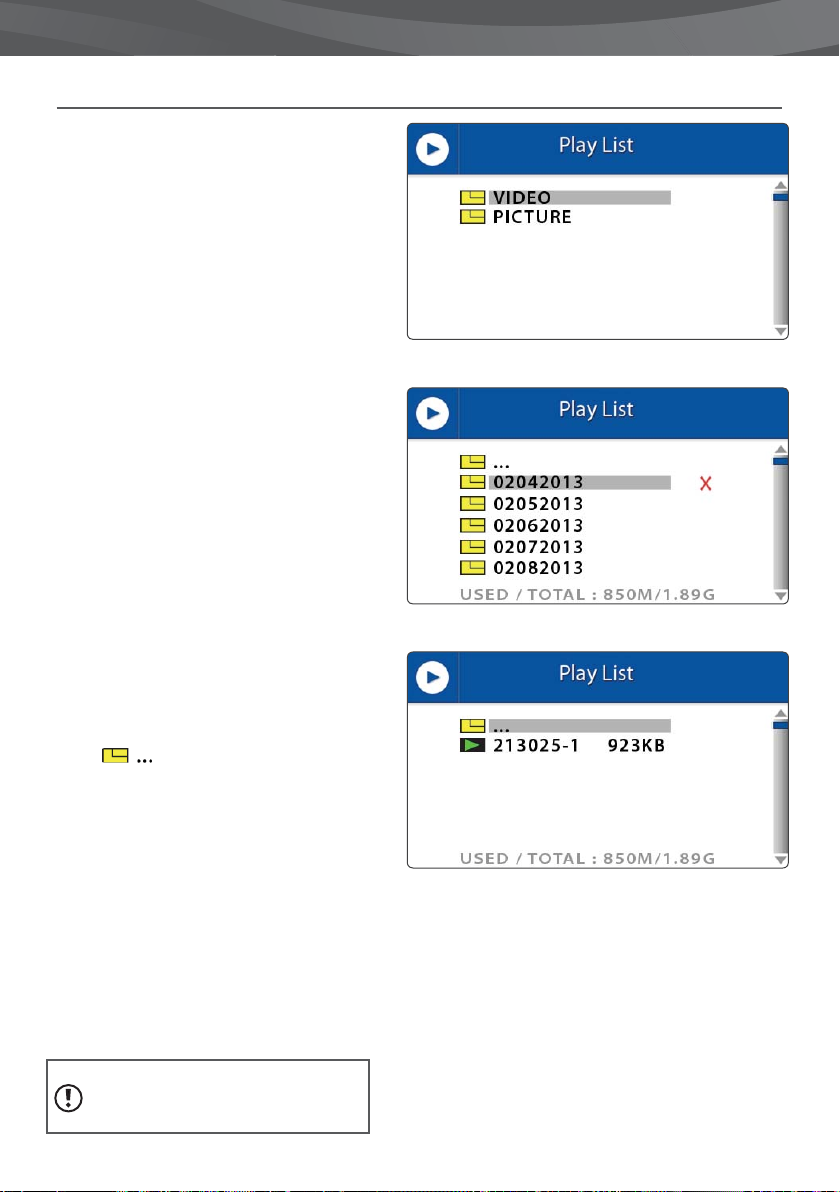
> Press the joystick to enter the Playback menu
> Move the joystick up/down to select the
VIDEO or PICTURE folders. (img. I)
All recorded videos are stored in the VIDEO
folder. While all the snapshots that have been
taken are stored in the PICTURE folder.
45
> Press the joystick to open a folder.
> Move the joystick up and down to select a
folder from which you would like to see the
videos. (img. II)
NOTE: The folders are named by month/day/year
For example a le named 02042013 means that
the le was created on the 4th of February (02)
2013. Photos and videos are named by the time
(hhmmss) at which they were recorded.
> Press the joystick to open a folder.
> Select the video/photo you would like to see.
> Press the joystick to play the video/show the
photo. Press right to fast forward the video, or
left to rewind it. (see img. III)
Press the MENU button to go back to the folder.
Select
a level.
TO DELETE FILES AND FOLDERS
> Press the joystick to enter the Playback menu.
> Move the joystick up/down to move between
les and folders.
> Select the le of folder you wish to delete.
> Move the joystick to the right to select the
red “X”.
> Press the joystick to con rm your selection.
> Select YES and press the joystick to delete
your selection.
and press the joystick to go up
I: Select Video or Picture folder
II: Select folder by date
III: Select video by time
NOTE: The Video/Picture folders cannot be
deleted.
Page 46

46
TROUBLESHOOTING
If you have any problems with the Luvion Supreme Connect, there is often a quick and simple solution.
Please try the following:
Problem Solution
No video from the baby
unit
The video is dropping/
I have a constant low
reception/“Buiten Bereik”
message
Audio problems 1. Make sure that the volume on the parent unit is not muted. Press the
The video is or has become
choppy
1. Check the power supply of the baby unit. Make sure the power
adapter is plugged in and the green power LED is switched on.
2. Make sure that the parent unit is switched on.
3. Make sure that the baby unit is in range of the parent unit.
4. Make sure that the parent unit is not in the audio only mode (press
the power button shortly to exit the audio only mode)
5. Make sure that the parent unit is not in the power save mode. Go to
menu > power save and switch the power save mode o .
1. Move the baby unit closer to the parent unit.
2. Try repositioning the baby and/or parent unit (away from walls) to
improve the reception.
3. Place the antenna of the parent unit in the upright position.
4. (re-)Pair the parent unit with the baby unit (see pairing chapter)
+ volume button on the parent unit to increase the volume.
2. Make sure that there is sound within range of the baby unit
microphone.
3. If the unit emits a loud, screeching noise, move the baby and parent
unit further apart.
The video may become choppy when a lower frame rate is experienced
(i.e. 10 frames per second instead of 20 frames per second).
1. Try moving the baby unit closer to the parent unit.
2. Remove obstructions between the baby and parent unit.
3. Place the antenna of the parent unit in the upright position.
The battery of the parent
unit runs out very fast
The screen is frozen and I
can’t use the on/o button
to switch o the parent
unit.
The image is upside down Use the videoswitch on the bottom of the camera unit to ip the image.
Use the power save mode or replace the battery with an o cial one.
O cial batteries can be acquired at your local luvion dealer.
Use the reset button located at the back of the parent unit to switch of
the parent unit. You can use the on/o button to switch it back on.
(see Overview baby unit).
Page 47
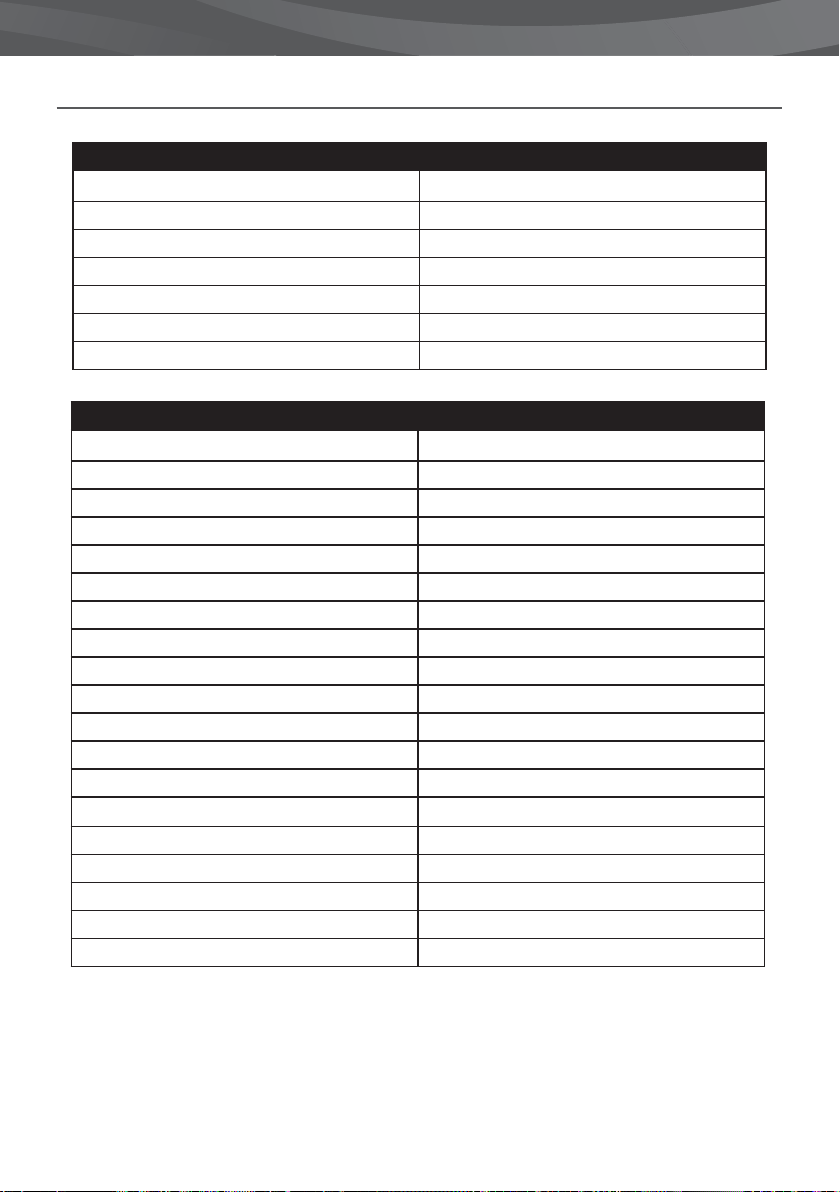
LUVION Premium Baby products
TECHNICAL SPECIFICATIONS
General Speci cations
Operating Frequency Range 2.400 MHz ~ 2.483,5 MHz
Transmitting Power 15 dBm Max
Receiving Sensitivity -81 dBm
Type of Spread Spectrum FHSS 39 Channels
Type of Modulation GSFK
Data Rate 2 Mbps
Transmitting Distance 300 m (Line of Sight)
Baby unit (camera)
Image Sensor Type 1/6” v 7660 Color CMOS Image Sensor
E ective Pixels H: 640 px, V: 480 px
Image Resolution/Frame Rate 20 fps
White Balance Auto
Lens 3.0 mm, F 2.8
Field of View 60°
IR On/O 15-25 Lux O , 5-15 Lux On
IR LED Type/Night Vision 850 nm / 5 m
Speaker Output 0.5 W Max
Power Requirement 5 Vdc 1.5A +/- 10%
Power Consumption 600mA +/- 20mA
Operating Temperature Range - 10° ~ 40°
Operating Humidity Range 80% HR
Environment Rating N/A (for indoor use only)
Dimensions 72*46*41 mm
Regulation Compliance FCC/CE
Camera Housing Material Plastic
Motory Type Stepping motor
Moving Angle Up 90° Down 20° Left/Right 135°
47
Page 48

48
Parent unit (monitor)
LCD Panel Size 4,3“ / 10,9 cm
LCD Resolution H: 480 px, V: 272 px
Viewing Angle H: 150° V: 130°
A/V Out Resolution CCIR656 YUV640
Power Requirement 5 Vdc 1.5A +/- 5 %
Power Consumption 360mA
Operating Temperature - 10° ~ 40°
Operating Humidity 0% ~ 85%
Page 49

LUVION Premium Baby products
49
Page 50

Luvion Premium Babyproducts
Visit us at:
www. Luvion.com
 Loading...