

Page 1
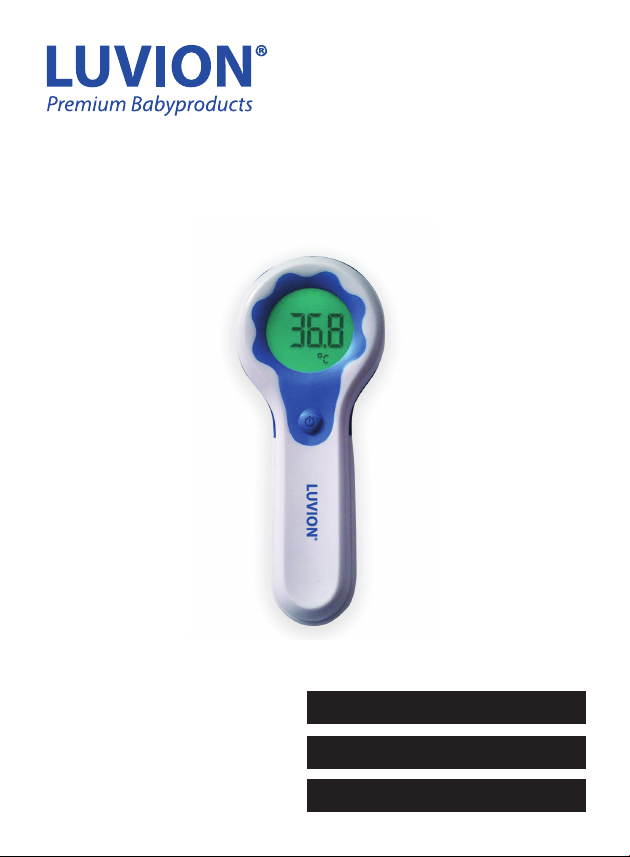
Exact non-contact thermometer
ENGLISH - USER MANUAL
NEDERLANDS - GEBRUIKSHANDLEIDING
FRANCAIS - GUIDE DE L’UTILISATEUR
Page 2

ENGLISH - USER MANUAL
Thank you for purchasing the Luvion Exact non-contact digital Infrared
thermometer.
1. The advantages of the Luvion Exact non-contact thermometer
Measurement within seconds
The innovative infrared technology allows measurement of forehead temperature in just a few seconds.
The Exact non-contact thermometer is a high quality product incorporating the
latest technology and it has been tested in accordance with international
standards. With it’s unique technology, the Luvion Exact non-contact
thermometer will guarantee reliable readings. The thermometer will self-test
every time it starts up to always ensure the accuracy of measurements.
The Exact non-contact thermometer can be used to measure the body
temperature, and is suitable for people of all ages. The thermometer can be used
to measure the temperature of milk as well.
Please read these instructions carefully before using this instrument and keep
the instructions and the thermometer in a safe and secure place.
Accurate and reliable
Due to the unique probe assembly construction, the advanced infrared sensor
and the complete calibration process, this thermometer will oer a very
accurate and reliable temperature measurement.
Gentle and easy to use
• The non-contact thermometer is non-invasive. A measurement can be taken
even while a child is sleeping.
• The unique design makes the non-contact thermometer easy to hold and use.
• The non-contact thermometer is less threatening to a child than a rectal ther-
mometer.
Multiple reading recalls
Users can recall the last 20 readings when activating the memory mode,
enabling ecient tracking of temperature history and variations.
Safe and hygienic
Contents
1. The advantages of the Luvion Exact non-contact thermometer ....................... 3
2. Necessary safety instructions .......................................................................................... 3
3. Product description ............................................................................................................ 5
4. How to measure the forehead temperature .............................................................. 5
5. How to measure the milk temperature ........................................................................ 5
6. Explanation of displays and operation instructions ................................................ 6
7. Cleaning and storage ....................................................................................................... 10
8. Technical specications ................................................................................................... 10
9. After-sale service .............................................................................................................. 12
10. Security type .......................................................................................................................12
• No risk of broken glass or mercury ingestion.
• Completely safe for use on children.
Fever Indication feature
The Fever Indication feature helps you to interpret the meaning of the temperature faster thanks to the colour indicated display.
The screen displays green if there is no fever and a red alert for fever.
Seven audible beeps indicate temperatures above 37.5°C.
2. Necessary safety instructions
• Never use the thermometer for purposes other than those it has been intended
for. Please follow the general safety precautions when using on children.
• Never immerse the Forehead Thermometer into water or other liquids (not
waterproof). For cleaning and disinfecting please follow the instructions in the
“Cleaning and Storage” section.
2 3
Page 3
• Keep the instrument away from direct exposure to the sun and keep it in a dust-
free, dry area at a temperature between 16°- 40°C.
• Do not use the thermometer if there are signs of damage on the measuring
sensor or on the instrument itself. If damaged, do not attempt to repair the
instrument!
• This non-contact thermometer consists of high-quality precision parts. Do not
drop the instrument. Protect it from severe impact and shock.
Do not twist the instrument or the measuring sensor.
• The thermometer is only suitable for the measurement of body temperature
and the temperature of liquids like milk. The use of this thermometer is not
intended as a substitute for consultation with your doctor. The thermometer is
initially calibrated at the time of manufacture. If this thermometer is used according to these instructions, the accuracy of measurements will not be aected.
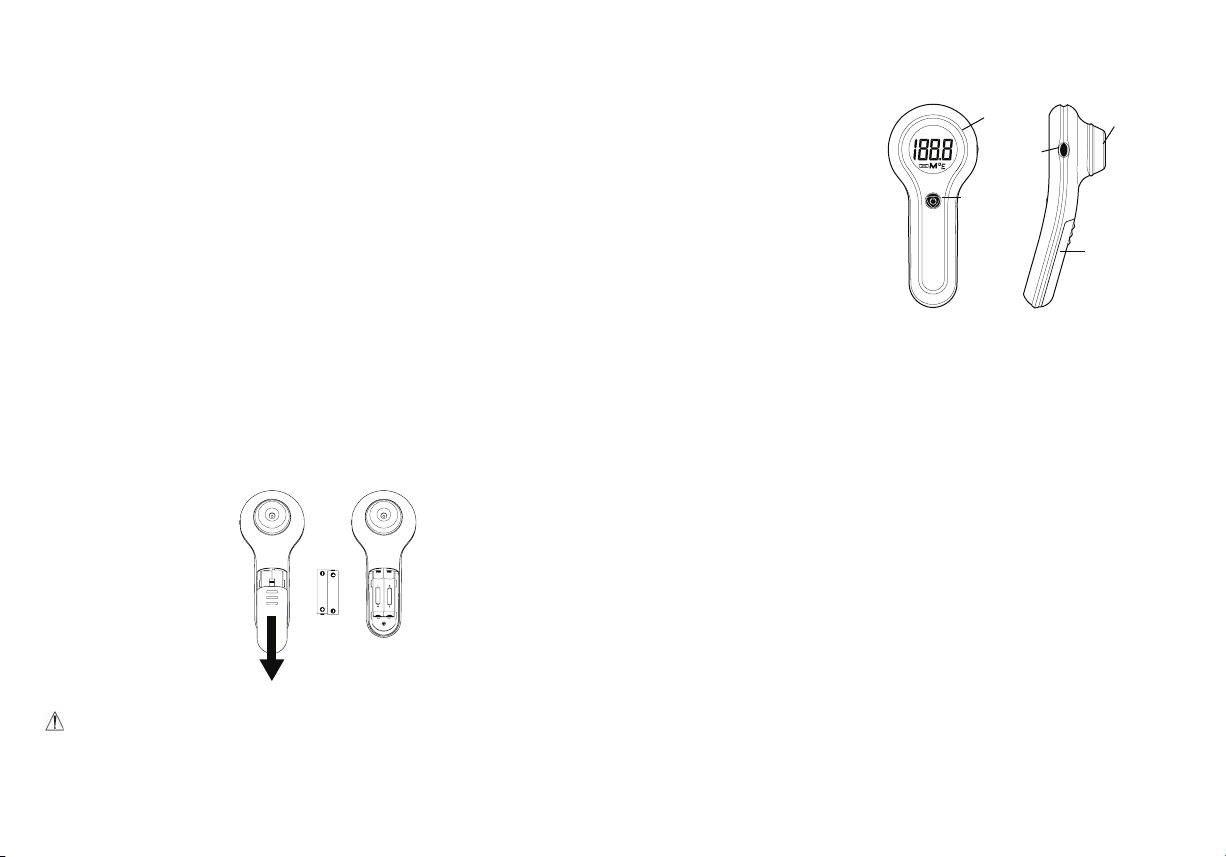
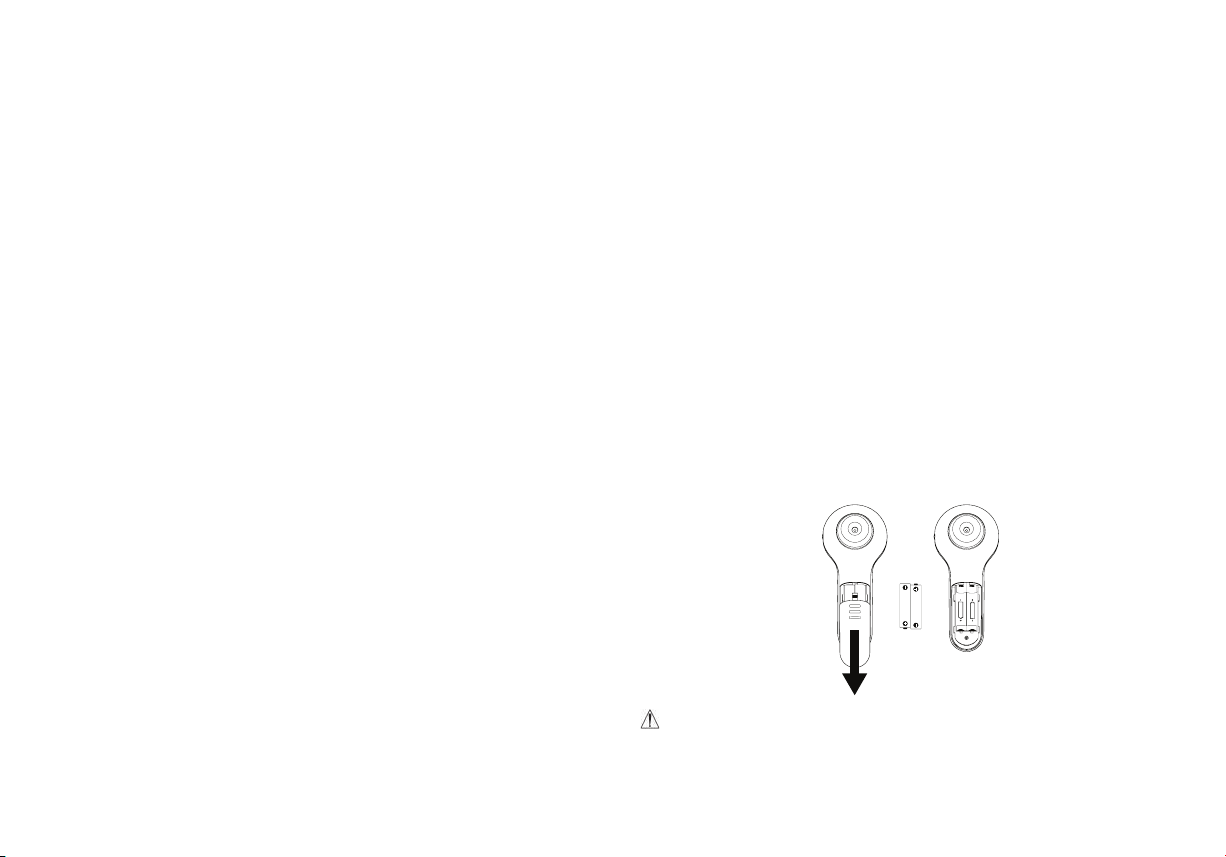
• The non-contact thermometer is supplied with 2 AAA batteries. Replace
with 2 new AAA batteries when the ashing battery symbol appears on
the LCD display. To change the batteries, slide open the battery cover as
shown and remove batteries. When replacing the batteries be sure to align
the batteries properly as indicated inside the battery compartment.
• Remove the battery from the instrument if it is not required for extended
periods of time, in order to avoid damage to the thermometer resulting from a
leaking battery.
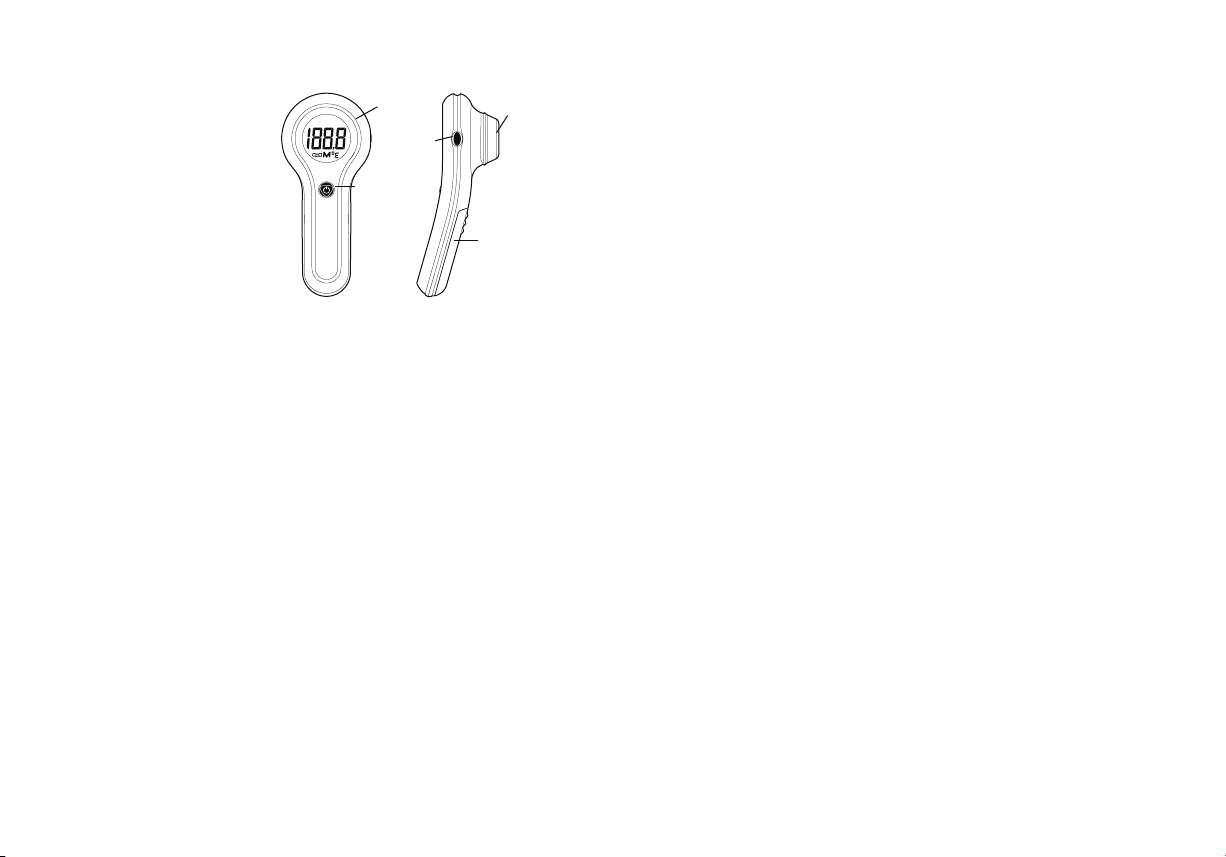
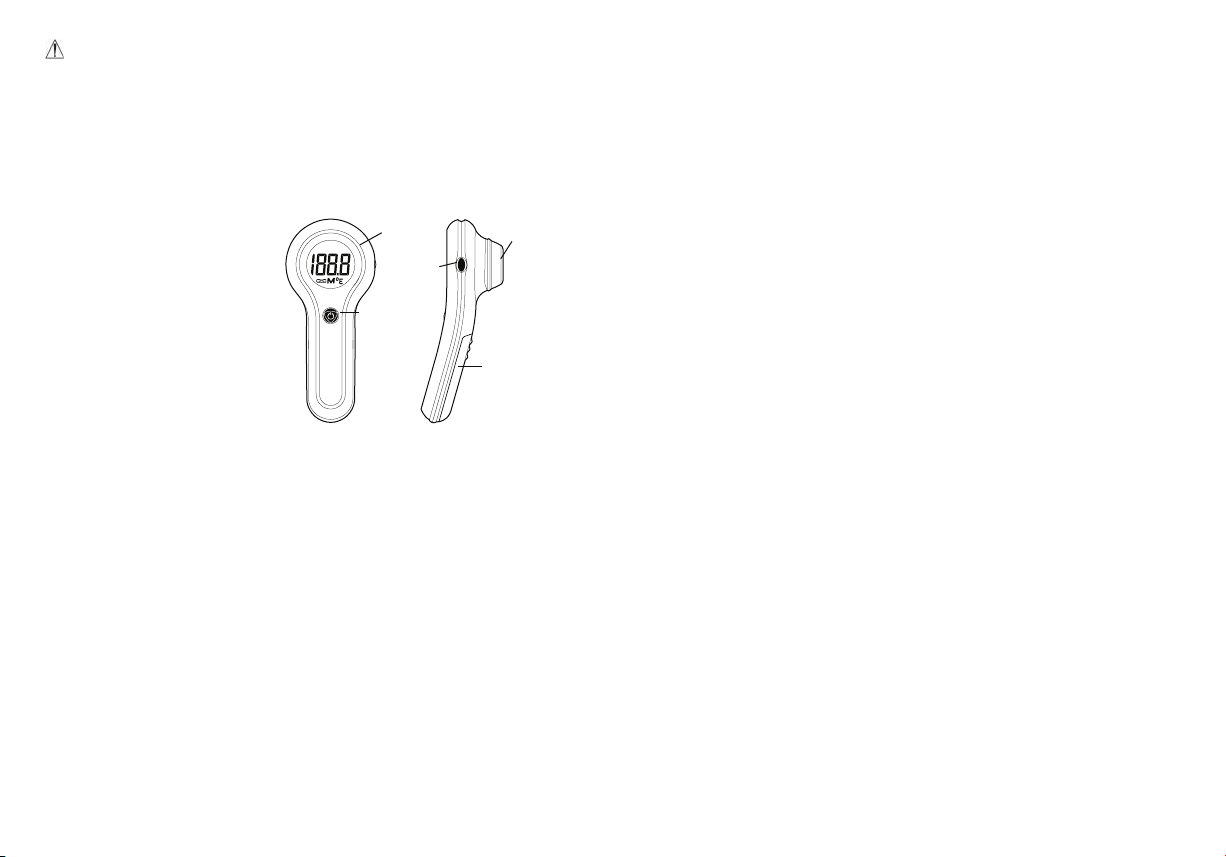
3. Product description
(1) Sensor
(2) Body measuring button
(3) Milk measuring button
(4) LCD display
(5) Battery cover
4. How to measure the body temperature
The Luvion Exact non-contact thermometer measures infrared energy emitted
from the skin above the eyebrow area and the surrounding tissue. This energy
is collected through the lens and converted to a temperature value. Temperature
readings obtained by scanning the skin above the eyebrow
area will provide the greatest accuracy.
The Luvion Exact non-contact thermometer has been clinically tested and
proven to be safe and accurate when used in accordance with its operating
instruction manual.
5. How to measure the milk temperature
(4)
(3)
(2)
(1)
(5)
WARNING:
• Use of this non-contact thermometer is not intended as a substitute for
consultation with your physician or pediatrician.
• This thermometer is not waterproof! Please NEVER immerse into liquids!
4 5
2 x AAA
The non-contact thermometer measures infrared energy emitted from the feeding bottle, and it shall display the milk temperature by transition calculating and
emission rate compensation. Please use the button on the side of the thermom-
eter (3) for startup when measuring milk temperature.
To avoid an inaccurate measurement, note the following:
• Patients and thermometer should stay in steady-state room condition for at
least 30 minutes before measuring.
• Don’t take a measurement while or immediately after nursing a baby.
Page 4
• Don’t use the non-contact thermometer in high humidity environments.
• Patients should not drink, eat, or be physically active before/while taking the
measurement.
• Before placing the thermometer sensor onto the measurement area, remove
hair, sweat, or dirt.
• Use an alcohol swab to carefully clean the sensor and wait for 5 minutes before
taking a measurement on another patient.
• 7 short beeps will sound when the temperature is higher than 37.5 °C in order
to alert the patient that he/she may have a fever.
• Always take the temperature in the same location, since the temperature read-
ings may vary from dierent locations.
• In the following situations it is recommended that three temperatures in the
same location be taken and the highest one taken as
the reading:
1) Newborn infants in the rst 100 days.
2) Children under three years of age with a compromised immune system and for
whom the presence or absence of fever is critical.
3) When you’re using the thermometer for the rst time until you have familiarized yourself with the instrument and obtain consistent readings.
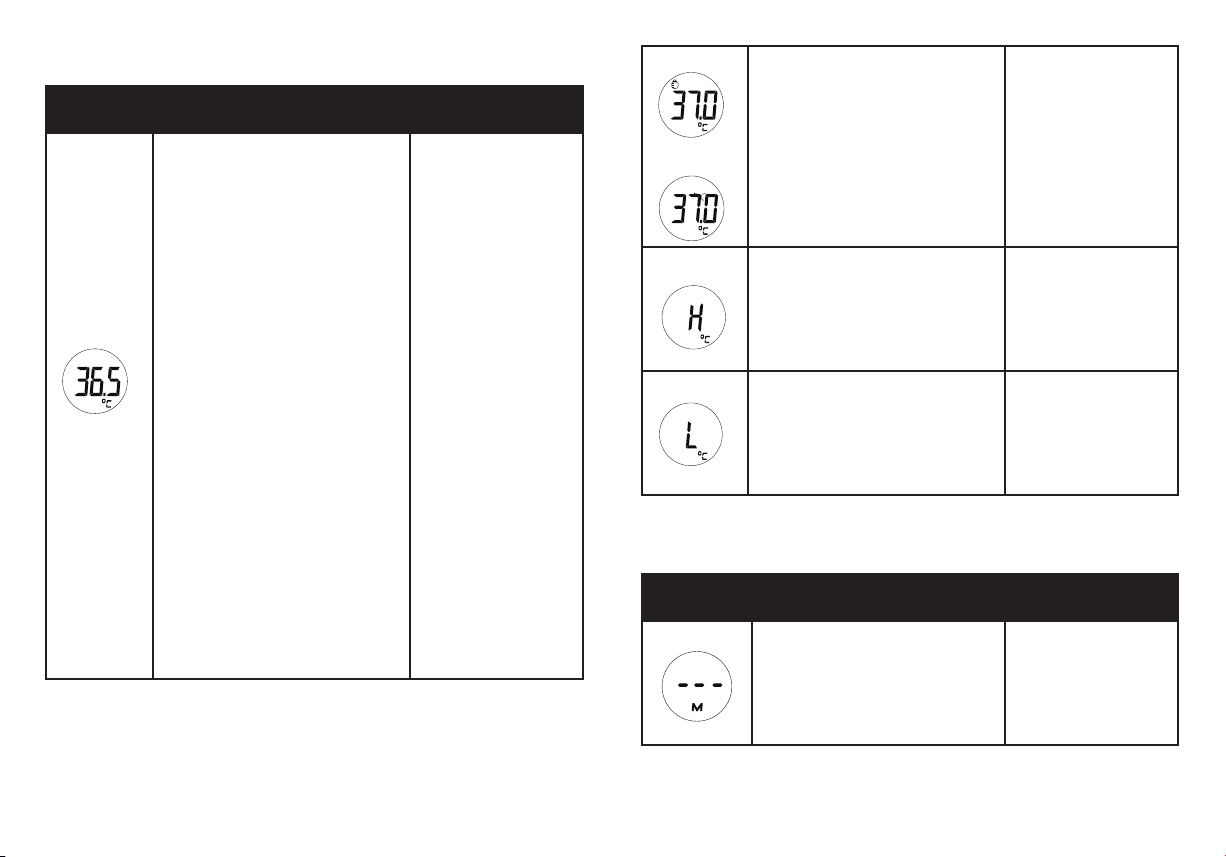
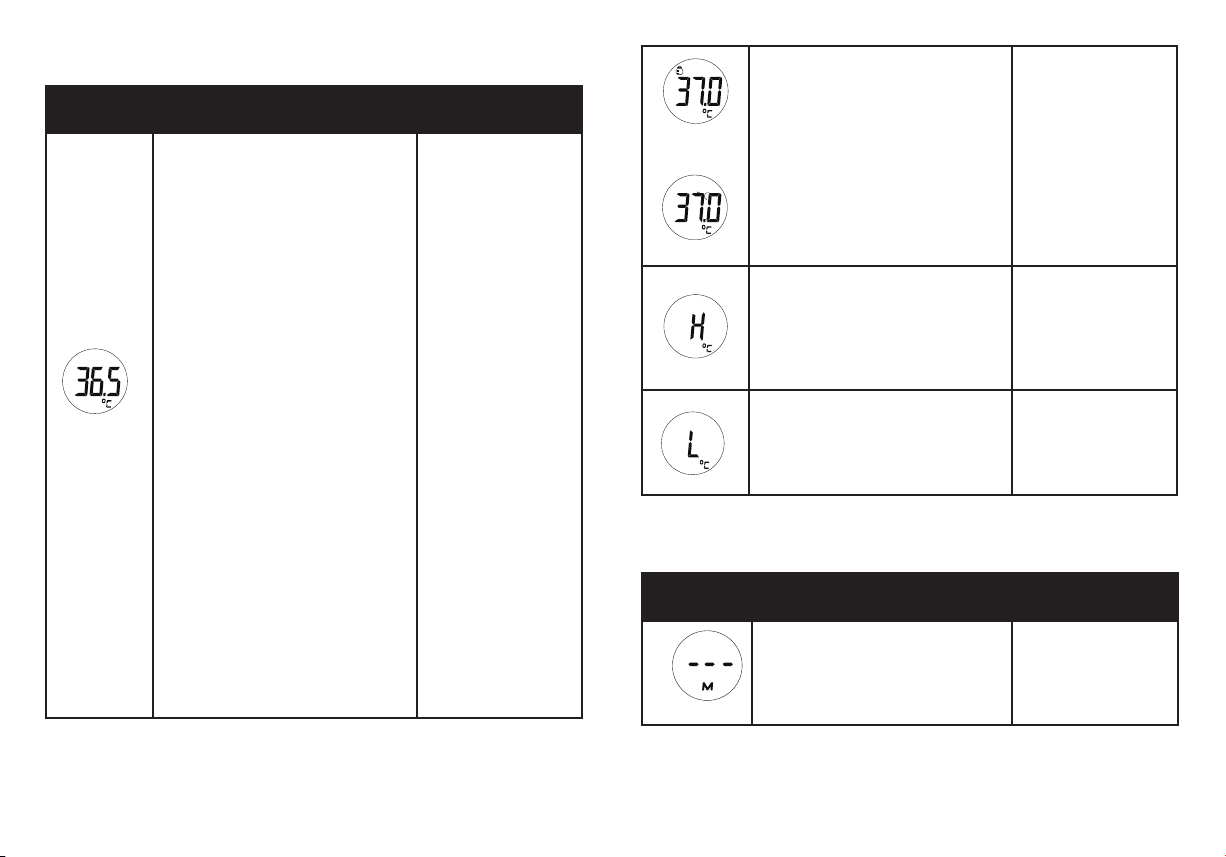
6. Explanation of displays and operation instructions
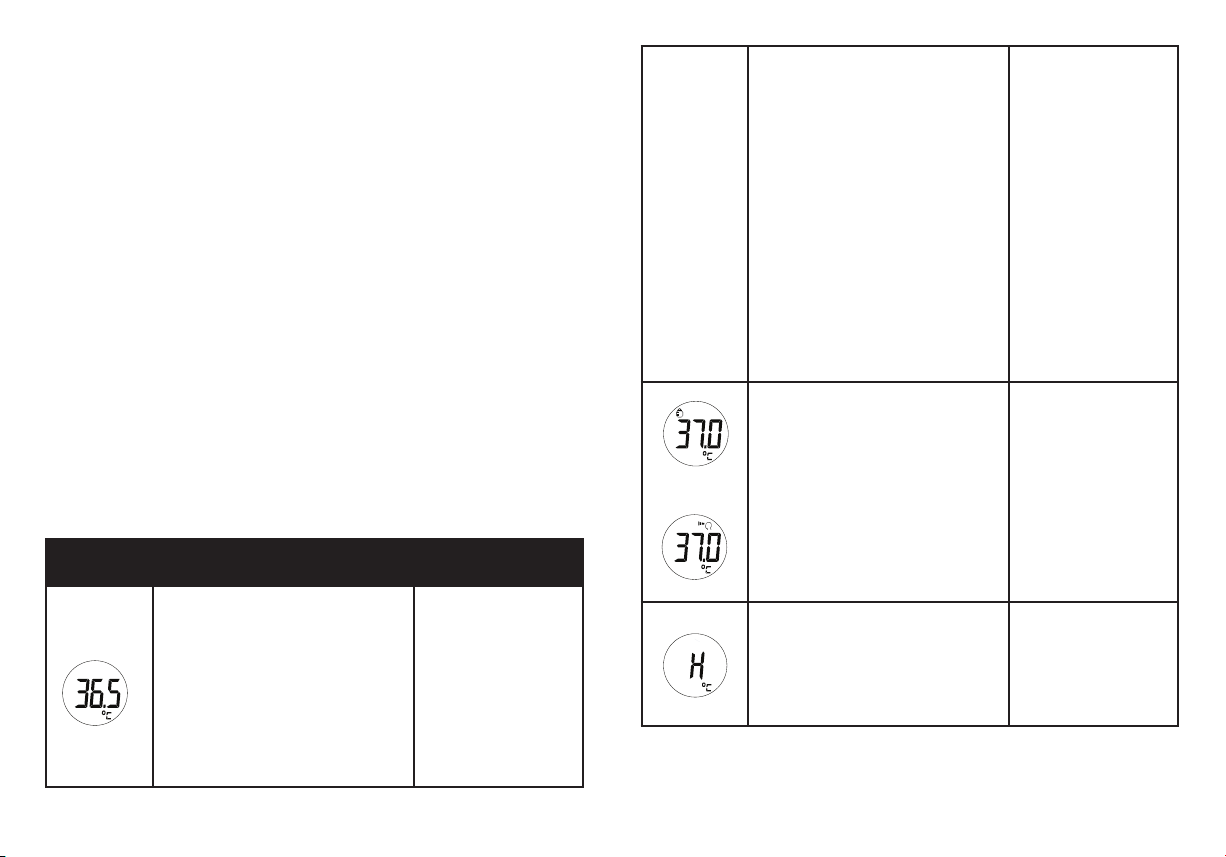
LCD display Operation instructions and explana-
Sound and backlit
tion of displays
1. Measurement of body
temperature
1. Aim the temperature sensor (1)
at the measurer’s forehead directly
(eective distance 1 to 6 cm), under
shutdown state press button (2)
or hold down button (2), the LCD
display will display the measured
forehead temperature.
Body
temperature mode
1. When temperature
value is between
32.0°C and 37.6°C
there will be one long
beep and green backlit
for 3 seconds.
2. When temperature
value is
Holding down the button and scanning over the forehead is suggested.
The system will read sequentially
and show the maximum value.
2. Measurement of milk temperature. Under shutdown state Press
button (3) and release it within 4
seconds. the LCD display will display
the measured milk temperature.
3. Press button (2) or (3) under
startup mode to measure again.
Attention:
There will be 7 short rapid beeps
when the measured temperature
exceed 37.5°C/99.5°F which is a
between 37.6°C/99.6°F
and 42.2°C/107.9°F,
there will be 7 short
beeps and red backlit
for 3 seconds.
Milk temperature
mode
1. When the temperature value is between
0.0°C/32.0°F and
100.0°C/212.0°F there
will be a long beep
and green backlit for 3
seconds.
warning for patients that he/she
might have a fever.
The feeding bottle symbol will be
visible in the left top corner when
in Milk temperature mode. The °C
or
symbol will blink when the reading
is ready.
The forehead symbol will be visible
in the right top corner when in Body
temperature mode. The °C symbol
will blink when the reading is ready.
1. The measured value exceeds
100°C/212.0°F under milk temperature mode.
3 short beeps and red
backlit for 3 seconds.
2. The measured value exceeds
42.2°C/107.9°F under body
temperature mode.
6 7
Page 5
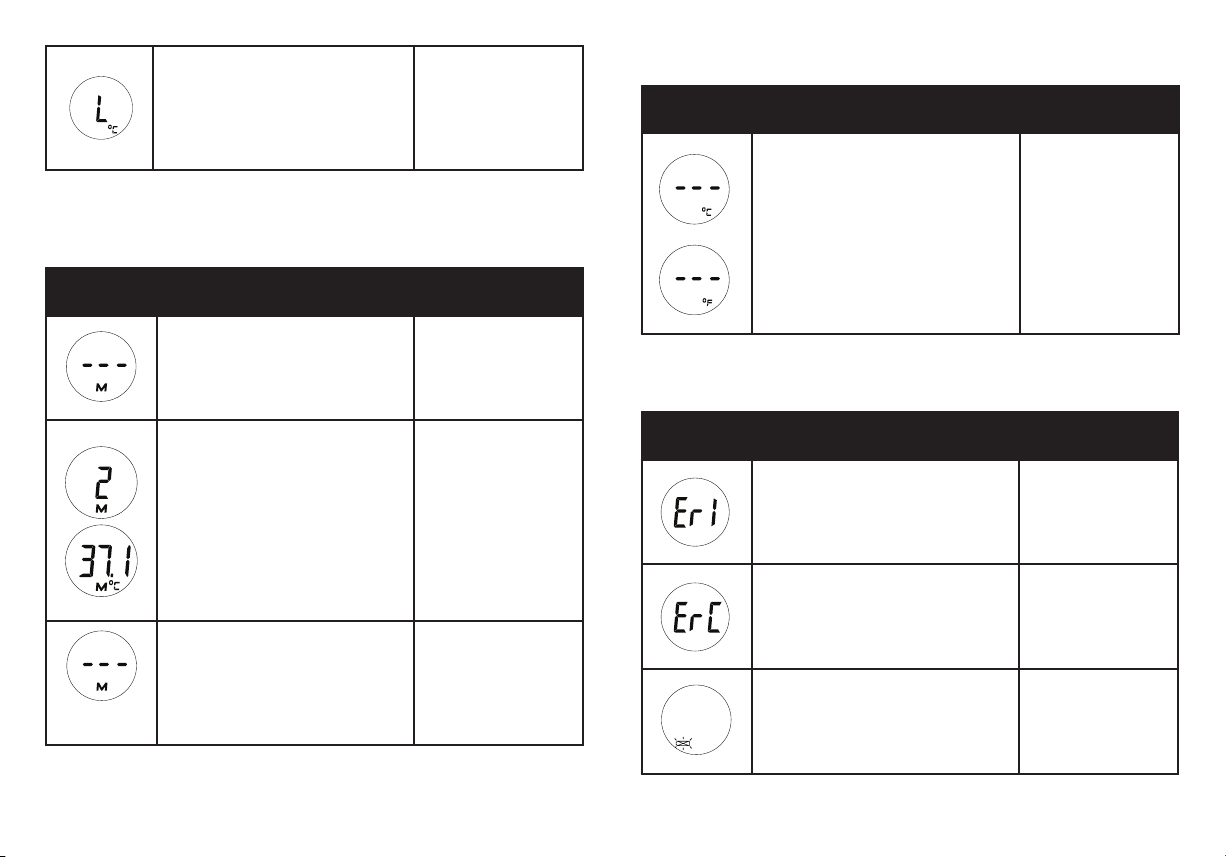
1. The measured value is lower than
0°C/32.0°F under milk
temperature mode.
2. The measured value is lower than
32°C/89.6°F under body
temperature mode.
Retrieval of stored readings, Storing 20 readings
3 short beeps and red
backlit for 3 seconds.
C/F conversion
LCD display Operation instructions and explana-
tion of displays
Press and hold down button (3) for
8-12 seconds under shutdown state
to enter the C/F conversion mode.
Press button (3) within 5 seconds af-
Sound and backlit
ter release to change the temperature
LCD display Operation instructions and explana-
Sound and backlit
unit from °C to °F or from °F to °C
tion of displays
Press and hold down button (3) for
4-8 seconds and LCD displays “---”
with the M symbol blinking.
Press button (3) again and the LCD
displays the rst stored reading with
the M symbol blinking.
Press button (3) and the LCD will
display the serial number of the
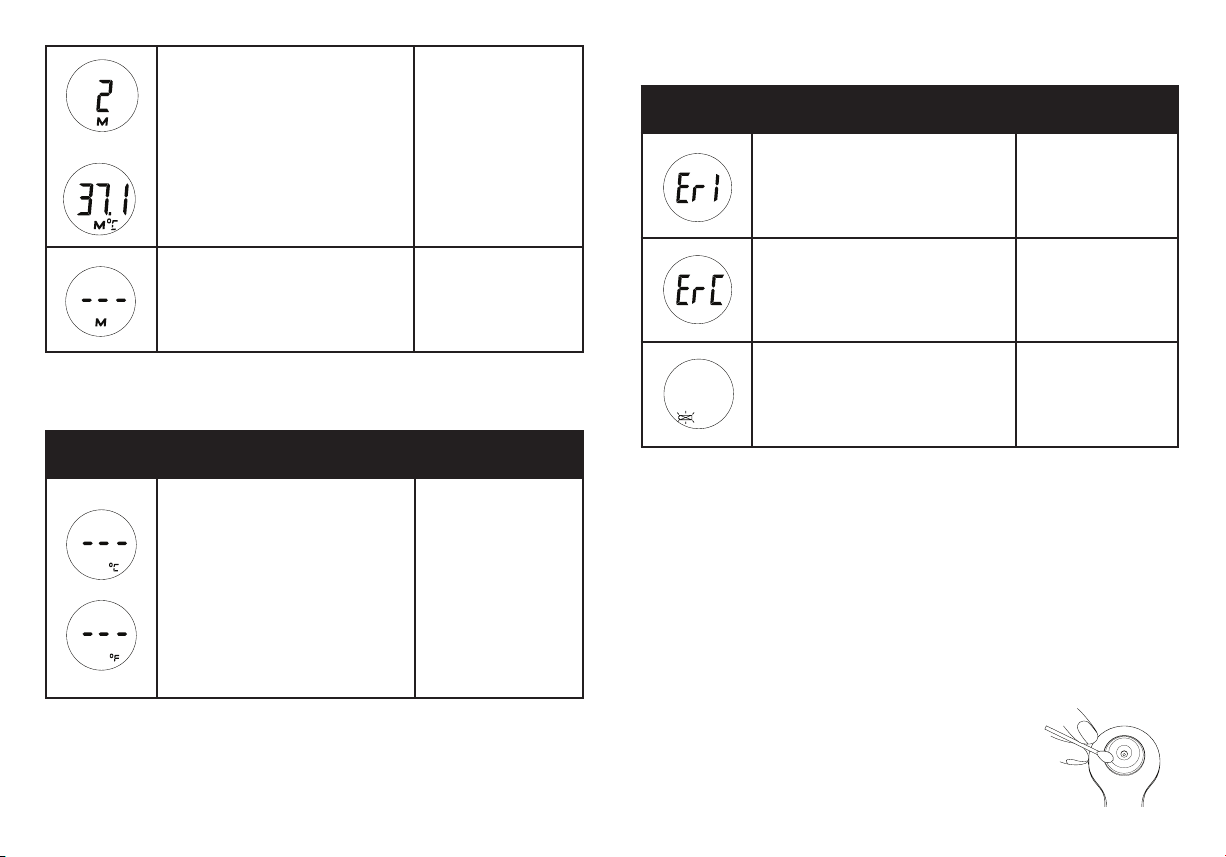
Error message
LCD display Operation instructions and explana-
tion of displays
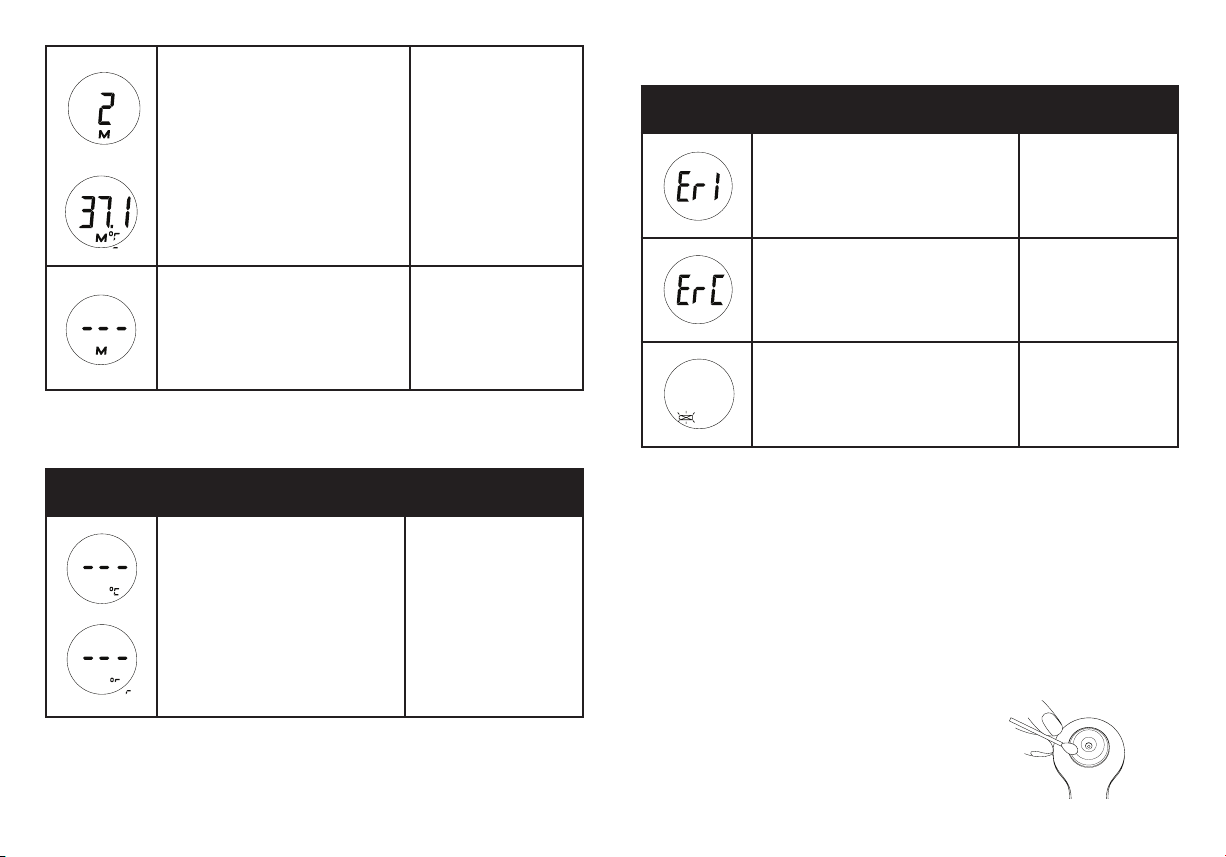
The LCD Display will display “Er1”
when the ambient temperature ex-
ceeds 40.0 °C / 104°F or drops below
10.0 °C / 50.0°F
Sound and backlit
3 short beeps and
red backlit for 3
seconds.
stored reading for 1 second and
then display the measured temperature. There are 20 stored readings.
The LCD Display will display “ErC” if
there is EEPROM data reading error
or if the correcting process is not
nished. Please contact your supplier.
3 short beeps and
red backlit for 3
seconds.
The LCD display will only display
“---”, °C/°F and the M symbol with
the M symbol blinking if there are
no stored readings available.
8 9
If the thermometer is not used for 10 seconds it will automatically switch o.
The LCD Display will display the low-
voltage signal (non blinking) when
the battery voltage is below 2.61V .
Please replace the battery.
Page 6

7. Cleaning and storage
Use an alcohol swab or cotton swab moistened with alcohol (70% Isopropyl) to
clean the thermometer casing and the measuring probe. Ensure that no liquid
enters the interior of the thermometer. Never use abrasive cleaning agents, thinners or benzene for cleaning and never immerse the instrument in water or other
cleaning liquids. After cleaning the unit should not be used until the cleaning
agent is completely vaporized as the cleaning agent may aect the accuracy of
measurements. Take care not to scratch the surface of the LCD display.
8. Technical specications
Items Standards
Model Luvion Exact non-contact thermometer
Applicable
regulations
ASTM 1965 GB/T 19146-2010
and laws
Temperature
°C / °F, adjustable
units
Measurement
range
Body temperature mode: 32.0°C - 42.2°C / 89.6°F - 107.9°F
Milk temperature mode: 0.0°C - 100.0°C / 32.0°F - 212.0°F
Precision ±0.2°C / ±0.4°F
Display reso-
±0.1°C / ±0.1°F
lution
Latency Time 1 second
Abnormal
state display
LCD Displays “L °C” if the measured temperature is below the
minimum of measurement range.
LCD Displays “H °C” if the measured temperature is above the
maximum of measurement range.
Sound and
Backlit
Automatic
shutdown
function
Low-voltage
display function
Memory
function
Current
consumption
LED backlit
specications
Operational
conditions
LCD displays “Er1” if the temperature measurement circuit is
abnormal (fault of SENSOR or the temperature measurement
circuit), or the ambient temperature exceeds 10°C ~ 40°C
(50°F ~ 104°F). There shall be “ErC”if the calibration process is
not completed or EEPROM is abnormal.
Volume ≥50 db (the perpendicular distance from dB Volume
sensor to thermometer is 10cm).
Two kinds of backlit: red and green
Body temperature mode:
• There will be one long beep and green backlit for 3 seconds when the temperature is between: 32.0°C/89.9°F and
37.6°C/99.6°F
• There will be seven short beeps and red backlit for 3 seconds when the temperature is between 37.6°C/99.6°F and
42.2°C/107.9°F
Milk temperature mode:
• There will be one long beep and green backlit for 3 seconds when the temperature is between: 0.0°C/32.0°F and
100.0°C/212.0°F
10s ±1s
The product shall display low-voltage signal if the voltage is
below 2.61V ±0.15V
Memorize 20 groups of measured temperature
<2 µA; I
I
stand-by
Red ≥ 1.2cd/m
Green ≥ 2.0cd/m
working
2
<0.5mA; I
2
Buzzer on
<2mA; I
Backlit
<15mA
ASTM 10°C - 40°C / 50°F - 104°F 15-95% RH
10 11
Page 7

Type of
Applicable for body temperature and milk temperature
measuring
Battery Two 1.5V AAA batteries
Battery life More than a 1000 times
The maximum allowable error for clinical test is specied in
the formula below:
Accuracy for
clinical test
error
1
ref
) + (T2 - T
(T
)
ref
2
T
=
- T
≤0.3°C / 0.6°F (for 95%)
T1 and T2 represent temperature value for the thermometer
under test respectively, T
temperature.
represents the constant reference
ref
It’s recommended that the professional users apply technical inspection once
every two years in accordance with Medical Product User Law.
9. After-sale service
The device is under warranty for one year since the date of acquisition. Application for repairing should be presented during the warranty period.
The damage caused by improper use is not under warranty scope.
Batteries and packaging are not under warranty scope as well.
10. Security type
The signal indicates that the thermometer is a BF type device with internal
power supply.
Please do not dispose of the product and its batteries in the household
waste at the end of its useful life.
NEDERLANDS - GEBRUIKSHANDLEIDING
Hartelijk dank voor de aanschaf van de Luvion non-contact digitale
infrarood thermometer.
De Exact non-contact thermometer is een kwalitatief hoogwaardig product voorzien van de nieuwste technologieën. De Luvion Exact non-contact thermometer
is getest in overeenstemming met de internationale normen. De unieke technologie staat garant voor betrouwbare metingen van de temperatuur.
Iedere keer dat de thermometer wordt ingeschakeld voert de thermometer een
zelftest uit om de nauwkeurigheid van de metingen te waarborgen.
De Exact non-contact thermometer kan worden gebruikt voor het meten van de
lichaamstemperatuur en de melk temperatuur, en is bedoeld voor mensen van
alle leeftijden.
Lees voor het gebruik van de thermometer deze gebruiksaanwijzing goed door,
bewaar deze gebruiksaanwijzing met de thermometer in een veilige plaats.
Inhoud
1. Voordelen van uw non-contact thermometer .........................................................14
2. Belangrijke veiligheids instructies ................................................................................14
3. Product beschrijving .........................................................................................................16
4. Meten van de lichaamstemperatuur ...........................................................................16
5. Meten van de melk temperatuur ................................................................................. 16
6. Gebruiksaanwijzing en uitleg van schermen ...........................................................18
7. Schoonmaken en bewaren ............................................................................................ 21
8. Technische specicaties .................................................................................................. 22
9. After-sale service ............................................................................................................... 24
10. Veiligheids type .................................................................................................................. 24
12 13
Page 8
1. Voordelen van uw Luvion non-contact thermometer thermometer is niet waterdicht). Volg de instructies beschrijven bij “schoonmak-
Meting in enkele seconden
De innovatieve infrarood technologie maakt het mogelijk om de de temperatuur
van het voorhoofd te meten in slechts enkele seconden.
Accuraat en betrouwbaar
Door de unieke samenstelling van deze thermometer, de geavanceerde infrarood sensor, en het accurate kalibratie proces biedt deze thermometer zeer
nauwkeurige en betrouwbare metingen.
Zacht en makkelijk te gebruiken
• De non-contact thermometer is niet-invasief. Zelfs als het kind slaapt kan de
temperatuur worden gemeten.
• Door het unieke ontwerp ligt de non-touch thermometer lekker in de hand en
is de thermometer makkelijk te gebruiken.
• De non-contact thermometer is minder bedreigend voor een kind dan een
rectale thermometer.
Bewaarde eerdere metingen
Gebruikers kunnen de laatste 20 metingen oproepen zodra de geheugenmode
wordt geactiveerd, hiermee kan het verloop van de temperatuur en de variaties
in temperatuur direct bekeken worden.
Veilig en hygiënisch
Geen gevaar voor gebroken glas of inname van kwik. Deze thermometer is volledig veilig voor gebruik bij baby’s en kinderen.
Koorts indicatie display
Het koorts indicatie display helpt u om de temperatuur meting sneller te interpreteren, Het scherm wordt groen als er geen sprake is van koorts, en rood als er
sprake is van koorts. 7 pieptonen waarschuwen bij temperaturen boven 37.5°C.
en en bewaren” als u de thermometer wil desinfecteren of schoonmaken.
• Stel de thermometer niet bloot aan direct zonlicht en bewaar het op een stof
vrije, droge plaats bij temperaturen tussen de 16°C en 40°C.
• Gebruik de thermometer niet als er sporen zijn van schade aan de sensor of
de thermometer zelf. Probeer de thermometer niet zelf te repareren als de thermometer beschadigd is.
• Deze non-touch thermometer bestaat uit hoogwaardige precisieonderdelen.
Laat de thermometer niet vallen en bescherm de thermometer tegen harde
schokken. Buig of verdraai de thermometer of de sensor niet.
• De thermometer is alleen geschikt voor het meten van de lichaamstemperatuur
en de temperatuur van vloeistoen zoals melk. Het gebruik van een thermometer is niet bedoeld als vervanging voor een consult van uw dokter. De thermometer is gekalibreerd tijdens het productieproces. Als de thermometer gebruikt
wordt zoals beschreven in deze gebruiksaanwijzingen zal de nauwkeurigheid
van de metingen niet worden aangetast.
• De non-contact hermometer wordt geleverd met 2 AAA batterijen. Vervang
deze met 2 nieuwe AAA batterijen zodra het knipperende batterijen symbooltje
verschijnt op het LCD scherm. De batterijen vervangen: schuif het batterijen
klepje open zoals afgebeeld en verwijder de batterijen. Plaats de nieuwe batterijen zoals afgebeeld aan de binnen in het batterijen compartiment.
• Verwijder de batterijen uit de thermometer als de thermometer gedurende een
langere periode niet zal worden gebruikt om schade door lekkende batterijen te
voorkomen.
2 x AAA
2. Belangrijke veiligheids instructies
• Gebruik de thermometer nooit voor andere doeleinden dan waar de thermometer voor is bedoeld. Volg de algemene veiligheidsmaatregelen bij gebruik op
kinderen.
• Dompel de non-contact thermometer nooit in water of andere vloeistoen (de
14 15
WAARSCHUWING:
• Gebruik van deze non-contact thermometer is niet bedoeld als vervanging
voor een consult van uw huisarts of kinderarts.
• Deze thermometer is niet waterdicht! Stel deze thermometer NOOIT bloot
aan water!
Page 9
3. Product beschrijving
(1) Sensor
(2) Lichaamstemperatuur knop
(3) Melk temperatuur knop
(4) LCD scherm
(5) Batterijen klepje
(4)
(3)
(2)
(1)
(5)
4. Meten van de lichaamstemperatuur
De non-contact thermometer meet infrarood energie uitgestraald door de huid
boven de wenkbrauwen en de omringende gebieden.
Deze infrarood energie wordt opgevangen door de lens en omgezet tot een
temperatuur waarde. Temperatuurmetingen verkregen door het scannen van de
huid in het gebied boven de wenkbrauw zijn het nauwkeurigst.
De non-contact thermometer is klinisch getest en is bewezen veilig en nauwkeurig te zijn wanneer het wordt gebruikt in overeenstemming met beschreven in de handleiding
5. Meten van de melk temperatuur
De non-contact thermometer meet infrarood energie uitgestraald door de melk
es, de melk temperatuur wordt weergegeven door overgangs berekeningen en
emissiewaarde compensatie. Start de thermometer met de knop aan de zijkant
van de thermometer (3) om de melk temperatuur te meten.
Om een onnauwkeurige meting te vermijden, let op het volgende:
• Meet de temperatuur niet tijdens of net na de borstvoeding.
• Gebruik de non-contact thermometer niet in omgevingen met een hoge lucht-
vochtigheid.
• Patiënten mogen niet drinken, eten of fysiek actief zijn vlak voor of tijdens de
meting.
• Voor dat u de thermometer op het onderzoeksgebied plaatst moet het onderzoeksgebied vrij zijn van haar, zweet of vuil.
• Gebruik een wattenstaae gedrenkt in alcohol om voorzichtig de sensor te
reinigen en wacht minimaal 5 minuten voor gebruik op een andere patient.
• 7 korte pieptonen zijn te horen als de temperatuur hoger is dan 37.5°C om de
patiënt te waarschuwen dat hij/zij koorts zou kunnen hebben.
• Meet de temperatuur altijd op dezelfde plaats aangezien temperatuur metin-
gen kunnen verschillen op verschillende locaties.
• In de volgende situaties is het aanbevolen om de temperatuur 3x op dezelfde
plaats te meten en om de hoogst gemeten temperatuur aan te houden:
1. Baby’s jonger dan 100 dagen
2. Kinderen jonger dan 3 jaar met een zwakker immuun systeem voor wie de
aan- of afwezigheid van koorts cruciaal is.
3. Van het eerste gebruik van de thermometer tot de gebruiker voldoende
ervaring in het gebruik van de thermometer heeft opgedaan om consistente
nauwkeurige metingen te verrichten.
• Patiënten moeten minstens gedurende een half uur verblijven in stabiele kamer
temperaturen.
16 17
Page 10
6. Gebruiksaanwijzing en uitleg van schermen
LCD scherm Gebruiksaanwijzingenen en uitleg
van schermen
1. Meten van lichaamstemperatuur. Richt de Sensor (1) direct op het
voorhoofd (eectieve afstand is 1 to
6 cm) en druk op de lichaamstem-
peratuur knop (2) of houdt de knop
(2) ingedrukt, de gemeten waarde
zal worden weergegeven zodra de
knop losgelaten wordt. De knop
korte tijd ingedrukt houden en over
een gebied boven het voorhoofd
bewegen wordt aangeraden. Het
systeem zal sequentieel meten en
de hoogste waarde tonen.
2. Meten van de melk temper-
atuur. Richt de sensor op de es.
Druk op de melk temperatuur
knop (3) en houd deze korter dan 4
seconden ingedrukt. zodra de knop
wordt losgelaten wordt de temperatuur weergegeven
Let op:
Er zullen 7 korte pieptonen te horen
zijn als de
gemeten temperatuur hoger is dan
37.5°C/99.5°F dit is een waarschuwing voor de patient dat hij of zij
koorts zou kunnen hebben.
Geluid en
schermkleur
Lichaams
temperatuur mode
1. Als de gemeten
lichaams temperatuur
tussen 32.0°C and
37.6°C is dan zal er
1 lange pieptoon en
gedurende 3 seconden
een groen scherm
worden weergegeven
2. Als de gemeten
lichaamstemperatuur
tussen 37.6°C/99.6°F en
42.2°C/107.9°F is zullen
er 7 korte pieptonen
en een rood scherm
for 3 seconds worden
weergegeven
Melk temperatuur
mode
1. Als de gemeten temperatuur
tussen 0.0°C/32.0°F
en100.0°C/212.0°F is zal
er een lange pieptoon
en een groen scherm
worden weergegeven.
Het melk es symbool is linksboven
zichtbaar in de melk temperatuur
mode.
Het °C symbol knippert zodra de
of
meting voltooid is.
Het voorhoofd meting symbool is
rechstboven zicht in de lichaamstemperatuur mode.
Het °C knippert zodra de meting
voltooid is.
1. De gemeten waarde is hoger dan
100°C/212.0°F in de Melk temperatuur mode.
2. De gemeten waarde is hoger dan
3 korte piepjes en
rood scherm voor 3
seconden.
42.2°C/107.9°F in de lichaamstemperatuur mode.
1. gemeten waarde is lager dan
0°C/32.0°F in de melk temperatuur
mode.
2. De gemeten waarde is lager dan
3 korte piepjes en
rood scherm voor 3
seconden.
32°C/89.6°F in de lichaamstemperatuur mode.
Oproepen van bewaarde metingen, opslaan van 20 metingen
LCD scherm Gebruiksaanwijzingenen en uitleg
van schermen
schermkleur
Houdt de knop aan de zijkant
(3) gedurende 4-8 seconden
ingedrukt, het LCD scherm zal
“---” en een knipperent M symbool
weergeven.
Geluid en
18 19
Page 11
Druk opnieuw op de knop aan de
zijkant (3) en de laatst opgeslagen
meting zal worden weergegeven.
Druk weer op de knop aan zijkant
om steeds 1 meting terug te gaan,
het serienummer van de meting
wordt steeds gedurende 1 seconde
weergegeven gevolgt door de
gemeten temperatuur. Er kunnen
tot 20 metingen worden opgeslagen.
Het LCD scherm zal alleen “---”, °C/°F
en het knipperende M symbool
weergeven als er geen eerdere
metingen zijn opgeslagen.
C/F conversie
LCD scherm Gebruiksaanwijzingenen en uitleg
van schermen
Houdt de knop aan de zijkant
(3) ingedrukt gedurende 8-12
seconden om de temperatuur eenheid te veranderen. Druk binnen 5
seconden na loslaten van de knop
weer op de knop aan de zijkant
(3), om de temperatuur eenheid te
veranderen in °F of °C
Geluid en
schermkleur
Fout meldingen
LCD scherm Gebruiksaanwijzingenen en uitleg
van schermen
Het LCD scherm zal “Er1” weergeven
als de omgevingstemperatuur hoger
is dan 40.0 °C / 104°F of lager is dan
10.0 °C / 50.0°F
Het LCD scherm zal “ErC” weergeven
als er een EEPROM data leesfout is
of als het corrigeer proces is niet
afgerond is. Neem contact op met uw
Geluid en
schermkleur
3 korte piepjes en
rood scherm voor 3
seconden.
3 korte piepjes en
rood scherm voor 3
seconden.
leverancier.
Het LCD scherm zal het lege batterij
signaal (niet knipperent)weergeven
zodra het batterij voltage lager is dan
2.61V . Vervang de batterij.
Zodra de thermometer 10 seconden lang niet gebruikt wordt zal deze automatisch uitschakelen.
7. Schoonmaken en bewaren
Gebruiken een wattenstaae of een wattenschije gedrenkt in alcohol (70%)
om de thermometer, beschermkap en sensor schoon te maken. Zorg ervoor dat
er geen vloeistof in de thermometer komt. Gebruik geen schurende reinigings-
middelen, thinner of terpentine for het schoonmaken van de thermometer en
dompel de thermometer nooit onder in water of schoonmaak vloeistoen. De
thermometer kunt u na het schoonmaken pas gebruiken als alle schoonmaak-
middelen compleet verdampt zijn. Restanten van schoonmaakmiddelen kunnen
de nauwkeurigheid van de meting beïnvloeden.
20 21
Page 12

8. Technische specicaties
Items Standaarden
Model Luvion Exact non-contact thermometer
Geldende
voorschriften
ASTM 1965 GB/T 19146-2010
en wetten
Temperatuur
°C / °F, instelbaar
eenheden
Meet bereik Lichaams temperatuur mode: 32.0°C - 42.2°C / 89.6°F -
107.9°F
Melk temperature mode: 0.0°C - 100.0°C / 32.0°F - 212.0°F
Precisie ±0.2°C / ±0.4°F
Scherm
±0.1°C / ±0.1°F
resolutie
Wachttijd 1 seconde
Foutmeldings
schermen
LCD scherm toont “L °C” als de temperatuur lager is dan de
laagste temperatuur in het meet bereik.
LCD scherm toont “H °C” als de temperatuur hoger is dan de
hoogste temperatuur in het meet bereik.
LCD scherm toont “Er1” als de thermometer niet functioneert
(niet werkende SENSOR of het temperature meting circuit), of
als de omgevings temperatuur zich niet tussen 10°C en 40°C
(50°F en 104°F) bevind. Er wordt “ErC” weergegeven als het
calibratie proces niet voltooid is of als EEPROM abnormaal is.
Geluid en
Schermkleur
Automatische
uitschakel
functie
Lege batterij
weergave
functie
Geheugen
functie
Stroom
verbruik
LED backlit
specicaties
Operationele
omstandigheden
Volume ≥50 db (de loodrechte afstand van dB Volume sensor
tot de thermometer is 10cm).
Twee verschillende schermkleuren: rood en groen
Lichaams temperatuur mode:
• Een lange pieptoon en groene schermkleur gedurende
3 seconden als de temperatuur tussen 32.0°C/89.9°F en
37.6°C/99.6°F is.
• Zeven korte pieptonen en rode schermkleur gedurende
3 seconden als de temperatuur tussen 37.6°C/99.6°F en
42.2°C/107.9°F is.
Melk temperatuur mode:
• Een lange pieptoon en groene schermkleur gedurende
3 seconden als de temperatuur tussen 0.0°C/32.0°F en
100.0°C/212.0°F is.
10s ±1s
Het LCD scherm zal het lege batterij symbol weergeven als
het voltage lager is dan 2.61V ±0.15V
Geheugen voor 20 temperatuur metingen
I
<2 µA; I
stand-by
Rood ≥ 1.2cd/m
Groen ≥ 2.0cd/m
working
<0.5mA; I
2
2
Buzzer on
<2mA; I
Backlit
<15mA
ASTM 10°C - 40°C / 50°F - 104°F 15-95% RH
22 23
Page 13

Type van
metingen
Toepasbaar voor lichaamstemperatuur en melk
temperatuur.
Batterijen Twee 1.5V AAA batterijen
Batterij
Meer dan 1000 metingen
levensduur
De maximaal toelaatbare foutmarge voor klinische testen
wordt gespeciceerd in de onderstaande formule:
- T
Nauwkeurigheid voor
klinische
testen
) + (T2 - T
(T
1
T
error
ref
=
≤0.3°C / 0.6°F (voor 95%)
T1 en T2 representeren temperatuur waardes voor de geteste
thermometer, T
temperatuur.
)
ref
2
representeert de constante referentie
ref
Een technische inspectie is een keer per twee jaar aanbevolen voor
professionele gebruikers, overeenkomstig met de wet voor gebruikers van
medische producten.
9. After-sale service
Het apparaat valt onder garantie gedurende een jaar vanaf de datum van
aankoop. Aanvraag voor reparatie moet tijdens de garantieperiode worden
gedaan. Schades veroorzaakt door oneigenlijk gebruik vallen niet onder de
garantie dekking. Batterijen en verpakkingen vallen ook niet onder de garantie
dekking.
10. Security type
Dit symbool geeft aan dat deze thermometer een type BF apparaat is met
interne voeding.
FRANCAIS - GUIDE DE L’UTILISATEUR
Merci d’avoir acheté le thermomètre numérique infrarouge sans-contact Luvion
Exact.
Le thermomètre sans-contact est un produit de haute qualité utilisant les toutes
dernières technologies et il a été testé en conformité avec normes internationales. Avec sa technologie unique, le thermomètre sans-contact Luvion Exact
garantit des mesures ables. Le thermomètre s’auto-teste à chaque fois qu’il
démarre pour assurer la précision des mesures.
Le thermomètre sans-contact Exact peut être utilisé pour mesurer la température
du corps, il est adapté pour les personnes de tous âges. Le thermomètre peut
être aussi utilisé pour mesurer la température du lait.
Veuillez lire attentivement ces instructions avant d’utiliser cet instrument et
garder les instructions et le thermomètre dans un endroit sûr et sécurisé.
Table des matières
1 Les avantages du thermomètre sans-contact Luvion Exact .................................... 26
2 Consignes de sécurité nécessaires .................................................................................... 26
3 Description du produit .......................................................................................................... 28
4 Comment mesurer la température du front .................................................................. 28
5 Comment mesurer la température du lait ...................................................................... 28
6 Explication de l’achage et mode d’emploi ................................................................. 30
7 Nettoyage et rangement ...................................................................................................... 33
8 Spécications techniques ..................................................................................................... 34
9 Service après-vente ................................................................................................................ 36
10 Type de sécurité ..................................................................................................................... 36
Gooi het product en de batterijen niet bij het huishoudelijke afval.
24 25
Page 14

1. Les avantages du thermomètre sans-contact Luvion Exact thermomètre n’est pas étanche). Pour le nettoyage et la désinfection veuillez
Mesure en quelques secondes
La technologie infrarouge innovante permet de mesurer la température du front
en seulement quelques secondes.
Précis et able
En raison de la construction unique de l’assemblage de sonde, du capteur infra-
rouge de pointe et du processus d’étalonnage, l’appareil ore une mesure de
température très précise et able.
Doux et facile à utiliser
• Le thermomètre sans contact est non invasif. Une mesure peut être prise même
si l’enfant dort.
• La conception unique rend le thermomètre frontal facile à tenir et à utiliser.
• Le thermomètre frontal est moins menaçant pour un enfant que d’un thermomètre rectal.
Plusieurs rappels de lecture
Les utilisateurs peuvent rappeler les 20 dernières lectures lors de l’activation du
mode mémoire, permettant de mieux suivre les variations de température dans
le temps.
Sûr et hygiénique
• Pas de risque de débris de verre ou d’ingestion de mercure.
• Totalement sûr pour les enfants.
Fonction d’indication de èvre
La fonction d’indication de èvre vous aide à mieux expliquer à votre enfant la
signication de leur température grâce à la couleur indiquée sur l’écran. L’écran
est vert s’il n’y a pas de èvre et ache une alerte rouge pour la èvre. 7 bips
sonores indiquent des températures supérieures à 37,5°C.
suivre les instructions de la section « Nettoyage et stockage ».
• Gardez l’appareil loin de l’exposition directe au soleil et le garder dans un endroit sans poussière et sec, à une température comprise entre 16°C - 40°C.
• Ne pas utiliser le thermomètre s’il y a des signes de dommages sur le capteur
ou sur l’instrument lui-même. S’il est endommagé, n’essayez pas pour réparer
l’instrument !
• Ce thermomètre sans-contact se compose de pièces de précision de haute
qualité. Ne laissez pas tomber l’appareil. Protégez-le des chocs brutaux. Ne pas
tordre l’instrument ou le capteur.
• Le thermomètre ne convient que pour la mesure de la température corporelle
et la température des liquides tels que le lait. L’utilisation de ce thermomètre
n’est pas destinée à remplacer une consultation avec votre médecin. Le thermomètre est calibré initialement au moment de la fabrication. Si ce thermomètre
est utilisé conformément aux instructions d’utilisation, la précision des mesures
ne sera pas aectée.
• Le thermomètre frontal est fourni avec 2 piles AAA. Remplacez avec 2 piles AAA
neuves lorsque le symbole de batterie clignotant apparaît sur l’écran LCD. Pour
changer les piles, ouvrez le couvercle à piles comme indiqué et retirer les piles.
Remplacez les piles en veillant à aligner correctement comme indiqué dans le
compartiment de la batterie.
• Retirez les piles de l’appareil si il ne va pas être utilisé pendant de longues périodes an d’éviter d’endommager le thermomètre suite à une fuite de pile.
2. Consignes de sécurité nécessaires
• Ne pas utiliser le thermomètre à des ns autres que pour celles qu’il a été conçu.
Veuillez suivre les consignes générales de sécurité lors de l’utilisation sur les
enfants.
• Ne jamais plonger le thermomètre frontal dans l’eau ou d’autres liquides (le
26 27
2 x AAA
Page 15
AVERTISSEMENT :
• L’utilisation de ce thermomètre frontal n’est pas conçu comme un substitut à
une consultation avec votre médecin ou un pédiatre.
• Ce thermomètre n’est pas étanche! Veuillez NE JAMAIS le plonger dans un
liquide!
3. Description du produit
(1) Capteur
(2) Touche de mesure corporelle
(3) Touche de mesure du lait
(4) Ecran LCD
(5) Couvercle à piles
(4)
(3)
(2)
(1)
(5)
4. Comment mesurer la température corporelle
Le thermomètre sans-contact Luvion Exact mesure l’énergie infrarouge émise
par la peau au-dessus de la zone des sourcils et les tissus environnants. Cette
énergie est recueillie par la lentille et convertie en une valeur de température. Les
mesures de température obtenues en scannant la peau au-dessus la zone des
sourcils fournira la plus grande exactitude. Le thermomètre sans-contact Luvion
Exact a été cliniquement testé et approuvé lorsqu’il est utilisé conformément à
son manuel d’instructions.
Pour éviter une mesure inexacte, notez ce qui suit:
• Les patients et le thermomètre devraient rester dans une pièce à température
constante pendant au moins 30 min avant la mesure.
• Ne prenez pas de mesure pendant ou juste après l’allaitement d’un bébé.
• Ne pas utiliser le thermomètre frontal dans des environnements très humides.
• Les patients ne doivent pas boire, manger ou être physiquement actifs avant /
pendant que vous prenez la mesure.
• Avant de placer le capteur du thermomètre sur la zone de mesure, enlever poils,
sueur ou saleté.
• Utilisez un coton imbibé d’alcool pour nettoyer soigneusement le capteur et
attendre 5 minutes avant de prendre une mesure sur un autre patient.
• 7 bips courts retentissent lorsque la température est supérieure à 37,5°C an
d’alerter le patient qu’il peut avoir de la èvre.
• Il faut toujours prendre la température au même endroit, puisque les relevés de
température peuvent varier à diérents endroits.
• Dans les situations suivantes, il est recommandé de prendre trois températures
au même endroit et de garder la température la plus élevée :
1) Les nouveau-nés dans les 100 premiers jours.
2) Les enfants de moins de trois ans avec un système immunitaire aaibli et pour
qui la présence ou l’absence de èvre est critique.
3) Lorsque l’utilisateur apprend à utiliser le thermomètre pour la première fois
jusqu’à ce qu’il se soit familiarisé avec l’appareil et obtient des mesures repro-
ductibles.
5. Comment mesurer la température du lait
Le thermomètre frontal mesure l’énergie infrarouge émise par le biberon, et il
ache la température du lait par calcul de transition et compensation du taux
d’émission. Veuillez presser le bouton (3) sur le côté du thermomètre pour la mise
en marche lors de la mesure.
28 29
Page 16
6. Ecrans d’explication et mode d’emploi
Écran LCD Méthode opérationnelle et instruc-
tion pour achages
1 Mesure de la température corporelle
1 Dirigez le capteur de température
(1) vers le front du patient directement (distance ecace 1 à 6 cm) en
état d’arrêt, et appuyez sur la touche
(2) ou maintenez la touche (2) enfoncée, l’écran ache la valeur mesurée
lorsque la touche est relâchée, qui
est en mode de mesure de tempéra-
ture du front.
Il est conseillé de maintenir le bouton enfoncé et de scanner le front .
Le système lit séquentiellement et
enregistre la valeur maximale.
2 Mesure de la température du lait.
Appuyez sur la touche (3) dans les
4 secondes et relâchez-la en état
d’arrêt. L’écran doit acher la valeur
mesurée, qui est en mode de mesure
de la température du lait.
3 Appuyez sur la touche (2) ou (3)
en mode de démarrage et entrez à
nouveau en mode de mesure.
Attention:
Il y aura 7 bips courts rapides lorsque
la température mesurée dépasse
37,5°C / 99.5°F, ce qui est un aver-
tissement pour le patient qu’il peut
avoir de la èvre.
Son et rétro-éclairage
Mode mesure corporelle
1 Lorsque la température est comprise
entre 32,0°C et 37,6°C,
il y aura un bip long et
un rétro-éclairage vert
pendant 3 secondes.
2 Lorsque la valeur
de température est
comprise entre 37,6°C
/ 99,6°F et 42,2°C /
107.9°F, il y aura 7
bips courts et un
rétro-éclairage rouge
pendant 3 secondes.
Mode mesure du lait
1 Lorsque la valeur de
température est comprise entre 0°C / 32.0 °
F et 100°C / 212.0°F, il
y aura un long bip et
un rétro-éclairage vert
pendant 3 secondes.
Le symbole du biberon sera visible
dans le coin supérieur gauche en
mode mesure du lait. Le symbole °C
ou
clignote lorsque la mesure est faite.
Le symbole du front sera visible dans
le coin en haut à droite en mode de
mesure de la température du corps.
Le symbole °C clignote lorsque la
mesure est faite.
1 La valeur mesurée est supérieure
à 100°C / 212,0°F en mode mesure
du lait.
2 La valeur mesurée est supérieure
3 bips courts et un
rétro-éclairage rouge
pendant 3 secondes.
à 42,2 ° C / 107,9 ° F pour le mode
mesure corporelle.
1 La valeur mesurée est inférieure à
0°C / 32,0°C en mode mesure du lait.
2 La valeur mesurée est inférieure
à 32°C / 89,6°C en mode mesure
3 bips courts et un
rétro-éclairage rouge
pendant 3 secondes.
corporelle.
Récupération de mesures enregistrées, enregistrer 20 lectures
Écran LCD Méthode opérationnelle et instruc-
Son et rétro-éclairage
tion pour achages
Appuyez sur la touche (3) pendant
4-8 secondes et l’écran LCD ache
“---” avec le signal clignotant M.
30 31
Page 17
Appuyez sur la touche (3) à nouveau
et l’écran LCD ache la première
mesure enregistrée avec le signal M
clignotant. Appuyez sur la touche
(3) et l’écran ache le numéro
de série pendant 1 seconde, puis
ache la température mesurée. 20
mesures peuvent être enregistrées.
Message d’erreur
Écran LCD Méthode opérationnelle et instruc-
tion pour achages
L’écran LCD achera « Er1 » quand
température ambiante dépasse
40,0°C / 104°F ou descend en dessous de 10,0°C / 50.0°F
Son et rétro-éclairage
3 bips courts et un
rétro-éclairage rouge
pendant 3 secondes.
L’écran LCD achera uniquement “--
-”, °C / °F et le signal M clignotant si il
n’y a pas de mesures enregistrées.
L’écran LCD achera « ErC » s’il y a
erreur dans les données de lecture
de l’EEPROM ou si le processus de
correction n’est pas terminé. Veuillez
contacter votre revendeur.
3 bips courts et un
rétro-éclairage rouge
pendant 3 secondes.
Conversion C/F
Écran LCD Méthode opérationnelle et instruc-
tion pour achages
Son et rétro-éclairage
Si le thermomètre n’est pas utilisé pendant 10 secondes, il s’éteindra automa-
L’écran LCD ache le signal basse
tension (non clignotant) lorsque la
tension de la pile est inférieure à
2,61V. Veuillez remplacer les piles.
tiquement.
Appuyez sur la touche (3) pendant
8-12 secondes en état d’arrêt et
7. Nettoyage et rangement
l’unité de température change
automatiquement. Appuyez sur la
touche (3) dans les 5 secondes après
l’avoir relâché, et l’unité de température change automatiquement à
moins que le temps de relâche soit
supérieur à 5 secondes.
Utilisez un tampon imbibé d’alcool ou un coton-tige imbibé d’alcool (isopropyle
à 70%) pour nettoyer la surface du thermomètre et le capteur de mesure. Veillez
à ce qu’aucun liquide ne pénètre à l’intérieur du thermomètre. Ne jamais utiliser
de produits abrasifs, de diluants ou du benzène pour nettoyer et ne jamais
plonger l’appareil dans l’eau ou d’autres liquides de nettoyage. Après nettoyage l’appareil ne doit pas être utilisé jusqu’à ce que l’agent de nettoyage soit
complètement vaporisé car l’agent de nettoyage peut aecter la précision des
mesures. Prenez soin de ne pas rayer la surface de l’écran LCD.
32 33
Page 18

8. Spécications techniques
Articles Normes
Modèle Luvion Exact thermomètre sans-contact
Les lois et
règlements ASTM 1965 GB/T 19146-2010
Unités de
°C / °F, réglable
température
Plage de
mesure
Mode de température corporelle: 32.0°C - 42.2°C / 89.6°F -
107.9°F
Mode de température du lait: 0.0°C - 100.0°C / 32.0°F - 212.0°F
Précision ±0.2°C / ±0.4°F
Résolution
±0.1°C / ±0.1°F
d’écran
Latence 1 deuxième
Écrans de
notication
d’erreur
Achage à cristaux liquides ache “L ° C” lorsque la température est inférieure à la température la plus basse dans la plage
de mesure.
Écran ache “H ° C” lorsque la température est plus élevée
que la température la plus élevée dans la plage de mesure.
Écran ache “Er1” si le thermomètre ne fonctionne pas (SENSOR ne fonctionne pas ou le circuit de mesure de température), ou si la température ambiante n’est pas comprise entre
10 ° C et 40 ° C (50 ° F et 104 ° F) situé. Il est “CEr” apparaît
lorsque le processus d’étalonnage n’est pas remplie ou si
l’EEPROM est anormale.
Volume ≥50 db (la distance perpendiculaire à partir de capteur de volume dB pour le thermomètre est de 10 cm).
Deux couleurs d’écran diérentes: rouge et vert
Corps mode de température:
• Un long bip sonore et l’écran couleur verte pendant 3 sec-
Couleur Son
et écran
ondes lorsque la température se situe entre 32,0 ° C / 89,9 ° F
et 37,6 ° C / 99,6 ° F.
• Sept bips courts et écran couleur rouge pendant 3 secondes
lorsque la température est comprise entre 37,6 ° C / 99,6 ° F et
42,2 ° C / 107.9 ° F.
Lait mode de température:
• Un long bip sonore et l’écran couleur verte pendant 3 secondes lorsque la température est comprise entre 0.0 ° C / 32.0
° F et 100,0 ° C / 212.0 ° F.
Arrêt
automatique 10s ±1s
Fonction
d’achage
L’écran LCD ache le symbole de pile faible s’ache lorsque
la tension est inférieure à 2.61V ± 0,15 V
de batterie
faible
Fonction de
Mémoire pour 20 mesures de température
mémoire
Consommation
Spécications
LED rétro-
I
stand-by
Rouge ≥ 1.2cd/m
Vert ≥ 2.0cd/m
éclairé
Conditions
ASTM 10°C - 40°C / 50°F - 104°F 15-95% RH
opération-
nelles
<2 µA; I
working
2
<0.5mA; I
2
Buzzer on
<2mA; I
Backlit
<15mA
34 35
Page 19

Type de
mesures
Convient à la température du corps et du lait
température.
Batteries Deux piles AAA de 1,5 V
Autonomie
Plus de 1000 mesures
de la batterie
L’erreur maximale tolérée pour l’essai clinique est spécié dans
la formule ci-après:
(T
- T
La précision
des essais
cliniques
) + (T2 - T
1
T
error
ref
=
≤0.3°C / 0.6°F (voor 95%)
)
ref
2
T1 et T2 représentent les valeurs de température du thermomè-
tre testé, T
représente la température de référence constante.
ref
Il est recommandé aux utilisateurs professionnels de faire un contrôle technique
tous les deux ans conformément à la loi relative à l’utilisation de produits médi-
caux.
9. Service après-vente
L’appareil est sous garantie pendant un an à partir de la date d’acquisition. Toute
demande de réparation devrait être présentée au cours de la période de garantie. Les dommages causés par une mauvaise utilisation ne sont pas couverts par
la garantie. Les piles et l’emballage ne sont pas sous garantie non plus.
10. Type de sécurité
Le signal indique que le thermomètre est un dispositif de type BF avec
alimentation interne.
Veuillez ne pas jeter le produit et les piles dans les ordures ménagères.
36
Page 20
www.luvion.com
 Loading...