

Luvelo Elite Yoghurt Maker
LEYM42D
Congratulations
Sa fety Inst ructions
• Remove all packaging material before using the Yoghurt Maker for the first time.
• Do not place the Yoghurt Maker near the edge of a bench or table during
operation. Ensure the surface is level, free of liquid or other substances.
• Do not place the Yoghurt Maker on or near a hot stove or oven
• Use only the yoghurt container and yoghurt container lid
supplied with the Yoghurt Maker.
• Do not place any parts of the Yoghurt Maker in a dishwasher or microwave oven.
Do not immerse Yogurt Maker in water or other liquids.
• Never operate damaged appliance (incl. mains cables).
• Operate appliance only through a professionally installed socket supplying
the correct voltage and do not use extension cables.
• Never remove main cable with wet hands, or lay cable on hot surfaces, or let
cable come into contact with oils.
• Unplug the appliance after each use, when the appliance is not in use and before
changing accessories or cleaning the appliance.
• Do not try and perform any maintenance, other than cleaning, For any
maintanance issues please contact Luvelo Australia.
• Do not operate outdoors
• This appliance is not intended for use by young children or infirm persons
without supervision.
• Use only fire blankets to extinguish fires on appliances.
• The appliance is not designed for commercial or industrial use; it is for household
use only.
• Remove all packaging material before using the Yoghurt Maker for the first time.
• Do not place the Yoghurt Maker near the edge of a bench or table during
operation. Ensure the surface is level, free of liquid or other substances.
• Do not place the Yoghurt Maker on or near a hot stove or oven.
• Use only the yoghurt container and yoghurt container lid
supplied with the Yoghurt Maker.
• Do not place any parts of the Yoghurt Maker in a dishwasher or microwave oven.
Do not immerse Yogurt Maker in water or other liquids.
• Never operate damaged appliance (incl. mains cables).
• Operate appliance only through a professionally installed socket supplying
the correct voltage and do not use extension cables.
• Never remove main cable with wet hands, or lay cable on hot surfaces, or let
cable come into contact with oils.
• Unplug the appliance after each use, when the appliance is not in use and before
changing accessories or cleaning the appliance.
• Do not try and perform any maintenance, other than cleaning For any
maintanance issues please contact Luvelo Australia.
• Do not operate outdoors.
• This appliance is not intended for use by young ch
ildren or infirm persons
ildren or infirm persons
without supervision.
• Use only fire blankets to extinguish fires on appliances.
• The appliance is not designed for commercial or industrial use; it is for household
use only.
•
P/3
Safety Instructions
PLEASE BE SURE TO READ ALL INSTRUCTIONS BEFORE USING THE LUVELO
ELITE YOGHURT MAKER.KEEP THESE INSTRUCTIONS FOR FUTURE REFERENCE
.
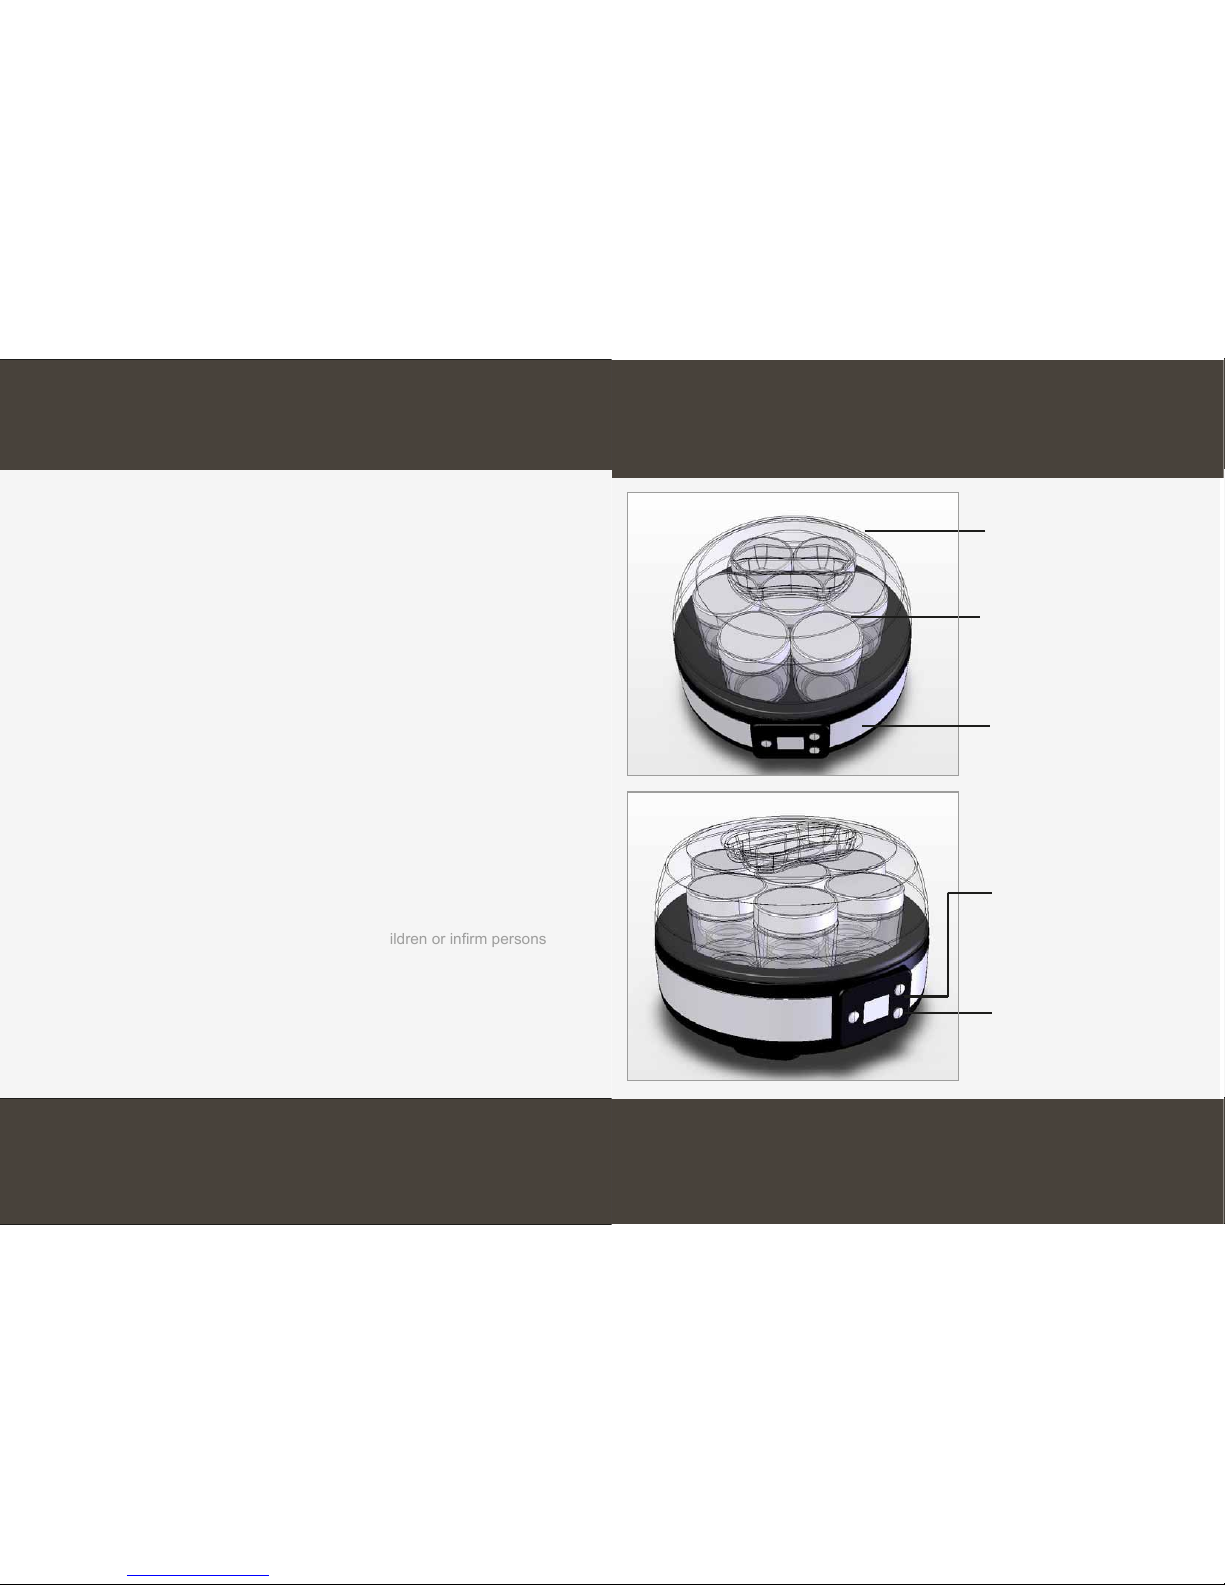
Elegant stainless steel design along with
the unique at structure allows for
all-around heaing circulation, ensuring an
optimal temperature to incubate the live
active cultures.
Covers the Yoghurt Maker housing
during incubation. Plastic cover lid
is dishwasher safe.
Outer Yoghurt Maker Lid
Yoghurt Maker Housing
LED Digital Timer
Operation Panel
P/4
+ / - Buttons allow user to set the appropriate
time for incubation. Press On / O button
before setting timer. When incubation period is
complete press On / O button to switch o
Yoghurt Maker.
19 hour timer function allows
user to monitor incubation
time which can be set between
1 - 19 hours . Yoghurt Maker
wil automatically switch o
when timer is complete.
Individual Removable Yoghurt Jars
Seven 250ml platics or glass jars hold yoghurt
ingredientsduring incubation. They have a
screw lid which creates an airtight lid for storage.
They are dishwasher safe.
Know Your Luvelo Elite Yoghurt Maker

Step 1 - Before assembling the Yoghurt Maker make sure the power is switched off at
the power outlet and the power plug is removed from the power outlet.
Step 2 - Prepare yoghurt mixture following desired recipe instructions. Refer to Recipes on Page 6.
Step 3 -
Step 4 -
Avoid moving the Yoghurt Maker during the incubation period. Do not stir yogurt during or at
the end of incubation to avoid the yoghurt curdling.
Step 6 - At the end of the selected incubation time, remove the lids and check that the yoghurt has
thickened and set. If the yoghurt requires more thickening, replace the lids and set the digital timer
to required additional incubation time. When the yoghurt has thickened sufficiently, switch the power
off at the outlet and unplug the power cord. Remove the yoghurt container and lid from the housing.
Place the yoghurt into the refrigerator overnight to achieve firmly set yoghurt.
P/5
Some separation of the liquid whey may occur. If so, pour off this liquid and discard it before
using the yoghurt.
Using Your Luvelo Elite Yoghurt Maker
Before rst using your Yoghurt Maker
Operating your Luvelo Elite Yoghurt Maker
Remove all packaging material. Then remove the Yoghurt Maker lid, the yoghurt jars and their lids.
Wash them in warm, soapy water then rinse under hot water and dry thoroughly. Wipe the Yoghurt
Maker housing with a damp cloth and dry thoroughly. Ensure that all parts are completely dry before
assembling.
Pour the yoghurt mixture into the yoghurt jars. Place the yoghurt jar lids onto the
yoghurt jars, screw on firmly to create an air tight seal.
Insert the yoghurt jars into the housing, then place the outer lid onto the housing.
Do not operate your Luvelo Elite Yoghurt Maker without the supplied yoghurt jars, containing
ingredients and with lid attached and inserted into the housing
Step 5 - Plug your Yoghurt Maker into a power outlet. Then switch the Yoghurt Maker on by
pressing and holding the On / Off switch on the Yoghurt Maker. This will light up the blue LCD digital
display timer. 8 hours will light up as default. Use the + / - button to set required time between
1 and 19 hours. When you have selected required time the Yoghurt Maker with automatically begin
the incubation period.
Full cream milk natural yoghurt
6 cups/1½ litres full cream milk
½ cup/125ml natural yoghurt
¾ cup/75g full cream milk powder
Skim milk natural yoghurt
6 cups/1 ½ litres skim milk
½ cup/125ml natural skim milk yoghurt
¾ cup/75g skim milk powder
Ingredients
Directions
Goat’s milk natural yoghurt
6 cups/1 ½ litres pasteurised goat’s milk
½ cup/125ml natural goat’s milk yoghurt
½ cup/150g goat’s milk powder (if not available
increase goat’s milk yoghurt to ¾ cup)
1. Heat the milk to just below boiling point (90-95ºC) then cool quickly to 40-45ºC. Use a sterilised
kitchen thermometer to monitor temperature of the milk when heating and cooling.
2. Stir in yoghurt and milk powder until combined. Do not aerate.
The life span of the yoghurt will vary depending on the ingredients used and the length of
incubation time. Yoghurt should be refrigerated and consumed within 3-4 days.
Yoghurt can also be made by following above method and omitting the starter yoghurt and milk
powder, and adding 3 teaspoons bacterial yoghurt starter. Bacterial yoghurt starter can be
purchased from the refrigerated section of all go health food stores.
P/6
Yoghurt Recipes
3. Pour yoghurt mixture into the yoghurt jars and screw on lids. Place the yoghurt jars into the
Yoghurt Maker housing and cover with the outer Yoghurt Maker lid.
4. Press the + / - to set desired incubation time. Generally between 8 – 10 hours is sufficient to create
thick creamy yoghurt. However, you can set the timer up to 19 hours. The longer you incubate the
yoghurt mixture, the thick and richer the yoghurt will become. You will need to experiment with the
incubation time to get the consistency you desire.
6. Remove the outer lid and the yoghurt jars. Remove the yoghurt jar lids and check the texture of the
yoghurt. Do not stir the yoghurt. If set to desired thickness, switch the Yoghurt Maker off, replace the
yoghurt jar lids and place yoghurt jars into the refrigerator for 8 hours or overnight.
TIP - Leave enough of the yoghurt you have made to use as a starter when making your next
yoghurt mixture.
5. When the Yoghurt Maker has completed incubation time, switch it off at the power outlet.

Step 1 - Before disassembling and cleaning, ensure the power is switched off at the power outlet, the power
cord is unplugged from the power outlet and the appliance is cool.
.
Step 3 - Use a slightly damp, soft cloth to wipe the housing. Dry thoroughly.
thoroughly with a soft, clean cloth. Do not use abrasive cleaners or solvents as these
may cause damage to the appliance. Do not wash any parts of the Yoghurt Maker in
the dishwasher.
Storage - Ensure the Yoghurt Maker is switched off, cooled and cleaned before storing. Store the
Yoghurt Maker fully assembled and in an upright position. Do not store anything on top
of the appliance
.
• Ensure the yoghurt container, container lid and other utensils used in preparation of the yoghurt are clean and
rinsed under hot water then dried with a clean tea towel prior to use. This will help eliminate interfering bacteria.
• Ensure the ingredients to be used in yoghurt making are fresh. Using out-of-date products will impede the
production of thick, flavoursome yoghurt.
• Follow suggested recipe quantities (see Recipes on page 6) and methods to ensure successful yoghurt production.
• To avoid milk sticking or burning to base of saucepan when heating, use medium heat and stir continuously with
a metal spoon. Do not heat milk in a microwave oven.
• After heating the milk place the saucepan in a shallow, cold water bath to speed up cooling.
• Use a sterilised kitchen thermometer to monitor temperature of the milk when heating and cooling.
• Avoid moving the Yoghurt Maker during the incubation time.
• Avoid leaving the yoghurt to incubate for longer than suggested time in the recipe. The yoghurt is still edible but
may separate and have a curdled appearance.
• Do not use the Yoghurt Maker near a heat source, outdoors or in sunlight, as exposure to excessive heat may
make the yoghurt separate and have a curdled appearance.
• Refrigerate the finished yoghurt for 8 hours or overnight before using. The texture and flavour will improve
with longer refrigeration.
• If the yoghurt container is required for further yoghurt making, place the refrigerated, set yoghurt into a clean,
sterilised container, seal with a lid and refrigerate until required.
• Keeping qualities of the yoghurt will vary depending on the ingredients used and length of incubation
time. Yoghurt and yoghurt culture foods should be refrigerated and consumed within 3-4 days.
• Leave enough of the yoghurt you have made to use as a starter when making your next yoghurt mix.
P/7
Cleaning and Care
Step 2 - Remove the Yoghurt Maker’s outer lid from the top of the housing. Remove the yoghurt jars from
inside the housing. Un-screw lids off yoghurt jars.
Step 4 - Wash the yoghurt jars, yoghurt jar lids and the outer lid in warm soapy water. Rinse with hot water. Dry
Hints and Tips
Cleaning / Hints
 Loading...