

Page 1

NONATEC Identification
And
Traceability Solution
User’s guide for :
Nonatec Bluetooth LAB BENCH Reader/Writer
Nonatec PRO Software
1 Version 2.0 November 2008
Page 2

TABLE OF CONTENTS
I. LAB BENCH READER Page 4
1. General description Page 5
2. Security
A. FCC Requirements for USA Page 5
B. IC Requirements for CANADA Page 7
C. Temperature Page 7
D. Electrical Power Supply Page 8
E. Battery Page 8
F. Lets protect our environment Page 8
II. LAB BENCH READER Quick Start Page 9
III. LAB BENCH Bluetooth Reader/Writer Page 10
1. Bluetooth Key Setup Page 10
A. Operating System Windows XP Service Pack 2 Page 10
B. Other Operating System Page 10
2. LAB BENCH Reader / Writer Setup Page 11
IV. Nonatec PRO Software Page 13
1. Nonatec Pro Software Setup Page 13
A. CD Installation Page 13
B. First use of the Nonatec Pro Software Page 13
2 Version 2.0 November 2008
Page 3

TABLE OF CONTENTS
2. How to Use the Nonatec PRO software? Page 15
A. General Presentation Page 15
a. The “General” Menu Page 15
b. The “Initialization” Menu Page 16
c. The “Work in Progress” Menu Page 17
d. The “History” Menu Page 18
e. The “ Universal Reading” Menu Page 20
f. The “Maintenance” Menu Page 21
g. The “?” Menu Page 21
B. More Explanations Page 22
a. To read a tag Page 22
b. To Modify a tag Page 23
c. To write a tag Page 23
d. To print a document Page 24
e. The database Page 24
IV. FAQ and SUPPORT Page 25
1. FAQ Page 25
2. Contact Page 26
3 Version 2.0 November 2008
Page 4

I. LAB BENCH READER
1. General description
LCD Display
Plug for reloading
Power Up Button
Antenna for reading / Writing the Nonatec transponder
4 Version 2.0 November 2008
Page 5

Before the first use, completely reload the battery.
First connect the plug to the reader, then connect
I. LAB BENCH READER
NEVER use the reader when the
battery is being reloaded
Before the first use, completely
the charger to the electrical power.
reload the battery.
2. Security
To comply with FCC and Industry Canada RF radiation exposure limits
for general population/uncontrolled exposure, this device must not be
co-located or operating in conjunction with any other antenna or transmitter.
A. FCC Requirements for USA
Lab Bench Reader
WARNING TO USERS IN THE UNITED STATES
Federal Communication Commission Interference Statement
47 CFR Section 15.105 (b)
This equipment has been tested and found to comply with the limits for
a Class B digital device, pursuant to Part 15 of the FCC Rules. These
limits are designed to provide reasonable protection against harmful interference in a residential installation. This equipment generates uses
and can radiate radio frequency energy and, if not installed and used in
accordance with the instructions, may cause harmful interference to radio communications. However, there is no guarantee that interference
will not occur in a particular installation.
5 Version 2.0 November 2008
Page 6

I. LAB BENCH READER
If this equipment does cause harmful interference to radio or television
reception, which can be determined by turning the equipment off and
on, the user is encouraged to try to correct the interference by one of
the following measures:
-
Reorient or relocate the receiving antenna.
- Increase the separation between the equipment and receiver.
- Connect the equipment into an outlet on a circuit different from that
to which the receiver is connected.
- Consult the dealer or an experienced radio/TV technician for help.
NO UNAUTHORIZED MODIFICATIONS
47 CFR Section 15.21
Caution: This equipment may not be modified, altered, or changed in
any way without signed written permission from LUTRONIC INTERNATIONAL. Unauthorized modification may void the equipment authorization from the FCC and will void the LUTRONIC INTERNATIONAL.
This device ARM READER complies with Part 15 of the FCC Rules. Operation is subject to the following two conditions: (1) This device may
not cause harmful interference, and (2) this device must accept any interference received, including interference that may cause undesired
operation.
6 Version 2.0 November 2008
Page 7

I. LAB BENCH READER
B. IC Requirements for CANADA
Operation is subject to the following two conditions: (1) this device may
not cause interference, and (2) this device must accept any interference, including interference that may cause undesired operation of the device.
To reduce potential radio interference to other users, the antenna type
and its gain should be so chosen that the equivalent isotropically radiated power (e.i.r.p.) is not more than that permitted for successful communication.
L'utilisation de ce dispositif est autorisée seulement aux deux conditions
suivantes : (1) il ne doit pas produire de brouillage, et (2) l'utilisateur du
dispositif doit être prêt à accepter tout brouillage radioélectrique reçu,
même si ce brouillage est susceptible de compromettre le fonctionnement du dispositif.
Afin de réduire le risque d'interférence aux autres utilisateurs, il faut
choisir le type d'antenne et son gain de façon à ce que la puissance isotrope rayonnée équivalente (p.i.r.e.) ne soit pas supérieure au niveau
requis pour l'obtention d'une communication satisfaisante. Cet appareilnumérique de la classe B respecte toutes les exigences du règlement
sur le matériel brouilleur du Canada.
C. Temperature
The maximum temperature for using this product is 40°C. (104°F)
7 Version 2.0 November 2008
Page 8

I. LAB BENCH READER
D. Electrical Power Supply
The Power Supply should always be plugged in a source having the
electrical features required. NEVER modify the line cord or the adaptor.
Always use the power supply included with the Nonatec Reader. Other
power supplies might not have the same characteristics; they might not
be respecting the same security and performance standards.
E. Battery
The battery could explode if it is replaced by an incorrect type of battery.
Please completely reload the battery before using the reader.
F. Lets protect our environment
This reader is composed of many components that can be easily recycled.
Make sure it is given to an authorized company for recycling.
Users are invited to read the generals sales conditions.
Recycling the Battery
The battery should be recycled by following the legislation.
It is not recommended to use the reader while being
reloaded.
8 Version 2.0 November 2008
Page 9
II. LAB BENCH READER Quick Start
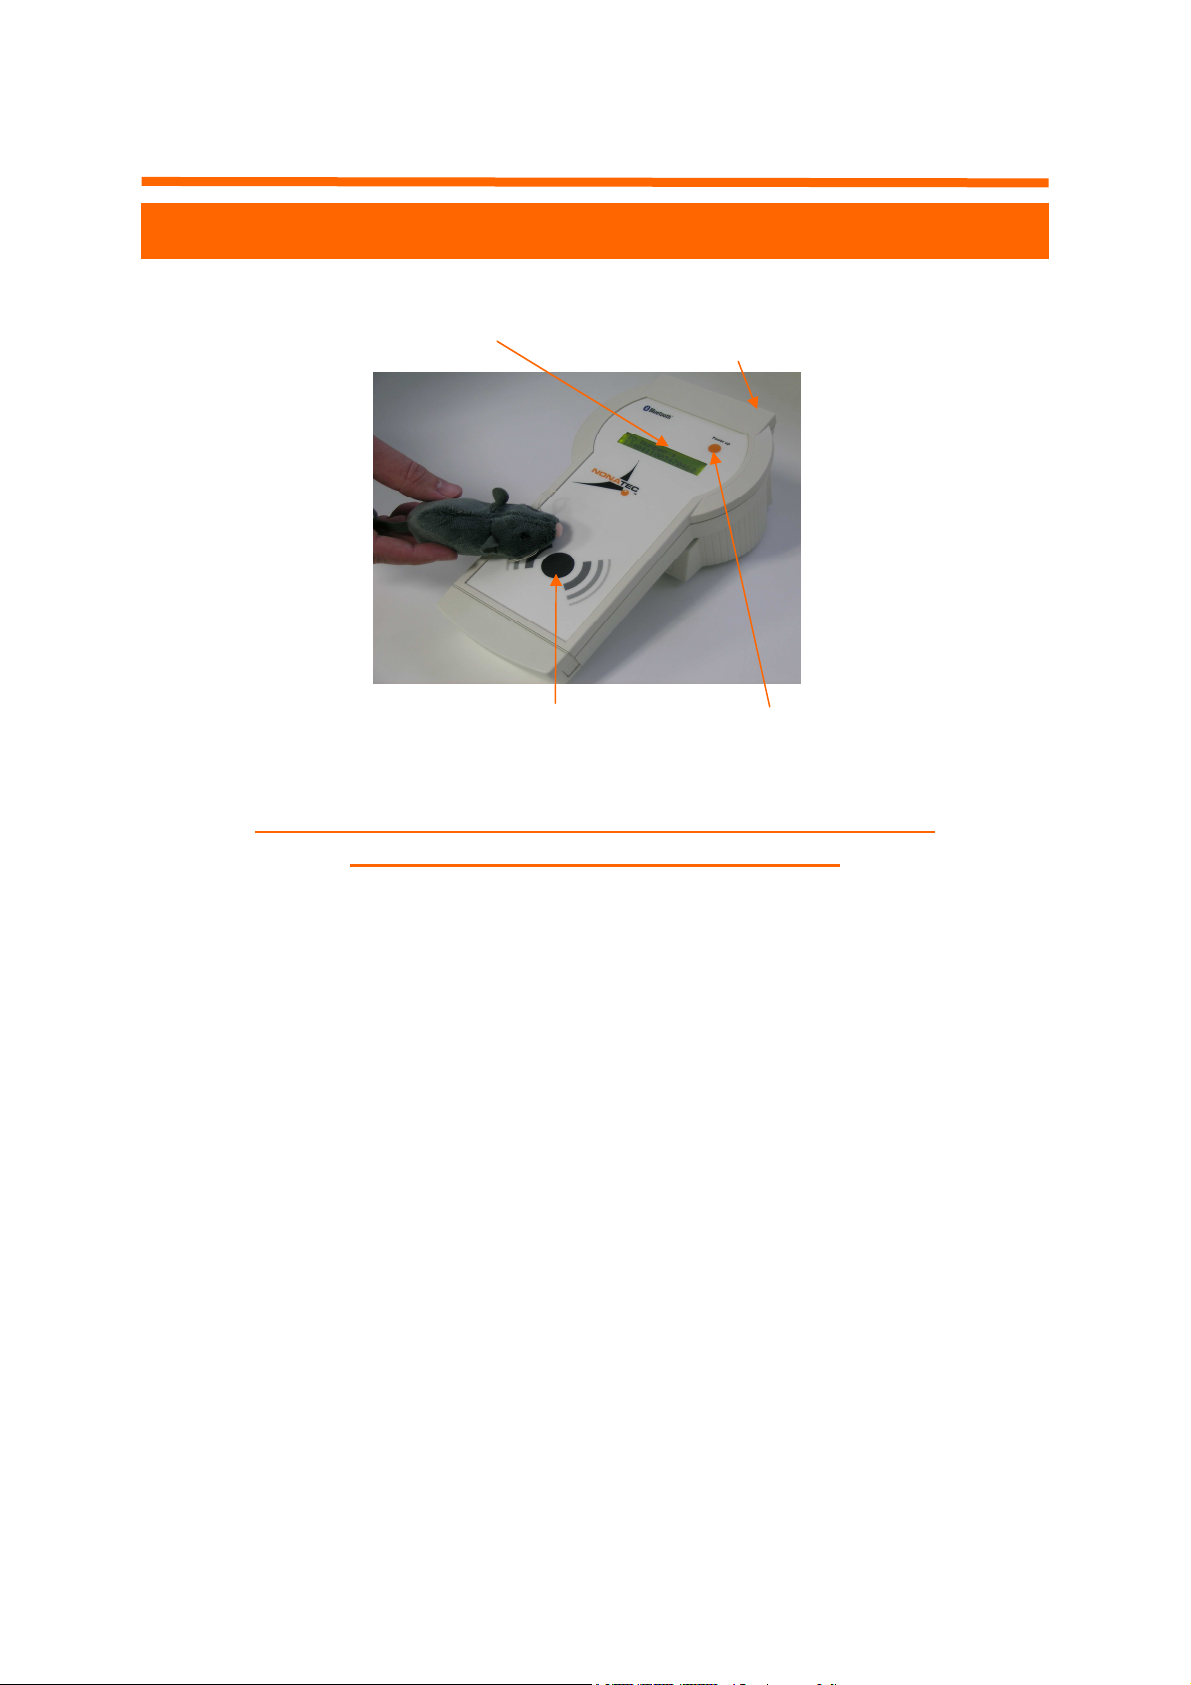
LCD Display
Plug for reloading
Antenna for reading / Writing
Power Up Button
Making a Quick Test with the Nonatec Bluetooth
LAB BENCH Reader / Writer device
1. Click on
« Power Up »
The following message should appear on the LCD Display:
« LUTRONIC RFID NONATEC »
2. After a few seconds,
3. Scan the Nonatec transponder with the reader
4. The ID Number appears on the LCD Display
5. In order to switch on the backlight, press again on
Up »
6. To switch off the reader, press
NOTA:
When not used, the reader will automatically standby after 10 Minutes.
« ID Number »
« Power Up »
will appear
« Power
for 2 to 3 seconds.
9 Version 2.0 November 2008
Page 10
III. LAB BENCH Bluetooth Reader / Writer
1. Bluetooth Key Setup
A. OPERATING SYSTEM Windows XP Service Pack 2
•
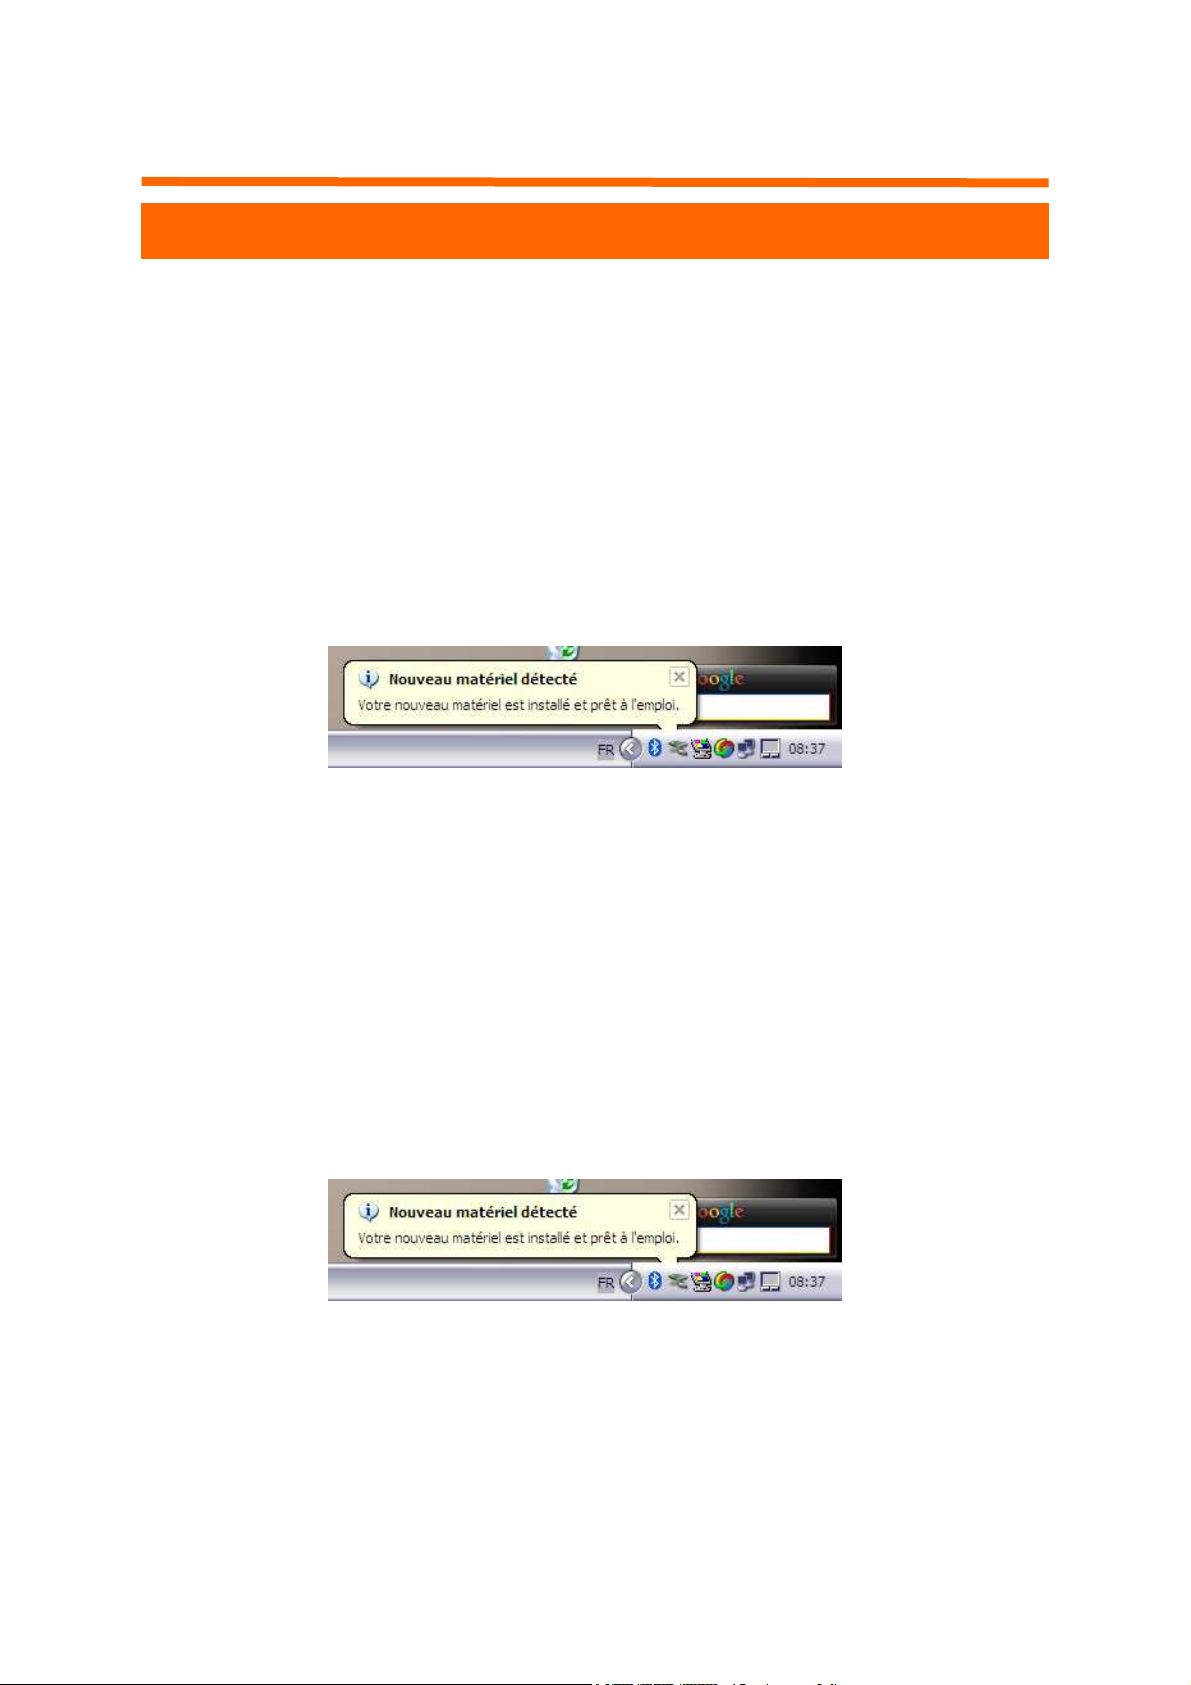
Plug the Bluetooth Key on any of the USB Port of your Computer.
Your computer will automatically connect the key.
•
Wait to see the following message:
« Your new device is ready to use »
Then go to II.2: Lab Bench Reader / Writer Setup
B. Other OPERATING SYSTEM
•
Launch the BlueTooth Key Installation CD.
•
Follow the instructions
•
Wait to see the following message:
•
« Your new device is ready to use »
Then go to II.2: Lab Bench Reader / Writer Setup
10 Version 2.0 November 2008
Page 11
III. LAB BENCH Bluetooth Reader / Writer
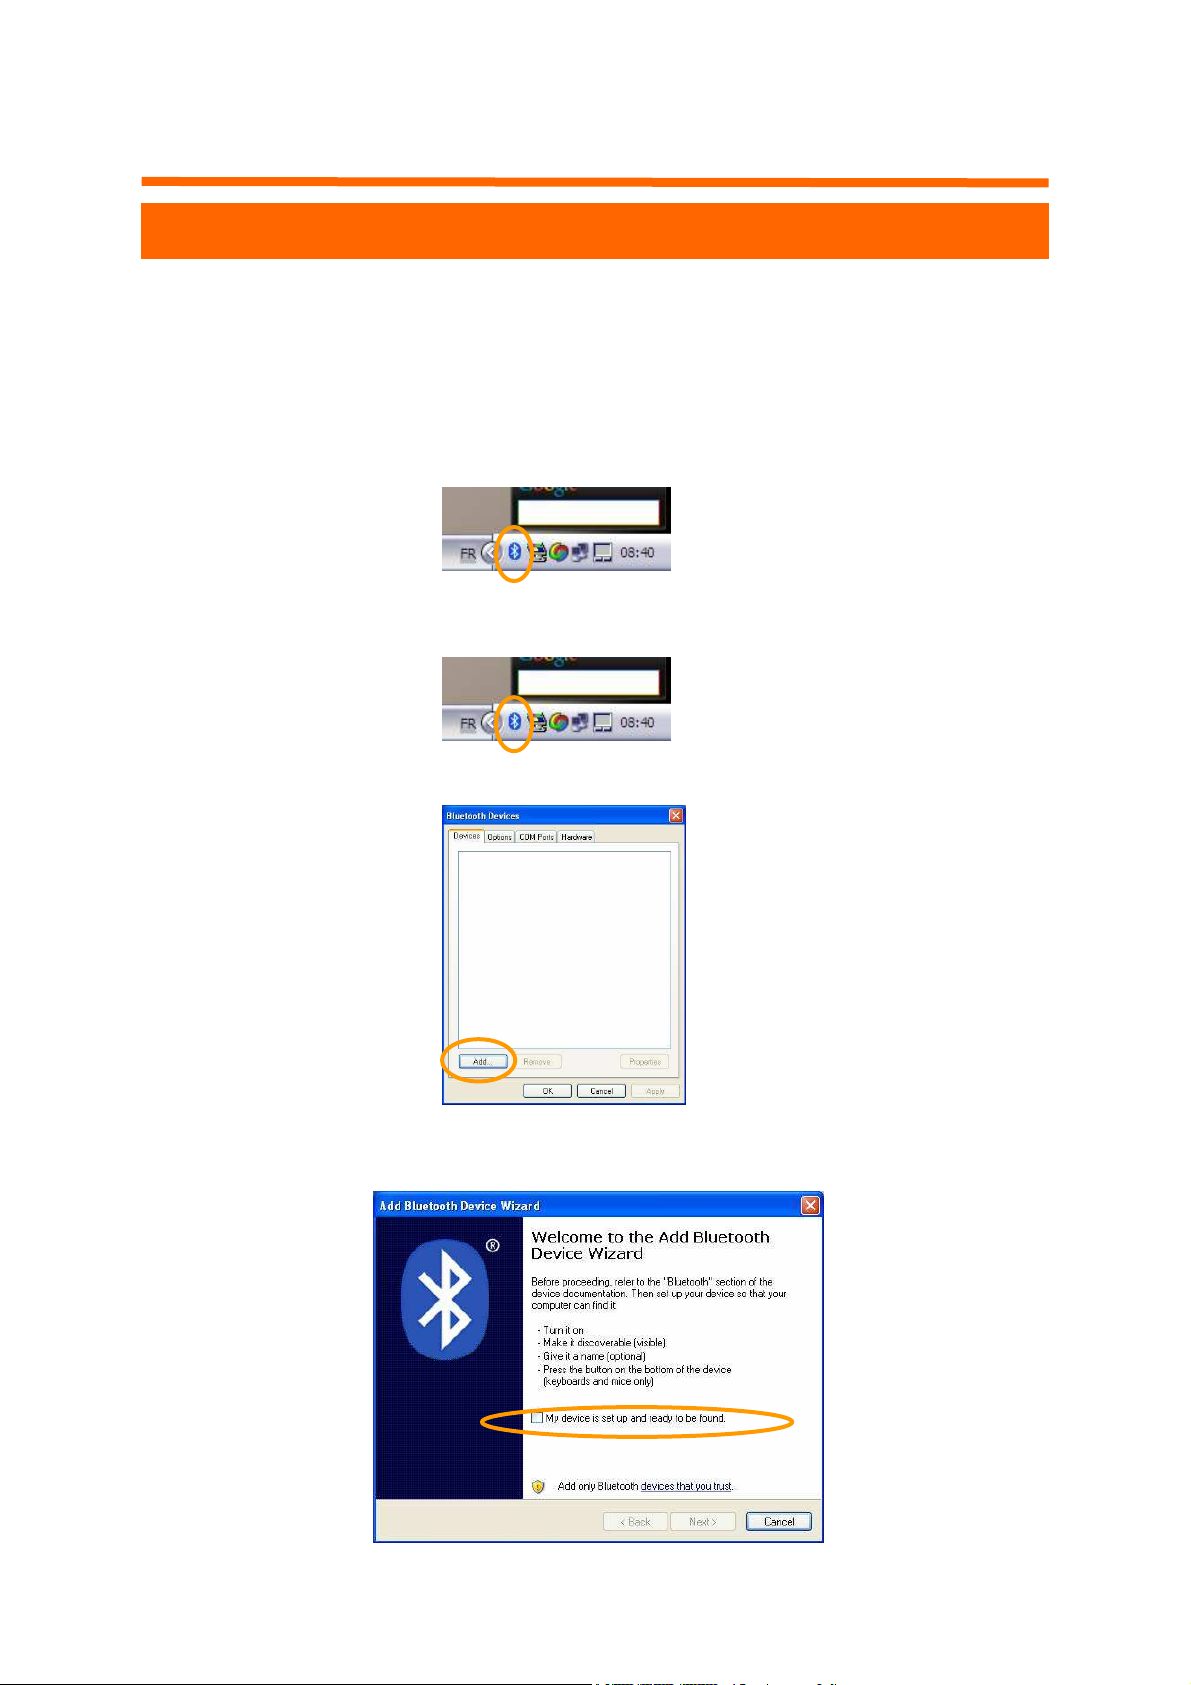
2. LAB BENCH Reader / Writer Setup
1. Plug the Bluetooth Key on any of the USB Port of your Computer.
The following icon will appear on the screen of your computer:
2. Switch on the reader by pressing
3. Double click on the Bluetooth Icon.
The following window will appear:
4. Click on
« add »
5. Tick the box
then click on
« My device is set up and ready to be found.»
« Next ».
« Power Up »
11 Version 2.0 November 2008
Page 12
III. LAB BENCH Bluetooth Reader / Writer
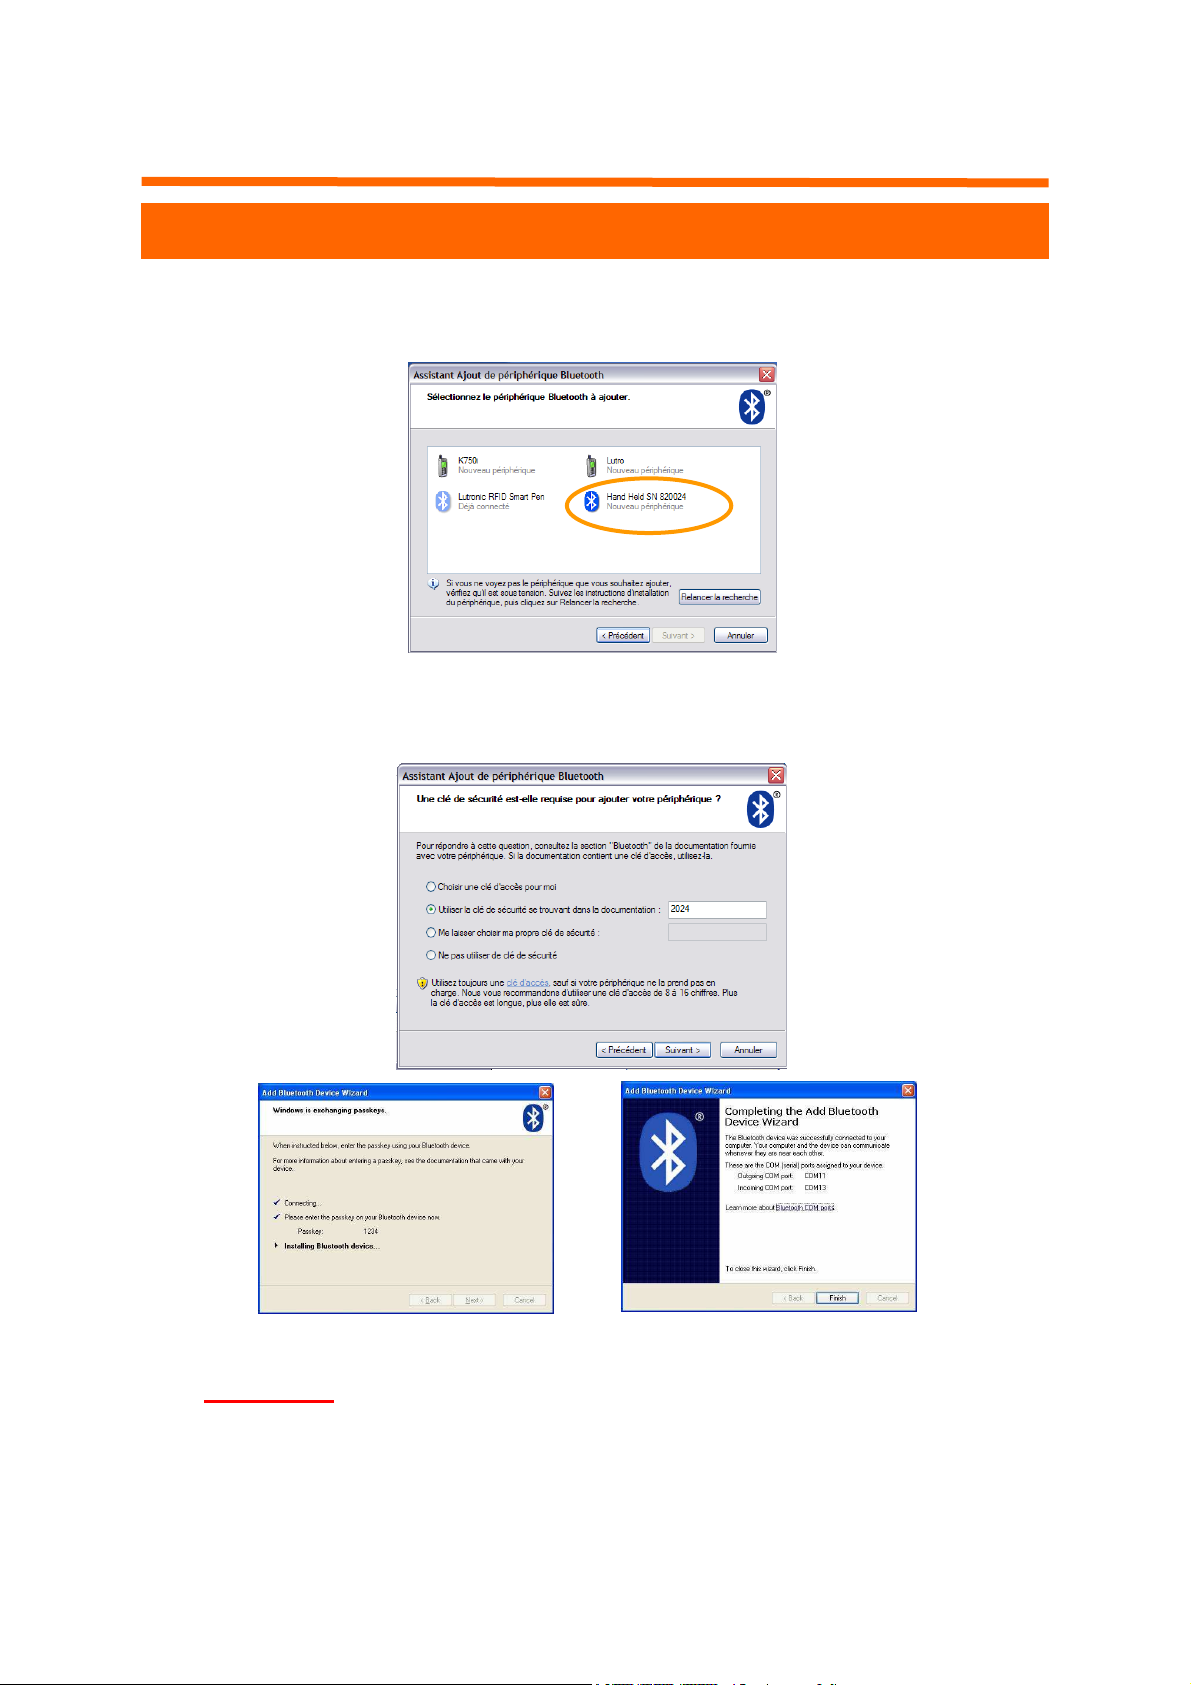
6. Wait for the research to end. Select the icon
82XXXX »
and then, click on
«Next ».
« LAB BENCH SN
7. Select «
last numbers of the Serial Number of your reader. Ex: «
then click on «
8. Wait for the connecting process to end.
9. Warning: the Outgoing and incoming COM port should be set between 1 and 32, otherwise the reader will not connect to the computer. Refer to the Microsoft Windows assistance for more information, or contact the Nonatec after sales office.
12 Version 2.0 November 2008
Use the passkey found in the documentation ».
Next
».
Enter the 4
0024
»
Page 13
IV. Nonatec PRO Software
To install the Nonatec Pro software, please make sure that you have the
following component:
•
A PC with Windows 2000 or Windows XP or Vista
1. Nonatec Pro Software Setup
A. Nonatec Pro Software CD Installation
1. Introduce the CD set up in your computer
2. The software should launch automatically. If not, launch it
manually and select on the Nonatec Pro CD the file
stall_NONATECPRO_2.41.EXE
3. Follow instructions given on the screen during the entire set up
process.
Once this step is finished, the software is installed and ready to use,
you can then proceed to the next step.
B. First use of the Nonatec Pro Software
1. Launch the Nonatec Pro Software by clicking on the icon.
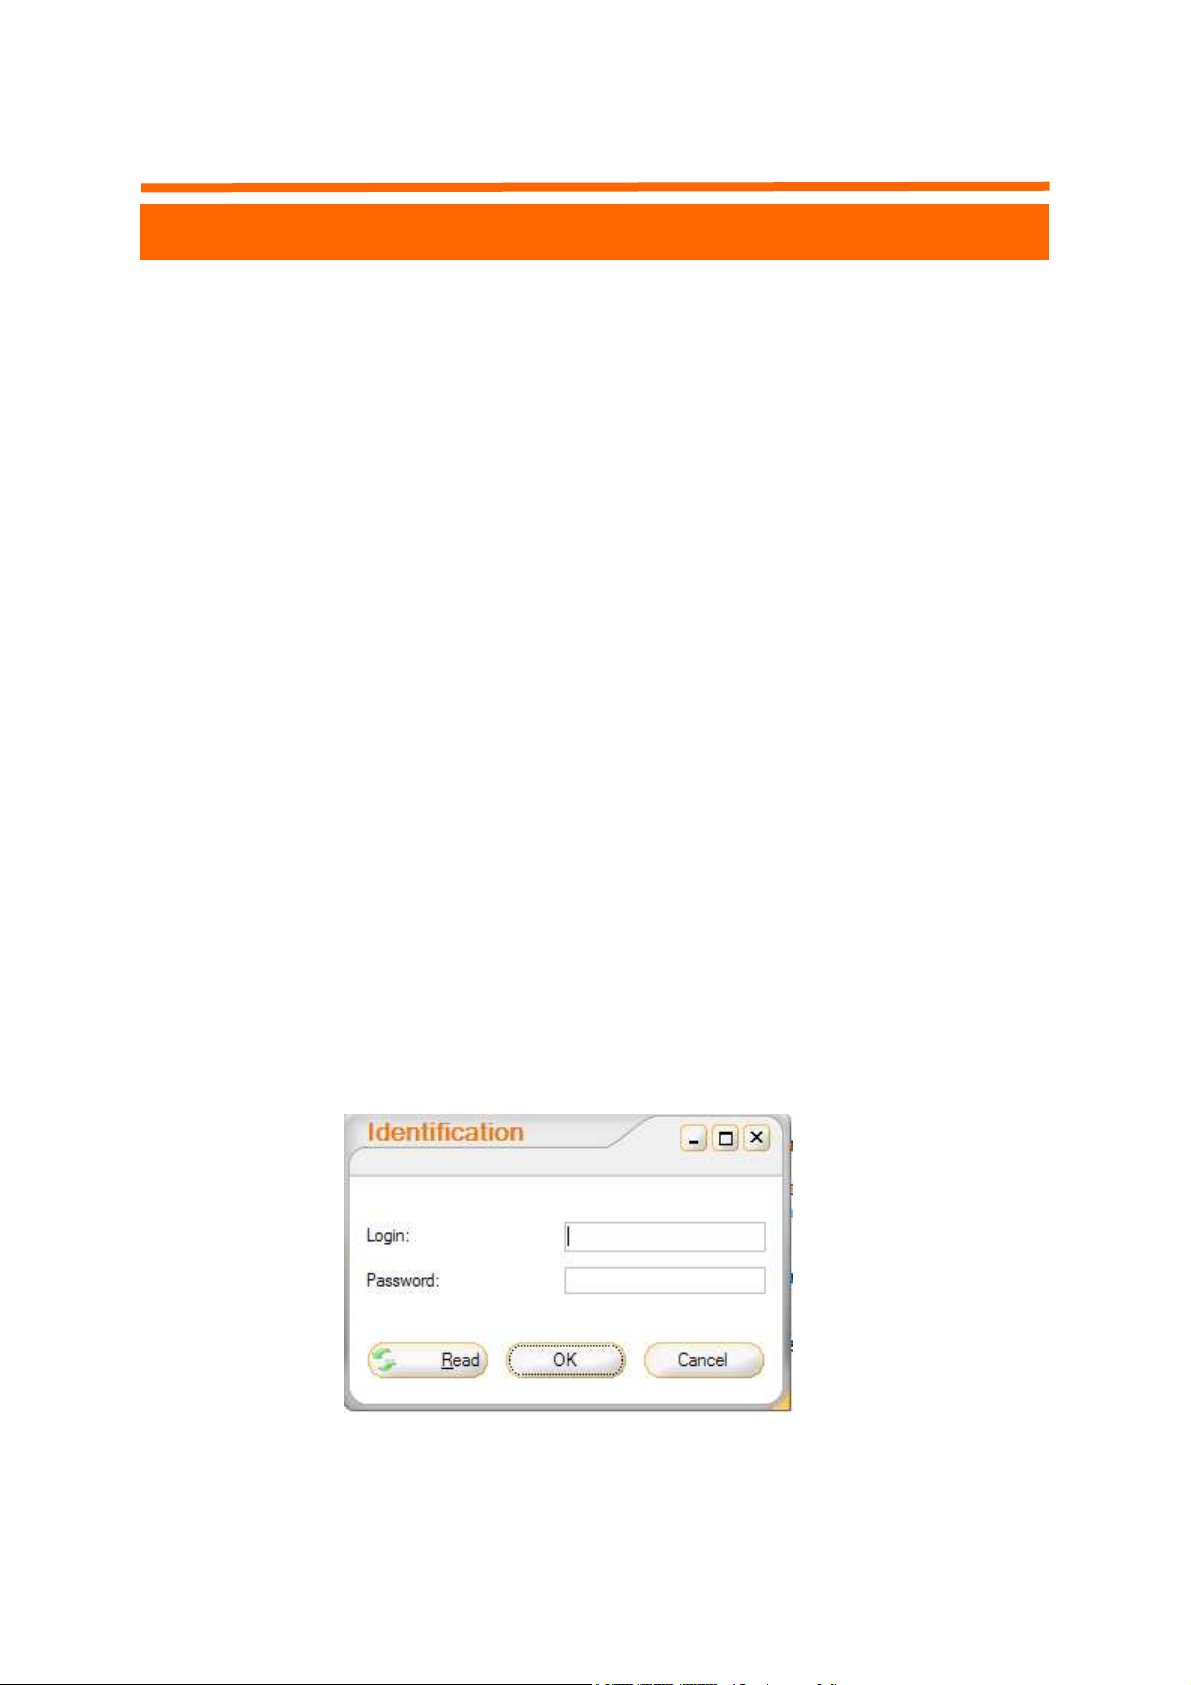
2. The following window will appear:
For the first use, just click on «
launch.
OK
» the software will then
In-
13 Version 2.0 November 2008
Page 14
IV. Nonatec PRO Software
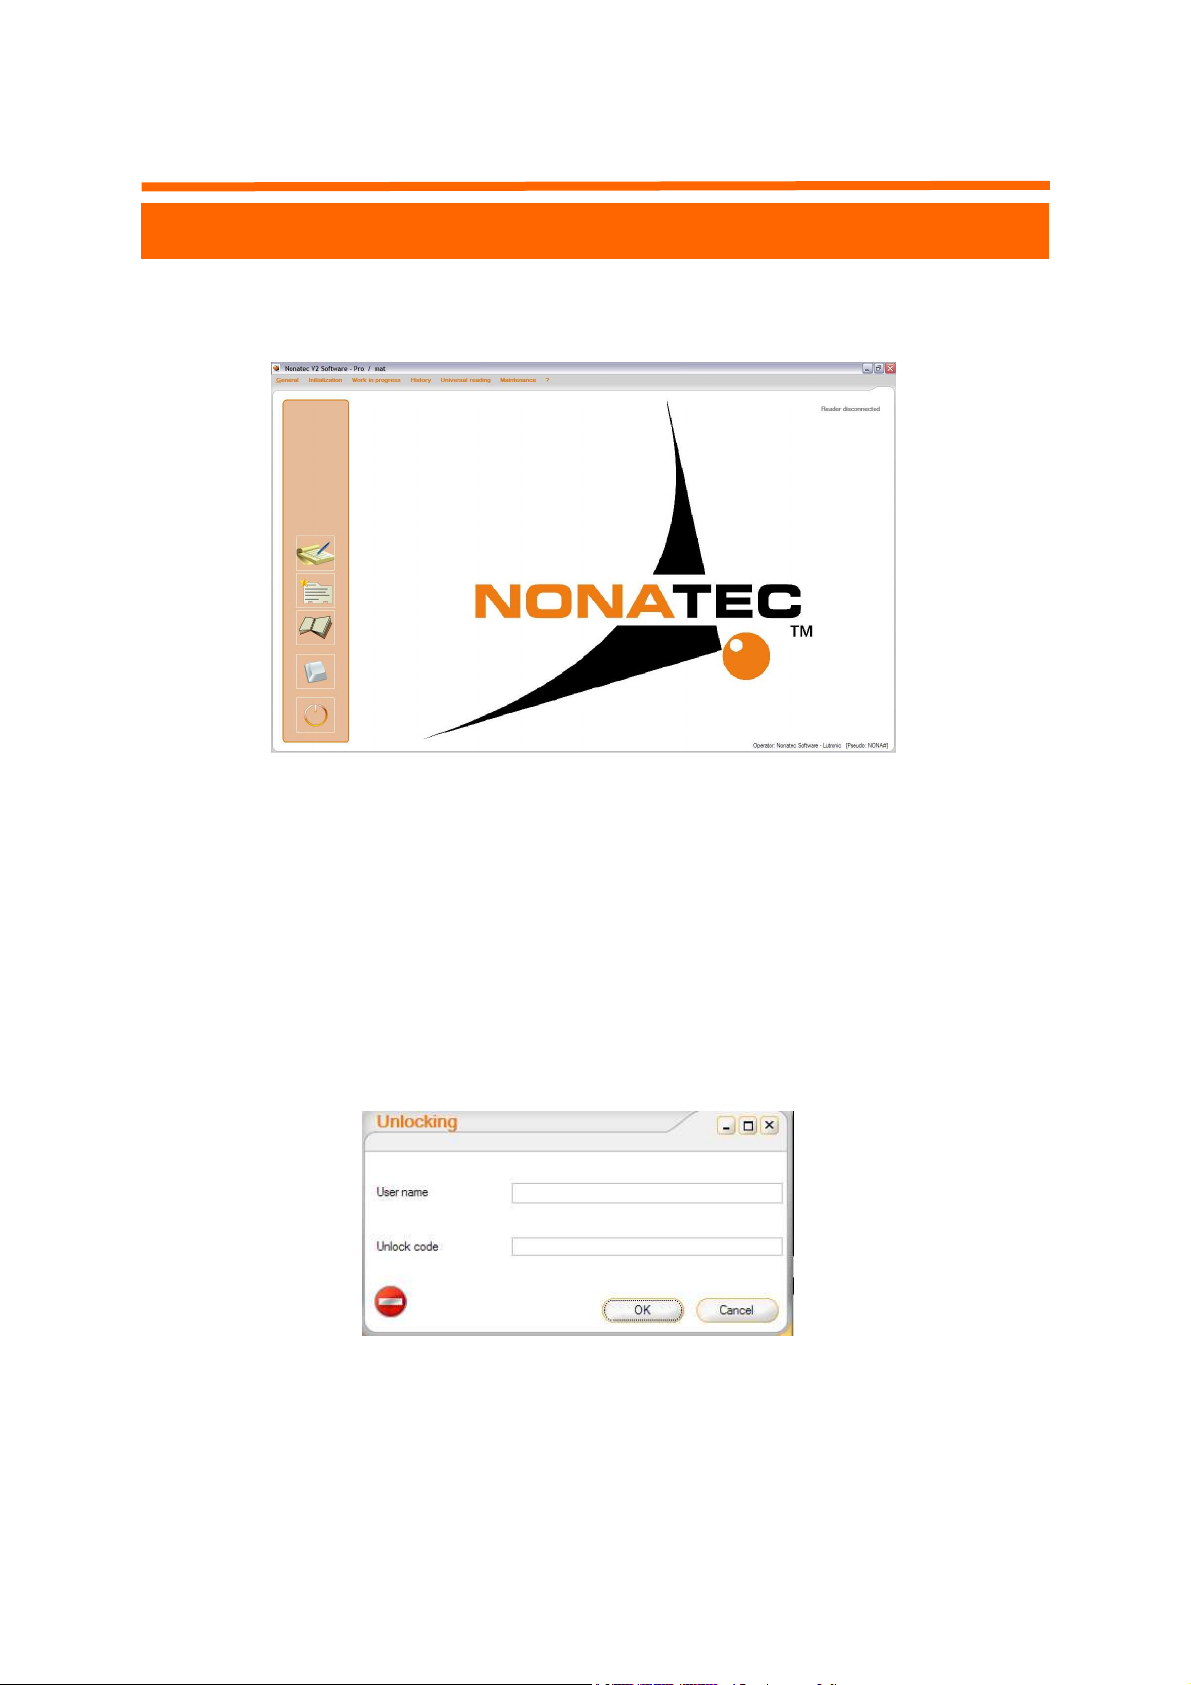
The Nonatec Pro Software front page will appear once you have
launched the software.
As a security, the main functions of the software are locked when you
install it.
To make all the functions of the available, you need to enter your
unlocking code. Proceed as following:
1. Click on « ? ».
2. Select «
3. The following window will appear:
Unlocking Code
»
4. Enter the User name (Nom d’utilisateur) and the Unlock Code
(Code de Débridage) that is given with the software. Nonatec
Pro is now ready for use.
Have a great use of the NONATEC identification products!
14 Version 2.0 November 2008
Page 15
IV. Nonatec PRO Software
2. How to Use the Nonatec PRO software?
A. General presentation
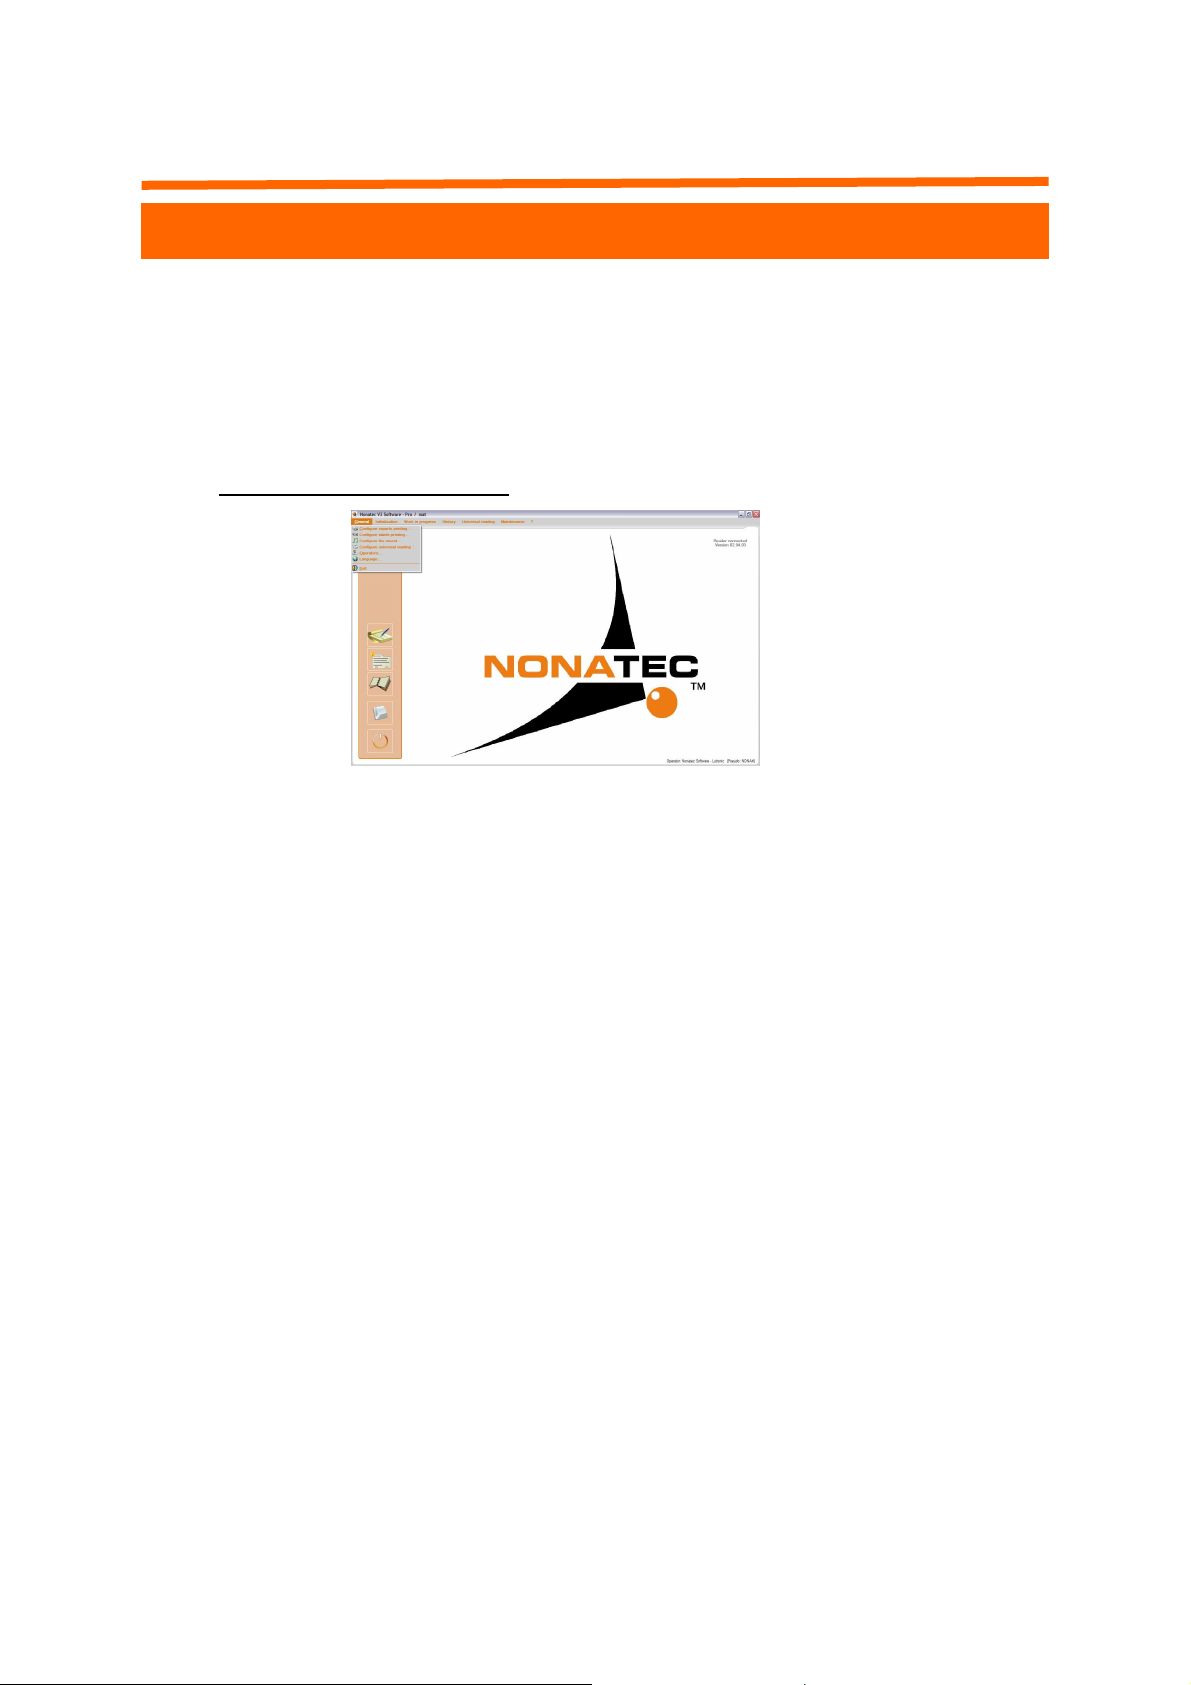
This pull-down menu is made up of 4 possibilities.
•
•
•
•
•
•
a. The “General” Menu
“Configure reports printing”, which enables you to configure
the printer.
“Configure labels printing”, which enables you to configure the
printing of labels if wanted.
“Configure the sound”, which enables the user to set the sounds
of NONATEC PRO.
⇒
For instance, you will be able to choose the “emitting” of the
sound during the reading and the writing of a tag and the
sound in itself during both the RFID Reading and RFID Writing.
“Configure Universal reading”, which enables you to configure
the Universal reading. The Universal Reading is used to save the
transponder identification number on any other software (ex: Microsoft Excel…),
“Operators”, which is a fact sheet concerning the different us-
ers of the software,
“Language” which enables you to select your language.
15 Version 2.0 November 2008
Page 16
IV. Nonatec PRO Software
b. The “Initialization” Menu
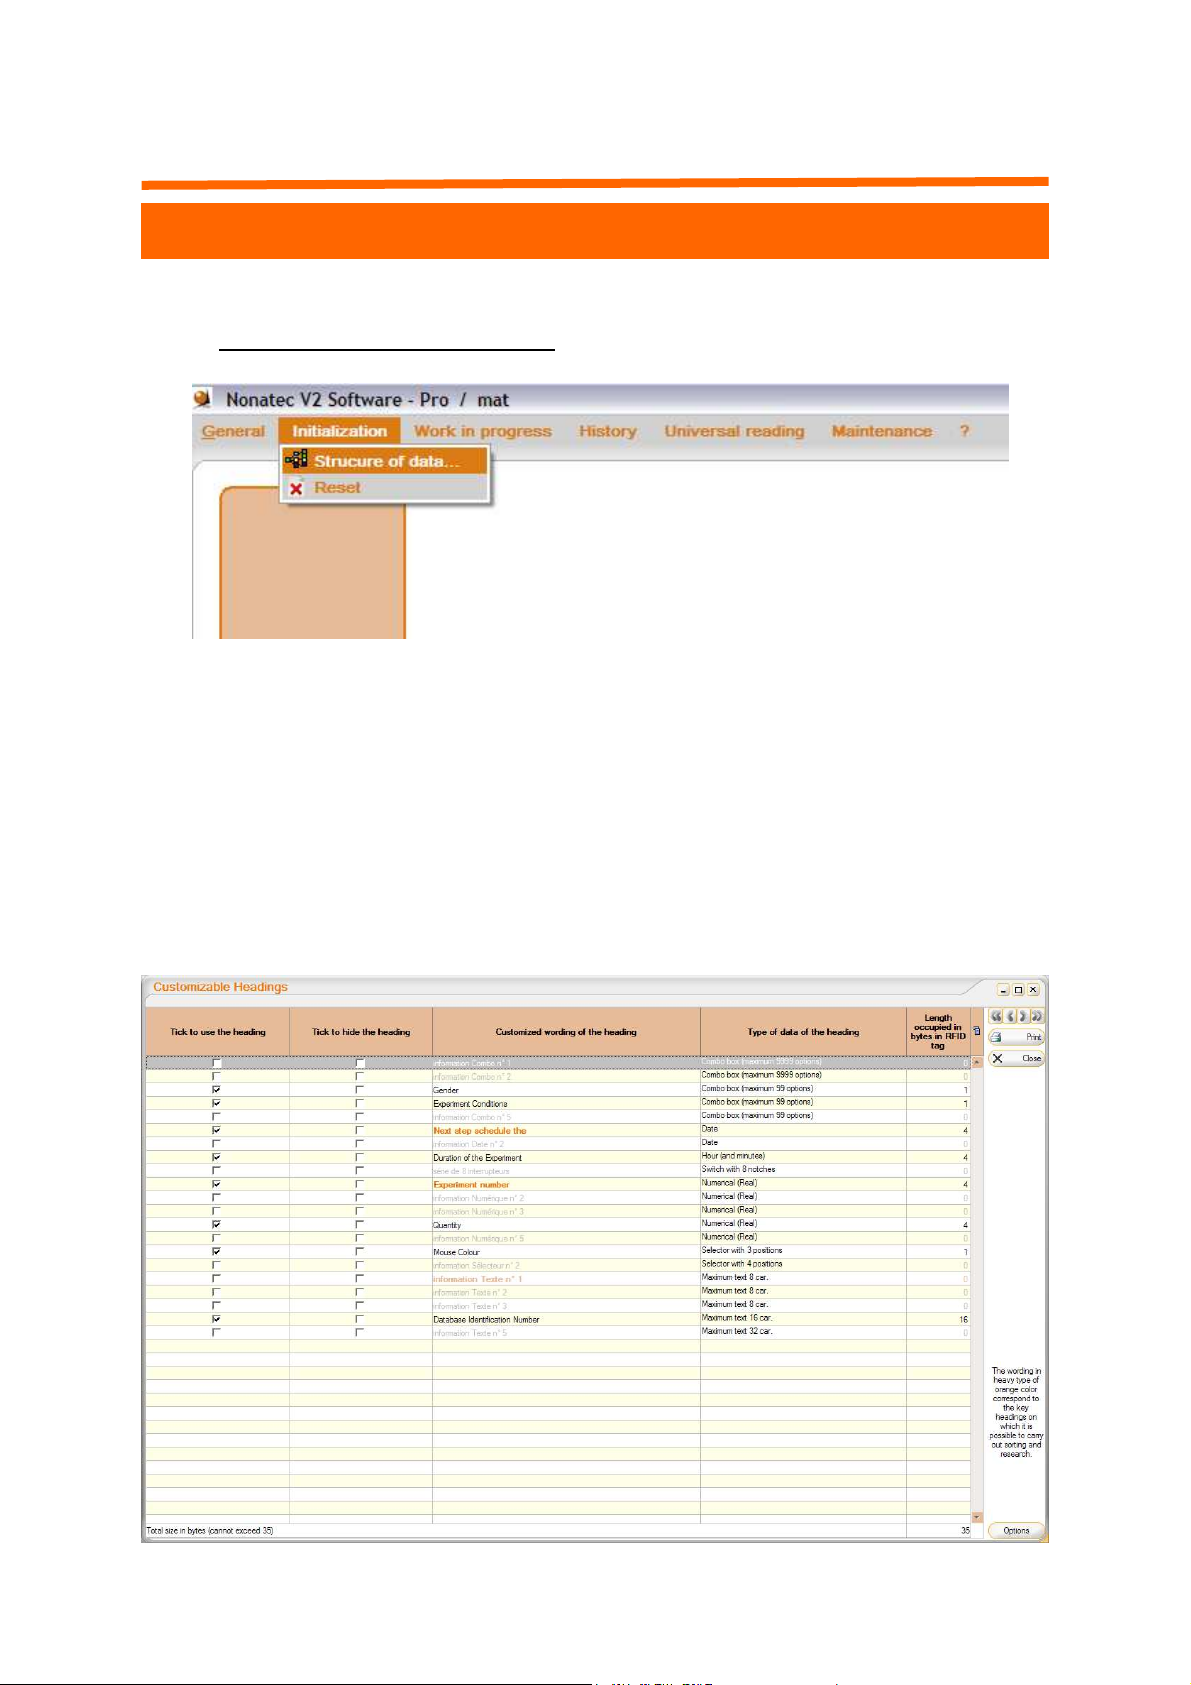
This menu has a sole option “Structure of the data”, which enables
you to customize your data base.
For example:
•
You will be able to choose, according to your needs, the headings
in which you are interested by simply notching the right boxes.
•
You will also be able to personalize the wording of these headings
as well as the type of the data (hour, date…).
16 Version 2.0 November 2008
Page 17
IV. Nonatec PRO Software
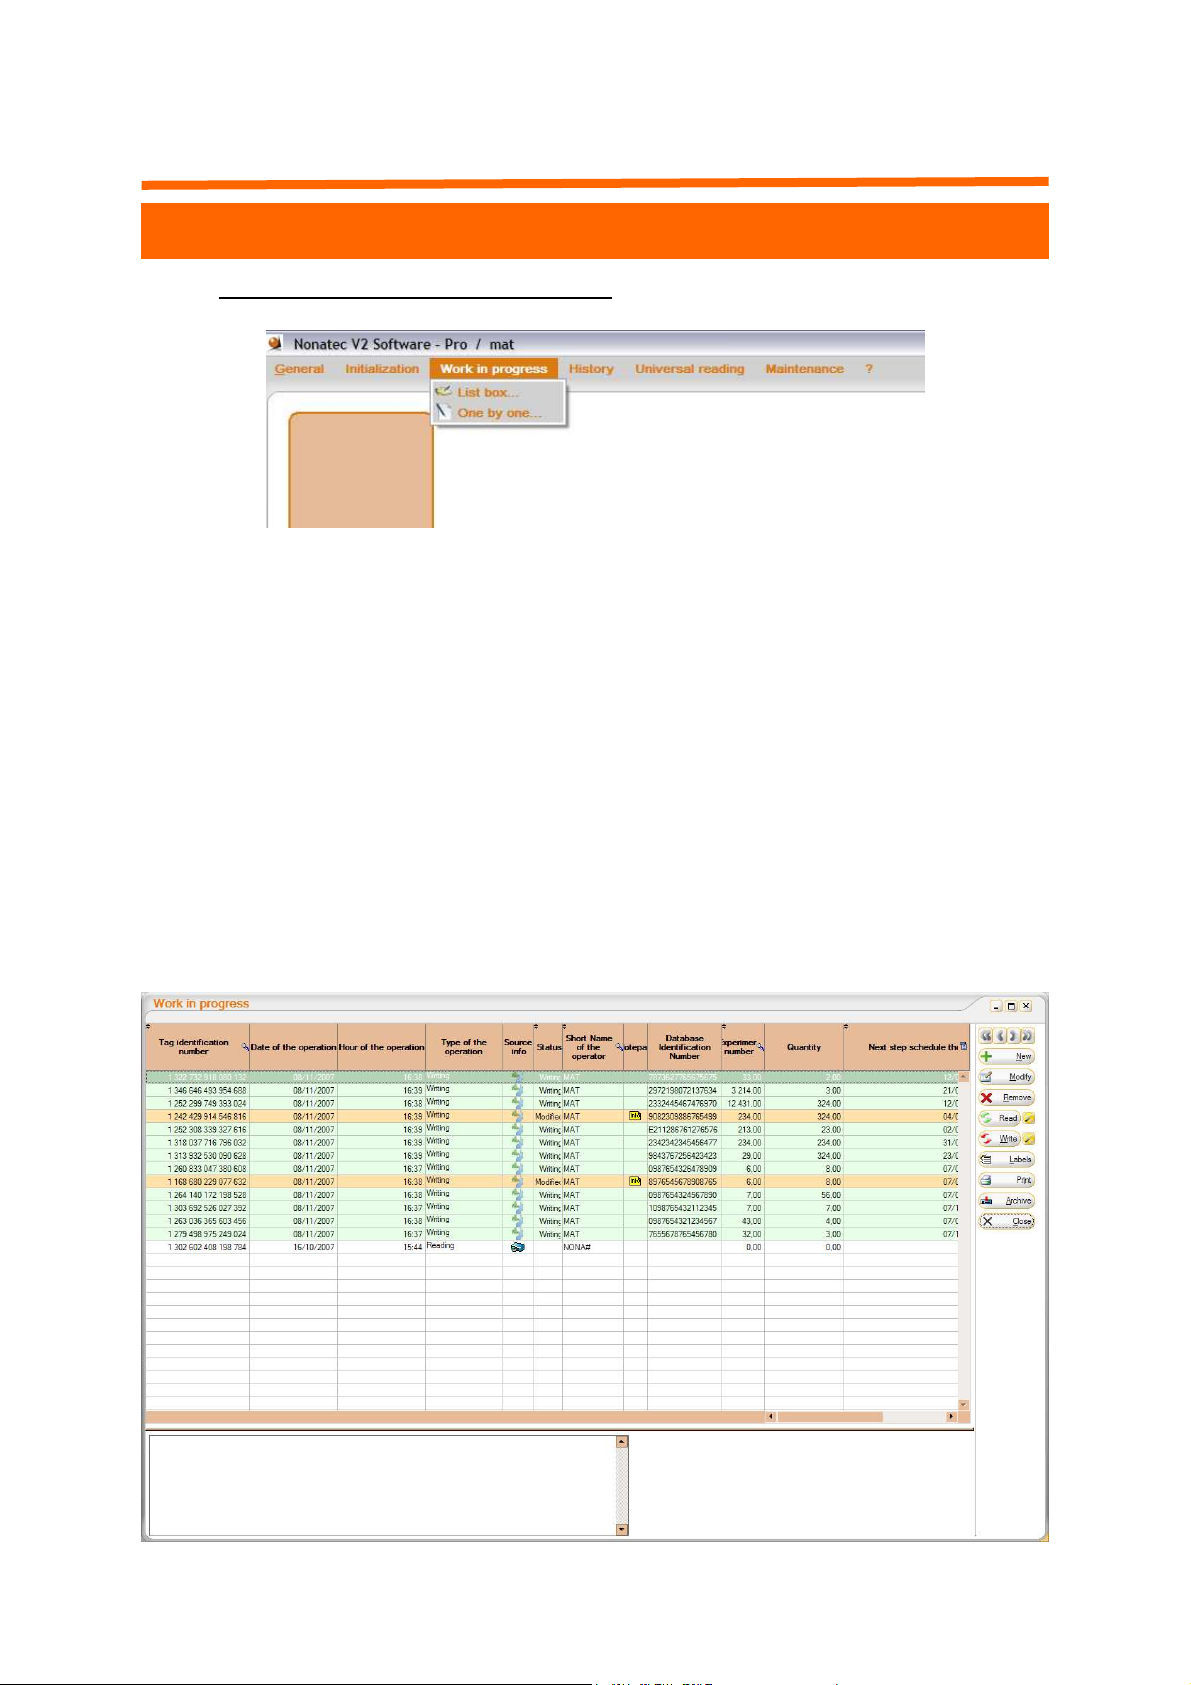
c. The “Work in Progress” Menu
This menu is composed of two options.
•
The “List box”, which is a table with various headings, related to
the experimentation environment. Thanks to this tool, you will be
able:
⇒
To read the data contained in the tag,
⇒
To rewrite and add new data on the tag, but also modify or
delete former data,
⇒
To store a subsequent amount of data related to your current
experimentations,
⇒
To print out codes bars corresponding to the unique and universal number of the tag for a better traceability,
⇒
To archive data you will use later.
17 Version 2.0 November 2008
Page 18
IV. Nonatec PRO Software
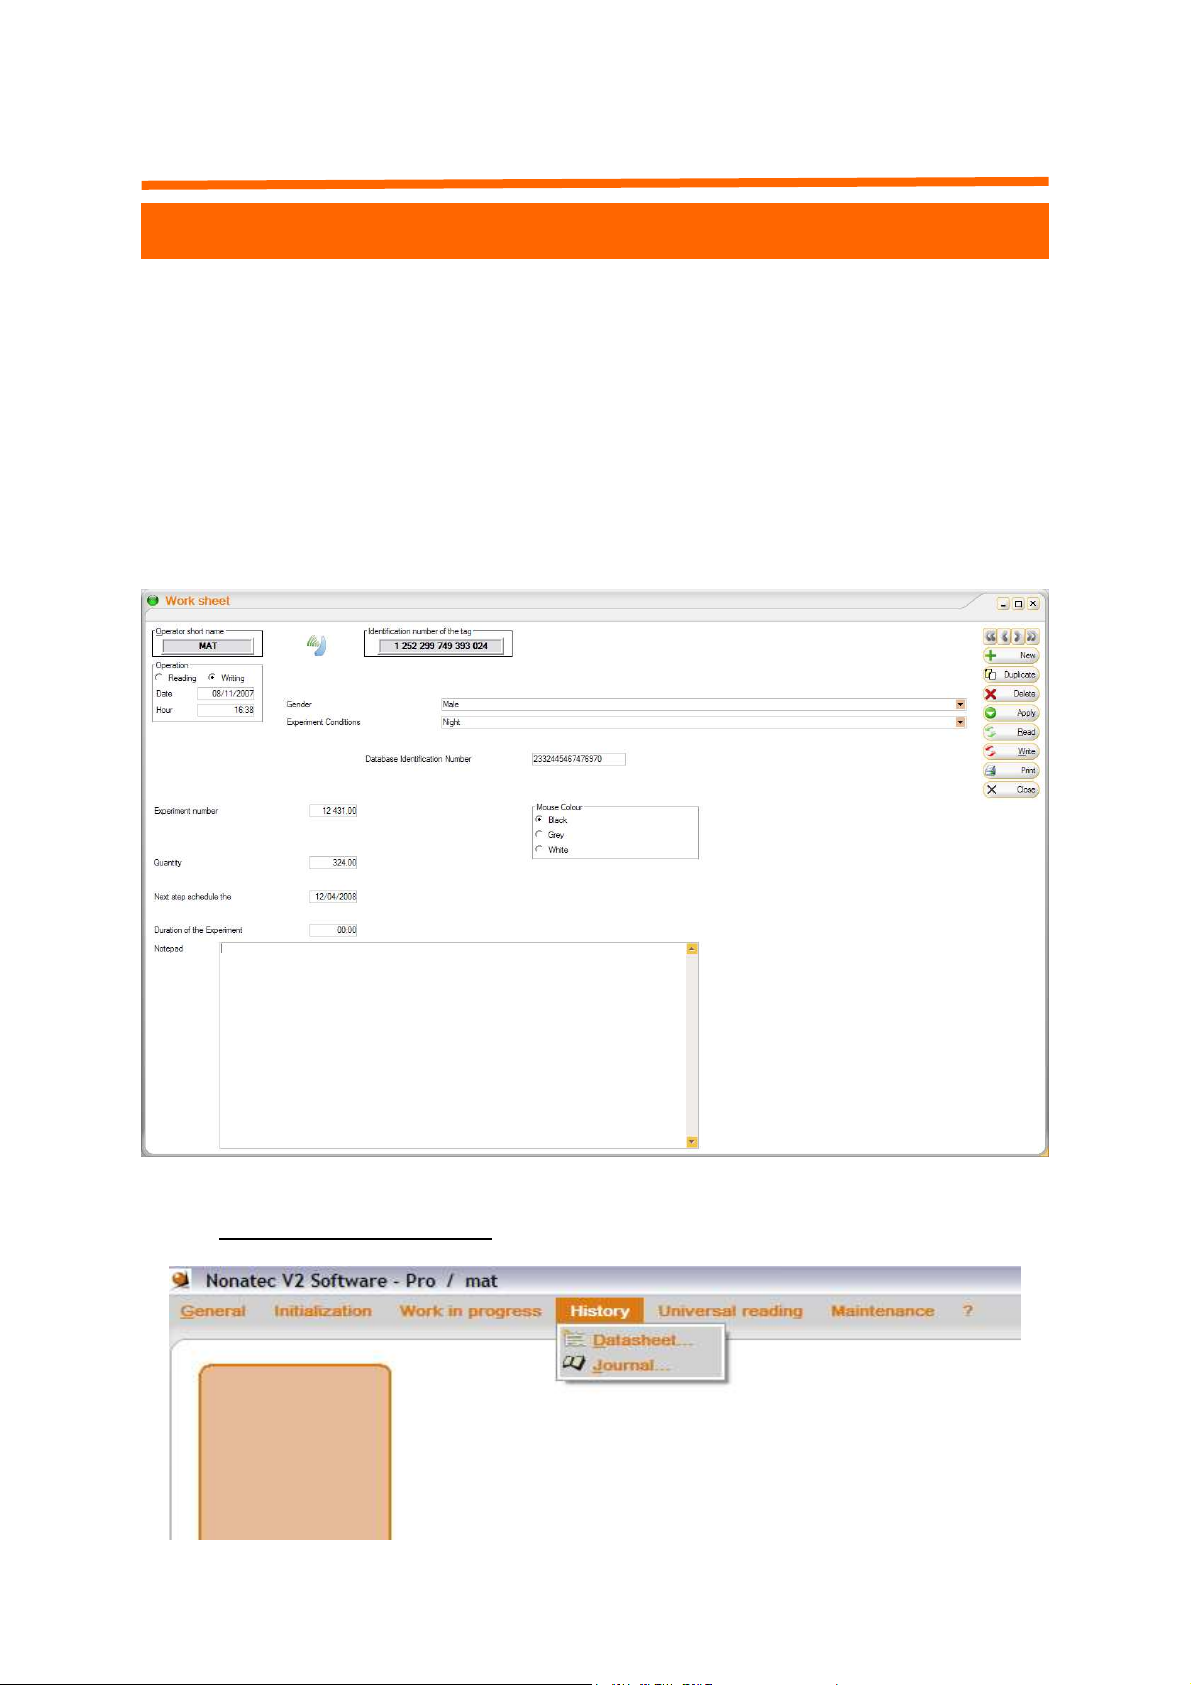
•
The “One by one” option, which corresponds to a sheet follow up
record.
⇒
This sheet is an individual card in which you will be able to
find all the data extracted from the transponder,
⇒
You will also be able to write all your remarks and observations thanks to a writing pad system.
18 Version 2.0 November 2008
d. The “History” Menu
Page 19
IV. Nonatec PRO Software
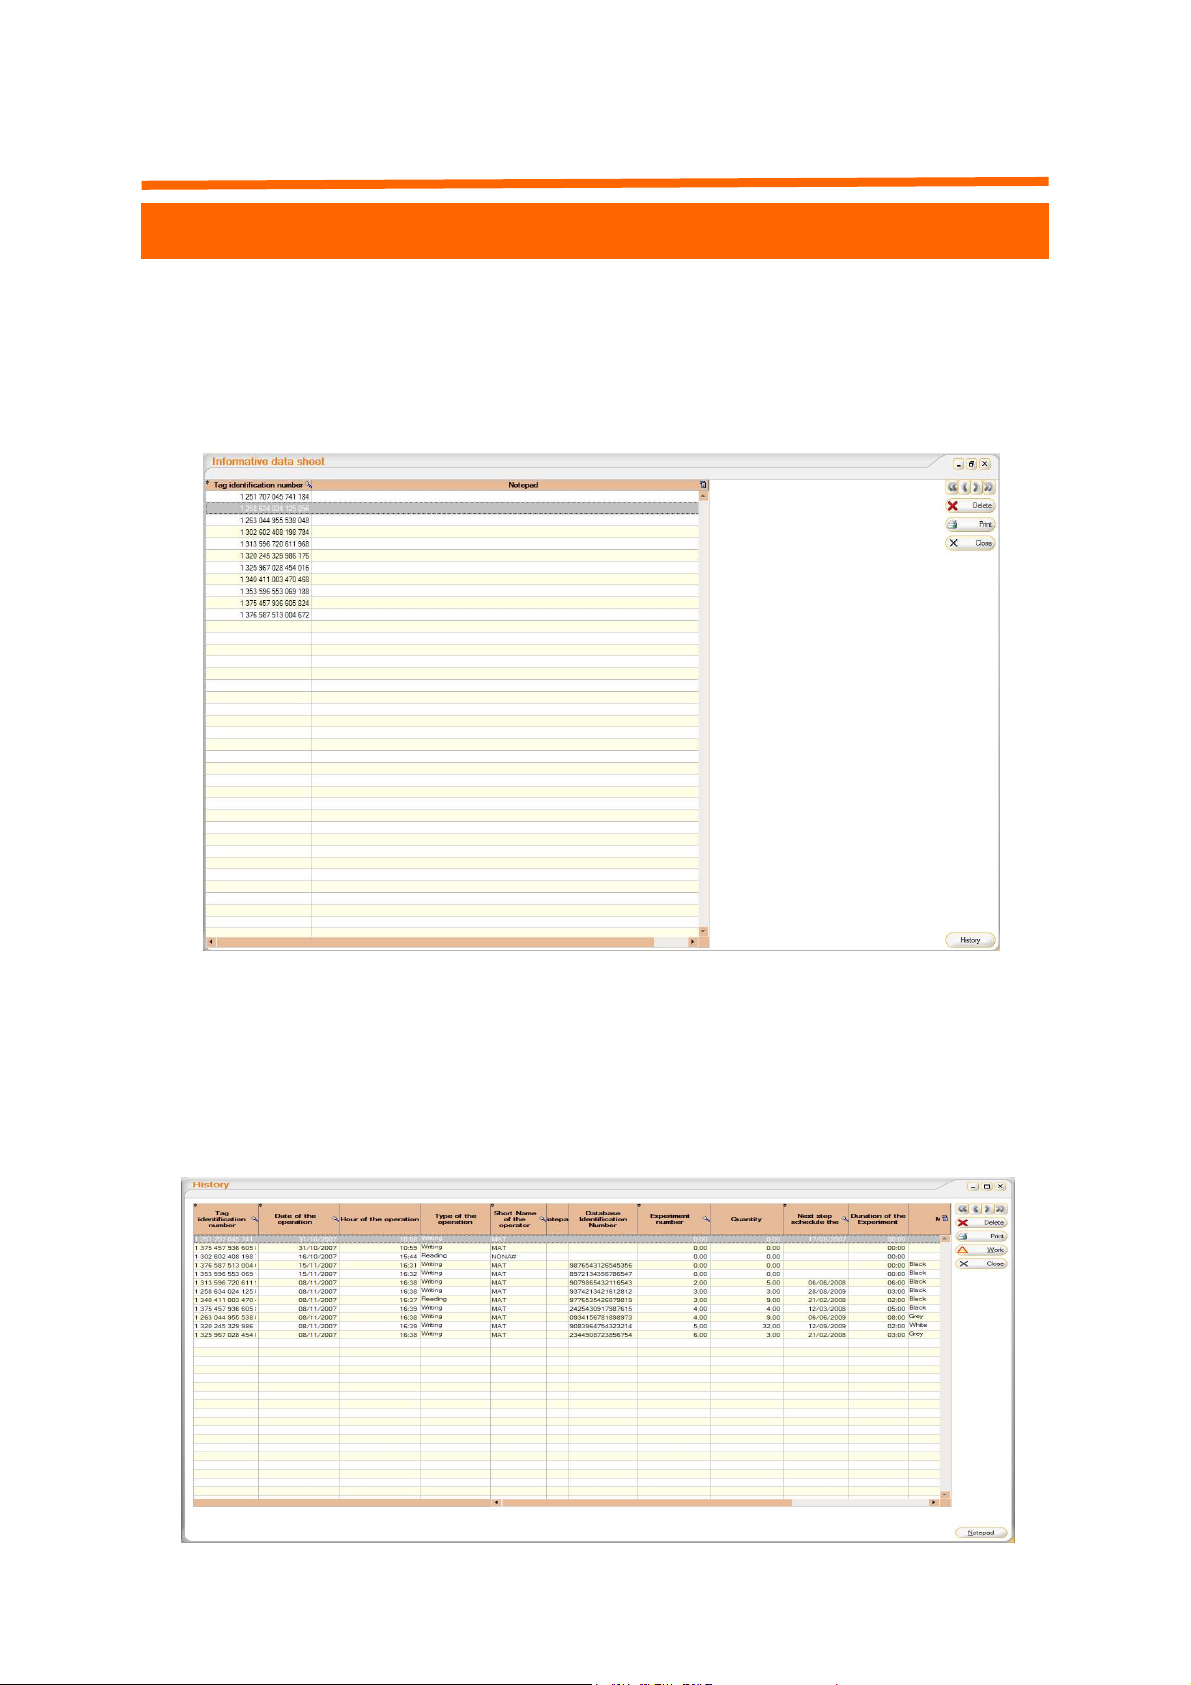
This menu includes two options:
•
The « Datasheet », which corresponds to a memo pad.
⇒
In this table you will be able to write all your remarks and observations for each tag.
•
And the « Journal » that is the history of the information the user
has saved. The History enables you:
⇒
To file certain data,
⇒
To re-use them later without having to re-identify the tag
before.
19 Version 2.0 November 2008
Page 20
IV. Nonatec PRO Software
e. The “ Universal Reading” Menu
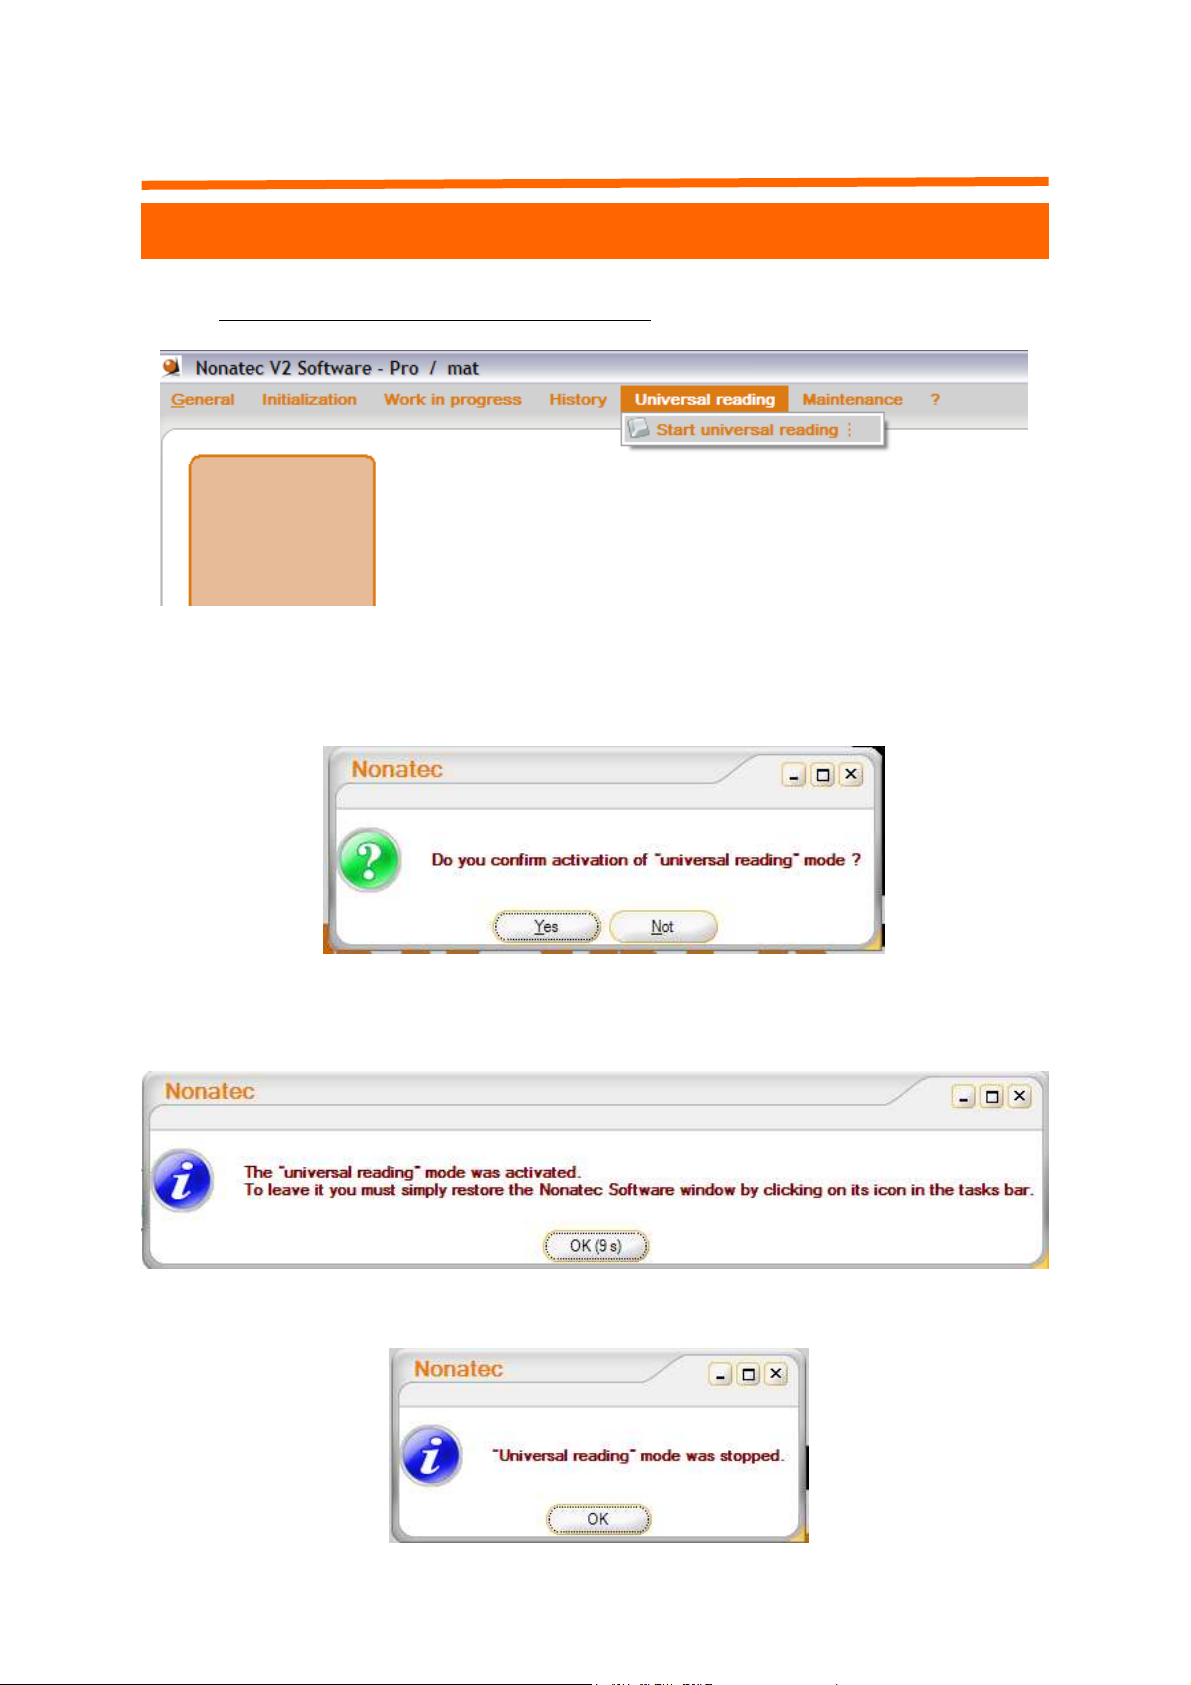
In this menu you will be able to read the identification number of the
transponder on any other software (ex: Microsoft Excel…).
The following window will appear:
Once you have selected “yes” this window will appear. Before the Universal Reading starts, you will only need to open the software you want
to work on.
Once you have finished working, just restore the Nonatec Software to
shut down the Universal Reading. The following window will appear:
20 Version 2.0 November 2008
Page 21
IV. Nonatec PRO Software
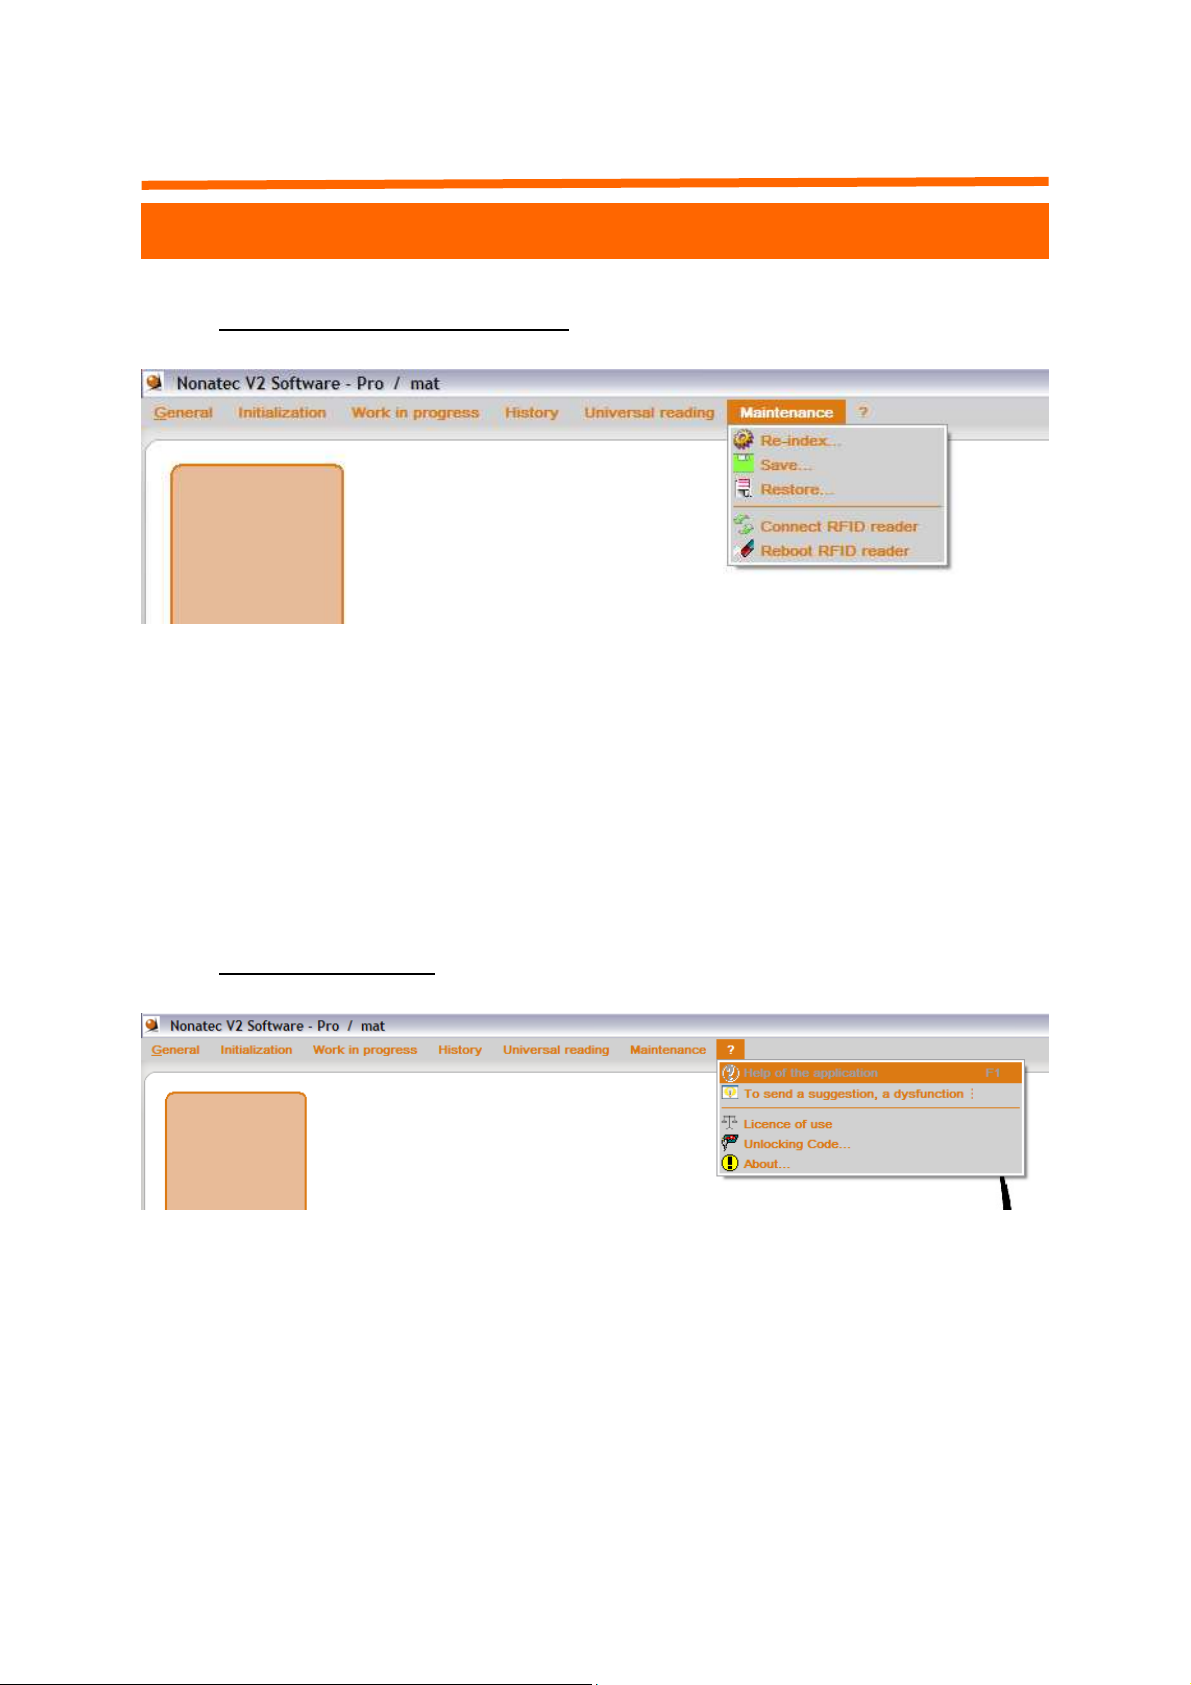
f. The “Maintenance” Menu
In this last menu you will find all the necessary tools in order to store
efficiently your data. The different options are respectively used for:
⇒
Re-indexing the files of the data base,
⇒
Saving the data base,
⇒
Restoring a data base previously saved a compressed file,
⇒
Connecting and reinitializing the Reader RFID.
g. The “?” Menu
This menu is composed of 4 options:
⇒
“To send a suggestion, a dysfunction”, which helps you
to send feedback or to signal an incident,
⇒
“Licence of use”
⇒
“Unlock code” that we have already referred to.
⇒
“About” which gives you information about the software.
21 Version 2.0 November 2008
Page 22
IV. Nonatec PRO Software
B. More Explanations
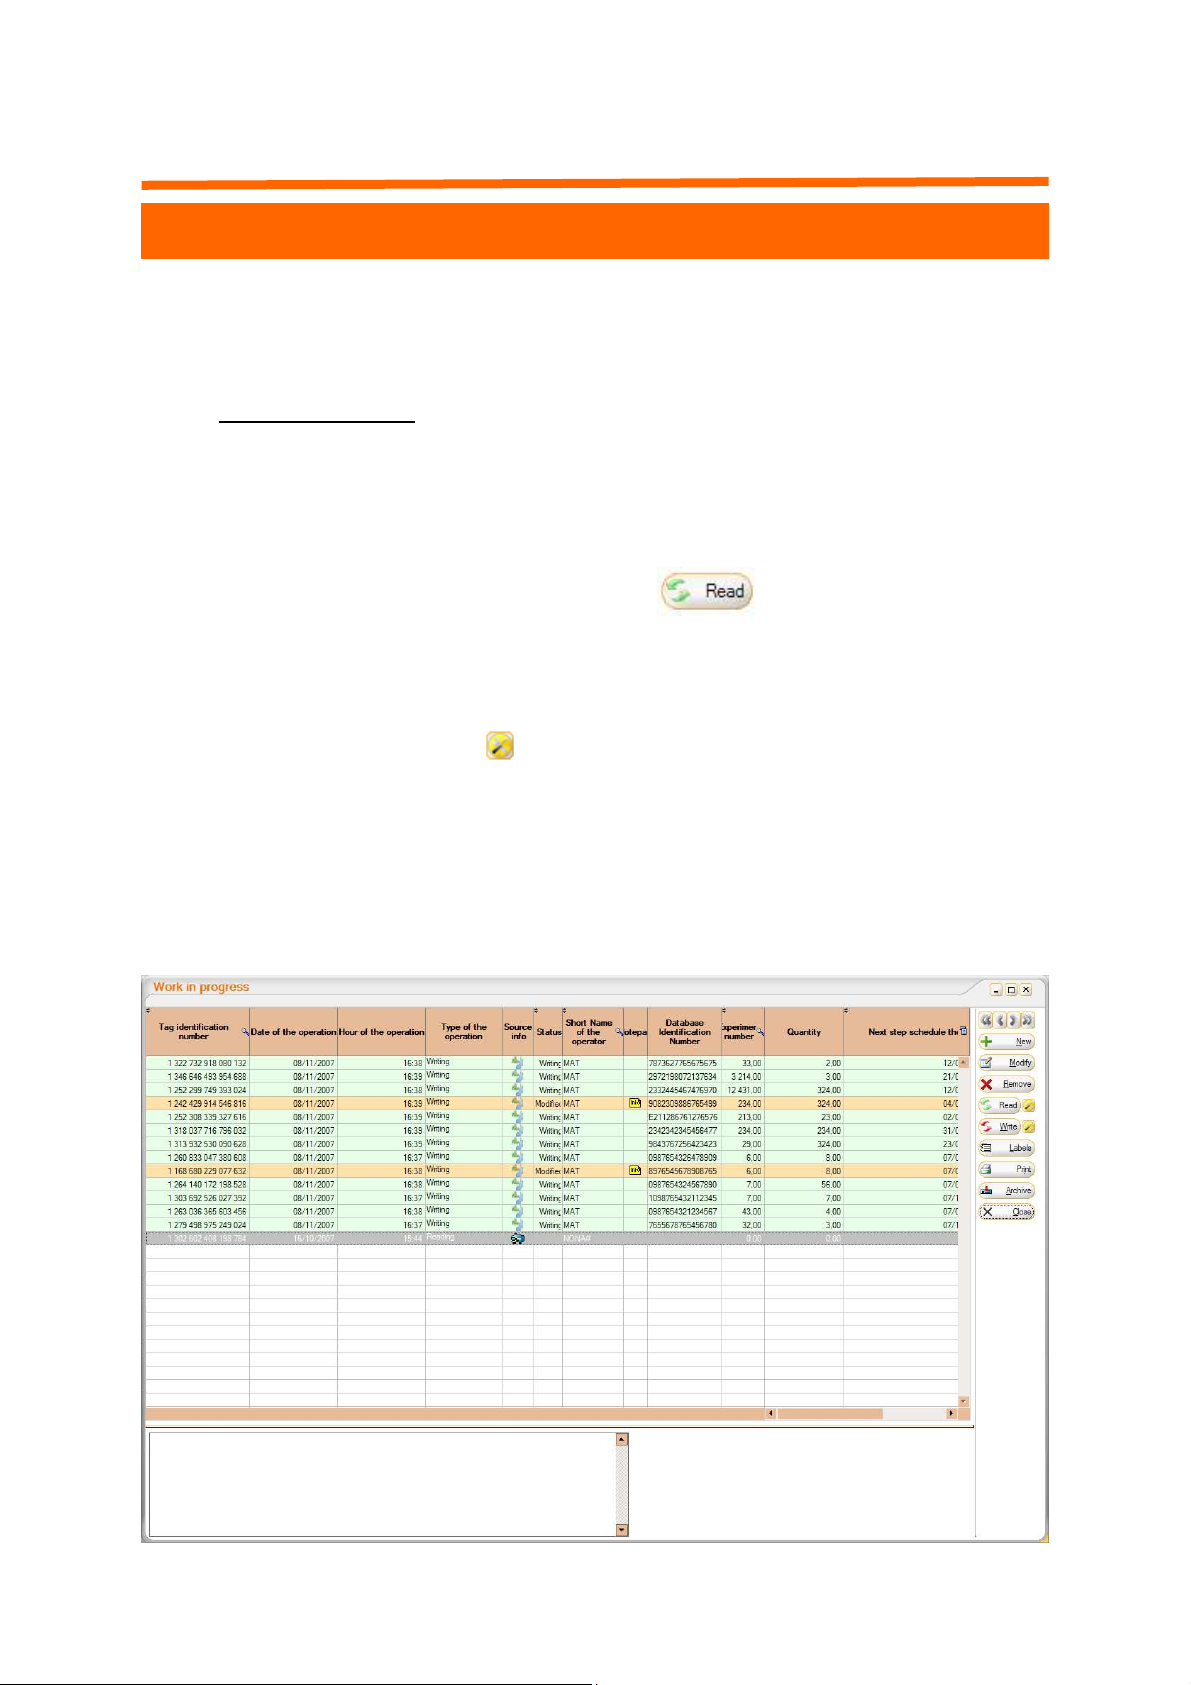
The handling to read a tag is very simple:
1. Go in “Work in Progress” and select “List Box”
2. Then click on the following Icon:
3. You then only need to bring the Reader / Writer device close to the
4. Information contained in the NONATEC Transponder will then ap-
The NONATEC software keeps up automatically the data to date!
a. To read a tag
place where the NONATEC Transponder was injected.
NOTA:
You can make a continuous reading by selecting
at the same time the Icon.
pear on the screen.
22 Version 2.0 November 2008
Page 23
IV. Nonatec PRO Software
b. To Modify a tag
1. Double click on the line corresponding to the Nonatec Transponder
you which to modify.
2. Make the changes you need, then click on “Apply”
3. In the list box, you will notice that the line you have modified is
now highlighted in orange and the status is on “modified”
4. You then need to write the information on the Nonatec Transponder. (Go to Chapter “ Write a tag”)
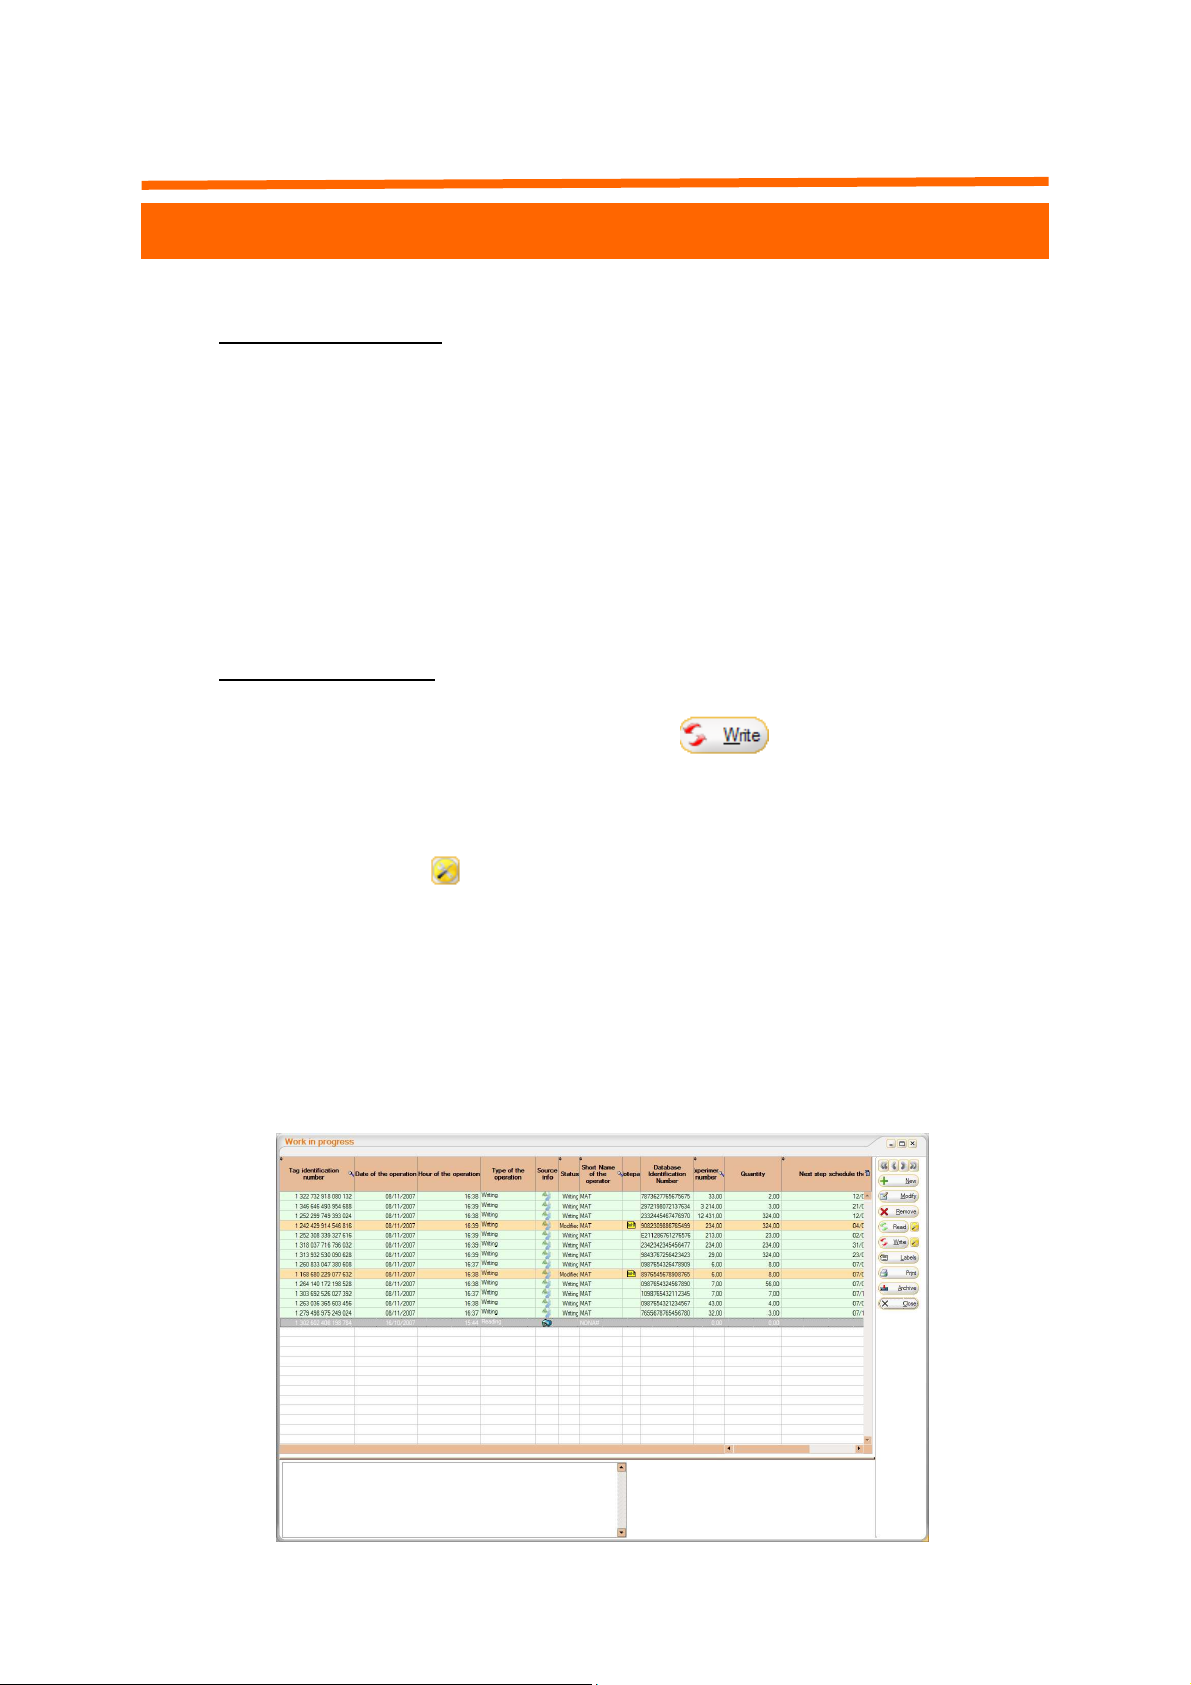
c. To write a tag
The handling to write a tag is very simple:
1. In “Work in Progress” click on the following icon :
NOTA: You can make a continuous writing by selecting at the
same time the Icon.
2. You then only need to bring the Reader / Writer device close to the
place where the NONATEC Transponder was injected. The system
will automatically recognize the Identification number of the tag
and make the modifications corresponding.
3. Once done, the line will Highlight in “green” and the status will go
to “writing”.
23 Version 2.0 November 2008
Page 24
IV. Nonatec PRO Software
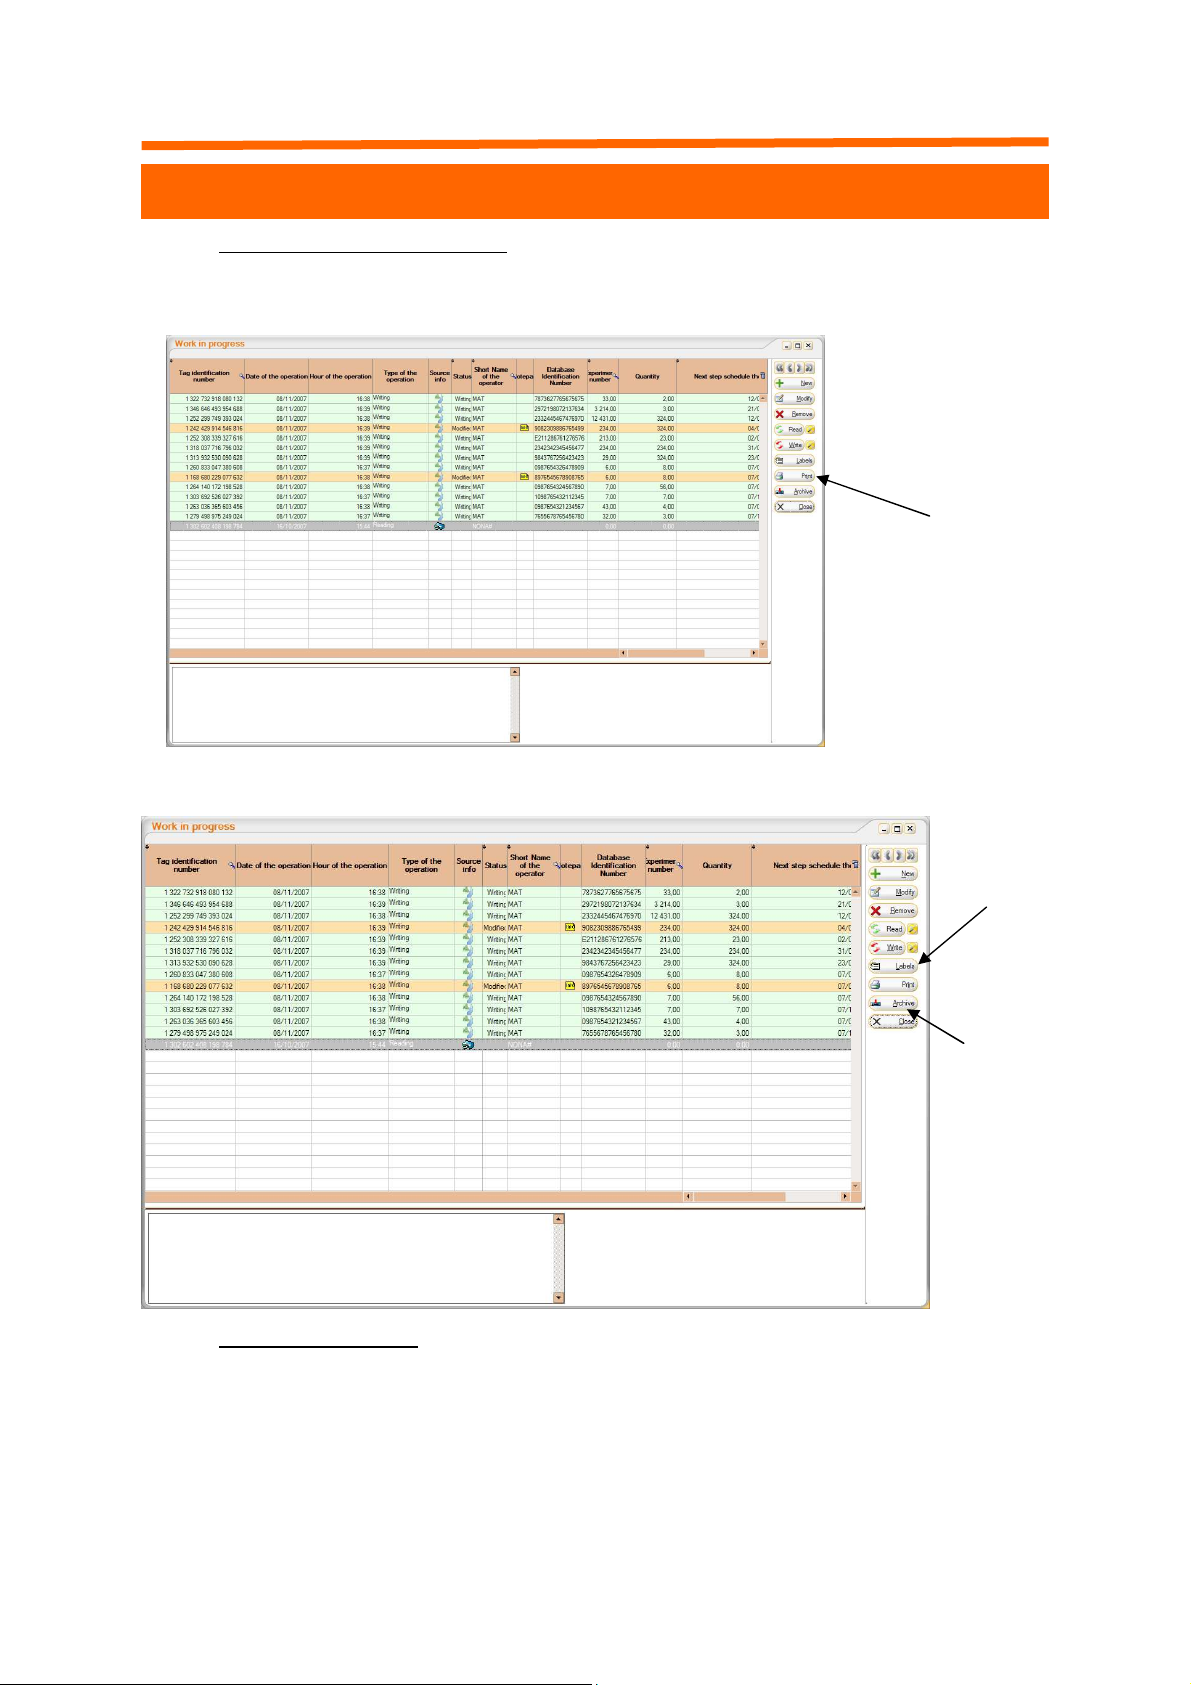
d. To print a document
•
Select the line you want to print out,
•
Click on the “Print” key.
•
You can also click on “labels” to print some labels or on
Print
“archive” to archive the data into “history”.
•
•
e. The database
Is able to identify an unlimited number of transponders, and to safeguard a
substantial quantity of data,
Has a practical layout, which will help you in your analysis as it allows the
combination of an overview of your experimentation with specific data, observations and annotations concerning each tag.
Labels
Archive
24 Version 2.0 November 2008
Page 25

IV. FAQ and SUPPORT
1. FAQ
PROBLEM: DUE TO: SOLUTION:
The Bluetooth key
Bluetooth Driver Install the Bluetooth
does not connect auto-
matically
key with the CD provi-
ded for the key
25 Version 2.0 November 2008
Page 26

IV. FAQ and SUPPORT
2. CONTACT
1, rue de L’industrie
L-4801 RODANGE
LUXEMBOURG
Tél. (352) 26 50 32 93 - Fax. (352) 26 50 32 94
Web: www.nonatec.net
Mail: [email protected]
26 Version 2.0 November 2008
 Loading...