


Sivoia QED
™
Roller 64
™
Pocket Mount
Installation
Instructions

Sivoia QEDTM|Roller 64TM Pocket Mount
Installation Instructions
Tools Required:
Tape Measure 1/4” Hex-Head Driver
Wire Cutter/Stripper Level
Pliers Power Drill
#2 Phillips Screwdriver
Notes:
1) Complete wiring and programming information can be found in the Sivoia QED Wire and
Programming Guide, P/N 045-038 or at www.lutron.com.
2) The Electronic Drive Unit (EDU) will need to be powered to complete installation.
Box Contents:
Sivoia QED
Shade Brackets with Retaining Screws
(2) 4” (102mm) Cable Ties
(1) Pocket
Roller 64
™
(2) Bracket Leveling Spacer (2) Cable Tie Anchor
(1) 7 Pin Terminal Block
(1) Screwdriver
(1) Programming Stylus
(5) Mounting Screws
(#8x1-3/4" (#8x44mm)
Hex Head Screws)
(1) Flap
SIVOIA QEDTM Roller 64 Pocket Mount Installation
Instructions
(2) Pocket Endcaps (if applicable)
1

Sivoia QEDTM|Roller 64TM Pocket Mount
Installation Instructions (continued)
Warning: Incorrect installation can lead to severe injury, follow all installation instructions.
Notes:
• The Sivoia QED Roller 64 must be used only with window systems approved by Lutron.
• There must be a clearance of at least 1.3 feet (0.4 meters) between the fully lowered system
and any permanent object.
• Installation shall be executed by a qualified electrician according to national wiring rules.
• Before shade installation, remove any unnecessary cords and disable any equipment not
needed for powered operation. The Sivoia QED Roller 64 has a maximum rated operating
time of 8 min.
• The Sivoia QED Roller 64 must be used only with window systems approved by Lutron,
and should not be taken appart from the window system.
•
Codes: Install in accordance with all local and national electrical codes.
Environment: Ambient operating temperature: 0-40°C, 32-104°F, 0-90% humidity, non-condensing.
•
Indoor use only.
SIVOIA QEDTM Roller 64 Pocket Mount Installation
Instructions
2

1
1
1.1
1.1
Compare system dimensions on
the package label with the window
dimensions to verify appropriate
window/shade combination.
Confirm System Dimensions
Package Label
System Width
System Height
SIVOIA QEDTM Roller 64 Pocket Mount Installation
Instructions
3

2
Install Pocket Endcaps (if applicable)
2.1
Slide the 2 tabs of the pocket endcap into the pocket until it is flush with the outside.
SIVOIA QEDTM Roller 64 Pocket Mount Installation
Instructions
4

3
Mount Pocket
DANGER - Locate and lock breaker to the shade power supply in the OFF position or
unplug the power plug-in transformer before doing any wiring.
3.1
Pre-drill pocket to allow clearance for the wires without interfering with the bracket. Follow figure below for suggested
hole locations.
Note: Hole should be large enough to allow adjustment during install without pinching the wire.
Note: Cable should exit from EDU side of the system.
SIVOIA QEDTM Roller 64 Pocket Mount Installation
Instructions
5

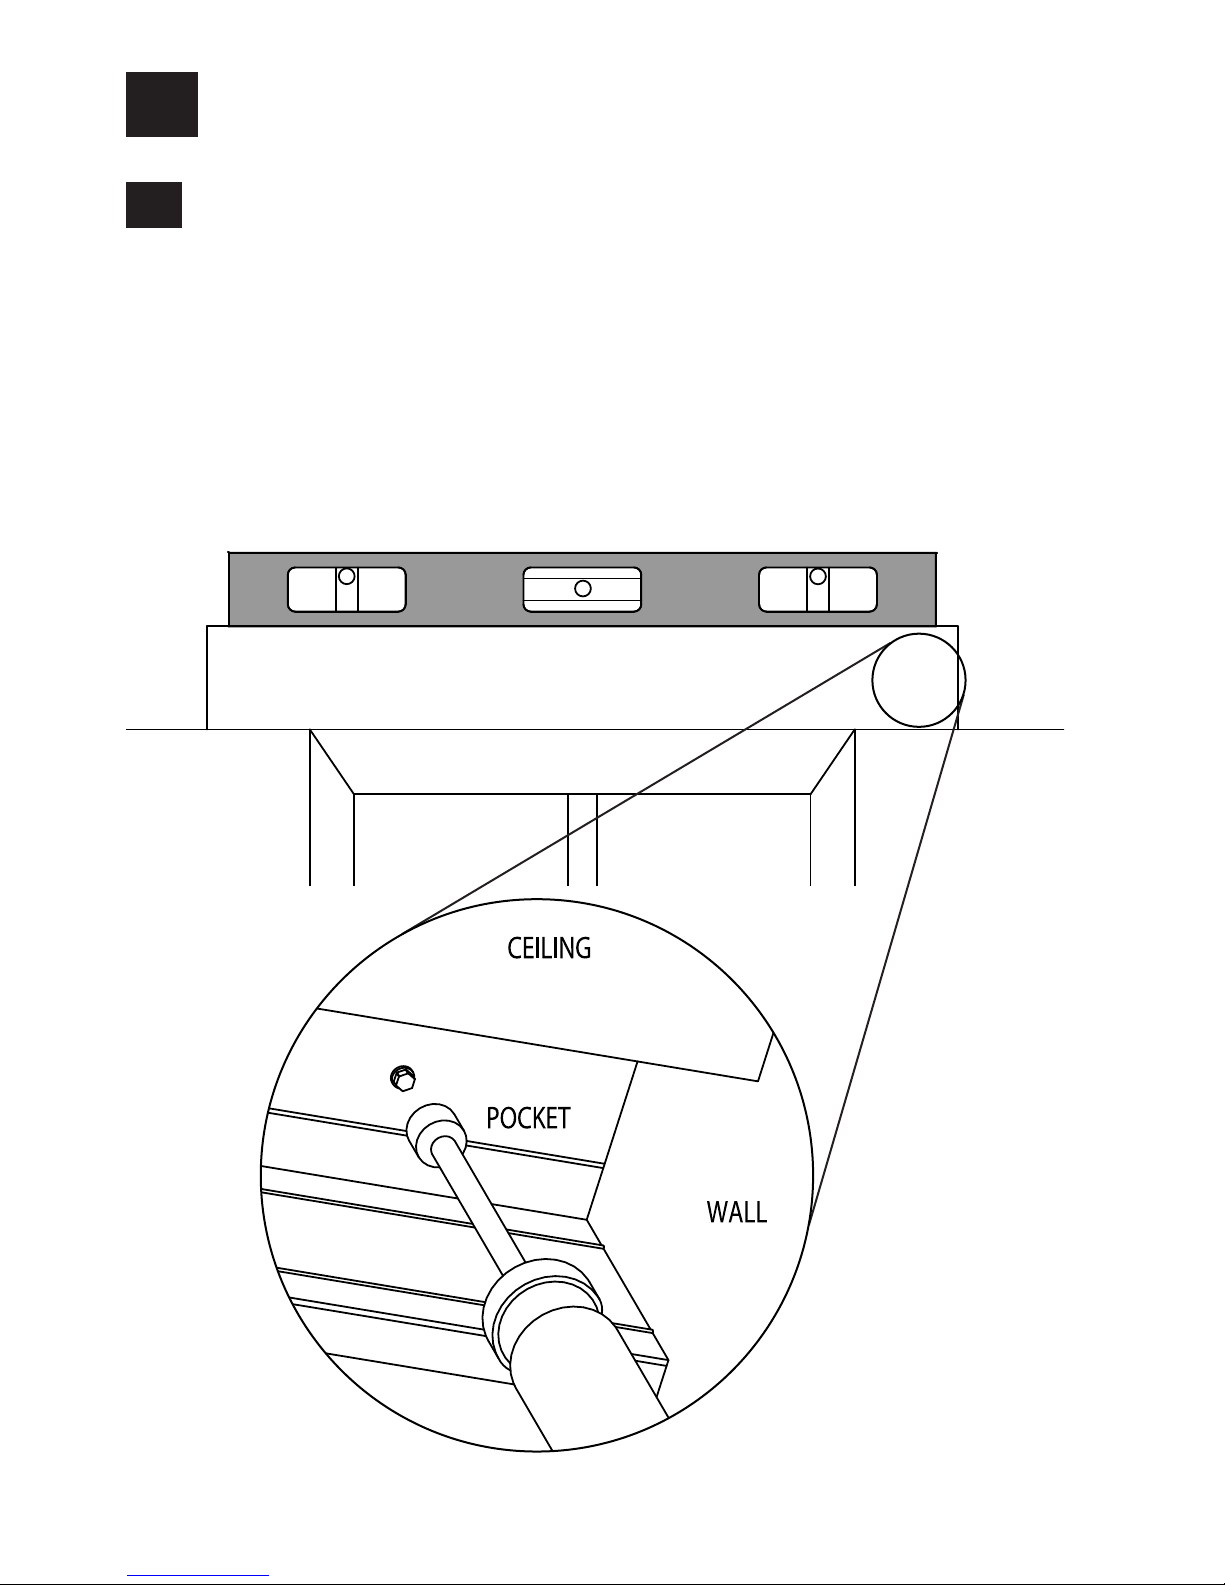
3
Mount Pocket
3.2
Verify mounting surface is level/plumb before attaching pocket.
Note: Pocket may rub fabric if installed with an improper tilt or may cause flap to fall.
3.3
Orient the pocket. For regular roller shades, install pocket with flap hanging feature on the opposite side
of the glass. For reverse roller shades, flap hanging feature is on glass side.
Flap Hanging
Feature
SIVOIA QEDTM Roller 64 Pocket Mount Installation
Instructions
6
3
Mount Pocket (continued)
3.4
Mount the pocket using appropriate fasteners (make sure it is level).
Note: Screws must be at least 1.5” (38mm) from system end to avoid interfering with mounting of
shade brackets.
Note: Be sure to pull cable from wall through the hole in pocket while mounting.
Note: The pocket should be mounted to support at least 300 lbs (136 kg). The fasteners provided may
not be appropriate for use in all applications.
Note: Blocks (Not Provided) may be required to prevent fabric from rubbing against trim, window, top
treatment, etc.
SIVOIA QEDTM Roller 64 Pocket Mount Installation
Instructions
7
 Loading...