

Lutron Electronics QSGRJ-6P, QSGRJ-3P, QSGRK-3PCE, QSGRK-4PCE, QSGRK-6PCE Programming Addendum
...Page 1

Wireless
R
Programming Addendum
LUTRON
This addendum applies to the GRAFIK Eye QS Wireless models listed
below, and their associated components.
QSGRJ-3P
QSGRJ-4P
QSGRJ-6P
QSGRK-3PCE
QSGRK-4PCE
QSGRK-6PCE
QSGRJ-6E
QSGRJ-8E
QSGRJ-16E
Contents
Associating GRAFIK Eye QS Wireless Control Units. . . . . . . . . . . . . . . . . . . . . . . . . . . . . . . . . . . . . . . . . . . . . . . . 2
Associating Wireless Occupancy Sensors and GRAFIK Eye QS Wireless Control Units . . . . . . . . . . . . . . . . . . . . 3
Associating Sivoia® QS Wireless Shades/Drapes and GRAFIK Eye QS Wireless Control Units . . . . . . . . . . . . . . . . 4
Associating PicoTM Wireless Controls and GRAFIK Eye QS Wireless Control Units: Zone Control. . . . . . . . . . . . . . 5
Associating PicoTM Wireless Controls and GRAFIK Eye QS Wireless Control Units: Scene Control. . . . . . . . . . . . . 6
Wireless Mode . . . . . . . . . . . . . . . . . . . . . . . . . . . . . . . . . . . . . . . . . . . . . . . . . . . . . . . . . . . . . . . . . . . . . . . . . . . . 7
Contact Information . . . . . . . . . . . . . . . . . . . . . . . . . . . . . . . . . . . . . . . . . . . . . . . . . . . . . . . . . . . . . . . . . . . . . . . . 8
Page 2

Wireless System Programming
R
GRAFIK Eye® QS Wireless System Programming 2
OK
1 2 3 4 5 6
OK
1 2 3 4 5 6
GRAFIK Eye QS A
“Talks” to GRAFIK Eye QS B; scene
activation and master (raise/lower)
button presses activated on unit A are
replicated on unit B.
GRAFIK Eye QS B
“Listens” to GRAFIK Eye QS A; unit B
replicates scene activations and master
(raise/lower) button presses on unit A.
When there is more than one GRAFIK Eye QS control unit in a
wireless system, it is often convenient to associate them so that
scene activations and master (raise/lower) button presses carry
over to other associated GRAFIK Eye QS control units.
To associate two GRAFIK Eye QS control units:
1. Begin with the GRAFIK Eye QS control unit that will “talk” (button
presses will be replicated on the other control unit; in the drawing
below this is GRAFIK Eye QS A). Press and hold the top and
bottom scene buttons until the LEDs flash (about
3 seconds).
2. Continue with the GRAFIK Eye QS control unit that will “listen”
(replicate button presses on the other control unit; in the drawing
below this is GRAFIK Eye QS B). Press and hold the top scene
button until the LEDs flash (about 3 seconds).
3. Return to the GRAFIK Eye QS control unit that will “talk” (A). Press
and hold the top and bottom scene buttons until the LEDs stop
flashing (about 3 seconds).
4. It is often desired to repeat the process in reverse so that GRAFIK
Eye QS B talks to GRAFIK Eye QS A.
To disassociate two wireless GRAFIK Eye QS control units:
Simply repeat the association steps, in the same order; press and
hold the bottom scene button on B to disassociate.
Note: The wireless signal has a range of 30 feet (10 m) through
standard construction.
Associating GRAFIK Eye QS Wireless Control Units
OK
9-16
1-8
On the unit that will “talk”,
press and hold the top and
bottom scene buttons for
3 seconds to begin or end
association or disassociation
with the unit that will “listen”.
OK
9-16
1-8
On the unit that will “listen”,
press and hold the top scene
button for 3 seconds to
associate, or press and hold
the bottom scene button for 3
seconds to disassociate with
the unit that will “talk”.
Associate
OR
Disassociate
Page 3
Wireless System Programming
R
GRAFIK Eye® QS Wireless System Programming 3
OK
1 2 3 4 5 6
Wireless Occupancy Sensor
“Talks” to GRAFIK Eye QS control
unit, activating scenes on the
GRAFIK Eye QS.
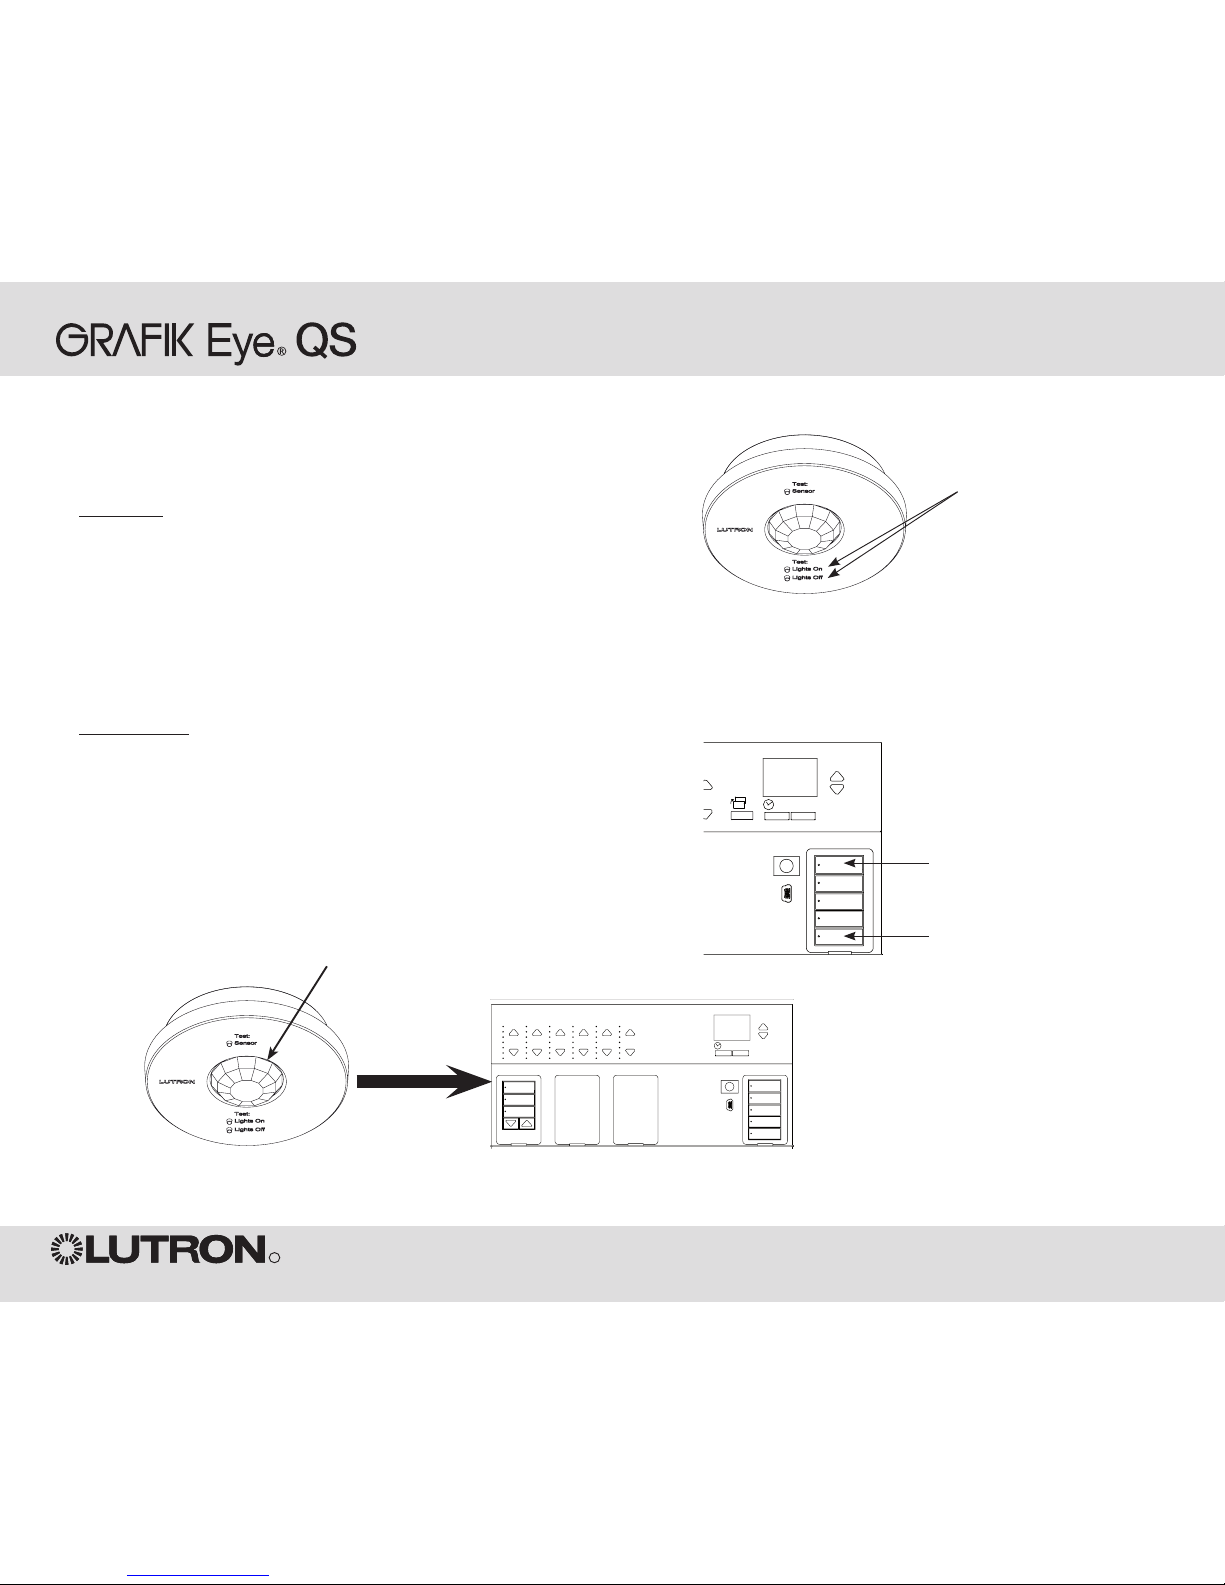
Lutron’s wireless Radio Powr SavrTM occupancy and vacancy sensors can
be associated with the GRAFIK Eye QS Wireless to activate scenes when
occupancy or vacancy is detected.
To associate wireless occupancy sensors and
GRAFIK Eye QS control units:
1. Press and hold the “Lights On” and “Lights Off” buttons on the front of
the occupancy/vacancy sensor simultaneously until the lens starts flashing
(about 3 seconds).
2. Press and hold the top scene button of the GRAFIK Eye QS Wireless
control unit until the LEDs flash (about 3 seconds).
3. Return to the occupancy sensor. Press and hold the “Lights On” and
“Lights Off” buttons simultaneously until the lens stops flashing (about 3
seconds).
To disassociate wireless occupancy sensors and
GRAFIK Eye QS control units:
Simply repeat the association steps, in the same order; press and hold the
bottom scene button on the GRAFIK Eye QS to disassociate.
Note: The wireless signal has a range of 30 feet (10 m) through standard
construction.
Associating Wireless Occupancy Sensors and GRAFIK Eye QS Wireless Control Units
On the wireless occupancy
sensor, press and hold the
“Lights On” and “Lights Off”
buttons for 3 seconds to begin or
end association or disassociation
with the GRAFIK Eye QS control
unit.
Note: Pressing the “Lights On”
button initiates the “occupied”
scene programmed on the
GRAFIK Eye QS control unit.
Pressing the “Lights Off” button
initiates the “unoccupied” scene
programmed on the GRAFIK Eye
QS control unit.
Before the GRAFIK Eye QS is
programmed, the “Lights On”
button may not produce an
action. Refer to the Installation
manual for the GRAFIK Eye QS
to program desired scenes.
OK
9-16
1-8
On the GRAFIK Eye QS
control unit, press and hold
the top scene button for 3
seconds to associate, or
press and hold the bottom
scene button for 3 seconds
to disassociate with the
occupancy sensor.
Associate
OR
Disassociate
GRAFIK Eye QS Control Unit
“Listens” to wireless occupancy sensor,
so that the occupancy sensor activates
scenes on the GRAFIK Eye QS.
Lens
Page 4

Wireless System Programming
R
GRAFIK Eye® QS Wireless System Programming 4
When a GRAFIK Eye QS wireless system consists of Sivoia QS shades (or drapes) and
a GRAFIK Eye QS with one or more shade button groups, you can associate the shade
button groups on the control unit with the shades/drapes so the shade buttons can directly
control the shades/drapes.
To associate wireless GRAFIK Eye QS shade buttons and Sivoia QS shades/drapes:
1. On the GRAFIK Eye QS shade button group you want to control the shades/drapes, enter
programming mode: Press and hold the top (open) and bottom (close) buttons for
3 seconds. The top and bottom LEDs will flash.
2. The LEDs on the electronic drive unit (EDU) and the wireless antenna of unassociated
shades/drapes will blink slowly. On the shade/drape that you wish to associate with the
shade button group, tap any button; the LED on the EDU will blink rapidly to indicate the
shade is now associated with the shade button group on the GRAFIK Eye QS.
3. Repeat step 2 to associate additional shades/drapes to that shade button group.
4. Exit programming mode: Press and hold the top (open) and bottom (close) buttons for
3 seconds. The top and bottom LEDs will stop flashing.
5. Repeat steps 1 through 4 for additional shade button groups, as applicable.
To disassociate wireless GRAFIK Eye QS shade buttons and Sivoia QS shades/
drapes:
1. On the GRAFIK Eye QS shade button group you want to disassociate shades/drapes from,
enter programming mode: Press and hold the top (open) and bottom (close) buttons for
3 seconds. The top and bottom LEDs will flash.
2. On the electronic drive unit (EDU) of the shades/drapes that you wish to disassociate from
this shade button group, tap any button; the green LEDs on the EDU and antenna will blink
slowly to indicate the shade is disassociated from the shade button group on the GRAFIK
Eye QS.
3. Repeat step 2 to disassociate additional shades/drapes from that shade button group.
4. Exit programming mode: Press and hold the top (open) and bottom (close) buttons for
3 seconds. The top and bottom LEDs will stop flashing.
5. Repeat steps 1 through 4 for additional shade button groups, as applicable.
To store shade/drape presets on a wireless GRAFIK Eye QS shade button group:
The shade/drape must already be associated with the shade button group.
1. Use the raise/lower buttons on the GRAFIK Eye QS shade button group to position the
shades/drapes at their desired preset level.
2. Press and hold the preset button of the shade button group for 3 seconds. The LED next
to the button will flash, then turn on, indicating the preset is stored.
Note: The wireless signal has a range of 30 feet (10 m) through standard construction.
Associating Sivoia® QS Wireless Shades/Drapes and GRAFIK Eye QS Wireless Control Units
Press and hold the top (open)
and bottom (close) buttons
on the GRAFIK Eye QS shade
button group to enter or exit
programming mode.
OK
1 2 3 4 5 6
Open
Preset
Close
Press and hold the preset button
for 3 seconds to store a preset on
the GRAFIK Eye QS shade button
group.
OK
1 2 3 4 5 6
Open
Preset
Close
Shade EDU
LED
Page 5
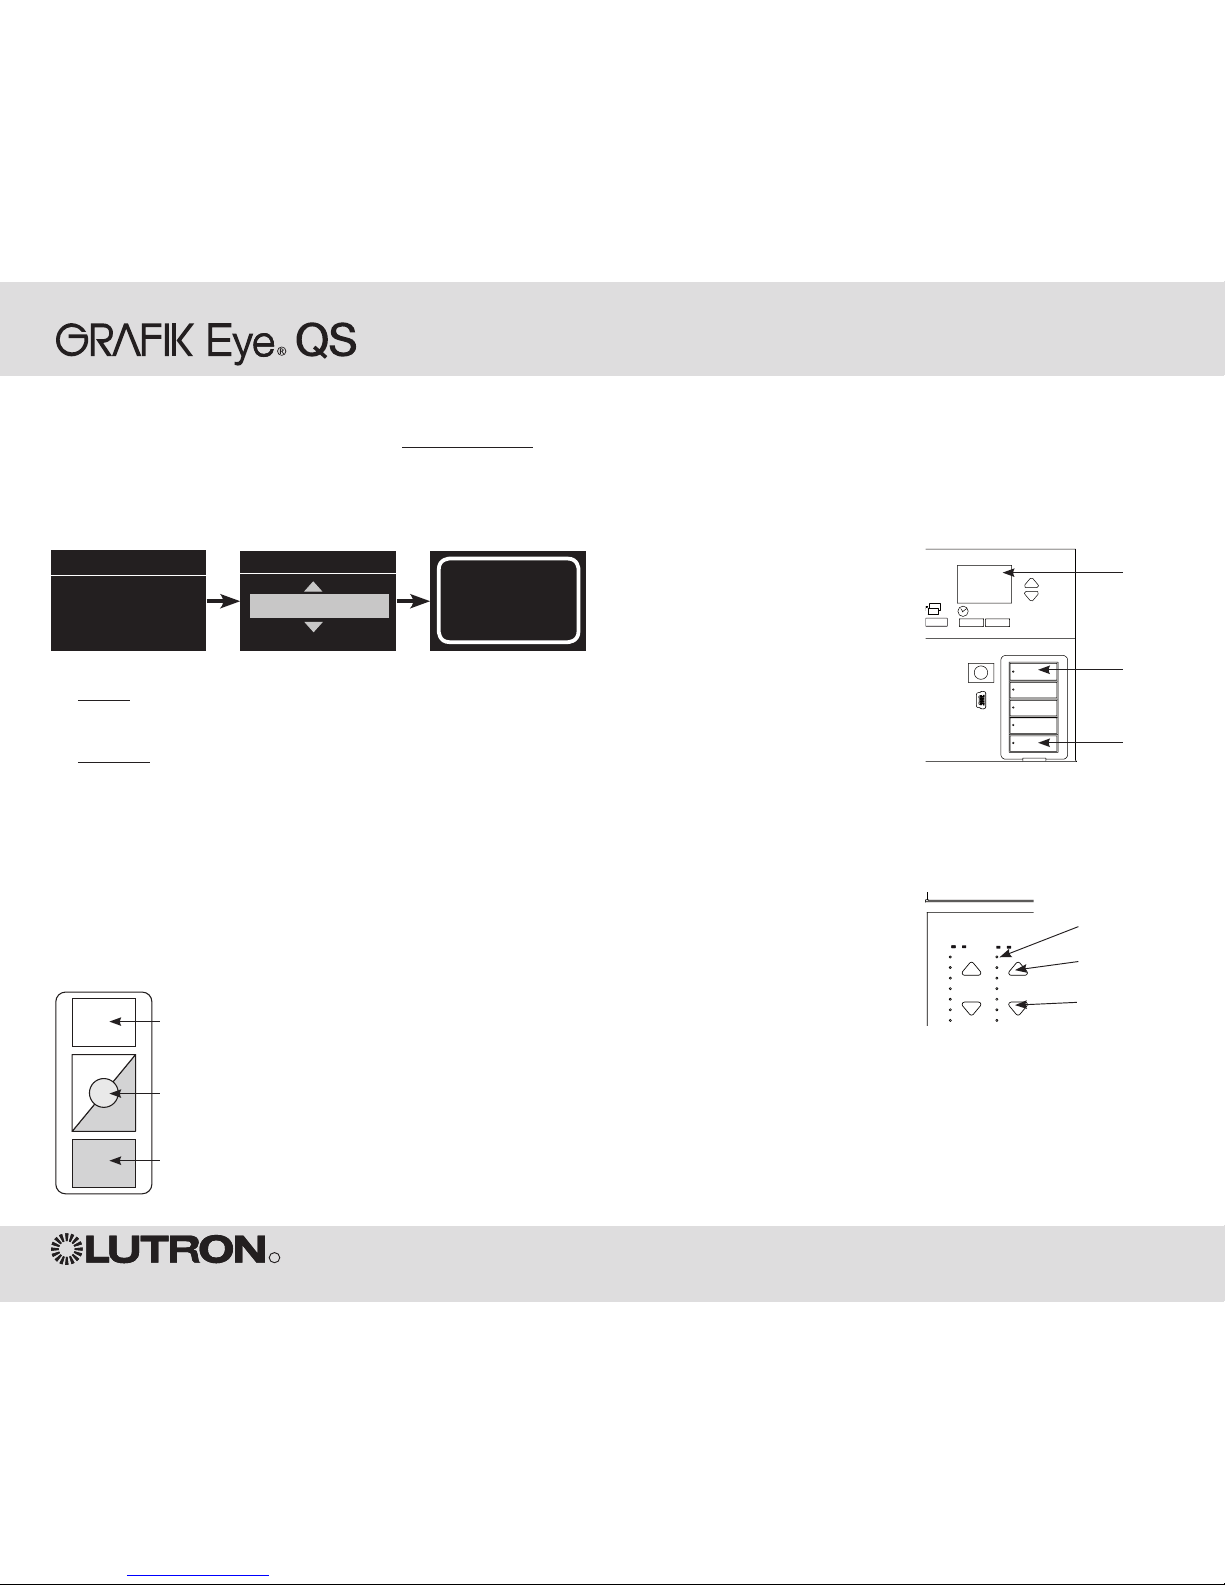
To use the Pico wireless controller as a zone controller with a GRAFIK Eye QS Wireless control unit:
1. On the Pico, press and hold the top (on) and bottom (off) buttons for 3 seconds. The LED on the Pico will
flash slowly, and the scene buttons LEDs on the GRAFIK Eye QS will all flash.
2. On the GRAFIK Eye QS, the info screen will ask for confirmation that you wish to change the type; press
the OK button. Use the master buttons on the GRAFIK Eye QS to select “Zone”. Press OK to save.
3. To assign a zone on the GRAFIK Eye QS to the Pico, use the zone raise/lower buttons for that zone to set
the desired preset level, then press and hold the zone raise and lower buttons simultaneously for 1 second
(until the LEDs flash at the programmed preset level).
To unassign a zone on the GRAFIK Eye QS to the Pico, while the zone LEDs are flashing, press and hold
the zone raise and lower buttons simultaneously for 1 second (until the LEDs stop flashing and the 3
middle LEDs light).
Repeat this step to assign levels for all desired zones to the Pico control. Zones assigned to the Pico will
have all LEDs flashing in unison, and zones not assigned will have the 3 middle LEDs lit.
4. On the Pico, press and hold the top (on) and bottom (off) buttons for 3 seconds. The LED on the Pico and
the LEDs on associated GRAFIK Eye QS Wireless control units will stop flashing.
Functionality of the Pico control when programmed as a zone controller:
Top button: All assigned zones go to 100%
Center round button: All assigned zones go to the programmed preset level
Bottom button: All assigned zones go to Off
Note: The wireless signal has a range of 30 feet (10 m) through standard construction.
Wireless System Programming
R
GRAFIK Eye® QS Wireless System Programming 5
Light
On
Adjust
Off
Change type?
Zone
Saved
Saved
Pico
Change type?
Press OK
OK
9-16
1-8
On the GRAFIK Eye QS control
unit, press and hold the top scene
button for 3 seconds to associate,
or press and hold the bottom
scene button for 3 seconds to
disassociate with the Pico control.
Associate
OR
Disassociate
Info
screen
Associating PicoTM Wireless Controls and GRAFIK Eye QS Wireless Control Units
OK
1 2
3
4
5
69 10
11 12
13
14
7
815 16
9-16
1-8
Zone LEDs
Zone Raise
Zone Lower
Page 6

When a GRAFIK Eye QS wireless system includes a Pico wireless control, you can use the Pico wireless
control as either a scene controller or a zone controller. This page describes using the Pico wireless control
as a scene controller; the previous page describes using it as a zone controller.
To use the Pico wireless control as a scene controller with a GRAFIK Eye QS Wireless control unit:
1. On the Pico, press and hold the top (on) and bottom (off) buttons for 3 seconds. The LED on the Pico will
flash slowly, and the scene button LEDs on the GRAFIK Eye QS will all flash.
2. On the GRAFIK Eye QS, the info screen will ask for confirmation that you wish to change the type; press
the OK button. Use the master buttons on the GRAFIK Eye QS to select “Scene”. Press OK to save.
3. To associate the GRAFIK Eye QS with the Pico, press and hold the top scene button on the
GRAFIK Eye QS for 3 seconds (until the LEDs all flash).
To disassociate the GRAFIK Eye QS with the Pico, press and hold the bottom scene button on the
GRAFIK Eye QS for 3 seconds (until the LEDs stop flashing).
4. On the Pico, press and hold the top (on) and bottom (off) buttons for 3 seconds. The LED on the Pico and
the LEDs on associated GRAFIK Eye QS Wireless control units will stop flashing.
Functionality of the Pico control when programmed as a scene controller:
Top button: Scene 1
Center round button: Scene 16
Bottom button: Off
Note: The wireless signal has a range of 30 feet (10 m) through standard construction.
Wireless System Programming
R
GRAFIK Eye® QS Wireless System Programming 6
Light
On
Adjust
Off
Change type?
Scene
Saved
Saved
Pico
Change type?
Press OK
OK
9-16
1-8
On the GRAFIK Eye QS control
unit, press and hold the top scene
button for 3 seconds to associate,
or press and hold the bottom
scene button for 3 seconds to
disassociate with the Pico control.
Associate
OR
Disassociate
Info
screen
Associating PicoTM Wireless Controls and GRAFIK Eye QS Wireless Control Units
Page 7

Wireless System Programming
Wireless Mode
By default, the GRAFIK Eye QS Wireless control unit’s wireless
feature is in Setup Mode. In this mode, the GRAFIK Eye
QS Wireless control unit will respond to any programming
commands from other nearby Lutron QS wireless (and
compatible) products.
After associating other wireless devices to the GRAFIK Eye
QS Wireless, you may wish to prevent additional devices from
communicating with it. To do this, change the wireless mode to
“Locked Mode”.
1. Press and hold the top and bottom
scene buttons to enter programming
mode (see illustration at right).
2. Use the master buttons to highlight
“Wireless Mode” and press the
OK button to accept.
3. Use the master buttons to highlight
“Locked Mode” and press the OK button
to accept.
4. The info screen will display a confirming
“Saved” message.
5. Press and hold the top and bottom
scene buttons to exit programming
mode.
Wireless Mode
Locked Mode
Saved
Saved
Main menu
Shade labels
Wireless Mode
OK
9-16
1-8
Master
buttons
OK
button
Press and hold the
top and bottom
scene buttons
to enter or exit
programming mode.
GRAFIK Eye® QS Wireless System Programming 7
R
Page 8
Wireless
R
Programming Addendum
Contact Information
Internet: www.lutron.com
E-mail: product@lutron.com
World Headquarters
USA
Lutron Electronics Co., Inc.
7200 Suter Road, Coopersburg, PA 18036-1299
TEL +1.610.282.3800
FAX +1.610.282.1243
Toll-Free 1.888.LUTRON1
Technical Support 1.800.523.9466
North and South America Technical Hotlines
USA, Canada, Caribbean: 1.800.523.9466
Mexico: +1.888.235.2910
Central/South America: +1.610.282.6701
European Headquarters
United Kingdom
Lutron EA Ltd.
6 Sovereign Close, London, E1W 3JF United Kingdom
TEL +44.(0)20.7702.0657
FAX +44.(0)20.7480.6899
FREEPHONE (UK) 0800.282.107
Technical support +44.(0)20.7680.4481
Asian Headquarters
Singapore
Lutron GL Ltd.
15 Hoe Chiang Road, #07-03 Euro Asia Centre,
Singapore 089316
TEL +65.6220.4666
FAX +65.6220.4333
Asia Technical Hotlines
Northern China: 10.800.712.1536
Southern China: 10.800.120.1536
Hong Kong: 800.901.849
Indonesia: 001.803.011.3994
Japan: +81.3.5575.8411
Macau: 0800.401
Singapore: 800.120.4491
Taiwan: 00.801.137.737
Thailand: 001.800.120.665853
Other countries: +65.6220.4666
Lutron Electronics Co., Inc.
Made and printed in U.S.A.
PN 032-218 Rev. C 05.01.09
 Loading...