

Page 1
I
I
I
I
I
I
Dual-Circuit Occupancy
I
I
I
I
I
I
Sensing Switch
MS-OPS6-DDV
Occupancy
Single-pole only
Two circuits, each rated at:
Lighting
(incandescent, halogen, CFL, LED, ELV, MLV,
electronic fluorescent, magnetic fluorescent)
120-277 V~ 50 / 60 Hz 6 A
Fan
120 V~ 50 / 60 Hz 4.4 A 1/6 HP
Combined lighting and fan load
120 V~ 50 / 60 Hz 4.4 A
P/N 032444 Rev. A 11/2013
Major motion coverage:
30 ft × 30 ft (9 m × 9 m) [900 ft2 (81 m2)]
Minor motion coverage:
20 ft × 20 ft (6 m × 6 m) [400ft
Lutron Electronics Co., Inc.
7200 Suter Road
Coopersburg, PA 18036-1299 U.S.A.
www.lutron.com
MS-PPS6-DDV
Partial-ON only
English
®
Circuit1
Tap Button
Top
programming
button
Bottom
programming
button
Circuit2
Tap Button
2
(36m2)]
Important Notes
®
Please read before installing.
1. Device will not function if it is not
grounded. Both bare and green ground
wires are required to connect to ground.
If no ground is available, consult an
electrician.
2. Device will not function if Black wires
(Circuit 1/Line 1) are not wired.
3. This product is rated to control 6 A per
circuit. Circuits may NOT be wired in
parallel to control loads greater than 6 A.
4. CAUTION: Risk of Electric Shock —
More than one disconnect switch may be
required to de-energize the equipment
before installing the unit, rewiring, or
replacing bulbs.
5. When power is applied, the dualcircuit sensing switch can be manually
turned on or off after 60 seconds and
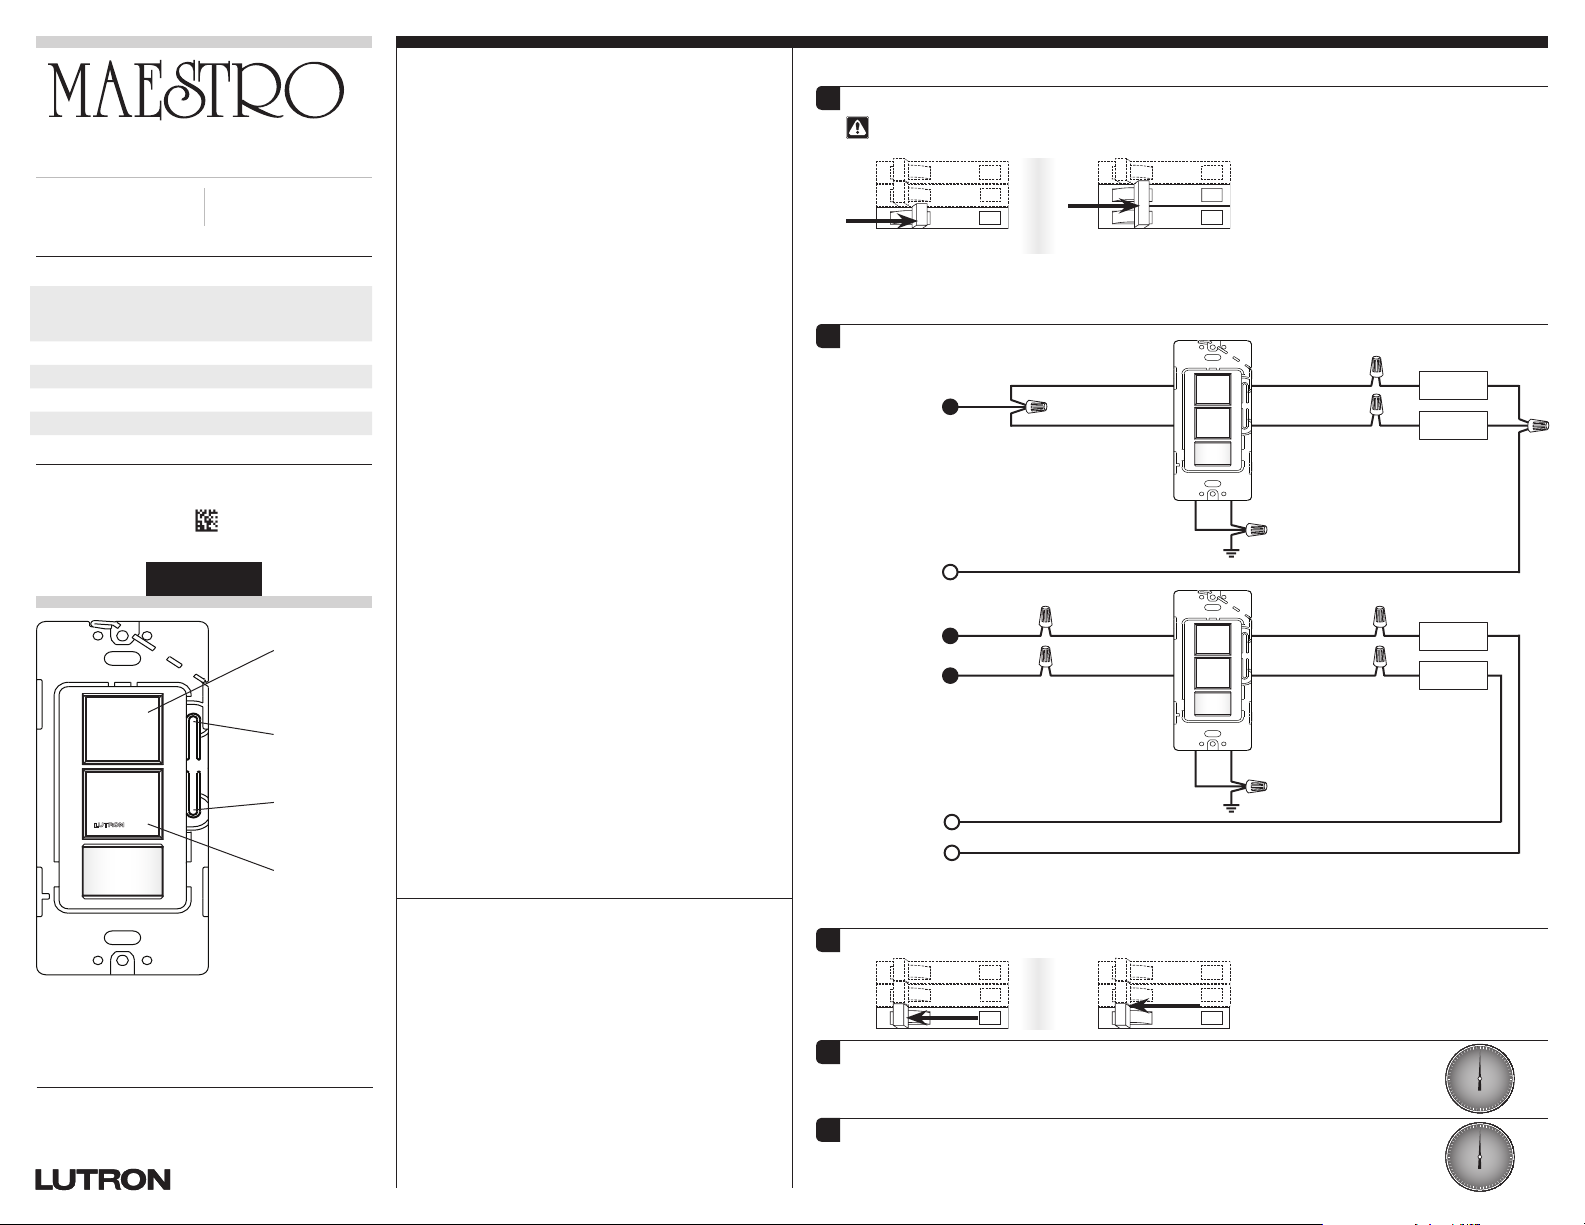
Wiring
Turn power OFF
1
WARNING! Shock Hazard. May result in serious injury or death. Turn power OFF at circuit
breaker(s) before installing the unit, rewiring, or replacing bulbs.
A
.
O
O
O
Single-Line
* Wiring must comply with NEC code for wiring Multiple Branch Circuits: Where two or more branch circuits
supply devices or equipment on the same yoke, a means to simultaneously disconnect the ungrounded
conductors supplying those devices shall be provided at the point at which the branch circuits originate.
Connect dual-circuit sensing switch
2
A
. Single-Line Wiring
120-277 V~
B
OR
Black-Orange
.
Two-Line*
Black
O
O
O
1
Black
Black-Orange
Load 1
Load 2
will automatically control the load after
2minutes.
6. The dual-circuit sensing switch requires
an unobstructed view of the room and
line-of-sight to detect motion.
7. Hot objects or moving air currents can
affect the performance of the dual-circuit
sensing switch and may cause the sensor
to turn on unexpectedly or maintain its
current state longer than desired.
8. CAUTION: To reduce the risk of
overheating and possible damage to
other equipment, DO NOT use to control
receptacles.
B
. Two-Line Wiring
120-277 V~
120-277 V~
Neutral
Line 1
Line 2
1
Black
Black-Orange
GreenBare
Ground
Black
Black-Orange
2
Load 1
Load 2
9. Install in accordance with all national and
local electrical codes.
10. For indoor use only. Operate between 32°F
and 104°F (0 °C and 40 °C).
Bare
Green
11. DO NOT exceed 20 devices at 120V~ or
7 devices at 277 V~ on a single branch
circuit.
12. Clean with a soft damp cloth only. DONOT
use any chemical cleaners.
Limited Warranty (Valid only in U.S.A., Canada, Puerto Rico, and
the Caribbean). Lutron will, at its option, repair or replace any unit
that is defective in materials or manufacture within five years after
purchase. For warranty service, return unit to place of purchase or
mail to Lutron at 7200 Suter Rd., Coopersburg, PA 18036-1299,
postage pre-paid. This warranty is in lieu of all other express
warranties, and the implied warranty of merchantability is limited
to FIVE years from purchase. This warranty does not cover the cost
of installation, removal or reinstallation, or damage resulting from
misuse, abuse, or damage from improper wiring or installation.
This warranty does not cover incidental or consequential damages.
Lutron’s liability on any claim for damages arising out of or in
connection with the manufacture, sale, installation, delivery,
or use of the unit shall never exceed the purchase price of the
unit. This warranty gives you specific legal rights, and you may
have other rights which vary from state to state. Some states do
not allow the exclusion or limitation of incidental or consequential
damages, or limitation on how long an implied warranty may last,
so the above limitations may not apply to you.
Lutron and Maestro are registered trademarks of Lutron
Electronics Co., Inc.
© 2013 Lutron Electronics Co., Inc.
Neutral 2
Neutral 1
1
Device will not function if Black wires (Circuit 1/ Line 1) are not wired.
2
Device will not function if it is not grounded.
NOTE: Leave wallplate off if custom settings are desired. See Custom Settings instructions on reverse side.
Turn Power ON
3
A
.
Wait for 60 seconds before manual switching
4
O
O
O
OR
B
.
O
O
O
• The sensing switch will not manually control the load for 60 seconds.
Wait for an additional 60 seconds for automatic switching
5
• Once power has been restored, the sensing switch will not
automatically control the load for the first 2 minutes.
Ground
2
60 s
60 s
Page 2
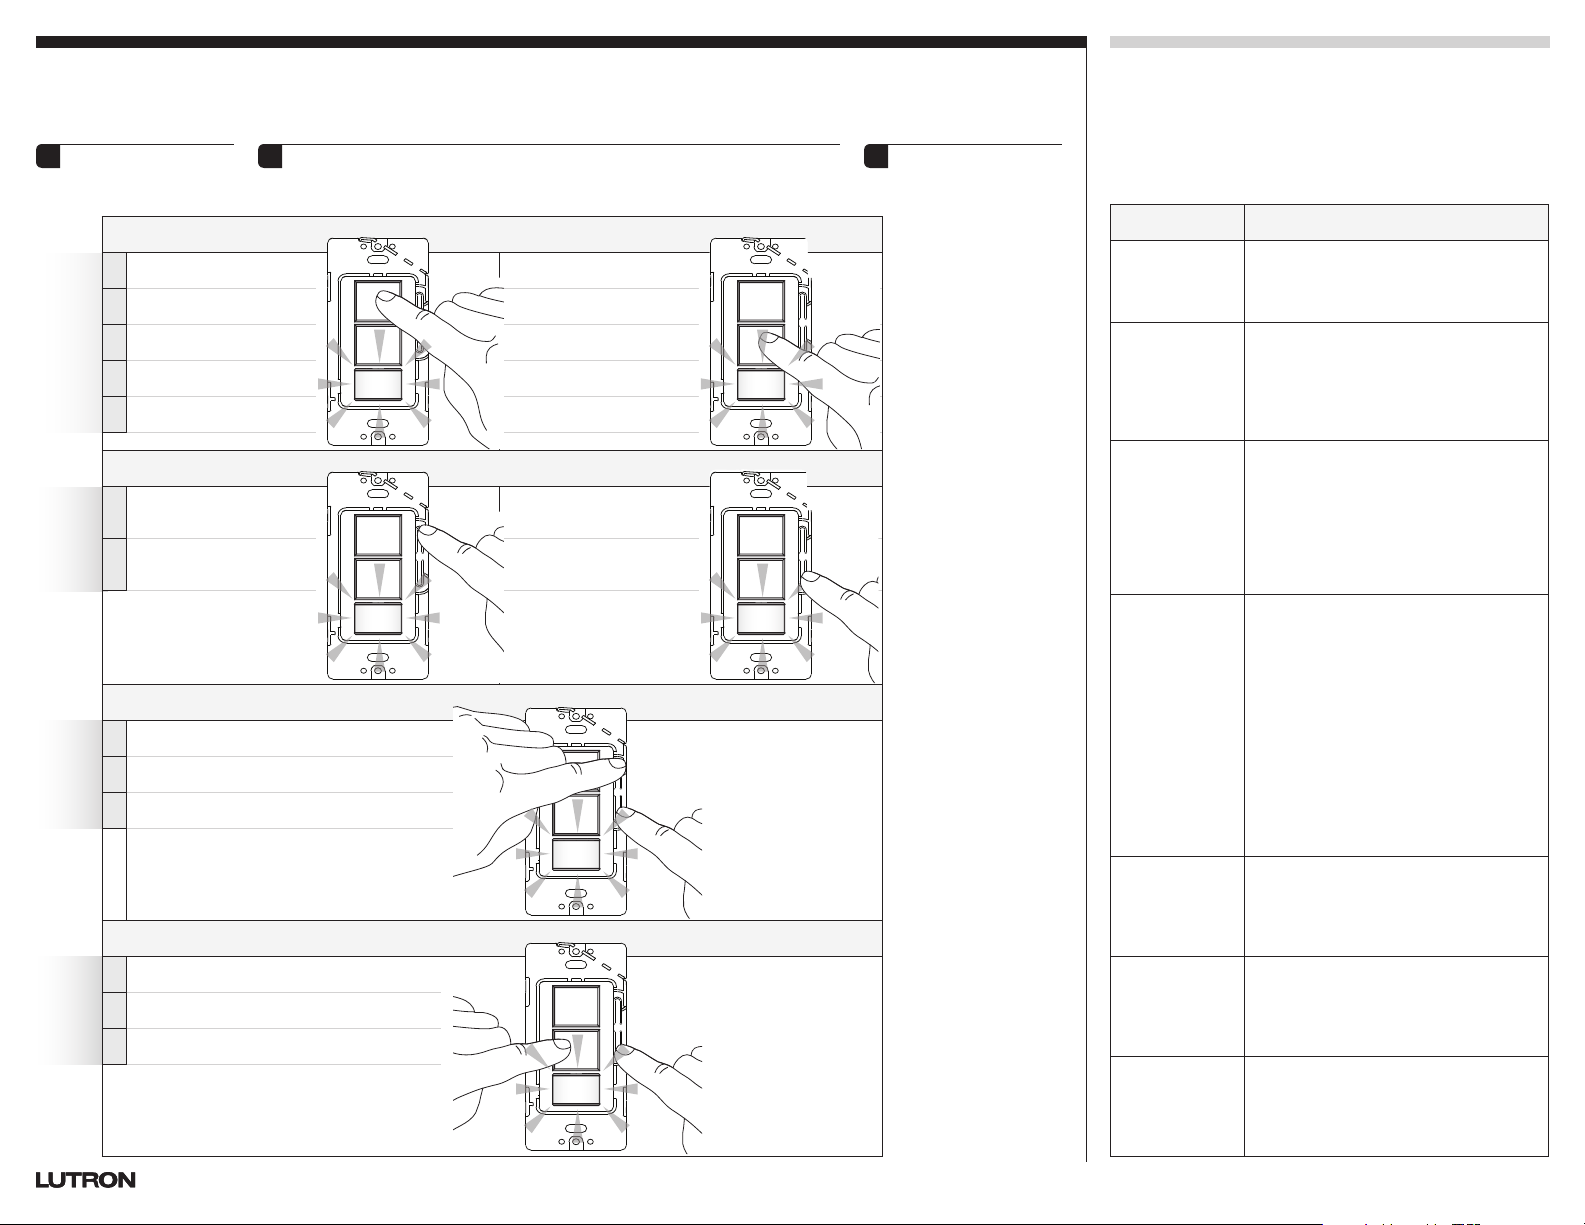
Adjustable Settings
®
Before proceeding, select your preferred settings from the table below; default settings are shown in bold.
Read all instructions before continuing.
Press and hold the
1
buttons indicated in
the pictures.
Timeout
Total
1 Test Mode
number
of
2 1 minute 1 minute
flashes
3 5 minutes 5 minutes
4 15 minutes 15 minutes
5 30 minutes 30 minutes
Sensor Mode
Total
number
Auto-ON/Auto-OFF
1
(Occupancy mode)
of
flashes
Manual-ON/Auto-OFF
2
(Vacancy mode)
Advanced Auto-On Modes
Total
1 Ambient Light Detect (ALD)
number
of
2 Off-While-Occupied Enabled
flashes
3 Off-While-Occupied Disabled
Sensitivity
Total
1 Low
number
of
2 High
flashes
3 Restore ALL settings to default
2
The lens will flash once at each setting (always starts at setting 1).
Example: To set the Timeout to 1 minute, press and hold the tap
button. Release the button after the lens flashes for the second time.
Circuit 1
1
2
Circuit 1
Test Mode
1
Circuit 2
Circuit 2
Auto-ON/Auto-OFF
(Occupancy mode)
Manual-ON/Auto-OFF
(Vacancy mode)
3
4,5,7
6,7
Technical Assistance: www.lutron.com | U.S.A., Canada, Caribbean: 1.800.523.9466 | Mexico: +1.888.235.2910 | Others: +1.610.282.3800
The setting is saved
3
after the button(s) is
(are) released.
1
2
3
4
5
6
7
NOTES
Short (less than
15-second) timeout
for testing sensor
coverage. Device
will exit test mode
automatically after
5minutes, or when
any button is pressed.
Default Sensor Mode
settings are locked in
the MS-PPS6-DDV
(Partial-ON model
only) to satisfy the
CEC 2013 Title24
definition for a
“Partial-ON” sensor.
These settings
apply to all circuits
set to “Auto-ON”
(Occupancy) mode.
Lights turn on only if
natural light in room is
low. If switch turns on
when there is enough
natural light, or if
switch does not turn
on when there is not
enough natural light,
press the appropriate
tap button within
5seconds of entering
the room. Over time,
the switch will learn
your preferred setting.
If ALD mode is
selected, fan loads
should be set to
Manual-ON/Auto-OFF.
After manual shutoff,
sensor will keep
lights off for as long
as space is occupied
and timeout has not
expired.
For more information
on Off-While-Occupied
and ALD, please visit
www.lutron.com/
DCSensorInstall
Questions?
For additional instructions, information, and product
application information, please review Application
Note #489 (P/N 048489) at
www.lutron.com/DCSensorInstall
Troubleshooting
Symptom Solution
Sensor modes
can’t be
changed.
Power can’t be
switched ON
or OFF with
newly installed
sensing
switch.
Lights turn
OFF while
space is
occupied.
Lights do
not turn ON
when space is
occupied.
Lights turn
back ON
after they
are manually
turned OFF.
Tap buttons
control the
wrong circuits.
Lights stay ON
after space is
vacated.
• User has the “Partial-ON” version
of this product. Sensor modes
are not adjustable in this model
number (MS-PPS6-DDV).
• Connect green and bare wires to
ground. Ground is required for
sensor to function.
• After power is restored to the
sensor, it will take 2 minutes
before the unit is fully functional.
• Sensor’s timeout is too short
for this application; increase the
timeout.
• Sensor doesn’t have full view of
the room; move objects blocking
its line of sight.
• Sensor’s sensitivity is set too low;
change it to high sensitivity.
• Sensor mode is set to Manual-ON
(Vacancy).
• Ambient Light Detection (ALD)
mode is enabled and the room is
too bright. Continue to turn lights
on within 5 seconds of entering
room to teach the unit your
preferred daylight threshold.
• Sensor does not have full view of
the room. Move objects blocking
sensor’s line of sight.
• Sensor is in Off-While-Occupied
mode and the timeout has not
expired.
• Off-While-Occupied is disabled:
sensor will turn lights back on
25seconds after being turned off;
Enable Off-While-Occupied.
• Switch wiring of product to match
desired zones.
• Find “zone mapping”
programming at
www.lutron.com/DCSensorInstall.
• Check room to ensure that no hot
or moving objects or air currents
are in the sensor’s line of sight.
These can cause false-tripping of
the sensor.
Page 3

I
I
I
I
I
I
Sensor de ocupación con
I
I
I
I
I
I
interruptor de doble circuito
MS-OPS6-DDV
Ocupación
Sólo polo único
Dos circuitos, cada uno certificado a:
Iluminación
(incandescente, halógeno, LFCA, LED,
BVE, BVM, fluorescente electrónica,
fluorescente magnética)
120-277 V~ 50 / 60 Hz 6 A
Ventilador
120 V~ 50 / 60 Hz 4,4 A 1/6 HP
Carga combinada de iluminación y ventilador
120 V~ 50 / 60 Hz 4,4 A
P/N 032444 Rev. A 11/2013
Cobertura mayor de movimiento:
9 m × 9 m (30 pi × 30 pi) [81 m2 (900 pi2)]
Cobertura menor de movimiento:
6 m × 6 m (20 pi × 20 pi) [36 m2 (400 pi2)]
Lutron Electronics Co., Inc.
7200 Suter Road
Coopersburg, PA 18036-1299 E.U.A.
www.lutron.com
MS-PPS6-DDV
Sólo ParcialACTIVADO
Español
Tecla de
circuito 1
Botón
superior de
programación
Botón
inferior de
programación
Tecla de
circuito 2
®
Notas importantes
®
Por favor lea antes de instalar.
1. El dispositivo no funcionará si no está puesto
a tierra. Para la conexión a tierra se requieren
tanto el cable de tierra verde como el pelado. Si
no hay una toma de tierra disponible, consulte
con un electricista.
2. El dispositivo no funcionará si no están
conectados los cables negros (Circuito 1/Línea 1).
3. Este producto está certificado para controlar
6 A por circuito. Los circuitos NO pueden ser
conectados en paralelo para controlar cargas
mayores que 6 A.
4. CUIDADO: Riesgo de descarga eléctrica.
Podría ser necesario más de un interruptor de
desconexión para desenergizar el equipo antes de
reemplazar focos, instalar o recablear la unidad.
5. Cuando se aplica suministro eléctrico, el sensor
con interruptor de doble circuito puede ser
activado o desactivado manualmente luego
de los primeros 60 segundos y controlará
automáticamente la carga luego de 2 minutos.
6. El sensor con interruptor de doble circuito
requiere una visión de la habitación y una línea
de visión sin obstrucciones para detectar los
movimientos.
7. Los objetos calientes o las corrientes de aire
en movimiento pueden afectar al desempeño
del sensor con interruptor de doble circuito
y podrían hacer que el sensor se activara de
manera inesperada o mantuviera su estado
presente más tiempo del deseado.
8. CUIDADO: Para reducir el riesgo de
sobrecalentamiento y posibles daños a
otros equipos, NO lo utilice para controlar
receptáculos.
9. Instálelo de acuerdo con todos los códigos
eléctricos locales y nacionales.
10. Sólo para uso bajo techo. Opérelo entre 0 °C y
40 °C (32 °F y 104 °F).
11. NO exceda de 20 dispositivos a 120 V~ o
7 dispositivos a 277 V~ en un ramal de circuito
individual.
12. Sólo limpie con un paño suave y húmedo. NO
utilice ningún limpiador químico.
Garantía limitada (Válida sólo en E.U.A., Canadá, Puerto Rico y el Caribe).
Lutron reparará o reemplazará, a su entera discreción, cualquier equipo
que exhiba fallas de materiales o fabricación dentro de los cinco años a
partir de la compra. Para obtener el servicio de garantía, retorne el equipo
al lugar donde lo adquirió o envíelo por correo a Lutron, 7200 Suter Rd.,
Coopersburg, PA 18036-1299, con franqueo prepago. Esta garantía se
otorga en lugar de cualquier otra garantía expresa, y la garantía implícita
de comerciabilidad está limitada a CINCO años a partir de la compra. Esta
garantía no cubre el costo de instalación, remoción o reinstalación, ni los
daños resultantes del mal uso, abuso o los daños debidos a un cableado
o instalación incorrectos. Esta garantía no cubre daños incidentales o
consecuentes. La responsabilidad de Lutron ante una reclamación por
daños que surjan de la fabricación, venta, instalación, entrega o uso del
equipo o en relación con los mismos no excederá nunca del precio de
compra del equipo. Esta garantía le otorga derechos legales específicos, y
usted podría tener otros derechos que varían de estado en estado. Algunos
estados no permiten la exclusión o limitación de los daños incidentales o
consecuentes, ni la limitación sobre la duración de una garantía implícita,
por lo que las limitaciones anteriores podrían no regir en su caso.
Lutron y Maestro son marcas comerciales registradas de Lutron
Electronics Co., Inc.
© 2013 Lutron Electronics Co., Inc.
Cableado
DESCONECTE la alimentación eléctrica
1
¡ADVERTENCIA! Peligro de descarga eléctrica. Podría ocasionar lesiones graves o la
muerte. Antes de instalar el equipo DESCONECTE el suministro eléctrico en el disyuntor.
A
.
O
O
O
Línea única
* El cableado debe satisfacer la norma NEC de cableado de circuitos con múltiples ramales: Cuando dos o más
ramales de circuito alimentan dispositivos o equipos ubicados en el mismo yugo, se deberá proporcionar en el
punto en el que se originan los ramales de circuito una manera de desconectar simultáneamente los conductores
no puestos a tierra que alimenten dichos dispositivos.
Conecte el sensor con interruptor de doble circuito
2
A
. Cableado de una sola línea
120-277 V~
Neutro
B
. Cableado de dos líneas
120-277 V~
120-277 V~
Línea 1
Línea 2
Neutro 2
Neutro 1
1
El dispositivo no funcionará si no están conectados los cables negros (Circuito 1/ Línea 1).
2
El dispositivo no funcionará si no está puesto a tierra.
NOTA: Si se desean ajustes personalizados deje la placa de pared desactivada. Consulte al dorso las instrucciones de configuración personalizada.
ENCIENDA el equipo
3
A
.
Espere 60 segundos antes de encender manualmente.
4
O
O
O
• El interruptor de detección no controlará la carga manualmente
durante 60 segundos.
Espere otros 60 segundos para el encendido automático.
5
• Cuando se restablezca la energía, el sensor de detección no controlará
automáticamente la carga durante los primeros dos minutos.
O
O
B
.
Dos líneas*
Negro
Negro-
Anaranjado
Negro
Negro-
Anaranjado
B
.
O
O
O
1
1
Pelado
O
O
O
VerdePelado
Tierra
Verde
Tierra
Negro
Negro-
Anaranjado
2
Negro
Negro-
Anaranjado
2
Carga 1
Carga 2
Carga 1
Carga 2
60 s
60 s
Page 4

Configuraciones ajustables
®
Antes de continuar, seleccione su configuración preferida de la siguiente tabla; los parámetros predeterminados se
indican en negrita. Lea todas las instrucciones antes de continuar.
Pulse y mantenga
1
pulsados los botones
indicados en las
imágenes.
Intervalo de espera
Número
total de
destellos
1 Modo de ensayo
2 1 minuto 1 minuto
3 5 minutos 5 minutos
4 15 minutos 15 minutos
5 30 minutos 30 minutos
Modo de sensor
Número
total de
destellos
ACTIVACIÓN
automática/
1
DESACTIVACIÓN
automática (modo
de ocupación)
ACTIVACIÓN manual/
DESACTIVACIÓN
2
automática (modo de
vacancia)
Modos avanzados de activación automática
Número
total de
destellos
1 Detección de luz ambiental (ALD)
2 Apagado-Mientras-Ocupado (OWO)
3 Apagado-Mientras-Ocupado deshabilitado
Sensibilidad
Número
total de
destellos
1 Bajo
2 Alto
Restaurar todos los parámetros a sus
3
valores predeterminados
La lente destellará una vez en cada configuración (siempre comenzará por la
2
configuración 1). Ejemplo: Para configurar el intervalo de espera a 1 minuto,
pulse y mantenga pulsada la tecla. Suelte la tecla luego de que la lente
destelle por segunda vez.
Circuito 1
1
2
Circuito 1
Modo de ensayo
1
Circuito 2
Circuito 2
ACTIVACIÓN
automática/
DESACTIVACIÓN
automática (modo de
ocupación)
ACTIVACIÓN manual/
DESACTIVACIÓN
automática (modo de
vacancia)
3
4,5
6
Asistencia técnica: www.lutron.com | E.U.A., Canadá y el Caribe: 1.800.523.9466 | México: +1.888.235.2910 | Demás países: +1.610.282.3800
La configuración se
3
guardará luego de
soltar el o las teclas.
NOTAS
1
Intervalo corto (menos de
15 segundos) para
comprobar la cobertura
del sensor. El dispositivo
saldrá del modo de ensayo
automáticamente luego de
5 minutos, o cuando se
pulse cualquier botón.
2
Los parámetros
predeterminados del modo
de sensor están bloqueados
en el MS-PPS6-DDV (sólo
en el modelo ParcialACTIVADO) para satisfacer
la definición del Título 24 del
CEC 2013 para un sensor
“Parcial-ACTIVADO.”
3
Estos parámetros rigen
para todos los circuitos
configurados al modo de
“ACTIVACIÓN automática”
(ocupación).
4
Las luces sólo se encienden
si la luz natural en la
habitación es baja. Si el
interruptor se activa cuando
hay suficiente luz natural, o
si no se activa cuando no
hay suficiente luz natural,
presione la tecla adecuada
dentro de los 5segundos
de ingresar a la habitación.
Con el tiempo, el interruptor
aprenderá su configuración
preferida.
5
Si se selecciona el modo
ALD, las cargas de
ventilador deberán ser
configuradas a ACTIVACIÓN
manual / DESACTIVACIÓN
automática.
6
Luego de un apagado
manual, el sensor
mantendrá las luces
encendidas durante el
tiempo en que el espacio
esté ocupado y el intervalo
de espera no haya expirado.
7
Para obtener más
información sobre el
modo Apagado-MientrasOcupado y el modo ALD,
visite www.lutron.com/
DCSensorInstall
¿Alguna pregunta?
Para obtener instrucciones adicionales, información
general e información de aplicaciones de producto,
revise la Nota de aplicación Nº 489 (N/P 048489) en
www.lutron.com/DCSensorInstall.
Solución de problemas
Síntoma Solución
Los modos de los
sensores no pueden
ser cambiados.
La alimentación
eléctrica no se
puede cambiar
entre ENCENDIDA
o APAGADA con
el sensor con
interruptor recién
instalado.
Las luces se
apagan mientras
el espacio está
ocupado.
Las luces no se
encienden cuando
el espacio se
ocupa.
Las luces se vuelven
a ENCENDER
luego de haber
sido APAGADAS
manualmente.
Las teclas controlan
los circuitos
equivocados.
Las luces
permanecen
ENCENDIDAS
luego de que
el espacio se
desocupa.
• El usuario tiene la versión
“Parcial-ACTIVADO” de este producto.
Los modos de los sensores no son
ajustables en este número de modelo
(MS-PPS6-DDV).
• Conecte el cable verde y el cable pelado
a tierra. Para que el sensor funcione se
requiere una conexión a tierra.
• Luego de restablecerse la alimentación
eléctrica al sensor, demorará 2minutos
hasta que el equipo recupere
completamente su funcionalidad.
• El intervalo de espera del sensor es
demasiado corto para esta aplicación;
incremente el intervalo de espera.
• El sensor no tiene una vista completa de
la habitación, desplace los objetos que
bloquean su línea de visión.
• La sensibilidad del sensor está
configurada demasiado baja; cámbiela
a alta sensibilidad.
• El modo del sensor está configurado a
ACTIVACIÓN manual (vacancia).
• Está habilitado el modo de Detección de
la Luz Ambiental (ALD) y la habitación
está demasiado brillante. Continúe
encendiendo las luces dentro de los
5 segundos de ingresar a la habitación
para enseñarle al equipo su umbral de
luz diurna preferido.
• El sensor no tiene una vista completa de
la habitación. Desplace los objetos que
bloquean la línea de visión del sensor.
• El sensor está en el modo
Apagado-Mientras-Ocupado (OWO) y el
intervalo de espera no ha expirado.
• Apagado-Mientras-Ocupado está
deshabilitado:
encender las luces 25 segundos después
de apagadas; habilitar
Mientras-Ocupado
• Cambie el cableado del producto para
que coincida con las zonas deseadas.
• Busque la programación de “asignación
de zonas” en www.lutron.com/
DCSensorInstall.
• Inspeccione la habitación para
asegurarse de que no haya objetos
calientes o en movimiento o corrientes
de aire en la línea de visión del sensor.
Estos pueden provocar un disparo falso
del sensor.
el sensor volverá a
Apagado-
.
Page 5

I
I
I
Interrupteur de détection de
I
I
I
I
I
I
présence à double circuit
MS-OPS6-DDV
Occupation
Unipolaire seulement
Deux circuits, chacun de :
Éclairage
(incandescente, halogène, AFC, DEL,
BTE, BTM, fluorescente magnétique,
fluorescent magnétique)
120-277 V~ 50 / 60 Hz 6 A
Ventilateur
120 V~ 50 / 60 Hz 4,4 A 1/6 HP
Charge combinée d’éclairage et de ventilateur
120 V~ 50 / 60 Hz 4,4 A
N° de pièce 032444 Rév. A 11/2013
Portée pour un mouvement majeur :
9 m × 9 m (30 pi × 30 pi) [81 m2 (900 pi2)]
Portée pour un mouvement mineur :
6 m × 6 m (20 pi × 20 pi) [36 m2 (400 pi2)]
Lutron Electronics Co., Inc.
7200 Suter Road
Coopersburg, PA 18036-1299 États-Unis
www.lutron.com
MS-PPS6-DDV
ACTIVATIONpartielle seulement
Français
Bouton à
pression du
circuit 1
Bouton de
programmation
supérieur
Bouton de
programmation
inférieur
Bouton à
pression du
circuit 2
®
Remarques importantes
®
Veuillez lire avant l'installation.
1. L’appareil ne fonctionnera pas s’il n’est
pas raccordé à la masse. Le fil dénudé et
le fil vert de masse sont nécessaires pour le
raccordement à la masse. Si aucune masse n’est
disponible, consultez un électricien.
2. L’appareil ne fonctionnera pas si les fils noirs
(Circuit 1/Ligne 1) ne sont pas raccordés.
3. Ce produit est conçu pour commander 6 A par
circuit. Les circuits ne peuvent PAS être câblés
en parallèle pour commander des charges
supérieures à 6 A.
4. ATTENTION : Risque de choc électrique — La
déconnexion de plus d’un interrupteur peut être
requise pour mettre l’équipement hors tension
avant d’effectuer l’installation de l’unité, le
recâblage ou le remplacement d’ampoules
5. Une fois mis sous tension, l’interrupteur de
détection à double circuit peut être activé ou
désactivé manuellement après 60 secondes et
commandera automatiquement la charge après
2 minutes.
6. L’interrupteur de détection à double circuit
nécessite une vue dégagée de la pièce et de son
champ de vision pour détecter les mouvements.
7. Les objets chauds ou le déplacement des
courants d’air peuvent affecter les performances
de l’interrupteur de détection à double circuit,
pouvant provoquer l’activation inattendue du
détecteur ou maintenir son état actuel plus
longtemps que souhaité.
8. ATTENTION : Pour réduire les risques de
surchauffe et l’endommagement possible d'autres
équipements, ne l’utilisez PAS pour commander
des prises.
9. Effectuez l'installation en conformité avec les
codes électriques nationaux et locaux.
10. Utilisation à l'intérieur seulement. Fonctionne
entre 0 °C et 40 °C (32 °F et 104 °F).
11. Ne dépassez PAS 20 appareils de 120 V~ ou
7 appareils de 277 V~ sur chaque circuit dérivé.
12. Ne nettoyez qu'avec un chiffon doux et humide.
N’utilisez PAS de nettoyants chimiques.
Garantie limitée (Valide seulement aux États-Unis, au Canada, à Puerto Rico
et aux Caraïbes). Lutron réparera ou remplacera, selon son choix, tout appareil
défectueux au niveau de ses pièces ou de sa fabrication dans les cinq ans
suivant l'achat. Pour le service de garantie, ramenez l'appareil au lieu d'achat
ou envoyer une lettre préaffranchie à Lutron à 7200 Suter Rd., Coopersburg,
PA 18036-1299. Cette garantie tient lieu de toute autre garantie expresse et la
garantie implicite de qualité marchande est limitée à CINQ ans suivant l'achat.
Cette garantie ne couvre pas le coût d'installation, de retrait ou de réinstallation,
ou les dommages résultant d'une mauvaise utilisation et d'abus, ni les dommages
dus à un câblage ou une installation incorrects. Cette garantie ne couvre pas
les dommages accessoires ou indirects. La responsabilité de Lutron quant à
toute réclamation pour des dommages découlant de ou en rapport avec la
fabrication, la vente, l'installation, la livraison ou l'utilisation de l'appareil ne
doit jamais excéder le prix d'achat de l'appareil. Cette garantie vous donne
des droits spécifiques, et vous pouvez avoir d'autres droits variant d'un état
à l'autre. Certains États permettent l’exclusion ou la limitation des dommages
accessoires ou indirects, ou la limitation de la durée d'une garantie implicite, de
sorte que les limitations ci-dessus peuvent ne pas s'appliquer à vous.
Lutron et Maestro sont des marques déposées de Lutron Electronics
Co., Inc.
© 2013 Lutron Electronics Co., Inc.
Câblage
COUPER le courant
1
AVERTISSEMENT ! Risque d'électrocution. Peut causer des blessures graves ou la mort.
Coupez le courant au niveau du disjoncteur avant d’installer l’unité.
A
.
O
O
O
Une ligne
* Le câblage doit être conforme au code de la norme NEC pour le câblage des circuits à multiples dérivations :
Lorsque deux circuits dérivés ou plus alimentent des appareils ou des équipements sur la même structure
métallique, un moyen de déconnecter les conducteurs non raccordés à la masse et alimentant ces appareils
doit être fourni au point d’origine du circuit dérivé.
Raccorder l’interrupteur de détection à double circuit
2
A
. Câblage pour une ligne
120-277 V~
Neutre
B
. Câblage pour deux lignes
120-277 V~
120-277 V~
Ligne 1
Ligne 2
Neutre 2
Neutre 1
1
L’appareil ne fonctionnera pas si les fils noirs (Circuit 1/ Ligne 1) ne sont pas raccordés.
2
L’appareil ne fonctionnera pas s’il n’est pas raccordé à la masse.
REMARQUE : N'installez pas encore la plaque murale si des réglages personnalisés sont souhaités.
METTEZ sous tension
3
A
.
Attendre 60 secondes avant la commutation manuelle
4
Voir les instructions des réglages personnalisés au verso.
O
O
O
• Le commutateur de détection ne peut contrôler
manuellement la charge pendant 60 secondes.
Attendre 60 secondes de plus avant la commutation automatique
5
• Dès que le courant est rétabli, le commutateur de détection
ne peut contrôler automatiquement la charge pour les
2 premières minutes.
OU
OU
B
.
I
I
I
Deux lignes*
Noir
Noir-Orange
Noir
Noir-Orange
B
.
O
O
O
1
1
Dénudé
Noir
Noir-Orange
Charge 1
Charge 2
VertDénudé
2
Masse
Noir
Noir-Orange
Charge 1
Charge 2
Vert
2
Masse
O
O
O
60 s
60 s
Page 6

Paramètres de réglages
®
Avant de commencer, choisissez vos réglages préférés dans le tableau ci-dessous; les réglages par défaut sont indiqués
en gras. Lisez toutes les instructions avant de continuer.
Appuyez et maintenez
1
les boutons indiqués
sur les images.
Délai d’extinction
Nombre
total de
clignotements
1 Mode Test
2 1 minute 1 minute
3 5 minutes 5 minutes
4 15 minutes 15 minutes
5 30 minutes 30 minutes
Mode du détecteur
Nombre
total de
clignotements
ACTIVATION auto/
1
DÉSACTIVATION auto
(mode de présence)
ACTIVATION manuelle/
2
DÉSACTIVATION auto
(mode d’inoccupation)
Modes d’activation auto avancés
Nombre
total de
clignotements
1 Détection de la lumière ambiante (ALD)
Activation du mode de désactivation en
2
cas de présence (OWO)
Désactivation du mode de désactivation en
3
cas de présence
Sensibilité
Nombre
total de
clignotements
1 Faibles
2 Élevés
3 Restaurer TOUS les réglages par défaut
La lentille clignotera une fois à chaque réglage (elle commence toujours au
2
réglage 1). Exemple: Pour régler le délai d’extinction à 1 minute, appuyez
et maintenez le bouton à pression. Relâchez le bouton après le second
clignotement de la lentille.
Circuit 1
1
2
Circuit 1
Mode Test
1
Circuit 2
Circuit 2
ACTIVATION auto/
DÉSACTIVATION auto
(mode de présence)
ACTIVATION manuelle/
DÉSACTIVATION auto
(mode d’inoccupation)
3
4,5
6
Le réglage est
3
enregistré une fois le(s)
bouton(s) relâché(s).
REMARQUES
1
Un délai d’extinction court
(moins de 15 secondes) pour
tester la portée du détecteur.
L’appareil quittera le mode
test automatiquement après
5minutes, ou si un bouton
est pressé.
2
Les réglages du mode par
défaut du détecteur sont
verrouillés sur le modèle
MS-PPS6-DDV (modèle
à ACTIVATION-partielle
seulement) conformément
à la définition du Titre 24
des détecteurs à activation
partielle de la norme CEC de
2013.
3
Ces réglages s’appliquent à
tous les circuits réglés sur le
mode d’ACTIVATION auto
(occupation).
4
L’éclairage s’allume
seulement si la lumière
naturelle dans la pièce
est faible. Si l’interrupteur
s’allume lorsqu’il y a
suffisamment de lumière
naturelle, ou si l’interrupteur
ne s’allume pas lorsqu’il n’y a
pas suffisamment de lumière
naturelle, appuyez sur le
bouton à pression approprié
dans les 5secondes suivant
votre entrée dans la pièce.
Au fil du temps, l’interrupteur
apprendra votre réglage
préféré.
5
Si le mode ALD est
sélectionné, les charges
des ventilateurs doivent
être réglées en ACTIVATION
manuelle/DÉSACTIVATION
auto.
6
Après une extinction manuelle,
le détecteur garde l’éclairage
éteint tant que l’espace
est occupé et que le délai
d’extinction n’est pas expiré.
7
Pour plus d’information sur
Désactivation en cas de
Présence et ALD, veuillez
visiter le : www.lutron.
com/DCSensorInstall
Questions?
Pour des instructions et des informations sur
l'application du produit, veuillez consulter la note
d’utilisation #489 (nº de pièce 048489) sur
www.lutron.com/DCSensorInstall.
Dépannage
Symptôme Solution
Les modes du
détecteur ne
peuvent pas être
modifiés.
L’alimentation
ne peut pas
être activée ou
désactivée avec
l’interrupteur
de détection
nouvellement
installé.
L’éclairage s’éteint
lorsque l’espace
est occupé.
L’éclairage ne
s’allume pas
lorsque l’espace
est occupé.
L’éclairage s’allume
de nouveau après
avoir été éteint
manuellement.
Les boutons
à pression
commandent les
mauvais circuits.
L’éclairage reste
allumé lorsque
l’espace est
inoccupé.
• L’utilisateur possède la version à
« ACTIVATION-partielle » de ce produit.
Les modes du détecteur ne sont pas
ajustables sur ce numéro de modèle
(MS-PPS6-DDV).
• Raccordez le fil vert et le fil dénudé à
la masse. La masse est requise pour le
fonctionnement du détecteur.
• Une fois le détecteur remis sous tension,
il faudra 2 minutes pour que l’unité soit
entièrement fonctionnelle.
• Le délai d’extinction du détecteur est trop
court pour cette utilisation ; augmentez
le délai.
• Le détecteur ne voit pas la pièce
intégralement ; déplacez les objets
bloquant son champ de vision.
• La sensibilité du détecteur est trop faible ;
choisissez le réglage de haute sensibilité.
• Le mode du détecteur est réglé sur une
activation manuelle (inoccupation).
• Le mode de détection de la lumière
ambiante (Ambient Light Detection
ou ALD) est activé et la pièce est trop
lumineuse. Continuez d'allumer l’éclairage
dans les 5 secondes suivant votre entrée
dans la pièce pour apprendre à l’unité
votre seuil préféré de lumière du jour.
• Le détecteur ne voit pas la pièce
intégralement. Déplacez les objets
bloquant son champ de vision.
• Le détecteur est en mode de
désactivation en cas de présence
(Off-While-Occupied ou OWO) et le délai
d’extinction n’a pas expiré.
• Le mode de désactivation en cas de
présence est désactivé: le détecteur
rallume les lumières 25 secondes après
extinction ; activer.
• Inversez le câblage du produit pour
correspondre aux zones souhaitées.
• Trouvez la programmation de la
« correspondance des zones » sur
www.lutron.com/DCSensorInstall.
• Vérifiez la pièce pour vous assurer
qu’il n’y a pas d’objet chaud ou en
mouvement ou de courants d’air dans le
champ de vision du détecteur. Cela peut
provoquer un déclenchement involontaire
du détecteur.
Assistance technique : www.lutron.com | États-Unis, Canada et les Caraïbes : 1.800.523.9466 | Mexique : +1.888.235.2910 | Autres : +1.610.282.3800
Page 7

I
I
I
I
I
I
Chave sensora de ocupação
I
I
I
I
I
I
de circuito duplo
MS-OPS6-DDV
Ocupação
Somente ponto único
Dois circuitos, classificados como:
Iluminação
(incandescente, halogênio, LFC, LED,
BVE, BVM, eletrônica fluorescente,
fluorescente magnética)
120-277 V~ 50 / 60 Hz 6 A
Ventilador
120 V~ 50 / 60 Hz 4,4 A 1/6 HP
Carga combinada da iluminação e do ventilador
120 V~ 50 / 60 Hz 4,4 A
P/N 032444 Rev. A 11/2013
Máxima cobertura de movimento:
9 m × 9 m (30 pés × 30 pés) [81 m2 (900 pés2)]
Mínima cobertura de movimento:
6 m × 6 m (20 pés × 20 pés) [36 m2 (400 pés2)]
Lutron Electronics Co., Inc.
7200 Suter Road
Coopersburg, PA 18036-1299 EUA
www.lutron.com
MS-PPS6-DDV
Somente ligado
parcialmente
Português
®
Botão do
circuito1
Botão
superior de
programação
Botão
inferior de
programação
Botão do
circuito2
Observações importantes
®
Leia antes de instalar.
1. O dispositivo não funcionará se não
estiver aterrado. O cabo descascado e o
verde são necessários para o aterramento.
Se não houver aterramento disponível,
consulte um eletricista.
2. O dispositivo não funcionará se os cabos
pretos (circuito 1/linha 1) não estiverem
conectados.
3. Este produto foi classificado para
controlar 6 A por circuito. Os circuitos
podem NÃO estar cabeados em paralelo
para controlar cargas superiores a 6 A.
CUIDADO: risco de choque elétrico —
4.
mais de uma chave de desconexão
pode ser necessária para desenergizar o
equipamento antes de instalar a unidade,
recabear ou substituir as lâmpadas.
5. Quando houver fornecimento de energia,
a chave sensora de circuito duplo poderá
Cabeamento
DESLIGUE o disjuntor
1
CUIDADO! Risco de choque. Pode resultar em ferimentos graves ou morte. Desligue a
alimentação do(s) disjuntor(es) antes de instalar a unidade, recabear ou substituir as lâmpadas.
A
.
O
O
O
Linha única
* O cabeamento deve estar em conformidade com o código NEC para circuitos com múltiplas derivações: em
que devem ser disponibilizados, no ponto de origem do circuito com derivação, dois ou mais dispositivos
de fornecimento de circuitos com derivação ou equipamentos no mesmo jugo, como meio de desconectar
simultaneamente os condutores não aterrados que alimentam tais dispositivos.
Conecte a chave sensora de circuito duplo
2
A
. Cabeamento de linha única
120-277 V~
B
OU
Preto-Laranja
.
Duas linhas*
1
Preto
O
O
O
Preto
Preto-Laranja
Carga 1
Carga 2
ser ligada ou desligada manualmente
após 60 segundos e controlará
automaticamente a carga após 2minutos.
6. A chave sensora de circuito duplo precisa
ter visão total do ambiente e campo de
visão para detectar movimentos.
7. Objetos quentes ou correntes de ar
afetam o desempenho da chave sensora
de circuito duplo e podem acionar o
sensor inesperadamente ou manter seu
estado atual por tempo mais longo que o
desejado.
CUIDADO: para reduzir o risco de
8.
Neutro
B
. Cabeamento de duas linhas
120-277 V~
120-277 V~
Linha 1
Linha 2
Preto-Laranja
Preto
1
VerdeDescascado
2
Terra
Preto-Laranja
Preto
Carga 1
Carga 2
superaquecimento e possíveis danos ao
equipamento, NÃO o utilize para controlar
recipientes.
9. A instalação elétrica deve ser feita de
acordo com as normas locais e nacionais.
10. Para uso somente em ambientes
fechados. Use a chave sob temperaturas
0 °C e 40 °C (32 °F e 104 °F).
entre
11.
NÃO use mais de 20 dispositivos a
120V~ ou 7 dispositivos a 277 V~ no
mesmo circuito.
12. Limpe apenas com um pano macio e
úmido. NÃO use produtos químicos de
limpeza.
Garantia limitada (válida somente nos EUA, no Canadá, em Porto Rico e no
Caribe). A Lutron, a seu critério, poderá reparar ou substituir uma unidade
defeituosa em materiais ou produtos em até cinco anos após a compra. Para
usar a garantia, envie a unidade ao local de compra ou à Lutron, no endereço
7200 Suter Rd., Coopersburg, PA 18036-1299, com porte pré-pago. Esta
garantia substitui todas as demais garantias expressas, assim como a garantia
implícita de comercialização está limitada a CINCO anos a partir da compra.
Ela não cobre custos de instalação, remoção ou reinstalação, nem danos
resultantes de mau uso, abusos ou danos causados por fiação ou instalação
inadequada. Esta garantia não cobre danos acidentais ou consequentes.
A responsabilidade da Lutron em qualquer reivindicação por danos
decorrentes da fabricação, venda, instalação, entrega ou uso da unidade
nunca poderá ultrapassar o preço de compra. Esta garantia concede direitos
legais específicos, mas você poderá ter outros direitos que variam de um
estado para o outro. Alguns estados não permitem a exclusão ou limitação de
danos acidentais ou consequentes, ou a limitação da duração de uma garantia
implícita, portanto as limitações acima podem não ser relevantes no seu caso.
Lutron e Maestro são marcas comerciais registradas da Lutron
Electronics Co., Inc.
© 2013 Lutron Electronics Co., Inc.
Descascado
Neutro 2
Neutro 1
1
O dispositivo não funcionará se os fios pretos (circuito 1/linha 1) não estiverem conectados.
2
O dispositivo não funcionará se não estiver aterrado.
NOTA: deixe o espelho desligado se desejar usar configurações personalizadas. Veja as instruções de Configurações personalizadas no verso.
LIGUE o disjuntor
3
A
.
Aguarde 60 segundos antes de fazer a comutação manual
4
O
O
O
OU
B
.
O
O
O
• A chave sensora não controlará manualmente a carga por 60 segundos.
Espere mais 60 segundos para a comutação automática
5
• Quando a alimentação for restaurada, a chave sensora não controlará
automaticamente a carga nos primeiros dois minutos.
Verde
Terra
2
60 s
60 s
Page 8

Configurações ajustáveis
®
Antes de continuar, selecione suas configurações preferenciais a partir da tabela abaixo; a configuração padrão é exibida em
negrito. Leia todas as instruções antes de continuar.
Aperte e mantenha
1
os botões indicados
nas imagens.
Tempo limite
Número
1 Modo teste
total de
piscadas
2 1 minuto 1 minuto
3 5 minutos 5 minutos
4 15 minutos 15 minutos
5 30 minutos 30 minutos
Modo sensor
Número
total de
piscadas
Liga/desliga
1
automático (modo
ocupação)
Ligado manual/
2
desligado automático
(modo ausência)
Modos avançados "ligados automaticamente"
Número
1 Detecção de iluminação ambiente (ALD)
total de
piscadas
2 Modo desligado durante a ocupação habilitado
3 Modo desligado durante a ocupação desabilitado
Sensibilidade
Número
1 Baixo
total de
piscadas
2 Alto
3 Restaurar TODAS as configurações para o padrão
Assistência técnica: www.lutron.com | EUA, Canadá e Caribe: 1.800.523.9466 | México: +1.888.235.2910 | Outros: +1.610.282.3800
2
As lentes piscarão uma vez em cada configuração (sempre começa
na configuração 1). Exemplo: para configurar o tempo limite para um
minuto, aperte e mantenha o botão. Libere-o depois que as lentes
piscarem pela segunda vez.
Circuito 1
1
2
Circuito 1
Modo teste
1
Liga/desliga
automático (modo
ocupação)
Ligado manual/
desligado automático
(modo ausência)
3
4,5,7
6,7
Circuito 2
Circuito 2
A configuração
3
será salva depois
que o(s) botão(ões)
for(em) liberado(s).
NOTAS
1
Tempo limite (menor
que 15 segundos) curto
para testar a cobertura
do sensor. O dispositivo
sairá do modo teste
automaticamente
após cincominutos ou
quando um botão for
pressionado.
2
As configurações padrão
do modo sensor estão
travadas no MS-PPS6DDV (somente modo
ligado parcialmente)
para atender à definição
do Título 24 da CEC
2013 para um sensor
“parcialmente ligado”.
3
Estas configurações são
válidas para todos os
circuitos configurados
no modo “automático
ligado” (ocupação).
4
As luzes se acendem
somente se a luz natural
do ambiente estiver
baixa. Se a chave for
acionada quando há
luz natural suficiente ou
se ela não for acionada
quando não houver luz
natural suficiente, aperte
o botão adequado em
até cincosegundos
após entrar no ambiente.
Com o tempo, a
chave aprenderá a
sua configuração de
preferência.
5
Se o modo ALD estiver
selecionado, as cargas
dos ventiladores deverão
ser configuradas em
ligado manual/desligado
automático.
6
Após o desligamento
manual, o sensor
manterá as luzes
apagadas pelo tempo
em que o ambiente
estiver ocupado, e o
tempo limite não tiver
esgotado.
7
Para obter mais
informações sobre
os modos desligado
durante a ocupação
e ALD, visite o site
www.lutron.com/
DCSensorInstall
Dúvidas?
Para obter outras instruções, informações e
orientação sobre uso do produto, leia a
Nota de Uso 489 (P/N 048489) no site
www.lutron.com/DCSensorInstall
Resolução de problemas
Problema Solução
Os modos do
sensor não
podem ser
alterados.
A alimentação
não pode
ser ligada ou
desligada com
chave sensora
recém-instalada.
As luzes se
apagam quando
o espaço é
ocupado.
As luzes não
acendem
quando o
espaço está
ocupado.
As luzes se
reacendem
após serem
manualmente
apagadas.
Os botões
controlam
os circuitos
errados.
As luzes
permanecem
acesas após a
desocupação.
• O usuário adquiriu a versão
“parcialmente ligada” do produto. Os
modos do sensor não são ajustáveis
neste número de modelo
(MS-PPS6-DDV).
• Conecte os cabos verde e descascado
ao aterramento, que é necessário para
o funcionamento do sensor.
• Depois de a alimentação ser
restaurada ao sensor, levará dois
minutos até que a unidade esteja
pronta para funcionamento normal.
• O tempo limite do sensor é muito curto
para esta aplicação. Aumente-o.
• O sensor não tem visão total do
ambiente. Movimente os objetos que
estão bloqueando seu campo de
visão.
• A sensibilidade do sensor está com
configuração muito baixa. Altere-a
para máxima.
• O modo do sensor está configurado
como Ligado Manual (ausência).
• O modo Detecção de Luz Ambiente
(ALD) está habilitado, e o ambiente
está muito claro. Continue a acender
as luzes em até cinco segundos após
entrar no ambiente para ensinar à
unidade o seu limite de luz natural de
preferência.
• O sensor não tem visão total do
ambiente. Movimente os objetos que
estão bloqueando seu campo de
visão.
• O sensor está no modo desligado
durante a ocupação, e o tempo limite
não esgotou.
• O modo desligado durante a
ocupação está desabilitado: O sensor
será religado 25segundos após ser
desligado; Habilitar.
• Troque o cabeamento do produto para
corresponder às zonas desejadas.
• A programação do “mapeamento de
zona” está disponível no site
www.lutron.com/DCSensorInstall.
• Verifique se há objetos quentes ou
em movimento ou correntes de ar
no campo de visão do sensor, pois
podem causar falsos erros.
 Loading...