

Lutron Electronics SVIT-DR-WH, SVIT-GRX-SH-WH, SVIT-SH-WH, SVIT-GRX-DR-WH, SVIT-MIR-SH-WH Programming Manual
...Page 1

Sivoia QED®
IR Remotes With
Favorite Preset
Button
Programming
Guide
Page 2

Sivoia QED®
The Sivoia QED IR Remote with Favorite Preset Button Programming Guide is a supplement to
the Sivoia QED Wiring and Programming Guide. This guide describes the programming and setup
of the three configurations of IR remotes that have a round silver favorite preset button.
The IR Remote can be used to program and control shades/drapes in the system via a drive unit
with an IR receiver, an IR Keypad or via the IR reciever in the Contact Closure Interface.
The following chart describes the programming steps. Most of the programming can be
performed from any of the three IR remotes. The Two Shade Group Remotes (Type C) require
additional programming to define the shades/drapes that are assigned to the two sub groups
that these can control.
Favorite Preset Remote Programming Guide
IR Remote Programming Steps for IR Remotes with
Favorite Preset Button
Step Description
Addressing System
1
Assigning Drives
2
3
4 & 5
to IR Remote
Master Group
Assigning Drives
to IR Remote
Sub Groups
Storing and
Locking Presets
Type A
Single Shade Group
with Favorite Preset
SVIT-SH-WH
SVIT-DR-WH
Type B
Shade and Lighting
with Favorite Preset
SVIT-GRX-DR-WH
SVIT-GRX-SH-WH
SVIT-MIR-SH-WH
SVIT-MIR-DR-WH
Two Shade Groups
with Favorite Preset
SVIT-SC-BL-WH
SVIT-SR-BL-WH
SVIT-SH-DR-WH
SVIT-SH-SH-WH
P P P
P P P
N/A N/A
P
Type C
GROUP 1
GROUP 2
Individual Level
6
Adjust
P P P
P P P
Page 1
Sivoia QED® Favorite Preset Remote Programming Guide
Page 3

1
Addressing the system
Addressing can be done with type A, B, or C remotes.
Note: Prior to addressing the system, all shades/drapes, by default, will respond to all IR
Remotes. After addressing, shades/drapes will not respond to any remote until it is assigned to
an IR Receiver, IR Keypad or contact closure interface.
(H) Press and hold button
(T) Tap button
1.1
1.2
Enter Programming Mode
Aim the Remote at the IR Receiver
and Press and Hold Open and
Close for 5 seconds. The LED’s
on the receiving device will ash
Enter Addressing Mode
Aim the Remote at the IR
Receiver and tap Open. The LED’s
on the drive will ash rapidly until
addressed. Addressing is
complete when the receiving
device starts ashing slowly.
The addressing process will take
approximately 1 minute.
H
H
H
H
H
H
A
B
T
T
C
T
A
B
C
1.3
Exit Addressing Mode
Aim the Remote at the IR Receiver
H
H
H
H
and Hold Open and Close for
5 seconds. The LED’s on the drive
will stop ashing.
A
H
H
B
C
Page 2
Sivoia QED® Favorite Preset Remote Programming Guide
Page 4

2
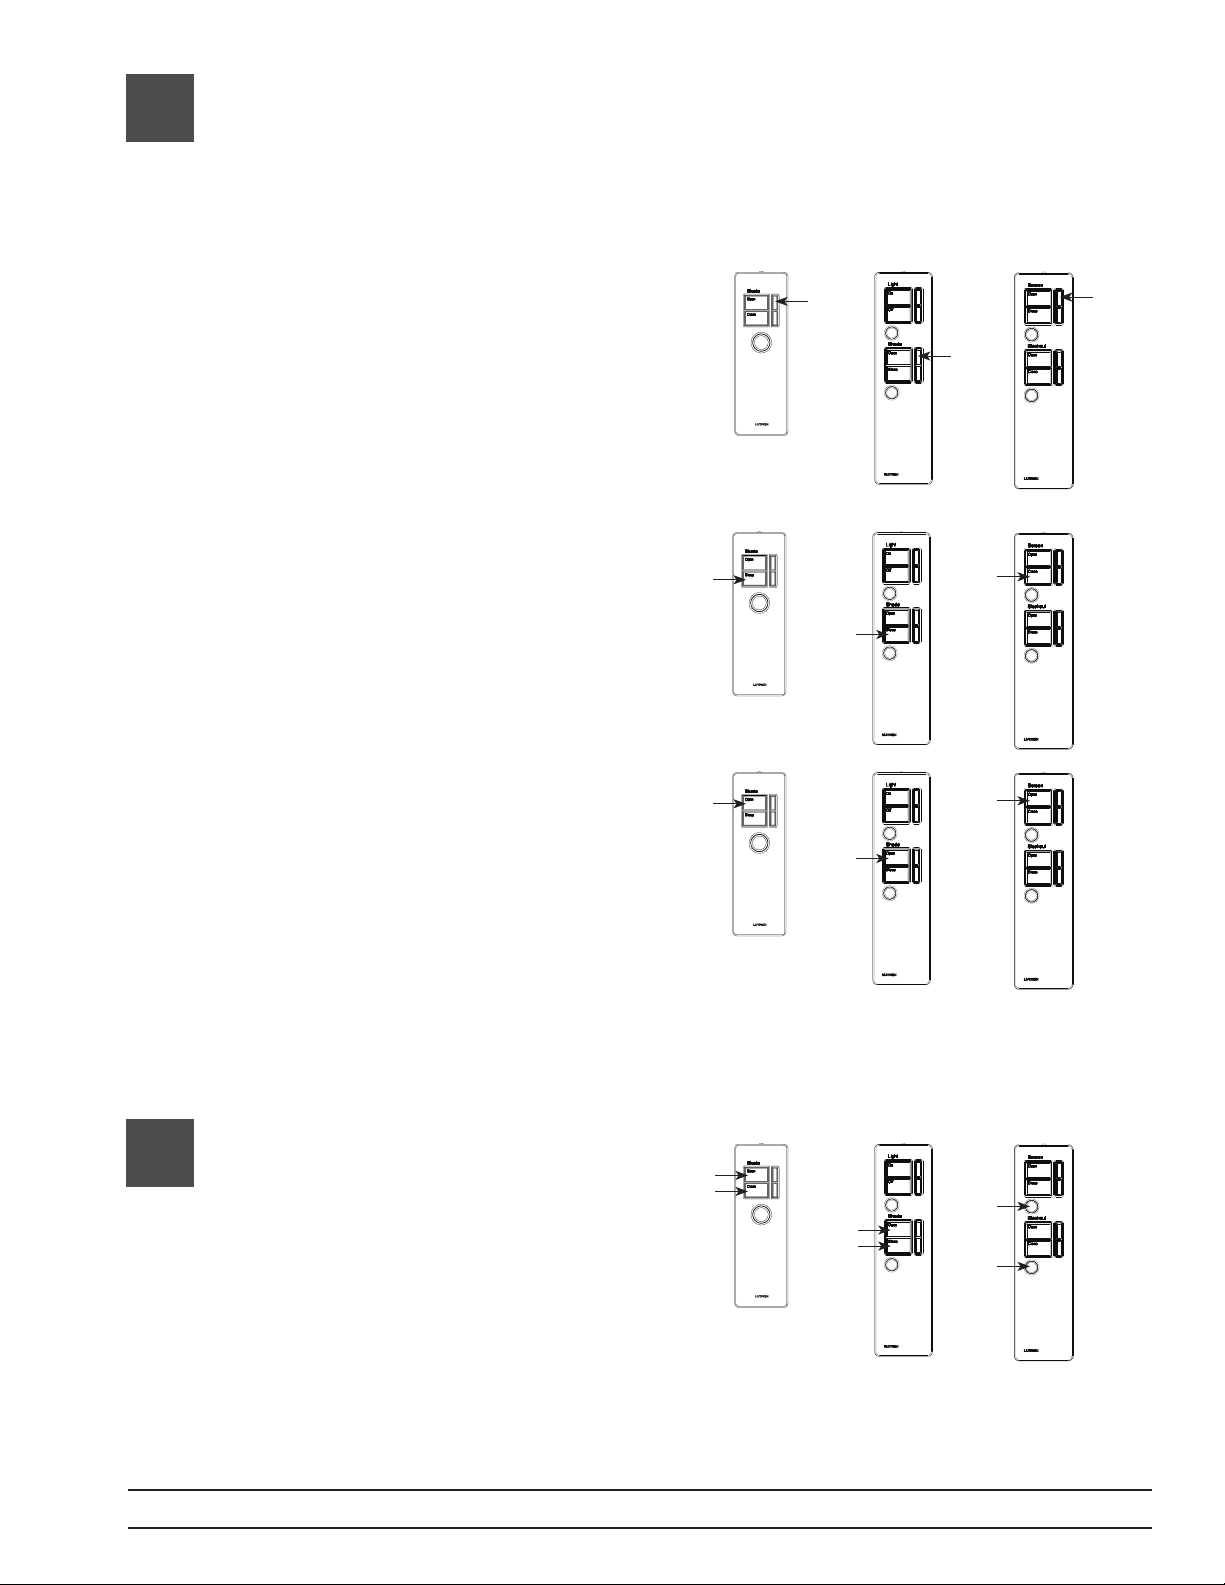
Assigning Drives to the Master Shade Group
All three types of remotes (A, B and C) can be used to assign shades to the Master Shade Group.
However, all shades that are assigned to this group will only respond to the Type A and Type B
remotes after this step. Type C remote requires this step, in addition to step 3, to control
shades/drapes.
2.1
2.2
2.3
Enter Programming Mode
Aim the Remote at the IR Receiver
and Press and Hold Open and
Close buttons (Type A and B) or
both round silver buttons (Type C)
for 5 seconds. The LED’s on the
receiving device will ash
Enter Master Assignment Mode
Aim the Remote at the IR Receiver
and tap the Close button (Type
A and B) or while holding the
bottom round silver button, tap
close button (Type C). All
unassigned shades/drapes will
open and all assigned shades
drapes will close.
Assigning and Un-Assigning
Shades/Drapes
H
H
H
A
H
B
T
T
A
B
H
H
C
T
H
C
Select Shade/Drape to Assign
Aim the Remote at the IR Receiver
and tap the Close button until the
desired shade/drape is selected
(Tapping the Open button will
select shades/drapes in the
opposite order). Selected shade/
drape will “wiggle” or move back
and forth a few inches
continuously.
Then
Assign Selected Shade/Drape
Aim the Remote at the IR Receiver
and tap the Lower button. The
wiggling shade/drape will close to
indicate it is assigned.
Or
T
T
T
A
B
T
T
C
T
A
B
C
Page 3
Sivoia QED® Favorite Preset Remote Programming Guide
Page 5
2
Assigning Drives to the Master Shade Group
(continued)
Unassign Selected
Shade/Drape
Aim the Remote at the IR Receiver
and tap the Raise button. The
wiggling shade/drape will open
to indicate it is unassigned.
Or
Assign All Shades/Drapes
Aim the Remote at the IR Receiver
and Press and Hold the Close
button for 5 seconds (Type A,B
and C). All shades/drapes will
close to indicate they are assigned.
Or
Unassign All Shades/Drapes
Aim the Remote at the IR Receiver
and Press and Hold the Open
button for 5 seconds (Type A,B
and C). All shades/drapes will
open to indicate they are
unassigned.
T
T
T
A
B
H
H
C
H
A
B
H
H
C
H
A
B
C
2.4
Exit Programming Mode
Aim the Remote at the IR Receiver
and Press and Hold Open and
Close buttons (Type A and B) or
both round silver buttons (Type C)
for 5 seconds. The LED’s on the
H
H
H
H
A
B
H
H
C
receiving device will ash. All
shades/drapes will return their
previous position.
Page 4
Sivoia QED® Favorite Preset Remote Programming Guide
Page 6
3
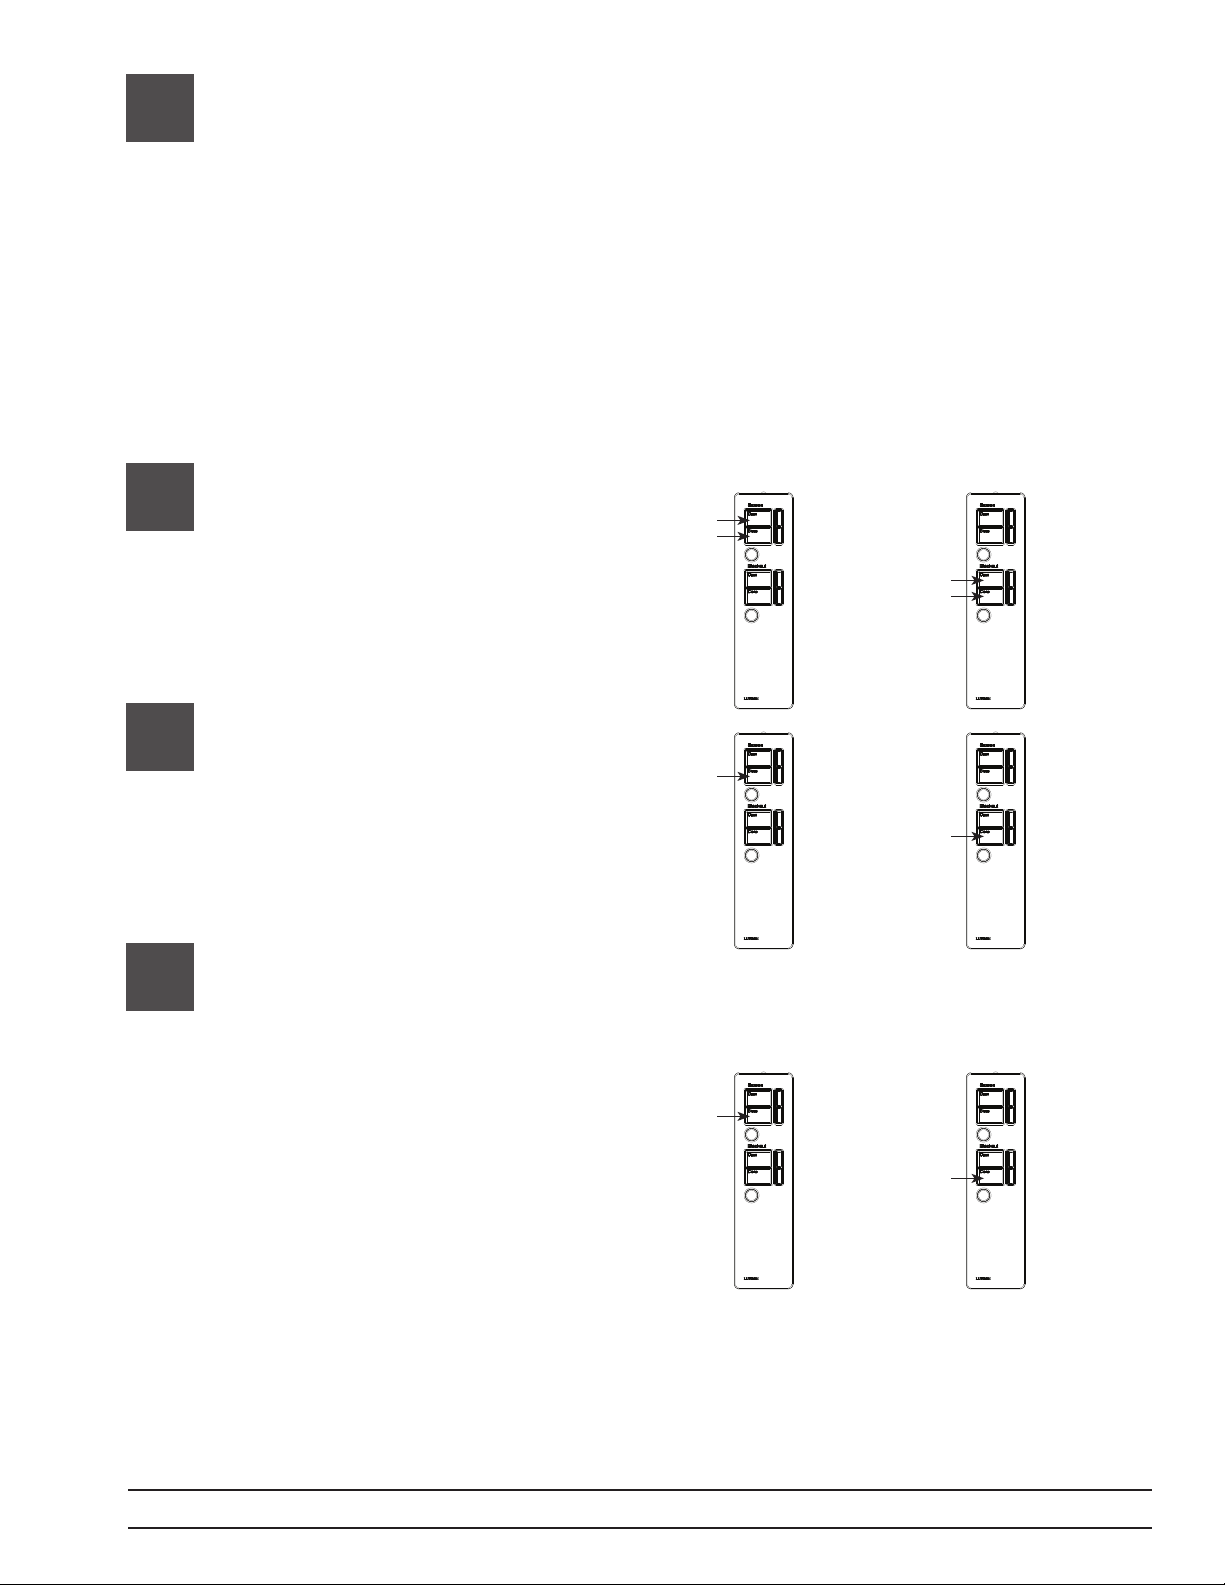
Assigning Shades/Drapes to the Two Group Remote
(Type C)
Complete step 2 before proceeding. Shades/drapes must be assigned to the master group
before they can be assigned to subgroups 1 and 2. Shades/drapes assigned to sub group 1
and 2 will still respond to the master shade/drape group commands sent from the type A and
B remotes.
3.1
3.2
3.3
Enter Programming Mode
Aim the Remote at the IR Receiver
and Press and Hold Open and
Close buttons for 5 seconds. The
LED’s on the receiving device
will ash
Enter Assignment Mode
Aim the Remote at the IR Receiver
and tap the Close button. All
unassigned shades/drapes will
open and all assigned drapes/
shades will close.
Assigning and unassigning
shades/drapes
For Group 1
H
H
C
T
C
For Group 2
H
H
C
T
C
Select Shade
Aim the Remote at the IR Receiver
and tap the Close button until the
desired shade/drape is selected
(Tapping the open button will
select shades/drapes in the
opposite order). Selected shade/
drape will “wiggle” or move back
and forth a few inches
continuously.
Then
Sivoia QED® Favorite Preset Remote Programming Guide
T
T
CC
Page 5
Page 7
3
Assigning Shades/Drapes to Two Group Remote
(continued)
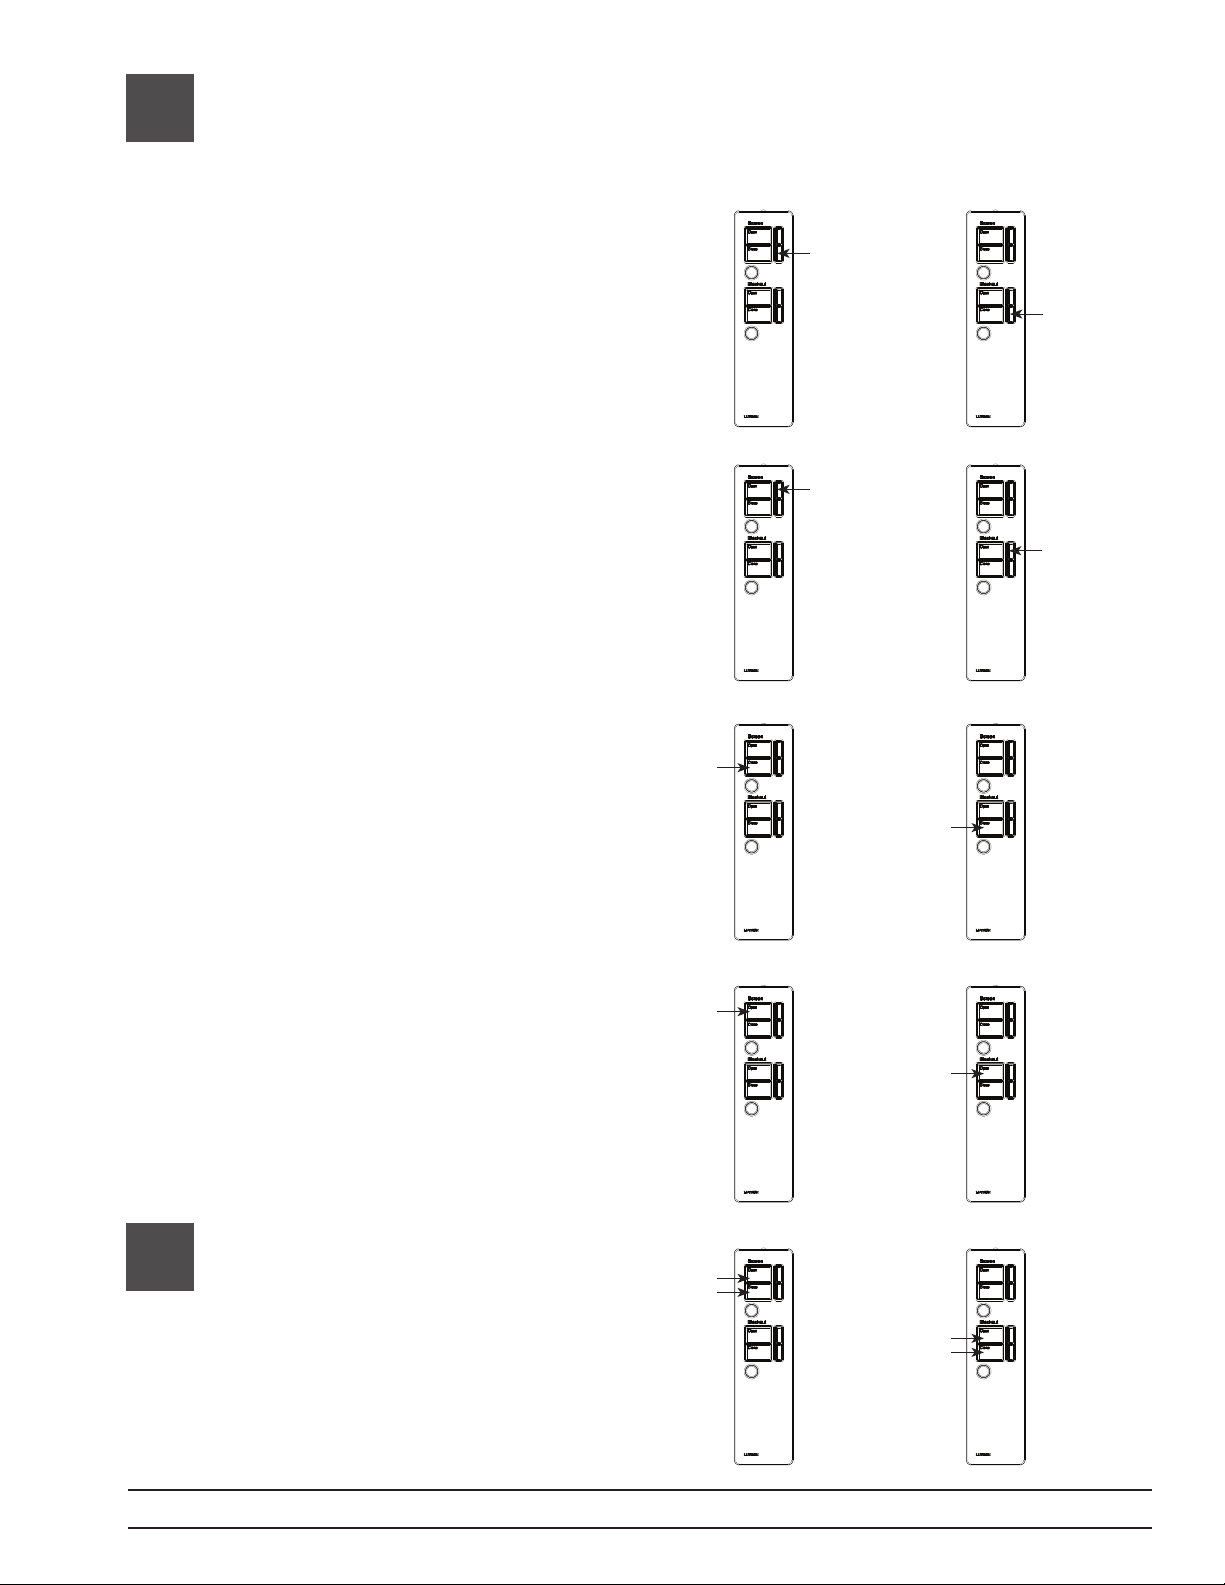
Assign Selected Shade
Aim the Remote at the IR Receiver
and tap the Lower button. The
wiggling shade/drape will close to
indicate it is assigned.
Or
T
CC
T
Unassign Selected Shade
Aim the Remote at the IR Receiver
and tap the Raise button. The
wiggling shade/drape will open to
indicate it is unassigned.
Or
Assign All Shades/Drapes
Aim the Remote at the IR Receiver
and Press and Hold the Close
button for 5 seconds button. All
shades/drapes will close to
indicate they are assigned.
Or
Unassign All Shades/Drapes
Aim the Remote at the IR Receiver
and Press and Hold the Open
button for 5 seconds button. All
shades/drapes will open to
indicate they are unassigned.
T
T
CC
H
H
CC
H
H
CC
3.4
Exit Programming Mode
Aim the Remote at the IR Receiver
H
H
and Press and Hold Open and
Close buttons for 5 seconds. The
H
H
LED’s on the receiving device will
ash. All shades/drapes will return
CC
their previous position.
Page 6
Sivoia QED® Favorite Preset Remote Programming Guide
Page 8
4
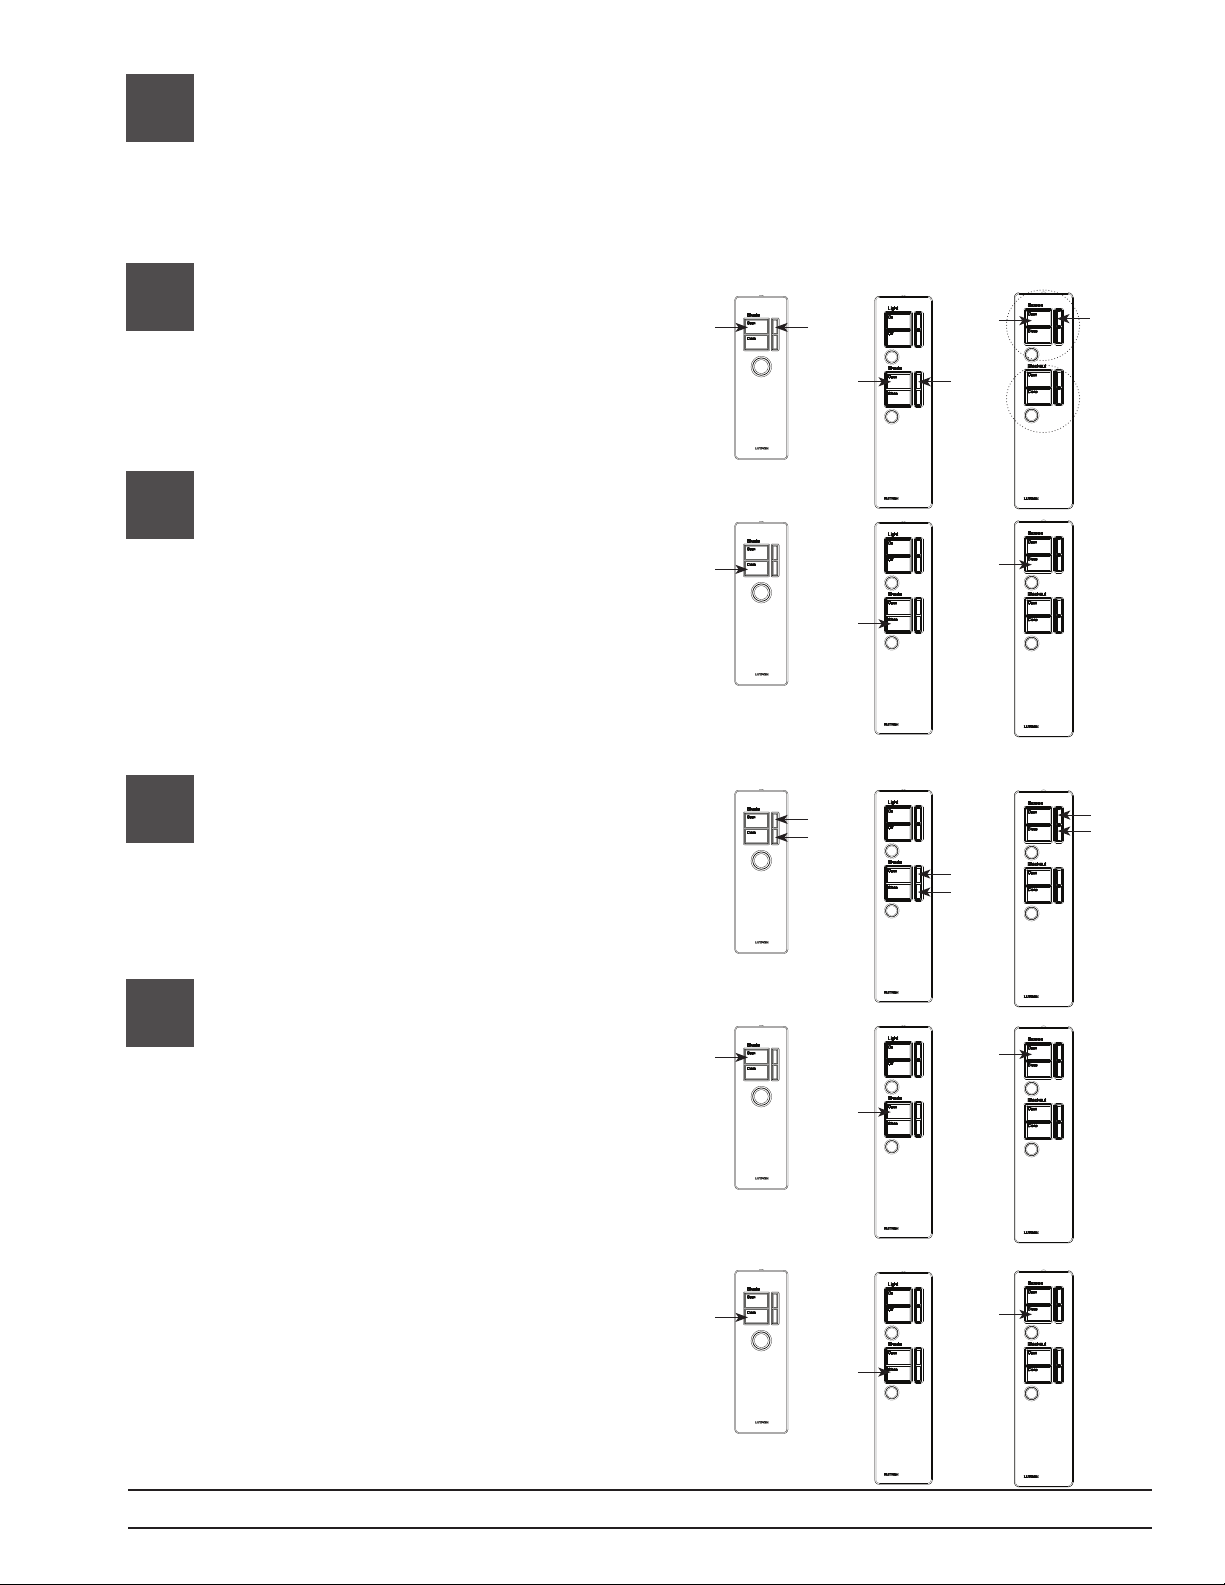
Setting Limits from the IR Remote
The Open and Close limits of shades/drapes can be set from any of the three types of IR remotes.
The shade/drape must be assigned to the master shade group (for Type A and B) remote or sub
group (Type C), to adjust the limit with that remote.
(*) Group 1 programming shown on type C remote. To program with Group 2 use Group 2 buttons.
4.1
4.2
4.3
Enter Programming Mode
Aim the Remote at the IR Receiver
and Press and Hold Open and
Raise buttons for 5 seconds. The
LED’s on the receiving device
will ash
Select Shade/Drape
Aim the Remote at the IR Receiver
and tap the Close button until the
desired shade/drape is selected
(Tapping the open button will
select shades/drapes in the
opposite order). Selected shade/
drape will “wiggle” or move back
and forth a few inches
continuously.
Position the Shade/Drape
to the desired limit
Aim the Remote at the IR Receiver
and Press and hold Raise (or
Lower) button until the shade/
drape is in the desired position.
*
H
H
H H
H
H
GROUP 1
GROUP 2
A
B
T
T
C
*
T
A
B
H
or
H
H
or
H
C
*
H
or
H
A
B
C
4.4
Storing the limit
Open Limit
H
H
*
Aim the Remote at the IR Receiver
and Press and hold the Open
button 5 seconds. The LED’s on
A
H
the receiving device will ash to
indicate the limit is stored.
Close Limit
Repeat step 4.3. Aim the Remote
at the IR Receiver and Press and
hold the Close button 5 seconds.
The LED’s on the receiving device
B
H
H
A
C
*
H
will turn off to indicate the limit is
stored.
B
C
Page 7
Sivoia QED® Favorite Preset Remote Programming Guide
Page 9
4
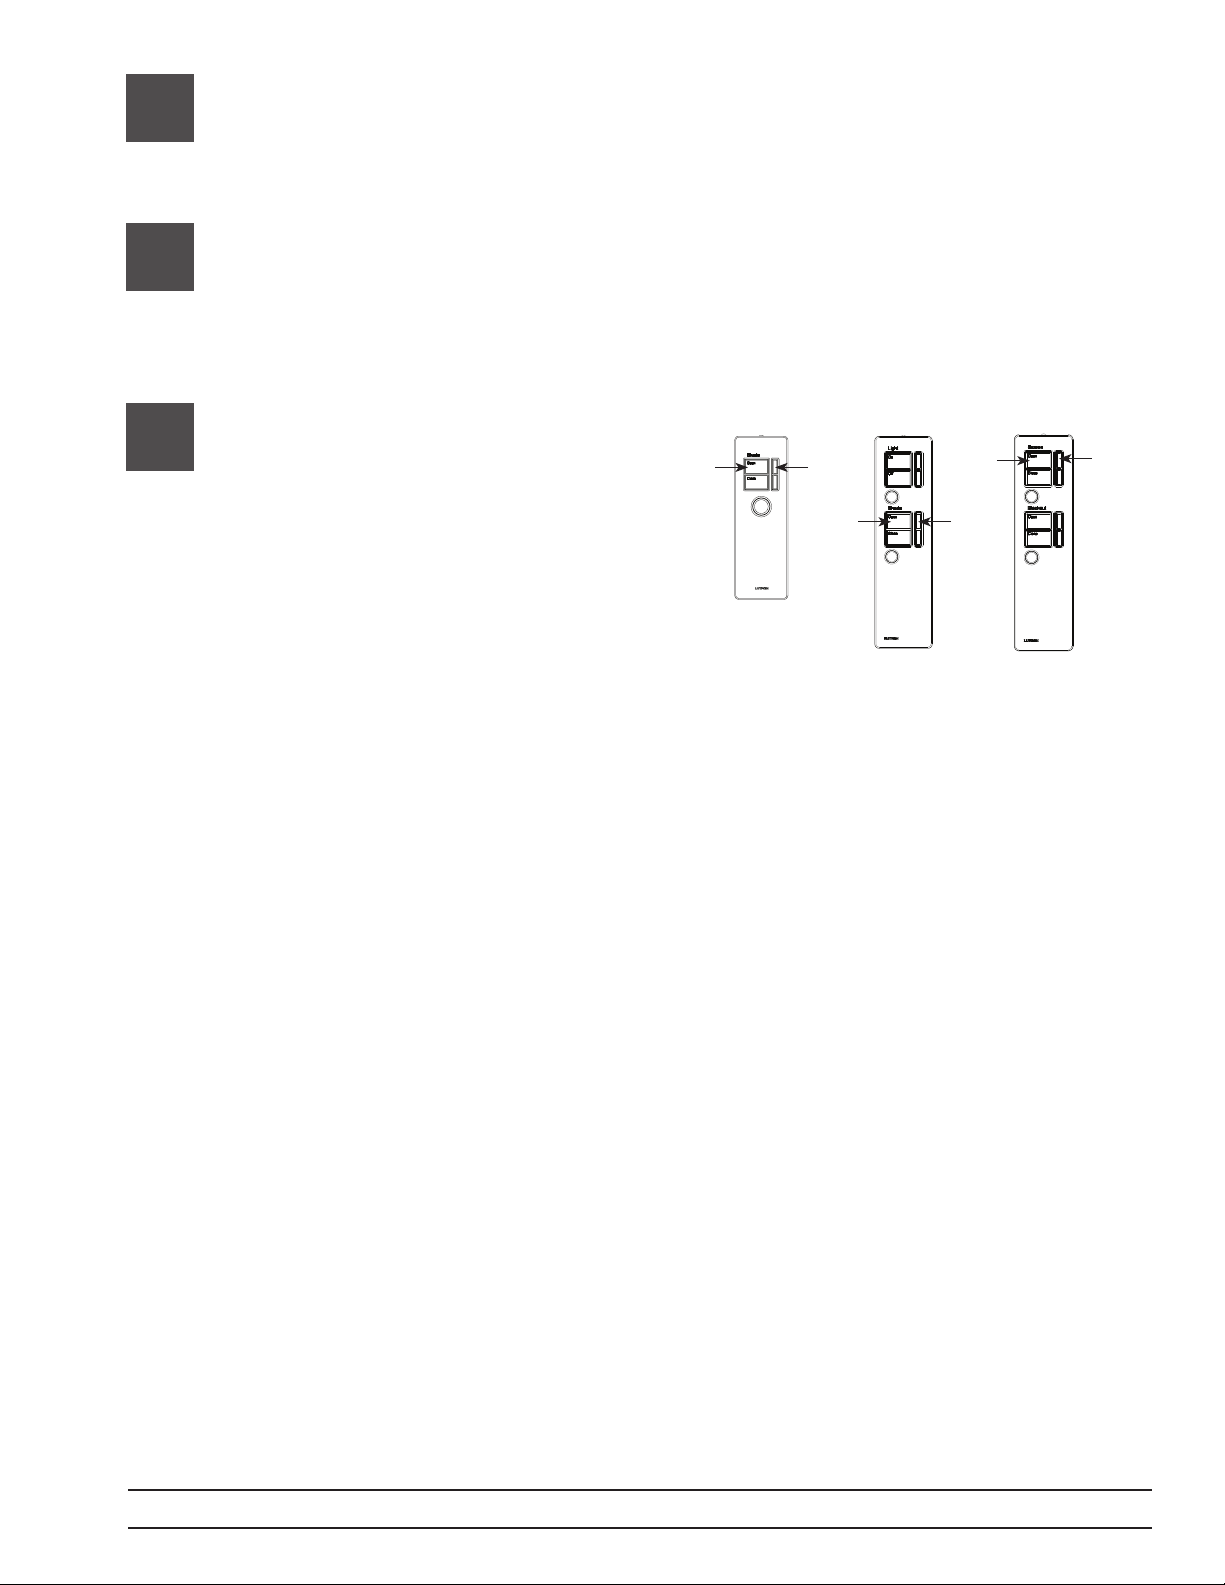
Setting Limits from the remote (continued)
4.5
4.6
Setting Limits on Additional
Shades/Drapes
Repeat steps
4.2 – 4.4
Exit Programming Mode
Aim the Remote at the IR Receiver
and Press and Hold Open and
Raise buttons for 5 seconds. The
LED’s on the receiving device
will ash
H H
A
H H
B
*
H
H
C
Page 8
Sivoia QED® Favorite Preset Remote Programming Guide
Page 10
5
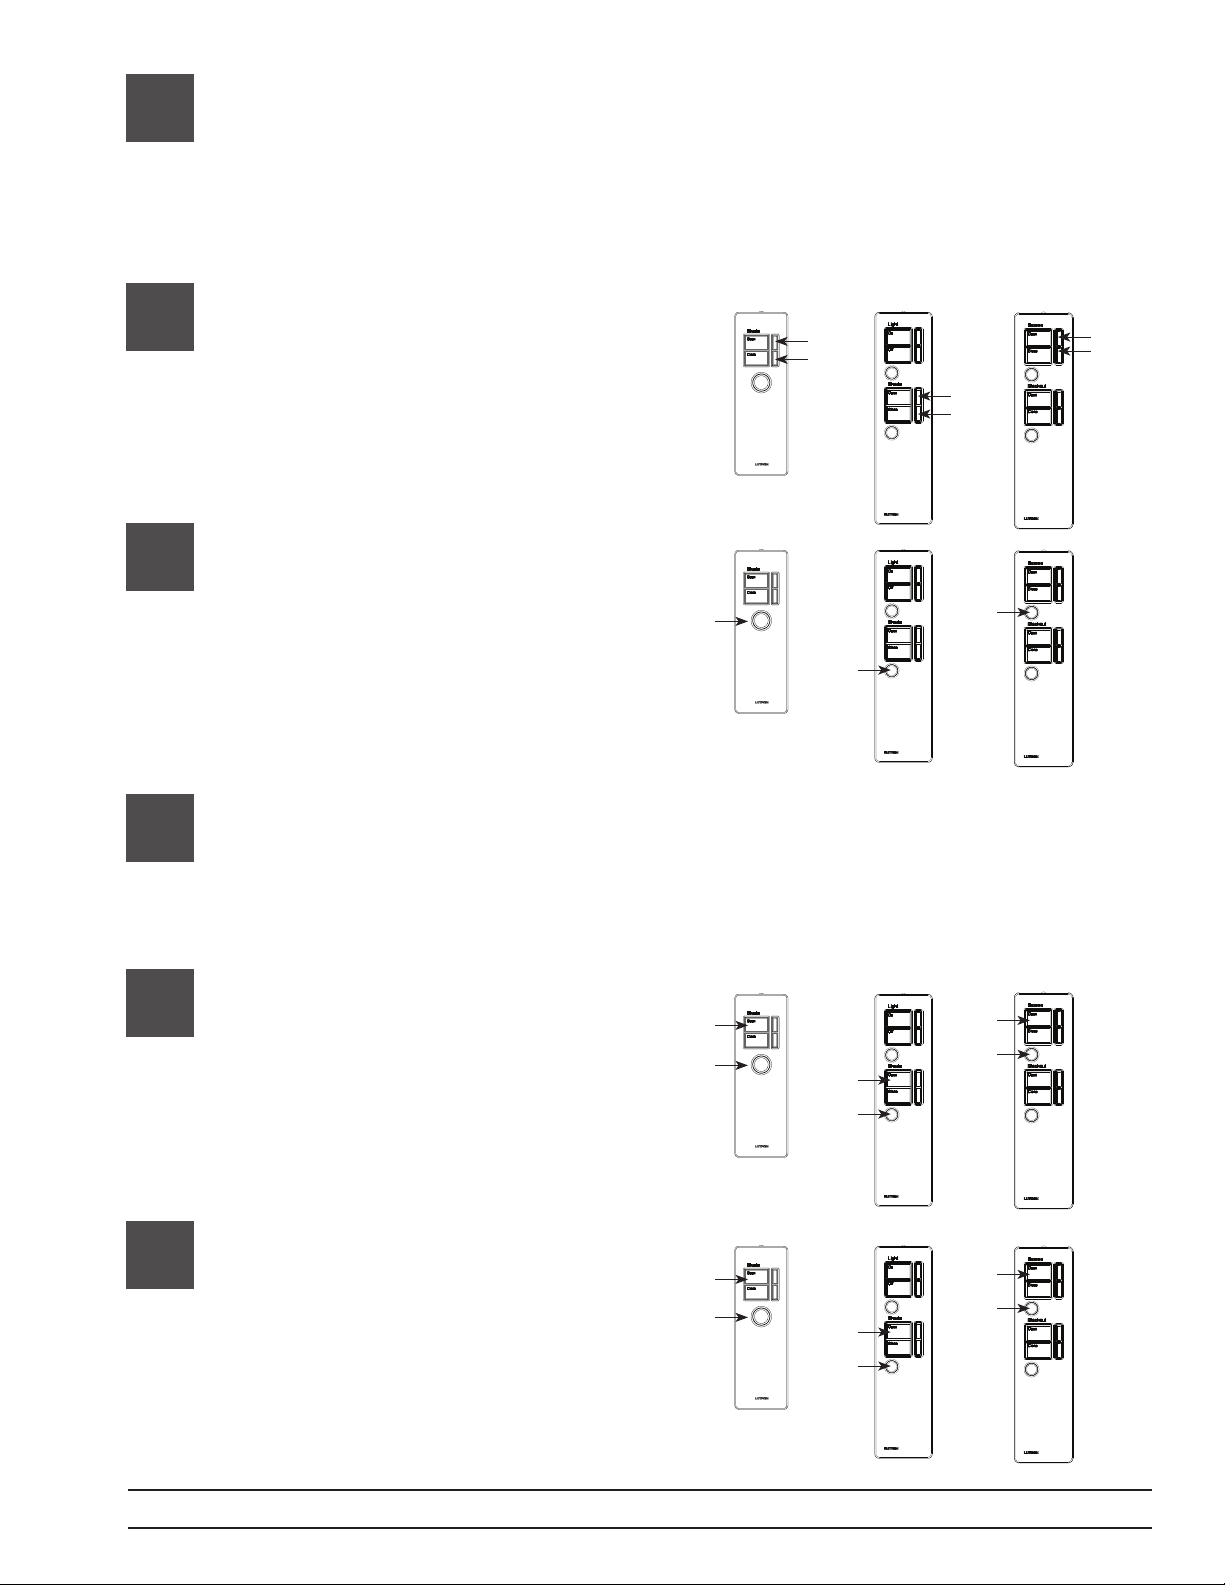
Storing Presets
The round silver favorite preset button can return the shade/drape to a favorite preset or
position when tapped once in normal operating mode. By default the favorite preset is stored
midway between the open and close limit. The favorite preset can be changed to a user
defined position with the following procedure.
(*) Group 1 programming shown on type C remote. To program with Group 2 use Group 2 buttons.
5.1
5.2
6
Position the Shade/Drape
H
to the desired location
Aim the Remote at the IR Receiver
and Press and hold Raise (or
Lower) button until the shade/
drape is in the desired position.
A
or
H
H
or
H
B
C
Storing the Favorite Preset
Aim the Remote at the IR Receiver
and Press and hold the round
H
H
silver favorite preset button for 5
seconds. The LED’s on the
receiving device will ash to
A
H
B
C
indicate the limit is stored.
Locking Presets
The favorite preset can be “locked” to prevent accidental reprogramming of the preset.
Locking the presets from the remote or any other device will prevent presets from being
accidentally changed from the remote or any other device in the system.
*
H
or
H
*
6.1
Locking Presets
Aim the Remote at the IR Receiver
and Press and hold Open and the
Favorite Preset buttons for 5
seconds. The LED on the
receiving device will ash rapidly
H
H
A
H
H
B
H
H
C
then turn off to indicate presets
have been locked.
6.2
Unlocking Presets
Aim the Remote at the IR Receiver
and Press and hold Open and the
Favorite Preset buttons for 5
seconds. The LED on the receiving
device will ash once then turn off
H
H
A
H
H
B
H
H
C
to indicate presets have been
unlocked.
Page 9
Sivoia QED® Favorite Preset Remote Programming Guide
Page 11
7
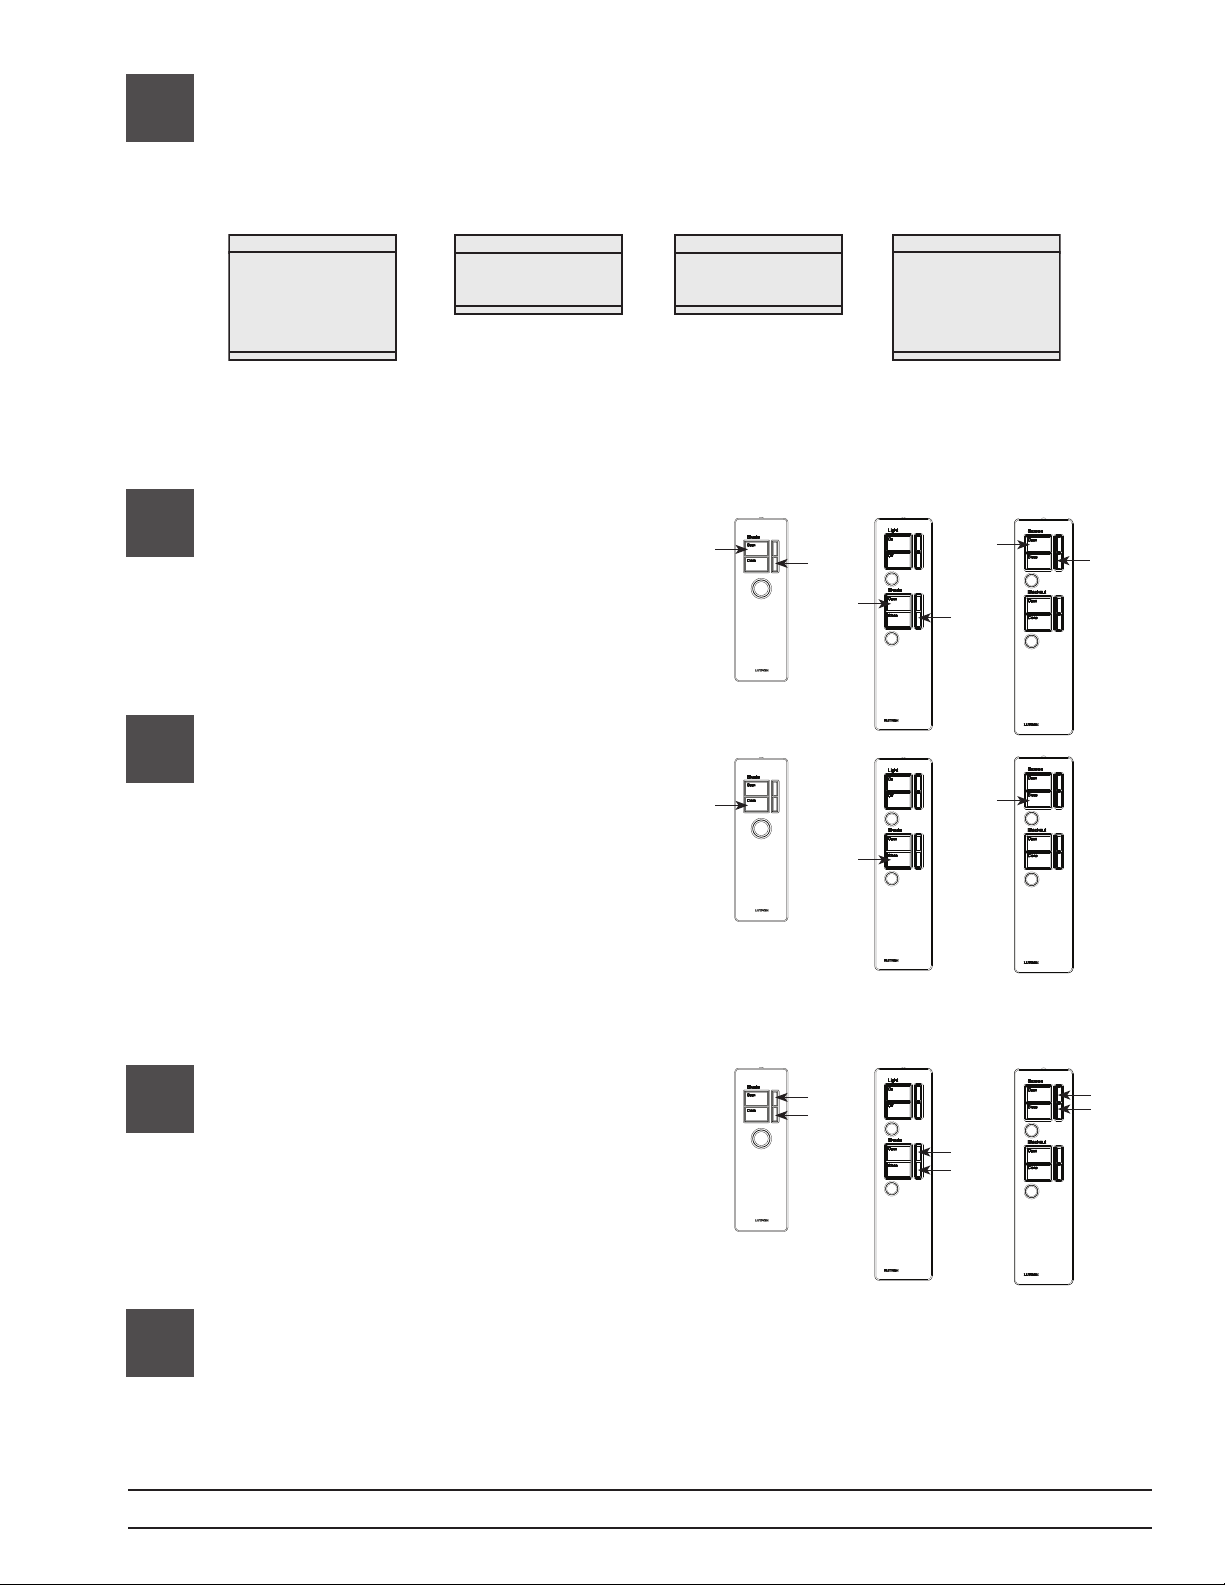
Individual Level Adjust
Individual level adjust allows the favorite preset of each of the shades/drapes assigned to a group,
to be set at different levels as shown in the following figure.
The presets must be unlocked to perform this step (refer to step 6.2).
7.1
7.2
7.3
Enter Individual Level Adjust
Mode
Aim the Remote at the IR Receiver
and Press and hold Open and
Lower buttons for 5 seconds. The
LED’s on the receiving device
will ash.
Select Shade/Drape
Aim the Remote at the IR Receiver
and tap the Close (or Open) button
until the desired shade/drape is
selected. Selected shade/drape
will “wiggle” or move back and
forth a few inches continuously.
Note: For Type C Remotes both
Group 1 and Group 2 shades/
drapes can be selected.
Position the Shade/Drape to
the desired location for the
preset
Aim the Remote at the IR Receiver
and Press and hold Raise (or
Lower) button until the shade/
drape is in the desired position.
H
H
H
H
H
H
A
B
T
T
C
T
A
B
H
or
H
H
or
H
C
H
or
H
A
B
C
7.4
Select and set additional
shades/drapes
Repeat steps 7.2 and 7.3.
Page 10
Sivoia QED® Favorite Preset Remote Programming Guide
Page 12
7
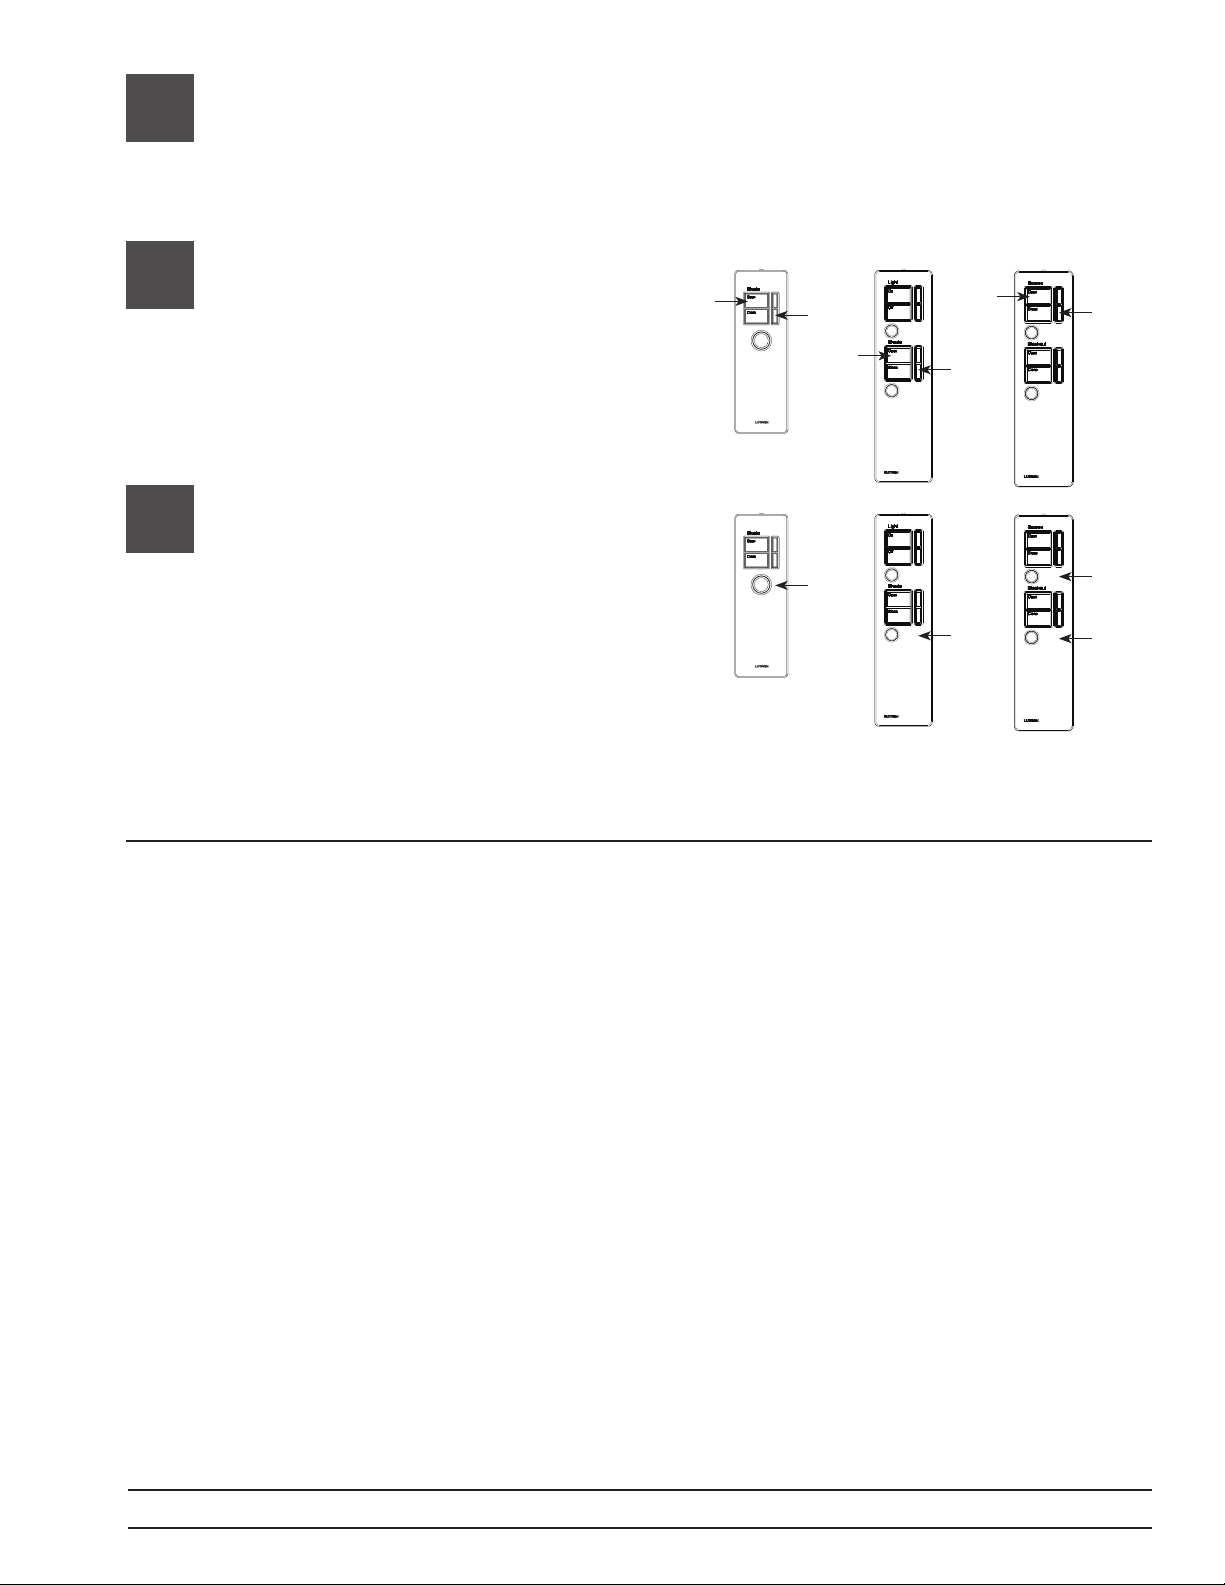
Individual Level Adjust (continued)
7.5
7.6
Exit Individual Level Adjust
Mode
Aim the Remote at the IR Receiver
and Press and Hold Open and
Lower buttons for 5 seconds. The
LED’s on the receiving device will
flash the turn off.
Storing the Favorite Preset
Aim the Remote at the IR Receiver
and Press and hold the round
silver favorite preset button for 5
seconds. The LED’s on the
receiving device will flash to
indicate the limit is stored.
Note: For Type C Remote store
presets for both Group 1
and Group 2.
H
H
H
H
H
H
A
B
H
A
H
B
C
H
THEN
H
C
Contact Information
Worldwide Headquarters |
USA
Lutron Electronics Co., Inc.
7200 Suter Road
Coopersburg, PA 18036-1299
USA
TEL: 1.610.282.3800
FAX: 1.610.282.3090
Technical Support:
1.800.523.9466 or
1.610.282.6701
Toll Free: 1.888.LUTRON
EMAIL: [email protected]
WEB: www.lutron.com/
shadingsolutions
These products may be covered under one or more of the following U.S. patents: 6,380,696;
6,992,612; 7,142,932; D518,447; D525,948; and corresponding foreign patents.
©2009 LUTRON Electronics Co., Inc.
P/N 045-207 REV. A
Europe Headquarters |
United Kingdom
Lutron EA Ltd
6 Sovereign Close
London, E1W 3JF, UK
TEL: +44.(0)20.7702.0657
FAX: +44.(0)20.7480.6899
Technical Support:
+44.(0)20.7480.6899
FREEPHONE: 0800.282.107
Asian Headquarters |
Singapore
Lutron GL Ltd
15 Hoe Chiang Road
#07-03
Singapore, 089316
TEL: +65.6220.4666
FAX: +65.6220.4333
Technical Support:
800.120.4491
Page 11
Sivoia QED® Favorite Preset Remote Programming Guide
 Loading...